Export Control
EAR Export Classification: Not subject to the EAR per 15 C.F.R. Chapter 1, Part 734.3(b)(3), except for the following Service Bulletins which are currently published as EAR Export Classification 9E991: SBE70-0992, SBE72-0483, SBE72-0580, SBE72-0588, SBE72-0640, SBE73-0209, SBE80-0024 and SBE80-0025.Copyright
© IAE International Aero Engines AG (2001, 2014 - 2021) The information contained in this document is the property of © IAE International Aero Engines AG and may not be copied or used for any purpose other than that for which it is supplied without the express written authority of © IAE International Aero Engines AG. (This does not preclude use by engine and aircraft operators for normal instructional, maintenance or overhaul purposes.).Applicability
All
Common Information
TASK 72-38-11-200-002-A00 Inlet Cone Assembly - Examine, Inspection-002
General
This TASK gives the procedure for the inspection of the inlet cone.
The policy that is necessary for inspection is given in the SPM TASK 70-20-00-200-501.
All the parts must be cleaned before any part is examined. Refer to SPM TASK 72-38-11-100-000 (CLEANING-000).
All parts must be visually examined for damage, corrosion and wear. Any defects that are not identified in the procedure must be referred to IAE.
Do not discard any part until you are sure there are no repairs available. Refer to the instructions in Repair before a discarded part is used again or oversize parts are installed.
Parts which should be discarded can be held although no repair is available. The repair of a discarded part could be shown to be necessary at a later date.
All parts must be examined to make sure that all the repairs have been completed satisfactorily.
A** following repair referenced in this inspection indicates that the repair is not yet published in the current revision of the manual and the part must be rejected. Contact IAE for additional information concerning FAA approved repair date.
The practices and processes referred to in the procedure by the TASK numbers are in the SPM.
References
Refer to the SPM for data on these items.
Definitions of Damage, SPM TASK 70-02-02-350-501
Inspection of Parts, SPM TASK 70-20-01-200-501
Some data on these items is contained in this TASK. For more data on these items refer to the SPM.
Method of Testing for Crack Indications.
Chemical Processes.
Surface Protection.
Preliminary Requirements
Pre-Conditions
NONESupport Equipment
NONEConsumables, Materials and Expendables
NONESpares
NONESafety Requirements
NONEProcedure
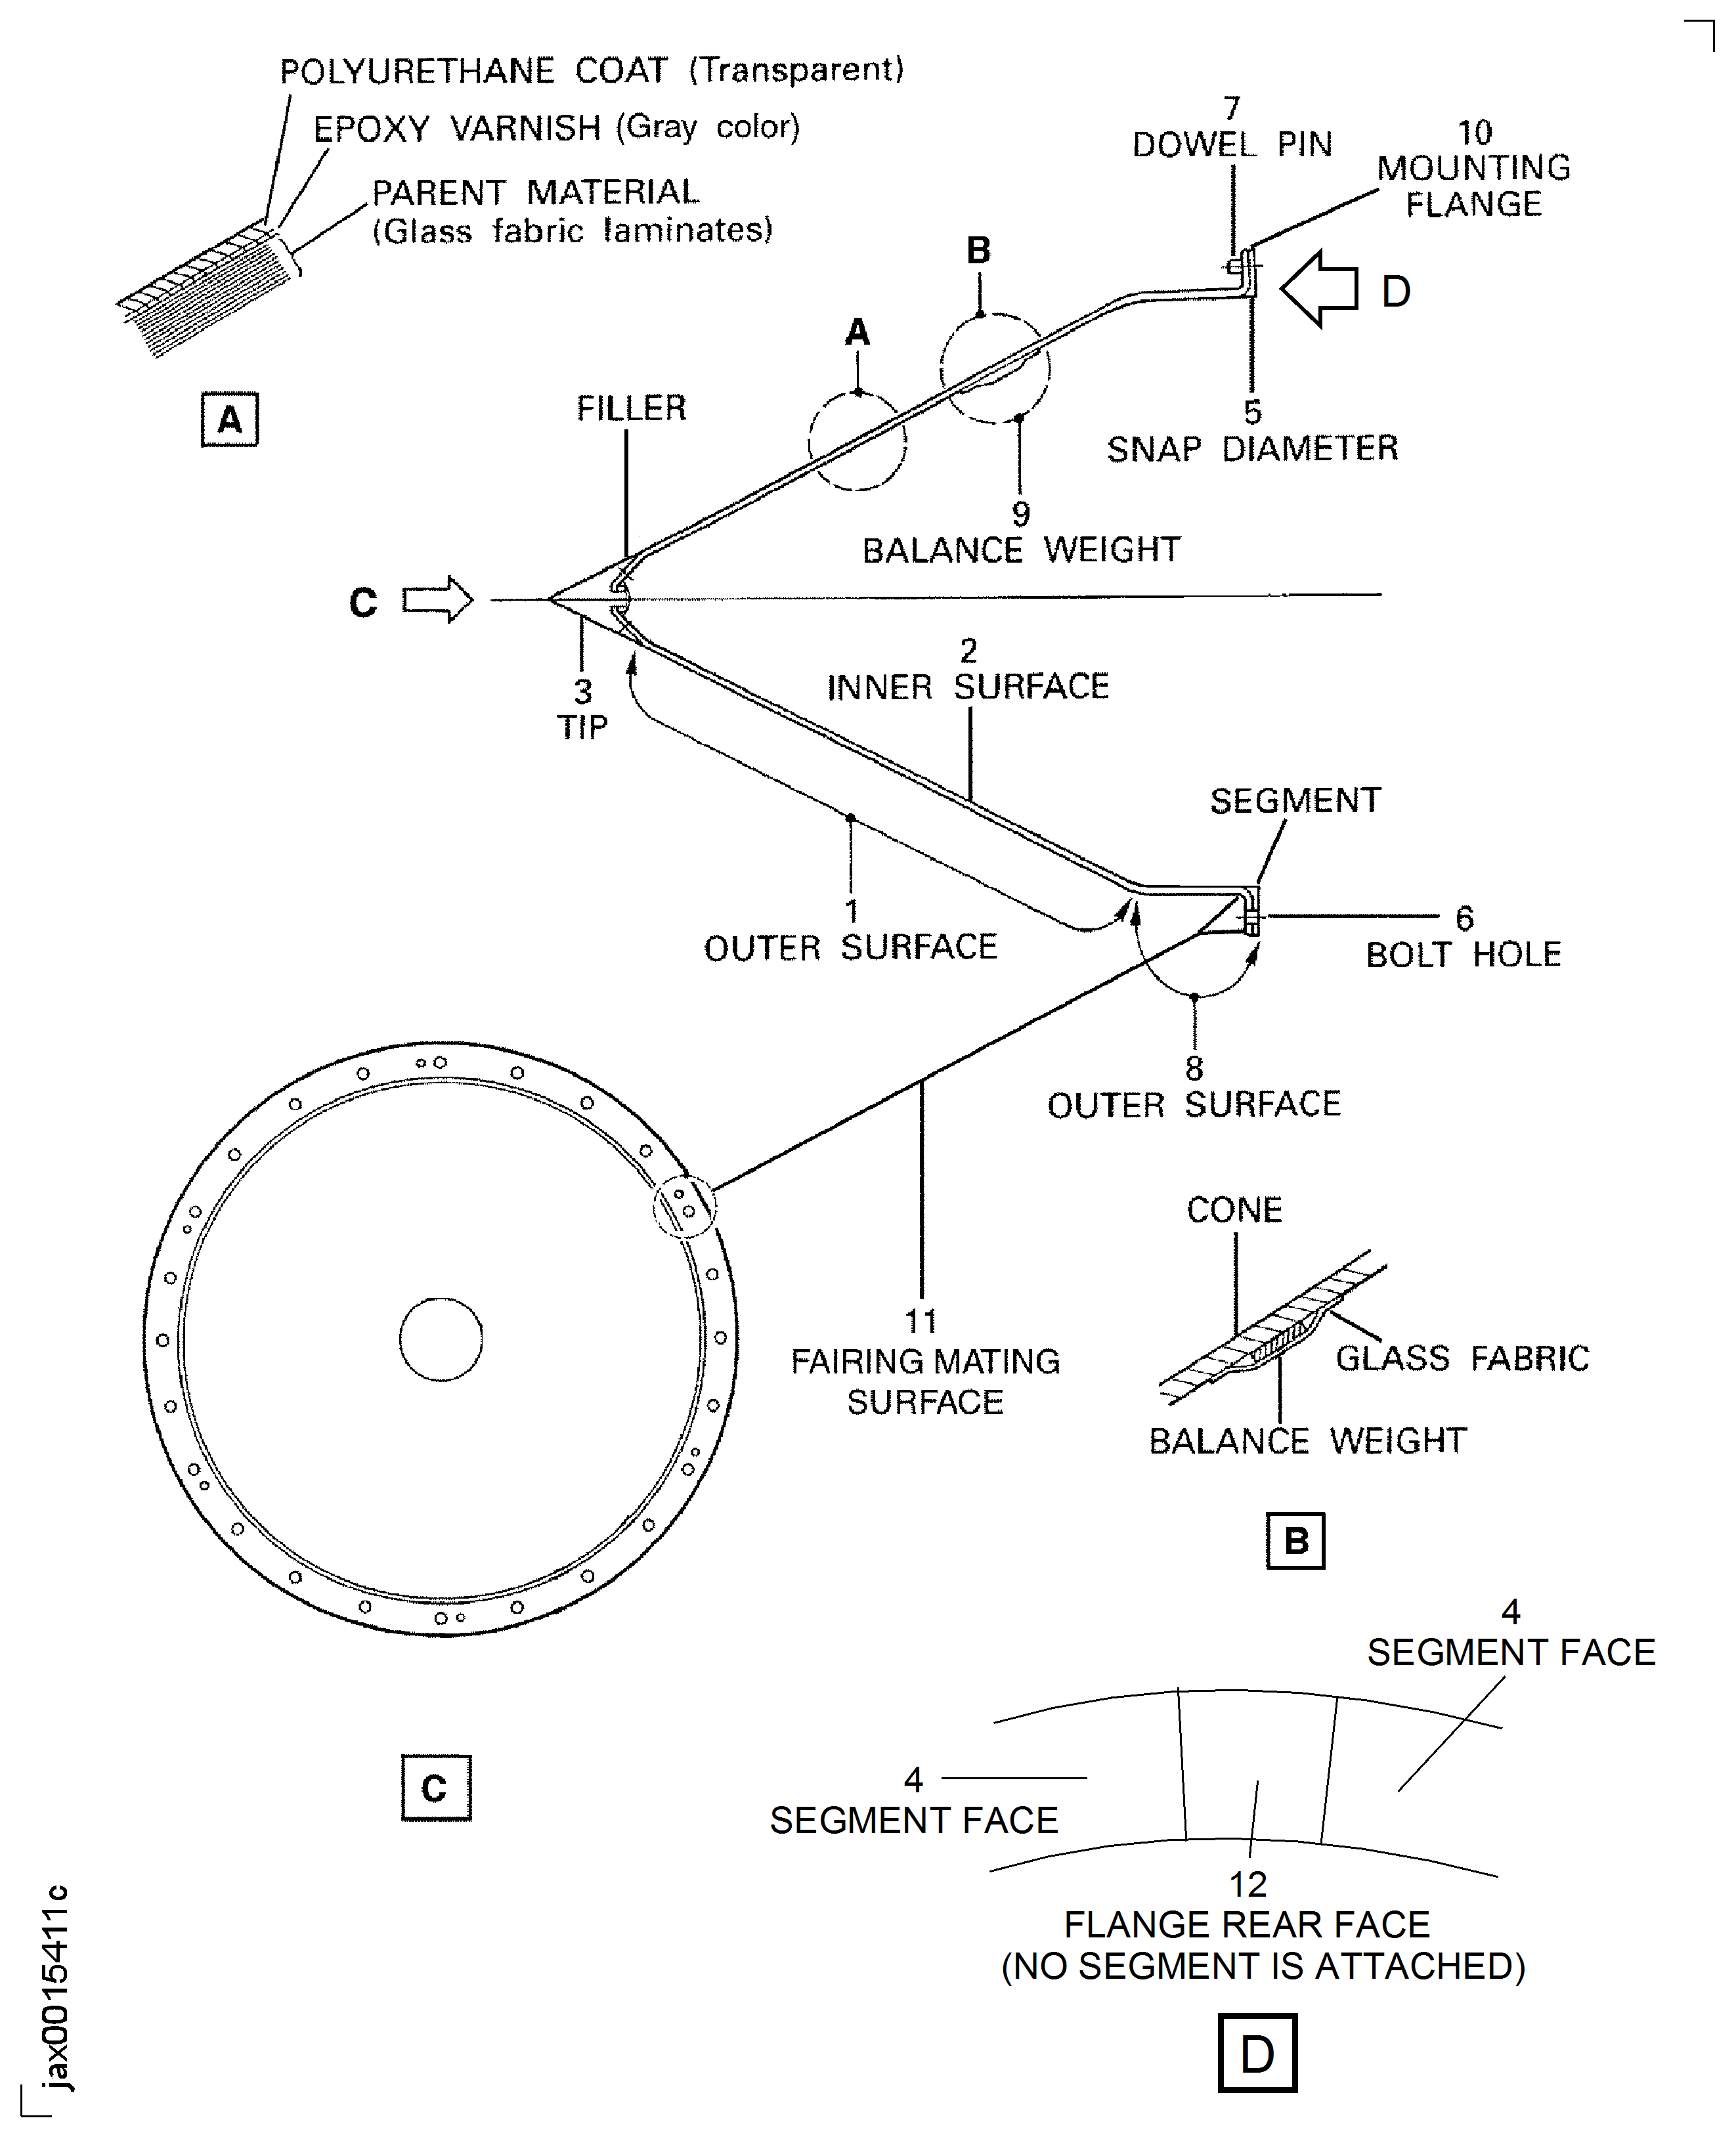
Refer to Figure.
Repair, VRS1466 TASK 72-38-11-300-001 (REPAIR-001)
Varnish coating colored gray
Repair VRS1458 TASK 72-38-11-300-010 (Repair-010)
Varnish coating colored black with white spiral mark
Eroded.
More than in Step
Scored, gouged or grooved.
Repair, VRS1473 TASK 72-38-11-300-008 (Repair-008)
Not more than 0.315 sqin. (2.03 sqcm) per missing coating area and within five places
Repair, VRS1458 TASK 72-38-11-300-010 (Repair-010) or VRS1466 TASK 72-38-11-300-001 (Repair-001)
More than in Step
Missing coating (polyurethane and/or varnish coating).
Examine the outer surface at Location 1.
Repair, VRS1461 TASK 72-38-11-300-015 (REPAIR-015).
Around pin holes.
More than in Step.
Around bolt holes.
Repair, VRS1507 TASK 72-38-11-300-016 (REPAIR-016).
Not more than 0.078 in. (2.00 mm) in depth, not more than 0.31 in. (8.00 mm) in radial width and not extended into the area within 0.083 in. (2.1 mm) from the hole edge.
More than in Step.
Flange edge.
Delaminated.
Examine the outer surface at Location 8.
SUBTASK 72-38-11-220-064 Examine the Inlet Cone Outer Surface
Refer to Figure.
SUBTASK 72-38-11-220-065 Examine the Inlet Cone Inner Surface
Refer to Figure.
Repair, VRS1462 TASK 72-38-11-300-002 (REPAIR-002)
Missing
Repair, VRS1462 TASK 72-38-11-300-002 (REPAIR-002)
Loss of bond securing tip
Repair, VRS1462 TASK 72-38-11-300-002 (REPAIR-002)
Tip securely bonded to inlet cone with filler missing
Examine the tip at Location 3.
SUBTASK 72-38-11-220-066 Examine the Inlet Cone Tip
Refer to Figure.
Repair, VRS1467 TASK 72-38-11-300-003 (REPAIR-003) or Repair, VRS1617 TASK 72-38-11-300-017 (REPAIR-017).
Cracked.
NOTE
Repair using Repair, VRS1467 TASK 72-38-11-300-003 (REPAIR-003) or Repair, VRS1617 TASK 72-38-11-300-017 (REPAIR-017) if the damage cannot be removed by Repair, VRS1701 TASK 72-38-11-300-018 (REPAIR-018).Repair, VRS1701 TASK 72-38-11-300-018 (REPAIR-018), Repair, VRS1467 TASK 72-38-11-300-003 (REPAIR-003) or Repair, VRS1617 TASK 72-38-11-300-017 (REPAIR-017).
More than in Step.
Galled.
Examine the segment face at Location 4.
Repair, VRS1507 TASK 72-38-11-300-016 (REPAIR-016).
Not more than 0.078 in. (2.00 mm) in depth, not more than 0.31 in. (8.00 mm) in radial width and provided that the area where the segment is not attached.
Reject.
More than in Step.
Delaminated.
Examine the flange rear face at Location 12.
SUBTASK 72-38-11-220-067 Examine the Inlet Cone Rear Face
Refer to Figure.
Repair, VRS1467 TASK 72-38-11-300-003 (REPAIR-003) or Repair, VRS1617 TASK 72-38-11-300-017 (REPAIR-017).
More than in Step
Scored.
Repair, VRS1467 TASK 72-38-11-300-003 (REPAIR-003) or Repair, VRS1617 TASK 72-38-11-300-017 (REPAIR-017).
If the average snap diameter measured at 8 equally spaced positions is more than 14.2992 in. (363.201 mm).
Worn.
Examine the snap diameter at Location 5.
SUBTASK 72-38-11-220-068 Examine the Inlet Cone Snap Diameter
Refer to Figure.
Repair, VRS1467 TASK 72-38-11-300-003 (REPAIR-003) or Repair, VRS1617 TASK 72-38-11-300-017 (REPAIR-017).
Missing or loose.
Repair, VRS1467 TASK 72-38-11-300-003 (REPAIR-003) or Repair, VRS1617 TASK 72-38-11-300-017 (REPAIR-017).
Distorted.
Examine the dowel pin at Location 7.
SUBTASK 72-38-11-220-070 Examine the Inlet Cone Dowel Pin
Refer to Figure.
Repair, VRS1464 TASK 72-38-11-300-005 (REPAIR-005)
Glass fabric delaminated
Repair, VRS1464 TASK 72-38-11-300-005 (REPAIR-005)
Balance weights disengaged
Examine the balance weights at Location 9.
SUBTASK 72-38-11-220-071 Examine the Inlet Cone Balance Weight
Refer to Figure.
Repair, VRS1467 TASK 72-38-11-300-003 (REPAIR-003) or Repair, VRS1617 TASK 72-38-11-300-017 (REPAIR-017).
Unbonded.
Examine the mounting flange at Location 10.
SUBTASK 72-38-11-220-085 Examine the Inlet Cone Mounting Flange
Refer to Figure.
Repair, VRS1431 TASK 72-38-11-300-013 (REPAIR-013).
Any amount.
Depression.
Examine the fairing mating surface at location 11.
SUBTASK 72-38-11-220-174 Examine the Fairing Mating Surface Around Six Bolt Holes Adjacent to the Dowel Pins
Figure: Locations On The Inlet Cone
Locations On The Inlet Cone

