Export Control
EAR Export Classification: Not subject to the EAR per 15 C.F.R. Chapter 1, Part 734.3(b)(3), except for the following Service Bulletins which are currently published as EAR Export Classification 9E991: SBE70-0992, SBE72-0483, SBE72-0580, SBE72-0588, SBE72-0640, SBE73-0209, SBE80-0024 and SBE80-0025.Copyright
© IAE International Aero Engines AG (2001, 2014 - 2021) The information contained in this document is the property of © IAE International Aero Engines AG and may not be copied or used for any purpose other than that for which it is supplied without the express written authority of © IAE International Aero Engines AG. (This does not preclude use by engine and aircraft operators for normal instructional, maintenance or overhaul purposes.).Applicability
All
Common Information
TASK 72-42-61-200-001-B00 Outer Combustion Chamber Liner - Examine, Inspection-001
General
This TASK gives the procedure for the inspection of the combustion chamber outer liner. For the other part of the combustion chamber outer liner, refer to TASK 72-42-61-200-000 (INSPECTION/CHECK-000).
Fig/item numbers in parentheses in the procedure agree with those used in the IPC.
The policy that is necessary for inspection is given in SPM TASK 70-20-00-200-501.
All the parts must be cleaned before any part is examined. Refer to the SPM TASK 70-10-00-100-501.
All parts must be visually examined for damage, corrosion and wear. Any defects that are not identified in the procedure must be referred to IAE.
Do not discard any part until you are sure there are no repairs available. Refer to the instructions in Repair before a discarded part is used again or oversize parts are installed.
Parts which should be discarded can be held although no repair is available. The repair of a discarded part could be shown to be necessary at a later date.
All parts must be examined to make sure that all the repairs have been complete satisfactorily.
The practices and processes referred to in the procedure by the TASK numbers are in the SPM.
Use a bright light and a 3X magnifying glass to find surface cracks.
References
Refer to the SPM for data on these items.
Definitions of Damage, SPM TASK 70-02-02-350-501
InspectIon of Parts, SPM TASK 70-20-01-200-501
NOTE
Preliminary Requirements
Pre-Conditions
NONESupport Equipment
| Name | Manufacturer | Part Number / Identification | Quantity | Remark |
|---|---|---|---|---|
| IAE 2P16148 Check and correct fixture | 0AM53 | IAE 2P16148 | 1 | |
| IAE 2P16151 Plug gage | 0AM53 | IAE 2P16151 | 1 | |
| IAE 2P16192 Plug gage | 0AM53 | IAE 2P16192 | 1 | |
| IAE 2P16458 Length gage | 0AM53 | IAE 2P16458 | 1 | |
| IAE 2P16193 Length gage | 0AM53 | IAE 2P16193 | 1 | |
| IAE 2P16194 Plug gage | 0AM53 | IAE 2P16194 | 1 | |
| IAE 2P16195 Plug gage | 0AM53 | IAE 2P16195 | 1 | |
| IAE 2P16196 Plug gage | 0AM53 | IAE 2P16196 | 1 | |
| IAE 2P16197 Plug gage | 0AM53 | IAE 2P16197 | 1 | |
| IAE 2P16199 Plug gage | 0AM53 | IAE 2P16199 | 1 | |
| IAE 2P16201 Plug gage | 0AM53 | IAE 2P16201 | 1 |
Consumables, Materials and Expendables
NONESpares
NONESafety Requirements
NONEProcedure
Refer to: Figure
Repair, VRS3092 TASK 72-42-61-300-004 (REPAIR-004)
Other than (a)
Cracks.
Repair, VRS3092 TASK 72-42-61-300-004 (REPAIR-004)
Holes.
Repair, VRS3092 TASK 72-42-61-300-004 (REPAIR-004)
Other than (a)
Burns on the trailing edge (missing material).
Repair, VRS3092 TASK 72-42-61-300-004 (REPAIR-004)
Other than (a)
Burns on corners (missing material).
Repair, VRS3092 TASK 72-42-61-300-004 (REPAIR-004)
Other than (a)
Distortion.
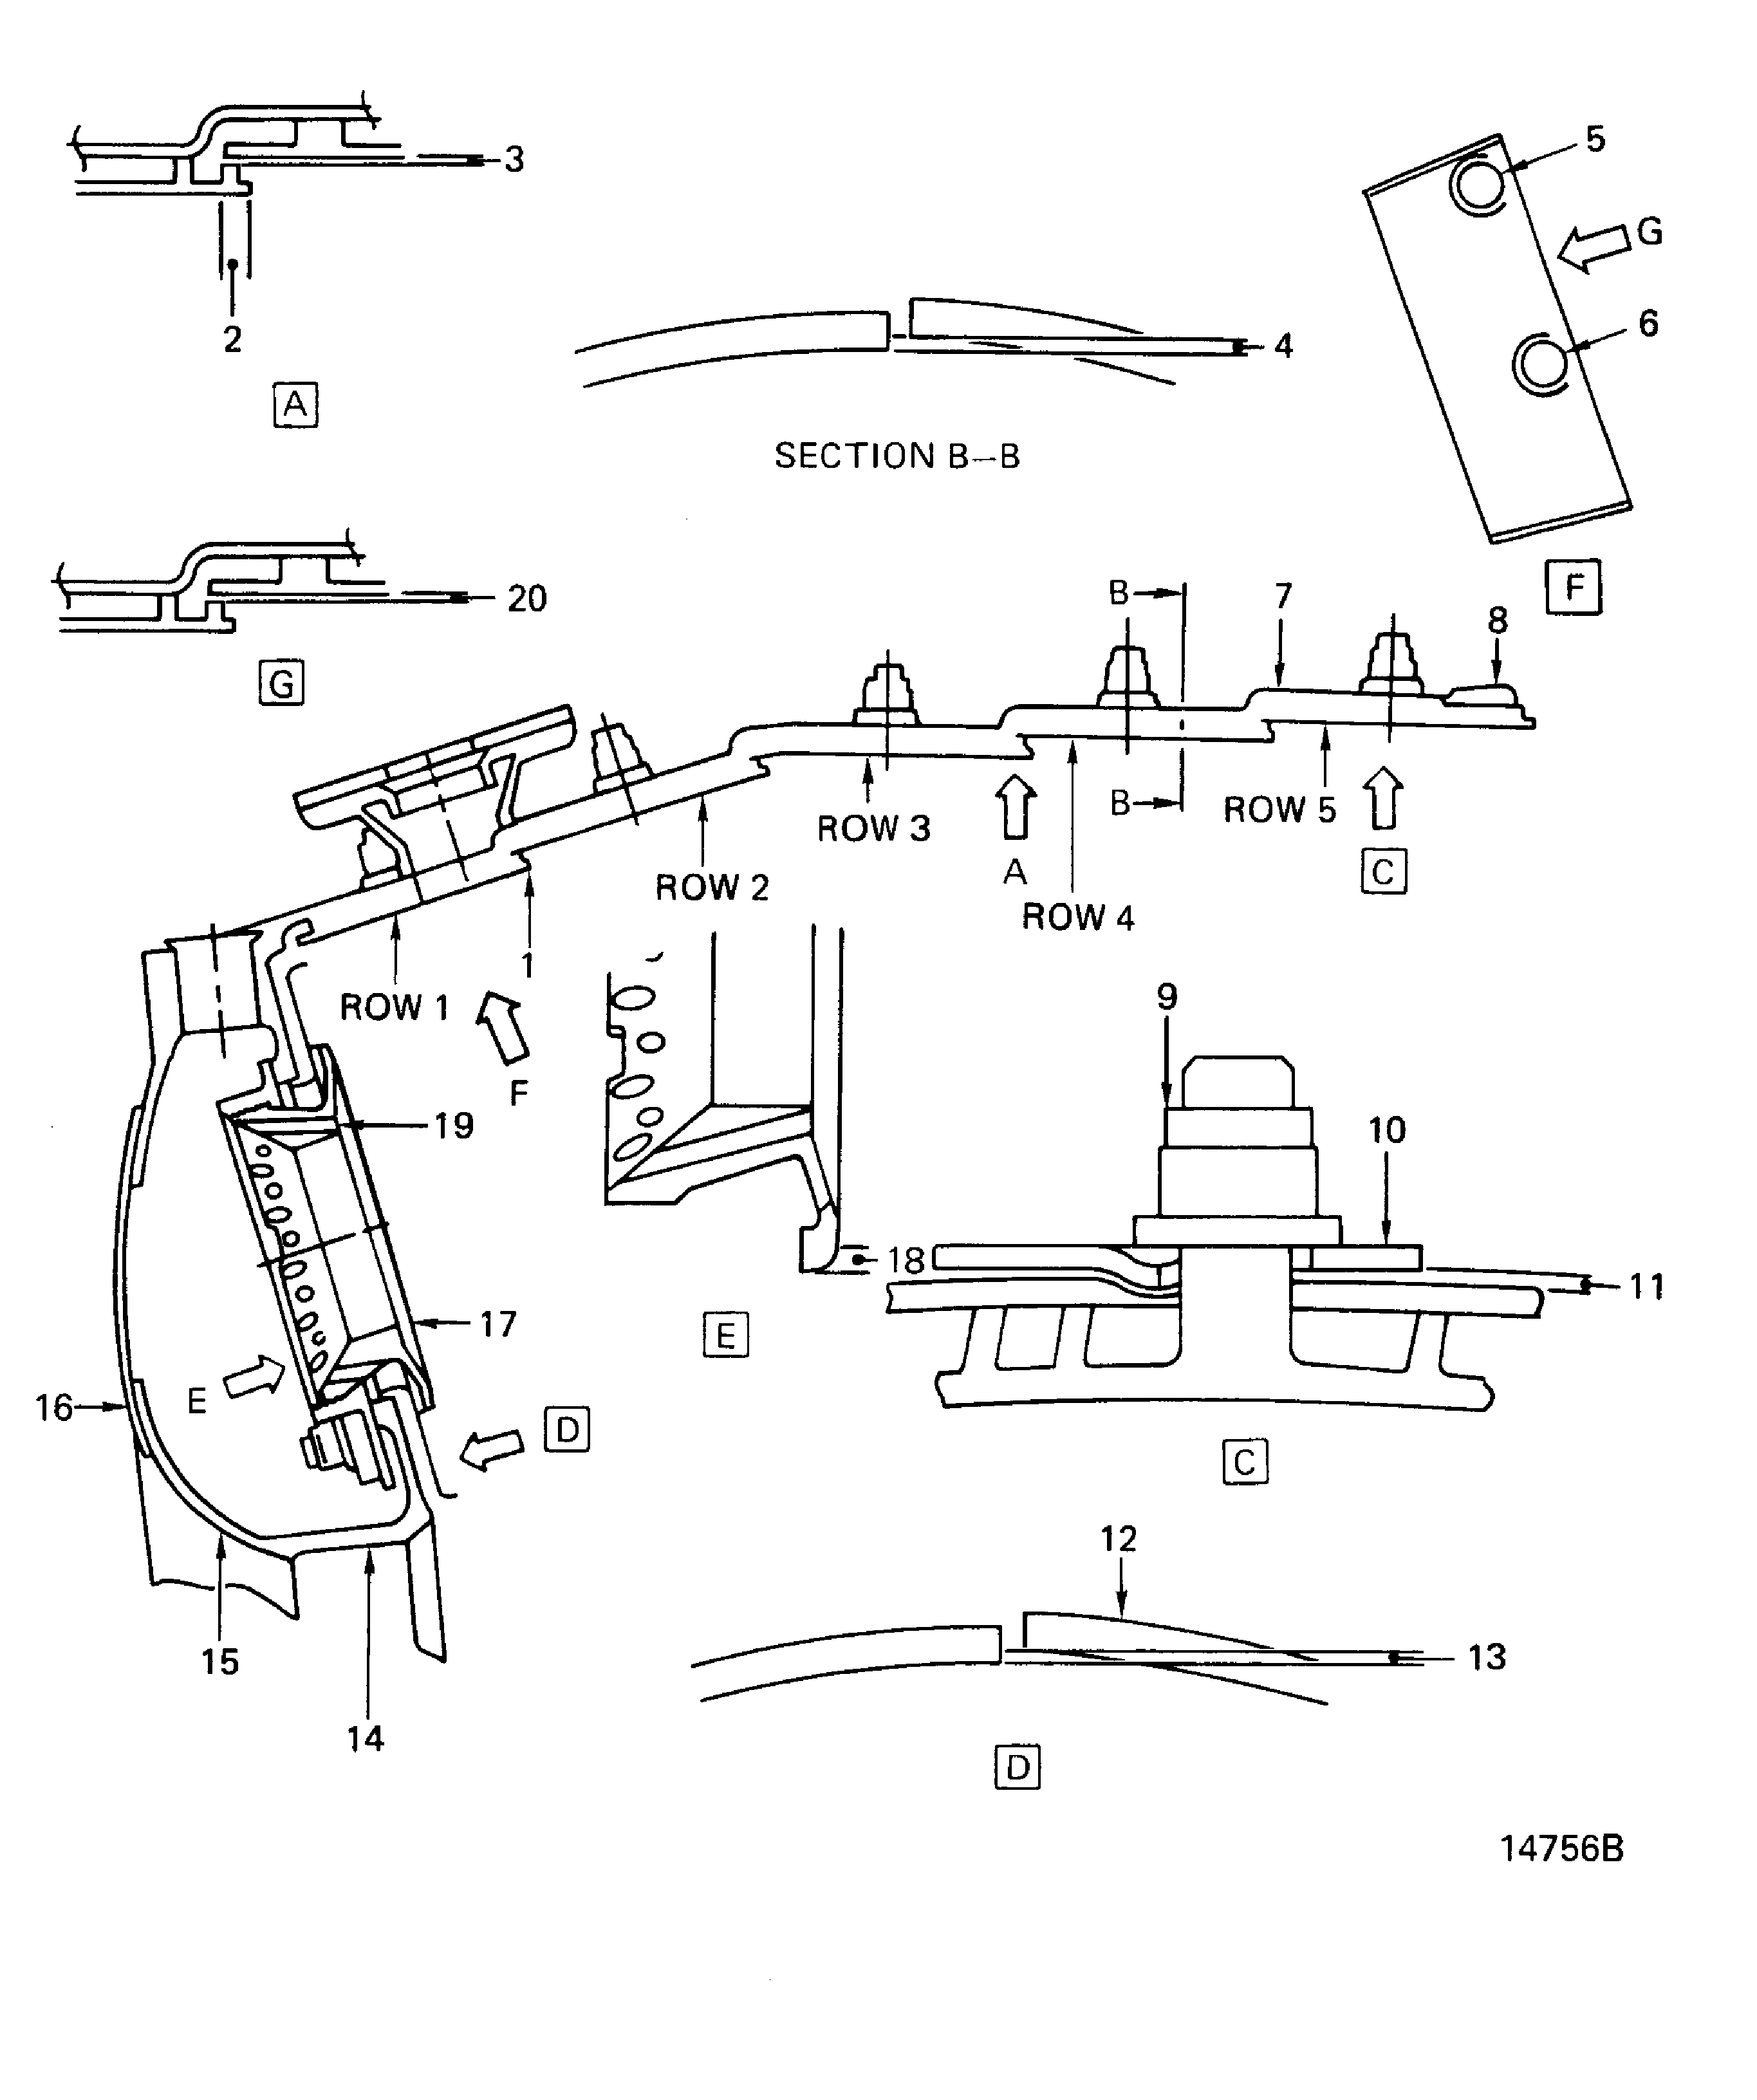
Examine the outer liner for cracks, holes, burns and distortion in the liner segments, Rows 1 (except at the igniter position) thru 5.
SUBTASK 72-42-61-220-074 Examine the Combustion Chamber Outer Liner (01-501) for Cracks, Holes, Burns, and Distortion in the Liner Segments
Refer to: Figure
Repair, VRS3092 TASK 72-42-61-300-004 (REPAIR-004)
Cracks.
Repair, VRS3092 TASK 72-42-61-300-004 (REPAIR-004)
Holes.
Repair, VRS3092 TASK 72-42-61-300-004 (REPAIR-004)
Repair, VRS3092 TASK 72-42-61-300-004 (REPAIR-004)
Other than (a)
Burns on the trailing edge at location 2 and the corners (missing material)
Repair, VRS3092 TASK 72-42-61-300-004 (REPAIR-004)
Surface burns
Examine the outer liner at locations 5 and 6 for cracks, holes, burns and distortion in the liner segments in row 1 at the igniter positions.
SUBTASK 72-42-61-220-099 Examine the Combustion Chamber Outer Liner (01-501) for Cracks, Holes, Burns and Distortion in the Liner Segments in Row 1 at the Igniter Positions
Refer to Figure.
Repair, VRS3091 TASK 72-42-61-300-003 (REPAIR-003)
Cracks
Repair, VRS3091 TASK 72-42-61-300-003 (REPAIR-003)
Other than (a)
Dents
Repair, VRS3091 TASK 72-42-61-300-003 (REPAIR-003)
Burn holes
Examine the outer liner shell at location 7 for cracks, dents, burn holes and blocked holes.
SUBTASK 72-42-61-220-075 Examine the Combustion Chamber Outer Liner (01-501) for Cracks, Dents, Burn Holes and Blocked Holes on the Shell
Refer to Figure.
Repair, VRS3100 TASK 72-42-61-300-010 (REPAIR-010)
NOTE
Before you do VRS3100, make sure the rear outer seal diameter by Step is in limits. Sizing or Rolling by VRS3099 can be necessary, if the rear outer seal diameter is more than the limits.
Other than (a)
Wear.
Repair, VRS3100 TASK 72-42-61-300-010 (REPAIR-010)
Other than (a)
Chipped or spalled hardface.
Examine the outer liner at location 8 for wear and chipped or spalled hardface on the rear outside diameter seal.
NOTE
Before you do VRS3100, make sure the rear outer seal diameter by Step is in limits. Sizing or Rolling by VRS3099 can be necessary, if the rear outer seal diameter is more than the limits.
SUBTASK 72-42-61-220-076 Examine the Combustion Chamber Outer Liner (01-501) for Wear and Chipped or Spalled Hardface on the Rear Outside Diameter Seal
Refer to: Figure
Repair, VRS3092 TASK 72-42-61-300-004 (REPAIR-004)
Nuts that are not there
Examine the outer liner at location 9, for nuts that are not there.
SUBTASK 72-42-61-220-077 Examine the Combustion Chamber Outer Liner (01-501) for Nuts that are Not There
Refer to Figure.
Replace washers by Repair, VRS3092 TASK 72-42-61-300-004 (REPAIR-004)
Loose washers
Examine the outer liner at location 10, for loose, oval-shaped washers.
SUBTASK 72-42-61-220-078 Examine the Combustion Chamber Outer Liner (01-501) for Loose, Oval-Shaped Washers
Refer to: Figure
Repair, VRS3096 TASK 72-42-61-300-008 (REPAIR-008)
Other than (a) and (b)
Cracks.
Repair, VRS3096 TASK 72-42-61-300-008 (REPAIR-008)
Burn-through and edge burns.
Repair, VRS3096 TASK 72-42-61-300-008 (REPAIR-008)
Other than (a)
Surface oxidation (burning).
Repair, VRS3096 TASK 72-42-61-300-008 (REPAIR-008)
Other than (a)
Distortion.
Examine the outer liner at fuel nozzle positions 7 and 8 (directly up stream from the igniters) for cracks, burns, distortion and spalled or worn ceramic coating in the bulkhead segments, location 12.
Repair, VRS3096 TASK 72-42-61-300-008 (REPAIR-008)
Other than (a)
Cracks.
Repair, VRS3096 TASK 72-42-61-300-008 (REPAIR-008)
Burn-through and edge burning
Repair, VRS3096 TASK 72-42-61-300-008 (REPAIR-008)
Other than (a)
Surface oxidation (burning).
Repair, VRS3096 TASK 72-42-61-300-008 (REPAIR-008)
NOTE
Spalled or worn coating must not be connected to other damage. Spalled coating has a dark area where there are no burns or cracks.
Other than (a)
Distortion.
Examine the outer liner at fuel nozzle positions other than 7 and 8 for cracks, burns and distortion in the bulkhead segments, location 12.
Repair, VRS3096 TASK 72-42-61-300-008 (REPAIR-008)
Other than (a)
Spalled coating.
Repair, VRS3096 TASK 72-42-61-300-008 (REPAIR-008)
Other than (a)
Worn or missing coating.
Examine the outer liner at location 12 for spalled or worn ceramic coating on the bulkhead segments.
SUBTASK 72-42-61-220-079 Examine the Combustion Chamber Outer Liner (01-501) for Cracks, Burns, Spalled or Worn Ceramic Coating and Distortion in the Liner (Bulkhead) Segments
Refer to: Figure
Repair, VRS3090 TASK 72-42-61-300-002 (REPAIR-002)
Other than (a)
Wear.
Repair, VRS3090 TASK 72-42-61-300-002 (REPAIR-002)
Other than (a)
Chipped or spalled hardface.
Examine the outer liner at location 14, for wear and chipped or spalled hardface on the front inside diameter seal.
SUBTASK 72-42-61-220-080 Examine the Combustion Chamber Outer Liner (01-501) for Wear and Chipped or Spalled Hardface on the Front Inside Diameter Seal
Refer to: Figure
Repair, VRS3091 TASK 72-42-61-300-003 (REPAIR-003)
Cracks and dents.
Examine the outer liner hood at location 15, for cracks and dents.
SUBTASK 72-42-61-220-081 Examine the Combustion Chamber Outer Liner (01-501) Hood for Cracks and Dents
Refer to: Figure
Repair, VRS3095 TASK 72-42-61-300-007 (REPAIR-007)
Loose access cover.
Examine the outer liner at location 16, for a loose access cover.
Repair, VRS3596 TASK 72-42-61-300-016 (REPAIR-016)
Oversize holes
Examine the access cover and hood rivet holes if rivets are removed. Required diameter of holes is 0.143 - 0.147 inch (3.63 - 3.73 mm).
SUBTASK 72-42-61-220-082 Examine the Combustion Chamber Outer Liner (01-501) for a Loose Access Cover
Refer to Figure and Fig. 72-42-61-990-036.
Repair, VRS3789 TASK 72-42-61-300-020 (REPAIR-020)
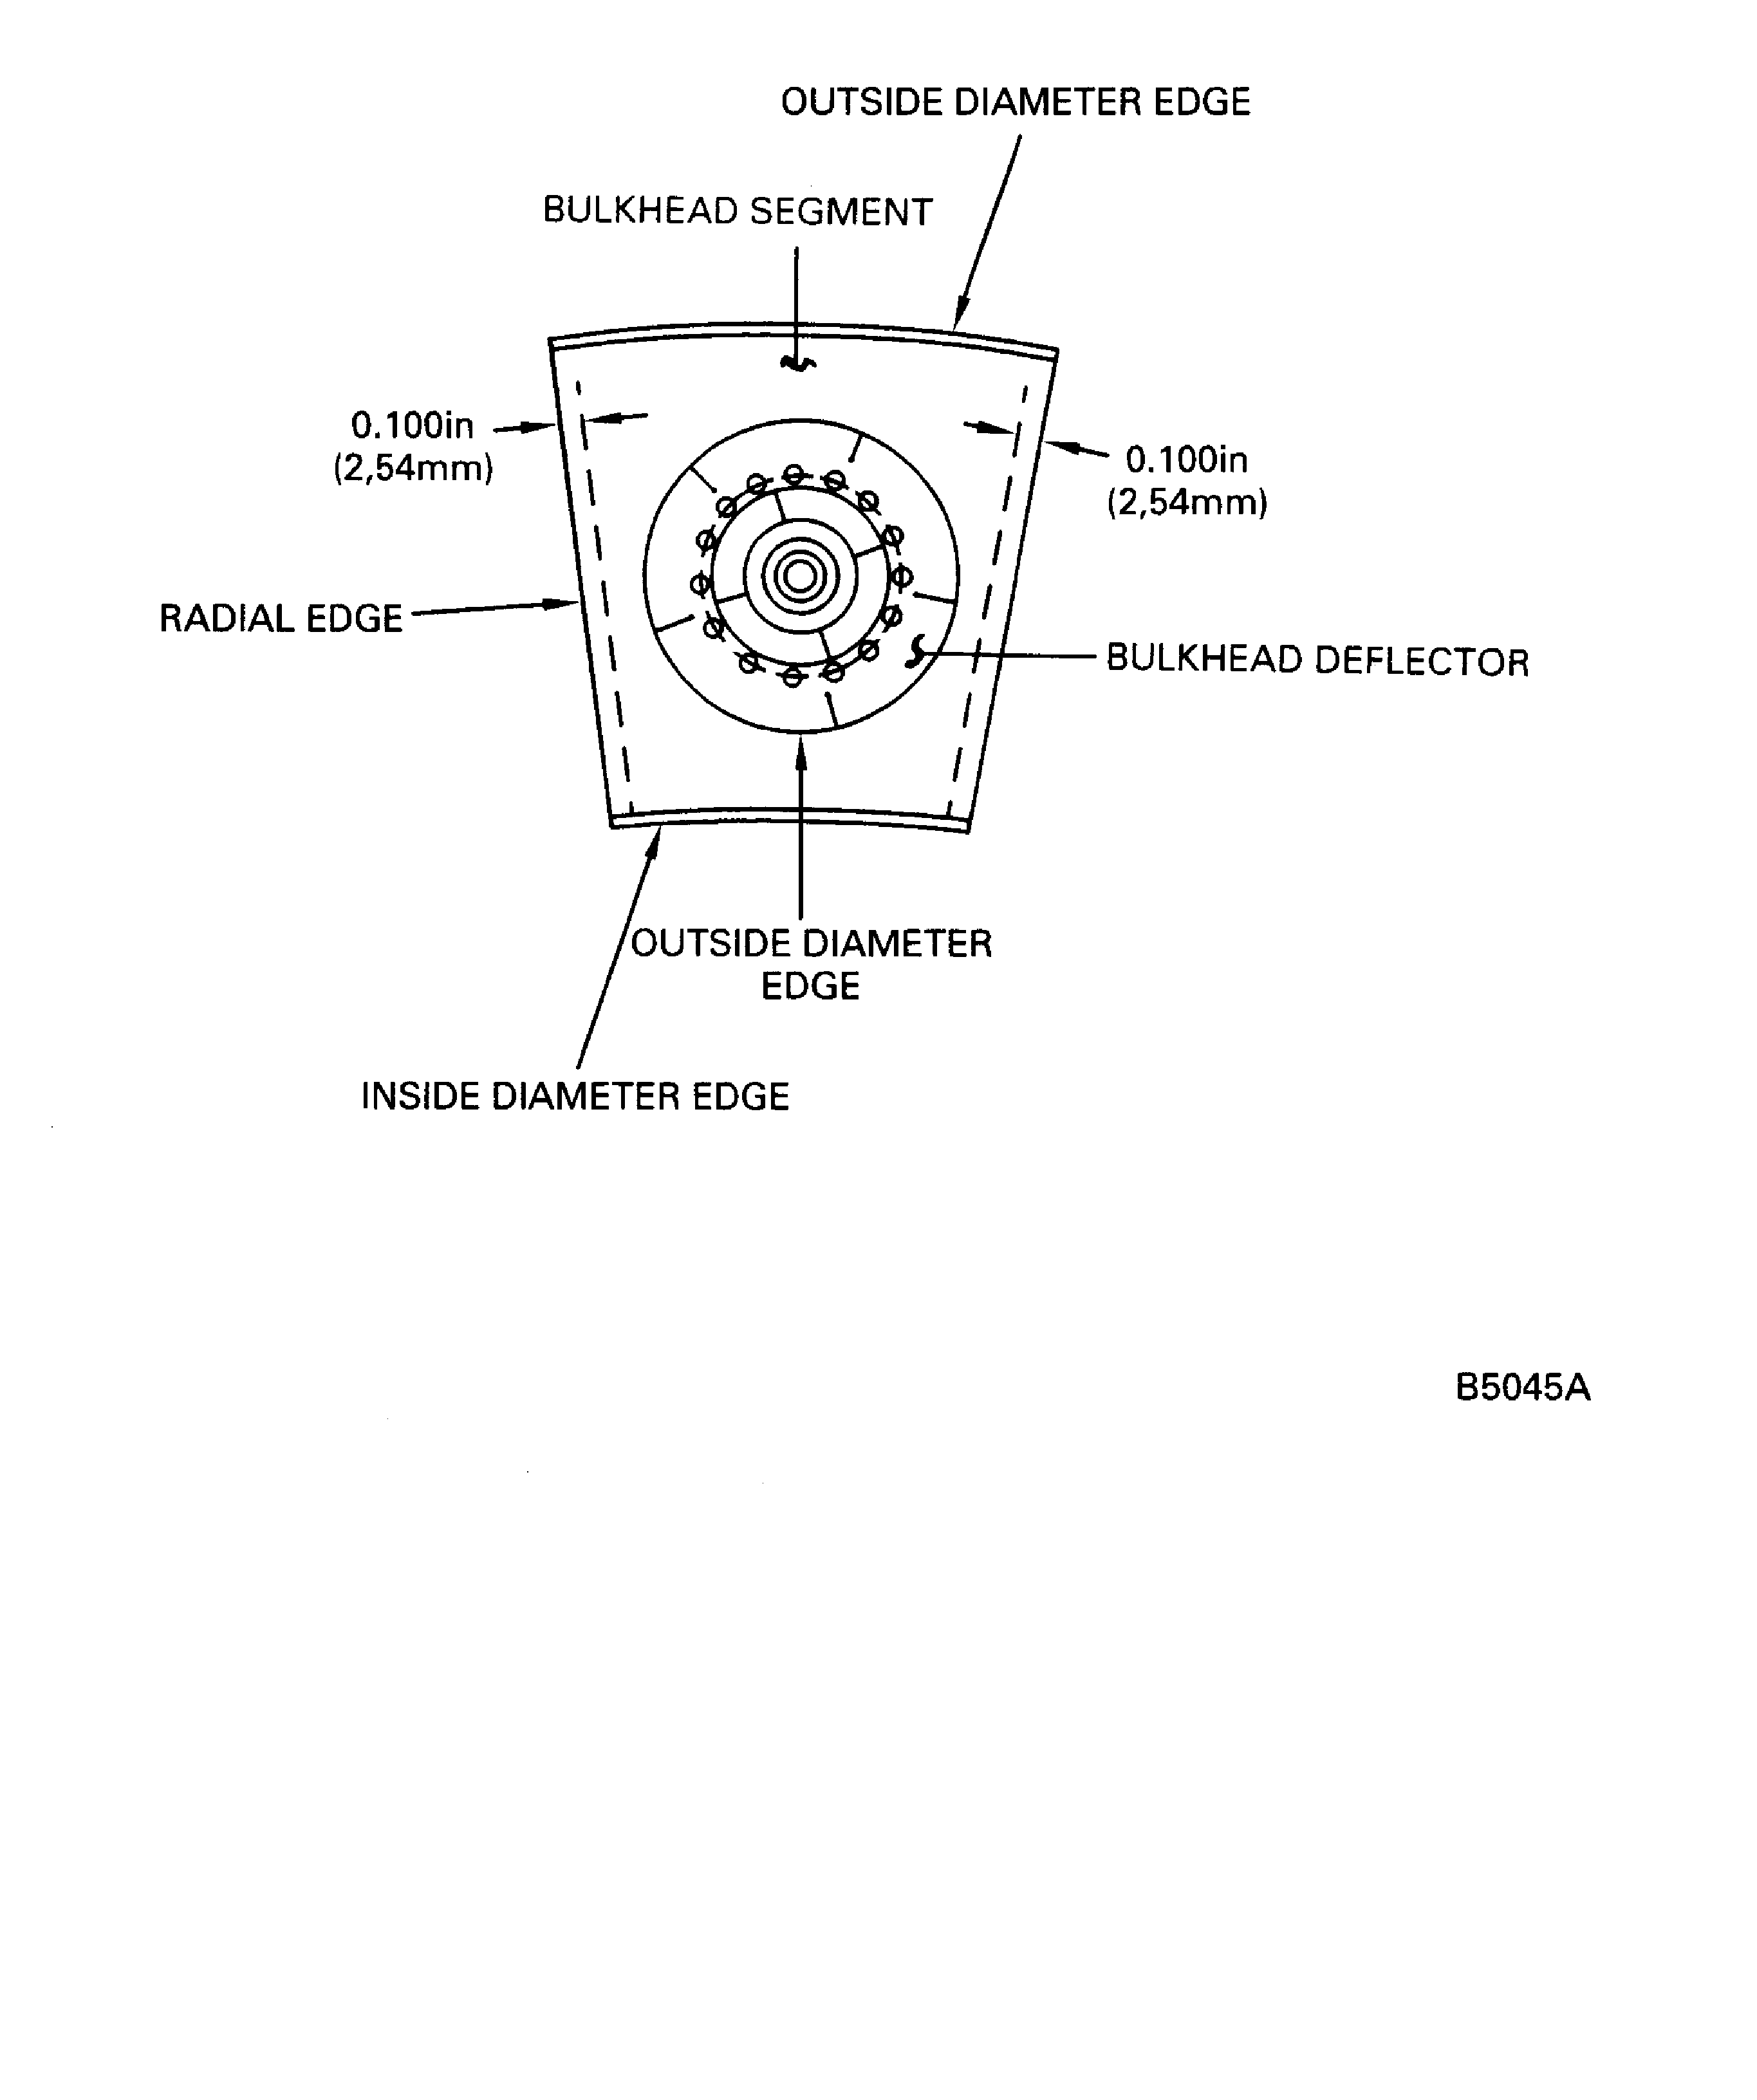
Optional to Step: One crack from the edge of the heat shield to the cooling hole. Any number of radical cracks from outer edge extending radially inward that is not greater than 0.250 in. (6.35 mm)
Repair, VRS3095 TASK 72-42-61-300-007 (REPAIR-007) or Repair, VRS3735 TASK 72-42-61-300-018 (REPAIR-018)
Cracks.
Repair, VRS3095 TASK 72-42-61-300-007 (REPAIR-007) or Repair, VRS3735 TASK 72-42-61-300-018 (REPAIR-018)
Other than (a)
Burns.
Repair, VRS3095 TASK 72-42-61-300-007 (REPAIR-007) or Repair, VRS3735 TASK 72-42-61-300-018 (REPAIR-018)
Pieces that are broken away
Repair, VRS3095 TASK 72-42-61-300-007 (REPAIR-007)
Other than (a)
Examine the outer liner at location 17, for cracks, burns, pieces that are broken away, and coating that is gone from the fuel nozzle guide deflectors.
SUBTASK 72-42-61-220-083 Examine the Combustion Chamber Outer Liner (01-501) for Cracks, Burns, Pieces that are Broken Away, and Coating that is Gone from the Fuel Nozzle Guide Deflectors
Refer to: Figure
NOTE
You can put a wire into the holes from the front and the rear of the guide to find out if the holes are blocked.Repair, VRS3421 TASK 72-42-61-300-014 (REPAIR-014)
Blocked holes
Examine the outer liner at location 19, for blocked holes in the fuel nozzle guides.
SUBTASK 72-42-61-220-084 Examine the Combustion Chamber Outer Liner (01-501) for Blocked Holes in the Fuel Nozzle Guides
Refer to: Figure
NOTE
Spalled coating must not be connected to any other damage. Spalled coating has a dark area where there are no burns or cracks.Repair, VRS3069 TASK 72-42-61-300-001 (REPAIR-001)
Other than (a)
Spalled coating.
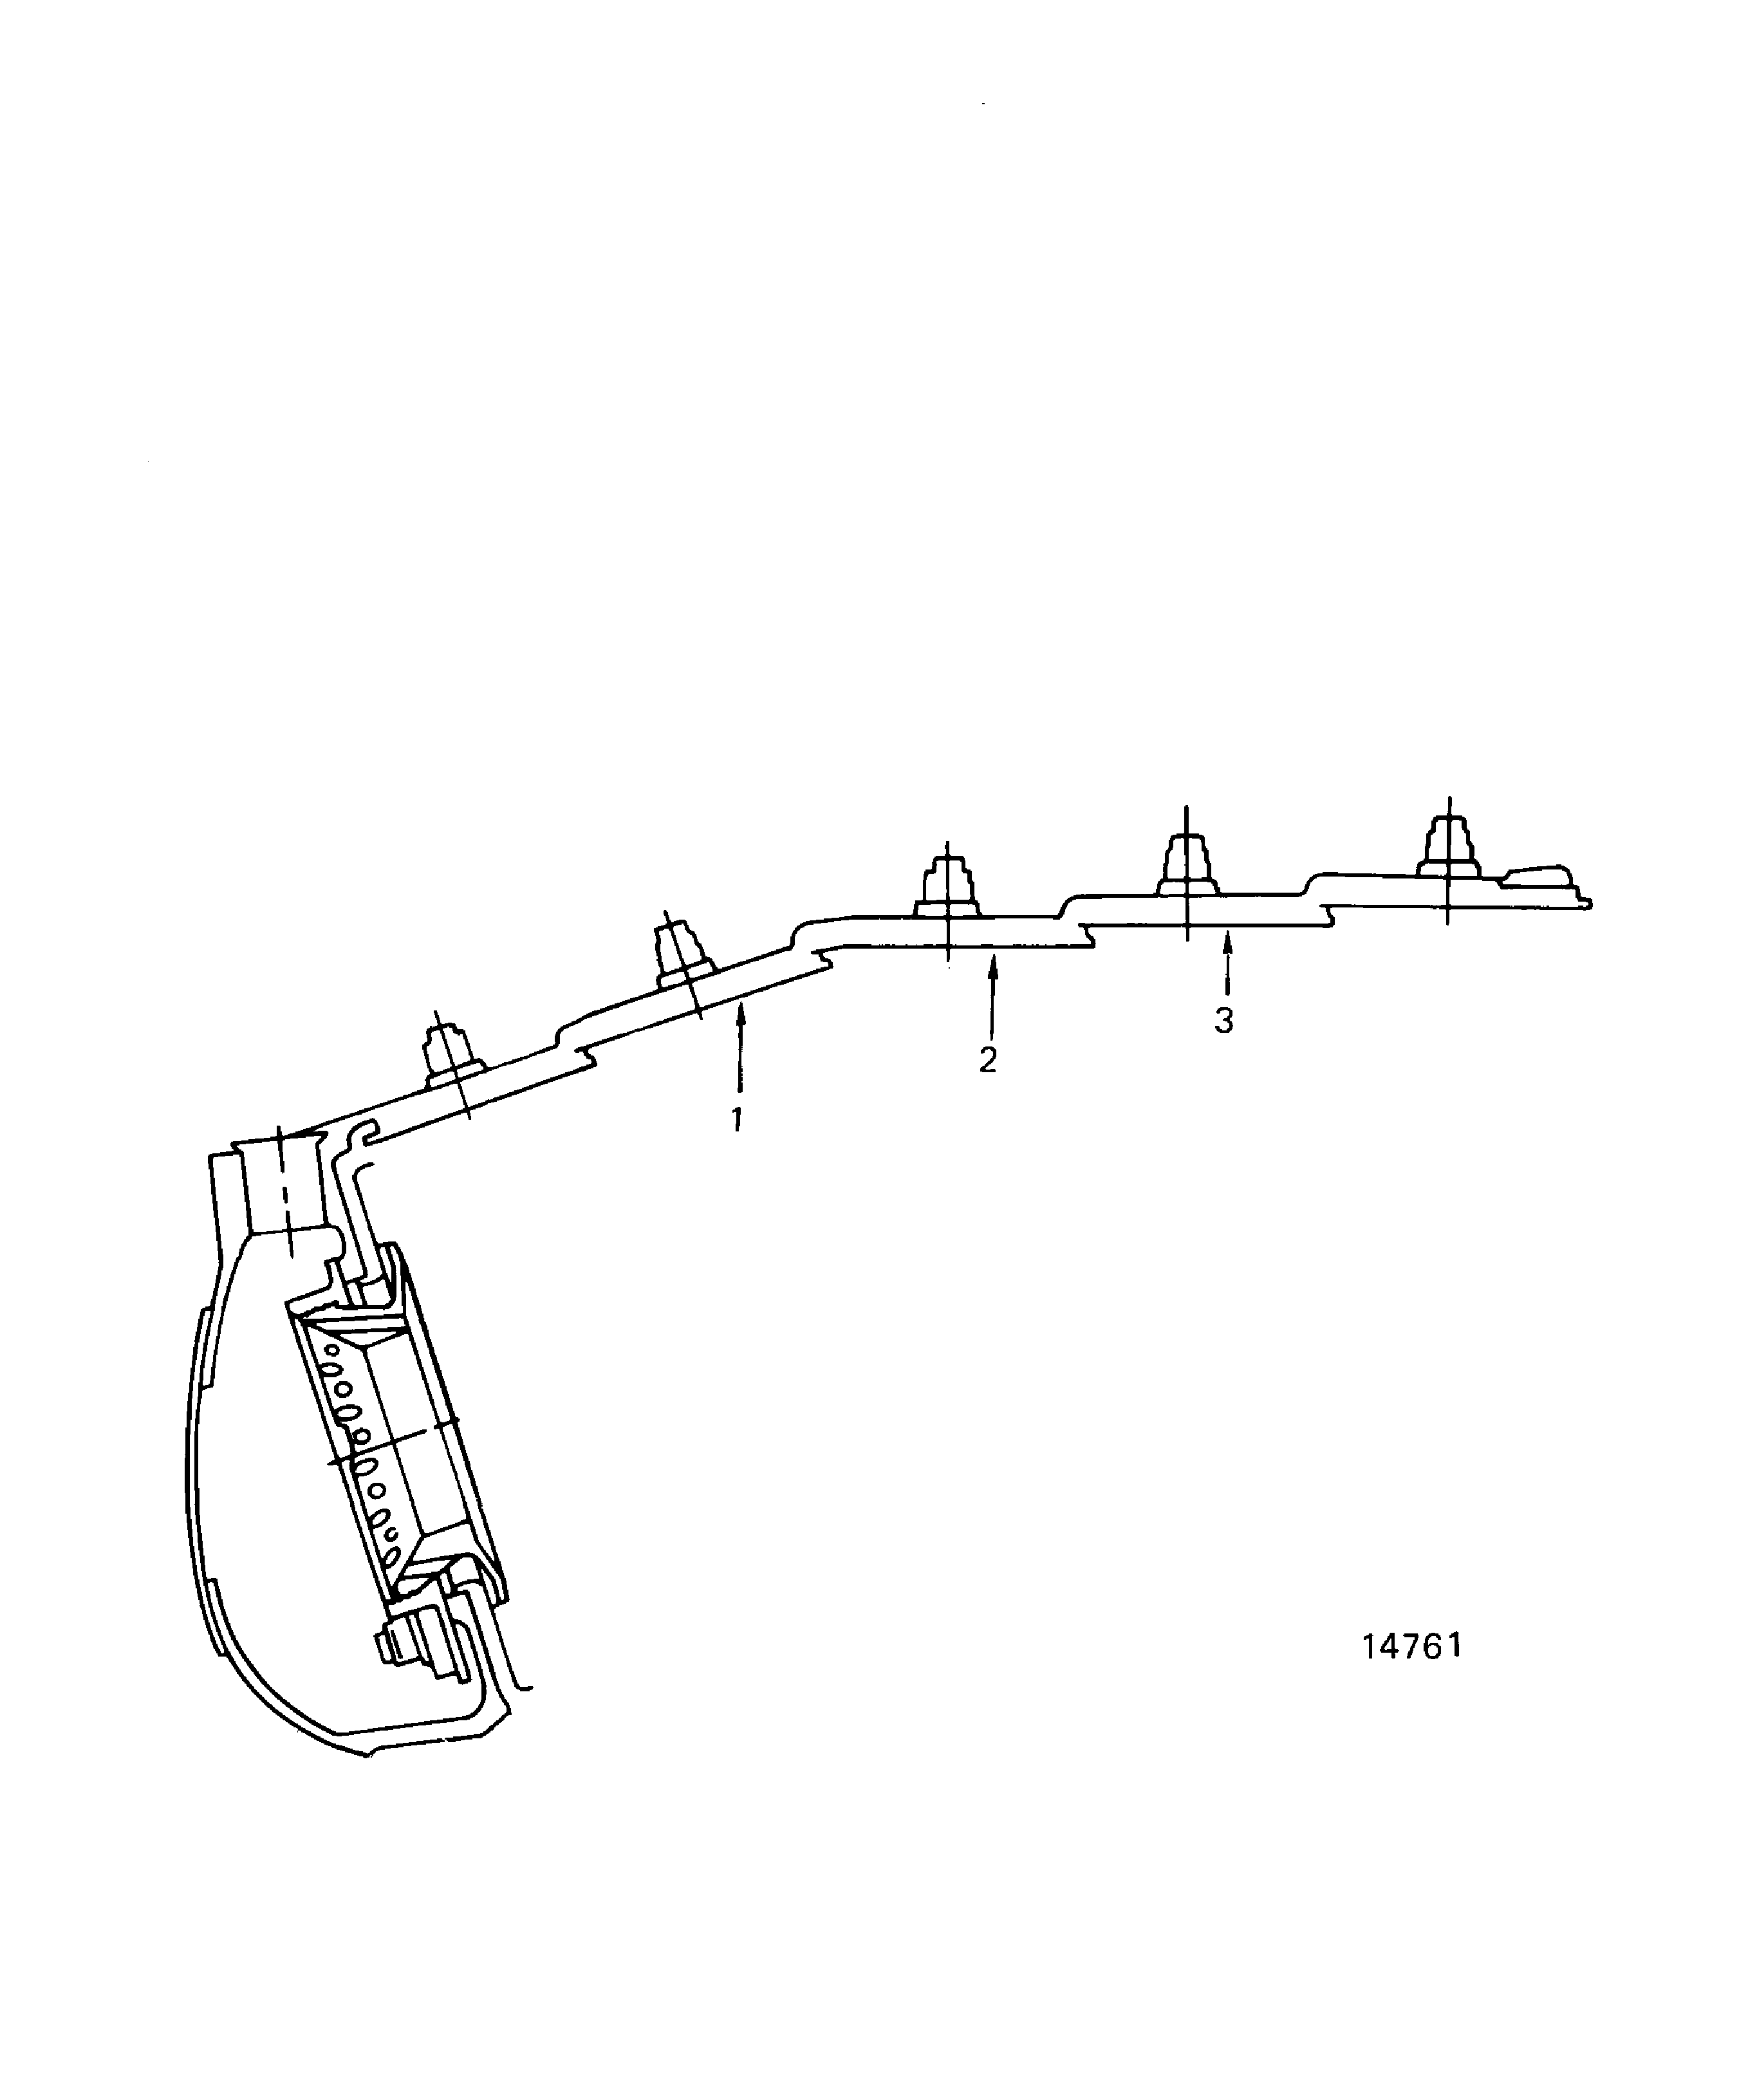
Examine the outer liner at locations 1, 2, and 3 for spalled ceramic coating on the liner segments (rows 2, 3, and 4).
SUBTASK 72-42-61-220-085 Examine the Combustion Chamber Outer Liner (01-501) for Spalled Ceramic Coating on the Liner Segments
Refer to: Figure
Remove the swing arm from the IAE 2P16148 Check and correct fixture 1 off.
SUBTASK 72-42-61-290-052 Install the Combustion Chamber Outer Liner (01-501) on the Check and Correct Fixture
Refer to: Figure
Repair, VRS3094 TASK 72-42-61-300-006 (REPAIR-006)
Other than (a)
Diameter.
Repair, VRS3094 TASK 72-42-61-300-006 (REPAIR-006)
Other than (a)
Clearance envelope.
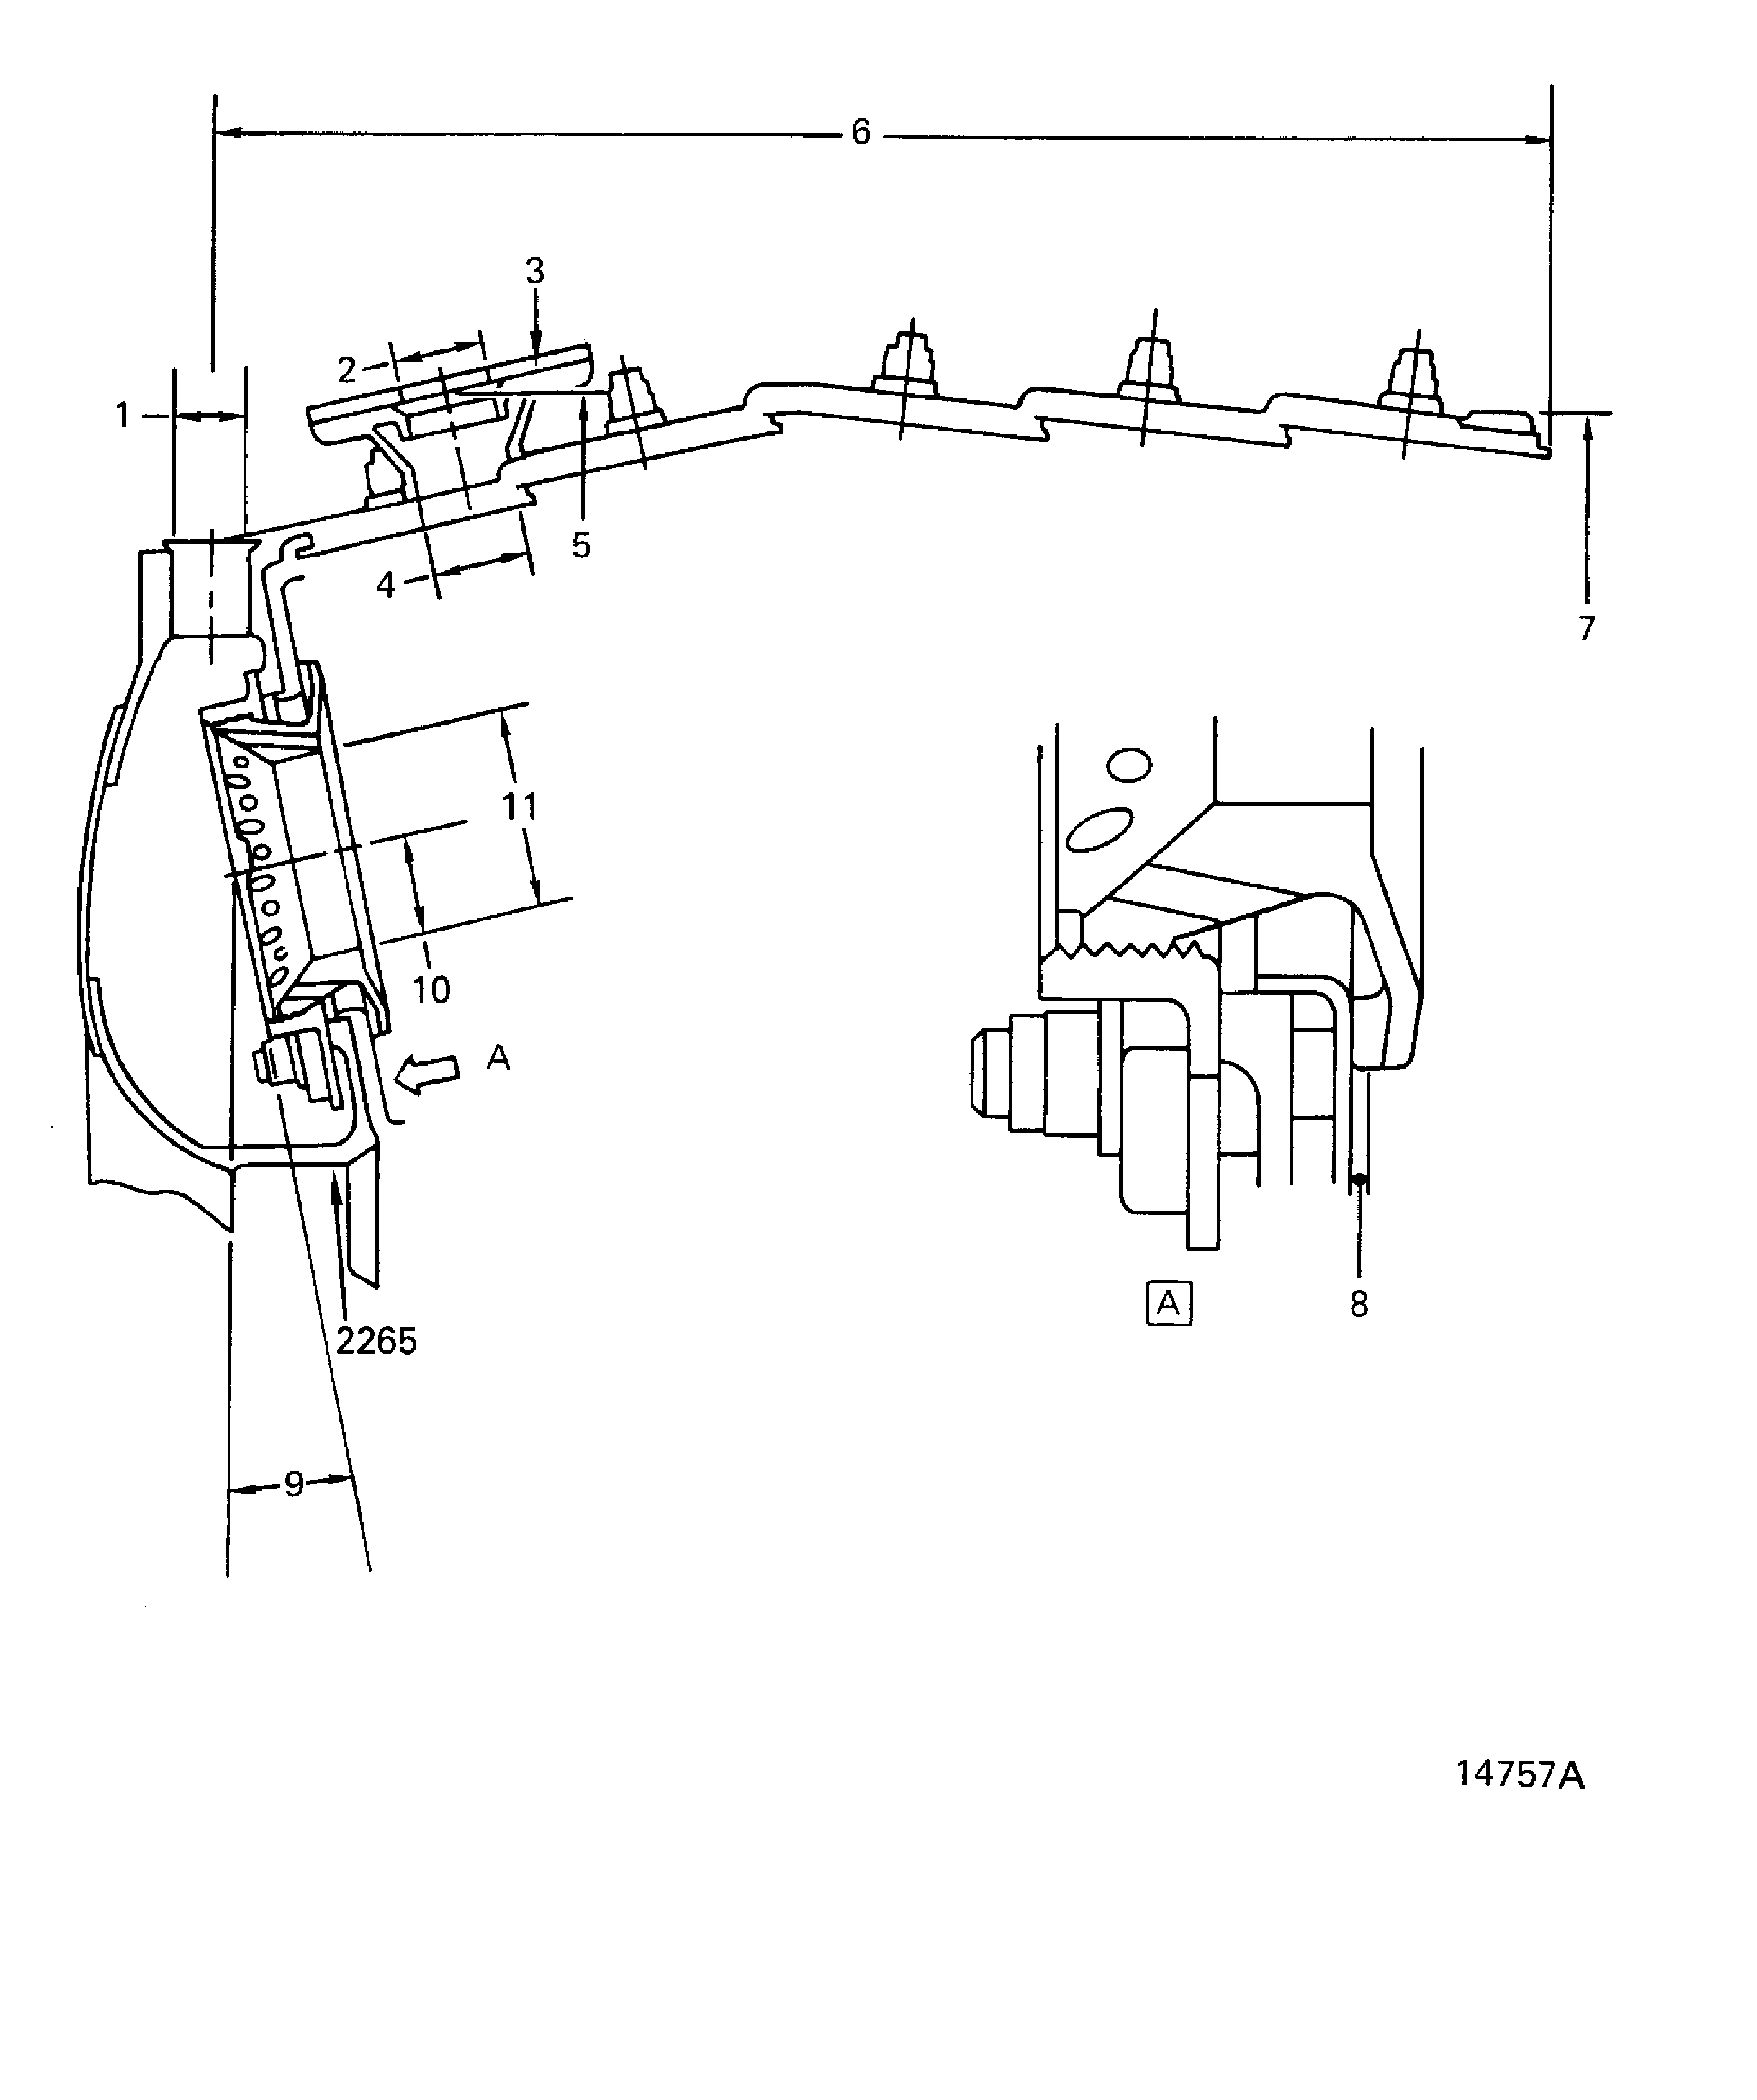
Use IAE 2P16192 Plug gage 1 off, to examine the outer liner at location 1 for the diameter and clearance envelope of the bushings.
SUBTASK 72-42-61-220-086 Examine the Combustion Chamber Outer Liner (01-501) for the Diameter and the Clearance Envelope of the Bushings
Refer to: Figure
Repair, VRS3093 TASK 72-42-61-300-005 (REPAIR-005)
Other than (a)
Diameter.
Use IAE 2P16199 Plug gage 1 off, to examine the outer liner at location 2 for the diameter of the igniter plug guide.
SUBTASK 72-42-61-220-087 Examine the Combustion Chamber Outer Liner (01-501) for the Diameter of the Igniter Plug Guide
Refer to: Figure
Repair, VRS3093 TASK 72-42-61-300-005 (REPAIR-005)
Other than (a)
Radial movement.
Use IAE 2P16201 Plug gage 1 off, to examine the outer liner at location 3 for the radial movement of the igniter plug guide.
SUBTASK 72-42-51-220-088 Examine the Combustion Chamber Outer Liner (01-501) for the Radial Movement of the Igniter Plug Guide
Refer to: Figure
Repair, VRS3093 TASK 72-42-61-300-005 (REPAIR-005)
Other than (a)
Clearance envelope.
Use IAE 2P16196 Plug gage 1 off, to examine the outer liner at location 4 for the clearance envelope of the igniter plug guide.
SUBTASK 72-42-61-220-089 Examine the Combustion Chamber Outer Liner (01-501) for the Clearance Envelope of the Igniter Plug Guide
Refer to: Figure
Repair, VRS3093 TASK 72-42-61-300-005 (REPAIR-005)
Other than (a)
Radial location.
Use IAE 2P16197 Plug gage 1 off, to examine the outer liner at location 5 for the radial location of the igniter plug guide.
SUBTASK 72-42-61-220-090 Examine the Combustion Chamber Outer Liner (01-501) for the Radial Location of the Igniter Plug Guide
Refer to Figure.
Use IAE 2P16458 Length gage length gage (supersedes IAE 2P16193 Length gage) 1 off, to examine the outer liner at location 6 for the length.
SUBTASK 72-42-61-220-091 Examine the Combustion Chamber Outer Liner (01-501) for the Length
Refer to Figure.
Repair, VRS3099 TASK 72-42-61-300-009 (REPAIR-009)
Other than (a)
Out-of-roundness.
If the diameter is between 26.120 to 26.130 in. (663.45 to 663.70 mm) with full coat around the circumference or local wear is in limits by Step
Repair, VRS3100 TASK 72-42-61-300-010 (REPAIR-010)
If the diameter is between 26.114 to 26.120 in. (663.30 to 663.45 mm) with no full coat or no coat
Repair, VRS3099 TASK 72-42-61-300-009 (REPAIR-009)
If the diameter is less than 26.114 in. (663.30 mm)
Diameter.
Examine the outer liner at location 7 for the out-of roundness and the diameter of the rear outside diameter seal.
SUBTASK 72-42-61-220-092 Examine the Combustion Chamber Outer Liner (01-501) for the Out-of-Roundness and the Diameter of the Rear Outside Diameter Seal
Refer to: Figure
Repair, VRS3095 TASK 72-42-61-300-007 (REPAIR-007)
Other than (a)
Clearance.
Examine the outer liner at location 8 for the clearance between the fuel nozzle guide deflector and the bulkhead segment.
SUBTASK 72-42-61-220-093 Examine the Combustion Chamber Outer Liner (01-501) for the Clearance Between the Fuel Nozzle Guide Deflector and the Bulkhead Segment
Refer to: Figure
Use IAE 2P16151 Plug gage 1 off, to examine the outer liner at location 9 for the angle of the fuel nozzle guide.
SUBTASK 72-42-61-220-094 Examine the Combustion Chamber Outer Liner (01-501) for the Angle of the Fuel Nozzle Guide
Refer to Figure.
Repair, VRS3090 TASK 72-42-61-300-002 (REPAIR-002) or Repair, VRS3742 TASK 72-42-61-300-019 (REPAIR-019)
Other than (1)
Examine the outer liner for the diameter of the front inside diameter seal at location 2265.
SUBTASK 72-42-61-220-095 Examine the Combustion Chamber Outer Liner (01-501) for the Diameter of the Front Inside Diameter Seal
Refer to: Figure
Repair, VRS3095 TASK 72-42-61-300-007 (REPAIR-007)
Other than (a)
Radial movement.
Use IAE 2P16195 Plug gage 1 off, to examine the outer liner at location 11 for the radial movement of the fuel nozzle guides.
SUBTASK 72-42-61-220-096 Examine the Combustion Chamber Outer Liner (01-501) for the Radial Movement of the Fuel Nozzle Guides
Refer to: Figure
Repair, VRS3095 TASK 72-42-61-300-007 (REPAIR-007)
Other than (a)
Inside diameter.
Use IAE 2P16194 Plug gage 1 off, to examine the outer liner at location 11 for the inside diameter of the fuel nozzle guide.
SUBTASK 72-42-61-220-097 Examine the Combustion Chamber Outer Liner (01-501) for the Inside Diameter of the Fuel Nozzle Guide
Figure: Combustion Chamber Outer Liner Inspection Locations
Combustion Chamber Outer Liner Inspection Locations

Figure: Combustion Chamber Outer Liner Inspection Locations
Combustion Chamber Outer Liner Inspection Locations

Figure: Install the Combustion Chamber Outer Liner Into IAE 2P16148 Fixture
Install the Combustion Chamber Outer Liner Into IAE 2P16148 Fixture

Figure: Combustion Chamber Outer Liner Inspection Locations
Combustion Chamber Outer Liner Inspection Locations

Figure: Fuel Nozzle Guide Deflector Inspection Locations
Fuel Nozzle Guide Deflector Inspection Locations

