Export Control
EAR Export Classification: Not subject to the EAR per 15 C.F.R. Chapter 1, Part 734.3(b)(3), except for the following Service Bulletins which are currently published as EAR Export Classification 9E991: SBE70-0992, SBE72-0483, SBE72-0580, SBE72-0588, SBE72-0640, SBE73-0209, SBE80-0024 and SBE80-0025.Copyright
© IAE International Aero Engines AG (2001, 2014 - 2021) The information contained in this document is the property of © IAE International Aero Engines AG and may not be copied or used for any purpose other than that for which it is supplied without the express written authority of © IAE International Aero Engines AG. (This does not preclude use by engine and aircraft operators for normal instructional, maintenance or overhaul purposes.).Applicability
All
Common Information
TASK 72-50-21-200-001-E00 LPT Case - Examine, Inspection-001
General
This TASK gives the procedure for the inspection of the LP turbine case.
Fig/item numbers in parentheses in the procedure agree with those used in IPC.
A** following any repair referenced in this inspection indicates that the repair is not yet published in the current revision of the manual and the part must be rejected. Contact IAE for additional information concerning FAA approved repair data.
The policy that is necessary for inspection is given in the SPM TASK 70-20-00-200-501.
All the parts must be cleaned before any part is examined. Refer to the SPM TASK 70-50-21-100-000 (CLEANING-000).
All parts must be visually examined for damage, corrosion and wear. Any defects that are not identified in the procedure must be referred to IAE.
The procedure for those parts which must have a crack test is given in SUBTASK 72-50-21-230-102. Do the test before the part is visually examined.
Do not discard any part until you are sure there are no repairs available. Refer to the instructions in Repair before a discarded part is used again or oversize parts are installed.
Parts which should be discarded can be held although no repair is available. The repair of a discarded part could be shown to be necessary at a later date.
All parts must be examined to make sure that all the repairs have been completed satisfactorily.
The practices and processes referred to in the procedure by the TASK numbers are in the SPM.
Reference
Refer to the SPM for data on these items
Definition of Damage, SPM TASK 70-02-02-350-501
Record and Control of the Lives of Parts, SPM TASK 70-05-00-220-501
Inspection of Parts, SPM TASK 70-20-00-200-501
Some data on these items is contained in this TASK. For more data on these items refer to the SPM
Method of Testing for Crack Indications
Chemical Processes
Surface Protection
NOTE
Preliminary Requirements
Pre-Conditions
NONESupport Equipment
| Name | Manufacturer | Part Number / Identification | Quantity | Remark |
|---|---|---|---|---|
| Straight edge | LOCAL | Straight edge | ||
| Depth gage | LOCAL | Depth gage | ||
| IAE 2M14176 Inspection gage | 0AM53 | IAE 2M14176 | 1 | |
| IAE 2M14177 Inspection gage | 0AM53 | IAE 2M14177 | 1 | |
| IAE 2M14178 Inspection gage | 0AM53 | IAE 2M14178 | 1 | |
| IAE 2M14179 Inspection gage | 0AM53 | IAE 2M14179 | 1 | |
| IAE 2M14180 Inspection gage | 0AM53 | IAE 2M14180 | 1 |
Consumables, Materials and Expendables
NONESpares
NONESafety Requirements
NONEProcedure
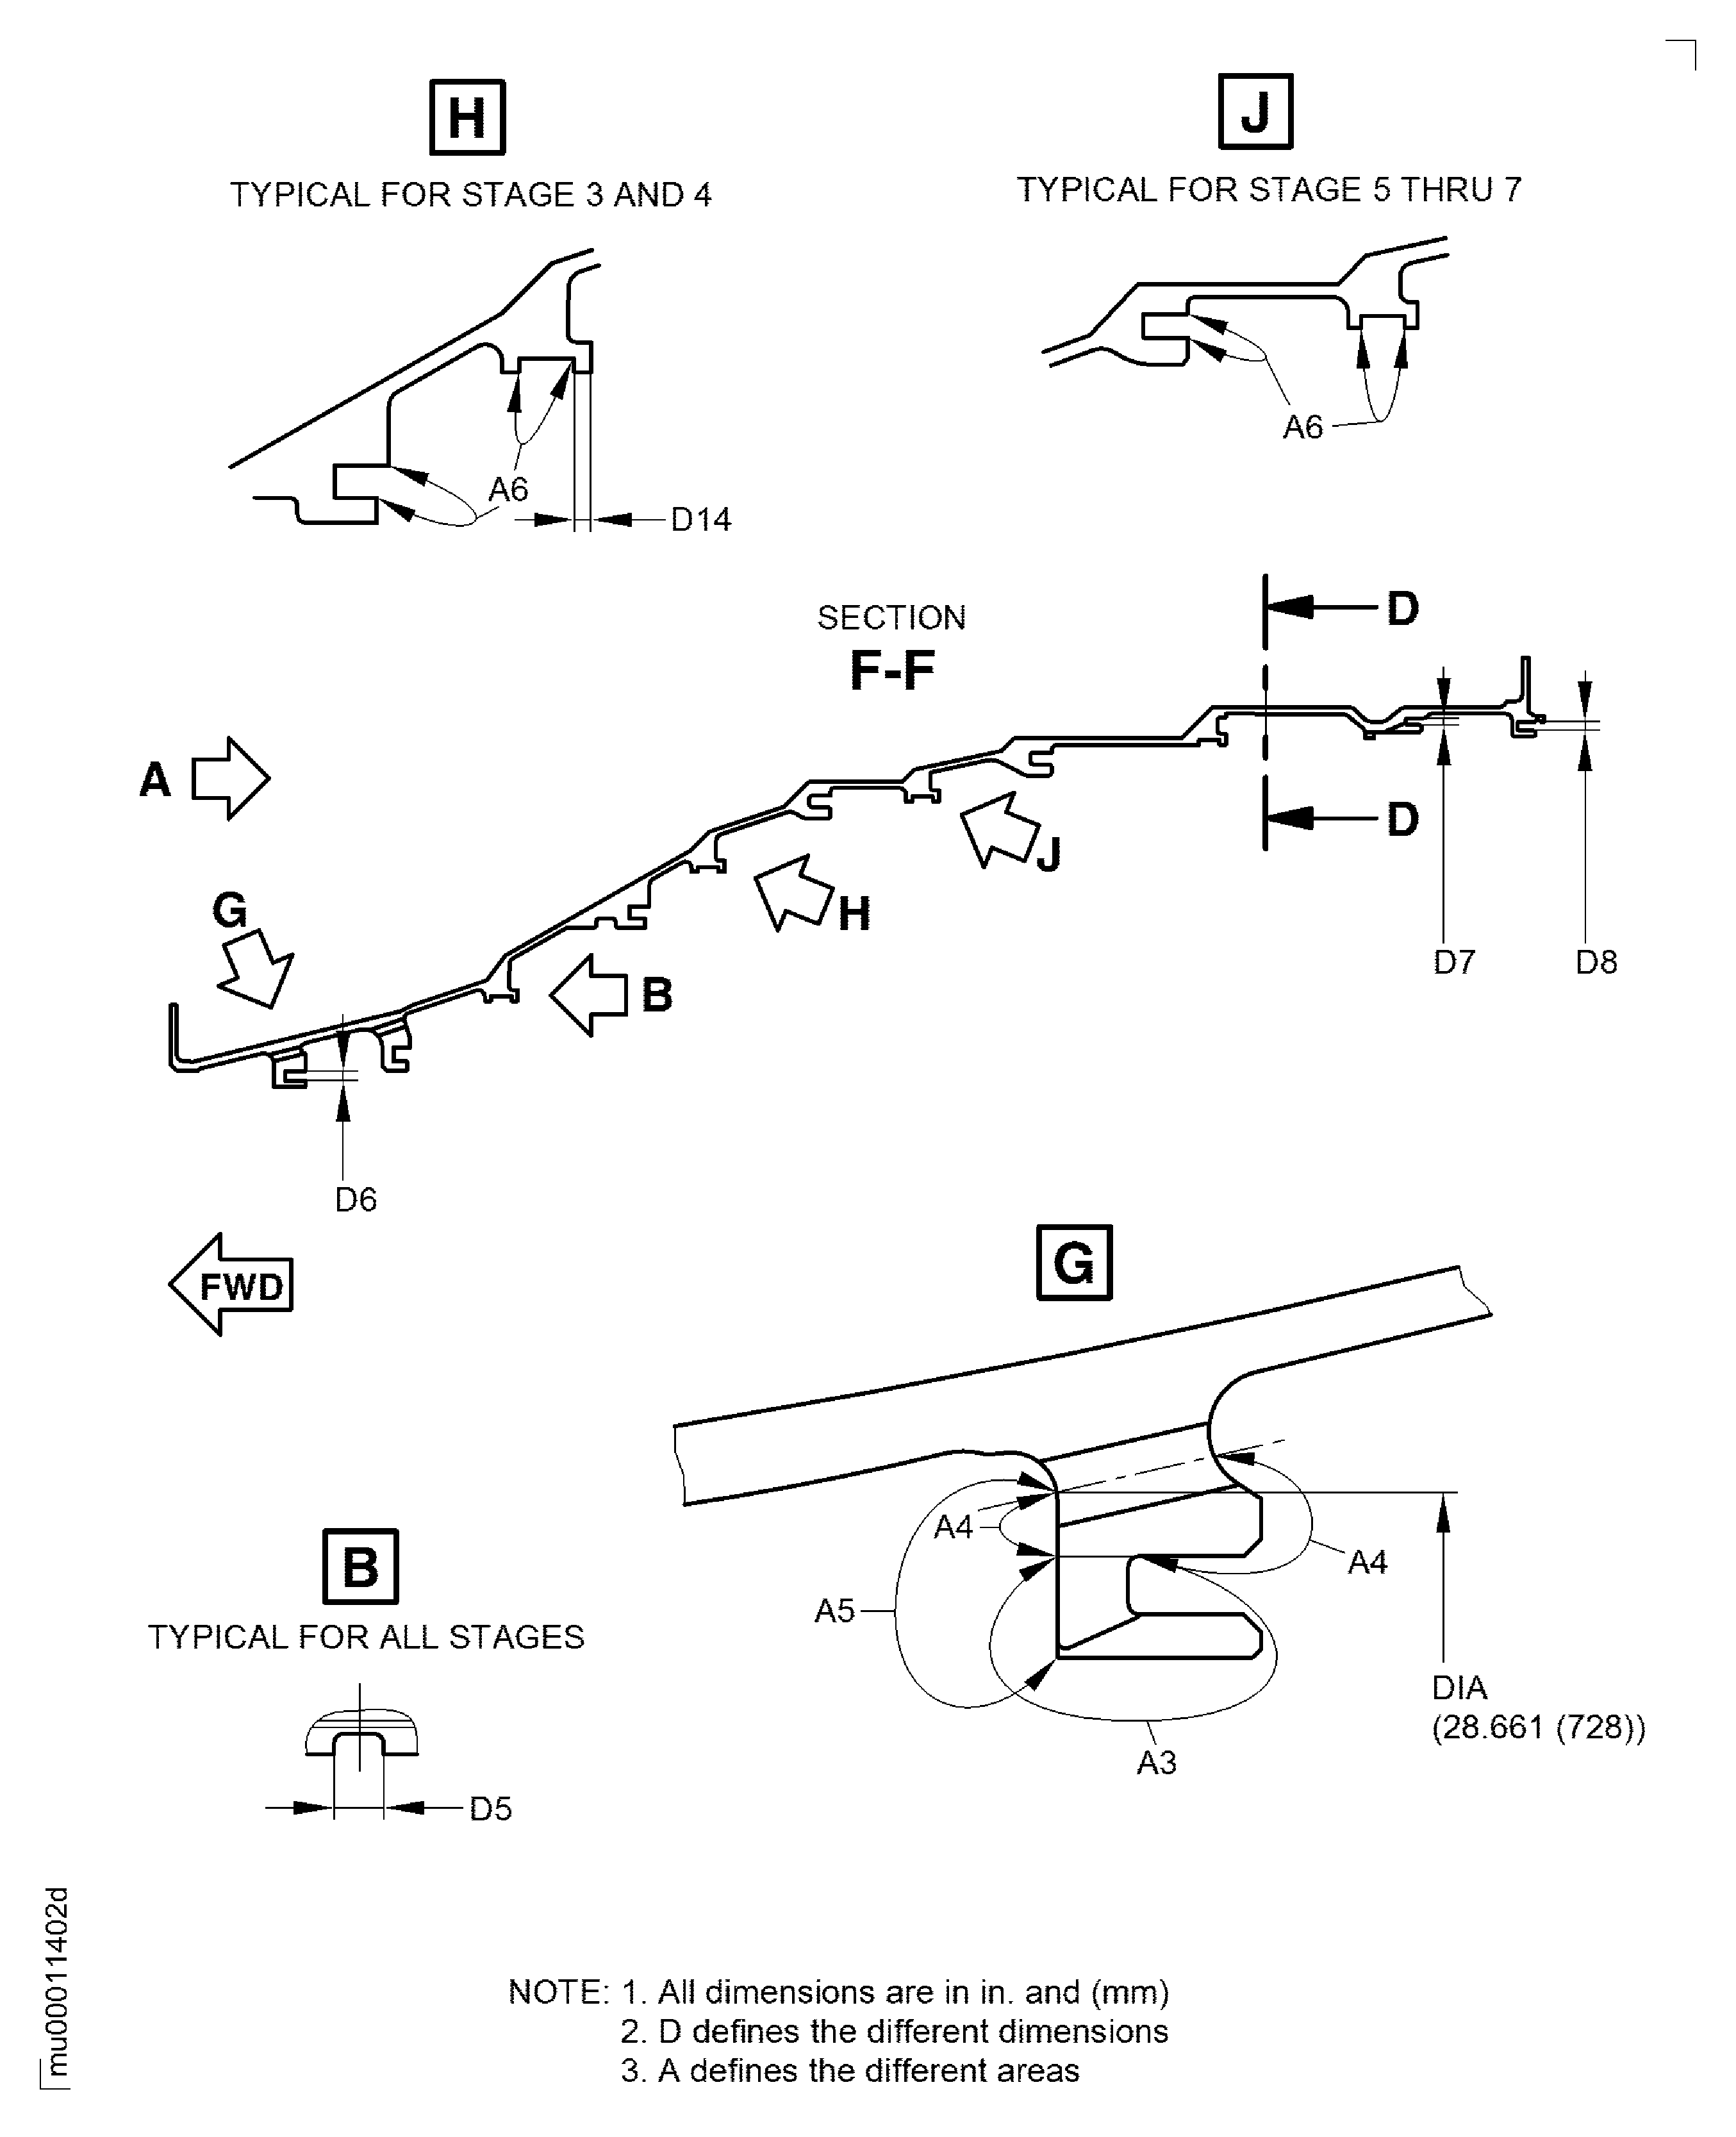
Inspect outer duct support hook for open stop holes which are 0.085 to 0.095 in. (2.16 to 2.41 mm) diameter. Plug all open stop holes, refer to VRS4343, TASK 72-50-21-300-031 (REPAIR-031).
SUBTASK 72-50-21-220-152 General Instructions for the Inspection of the LP Turbine Case
Clean the part. Refer to TASK 72-50-21-100-000 (CLEANING-000).
Repair, VRS4474 TASK 72-50-21-300-036 (REPAIR-036)
Cracked at the borescope holes
Repair, VRS4343 TASK 72-50-21-300-031 (REPAIR-031)
Cracked at area A3, going across into area A4
Cracked at the outer duct support hook
Do the test for cracks on the part that is given below. Use the applicable penetrant procedure.
PART IDENT
TASK/SUBTASK
LP turbine case and rotor
SUBTASK 72-50-21-230-102-001 Examine the LP Turbine Case for Cracks
Clean the part. Refer to TASK 72-50-21-100-000 (CLEANING-000).
Repair, VRS4474 TASK 72-50-21-300-036 (REPAIR-036)
Repair, VRS4343 TASK 72-50-21-300-031 (REPAIR-031)
Cracked at area A3, going across into area A4
Cracked at the outer duct support hook.
Cracked at the borescope holes
Do the test for cracks on the part that is given below. Use the applicable penetrant procedure.
PART IDENT
TASK/SUBTASK
LP turbine case and rotor
SUBTASK 72-50-21-230-102-002 Examine the LP Turbine Case for Cracks
Repair, VRS4001 TASK 72-50-21-300-001 (REPAIR-001)
Other than in (1)
Examine the surface of the LP turbine case for nicks.
Repair, VRS4001 TASK 72-50-21-300-001 (REPAIR-001)
Other than in (1)
Examine the surface of the LP turbine case for dents.
Repair, VRS4001 TASK 72-50-21-300-001 (REPAIR-001)
Other than in (1)
Examine the surface of the LP turbine case for pits.
SUBTASK 72-50-21-220-154 Examine the LP Turbine Case for Surface Damage
Repair, VRS4341 TASK 72-50-21-300-030 (REPAIR-030)
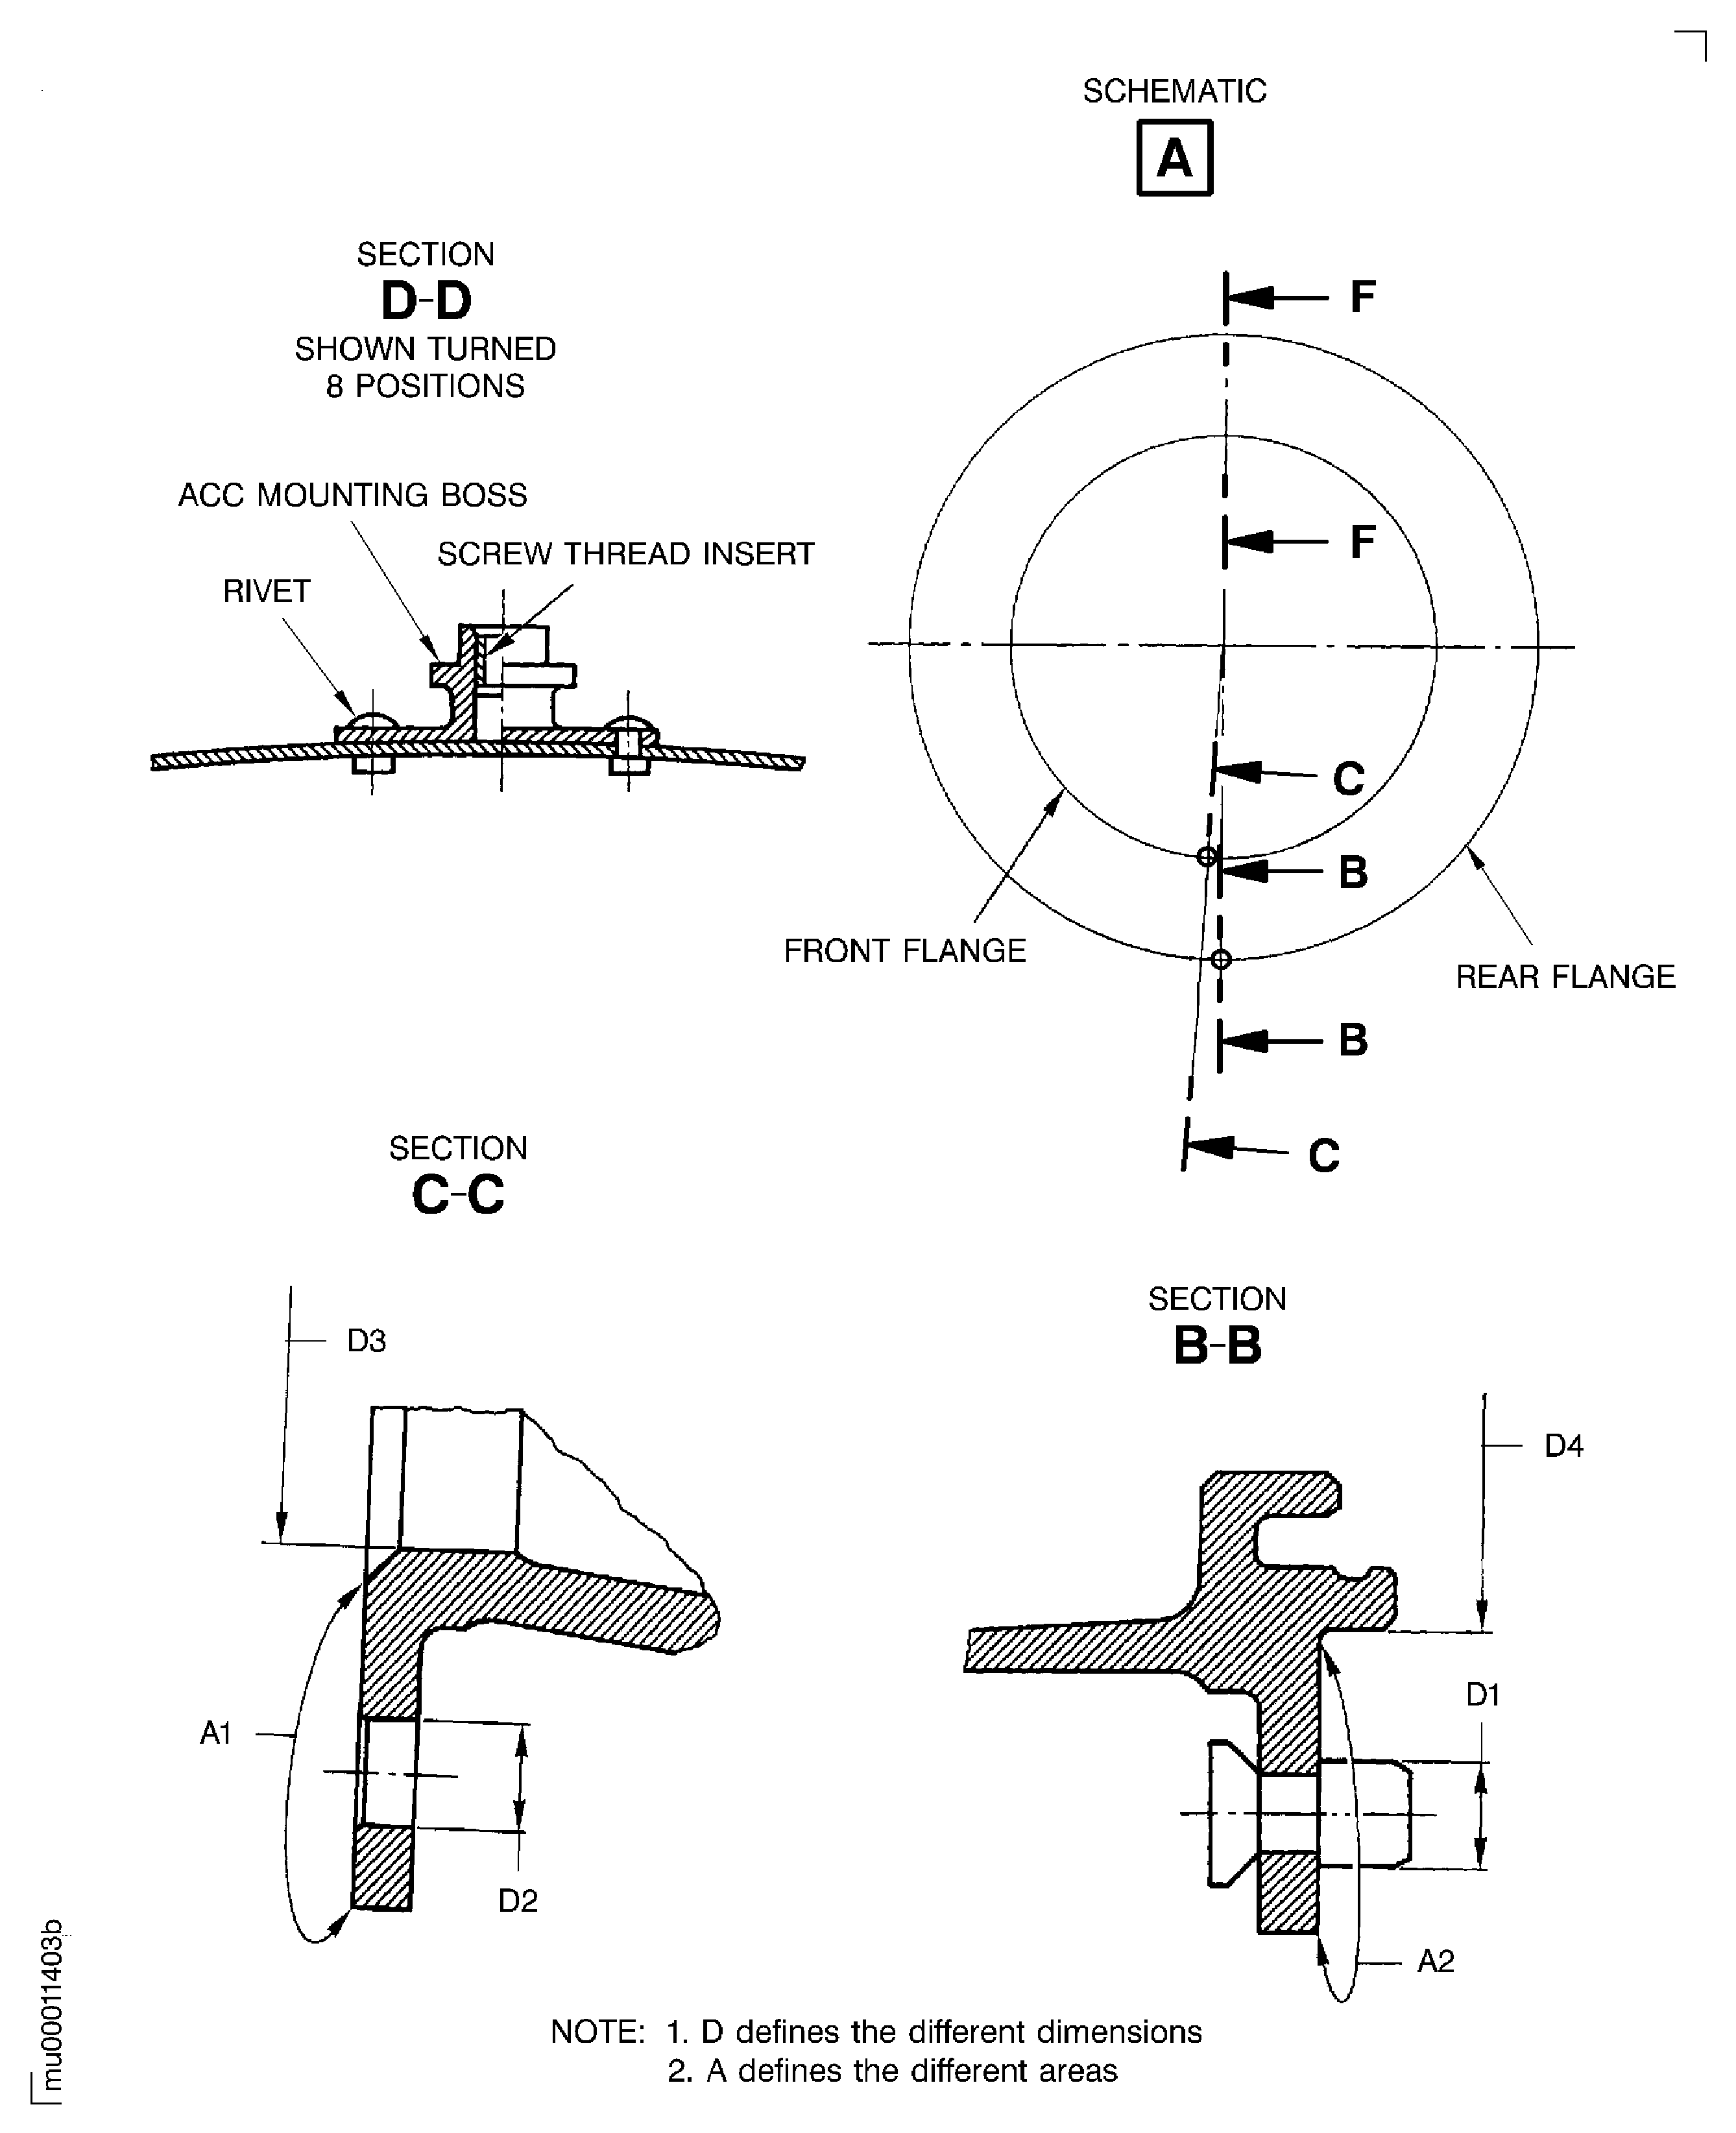
Loose rivets
Repair, VRS4341 TASK 72-50-21-300-030 (REPAIR-030)
Repair, VRS4341 TASK 72-50-21-300-030 (REPAIR-030)
Other than in (a)
Local fretting.
Damaged boss
Examine the borescope boss.
SUBTASK 72-50-21-220-155 Examine the Borescope Boss of the LP Turbine Case
Refer to: Figure
Repair, VRS4403 TASK 72-50-21-300-033 (REPAIR-033)
Loose rivets
Repair, VRS4403 TASK 72-50-21-300-033 (REPAIR-033)
Repair, VRS4403 TASK 72-50-21-300-033 (REPAIR-033)
Other than in (a)
Local fretting.
Damaged boss
Repair, VRS4049 TASK 72-50-21-300-026 (REPAIR-026)
Worn, damaged or missing inserts
Examine the active clearance control mounting boss.
SUBTASK 72-50-21-220-156 Examine the Active Clearance Control Mounting Boss of the LP Turbine Case
Refer to: Figure
Repair, VRS4002 TASK 72-50-21-300-002 (REPAIR-002)
Repair, VRS4002 TASK 72-50-21-300-002 (REPAIR-002)
Other than in (a)
Local fretting.
Loose locating pin
Examine the locating pin.
SUBTASK 72-50-21-220-157 Examine the Locating Pin at the Rear Flange of the LP Turbine Case at Diameter D1
Repair, VRS4014 TASK 72-50-21-300-011 (REPAIR-011)
Loose bracket because of worn rivets
Repair, VRS4014 TASK 72-50-21-300-011 (REPAIR-011)
Worn clip nuts
Examine the bracket and the plate.
SUBTASK 72-50-21-220-158 Examine the Identification Bracket and Plate of the LP Turbine Case
Refer to: Figure
Repair, VRS4034 TASK 72-50-21-300-023 (REPAIR-023)
More than in (1)
Examine the pin hole diameter D2.
Repair, VRS4010 TASK 72-50-21-300-007 (REPAIR-007)
More than in (1)
Examine the snap diameter of the LP turbine case at diameter D3. Do the measurements at the 90, 180, 270 and 360 degrees positions and get an average dimension.
SUBTASK 72-50-21-220-159 Examine the Front Flange of the LP Turbine Case
Refer to: Figure
Repair, VRS4011 TASK 72-50-21-300-008 (REPAIR-008)
Less than in (1)
Examine the snap diameter of the LP turbine case at diameter D4. Do the measurements at the 90, 180, 270 and 360 degrees positions and get an average dimension.
SUBTASK 72-50-21-220-160 Examine the Rear Flange of the LP Turbine Case
Refer to Figure.
Repair, VRS4001 TASK 72-50-21-300-001 (REPAIR-001)
Not more than 0.020 in. (0.5 mm) maximum depth, with raised material
Fretted.
Examine the surface in area A6.
Repair, VRS4001 TASK 72-50-21-300-001 (REPAIR-001)
Not less than 0.0823 in. (2.09 mm), with raised material
Worn, measure dimension D14.
Examine the surface at dimension D14.
SUBTASK 72-50-21-220-184 Examine the Vane Hooks for Wear
Repair, VRS4015 TASK 72-50-21-300-012 (REPAIR-012)
More than in (1)
Examine the anti-rotating slots at dimension D5.
Repair, VRS4490 TASK 72-50-21-300-040 (REPAIR-040)
Not more than 0.0236 in. (0.60 mm)
Examine the outer duct support hook location face at area A5 for wear.
SUBTASK 72-50-21-220-161 Examine the LP Turbine Case Anti-Rotating Slots and the Retaining Hooks
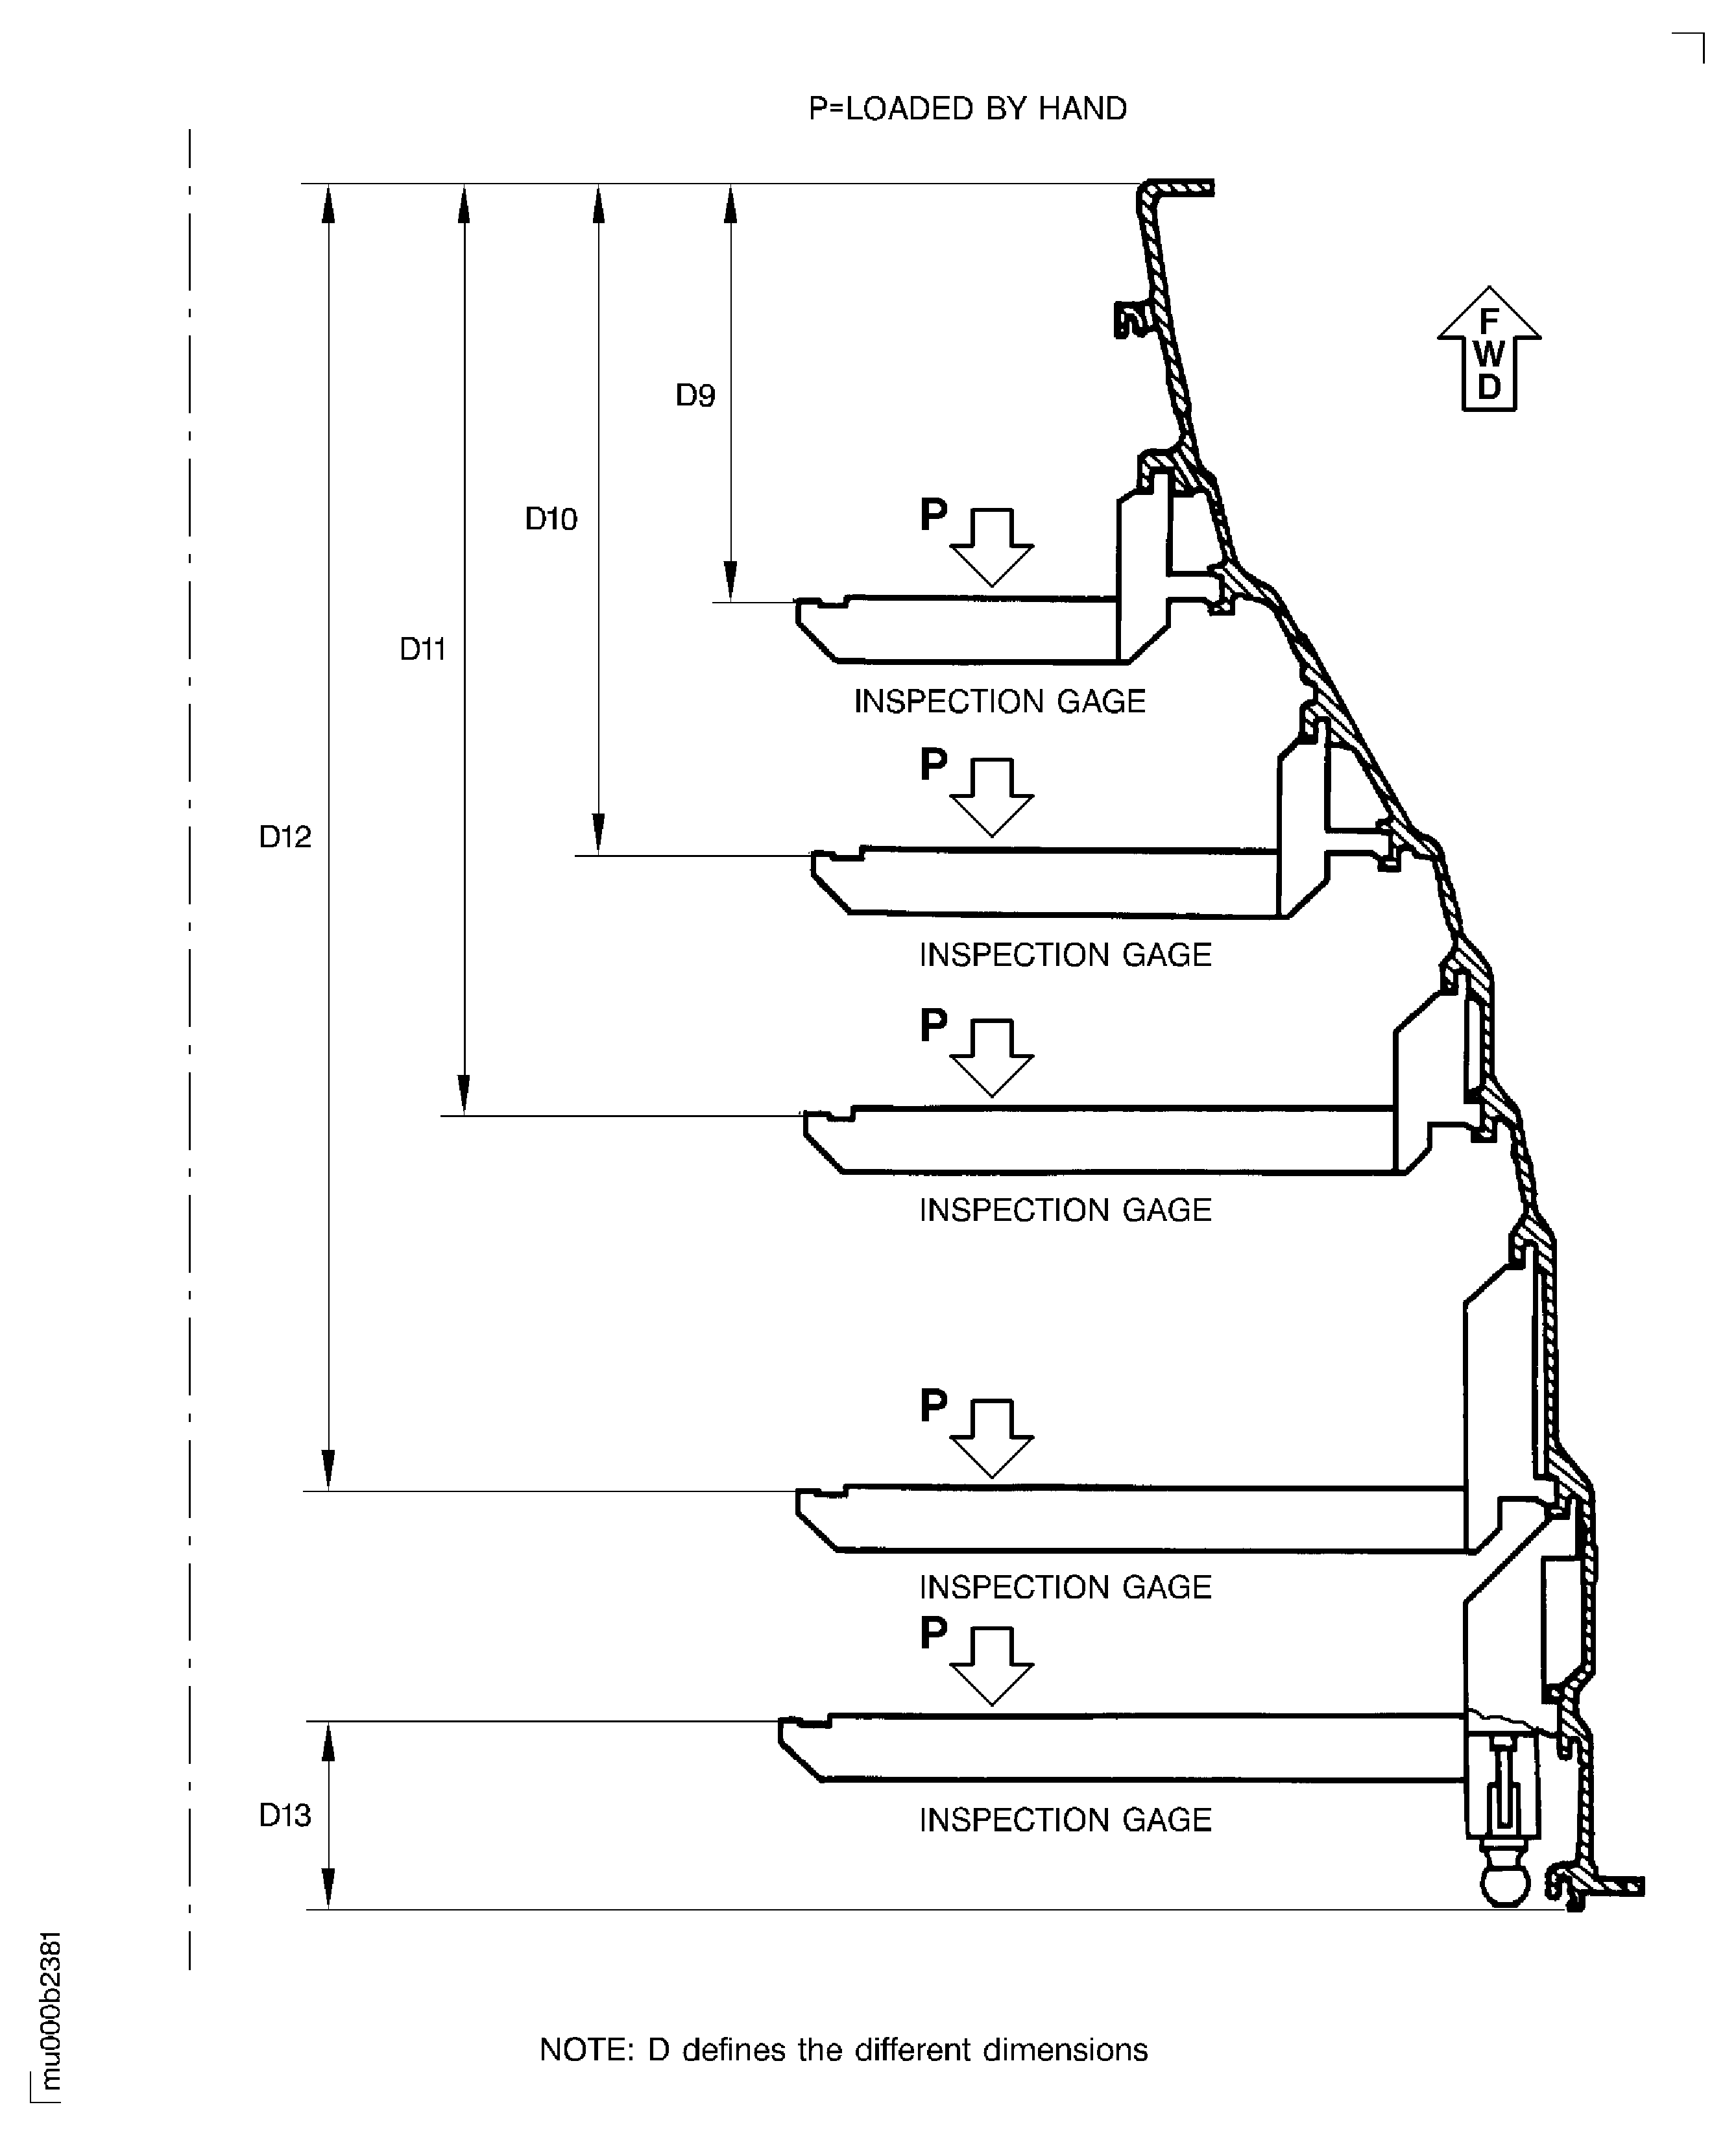
Put the LP turbine case in vertical position with the rear end down.
For the dimensional insepction at dimensions D9, D10, D11, D12 and D13 the inspection gages must be loaded by hand (refer to Figure.
Refer to: Figure
Repair, VRS4471 TASK 72-50-21-300-038 (REPAIR-038)
More than in (1)
Measure the stage 3 rear retaining hook at dimension D9. Use the IAE 2M14176 Inspection gage 1 off. Do the measurements at the 90, 180, 270 and 360 degrees positions and get an average dimension. Use straight edge, installed on the LP turbine case front flange and measure with a depth gage.
Measure the stage 4 rear retaining hook at dimension D10. Use the IAE 2M14177 Inspection gage 1 off. Do the measurements at the 90, 180, 270 and 360 degrees positions and get an average dimension. Use straight edge, installed on the LP turbine case front flange and measure with a depth gage.
Repair, VRS4471 TASK 72-50-21-300-038 (REPAIR-038)
More than in (1)
Measure the stage 5 rear retaining hook at dimension D11. Use the IAE 2M14178 Inspection gage 1 off. Do the measurements at the 90, 180, 270 and 360 degrees positions and get an average dimension. Use straight edge, installed on the LP turbine case front flange and measure with a depth gage.
Repair, VRS4471 TASK 72-50-21-300-038 (REPAIR-038)
More than in (1)
Measure the stage 6 rear retaining hook at dimension D12. Use the IAE 2M14179 Inspection gage 1 off. Do the measurements at the 90, 180, 270 and 360 degrees positions and get an average dimension. Use straight edge, installed on the LP turbine case front flange and measure with a depth gage.
Install IAE 2M14180 Inspection gage 1 off. Measure the dimension between the LP turbine case front flange and inspection gage. Do the measurements at the 90, 180, 270 and 360 degrees positions. Get an average dimension. Use straight edge and depth gage.
Repair, VRS4471 TASK 72-50-21-300-038 (REPAIR-038)
Less than in (a)
Subtract the dimension, measured in step (2), from the dimension measured in step (1).
Calculate the dimension D13 of the stage 7 rear retaining hook as follows:
SUBTASK 72-50-21-220-162 Examine the Inner Axial Dimensions of the LP Turbine Case
NOTE
Figure: Examine the LP Turbine Case
Examine the LP Turbine Case

Figure: Examine the LP Turbine Case
Examine the LP Turbine Case

Figure: Examine the Inner Axial Dimensions of the LP Turbine Case
Examine the Inner Axial Dimensions of the LP Turbine Case

