Export Control
EAR Export Classification: Not subject to the EAR per 15 C.F.R. Chapter 1, Part 734.3(b)(3), except for the following Service Bulletins which are currently published as EAR Export Classification 9E991: SBE70-0992, SBE72-0483, SBE72-0580, SBE72-0588, SBE72-0640, SBE73-0209, SBE80-0024 and SBE80-0025.Copyright
© IAE International Aero Engines AG (2001, 2014 - 2021) The information contained in this document is the property of © IAE International Aero Engines AG and may not be copied or used for any purpose other than that for which it is supplied without the express written authority of © IAE International Aero Engines AG. (This does not preclude use by engine and aircraft operators for normal instructional, maintenance or overhaul purposes.).Applicability
All
Common Information
TASK 72-60-29-200-002 Deoiler Housing Assembly - Examine, Inspection-002
General
This TASK gives the procedure for the inspection of the deoiler housing. For the other parts of the deoiler gear and impellor assembly refer to TASK 72-60-29-200-000.
Fig/item numbers in parentheses in the procedure agree with those used in the IPC.
The policy that is necessary for inspection is given in the SPM TASK 70-20-01-200-501.
All the parts must be cleaned before any part is examined. Refer to the SPM TASK 70-11-03-300-503.
All parts must be visually examined for damage, corrosion and wear. Any defects that are not identified in the procedure must be referred to IAE.
The procedure for those parts which must have a crack test is given in the SPM TASK 70-23-00-230-501. Do the test before the part is visually examined. Limits for cracks are given in the SUBTASK for each part.
A ** following repair referenced in this inspection indicates that the repair is not yet published in the current revision of the manual and the part must be rejected. Contact IAE for additional information concerning FAA approved repair date.
Do not discard any part until you are sure there are no repairs available. Refer to the instructions in repair before a discarded part is used again or oversize parts are installed.
Parts which should be discarded can be held although no repair is available. The repair of a discarded part could be shown to be necessary at a later date.
All parts must be examined to make sure that all the repairs have been completed satisfactorily.
The practices and processes referred to in the procedure by the TASK numbers are in the SPM.
References
Refer to the SPM for data on these items:
Definitions of Damage, SPM TASK 70-02-02-350-501,
Record and Control of the Lives of Parts, SPM TASK 70-05-00-220-501,
Inspection of Parts, SPM TASK 70-20-00-200-501.
Some data on these items are contained in this TASK. For more data on these items refer to the SPM:
Method of Testing for Crack Indications,
Chemical Processes,
Surface Protection.
Preliminary Requirements
Pre-Conditions
NONESupport Equipment
| Name | Manufacturer | Part Number / Identification | Quantity | Remark |
|---|---|---|---|---|
| Workshop inspection equipment | LOCAL | Workshop inspection equipment | ||
| FPI inspection station | LOCAL | FPI inspection station |
Consumables, Materials and Expendables
NONESpares
NONESafety Requirements
NONEProcedure
Clean the parts. Refer to the SPM TASK 72-60-29-100-000.
SUBTASK 72-60-29-230-051 Do a Crack Test on the Deoiler Housing (01-390) (Fluorescent Penetrant)
Refer to Figure.
Repair, VRS5078 TASK 72-60-29-300-003 (REPAIR-003).
All quantity, all length if not more than 0.035 in. (0.89 mm) in depth
Nicks, scores, dents or scratches.
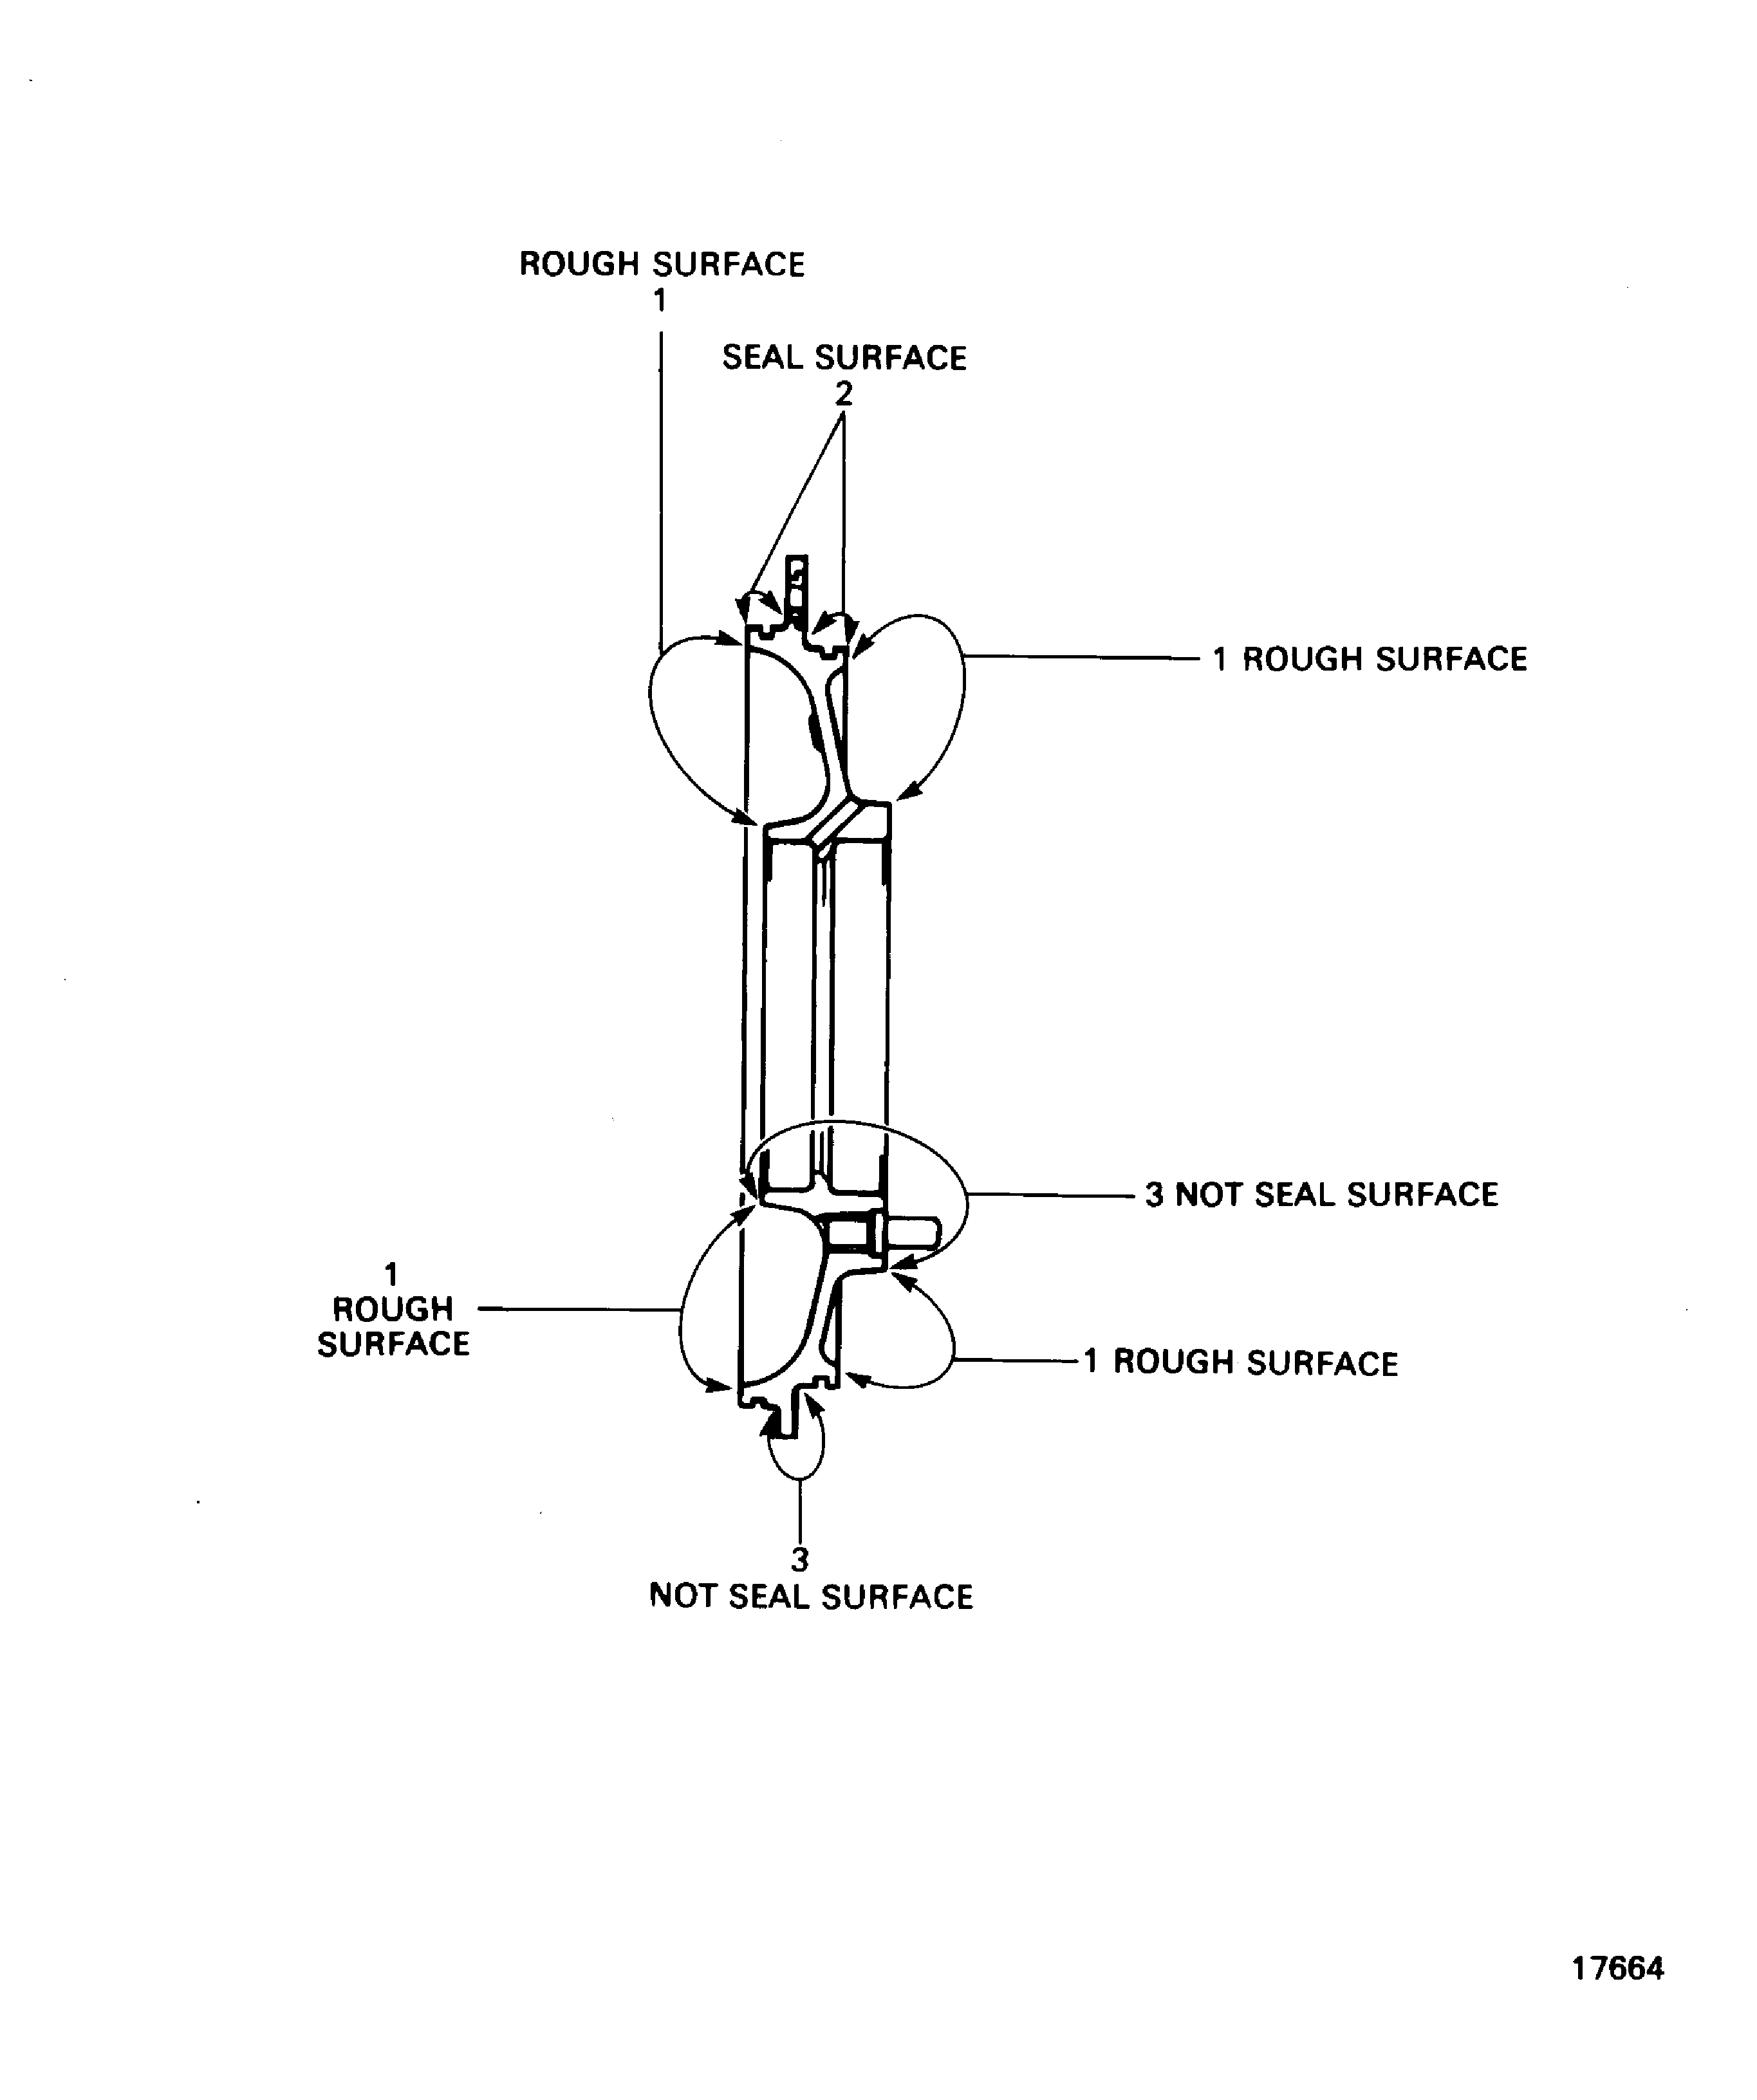
SUBTASK 72-60-29-220-059 Examine the Deoiler Housing (01-390) Rough Surfaces, Location 1
Refer to Figure.
SUBTASK 72-60-29-220-060 Examine the Deoiler Housing (01-390) Machined Seal Surfaces, Location 2
Refer to Figure.
SUBTASK 72-60-29-220-061 Examine the Deoiler Housing (01-390) Machined not Seal Surfaces, Location 3
Refer to Figure.
Repair, VRS5079 TASK 72-60-29-300-004 (REPAIR-004).
More than 0.0156 in. (0.397 mm). No axial movement is permitted (moved by hand)
Perpendicularity.
Repair, VRS5079 TASK 72-60-29-300-004 (REPAIR-004).
Thread damage or not there
SUBTASK 72-60-29-220-062 Examine the Deoiler Housing (01-390) Studs
Refer to Figure.
Repair, VRS5080 TASK 72-60-29-300-005 (REPAIR-005).
Loose, not there or with the internal thread damaged
SUBTASK 72-60-29-220-063 Examine the Deoiler Housing (01-390) Threaded Inserts
Refer to Figure.
Repair, VRS5087 TASK 72-60-29-300-012 (REPAIR-012).
More than Step
Parallelism.
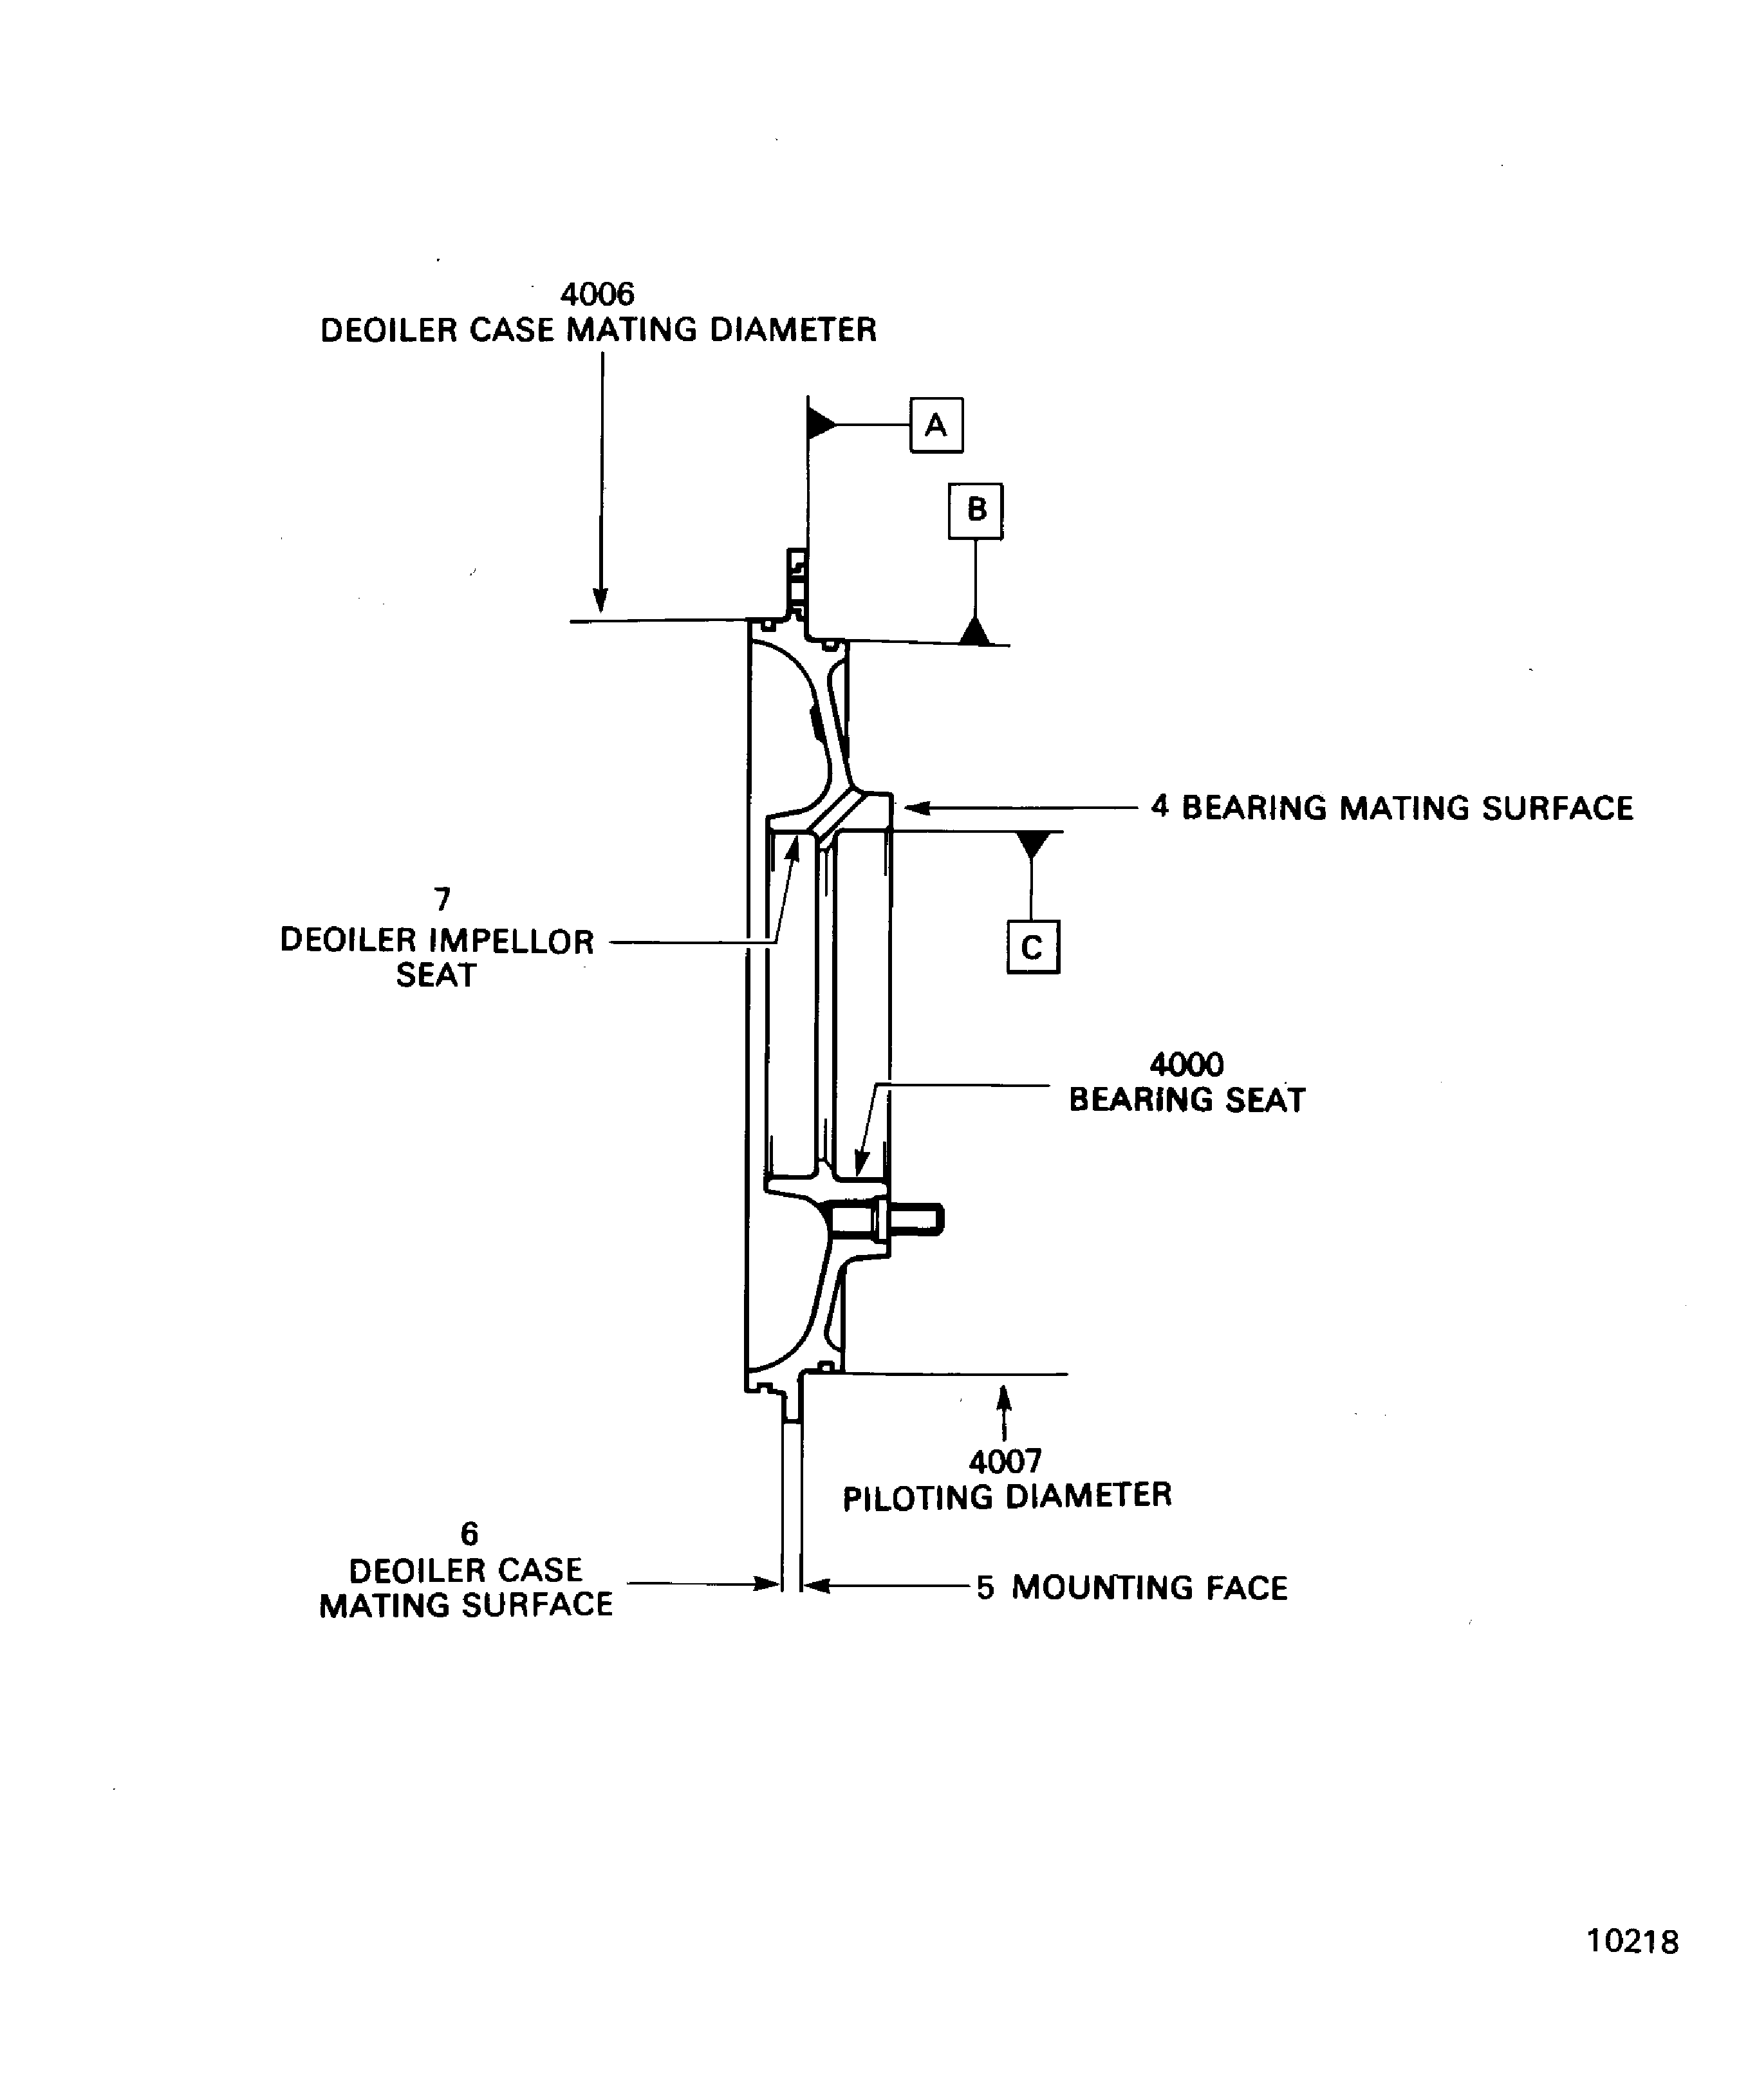
SUBTASK 72-60-29-220-064 Examine the Deoiler Housing (01-390) Bearing Mating Surface, Location 4
Refer to Figure.
Repair, VRS5086 TASK 72-60-29-300-011 (REPAIR-011).
More than 3.3466 in. (85.004 mm)
Diameter.
Repair, VRS5086 TASK 72-60-29-300-011 (REPAIR-011).
More than Step
Runout.
SUBTASK 72-60-29-220-065 Examine the Deoiler Housing (01-390) Bearing Seat, Location 4000
Refer to Figure.
Repair, VRS5083 TASK 72-60-29-300-008 (REPAIR-008).
Less than 6.9276 in. (175.960 mm)
Diameter.
Repair, VRS5083 TASK 72-60-29-300-008 (REPAIR-008).
More than Step
Perpendicularity.
Repair, VRS5083 TASK 72-60-29-300-008 (REPAIR-008).
More than Step
Runout.
SUBTASK 72-60-29-220-066 Examine the Deoiler Housing (01-390) Piloting Diameter, Location 4007
Refer to Figure.
Repair, VRS5081 TASK 72-60-29-300-006 (REPAIR-006).
More than Step
Planarity.
SUBTASK 72-60-29-220-067 Examine the Deoiler Housing (01-390) Mounting Face, Location 5
Refer to Figure.
Repair, VRS5082 TASK 72-60-29-300-007 (REPAIR-007).
More than Step
Parallelism.
SUBTASK 72-60-29-220-068 Examine the Deoiler Housing (01-390) Deoiler Case Mating Surface, Location 6
Refer to Figure.
Repair, VRS5085 TASK 72-60-29-300-010 (REPAIR-010).
More than 3.2953 in. (83.700 mm)
Diameter.
Repair, VRS5085 TASK 72-60-29-300-010 (REPAIR-010).
More than Step
Runout.
SUBTASK 72-60-29-220-069 Examine the Deoiler Housing (01-390) Deoiler Impellor Seat, Location 7
Refer to Figure.
Repair, VRS5084 TASK 72-60-29-300-009 (REPAIR-009).
Less than 7.2817 in. (184.954 mm)
Diameter.
Repair, VRS5084 TASK 72-60-29-300-009 (REPAIR-009).
More than Step
Runout.
SUBTASK 72-60-29-220-070 Examine the Deoiler Housing (01-390) Deoiler Case Mating Diameter, Location 4006
Repair, VRS5674 TASK 72-60-29-200-002 (REPAIR-044).
Loose, missing or with internal thread damaged
SUBTASK 72-60-29-220-196 Examine the Deoiler Housing (72-60-29,01-390) Helicoil Inserts (SBE 72-0492)
Figure: Location - Deoiler housing
Sheet 1

Figure: Locations - Deoiler housing
Sheet 2

