Export Control
EAR Export Classification: Not subject to the EAR per 15 C.F.R. Chapter 1, Part 734.3(b)(3), except for the following Service Bulletins which are currently published as EAR Export Classification 9E991: SBE70-0992, SBE72-0483, SBE72-0580, SBE72-0588, SBE72-0640, SBE73-0209, SBE80-0024 and SBE80-0025.Copyright
© IAE International Aero Engines AG (2001, 2014 - 2021) The information contained in this document is the property of © IAE International Aero Engines AG and may not be copied or used for any purpose other than that for which it is supplied without the express written authority of © IAE International Aero Engines AG. (This does not preclude use by engine and aircraft operators for normal instructional, maintenance or overhaul purposes.).Applicability
All
Common Information
TASK 72-60-33-200-003 PMA Support - Examine, Inspection-003
General
This TASK gives the procedure for the inspection of the PMA support. For the other parts of the PMA drive gear assembly refer to TASK 72-60-33-200-000 (INSPECTION-000).
Fig/item numbers in parentheses in the procedure agree with those used in the IPC.
The policy that is necessary for inspection is given in the SPM TASK 70-20-01-200-501.
A ** following a repair referenced in this inspection indicates that the repair is not yet published in the current revision of the manual and the part number must be rejected. Contact IAE for additional information concerning FAA approved repair date.
All the parts must be cleaned before any part is examined. Refer to the SPM TASK 70-11-03-300-503.
All parts must be visually examined for damage, corrosion and wear. Any defects that are not identified in the procedure must be referred to IAE.
The procedure for those parts which must have a crack test is given in the SPM TASK 70-23-00-230-501. Do the test before the part is visually examined. Limits for cracks are given in the SUBTASK for each part.
Do not discard any part until you are sure there are no repairs available. Refer to the instructions in repair before a discarded part is used again or oversize parts are installed.
Parts which should be discarded can be held although no repair is available. the repair of a discarded part could be shown to be necessary at a later date.
All parts must be examined to make sure that all the repairs have been completed satisfactorily.
The practices and processes referred to in the procedure by the TASK numbers are in the SPM.
References
Refer to the SPM for data on these items.
Definitions of Damage, TASK 70-02-02-350-501
Record and Control of the Lives of Parts, TASK 70-05-00-220-501
Inspection of Parts, TASK 70-20-00-200-501
Some data on these items is contained in this TASK. For more data on these items refer to the SPM.
Method of Testing for Crack Indications
Chemical Processes
Surface Protection
Preliminary Requirements
Pre-Conditions
NONESupport Equipment
| Name | Manufacturer | Part Number / Identification | Quantity | Remark |
|---|---|---|---|---|
| Workshop inspection equipment | LOCAL | Workshop inspection equipment |
Consumables, Materials and Expendables
NONESpares
NONESafety Requirements
NONEProcedure
Clean the parts. Refer to TASK 72-60-33-100-000 (CLEANING-000).
SUBTASK 72-60-33-240-052 Do a Crack Test on the PMA Support (01-420) (Magnetic)
Refer to Figure.
Damages that can be related to important deformation of the casing as oil leaks, high looseness between gears, unusual bearing wear or similar operational issues.
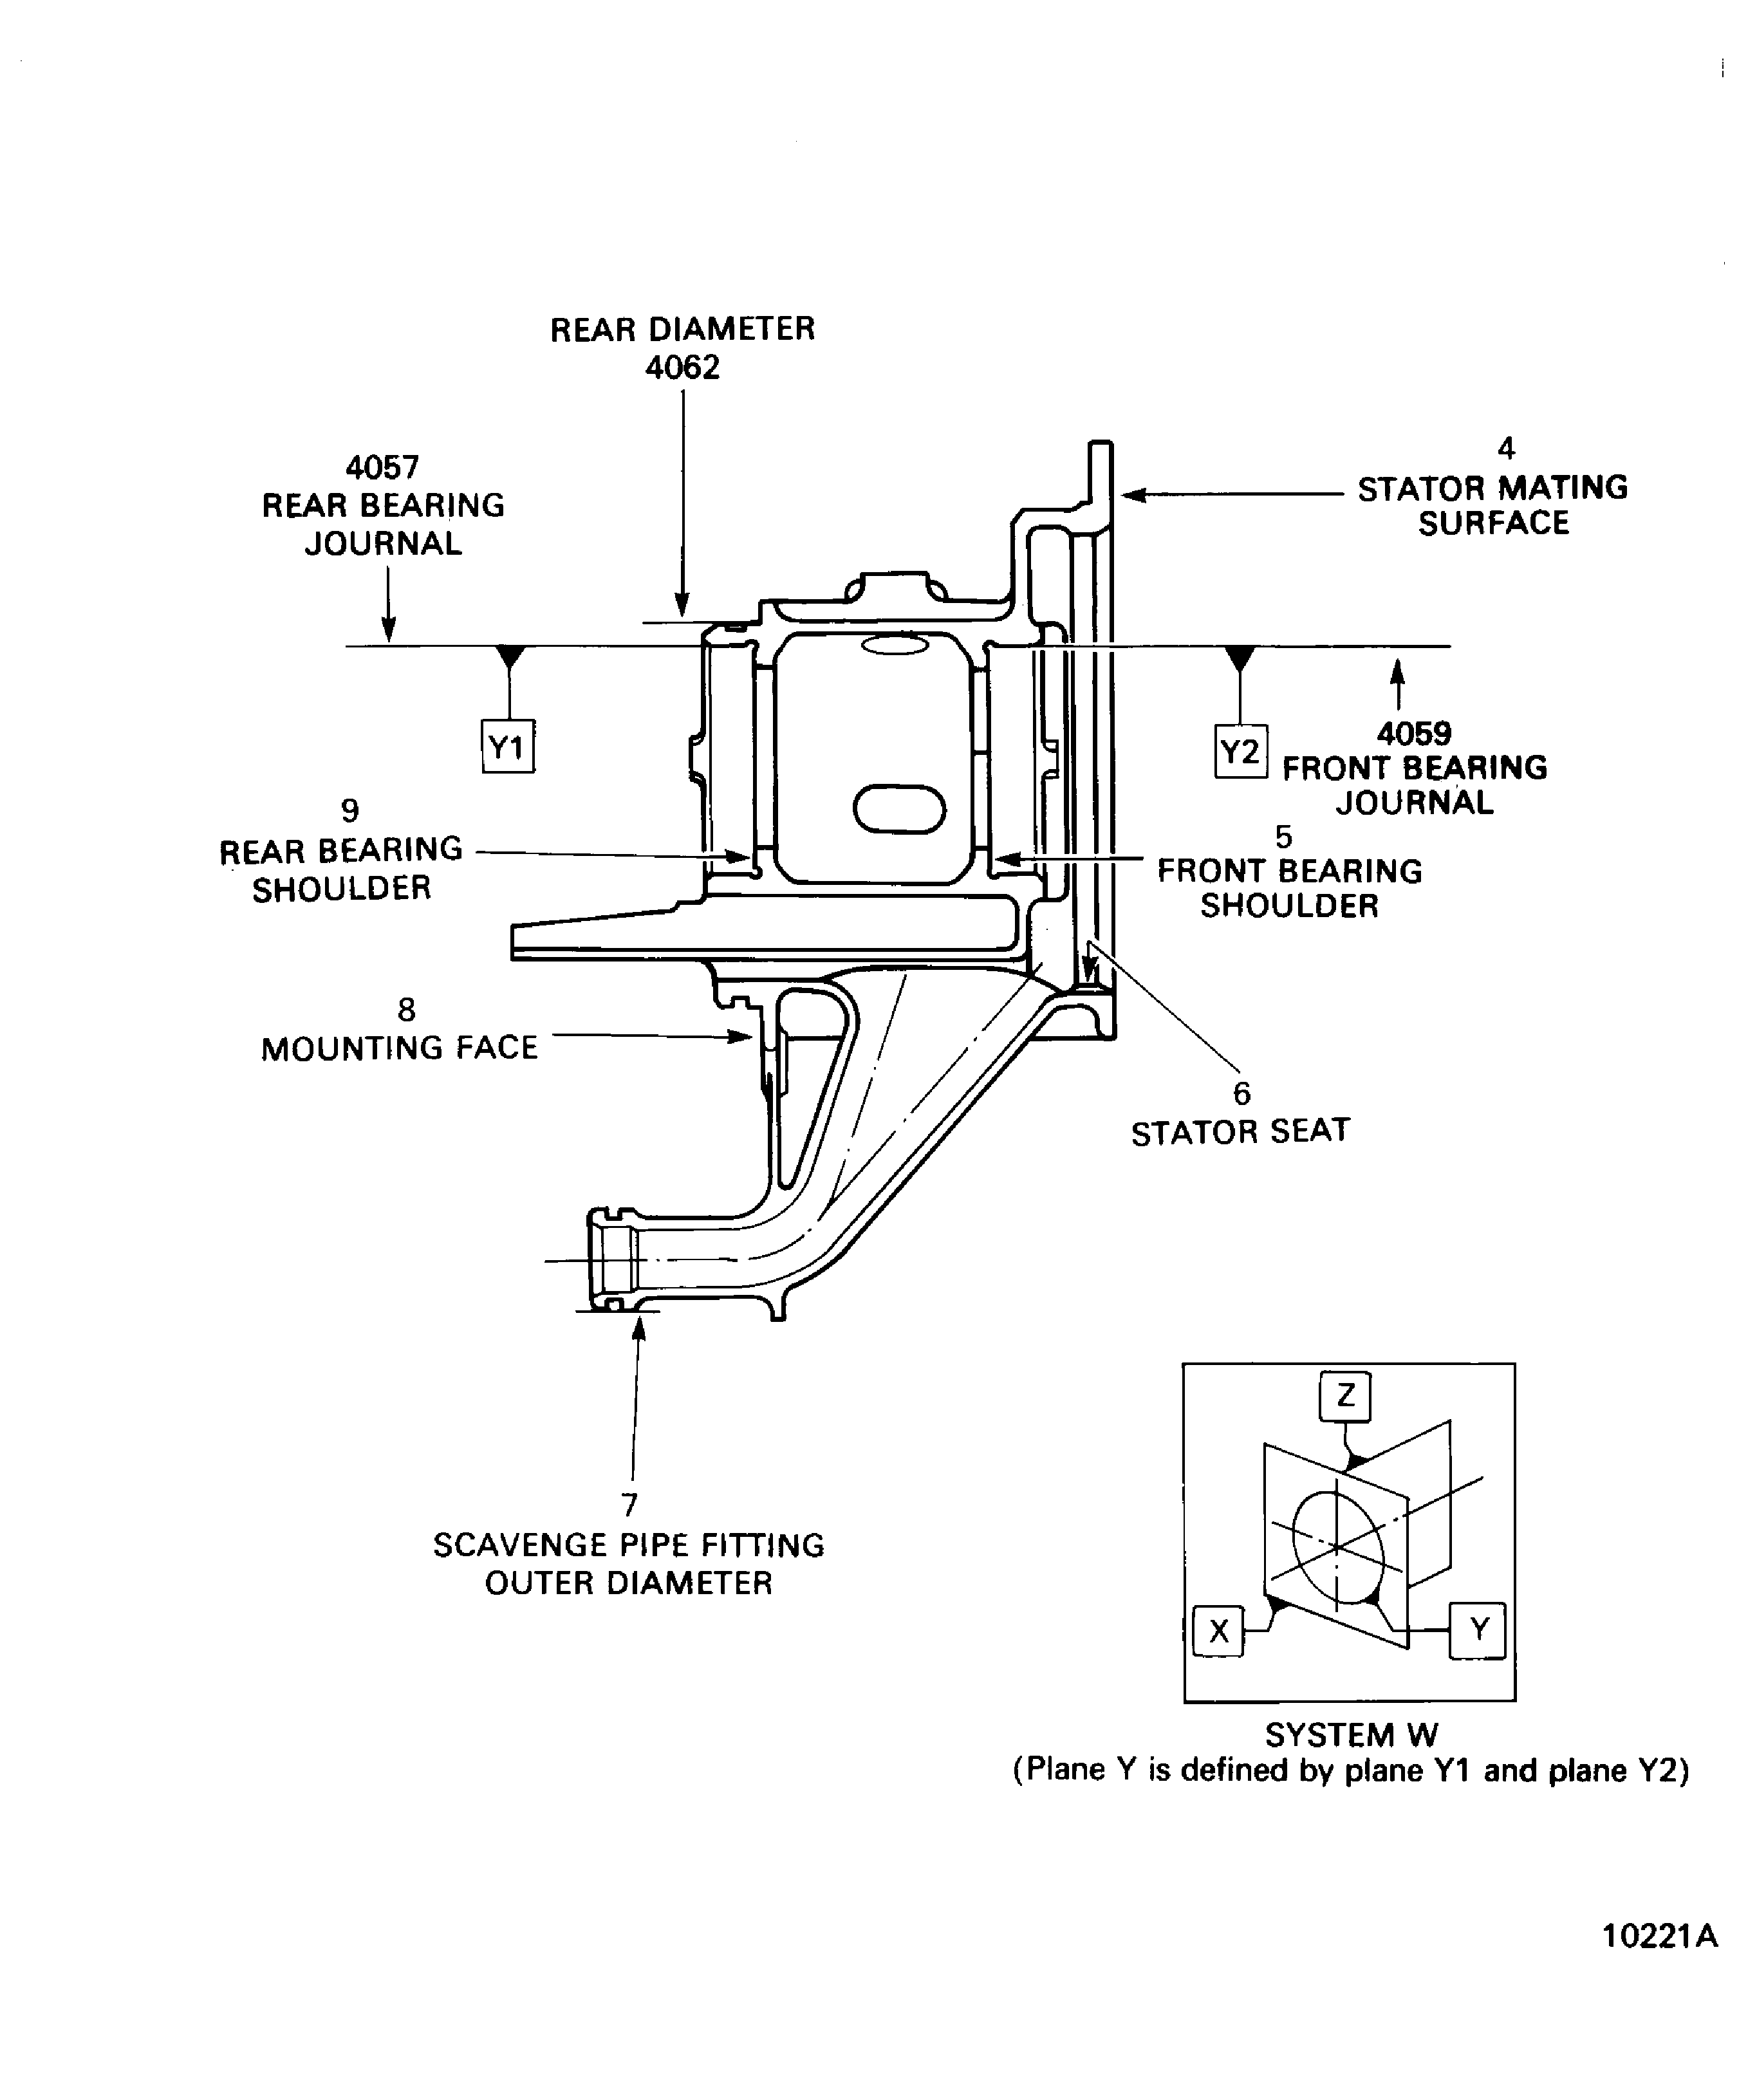
SUBTASK 72-60-33-220-060 Visually Examine the PMA Support (02-050) at Locations 4062, 4059, 5, 6, 7, 8, 9 and 4057
Repair, VRS5418 TASK 72-60-33-300-020 (REPAIR-020)
More than Step
Nicks, scores, dents or scratches.
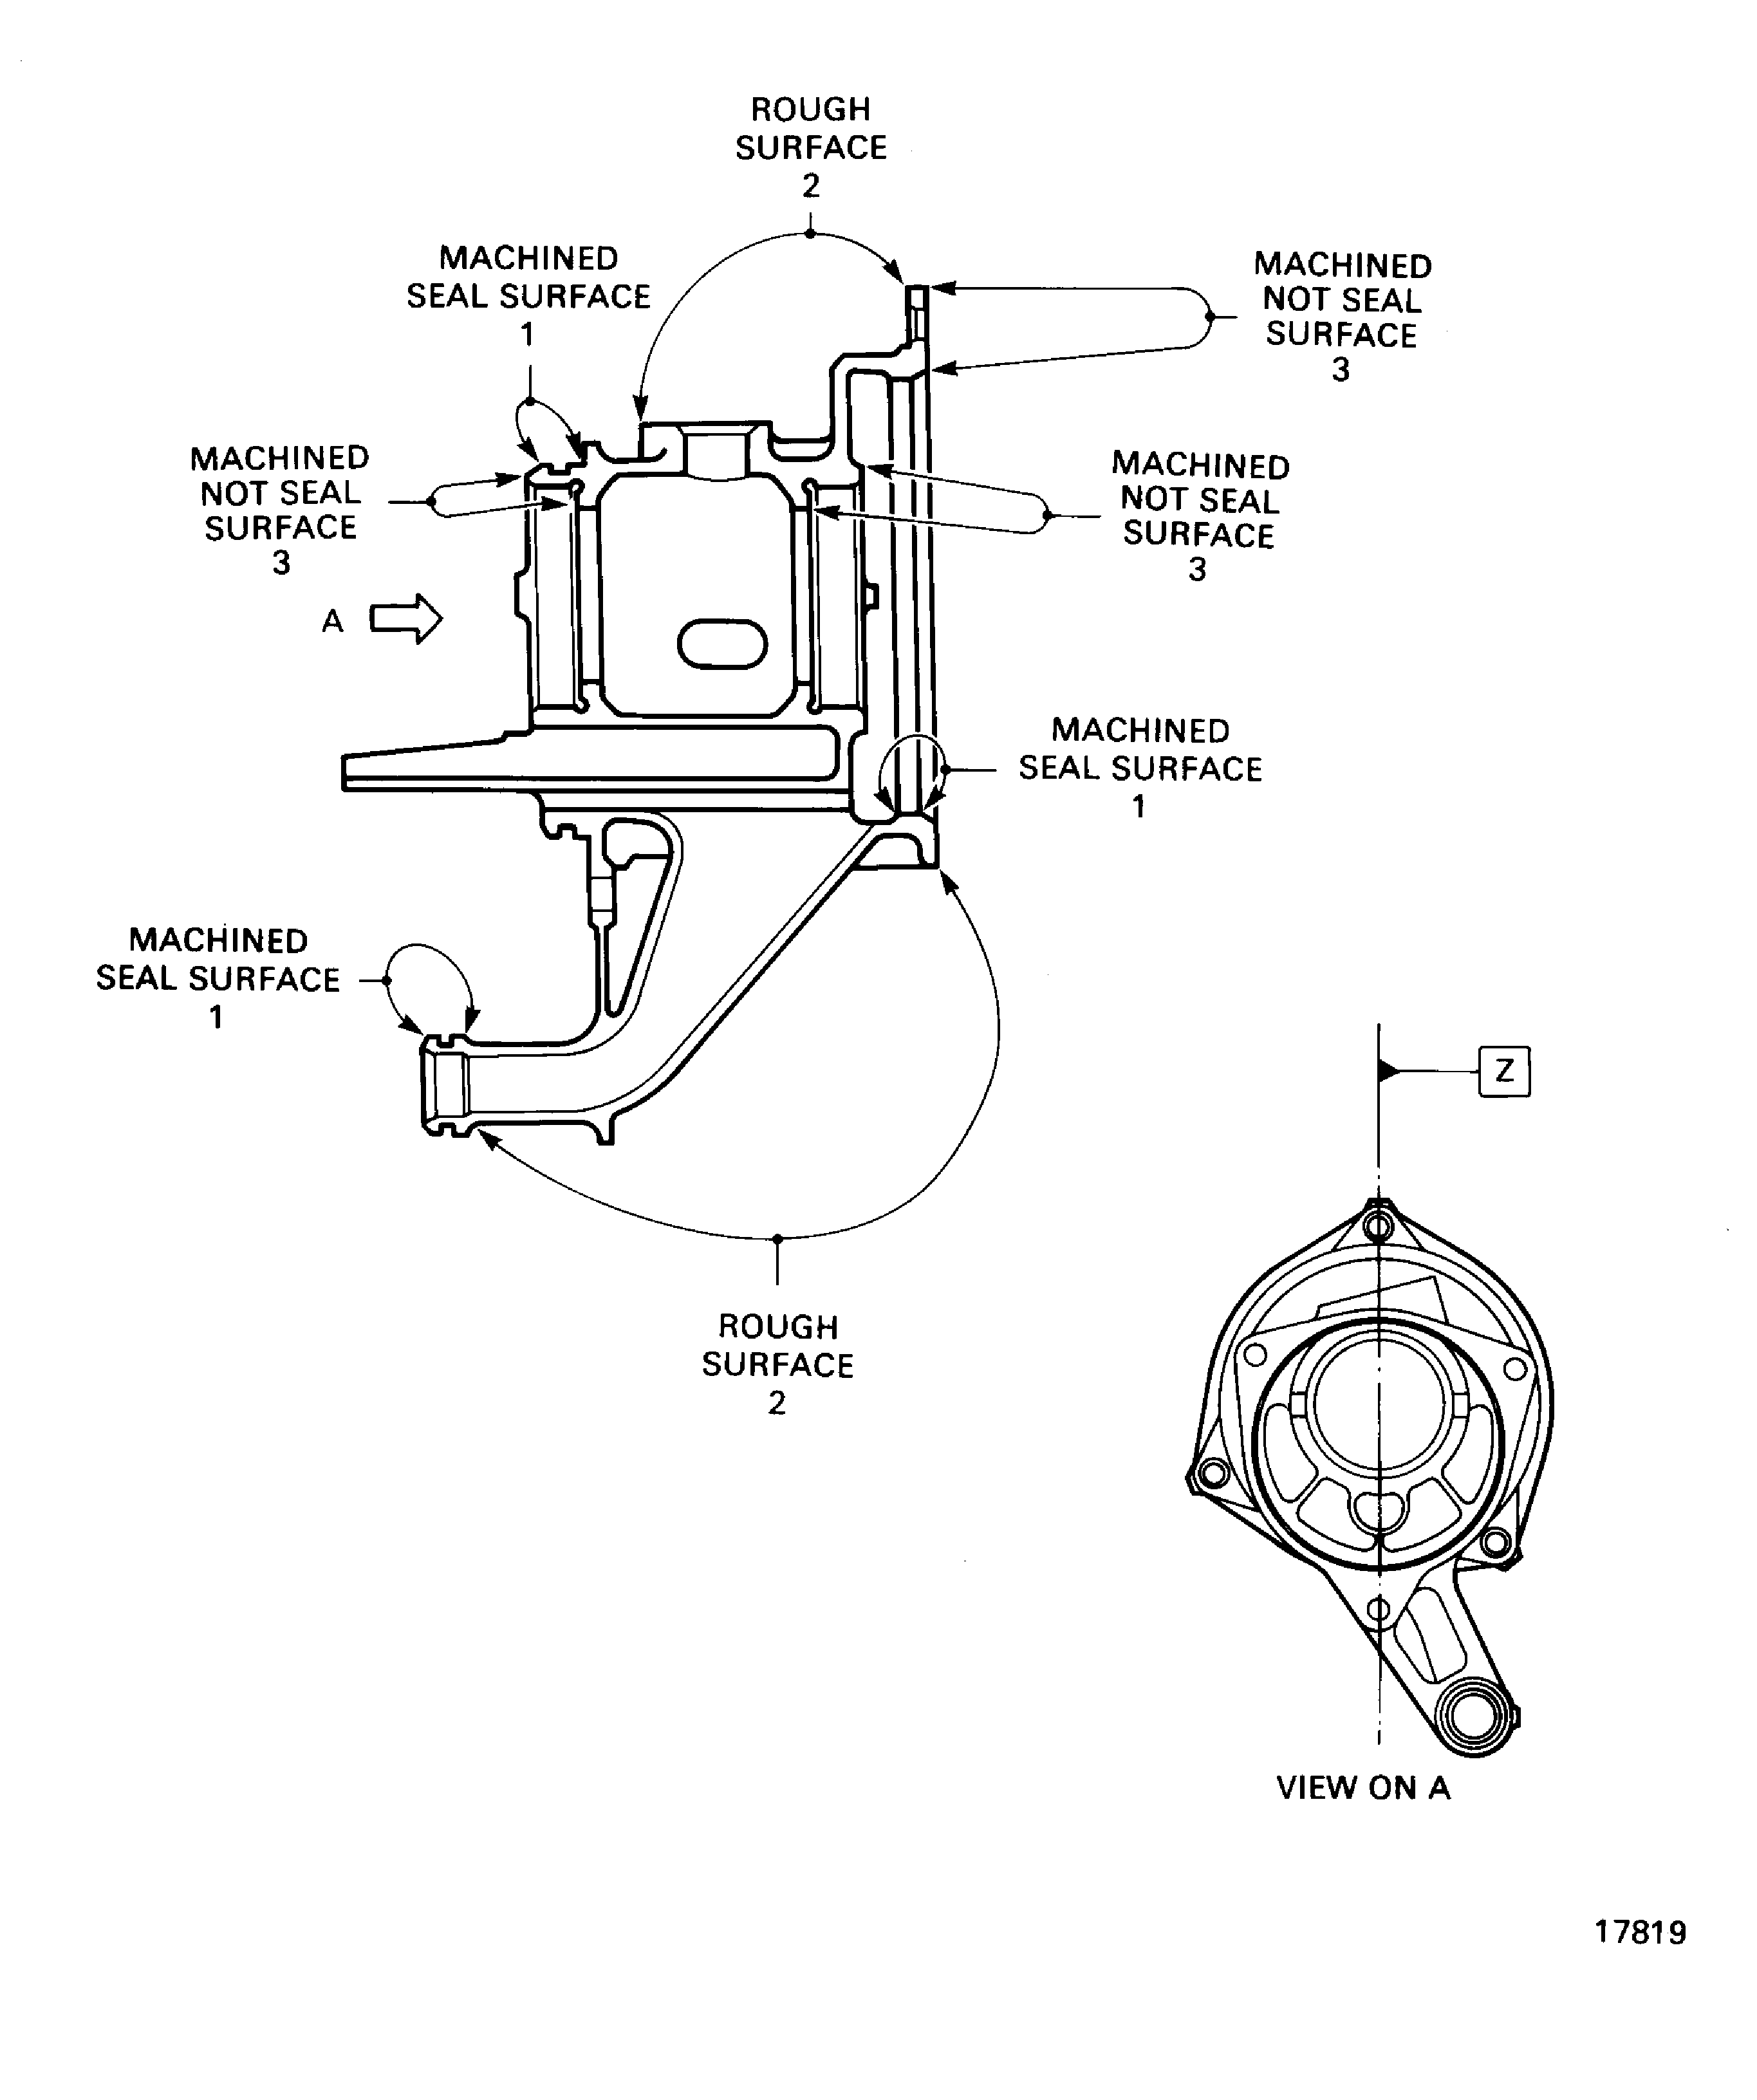
SUBTASK 72-60-33-220-094 Examine the PMA Support (01-420) Machined Seal Surfaces at Location 1
Repair, VRS5418 TASK 72-60-33-300-020 (REPAIR-020)
More than Step
Nicks, scores, dents or scratches.
SUBTASK 72-60-33-220-095 Examine the PMA Support (01-420) Rough Surfaces at Location 2
Repair, VRS5418 TASK 72-60-33-300-020 (REPAIR-020)
More than Step
Nicks, scores, dents or scratches.
SUBTASK 72-60-33-220-096 Examine the PMA Support (01-420) Machined Surfaces, Not Seal Surfaces at Location 3
Repair, VRS5183 TASK 72-60-33-300-010 (REPAIR-010)
No movement is permitted. Loose, not there or with the internal thread damaged
SUBTASK 72-60-33-220-062 Examine the PMA Support (01-420) Helicoils
Repair, VRS5186 TASK 72-60-33-300-013 (REPAIR-013) Repair, VRS5192 TASK 72-60-33-300-019 (REPAIR-019)
More than Step
Scratches.
SUBTASK 72-60-33-220-063 Examine the PMA Support (01-420) Front and Rear Bearing Journals at Locations 4059 and 4057
Repair, VRS5184 TASK 72-60-33-300-011 (REPAIR-011)
Less than 3.1876 in. (80.97 mm)
Diameter.
Repair, VRS5184 TASK 72-60-33-300-011 (REPAIR-011)
More than Step
True position.
SUBTASK 72-60-33-220-064 Examine the PMA Support (01-420) Rear Diameter at Location 4062
Repair, VRS5185 TASK 72-60-33-300-012 (REPAIR-012)
More than Step
Perpendicularity.
SUBTASK 72-60-33-220-065 Examine the PMA Support (01-420) Stator Mating Surface at Location 4
Repair, VRS5186 TASK 72-60-33-300-013 (REPAIR-013)
More than 1.9289 in. (48.995 mm)
Diameter.
Repair, VRS5186 TASK 72-60-33-300-013 (REPAIR-013)
More than Step
Runout.
SUBTASK 72-60-22-220-066 Examine the PMA Support (01-420) Front Bearing Journal at Location 4059
Repair, VRS5187 TASK 72-60-33-300-014 (REPAIR-014)
More than Step
Runout.
SUBTASK 72-60-33-220-067 Examine the PMA Support (01-420) Front Bearing Shoulder at Location 5
Repair, VRS5188 TASK 72-60-33-300-015 (REPAIR-015)
More than 3.7602 in. (95.510 mm)
Diameter.
Repair, VRS5188 TASK 72-60-33-300-015 (REPAIR-015)
More than Step
Runout.
SUBTASK 72-60-33-220-068 Examine the PMA Support (01-420) Stator Seat at Location 6
Repair, VRS5189 TASK 72-60-33-300-016 (REPAIR-016)
Less than 0.8189 in. (20.80 mm)
Diameter.
Repair, VRS5189 TASK 72-60-33-300-016 (REPAIR-016)
More than Step
True position.
SUBTASK 72-60-33-220-069 Examine the PMA Support (01-420) Scavenge Pipe Fitting Outer Diameter at Location 7
Repair, VRS5190 TASK 72-60-33-300-017 (REPAIR-017)
More than Step
Perpendicularity.
SUBTASK 72-60-33-220-070 Examine the PMA Support (01-420) Mounting Face at Location 8
Repair, VRS5191 TASK 72-60-33-300-018 (REPAIR-018)
More than Step
Runout.
SUBTASK 72-60-33-220-071 Examine the PMA Support (01-420) Rear Bearing Shoulder at Location 9
Repair, VRS5192 TASK 72-60-33-300-019 (REPAIR-019)
More than 1.9289 in. (48.995 mm)
Diameter.
Repair, VRS5192 TASK 72-60-33-300-019 (REPAIR-019)
More than Step
Runout.
SUBTASK 72-60-33-220-072 Examine the PMA Support (01-420) Rear Bearing Journal at Location 4057
Figure: Locations - PMA support
Locations - PMA support

Figure: Locations - PMA support
Locations - PMA support

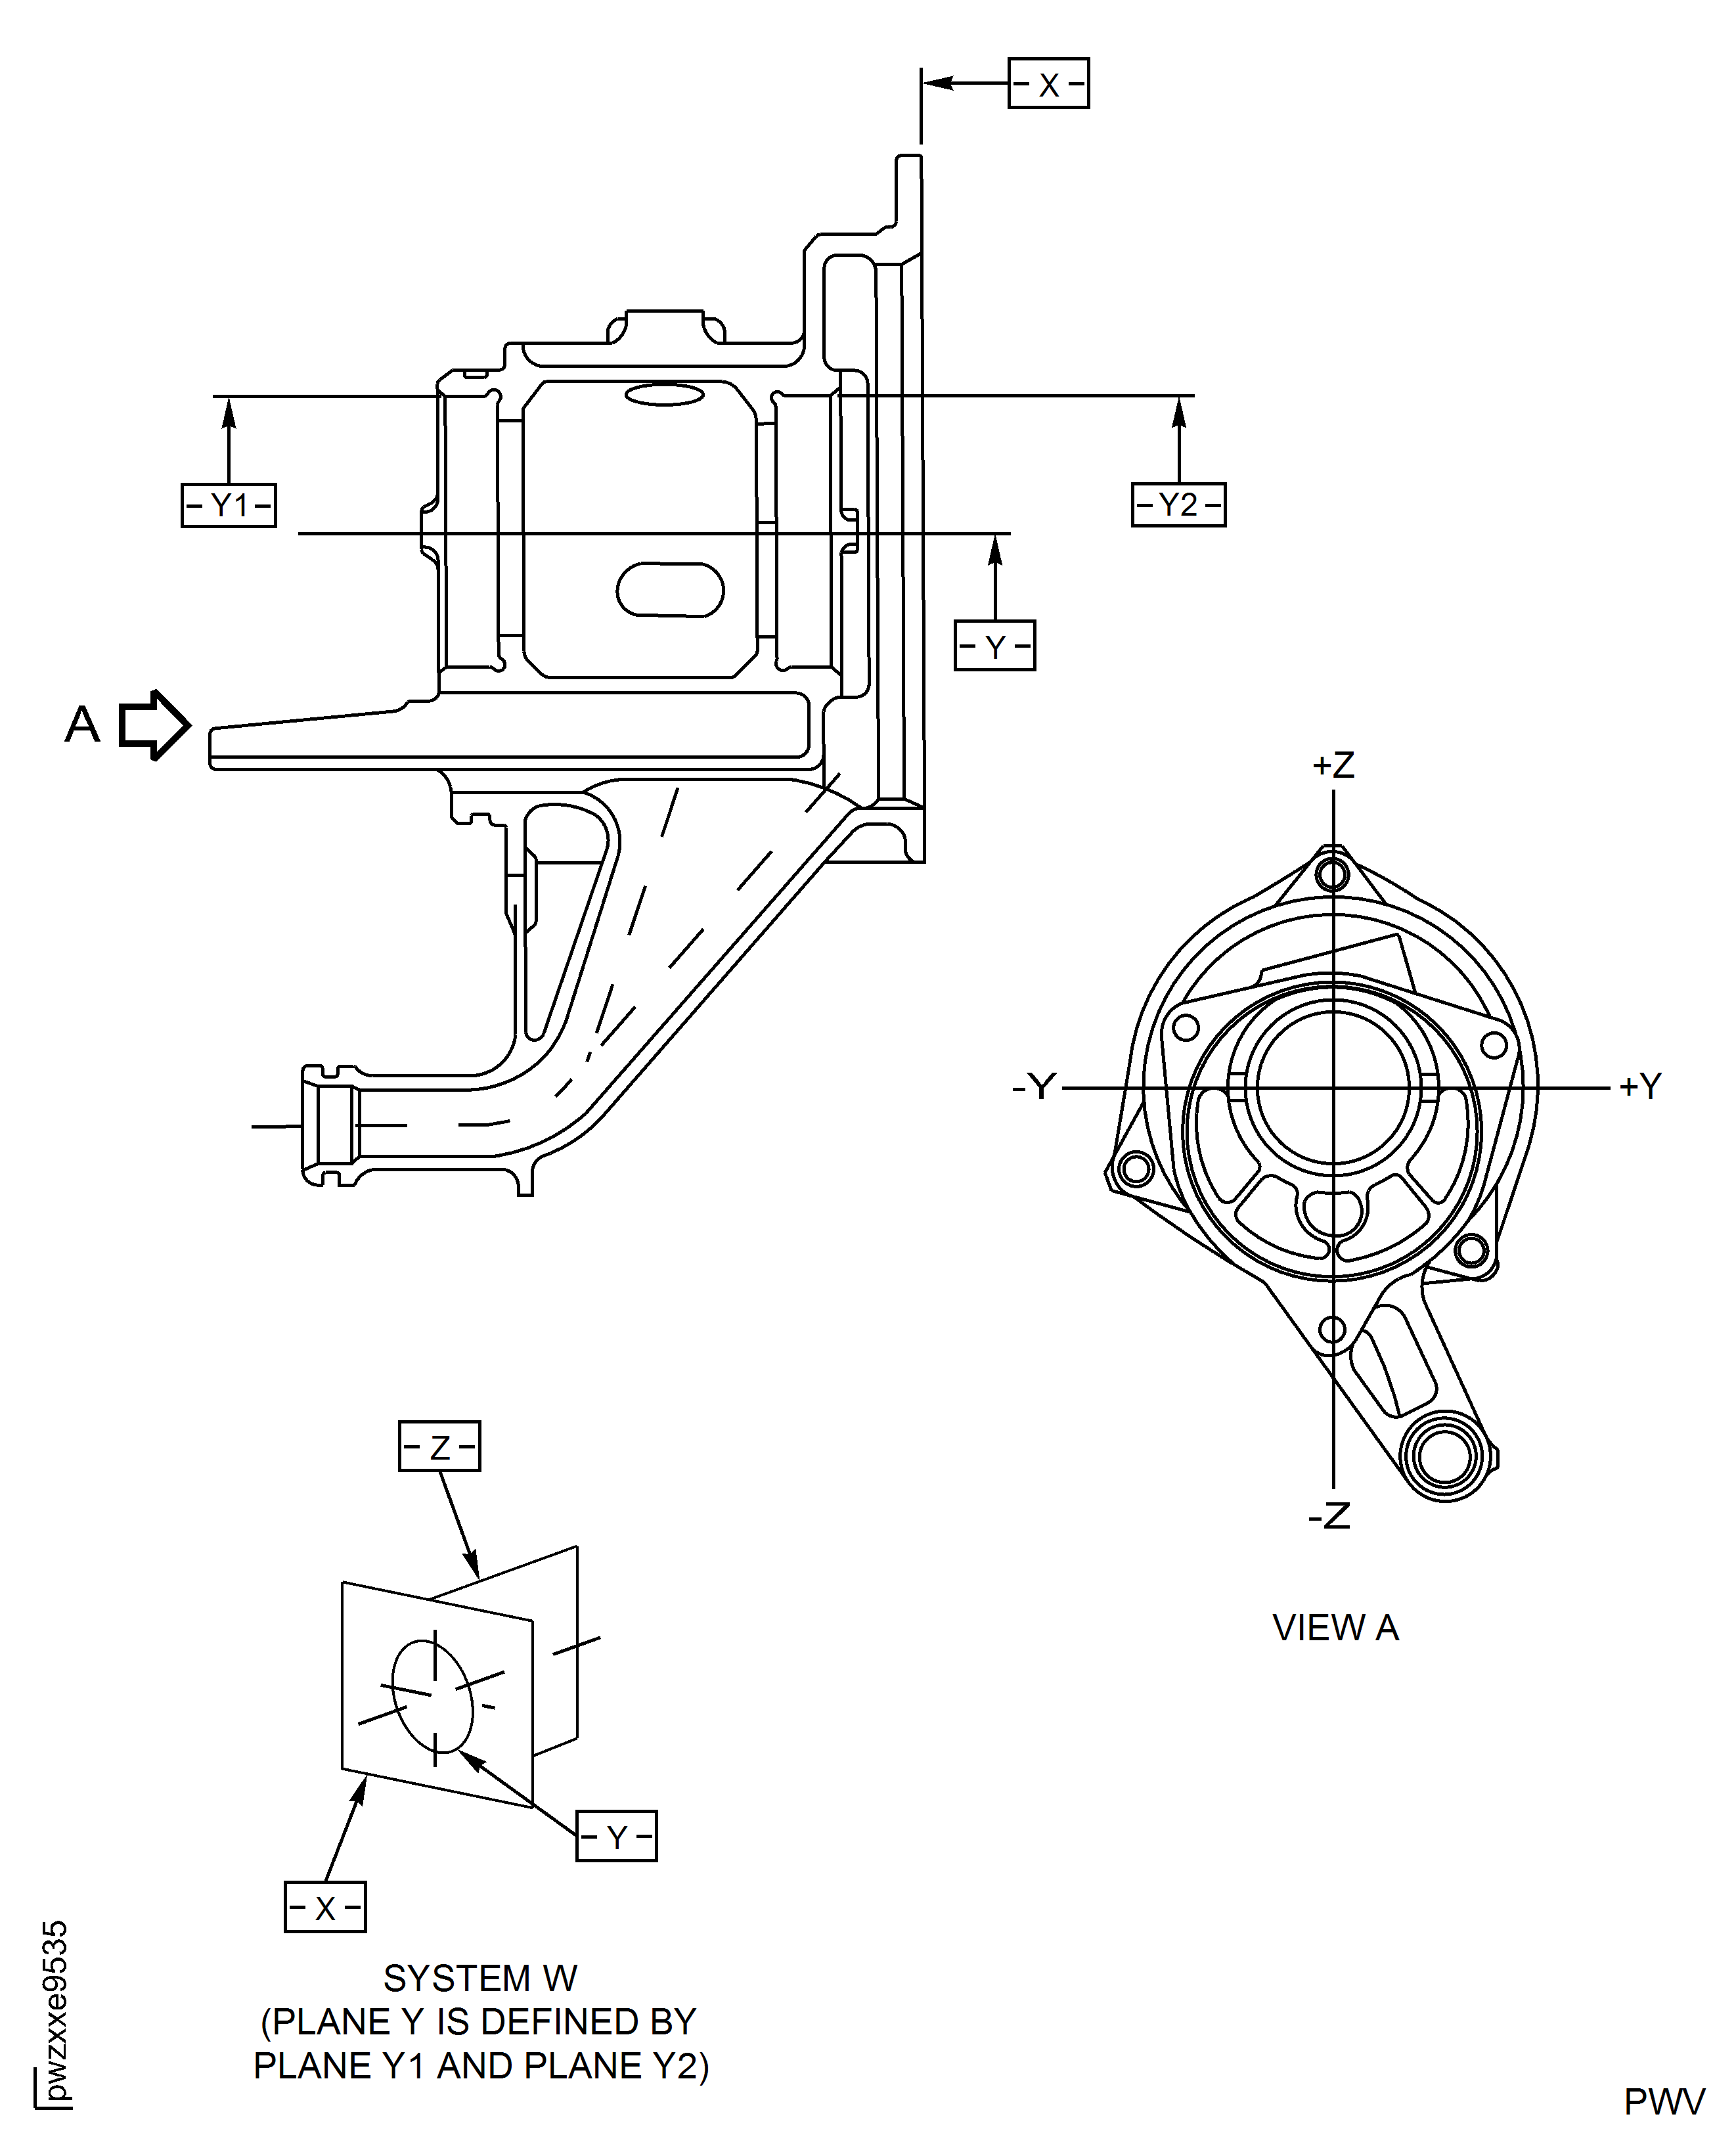
Figure: PMA Support W-System
PMA Support W-System

