Export Control
EAR Export Classification: Not subject to the EAR per 15 C.F.R. Chapter 1, Part 734.3(b)(3), except for the following Service Bulletins which are currently published as EAR Export Classification 9E991: SBE70-0992, SBE72-0483, SBE72-0580, SBE72-0588, SBE72-0640, SBE73-0209, SBE80-0024 and SBE80-0025.Copyright
© IAE International Aero Engines AG (2001, 2014 - 2021) The information contained in this document is the property of © IAE International Aero Engines AG and may not be copied or used for any purpose other than that for which it is supplied without the express written authority of © IAE International Aero Engines AG. (This does not preclude use by engine and aircraft operators for normal instructional, maintenance or overhaul purposes.).Applicability
V2500-A1 and Pre SBE 72-0063
Common Information
TASK 72-00-50-420-003-A00 LPT Module - Install The Turbine Exhaust Case (TEC) (Horizontal) - Method 2, Installation-004 - Pre SBE 72-0063
General
Fig/item numbers in parentheses in the procedure agree with those used in the IPC. Only the primary Fig/item numbers are used. For the service bulletin alpha variants refer to the IPC.
For all parts identified in a different Chapter/Section/Subject, the applicable Chapter/Section/Subject comes before the Fig/item number.
Special torque data is identified by the * symbol after the torque value.
Assembly tolerances are included in the procedure.
Lubricate all threads and abutment faces of nuts and bolts with CoMat 10-077 APPROVED ENGINE OILS, unless other lubricants are referred to in the procedure.
To identify, lubricate and install seal rings, refer to the SPM TASK 70-64-02-640-501.
After assembly apply CoMat 07-038 AIR DRYING ENAMEL to any damaged surface protection, joint flanges and attach parts. Use the correct color of the air drying enamel. Refer to the SPM TASK 70-38-21-380-501.
The number for each radial location must be identified in a clockwise direction. These start at the engine top position when you look from the rear of the engine, unless stated differently in the procedure.
Transportation covers/blanks must be removed immediately before installation of the components.
NOTE
NOTE
Preliminary Requirements
Pre-Conditions
NONESupport Equipment
| Name | Manufacturer | Part Number / Identification | Quantity | Remark |
|---|---|---|---|---|
| Electronic balance crane | LOCAL | Electronic balance crane | ||
| IAE 1F10016 Mechanical wrench | 0AM53 | IAE 1F10016 | 1 | |
| IAE 1F10026 Hydraulic hand pump | 0AM53 | IAE 1F10026 | 1 | |
| IAE 1F10033 Hydraulic installation pusher | 0AM53 | IAE 1F10033 | 1 | |
| IAE 1F10034 Hydraulic installation pusher | 0AM53 | IAE 1F10034 | 1 | |
| IAE 1F10037 Wrench support | 0AM53 | IAE 1F10037 | 1 | |
| IAE 1F10038 Torque wrench | 0AM53 | IAE 1F10038 | 1 | |
| IAE 1F10039 Anti-torque adapter | 0AM53 | IAE 1F10039 | 1 | |
| IAE 1F10040 Anchor wrench plate | 0AM53 | IAE 1F10040 | 1 | |
| IAE 1F10051 Two cable sling | 0AM53 | IAE 1F10051 | 1 | |
| IAE 1F10073 remove/installation fixture | 0AM53 | IAE 1F10073 | 1 | |
| IAE 1F10074 Guide pogo stick | 0AM53 | IAE 1F10074 | 1 | |
| IAE 1F10075 Support pedestal | 0AM53 | IAE 1F10075 | 2 | |
| IAE 1F10076 Locking collar | 0AM53 | IAE 1F10076 | 1 | |
| IAE 1F10153 Installation rod | 0AM53 | IAE 1F10153 | 1 | |
| IAE 1F10178 Storage and Turnover adapter | 0AM53 | IAE 1F10178 | 1 | |
| IAE 1F10182 Removal/installation drier | 0AM53 | IAE 1F10182 | 1 | |
| IAE 2F10368 Plate, Vacuum check | 0AM53 | IAE 2F10368 | 1 | |
| IAE 6F10029 Air flow test cart | 0AM53 | IAE 6F10029 | 1 | |
| IAE 6F10030 Vacuum test cart | 0AM53 | IAE 6F10030 | 1 | |
| IAE 1J12221 Impact hammer | 0AM53 | IAE 1J12221 | 1 | |
| IAE 1J12243 Sizing sleeve | 0AM53 | IAE 1J12243 | 1 | |
| IAE 1J12259 Seal slider | 0AM53 | IAE 1J12259 | 1 | |
| IAE 1J12522 Seal slider | 0AM53 | IAE 1J12522 | 1 | |
| IAE 1M14086 Supporting fixture | 0AM53 | IAE 1M14086 | 1 | |
| IAE 1P16354 Vacuum Test Adapter | 0AM53 | IAE 1P16354 | 1 | |
| IAE 1P16374 Wrench support | 0AM53 | IAE 1P16374 | 1 | |
| IAE 1P16426 remove/installation driver | 0AM53 | IAE 1P16426 | 1 | |
| IAE 1P17523 Blank-off Plate | 0AM53 | IAE 1P17523 | 1 |
Consumables, Materials and Expendables
| Name | Manufacturer | Part Number / Identification | Quantity | Remark |
|---|---|---|---|---|
| CoMat 07-038 AIR DRYING ENAMEL | k3504 | CoMat 07-038 | ||
| CoMat 10-045 LEAK CHECK FLUID, BUBBLES-TYPE | 03530 | CoMat 10-045 | ||
| CoMat 10-045A LEAK CHECK FLUID, BUBBLES-TYPE | LOCAL | CoMat 10-045A | ||
| CoMat 10-077 APPROVED ENGINE OILS | LOCAL | CoMat 10-077 |
Spares
| Name | Manufacturer | Part Number / Identification | Quantity | Remark |
|---|---|---|---|---|
| Sealing ring | 1 | |||
| Toroidal sealing ring | 2 | |||
| Metallic seal | 1 |
Safety Requirements
NONEProcedure
Examine the LP Turbine Module interface E50/50. Refer to TASK 72-00-50-200-004 (INSPECTION-004).
SUBTASK 72-00-50-220-067 Examine the Module Interfaces
Refer to Figure.
Reference the clearance at location 3399. If required, use the data written as a note in TASK 72-50-00-200-000 (INSPECTION-000) and TASK 72-50-53-200-000 (INSPECTION-000).
Table 1. Fits and Clearances (all dimensions are in inches) NEW PART
WORN PART
DIMENSIONS
DIMENSIONS
PART IDENT
Size
Clearance
(Non-select)
REJECT IF
MORE THAN
LOCATION 3399
Turbine Exhaust Case ENGINE-EXHAUST CASE AND FITTINGS (72-50-53, 01-001)
Stage 6 Inner Turbine Air Seal ATTACH PARTS & FITTINGS-LP TURBINE MINI MODULE (72-50-00, 01-240)
Turbine Exhaust Case Bore
5.5512
Clear
5.5551
0.0315
Air Seal Diameter
5.5157
0.0394
5.5197
Clear
Table 2. Fits and Clearances (all dimensions are in millimeters) NEW PART
WORN PART
DIMENSIONS
DIMENSIONS
PART IDENT
Size
Clearance
(Non-select)
REJECT IF
MORE THAN
LOCATION 3399
Turbine Exhaust Case ENGINE-EXHAUST CASE AND FITTINGS (72-50-53, 01-001)
Stage 6 Inner Turbine Air Seal ATTACH PARTS & FITTINGS-LP TURBINE MINI MODULE (72-50-00, 01-240)
Turbine Exhaust Case Bore
141.000
Clear
141.100
0.800
Air Seal Diameter
140.100
1.000
140.200
Clear
SUBTASK 72-00-50-220-109-A00 Reference Fits and Clearances of the TEC and the Stage 6 Inner Turbine Air Seal at Location 3399 (Pre SBE 77-0001)
Refer to Figure.
Reference the clearance at location 3409. If required, use the data written as a note in TASK 72-50-00-200-000 (INSPECTION-000) and TASK 72-50-53-200-000 (INSPECTION-000).
Table 3. Fits and Clearances (all dimensions are in inches) NEW PART
WORN PART
DIMENSIONS
DIMENSIONS
PART IDENT
Size
Clearance
(Non-select)
REJECT IF
MORE THAN
LOCATION 3409
Turbine Exhaust Case ENGINE-EXHAUST CASE AND FITTINGS (72-50-53, 01-001)
Stage 6 Inner Turbine Air Seal ATTACH PARTS & FITTINGS-LP TURBINE MINI MODULE (72-50-00, 01-240)
Turbine Exhaust Case Bore
5.5512
Clear
5.5551
0.0315
Air Seal Diameter
5.5157
0.0394
5.5197
Clear
Table 4. Fits and Clearances (all dimensions are in millimeters) NEW PART
WORN PART
DIMENSIONS
DIMENSIONS
PART IDENT
Size
Clearance
(Non-select)
REJECT IF
MORE THAN
LOCATION 3409
Turbine Exhaust Case ENGINE-EXHAUST CASE AND FITTINGS (72-50-53, 01-001)
Stage 6 Inner Turbine Air Seal ATTACH PARTS & FITTINGS-LP TURBINE MINI MODULE (72-50-00, 01-240)
Turbine Exhaust Case Bore
141.000
Clear
141.100
0.800
Air Seal Diameter
140.100
1.000
140.200
Clear
SUBTASK 72-00-50-220-109-B00 Reference Fits and Clearances of the TEC and the Stage 6 Inner Turbine Air Seal at Location 3409 (SBE 77-0001)
SBE 77-0001: Replacement of Turbine Exhaust Case and installation of a revised EGT bracket configuration
Refer to Figure.
Reference the interference at location 3396. If required, use the data written as a note in TASK 72-50-00-200-000 (INSPECTION-000) and TASK 72-50-53-200-000 (INSPECTION-000).
Table 5. Fits and Clearances (all dimensions are in inches) NEW PART
WORN PART
DIMENSIONS
DIMENSIONS
PART IDENT
Size
Clearance
(Non-select)
REJECT IF
MORE THAN
LOCATION 3396
LP Turbine Case (72-50-10, 01-010)
Turbine Exhaust Case ENGINE-EXHAUST CASE AND FITTINGS (72-50-53, 01-001)
LP Turbine Case Diameter
38.6587
Intf
38.6480
38.6642
0.0000
38.6642
0.0244
Turbine Exhaust Case Bore
38.6524
0.0118
38.6524
0.0118 Intf
38.6587
Intf
38.6724
Table 6. Fits and Clearances (all dimensions are in millimeters) NEW PART
WORN PART
DIMENSIONS
DIMENSIONS
PART IDENT
Size
Clearance
(Non-select)
REJECT IF
MORE THAN
LOCATION 3396
LP Turbine Case (72-50-10, 01-010)
Turbine Exhaust Case ENGINE-EXHAUST CASE AND FITTINGS (72-50-53, 01-001)
LP Turbine Case Diameter
981.93
Intf
981.66
982.07
0.000
982.07
0.62
Turbine Exhaust Case Bore
981.77
0.300
981.77
0.30 Intf
981.93
Intf
982.28
SUBTASK 72-00-50-220-110-A00 Reference Fits and Clearances of the TEC and the LP Turbine Case, Rotor and Shaft at Location 3396 (Pre SBE 77-0001)
Refer to Figure.
SBE 77-0001: Replacement of Turbine Exhaust Case and installation of a revised EGT bracket configuration.
Reference the interference at location 3406. If required, use the data written as a note in TASK 72-50-10-200-000 (INSPECTION-000) and TASK 72-50-53-200-000 (INSPECTION-000).
Table 7. Fits and Clearances (all dimensions are in inches) NEW PART
WORN PART
DIMENSIONS
DIMENSIONS
PART IDENT
Size
Clearance
(Non-select)
REJECT IF
MORE THAN
LOCATION 3406
LP Turbine Case ENGINE-LP TURBINE CASE AND ROTOR (72-50-10, 01-010)
Turbine Exhaust Case ENGINE-EXHAUST CASE AND FITTINGS (72-50-53, 01-001)
LP Turbine Case Diameter
38.6587
Intf
38.6480
38.6642
0.0000
38.6642
0.0244
Turbine Exhaust Case Bore
38.6524
0.0118
38.6524
0.0118 Intf
38.6587
Intf
38.6724
Table 8. Fits and Clearances (all dimensions are in millimeters) NEW PART
WORN PART
DIMENSIONS
DIMENSIONS
PART IDENT
Size
Clearance
(Non-select)
REJECT IF
MORE THAN
LOCATION 3406
LP Turbine Case ENGINE-LP TURBINE CASE AND ROTOR (72-50-10, 01-010)
Turbine Exhaust Case ENGINE-EXHAUST CASE AND FITTINGS (72-50-53, 01-001)
LP Turbine Case Diameter
981.93
Intf
981.66
982.07
0.000
982.07
0.62
Turbine Exhaust Case Bore
981.77
0.300
981.77
0.30 Intf
981.93
Intf
982.28
SUBTASK 72-00-50-220-110-B00 Reference Fits and Clearances of the TEC and the LP Turbine Case, Rotor and Shaft at Location 3406 (SBE 77-0001)
Refer to Figure.
Reference the interference at location 3394. If required, use the data written as a note in TASK 72-50-41-200-000 (INSPECTION-000).
Table 9. Fits and Clearances (all dimensions are in inches) NEW PART
WORN PART
DIMENSIONS
DIMENSIONS
PART IDENT
Size
Clearance
(Non-select)
REJECT IF
MORE THAN
LOCATION 3394
No. 5 Bearing ENGINE-LP TURBINE SHAFT (72-50-41, 01-100)
LP Turbine Shaft (72-50-41, 01-200)
No. 5 Bearing Bore
3.6217
Intf
3.6217
Intf
3.6220
0.0003
3.6224
0.0003
LP Turbine Shaft Diameter
3.6224
0.0011
3.6224
0.0011
3.6228
Intf
3.6228
Intf
Table 10. Fits and Clearances (all dimensions are in millimeters) NEW PART
WORN PART
DIMENSIONS
DIMENSIONS
PART IDENT
Size
Clearance
(Non-select)
REJECT IF
MORE THAN
LOCATION 3394
No. 5 Bearing ENGINE-LP TURBINE SHAFT (72-50-41, 01-100)
LP Turbine Shaft (72-50-41, 01-200)
No. 5 Bearing Bore
91.992
Intf
91.992
Intf
92.000
0.008
92.009
0.008
LP Turbine Shaft Diameter
92.008
0.028
92.008
0.028
92.020
Intf
92.020
Intf
SUBTASK 72-00-50-220-112-A00 Reference Fits and Clearances of the TEC and the LP Turbine Case, Rotor and Shaft at Location 3394 (Pre SBE 77-0001)
Refer to Figure.
Reference the interference at location 3404. If required, use the data written as a note in TASK 72-50-41-200-000 (INSPECTION-000).
Table 11. Fits and Clearances (all dimensions are in inches) NEW PART
WORN PART
DIMENSIONS
DIMENSIONS
PART IDENT
Size
Clearance
(Non-select)
REJECT IF
MORE THAN
LOCATION 3404
No. 5 Bearing ENGINE-LP TURBINE SHAFT (72-50-41, 01-100)
LP Turbine Shaft ENGINE-LP TURBINE SHAFT (72-50-41, 01-200)
No. 5 Bearing Bore
3.6217
Intf
3.6217
Intf
3.6220
0.0003
3.6224
0.0003
LP Turbine Shaft Diameter
3.6224
0.0011
3.6224
0.0011
3.6228
Intf
3.6228
Intf
Table 12. Fits and Clearances (all dimensions are in millimeters) NEW PART
WORN PART
DIMENSIONS
DIMENSIONS
PART IDENT
Size
Clearance
(Non-select)
REJECT IF
MORE THAN
LOCATION 3404
No. 5 Bearing ENGINE-LP TURBINE SHAFT (72-50-41, 01-100)
LP Turbine Shaft ENGINE-LP TURBINE SHAFT (72-50-41, 01-200)
No. 5 Bearing Bore
91.992
Intf
91.992
Intf
92.000
0.008
92.009
0.008
LP Turbine Shaft Diameter
92.008
0.028
92.008
0.028
92.020
Intf
92.020
Intf
SUBTASK 72-00-50-220-112-B00 Reference Fits and Clearances of the TEC and the LP Turbine Case, Rotor and Shaft at Location 3404 (SBE 77-0001)
SBE 77-0001: Replacement of Turbine Exhaust Case and installation of a revised EGT bracket configuration
Refer to Figure.
Reference the clearance at location 3393. If required use the data written as a note inTASK 72-50-41-200-000 (INSPECTION-000) andTASK 72-50-42-200-000 (INSPECTION-000).
Table 13. Fits and Clearances (all dimensions are in inches) NEW PART
WORN PART
DIMENSIONS
DIMENSIONS
PART IDENT
Size
Clearance
(Non-select)
REJECT IF
MORE THAN
LOCATION 3393
Carbon Seal ENGINE-NO.5 BEARING ASSEMBLY AND SEAL (72-50-42, 01-140)
LP Turbine Shaft (72-50-41, 01-200)
Carbon Seal Bore
3.7402
Clear
3.7411
0.0004
LP Turbine Shaft Diameter
3.7392
0.0020
3.7398
Clear
Table 14. Fits and Clearances (all dimensions are in millimeters) NEW PART
WORN PART
DIMENSIONS
DIMENSIONS
PART IDENT
Size
Clearance
(Non-select)
REJECT IF
MORE THAN
LOCATION 3393
Carbon Seal ENGINE-NO.5 BEARING ASSEMBLY AND SEAL (72-50-42, 01-140)
LP Turbine Shaft (72-50-41, 01-200)
Carbon Seal Bore
95.000
Clear
95.025
0.010
LP Turbine Shaft Diameter
94.975
0.050
94.990
Clear
SUBTASK 72-00-50-220-113-A00 Reference Fits and Clearances of the TEC and the LP Turbine Case, Rotor and Shaft at Location 3393 (Pre SBE 77-0001)
Refer to Figure.
Reference the clearance at location 3403. If required, use the data written as a note in TASK 72-50-41-200-000 (INSPECTION-000) and TASK 72-50-42-200-000 (INSPECTION-000).
Table 15. Fits and Clearances (all dimensions are in inches) NEW PART
WORN PART
DIMENSIONS
DIMENSIONS
PART IDENT
Size
Clearance
(Non-select)
REJECT IF
MORE THAN
LOCATION 3403
Carbon Seal ENGINE-NO.5 BEARING ASSEMBLY AND SEAL (72-50-42, 01-140)
LP Turbine Shaft ENGINE-LP TURBINE SHAFT (72-50-41, 01-200)
Carbon Seal Bore
3.7402
Clear
3.7411
0.0004
LP Turbine Shaft Diameter
3.7392
0.0020
3.7398
Clear
Table 16. Fits and Clearances (all dimensions are in millimeters) NEW PART
WORN PART
DIMENSIONS
DIMENSIONS
PART IDENT
Size
Clearance
(Non-select)
REJECT IF
MORE THAN
LOCATION 3403
Carbon Seal ENGINE-NO.5 BEARING ASSEMBLY AND SEAL (72-50-42, 01-140)
LP Turbine Shaft ENGINE-LP TURBINE SHAFT (72-50-41, 01-200)
Carbon Seal Bore
95.000
Clear
95.025
0.010
LP Turbine Shaft Diameter
94.975
0.050
94.990
Clear
SUBTASK 72-00-50-220-113-B00 Reference Fits and Clearances of the TEC and the LP Turbine Case, Rotor and Shaft at Location 3403 (SBE 77-0001)
SBE 77-0001: Replacement of Turbine Exhaust Case and installation of a revised EGT bracket configuration.
Refer to Figure.
Reference the interference at location 3410. If required, use the data written as a note in TASK 72-50-32-200-000 (INSPECTION-000) and TASK 72-50-53-200-000 (INSPECTION-000).
Table 17. Fits and Clearances (all dimensions are in inches) NEW PART
WORN PART
DIMENSIONS
DIMENSIONS
PART IDENT
Size
Clearance
(Non-select)
REJECT IF
MORE THAN
LOCATION 3410
Stage 7 LP Turbine Blade ENGINE-LP TURBINE BLADES (72-50-32, 01-010)
Turbine Exhaust Case ENGINE-EXHAUST CASE AND FITTINGS (72-50-53, 21-300)
Stage 7 LP Turbine Blade
0.0740
Turbine Exhaust Case
0.1770
Table 18. Fits and Clearances (all dimensions are in millimeters) NEW PART
WORN PART
DIMENSIONS
DIMENSIONS
PART IDENT
Size
Clearance
(Non-select)
REJECT IF
MORE THAN
LOCATION 3410
Stage 7 LP Turbine Blade ENGINE-LP TURBINE BLADES (72-50-32, 01-010)
Turbine Exhaust Case ENGINE-EXHAUST CASE AND FITTINGS (72-50-53, 21-300)
Stage 7 LP Turbine Blade
1.879
Turbine Exhaust Case
4.493
SUBTASK 72-00-50-220-163 Reference Fits and Clearances of the Stage 7 LP Turbine Blade and the TEC at Location 3410
Refer to Figure.
Install the IAE 1F10033 Hydraulic installation pusher 1 off on the rear end of the LP Turbine Shaft. Attach the reaction adapter (part of the hydraulic pusher) to the rear thread of the LP Turbine Shaft.
Connect the IAE 1F10026 Hydraulic hand pump 1 off to the coupler of the pusher.
SUBTASK 72-00-50-420-139-A00 Install the Carbon Seal to the LP Turbine Shaft, Detail A (Pre SBE 72-0142 and Pre SBE 72-0162)
Refer to Figure.
Install the IAE 1F10033 Hydraulic installation pusher 1 off on the rear end of the LP Turbine Shaft. Attach the reaction adapter (part of the hydraulic installation pusher) to the rear thread of the LP Turbine Shaft.
Connect the IAE 1F10026 Hydraulic hand pump 1 off to the coupler of the pusher.
SUBTASK 72-00-50-420-139-B00 Install the Carbon Seal to the LP Turbine Shaft, Detail A (SBE 72-0142 and Pre SBE 72-0162)
SBE 72-0142: Provide a new carbon seal for the No. 5 Bearing Compartment.
Refer to Figure.
Install the IAE 1F10033 Hydraulic installation pusher 1 off on the rear of the LP Turbine Shaft. Attach the reaction adapter (part of the hydraulic installation pusher) to the rear thread of the LP Turbine Shaft.
Connect the IAE 1F10026 Hydraulic hand pump 1 off to the coupler of the pusher.
SUBTASK 72-00-50-420-139-C00 Install the Carbon Seal to the LP Turbine Shaft,.etail A (SBE 72-0162 and SBE 72-0142)
SBE 72-0162: Introduce a new No. 5 Bearing Face Seal.
SBE 72-0142: Provide a new carbon seal for the No. 5 Bearing Compartment.
Refer to Figure.
Install the IAE 1F10033 Hydraulic installation pusher 1 off on the rear end of the LP Turbine Shaft. Attach the reaction adapter (part of the hydraulic installation pusher) to the rear thread of the LP Turbine Shaft.
Connect the IAE 1F10026 Hydraulic hand pump 1 off to the coupler of the pusher.
SUBTASK 72-00-50-420-139-D00 Install the Carbon Seal to the LP Turbine Shaft,.etail A (SBE 72-0162 and Pre SBE 72-0142)
SBE 72-0162: Introduce a new No. 5 Bearing Face Seal.
Refer to Figure.

WARNING
USE GLOVES TO INSTALL THE HOT INNER RACE OF THE NO. 5 BEARING.Pre SBE 72-0142: Install the inner race of the No. 5 Bearing to the LP Turbine Shaft. Refer to Figure. Detail B.
SBE 72-0142: Install the inner race of the No. 5 Bearing to the LP Turbine Shaft. Refer to Figure. Detail B.
Install the IAE 1F10034 Hydraulic installation pusher 1 off on the rear end of the LP Turbine Shaft. Attach the reaction adapter (part of the hydraulic installation pusher) to the rear thread of the LP Turbine Shaft.
Connect the IAE 1F10026 Hydraulic hand pump 1 off to the coupler of the pusher.
SUBTASK 72-00-50-420-140 Install the No. 5 Bearing Inner Race,. Detail B (SBE 72-0142 and Pre SBE 72-0142)
SBE 72-0142: Provide a new carbon seal for the No. 5 Bearing Compartment.
Refer to Figure.
Install the IAE 1F10074 Guide pogo stick 1 off in to the inner diameter of the LP Turbine Shaft. Use applicable webbing sling.
Put the IAE 1F10075 Support pedestal 1 off A below the guide pogo stick. Move the support pedestal A near to the rear flange of the LP Turbine Case.
SUBTASK 72-00-50-420-141 Install the Guide Pogo Stick to the LP Turbine Shaft
Refer to Figure.
Attach hoist equipment to the upper supports of the IAE 1F10073 remove/installation fixture 1 off.
SUBTASK 72-00-50-420-143 Install the Remove/Installation Fixture to the Turbine Exhaust Case (TEC)
Refer to Figure.
Attach an electronic balance crane to the hoist equipment. Attach the IAE 1F10051 Two cable sling 1 off to the electronic balance crane. Connect the two cables sling to the spools of the IAE 1F10073 remove/installation fixture.
Lift the Turbine Exhaust Case from the IAE 1F10178 Storage and Turnover adapter 1 off.

CAUTION
IN THE FOLLOWING STEPS, THE ELECTRONIC BALANCE CRANE MUST STAY AT APPROXIMATELY THE SAME WEIGHT.Lift the Turbine Exhaust Case and engage it to the IAE 1F10074 Guide pogo stick. Move the Turbine Exhaust Case forward.
Install the IAE 1F10075 Support pedestal 1 off behind the Turbine Exhaust Case to the rear end of the guide pogo stick. Refer to Step.
SUBTASK 72-00-50-420-121 Install the Turbine Exhaust (TEC) Case to the Guide Pogo Stick
Release the two hand knobs that attach the two clamps (part of the IAE 1M14086 Supporting fixture), to the Turbine Stage 7 Disk.
Release the four screws that attach the supporting fixture to the LP Turbine Case. Remove the supporting fixture from the rear flange of the LP Turbine Case, refer to Figure.
SUBTASK 72-00-50-420-142 Remove the Supporting Fixture
Refer to Figure.
Remove the IAE 1F10075 Support pedestal A 1 off.
Release the handwheel B of the IAE 1F10075 Support pedestal B 1 off. Turn the handwheel A until the electronic balance crane shows the initial weight. Refer to Step, step D.
NOTE
This step is necessary, because the weight of the LP Turbine Rotor increased the weight shown on the electronic balance crane.Turn the jackscrew (part of the remove/installation fixture) clockwise to the stop position. Safety the jackscrew in this position with the IAE 1F10076 Locking collar 1 off.

CAUTION
HOLD THE BOLTS IN THEIR POSITION WHEN YOU INSTALL THE NUTS ON TO THE BOLTS. DO NOT TURN THE BOLTS OR MAKE TO-AND-FRO MOVEMENTS. THE TURBINE EXHAUST CASE/LP CASE FLANGE AND/OR THE BOLTS CAN BE DAMAGED.Install the 16 brackets and attach the 114 bolts and nuts, which lock the TEC to the LP Turbine Case. Refer to Figure.
SUBTASK 72-00-50-420-144 Install the TEC to the LP Turbine Case
Refer to Figure.
Attach the IAE 1F10037 Wrench support 1 off to the inner rear flange of the TEC.
Install the IAE 1F10038 Torque wrench 1 off through the wrench support. Engage the torque wrench with the rear lock nut.
Install the IAE 1F10039 Anti-torque adapter 1 off through the torque wrench. Lock the anti-torque adapter to the LP Turbine Shaft.
Install the IAE 1F10016 Mechanical wrench 1 off to the torque wrench. Safety the anti-torque adapter to the mechanical wrench with the IAE 1F10040 Anchor wrench plate 1 off.
Do Step again.
Do Step again and check the correlation mark. The correlation mark must be not more than two degrees maximum of the same place.
SUBTASK 72-00-50-420-145-A00 Install the Rear Lock Nut to the LP Turbine Shaft (Pre SBE 72-0063)
Refer to Figure.
Attach the IAE 1P16374 Wrench support 1 off to the inner rear flange of the TEC.
Install the IAE 1F10038 Torque wrench 1 off through the wrench support. Engage the torque wrench with the rear lock nut.
Install the IAE 1F10039 Anti-torque adapter 1 off through the torque wrench. Lock the anti-torque adapter to the LP Turbine Shaft.
Install the IAE 1F10016 Mechanical wrench 1 off to the torque wrench. Safety the anti-torque adapter to the mechanical wrench with the IAE 1F10040 Anchor wrench plate 1 off.
Do Step again.
Do step Step again and check the correlation mark. The correlation mark must be no more than two degrees maximum of the same place.
SUBTASK 72-00-50-420-145-B00 Install the Rear Lock Nut to the LP Turbine Shaft (SBE 72-0063)
SBE 72-0063: Announce the availability of a new turbine exhaust assembly.
Refer to Figure.
Install ENGINE-NO.5 BEARING OIL JET AND FILTER (72-50-51, 01-120) toroidal sealing rings 2 off on both ends of the oil transfer tube.
Push the transfer tube from the rear with the IAE 1F10153 Installation rod 1 off until it is fully installed into the flange of the No. 5 Bearing Housing.
Install the oil filter into the threaded hole of the oil jet. Torque the oil filter to 371.736 lbfin (42.0 Nm). Use the IAE 1P16426 remove/installation driver 1 off.
SUBTASK 72-00-50-420-180 Install the Oil Jet of the No. 5 Bearing
Refer to Figure.
Install ENGINE-EXHAUST CASE AND FITTINGS (72-50-53, 01-390) metallic seal 1 off to the flange of the oil feed tube. Install the oil feed tube to the No. 5 Bearing Compartment.
SUBTASK 72-00-50-420-181 Connect the Oil Feed Tube of the No.5 Bearing
Put the blind cap ENGINE-LP TURBINE SHAFT (72-50-41, 01-150) on to a work bench with rear end down.
Lubricate the new ENGINE-LP TURBINE SHAFT (72-50-41, 01-160) sealing ring with CoMat 10-077 APPROVED ENGINE OILS.
Lubricate the outer diameter faces of the seal slider and the blind cap with CoMat 10-077 APPROVED ENGINE OILS.
Extend the sealing ring and install it to the blind cap as follows.
NOTE
Use of IAE 1J12259 Seal slider without IAE 1J12243 Sizing sleeve is not permitted.Lubricate the inner diameter face of the sizing sleeve and the outer diameter of the sealing ring with CoMat 10-077 APPROVED ENGINE OILS.

CAUTION
DO NOT INSTALL THE BLIND CAP AND THE SEALING RING INTO THE LP TURBINE SHAFT BEFORE Step. THE SEALING DIAMETER IS EXTENDED. THE LP TURBINE SHAFT BORE CAN CAUSE DAMAGE TO THE EXTENDED SEALING RING.Make the sealing ring diameter smaller as follows.
Install the blind cap to the LP Turbine Shaft. Use the IAE 1J12221 Impact hammer 1 off.
Install the internal retaining ring ENGINE-LP TURBINE SHAFT (72-50-41, 01-100).
SUBTASK 72-00-50-420-146-B00 Install the Blind Cap to the LP Turbine Shaft (SBE 72-0037 and Pre SBE 72-0227)
SBE 72-0037: Replacement of the LP Turbine Shaft Rear End Sealing Ring.
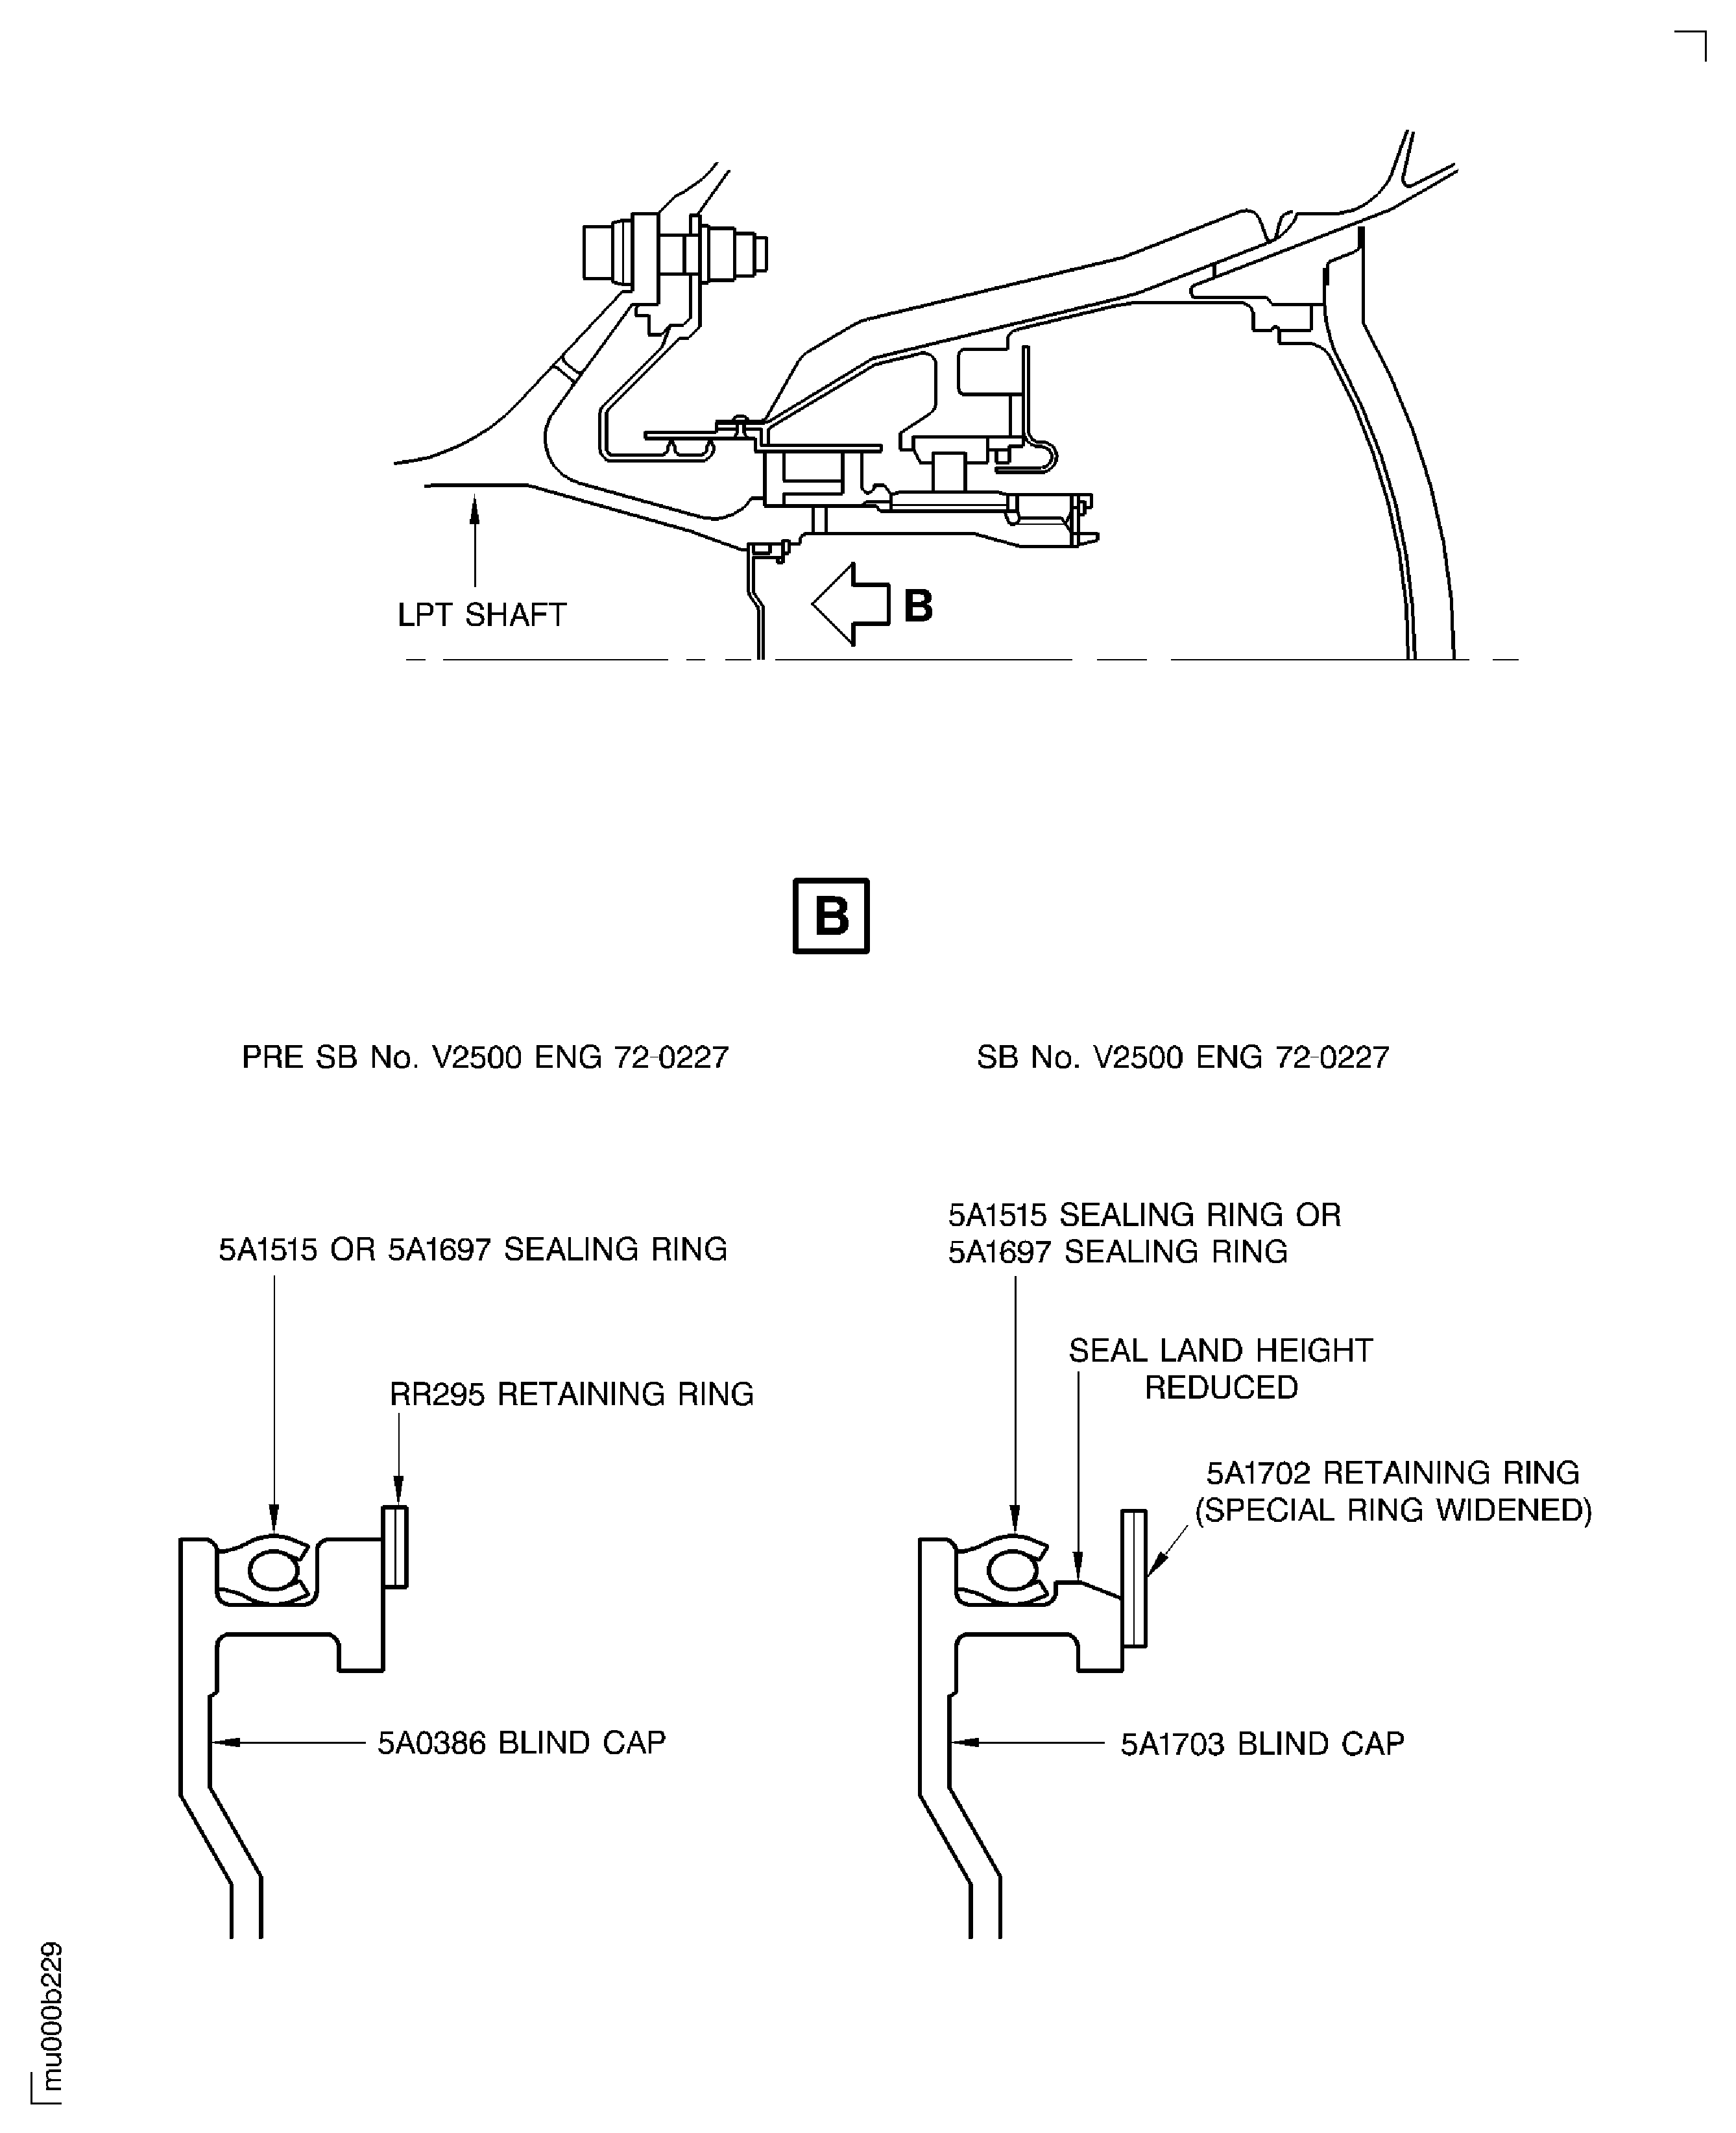
SBE 72-0227: Provide a new blind cap with decreased seal land height.
Install the IAE 1J12522 Seal slider 1 off on the blind cap.
Lubricate the sealing ring with CoMat 10-077 APPROVED ENGINE OILS.
Lubricate the outer diameter faces of the seal slider and the blind cap with CoMat 10-077 APPROVED ENGINE OILS.
Install the new ENGINE-LP TURBINE SHAFT (72-50-41, 01-160) sealing ring on to the blind cap ENGINE-LP TURBINE SHAFT (72-50-41, 01-150) as follows:

CAUTION
DO NOT CORRECT A TWISTED CONDITION OF THE SEALING RING. DISCARD THE TWISTED SEALING RING.Make sure that the sealing ring is not twisted. Refer to Figure.
Examine the sealing ring.
Install the blind cap into the LP Turbine Shaft. Use theIAE 1J12221 Impact hammer 1 off.

CAUTION
DO NOT USE THE INTERNAL RETAINING RING P/N RR295 WITH THE BLIND CAP P/N 5A1703.Install the internal retaining ring ENGINE-LP TURBINE SHAFT (72-50-41, 01-100).
SUBTASK 72-00-50-420-146-D00 Install the Blind Cap into the LP Turbine Shaft (SBE 72-0227)
Refer to Figure.
Lubricate packing ENGINE-NO.5 BEARING COMPARTMENT COVER (72-58-01, 01-160) with CoMat 10-077 APPROVED ENGINE OILS. Install the packing on the groove of the compartment cover.
Install the IAE 1P17523 Blank-off Plate 1 off to the No. 5 Bearing Outer Oil Feed Tube. Refer to Figure.
Install the IAE 1P16354 Vacuum Test Adapter 1 off to the No. 5 Bearing Oil Scavenge Tube Outlet with three bolts (part of the adapter). Tighten the bolts. Refer to Figure.
Attach the hose on the IAE 6F10029 Air flow test cart 1 off to the adapter.
Apply CoMat 10-045 LEAK CHECK FLUID, BUBBLES-TYPE or CoMat 10-045A LEAK CHECK FLUID, BUBBLES-TYPE A around the cover and oil tube interfaces to check for leaks. Replace the seal of any leaking interface with a new seal.

WARNING
IF YOU DO NOT SECURE THE COMPARTMENT COVER DURING THE LEAK TEST THERE IS A RISK OF PERSONAL INJURY FROM THE RELEASED COVER.
Do a leak check of the compartment cover and oil tubes.
SUBTASK 72-00-50-420-147 Install the Compartment Cover
Lubricate the bolts, nuts and washers with CoMat 10-077 APPROVED ENGINE OILS.
Install the IAE 1P16354 Vacuum Test Adapter 1 off to No. 5 Bearing Outer Oil Scavenge Tube, Figure.
Lubricate the bolts, nuts and washers with CoMat 10-077 APPROVED ENGINE OILS.
Install the IAE 2F10368 Plate, Vacuum check 1 off to No. 5 bearing outer oil feed tube, Figure.
SUBTASK 72-00-50-420-201 Install the Adapter and the Plate to the TEC
Refer to Figure.
Connect the hose of IAE 6F10030 Vacuum test cart 1 off to the nipple of the IAE 1P16354 Vacuum Test Adapter 1 off.
Set the air pressure at the test port to -20inHg (-508 mmHg gage). Based on the ambient pressure, refer to the table below for the vacuum pressure in psia.
Ambient Pressure of the Day (psia)
Vacuum Pressure (psia)
14.7
4.9
14.5
4.7
14.3
4.5
14.1
4.3
13.9
4.1
13.7
3.9
13.5
3.7
13.3
3.5
13.1
3.3
Vacuum pressure (psia) = Ambient pressure of the day (psia) - 9.8 psia
SUBTASK 72-00-50-420-202 Do an Evacuation Check for the No. 5 Bearing Compartment
Install the module dressings. Refer to TASK 72-00-50-420-005 (INSTALLATION-007).
SUBTASK 72-00-50-420-148 Install the Module Dressings
Figure: Pre SBE 77-0001: Fits and Clearances at Interface N-50/10 and N-50/50
Sheet 1
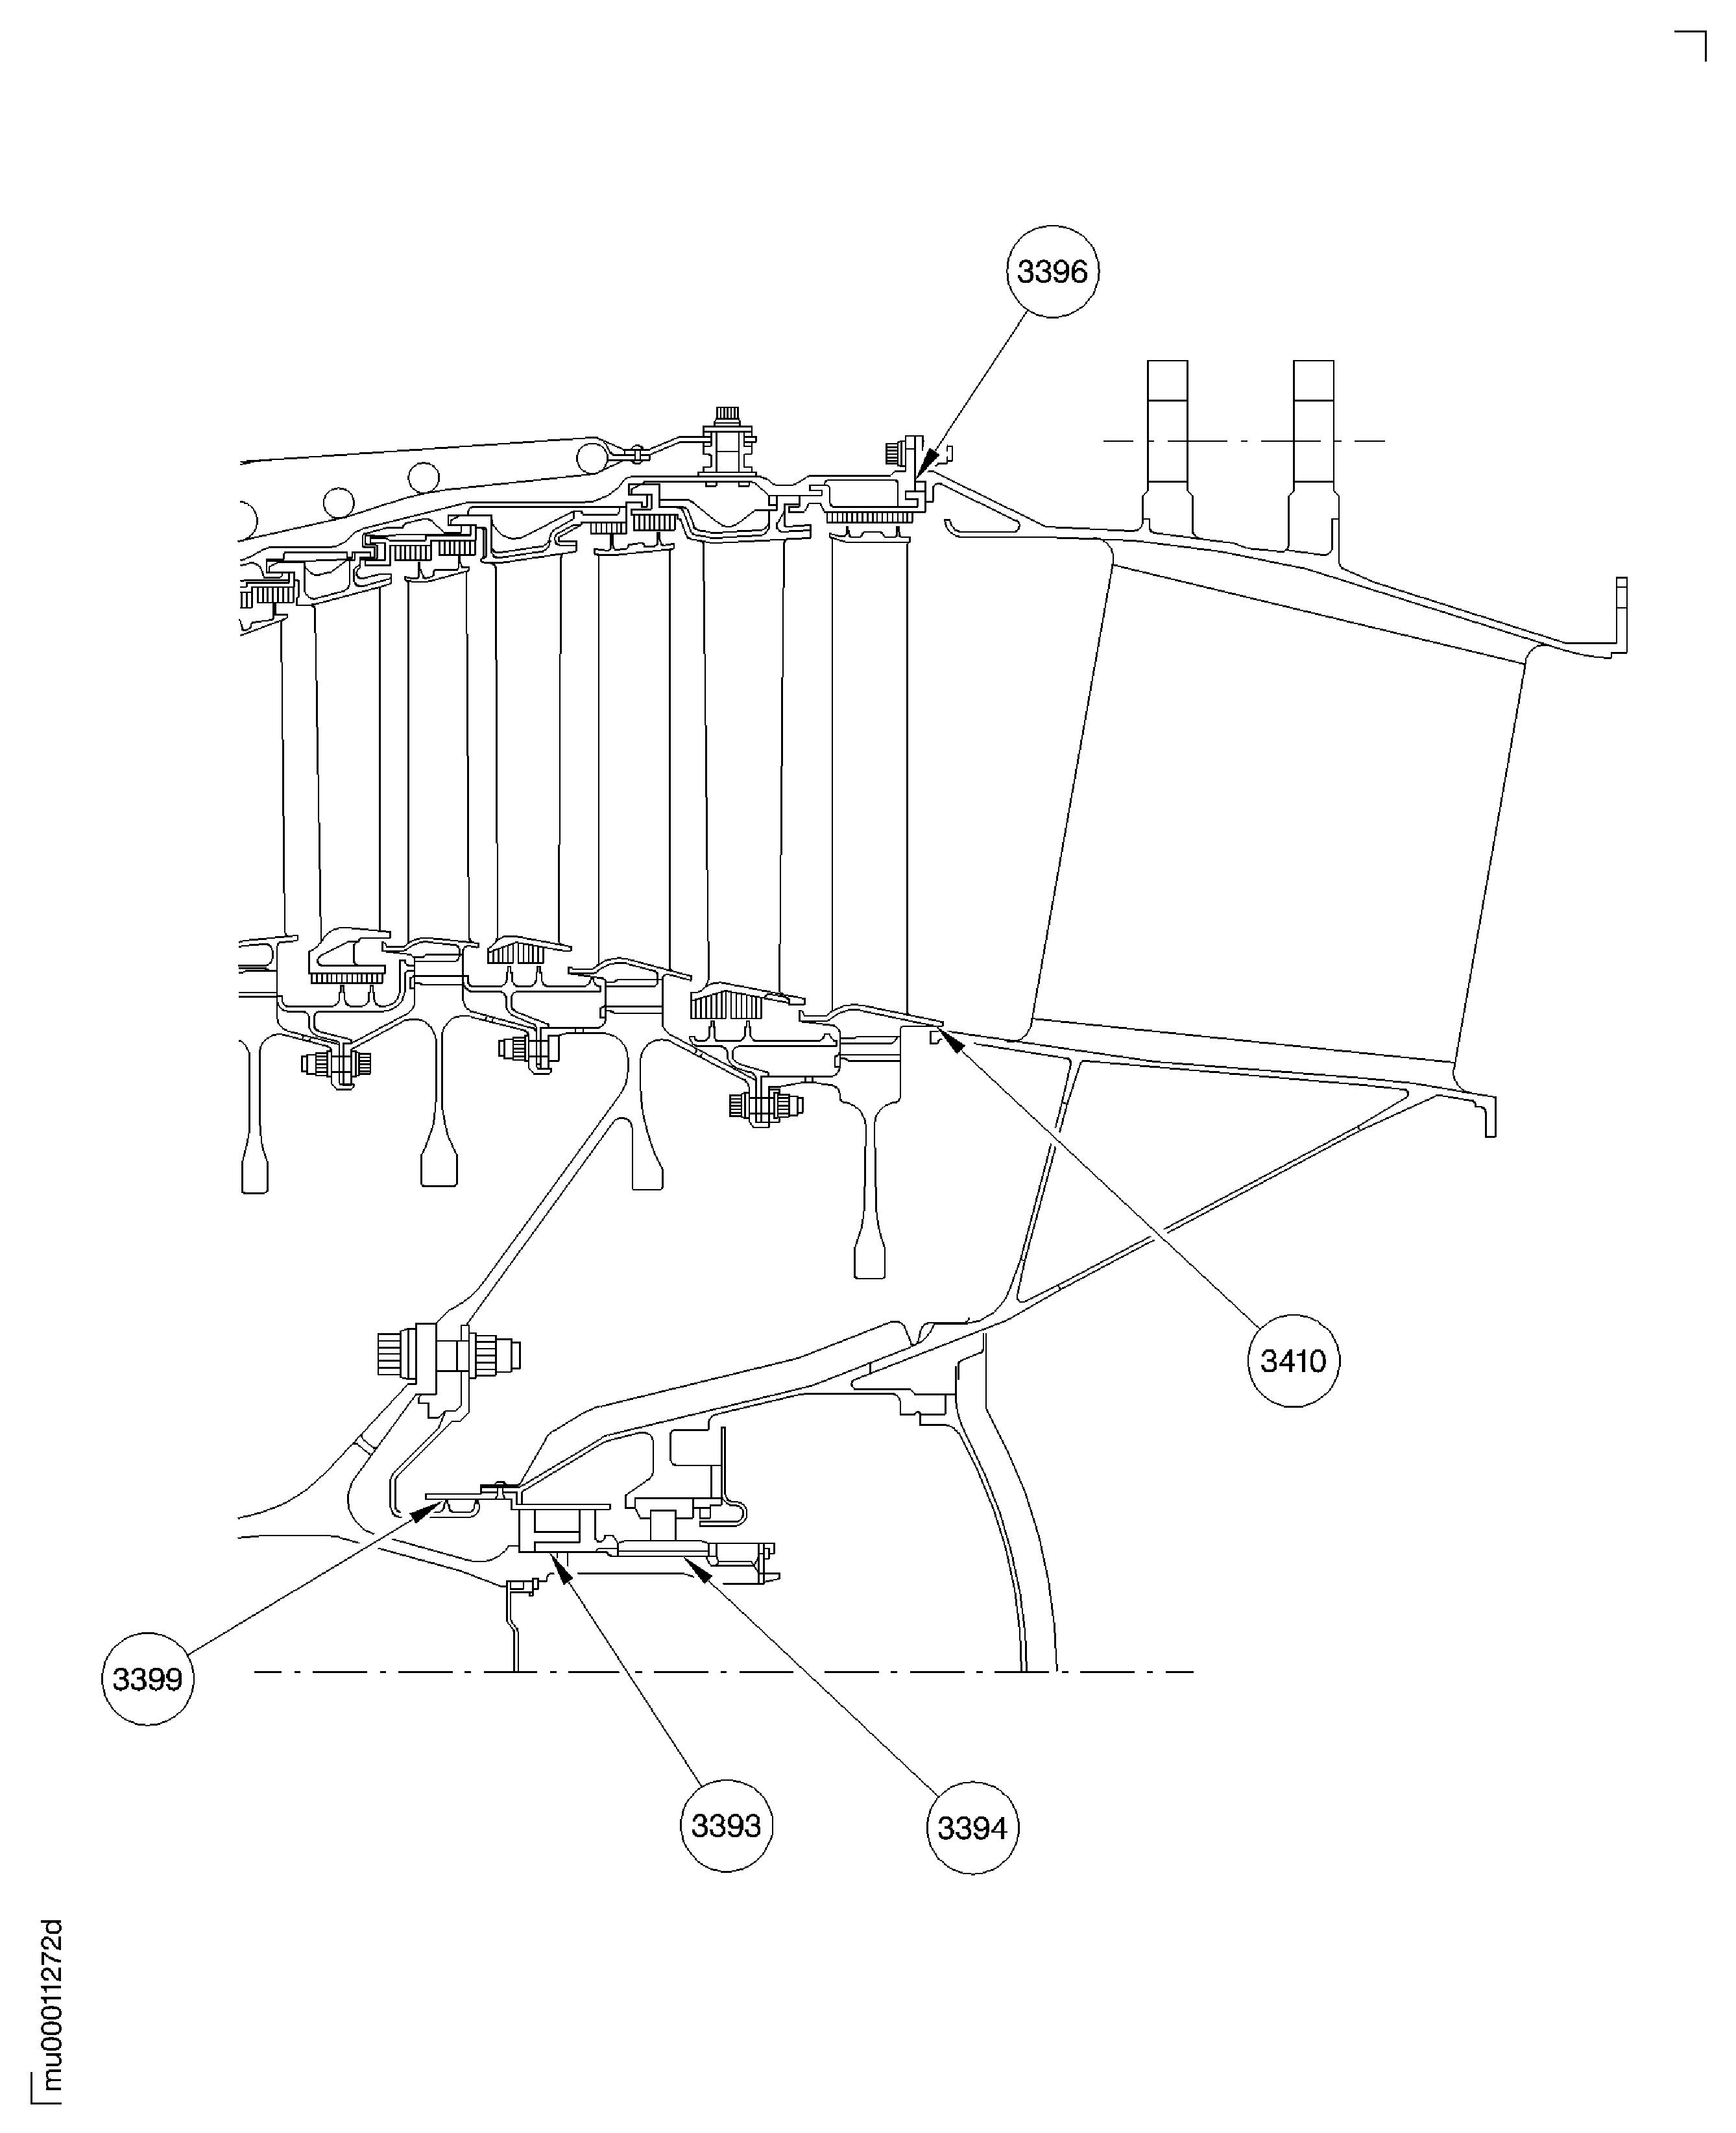
Figure: SBE 77-0001: Fits and Clearances at Interface N-50/10 and N-50/50 -
Sheet 2
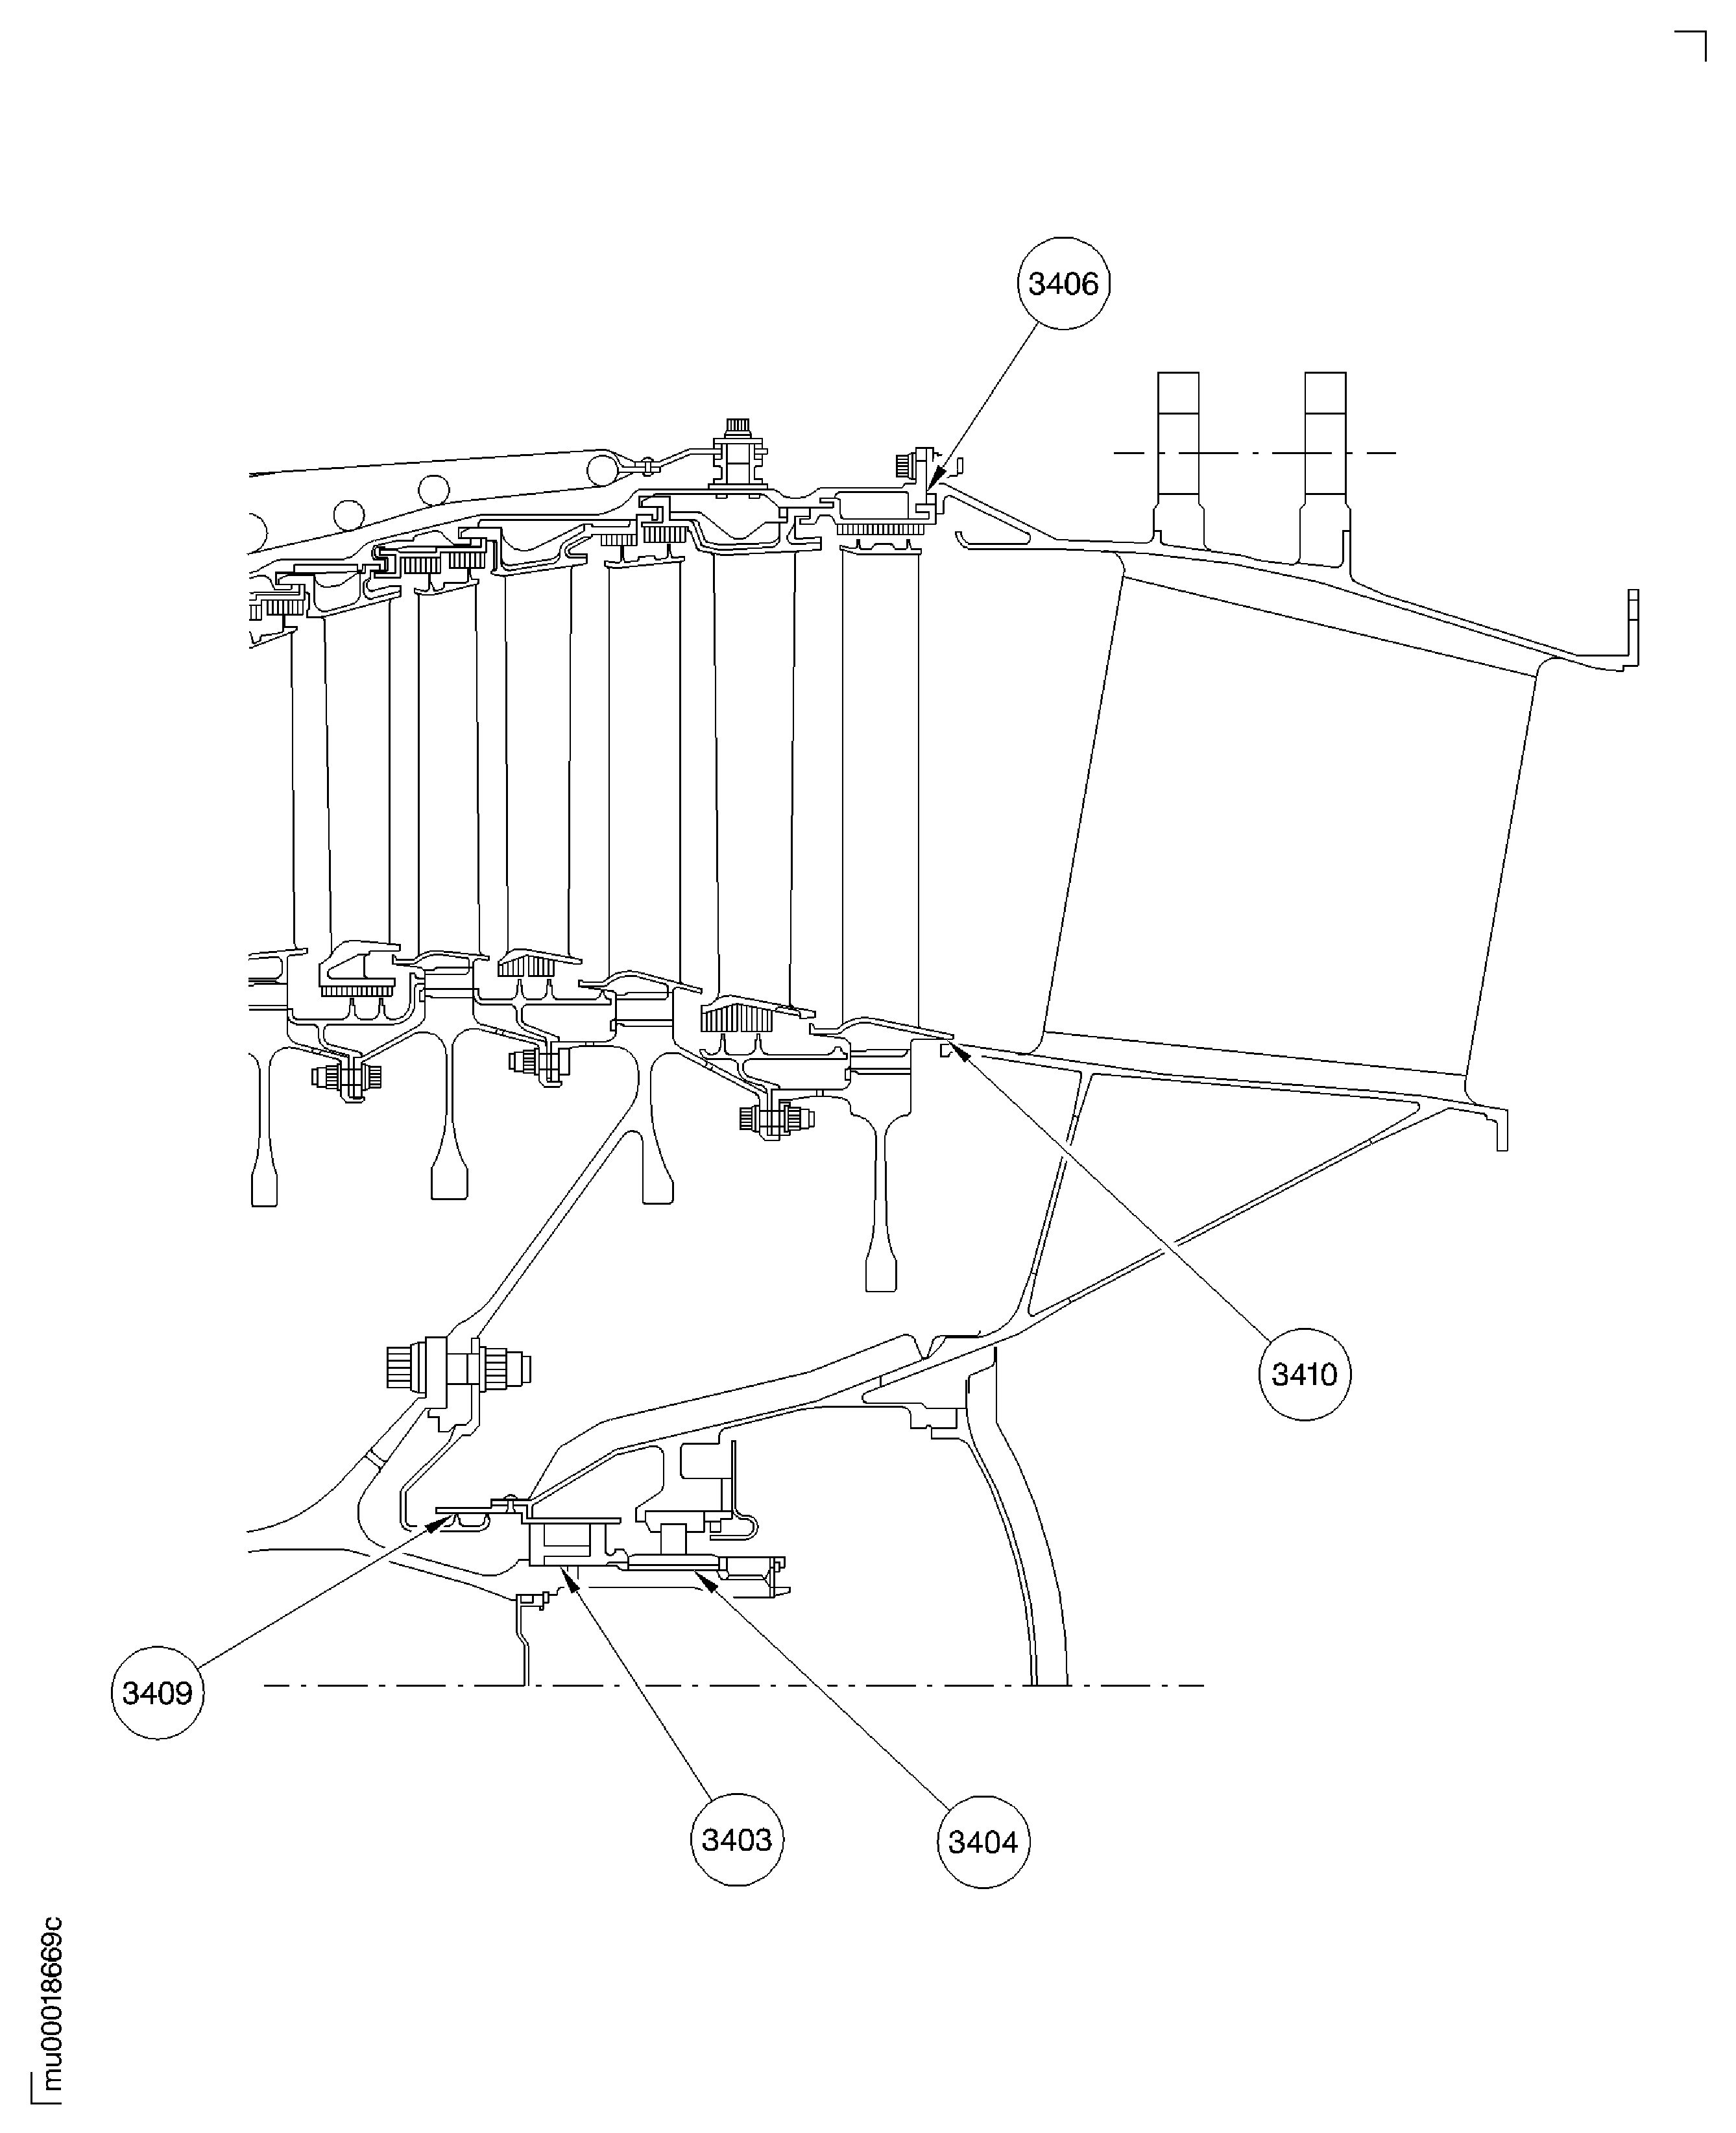
Figure: Pre SBE 72-0142: Install the Carbon Seal and the Inner Race of the No. 5 Bearing
Sheet 1
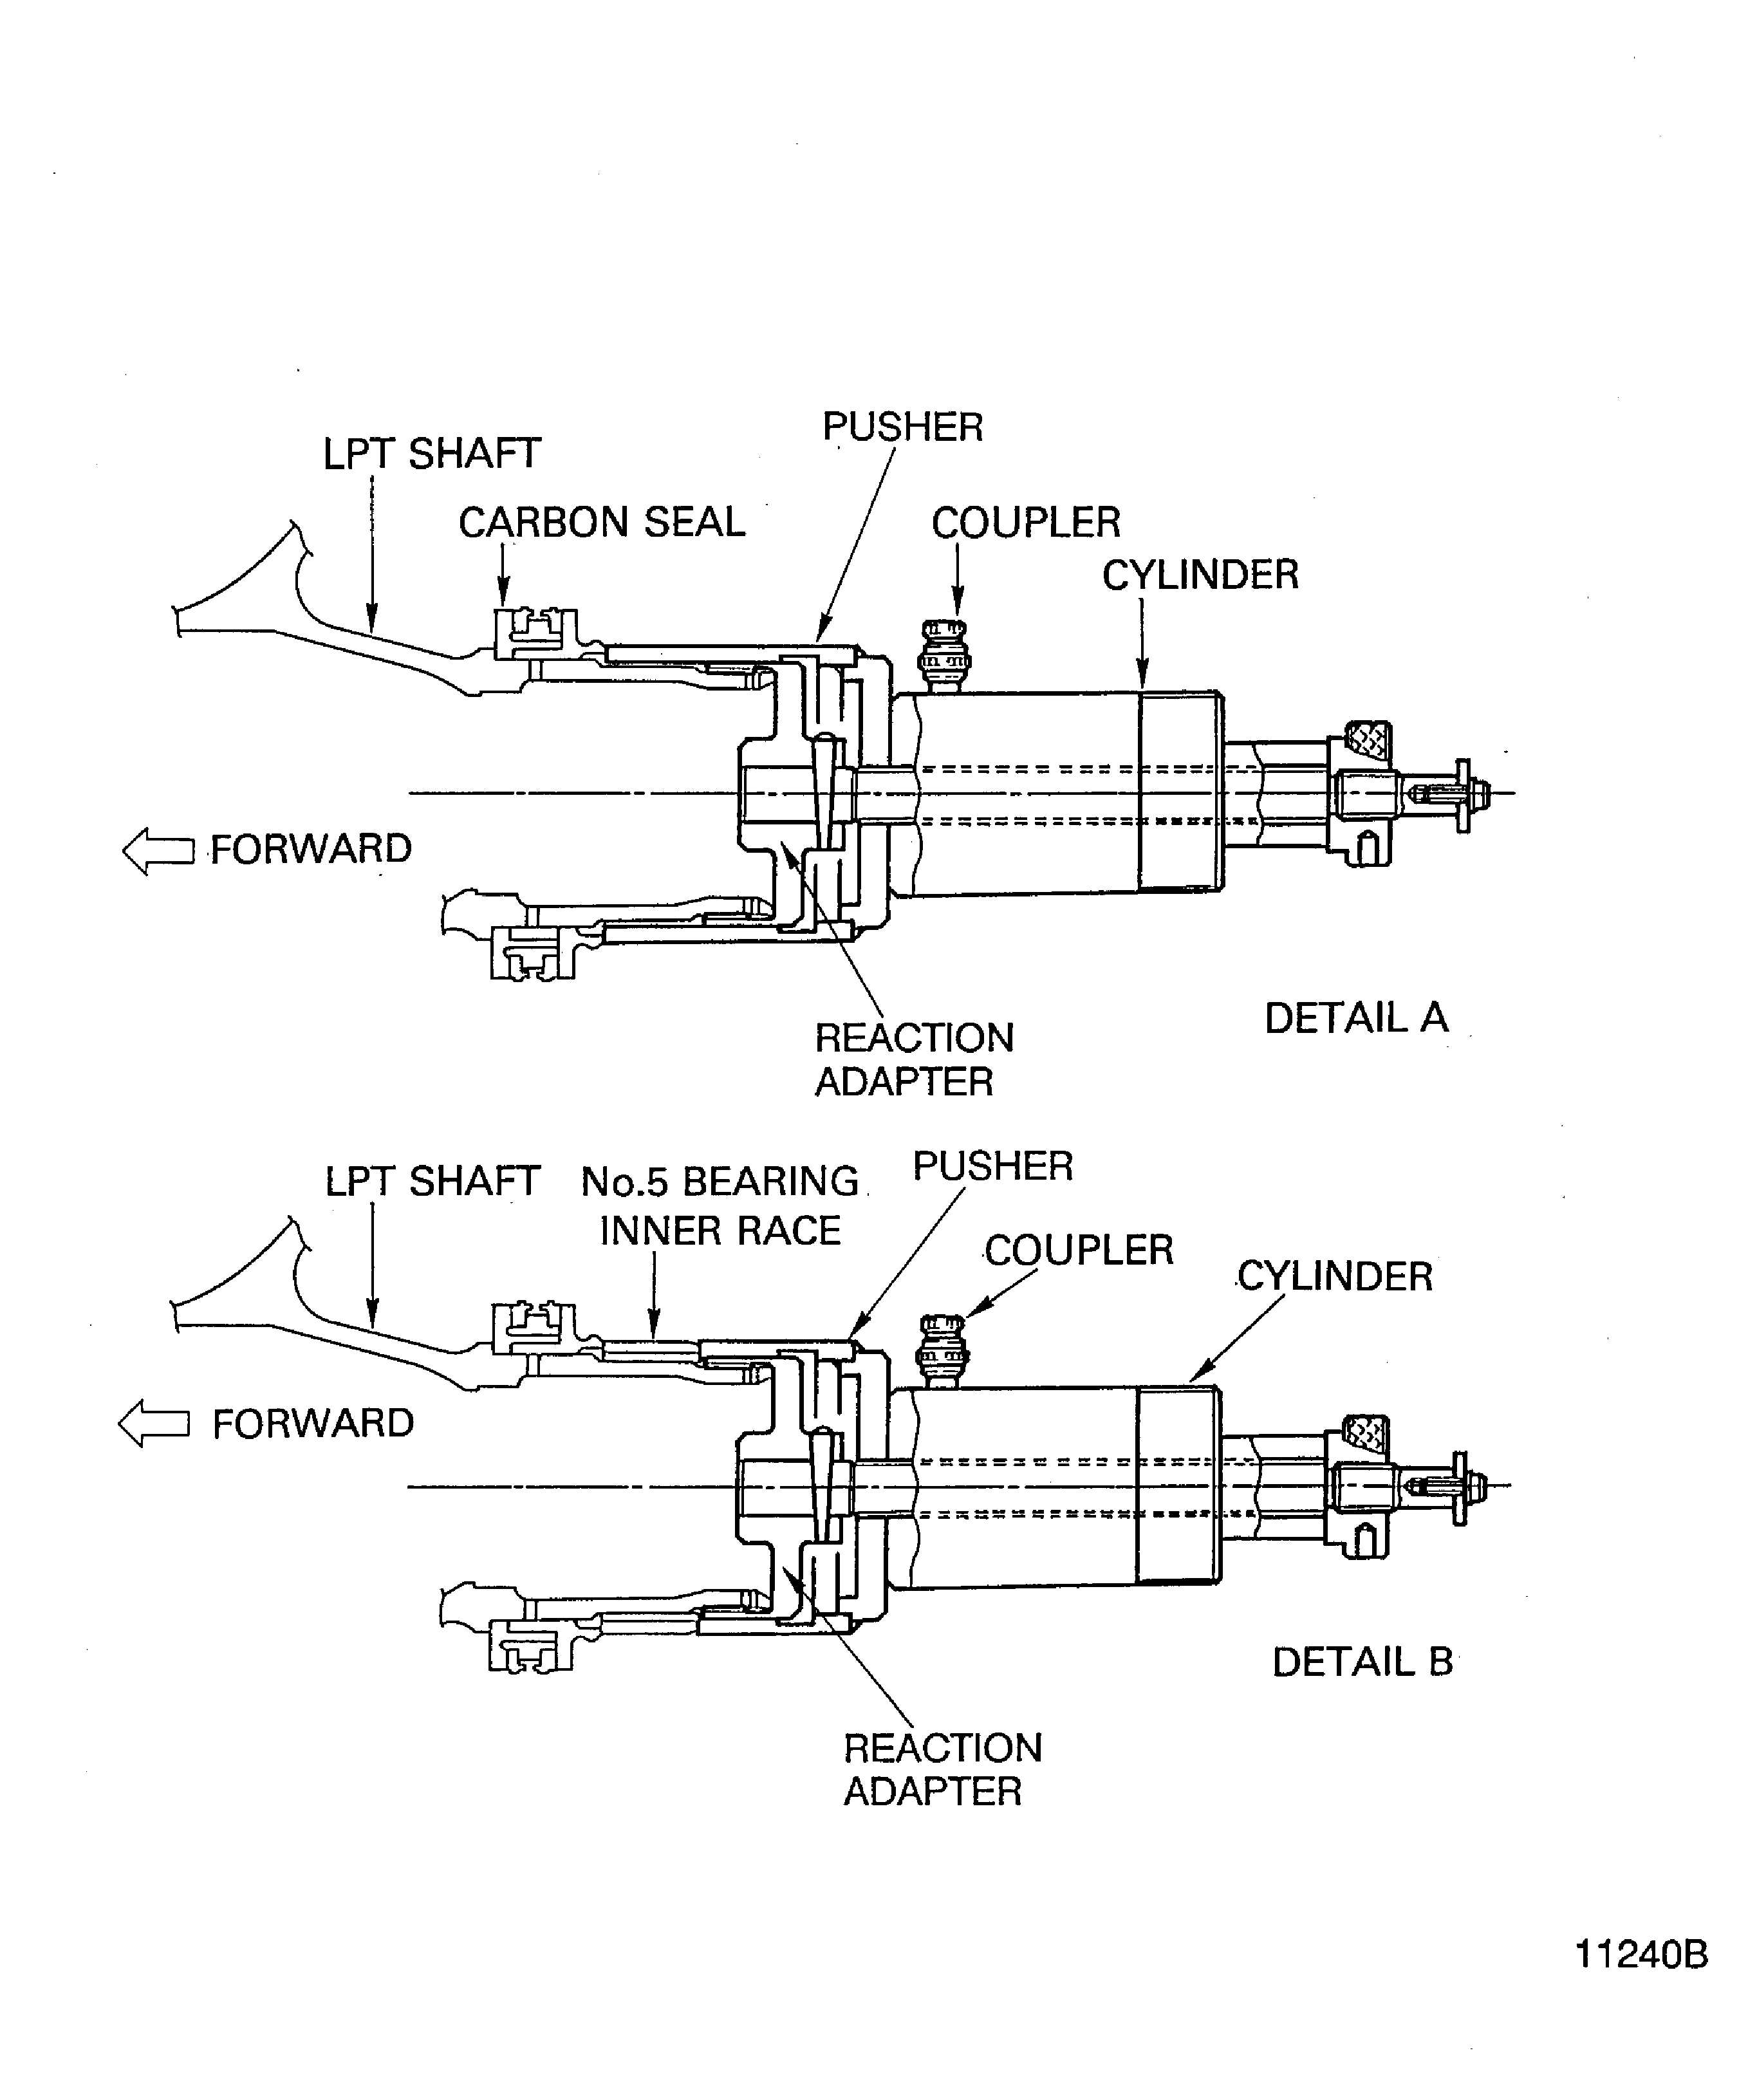
Figure: SBE 72-0142: Install the Carbon Seal and the Inner Race of the No. 5 Bearing
Sheet 2
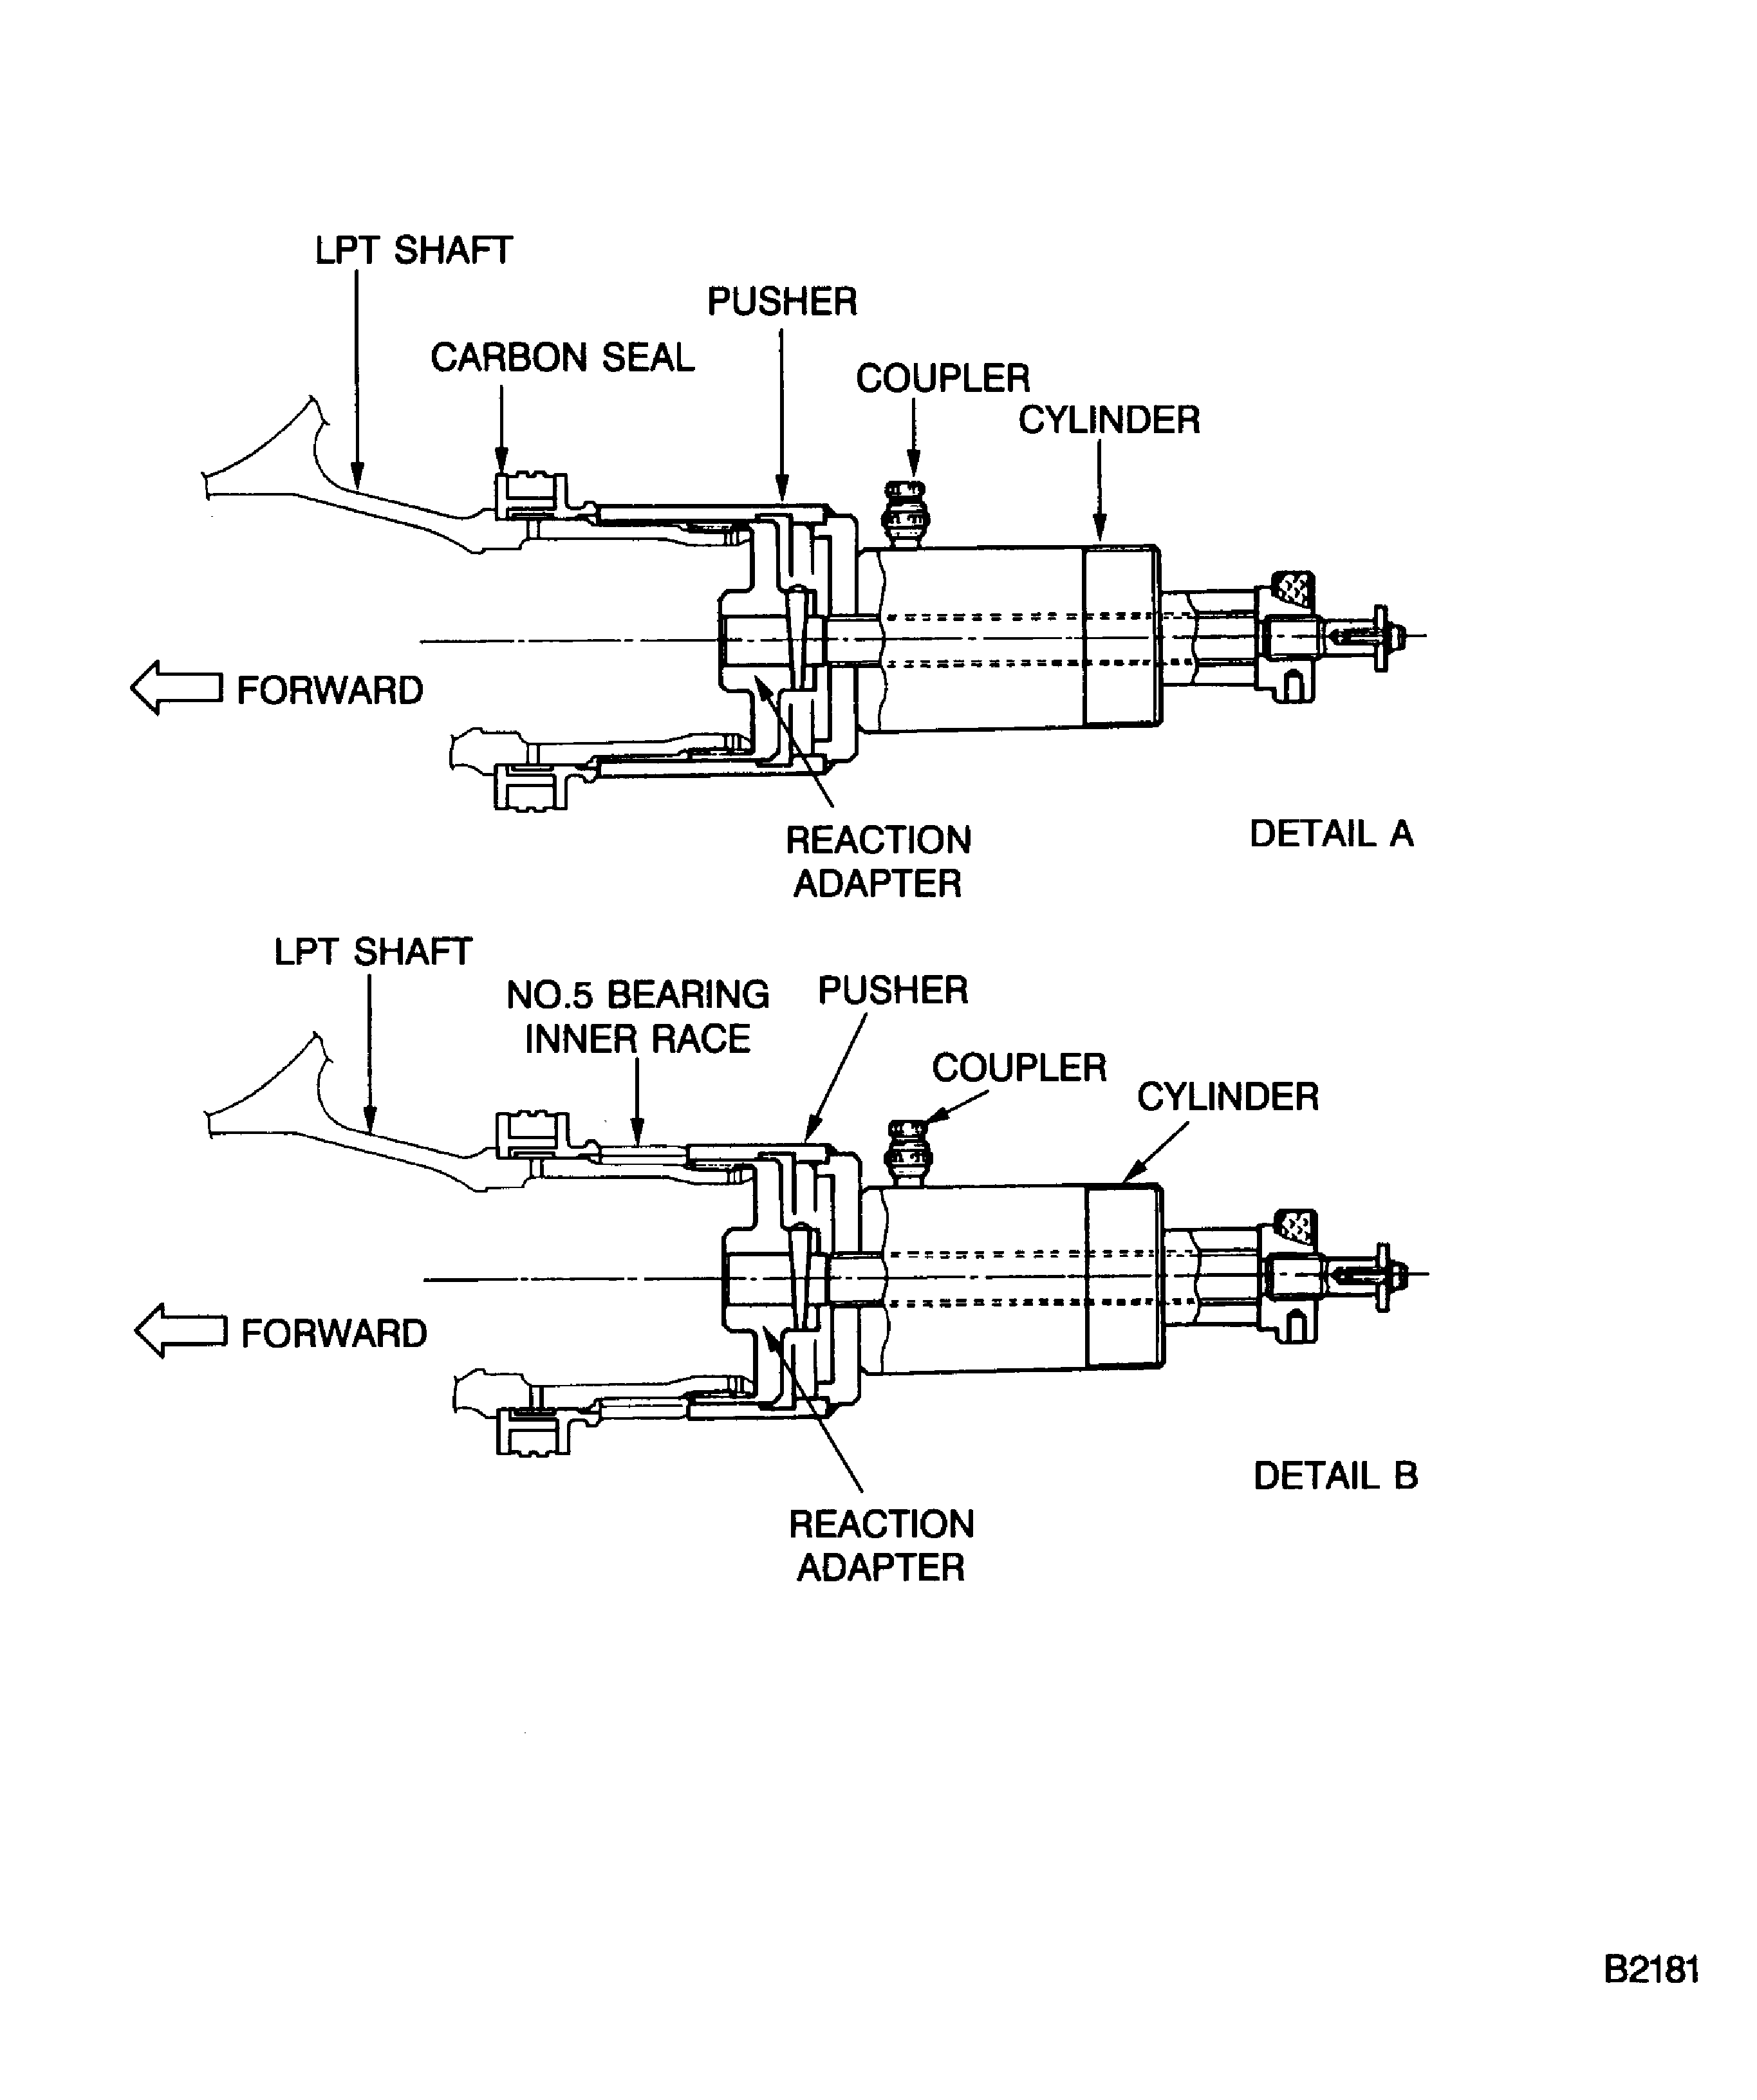
Figure: Install the Guide Pogo Stick to the LP Turbine Shaft
Install the Guide Pogo Stick to the LP Turbine Shaft
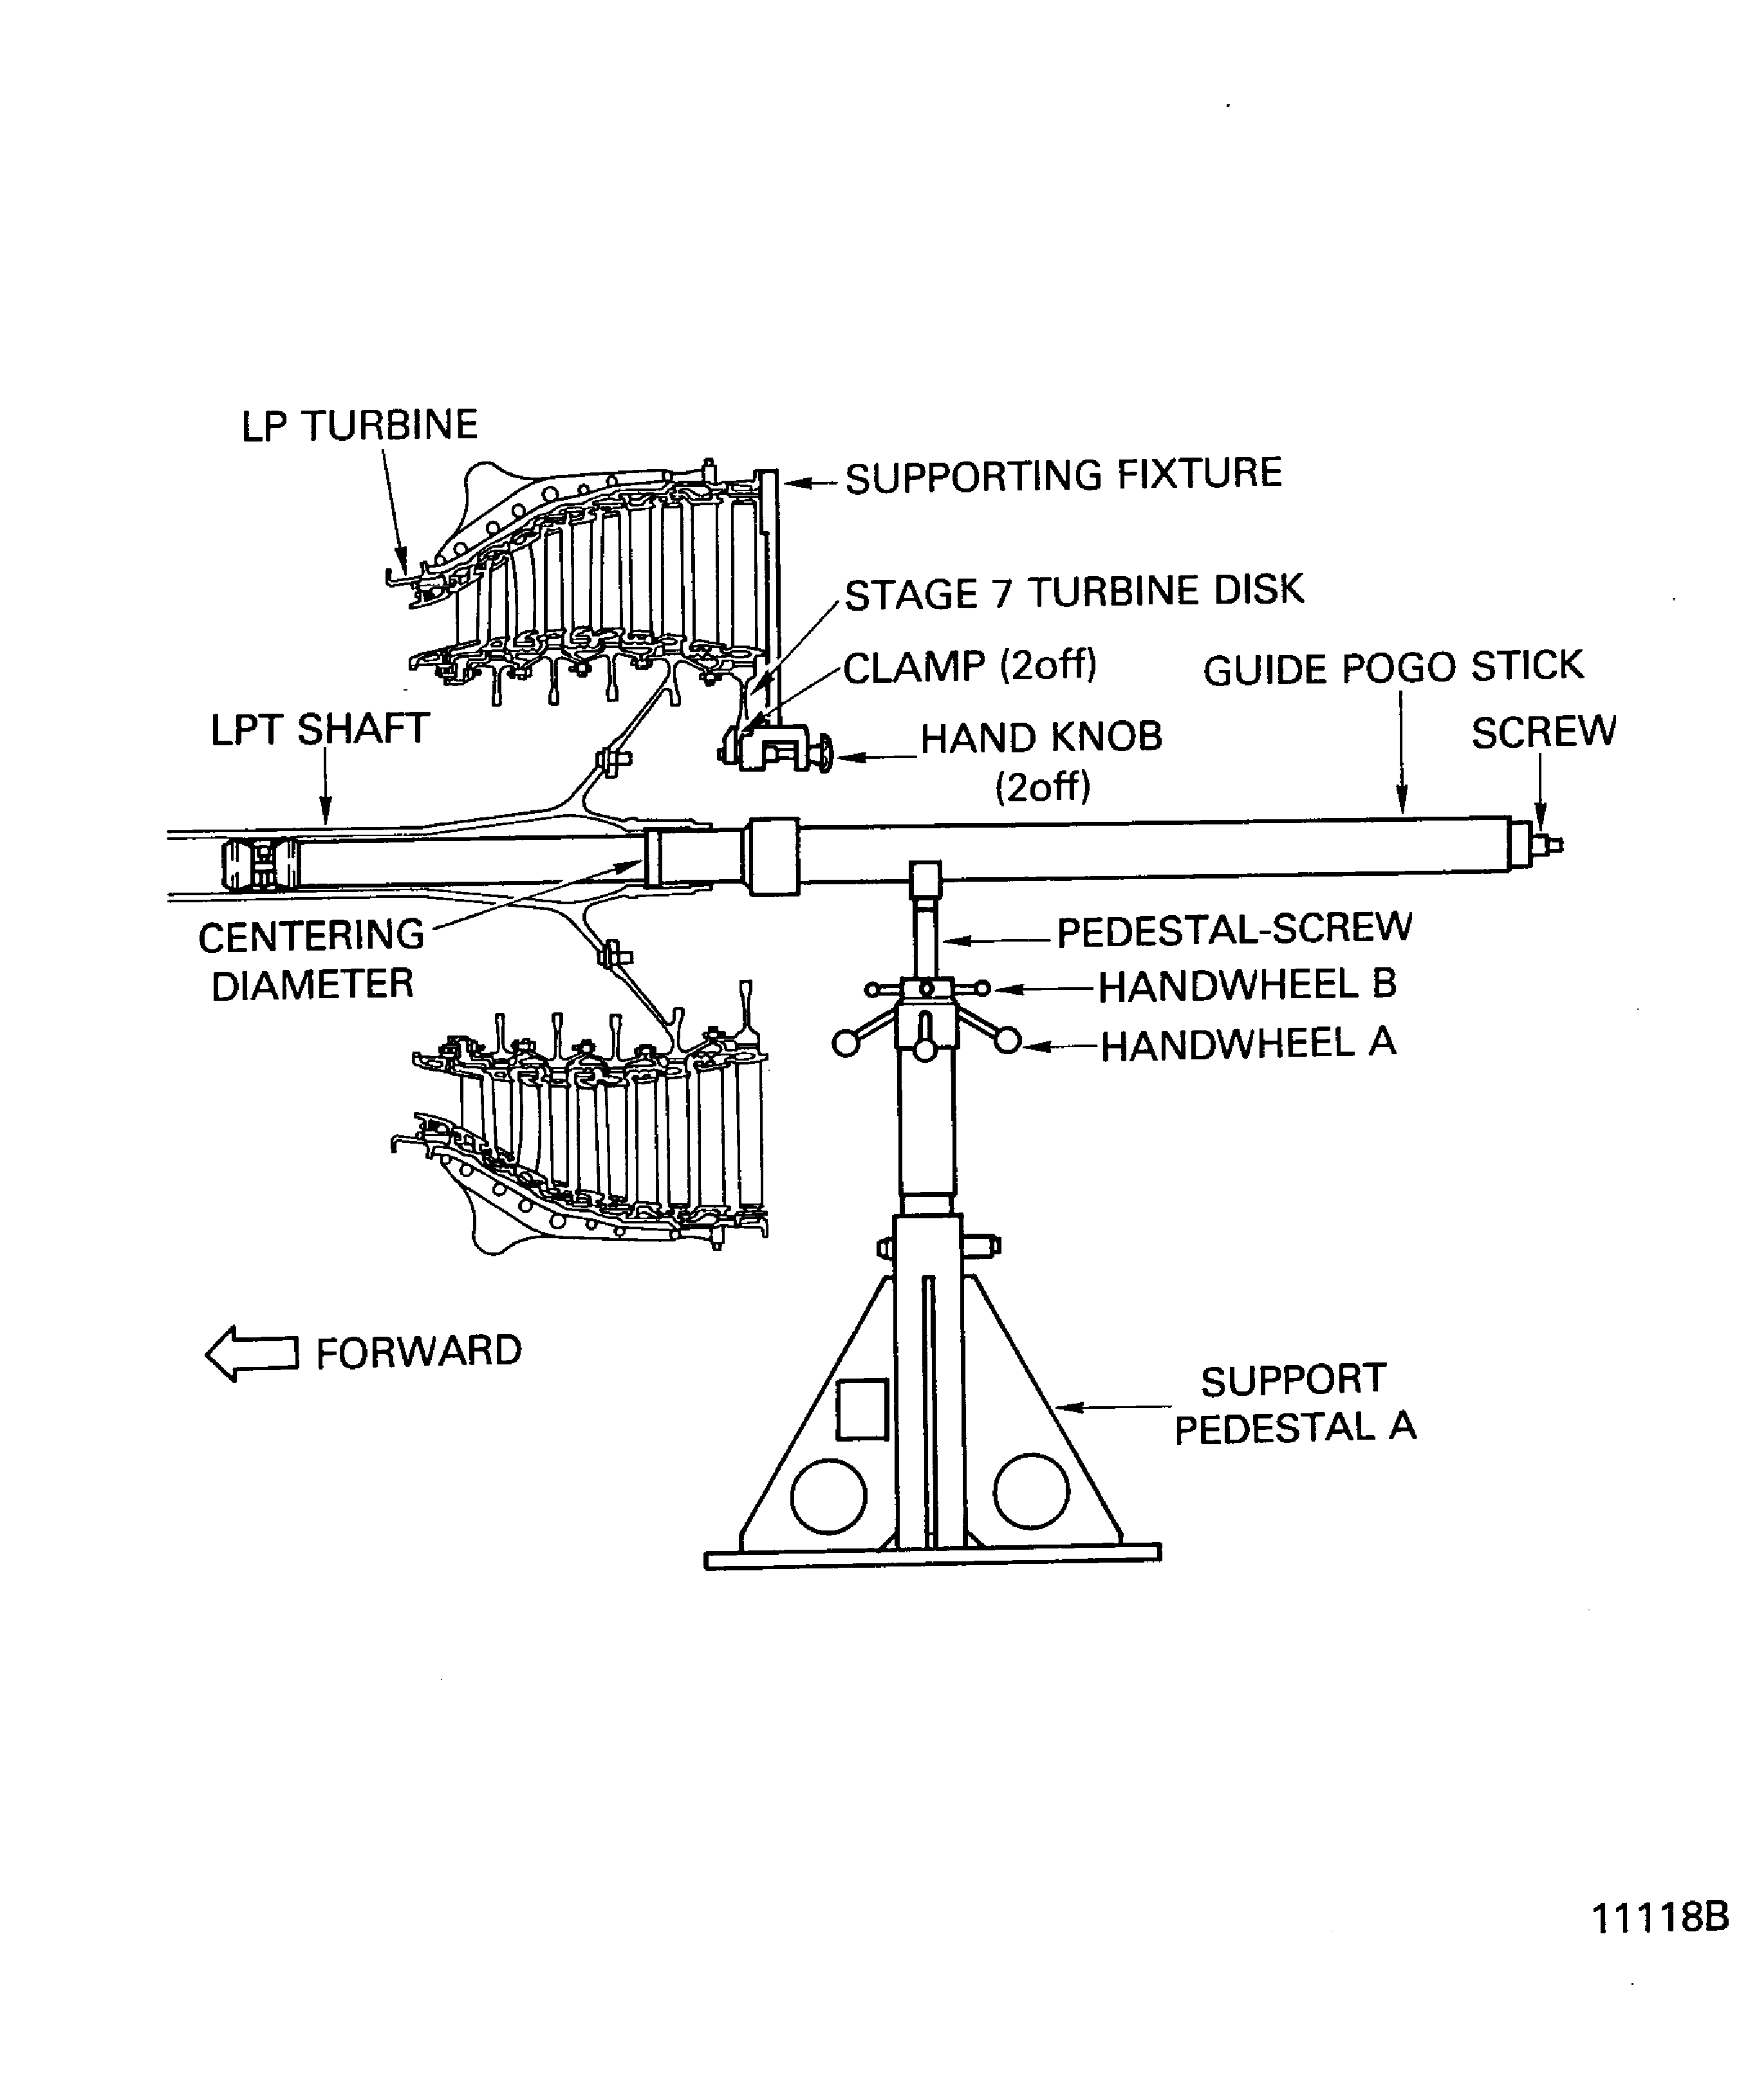
Figure: Install the Remove/Installation Fixture
Install the Remove/Installation Fixture
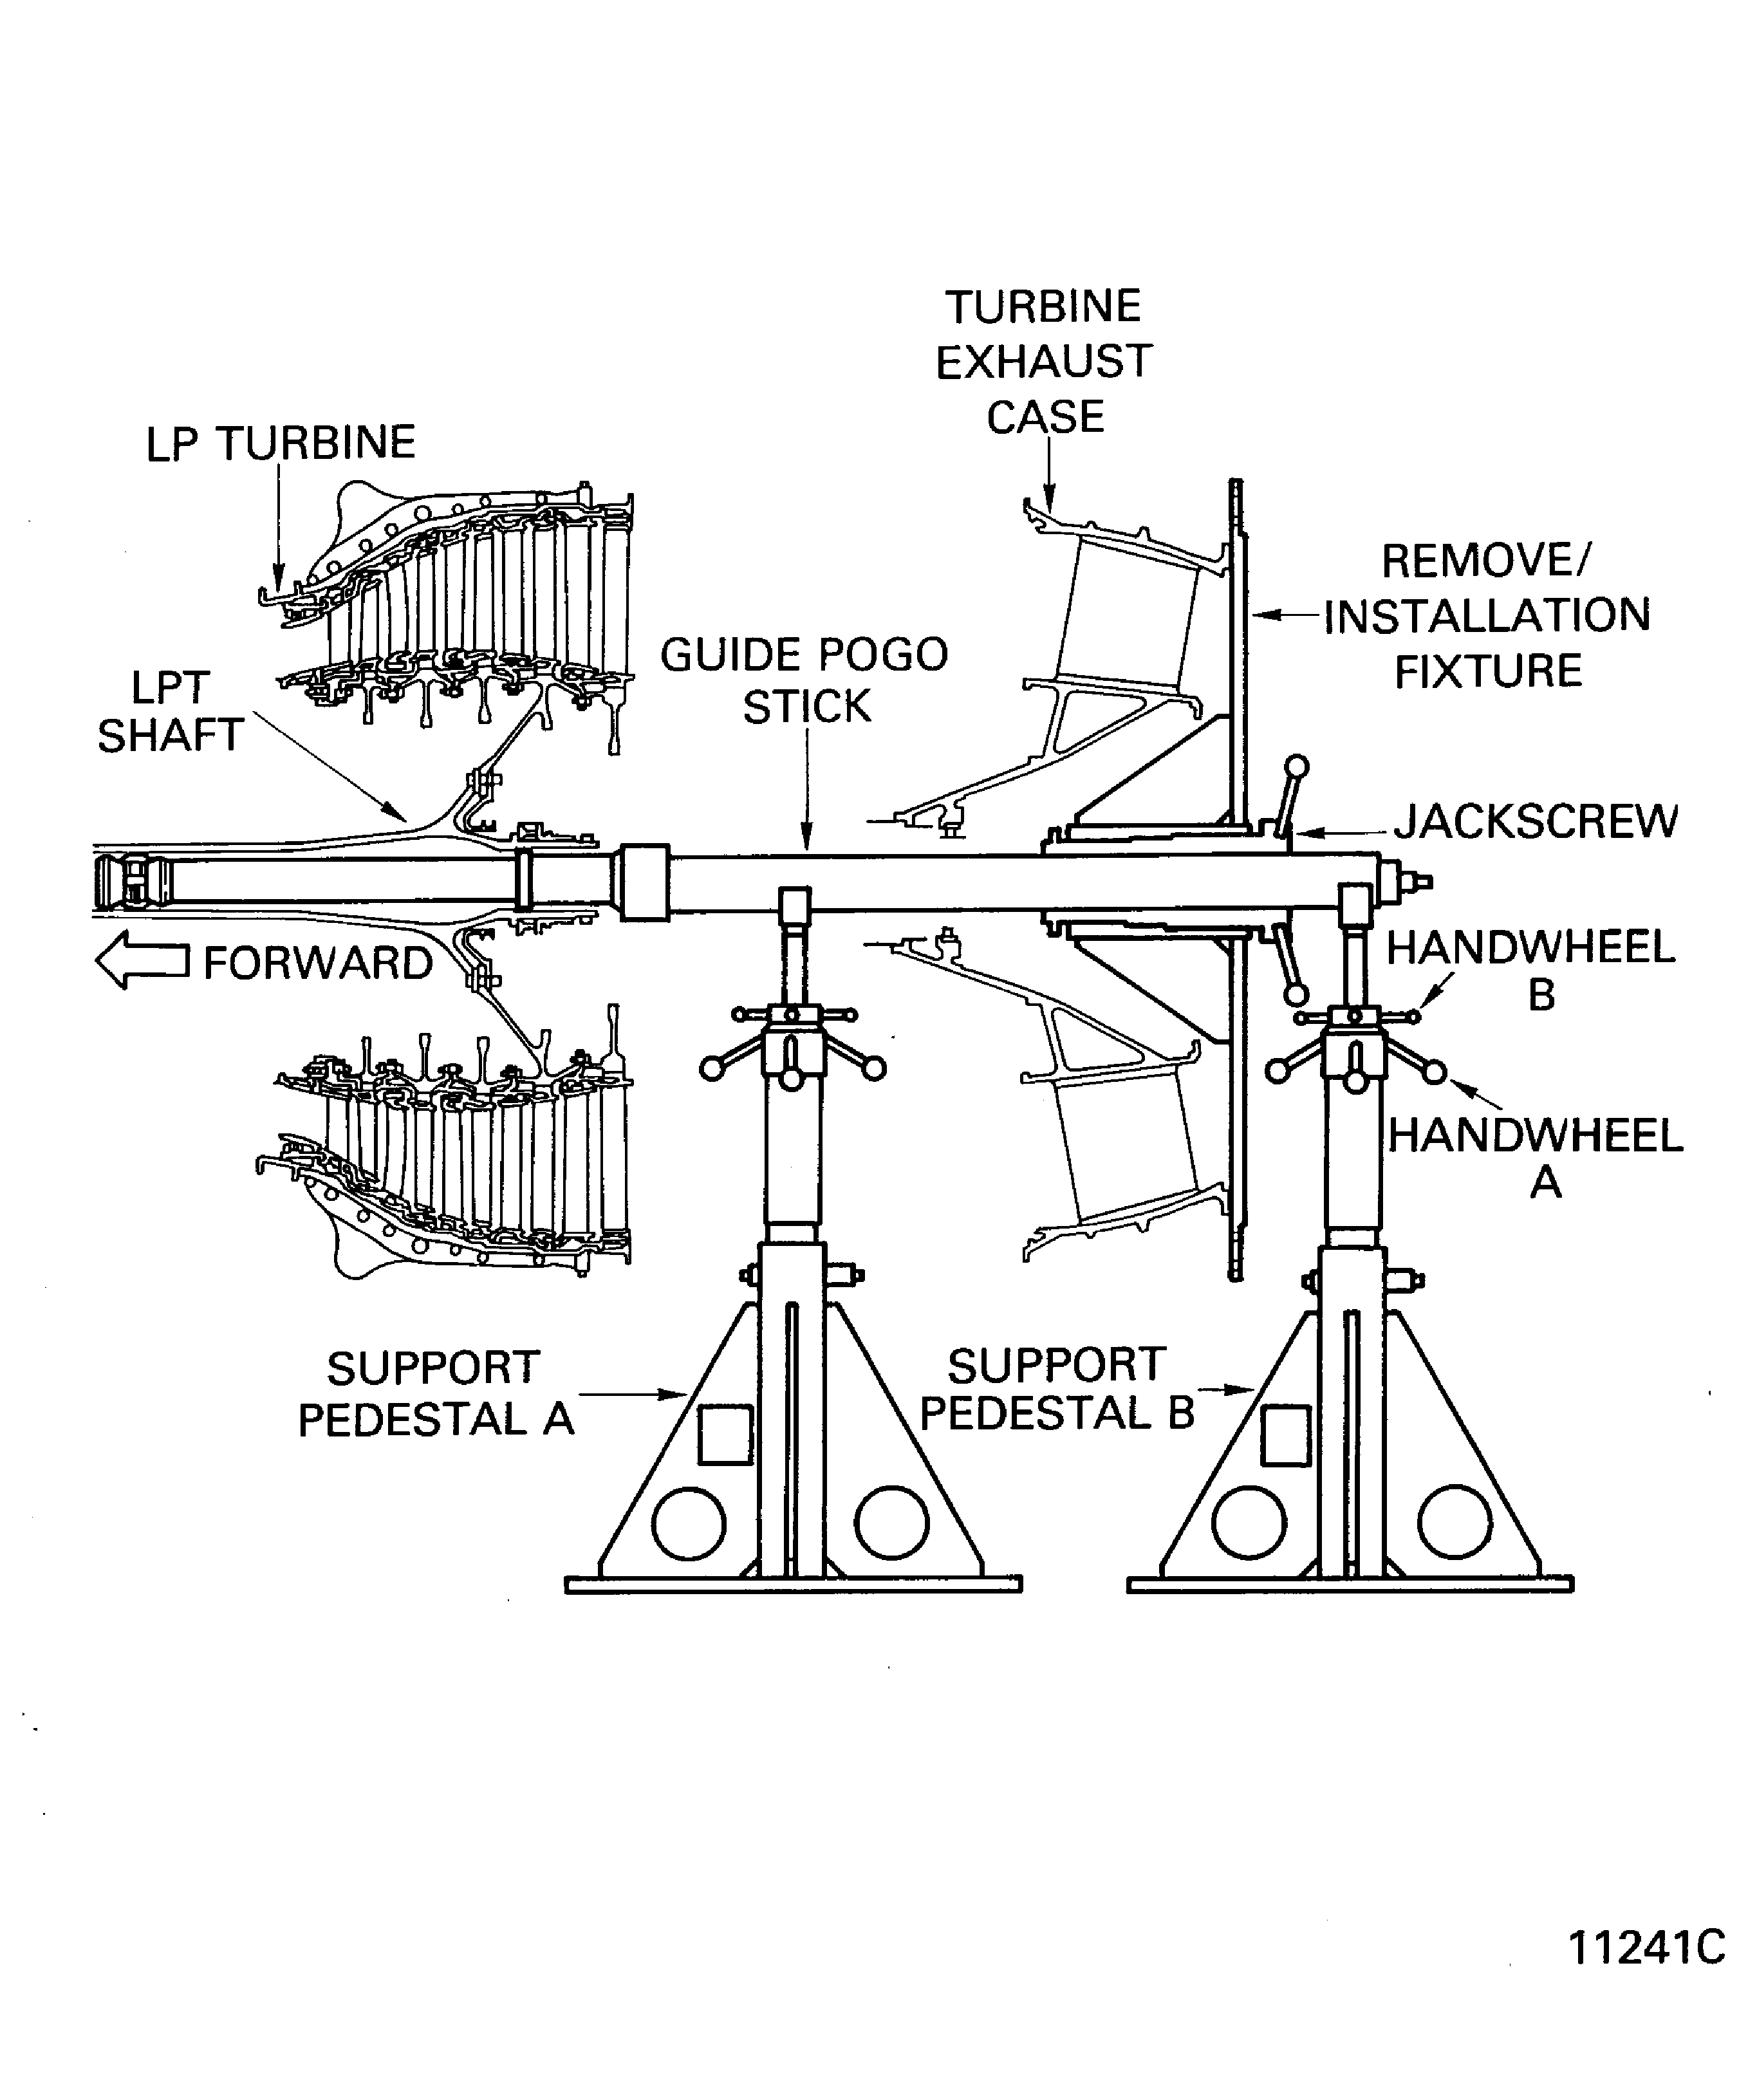
Figure: Installation of the Bolts and Brackets at the Front Flange of the TEC
Sheet 1
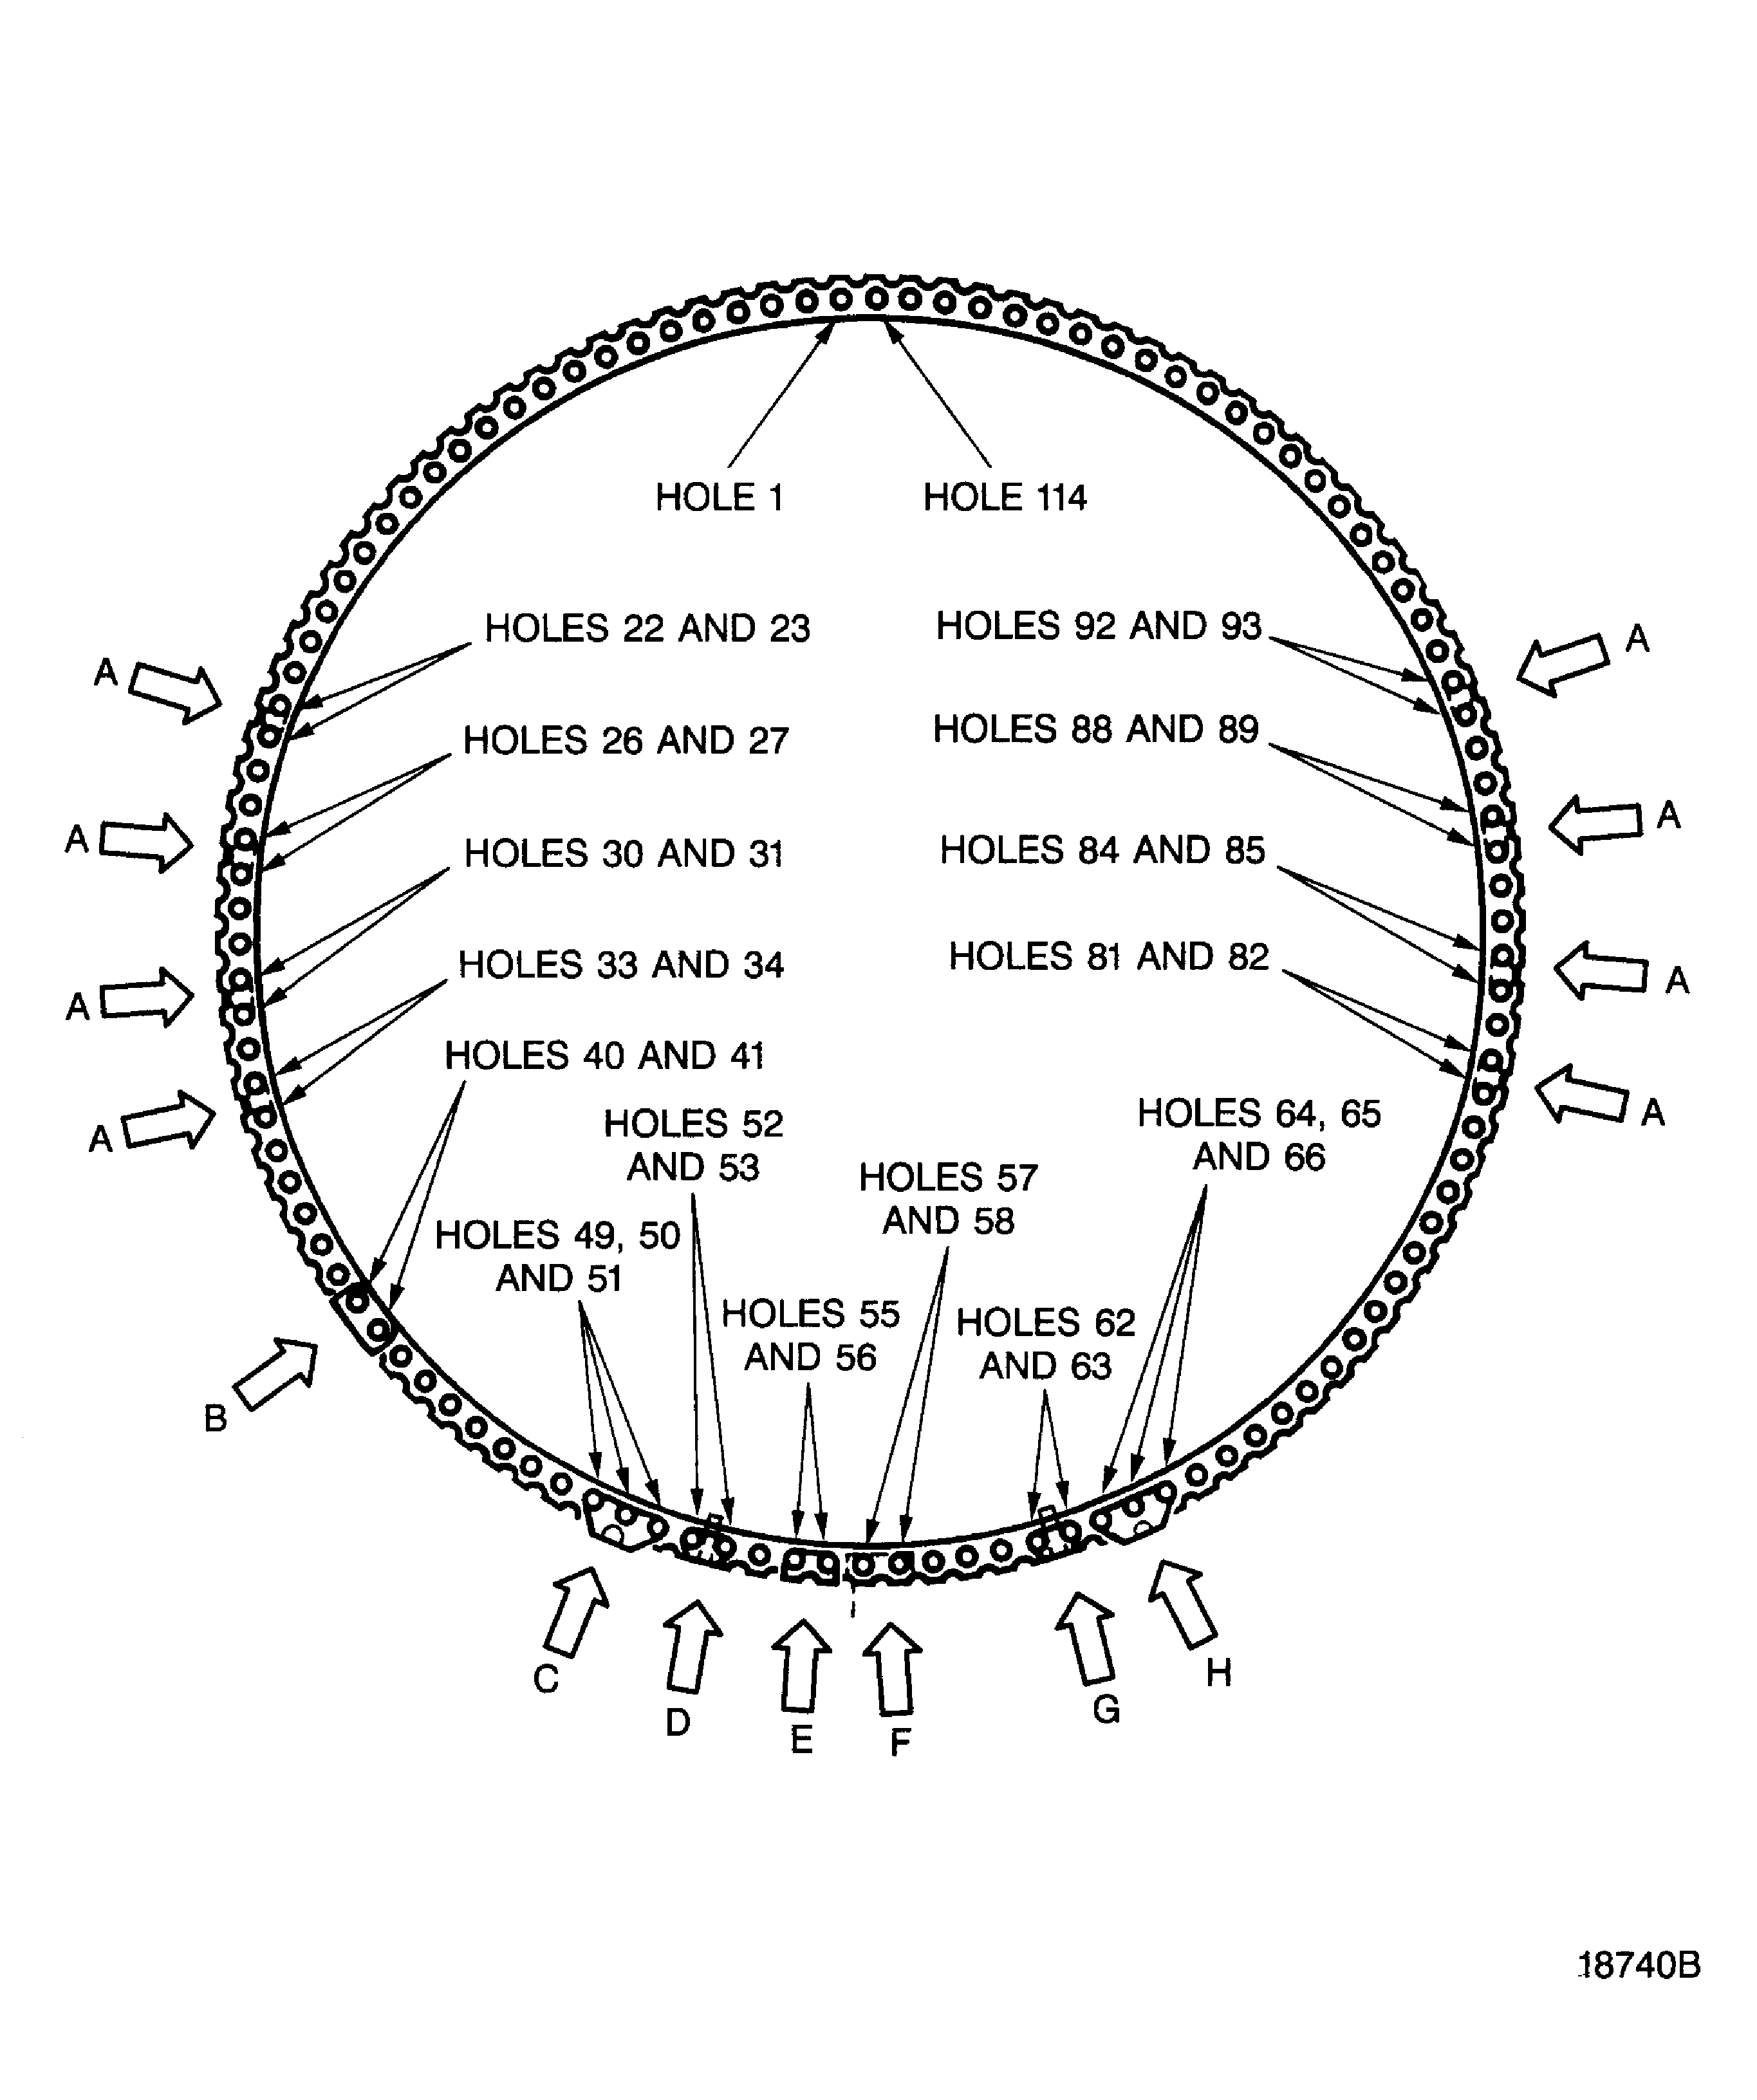
Figure: Installation of the Bolts and Brackets at the Front Flange of the TEC
Sheet 2
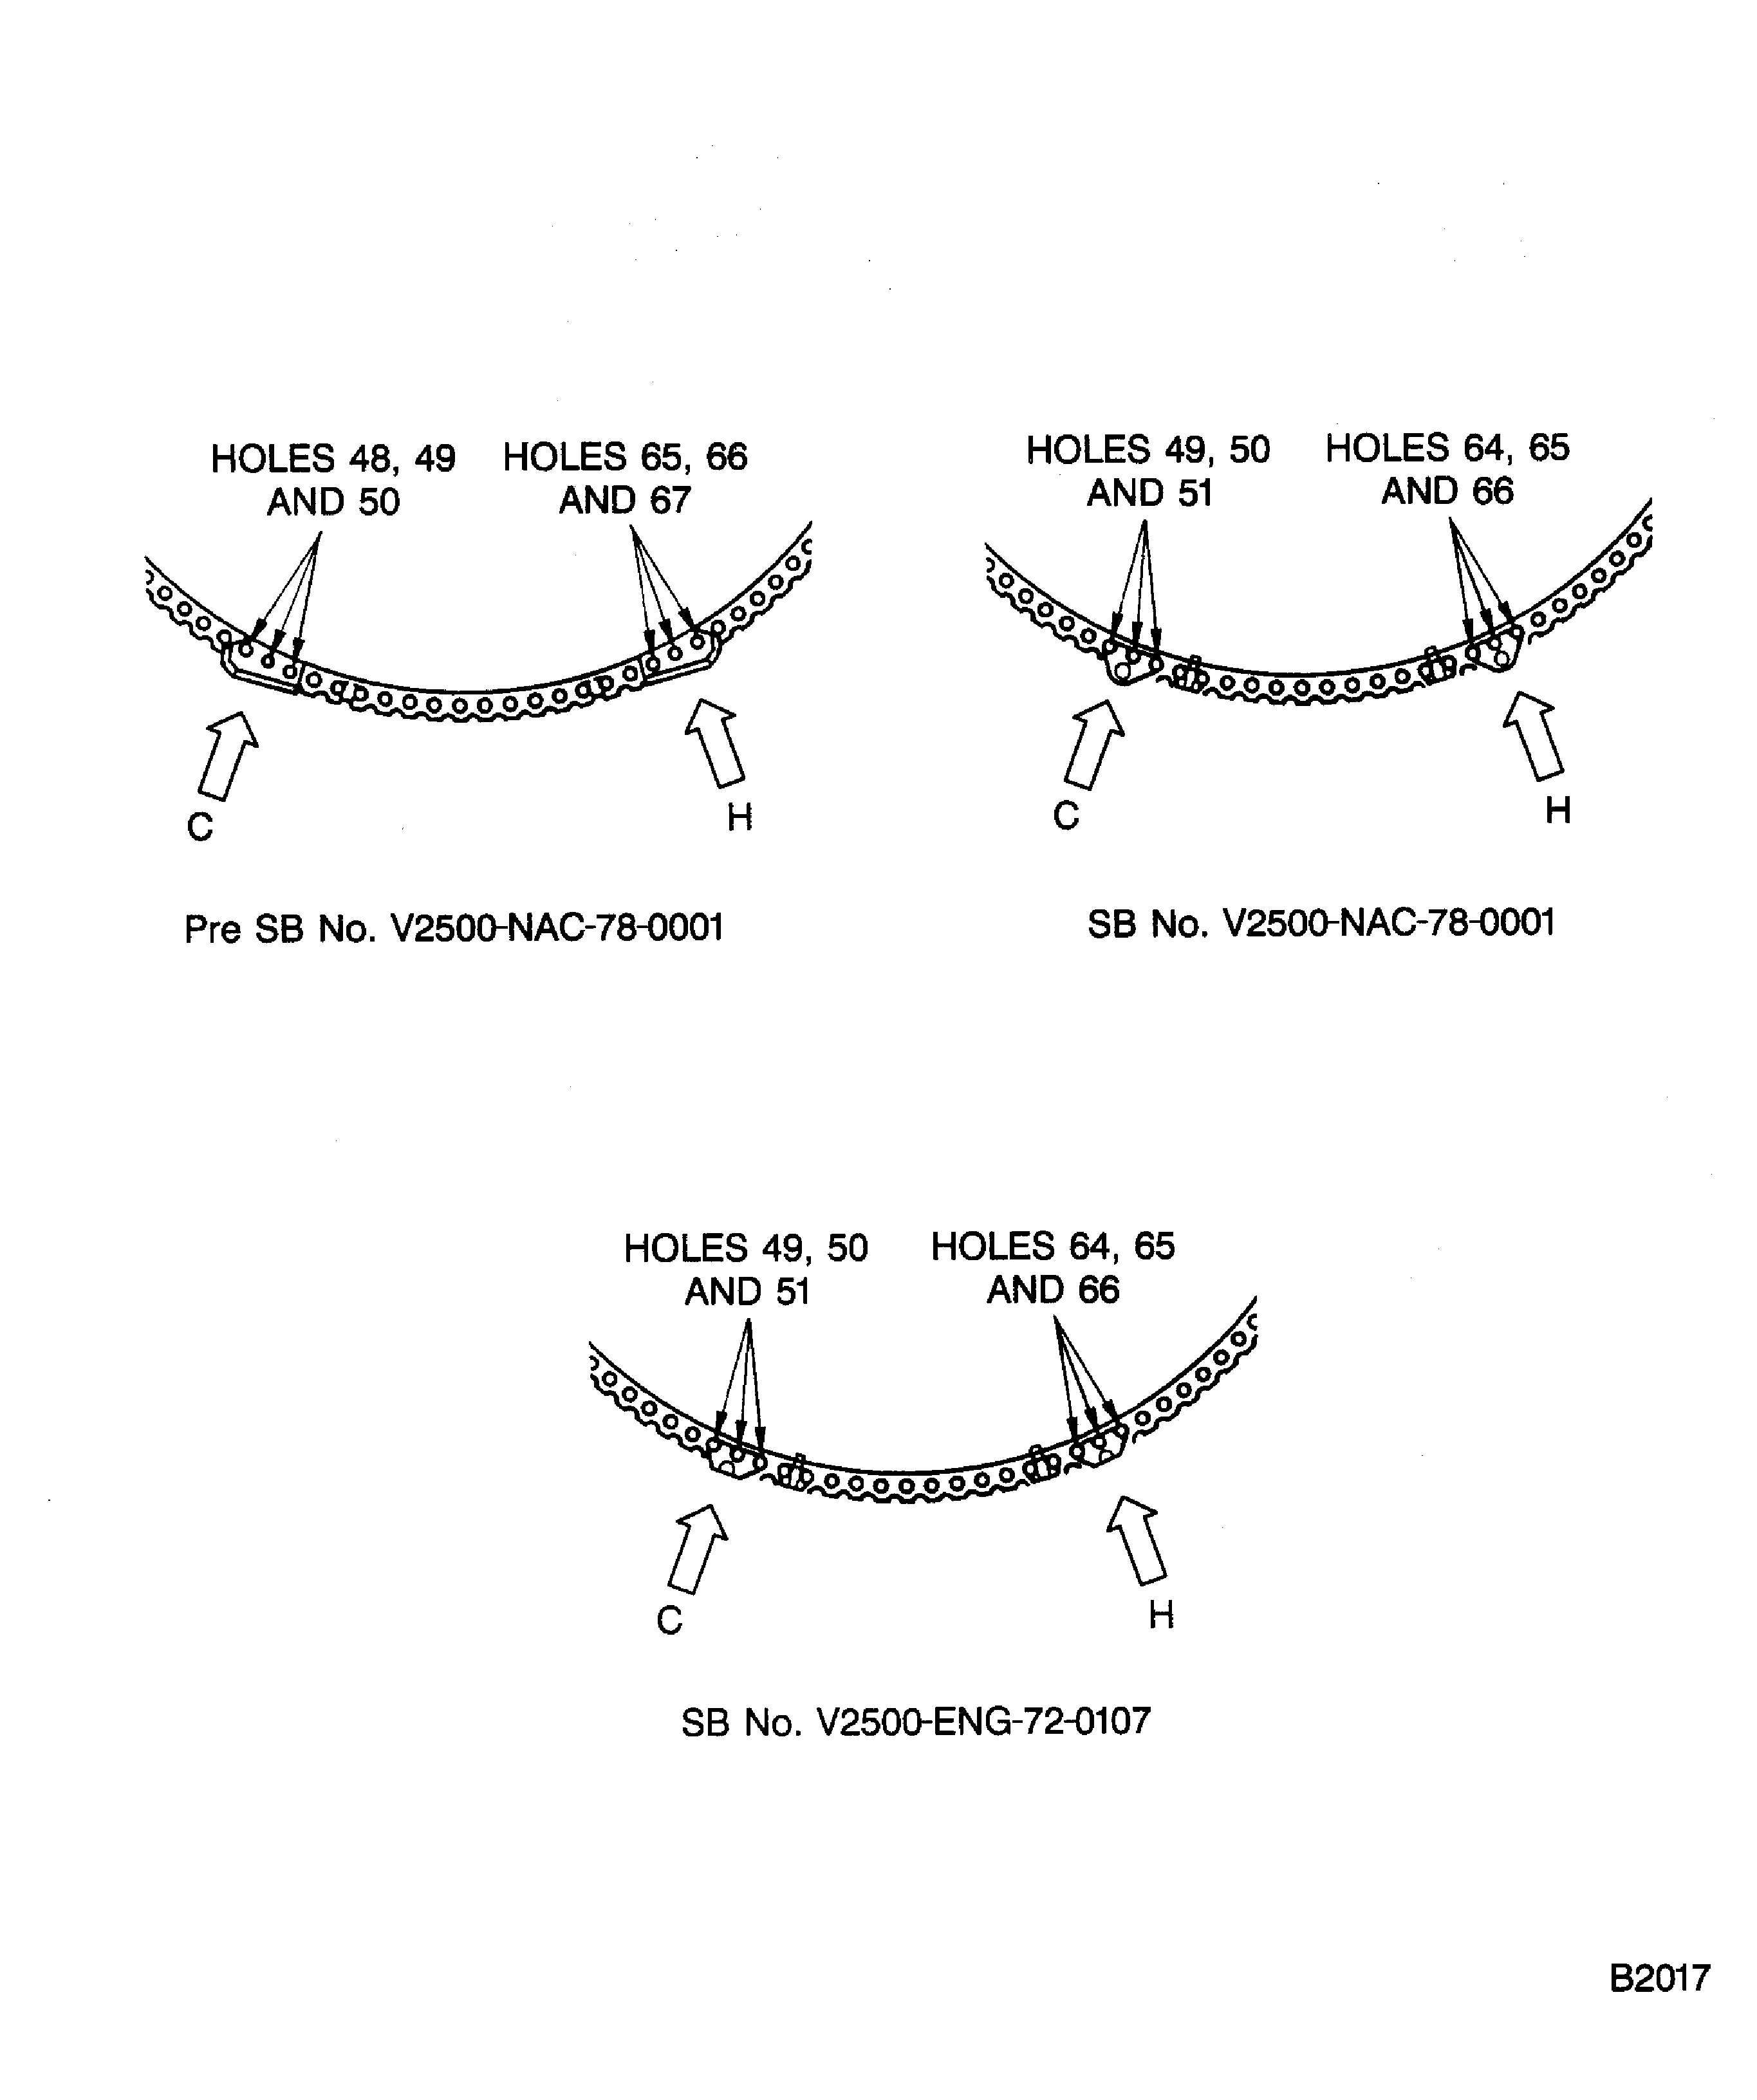
Figure: Installation of the Bolts and Brackets at the Front Flange of the TEC
Sheet 3
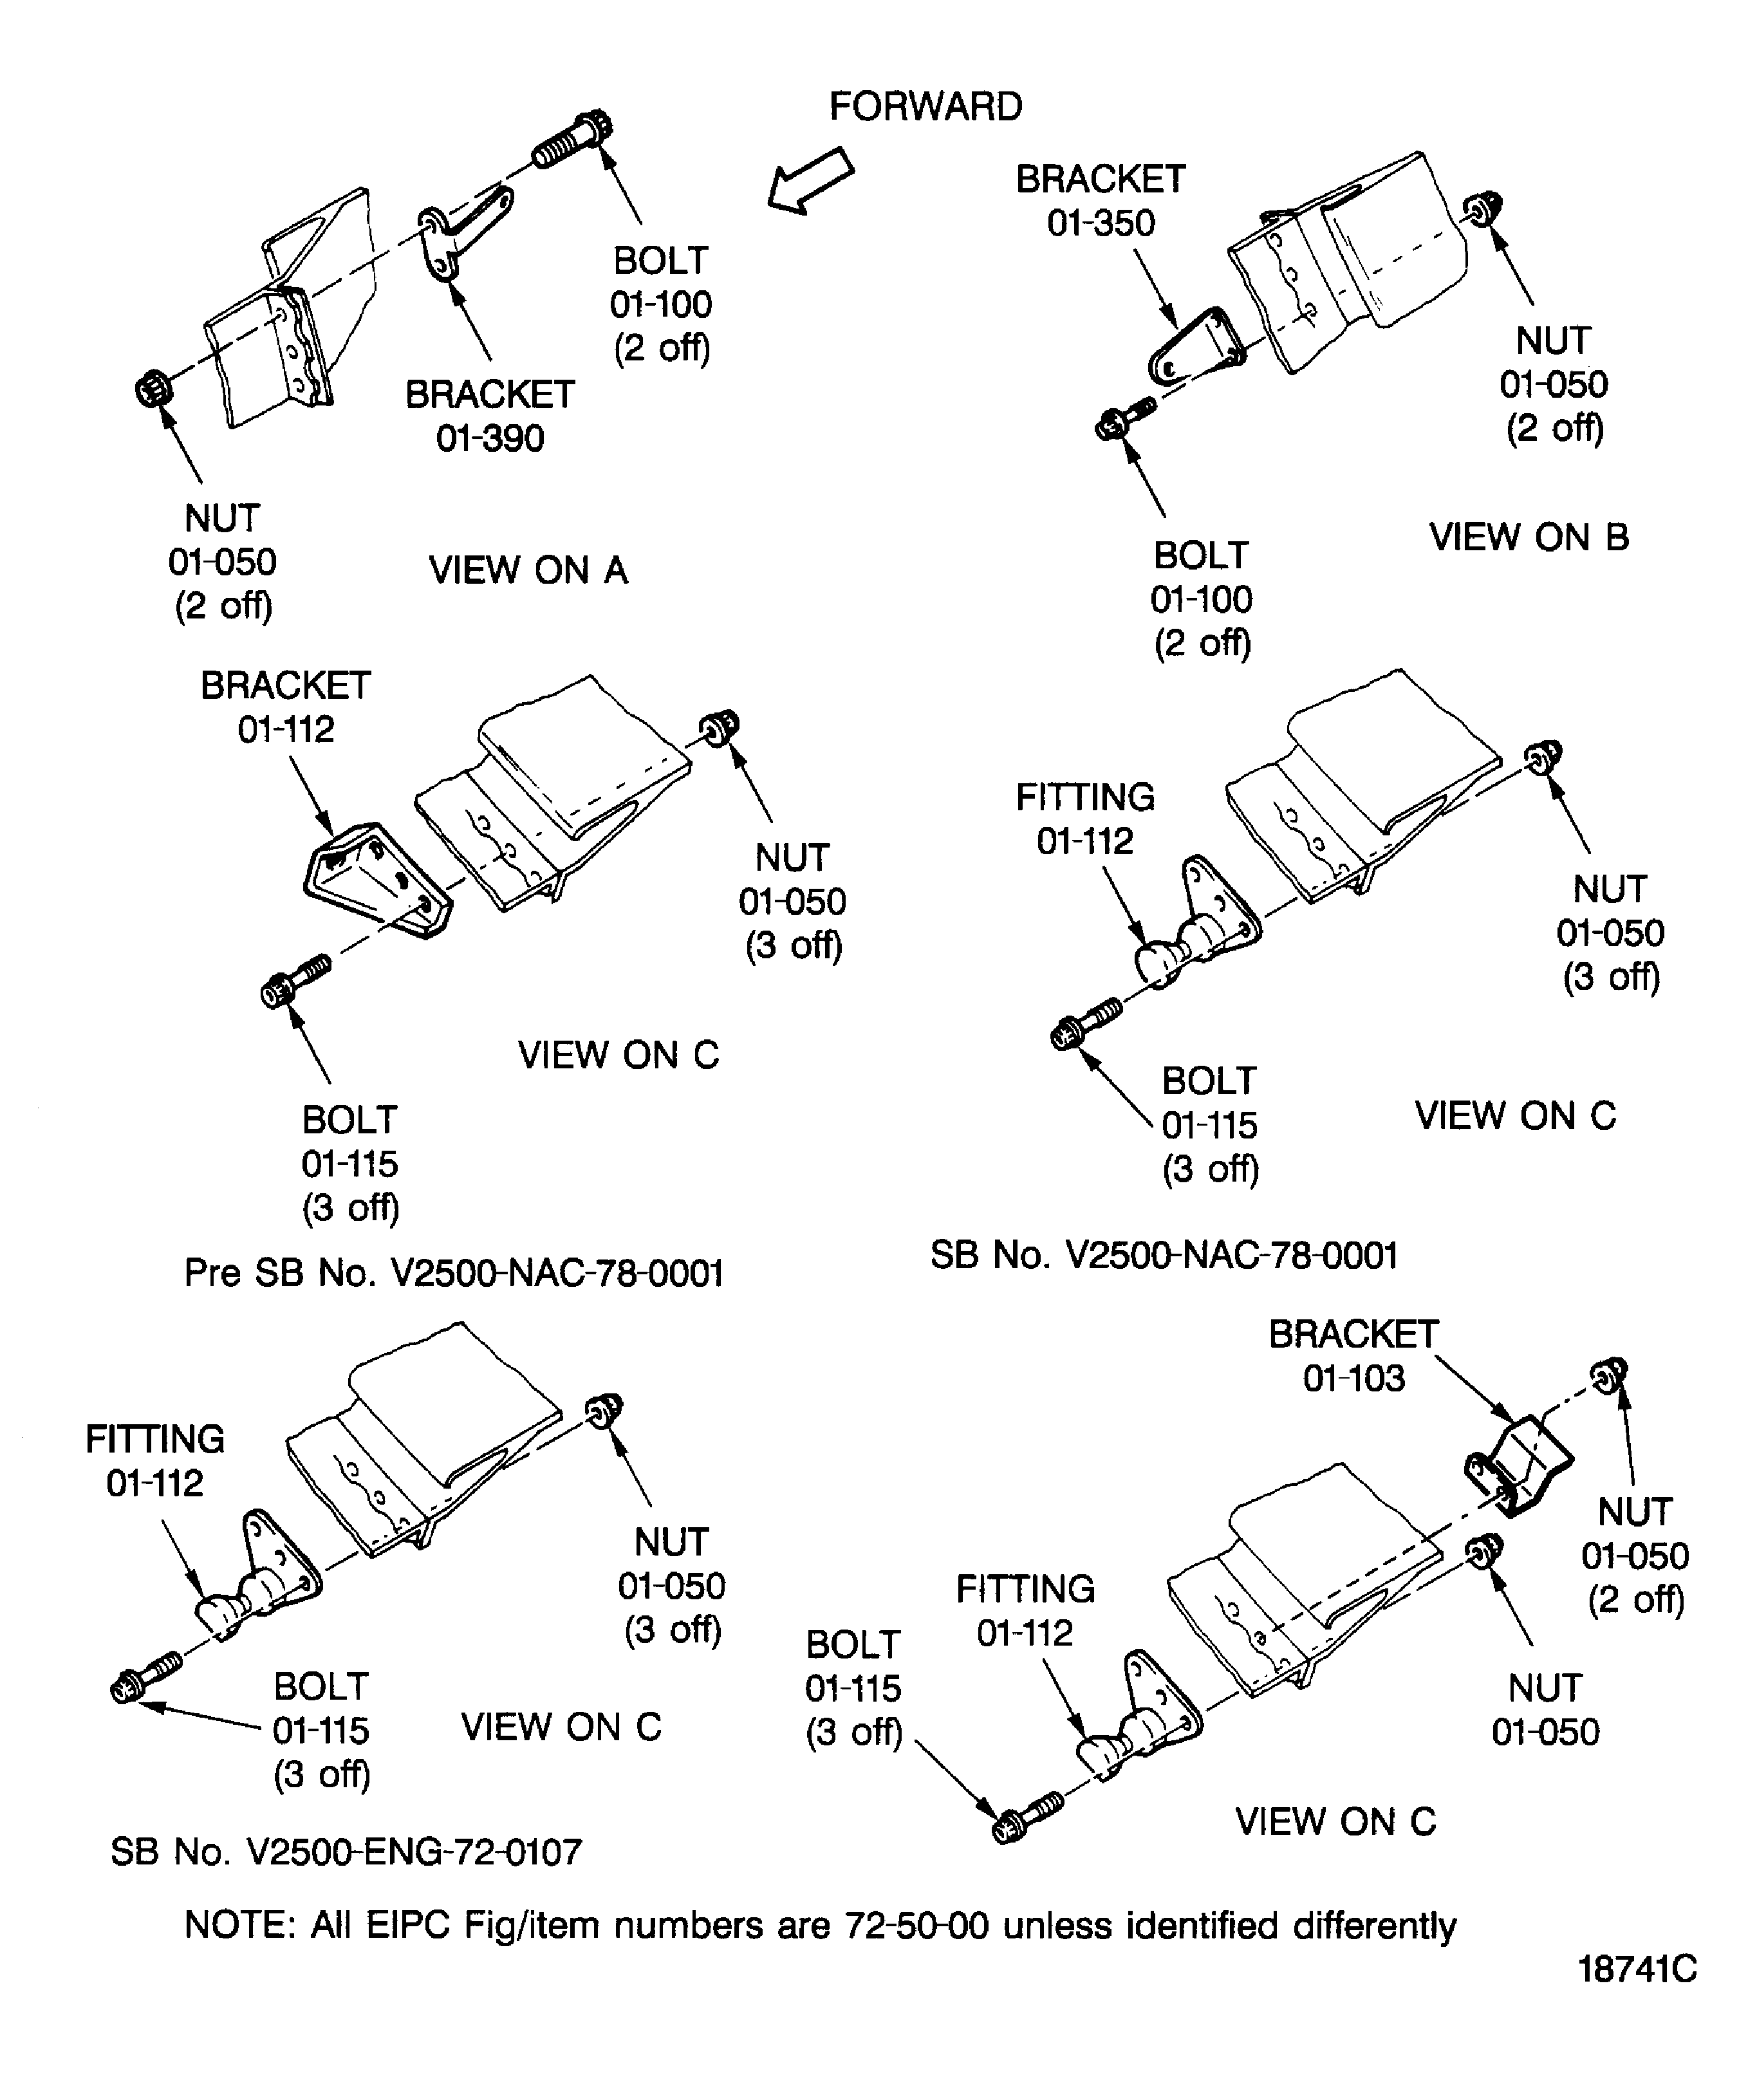
Figure: Installation of the Bolts and Brackets at the Front Flange of the TEC
Sheet 4
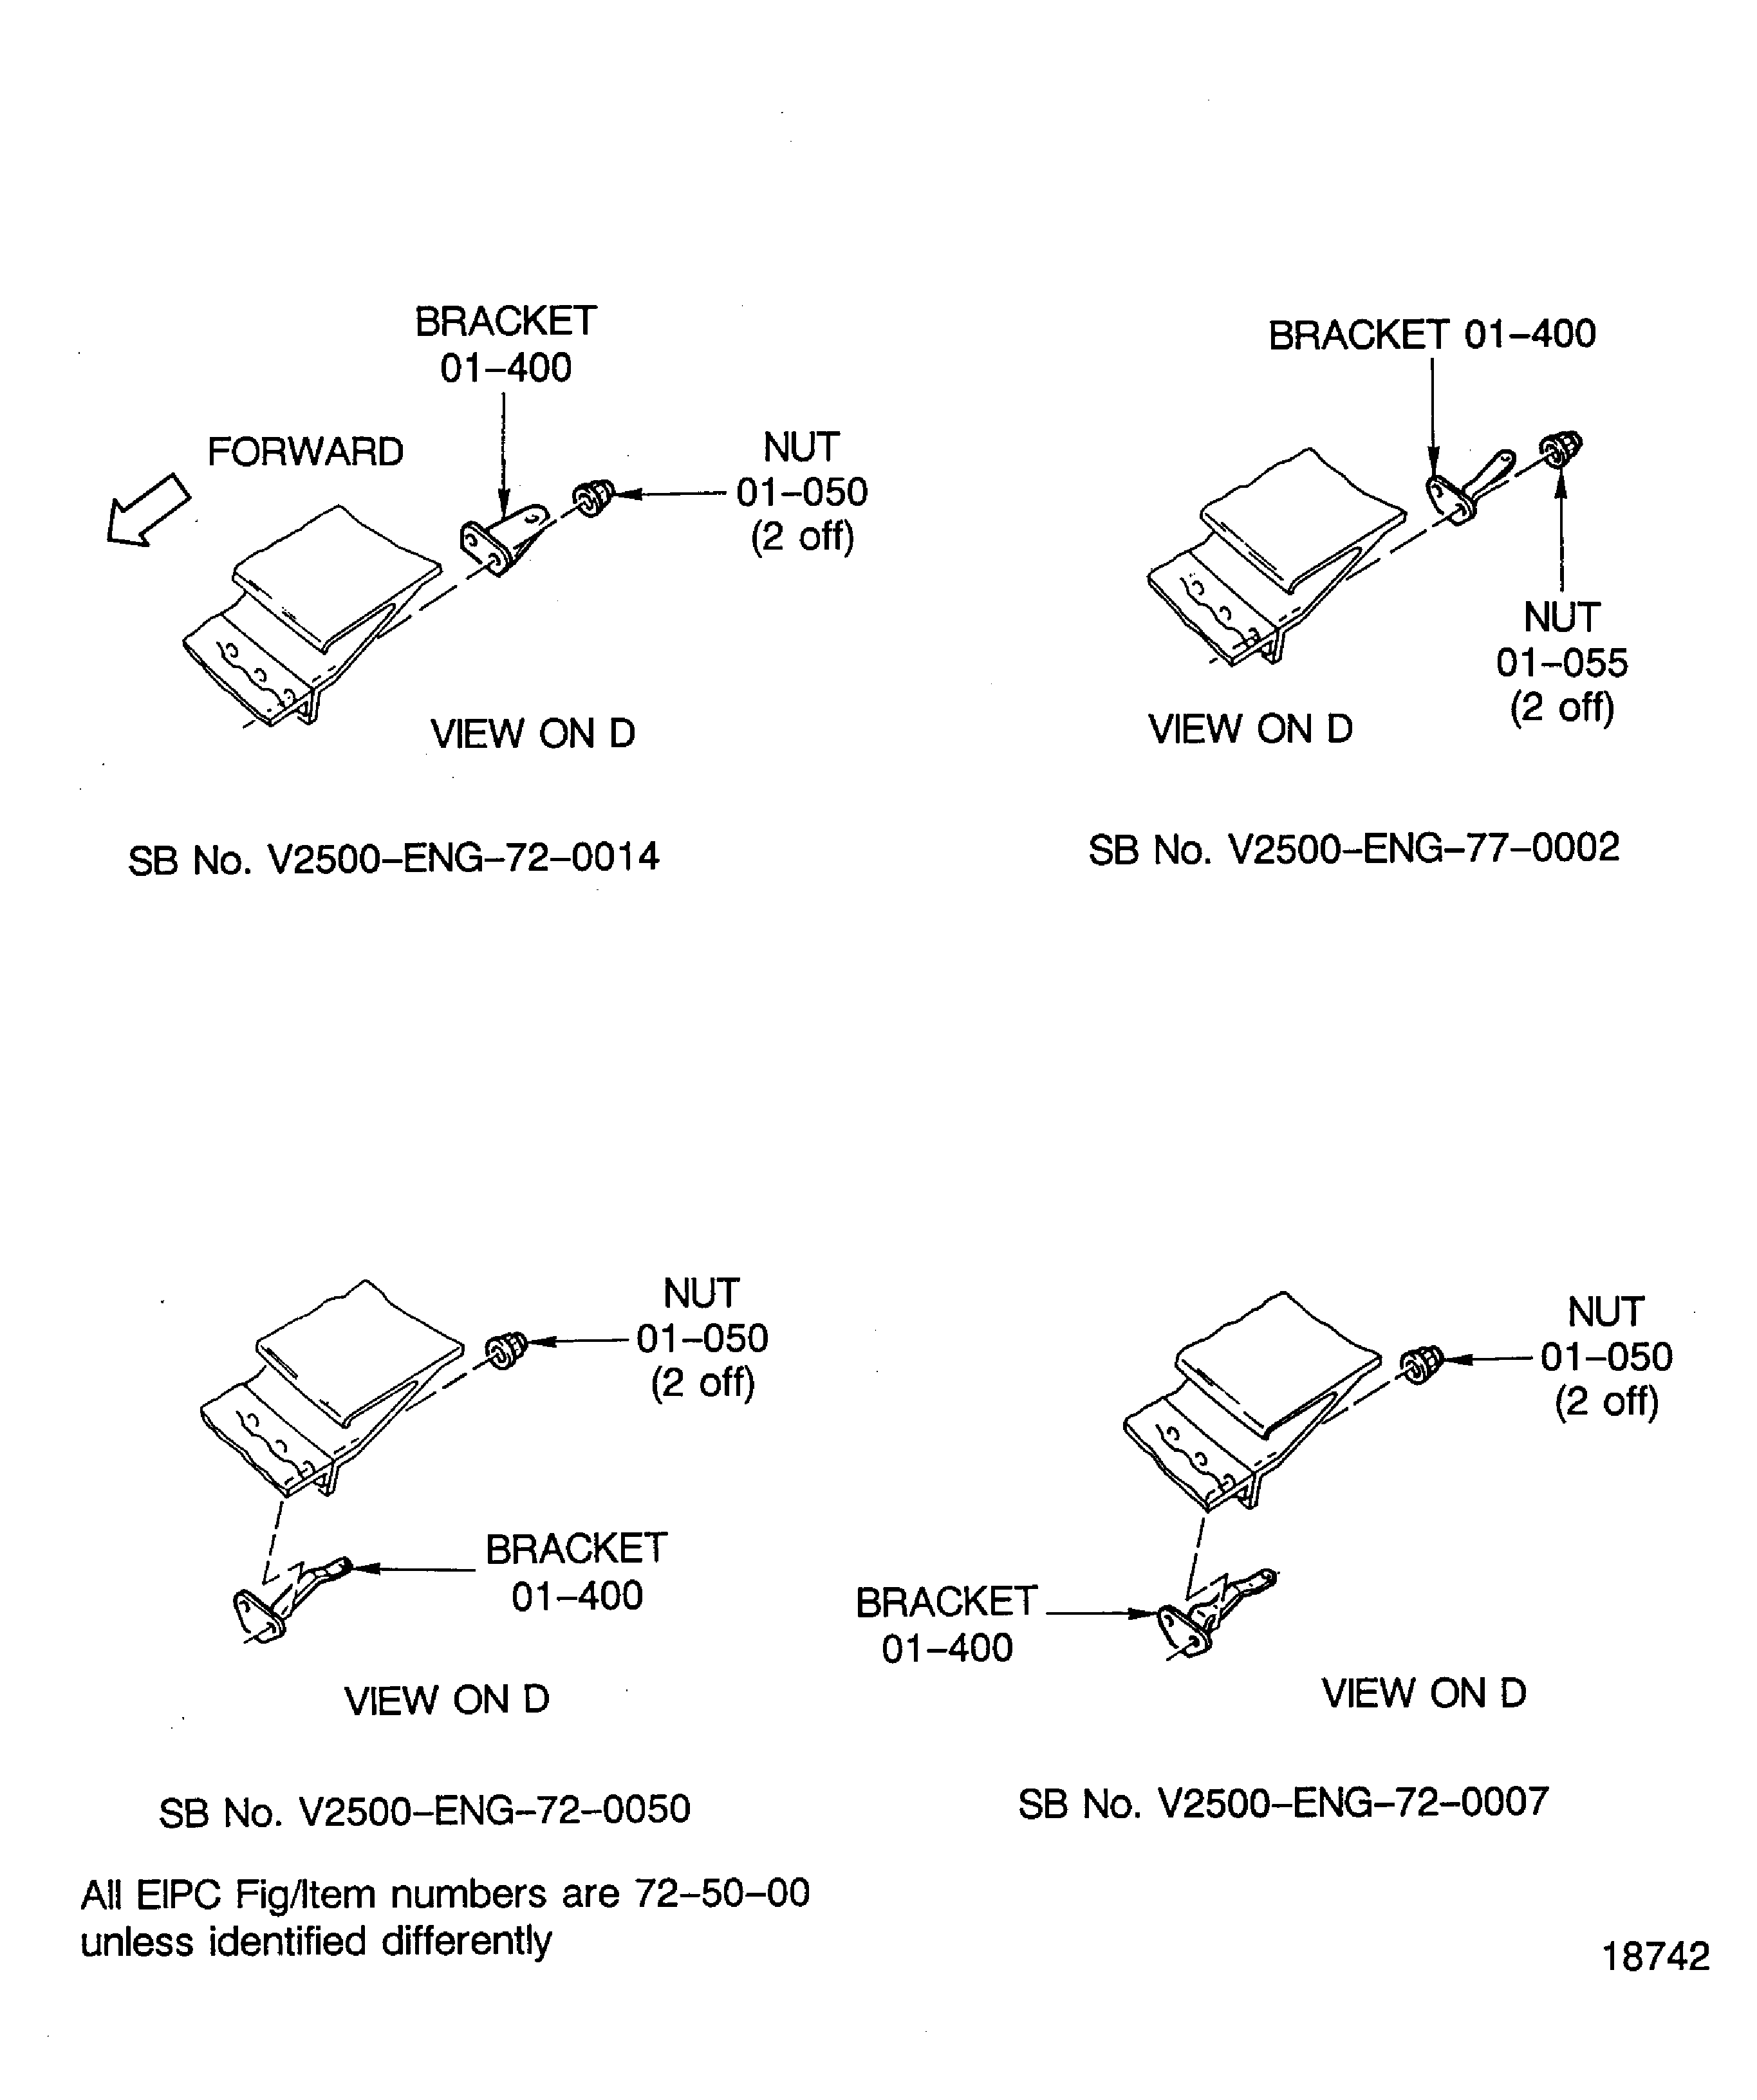
Figure: Installation of the Bolts and Brackets at the Front Flange of the TEC
Sheet 5
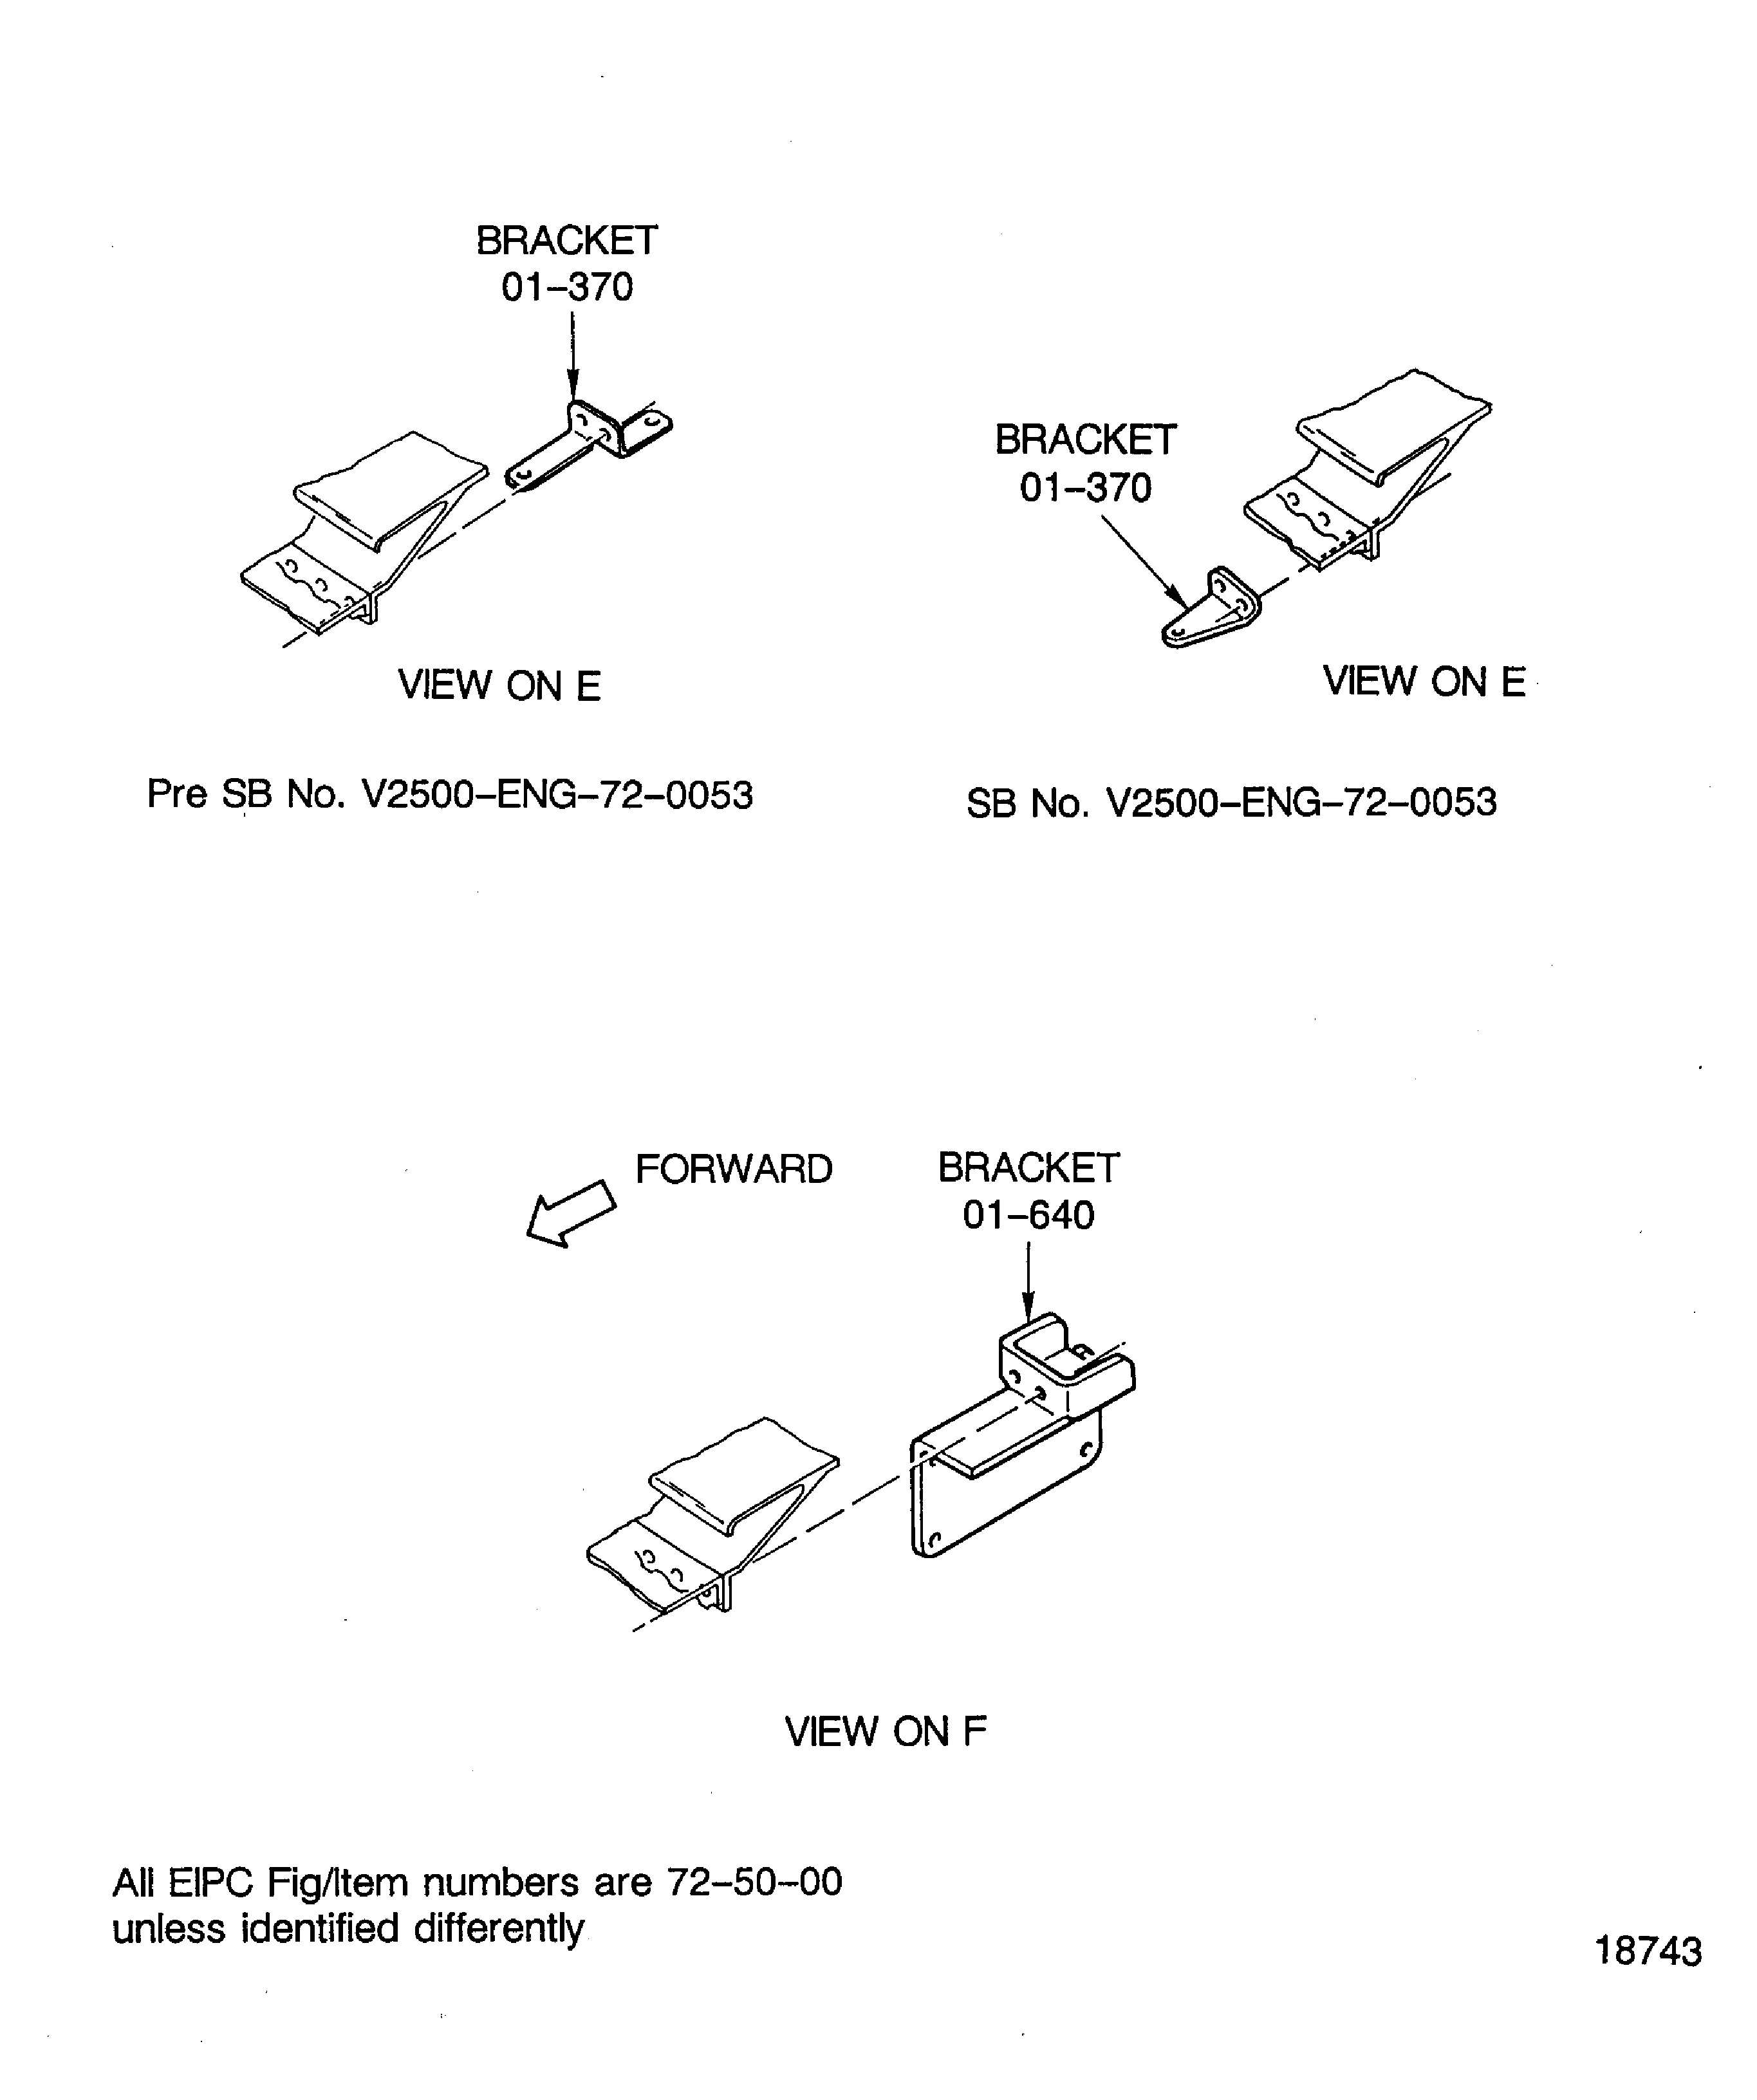
Figure: Installation of the Bolts and Brackets at the Front Flange of the TEC
Sheet 6
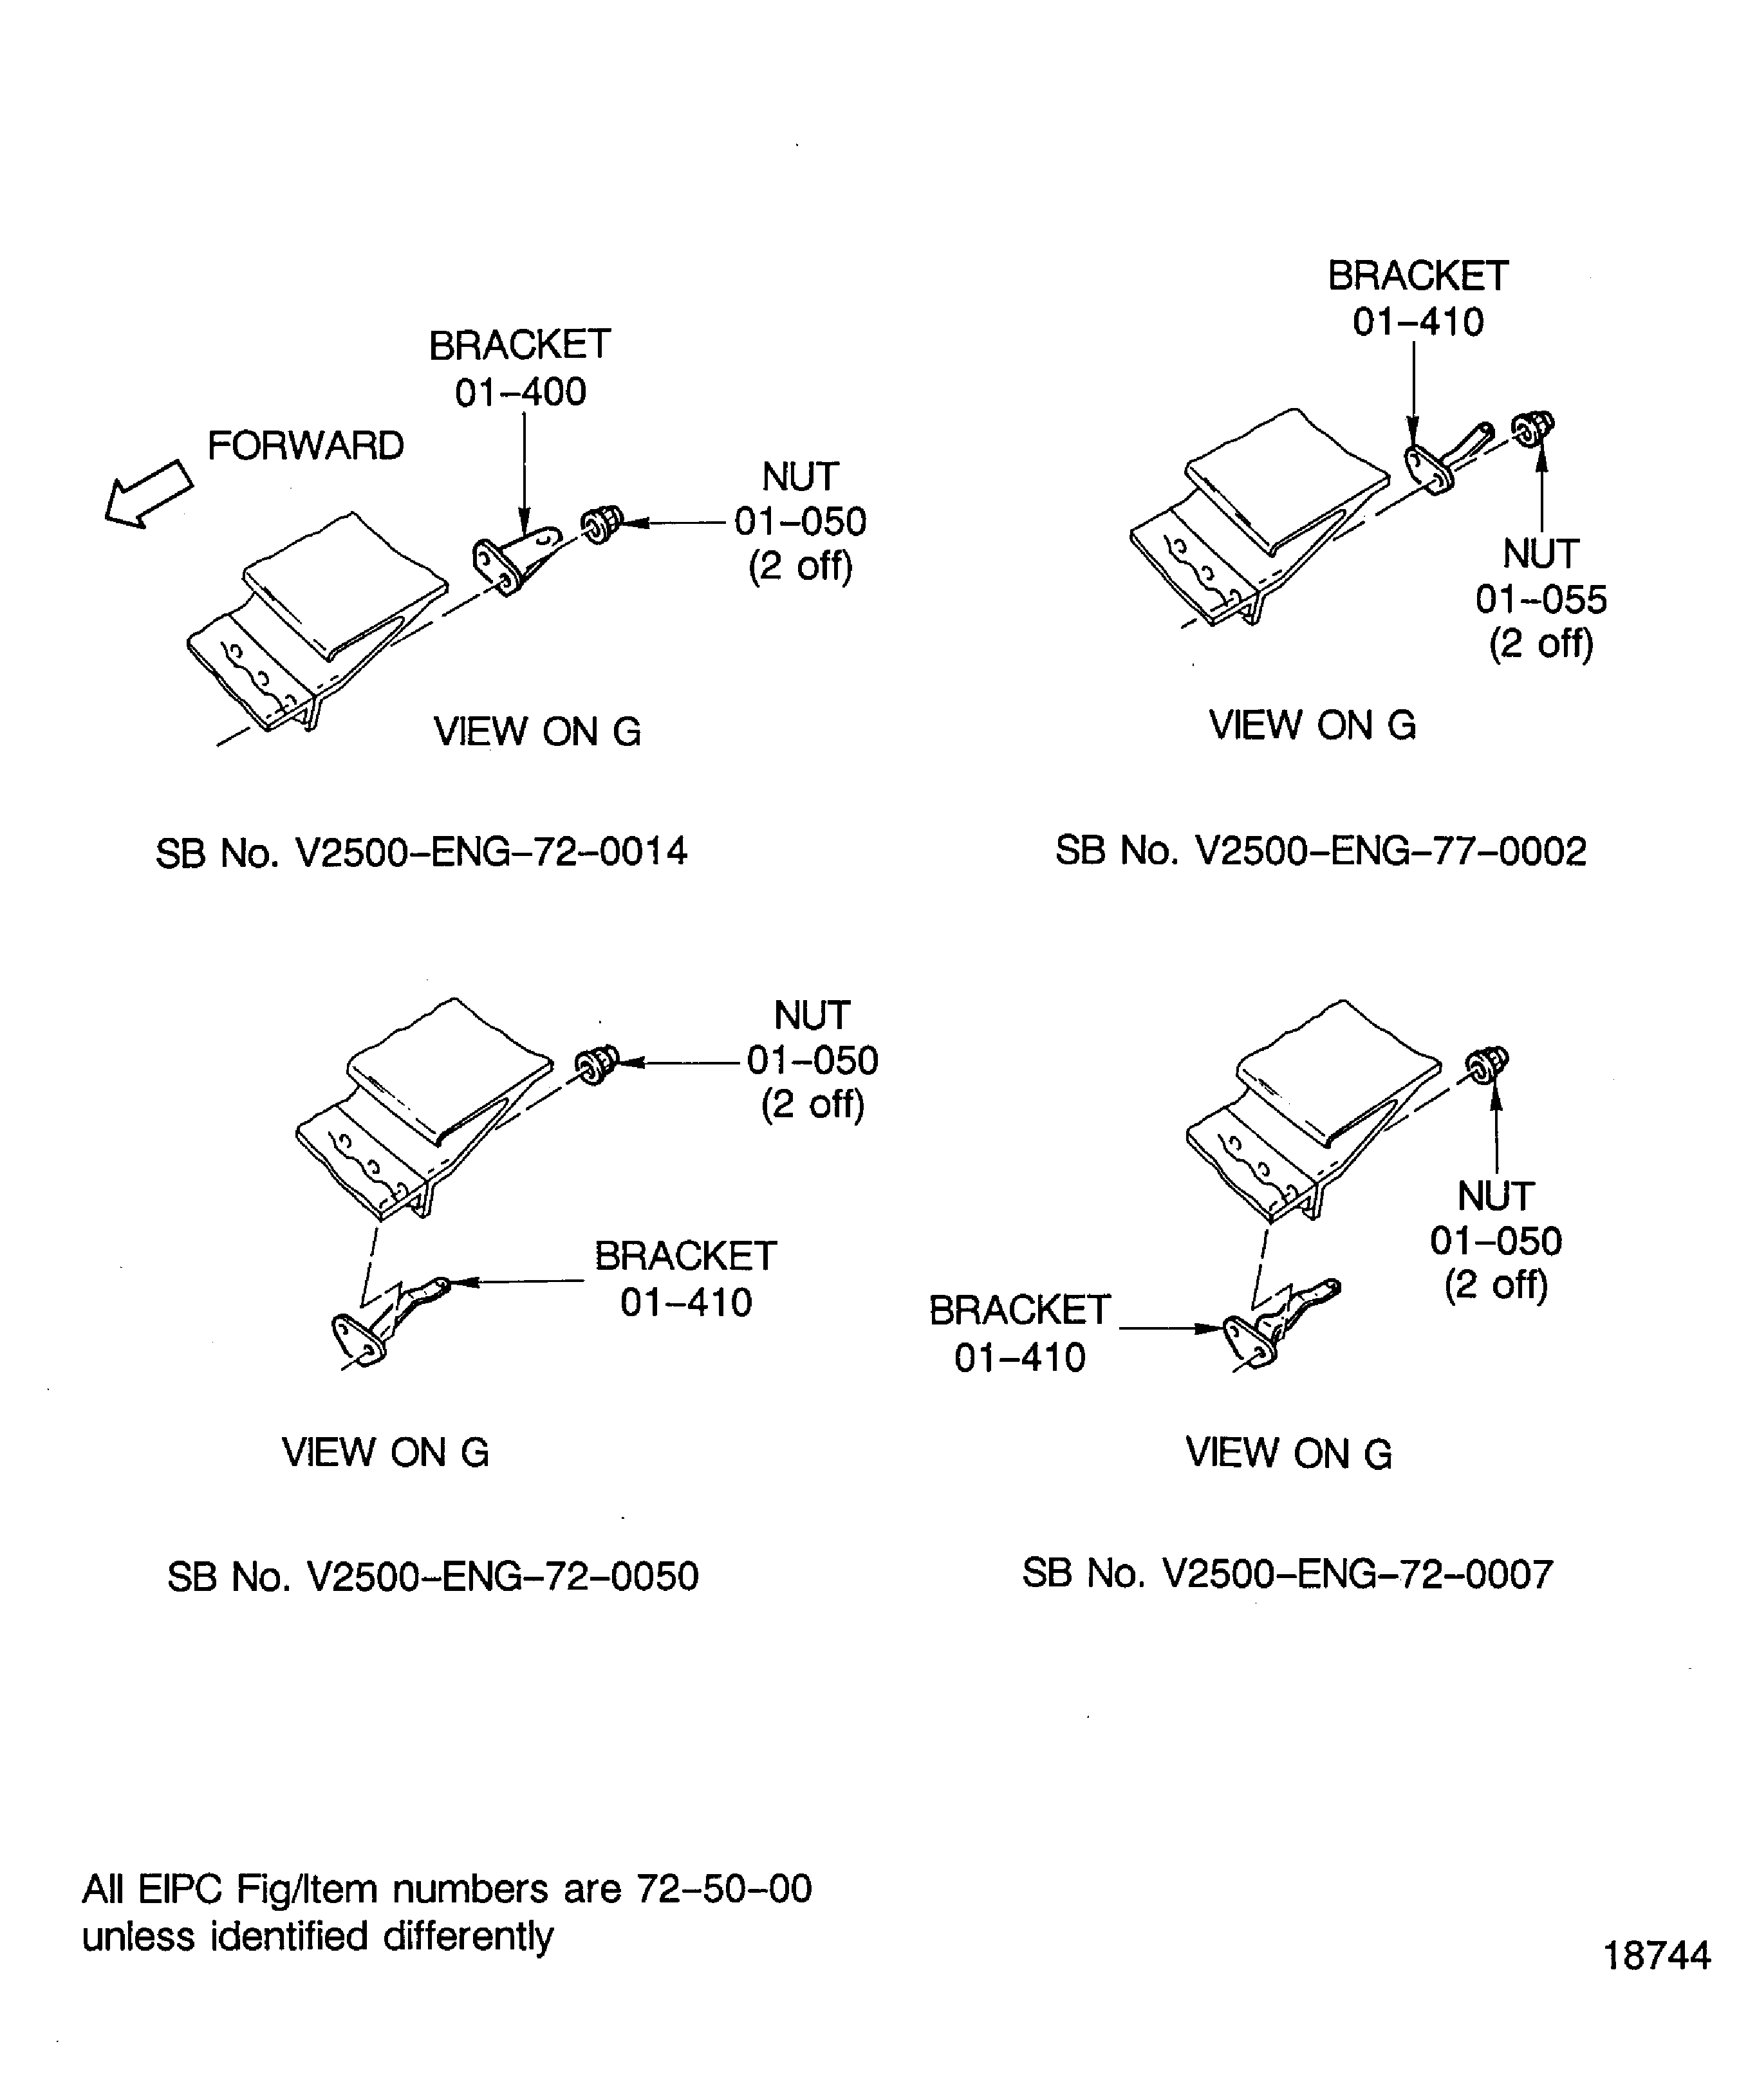
Figure: Installation of the Bolts and Brackets at the Front Flange of the TEC
Sheet 7
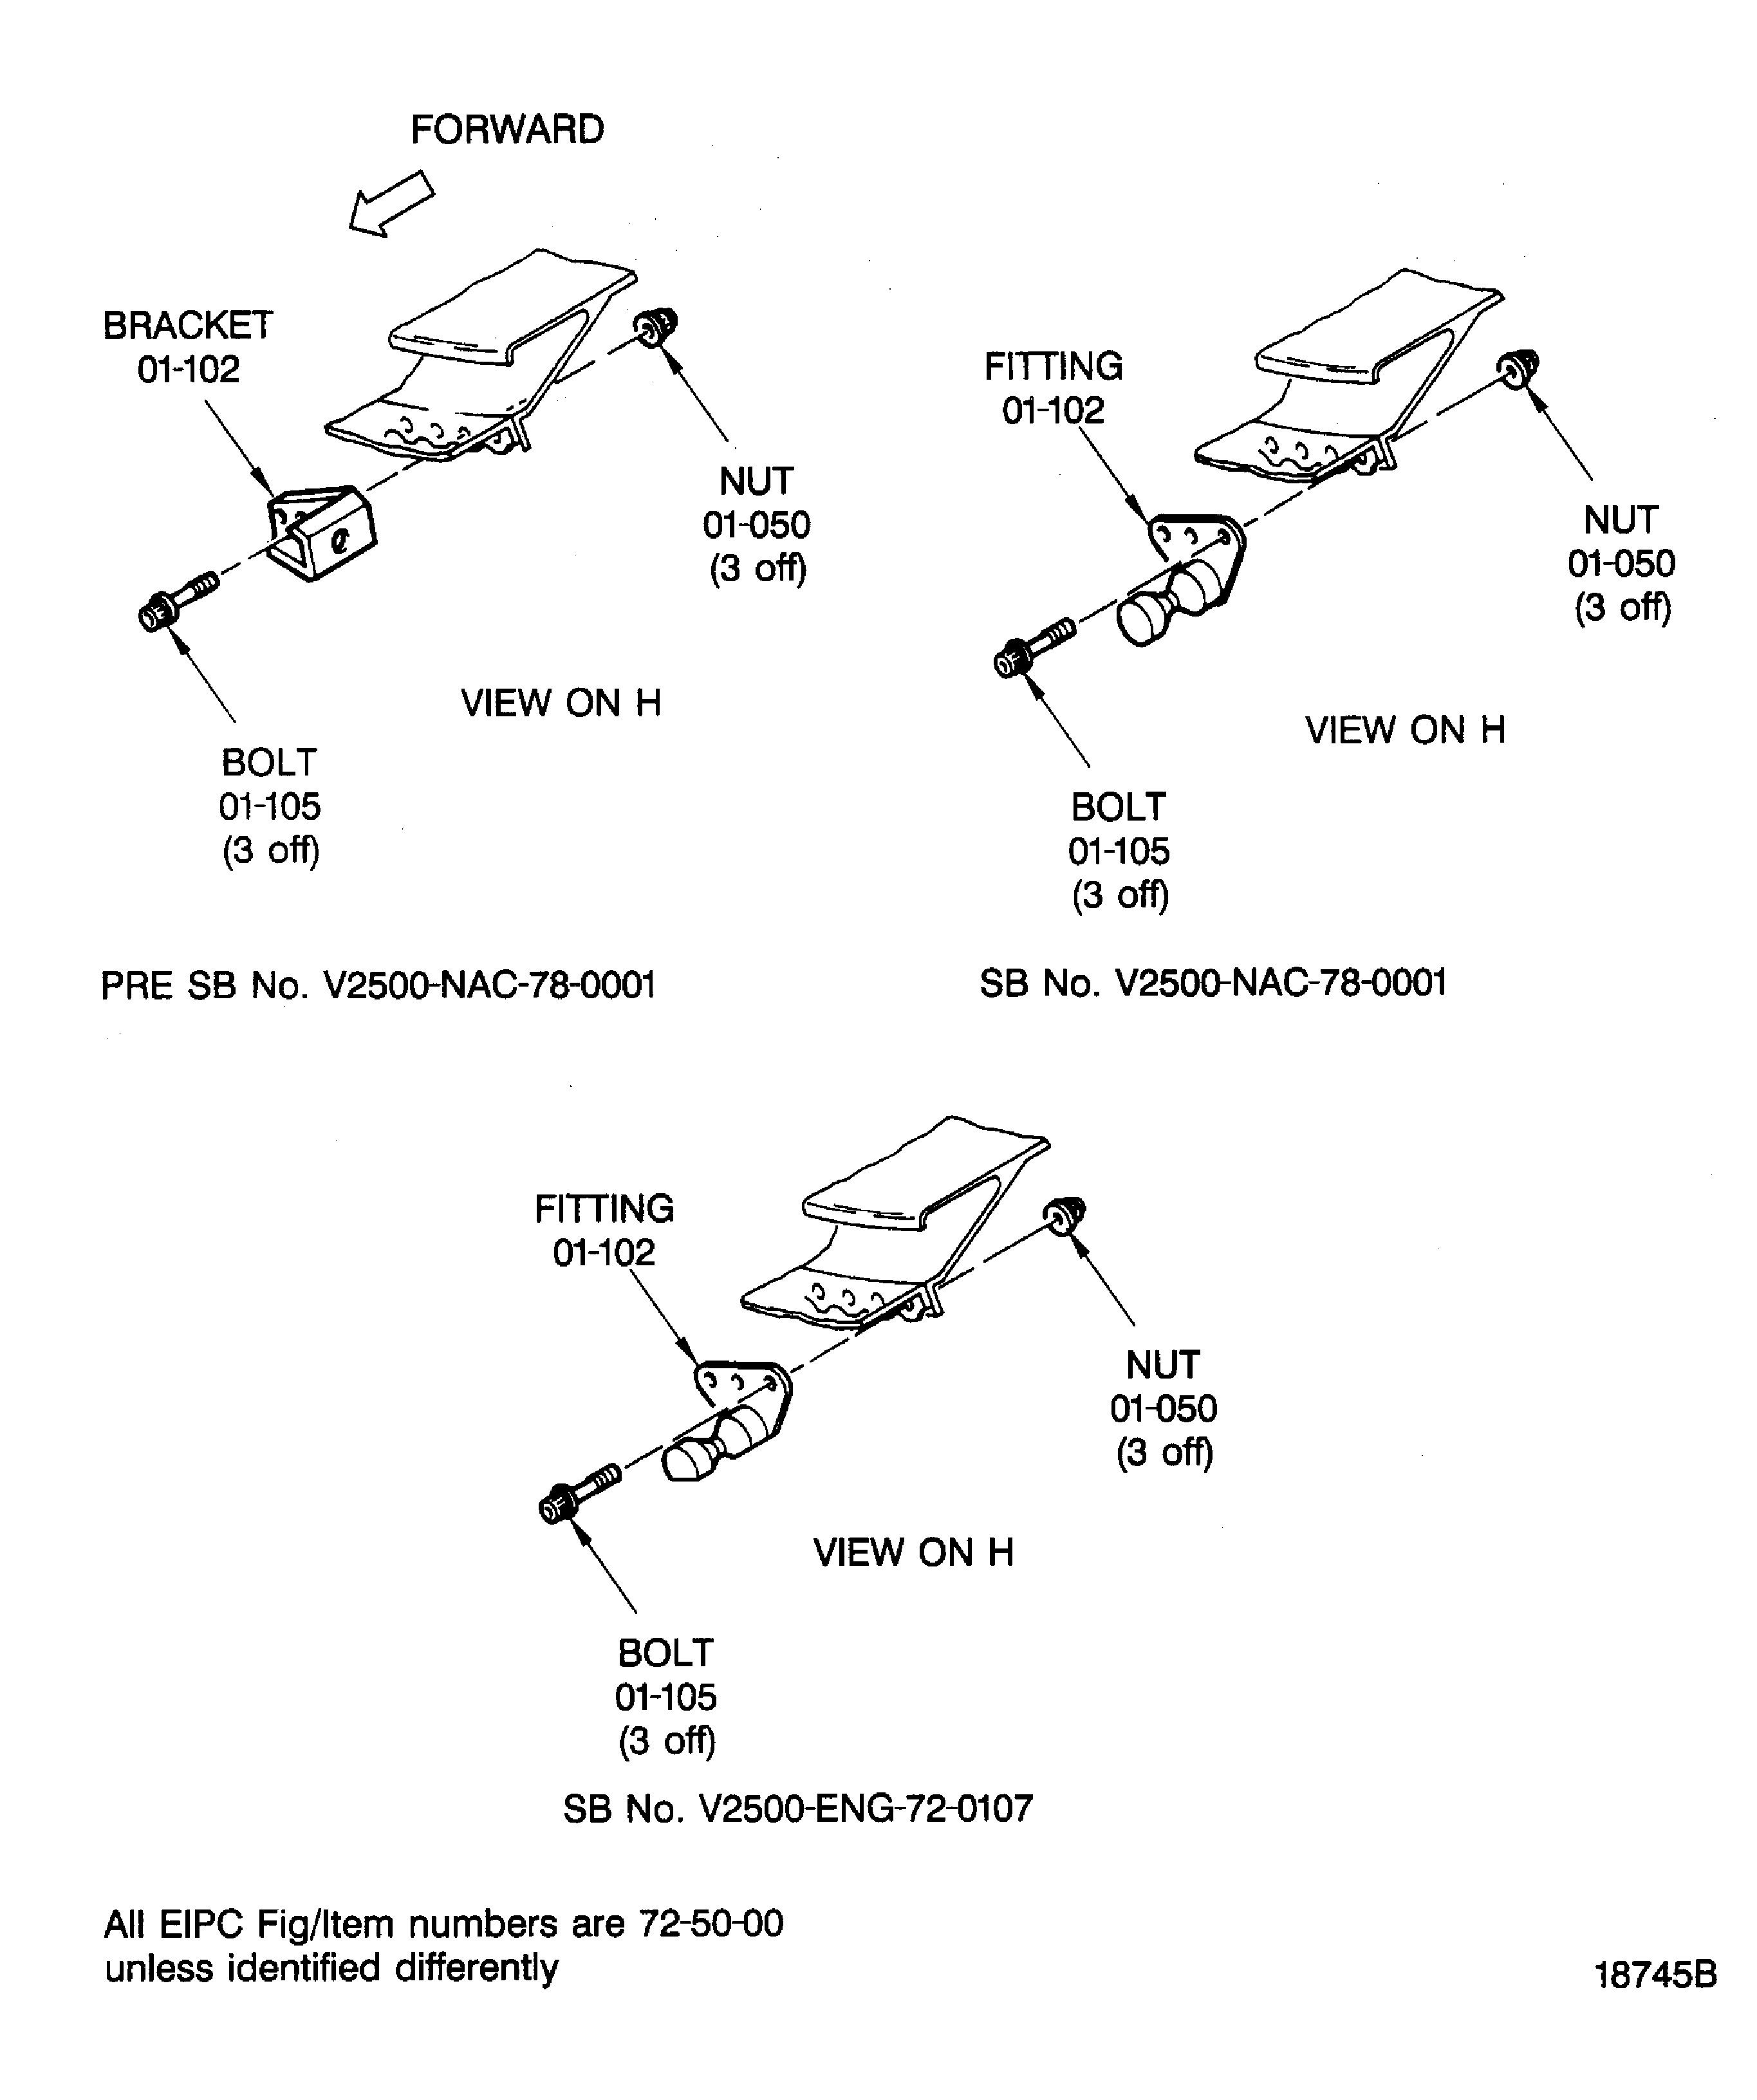
Figure: Install the Oil Jet and Filter of the No. 5 Bearing
Install the Oil Jet and Filter of the No. 5 Bearing
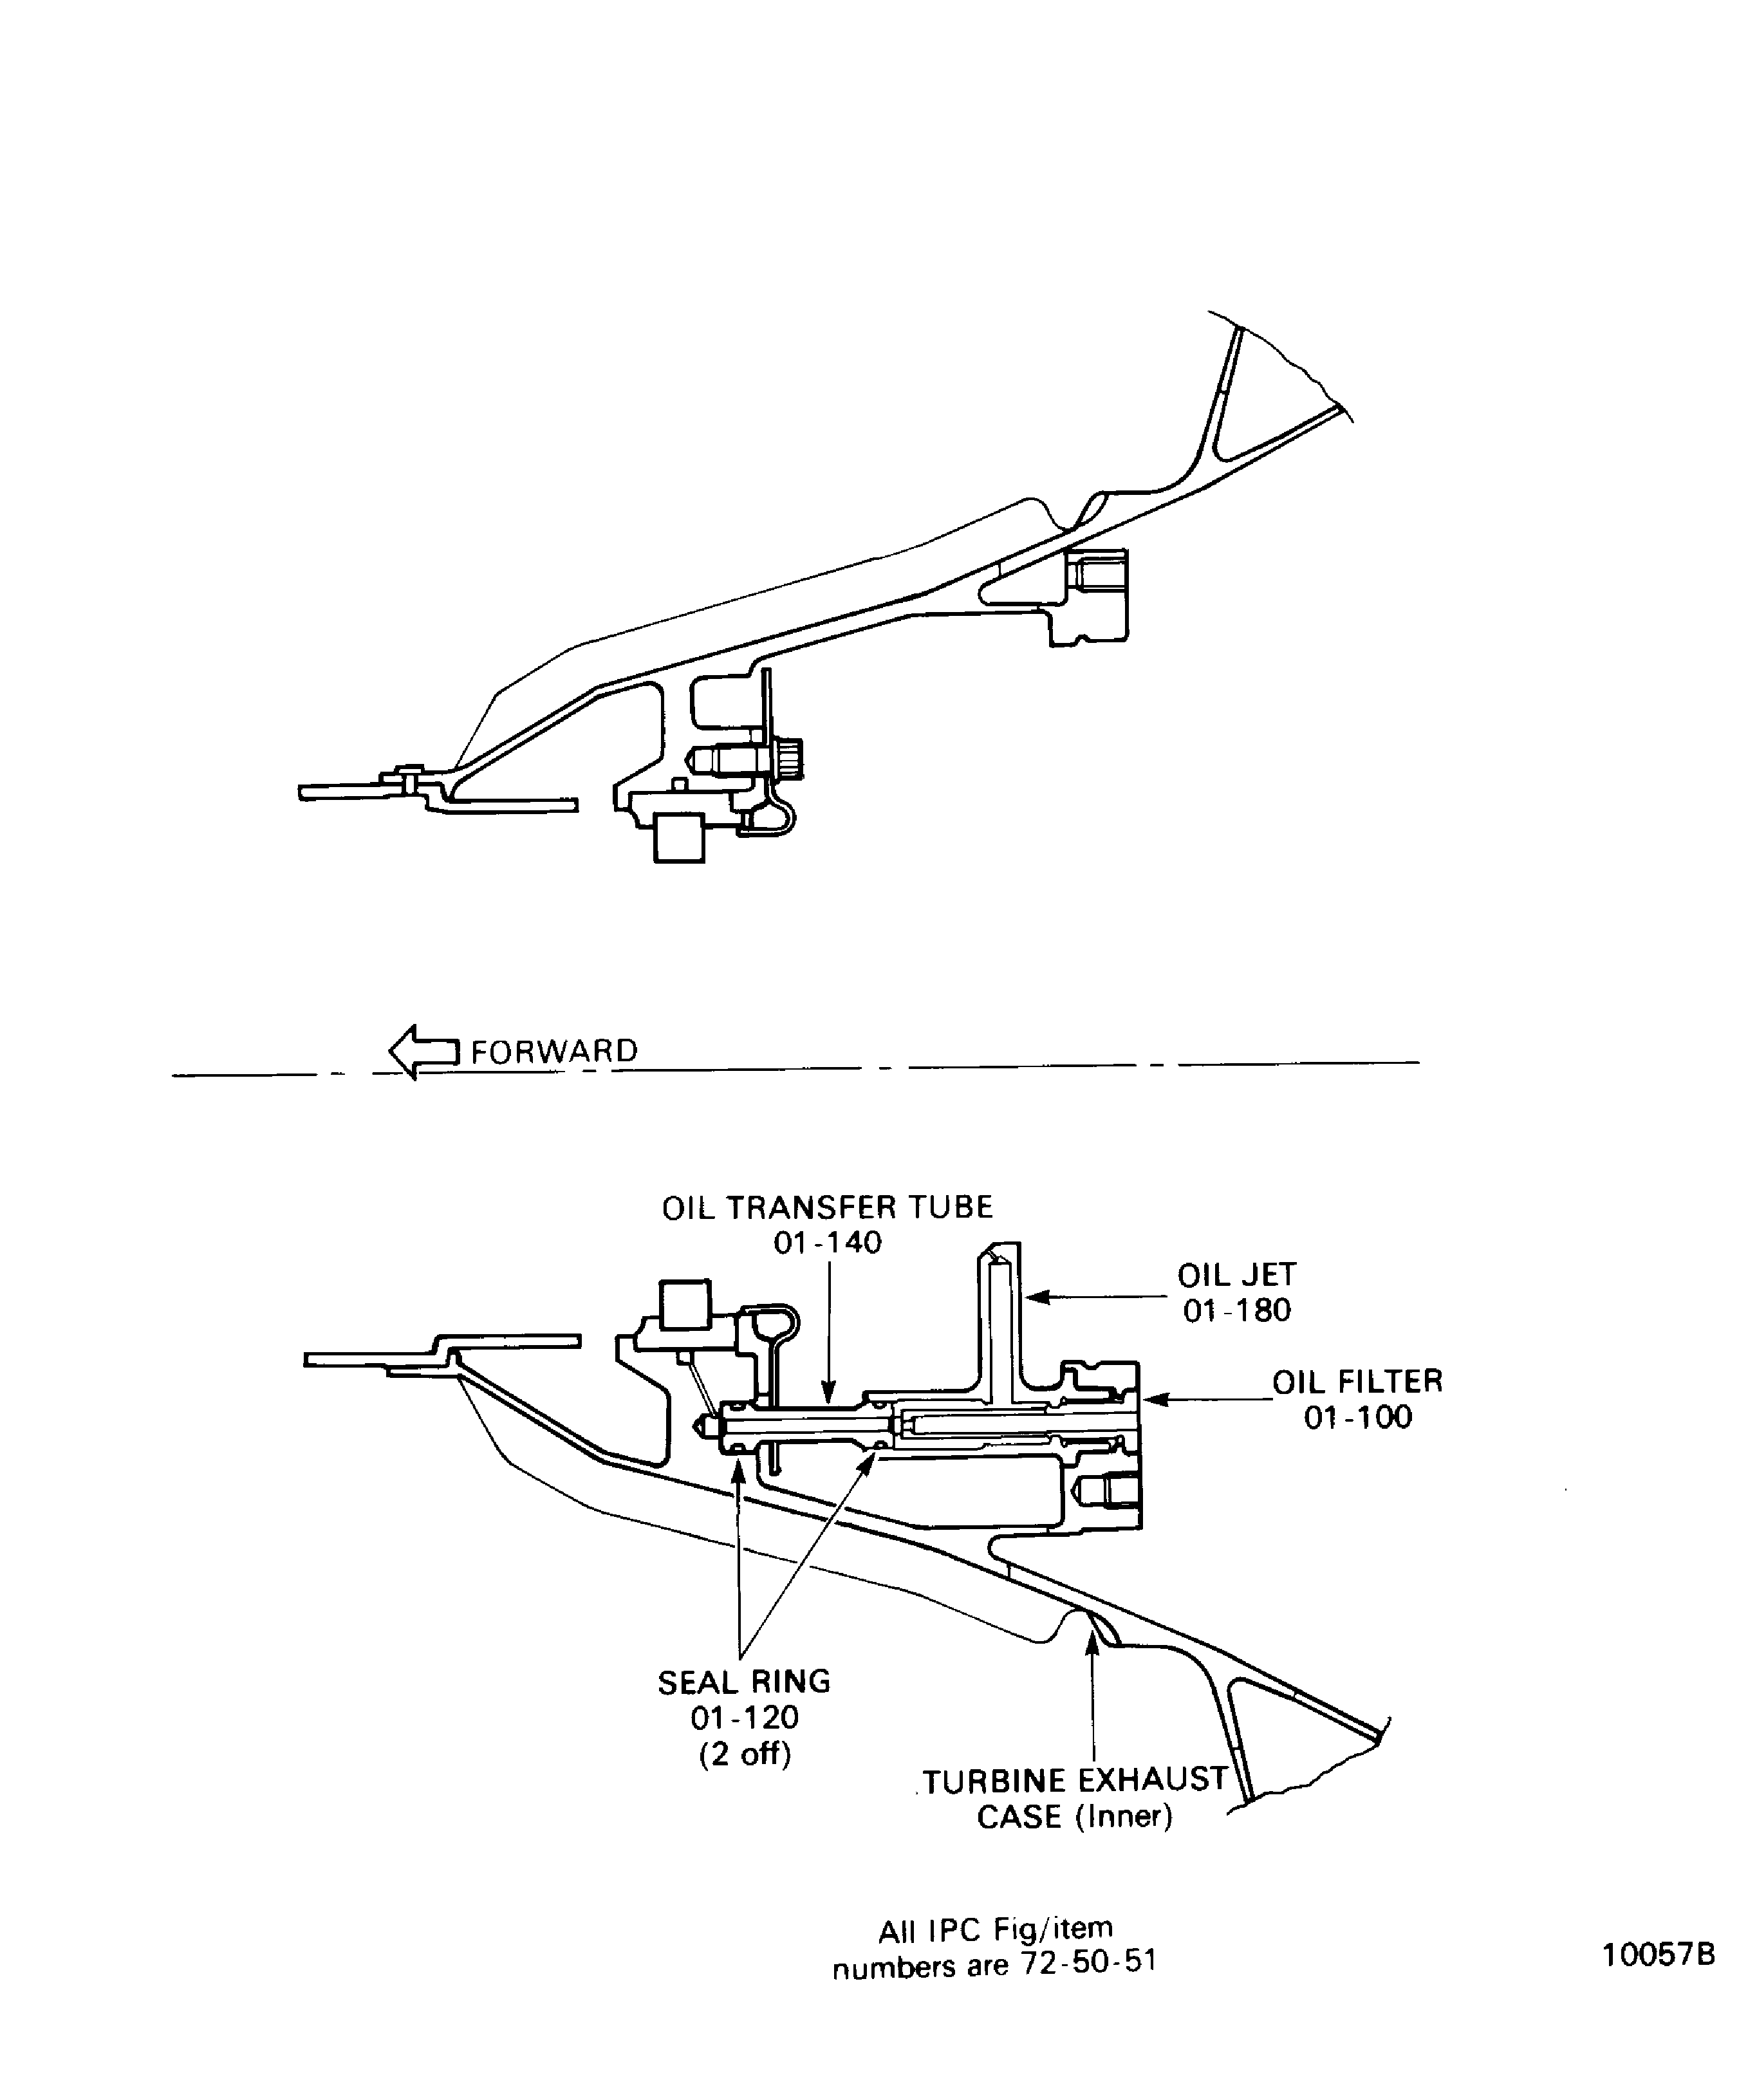
Figure: Install the Oil Feed Tube of the No. 5 Bearing
Install the Oil Feed Tube of the No. 5 Bearing
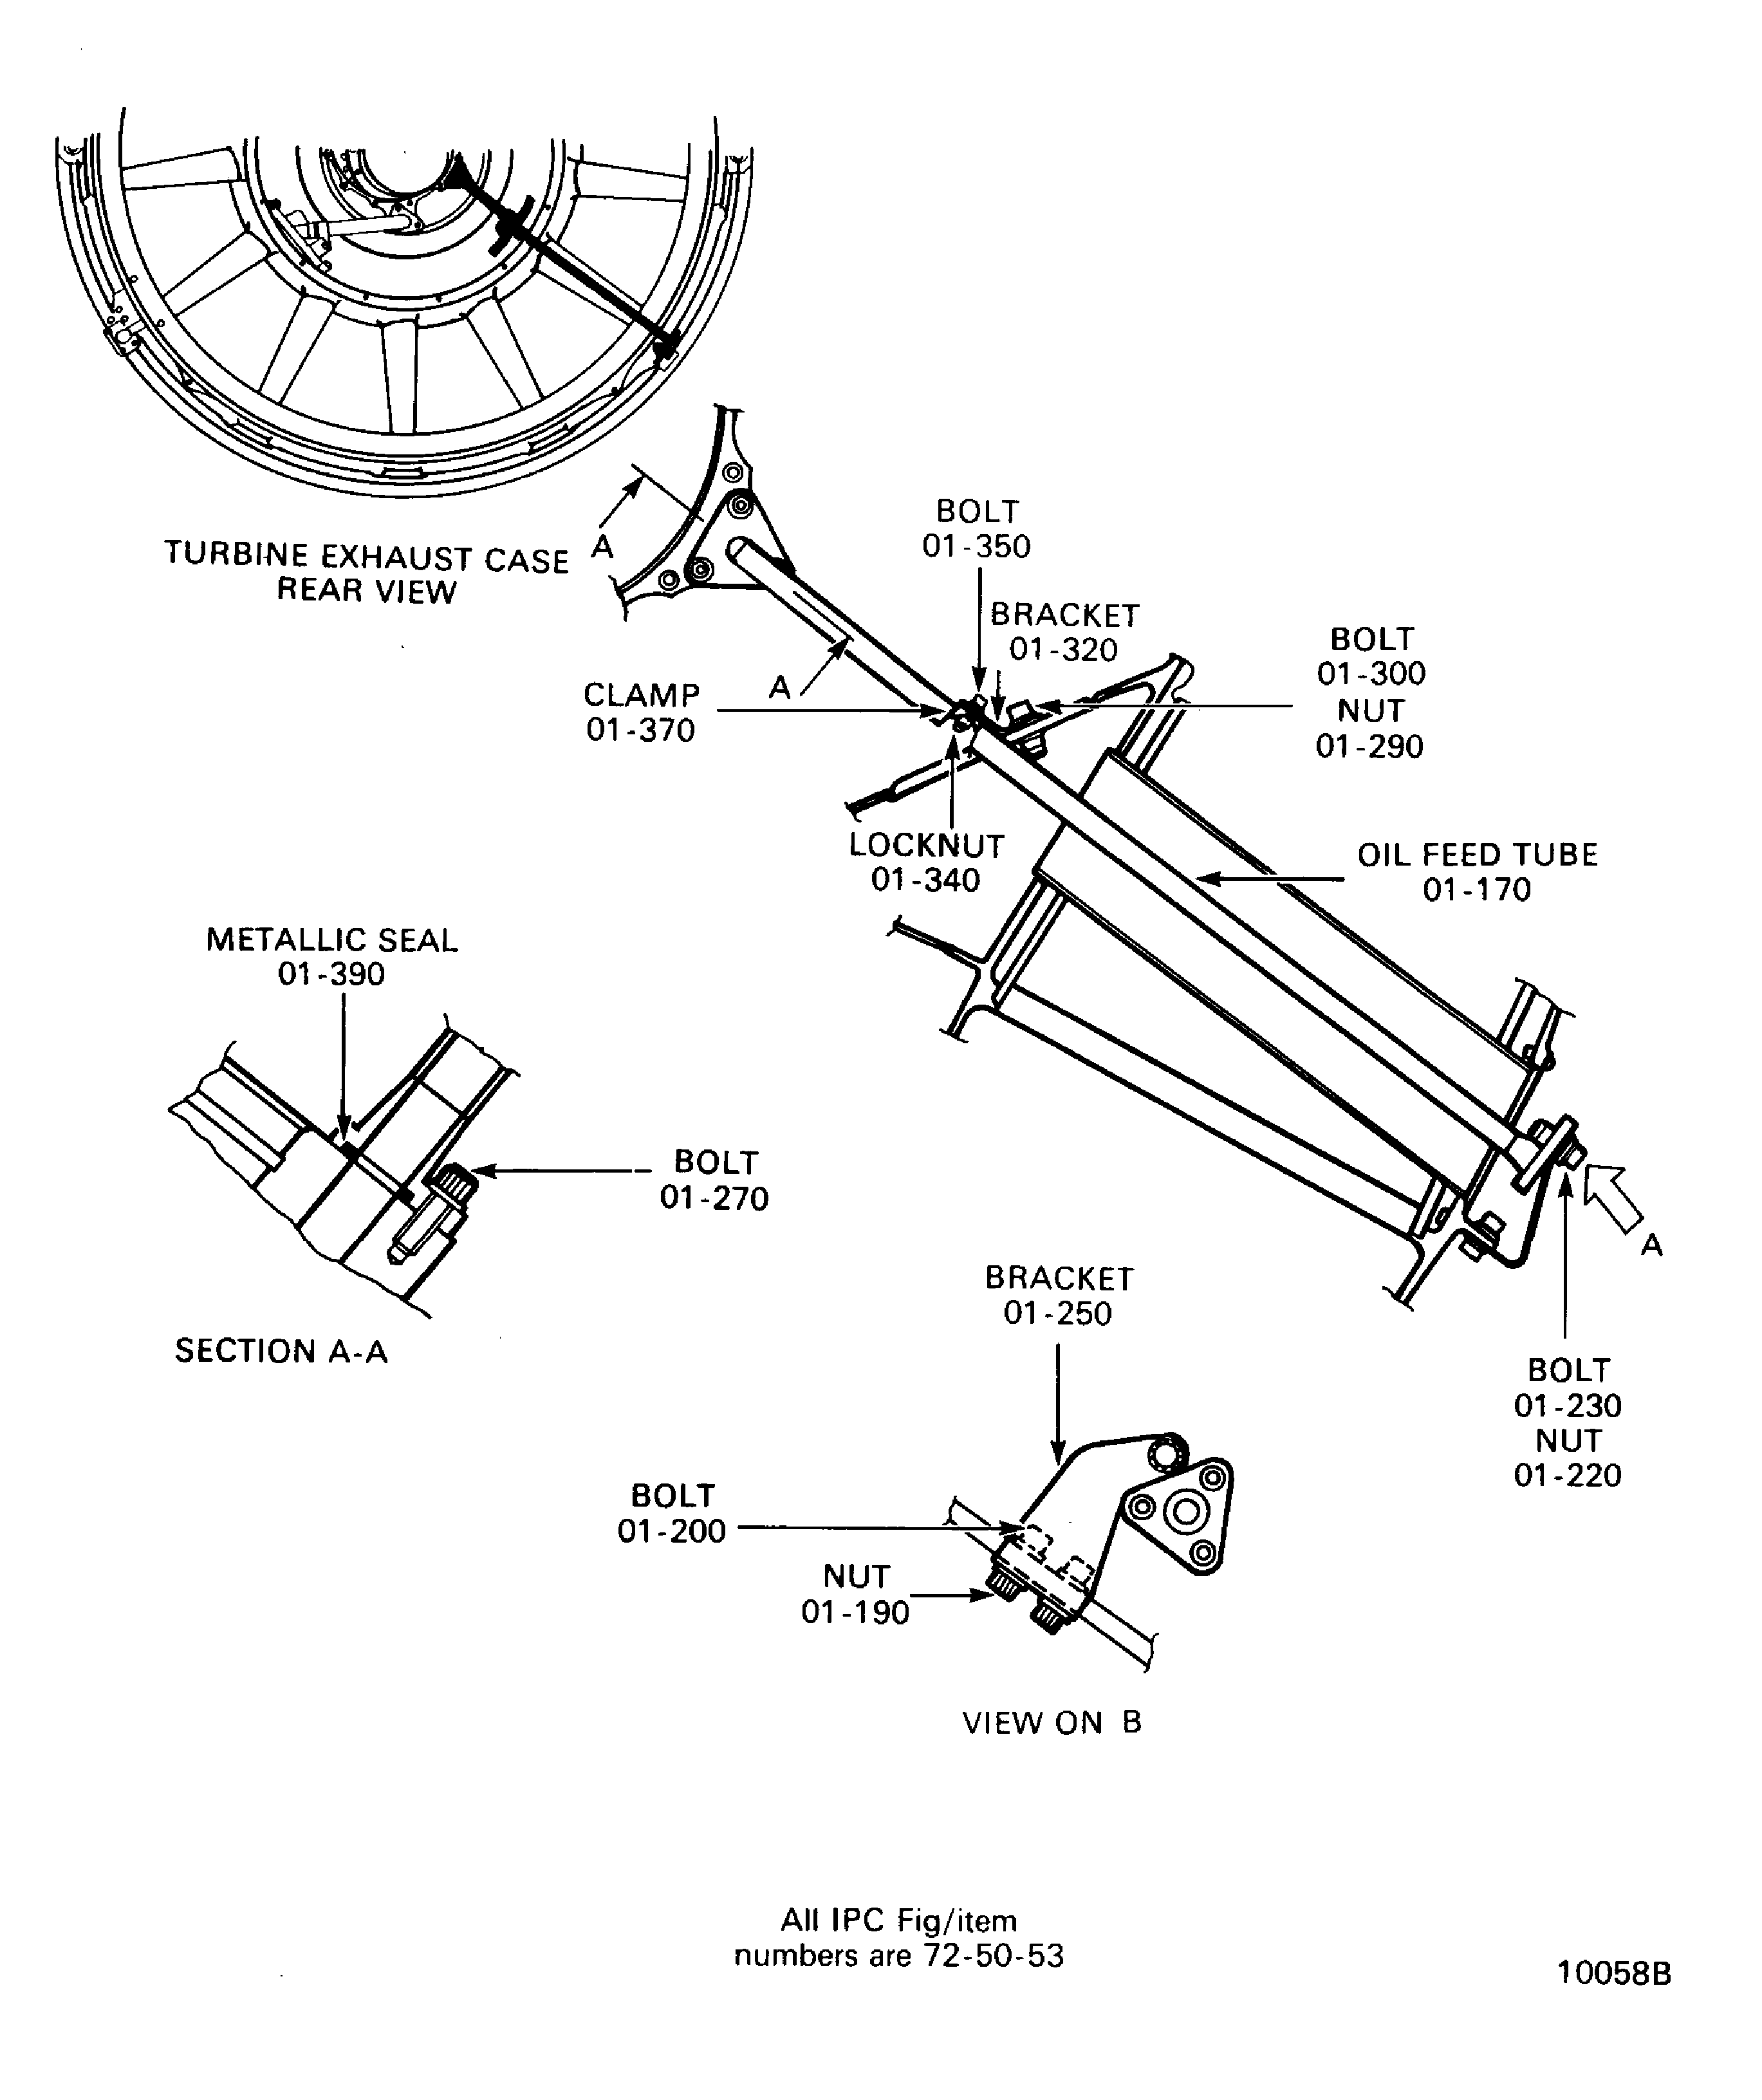
Figure: Install the Turbine Shaft Rear Lock Nut
Install the Turbine Shaft Rear Lock Nut

Figure: Install the Blind Cap
Install the Blind Cap
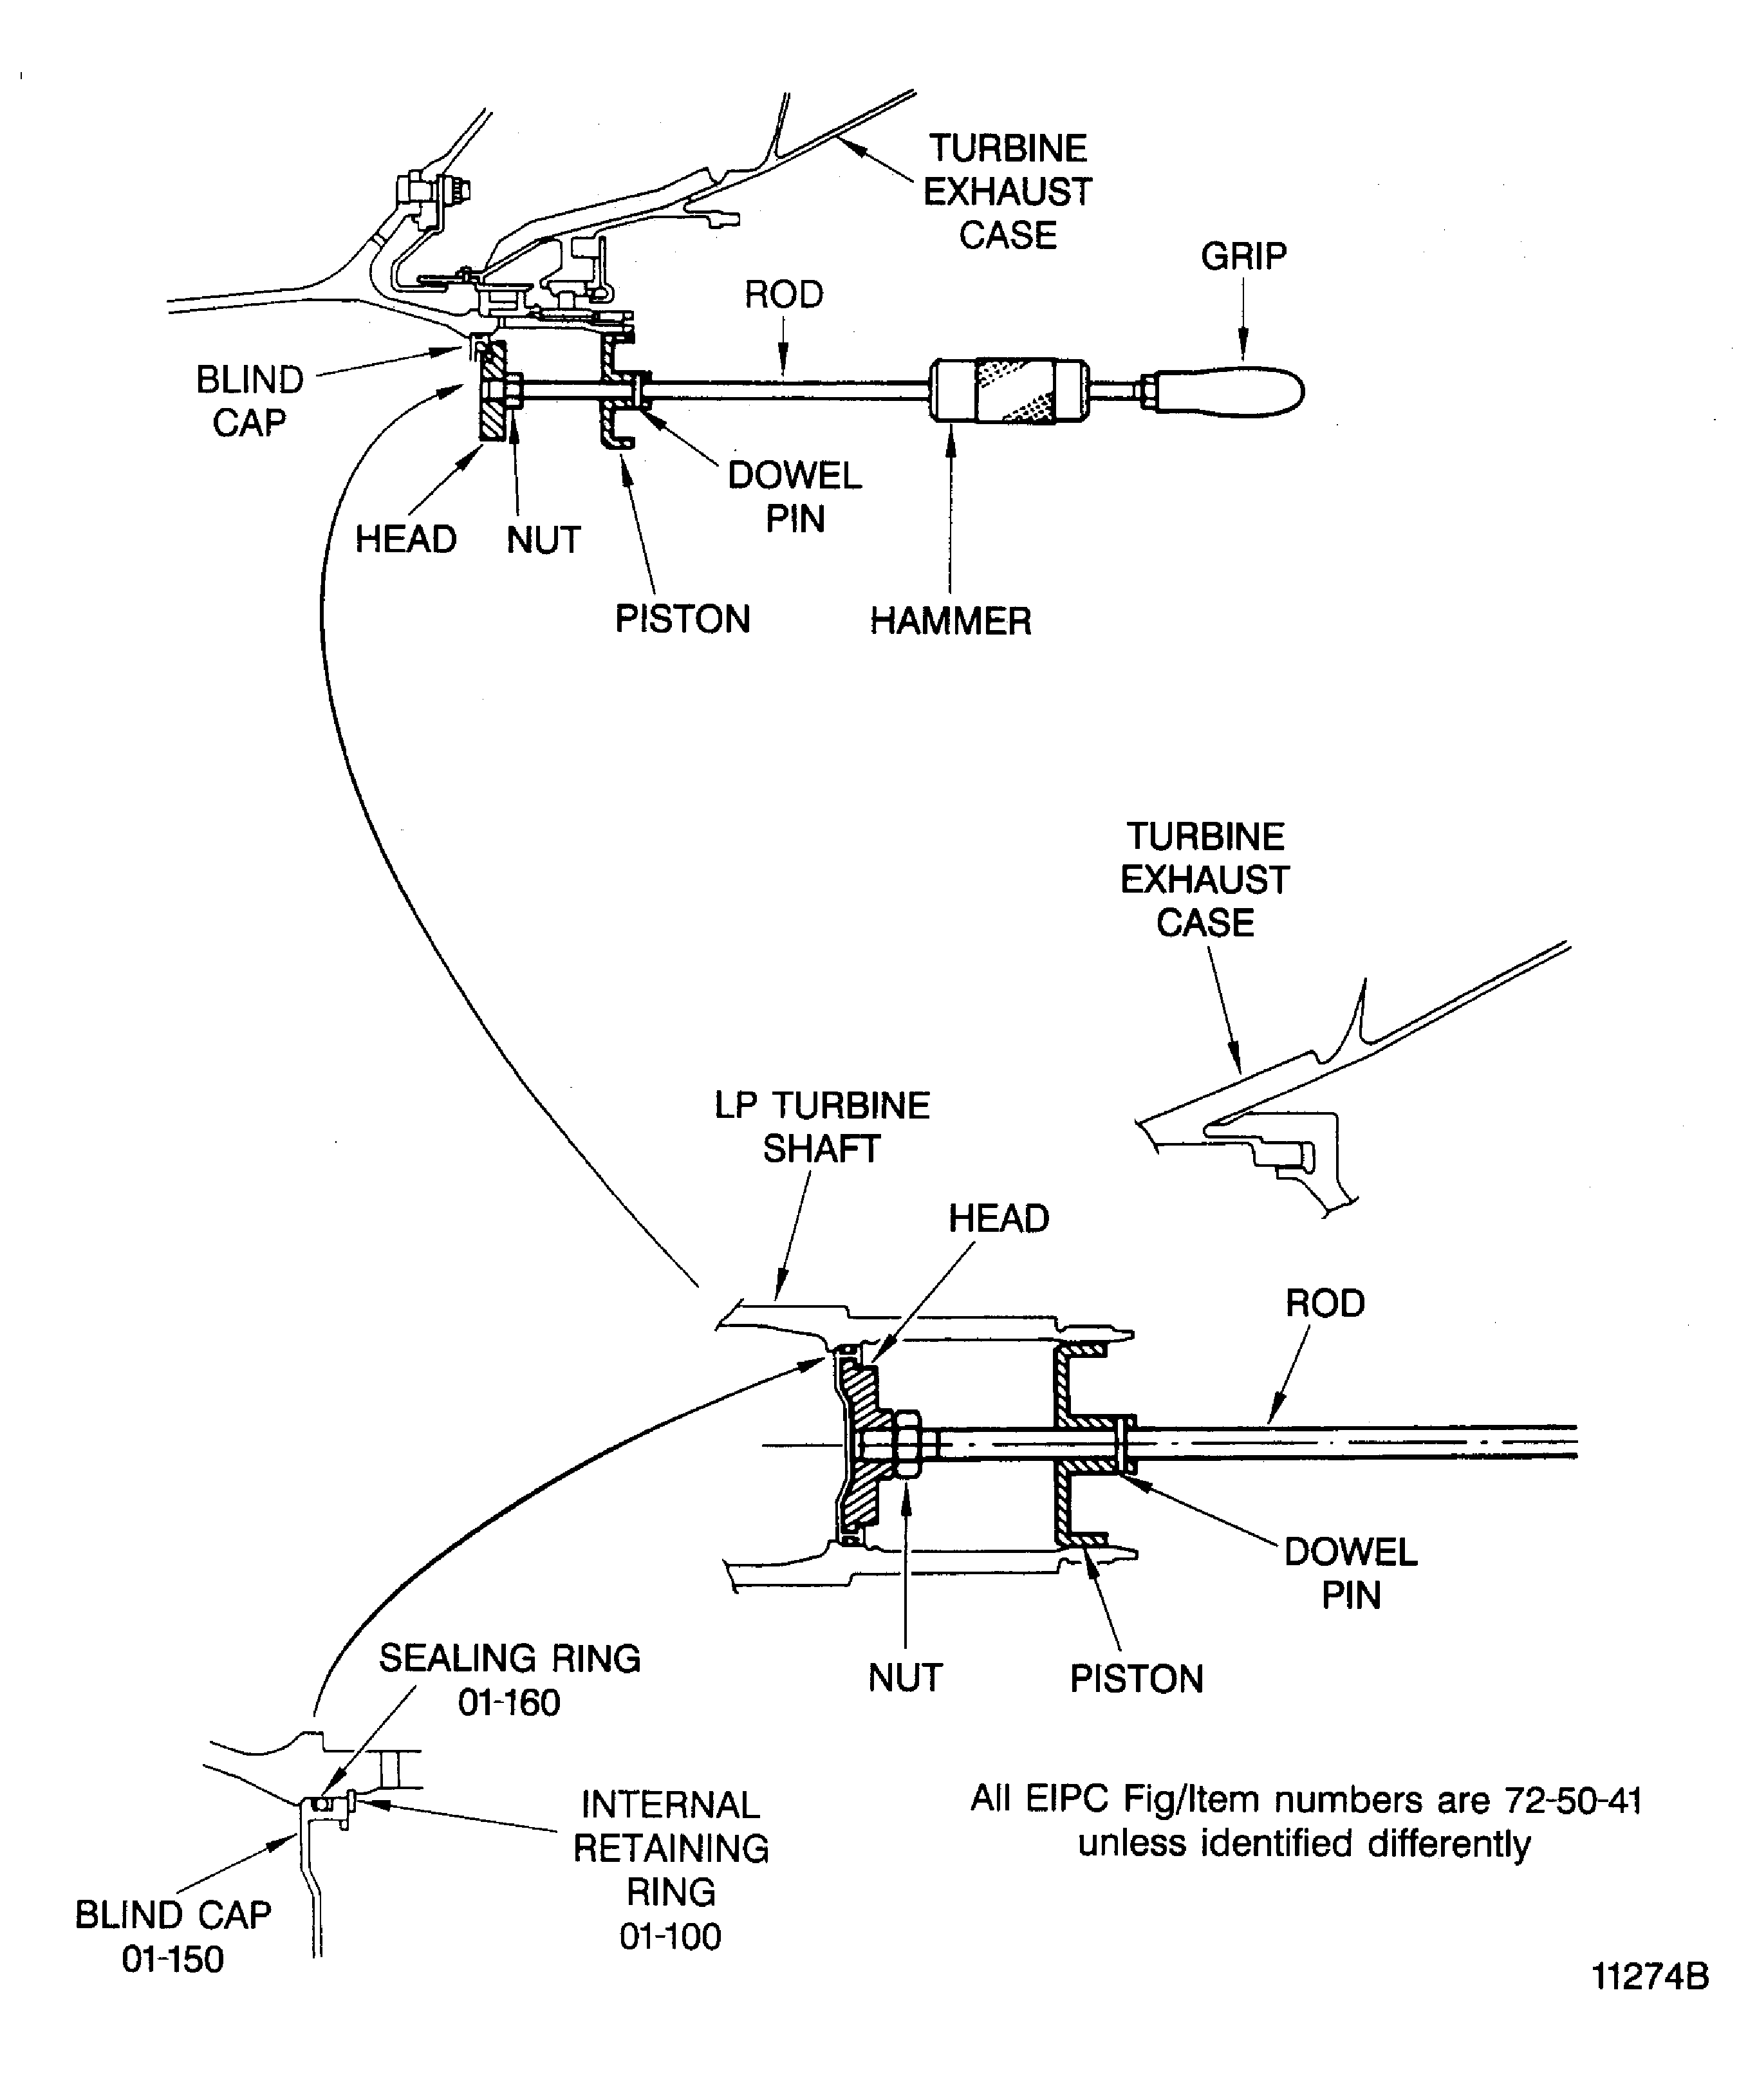
Figure: Installation of the Compartment Cover and the Rear Thermal Blanket
Installation of the Compartment Cover and the Rear Thermal Blanket
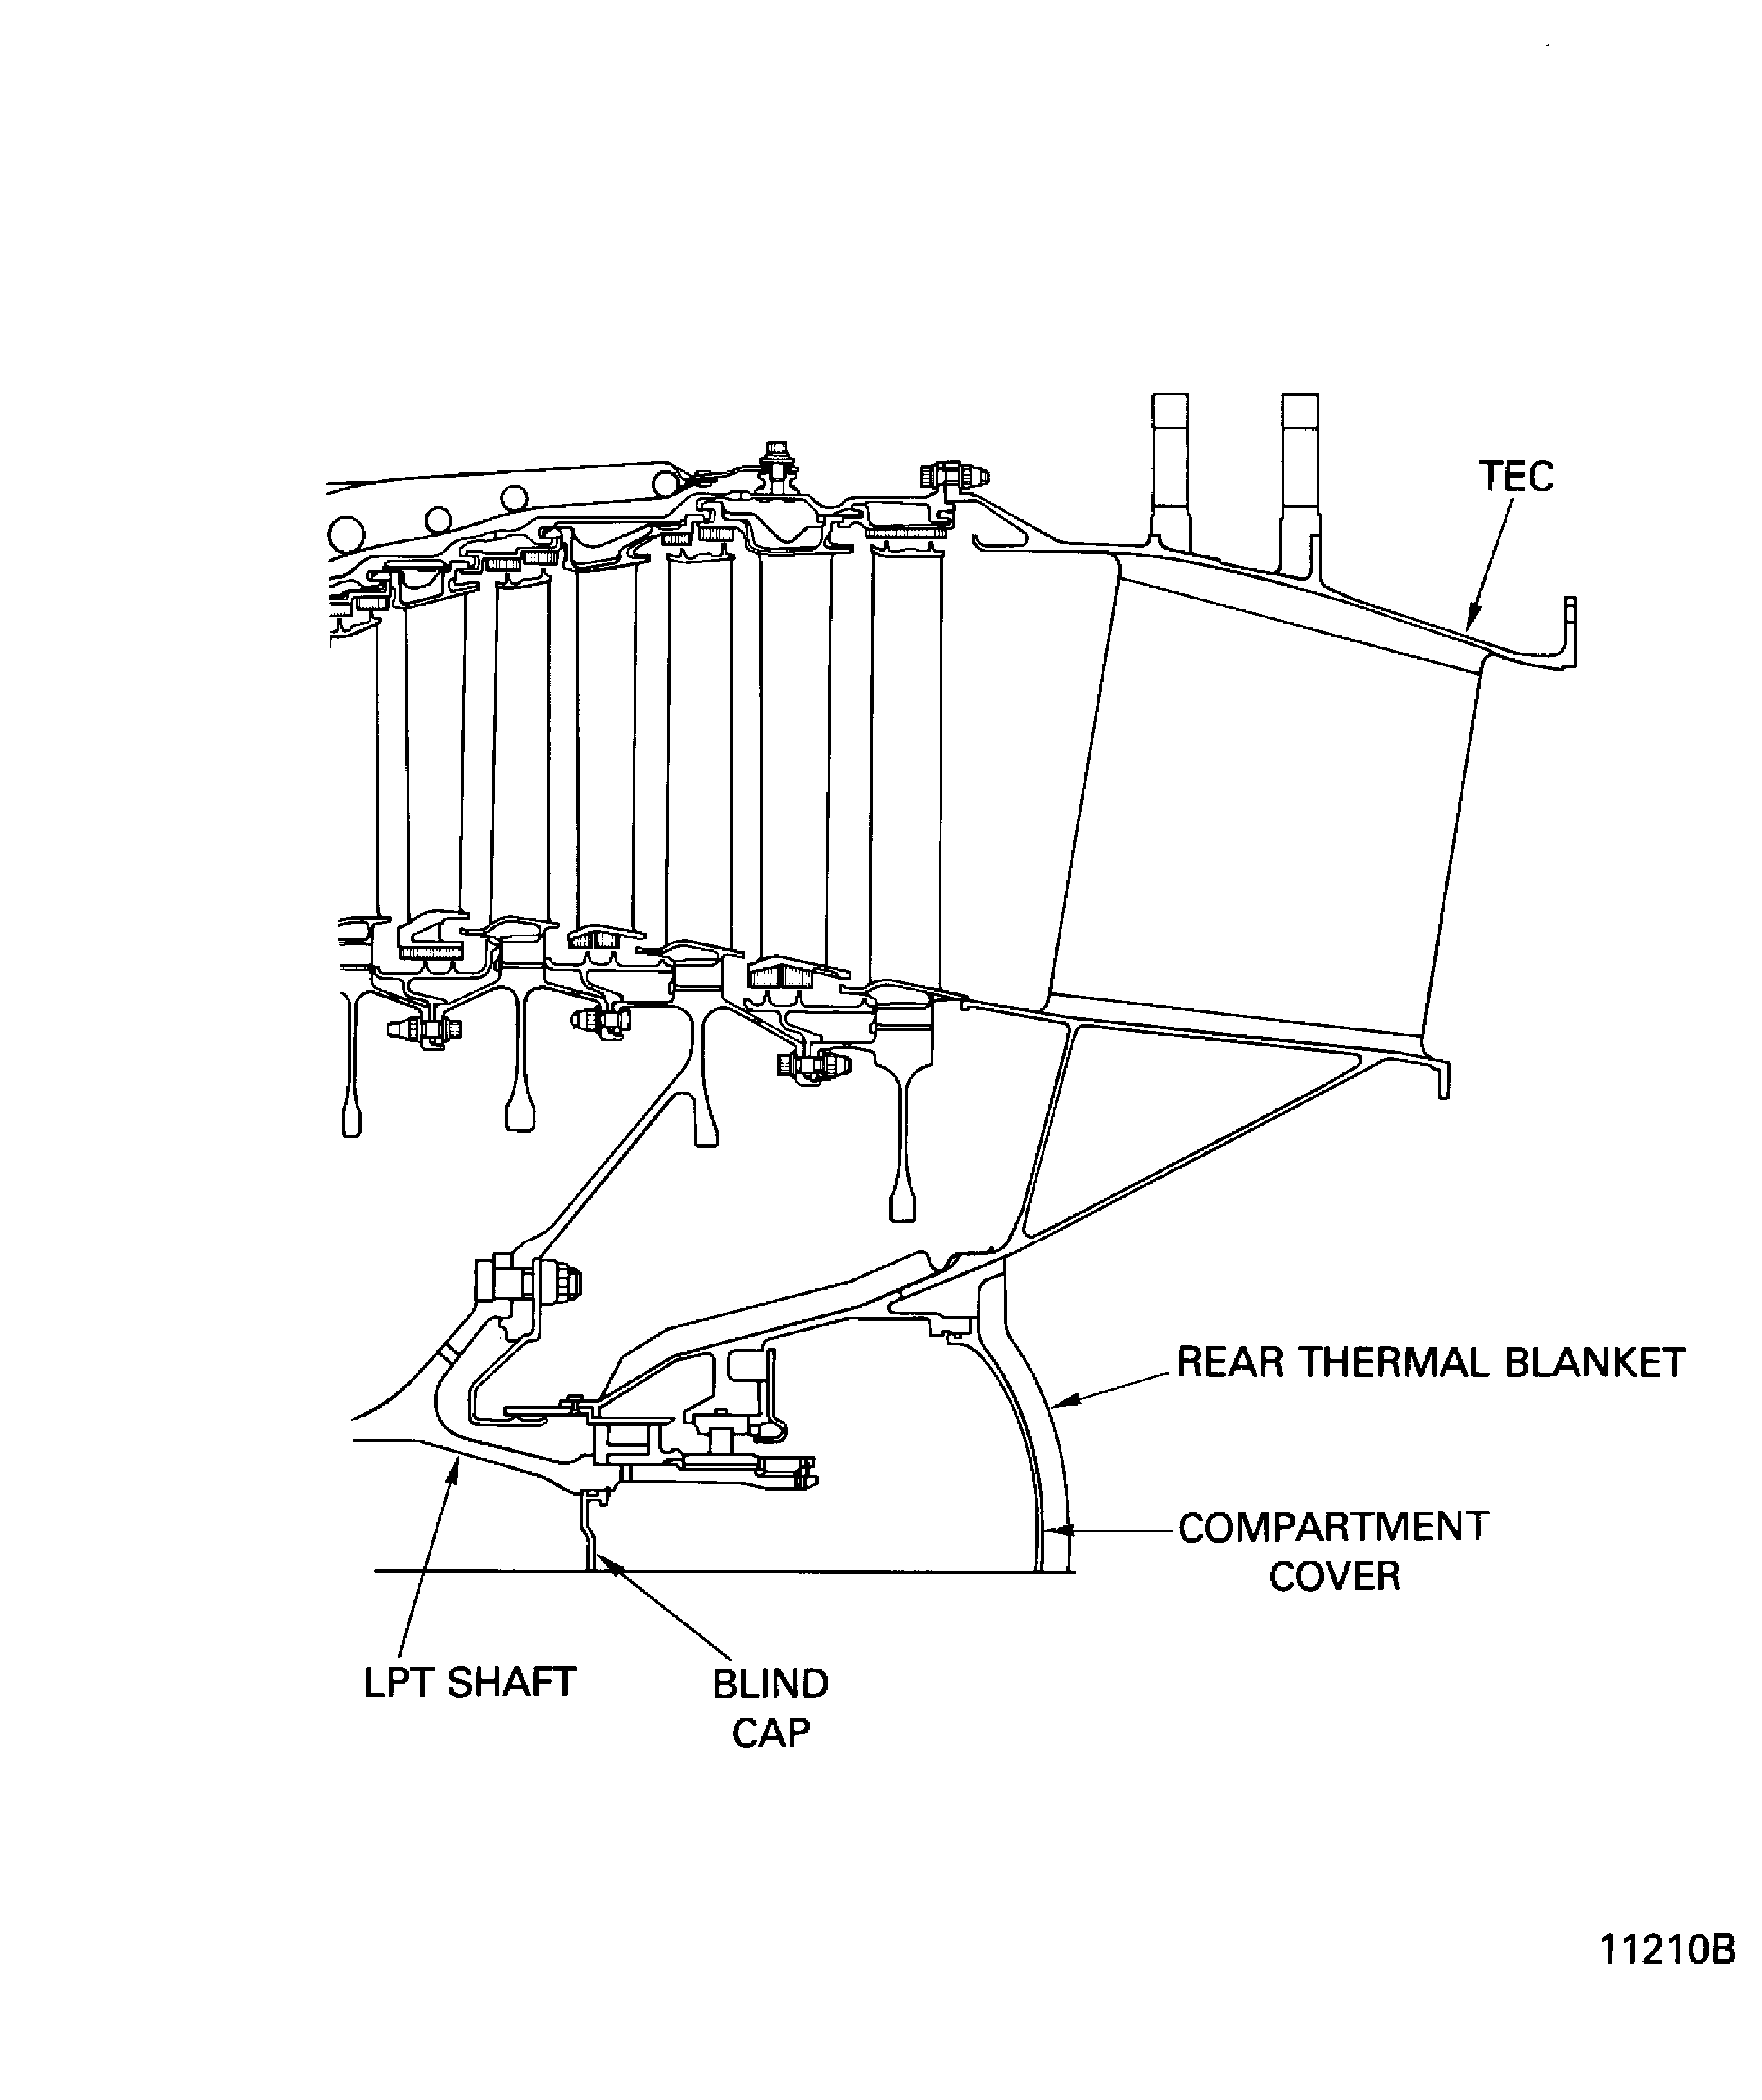
Figure: Installation of the Adapter to No.5 Bearing Outer Oil Scavenge Tube
Installation of the Adapter to No.5 Bearing Outer Oil Scavenge Tube
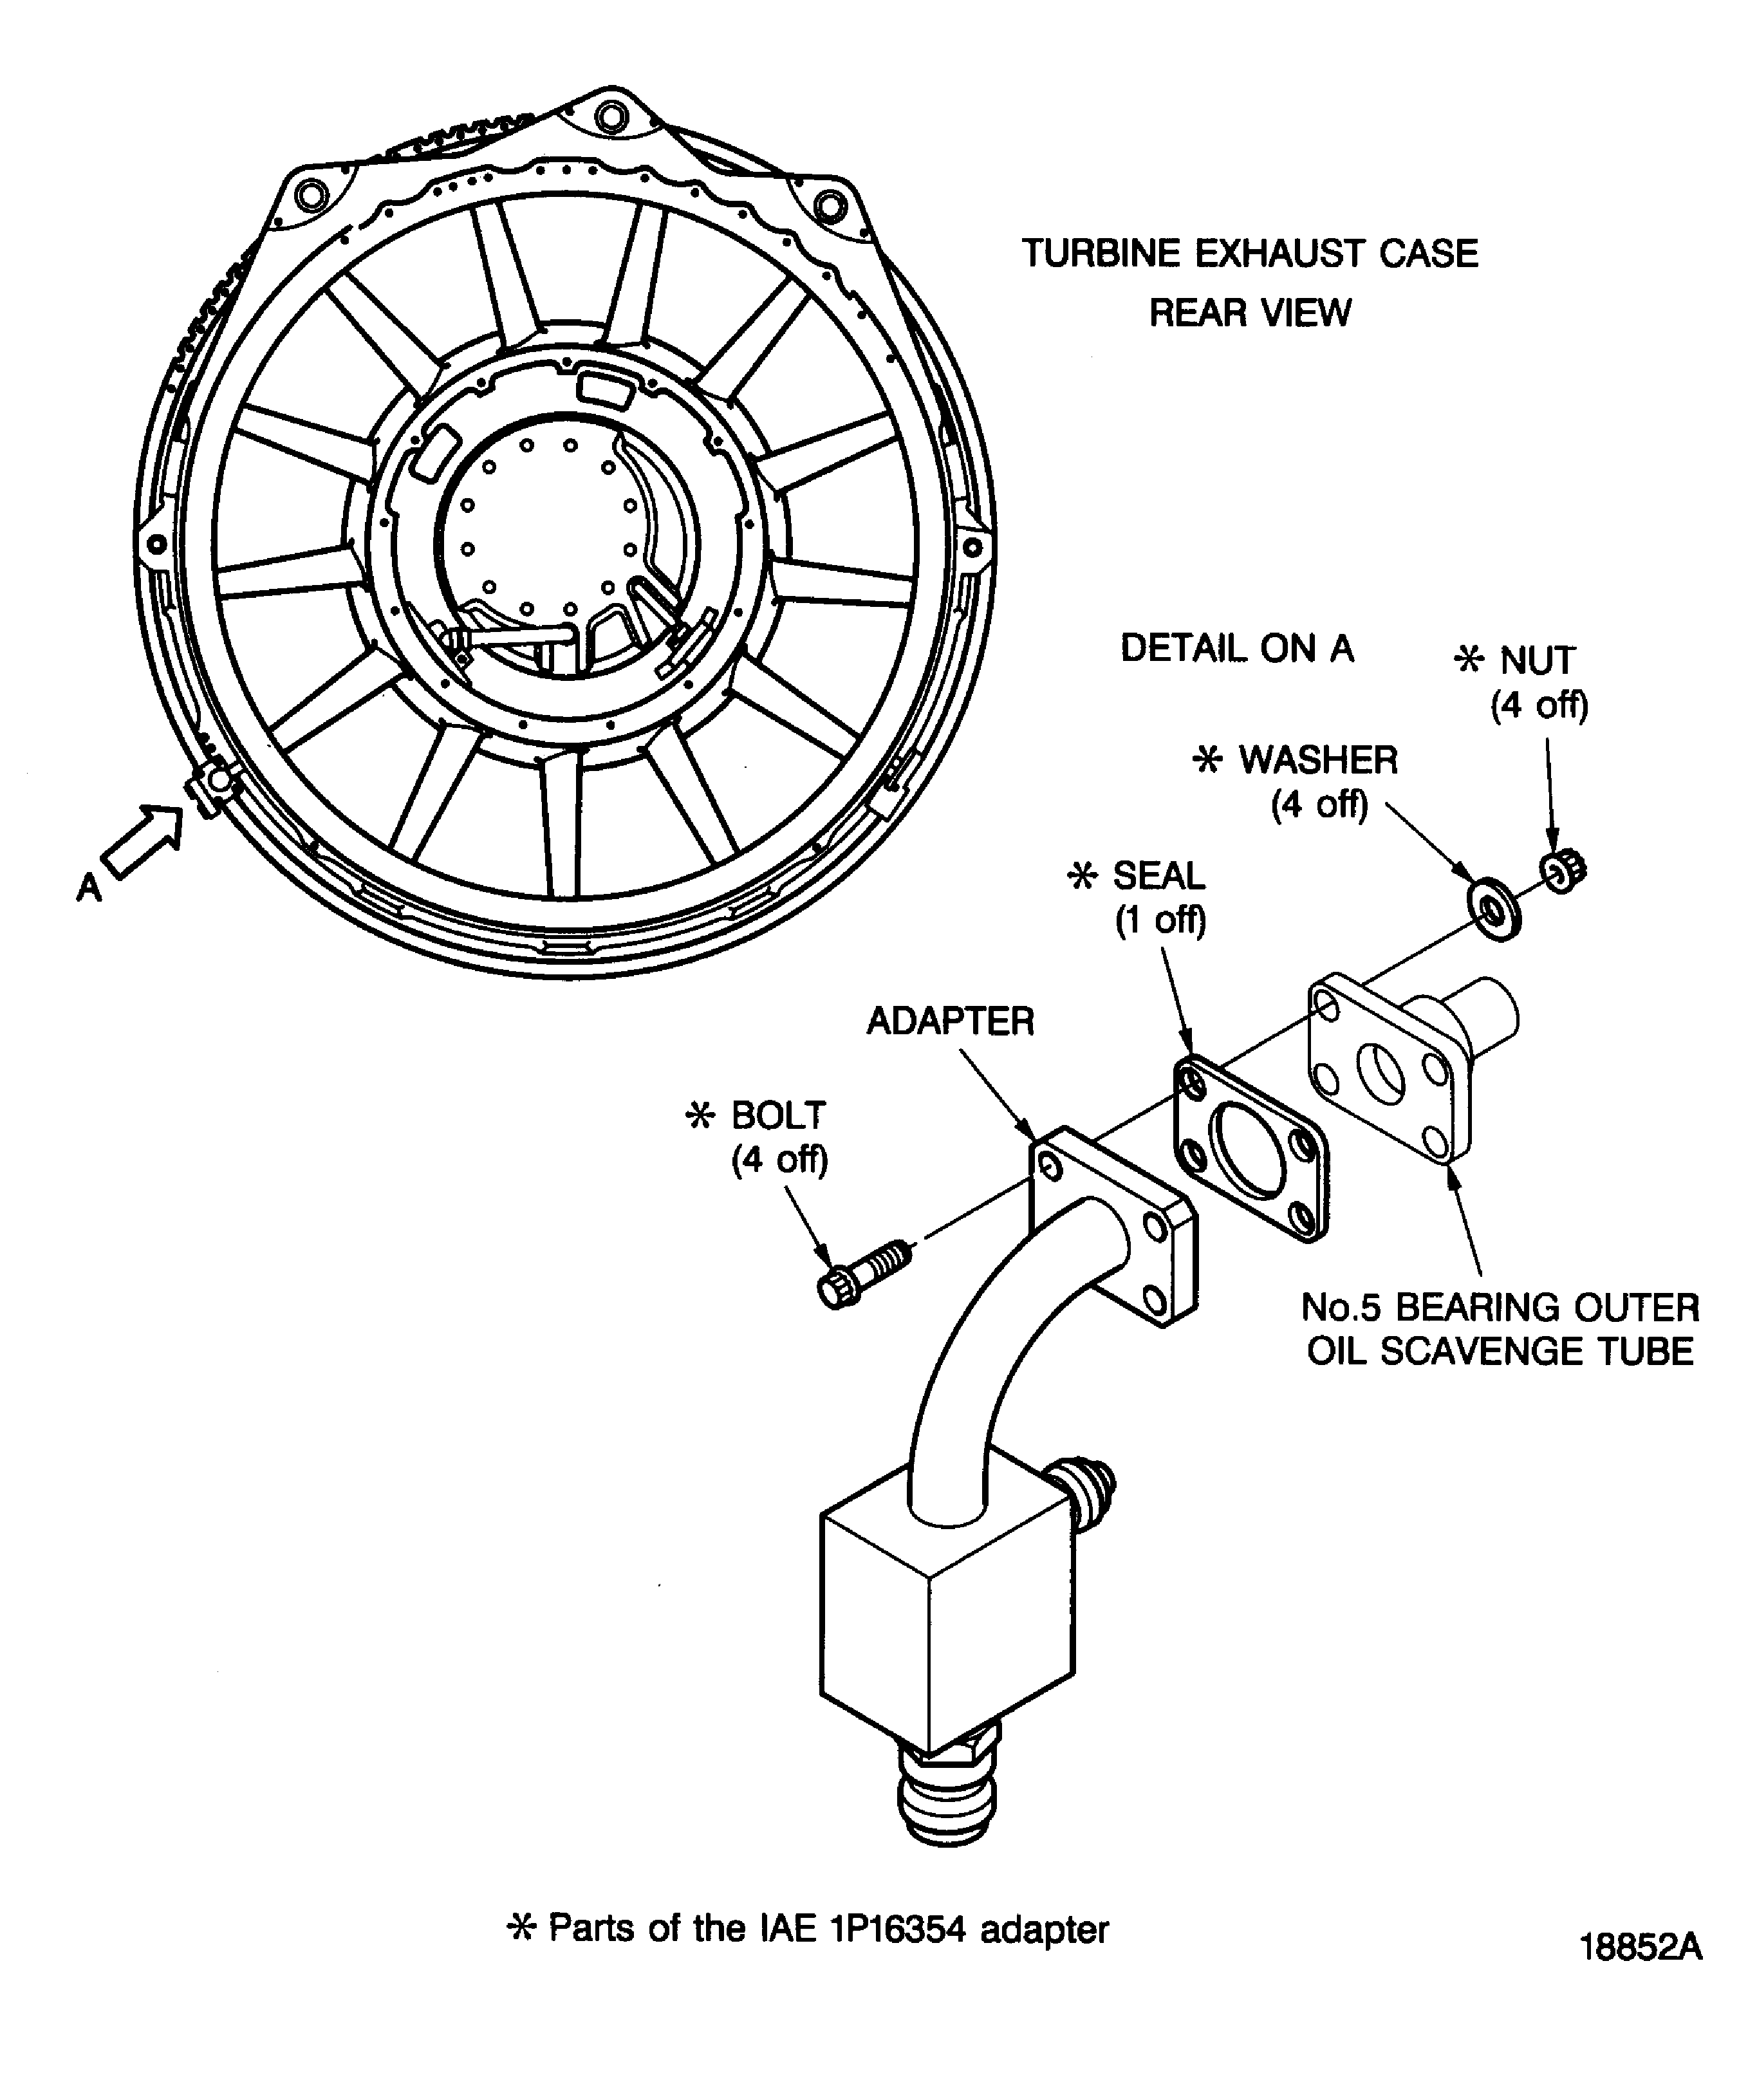
Figure: Installation of the Plate to No. 5 Bearing Outer Oil Feed Tube
Installation of the Plate to No. 5 Bearing Outer Oil Feed Tube
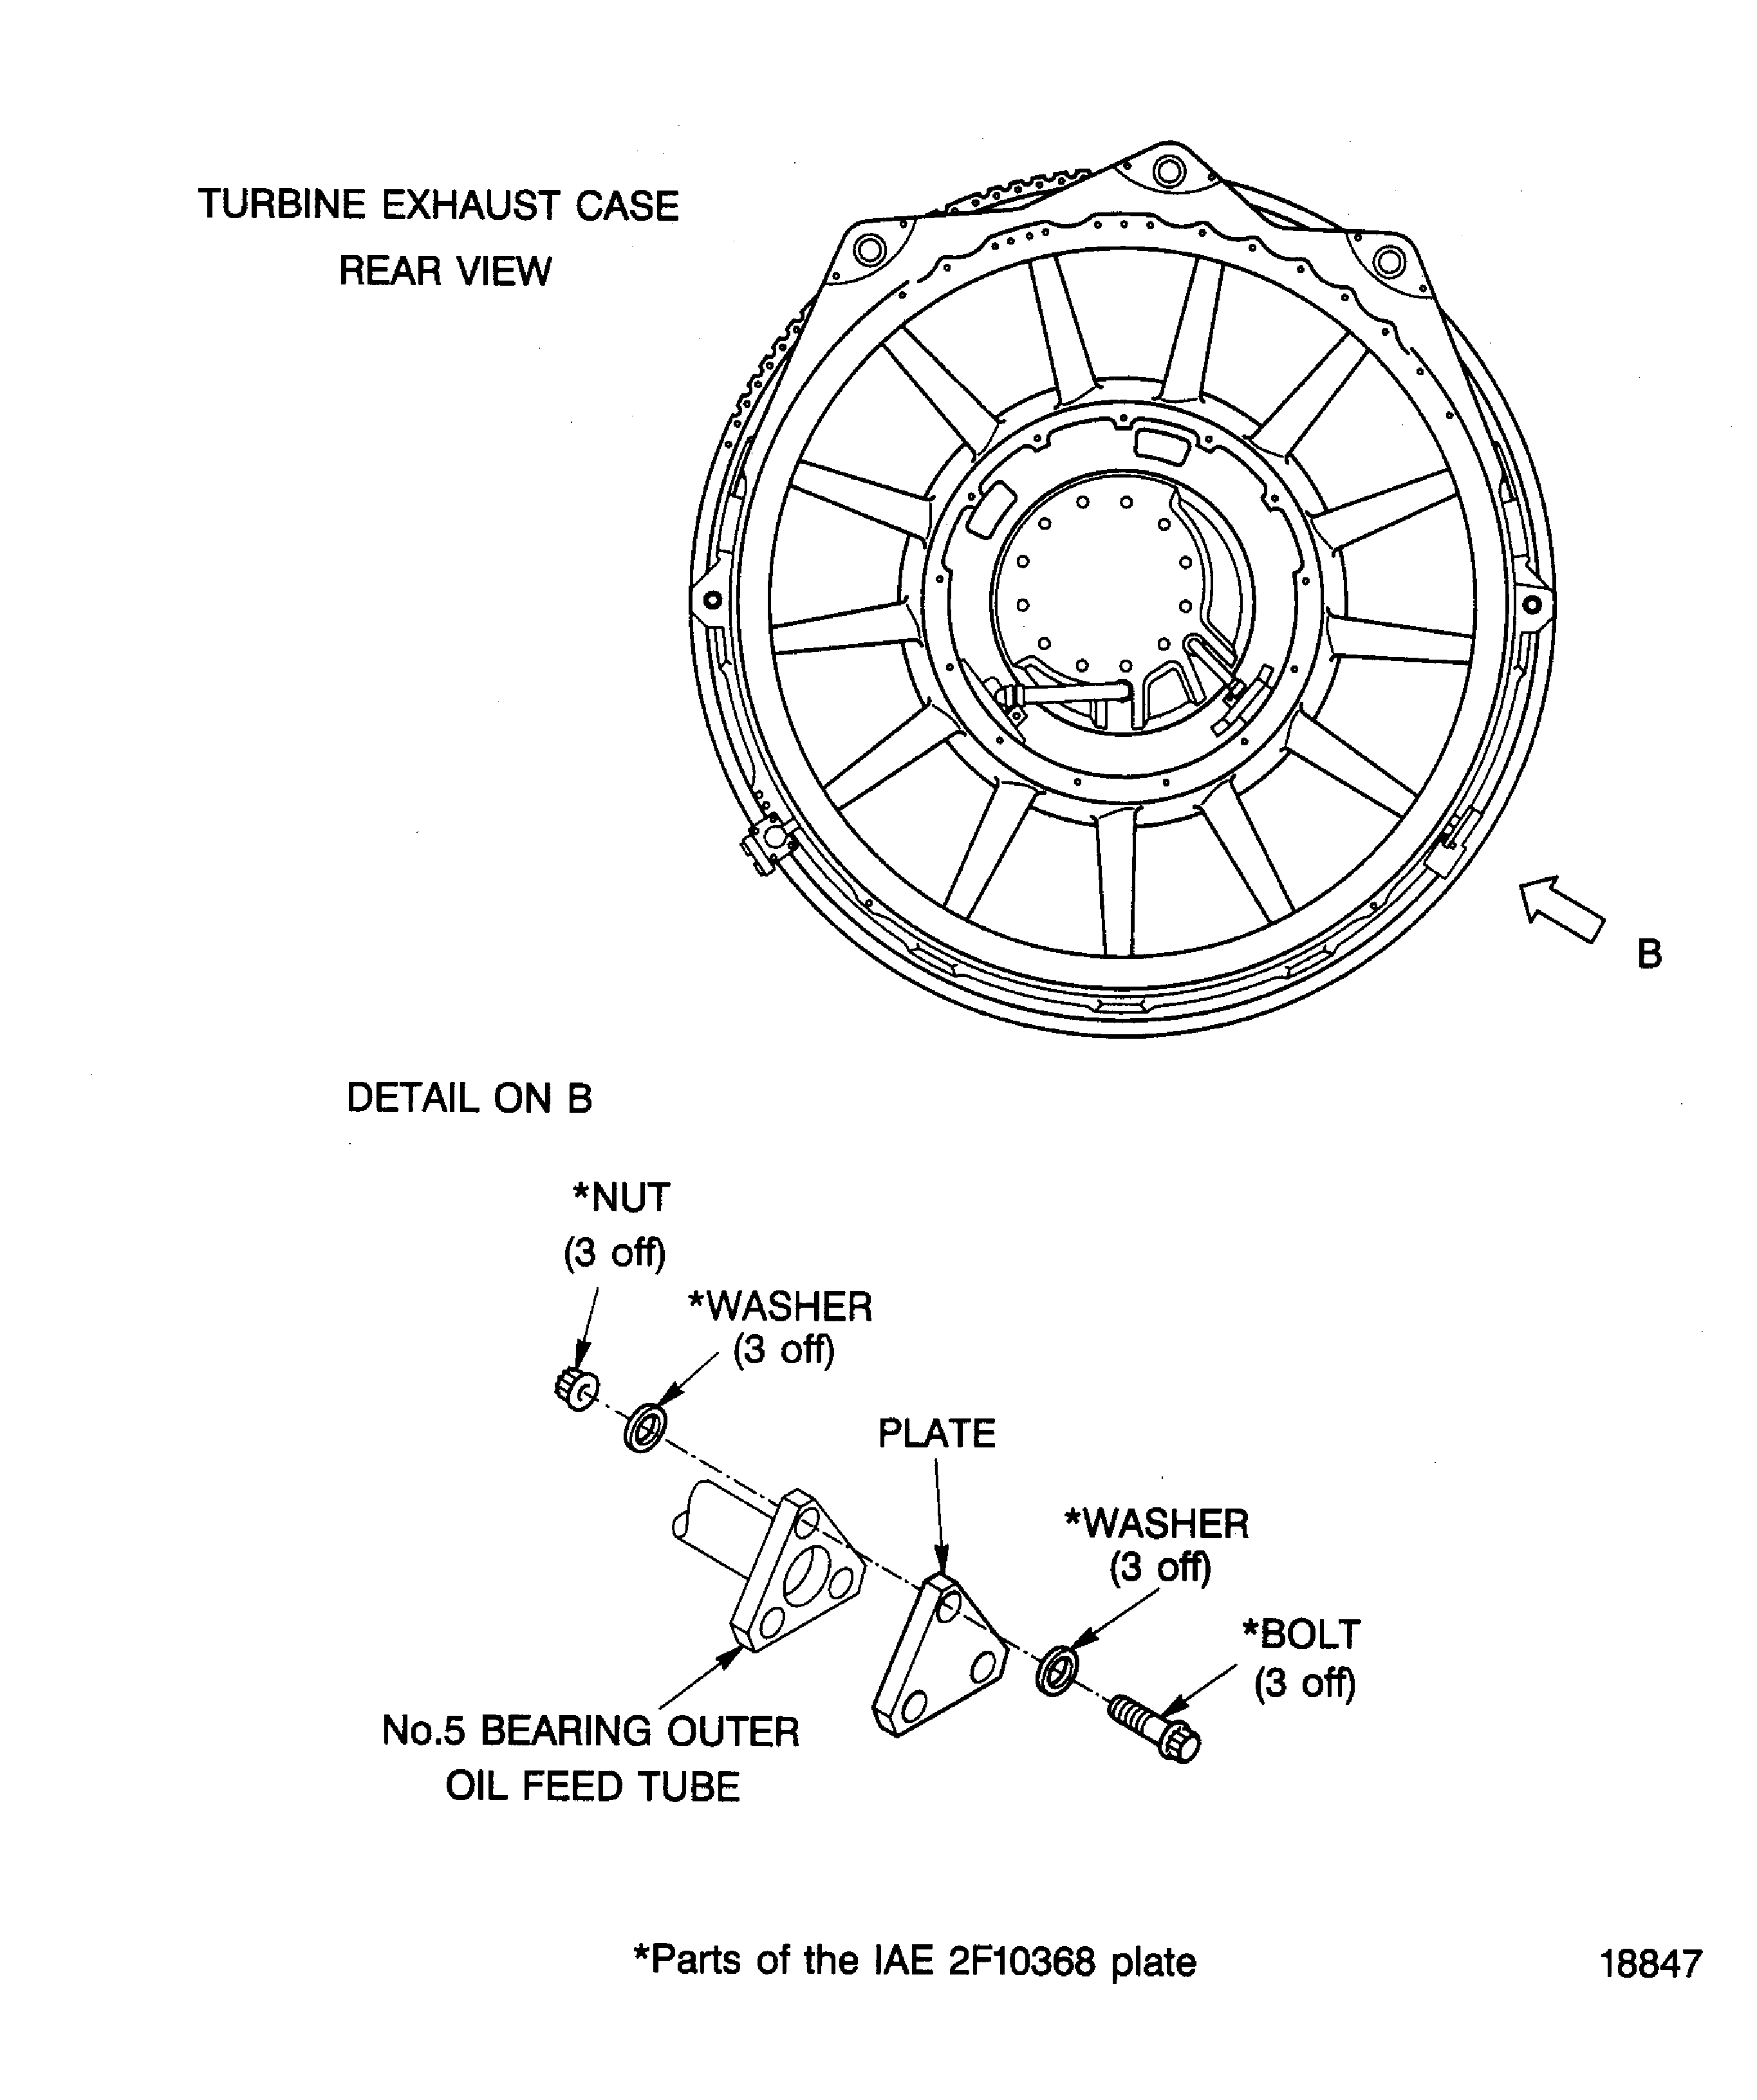
Figure: Connect the Fitting of the Vacuum Test Cart to the Adapter
Connect the Fitting of the Vacuum Test Cart to the Adapter

Figure: SBE 72-0037 and Pre SBE 72-0227: Installation of the Sealing Ring onto the Blind Cap
Sheet 1

Figure: SBE 72-0227: Installation of the Sealing Ring onto the Blind Cap
Sheet 2

Figure: SBE 72-0037 and Pre SBE 72-0227: Installation of the Sealing Ring into the Sizing Sleeve
SBE 72-0037 and Pre SBE 72-0227: Installation of the Sealing Ring into the Sizing Sleeve

Figure: SBE 72-0037: Installed Condition of the Sealing Ring
SBE 72-0037: Installed Condition of the Sealing Ring

Figure: SBE 72-0037: Example of incorrect Installation of the Sealing Ring onto the Blind Cap
SBE 72-0037: Example of incorrect Installation of the Sealing Ring onto the Blind Cap

Figure: Install the plate No. 5 bearing outer feed tube
Install the plate No. 5 bearing outer feed tube
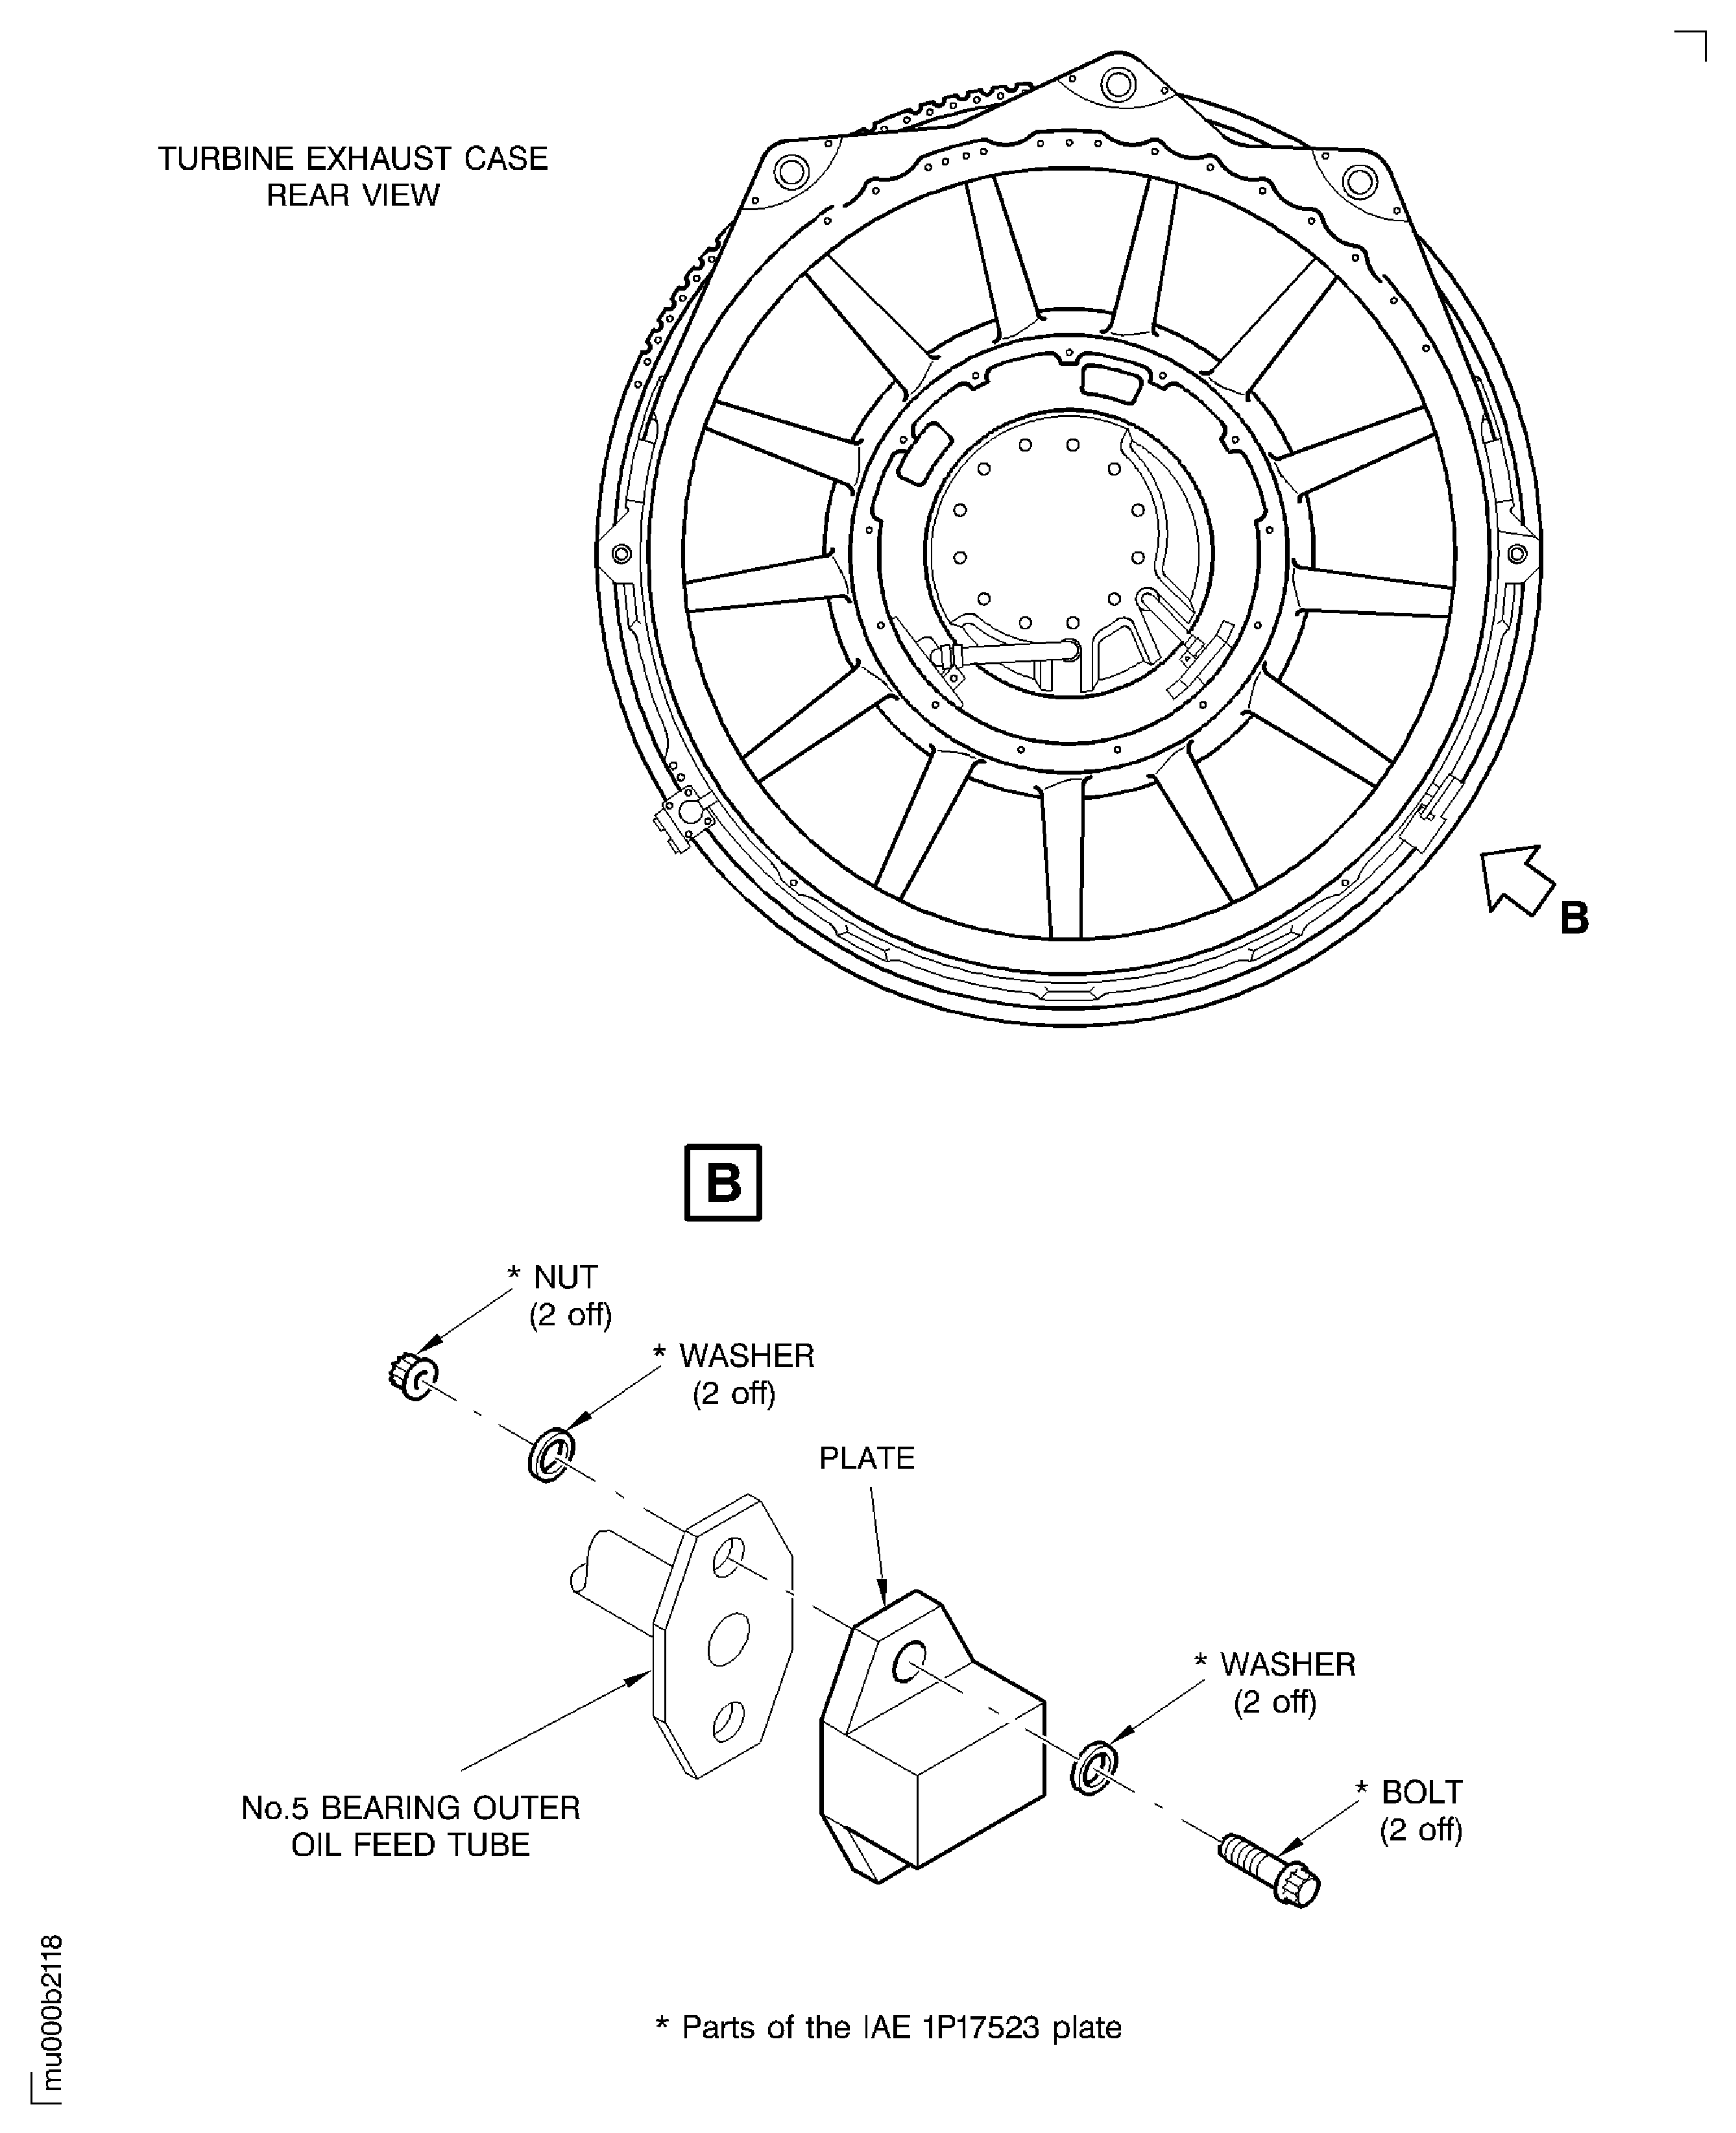
Figure: SBE 72-0037: Installation of Blind Cap and Retaining Ring
SBE 72-0037: Installation of Blind Cap and Retaining Ring
