Export Control
EAR Export Classification: Not subject to the EAR per 15 C.F.R. Chapter 1, Part 734.3(b)(3), except for the following Service Bulletins which are currently published as EAR Export Classification 9E991: SBE70-0992, SBE72-0483, SBE72-0580, SBE72-0588, SBE72-0640, SBE73-0209, SBE80-0024 and SBE80-0025.Copyright
© IAE International Aero Engines AG (2001, 2014 - 2021) The information contained in this document is the property of © IAE International Aero Engines AG and may not be copied or used for any purpose other than that for which it is supplied without the express written authority of © IAE International Aero Engines AG. (This does not preclude use by engine and aircraft operators for normal instructional, maintenance or overhaul purposes.).Applicability
V2500-A1 AND Post SBE 72-0402
Common Information
TASK 72-41-30-440-011-A00 HPC Front Case And Vane Assembly - Check And Set VSV System With Optimized Build And Setting Clearances, Assembly-011 - SBE 72-0402
General
This TASK gives the general procedure to check and set the clearances between the HP compressor front cases (VIGV stage and stages 3 to 6) and the VSV upper and lower actuating ring assemblies, refer to Figure. Do this procedure when instructed to do so from the applicable build procedures during the assembly of the HP compressor front case. Refer to the following procedures.
TASK 72-41-30-440-001-A00 (ASSEMBLY-001, CONFIG-001) Install the Stage 3 to 6 Rotor Path Rings Pre SBE 72-0027.
TASK 72-41-30-440-001-B00 (ASSEMBLY-001, CONFIG-002) Install the stage 5 and 6 Rotor Path Rings SBE 72-0027.
TASK 72-41-30-440-002-A00 (ASSEMBLY-002, CONFIG-001) Measure and then Machine the Stage 6 VSV and the Stage 3 to 6 Rotor Path Linings.
TASK 72-41-30-440-003-A00 (ASSEMBLY-003, CONFIG-001) Install the Inlet Guide Vanes.
TASK 72-41-30-440-004-A00 (ASSEMBLY-004, CONFIG-001) Install the Stage 3 VSV.
TASK 72-41-30-440-005-A00 (ASSEMBLY-005, CONFIG-001) Install the Stage 4 VSV.
TASK 72-41-30-440-006-A00 (ASSEMBLY-006, CONFIG-001) Install the Stage 5 VSV.
TASK 72-41-30-440-007-A00 (ASSEMBLY-007, CONFIG-001) Install the Stage 6 VSV.
TASK 72-41-30-440-008-A00 (ASSEMBLY-008, CONFIG-001) Install the Inlet Guide Vane and the Stage 3 to 6 Connector Assemblies.
TASK 72-41-30-440-010-A00 (ASSEMBLY-0010, CONFIG-001) Disassemble the HP Compressor Front Cases.
Fig/item numbers in parentheses in the procedure agree with those used in the IPC. Only the primary Fig/item numbers are used. For the service bulletin alpha variants refer to the IPC.
For standard torque data and procedures, refer to the SPM TASK 70-41-00-400-501, SPM TASK 70-41-01-400-501 and SPM TASK 70-41-02-400-501.
Special torque data and assembly tolerances are included in the procedure.
Lubricate all threads and touch faces of nuts and bolts with CoMat 10-077 APPROVED ENGINE OILS, unless other lubricants are referred to in the procedure.
After assembly apply CoMat 07-038 AIR DRYING ENAMEL to any damaged surface protection, joint flanges and parts used to attach. Use the correct color of the air drying enamel. Refer to the SPM TASK 70-63-02-380-501.
NOTE
NOTE
Preliminary Requirements
Pre-Conditions
NONESupport Equipment
| Name | Manufacturer | Part Number / Identification | Quantity | Remark |
|---|---|---|---|---|
| Feeler gage | LOCAL | Feeler gage | ||
| Spray hand pump | LOCAL | Spray hand pump | ||
| Brush | LOCAL | Brush | Clean | |
| IAE 1R18248 Rigging pin | 0AM53 | IAE 1R18248 | 2 | |
| IAE 1R18638 Rigging pin | 0AM53 | IAE 1R18638 | 2 | |
| IAE 1R18423 Rigging pin | 0AM53 | IAE 1R18423 | 2 | |
| IAE 1R18892 Rigging pin | 0AM53 | IAE 1R18892 | 2 | |
| IAE 1R18423 Rigging pin | 0AM53 | IAE 1R18423 | 6 per stage | |
| IAE 1R18893 Riggingpin | 0AM53 | IAE 1R18893 | 6 | |
| IAE 1R18894 Rigging pin | 0AM53 | IAE 1R18894 | 6 | |
| IAE 1R18895 Rigging pin | 0AM53 | IAE 1R18895 | 6 | |
| IAE 1R18896 Rigging pin | 0AM53 | IAE 1R18896 | 6 | |
| IAE 1R18638 Rigging pin | 0AM53 | IAE 1R18638 | 2 |
Consumables, Materials and Expendables
| Name | Manufacturer | Part Number / Identification | Quantity | Remark |
|---|---|---|---|---|
| CoMat 07-038 AIR DRYING ENAMEL | K3504 | CoMat 07-038 | ||
| CoMat 10-077 APPROVED ENGINE OILS | LOCAL | CoMat 10-077 | ||
| CoMat 10-108 HIGH PERFORMANCE PENETRATING LUBRICANT WITH TEFLON (R) | LOCAL | CoMat 10-108 |
Spares
NONESafety Requirements
NONEProcedure
Install the pins for the VIGV stage, it is only possible to install the four pins at positions D and E (with the left and right hand connector housings installed). At position E install two flattened pins, refer to Figure and table 1.
Install the pins for the stages 3 to 6, refer to Figure and table 1.
TABLE 1
VIGV STAGE :
Standard build pin - position C
2 off
Or
2 off
Stepped build pin - position D
2 off
Or
2 off
Flatted build pin - position E
2 off
STAGES 3 TO 6 :
Standard build pin - position H
6 off (for each stage)
Or
Stage 3
6 off
Stage 4
6 off
Stage 5
6 off
Stage 6
6 off
Install the pins through the actuating ring and into the mating holes in the compressor case. If you cannot install a pin in an actuating ring hole because a component prevents this then omit that pin. It may be necessary to make make small adjustments to the actuating ring to install all the pins.
SUBTASK 72-41-30-440-206 Prepare the HP Compressor Front Cases for the Setting and Clearance Checks
Before installation inspect the left hand and right hand connectors for each stage and the mating surfaces of the actuating ring assembly for marks caused by previously misaligned dowels. This check will give some indication of the possible areas which could result in a misaligned assembly during the build procedure.
During the assembly procedure lubricate the front compressor casing or mating pad surface for each stage with a thin layer of 10-108 teflon based lubricant, refer to Step.
After the installation of the connectors make sure that the dowels are correctly installed, refer to Step.
Install all build pins in each stage in turn, refer to Step.
Preparation checks.
Measure and make a record of the gap between the pad and the actuating ring at the adjusting washer position for that pad.
The feeler gauge must be put under the pad circumferentially along the length of the actuating ring. Refer to Figure and Figure for the feeler gauge positions.
NOTE
Refer to the applicable Assembly TASK, see TASK 72-41-30-440-000 (ASSEMBLY-000) for part details of IPC Fig./item numbers for the adjusting washers for the specific configuration.Remove each bolt and washer, then calculate and install the applicable adjusting washer to give the correct clearance for each stage, refer to Table 2. It is recommended that the lower limit is achieved.
A maximum allowable number of adjusting washers is two at each location.
For SBE72-0277 stage 3 pads the maximum number of adjusting washers is increased to three at each location.
TABLE 2 :
TABLE OF LIMITS - VSV CLEARANCE SETTING PROCEDURE
VSV SYSTEM STAGE
CLEARANCE - ALL PADS
VIGV
0.003 to 0.004 in.
(0.08 to 0.10 mm)
3
0.004 to 0.005 in.
(0.10 to 0.13 mm)
4
0.008 to 0.009 in.
(0.20 to 0.23 mm)
5
0.007 to 0.008 in.
(0.18 to 0.20 mm)
6
0.008 to 0.009 in.
(0.20 to 0.23 mm)
Install the two bolts and washers to attach the pad and adjusting washers(s) to the actuating ring.
NOTE
Refer to the applicable Assembly TASK for bolt torque values, see TASK 72-41-30-440-000 (ASSEMBLY-000).
Set the clearances between the compressor case and the actuating pads.
Measure and make a record of the clearance between the pads and the case for each stage, refer to table 2. The clearance must agree with the limits given in table 2. If the clearance does not agree with the limits in table 2 then the clearance must be reset.
Let the feeler gauge stay in position and then measure the next clearance at a circumferentially adjacent pad. When all eight pads are set there should be a feeler gauge remaining under each pad.
During disassembly of the connectors from the actuating ring look for new marks from misplaced dowels, refer to TASK 72-41-30-440-010-A00 (ASSEMBLY-010, CONFIG-001).
Completion procedures.
SUBTASK 72-41-30-440-207 Set the HP Compressor Front Case VSV Pad Clearances
It is not easy to decide if the connectors for a particular stage is installed incorrectly. An incorrect installation can occur if a dowel is not installed correctly in a mating hole of an actuating ring and instead touches the mating face of the actuating ring.
The wall of the actuating ring can become clamped between the dowel and the internal actuating ring boss, when this occurs the bridge piece is not held. The head of the mis-seated dowel can be visible above the connector and/or the connector could be offset from the actuating ring. Refer to Figure.
No indication of misaligned connectors is evident when the bolt(s) are torque tightened because of a 'cross-keying' action of the dowels in the connectors.
This is the general procedure to make sure that the left and right hand connectors which are installed to the upper and lower actuating rings are installed correctly. The check will make sure that the dowels which hold the connectors to the actuating ring are installed correctly and are not mis-seated. The following gives the causes of an incorrectly installed assembly and what to look for :
For the left hand and/or right hand joint (as applicable) examine the dowel heads, use a torch if necessary. Make a comparison in the position of each dowel. Look for differences in radial distances between the connector and the upper and lower actuating ring, all the distances should be the same. If there is a distance which does not appear regular then do steps (3) to (5).
Reset the pad clearances, refer to Step.
Inspect the left hand and right hand actuating ring and connector joint for each stage.
SUBTASK 72-41-30-220-445 Check the Installation of the Left and Right Hand Connectors and VSV Actuating Ring Assembly
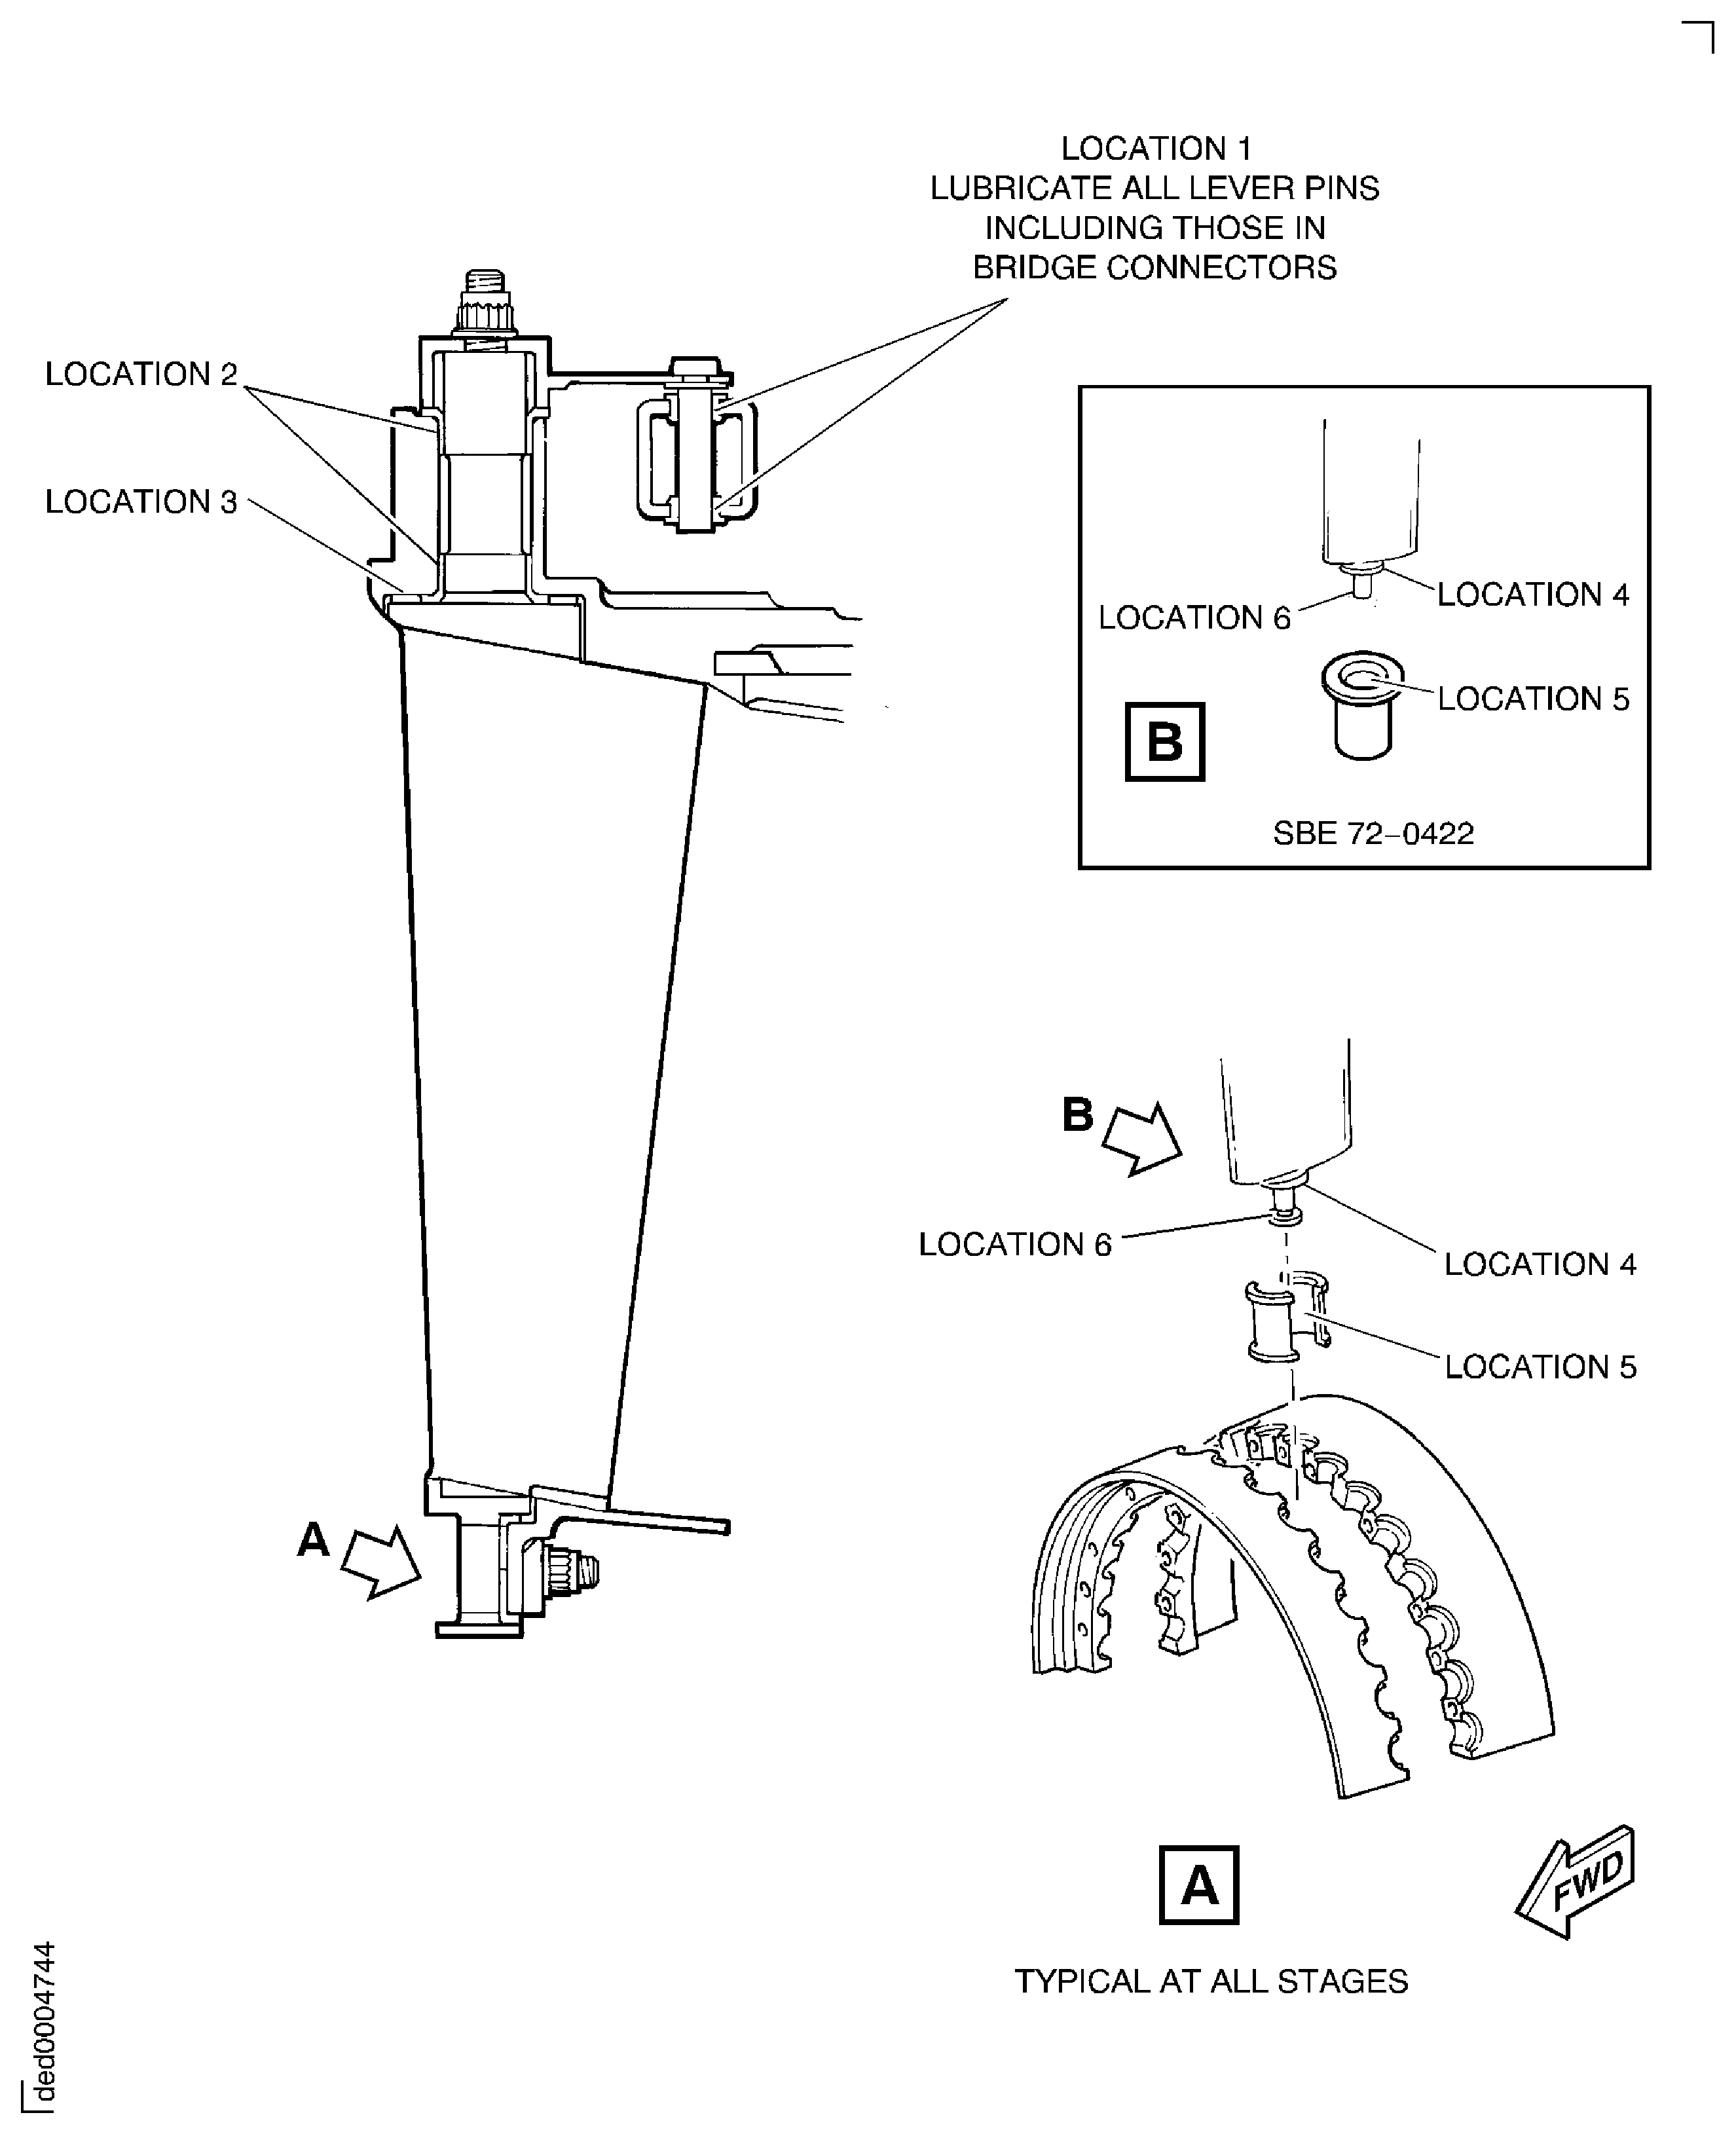
Each pin/bush mating surface at location 1 that connects the VSV levers to the actuating ring. Lubricate all lever pins including those in the actuating ring bridge connectors, refer to Figure.
Each VIGV actuating ring connector housing pad to case surface at location A, Figure.
Each VIGV actuating ring centralizing pad to case surface at location B, Figure.
Each stage 3 thru 6 actuating ring connector/compensating housing pad to case surface at location F, Figure.
Each stage 3 thru 6 actuating ring centralizing pad to case surface at location G, Figure.
Apply CoMat 10-108 HIGH PERFORMANCE PENETRATING LUBRICANT WITH TEFLON (R) to each of the locations which follow, refer to Figure and Figurewhich gives the typical areas for the lubrication of the mechanism. Do these procedures during each applicable assembly procedure for this configuration when told to do so.
Apply a thin layer of lubricant using an appropriately sized brush or hand pump spray. Not an aerosol.
SUBTASK 72-41-30-440-208 Lubricate the VSV Mechanism at the Locations

WARNING
YOU MUST USE THE CORRECT PERSONNEL PROTECTION EQUIPMENT WHEN HANDLING AND APPLYING THE LUBRICANT, CoMat 10-108 HIGH PERFORMANCE PENETRATING LUBRICANT WITH TEFLON (R) TEFLON BASED LUBRICANT.
Figure: HP compressor front cases and VSV actuating system
HP compressor front cases and VSV actuating system
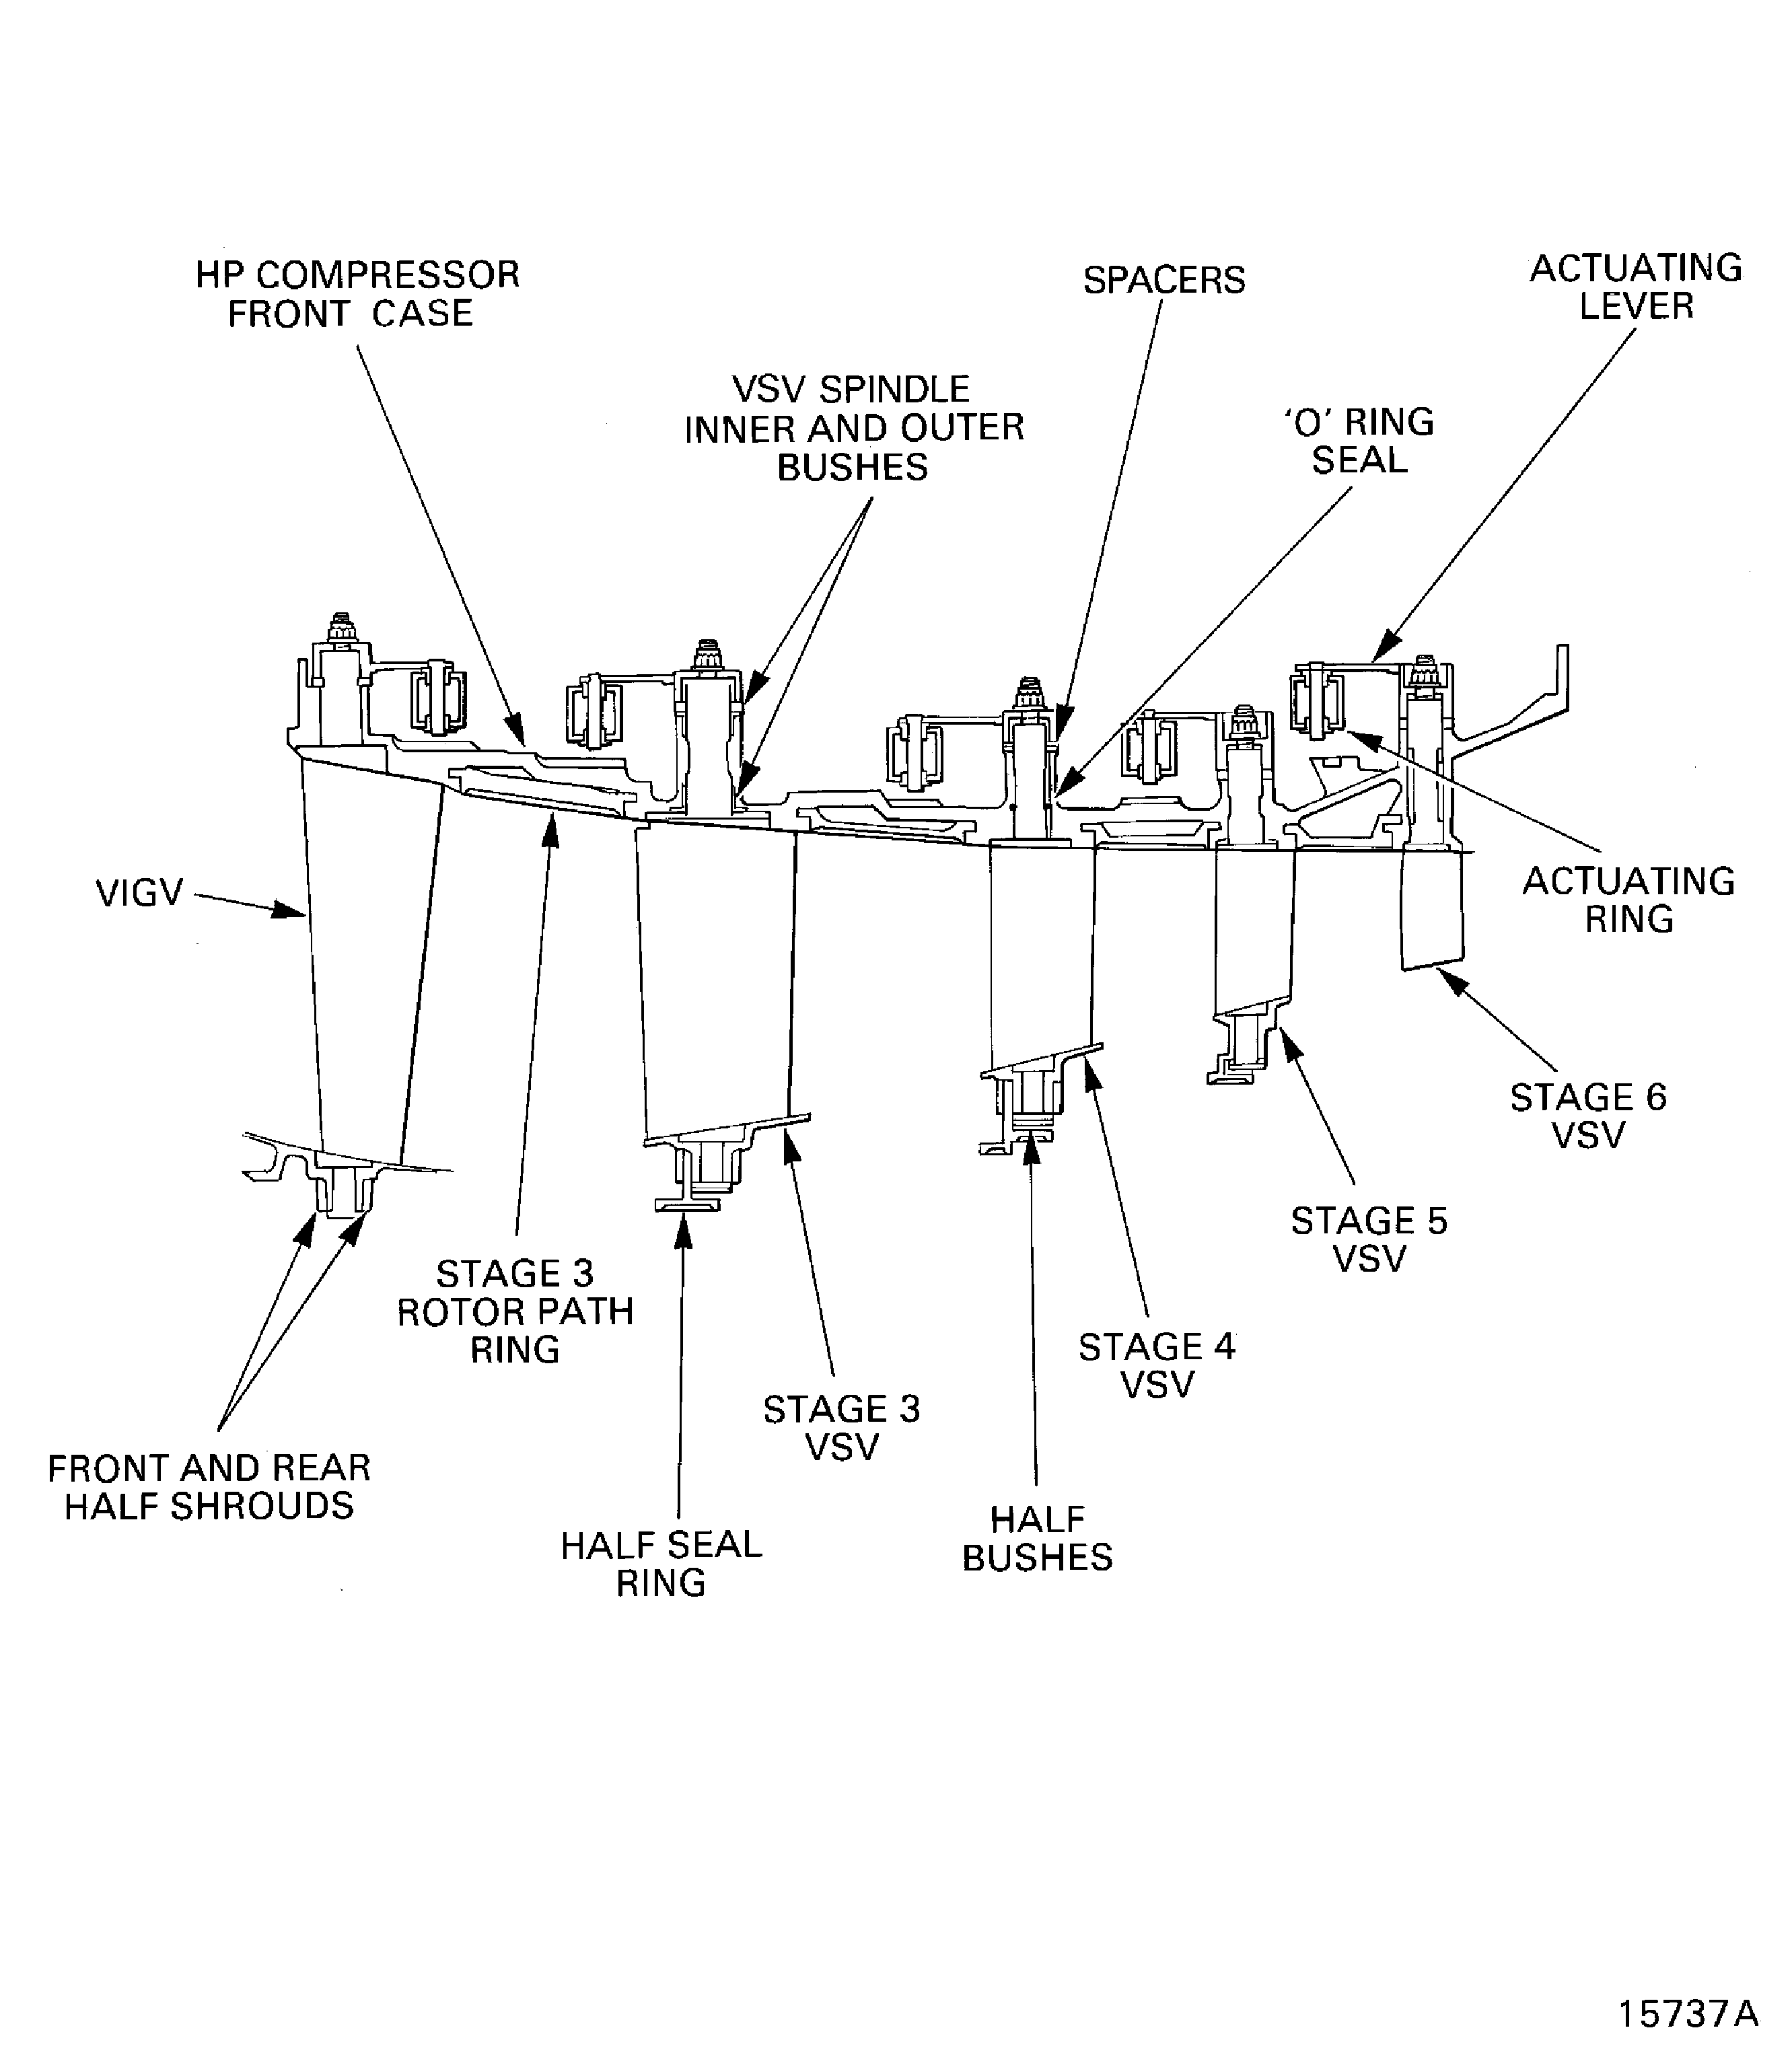
Figure: Install the pins - VIGV actuating ring
Install the pins - VIGV actuating ring
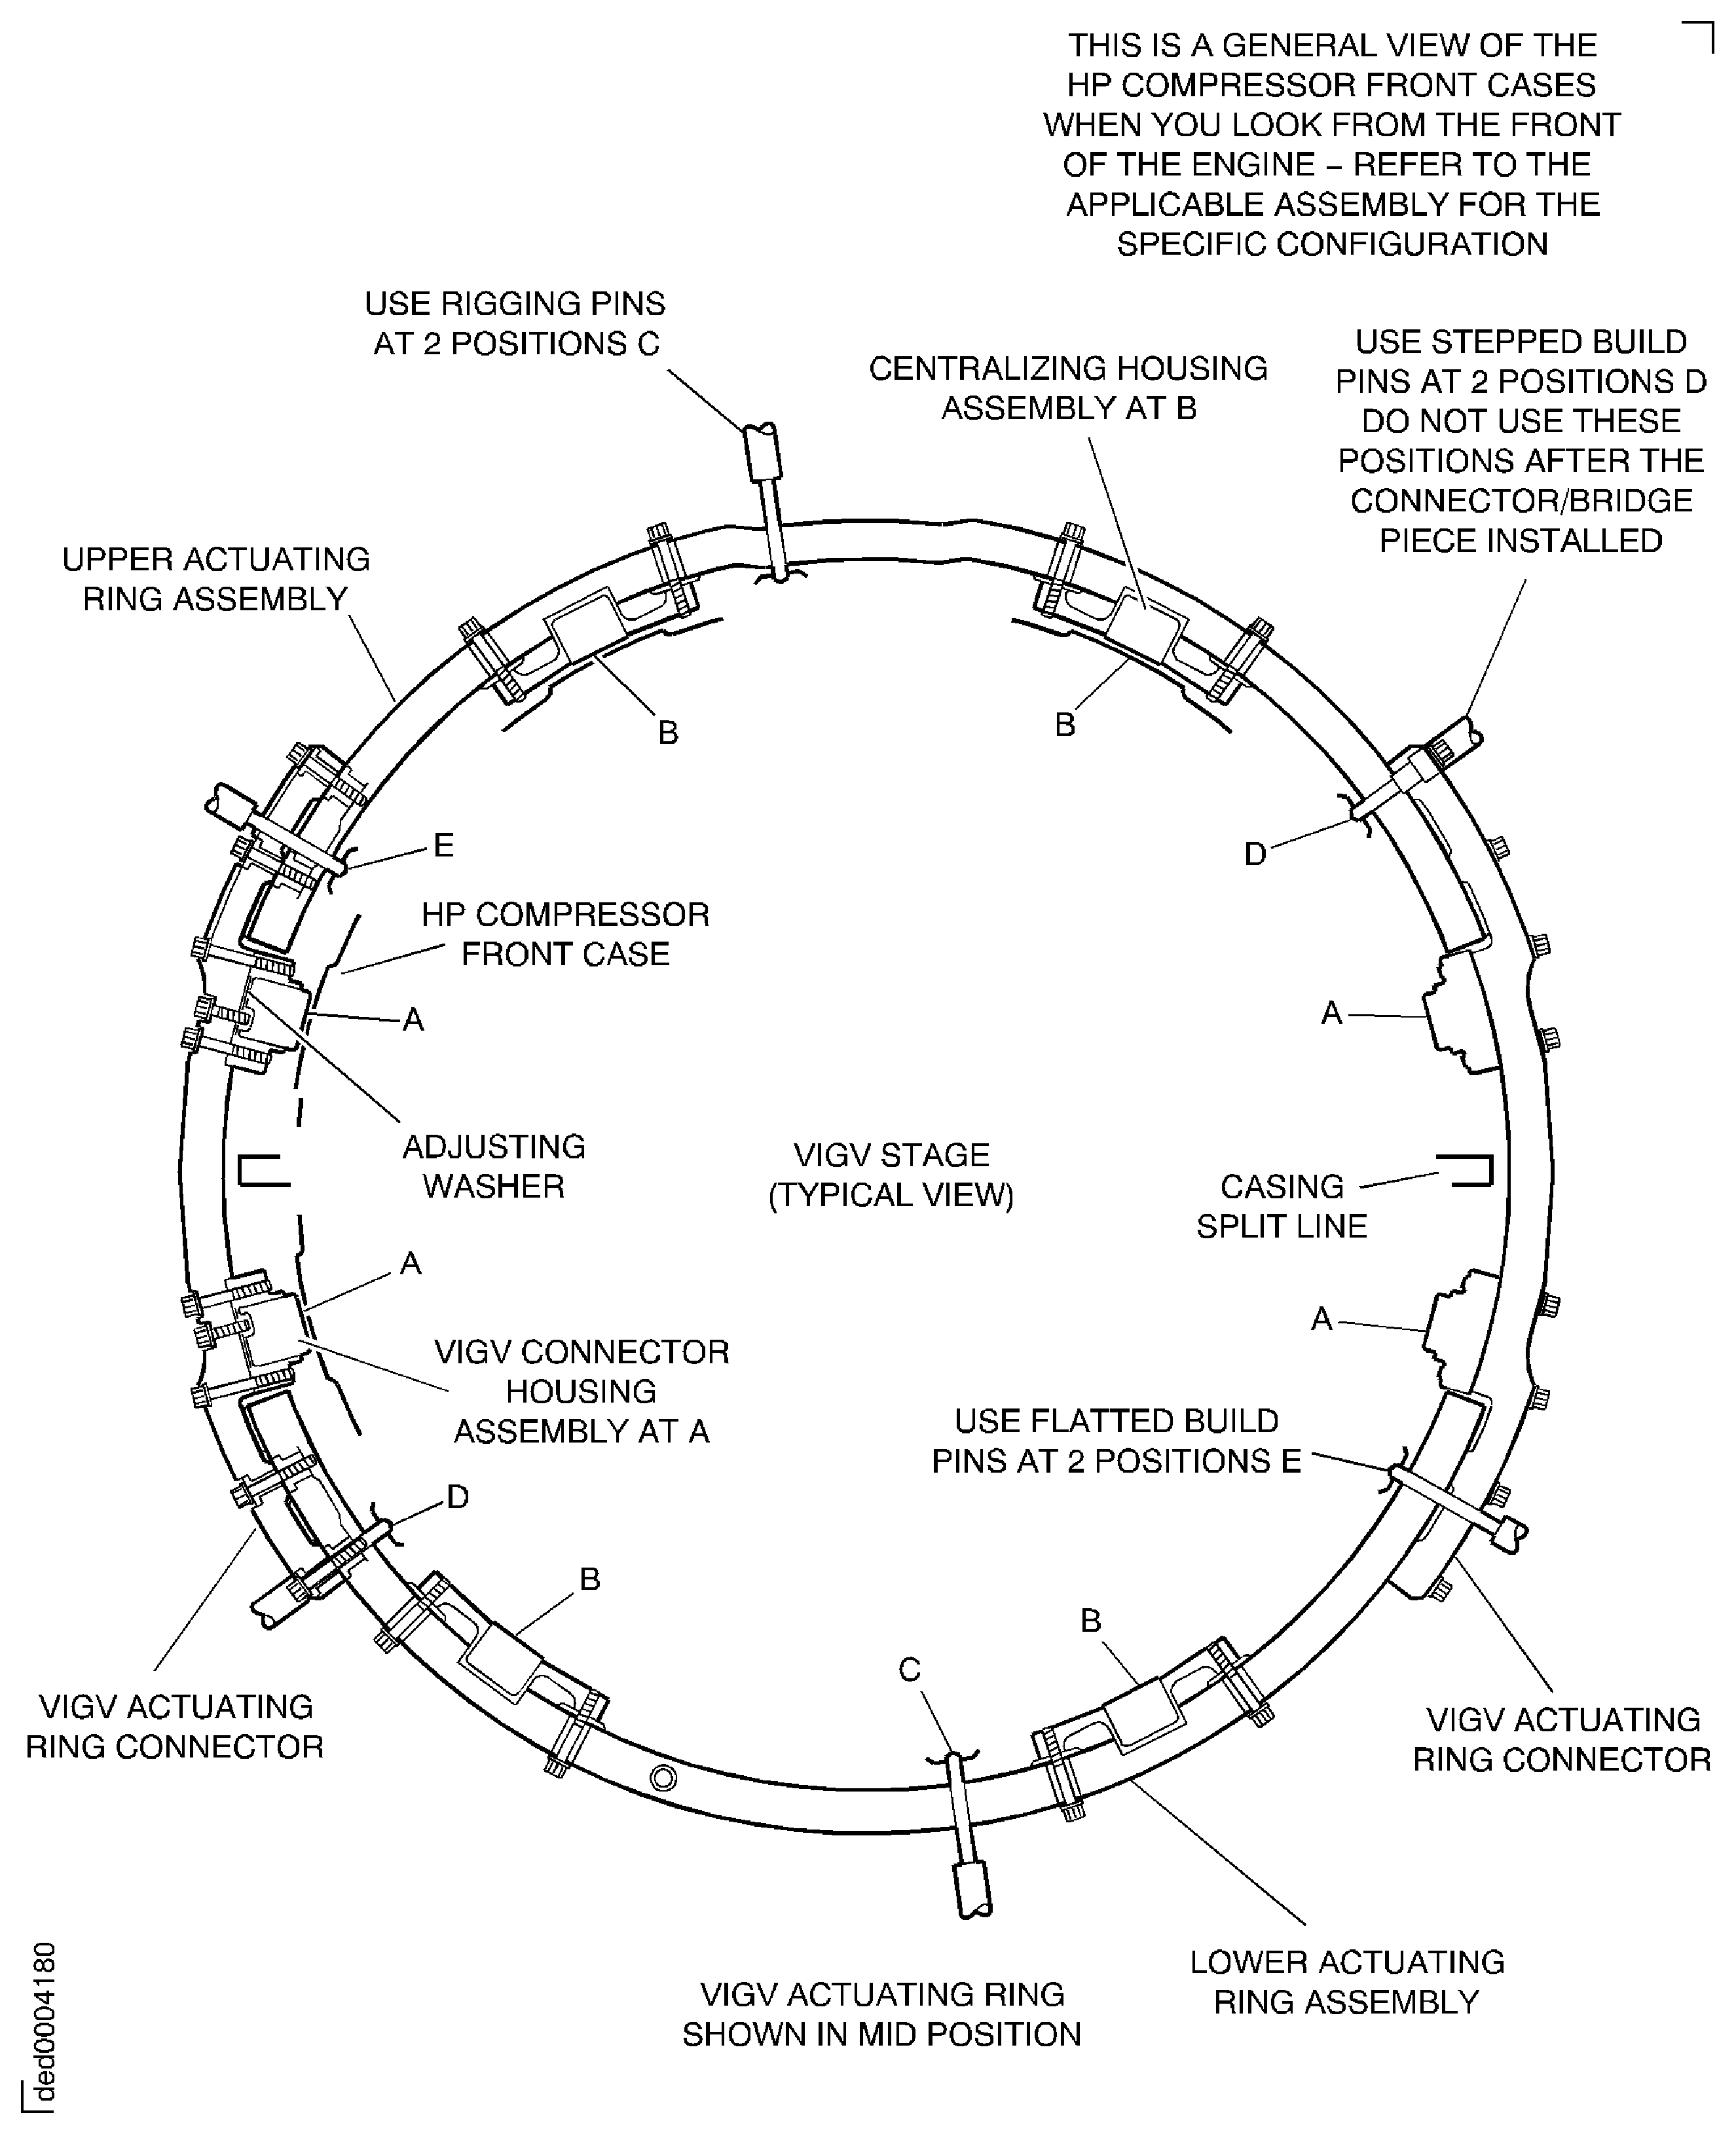
Figure: Install the pins - Stage 3 actuating ring
Install the pins - Stage 3 actuating ring
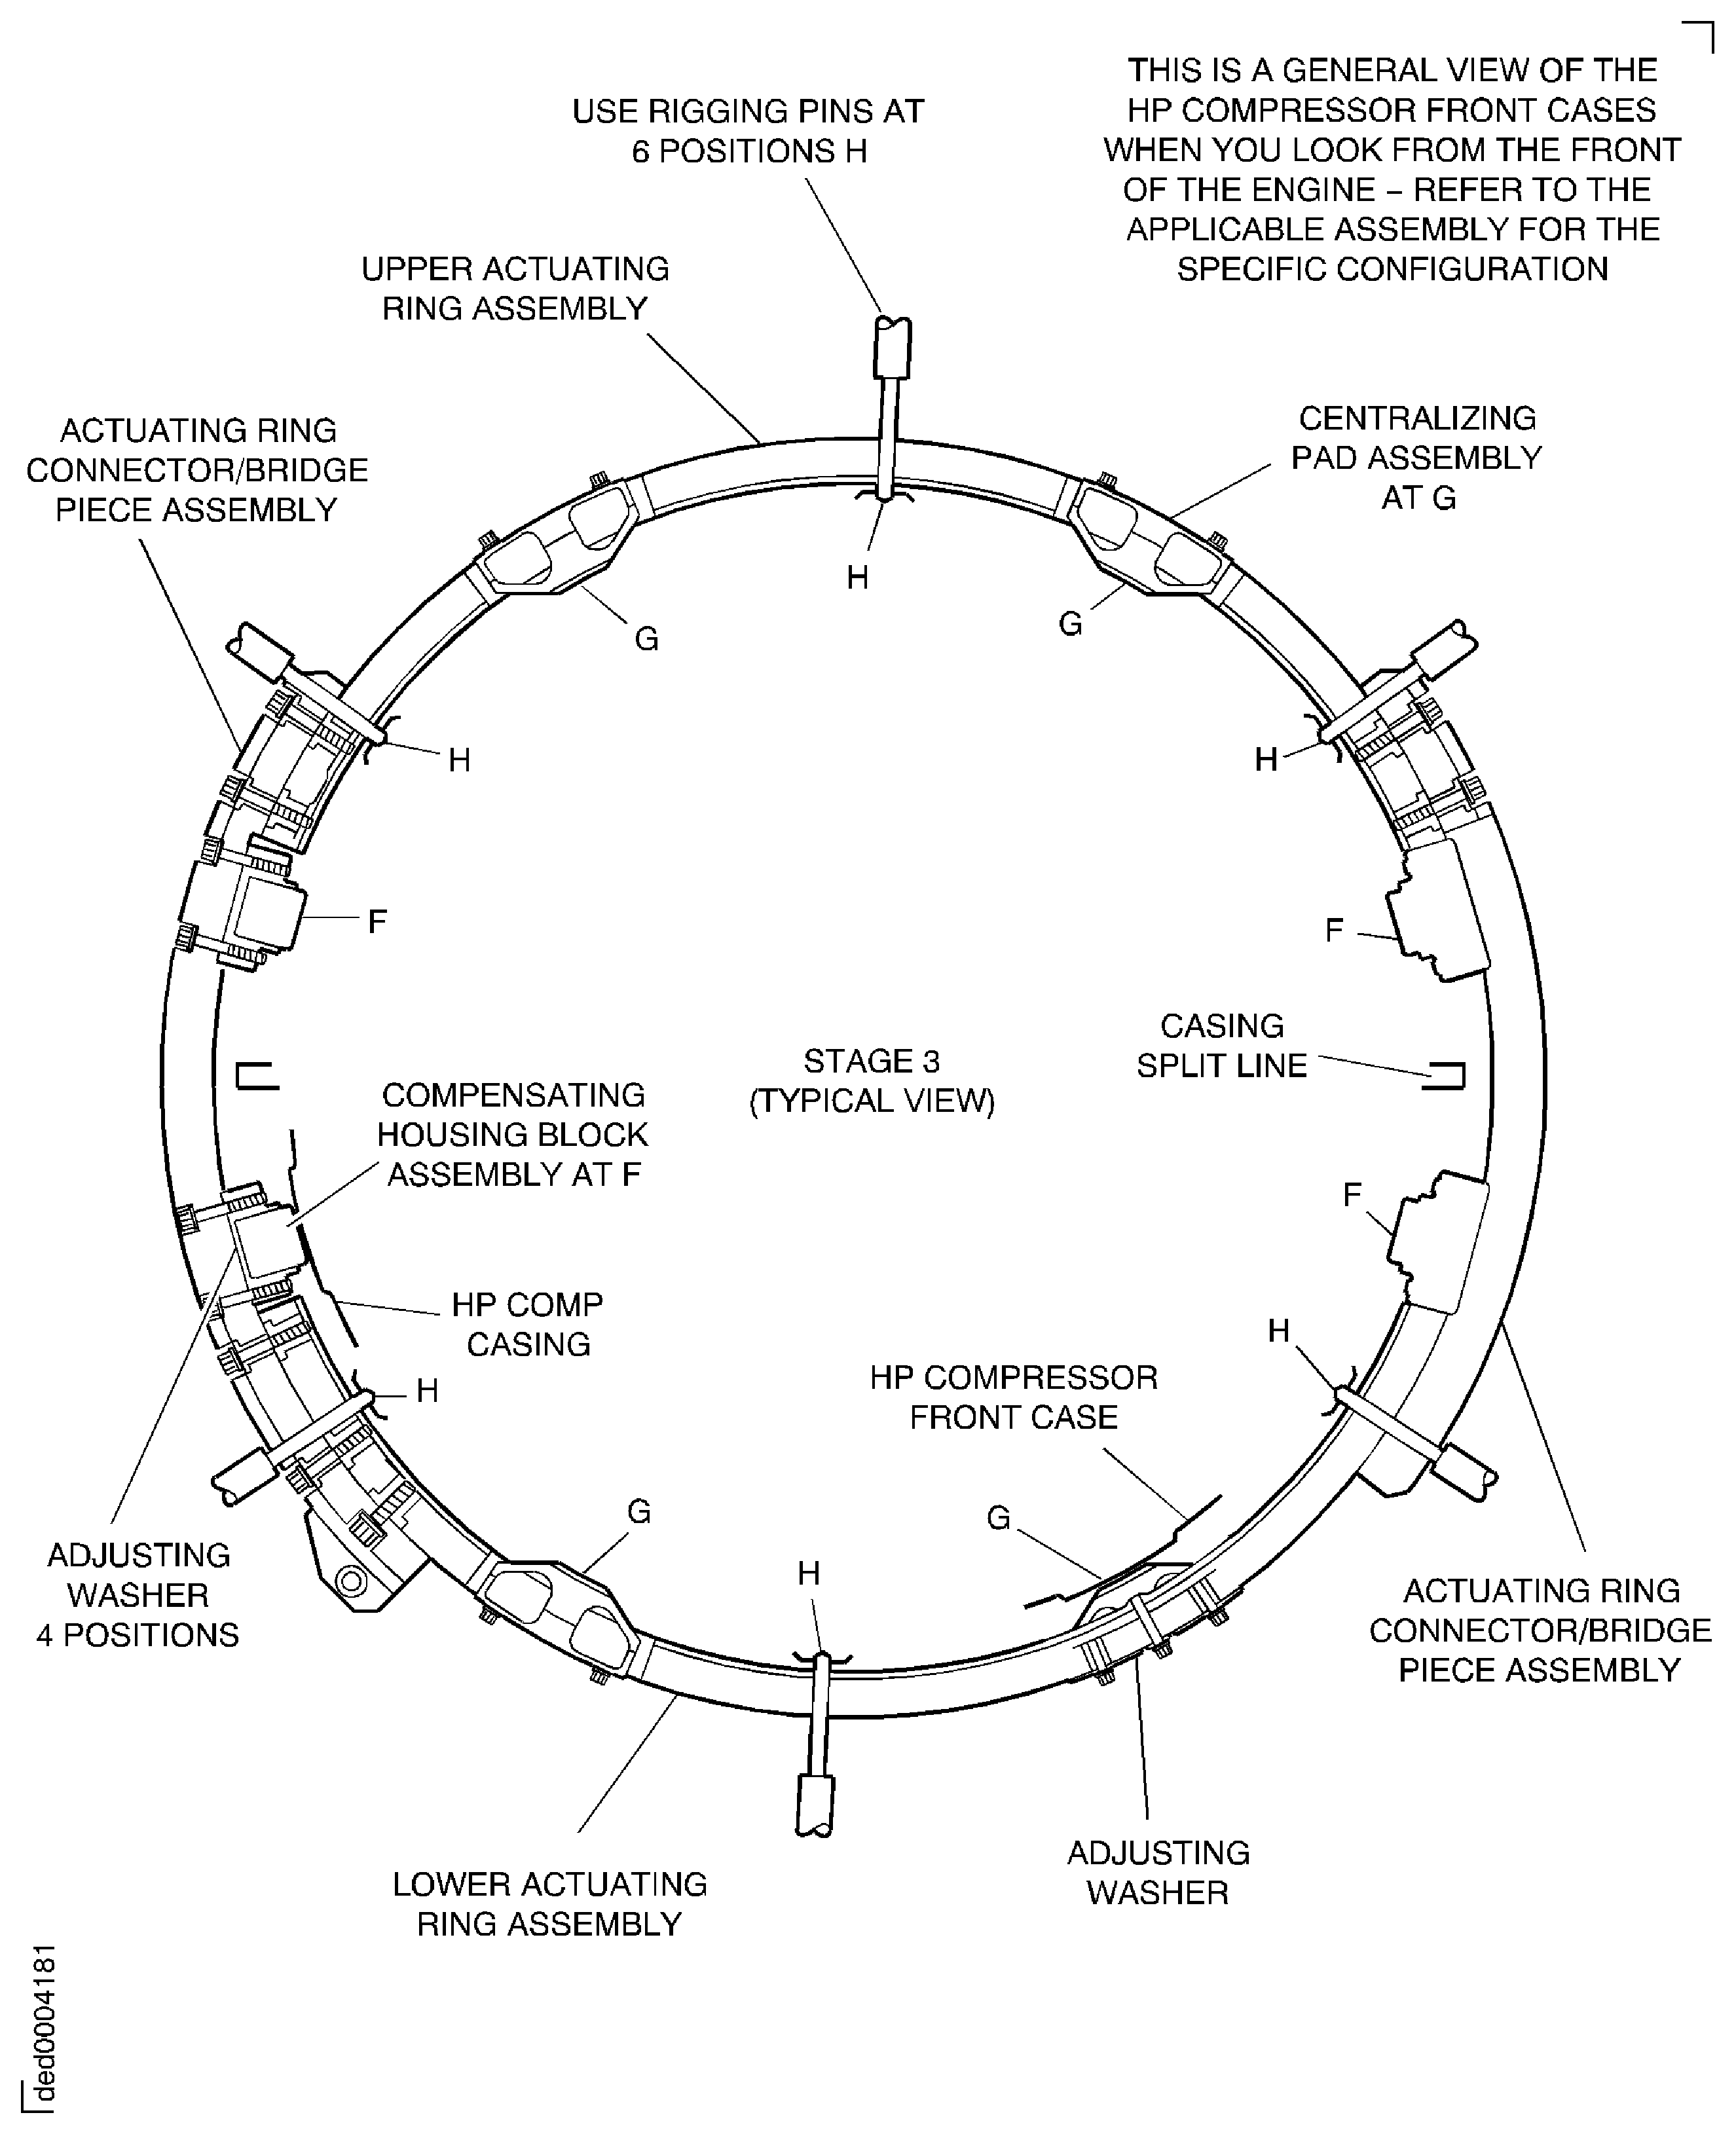
Figure: Check the connector/bridge piece assemblies to VSV actuating ring installation for mis-seated dowels
Check the connector/bridge piece assemblies to VSV actuating ring installation for mis-seated dowels
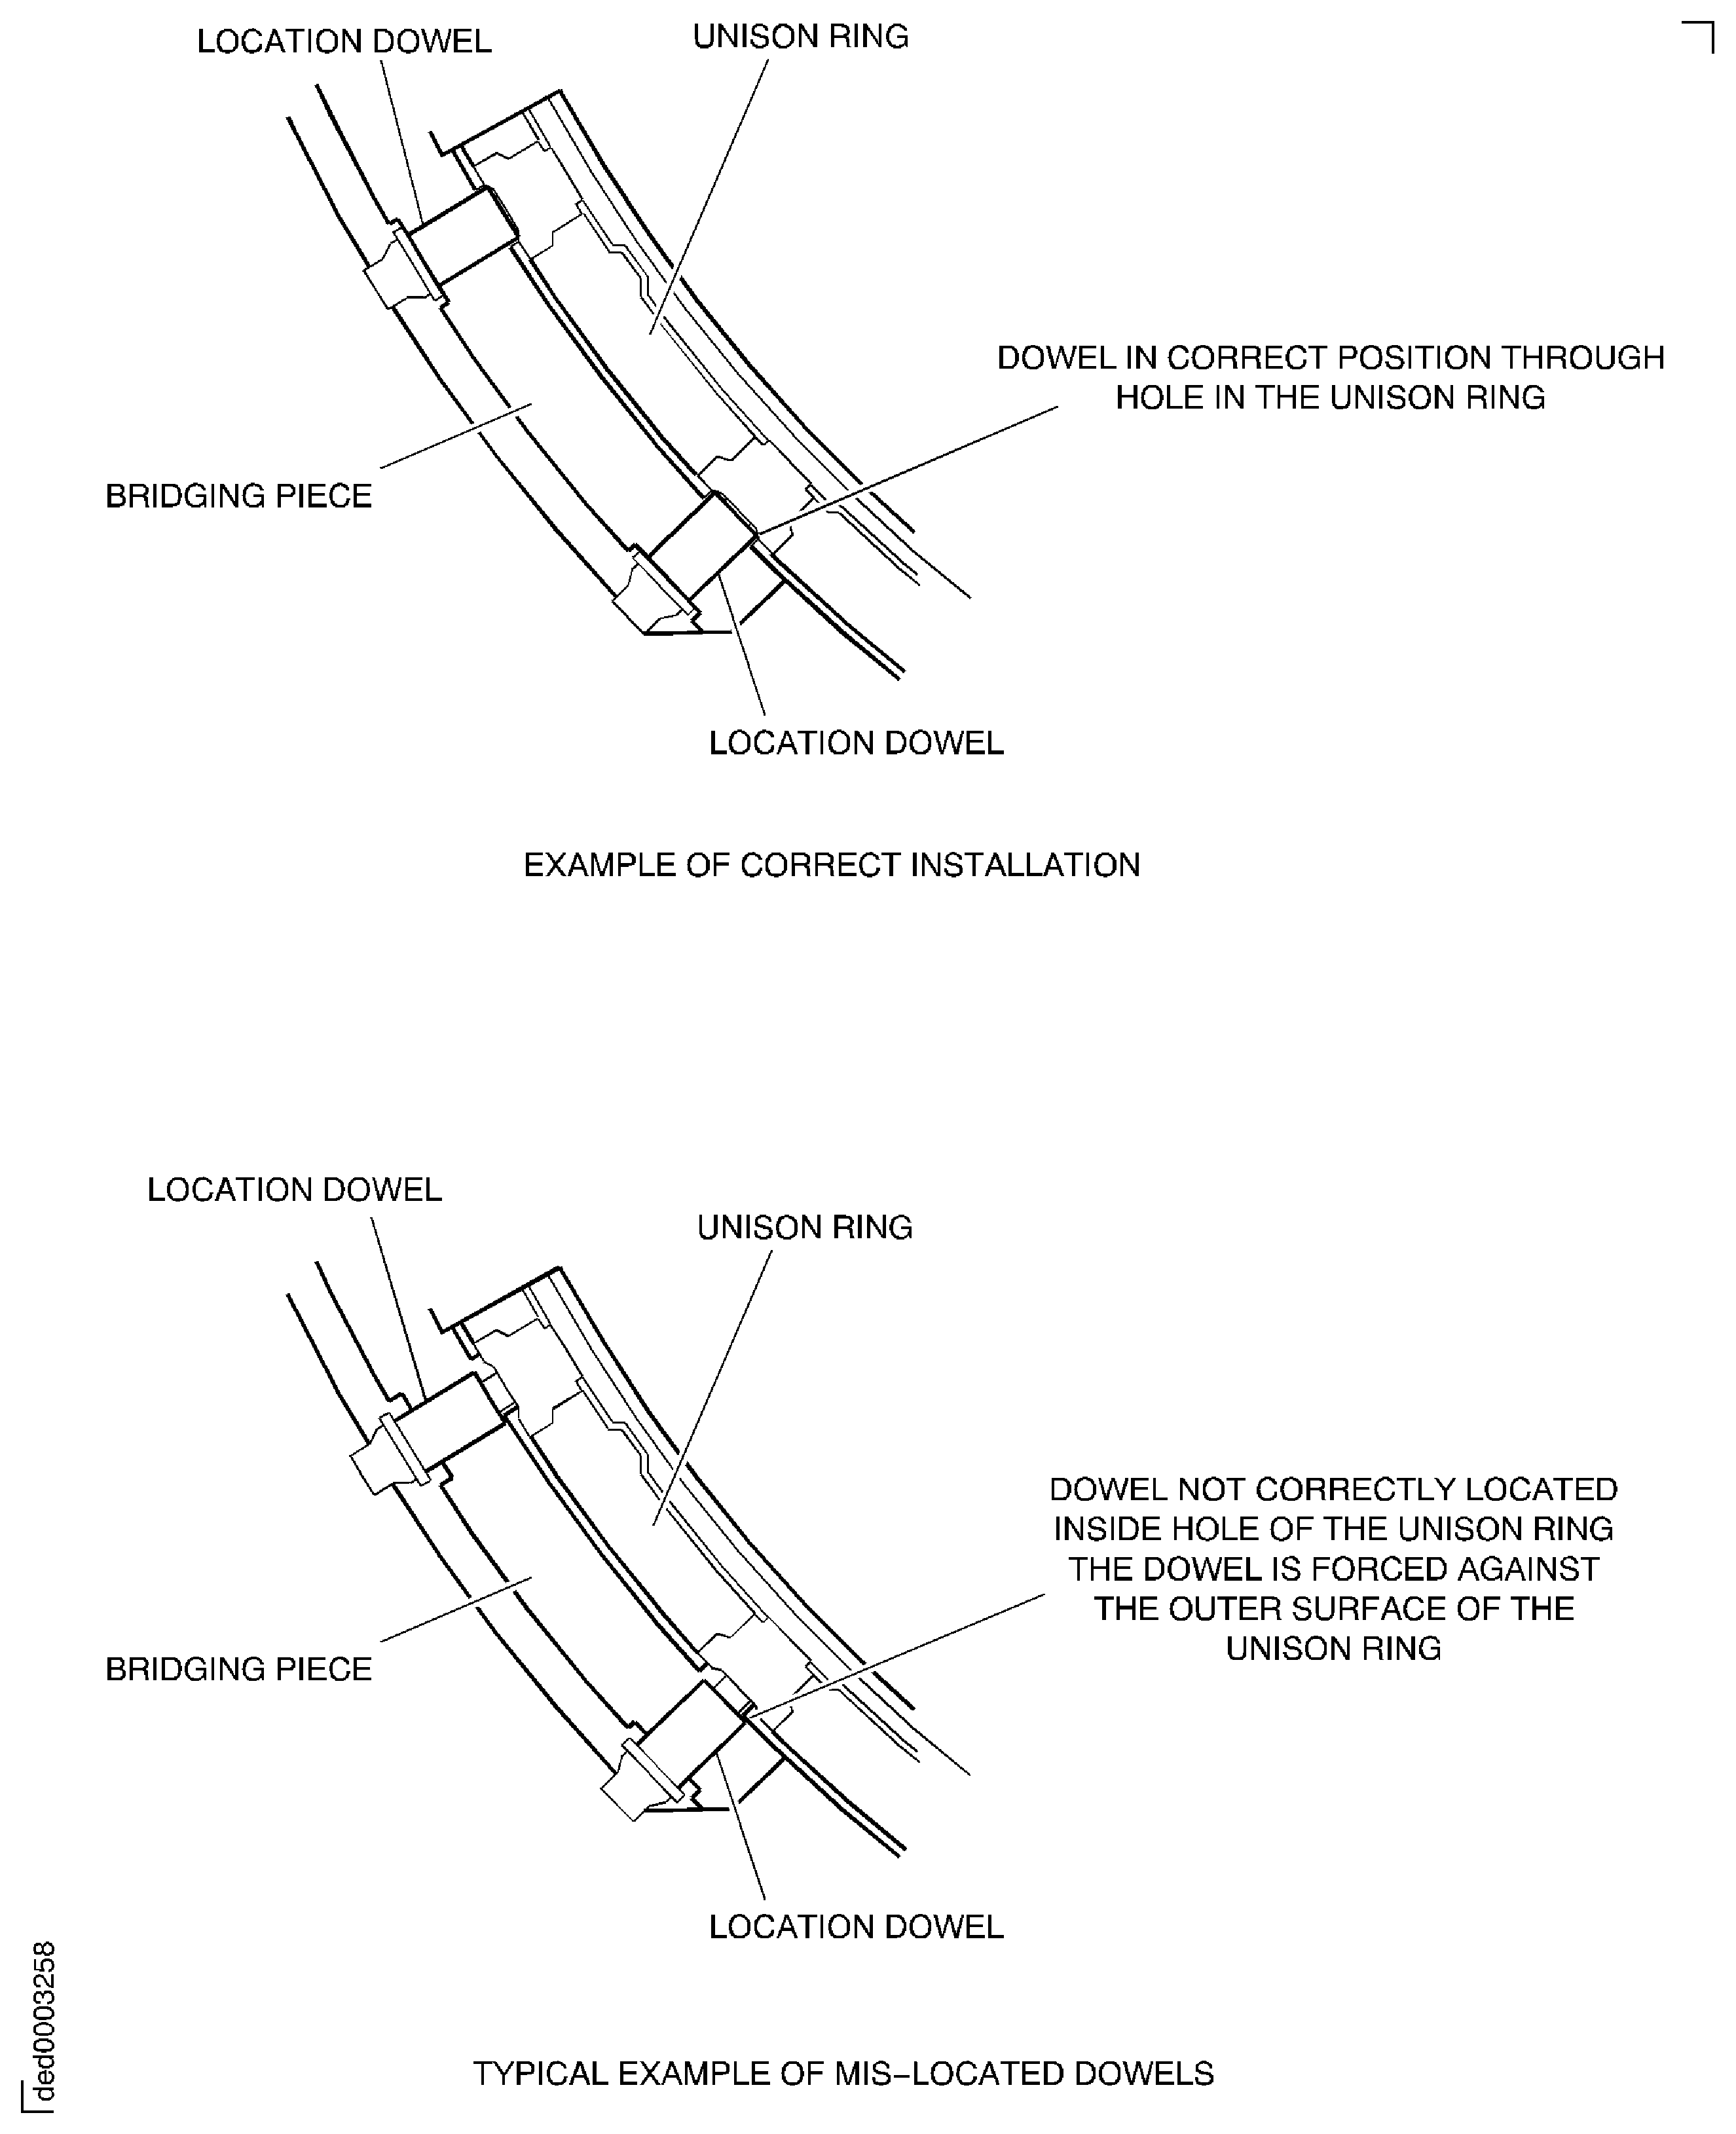
Figure: Set the HP compressor front case (left hand side) VSV pad clearances - recommended feeler gauge positions
Set the HP compressor front case (left hand side) VSV pad clearances - recommended feeler gauge positions
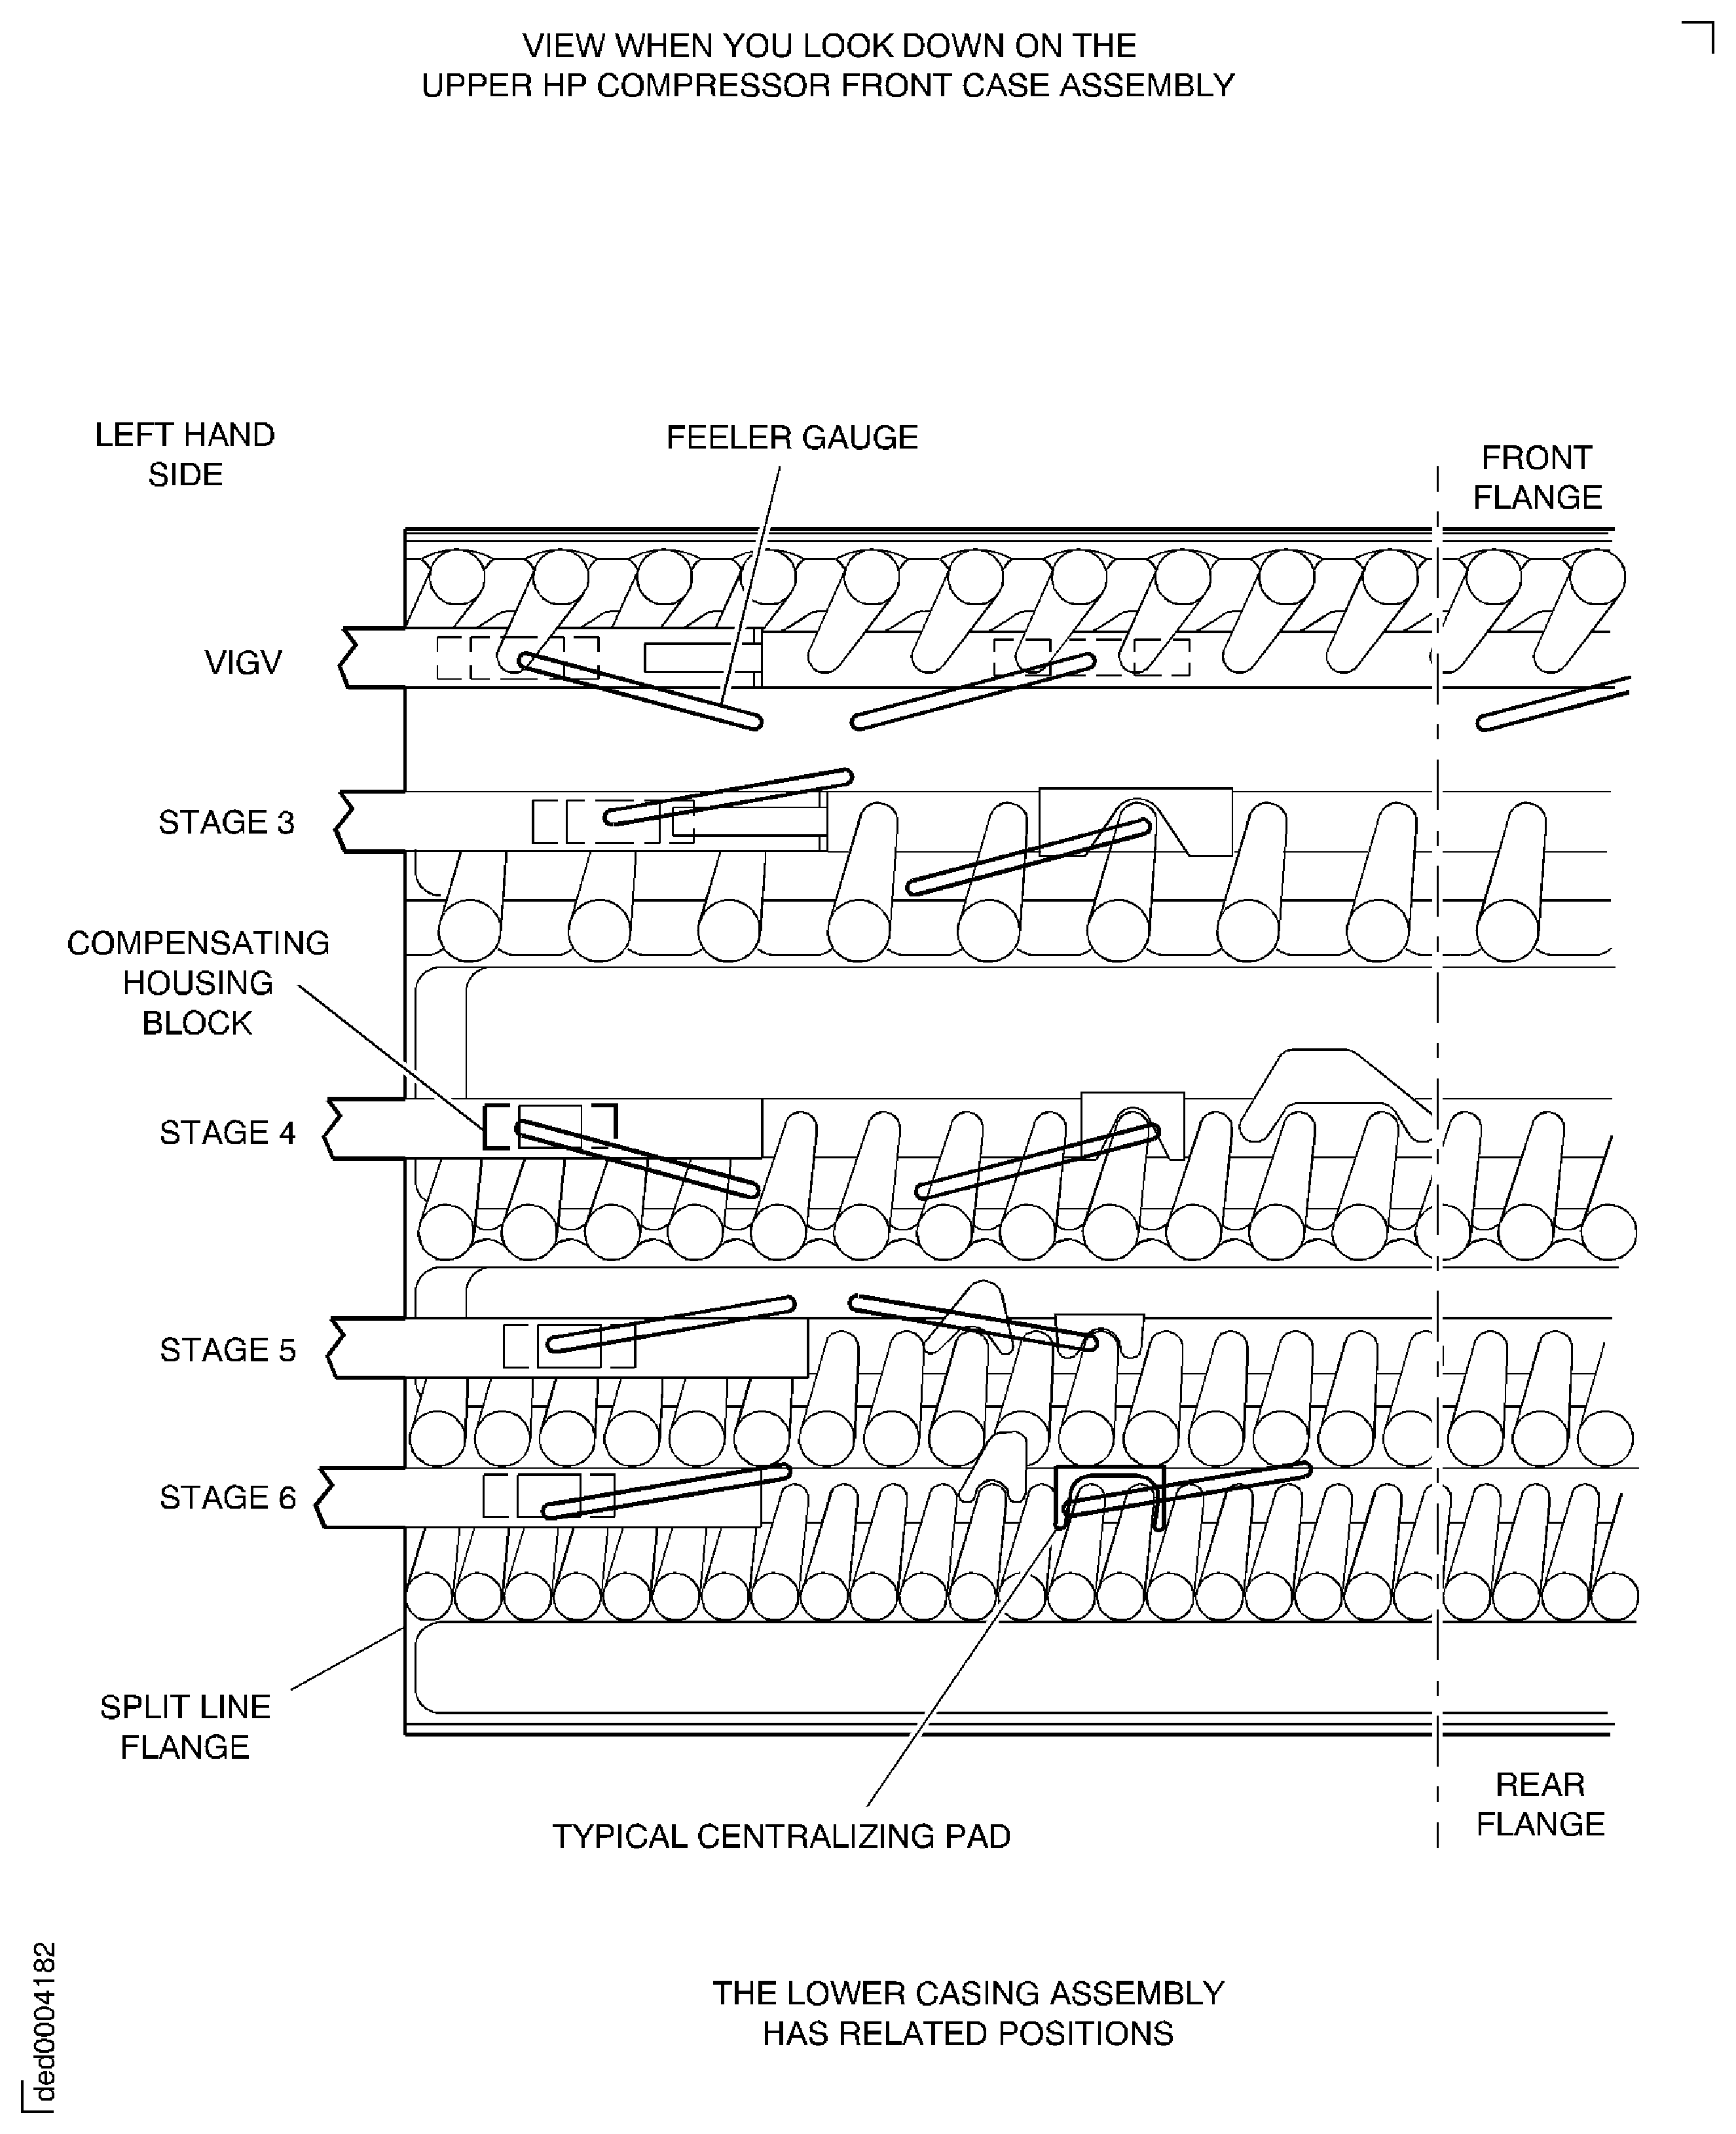
Figure: Set the HP compressor front case (right hand side) VSV pad clearances - recommended feeler gauge positions
Set the HP compressor front case (right hand side) VSV pad clearances - recommended feeler gauge positions
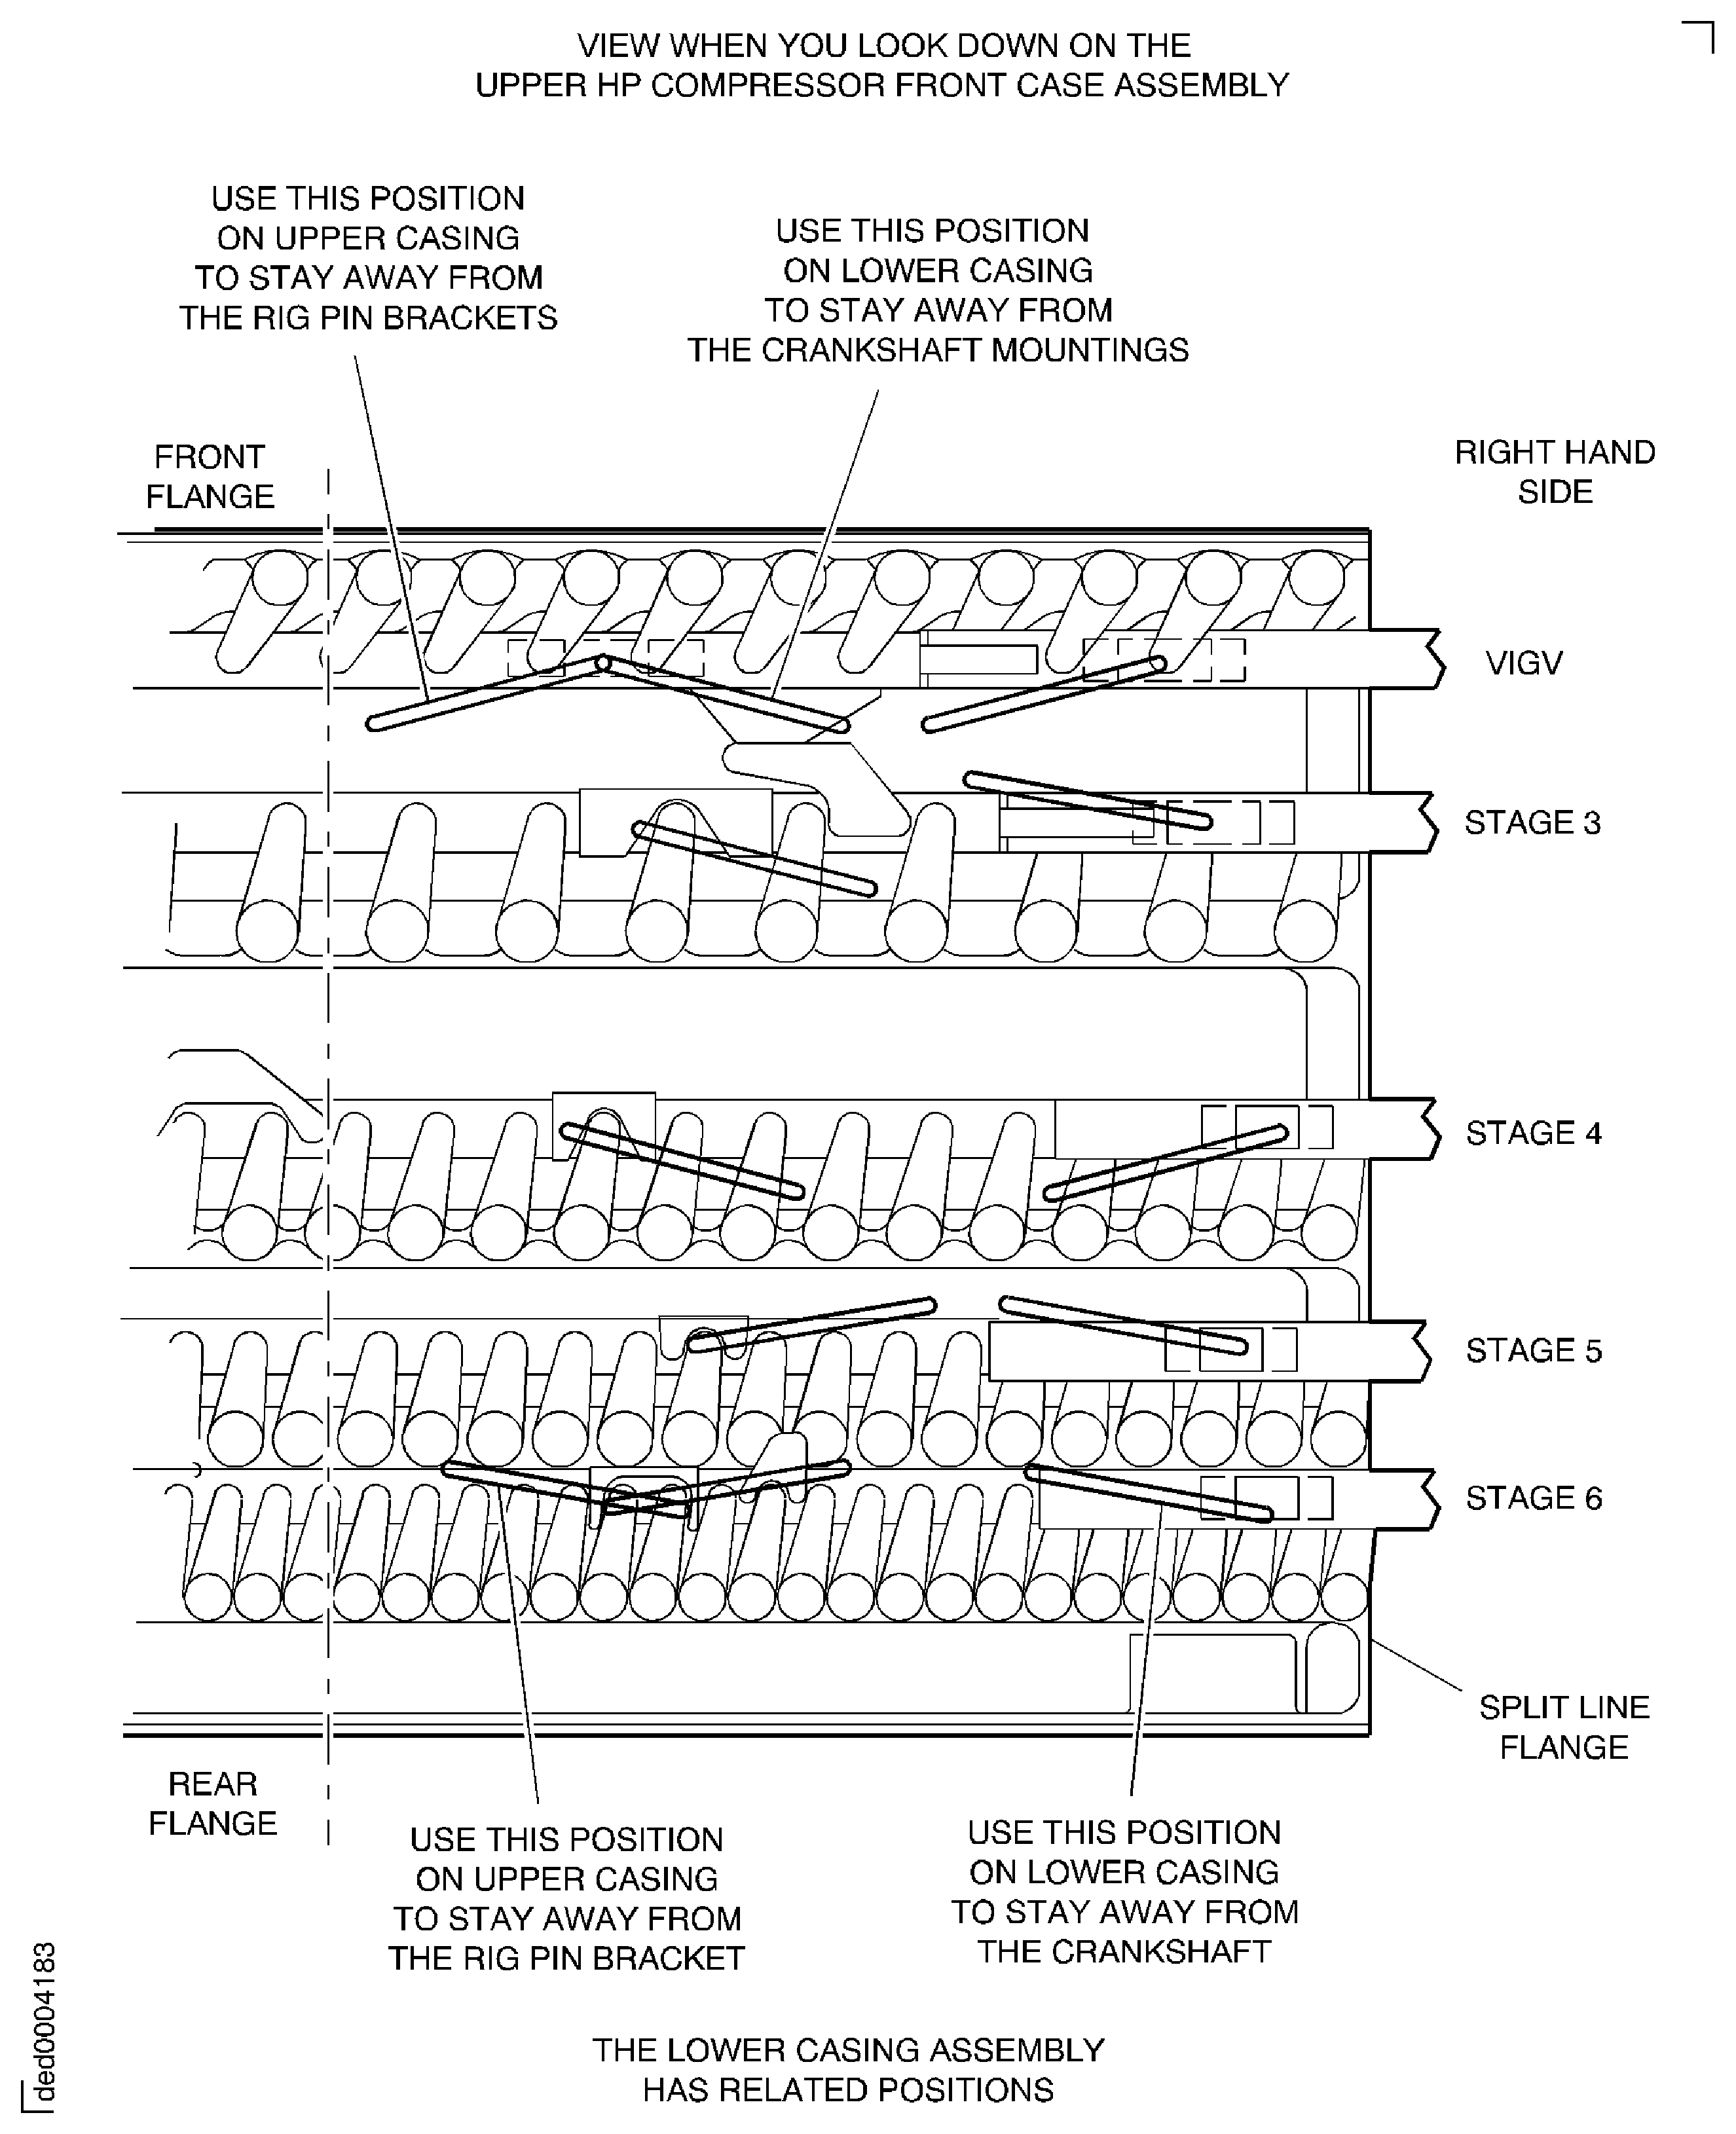
Figure: Lubrication positions - typical for all stages
Lubrication positions - typical for all stages
