Export Control
EAR Export Classification: Not subject to the EAR per 15 C.F.R. Chapter 1, Part 734.3(b)(3), except for the following Service Bulletins which are currently published as EAR Export Classification 9E991: SBE70-0992, SBE72-0483, SBE72-0580, SBE72-0588, SBE72-0640, SBE73-0209, SBE80-0024 and SBE80-0025.Copyright
© IAE International Aero Engines AG (2001, 2014 - 2021) The information contained in this document is the property of © IAE International Aero Engines AG and may not be copied or used for any purpose other than that for which it is supplied without the express written authority of © IAE International Aero Engines AG. (This does not preclude use by engine and aircraft operators for normal instructional, maintenance or overhaul purposes.).Applicability
V2500-A1
Common Information
TASK 72-41-30-440-002-A00 HPC Front Case And Vane Assembly - Measure And Machine The Stage 6 Variable Stator Vanes And Stage 4 Through 6 Rotor Path Rings, Assembly-002 - Pre SBE 72-0027 (And Stage 3 Through 6 Rotor Path Linings - SBE 72-0027)
General
Fig/item numbers in parentheses in the procedure agree with those used in the IPC. Only the primary Fig/item numbers are used. For the service bulletin alpha variants refer to the IPC.
For standard torque data and procedures, refer to the SPM TASK 70-41-00-400-501, SPM TASK 70-41-01-400-501 and SPM TASK 70-41-02-400-501.
Special torque data and assembly tolerances are included in the procedure.
Lubricate all threads and touch faces of nuts and bolts with CoMat 10-077 APPROVED ENGINE OILS unless other lubricants are referred to in the procedure.
To identify, lubricate and install seal rings, refer to the SPM TASK 70-44-01-400-501.
After assembly apply CoMat 07-038 AIR DRYING ENAMEL to any damaged surface protection, joint flanges and parts used to attach. Use the correct color of the air drying enamel. Refer to the SPM TASK 70-63-02-380-501.
The number for each radial location must be identified in a clockwise direction. These start at the engine top position when you look from the rear of the engine, unless stated differently in the procedure.
Refer to Figure for a sectional view of the HP compressor front case.
This TASK gives the procedure to measure and then machine the stage 6 variable stator vanes (VSV) and the stage 4, 5 and 6 rotor path rings (Pre SBE 72-0027) stage 3, 4, 5 and 6 rotor path linings (SBE 72-0027). The subsequent TASKS give the procedure to assemble HP compressor front cases.
TASK 72-41-30-440-001-A00 (ASSEMBLY-001, CONFIG-001) Install the Stages 3 to 6 Rotor Path Rings.
TASK 72-41-30-440-003-A00 (ASSEMBLY-003, CONFIG-001) Install the VIGV
TASK 72-41-30-440-004-A00 (ASSEMBLY-004, CONFIG-001) Install the Stage 3 VSV
TASK 72-41-30-440-005-A00 (ASSEMBLY-005, CONFIG-001) Install the Stage 4 VSV
TASK 72-41-30-440-006-A00 (ASSEMBLY-006, CONFIG-001) Install the Stage 5 VSV
TASK 72-41-30-440-007-A00 (ASSEMBLY-007, CONFIG-001) Install the Stage 6 VSV
TASK 72-41-30-440-008-A00 (ASSEMBLY-008, CONFIG-001) Install the VIGV and the Stage 3 to 6 Connectors
TASK 72-41-30-440-009-A00 (ASSEMBLY-009, CONFIG-001) Measure the HP Compressor Front Cases
TASK 72-41-30-440-010-A00 (ASSEMBLY-010, CONFIG-001) Disassemble the HP Compressor Front Cases.
TASK 72-41-30-440-011-A00 (ASSEMBLY-011, CONFIG-001) Check and Set VSV System with Optimised Build and Setting Clearances - SBE 72-0402.
Machine requirements
The information that follows is a guideline. If any additional information is necessary contact IAE.
For the rotor path ring machining, a machine is necessary that can meet the conditions that follow:
Permits a 34.0in. (863.60 mm) diameter by 18.0in. (457.20 mm) depth workpiece to be installed.
The workpiece must be turned in a counterclockwise direction, when viewed from the tailstock.
Permits a K grade carbide I.T.T. turning tool with a 0.031in. (0.8 mm) radius tip to be installed.
The conditions that follow must be used when you machine the rotor path linings.
A component surface speed of 70 m/min. This is equivalent to a speed of 42 r.p.m.
The maximum depth of cut to be used is 0.006in. (0.15 mm).
The feed rate is to be determined by general feel for the workpiece.
NOTE
NOTE
Preliminary Requirements
Pre-Conditions
NONESupport Equipment
| Name | Manufacturer | Part Number / Identification | Quantity | Remark |
|---|---|---|---|---|
| Grinding machine | LOCAL | Grinding machine | ||
| Mechanical brush | LOCAL | Mechanical brush | ||
| Lathe | LOCAL | Lathe | ||
| K Grade I.T.T. Turning Tool | LOCAL | K Grade I.T.T. Turning Tool | ||
| IAE 1R18041 Transducer carrier | 0AM53 | IAE 1R18041 | 1 | |
| IAE 1R18044 Measuring pin | 0AM53 | IAE 1R18044 | 1 | |
| IAE 1R18045 Distance sleeve | 0AM53 | IAE 1R18045 | 1 | |
| IAE 1R18205 Lifting tool | 0AM53 | IAE 1R18205 | 1 | |
| IAE 1R18207 Support stand | 0AM53 | IAE 1R18207 | 1 | |
| IAE 1R18321 Turnover stand | 0AM53 | IAE 1R18321 | 1 | |
| IAE 1R18410 Transport/park stand | 0AM53 | IAE 1R18410 | 1 | |
| IAE 1R18411 Machine fixture | 0AM53 | IAE 1R18411 | 1 | |
| IAE 1R18413 Turnover stand adaptor | 0AM53 | IAE 1R18413 | 1 | |
| IAE 1R18414 Boring bar | 0AM53 | IAE 1R18414 | 1 | |
| IAE 1R18418 Multiflex holder | 0AM53 | IAE 1R18418 | 1 | |
| IAE 1R18419 Probe holder | 0AM53 | IAE 1R18419 | 1 | |
| IAE 1R18430 Turning holder | 0AM53 | IAE 1R18430 | 1 | |
| IAE 1R18502 Setting plate | 0AM53 | IAE 1R18502 | 1 | |
| IAE 1R18506 Inspection fixture | 0AM53 | IAE 1R18506 | 1 | |
| IAE 1R18507 Grinding fixture | 0AM53 | IAE 1R18507 | 1 | |
| IAE 1R18508 Inspection fixture | 0AM53 | IAE 1R18508 | 1 | |
| IAE 1R18509 Grinding fixture | 0AM53 | IAE 1R18509 | 1 | |
| IAE 1R18510 Inspection fixture | 0AM53 | IAE 1R18510 | 1 | |
| IAE 1R18511 Grinding fixture | 0AM53 | IAE 1R18511 | 1 | |
| IAE 1R18512 Inspection fixture | 0AM53 | IAE 1R18512 | 1 | |
| IAE 1R18513 Grinding fixture | 0AM53 | IAE 1R18513 | 1 | |
| IAE 3R18232 Lifting beam | 0AM53 | IAE 3R18232 | 1 | |
| IAE 1R18031 Checking fixture | 0AM53 | IAE 1R18031 |
Consumables, Materials and Expendables
| Name | Manufacturer | Part Number / Identification | Quantity | Remark |
|---|---|---|---|---|
| CoMat 07-038 AIR DRYING ENAMEL | K3504 | CoMat 07-038 | ||
| CoMat 10-077 APPROVED ENGINE OILS | LOCAL | CoMat 10-077 |
Spares
NONESafety Requirements
NONEProcedure
Refer to Figure.
Refer to the SPM TASK 70-09-00-400-501 to make the marks on the parts.
At the stage 6 stator vane casing bosses, make a mark to identify the position numbers. Make the marks on the external surface of the HP compressor case. Refer to Figure for the position numbers.
NOTE
The four long spindle stator vanes must go at the positions 1, 42, 43 and 84.Use the set of stage 6 stator vanes which are to be installed and identify them with their position numbers. Make the marks on the vane spindle adjacent to the identity marks. Refer to Figure for the position numbers.
SUBTASK 72-41-30-440-061 Identify the Stage 6 Variable Stator Vanes (VSV) with their Position Numbers in the HP Compressor Front Cases
Refer to Figure.
Install IAE 1R18044 Measuring pin 1 off in to IAE 1R18502 Setting plate 1 off.
Install IAE 1R18041 Transducer carrier 1 off on to the pillar of the setting plate.
Loosen the clamp which attaches the transducer to the transducer carrier. Adjust the transducer until the insert touches the measuring pin. Set the measuring instrument to zero. Continue to move the transducer until the measuring instrument shows a value of 0.100in. (2.54 mm). Again set the measuring instrument to zero.
Assemble the tools.
SUBTASK 72-41-30-440-062 Assemble and Set the Tools to Measure the Stage 6 Stator Vane Inner Bush Abutment Face

CAUTION
MAKE SURE ALL THE TOOL FACES THAT TOUCH ARE CLEAN AND ARE NOT DAMAGED.Install IAE 1R18045 Distance sleeve 1 off on to the pillar of IAE 1R18031 Checking fixture 1 off.
Remove IAE 1R18044 Measuring pin 1 off from the setting plate. Install the measuring pin into the number 1 stage 6 stator vane location in the HP compressor front case. Make sure the measuring pin is correctly located.
Remove IAE 1R18041 Transducer carrier 1 off from the setting plate. Install the transducer carrier on to the distance sleeve on the pillar of the checking fixture.
SUBTASK 72-41-30-440-063 Measure the Stage 6 Stator Vane Inner Bush Abutment Faces

CAUTION
MAKE SURE ALL THE TOOL FACES THAT TOUCH ARE CLEAN AND ARE NOT DAMAGED.Refer to Figure.
Use 12 of the 168 stage 6 inner half bushes ENGINE-HP COMPRESSOR SPLIT CASES (72-41-31,01-290) that are to be installed.
SUBTASK 72-41-30-220-213 Measure the Stage 6 Inner Half Bush Flange Thickness
Refer to Figure.
Calculate and write down the length of each stage 6 stator vane, dimension AD. Start at the number 1 position.
AD = AC - (KR).
AC = The dimension to the stage 6 stator vane inner bush abutment face.
KR = AL6 + STC6 + AJ.
AL6 = Nominal radius of the stage 6 drum lining - 8.6048in. (218.562 mm).
STC6 = Nominal stage 6 stator vane tip clearance - 0.036in. (0.914 mm).
AJ = Stage 6 inner half bush flange average thickness.
SUBTASK 72-41-30-440-065 Calculate the Stage 6 Variable Stator Vane lengths
Install the IAE 1R18507 Grinding fixture 1 off into the grinding machine.
Machine the tip leading edge of the stage 6 variable stator vane to the dimension AD. The dimension AD was calculated in Step. The machining tolerance is plus or minus 0.0016in. (0.04 mm).

CAUTION
MAKE SURE THE TOOL FACES AND COMPONENT FACES THAT TOUCH ARE CLEAN AND ARE NOT DAMAGED. DIRTY OR DAMAGED SURFACES CAN CAUSE INCORRECT INDICATIONS AND CAN DAMAGE COMPONENTS.Remove the stage 6 variable stator vane from the grinding fixture and install it into the IAE 1R18508 Inspection fixture 1 off.
Machine the tip leading edge of the stage 6 variable stator vanes (short vane) ENGINE-HP COMPRESSOR VARIABLE VANES (72-41-32,05-500).
Install the IAE 1R18511 Grinding fixture 1 off into the grinding machine.
Machine the tip trailing edge of the stage 6 variable stator vane to the dimension AD. The dimension AD was calculated in Step. The machining tolerance is plus or minus 0.0016in. (0.04 mm).

CAUTION
MAKE SURE THE TOOL FACES AND COMPONENT FACES THAT TOUCH ARE CLEAN AND ARE NOT DAMAGED. DIRTY OR DAMAGED SURFACES CAN CAUSE INCORRECT INDICATIONS AND CAN DAMAGE COMPONENTS.Remove the stage 6 variable stator vane from the grinding fixture and install it into the IAE 1R18512 Inspection fixture 1 off.
Machine the tip trailing edge of the stage 6 variable stator vanes (short vane) ENGINE-HP COMPRESSOR VARIABLE VANES (72-41-32,05-500).
Install the IAE 1R18513 Grinding fixture 1 off into the grinding machine.
Machine the tip leading edge of the stage 6 variable stator vane to the dimension AD. The dimension AD was calculated in Step. The machining tolerance is plus or minus 0.0016in. (0.04 mm).

CAUTION
MAKE SURE THE TOOL FACES AND COMPONENT FACES THAT TOUCH ARE CLEAN AND ARE NOT DAMAGED. DIRTY OR DAMAGED SURFACES CAN CAUSE INCORRECT INDICATIONS AND CAN DAMAGE COMPONENTS.Remove the stage 6 variable stator vane from the grinding fixture and install it into the IAE 1R18506 Inspection fixture 1 off.
Machine the tip leading edge of the stage 6 variable stator vanes (long vane) ENGINE-HP COMPRESSOR VARIABLE VANES (72-41-32,05-600).
Install the IAE 1R18509 Grinding fixture 1 off into the grinding machine.
Machine the tip trailing edge of the stage 6 variable stator vane to the dimension AD. The dimension AD was calculated in Step. The machining tolerance is plus or minus 0.0016in. (0.04 mm).

CAUTION
MAKE SURE THE TOOL FACES AND COMPONENT FACES THAT TOUCH ARE CLEAN AND ARE NOT DAMAGED. DIRTY OR DAMAGED SURFACES CAN CAUSE INCORRECT INDICATIONS AND CAN DAMAGE COMPONENTS.Remove the stage 6 variable stator vane from the grinding fixture and install it into the IAE 1R18510 Inspection fixture 1 off.
Machine the tip trailing edge of the stage 6 variable stator vanes (long vane) ENGINE-HP COMPRESSOR VARIABLE VANES (72-41-32,05-600).
SUBTASK 72-41-30-324-051 Machine the Stage 6 Variable Stator Vanes
Install IAE 1R18205 Lifting tool 1 off on to the HP compressor front case rear flange as given in TASK 72-41-30-440-001-A00 (ASSEMBLY-001, CONFIG-001).
Vertically lift the HP compressor front case from the checking fixture and lower it on to the IAE 1R18207 Support stand 1 off.
SUBTASK 72-41-30-440-066 Remove the HP Compressor Front Case from the Checking Fixture
Refer to Figure.
Install IAE 1R18413 Turnover stand adaptor 1 off in IAE 1R18321 Turnover stand 1 off.
Install IAE 1R18411 Machine fixture 1 off into the turnover adapter.
SUBTASK 72-41-30-440-067 Assemble the Tools to Turn the HP Compressor Front Cases
Attach a suitable hoist to the lifting eye of the lifting fixture, installed in Step.
Install the HP compressor front case in IAE 1R18411 Machine fixture 1 off.
Remove the lifting fixture from the HP compressor front case rear flange as given in TASK 72-41-30-440-001-A00 (ASSEMBLY-001, CONFIG-001).
Install IAE 3R18232 Lifting beam 1 off on to the HP compressor front case and machine fixture.
Use a suitable hoist and lift the HP compressor front case and machine fixture from the turnover stand. Lower the assembly into IAE 1R18410 Transport/park stand 1 off.
SUBTASK 72-41-30-440-068 Install the HP Compressor Front Case in the Machine Fixture
Attach the IAE 1R18414 Boring bar 1 off to the machine tool post. Secure with the three set screws.
Install the IAE 1R18418 Multiflex holder 1 off in the locating slot on the boring bar. Secure with the three grub screws.
Attach the IAE 1R18430 Turning holder 1 off at the measurement holder interface. Secure with the allen screw.
To measure the rotor path rings, remove the turning holder and attach the IAE 1R18419 Probe holder 1 off to the measurement holder interface. Secure with the allen screw.
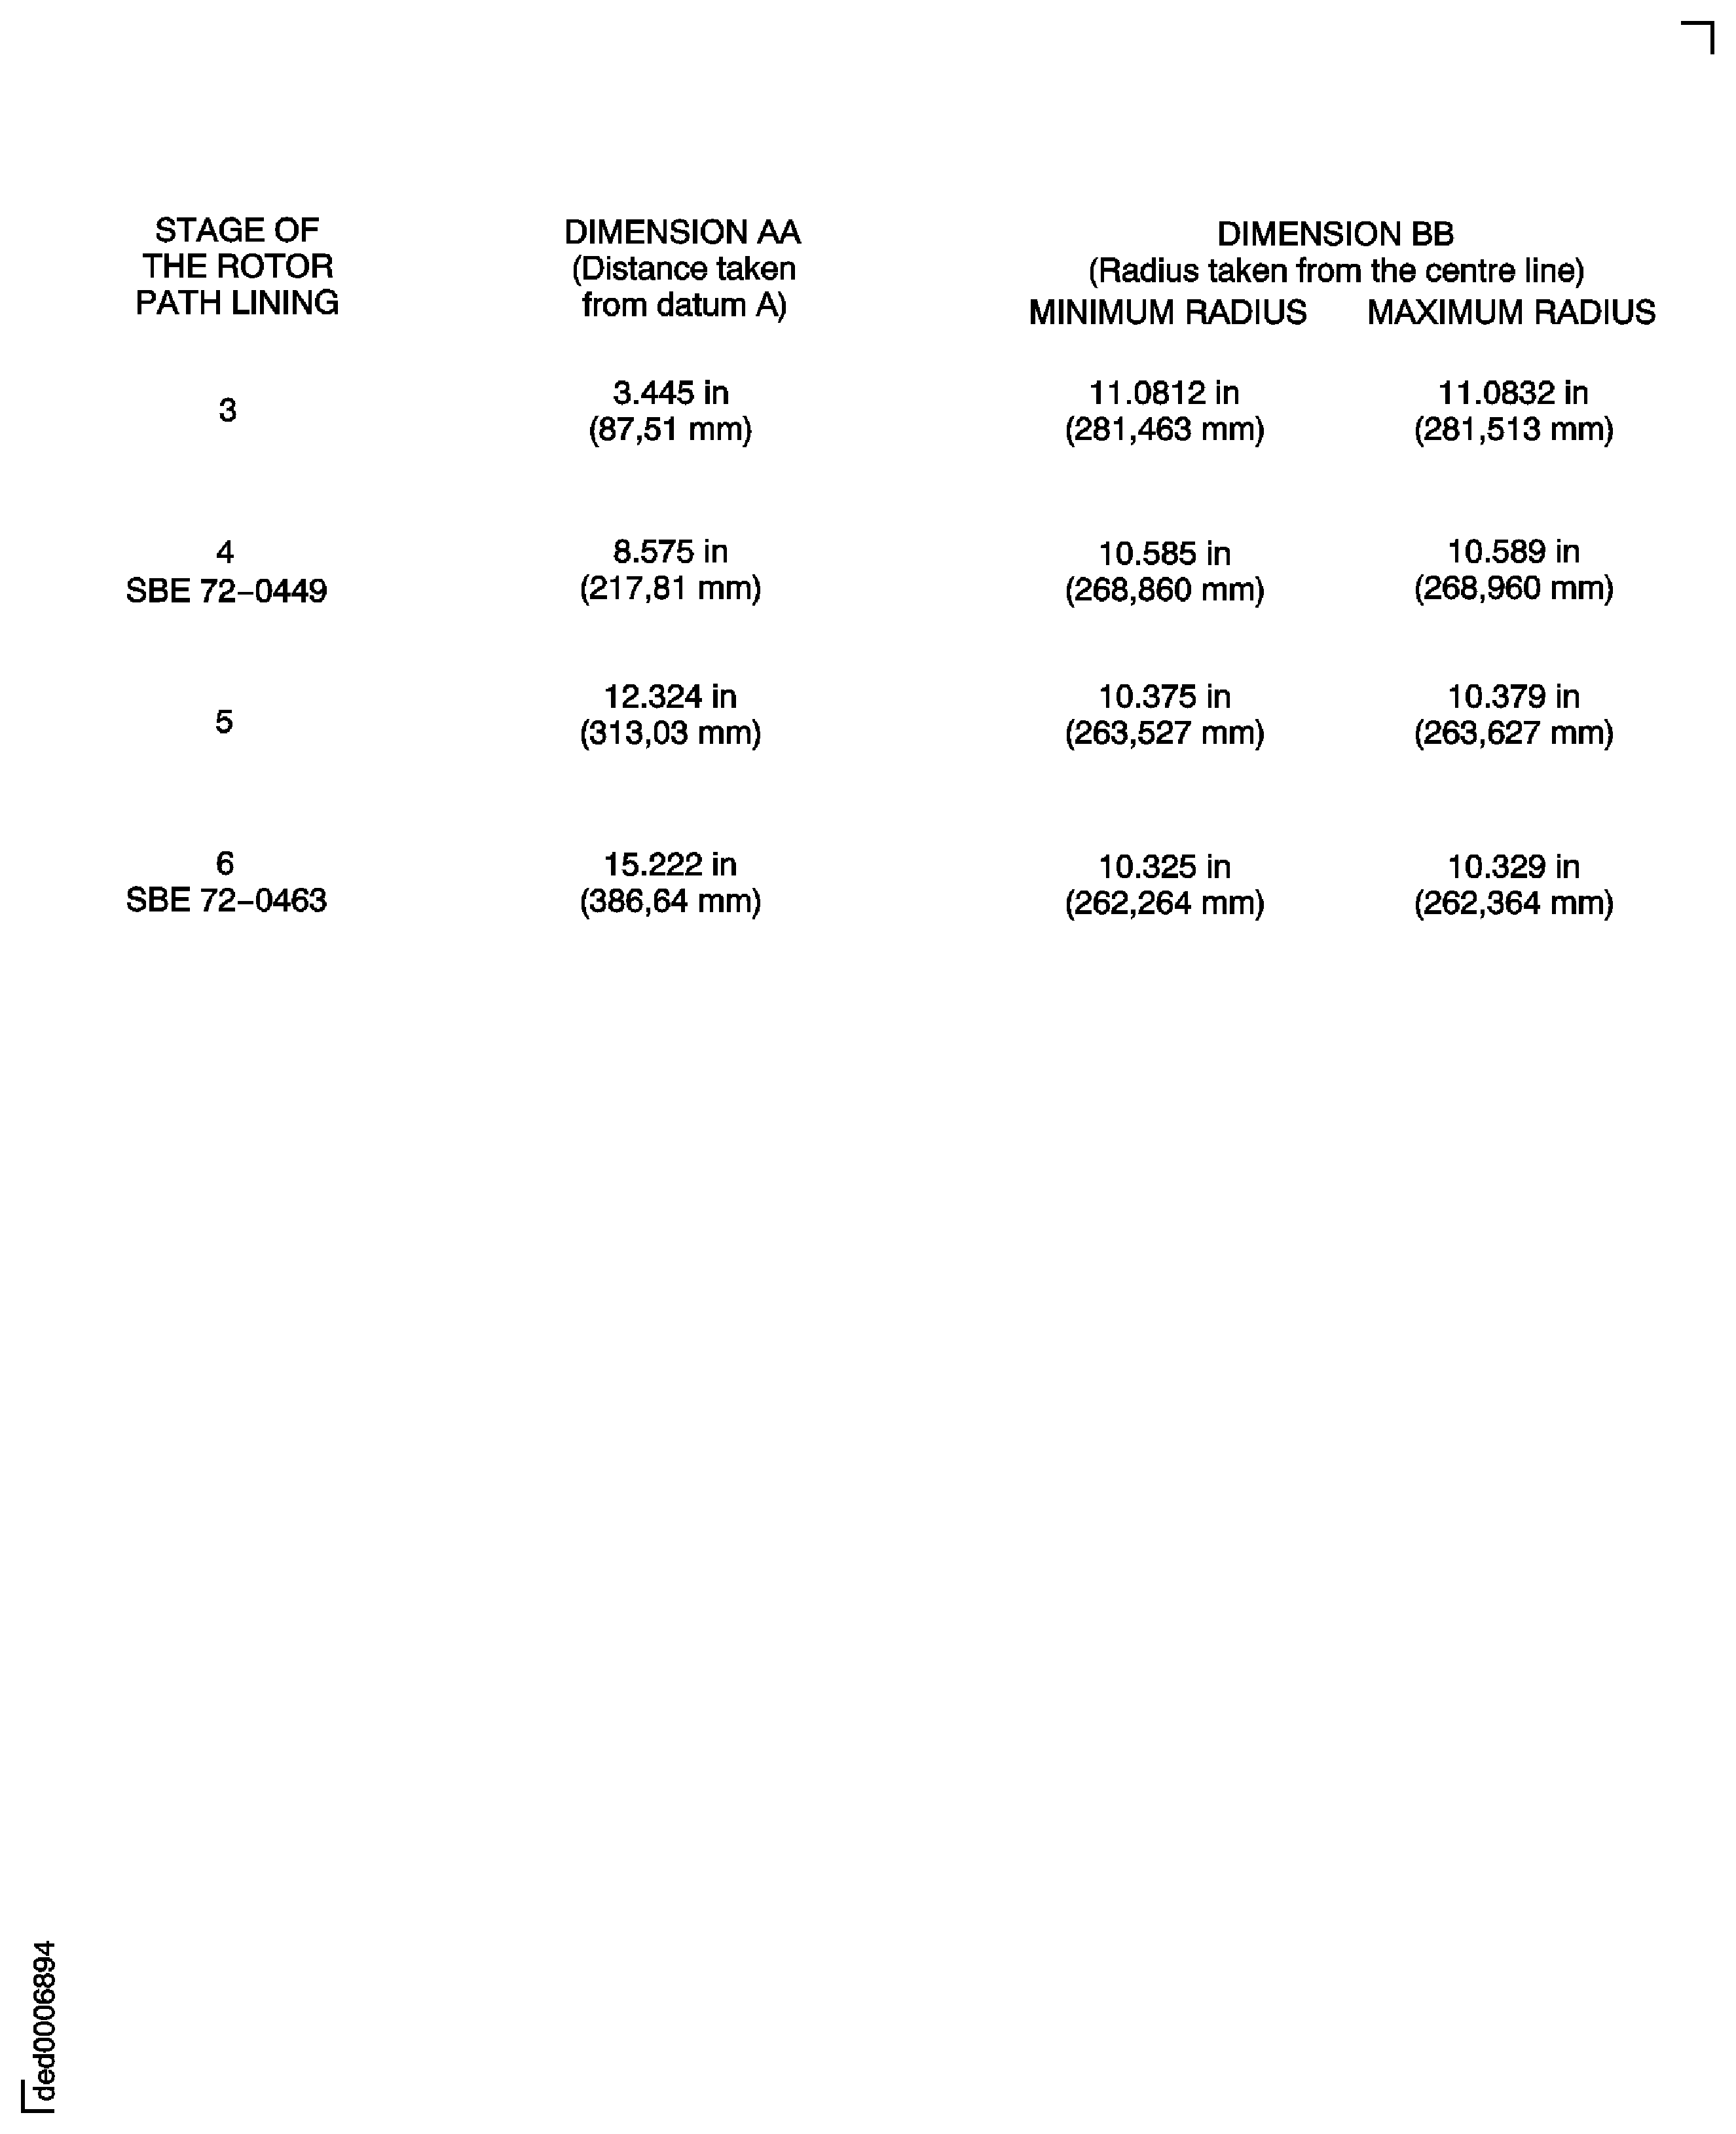
Use the conditions given in 3. Machine requirements, to machine the stage 4, 5 and 6 rotor path rings to the dimensions given in Figure.
When the rotor path rings have been machined remove the unwanted abradable lining. Remove the unwanted abradable lining as shown in detail A on Figure and Figure at the front and rear of each rotor path ring. Remove only the minimum quantity of abradable lining to show the metal at the front and rear of the lining.
Install IAE 3R18232 Lifting beam 1 off on to the HP compressor front case and machine fixture.
Install the HP compressor front case and machine fixture in IAE 1R18410 Transport/park stand 1 off.
SUBTASK 72-41-30-324-052-A00 Machine the Stage 3, 4, 5 and 6 Rotor Path Rings (Pre SBE 72-0027)
SBE 72-0027: Engine - HP compressor - Introduction of reduced weight front compressor casing.
SBE 72-0449: Engine - HP compressor - Introduction of HPC stage 4 rotor path trench with increased tip clearance
SBE 72-0463: Engine - HP compressor - Increase in tip clearance to stage 6 and stage 7 rotor paths
Attach the IAE 1R18414 Boring bar 1 off to the machine tool post. Secure with the three set screws.
Install the IAE 1R18418 Multiflex holder 1 off in the locating slot on the boring bar. Secure with the three grub screws.
Attach the IAE 1R18430 Turning holder 1 off at the measurement holder interface. Secure with the allen screw.
To measure the rotor path linings, remove the turning holder and attach the IAE 1R18419 Probe holder 1 off to the measurement holder interface. Secure with the allen screw.
Set up the tools to machine the stage 3, 4, 5 and 6 rotor path linings, refer to FigureFigure and Figure.
When the rotor path linings have been machined remove the unwanted abradable lining. Remove the unwanted abradable lining as shown in detail A on Figure at the front and rear of each rotor path. Remove only the minimum quantity of abradable lining to show the metal at the front of the lining.
SUBTASK 72-41-30-324-052-B00 Machine the Stage 3, 4, 5 and 6 Rotor Path Linings (SBE 72-0027, Pre SBE 72-0449, SBE 72-0449, Pre SBE/SBN not-parse : SBE72-0463 and SBE 72-0463)
Install IAE 3R18232 Lifting beam 1 off on to the HP compressor front case and machine fixture. Refer to Step.
Use a suitable hoist and install the assembly into IAE 1R18413 Turnover stand adaptor 1 off. The turnover adapter is installed in the turnover stand. Refer to Step. Remove the lifting adapter.
Install IAE 1R18205 Lifting tool 1 off as given in TASK 72-41-30-440-001-A00.
Carefully lower the HP compressor front case on to IAE 1R18207 Support stand 1 off.
Remove the lifting fixture as given in TASK 72-41-30-440-001-A00.
SUBTASK 72-41-30-440-069 Install the HP Compressor Front Cases on the Stand
Figure: View through the HP compressor front case
View through the HP compressor front case
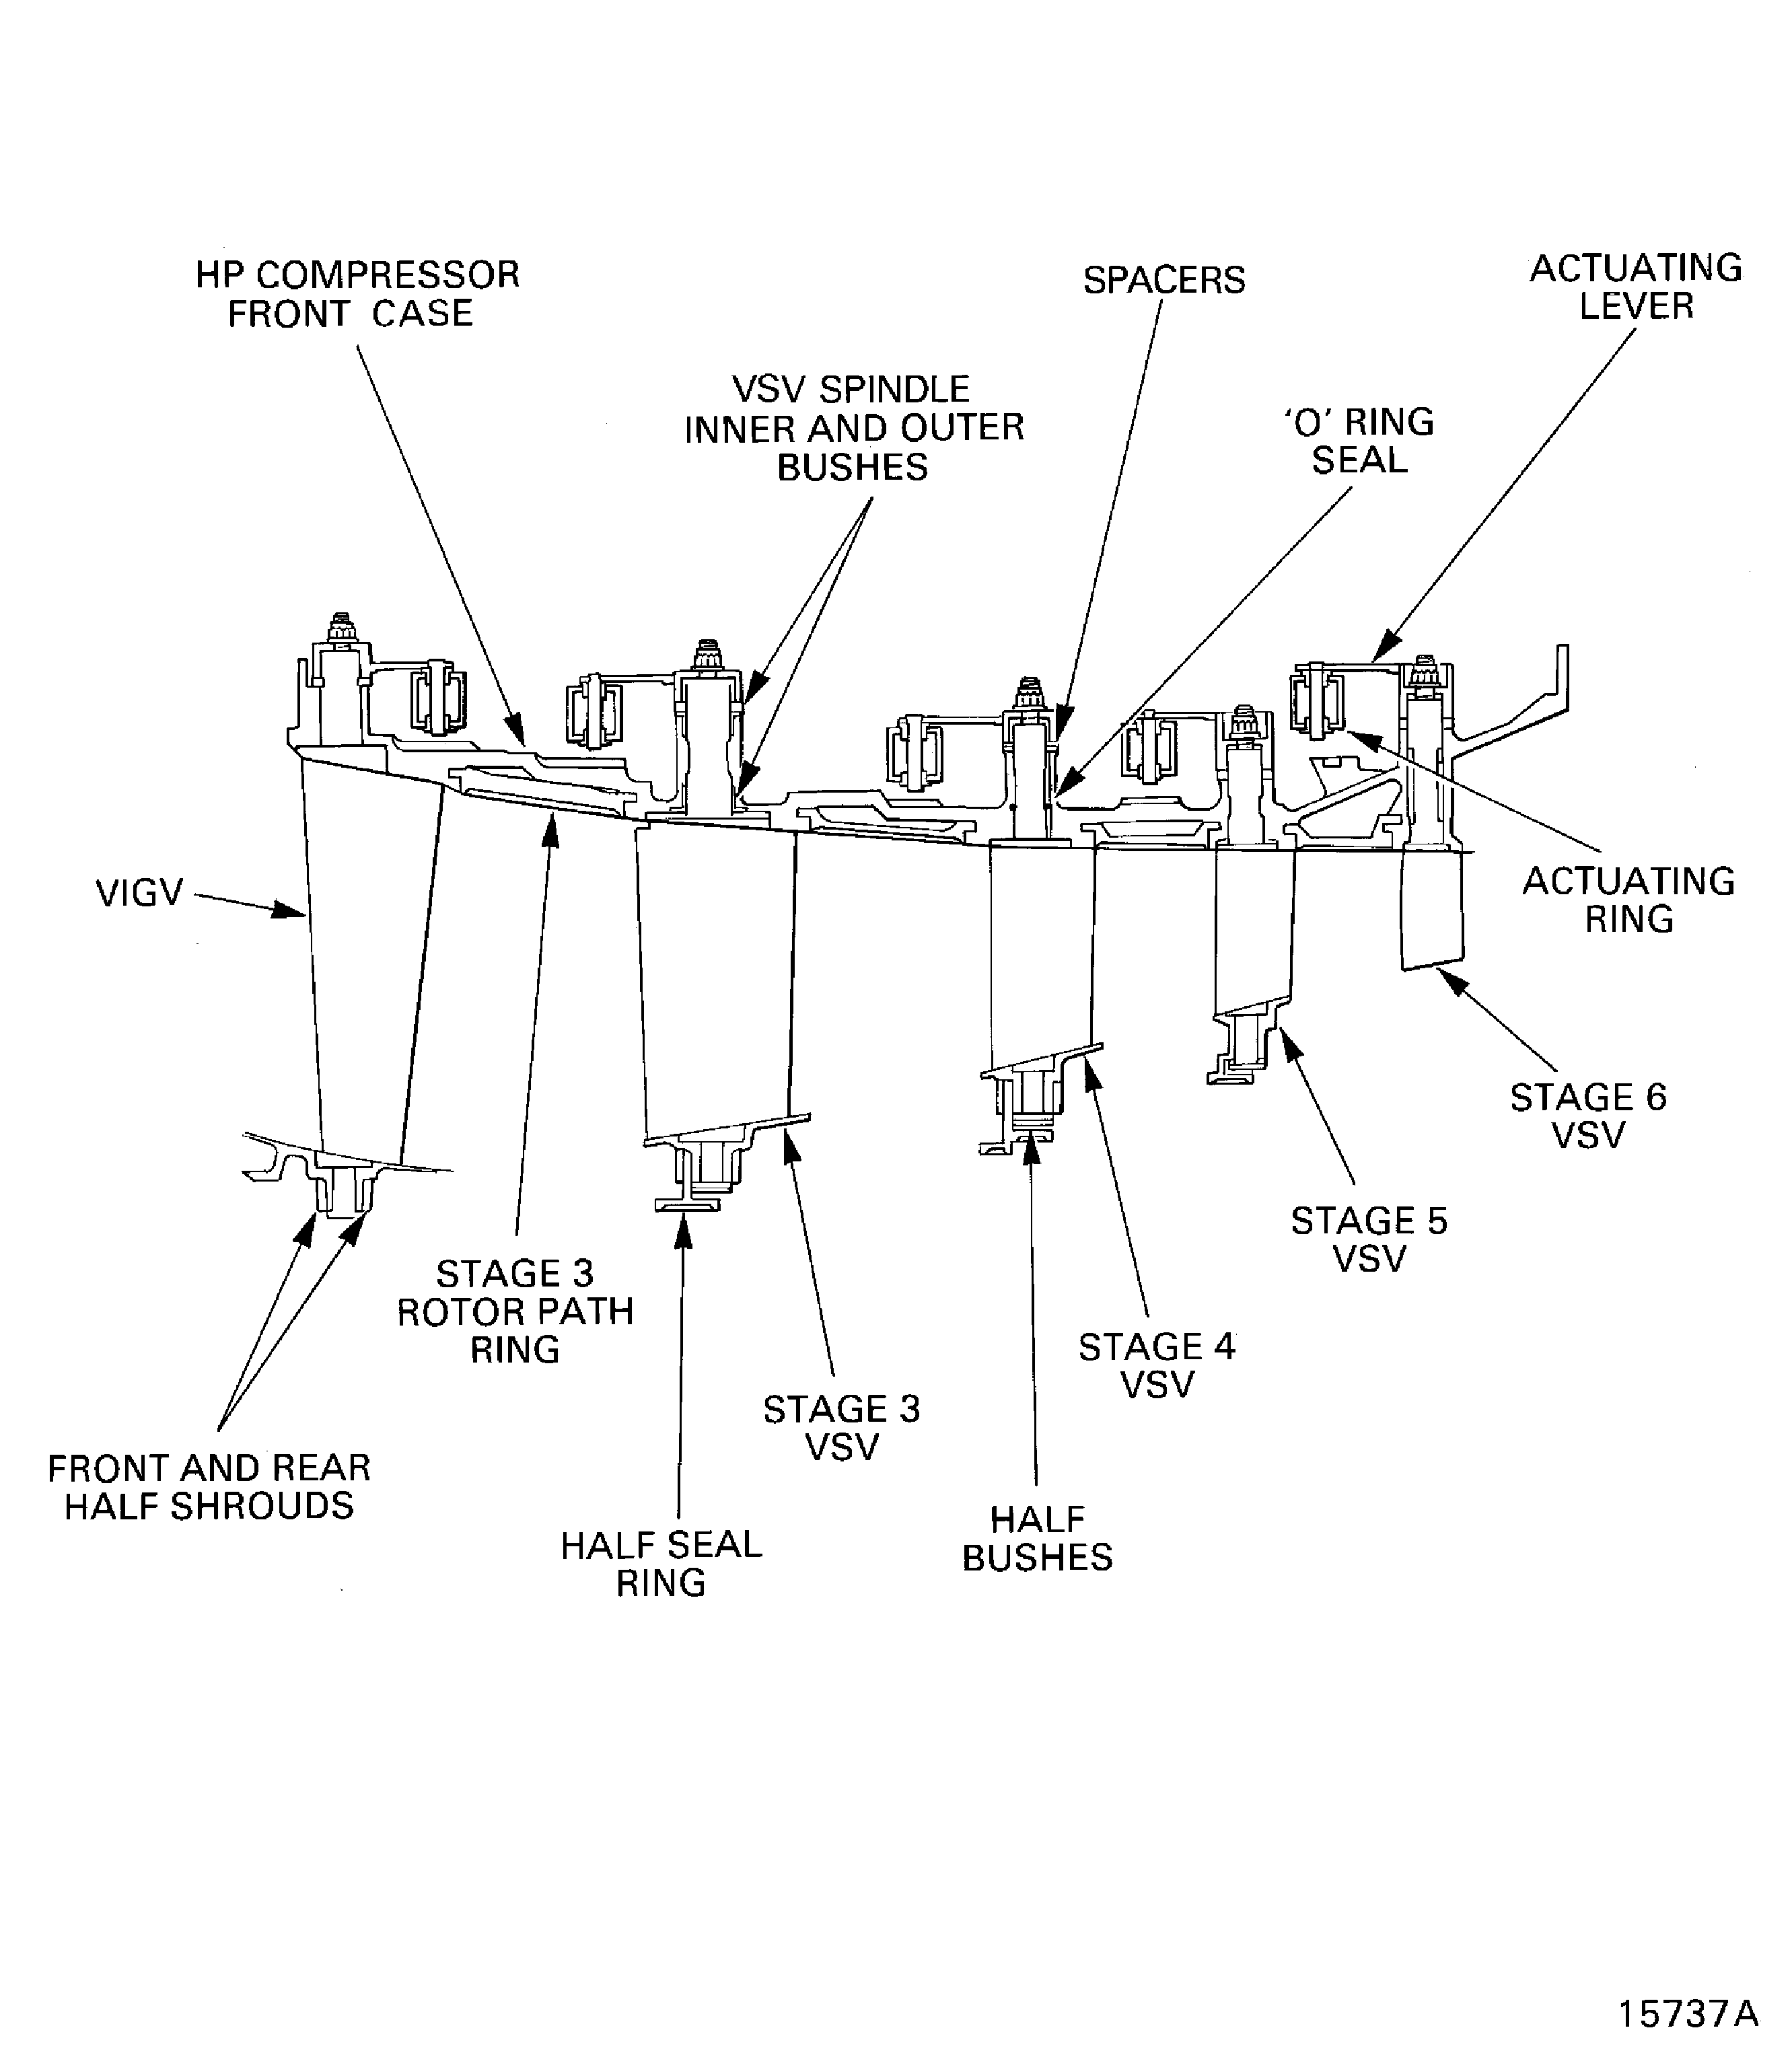
Figure: Locations for the stage 6 stator vanes
Locations for the stage 6 stator vanes
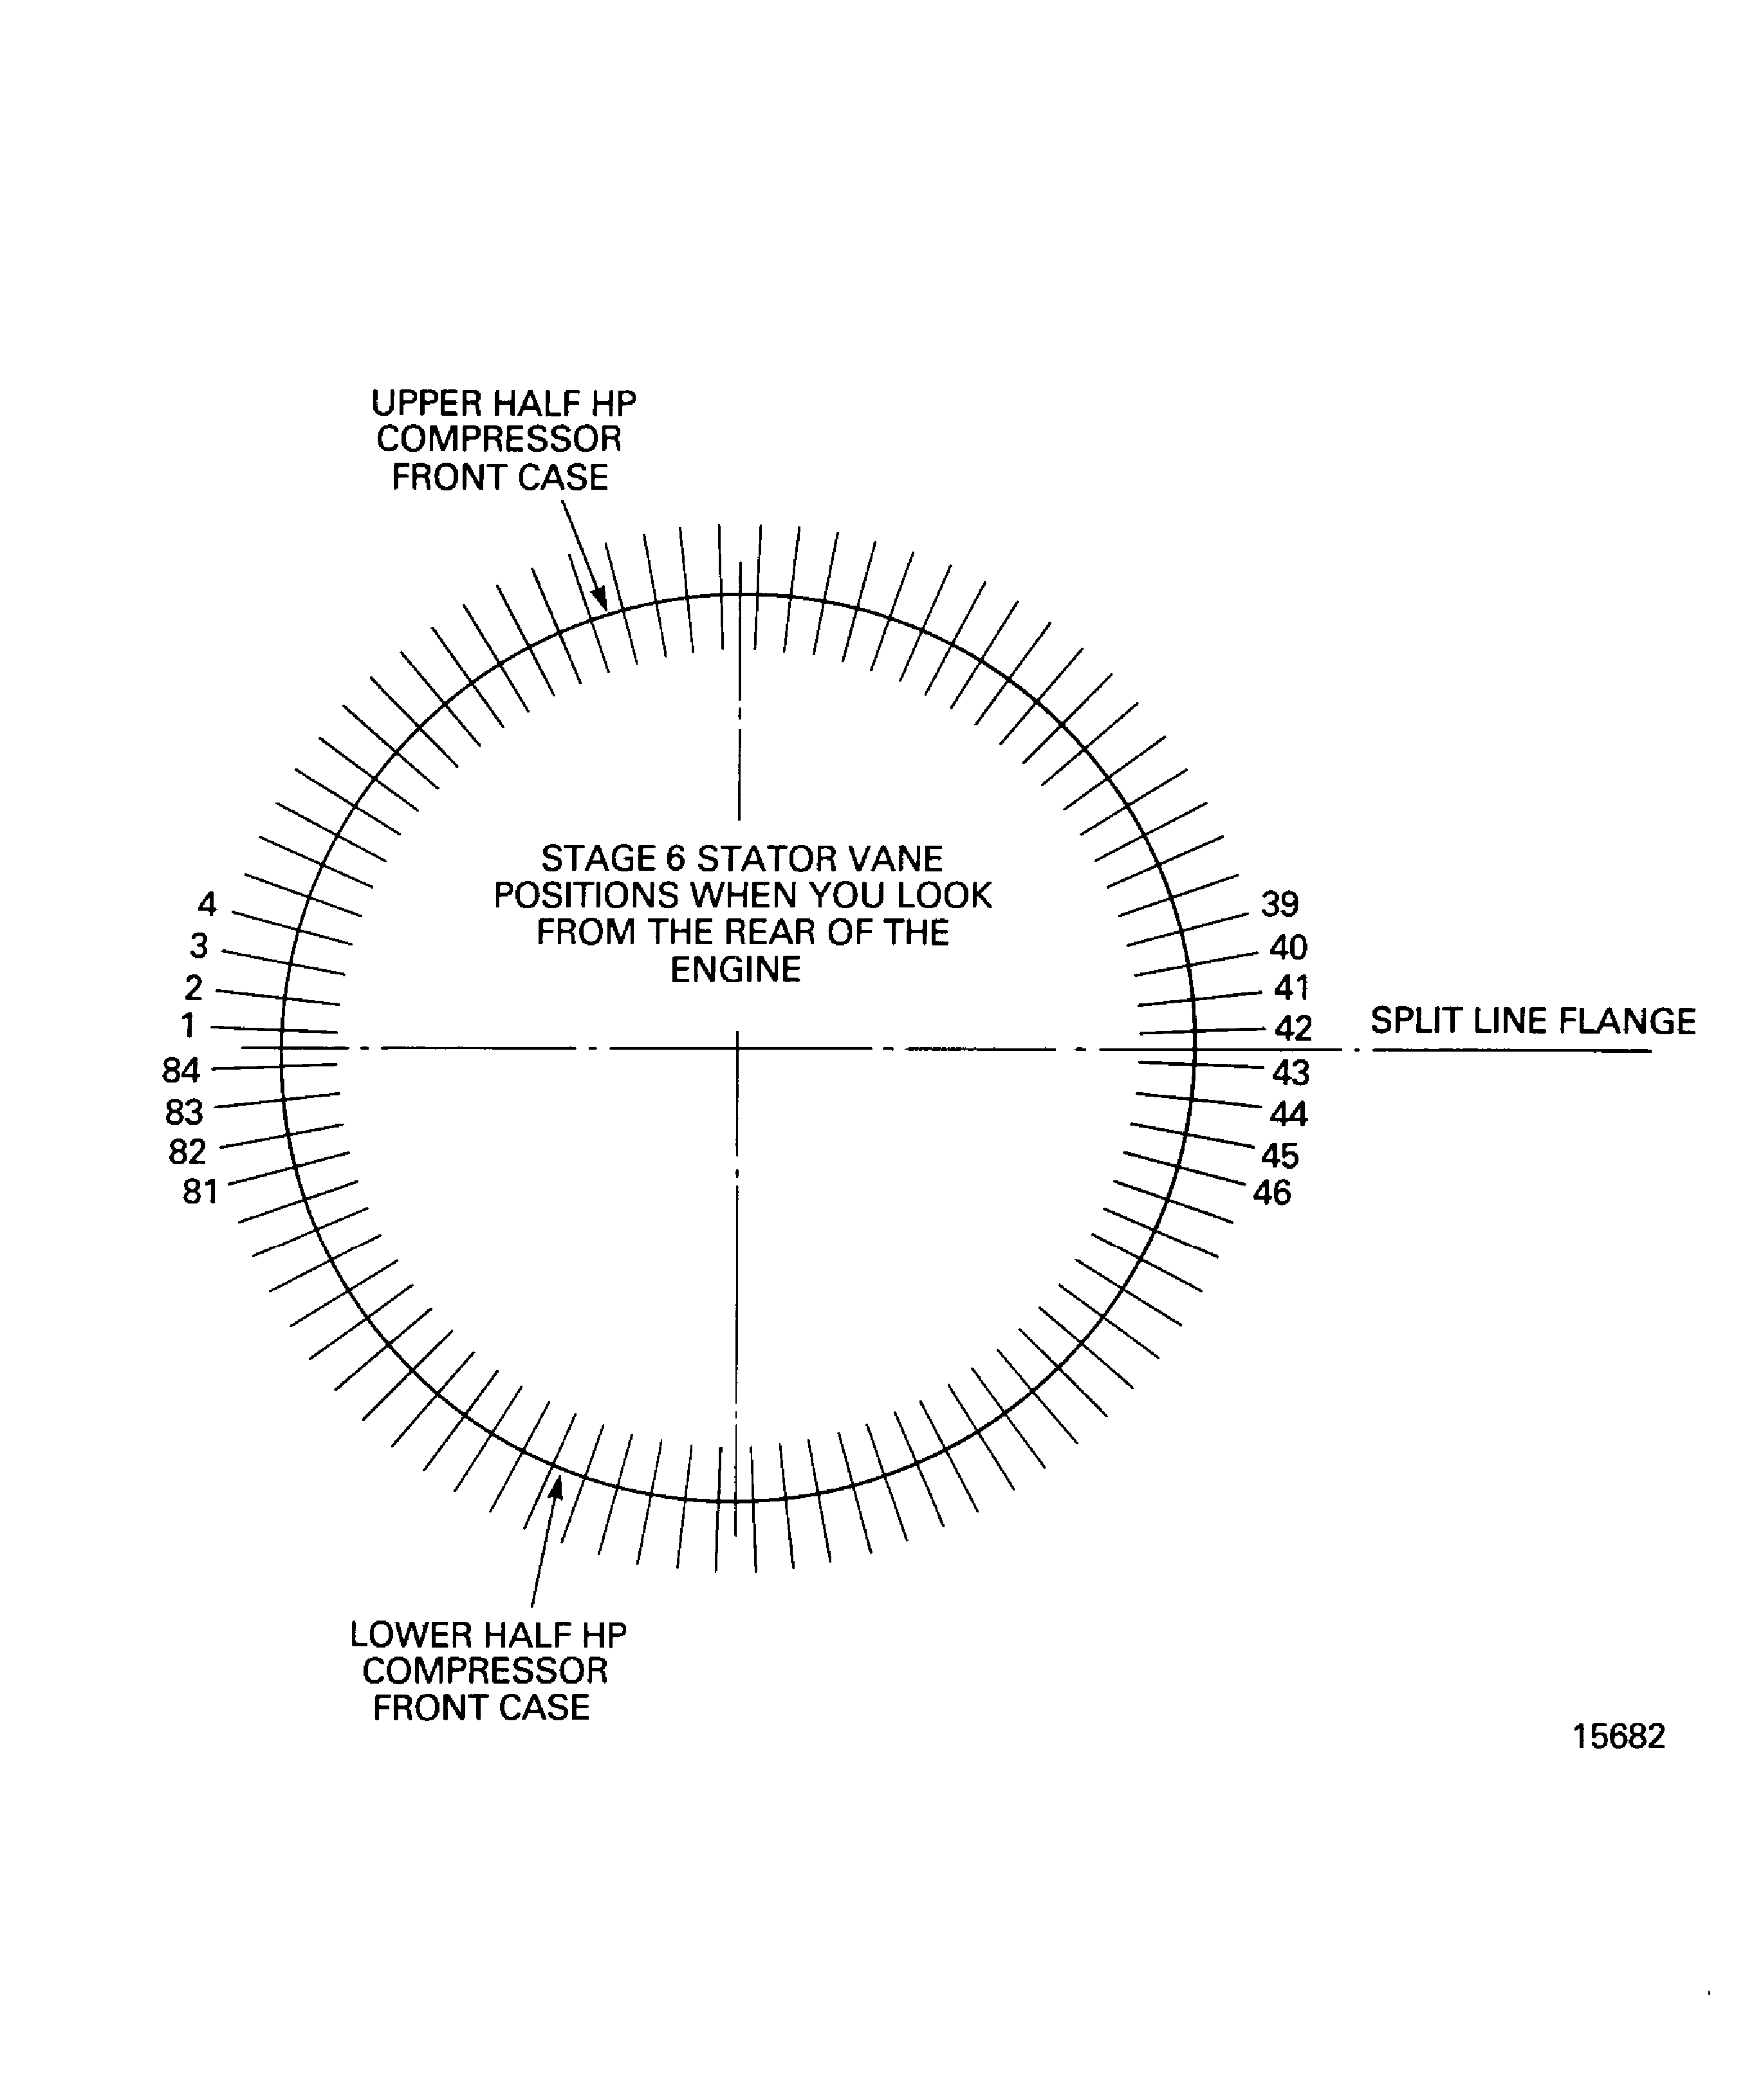
Figure: The tools to measure the stage 6 stator vanes abutment faces
The tools to measure the stage 6 stator vanes abutment faces
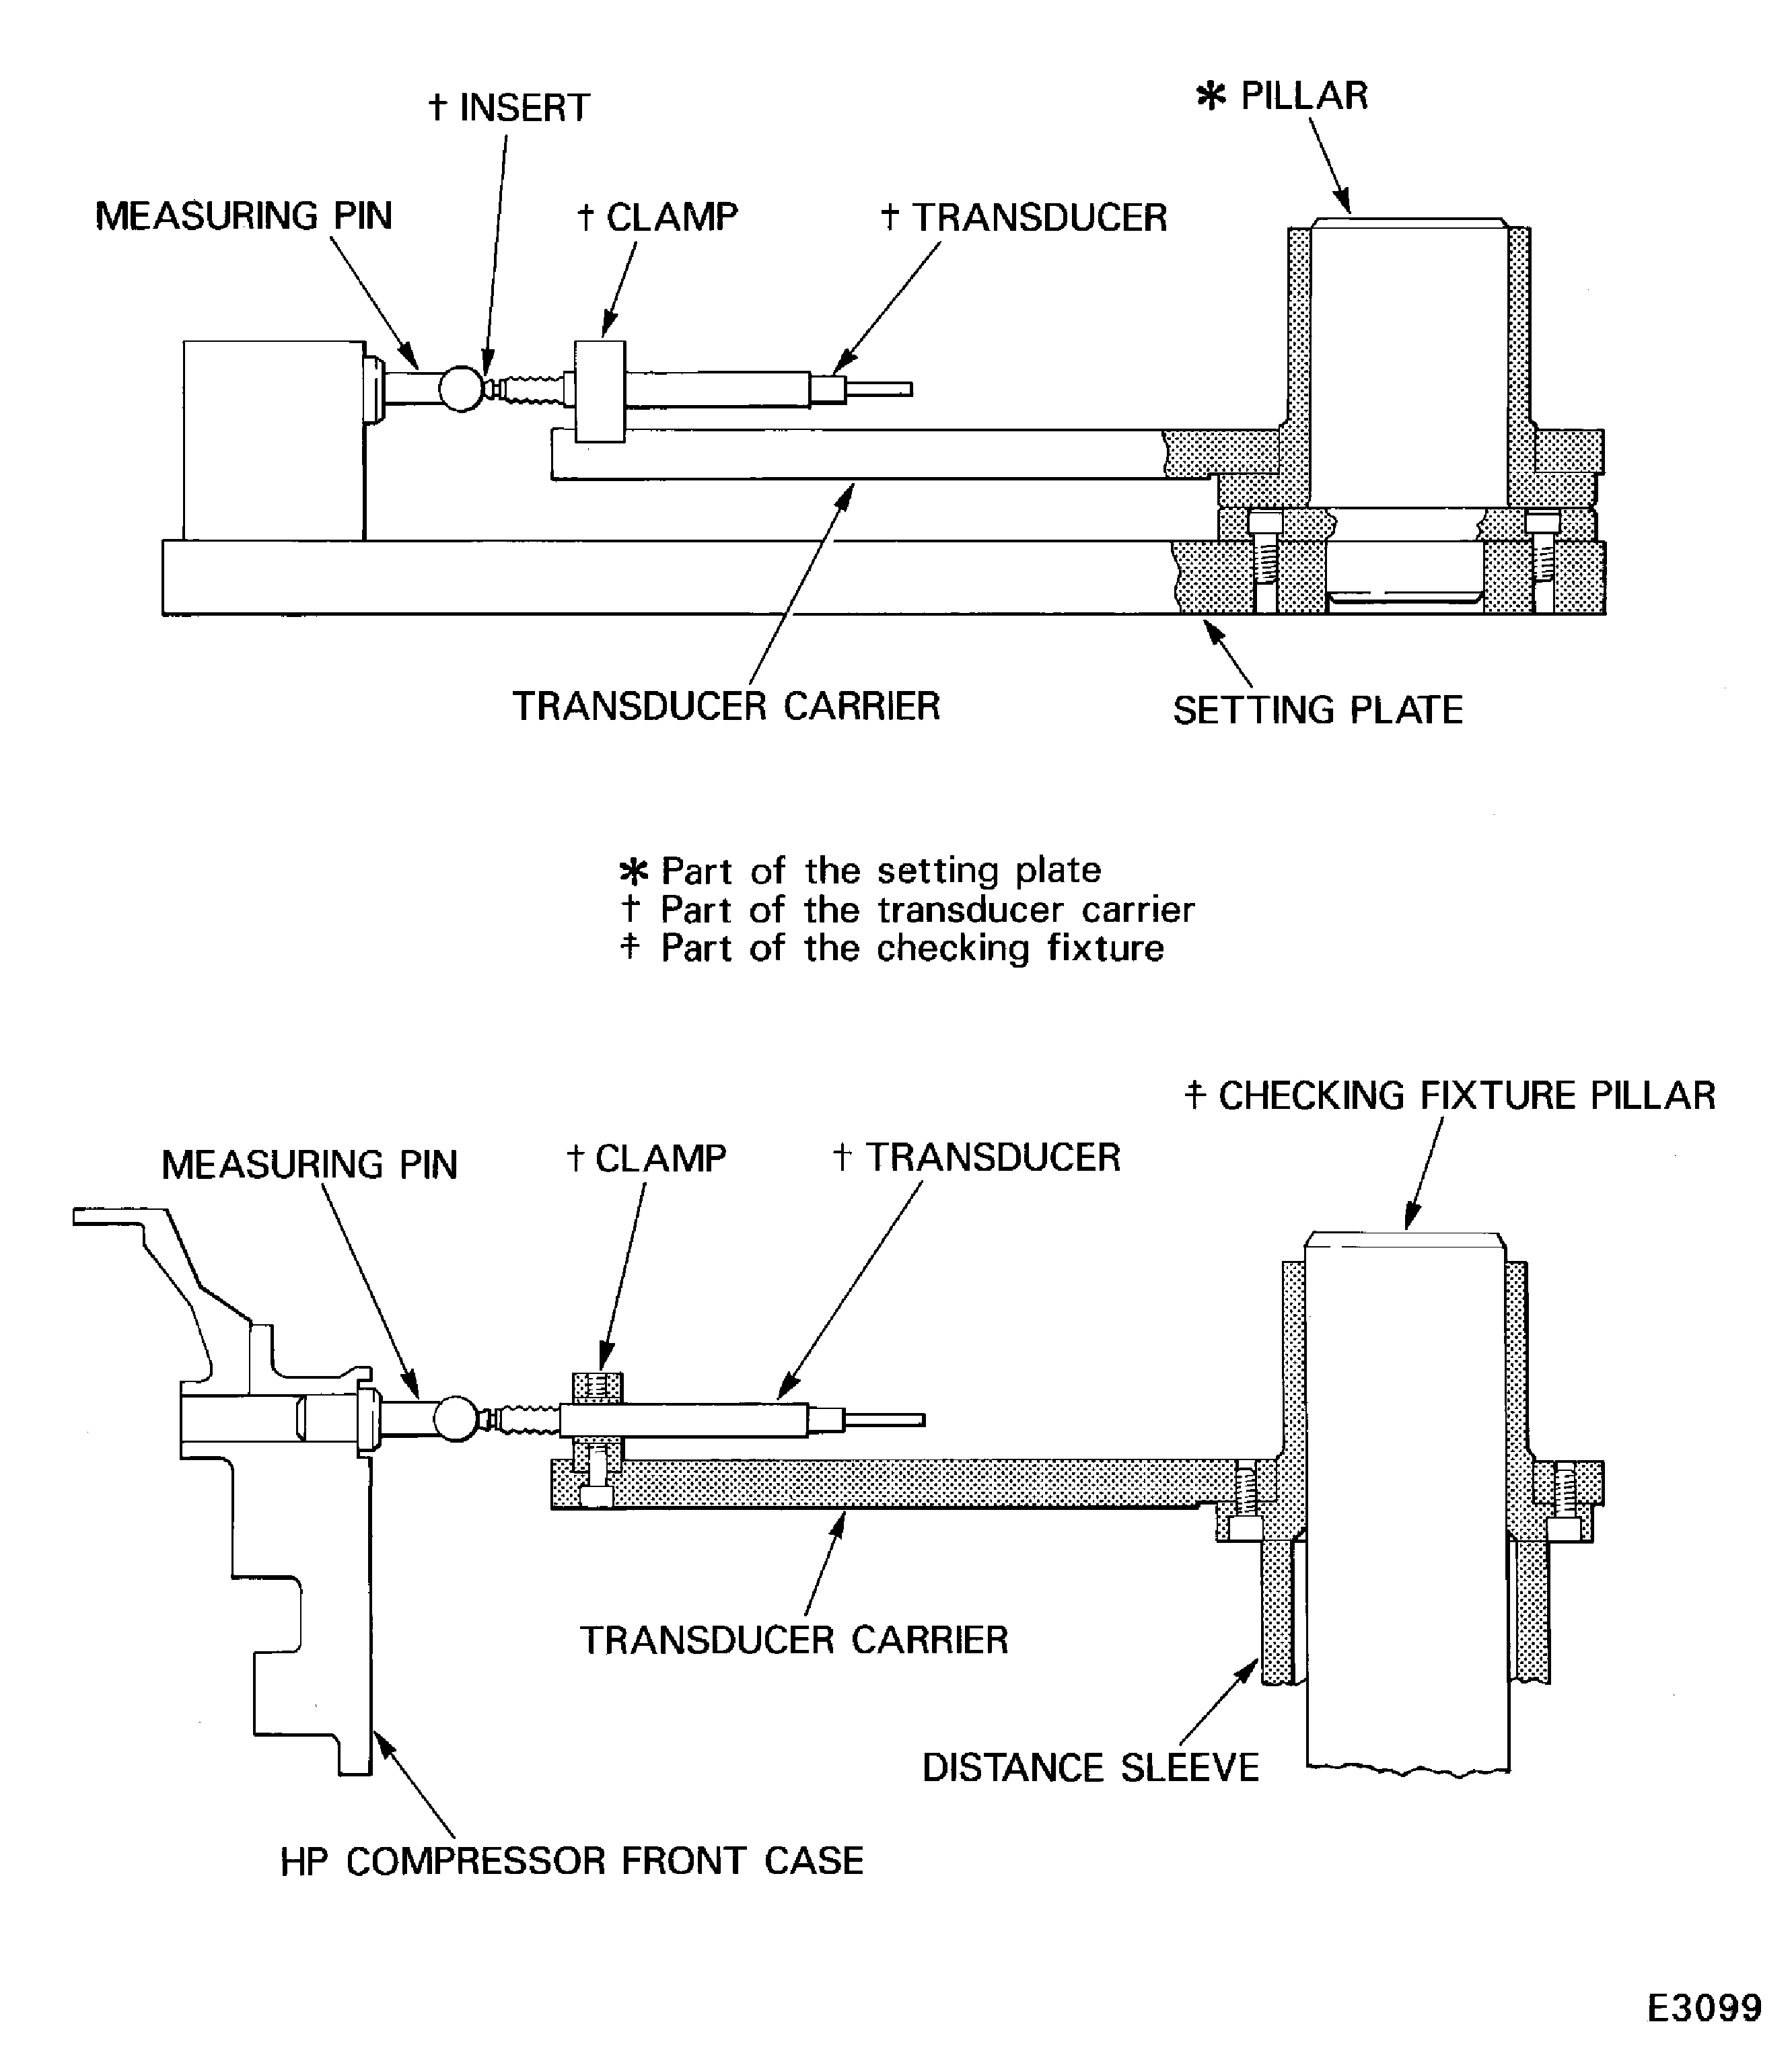
Figure: The dimensions for the stage 6 stator vanes
The dimensions for the stage 6 stator vanes
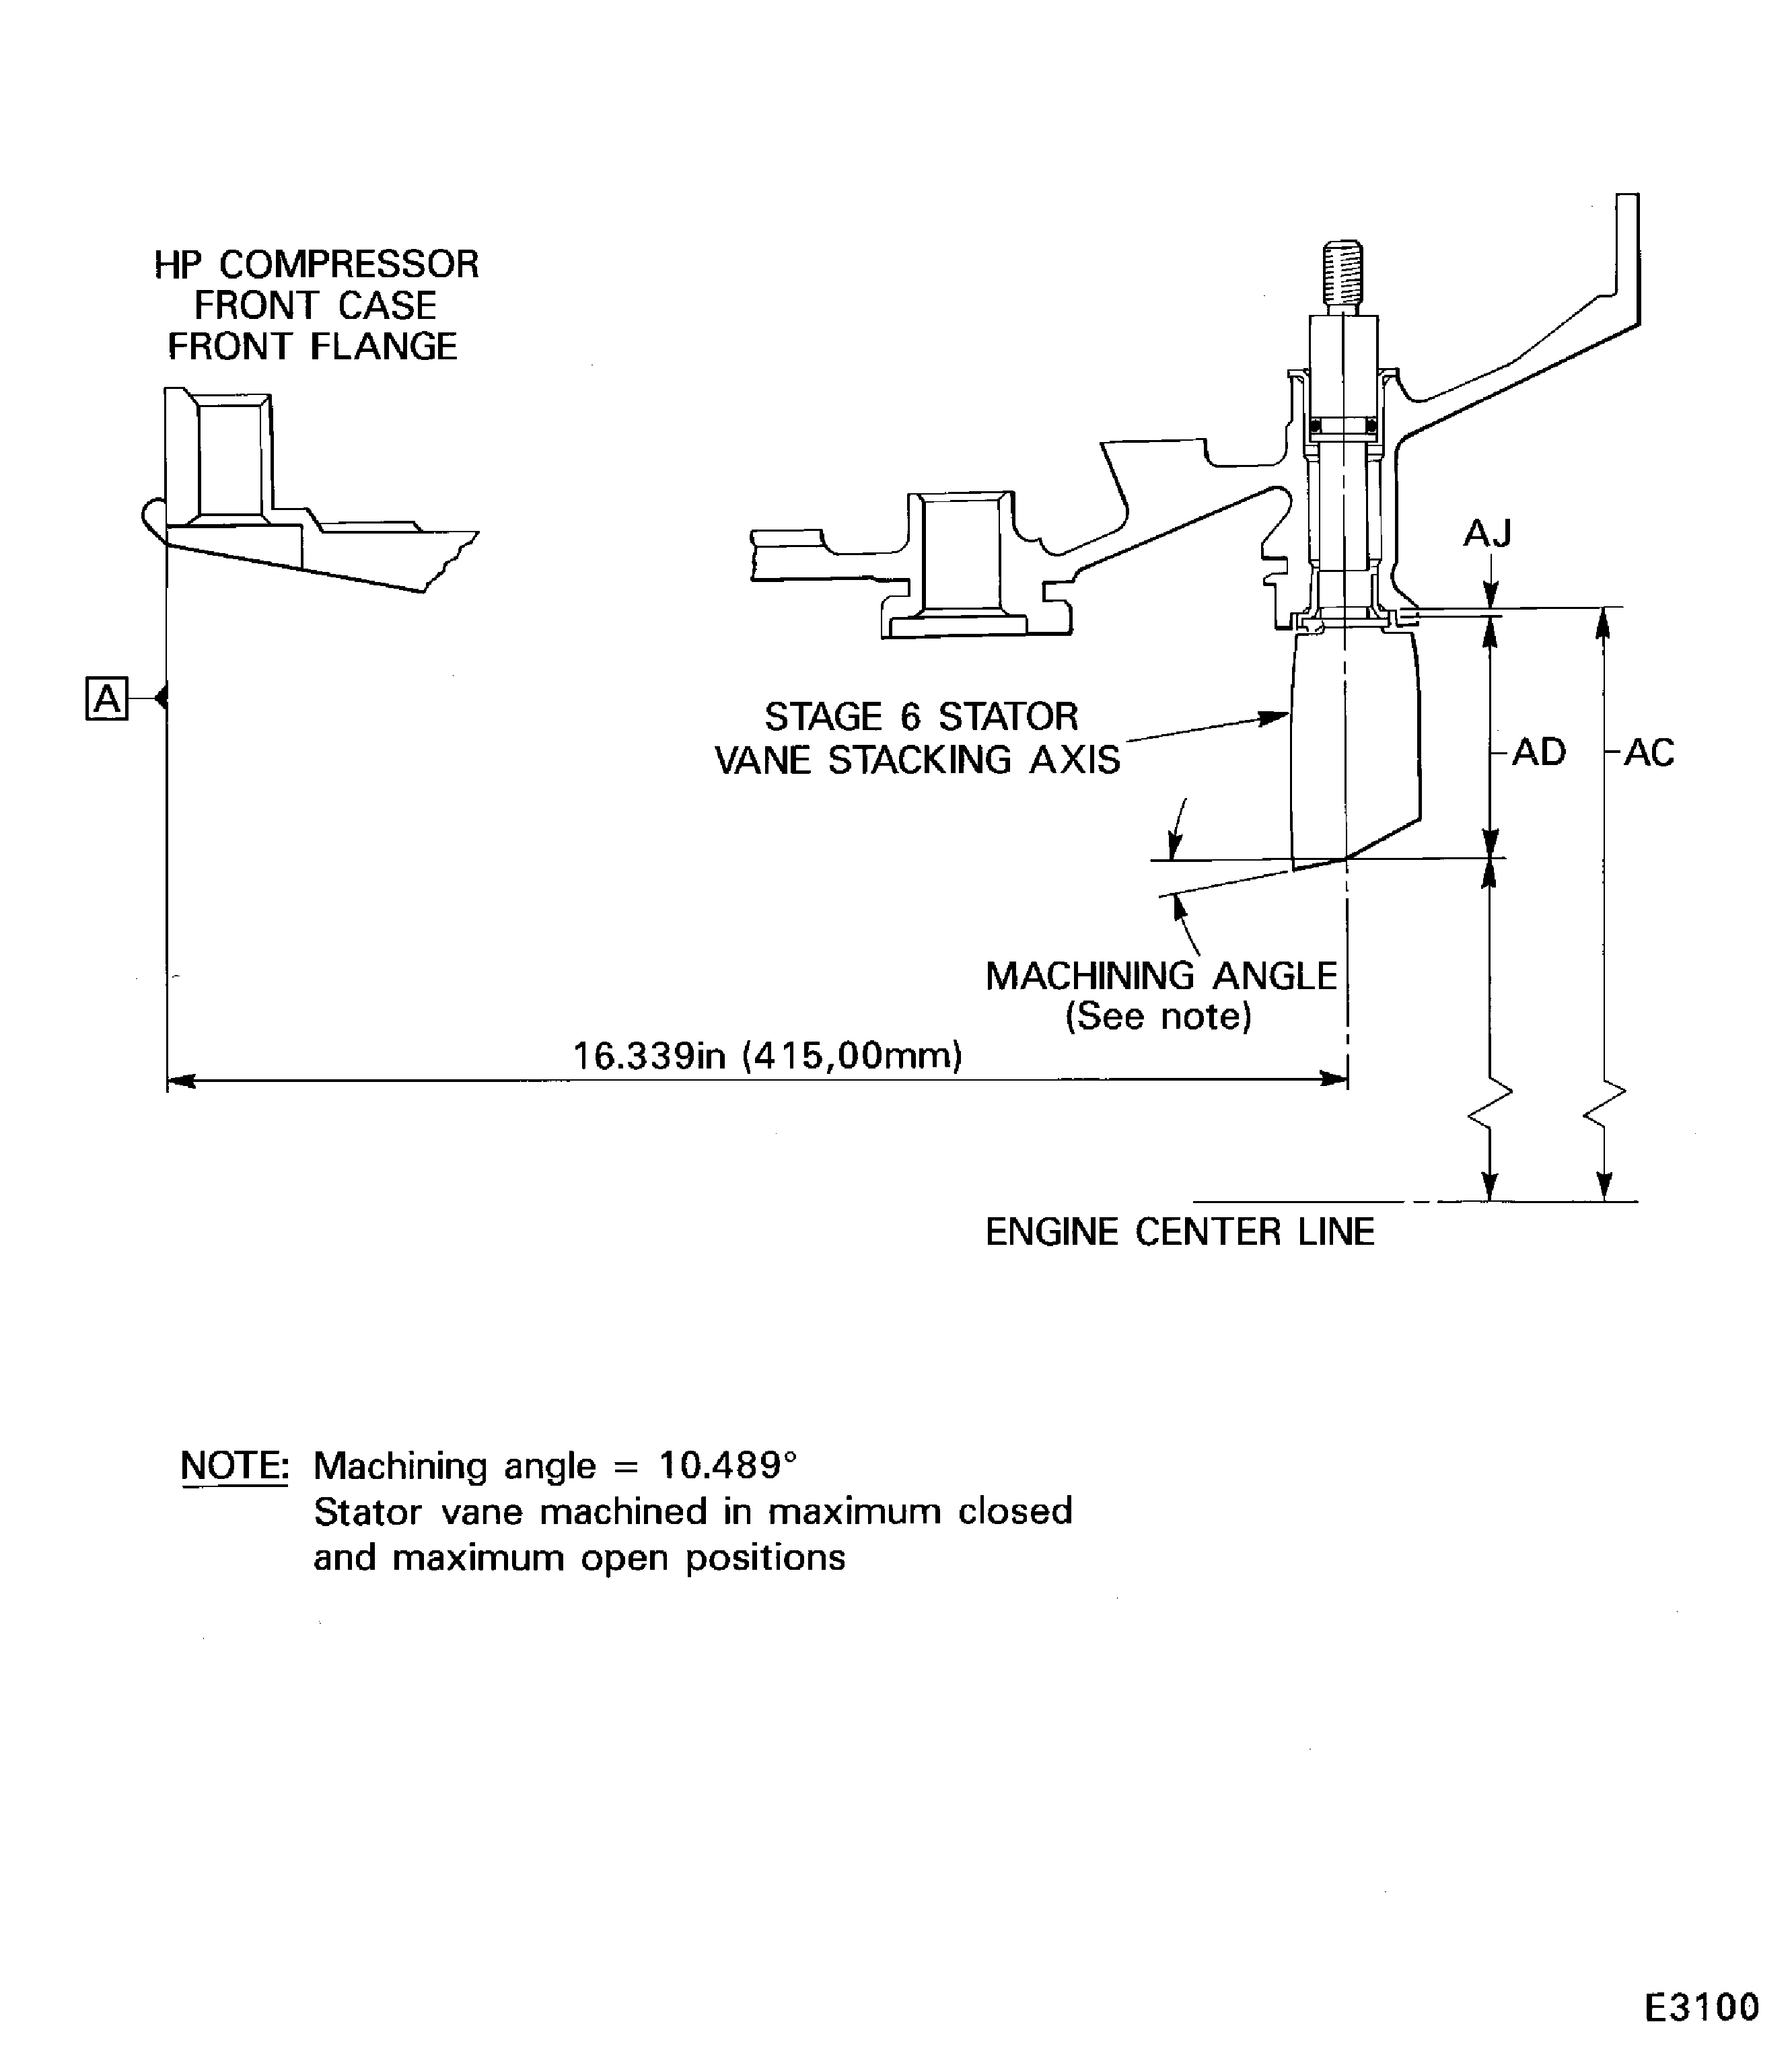
Figure: The tools to machine the stage 6 stator vanes
Sheet 1
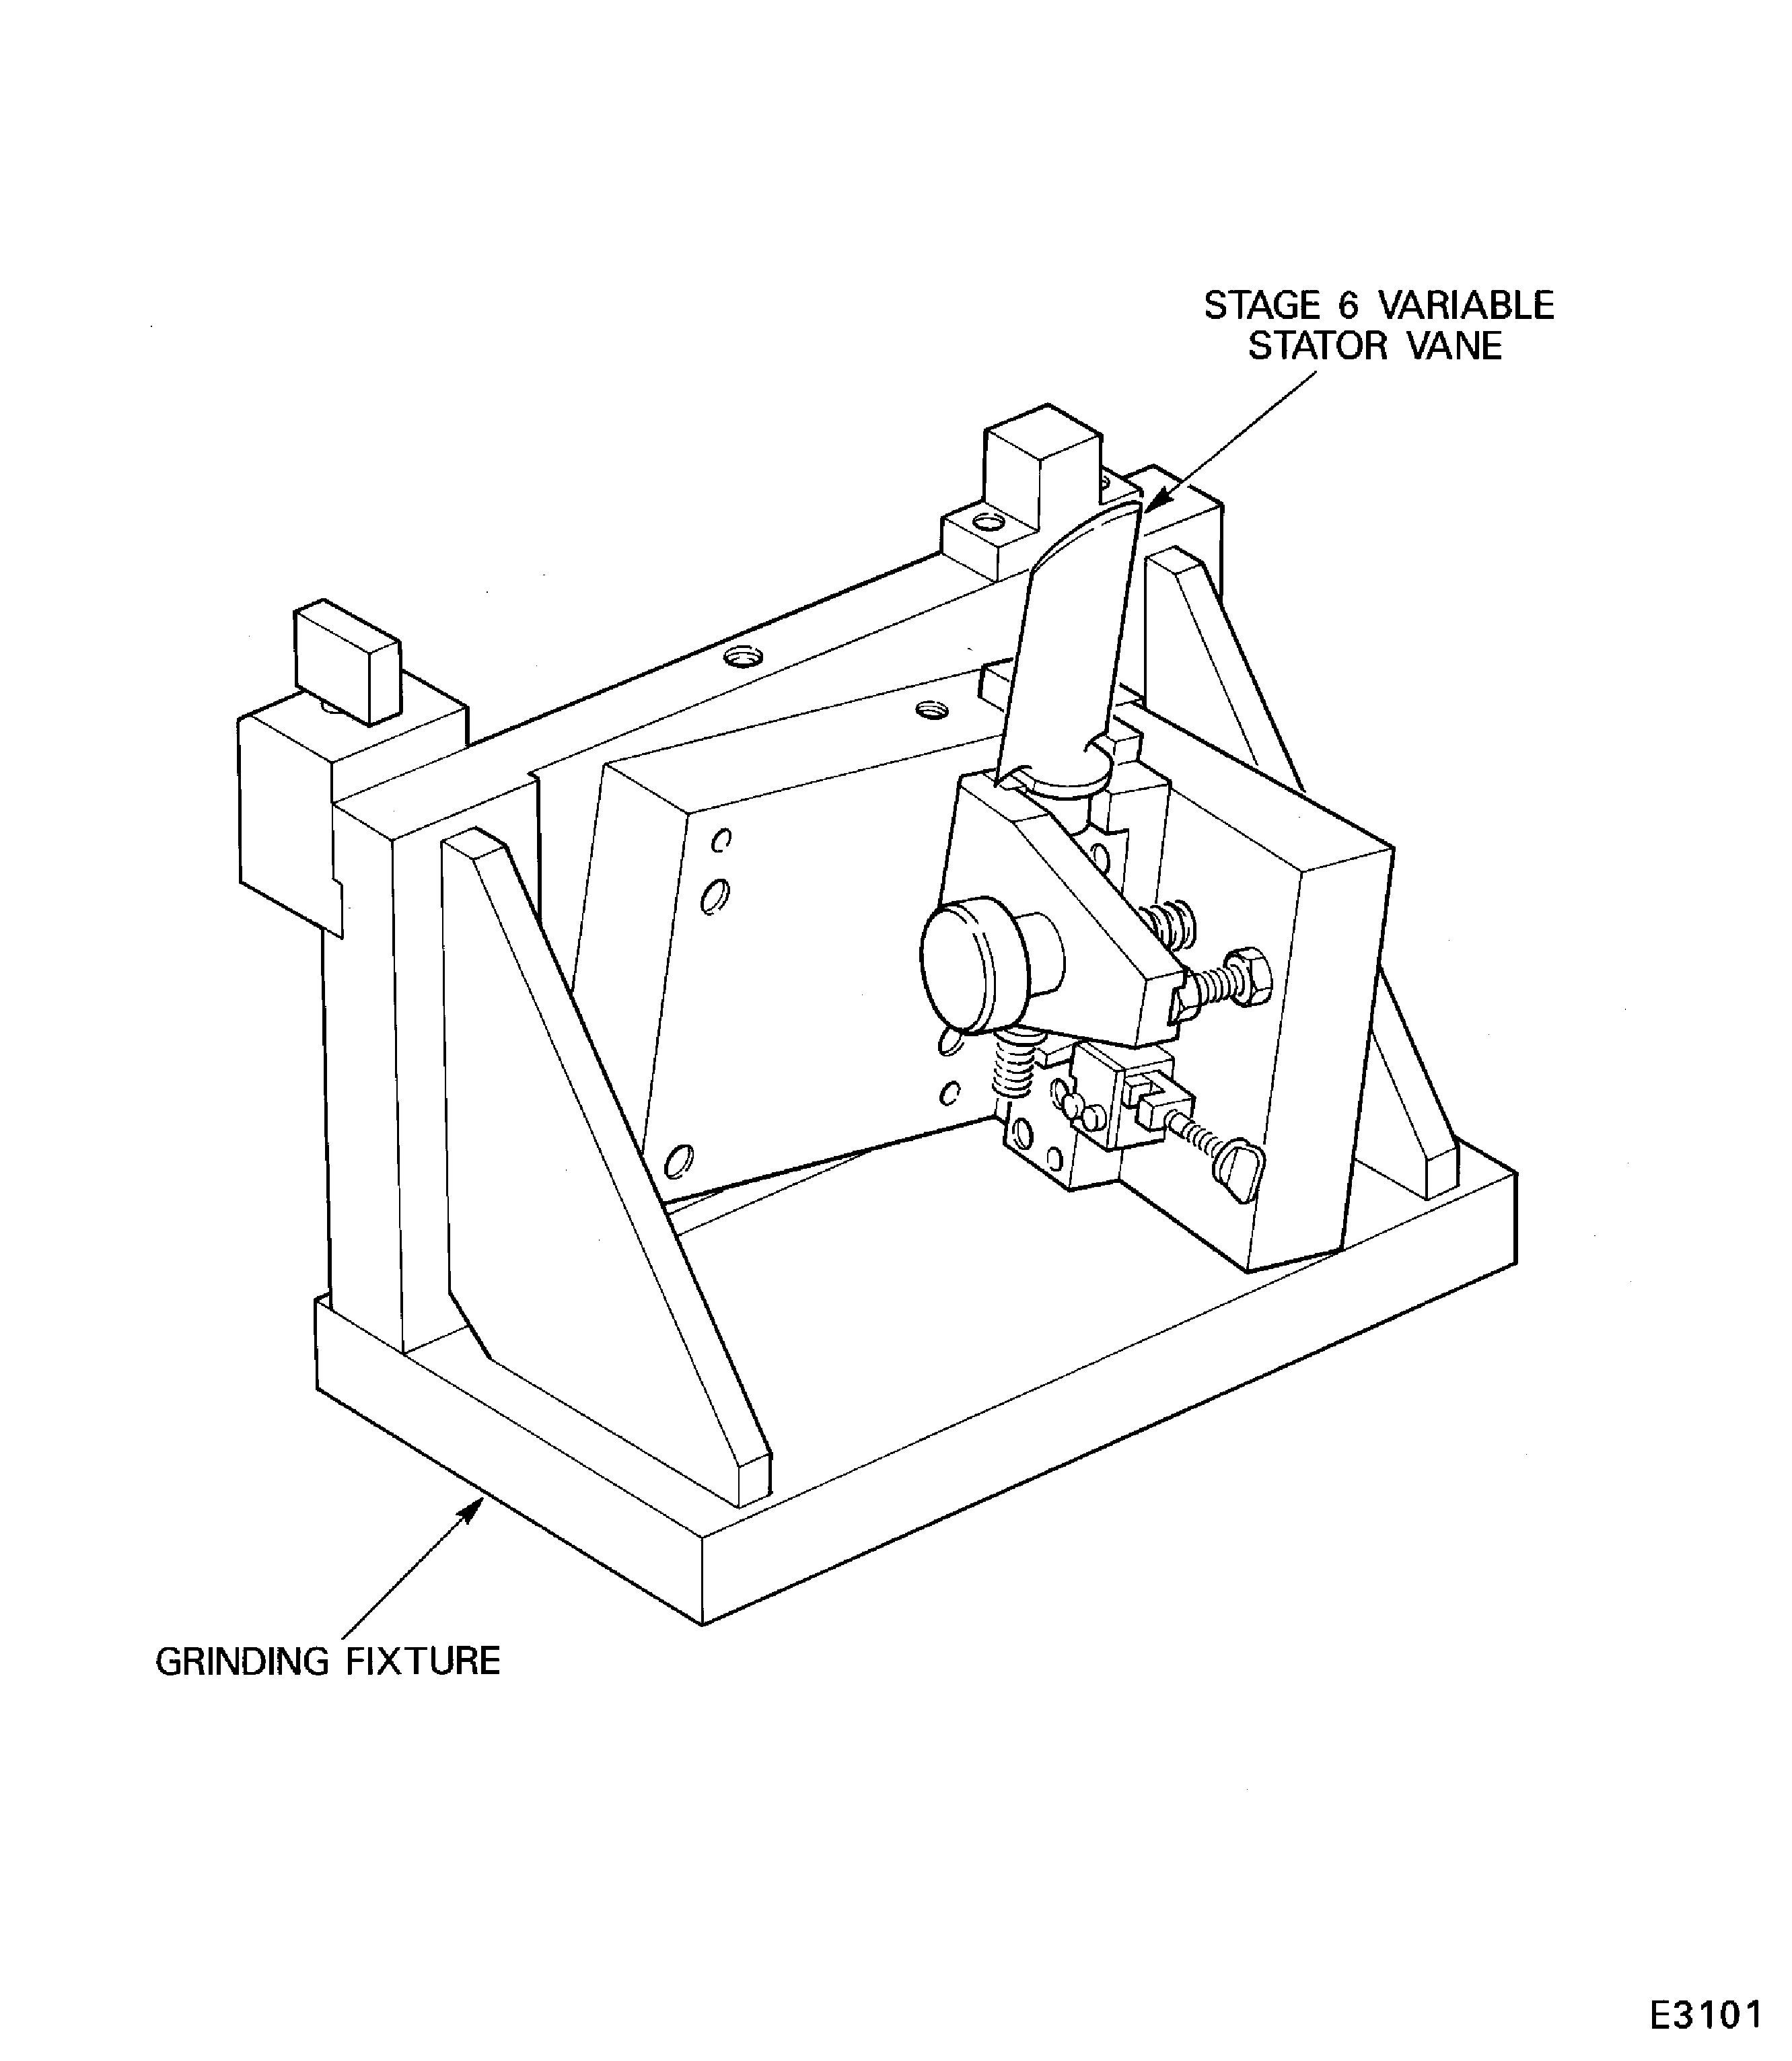
Figure: The tools to inspect the stage 6 stator vanes
Sheet 2
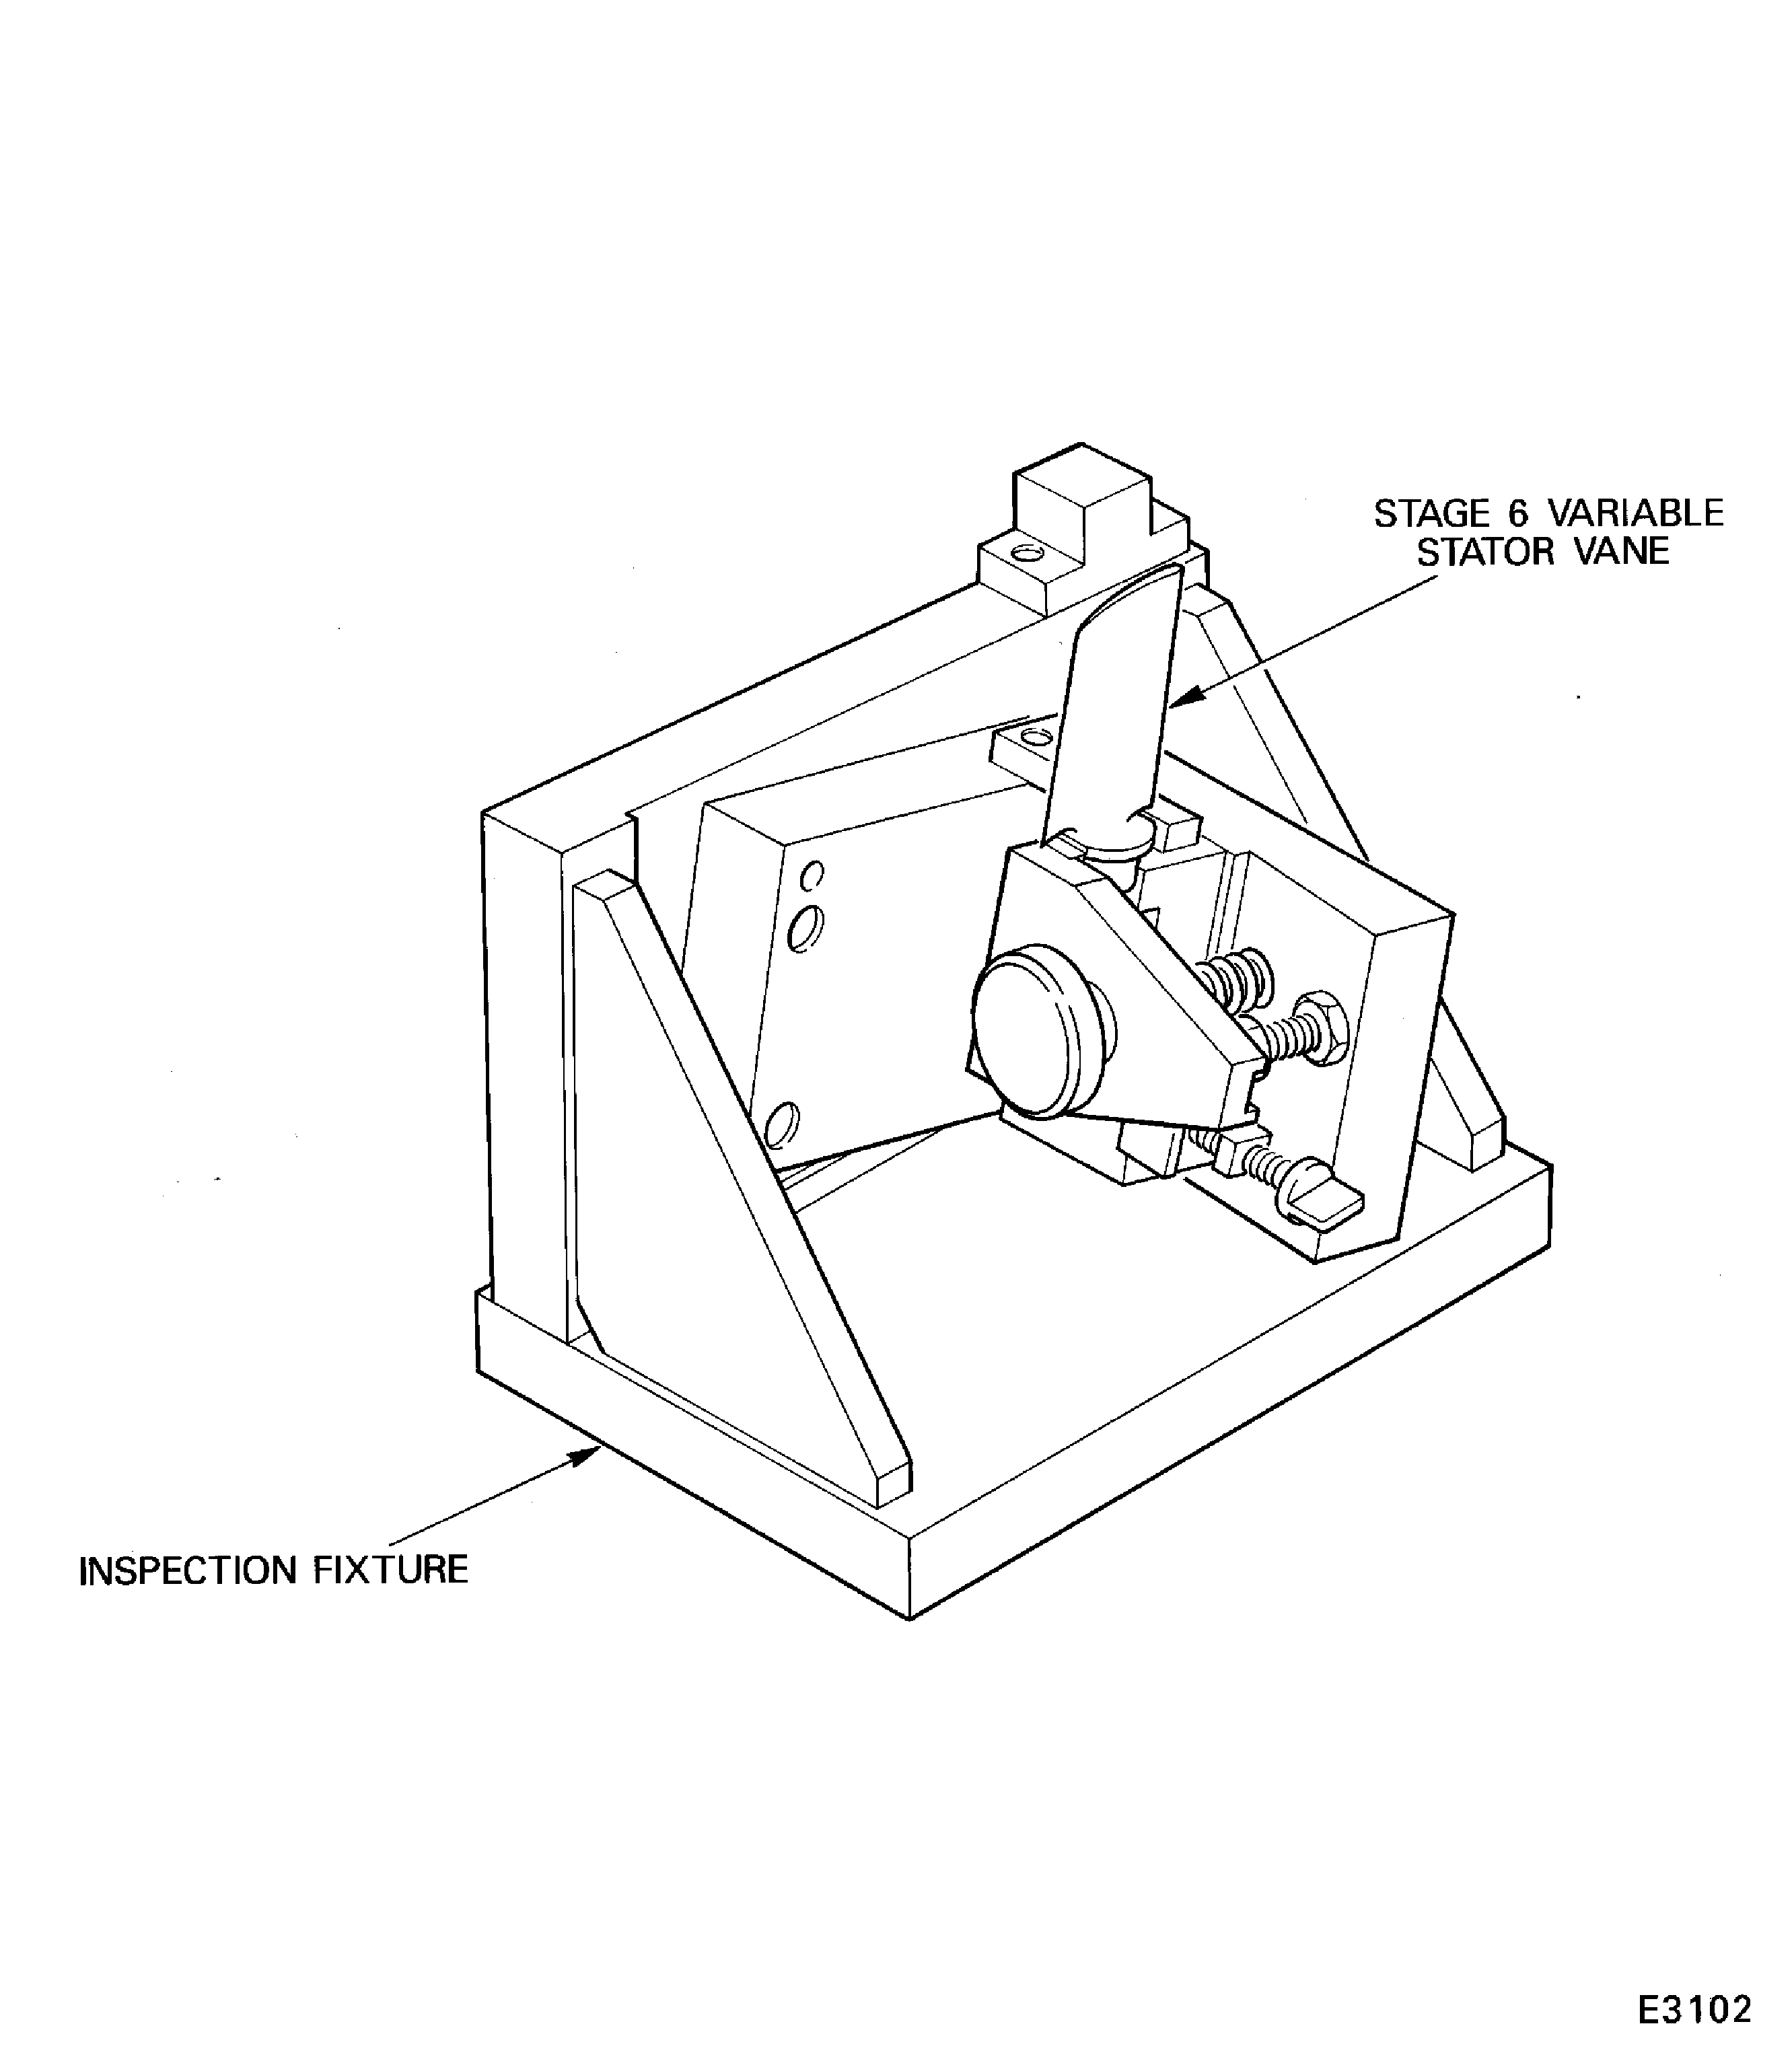
Figure: Install the lifting fixture on to the HP compressor front case
Install the lifting fixture on to the HP compressor front case

Figure: Remove the HP compressor front case from the checking fixture
Remove the HP compressor front case from the checking fixture
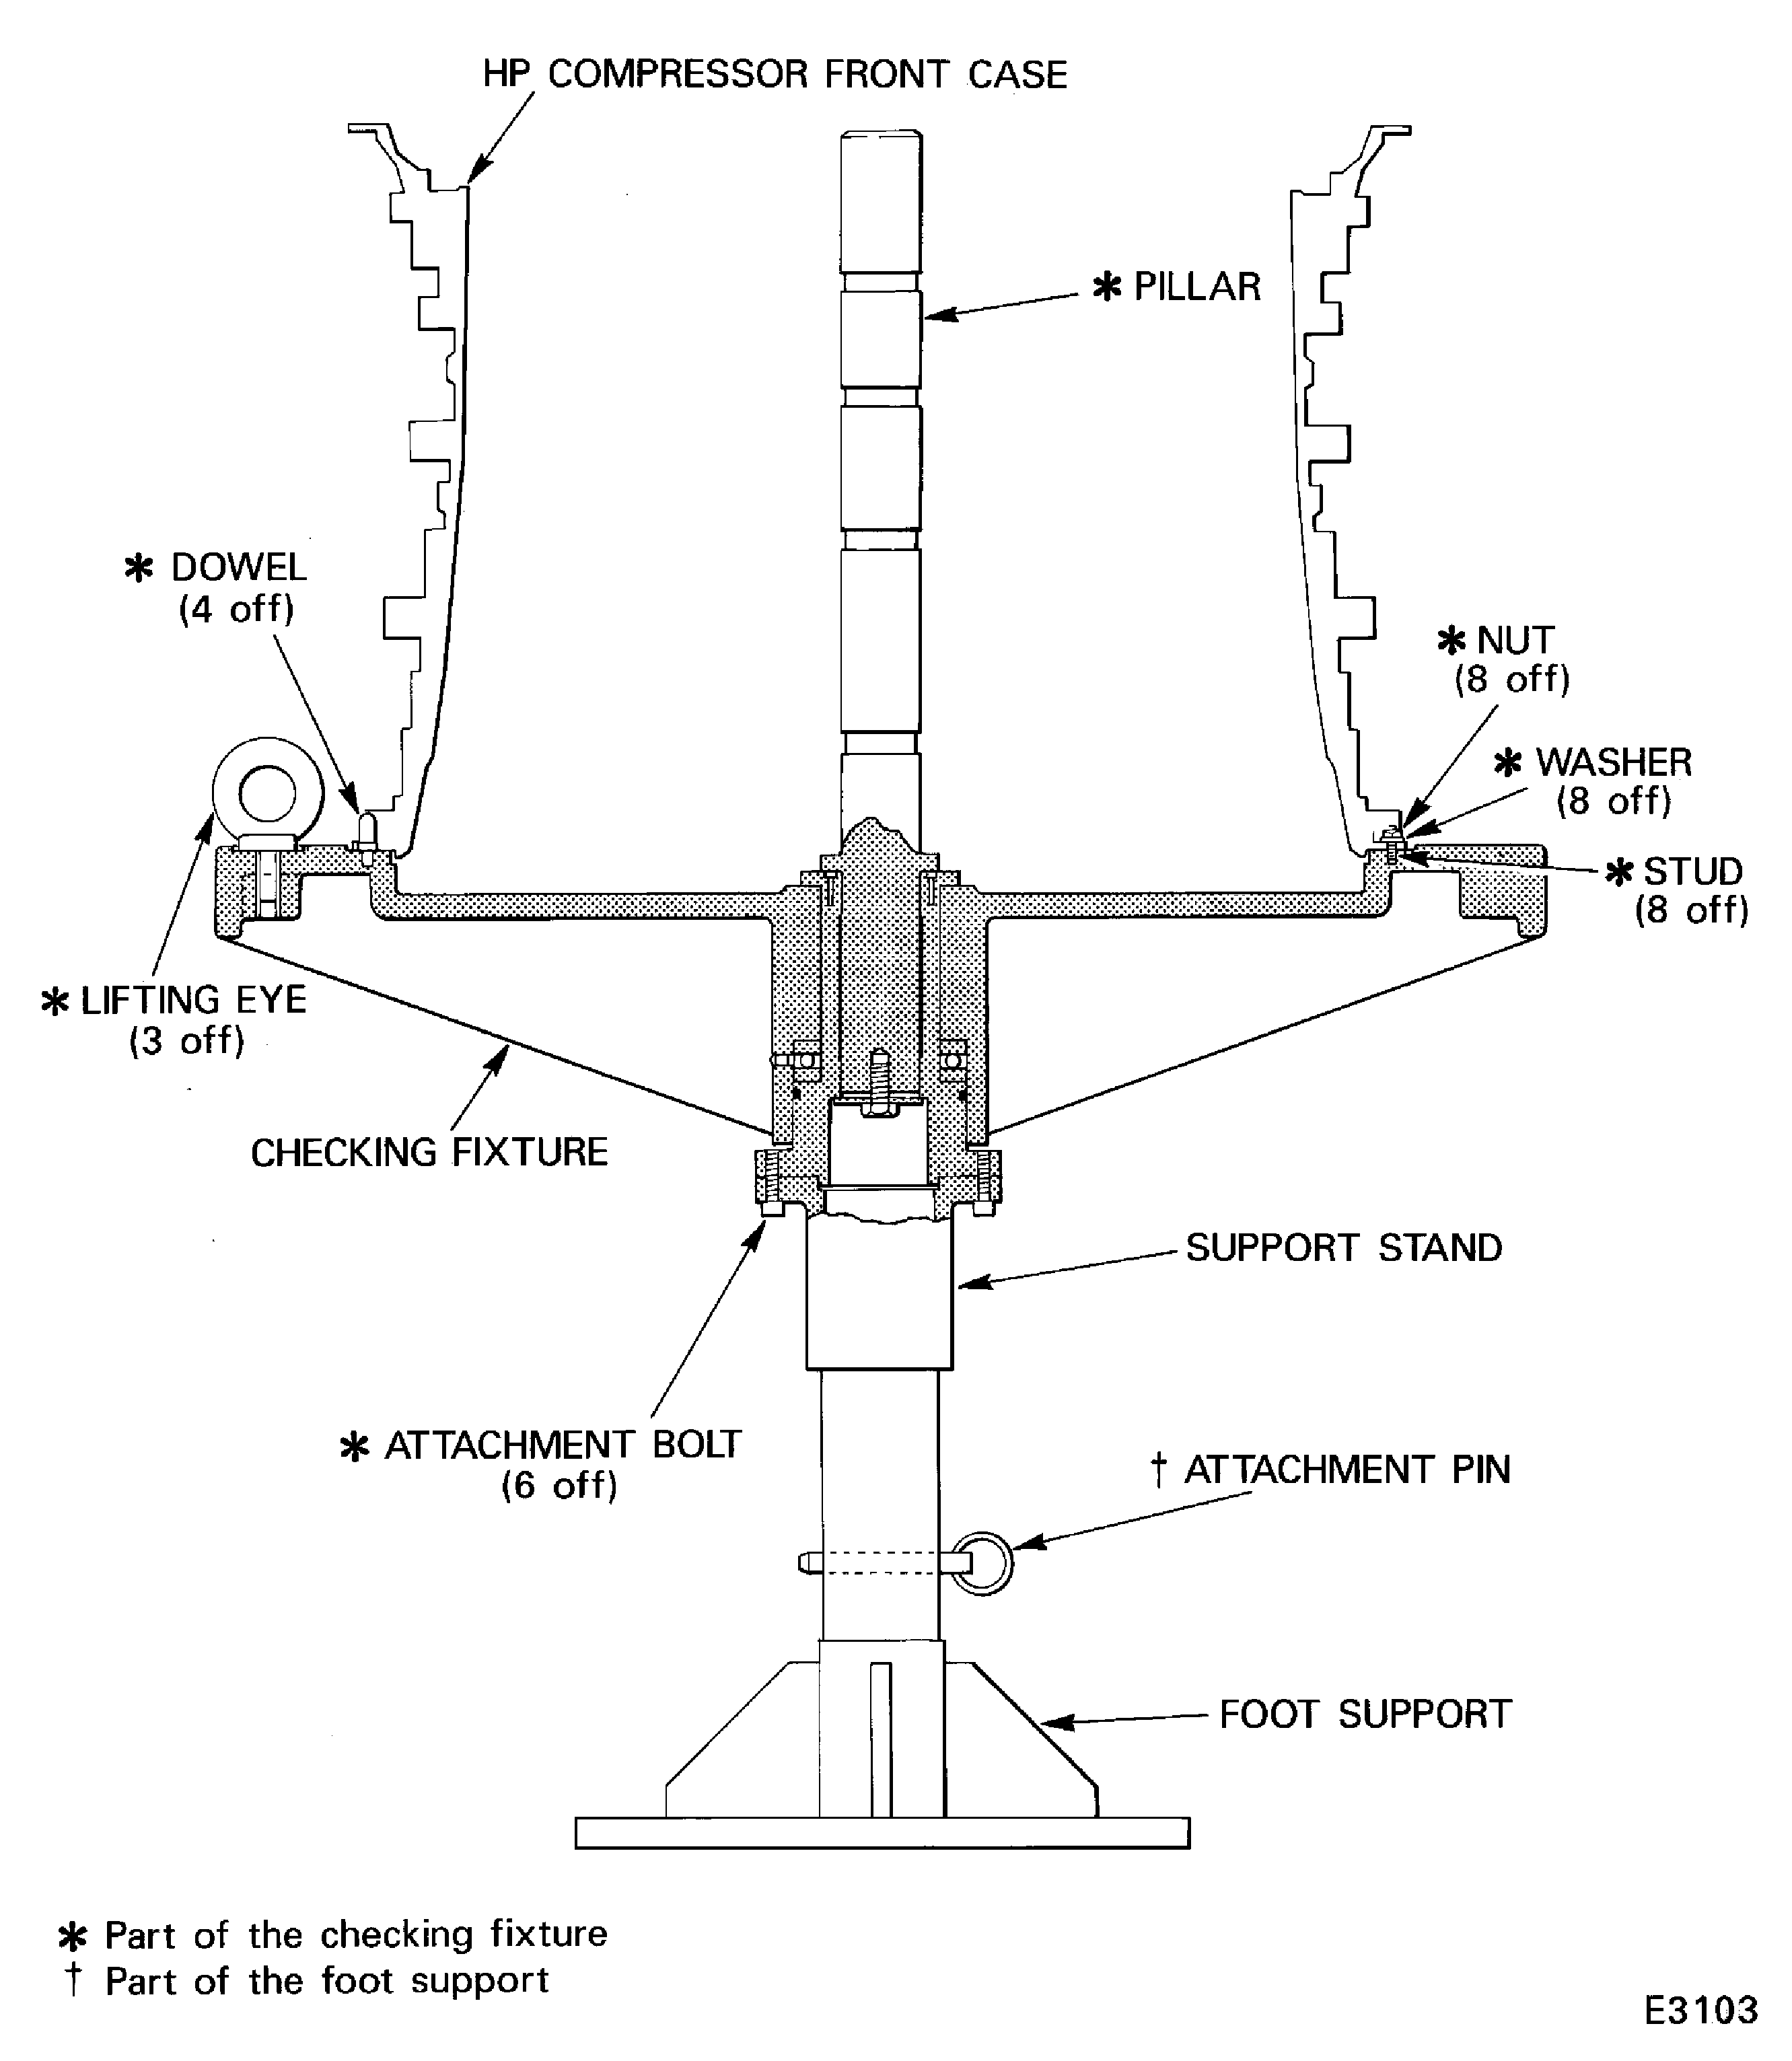
Figure: Assemble the tools to turn the HP compressor front case
Assemble the tools to turn the HP compressor front case
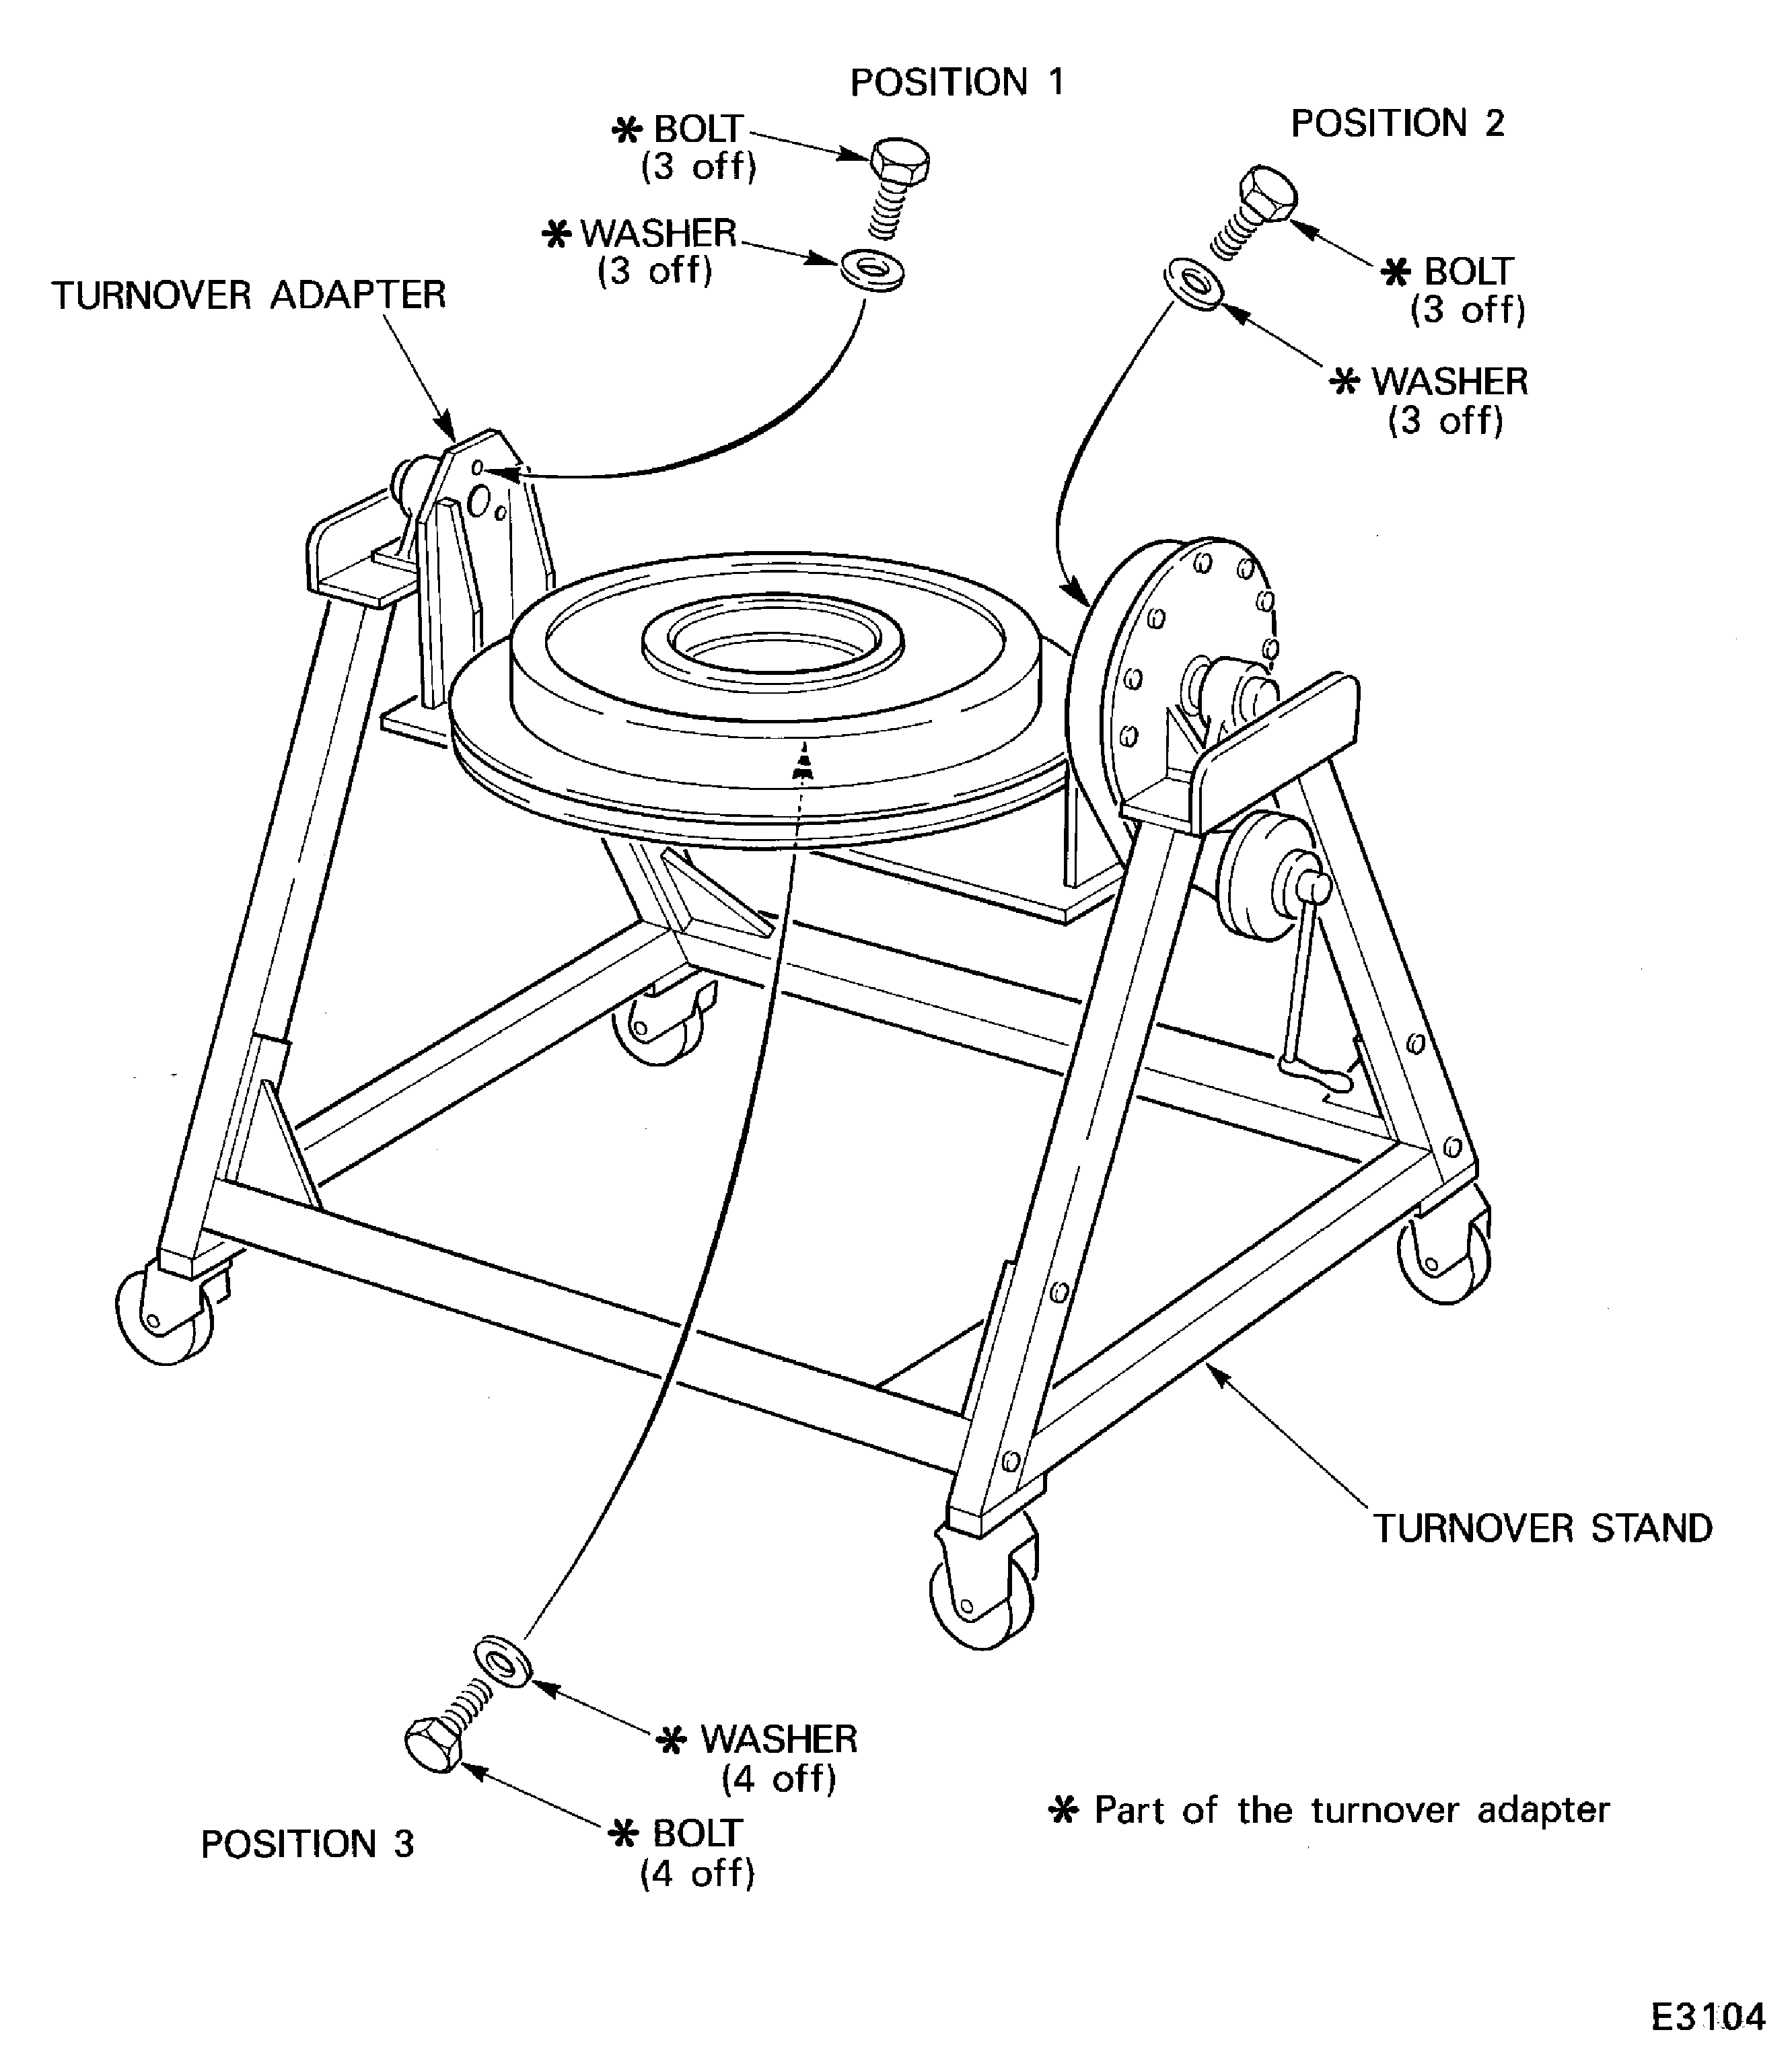
Figure: Install the HP compressor front case in the machine fixture
Sheet 1
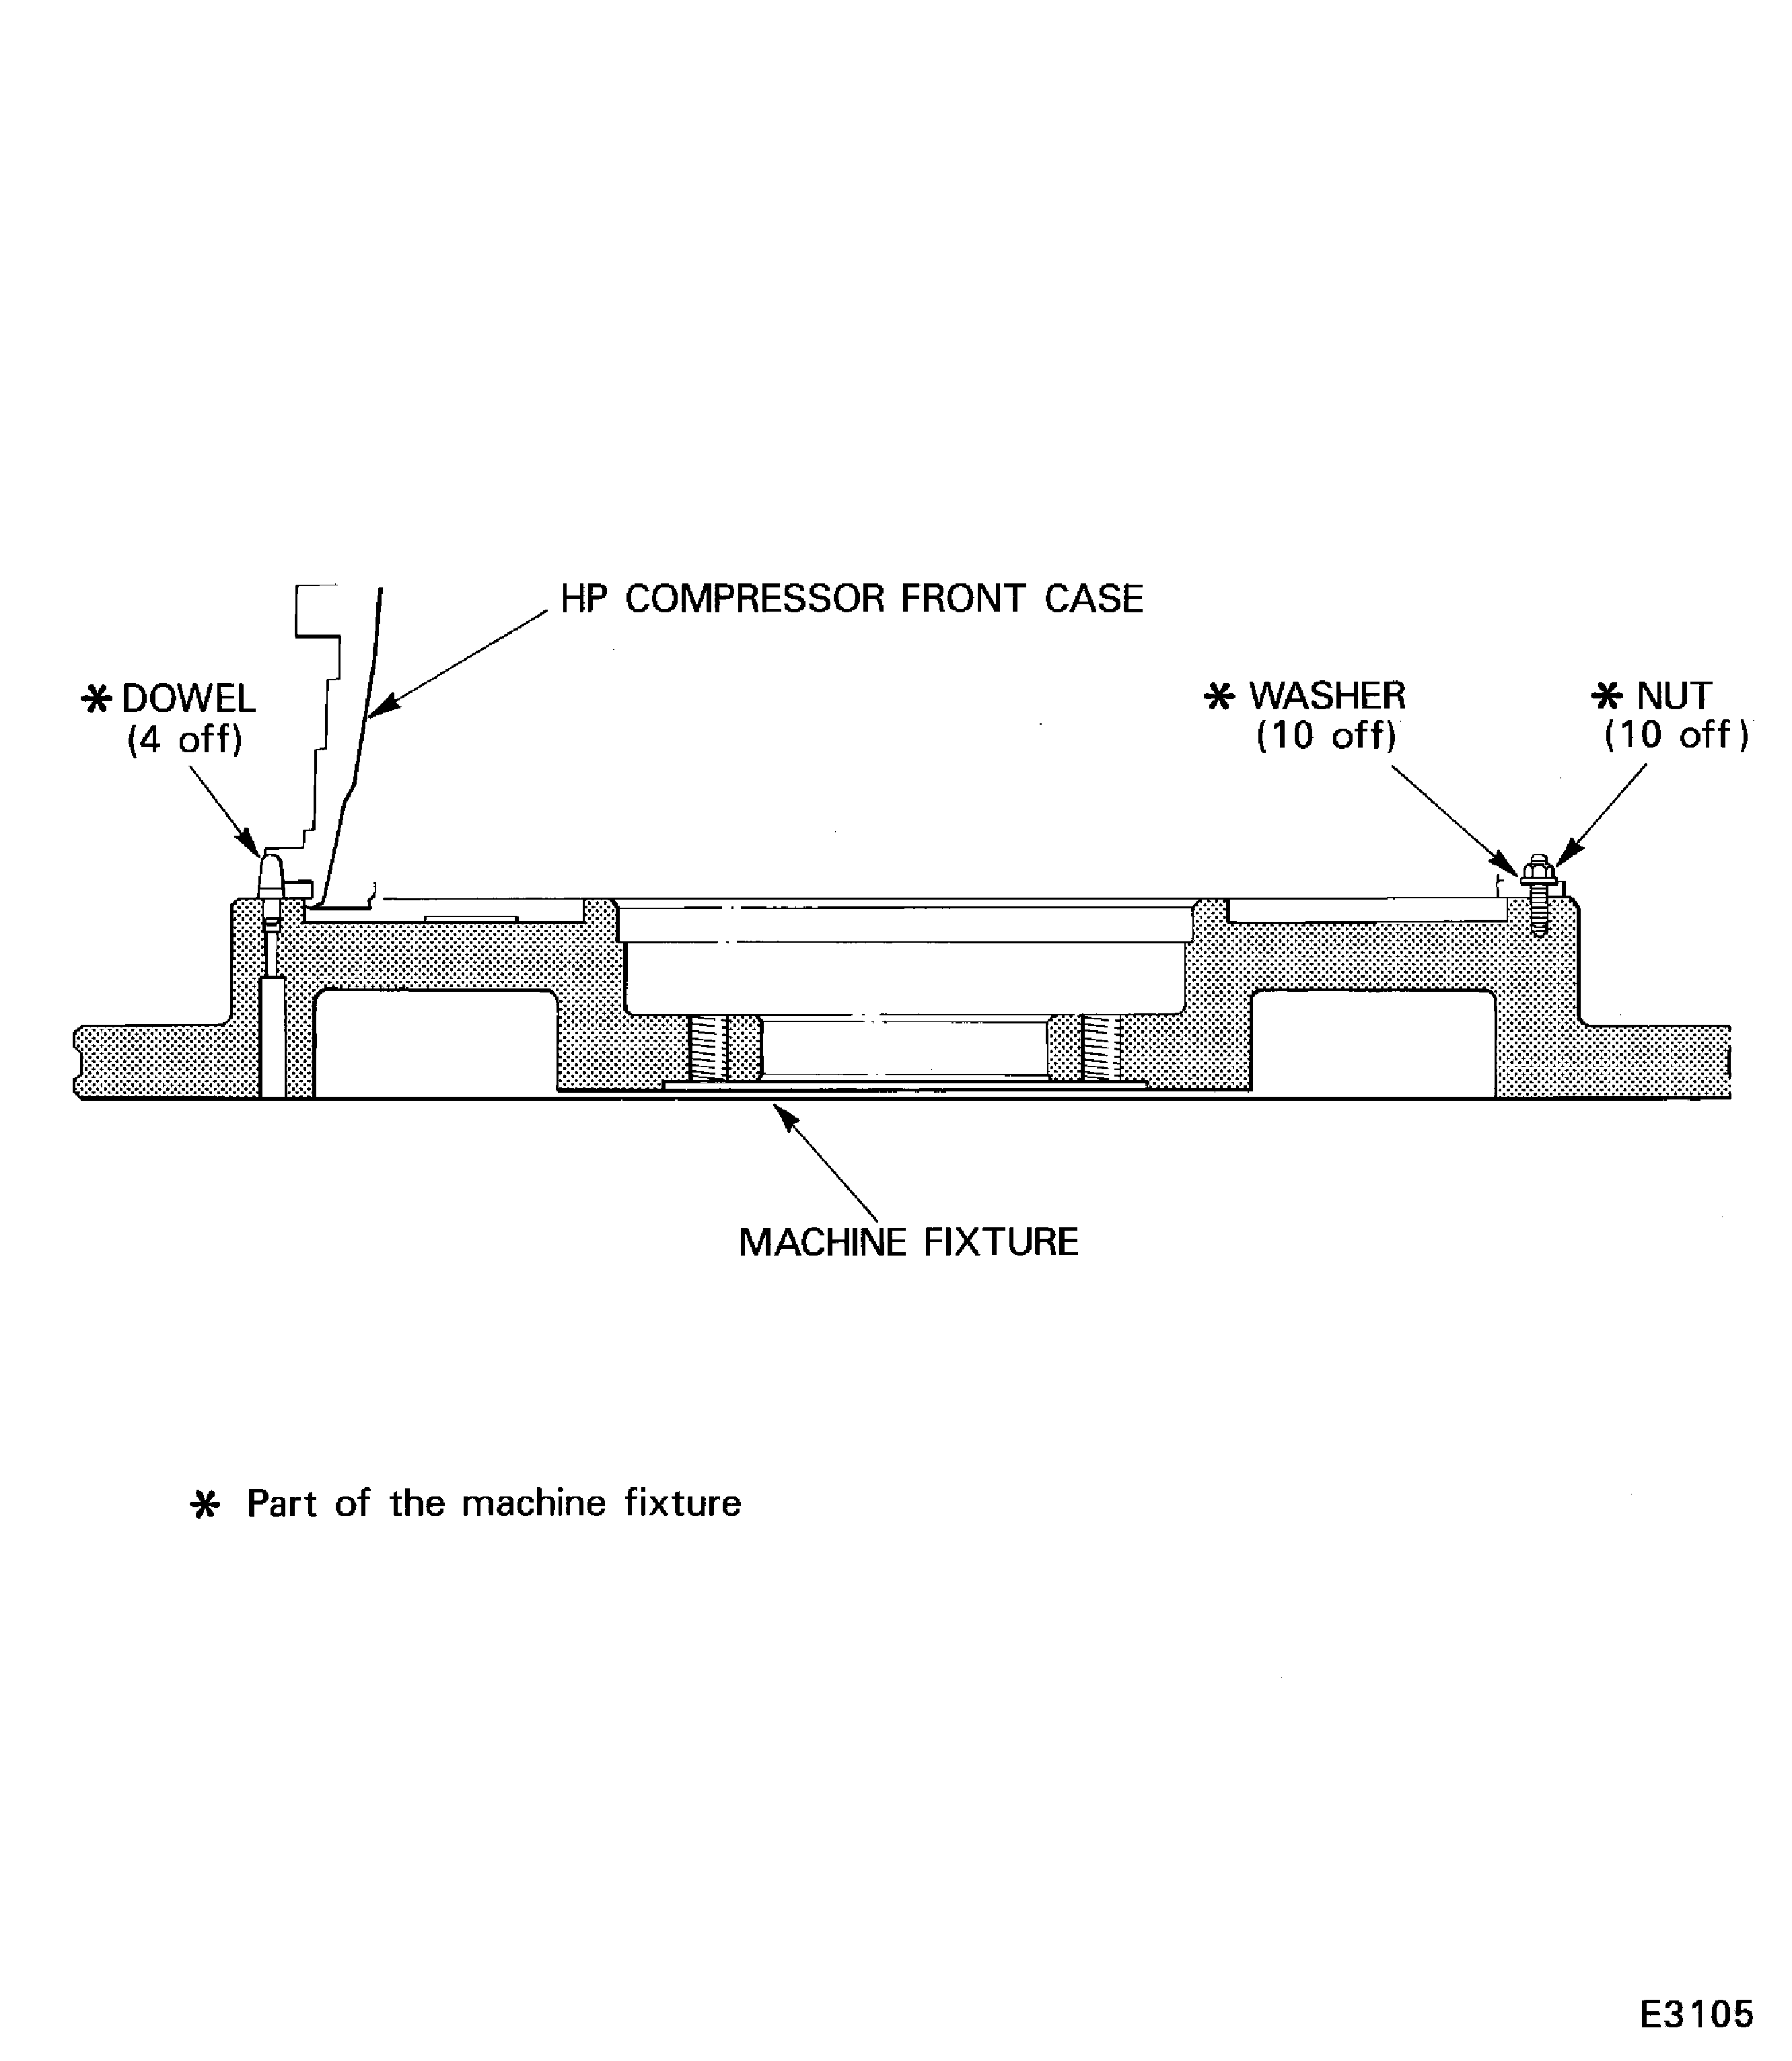
Figure: Install the HP compressor front case in the machine fixture
Sheet 2
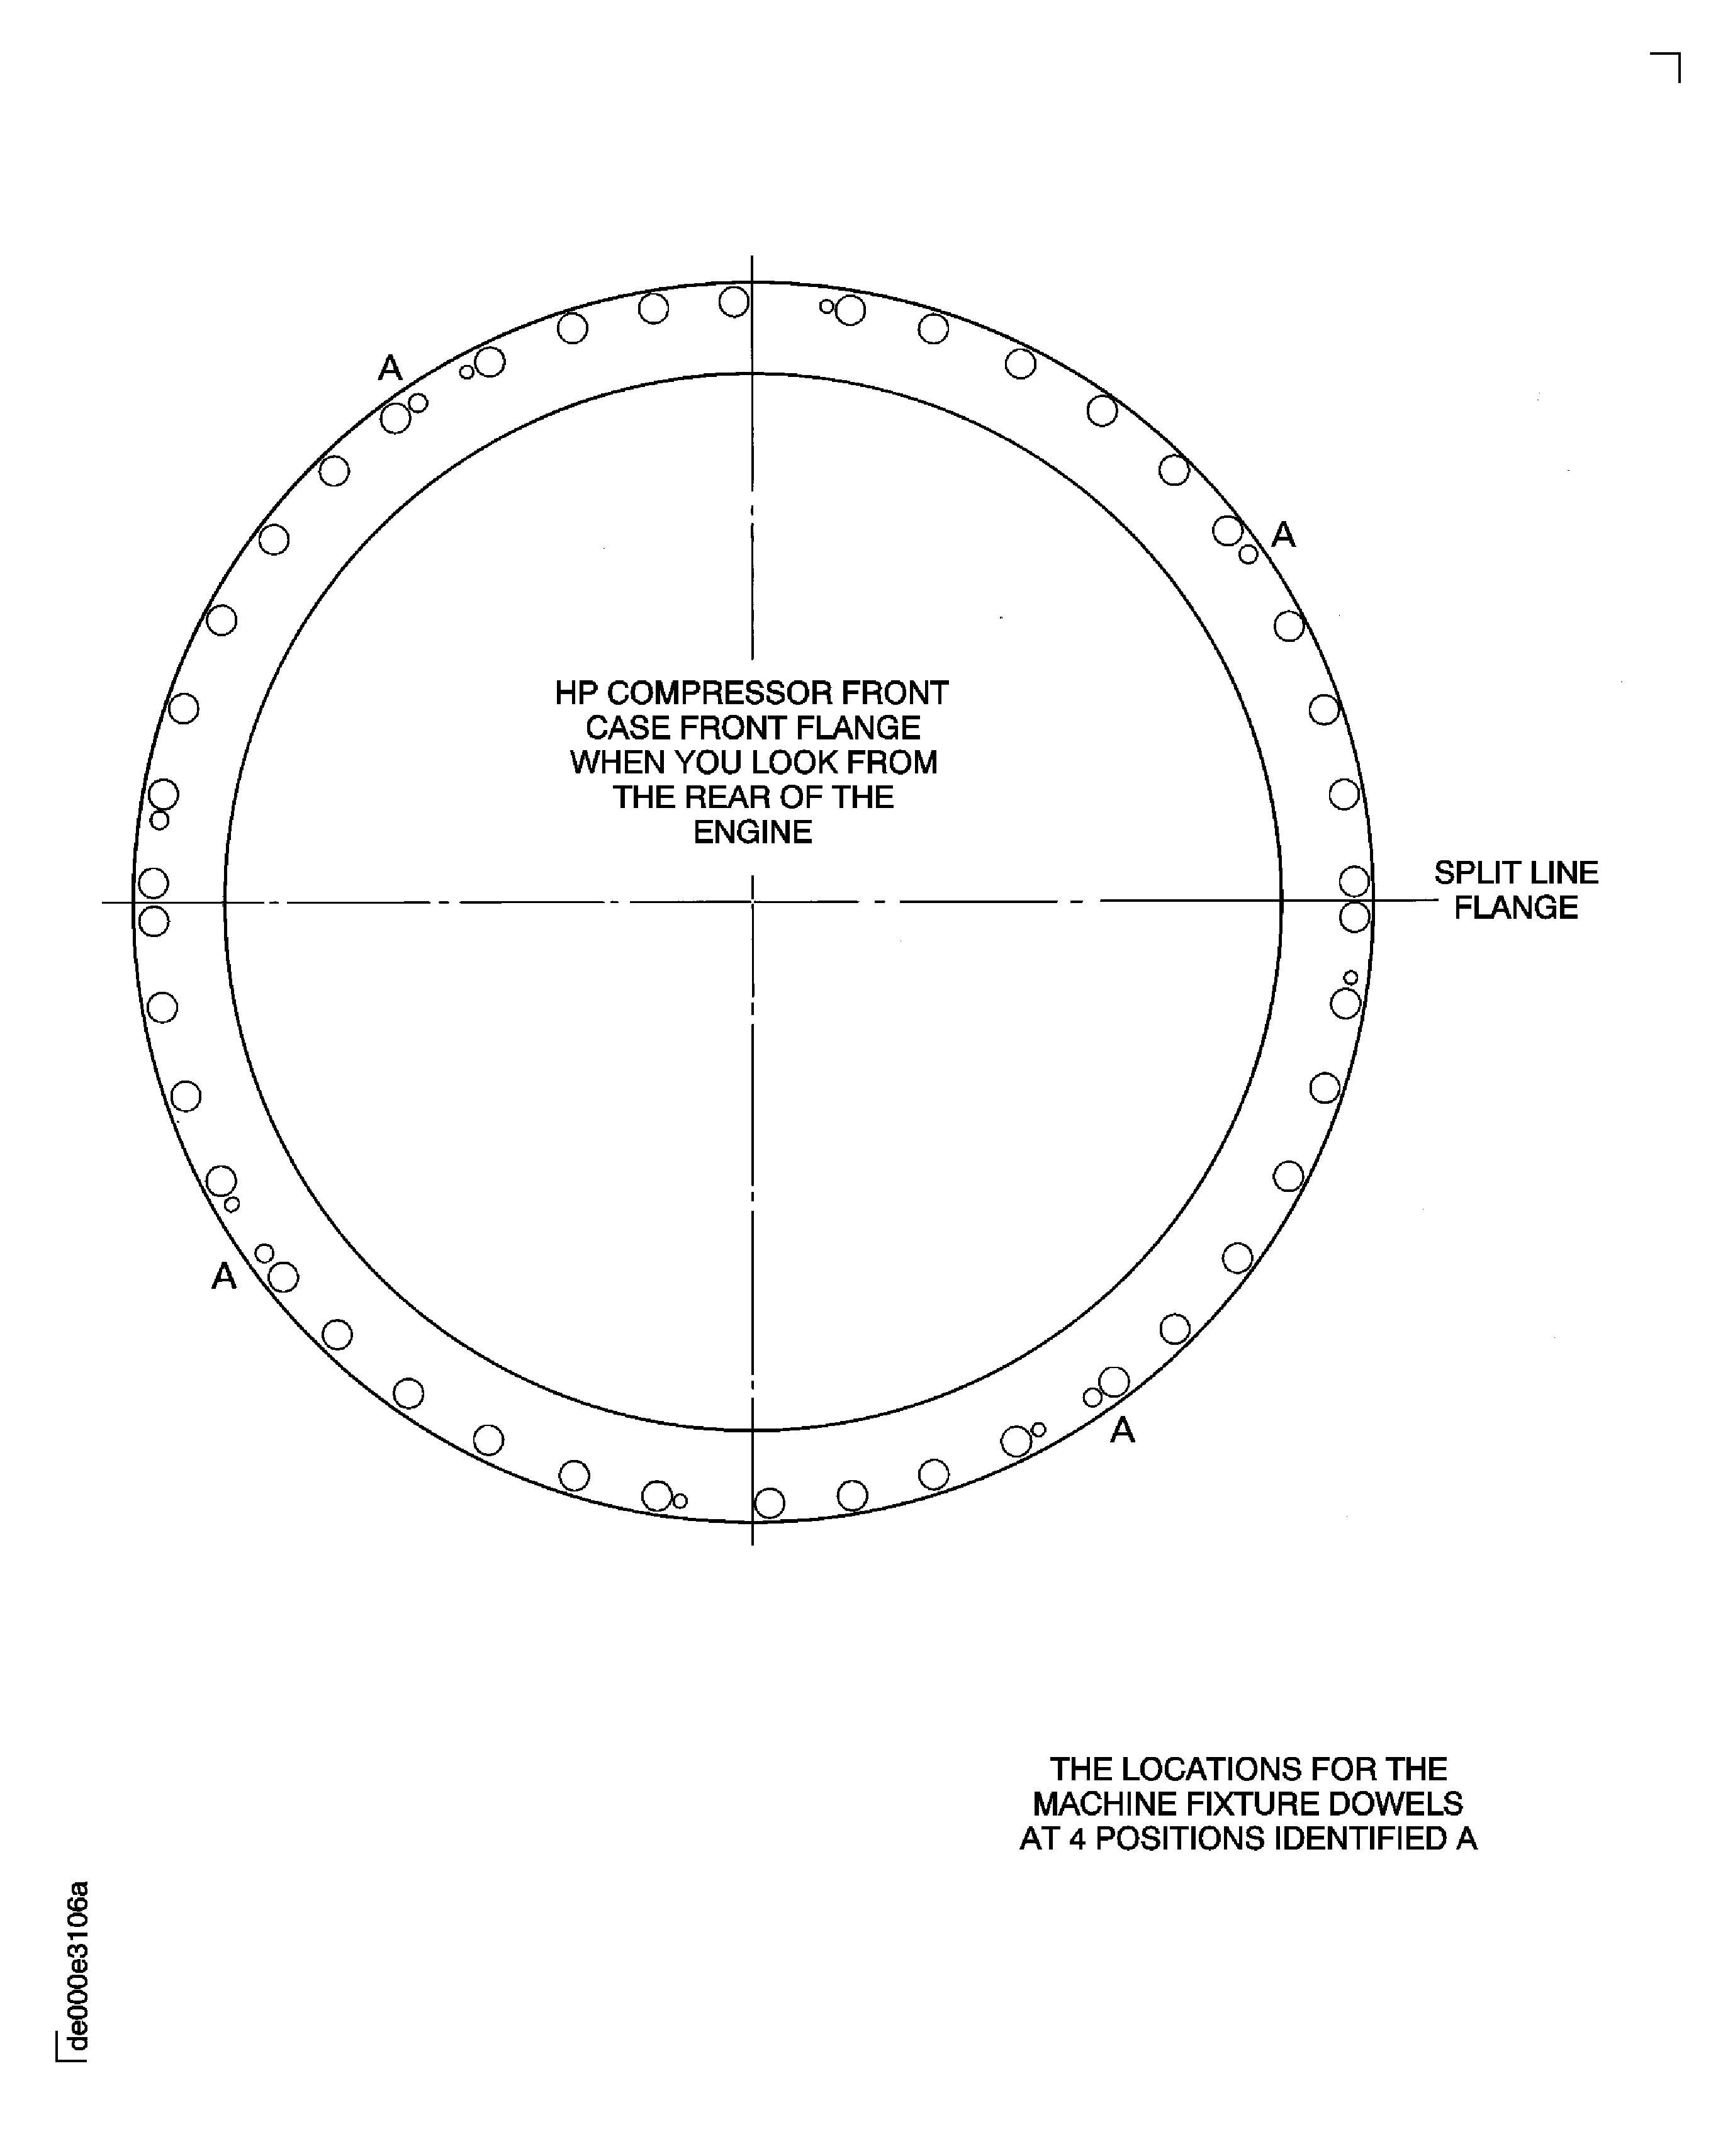
Figure: Pre SBE 72-0027: Dimensions to machine the stage 3, 4, 5 and 6 rotor path rings
Sheet 1
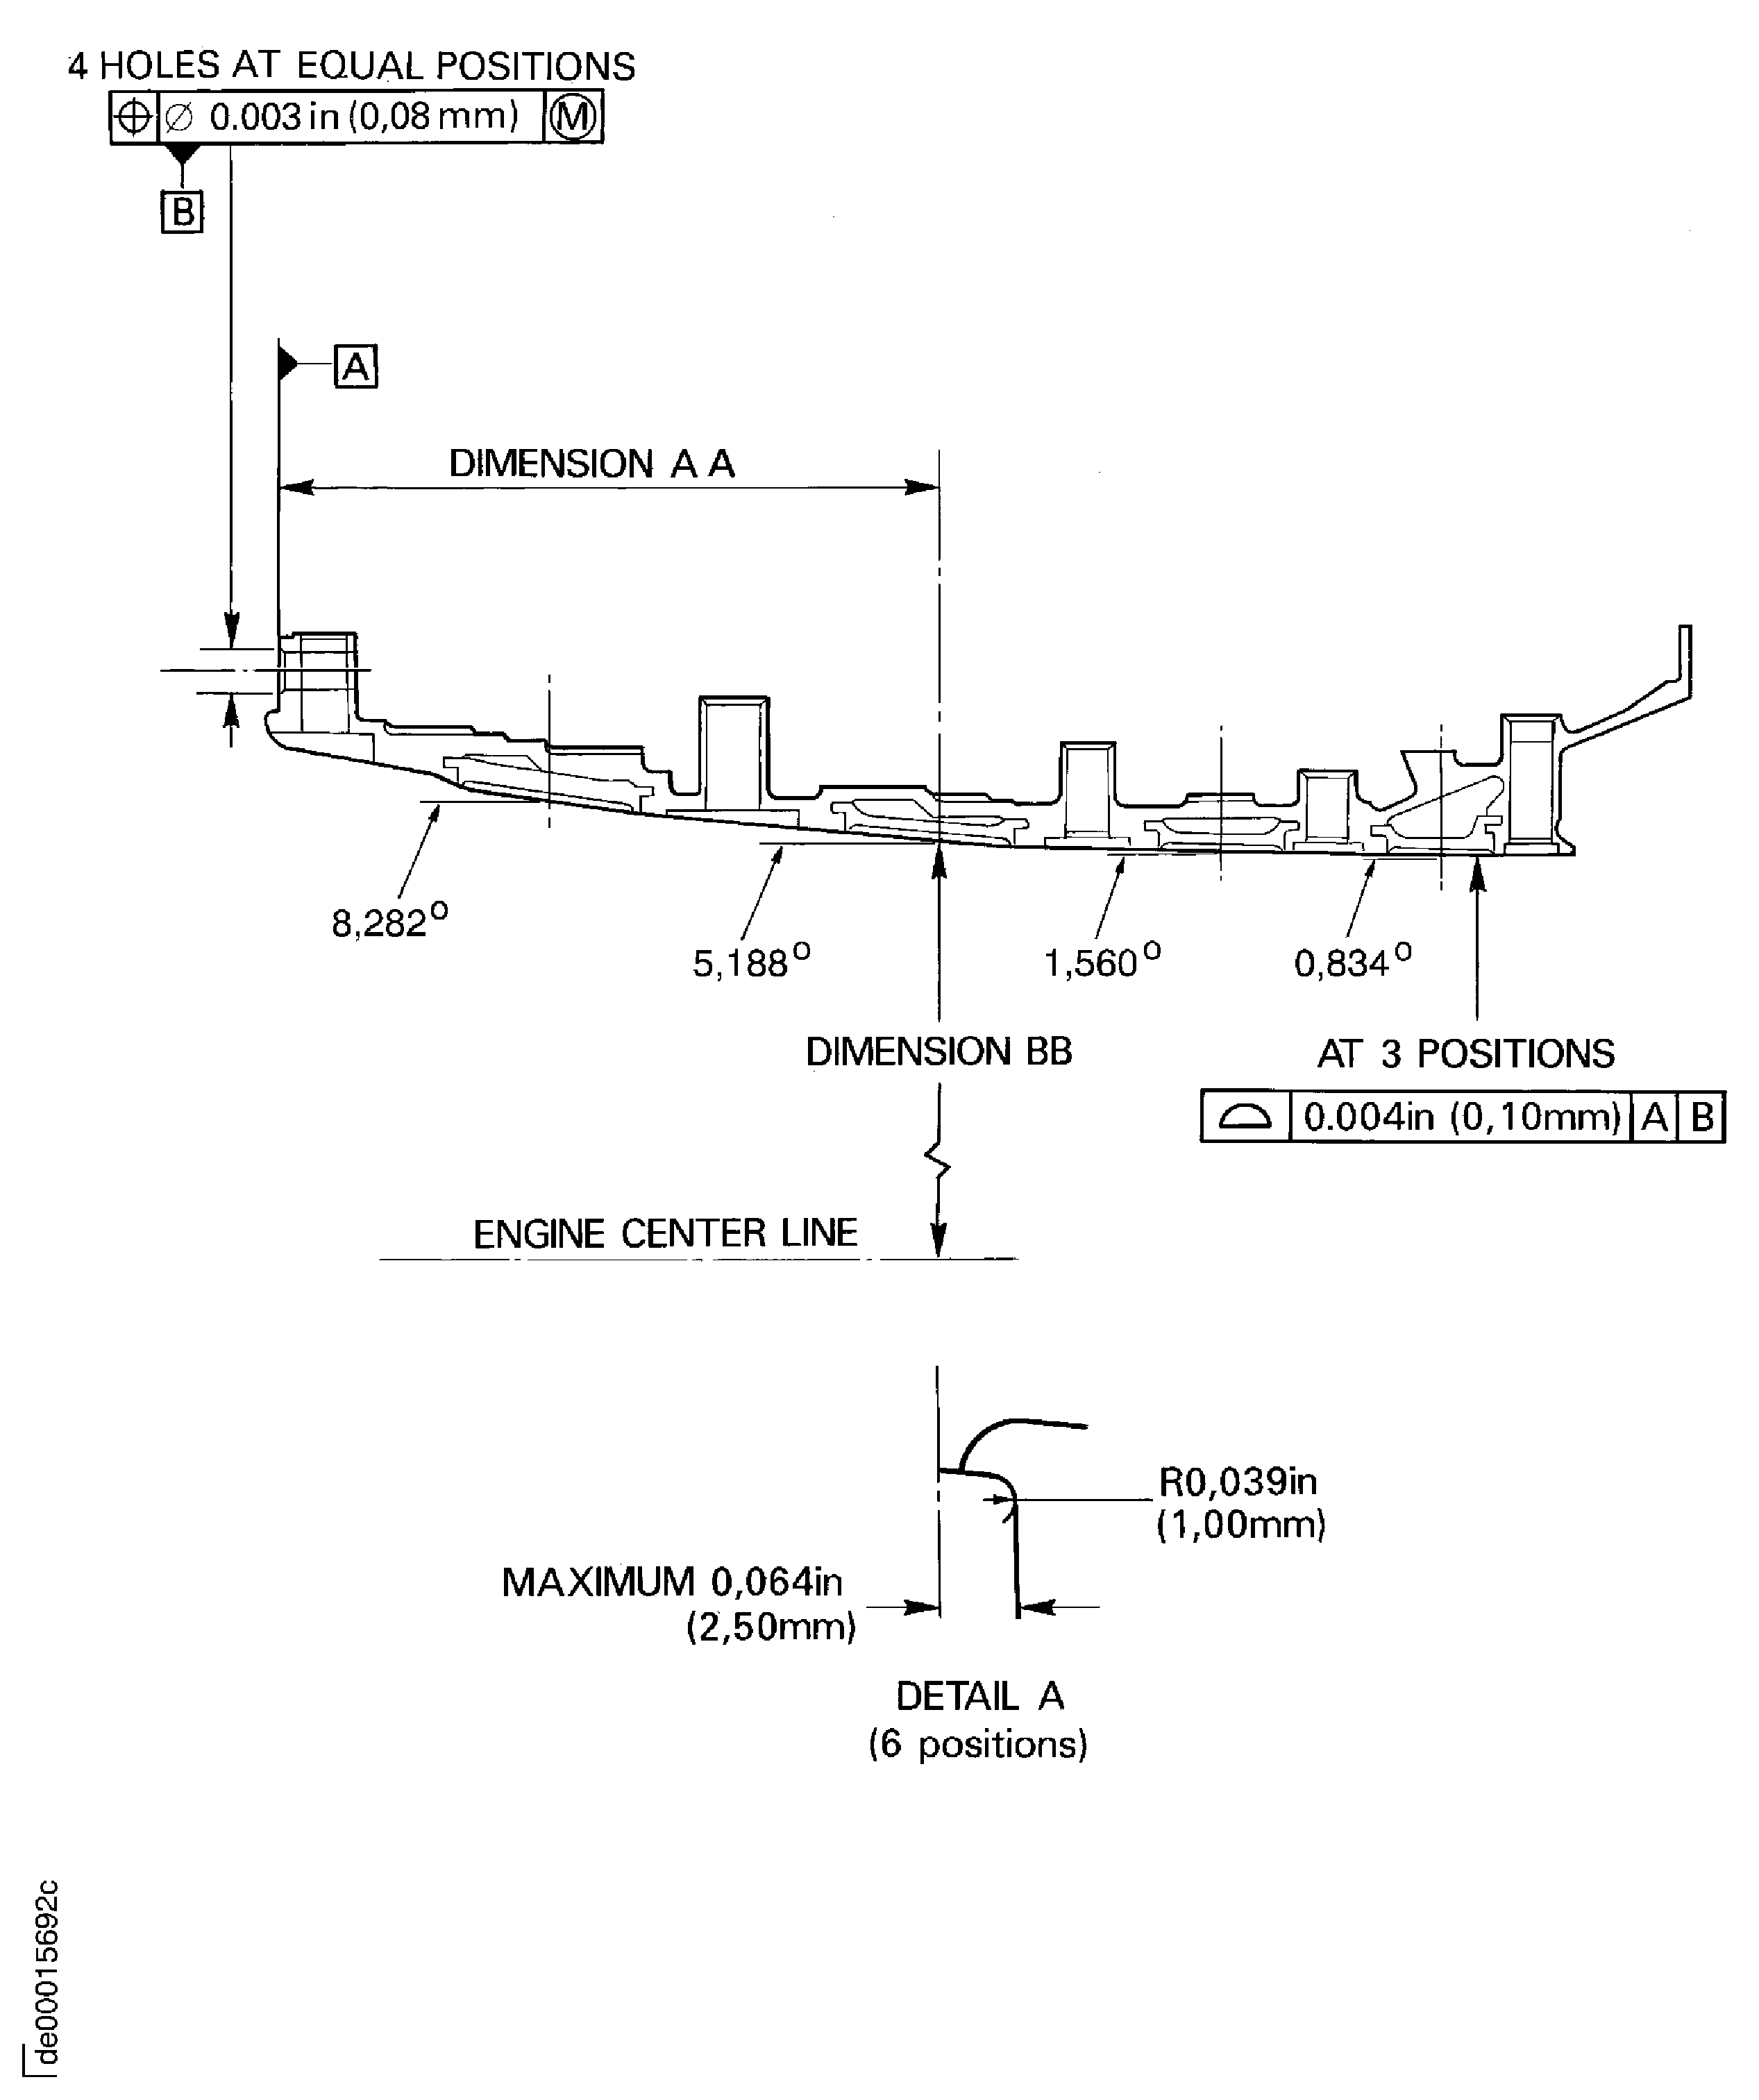
Figure: Pre SBE 72-0027: Dimensions to machine the stage 3, 4, 5 and 6 rotor path rings
Sheet 2
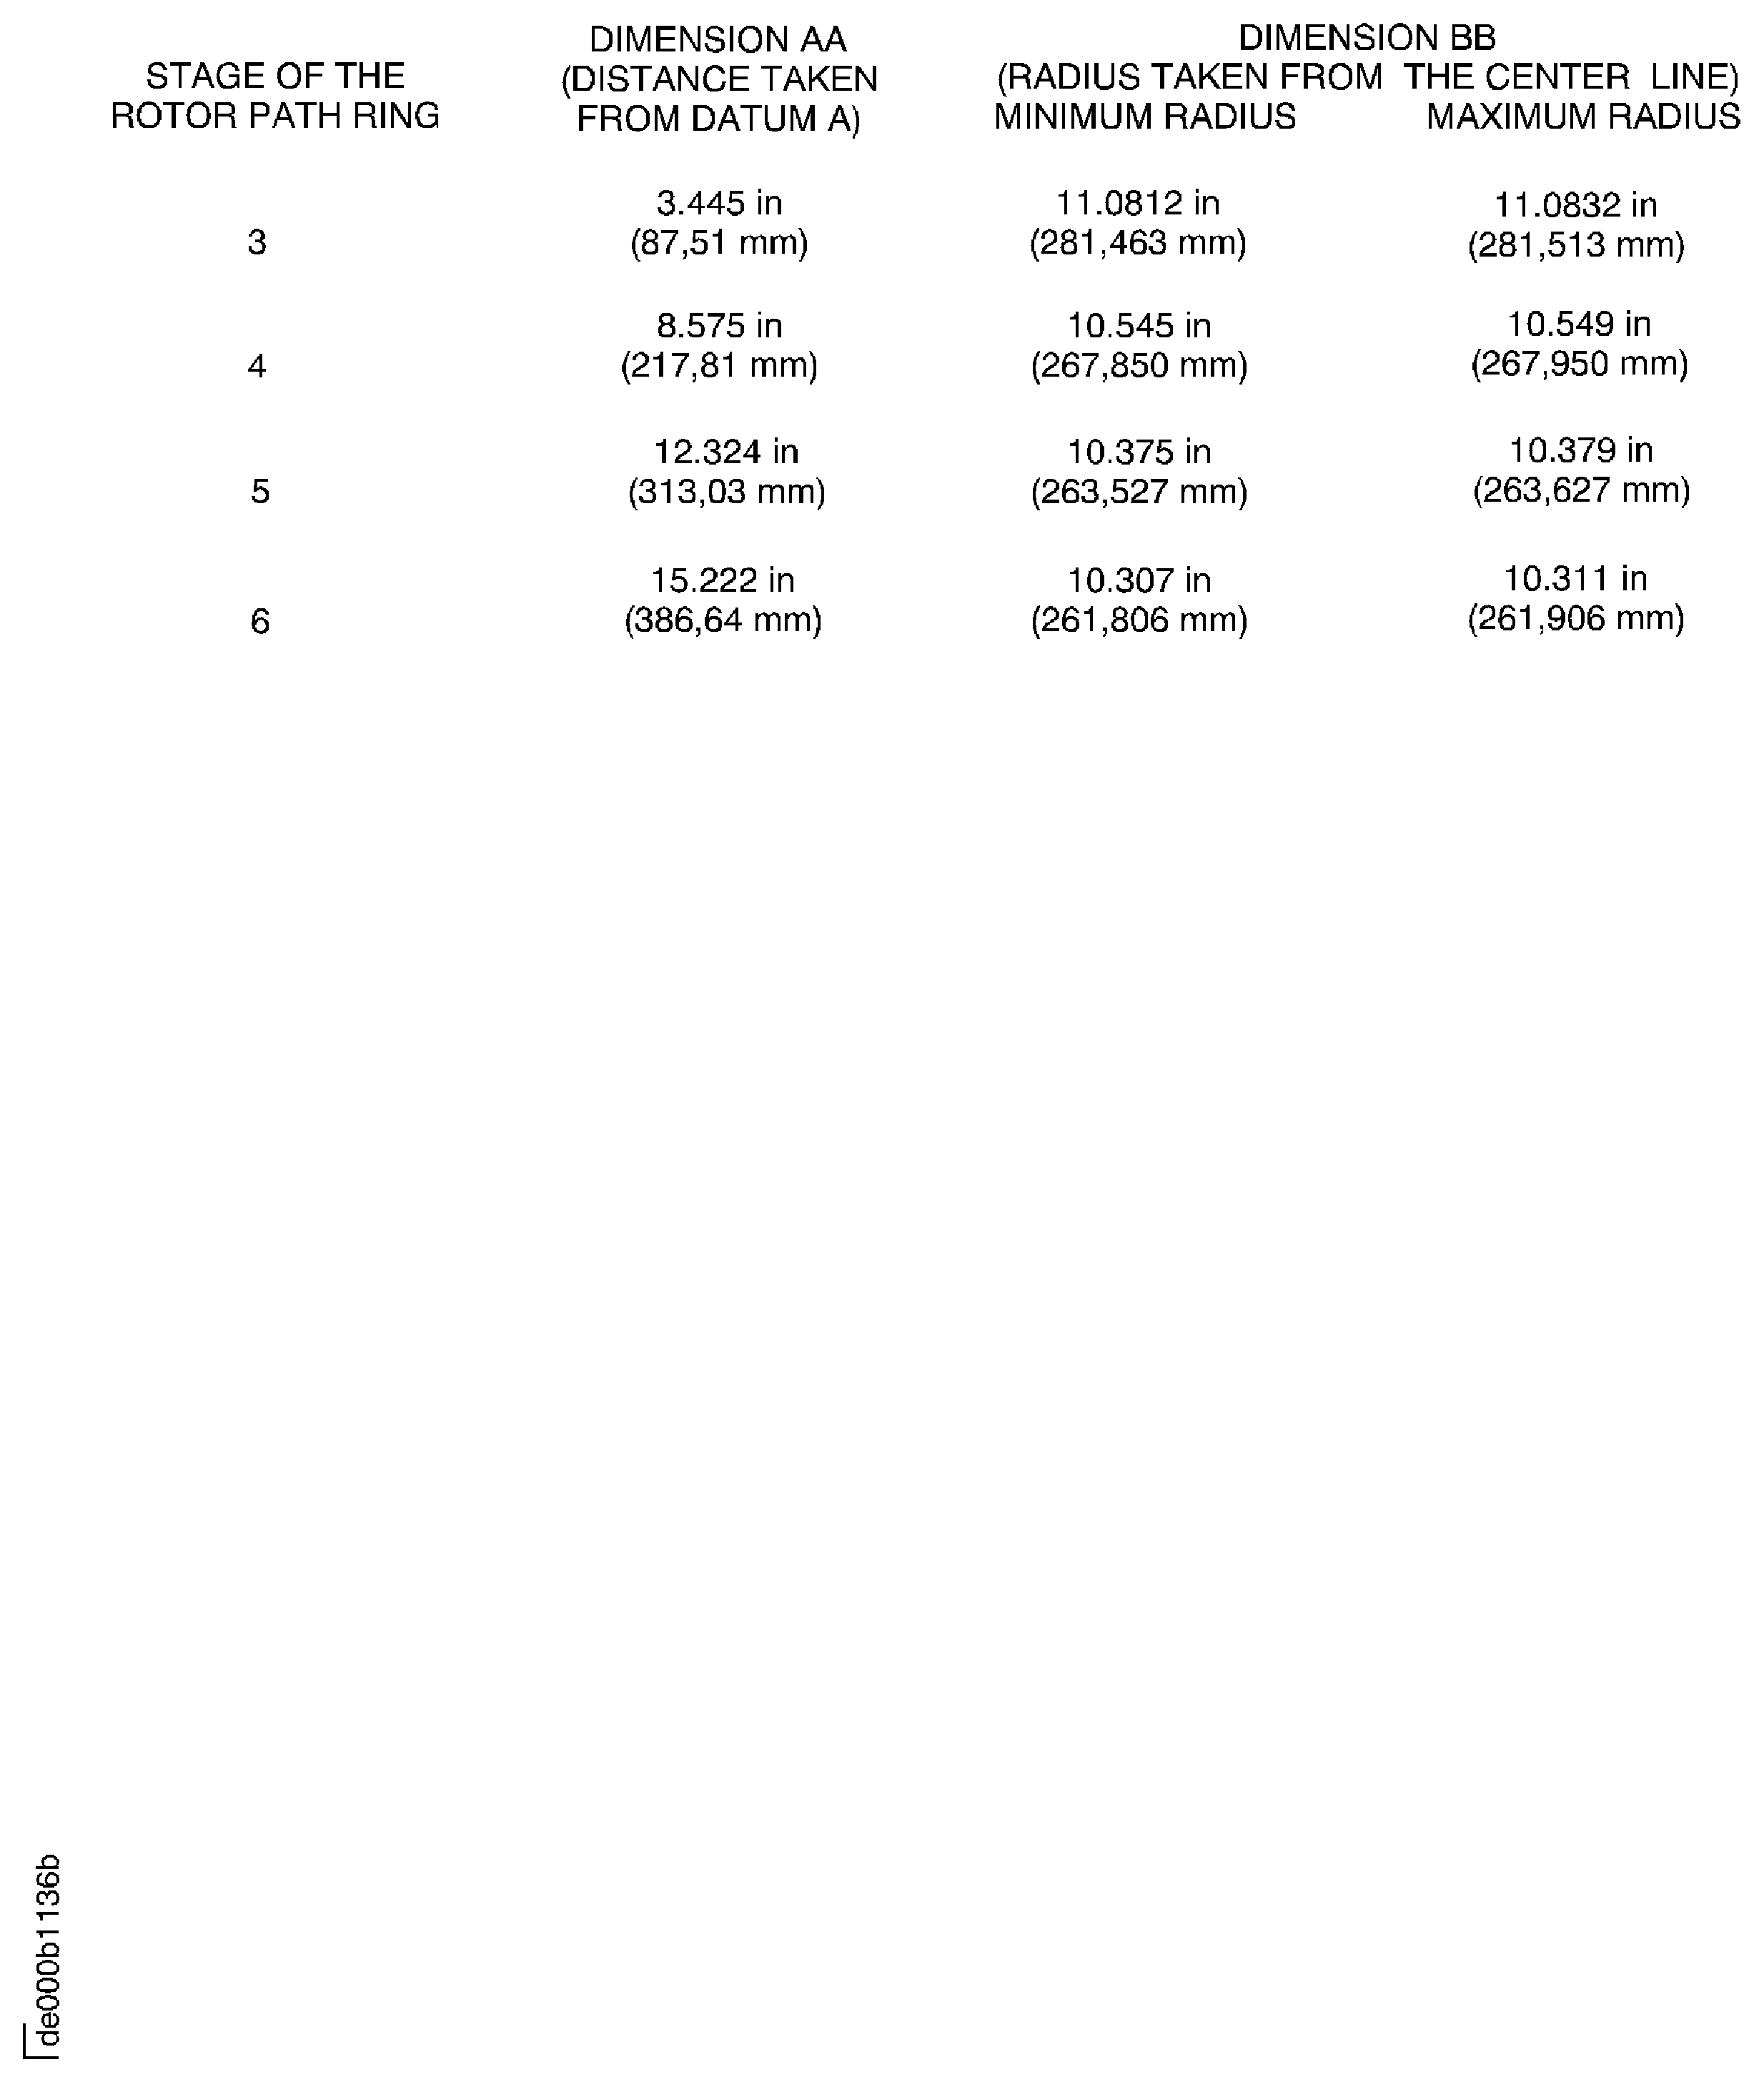
Figure: SBE 72-0027: Dimensions to machine the stage 3, 4, 5 and 6 rotor path linings
Sheet 3
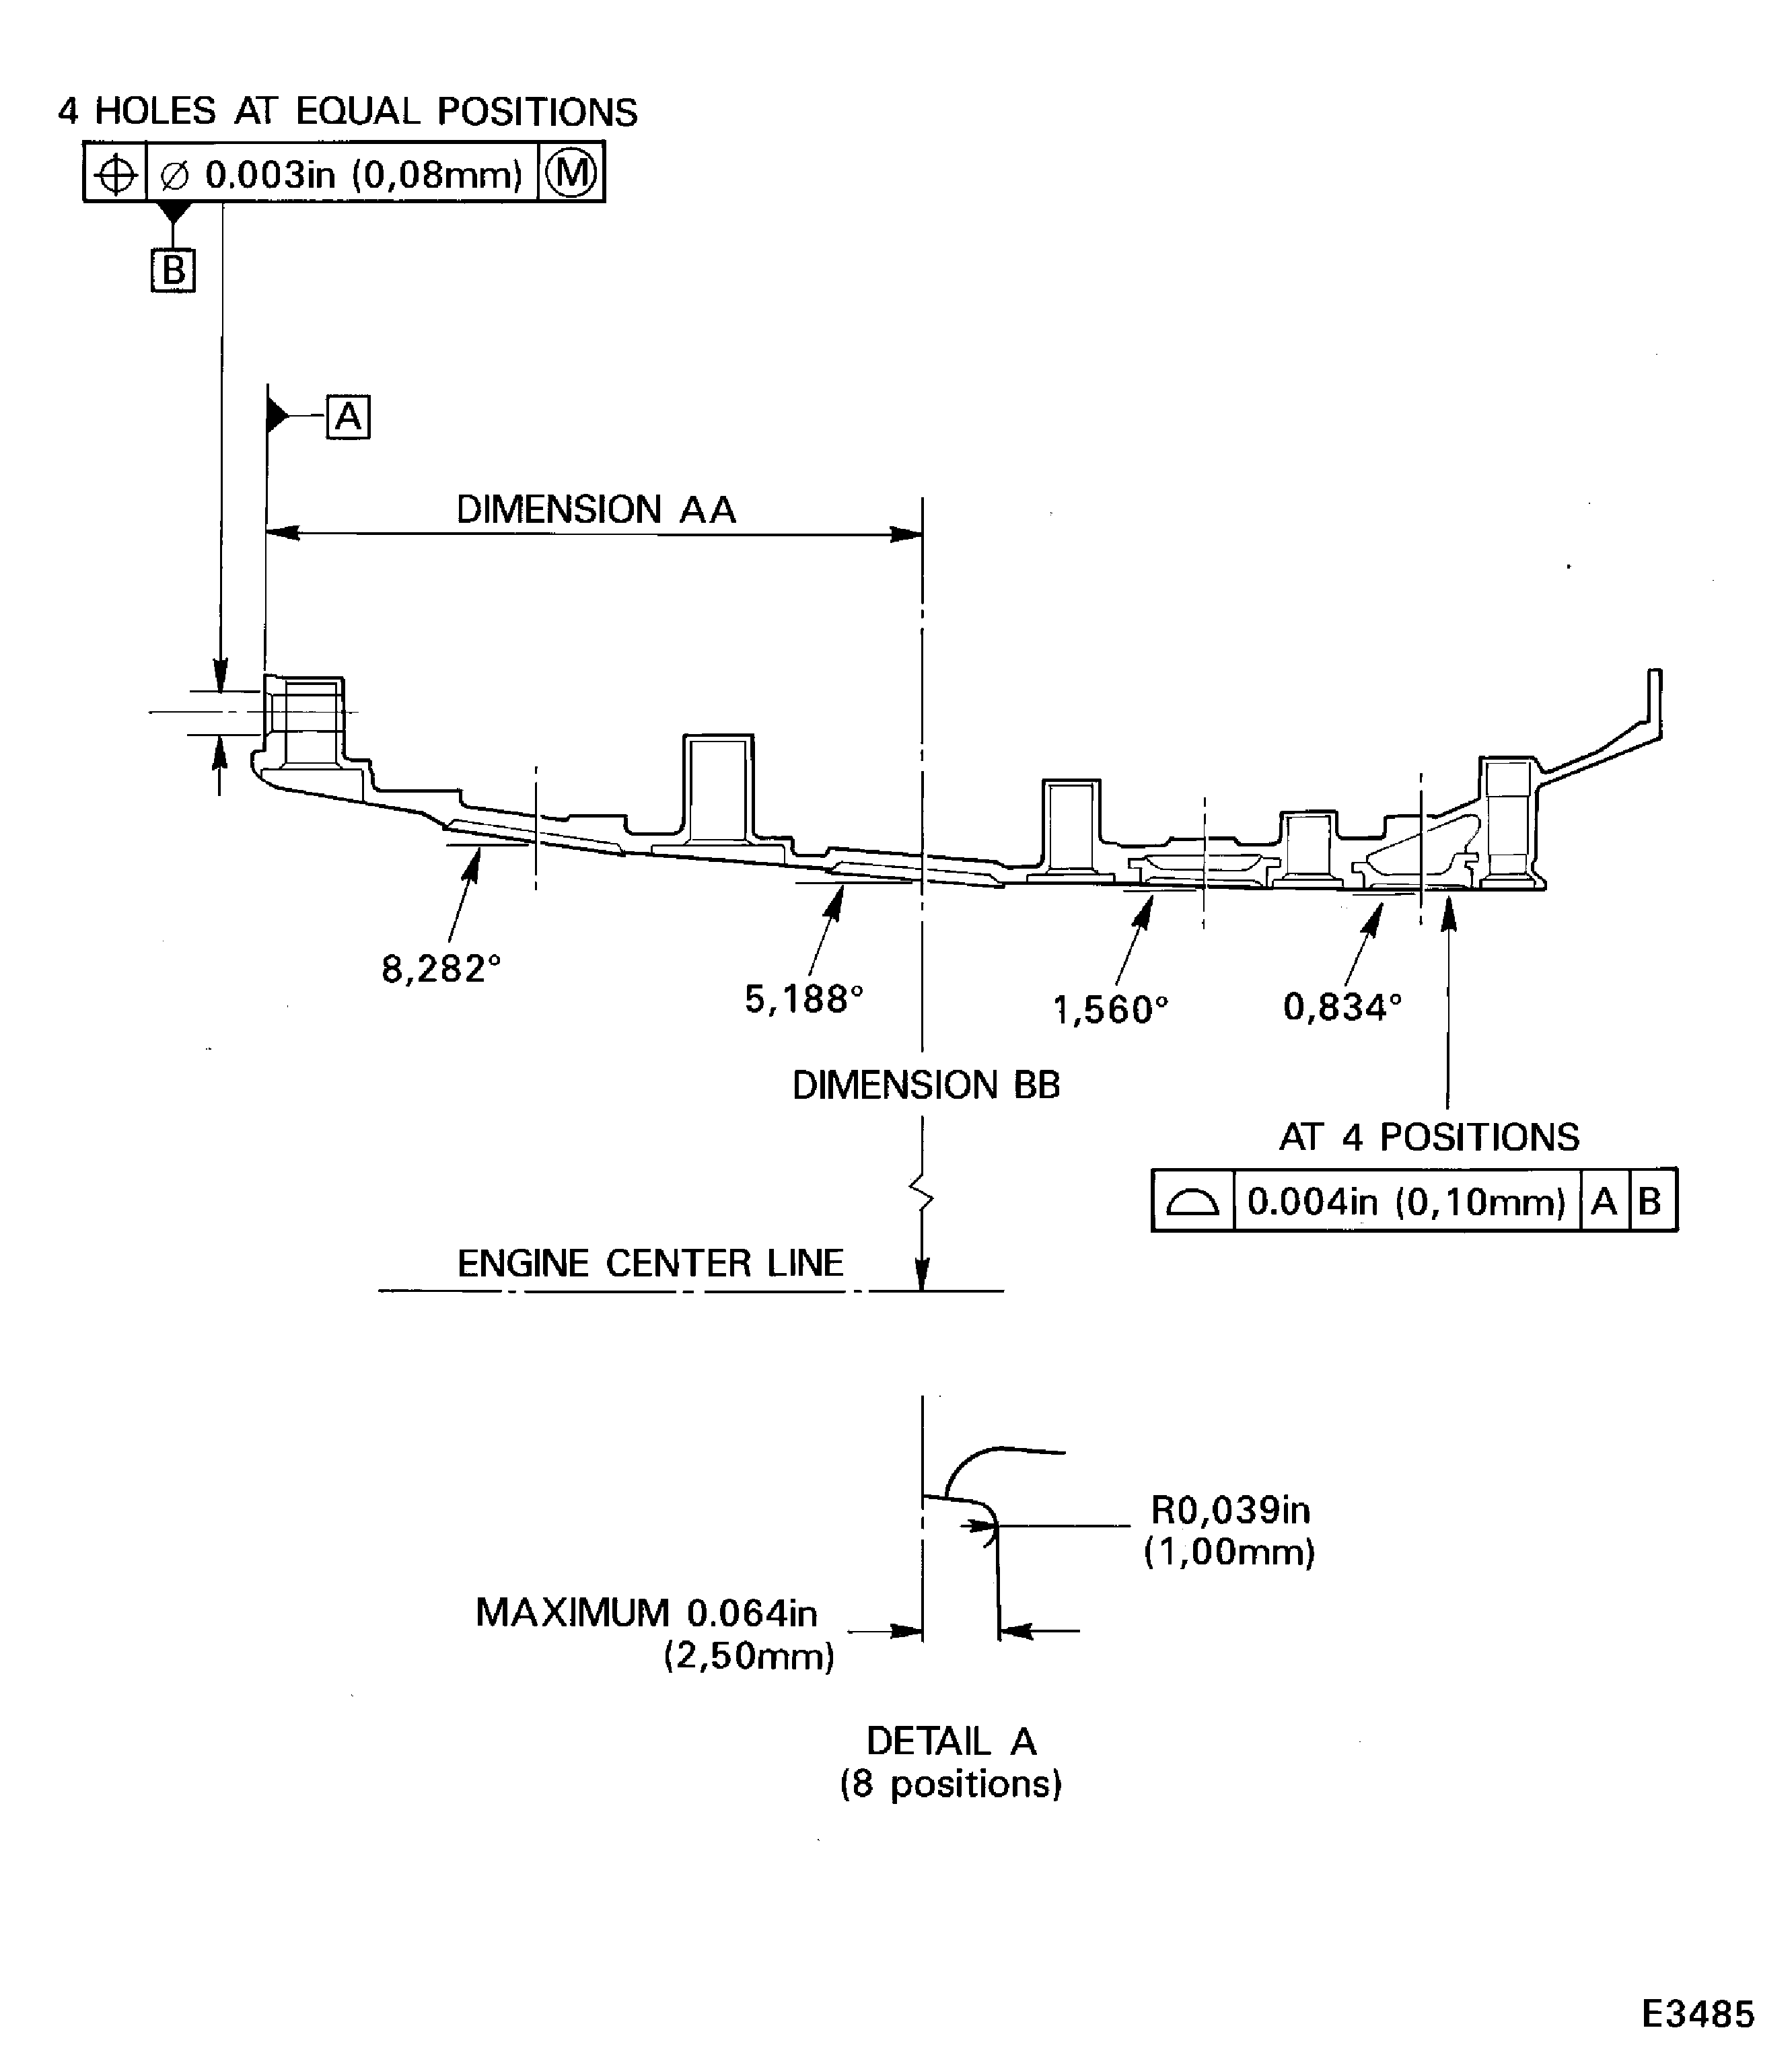
Figure: SBE 72-0027: Dimensions to machine the stage 3, 4, 5 and 6 rotor path linings
Sheet 4
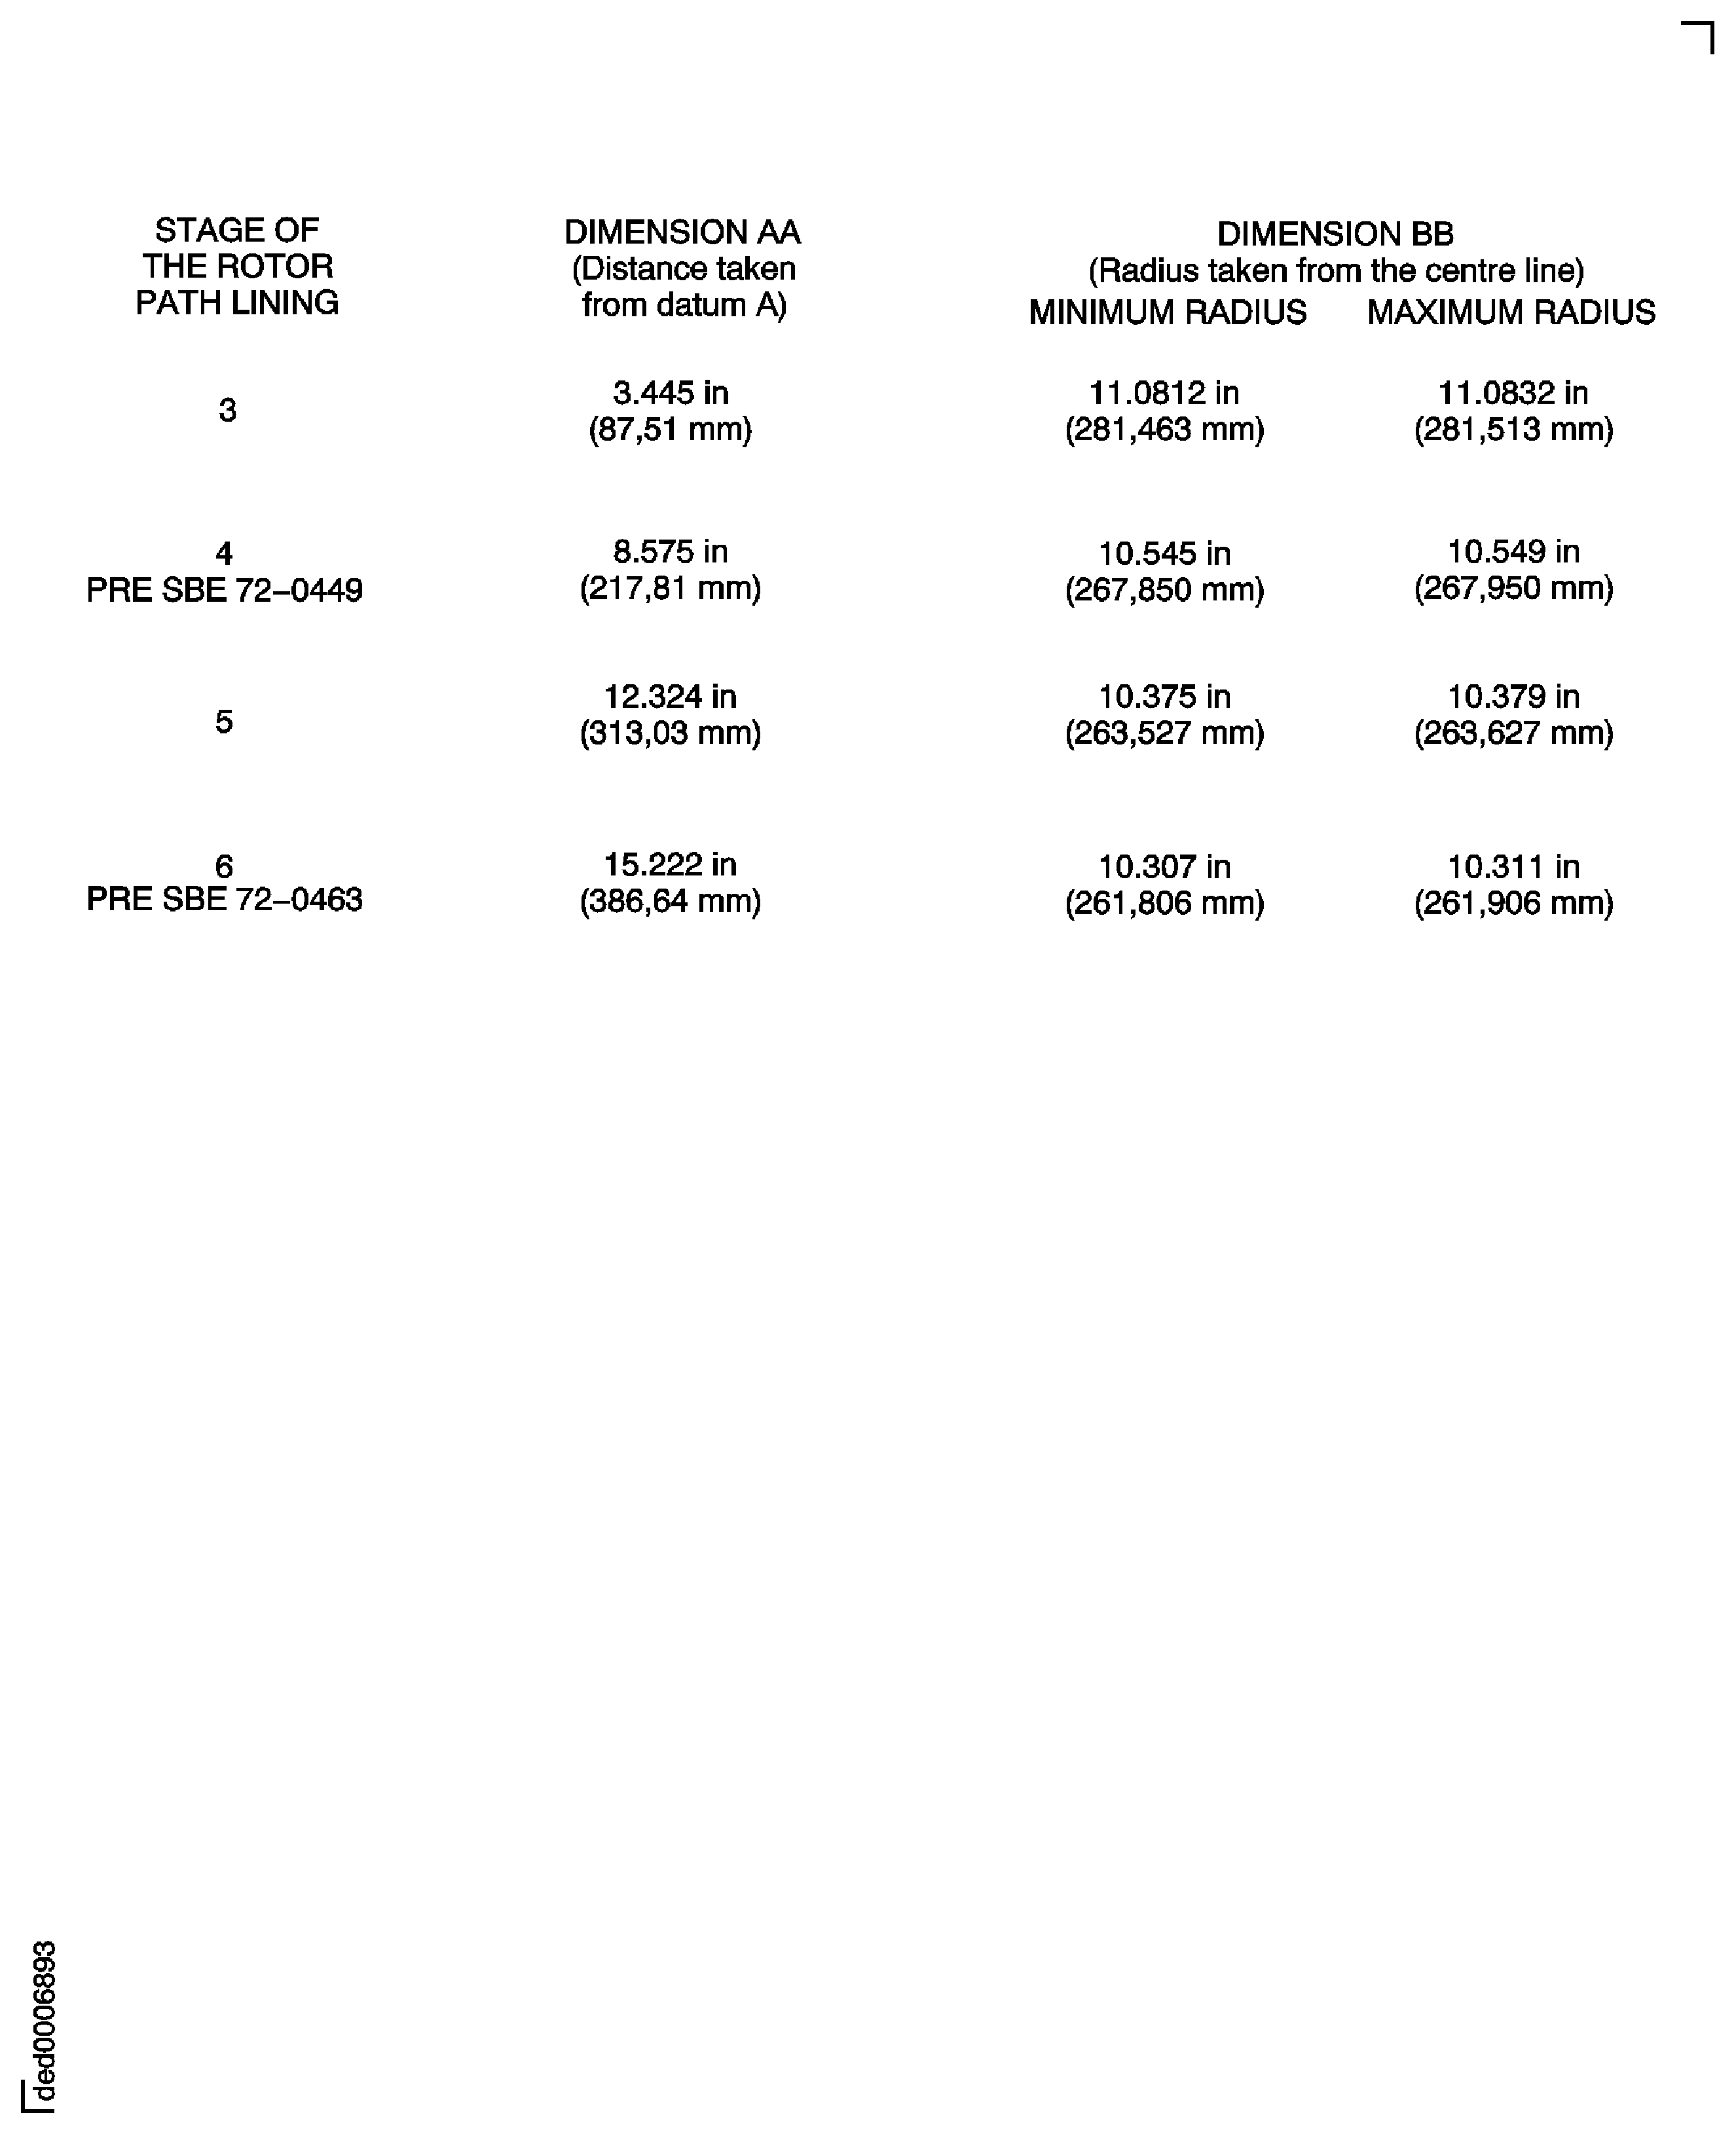
Figure: SBE 72-0449 and SBE 72-0463: Dimensions to machine the stage 3, 4, 5 and 6 rotor path linings
Sheet 5
