Export Control
EAR Export Classification: Not subject to the EAR per 15 C.F.R. Chapter 1, Part 734.3(b)(3), except for the following Service Bulletins which are currently published as EAR Export Classification 9E991: SBE70-0992, SBE72-0483, SBE72-0580, SBE72-0588, SBE72-0640, SBE73-0209, SBE80-0024 and SBE80-0025.Copyright
© IAE International Aero Engines AG (2001, 2014 - 2021) The information contained in this document is the property of © IAE International Aero Engines AG and may not be copied or used for any purpose other than that for which it is supplied without the express written authority of © IAE International Aero Engines AG. (This does not preclude use by engine and aircraft operators for normal instructional, maintenance or overhaul purposes.).Applicability
V2500-A1
Common Information
TASK 72-41-30-440-009-A00 HPC Front Case And Vane Assembly - Measure The HPC Front Cases, Assembly-009
General
For all parts identified in a different Chapter/Section/Subject, the applicable Chapter/Section/Subject comes before the Fig/item number.
For standard torque data and procedures, refer to the SPM TASK 70-41-00-400-501, SPM TASK 70-41-01-400-501 and SPM TASK 70-41-02-410-501.
Special torque data and assembly tolerances are included in the procedure.
Lubricate all threads and touch faces of nuts and bolts with CoMat 10-077 APPROVED ENGINE OILS, unless other lubricants are referred to in the procedure.
To identify, lubricate and install seal rings, refer to the SPM TASK 70-44-01-400-501.
After assembly apply CoMat 07-038 AIR DRYING ENAMEL to any damaged surface protection, joint flanges and parts used to attach. Use the correct color of the air drying enamel. Refer to the SPM TASK 70-63-02-380-501.
The number for each radial location must be identified in a clockwise direction. These start at the engine top position when you look from the rear of the engine, unless stated differently in the procedure.
Pre SBE 72-0027: Refer to Figure for a sectional view of the HP Compressor front case.
SBE 72-0027: Refer to Figure for a sectional view of the HP Compressor front case.
The Fit and Clearances, NEW PART DIMENSIONS and REJECT IF MORE THAN columns will be used by most operators. This permits the full use of the maximum wear allowance and a reduction in the number of parts which are rejected, is possible.
As long as REJECT IF MORE THAN columns do not include reject values, NEW PART DIMENSIONS do not have to be measured before assembly, as there are no reject-if criteria. Values are only valid for new parts, not for worn parts.
The column WORN PART DIMENSIONS (Non-select) is included for operators who want to have full interchangeability. If this column is used an increase in the number of parts which are rejected is possible.
After the part has been in service for some time the REJECT IF MORE THAN and WORN PARTS DIMENSIONS could be changed. The operator must tell IAE and if agreed the manual will be changed.
The abbreviation Intf shows an interference or tight fit. This causes REJECT IF MORE THAN to become REJECT IF LESS THAN.
The abbreviation clear shows a clearance fit.
This TASK gives the procedure to measure the HP Compressor front cases. The subsequent TASKS give the procedure to assemble the HP Compressor front case.
Install the Stage 3 to 6 Rotor Path Rings Pre SBE 72-0027TASK 72-41-30-440-001-A00 (ASSEMBLY-001).
Install the Stage 5 and 6 Rotor Path Rings SBE 72-0027TASK 72-41-30-440-001-B00 (ASSEMBLY-001).
Measure and then Machine the Stage 6 VSV and the Stage 3 to 6 Rotor Path Linings TASK 72-41-30-440-002-A00 (ASSEMBLY-002).
Install the Inlet Guide Vanes TASK 72-41-30-440-003-A00 (ASSEMBLY-003).
Install the Stage 3 VSV TASK 72-41-30-440-004-A00 (ASSEMBLY-004).
Install the Stage 4 VSV TASK 72-41-30-440-005-A00 (ASSEMBLY-005).
Install the Stage 5 VSV TASK 72-41-30-440-006-A00 (ASSEMBLY-006).
Install the Stage 6 VSV TASK 72-41-30-440-007-A00 (ASSEMBLY-007).
Install the Inlet Guide Vane and the Stage 3 to 6 Connector Assemblies TASK 72-41-30-440-008-A00 (ASSEMBLY-008)
Disassemble the HP Compressor Front Cases TASK 72-41-30-440-010-A00 (ASSEMBLY-010).
Check and Set VSV System with Optimised Build and Setting Clearances - SBE 72-0402TASK 72-41-30-440-011-A00 (ASSEMBLY-011).
NOTE
NOTE
Preliminary Requirements
Pre-Conditions
NONESupport Equipment
| Name | Manufacturer | Part Number / Identification | Quantity | Remark |
|---|---|---|---|---|
| IAE 1R18031 Checking fixture | 0AM53 | IAE 1R18031 | 1 | |
| IAE 1R18032 Transducer carrier | 0AM53 | IAE 1R18032 | 1 | |
| IAE 1R18033 Gage mounting plate | 0AM53 | IAE 1R18033 | 1 | |
| IAE 1R18034 Roller anil | 0AM53 | IAE 1R18034 | 1 | |
| IAE 1R18035 Distance sleeve | 0AM53 | IAE 1R18035 | 1 | |
| IAE 1R18037 Distance sleeve | 0AM53 | IAE 1R18037 | 1 | |
| IAE 1R18040 Setting button | 0AM53 | IAE 1R18040 | 1 | |
| IAE 1R18042 Transducer carrier | 0AM53 | IAE 1R18042 | 1 | |
| IAE 1R18045 Distance sleeve | 0AM53 | IAE 1R18045 | 1 | |
| IAE 1R18518 Measuring sleeve | 0AM53 | IAE 1R18518 | 1 | |
| IAE 1R18519 Measuring sleeve | 0AM53 | IAE 1R18519 | 1 | |
| IAE 1R18531 Measuring sleeve | 0AM53 | IAE 1R18531 | 1 | |
| IAE 1R18533 Setting base | 0AM53 | IAE 1R18533 | 1 | |
| IAE 1R18535 Set-up drawing | 0AM53 | IAE 1R18535 | 1 | |
| IAE 1R18537 Setting plate | 0AM53 | IAE 1R18537 | 1 | |
| IAE 1R18722 Setting button | 0AM53 | IAE 1R18722 | 1 | |
| IAE 1R18573 Cylinder, hydraulic | 0AM53 | IAE 1R18573 |
Consumables, Materials and Expendables
| Name | Manufacturer | Part Number / Identification | Quantity | Remark |
|---|---|---|---|---|
| CoMat 07-038 AIR DRYING ENAMEL | k3504 | CoMat 07-038 | ||
| CoMat 10-077 APPROVED ENGINE OILS | LOCAL | CoMat 10-077 |
Spares
NONESafety Requirements
NONEProcedure
Refer to Figure.
Reference dimensions at location 1326. If required use the data written as a note in TASK 72-41-34-200-000.
Table 1. Fits and Clearances (all dimensions are in inches) NEW PART
WORN PART
DIMENSIONS
DIMENSIONS
PART IDENT
Size
Clearance
Non-select
REJECT IF
MORE THAN
LOCATION 1326
Stage 4 Ring ACTUATING MECHANISM HP COMPRESSOR VARIABLE VANES (72-41-34, 04-600)
Location For The Sleeve dowelACTUATING MECHANISM HP COMPRESSOR VARIABLE VANES (72-41-34, 04-366)
Stage 4 Ring Location Bore For Sleeve Dowel
0.3181
0.3195
0.002
Sleeve Dowel Outer Diameter
0.3155
0.004
0.3161
Table 2. Fits and Clearances (all dimensions are in millimeters) NEW PART
WORN PART
DIMENSIONS
DIMENSIONS
PART IDENT
Size
Clearance
Non-select
REJECT IF
MORE THAN
LOCATION 1326
Stage 4 Ring ACTUATING MECHANISM HP COMPRESSOR VARIABLE VANES (72-41-34, 04-600)
Location For The Sleeve dowelACTUATING MECHANISM HP COMPRESSOR VARIABLE VANES (72-41-34, 04-366)
Stage 4 Ring Location Bore For The Sleeve Dowel
8.080
8.116
0.050
Sleeve Dowel Outer Diameter
8.015
0.101
8.030
SUBTASK 72-41-30-220-125 Reference Fits and Clearances of the HP Compressor Front Cases and Vanes at Location 1326
Refer to Figure.
Reference dimensions at location 1327. If required use the data written as a note in TASK 72-41-34-200-000.
Table 3. Fits and Clearances (all dimensions are in inches) NEW PART
WORN PART
DIMENSIONS
DIMENSIONS
PART IDENT
Size
Clearance
Non-select
REJECT IF
MORE THAN
LOCATION 1327
Stage 4 Bracket ACTUATING MECHANISM HP COMPRESSOR VARIABLE VANES (72-41-34, 04-360)
Location For The Sleeve DowelACTUATING MECHANISM HP COMPRESSOR VARIABLE VANES (72-41-34,04-366)
Stage 4 Bracket Location Bore For The Sleeve Dowel
0.3181
0.3195
0.002
Sleeve Dowel Outer Diameter
0.3155
0.004
0.3161
Table 4. Fits and Clearances (all dimensions are in millimeters) NEW PART
WORN PART
DIMENSIONS
DIMENSIONS
PART IDENT
Size
Clearance
Non-select
REJECT IF
MORE THAN
LOCATION 1327
Stage 4 Bracket ACTUATING MECHANISM HP COMPRESSOR VARIABLE VANES (72-41-34, 04-360)
Location For The Sleeve DowelACTUATING MECHANISM HP COMPRESSOR VARIABLE VANES (72-41-34, 04-366)
Stage 4 Bracket Location Bore For The Sleeve Dowel
8.080
8.116
0.050
Sleeve Dowel Outer Diameter
8.015
0.101
8.030
SUBTASK 72-41-30-220-126 Reference Fits and Clearances of the HP Compressor Front Cases and Vanes at Location 1327
Refer to Figure.
Reference dimensions at location 1334. If required use the data written as a note in TASK 72-41-34-200-000.
Table 5. Fits and Clearances (all dimensions are in inches) NEW PART
WORN PART
DIMENSIONS
DIMENSIONS
PART IDENT
Size
Clearance
Non-select
REJECT IF
MORE THAN
LOCATION 1334
Stage 5 Bracket ACTUATING MECHANISM HP COMPRESSOR VARIABLE VANES (72-41-34, 05-360)
Location For The Sleeve DowelACTUATING MECHANISM HP COMPRESSOR VARIABLE VANES (72-41-34, 05-366)
Stage 5 Bracket Location Bore For The Sleeve Dowel
0.3181
0.3195
0.002
Sleeve Dowel Outer Diameter
0.3155
0.004
0.3161
Table 6. Fits and Clearances (all dimensions are in millimeters) NEW PART
WORN PART
DIMENSIONS
DIMENSIONS
PART IDENT
Size
Clearance
Non-select
REJECT IF
MORE THAN
LOCATION 1334
Stage 5 Bracket ACTUATING MECHANISM HP COMPRESSOR VARIABLE VANES (72-41-34, 05-360)
Location For The Sleeve dowelACTUATING MECHANISM HP COMPRESSOR VARIABLE VANES (72-41-34, 05-366)
8.080
Stage 5 Bracket Location Bore For The Sleeve Dowel
8.116
0.050
Sleeve Dowel Outer Diameter
8.015
0.101
8.030
SUBTASK 72-41-30-220-127 Reference Fits and Clearances of the HP Compressor Front Cases and Vanes at Location 1334
Refer to Figure.
Reference dimensions at location 1335. If required use the data written as a note in TASK 72-41-34-200-000.
Table 7. Fits and Clearances (all dimensions are in inches) NEW PART
WORN PART
DIMENSIONS
DIMENSIONS
PART IDENT
Size
Clearance
Non-select
REJECT IF
MORE THAN
LOCATION 1335
Stage 5 Ring ACTUATING MECHANISM HP COMPRESSOR VARIABLE VANES (72-41-34, 05-600)
Location For The Sleeve DowelACTUATING MECHANISM HP COMPRESSOR VARIABLE VANES (72-41-34, 05-366)
0.3181
Stage 5 Ring Location Bore For Sleeve Dowel
0.3195
0.002
Sleeve Dowel Outer Diameter
0.3155
0.004
0.3161
Table 8. Fits and Clearances (all dimensions are in millimeters) NEW PART
WORN PART
DIMENSIONS
DIMENSIONS
PART IDENT
Size
Clearance
Non-select
REJECT IF
MORE THAN
LOCATION 1335
Stage 5 Ring ACTUATING MECHANISM HP COMPRESSOR VARIABLE VANES (72-41-34, 05-600)
Location for the sleeve dowelACTUATING MECHANISM HP COMPRESSOR VARIABLE VANES (72-41-34, 05-366)
8.080
Stage 5 Ring Location Bore For The Sleeve Dowel
8.116
0.050
Sleeve Dowel Outer Diameter
8.015
0.101
8.030
SUBTASK 72-41-30-220-128 Reference Fits and Clearances of the HP Compressor Front Cases and Vanes at Location 1335
Refer to Figure.
Reference dimensions at location 1342. If required use the data written as a note in TASK 72-41-34-200-000.
Table 9. Fits and Clearances (all dimensions are in inches) NEW PART
WORN PART
DIMENSIONS
DIMENSIONS
PART IDENT
Size
Clearance
Non-select
REJECT IF
MORE THAN
LOCATION 1342
Stage 6 Ring ACTUATING MECHANISM HP COMPRESSOR VARIABLE VANES (72-41-34, 06-600)
Location For The Sleeve dowelACTUATING MECHANISM HP COMPRESSOR VARIABLE VANES (72-41-34, 06-366)
0.2984
Stage 6 Ring Location Bore For The Sleeve Dowel
0.2998
0.002
Sleeve Dowel Outer Diameter
0.2958
0.004
0.2964
Table 10. Fits and Clearances (all dimensions are in millimeters) NEW PART
WORN PART
DIMENSIONS
DIMENSIONS
PART IDENT
Size
Clearance
Non-select
REJECT IF
MORE THAN
LOCATION 1342
Stage 6 Ring ACTUATING MECHANISM HP COMPRESSOR VARIABLE VANES (72-41-34, 06-600)
Location For The Sleeve DowelACTUATING MECHANISM HP COMPRESSOR VARIABLE VANES (72-41-34, 06-366)
7.580
Stage 6 Ring Location Bore For The Sleeve Dowel
7.616
0.050
Sleeve Dowel Outer Diameter
7.515
0.101
7.530
SUBTASK 72-41-30-220-129 Reference Fits and Clearances of the HP Compressor Front Cases and Vanes at Location 1342
Refer to Figure.
Reference dimensions at location 1343. If required use the data written as a note in TASK 72-41-34-200-000.
Table 11. Fits and Clearances (all dimensions are in inches) NEW PART
WORN PART
DIMENSIONS
DIMENSIONS
PART IDENT
Size
Clearance
Non-select
REJECT IF
MORE THAN
LOCATION 1343
Stage 6 Bracket ACTUATING MECHANISM HP COMPRESSOR VARIABLE VANES (72-41-34,06-360)
Location For The Sleeve dowelACTUATING MECHANISM HP COMPRESSOR VARIABLE VANES (72-41-34, 06-366)
0.2984
Stage 6 Bracket Location Bore For The Sleeve Dowel
0.2998
0.002
Sleeve Dowel Outer Diameter
0.2958
0.004
0.2964
Table 12. Fits and Clearances (all dimensions are in millimeters) NEW PART
WORN PART
DIMENSIONS
DIMENSIONS
PART IDENT
Size
Clearance
Non-select
REJECT IF
MORE THAN
LOCATION 1343
Stage 6 Bracket ACTUATING MECHANISM HP COMPRESSOR VARIABLE VANES (72-41-34, 06-360)
Location For The Sleeve DowelACTUATING MECHANISM HP COMPRESSOR VARIABLE VANES (72-41-34, 06-366)
7.580
Stage 6 Bracket Location Bore For The Sleeve Dowel
7.616
0.050
Sleeve Dowel Outer Diameter
7.515
0.101
7.530
SUBTASK 72-41-30-220-130 Reference Fits and Clearances of the HP Compressor Front Cases and Vanes at Location 1343
Refer to Figure.
Put the stage 4 control rod connector in to position on the stage 4 lower actuating ring ACTUATING MECHANISM HP COMPRESSOR VARIABLE VANES (72-41-34, 04-540).
Install the two sleeve dowels ACTUATING MECHANISM HP COMPRESSOR VARIABLE VANES (72-41-34, 04-366) and the two bolts ACTUATING MECHANISM HP COMPRESSOR VARIABLE VANES (72-41-34, 04-362) to attach the stage 4 control rod connector to the stage 4 lower actuating ring.
Install the stage 4 control rod connector ACTUATING MECHANISM HP COMPRESSOR VARIABLE VANES (72-41-34, 04-360).
Put the stage 5 control rod connector in to position on the stage 5 lower actuating ring ACTUATING MECHANISM HP COMPRESSOR VARIABLE VANES (72-41-34, 05-540).
Install the two sleeve dowels ACTUATING MECHANISM HP COMPRESSOR VARIABLE VANES (72-41-34, 05-366) and the two bolts ACTUATING MECHANISM HP COMPRESSOR VARIABLE VANES (72-41-34,05-362) to attach the stage 5 control rod connector to the stage 5 lower actuating ring.
Install the stage 5 control rod connector ACTUATING MECHANISM HP COMPRESSOR VARIABLE VANES (72-41-34, 05-360).
Put the stage 6 control rod connector in to position on the stage 6 lower actuating ring ACTUATING MECHANISM HP COMPRESSOR VARIABLE VANES (72-41-34, 06-540).
Install the two sleeve dowels ACTUATING MECHANISM HP COMPRESSOR VARIABLE VANES (72-41-34, 06-366) and the two bolts ACTUATING MECHANISM HP COMPRESSOR VARIABLE VANES (72-41-34, 06-362) to attach the stage 6 control rod connector to the stage 6 lower actuating ring.
Install the stage 6 control rod connector ACTUATING MECHANISM HP COMPRESSOR VARIABLE VANES (72-41-34, 06-360).
SUBTASK 72-41-30-440-106 Install the Stage 4, 5 and 6 Actuating Control Rod Connectors
Refer to Figure.
NOTE
Optional procedure to measure the HP Compressor forward case rotor path linings is to use a 3 axis measurement machine.Install the HP Compressor front case on IAE 1R18031 Checking fixture 1 off as given in TASK 72-41-30-440-001-A00.
SUBTASK 72-41-30-440-108 Install the HP Compressor Front Case on to the Checking Fixture
Refer to Figure.
Install IAE 1R18034 Roller anil 1 off in to the transducer, part of IAE 1R18032 Transducer carrier 1 off.
Install the transducer carrier in IAE 1R18033 Gage mounting plate 1 off.
Install IAE 1R18573 Cylinder, hydraulic 1 off in to its location in IAE 1R18533 Setting base 1 off.
Install IAE 1R18722 Setting button 1 off through the stage 3 hole in the setting plate and in to the setting button slot in the setting base.
SUBTASK 72-41-30-440-109 Assemble the Tools to Measure the Rotor Path Lining Radii

CAUTION
MAKE SURE THE TOOL FACES THAT TOUCH ARE CLEAN AND ARE NOT DAMAGED. DIRTY OR DAMAGED SURFACES CAN CAUSE INCORRECT INDICATIONS AND CAN DAMAGE TOOL FACES.Install IAE 1R18035 Distance sleeve 1 off on to the pillar of IAE 1R18031 Checking fixture 1 off. Refer to IAE 1R18535 Set-up drawing 1 off.
Remove IAE 1R18033 Gage mounting plate 1 off and IAE 1R18032 Transducer carrier 1 off from IAE 1R18533 Setting base 1 off.
Lock the transducer carrier in its initial position with the handknob released in Step.
Move the puller locked in Step to its initial position. This will release the transducer carrier in to its initial position.
NOTE
Oversize radii are shown on the measuring instrument by a minus value. Undersize radii are shown by a plus value.
Install the gage mounting plate and the transducer carrier on to the pillar of the checking fixture.
SUBTASK 72-41-30-220-131 Dimensionally Measure the Stage 3 Rotor Path Lining Radius

CAUTION
MAKE SURE THE TOOL FACES THAT TOUCH ARE CLEAN AND ARE NOT DAMAGED. DIRTY OR DAMAGED SURFACES CAN CAUSE INCORRECT INDICATIONS AND CAN DAMAGE TOOL FACES.Refer to Figure.
SBE 72-0449: Engine - HP Compressor - Introduction of HPC Stage 4 Rotor path trench with increased tip diameter
Remove IAE 1R18722 Setting button 1 off from the setting button location in IAE 1R18533 Setting base 1 off.
Turn IAE 1R18537 Setting plate 1 off and align the stage 4 hole with the setting button location in the setting base.
Install IAE 1R18033 Gage mounting plate 1 off and IAE 1R18032 Transducer carrier 1 off on to the pillar of the setting base.
SUBTASK 72-41-30-440-110 Set the Tools to Measure the Stage 4 Rotor Path Lining Radius (Pre SBE 72-0449 and SBE 72-0449)

CAUTION
MAKE SURE THE TOOL FACES THAT TOUCH ARE CLEAN AND ARE NOT DAMAGED. DIRTY OR DAMAGED SURFACES CAN CAUSE INCORRECT INDICATIONS AND CAN DAMAGE TOOL FACES.Install IAE 1R18518 Measuring sleeve 1 off on to the pillar of IAE 1R18031 Checking fixture 1 off.
Remove IAE 1R18033 Gage mounting plate 1 off and IAE 1R18032 Transducer carrier 1 off from the IAE 1R18533 Setting base 1 off.
Lock the transducer carrier in its initial position with the handknob released in Step.
Move the puller, locked in Step to its initial position. This will release the transducer carrier in to its initial position.
NOTE
Oversize radii are shown on the measuring instrument by a minus value. Undersize radii are shown by a plus value.
Install the gage mounting plate and the transducer carrier on to the pillar of the checking fixture.
SUBTASK 72-41-30-220-132 Dimensionally Measure the Stage 4 Rotor Path Lining Radius

CAUTION
MAKE SURE THE TOOL FACES THAT TOUCH ARE CLEAN AND ARE NOT DAMAGED. DIRTY OR DAMAGED SURFACES CAN CAUSE INCORRECT INDICATIONS AND CAN DAMAGE TOOL FACES.Refer to Figure.
Remove IAE 1R18722 Setting button 1 off from the setting button location in IAE 1R18533 Setting base 1 off.
Turn IAE 1R18573 Cylinder, hydraulic 1 off and align the stage 5 hole with the setting button location in the setting base.
Install IAE 1R18033 Gage mounting plate 1 off and IAE 1R18032 Transducer carrier 1 off on to the pillar of the setting base.
SUBTASK 72-41-30-440-111 Set the Tools to Measure the Stage 5 Rotor Path Lining Radius

CAUTION
MAKE SURE THE TOOL FACES THAT TOUCH ARE CLEAN AND ARE NOT DAMAGED. DIRTY OR DAMAGED SURFACES CAN CAUSE INCORRECT INDICATIONS AND CAN DAMAGE TOOL FACES.Install IAE 1R18037 Distance sleeve 1 off on to the pillar of IAE 1R18031 Checking fixture 1 off.
Remove IAE 1R18033 Gage mounting plate 1 off and IAE 1R18032 Transducer carrier 1 off from the IAE 1R18533 Setting base 1 off.
Lock the transducer carrier in its initial position with the handknob released in Step.
Move the puller, locked in Step to its initial position. This will release the transducer carrier in to its initial position.
NOTE
Oversize radii are shown on the measuring instrument by a minus value. Undersize radii are shown by a plus value.
Install the gage mounting plate and the transducer carrier on to the pillar of the checking fixture.
SUBTASK 72-41-30-220-133 Dimensionally Measure the Stage 5 Rotor Path Lining Radius

CAUTION
MAKE SURE THE TOOL FACES THAT TOUCH ARE CLEAN AND ARE NOT DAMAGED. DIRTY OR DAMAGED SURFACES CAN CAUSE INCORRECT INDICATIONS AND CAN DAMAGE TOOL FACES.Refer to Figure.
Remove IAE 1R18722 Setting button 1 off from the setting button location in IAE 1R18533 Setting base 1 off.
Turn IAE 1R18537 Setting plate 1 off and align the stage 6 hole with the setting button location in the setting base.
Install IAE 1R18033 Gage mounting plate 1 off and IAE 1R18032 Transducer carrier 1 off on to the pillar of the setting base.
SUBTASK 72-41-30-440-112 Set the Tools to Measure the Stage 6 Rotor Path Lining Radius

CAUTION
MAKE SURE THE TOOL FACES THAT TOUCH ARE CLEAN AND ARE NOT DAMAGED. DIRTY OR DAMAGED SURFACES CAN CAUSE INCORRECT INDICATIONS AND CAN DAMAGE TOOL FACES.SBE 72-0463: Engine - HP Compressor - Increase in tip clearance to stage 6 and stage 7 rotor paths
Install IAE 1R18519 Measuring sleeve 1 off on to the pillar of IAE 1R18031 Checking fixture 1 off. Refer to IAE 1R18535 Set-up drawing 1 off.
Remove IAE 1R18033 Gage mounting plate 1 off and IAE 1R18032 Transducer carrier 1 off from the IAE 1R18533 Setting base 1 off.
Lock the transducer carrier in its initial position with the handknob released in Step.
Move the puller, locked in Step to its initial position. This will release the transducer carrier in to its initial position.
NOTE
Oversize radii are shown on the measuring instrument by a minus value. Undersize radii are shown by a plus value.
Install the gage mounting plate and the transducer carrier on to the pillar of the checking fixture.
SUBTASK 72-41-30-220-134 Dimensionally Measure the Stage 6 Rotor Path Lining Radius (Pre SBE 72-0463 and SBE 72-0463)

CAUTION
MAKE SURE THE TOOL FACES THAT TOUCH ARE CLEAN AND ARE NOT DAMAGED. DIRTY OR DAMAGED SURFACES CAN CAUSE INCORRECT INDICATIONS AND CAN DAMAGE TOOL FACES.Refer to Figure.
Install IAE 1R18537 Setting plate 1 off on to IAE 1R18533 Setting base 1 off.
Install IAE 1R18040 Setting button 1 off through the stage 6 hole in the setting plate into the slot in the setting base.
Install IAE 1R18531 Measuring sleeve 1 off on to the pillar of the setting base.
Install IAE 1R18042 Transducer carrier 1 off on to the pillar of the setting base.
Set the transducer.
SUBTASK 72-41-30-440-113 Set the Tools to Measure the Stage 6 VSV Tip Radius
Install IAE 1R18045 Distance sleeve 1 off on to the pillar of IAE 1R18031 Checking fixture 1 off.
Remove IAE 1R18042 Transducer carrier 1 off from the setting plate.
Assemble the tools to measure the stage 6 stator vane tip radius. Refer to IAE 1R18535 Set-up drawing 1 off.
SUBTASK 72-41-30-220-135 Measure the Stage 6 Stator Vane Tip Radius
Refer to Figure.
Measure the HP Compressor stage 3 rotor path ring ENGINE-HP COMPRESSOR SPLIT CASES (72-41-31, 01-685) split line clearances. The split line clearances (DIM A) should be 0.041 in. to 0.047 in. (1.05 mm to 1.20 mm).
Measure the HP Compressor stage 4 rotor path ring ENGINE-HP COMPRESSOR SPLIT CASES (72-41-31, 01-690) split line clearances. The split line clearance (DIM B) should be 0.043 to 0.047 in. (1.10 to 1.20 mm).
Measure the HP Compressor stage 5 rotor path ring ENGINE-HP COMPRESSOR SPLIT CASES (72-41-31, 01-695) split line clearances. The split line clearance (DIM C) should be 0.007 to 0.023 in. (0.18 to 0.58 mm).
Measure the HP Compressor stage 6 rotor path ring ENGINE-HP COMPRESSOR SPLIT CASES (72-41-31, 01-700) split line clearances. The split line clearance (DIM D) should be 0.009 in. to 0.025 in. (0.23 mm to 0.63 mm).
SUBTASK 72-41-30-220-136-A00 Measure the Clearances between the Rotor Path Ring Segments at the Split Line Flange (Pre SBE 72-0027)
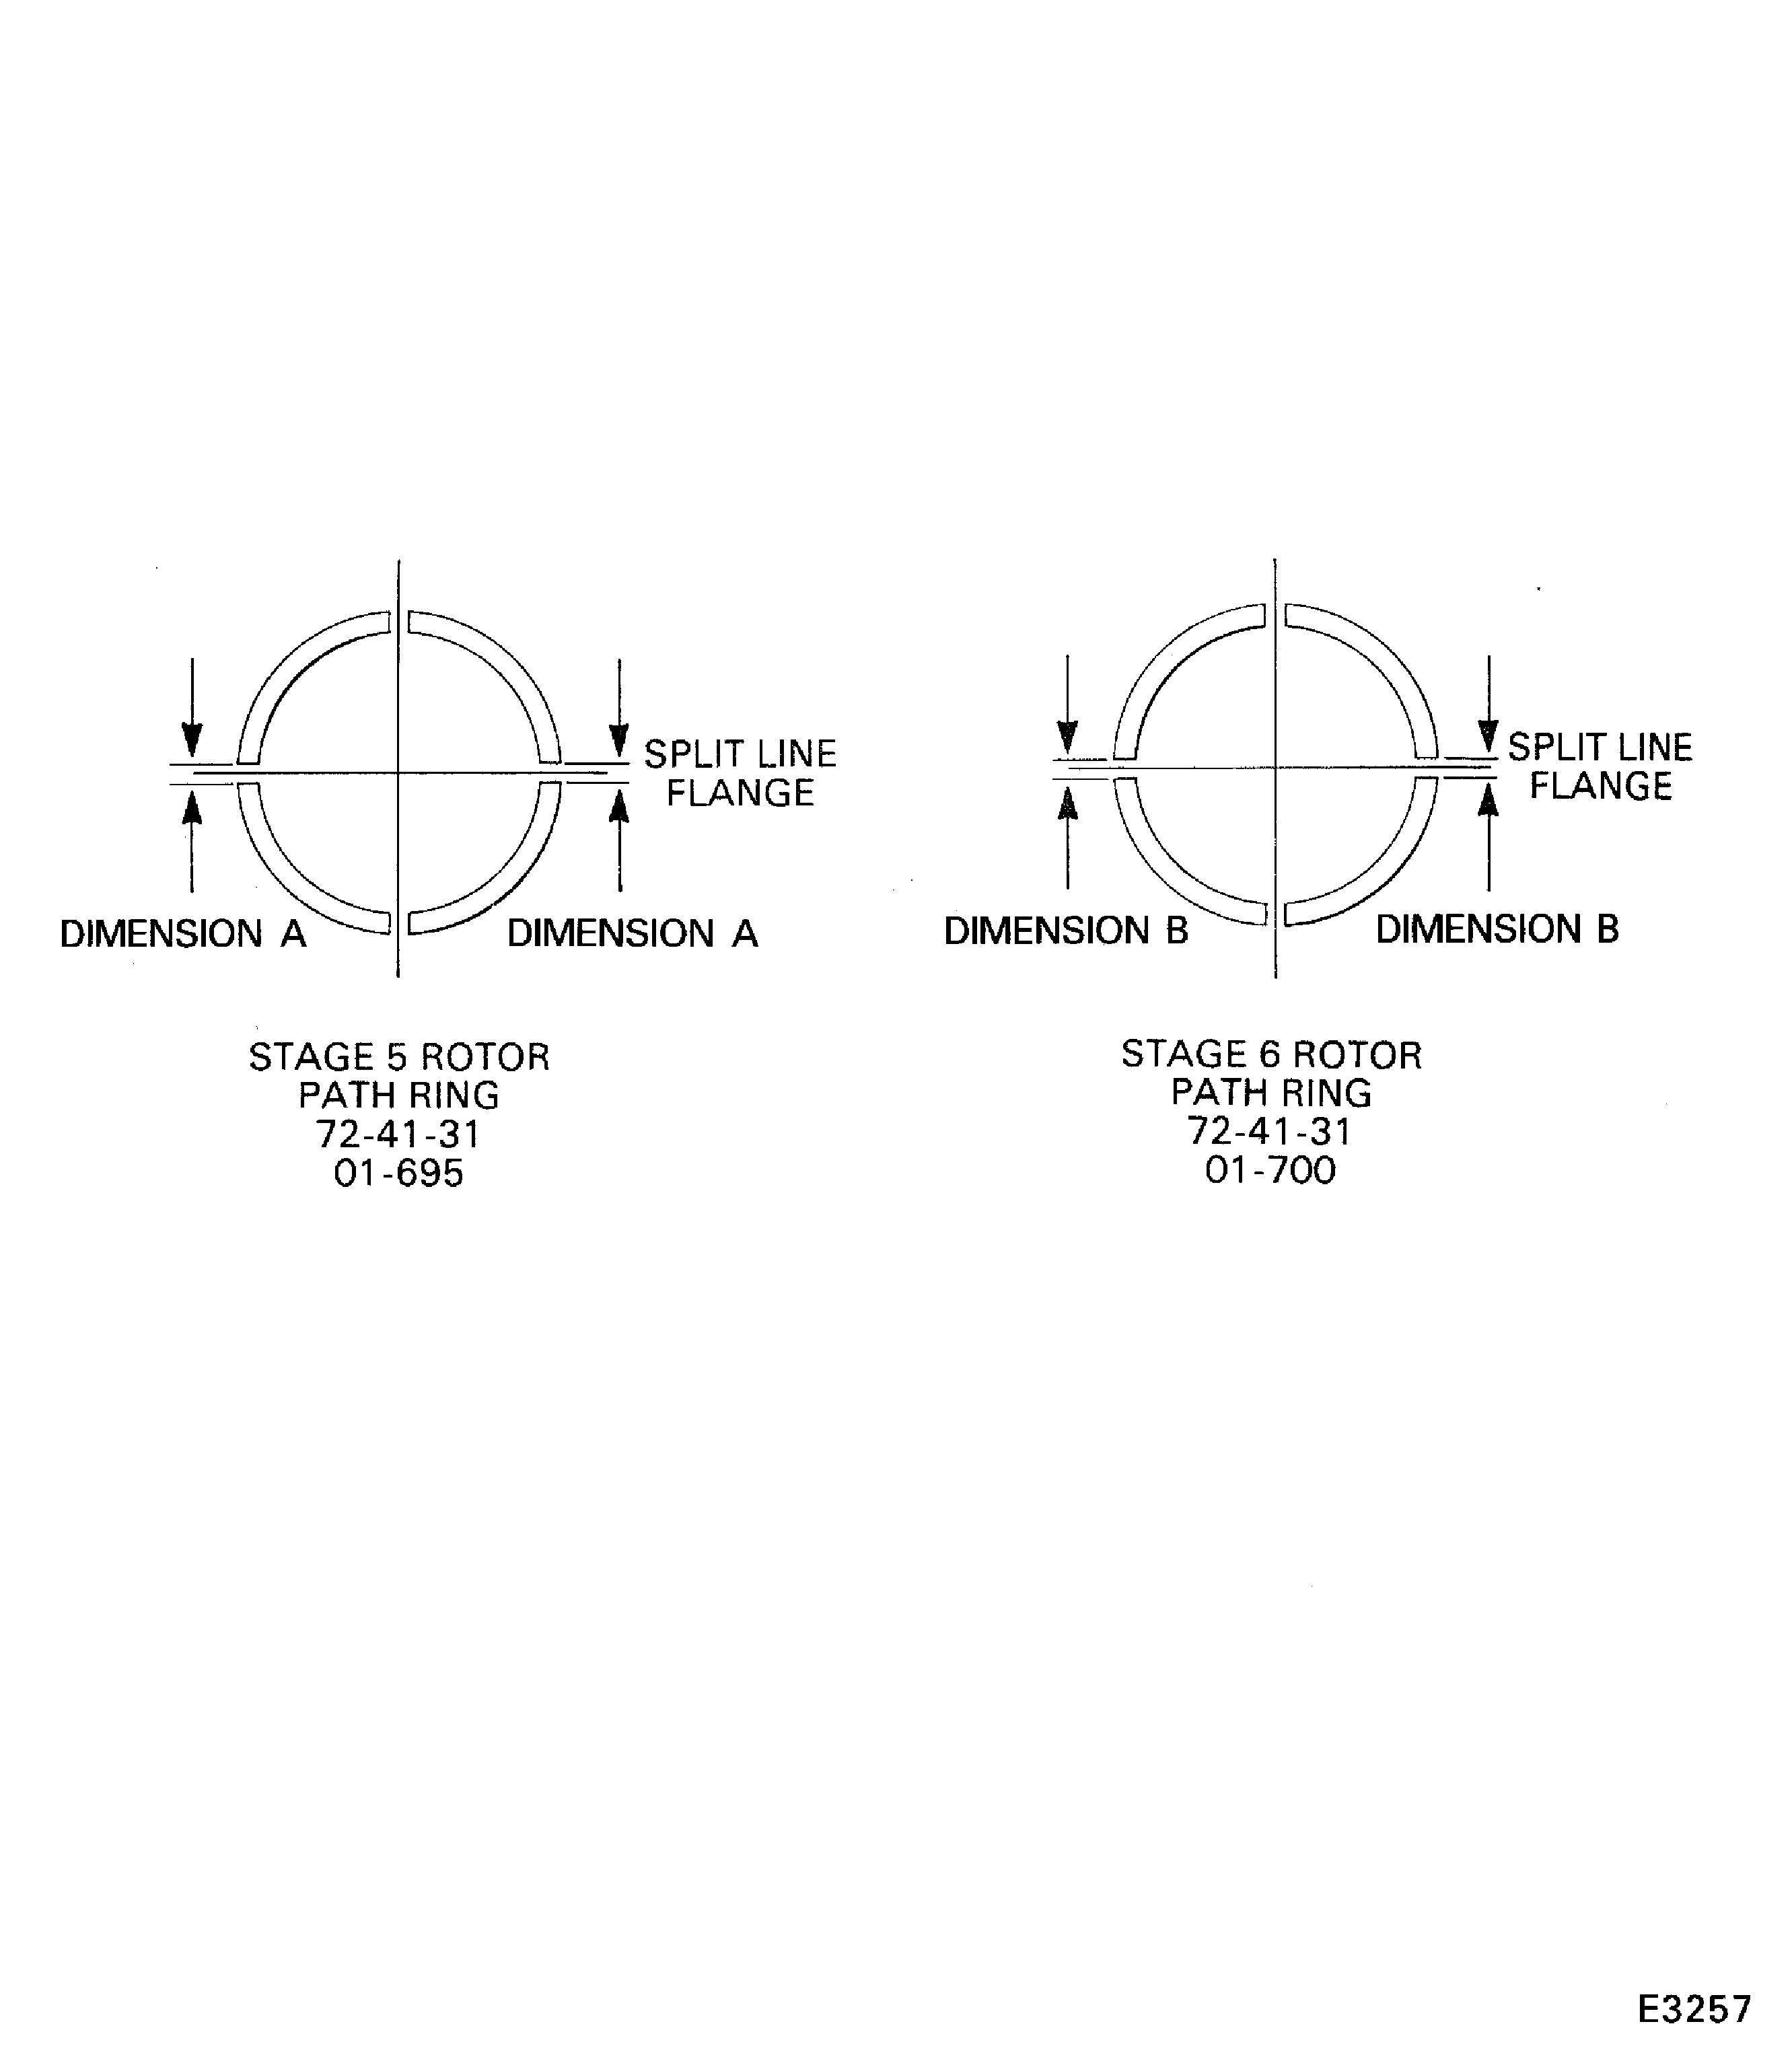
Refer to Figure.
SBE 72-0027: Engine - HP Compressor - introduction of reduced weight front casing.
Measure the HP Compressor stage 5 rotor path ring ENGINE-HP COMPRESSOR SPLIT CASES (72-41-31, 01-695) split line clearances. The split line clearance (DIM A) should be 0.007 in. to 0.023 in. (0.18 mm to 0.58 mm).
Measure the HP Compressor stage 6 rotor path ring ENGINE-HP COMPRESSOR SPLIT CASES (72-41-31, 01-700) split line clearances. The split line clearance (DIM B) should be 0.009 in. to 0.025 in. (0.23 mm to 0.63 mm).
SUBTASK 72-41-30-220-136-B00 Measure the Clearances between the Rotor Path Ring Segments at the Split Line Flange (SBE 72-0027)
Figure: Pre SBE 72-0027: View through the HP Compressor front case
Sheet 1
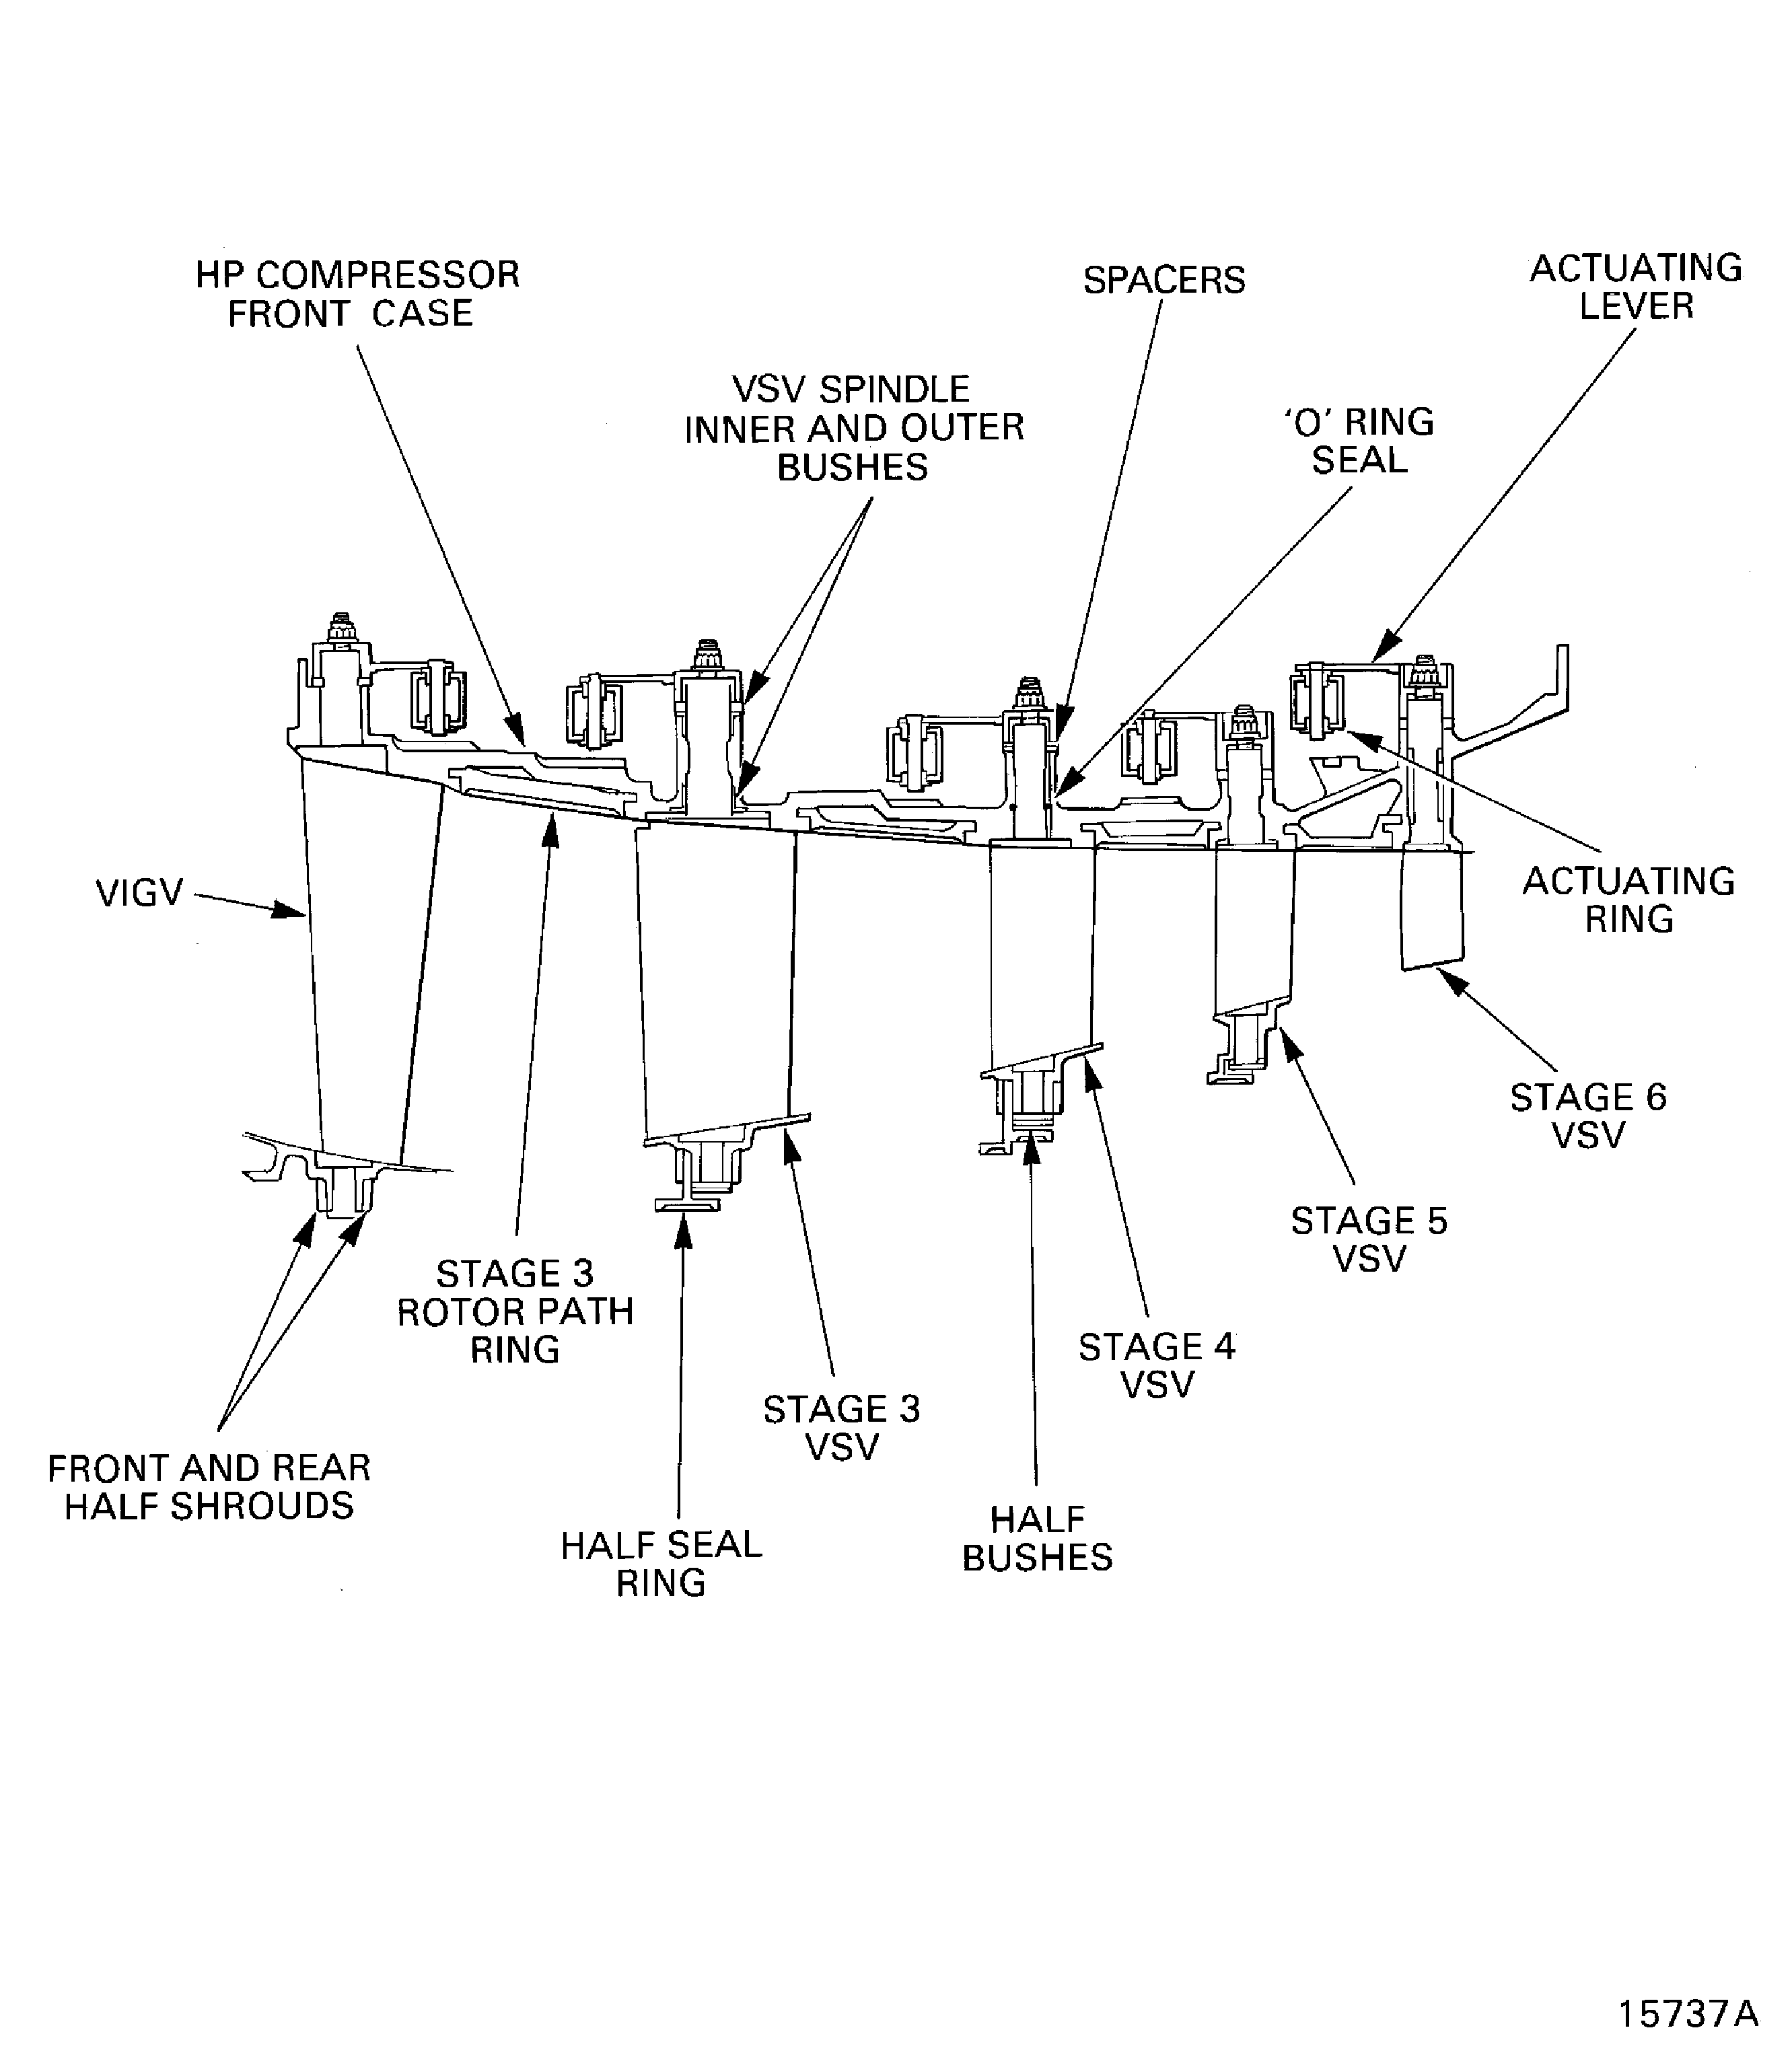
Figure: SBE 72-0027: View through the HP Compressor front case
Sheet 2
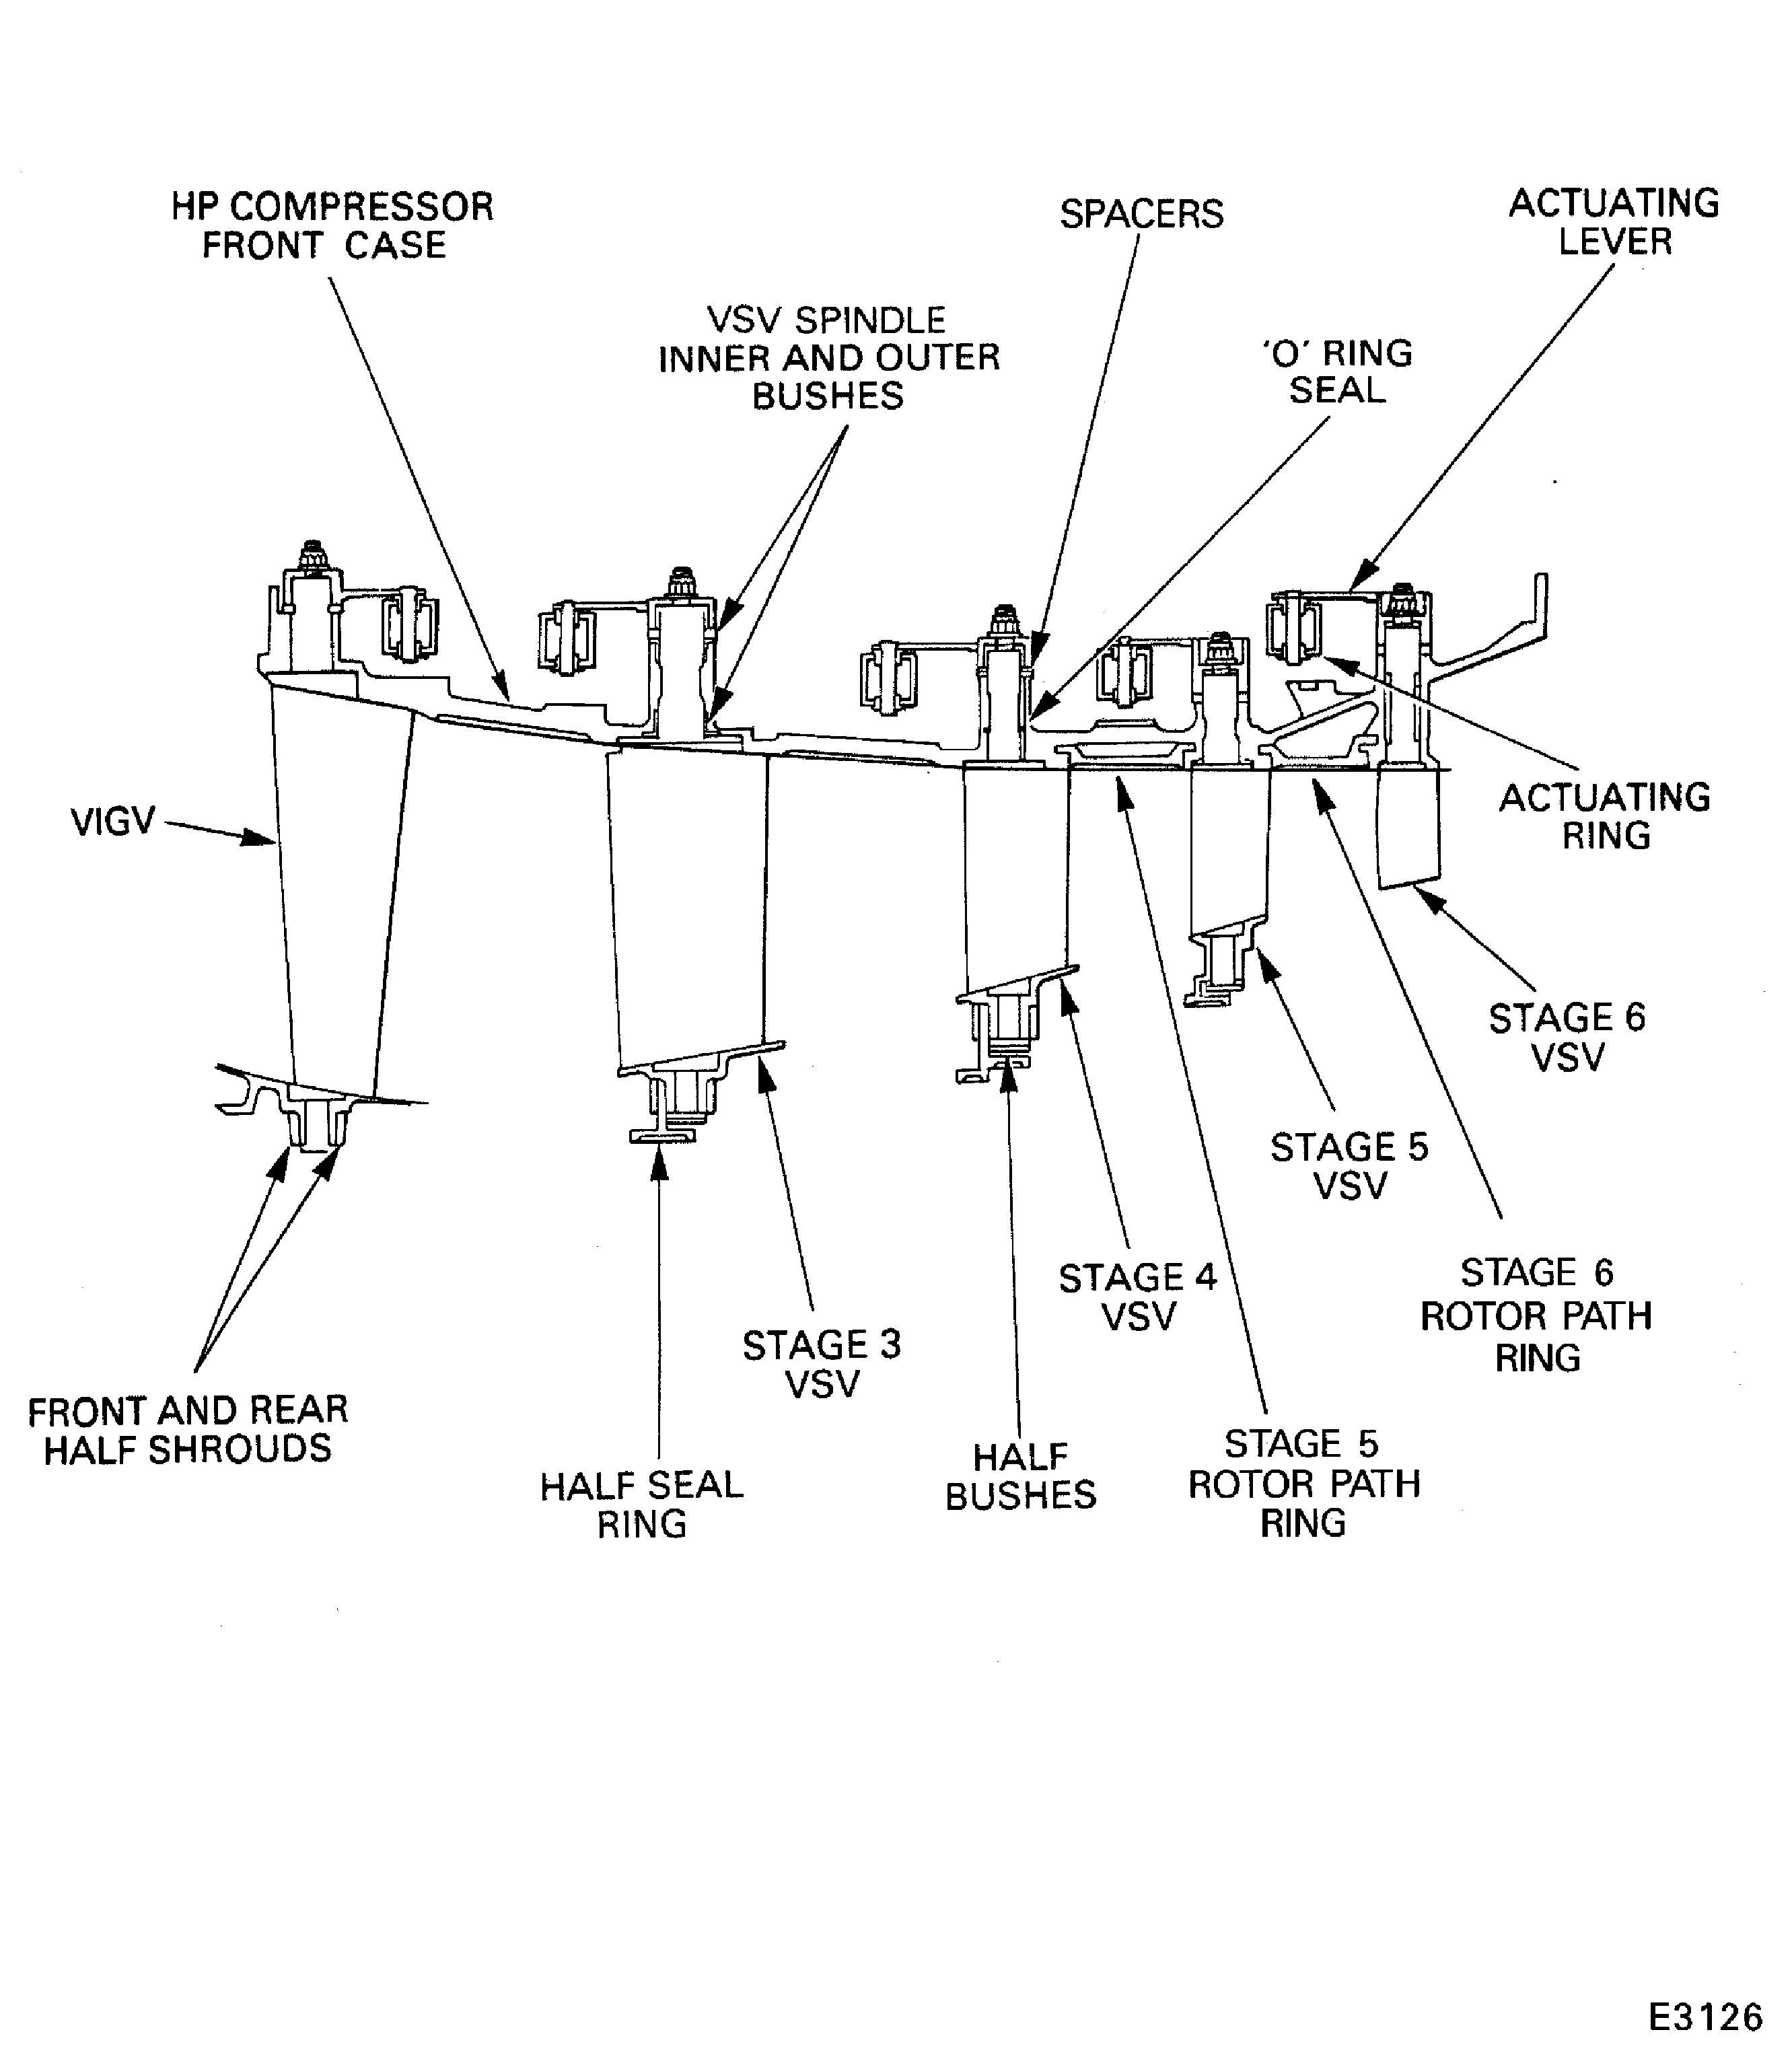
Figure: Locations for the fits and clearances
Locations for the fits and clearances
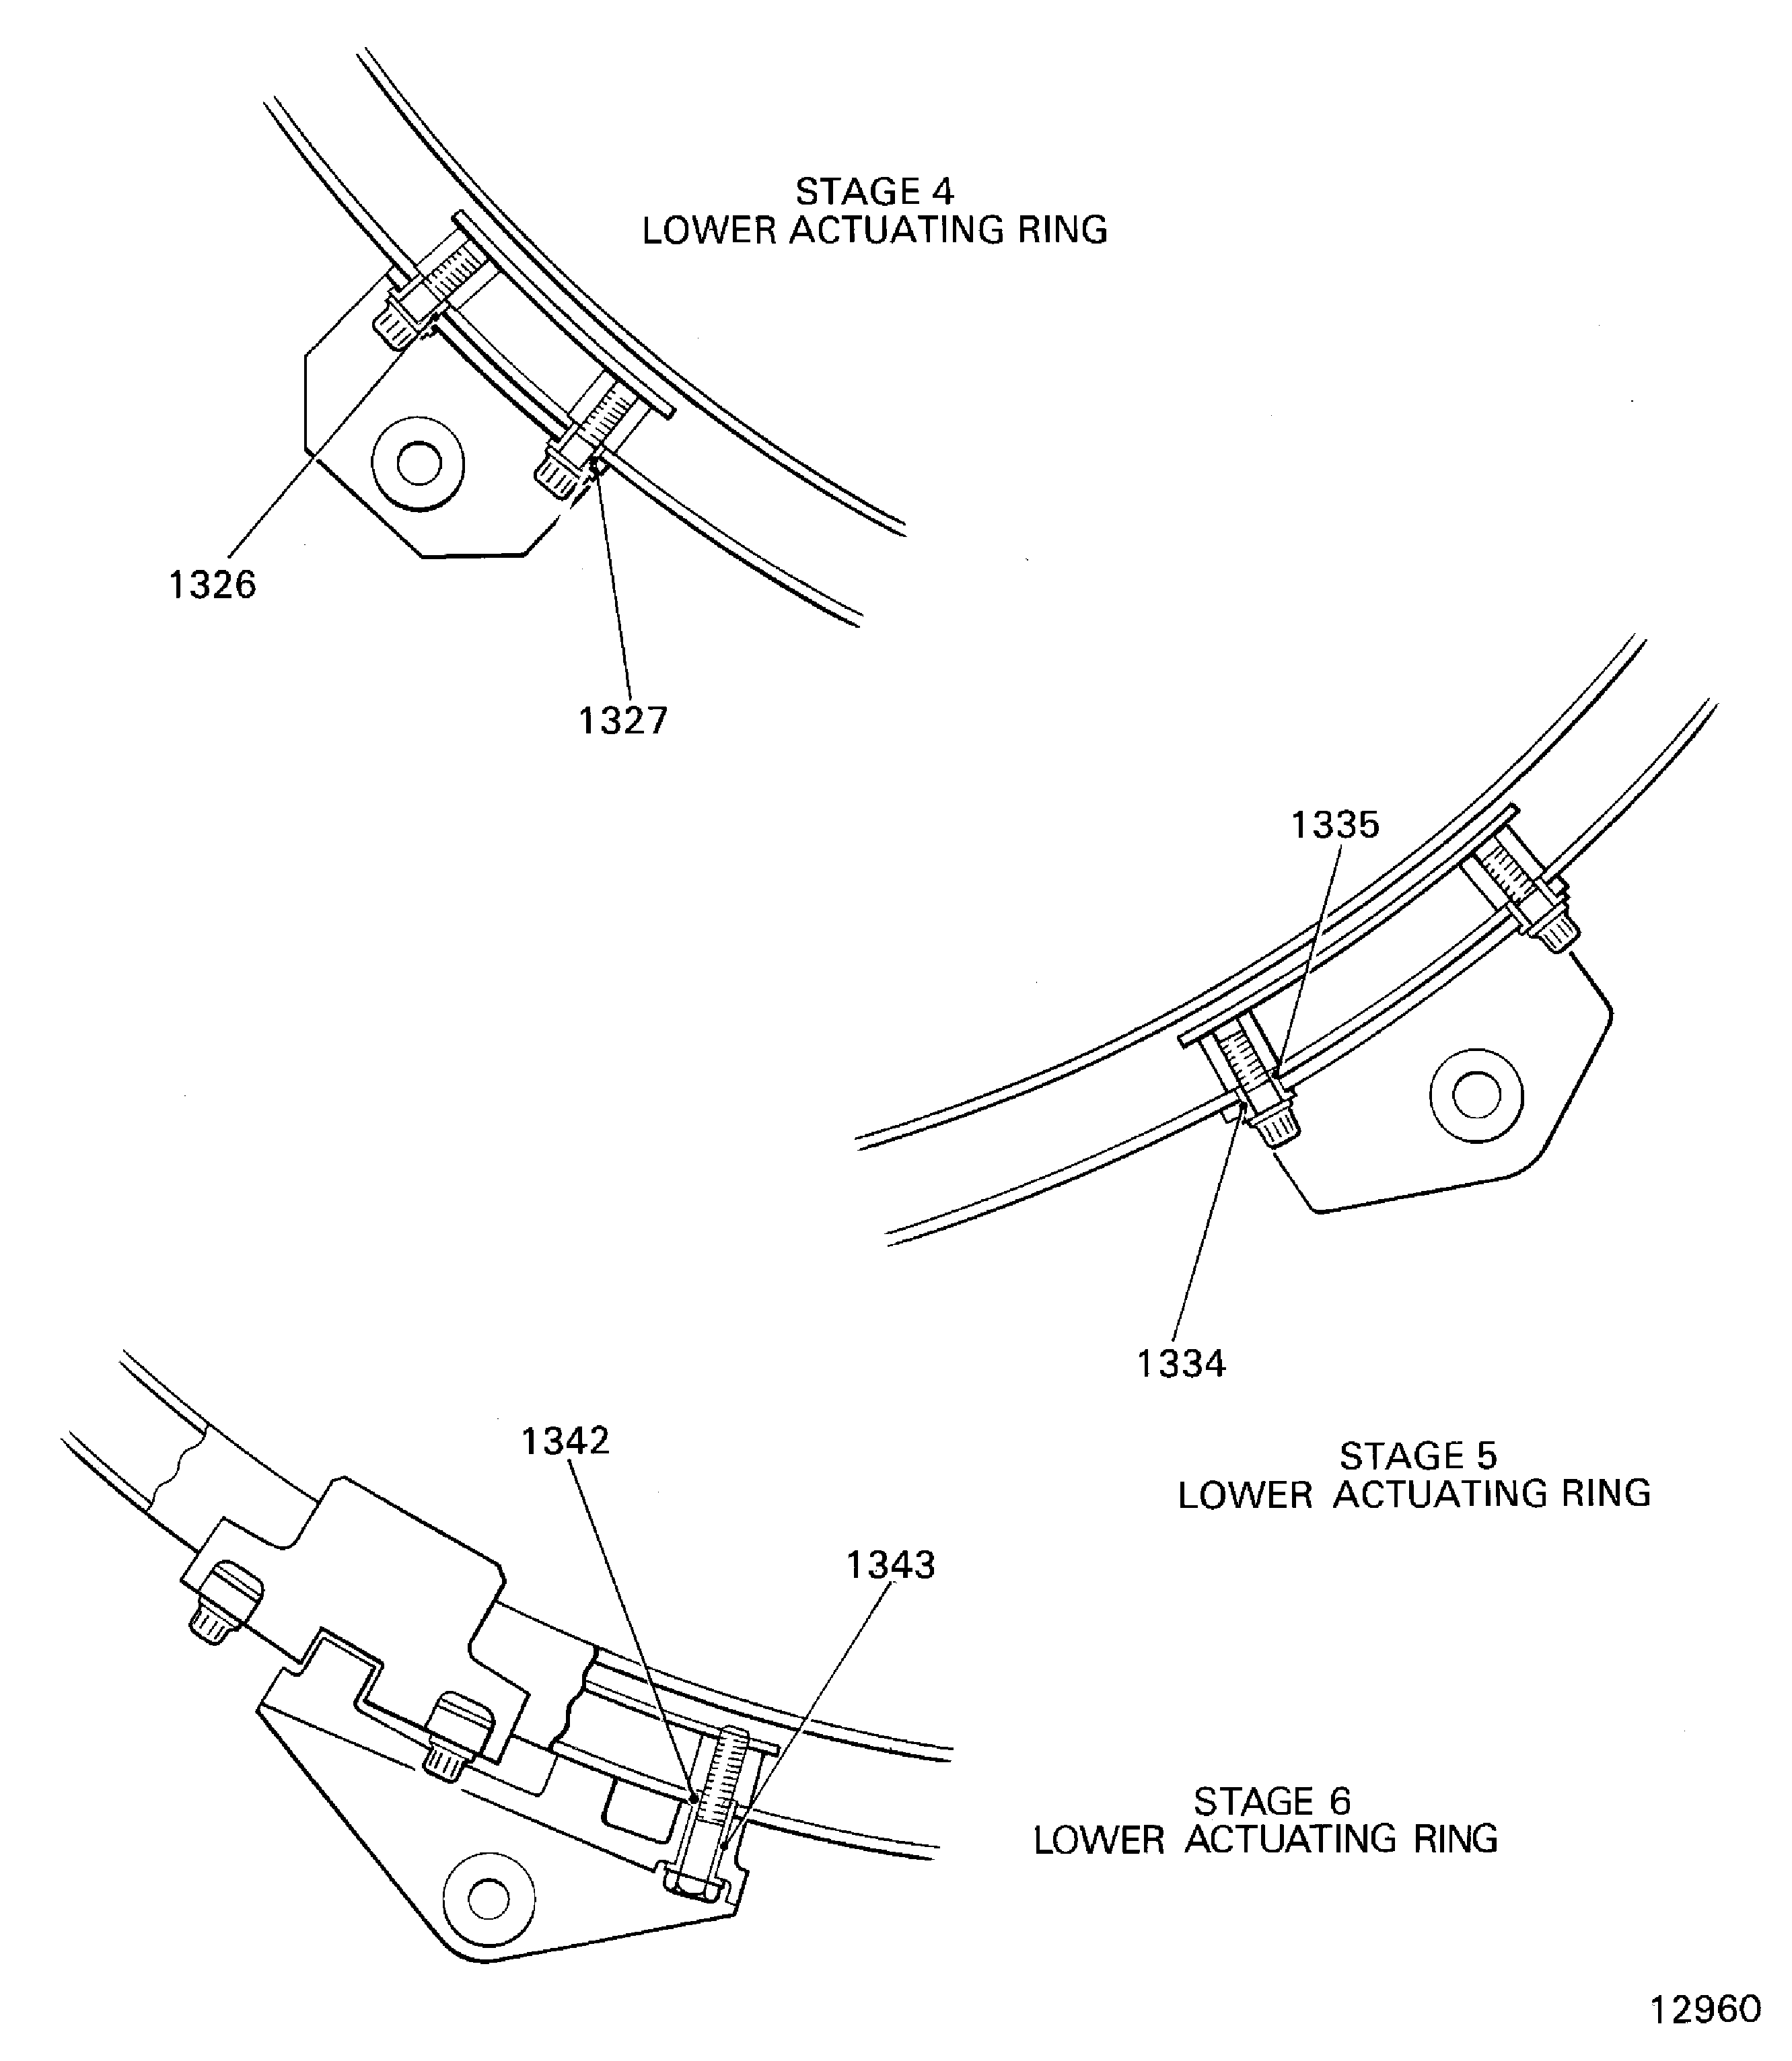
Figure: Install the stage 4 to 6 control rod connectors
Sheet 1
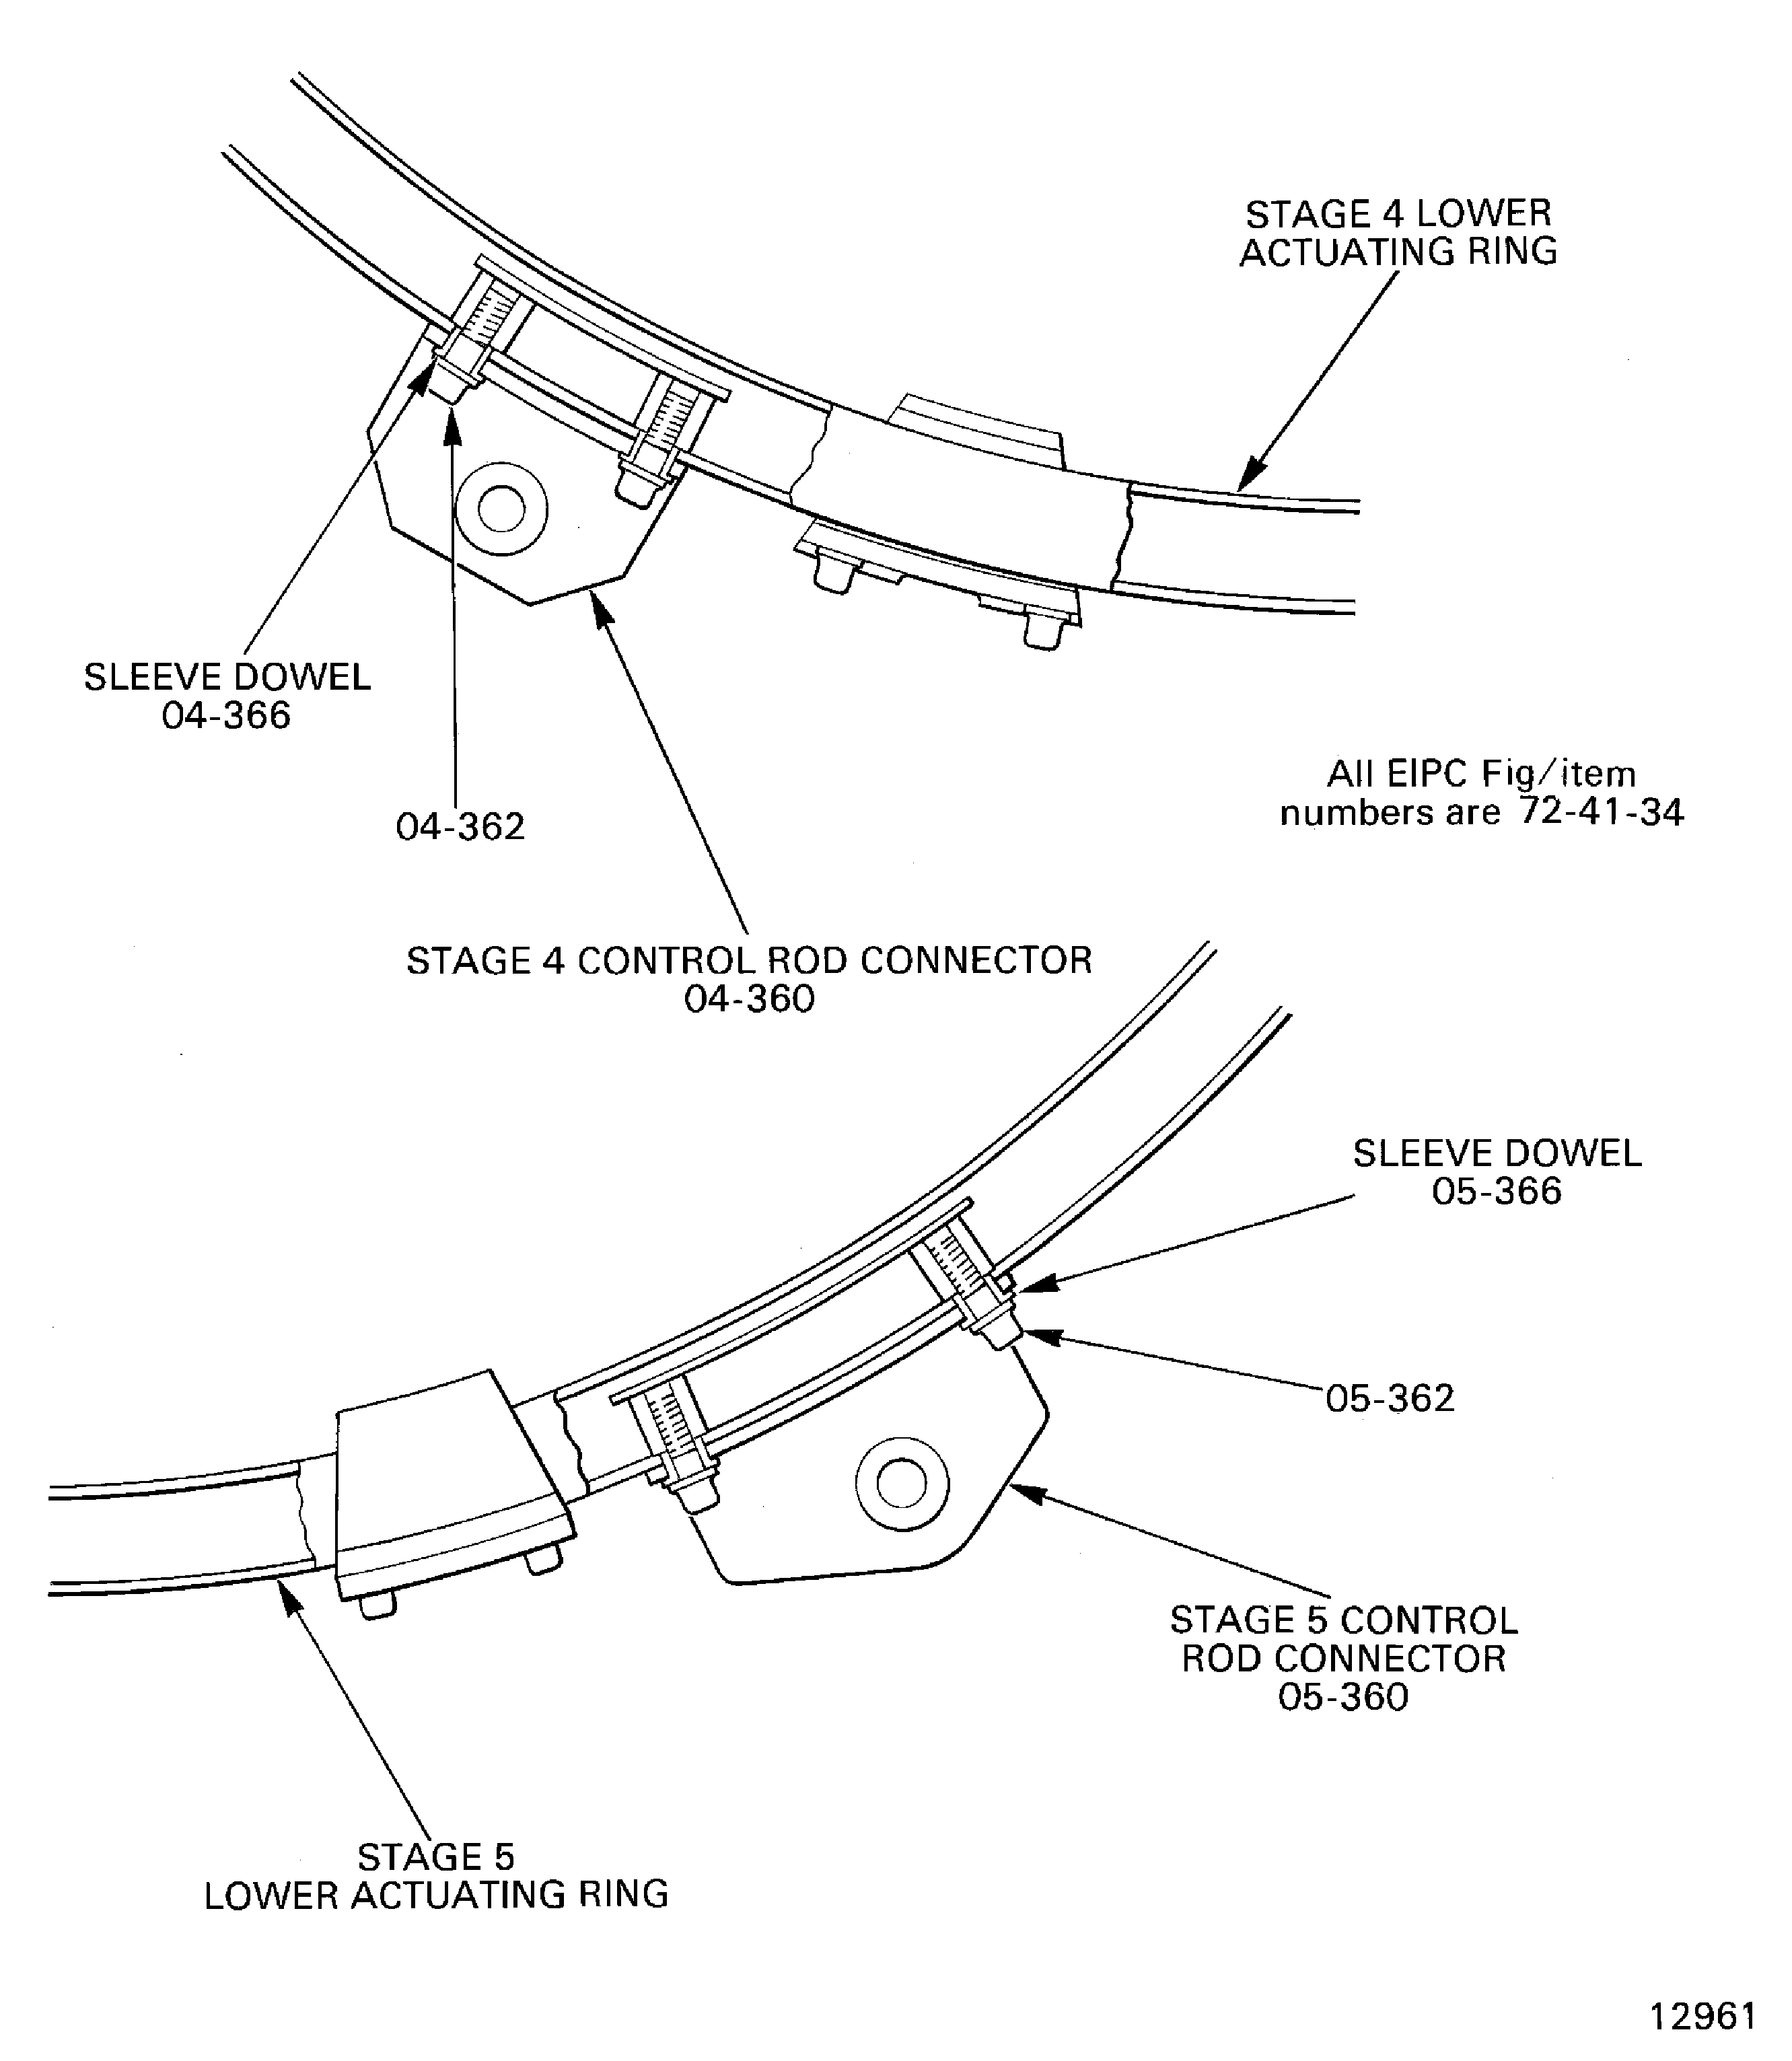
Figure: Install the stage 4 to 6 control rod connectors
Sheet 2
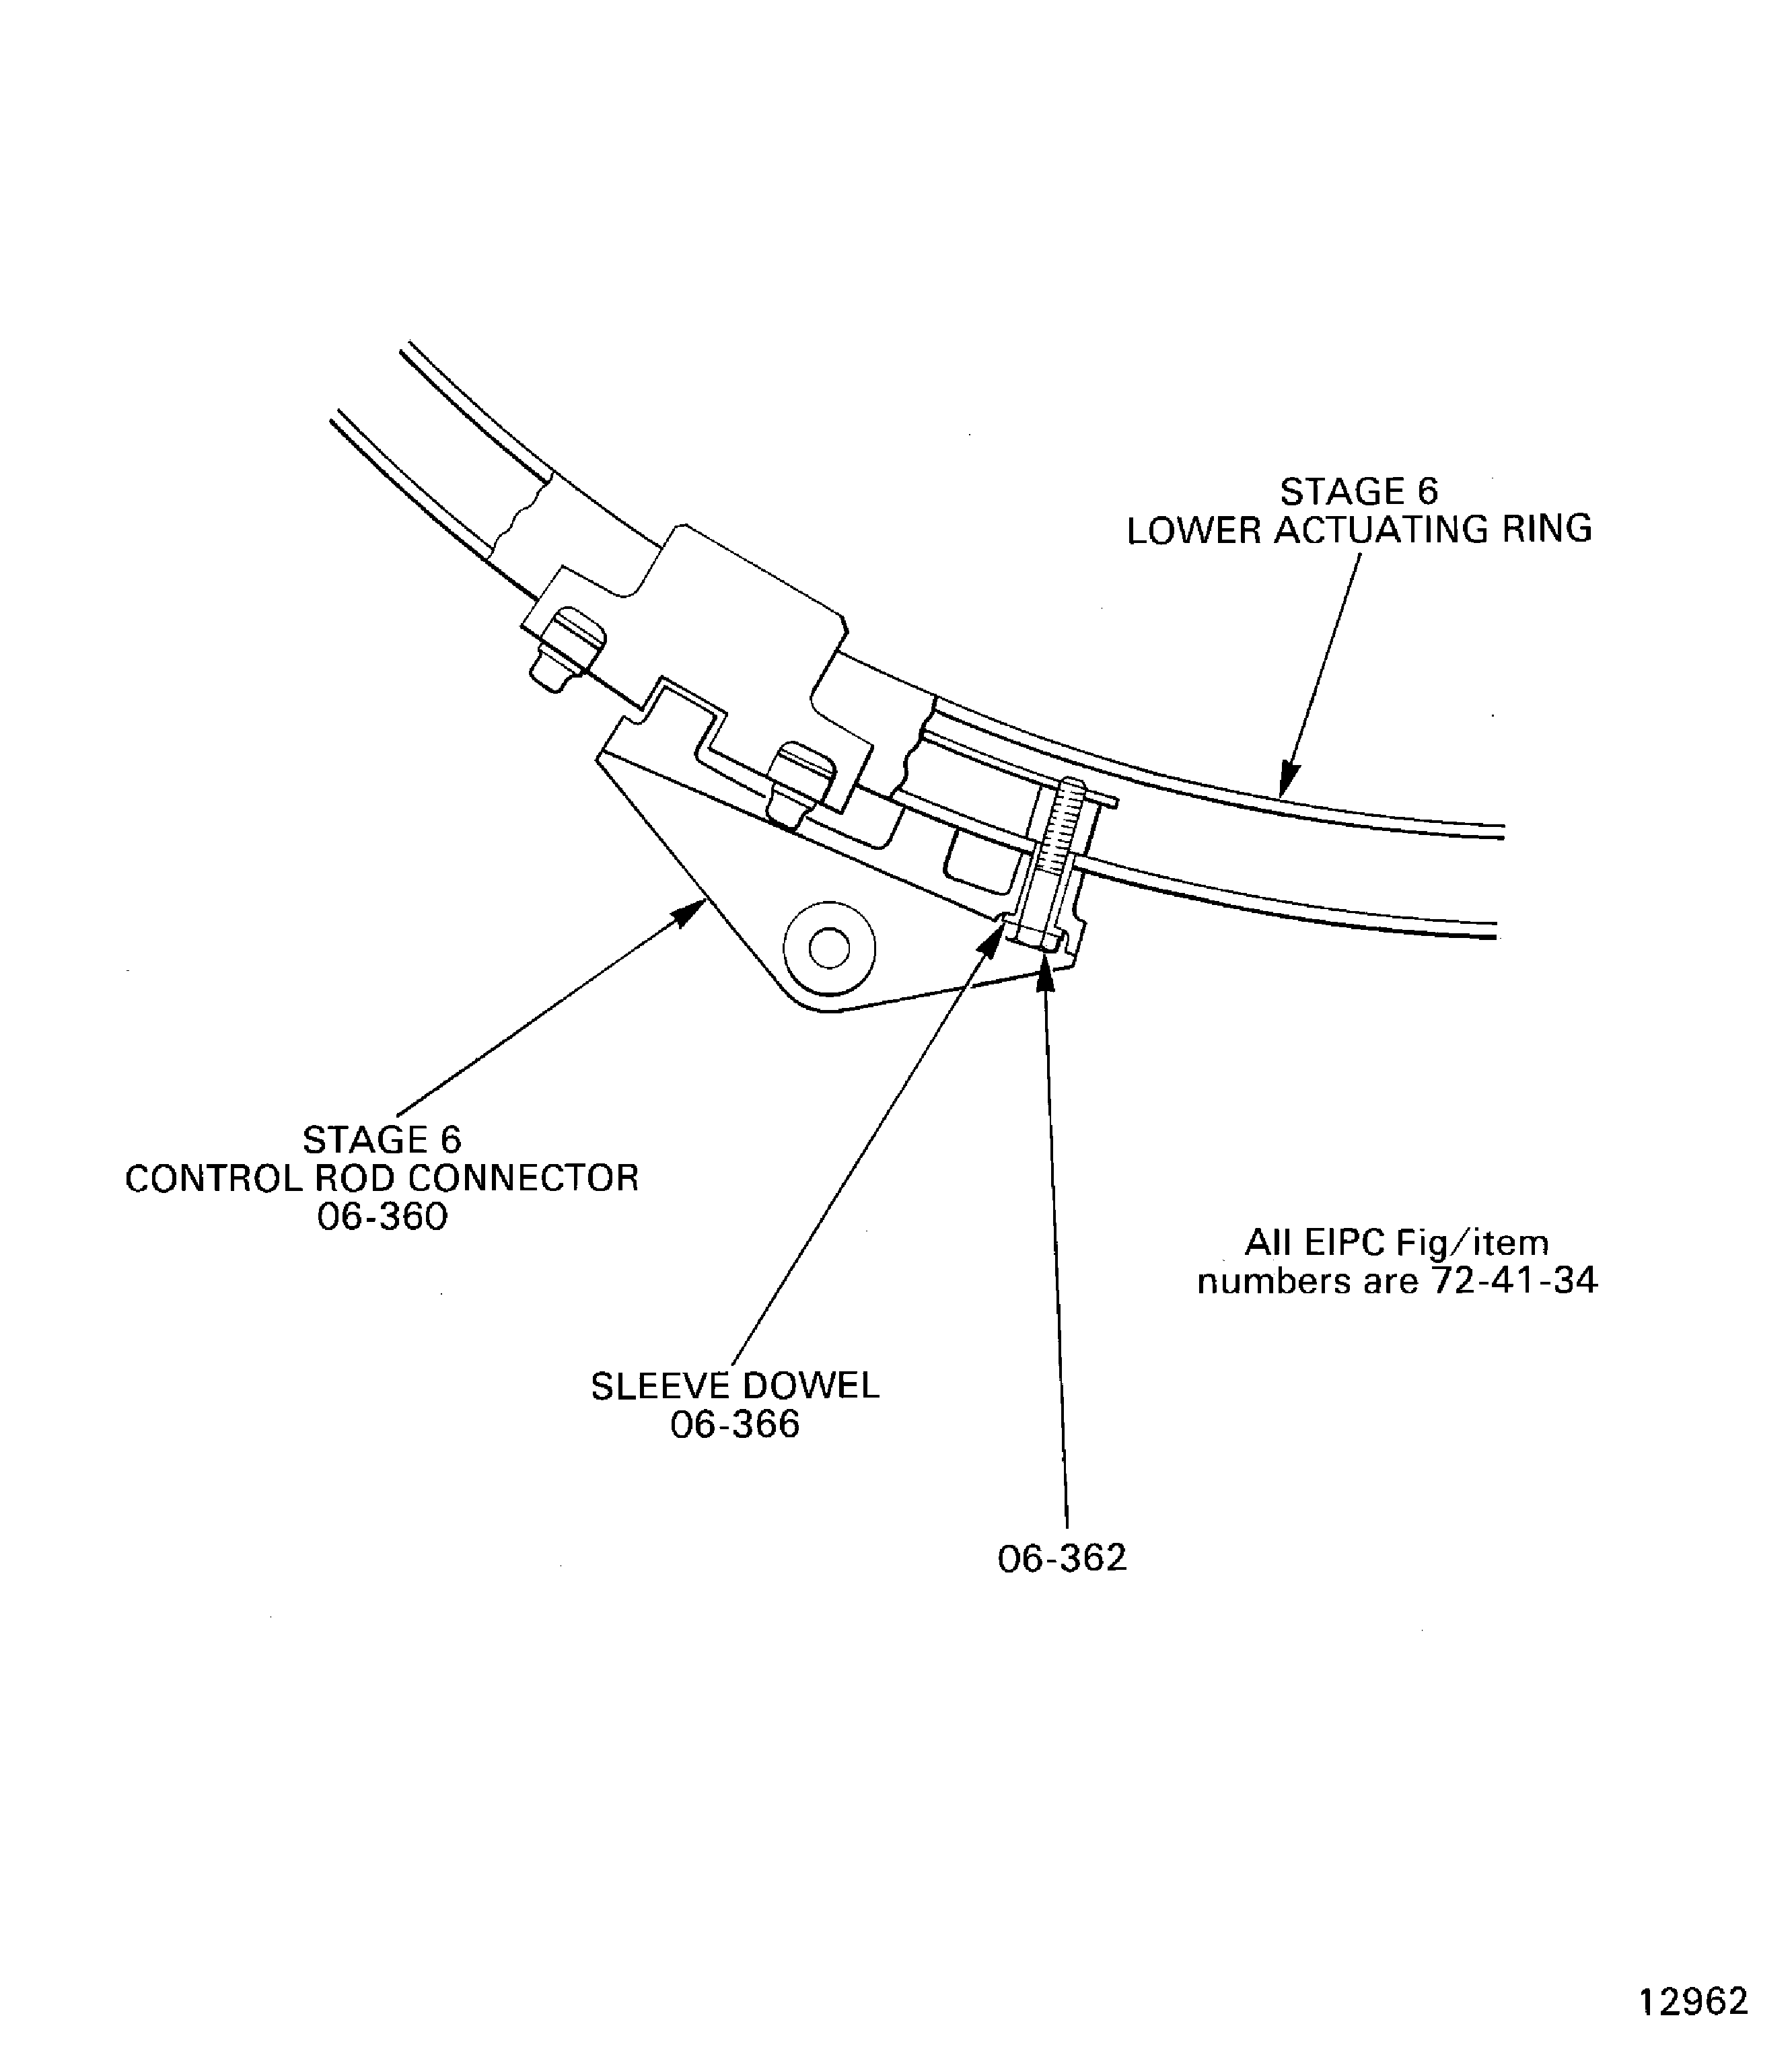
Figure: Install the HP Compressor front cases on the checking fixture
Sheet 1

Figure: Install the HP Compressor front cases on the checking fixture
Sheet 2
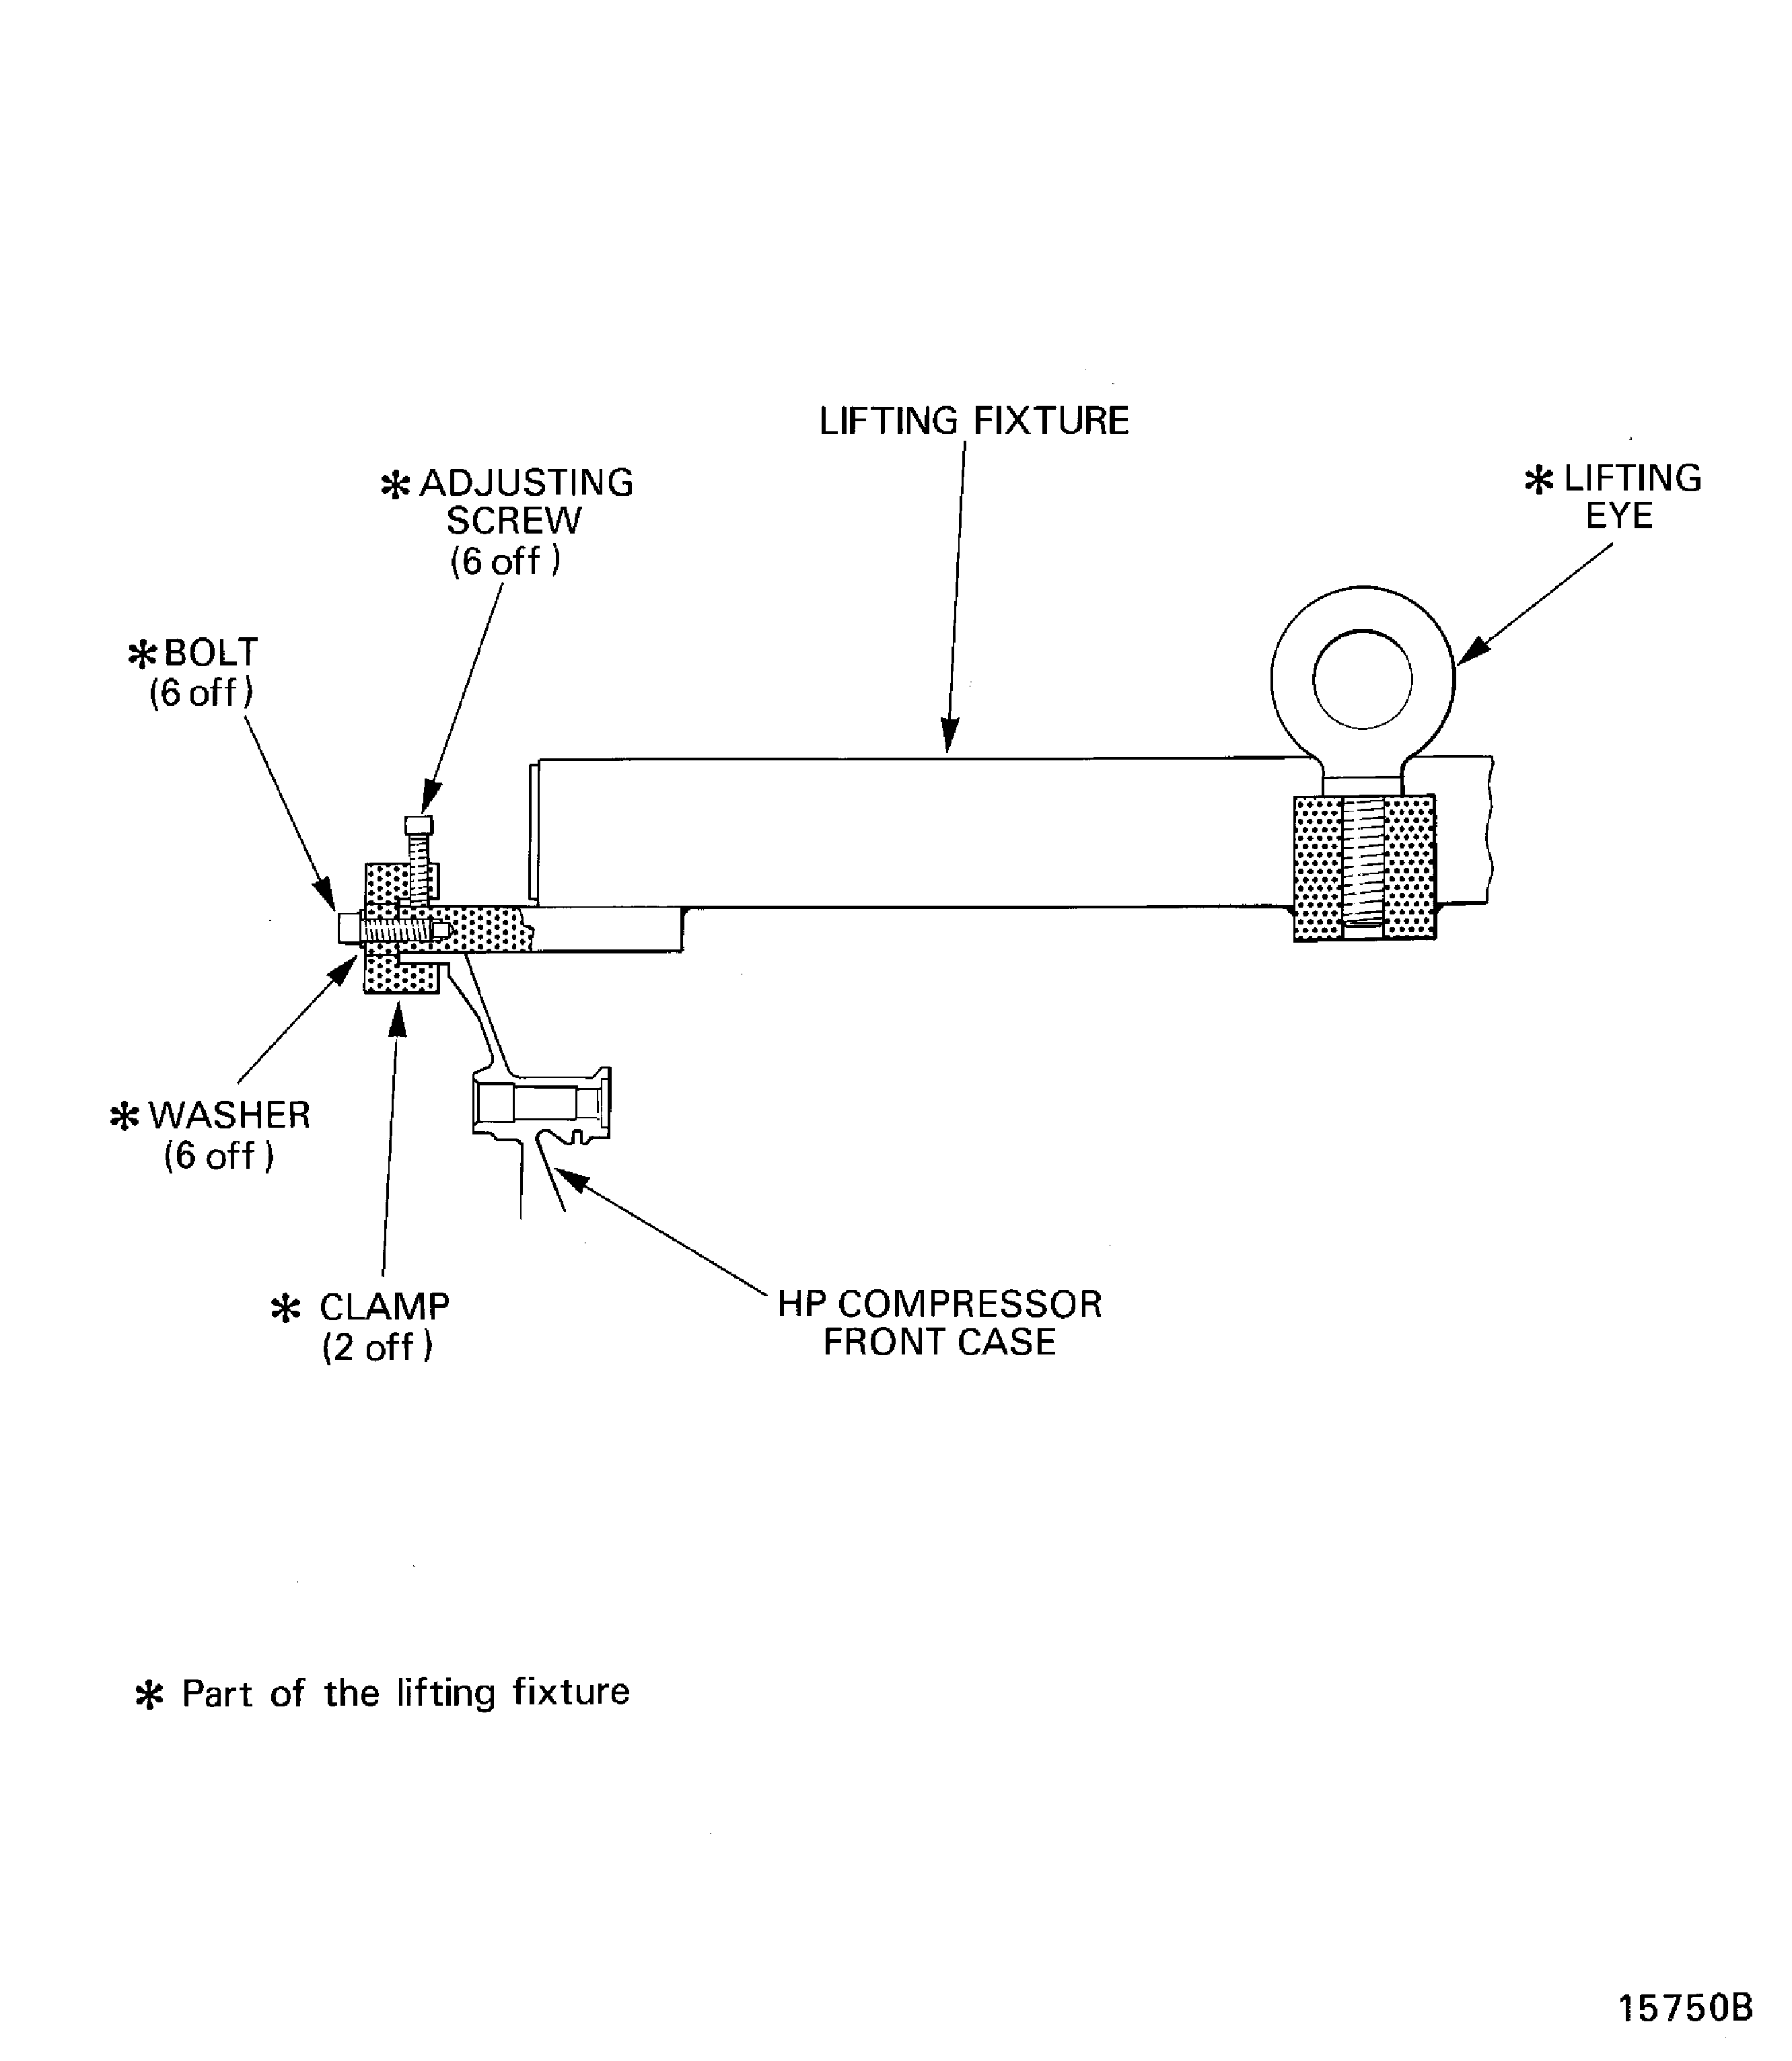
Figure: Assemble the tools to measure the rotor path linings radii
Assemble the tools to measure the rotor path linings radii
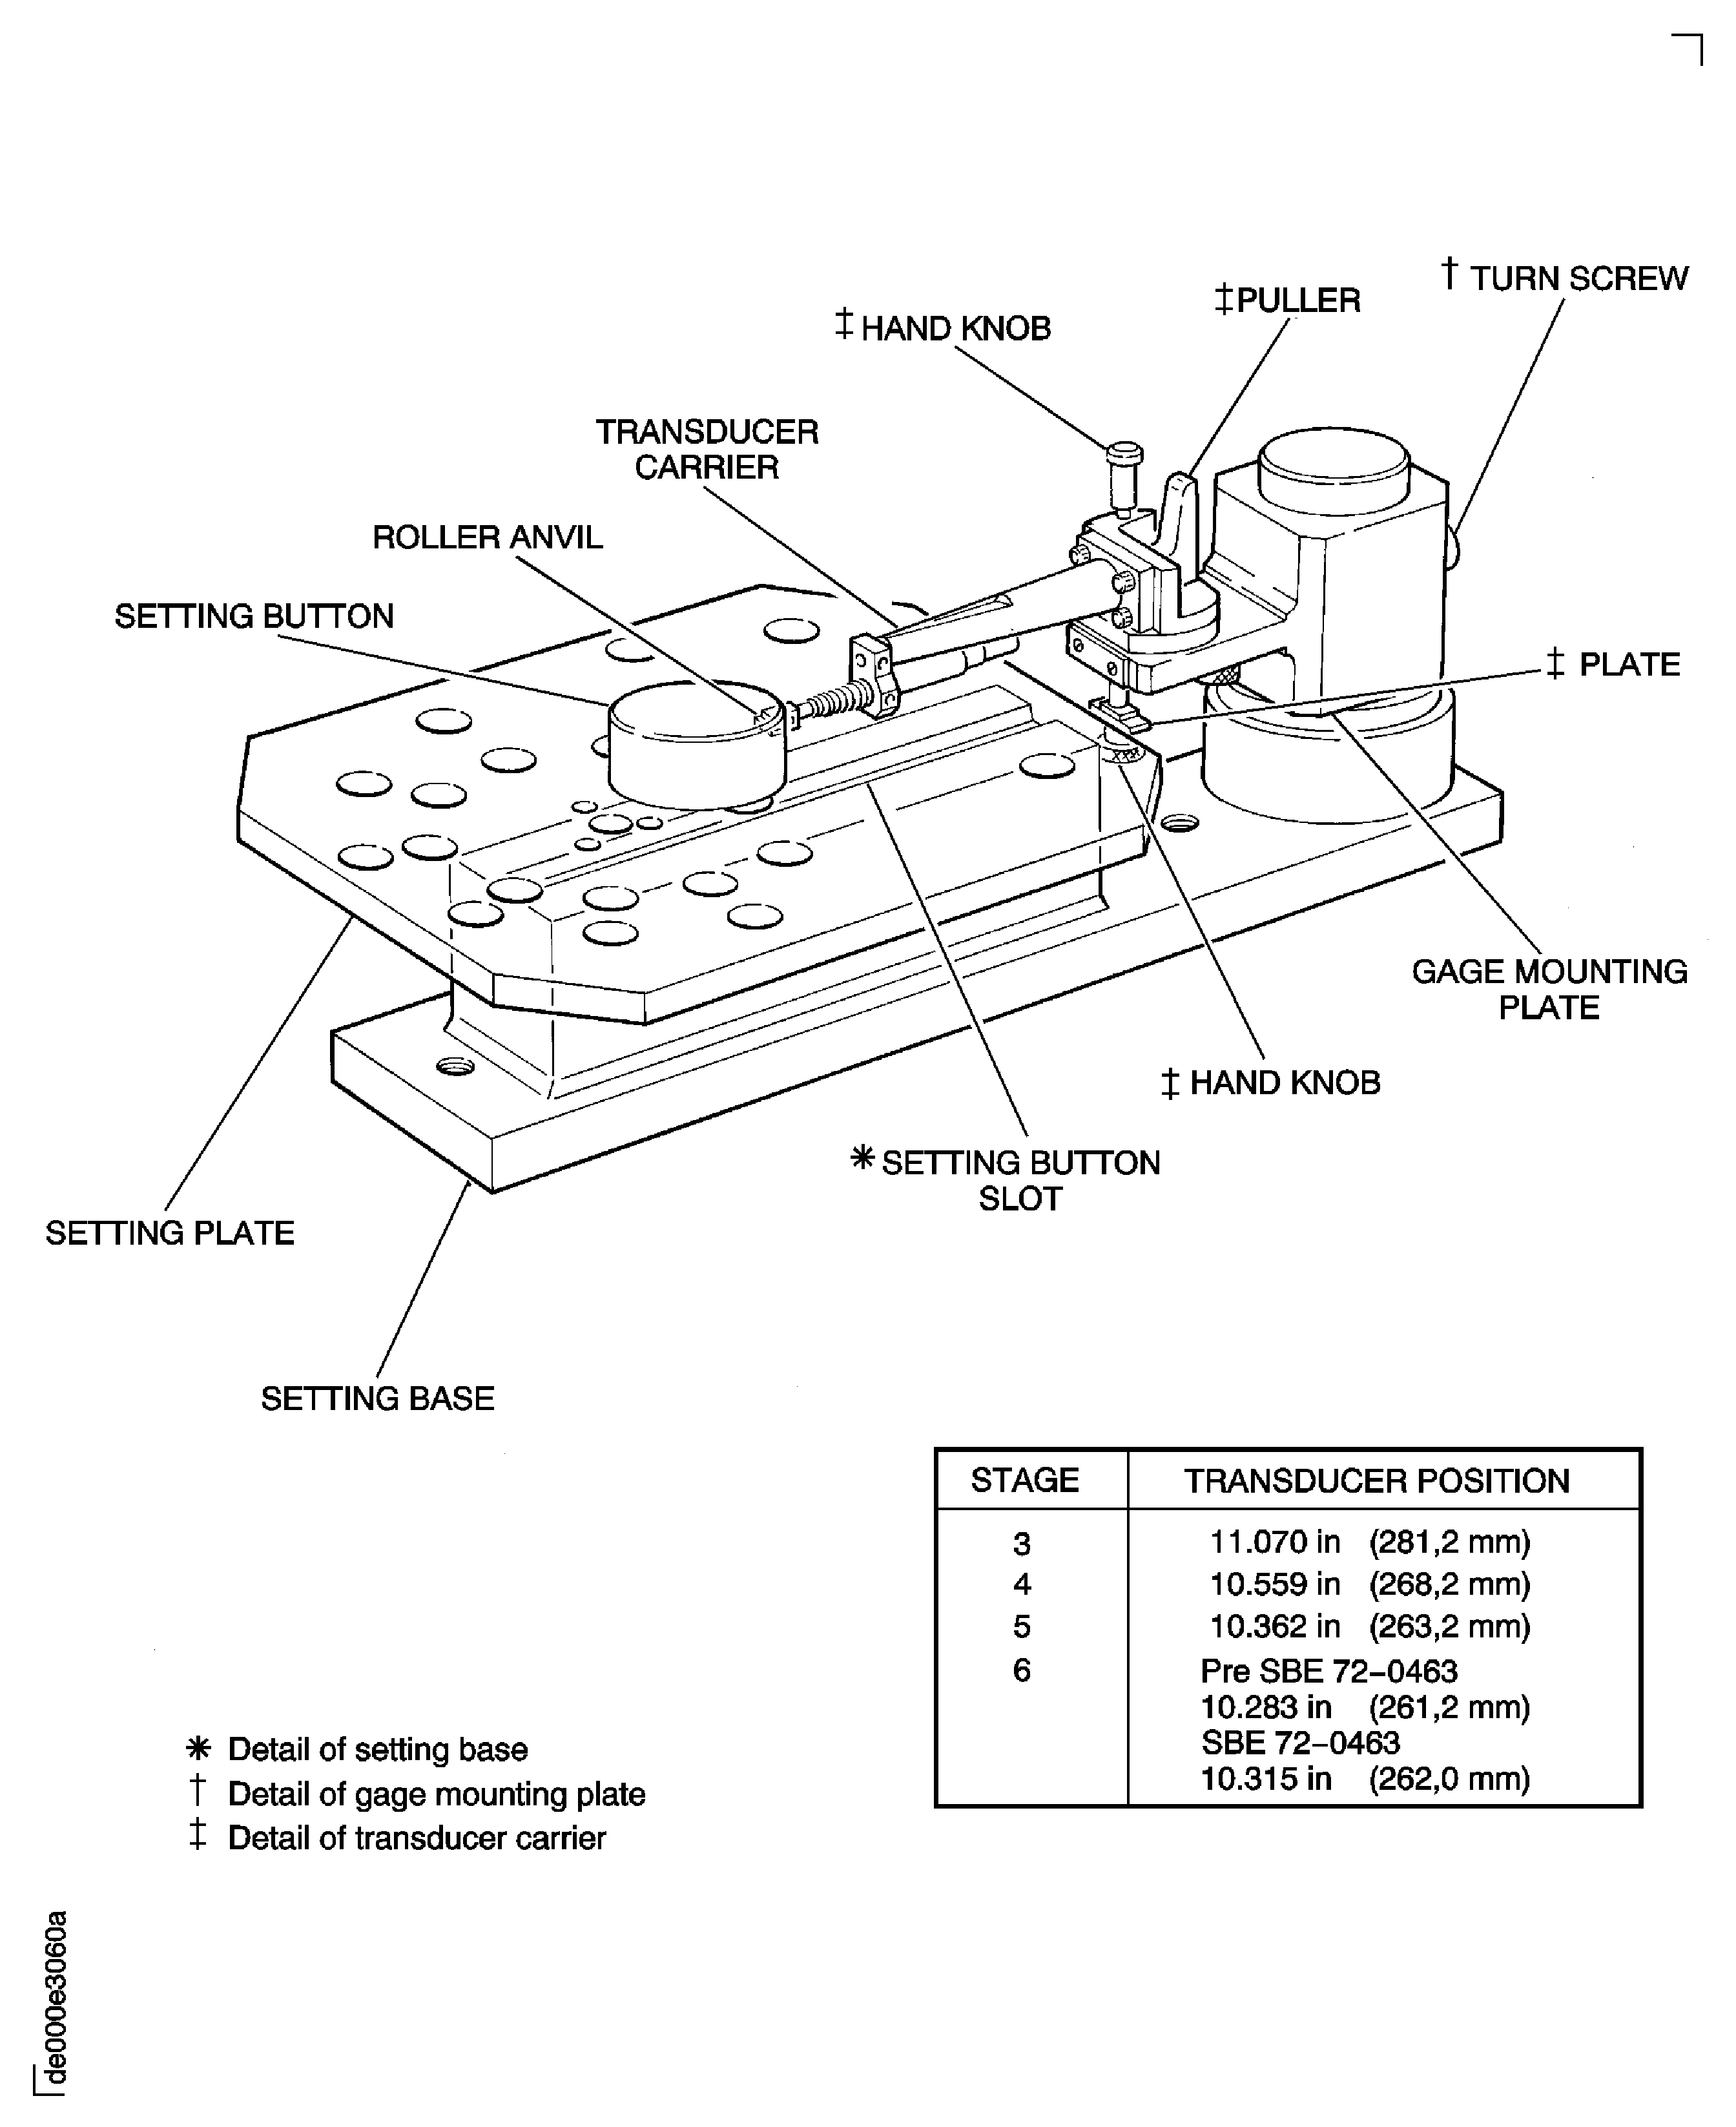
Figure: Measure the rotor path lining radii
Measure the rotor path lining radii
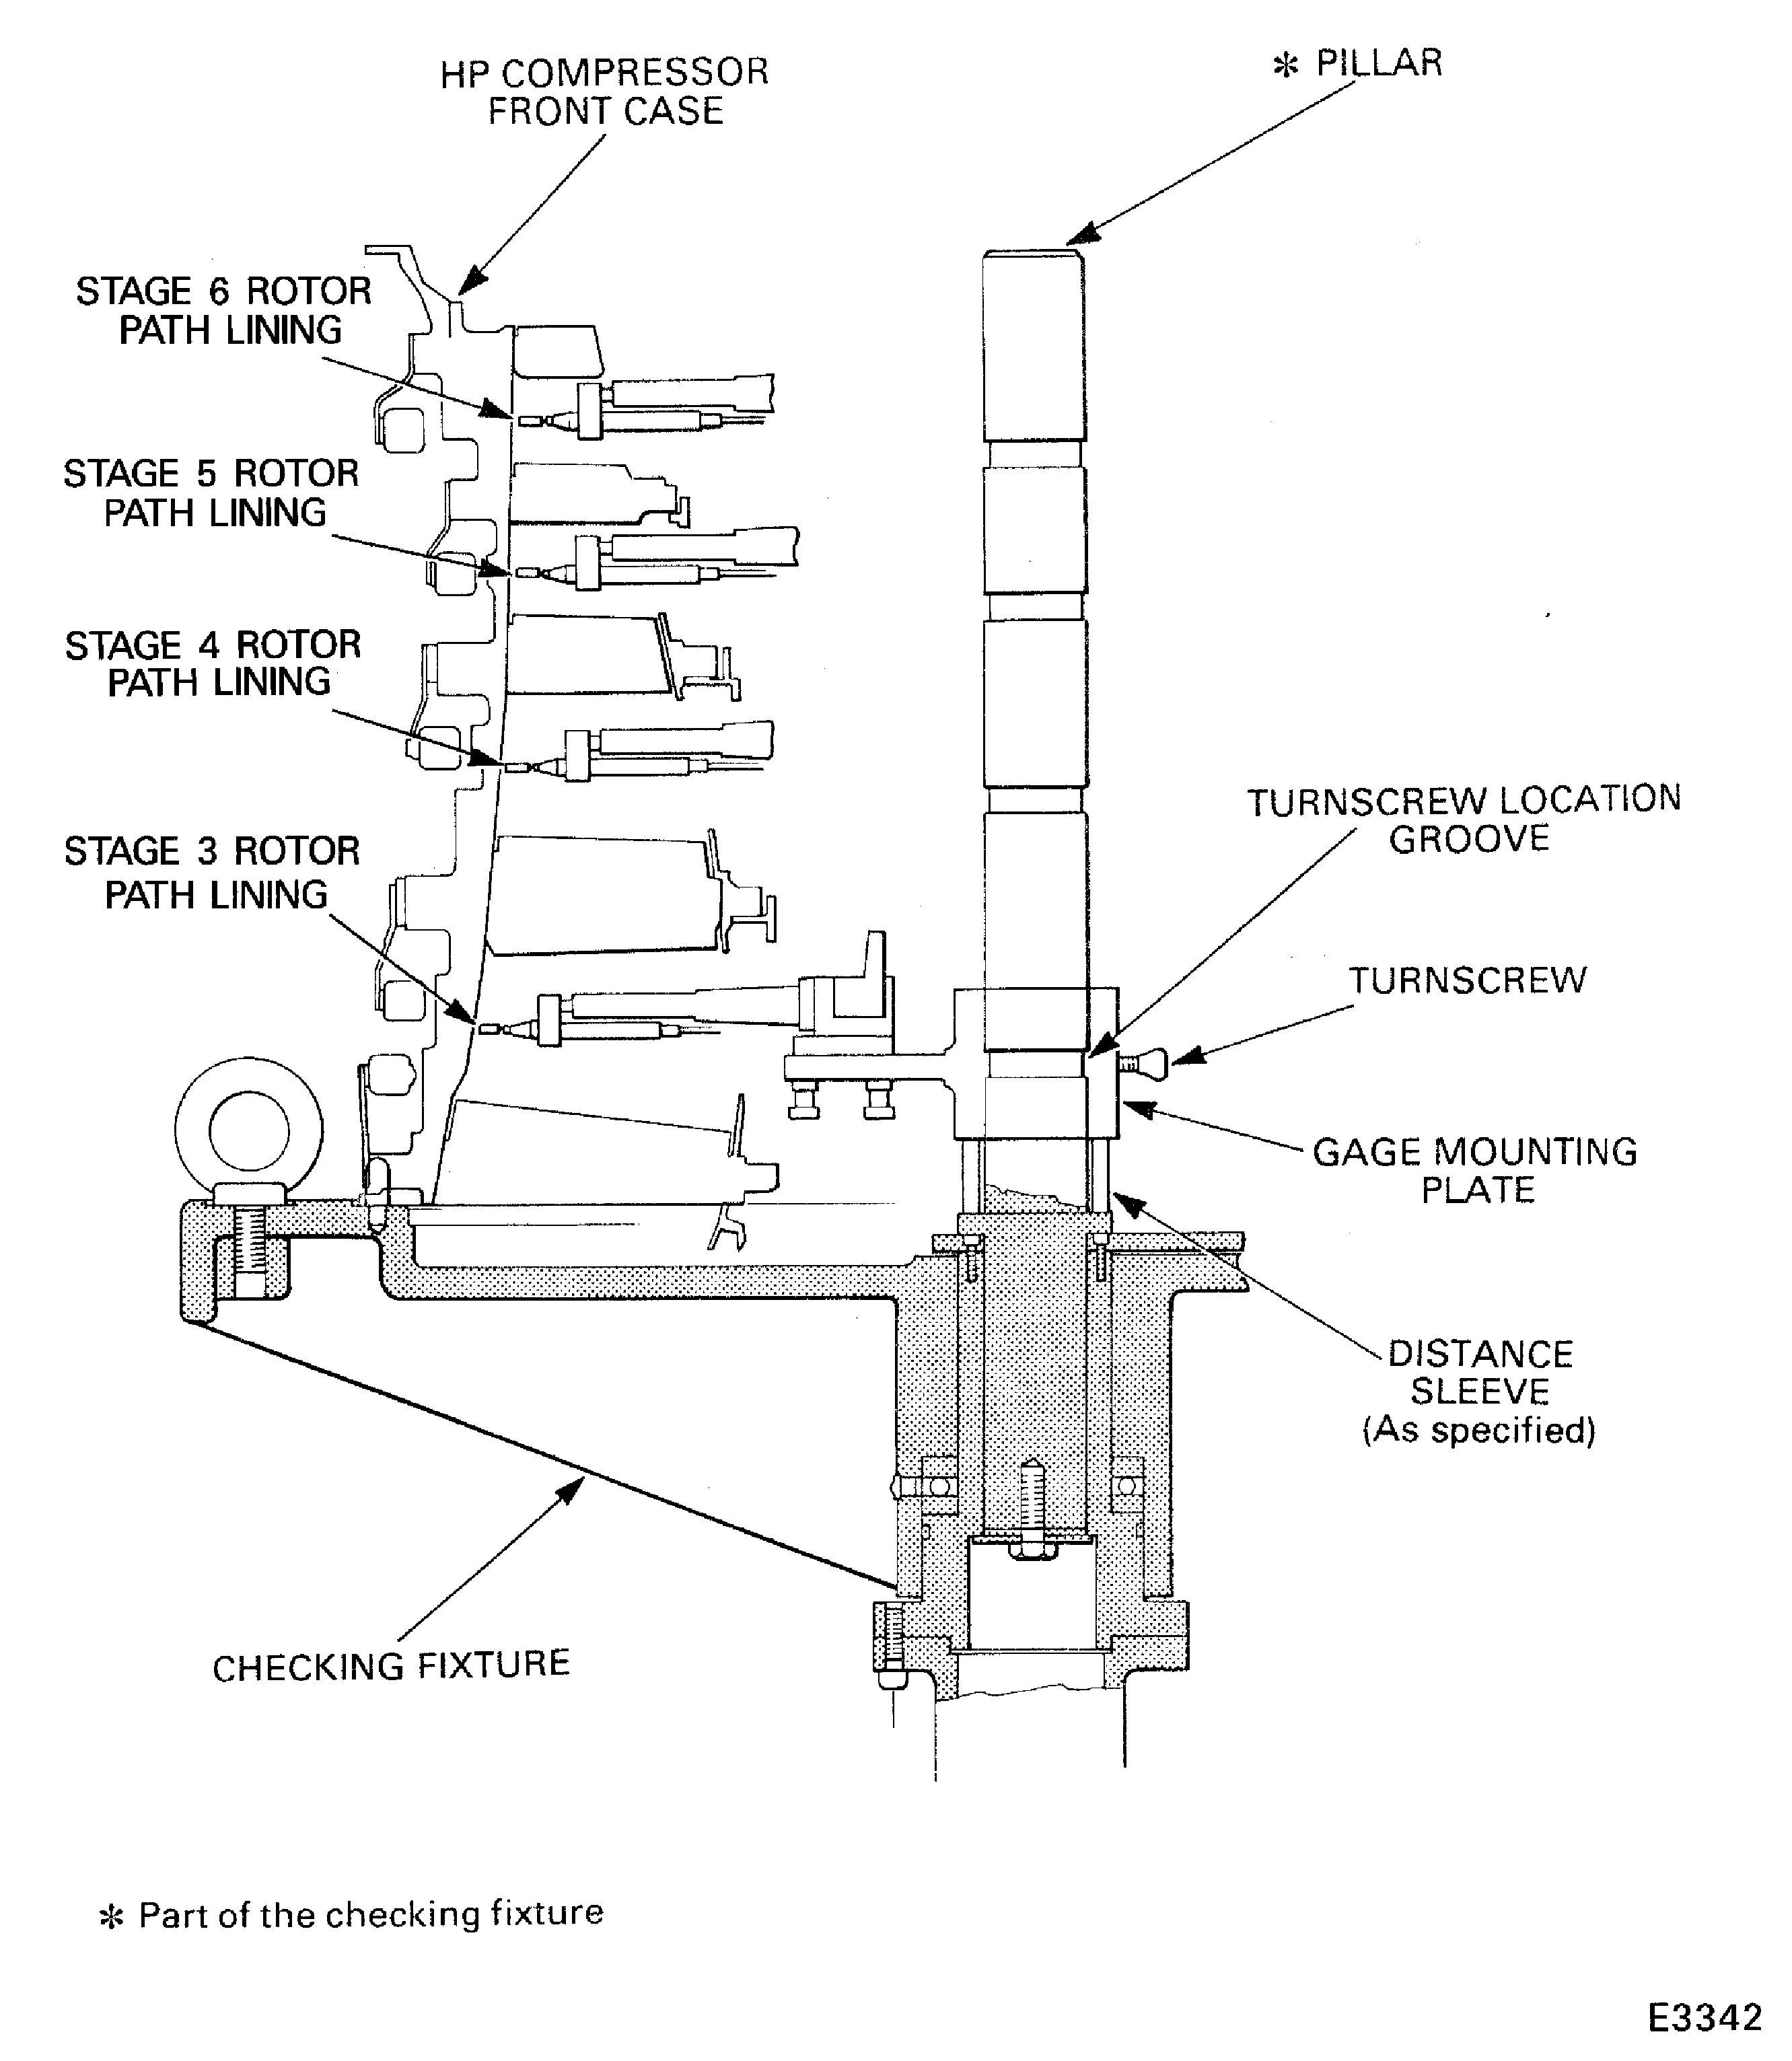
Figure: Assemble the tools to measure the stage 6 stator vane tip radius
Assemble the tools to measure the stage 6 stator vane tip radius
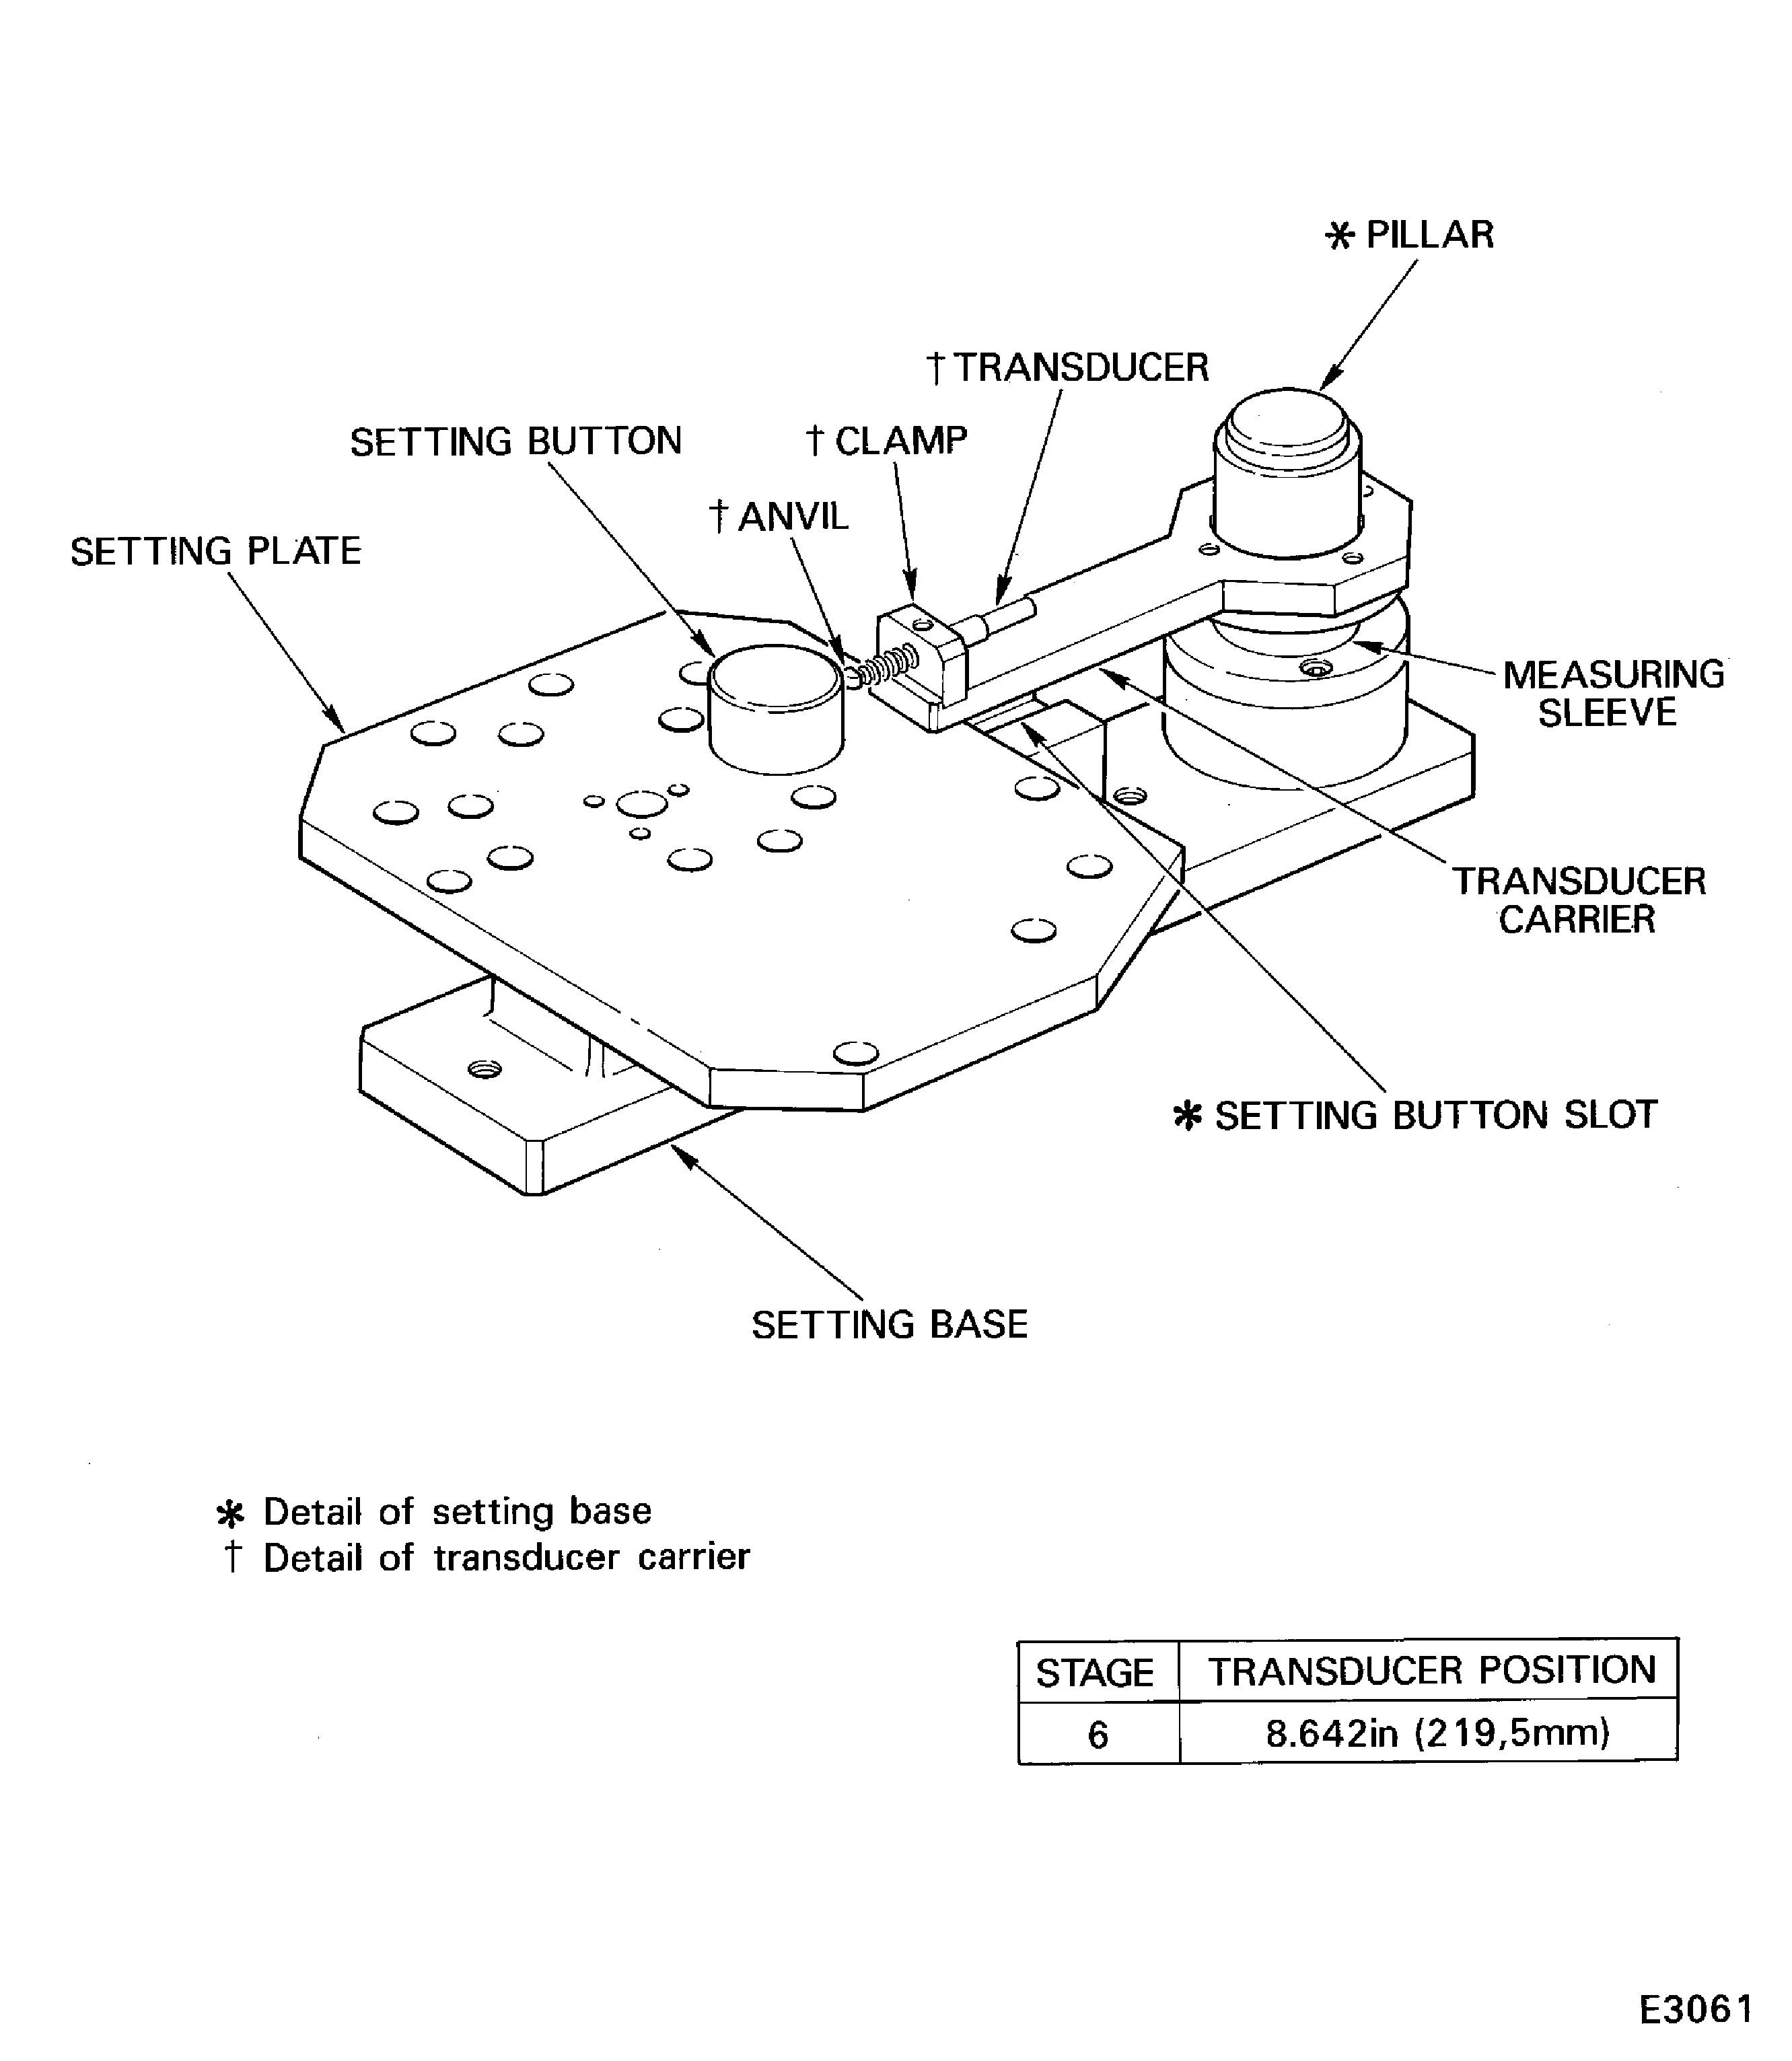
Figure: Measure the stage 6 stator vane tip radius
Measure the stage 6 stator vane tip radius
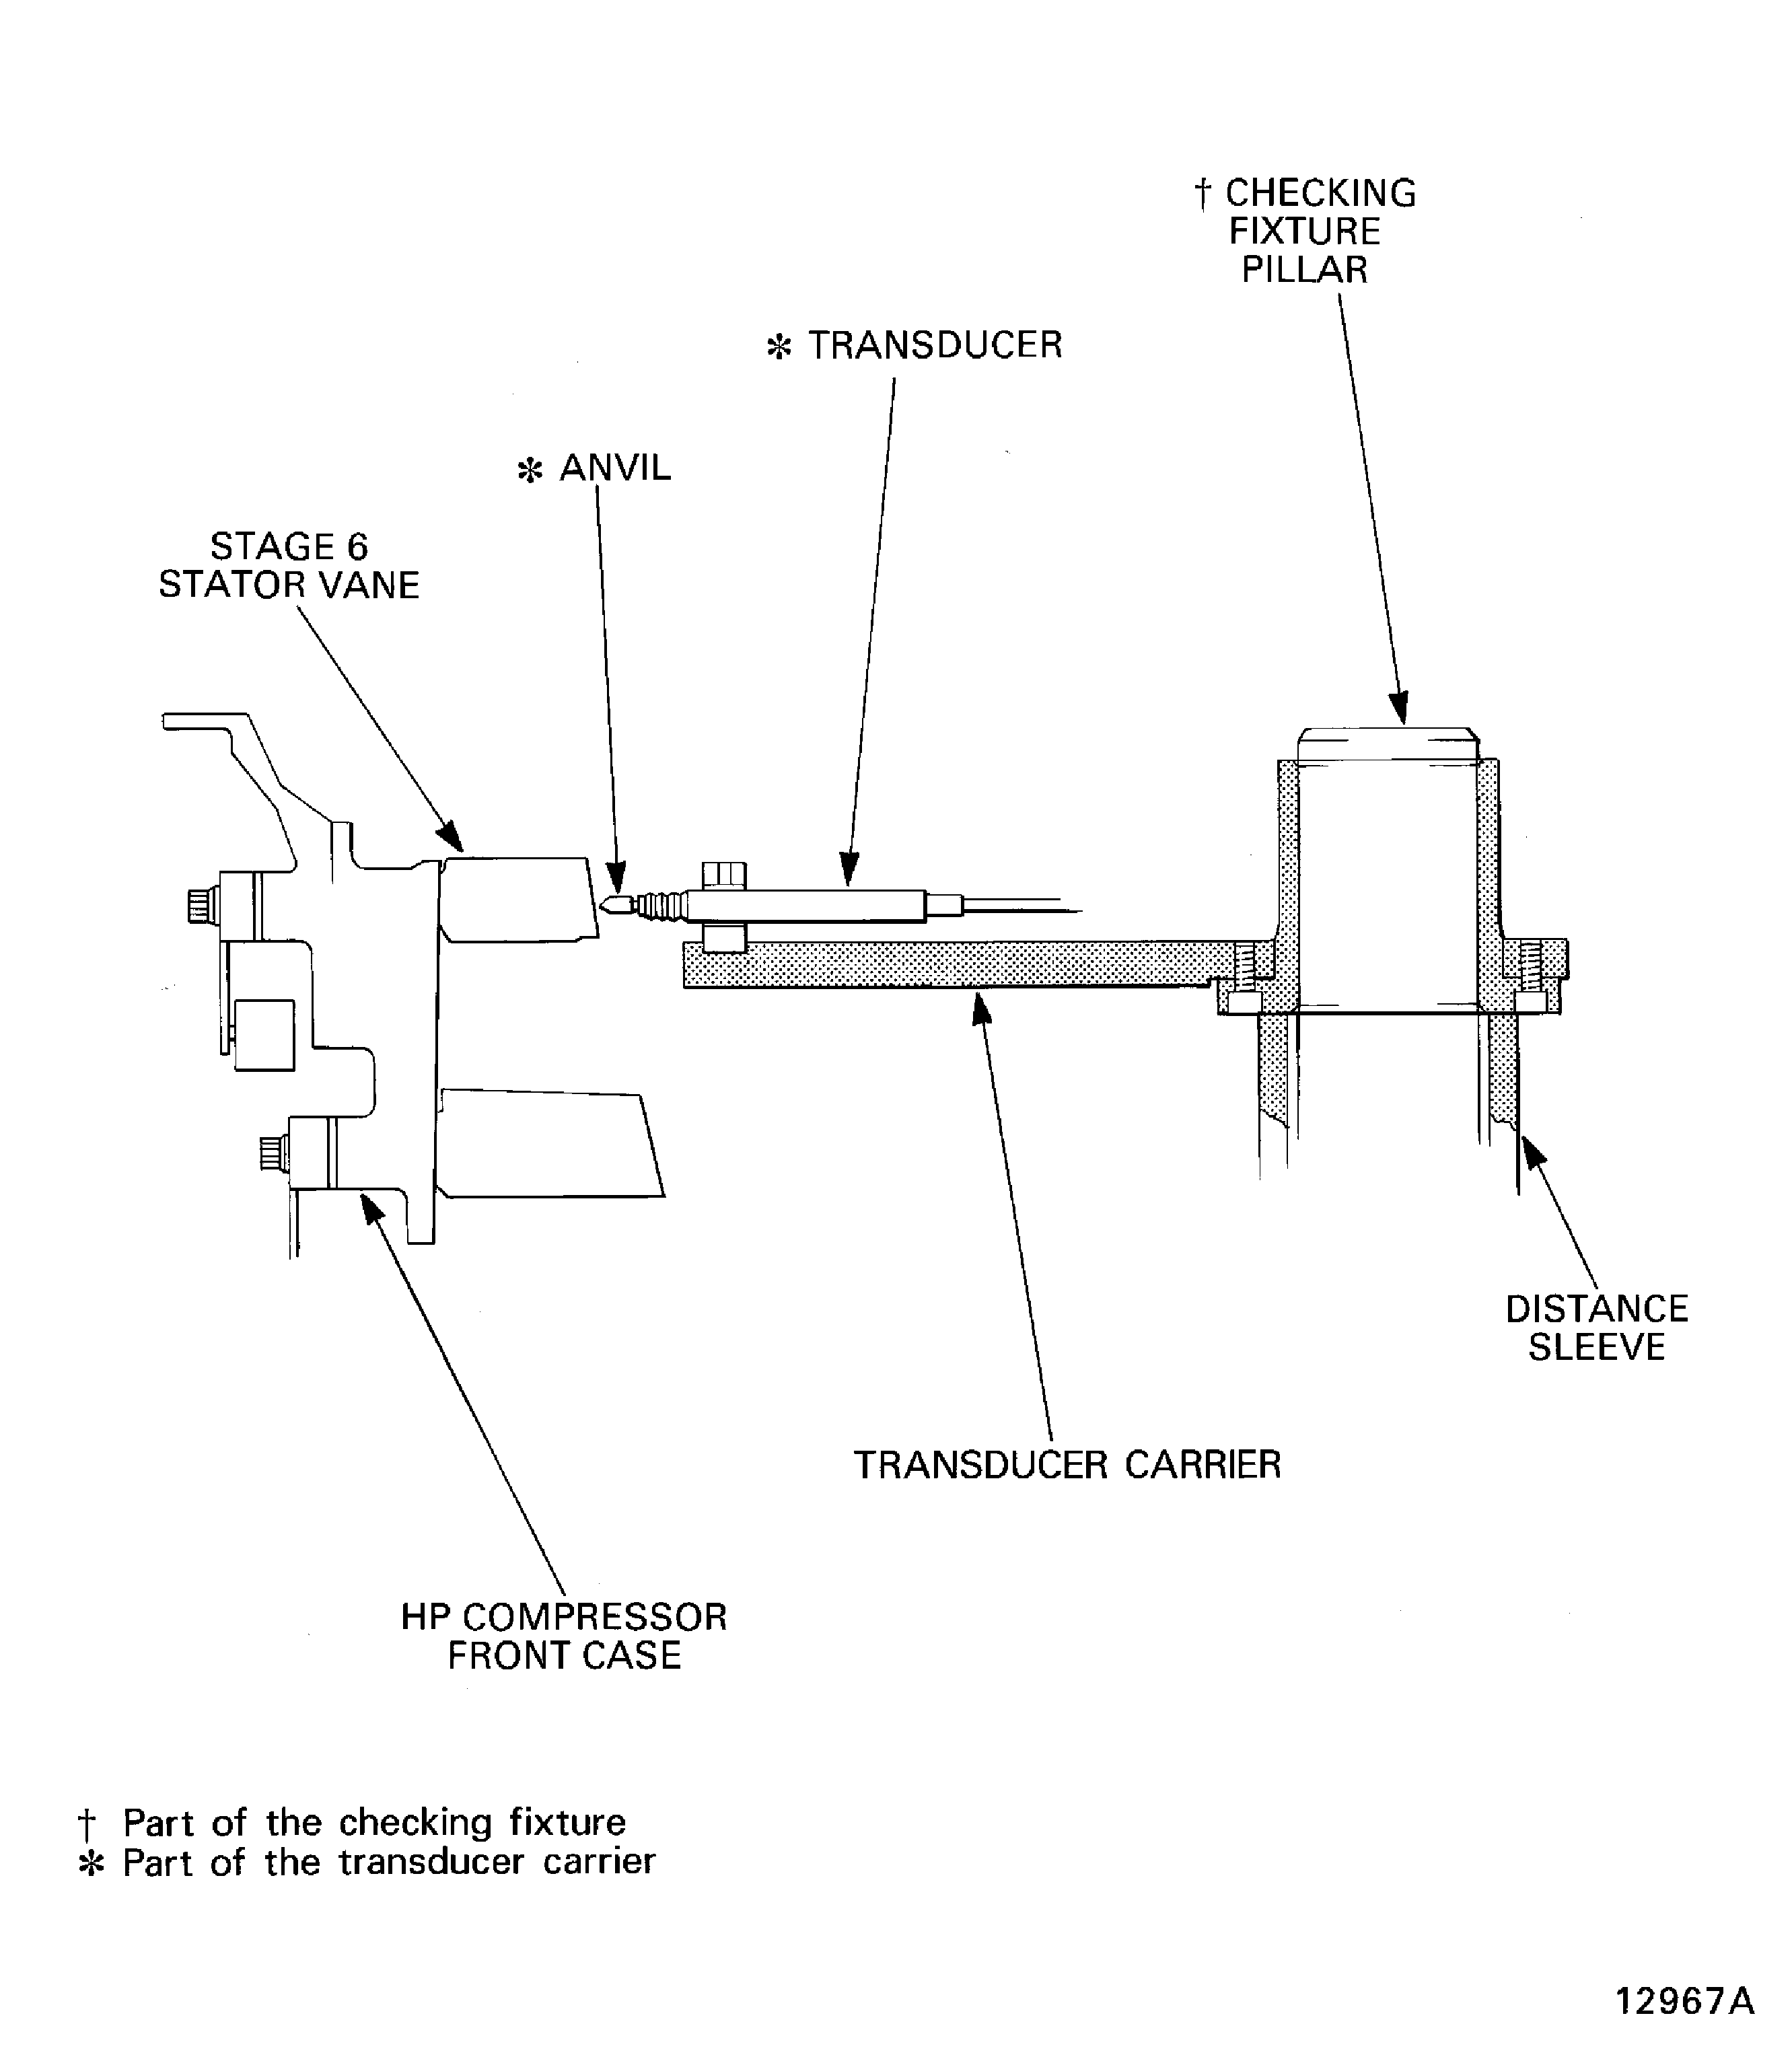
Figure: Pre SBE 72-0027: Measure the rotor path ring split line gaps
Sheet 1
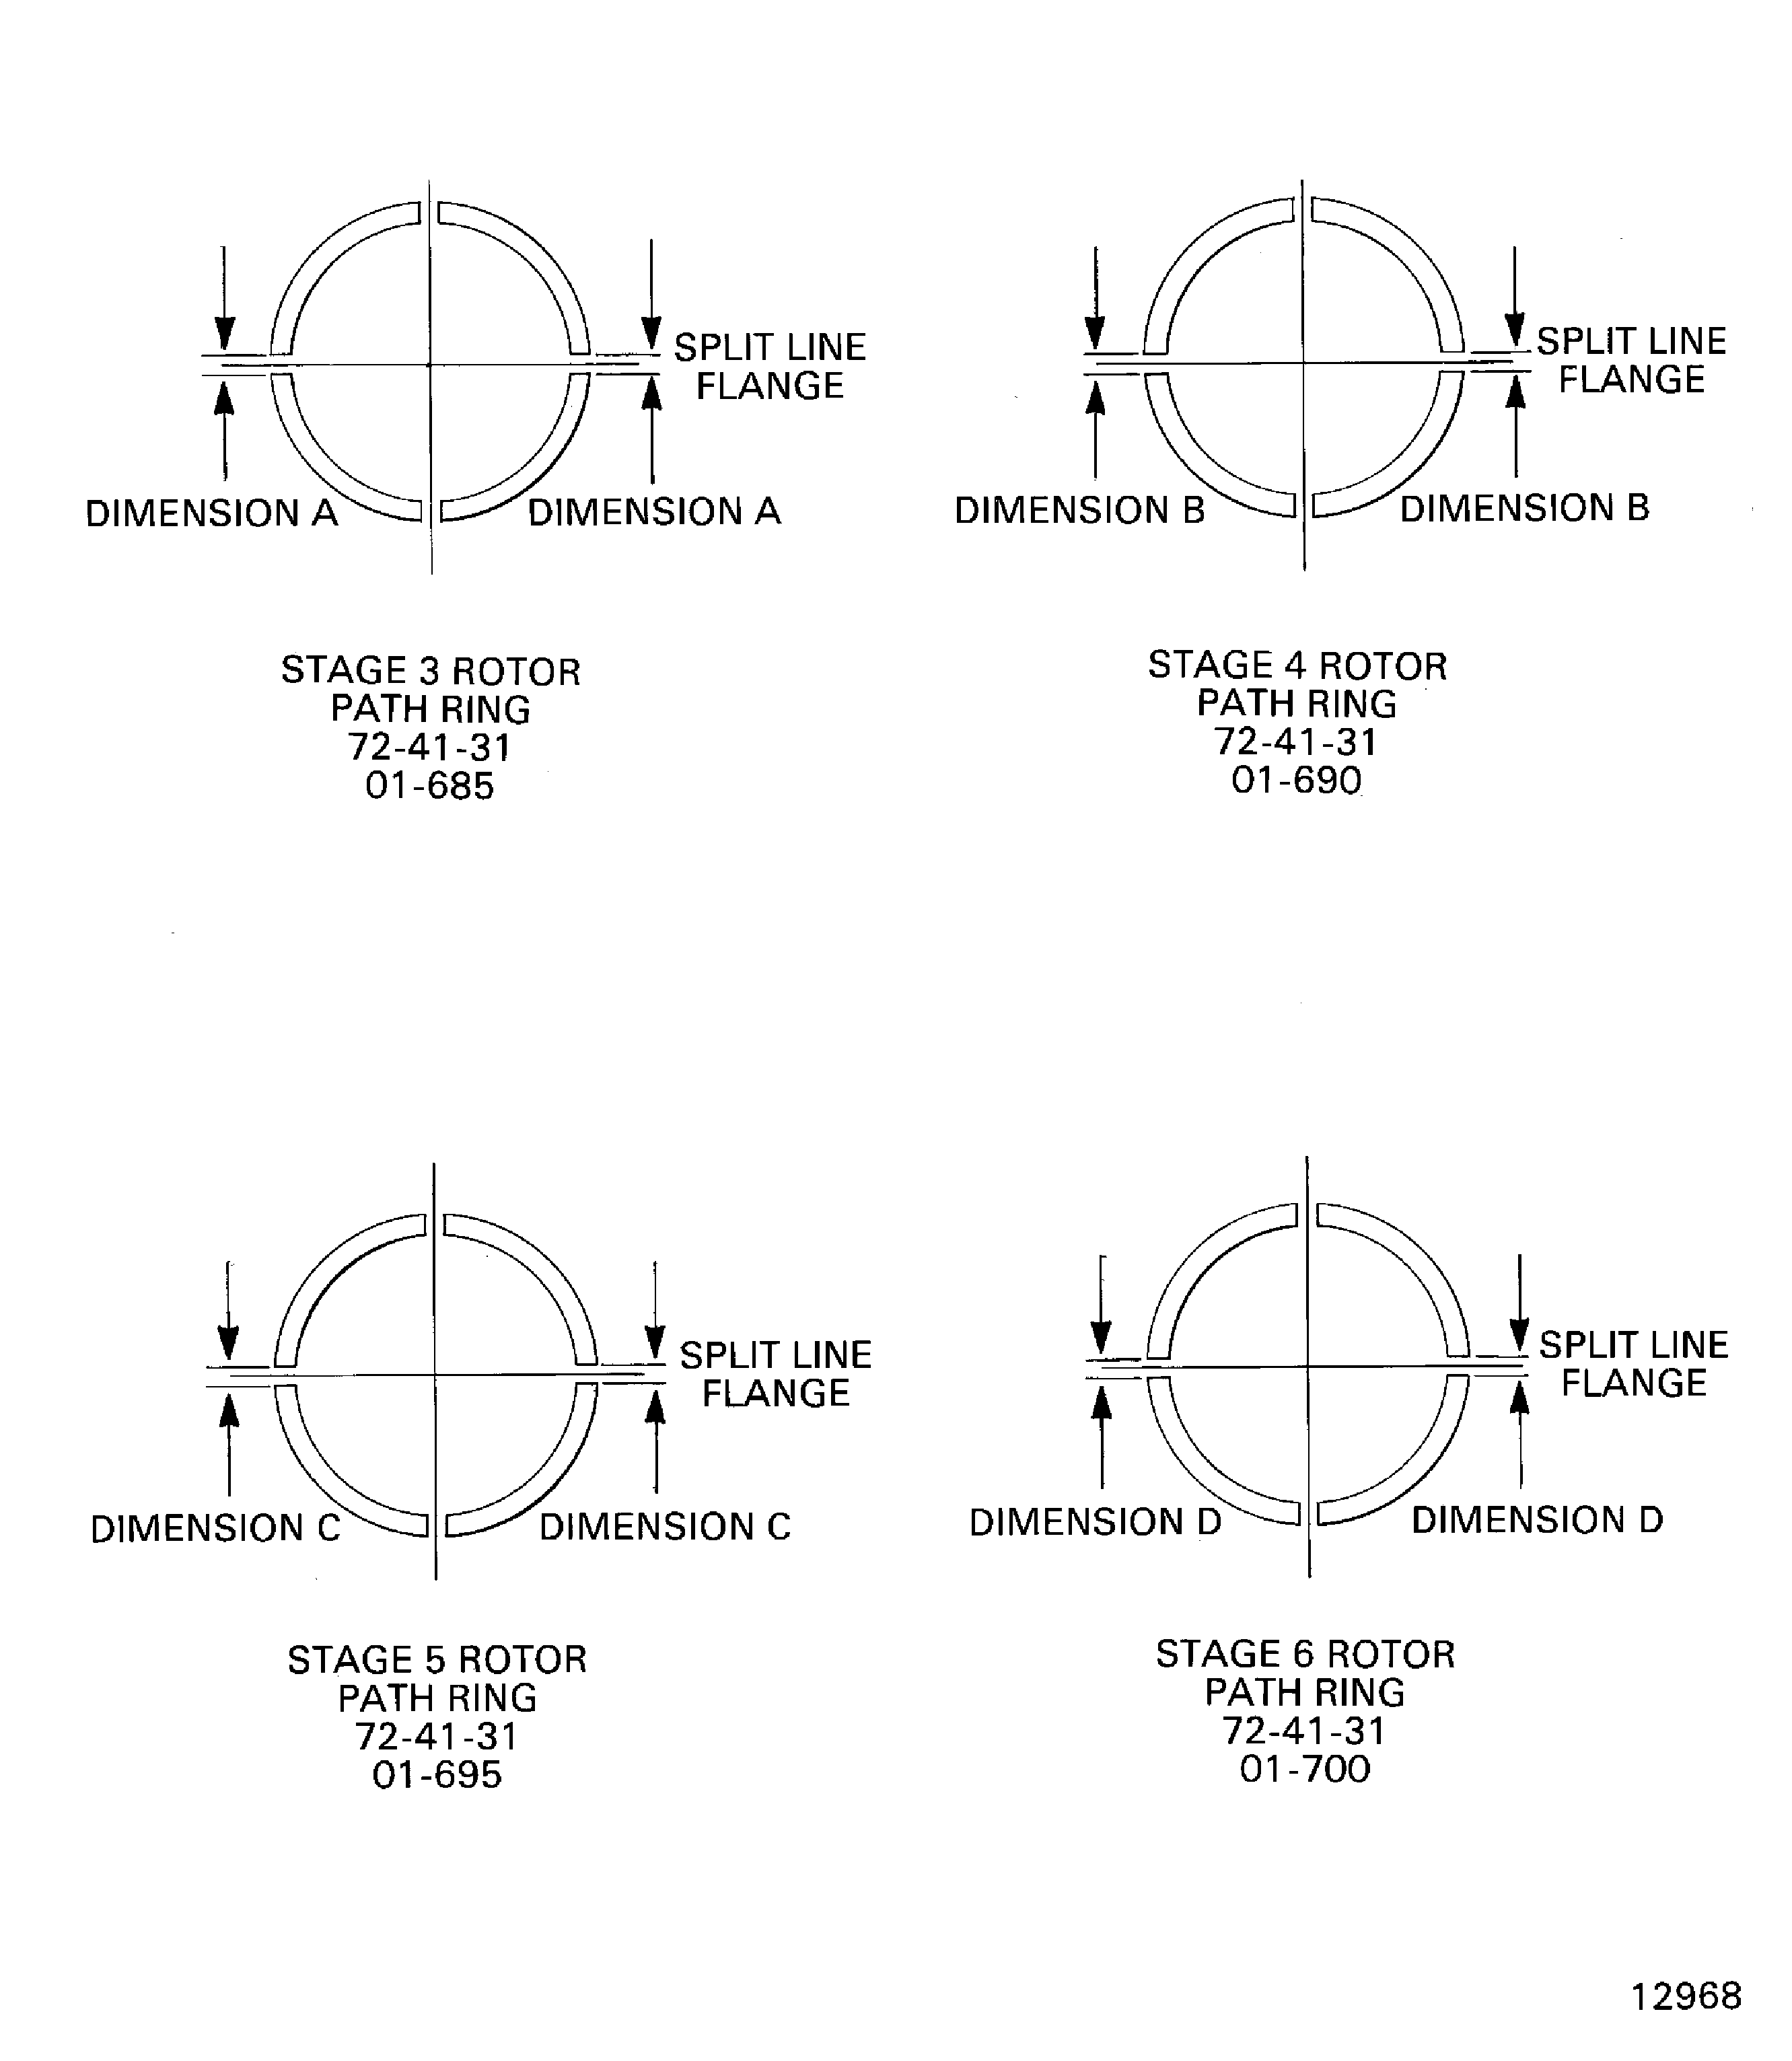
Figure: SBE 72-0027: Measure the rotor path ring split line gaps
Sheet 2
