Export Control
EAR Export Classification: Not subject to the EAR per 15 C.F.R. Chapter 1, Part 734.3(b)(3), except for the following Service Bulletins which are currently published as EAR Export Classification 9E991: SBE70-0992, SBE72-0483, SBE72-0580, SBE72-0588, SBE72-0640, SBE73-0209, SBE80-0024 and SBE80-0025.Copyright
© IAE International Aero Engines AG (2001, 2014 - 2021) The information contained in this document is the property of © IAE International Aero Engines AG and may not be copied or used for any purpose other than that for which it is supplied without the express written authority of © IAE International Aero Engines AG. (This does not preclude use by engine and aircraft operators for normal instructional, maintenance or overhaul purposes.).Applicability
V2500-A1 and POST SBE 72-0063
Common Information
TASK 72-50-00-430-002-B00 LP Turbine (LPT) And Turbine Exhaust Case (TEC) Unit - Assemble The TEC To The LPT Module, Assembly-002 - SBE 72-0063
General
Fig/item numbers in parentheses in the procedure agree with those used in the IPC. Only the primary Fig/item numbers are used. For the service bulletin alpha variants refer to the IPC.
For all parts identified in a different Chapter/Section/Subject, the applicable Chapter/Section/Subject comes before the Fig/item number.
For standard torque data and procedures, refer to SPM TASK 70-41-01-400-501, SPM TASK 70-41-00-400-501 and SPM TASK 70-41-01-400-501.
Special torque data and assembly tolerances are included in the procedure.
Lubricate all threads and abutment faces of nuts and bolts with CoMat 10-077 APPROVED ENGINE OILS, unless other lubricants are referred to in the procedure.
To identify, lubricate and install seal rings, refer to SPM TASK 70-64-02-640-501.
The number for each radial location must be identified in a clockwise direction. These start at the engine top position when you look from the rear of the engine, unless stated differently in the procedure.
Refer to TASK 72-50-00-990-501 for a sectional view of the LP turbine module.
For oil service tube installation reference the SPM TASK 70-41-00-400-501 for general torque tightening procedures.
NOTE
NOTE
Preliminary Requirements
Pre-Conditions
NONESupport Equipment
| Name | Manufacturer | Part Number / Identification | Quantity | Remark |
|---|---|---|---|---|
| IAE 1F10016 Mechanical wrench | 0AM53 | IAE 1F10016 | 1 | |
| IAE 1F10026 Hydraulic hand pump | 0AM53 | IAE 1F10026 | 1 | |
| IAE 1F10033 Hydraulic installation pusher | 0AM53 | IAE 1F10033 | 1 | |
| IAE 1F10034 Hydraulic installation pusher | 0AM53 | IAE 1F10034 | 1 | |
| IAE 1F10038 Torque wrench | 0AM53 | IAE 1F10038 | 1 | |
| IAE 1F10039 Anti-torque adapter | 0AM53 | IAE 1F10039 | 1 | |
| IAE 1F10040 Anchor wrench plate | 0AM53 | IAE 1F10040 | 1 | |
| IAE 1F10073 remove/installation fixture | 0AM53 | IAE 1F10073 | 1 | |
| IAE 1F10074 Guide pogo stick | 0AM53 | IAE 1F10074 | 1 | |
| IAE 1F10076 Locking collar | 0AM53 | IAE 1F10076 | 1 | |
| IAE 1F10153 Installation rod | 0AM53 | IAE 1F10153 | 1 | |
| IAE 1F10178 Storage and Turnover adapter | 0AM53 | IAE 1F10178 | 1 | |
| IAE 1P16374 Wrench support | 0AM53 | IAE 1P16374 | 1 | |
| IAE 1P16426 remove/installation driver | 0AM53 | IAE 1P16426 | 1 |
Consumables, Materials and Expendables
| Name | Manufacturer | Part Number / Identification | Quantity | Remark |
|---|---|---|---|---|
| CoMat 02-141 LOCKWIRE | LOCAL | CoMat 02-141 | ||
| CoMat 10-077 APPROVED ENGINE OILS | LOCAL | CoMat 10-077 |
Spares
| Name | Manufacturer | Part Number / Identification | Quantity | Remark |
|---|---|---|---|---|
| Washer | 2 | |||
| Packing | 3 | |||
| Packing | 1 | |||
| Washer | 2 | |||
| Packing | 1 |
Safety Requirements
NONEProcedure
Refer to Figure.
Reference the clearance at location 2275. If required, use the data written as a note in TASK 72-50-53-200-000 (INSPECTION-000) and TASK 72-50-00-200-000 (INSPECTION-000).
Table 1. Fits and Clearances (all dimensions are in inches) NEW PART
WORN PART
DIMENSIONS
DIMENSIONS
PART IDENT
Size
Clearance
Non-select
REJECT IF
MORE THAN
LOCATION 2275
No. 5 Bearing Housing ENGINE-EXHAUST CASE AND FITTINGS (72-50-53, 21-350)
The Stage 6 Inner Turbine Air Seal ATTACH PARTS & FITTINGS-LP TURBINE MINI MODULE (72-50-00, 01-240)
No. 5 Bearing Housing
5.5512
Clear
5.5551
0.0315
Stage 6 Inner Turbine Air Seal
5.5157
0.0394
5.5197
Clear
Table 2. Fits and Clearances (all dimensions are in millimeters) NEW PART
WORN PART
DIMENSIONS
DIMENSIONS
PART IDENT
Size
Clearance
Non-select
REJECT IF
MORE THAN
LOCATION 2275
No. 5 Bearing Housing ENGINE-EXHAUST CASE AND FITTINGS (72-50-53, 21-350)
The Stage 6 Inner Turbine Air Seal ATTACH PARTS & FITTINGS-LP TURBINE MINI MODULE (72-50-00, 01-240)
No. 5 Bearing Housing
141.001
Clear
141.099
0.800
Stage 6 Inner Turbine Air Seal
140.099
1.001
140.200
Clear
SUBTASK 72-50-00-220-089 Reference Fits and Clearances of Stage 6 Inner Turbine Air Seal and the No. 5 Bearing Housing at Location 2275
Refer to Figure.
Reference the interference at location 2277. If required, use the data written as a note in TASK 72-50-10-200-000 (INSPECTION-000) and TASK 72-50-53-200-000 (INSPECTION-000).
Table 3. Fits and Clearances (all dimensions are in inches) NEW PART
WORN PART
DIMENSIONS
DIMENSIONS
PART IDENT
Size
Clearance
Non-select
REJECT IF
MORE THAN
LOCATION 2277
LP Turbine Case ENGINE-LP TURBINE CASE AND ROTOR (72-50-10, 01-010)
Turbine Exhaust Case ENGINE-EXHAUST CASE AND FITTINGS (72-50-53, 21-300)
LP Turbine Case Diameter
38.6587
Intf
38.6480
Clear
38.6642
0.0000
38.6642
0.0244
Turbine Exhaust Case Bore
38.6524
0.0118
38.6524
0.0118
38.6587
Intf
38.6724
Intf
Table 4. Fits and Clearances (all dimensions are in millimeters) NEW PART
WORN PART
DIMENSIONS
DIMENSIONS
PART IDENT
Size
Clearance
Non-select
REJECT IF
MORE THAN
LOCATION 2277
LP Turbine Case ENGINE-LP TURBINE CASE AND ROTOR (72-50-10, 01-010)
Turbine Exhaust Case ENGINE-EXHAUST CASE AND FITTINGS (72-50-53, 21-300)
LP Turbine Case Diameter
981.931
Intf
981.66
Clear
982.070
0.000
982.07
0.62
Turbine Exhaust Case Bore
981.771
0.300
981.77
0.30
981.931
Intf
982.28
Intf
SUBTASK 72-50-00-220-090 Reference Fits and Clearances of the LP Turbine Case and the Turbine Exhaust Case at Location 2277
Refer to Figure.
Reference the interference at location 2271. If required, use the data written as a note in TASK 72-50-41-200-000 (INSPECTION-000) and TASK 72-50-52-200-000 (INSPECTION-000).
Table 5. Fits and Clearances (all dimensions are in inches) NEW PART
WORN PART
DIMENSIONS
DIMENSIONS
PART IDENT
Size
Clearance
Non-select
REJECT IF
MORE THAN
LOCATION 2271
LP Turbine Shaft ENGINE-LP TURBINE SHAFT (72-50-41, 01-200)
The No. 5 Bearing ENGINE-NO.5 BEARING PLATE AND OIL DEFLECTOR (72-50-52, 20-060)
LP Turbine Shaft Diameter
3.6224
Intf
3.6228
0.0003
No. 5 Bearing Bore
3.6217
0.0011
3.6220
Intf
Table 6. Fits and Clearances (all dimensions are in millimeters) NEW PART
WORN PART
DIMENSIONS
DIMENSIONS
PART IDENT
Size
Clearance
Non-select
REJECT IF
MORE THAN
LOCATION 2271
LP Turbine Shaft ENGINE-LP TURBINE SHAFT (72-50-41, 01-200)
The No. 5 Bearing ENGINE-NO.5 BEARING PLATE AND OIL DEFLECTOR (72-50-52, 20-060)
LP Turbine Shaft Diameter
92.009
Intf
92.019
0.008
No. 5 Bearing Bore
91.991
0.028
91.999
Intf
SUBTASK 72-50-00-220-091 References Fits and Clearances of the LP Turbine Shaft and the No. 5 Bearing at Location 2271
Refer to Figure.
Reference the clearance at location 2272. If required, use the data written as a note in TASK 72-50-41-200-000 (INSPECTION-000) and TASK 72-50-42-200-000 (INSPECTION-000).
Table 7. Fits and Clearances (all dimensions are in inches) NEW PART
WORN PART
DIMENSIONS
DIMENSIONS
PART IDENT
Size
Clearance
Non-select
REJECT IF
MORE THAN
LOCATION 2272
LP Turbine Shaft ENGINE-LP TURBINE SHAFT (72-50-41, 01-200)
The No. 5 Bearing Seal Spacer ENGINE-NO.5 BEARING ASSEMBLY AND SEAL (72-50-42, 20-120)
LP Turbine Shaft Diameter
3.7392
Clear
3.7398
0.0004
No. 5 Bearing Seal Spacer
3.7402
0.0019
3.7411
Clear
Table 8. Fits and Clearances (all dimensions are in millimeters) NEW PART
WORN PART
DIMENSIONS
DIMENSIONS
PART IDENT
Size
Clearance
Non-select
REJECT IF
MORE THAN
LOCATION 2272
LP Turbine Shaft ENGINE-LP TURBINE SHAFT (72-50-41, 01-200)
The No. 5 Bearing Seal Spacer ENGINE-NO.5 BEARING ASSEMBLY AND SEAL (72-50-42, 20-120)
LP Turbine Shaft Diameter
94.976
Clear
94.991
0.010
No. 5 Bearing Seal Spacer
95.001
0.048
95.024
Clear
SUBTASK 72-50-00-220-092 Reference Fits and Clearances of the LP Turbine Shaft and the No. 5 Bearing Seal Spacer at Location 2272
Refer to Figure.
Reference the clearance at location 2273. If required, use the data written as a note in TASK 72-50-41-200-000 (INSPECTION-000) and TASK 72-50-42-200-000 (INSPECTION-000).
Table 9. Fits and Clearances (all dimensions are in inches) NEW PART
WORN PART
DIMENSIONS
DIMENSIONS
PART IDENT
Size
Clearance
Non-select
REJECT IF
MORE THAN
LOCATION 2273
LP Turbine Shaft ENGINE-LP TURBINE SHAFT (72-50-41, 01-200)
The No. 5 Bearing Seal Spacer ENGINE-NO.5 BEARING ASSEMBLY AND SEAL (72-50-42, 20-160)
LP Turbine Shaft Diameter
3.739
Clear
3.740
0.008
No. 5 Bearing Seal Spacer
3.748
0.019
3.758
Clear
Table 10. Fits and Clearances (all dimensions are in millimeters) NEW PART
WORN PART
DIMENSIONS
DIMENSIONS
PART IDENT
Size
Clearance
Non-select
REJECT IF
MORE THAN
LOCATION 2273
LP Turbine Shaft ENGINE-LP TURBINE SHAFT (72-50-41, 01-200)
The No. 5 Bearing Seal Spacer ENGINE-NO.5 BEARING ASSEMBLY AND SEAL (72-50-42, 20-160)
LP Turbine Shaft Diameter
94.971
Clear
94.996
0.200
No. 5 Bearing Seal Spacer
95.200
0.480
95.450
Clear
SUBTASK 72-50-00-220-093-A00 Reference Fits and Clearances of the LP Turbine Shaft and the No. 5 Bearing Seal Spacer at Location 2273 (Pre SBE 72-0165)
Refer to Figure.
Reference the clearance at location 2273. If required, use the data written as a note in TASK 72-50-41-200-000 (INSPECTION-000) and TASK 72-50-42-200-000 (INSPECTION-000).
Table 11. Fits and Clearances (all dimensions are in inches) NEW PART
WORN PART
DIMENSIONS
DIMENSIONS
PART IDENT
Size
Clearance
Non-select
REJECT IF
MORE THAN
LOCATION 2273
LP Turbine Shaft ENGINE-LP TURBINE SHAFT (72-50-41, 01-200)
No. 5 Bearing Seal Spacer ENGINE-NO.5 BEARING ASSEMBLY AND SEAL (72-50-42, 20-160)
LP Turbine Shaft Diameter
3.739
Clear
3.740
0.004
No. 5 Bearing Seal Spacer
3.744
0.006
3.745
Clear
Table 12. Fits and Clearances (all dimensions are in millimeters) NEW PART
WORN PART
DIMENSIONS
DIMENSIONS
PART IDENT
Size
Clearance
Non-select
REJECT IF
MORE THAN
LOCATION 2273
LP Turbine Shaft ENGINE-LP TURBINE SHAFT (72-50-41, 01-200)
No. 5 Bearing Seal Spacer ENGINE-NO.5 BEARING ASSEMBLY AND SEAL (72-50-42, 20-160)
LP Turbine Shaft Diameter
94.971
Clear
94.946
0.102
No. 5 Bearing Seal Spacer
95.098
0.152
95.123
Clear
SUBTASK 72-50-00-220-093-B00 Reference Fits and Clearances of the LP Turbine Shaft and the No. 5 Bearing Seal Spacer at Location 2273 (SBE 72-0165)
Refer to Figure.
Reference the clearance at location 2274. If required, use the data written as a note in TASK 72-50-42-200-000 (INSPECTION-000).
Table 13. Fits and Clearances (all dimensions are in inches) NEW PART
WORN PART
DIMENSIONS
DIMENSIONS
PART IDENT
Size
Clearance
Non-select
REJECT IF
MORE THAN
LOCATION 2274
No. 5 Bearing Seal Spacer ENGINE-NO.5 BEARING ASSEMBLY AND SEAL (72-50-42, 20-120)
No. 5 Bearing Seal Spacer ENGINE-NO.5 BEARING ASSEMBLY AND SEAL (72-50-42, 20-160)
No. 5 Bearing Seal Spacer
4.0645
Clear
4.0655
0.002
No. 5 Bearing Seal Spacer
4.0675
0.004
4.0685
Clear
Table 14. Fits and Clearances (all dimensions are in millimeters) NEW PART
WORN PART
DIMENSIONS
DIMENSIONS
PART IDENT
Size
Clearance
Non-select
REJECT IF
MORE THAN
LOCATION 2274
No. 5 Bearing Seal Spacer ENGINE-NO.5 BEARING ASSEMBLY AND SEAL (72-50-42, 20-120)
No. 5 Bearing Seal Spacer ENGINE-NO.5 BEARING ASSEMBLY AND SEAL (72-50-42, 20-160)
No. 5 Bearing Seal Spacer
103.238
Clear
103.264
0.051
No. 5 Bearing Seal Spacer
103.314
0.102
103.340
Clear
SUBTASK 72-50-00-220-094 Reference Fits and Clearances of the No. 5 Bearing Seal Spacers at Location 2274
Refer to Figure.
Reference the clearance at location 2283. If required, use the data written as a note in TASK 72-58-02-200-000 (INSPECTION-000) and TASK 72-50-53-200-000 (INSPECTION-000).
Table 15. Fits and Clearances (all dimensions are in inches) NEW PART
WORN PART
DIMENSIONS
DIMENSIONS
PART IDENT
Size
Clearance
Non-select
REJECT IF
MORE THAN
LOCATION 2283
No. 5 Bearing Nozzle NO.5 BEARING OIL JET AND FILTER (72-58-02, 01-070)
The Turbine Exhaust Case ENGINE-EXHAUST CASE AND FITTINGS (72-50-53, 21-300)
No. 5 Bearing Nozzle
0.534
Clear
0.536
0.002
Turbine Exhaust Case
0.538
0.008
0.542
Clear
Table 16. Fits and Clearances (all dimensions are in millimeters) NEW PART
WORN PART
DIMENSIONS
DIMENSIONS
PART IDENT
Size
Clearance
Non-select
REJECT IF
MORE THAN
LOCATION 2283
No. 5 Bearing Nozzle NO.5 BEARING OIL JET AND FILTER (72-58-02, 01-070)
The Turbine Exhaust Case ENGINE-EXHAUST CASE AND FITTINGS (72-50-53, 21-300)
No. 5 Bearing Nozzle
13.564
Clear
13.614
0.051
Turbine Exhaust Case
13.665
0.203
13.767
Clear
SUBTASK 72-50-00-220-095 Reference Fits and Clearances of the No. 5 Bearing Nozzle and the Turbine Exhaust Case at Location 2283
Refer to Figure.
Reference the clearance at location 2284. If required, use the data written as a note in TASK 72-58-02-200-000 (INSPECTION-000) and TASK 72-50-53-200-000 (INSPECTION-000).
Table 17. Fits and Clearances (all dimensions are in inches) NEW PART
WORN PART
DIMENSIONS
DIMENSIONS
PART IDENT
Size
Clearance
Non-select
REJECT IF
MORE THAN
LOCATION 2284
No. 5 Bearing Transfer Tube NO.5 BEARING OIL JET AND FILTER (72-58-02, 01-030)
Turbine Exhaust Case ENGINE-EXHAUST CASE AND FITTINGS (72-50-53, 21-300)
No. 5 Bearing Transfer Tube
0.359
Clear
0.361
0.017
Turbine Exhaust Case
0.378
0.023
0.382
Clear
Table 18. Fits and Clearances (all dimensions are in millimeters) NEW PART
WORN PART
DIMENSIONS
DIMENSIONS
PART IDENT
Size
Clearance
Non-select
REJECT IF
MORE THAN
LOCATION 2284
No. 5 Bearing Transfer Tube NO.5 BEARING OIL JET AND FILTER (72-58-02, 01-030)
Turbine Exhaust Case ENGINE-EXHAUST CASE AND FITTINGS (72-50-53, 21-300)
No. 5 Bearing Transfer Tube
9.119
Clear
9.169
0.432
Turbine Exhaust Case
9.601
0.584
9.703
Clear
SUBTASK 72-50-00-220-096 Reference Fits and Clearances of the No. 5 Bearing Transfer Tube and the Turbine Exhaust Case at Location 2284
Refer to Figure.
Reference the clearance at location 2285. If required, use the data written as a note in TASK 72-58-02-200-000 (INSPECTION-000).
Table 19. Fits and Clearances (all dimensions in inches) NEW PART
WORN PART
DIMENSIONS
DIMENSIONS
PART IDENT
Size
Clearance
Non-select
REJECT IF
MORE THAN
LOCATION 2285
No. 5 Bearing Transfer Tube NO.5 BEARING OIL JET AND FILTER (72-58-02, 01-030)
No. 5 Bearing Nozzle NO.5 BEARING OIL JET AND FILTER (72-58-02, 01-070)
No. 5 Bearing Transfer Tube
0.359
Clear
0.361
0.017
No. 5 Bearing Nozzle
0.378
0.023
0.382
Clear
Table 20. Fits and Clearances (all dimensions in millimetres) NEW PART
WORN PART
DIMENSIONS
DIMENSIONS
PART IDENT
Size
Clearance
Non-select
REJECT IF
MORE THAN
LOCATION 2285
No. 5 Bearing Transfer Tube NO.5 BEARING OIL JET AND FILTER (72-58-02, 01-030)
No. 5 Bearing Nozzle NO.5 BEARING OIL JET AND FILTER (72-58-02, 01-070)
No. 5 Bearing Transfer Tube
9.119
Clear
9.169
0.432
No. 5 Bearing Nozzle
9.601
0.584
9.703
Clear
SUBTASK 72-50-00-220-097 Reference Fits and Clearances of the No. 5 Bearing Transfer Tube and the No. 5 Bearing Nozzle at Location 2285
Refer to Figure.
Reference the clearance at location 2286. If required, use the data written as a note in TASK 72-58-02-200-000 (INSPECTION-000).
Table 21. Fits and Clearances (all dimensions in inches) NEW PART
WORN PART
DIMENSIONS
DIMENSIONS
PART IDENT
Size
Clearance
Non-select
REJECT IF
MORE THAN
LOCATION 2286
No. 5 Bearing Transfer Tube NO.5 BEARING OIL JET AND FILTER (72-58-02, 01-030)
No. 5 Bearing Nozzle NO.5 BEARING OIL JET AND FILTER (72-58-02, 01-070)
No. 5 Bearing Transfer Tube
0.394
Clear
0.396
0.017
No. 5 Bearing Nozzle
0.413
0.023
0.417
Clear
Table 22. Fits and Clearances (all dimensions in millimeters) NEW PART
WORN PART
DIMENSIONS
DIMENSIONS
PART IDENT
Size
Clearance
Non-select
REJECT IF
MORE THAN
LOCATION 2286
No. 5 Bearing Transfer Tube NO.5 BEARING OIL JET AND FILTER (72-58-02, 01-030)
No. 5 Bearing Nozzle NO.5 BEARING OIL JET AND FILTER (72-58-02, 01-070)
No. 5 Bearing Transfer Tube
10.008
Clear
10.058
0.432
No. 5 Bearing Nozzle
10.490
0.584
10.592
Clear
SUBTASK 72-50-00-220-098 Reference Fits and Clearances of the No. 5 Bearing Transfer Tube and the No. 5 Bearing Nozzle at Location 2286
Refer to Figure.
Reference the interference at location 3792. If required, use the data written as a note in TASK 72-50-32-200-000 (INSPECTION-000) and TASK 72-50-53-200-000 (INSPECTION-000).
Table 23. Fits and Clearances (all dimensions are in inches) NEW PART
WORN PART
DIMENSIONS
DIMENSIONS
PART IDENT
Size
Clearance
Non-select
REJECT IF
MORE THAN
LOCATION 3792
Stage 7 LP Turbine Blade ENGINE-LP TURBINE BLADES (72-50-32, 01-010)
The Turbine Exhaust Case ENGINE-EXHAUST CASE AND FITTINGS (72-50-53, 21-300)
Stage 7 LP Turbine Blade
0.0740 Minimum
Turbine Exhaust Case
0.1770 Maximum
Table 24. Fits and Clearances (all dimensions are in millimeters) NEW PART
WORN PART
DIMENSIONS
DIMENSIONS
PART IDENT
Size
Clearance
Non-select
REJECT IF
MORE THAN
LOCATION 3792
Stage 7 LP Turbine Blade ENGINE-LP TURBINE BLADES (72-50-32, 01-010)
The Turbine Exhaust Case ENGINE-EXHAUST CASE AND FITTINGS (72-50-53, 21-300)
Stage 7 LP Turbine Blade
1.879 Minimum
Turbine Exhaust Case
4.493 Maximum
SUBTASK 72-50-00-220-099 Reference Fits and Clearances of the Stage 7 Turbine Blade and the Turbine Exhaust Case at Location 3792
Refer to Figure.
Install the IAE 1F10033 Hydraulic installation pusher 1 off on the rear end of the LP turbine shaft. Attach the reaction adapter (part of the hydraulic installation pusher) to the rear thread of the LP turbine shaft.
Connect the IAE 1F10026 Hydraulic hand pump 1 off to the coupler of the pusher.
SUBTASK 72-50-00-430-089-A00 Install the Carbon Seal to the LP Turbine Shaft, , Detail A (Pre SBE 72-0162)
Refer to Figure.
SBE 72-0162: Introduce a new No. 5 bearing face seal
Use a No. 5 bearing carbon seal from the seal option ENGINE-NO.5 BEARING ASSEMBLY AND SEAL (72-50-42, 20-140).
Soak the carbon seal in hot CoMat 10-077 APPROVED ENGINE OILS for ten minutes.
Install the No. 5 bearing carbon seal as follows:
SUBTASK 72-50-00-430-089-B00 Install the Carbon Seal to the LP Turbine Shaft, , Detail B (SBE 72-0162)
Refer to Figure.
Install the No. 5 bearing seal spacers ENGINE-NO.5 BEARING ASSEMBLY AND SEAL (72-50-42, 20-160) to the rear end of the LP turbine shaft.
Lightly coat the No. 5 bearing carbon seal (20-140) with CoMat 10-077 APPROVED ENGINE OILS.
Install the IAE 1F10033 Hydraulic installation pusher 1 off on the rear end of the LP turbine shaft. Attach the reaction adapter (part of the hydraulic installation pusher) to the rear thread of the LP turbine shaft.
Connect the IAE 1F10026 Hydraulic hand pump 1 off to the coupler of the pusher.
SUBTASK 72-50-00-430-089-C00 Install the No. 5 Bearing Seal and Spacers onto the LP Turbine Shaft (Pre SBE 72-0165)

CAUTION
MAKE SURE THE LIP OF THE NO. 5 BEARING SEAL SPACER POINTS TOWARDS THE REAR.Refer to Figure.
SBE 72-0165: Replace the No. 5 bearing seal spacer with a spacer incorporating fool-proof installation features
Install the No. 5 bearing seal spacer ENGINE-NO.5 BEARING ASSEMBLY AND SEAL (72-50-42, 20-160) to the rear end of the LP turbine shaft.
Lightly coat the No. 5 bearing carbon seal (20-140) with CoMat 10-077 APPROVED ENGINE OILS with a lint free cloth.
Install the IAE 1F10033 Hydraulic installation pusher 1 off on the rear end of the LP turbine shaft. Attach the reaction adapter (part of the hydraulic installation pusher) to the rear thread of the LP turbine shaft.
Connect the IAE 1F10026 Hydraulic hand pump 1 off to the coupler of the pusher.
SUBTASK 72-50-00-430-089-D00 Install the No. 5 Bearing Seal and Spacers onto the LP Turbine Shaft (SBE 72-0165)
Refer to Figure.
Install the IAE 1F10034 Hydraulic installation pusher 1 off on the rear end of the LP turbine shaft. Attach the reaction adapter (part of the hydraulic installation pusher) to the rear thread of the LP turbine shaft.
Connect the IAE 1F10026 Hydraulic hand pump 1 off to the coupler of the pusher.
SUBTASK 72-50-00-430-090-A00 Install the No. 5 Bearing Inner Race (Pre SBE 72-0165)
Refer to Figure.
SBE 72-0165: Replace the No. 5 bearing seal spacer incorporating fool-proof installation features
Heat the inner race of the No. 5 bearing ENGINE-NO.5 BEARING PLATE AND OIL DEFLECTOR (72-50-52,20-060) to approximately 212 deg F (100 deg C).
Install the IAE 1F10034 Hydraulic installation pusher 1 off on the rear end of the LP turbine shaft. Attach the reaction adapter (part of the hydraulic installation pusher) to the rear thread of the LP turbine shaft.
Connect the IAE 1F10026 Hydraulic hand pump 1 off to the coupler of the pusher.
SUBTASK 72-50-00-430-090-B00 Install the No. 5 Bearing Inner Race (SBE 72-0165)
Refer to Figure.
Install the IAE 1F10074 Guide pogo stick 1 off into the inner diameter of the LP turbine shaft. Use an applicable webbing sling.
SUBTASK 72-50-00-430-091 Install the Guide Pogo Stick to the LP Turbine Shaft
Refer to Figure.
Attach hoist equipment to the upper supports of the IAE 1F10073 remove/installation fixture 1 off.
SUBTASK 72-50-00-430-092 Install the Remove/Installation Fixture to the Turbine Exhaust Case
Release the turbine exhaust case and lift it from the IAE 1F10178 Storage and Turnover adapter 1 off.
Install the turbine exhaust case to the IAE 1F10074 Guide pogo stick 1 off front end down.
Turn the jackscrew (part of the IAE 1F10073 remove/installation fixture) clockwise to the stop position. Safety the jackscrew in the position with the IAE 1F10076 Locking collar 1 off.

CAUTION
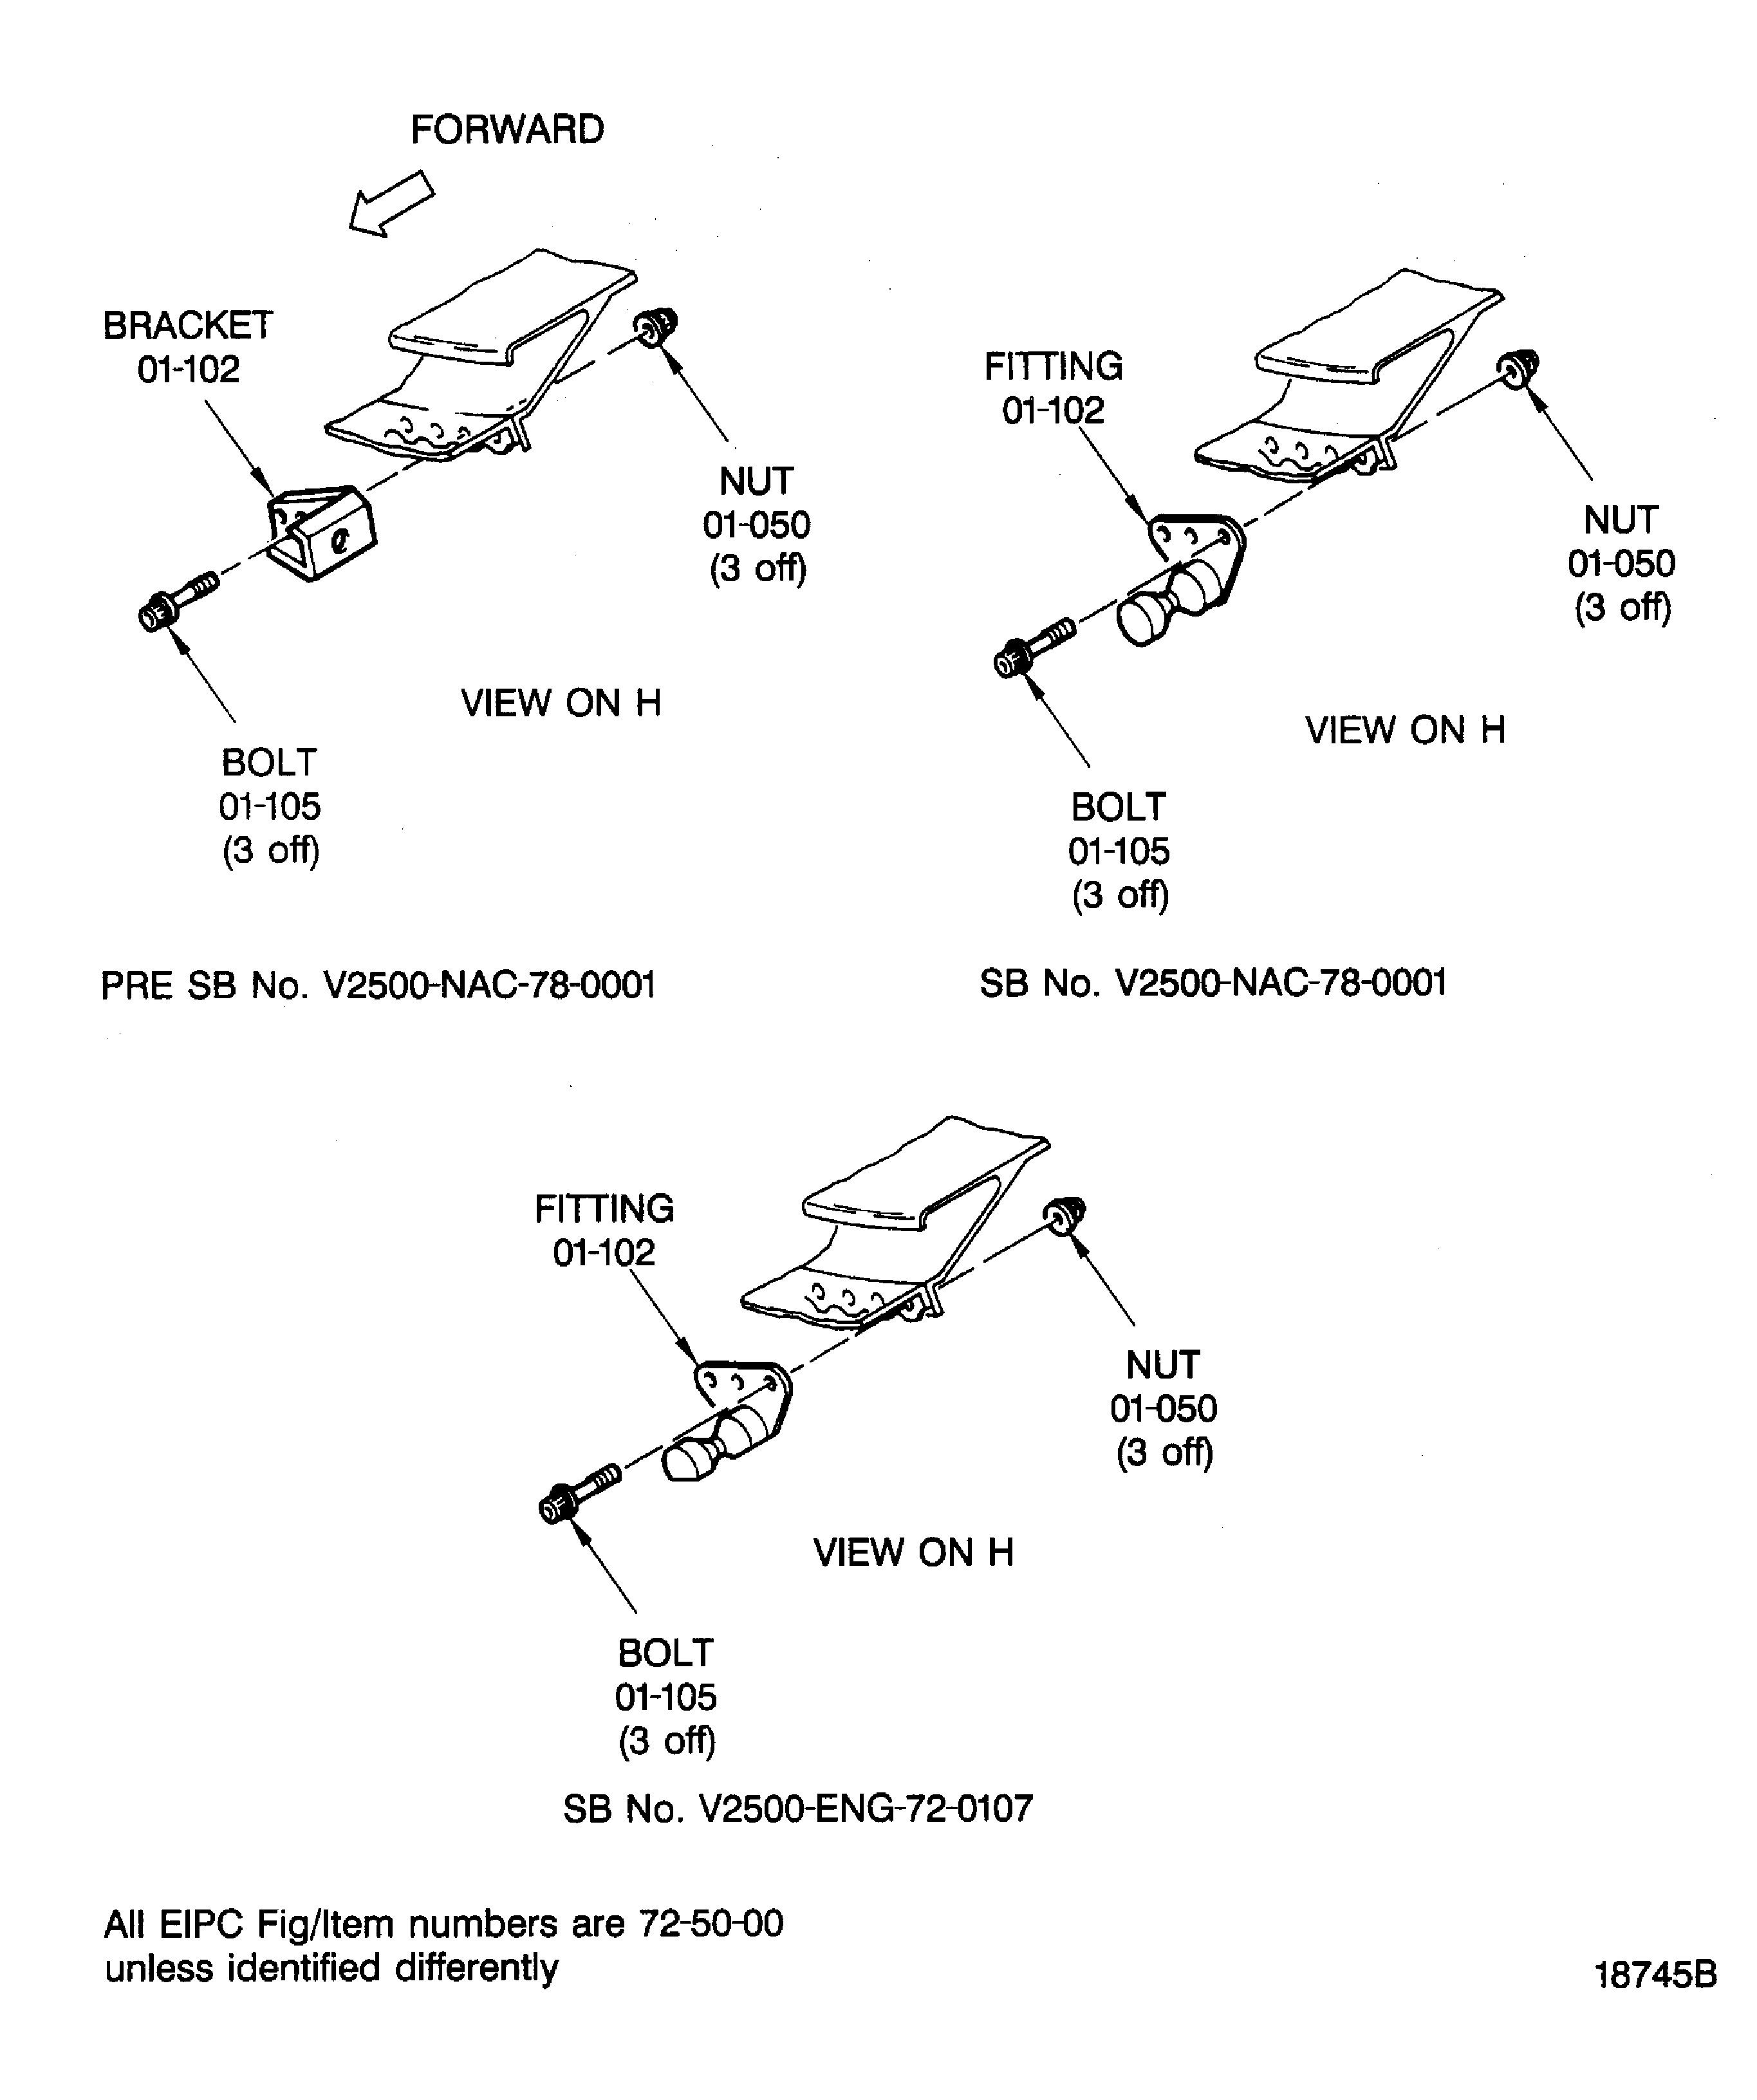
HOLD THE BOLTS IN THEIR POSITION WHEN YOU INSTALL THE NUTS ONTO THE BOLTS. DO NOT TURN THE BOLTS OR MAKE TO AND FRO MOVEMENTS. THE TURBINE EXHAUST CASE/LP TURBINE CASE AND/OR THE BOLTS CAN BE DAMAGED BY SCORES.Install the 16 brackets and attach the 114 bolts and nuts which lock the turbine exhaust case to the LP turbine case. Refer to Figure.
Remove the locking collar and the remove/installation fixture.
NOTE
If the rear lock nut is not installed, continue with Step.
Remove the tools from the engine as follows.
SUBTASK 72-50-00-430-093 Install the Turbine Exhaust Case to the LP Turbine Case
Refer to Figure.
Install three new packings NO.5 BEARING OIL JET AND FILTER (72-58-02, 01-040) and the No. 5 bearing packing transfer tube NO.5 BEARING OIL JET AND FILTER (72-58-02, 01-030) in to the No. 5 bearing nozzle NO.5 BEARING OIL JET AND FILTER (72-58-02, 01-070).
Install the two washers NO.5 BEARING OIL JET AND FILTER (72-58-02, 01-020) and the two bolts NO.5 BEARING OIL JET AND FILTER (72-58-02, 01-010) to attach the transfer tube to the bearing nozzle.
Install a new packing NO.5 BEARING OIL JET AND FILTER (72-58-02, 01-080) on to the bearing nozzle.
Attach the bearing nozzle with the two bolts NO.5 BEARING OIL JET AND FILTER (72-58-02,01-060).
Install the nipple ENGINE - EXHAUST CASE AND FITTINGS (72-50-53, 20-290) and a new packing ENGINE - EXHAUST CASE AND FITTINGS (72-50-53, 20-300). Torque the nipple to 110 lbfin to 120 lbfin (12.43 Nm to 13.56 Nm).
SUBTASK 72-50-00-430-094 Install the No. 5 Bearing Nozzle
Refer to Figure.
Attach the loop clamp bracket ENGINE - EXHAUST CASE AND FITTINGS (72-50-53, 20-020) to the external flange of the turbine exhaust case with the two bolts ENGINE - EXHAUST CASE AND FITTINGS (72-50-53, 20-040) and two nuts ENGINE - EXHAUST CASE AND FITTINGS (72-50-53, 20-030).
Attach the No. 5 bearing pressure tube ENGINE - EXHAUST CASE AND FITTINGS (72-50-53, 20-010) to the bracket. Install a nut ENGINE - EXHAUST CASE AND FITTINGS (72-50-53, 20-015) and bolt ENGINE - EXHAUST CASE AND FITTINGS (72-50-53, 20-017) to the clamp and support assembly ENGINE - EXHAUST CASE AND FITTINGS (72-50-53, 20-016).
Attach the No. 5 bearing pressure tube ENGINE - EXHAUST CASE AND FITTINGS (72-50-53, 20-176) to the nipple.
Safety the nut with CoMat 02-141 LOCKWIRE.
Attach the loop clamp bracket ENGINE - EXHAUST CASE AND FITTINGS (72-50-53, 20-200) to the tube heat shield with two washers ENGINE - EXHAUST CASE AND FITTINGS (72-50-53, 20-215), nut ENGINE - EXHAUST CASE AND FITTINGS (72-50-53, 20-210) and bolt ENGINE - EXHAUST CASE AND FITTINGS (72-50-53, 20-220).
Attach the bracket to the inner support of the turbine exhaust case with two bolts ENGINE - EXHAUST CASE AND FITTINGS (72-50-53, 20-190) and two nuts ENGINE - EXHAUST CASE AND FITTINGS (72-50-53, 20-180).
SUBTASK 72-50-00-430-095 Connect the No. 5 Bearing Pressure Tube Assembly
Refer to Figure.
Attach the IAE 1P16374 Wrench support 1 off to the inner rear flange of the turbine exhaust case.
Install the IAE 1F10038 Torque wrench 1 off through the wrench support. Engage the torque wrench with the rear lock nut.
Install the IAE 1F10039 Anti-torque adapter 1 off through the torque wrench. Lock the anti-torque adapter to the LP turbine shaft.
Install the IAE 1F10016 Mechanical wrench 1 off to the torque wrench. Safety the anti-torque adapter to the mechanical wrench with the IAE 1F10040 Anchor wrench plate 1 off.
Make a correlation mark between the IAE 1F10016 Mechanical wrench and the IAE 1F10038 Torque wrench.
Do Step again.
Do Step again and check the correlation mark. The correlation mark must be within two degrees maximum on the same place.
SUBTASK 72-50-00-430-097 Install the Rear Lock Nut to the LP Turbine Shaft
Figure: Fits and Clearances at Interface N50/50 and N50/10
Sheet 1

Figure: Fits and Clearances at Interface N50/50 and N50/10
Sheet 2

Figure: Fits and Clearances of No. 5 Bearing and the Turbine Exhaust Case
Fits and Clearances of No. 5 Bearing and the Turbine Exhaust Case

Figure: Install the Carbon Seal and the Inner Race of the No. 5 Bearing
Sheet 1
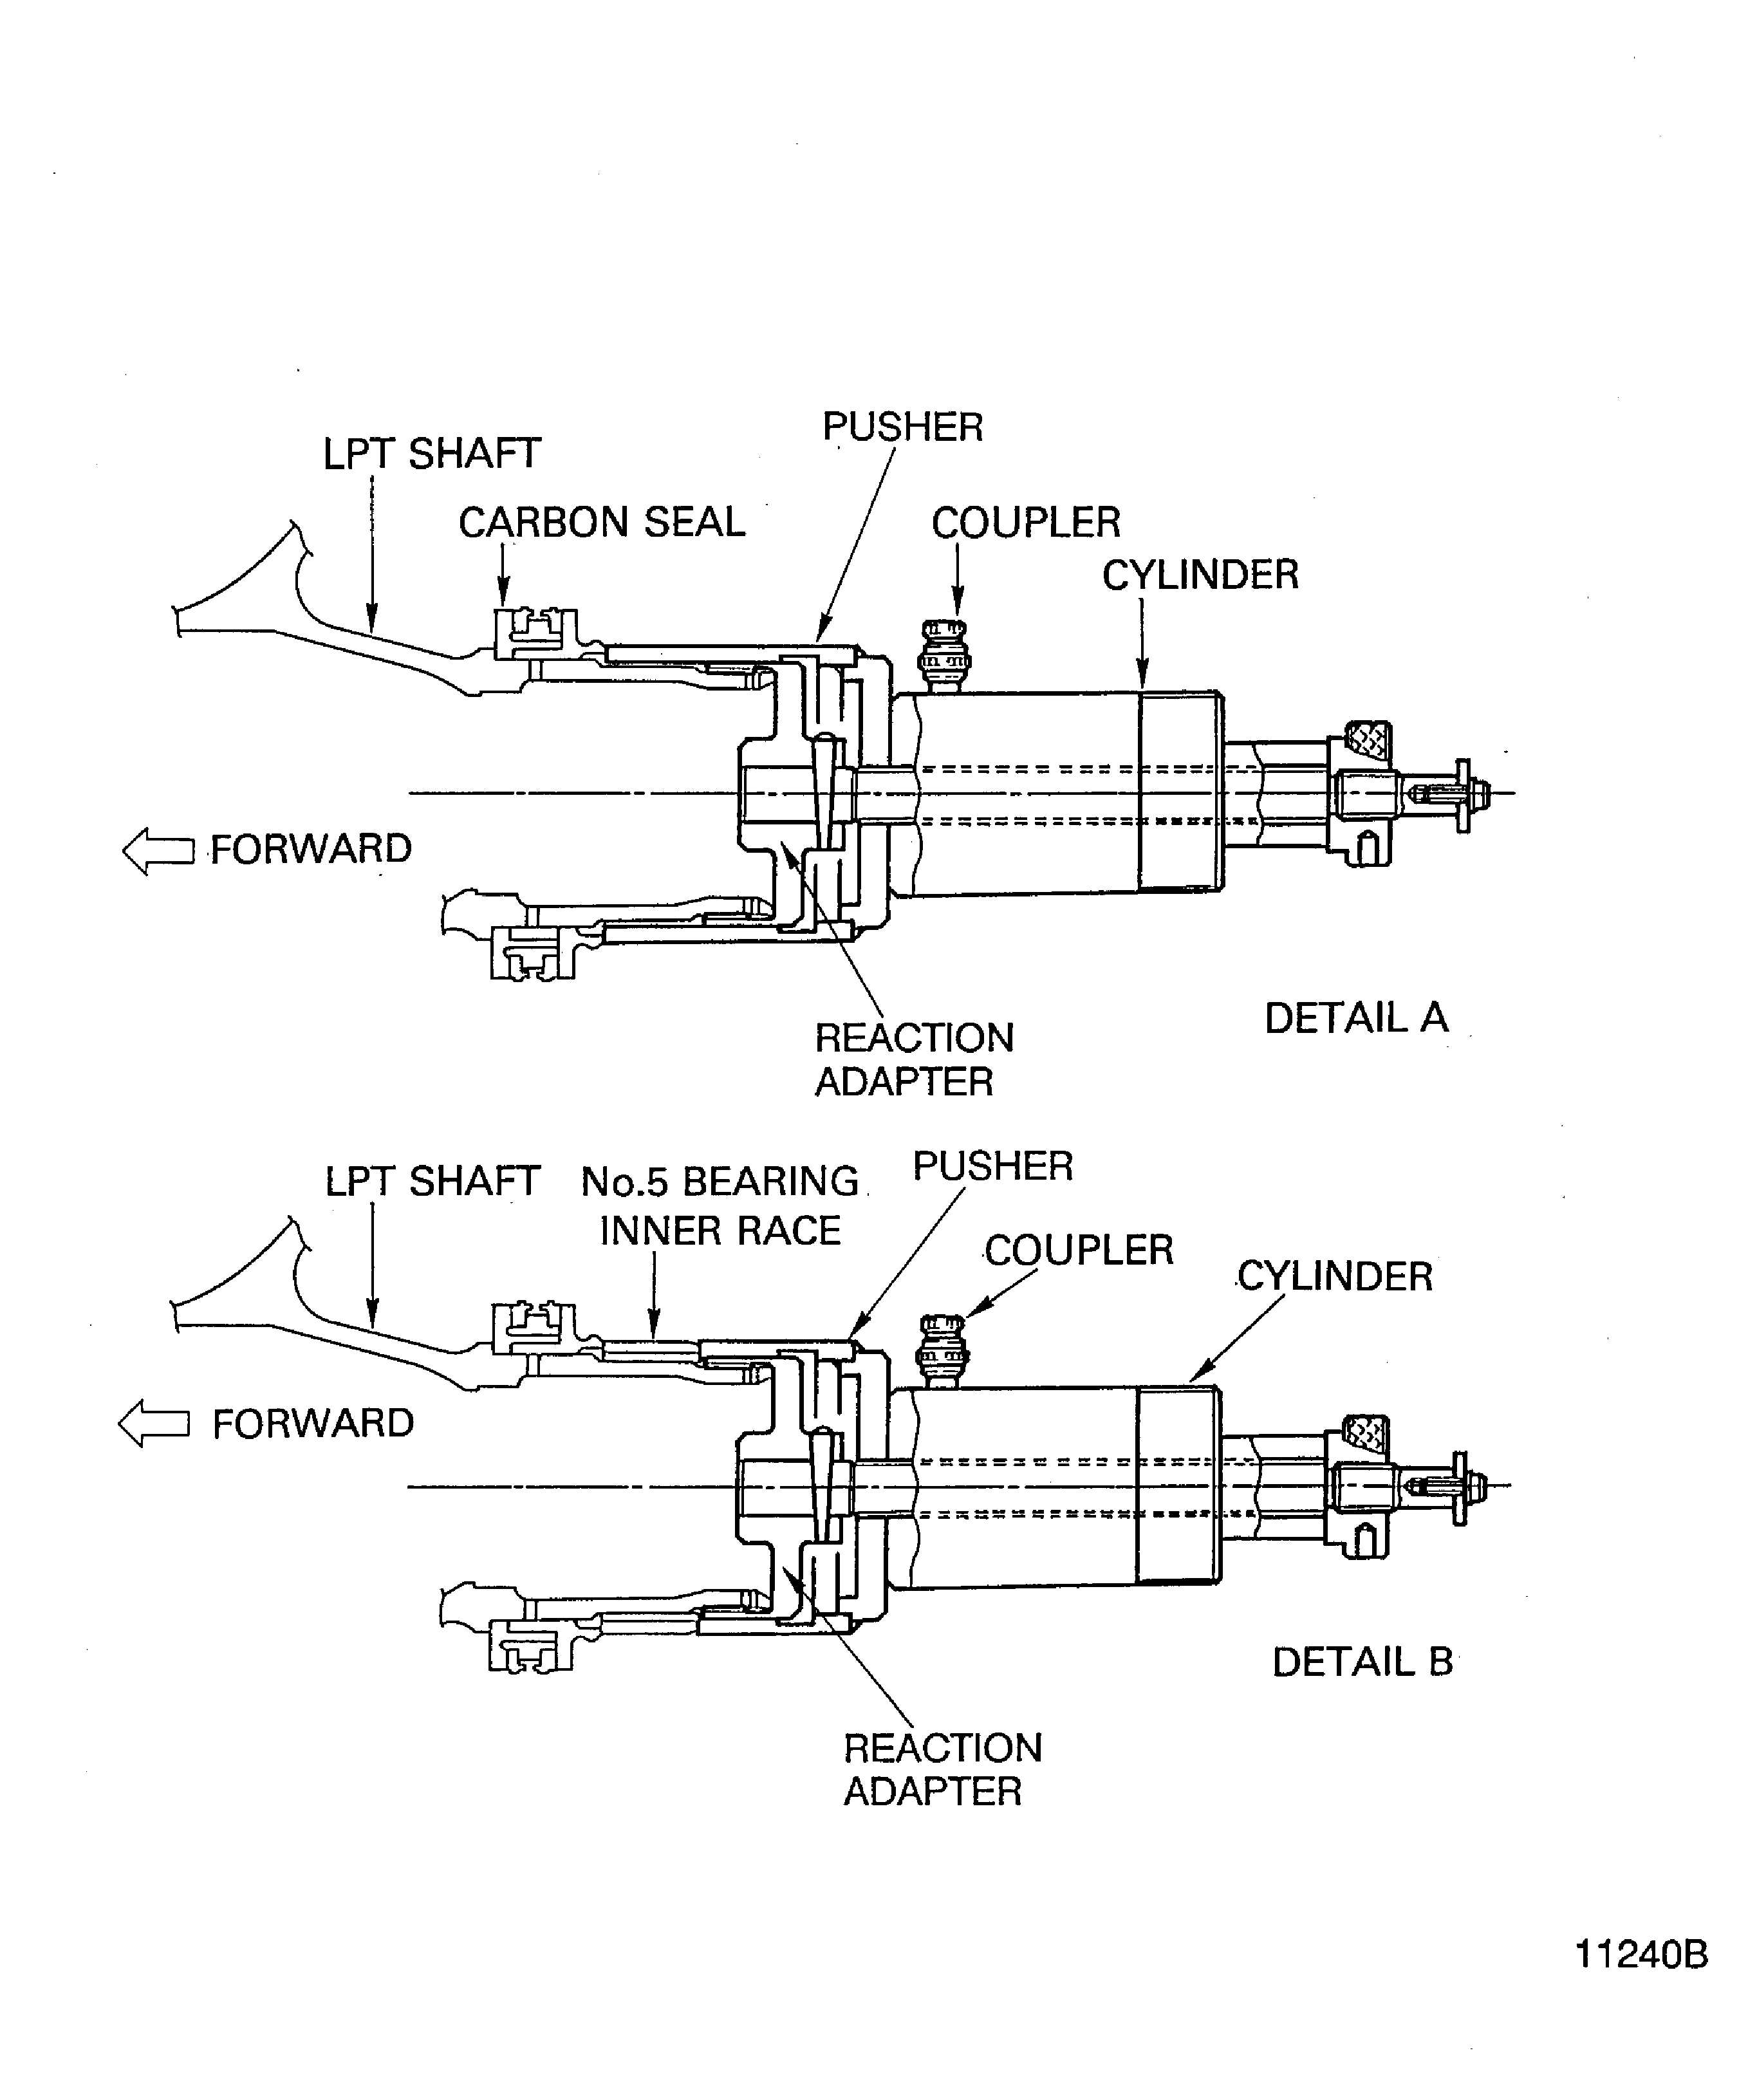
Figure: Install the Carbon Seal and the Inner Race of the No. 5 Bearing
Sheet 2
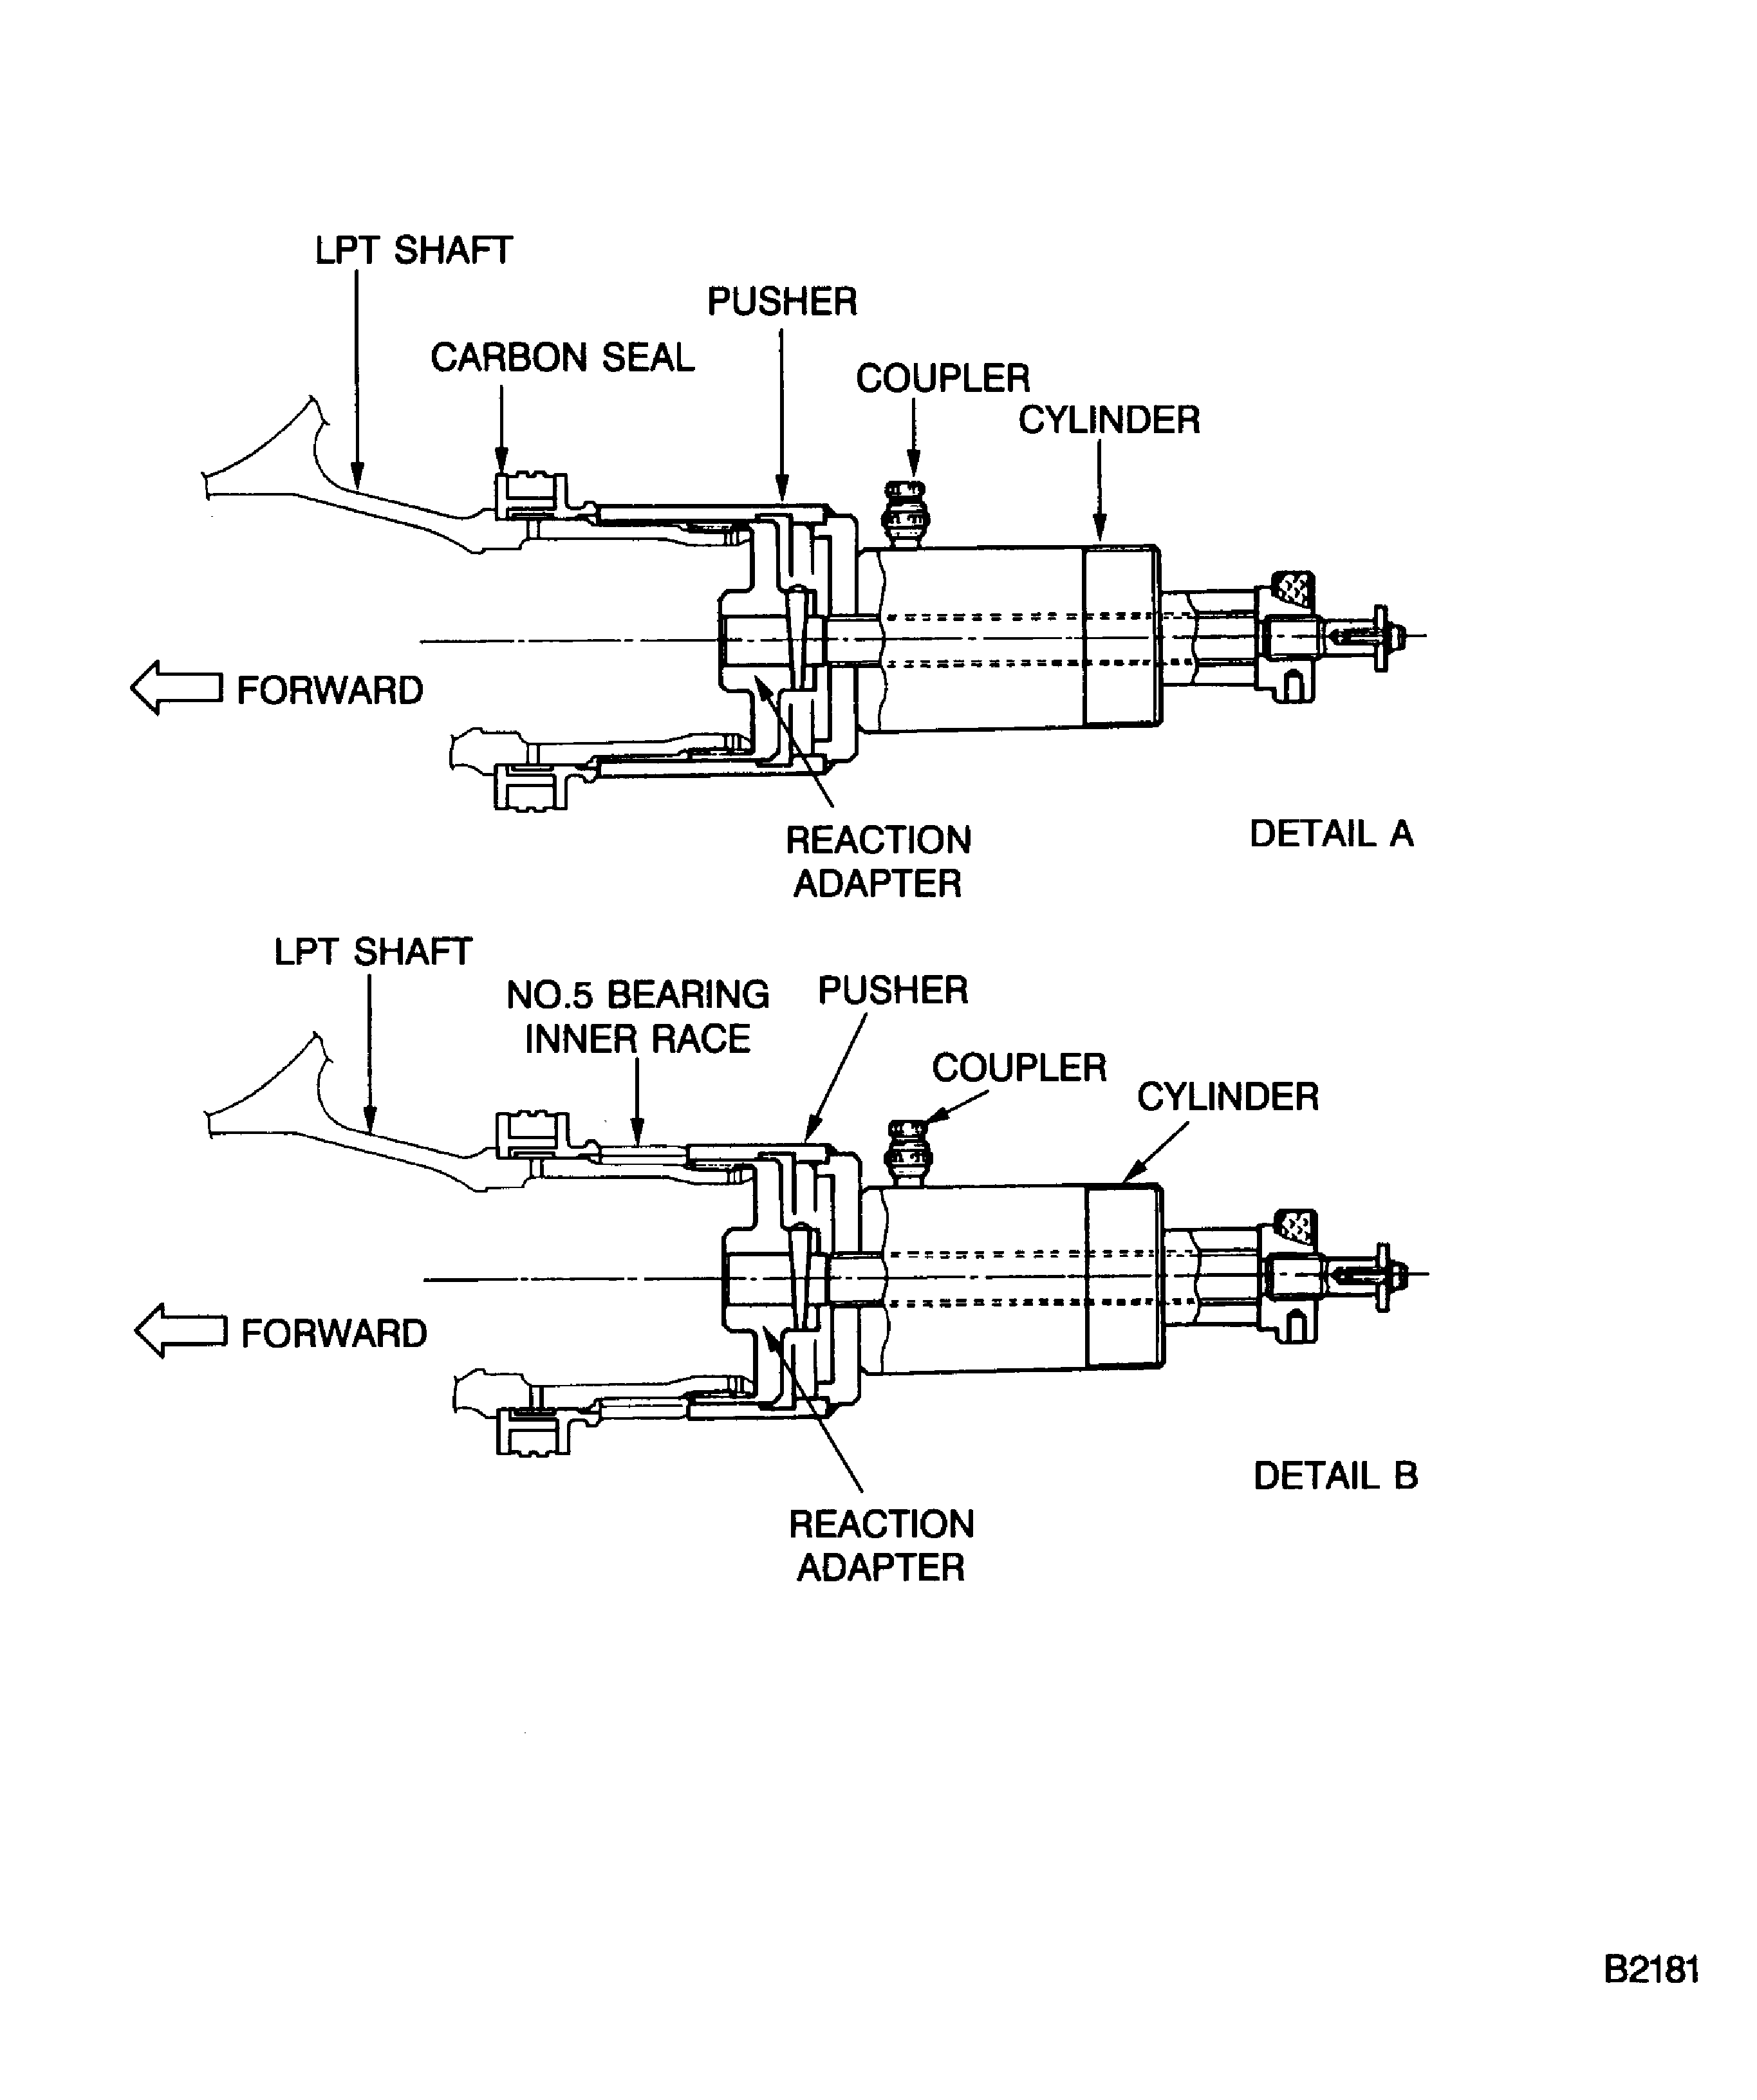
Figure: Install the No. 5 Bearing Seal Spacers and the Inner Race of No. 5 Bearing
Sheet 1

Figure: Install the No. 5 Bearing Seal Spacers and the Inner Race of No. 5 Bearing
Sheet 2

Figure: Install the Turbine Shaft Rear Lock Nut
Install the Turbine Shaft Rear Lock Nut

Figure: Install the No. 5 Bearing Nozzle
Install the No. 5 Bearing Nozzle
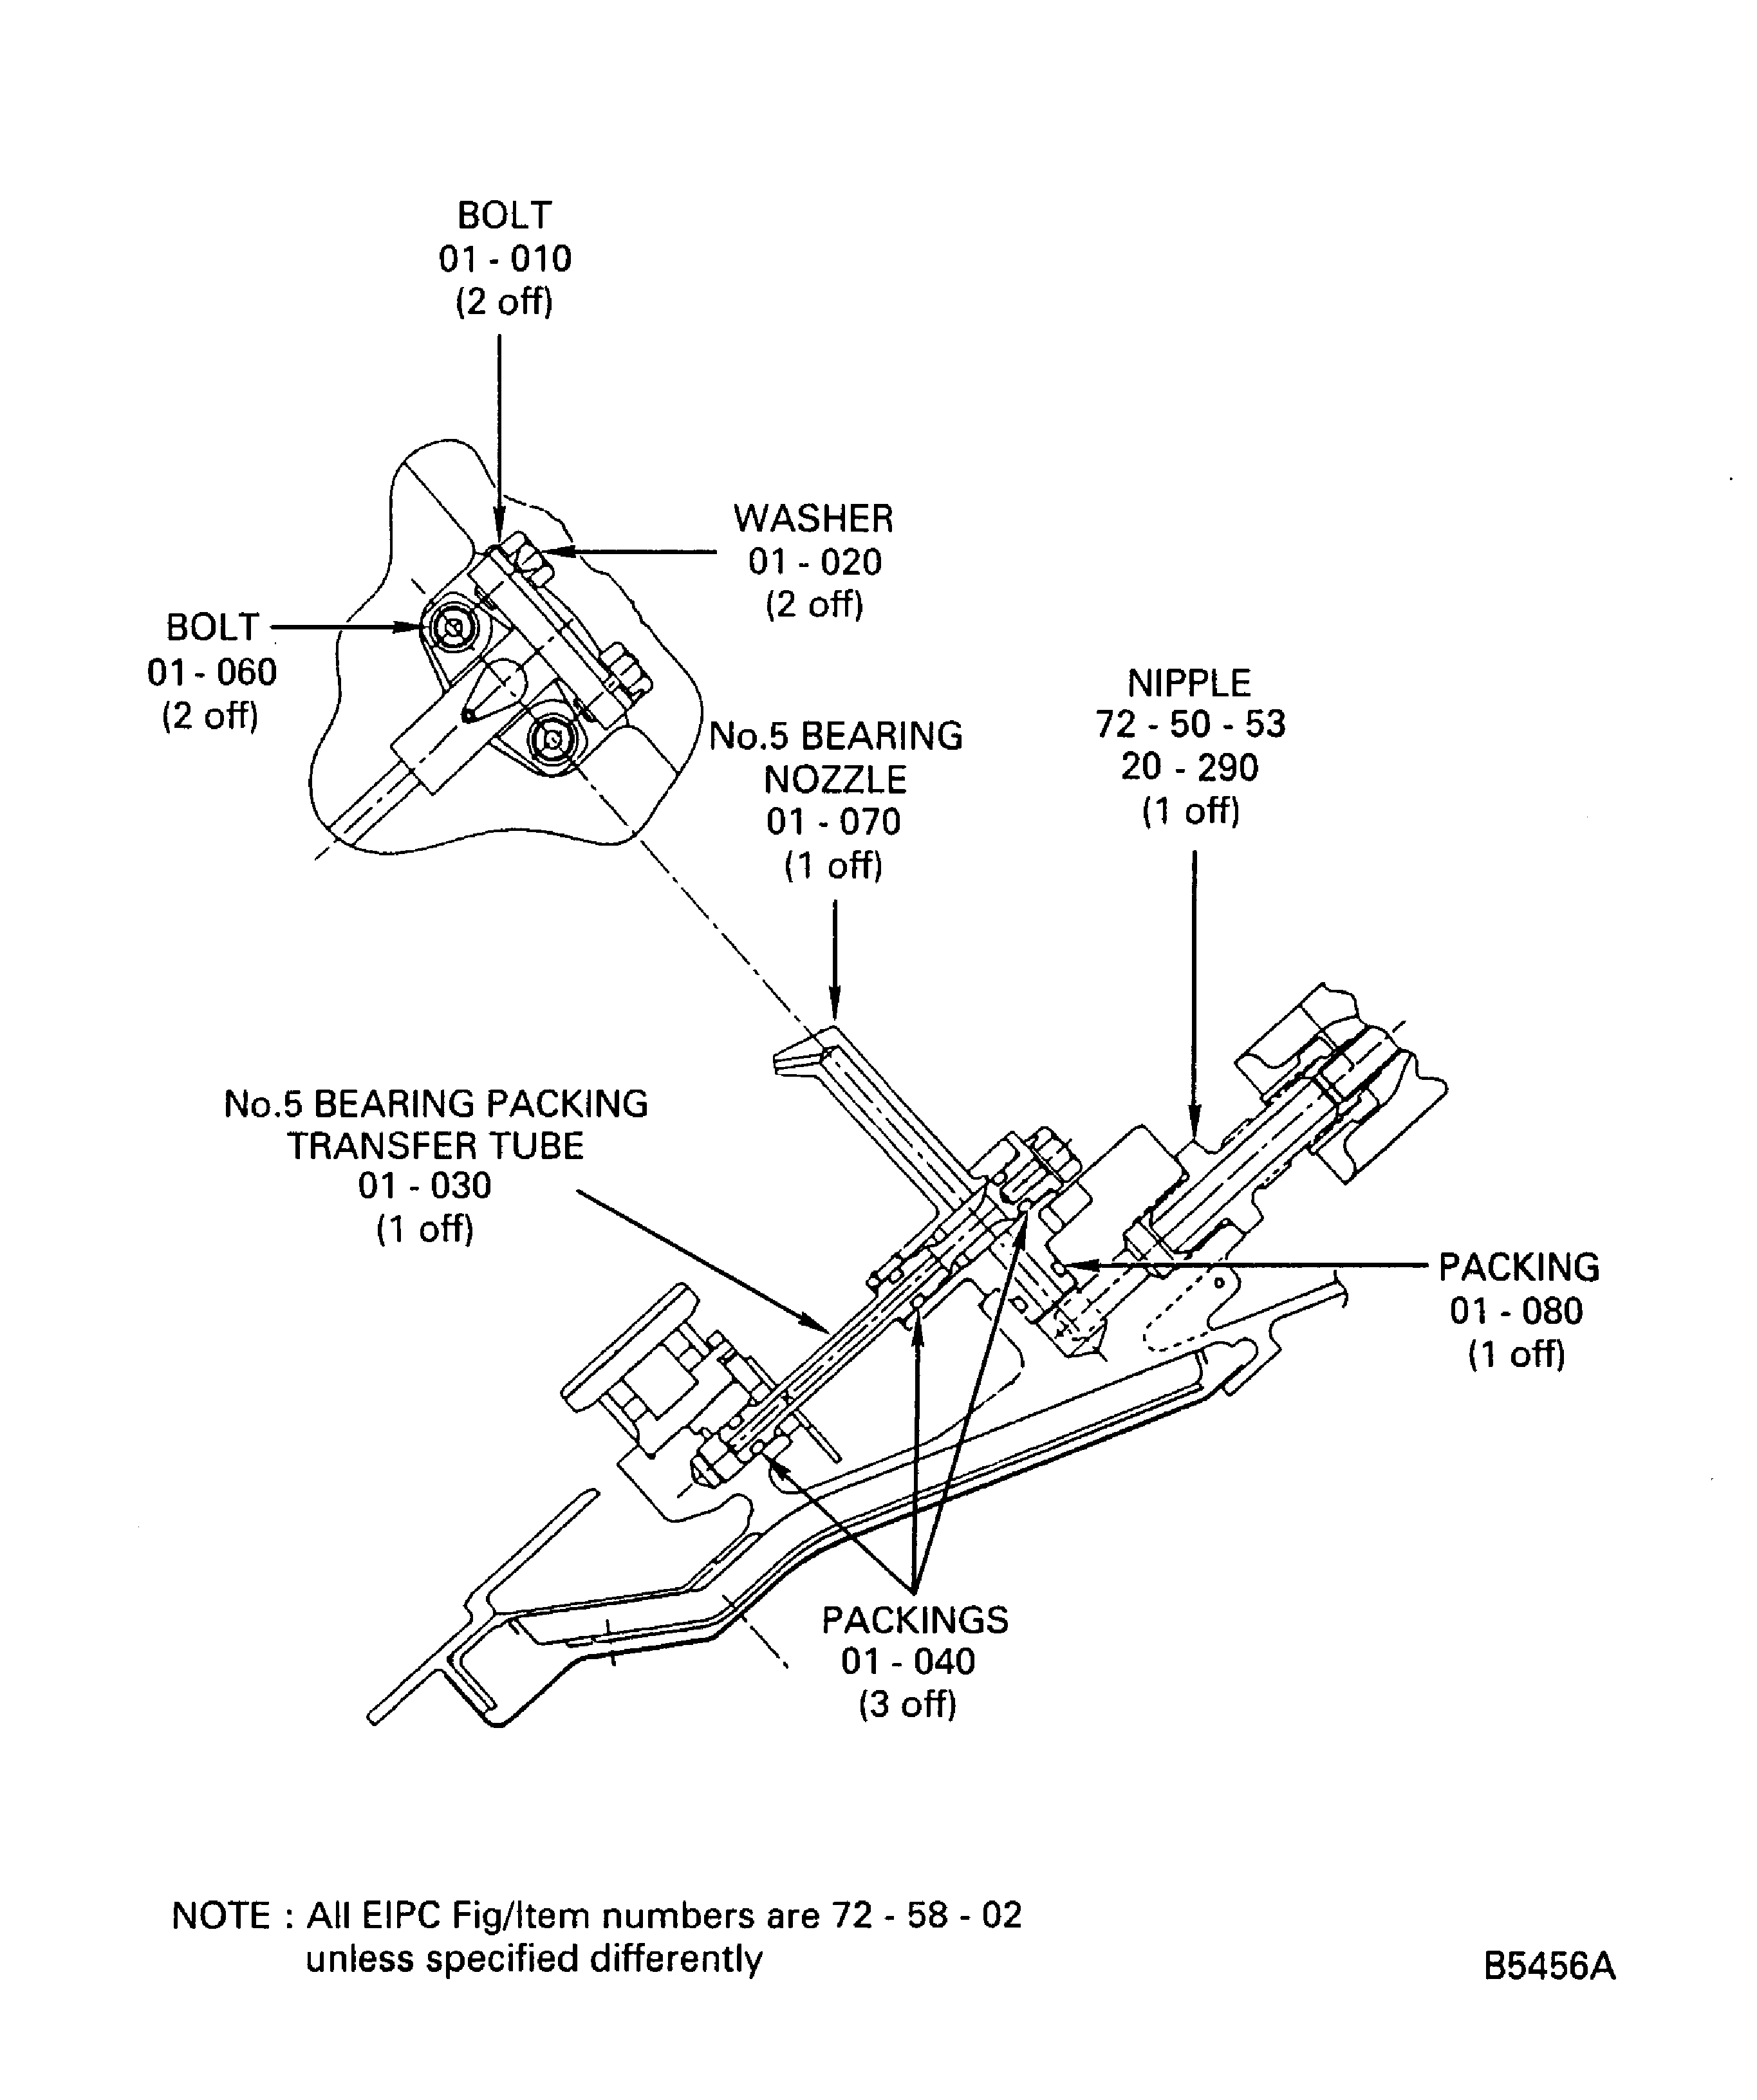
Figure: Connect the No. 5 Bearing Pressure Tube Assembly
Connect the No. 5 Bearing Pressure Tube Assembly
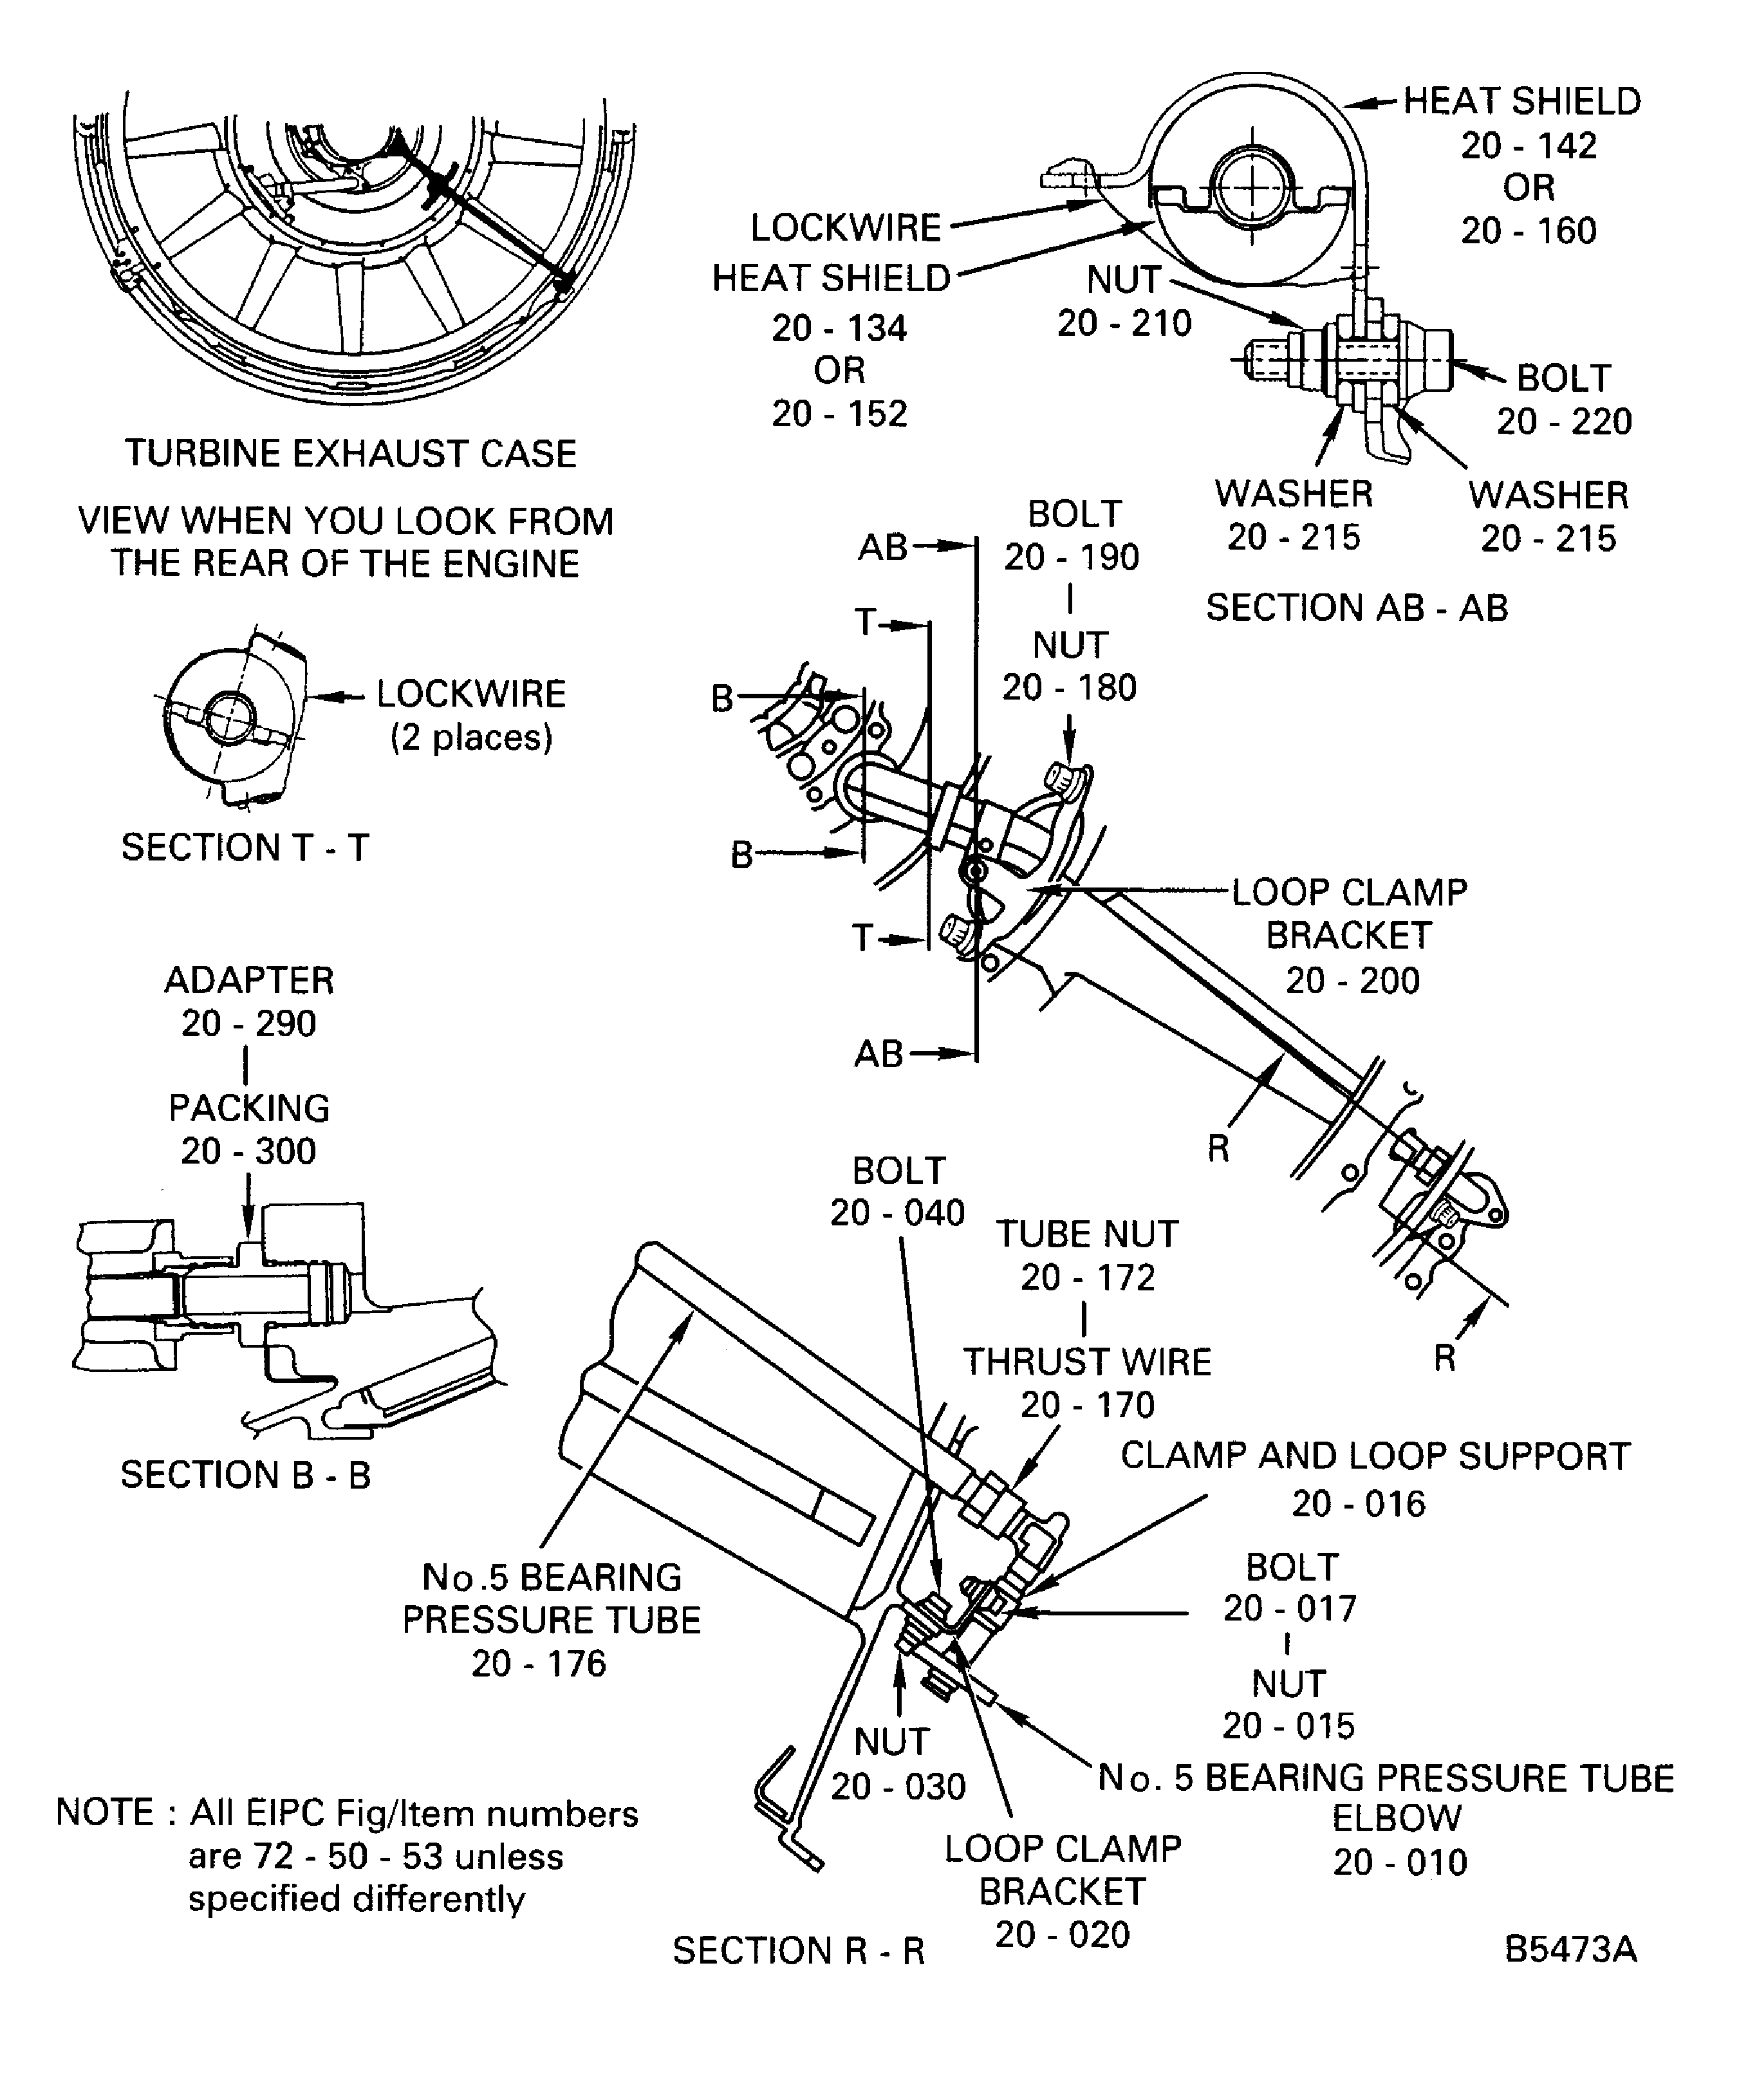
Figure: Install the Turbine Exhaust Case
Install the Turbine Exhaust Case
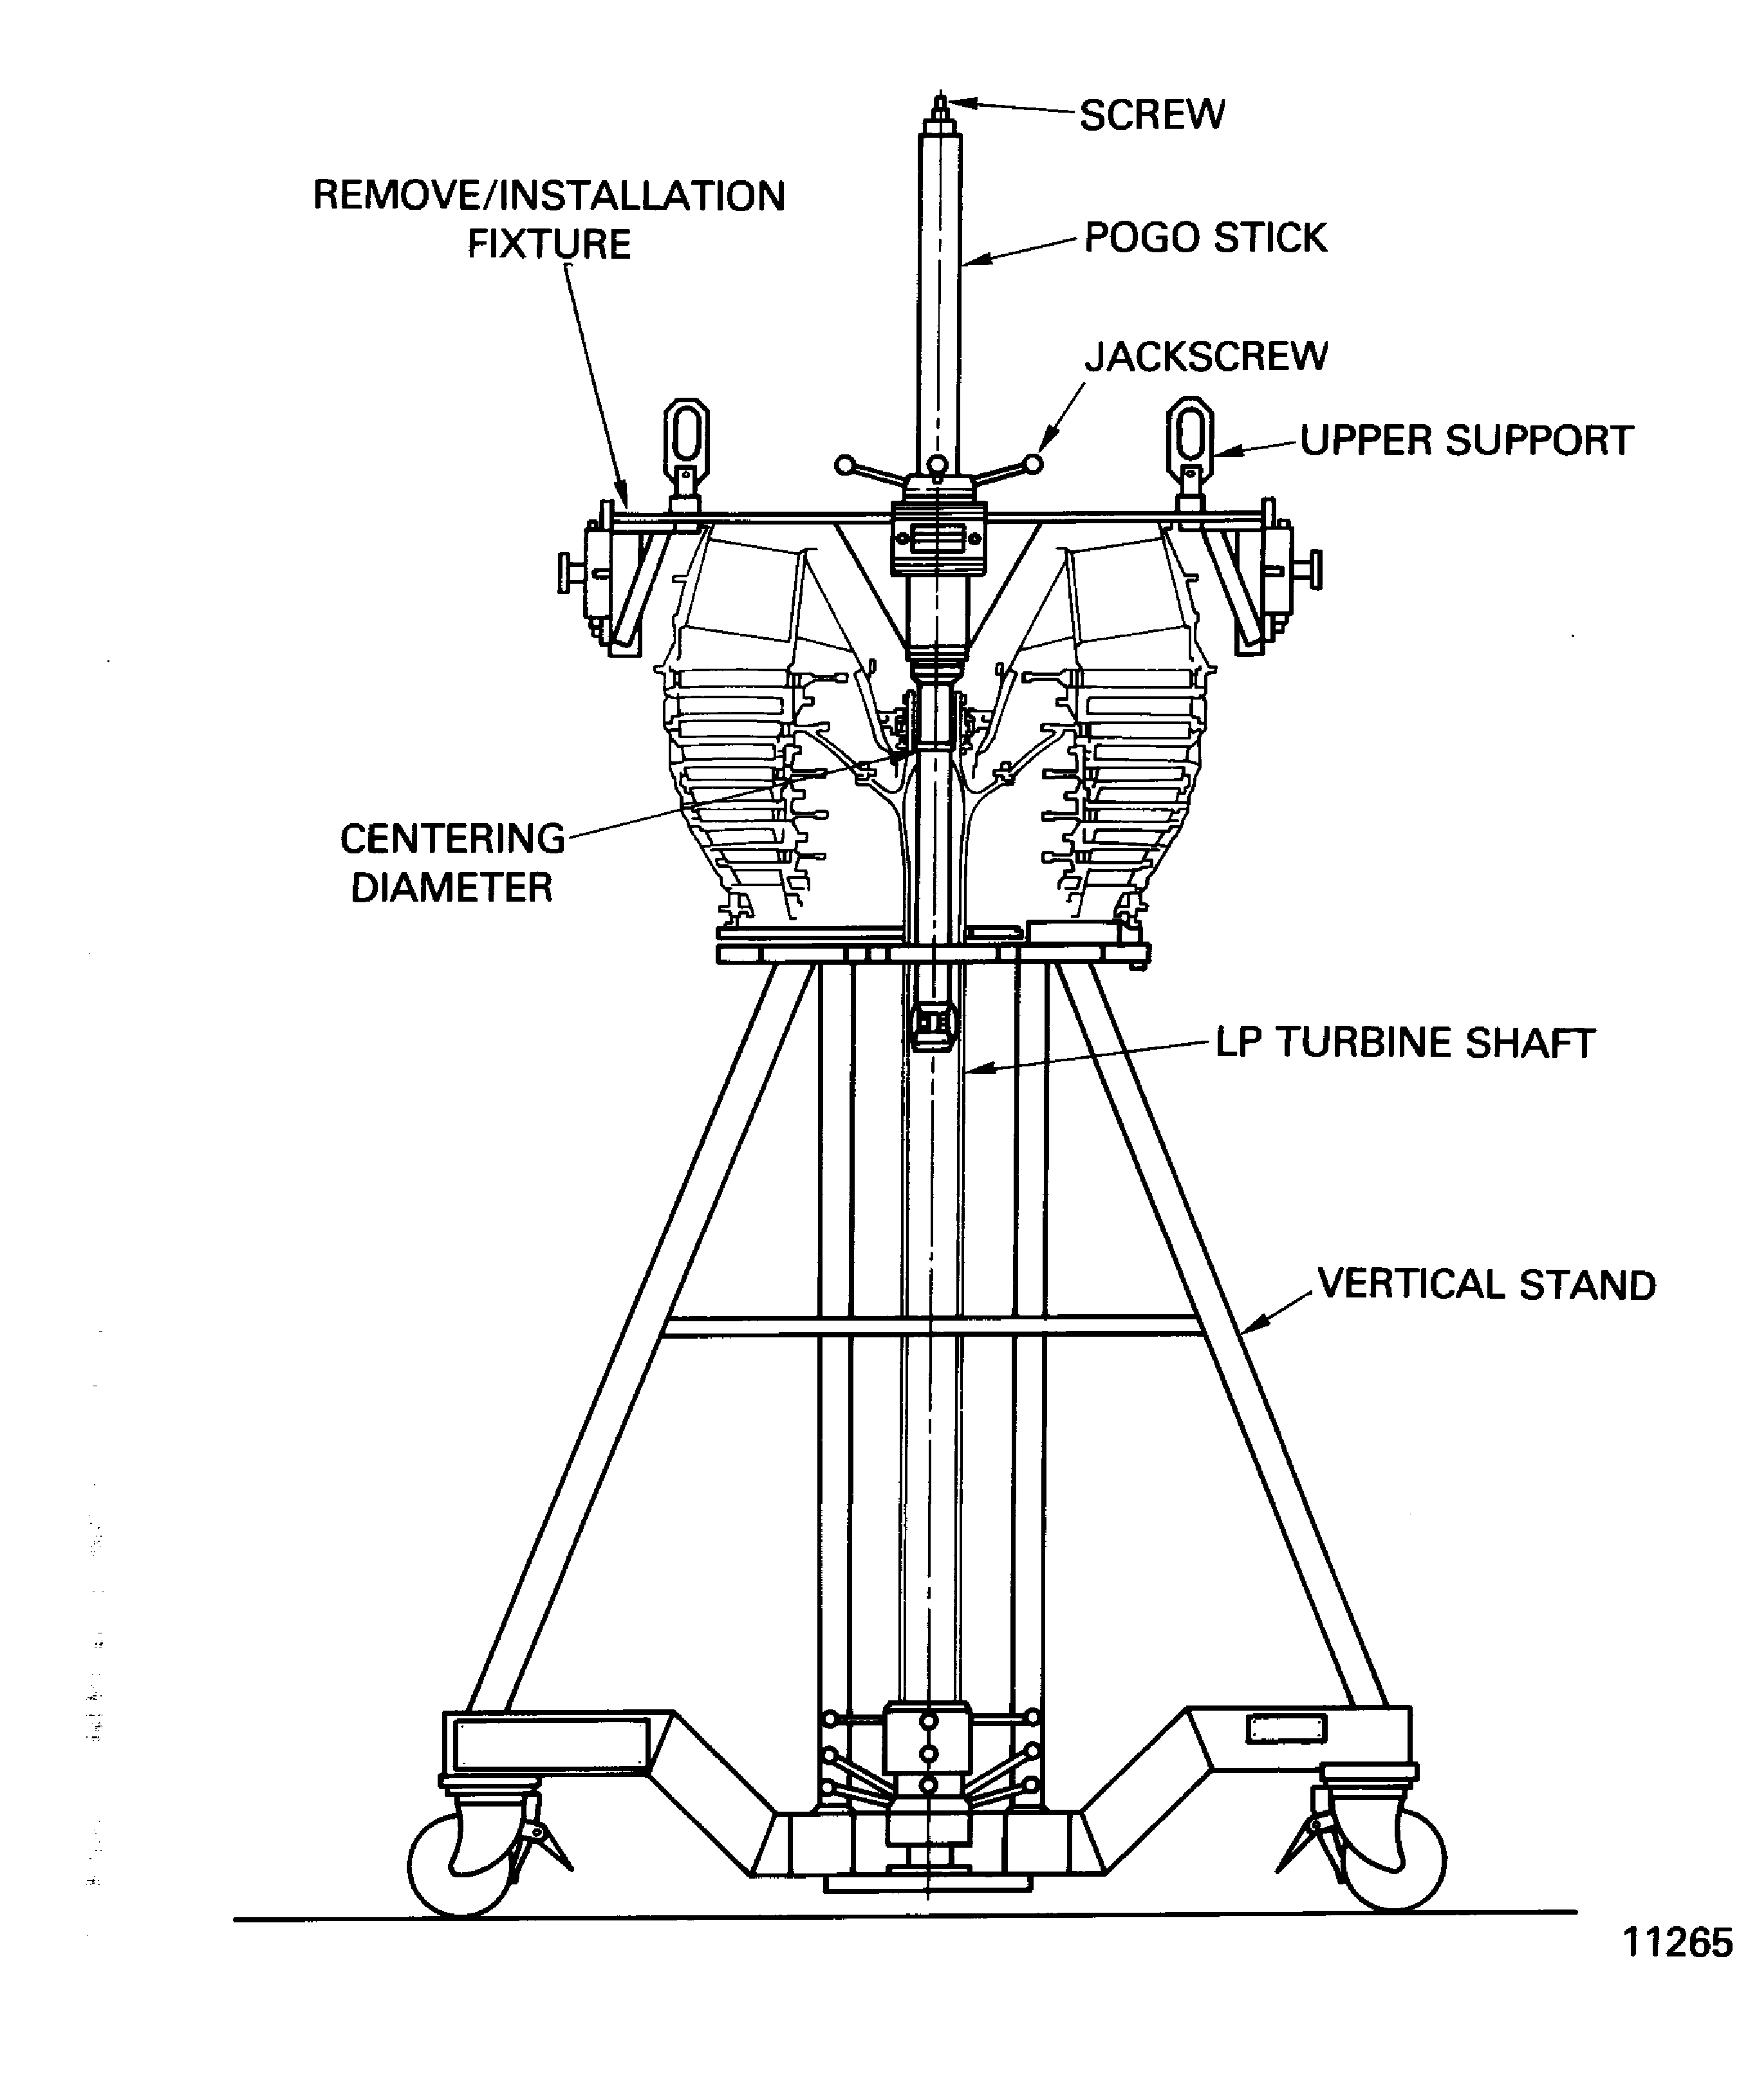
Figure: Installation of the Bolts and Brackets at the Front Flange of the Turbine Exhaust Case
Sheet 1

Figure: Installation of the Bolts and Brackets at the Front flange of the Turbine Exhaust Case
Sheet 2

Figure: Installation of the Bolts and Brackets at the Front Flange of the Turbine Exhaust Case
Sheet 3
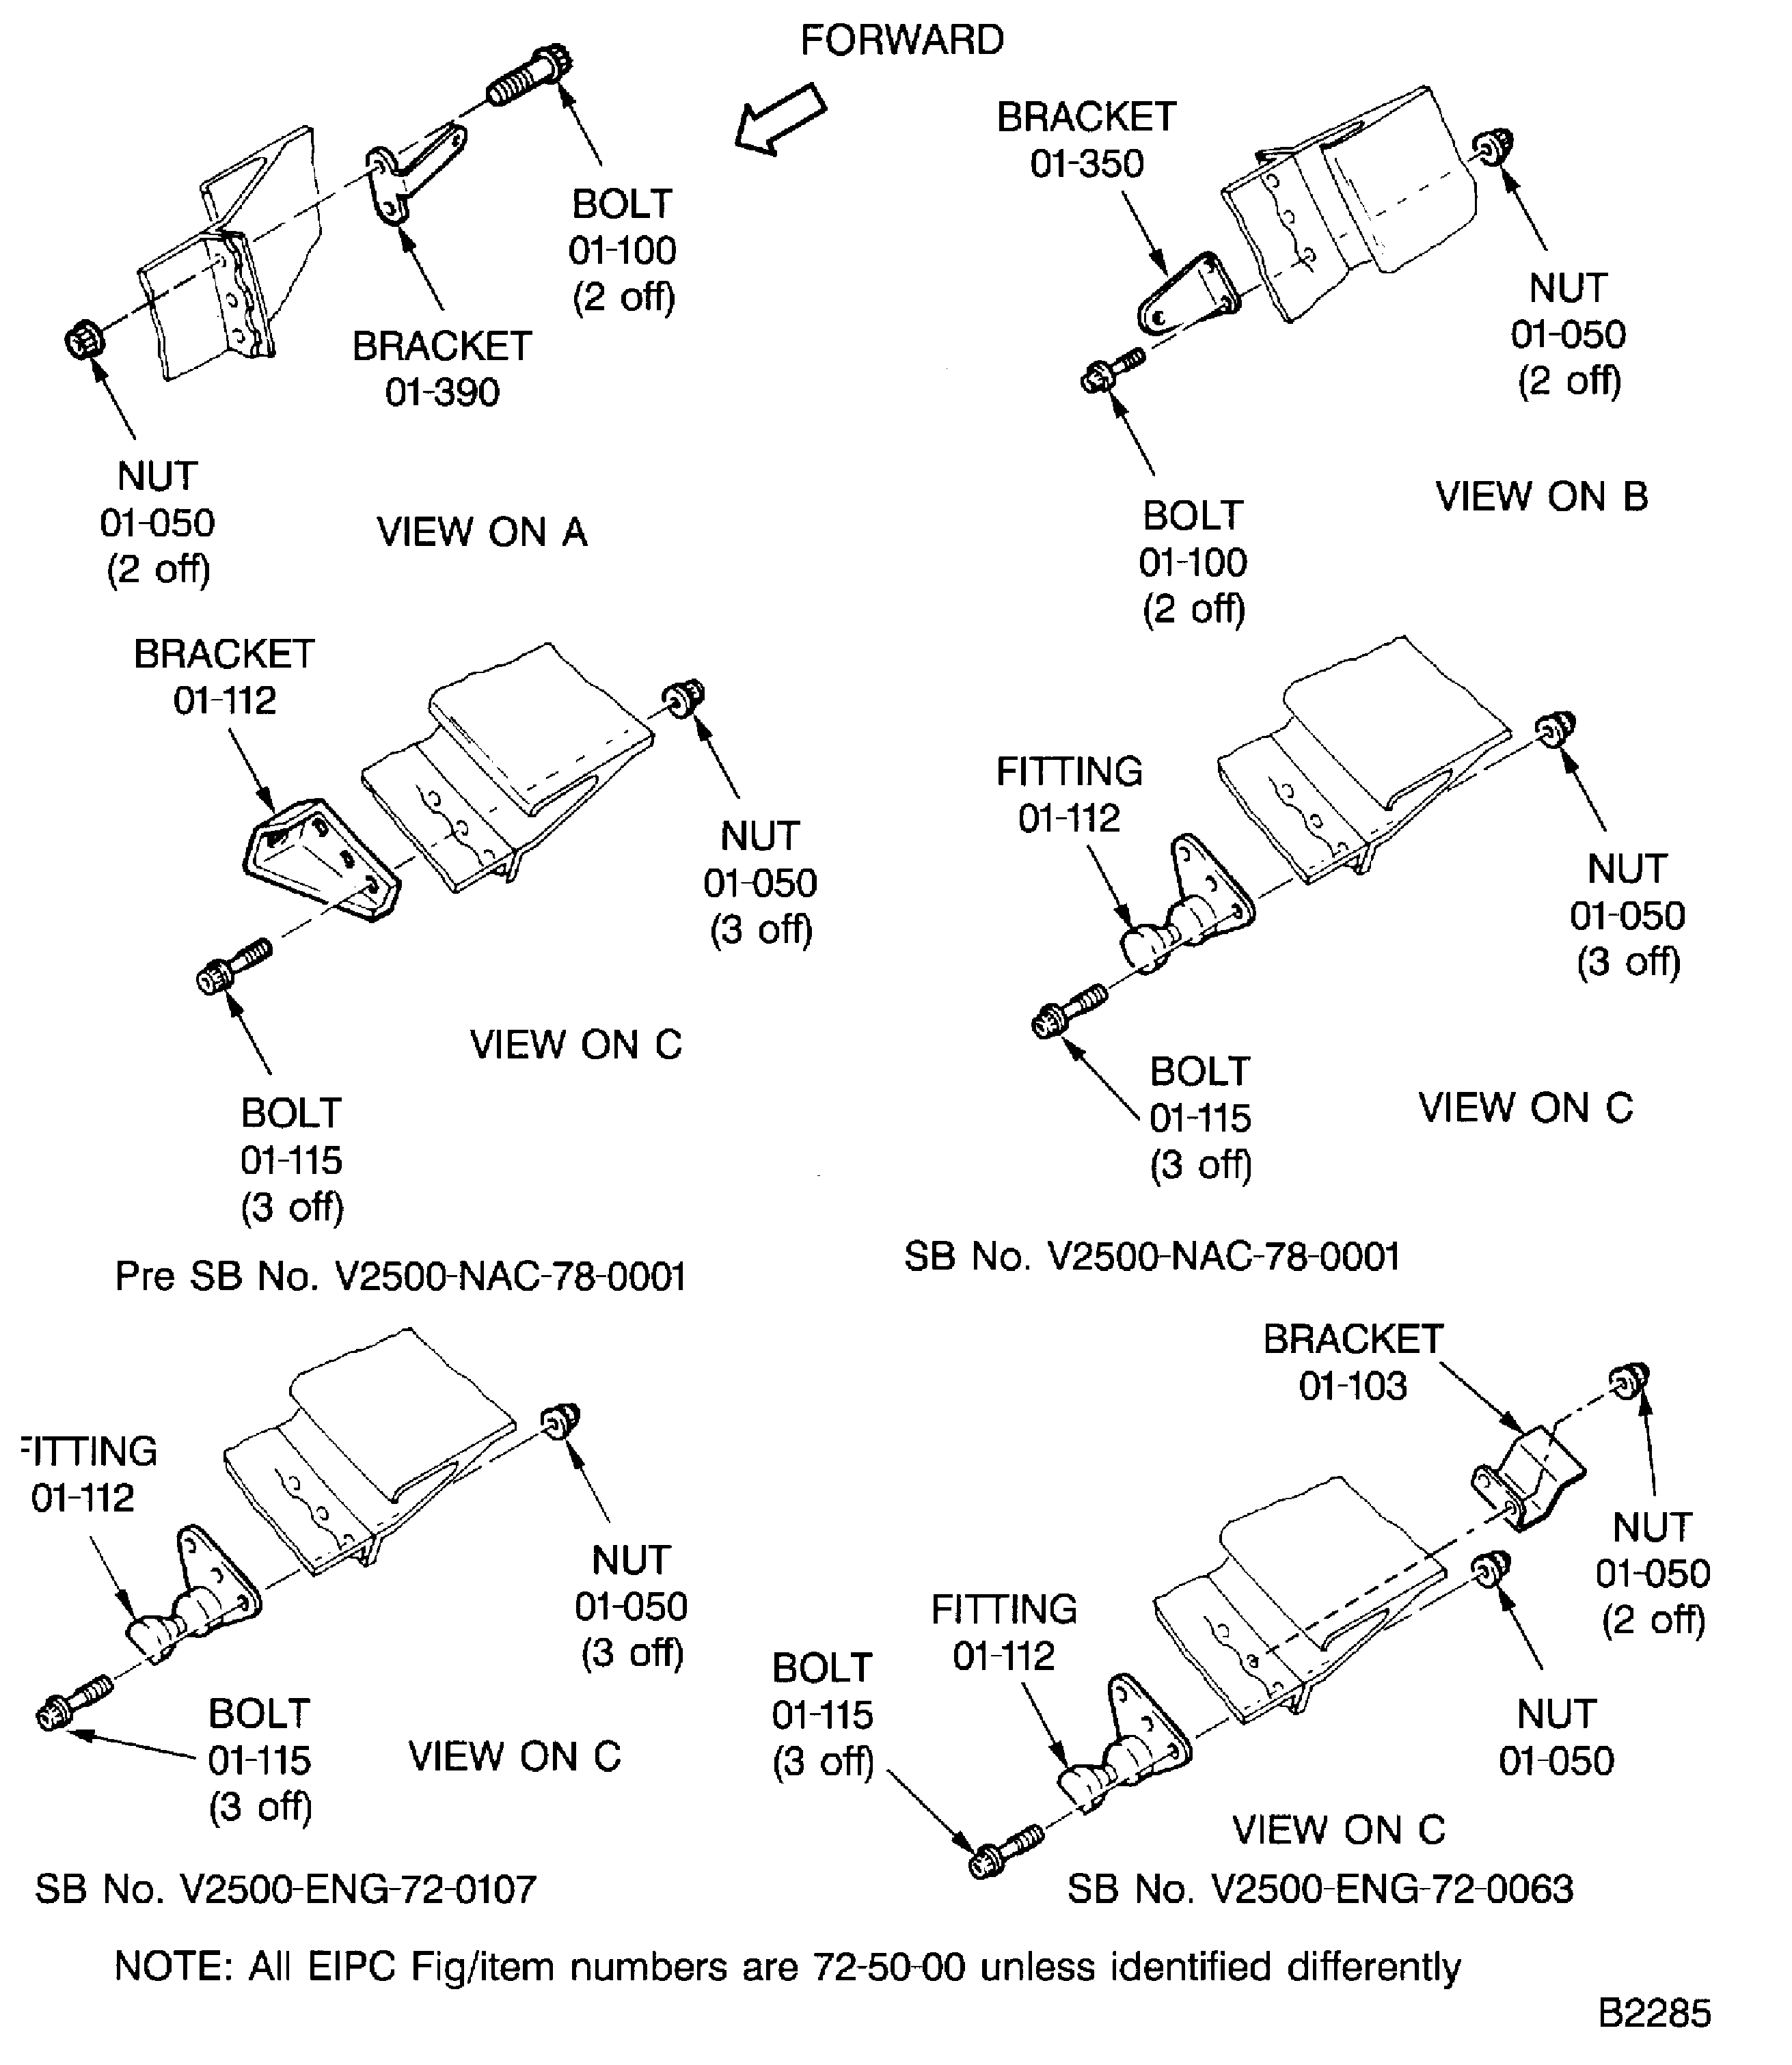
Figure: Installation of the Bolts and Brackets at the Front Flange of the Turbine Exhaust Case
Sheet 4
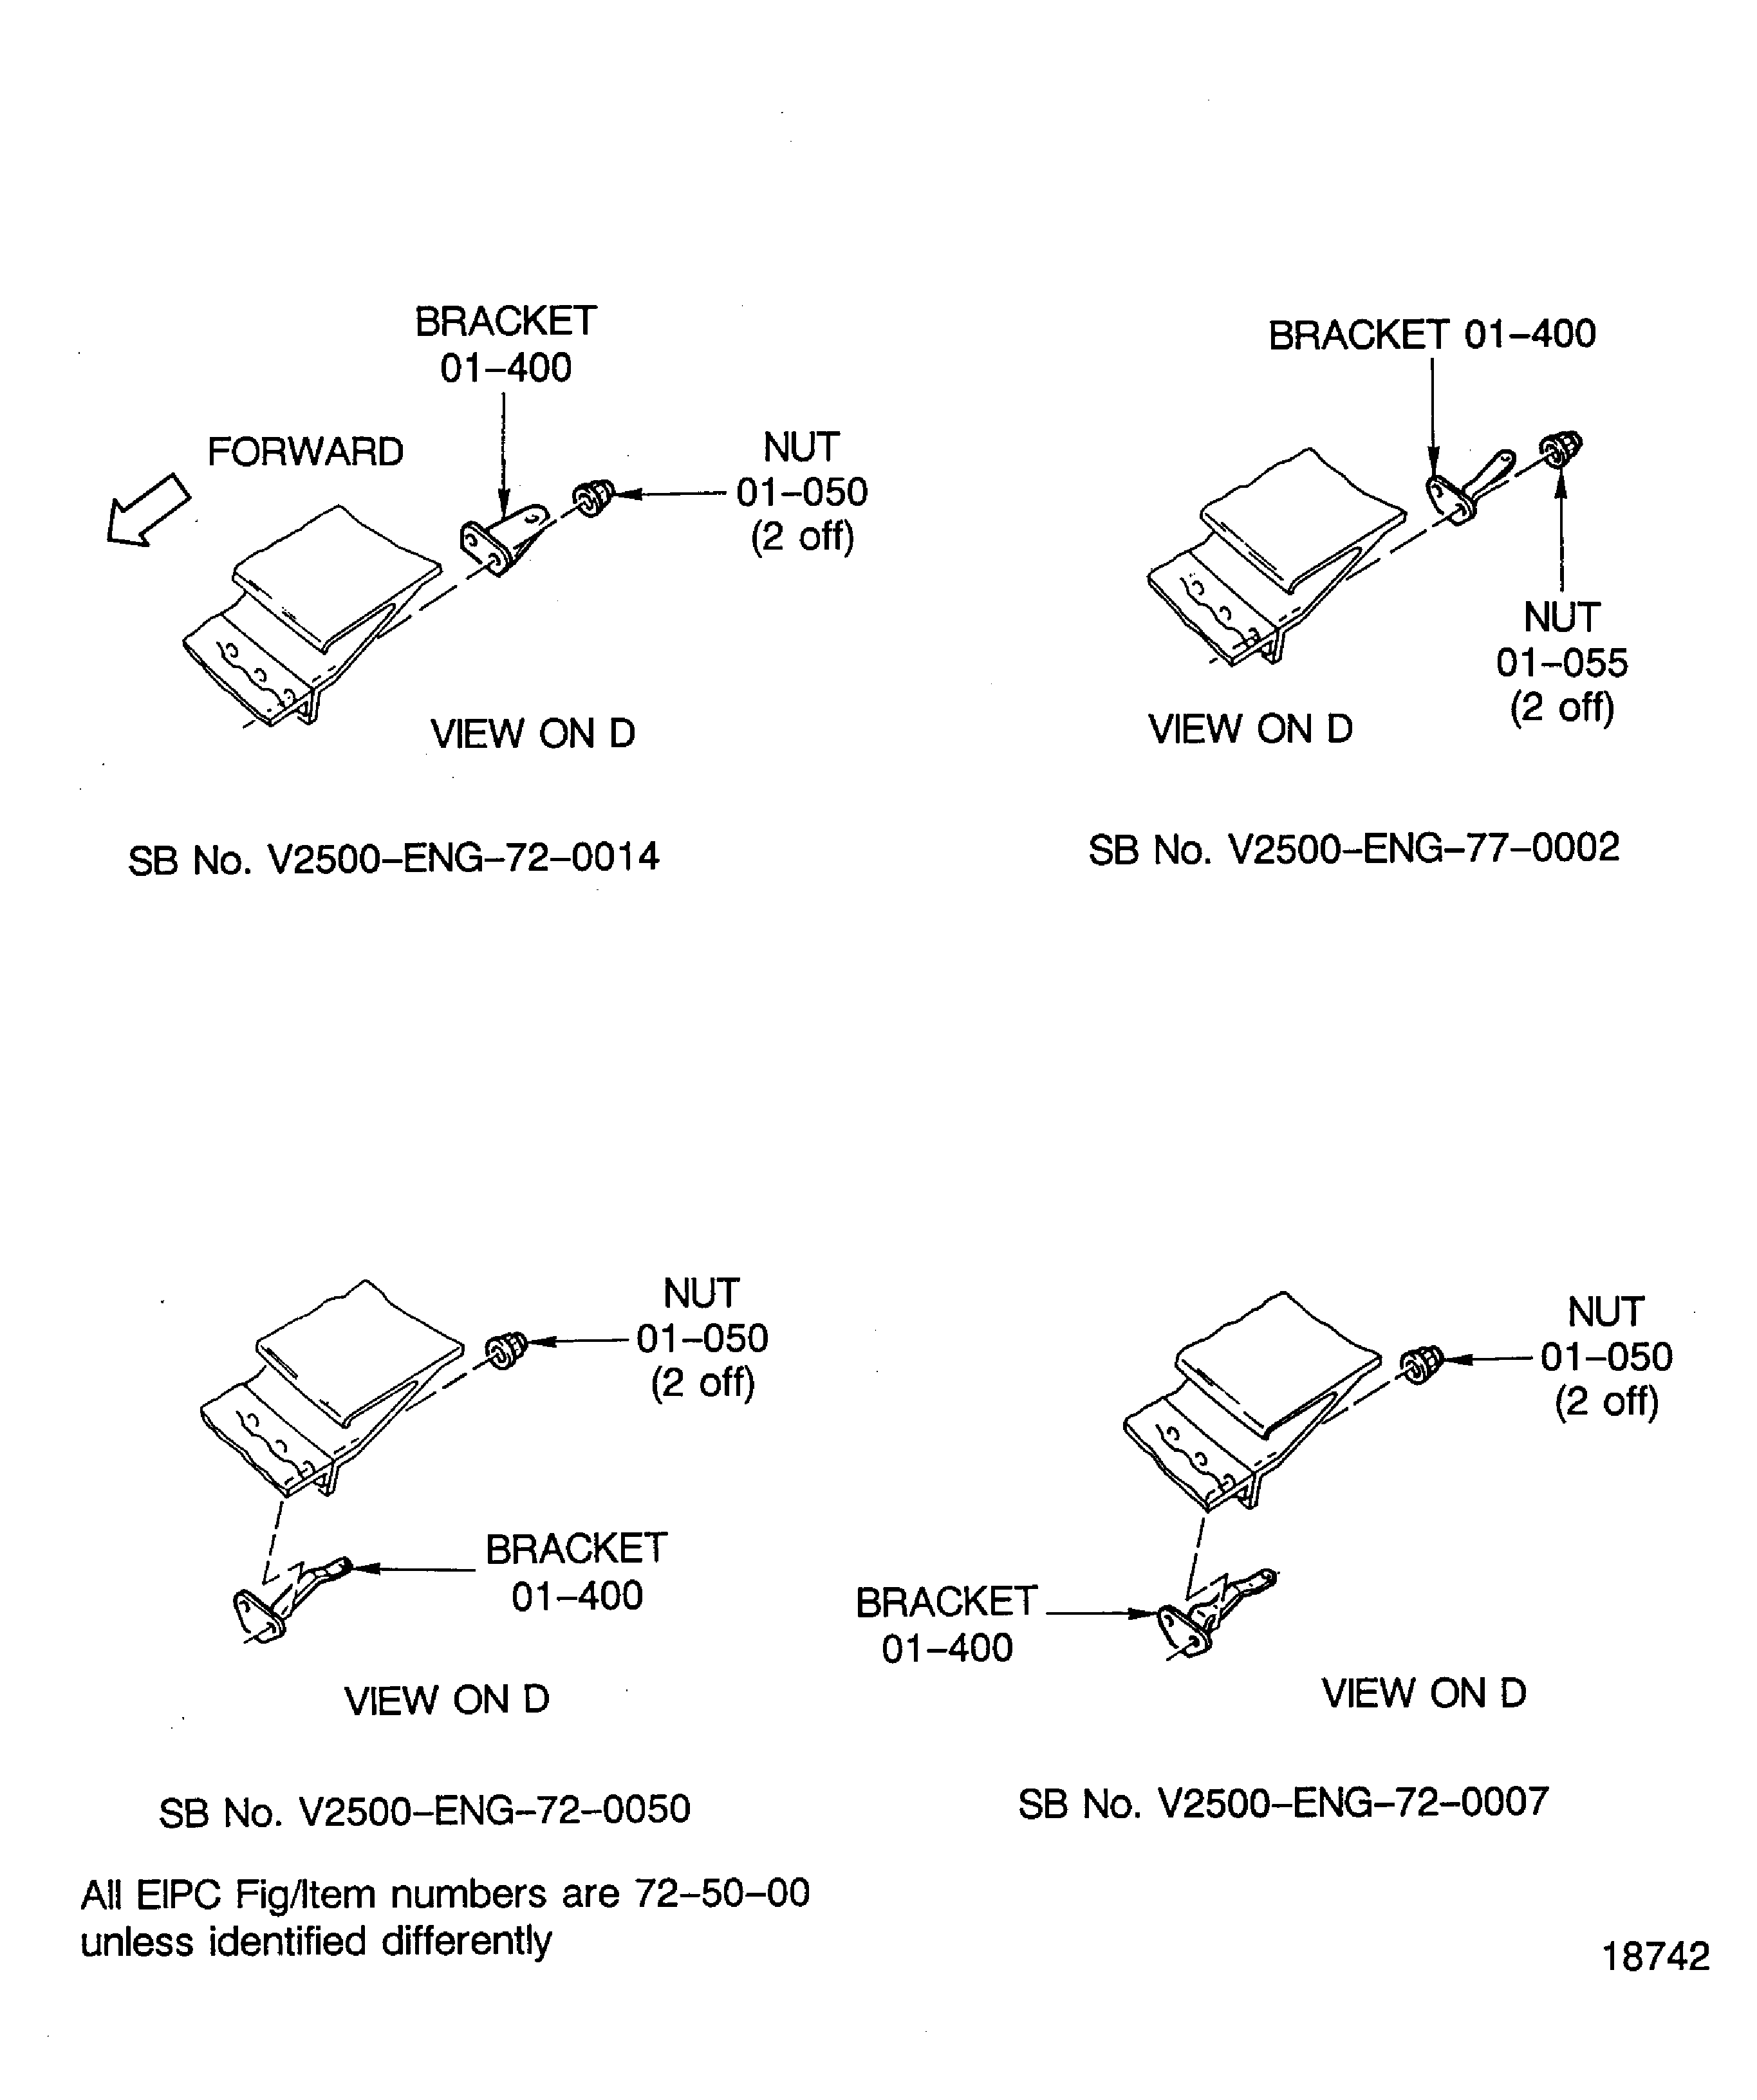
Figure: Installation of the Bolts and Brackets at the Front Flange of the Turbine Exhaust Case
Sheet 5
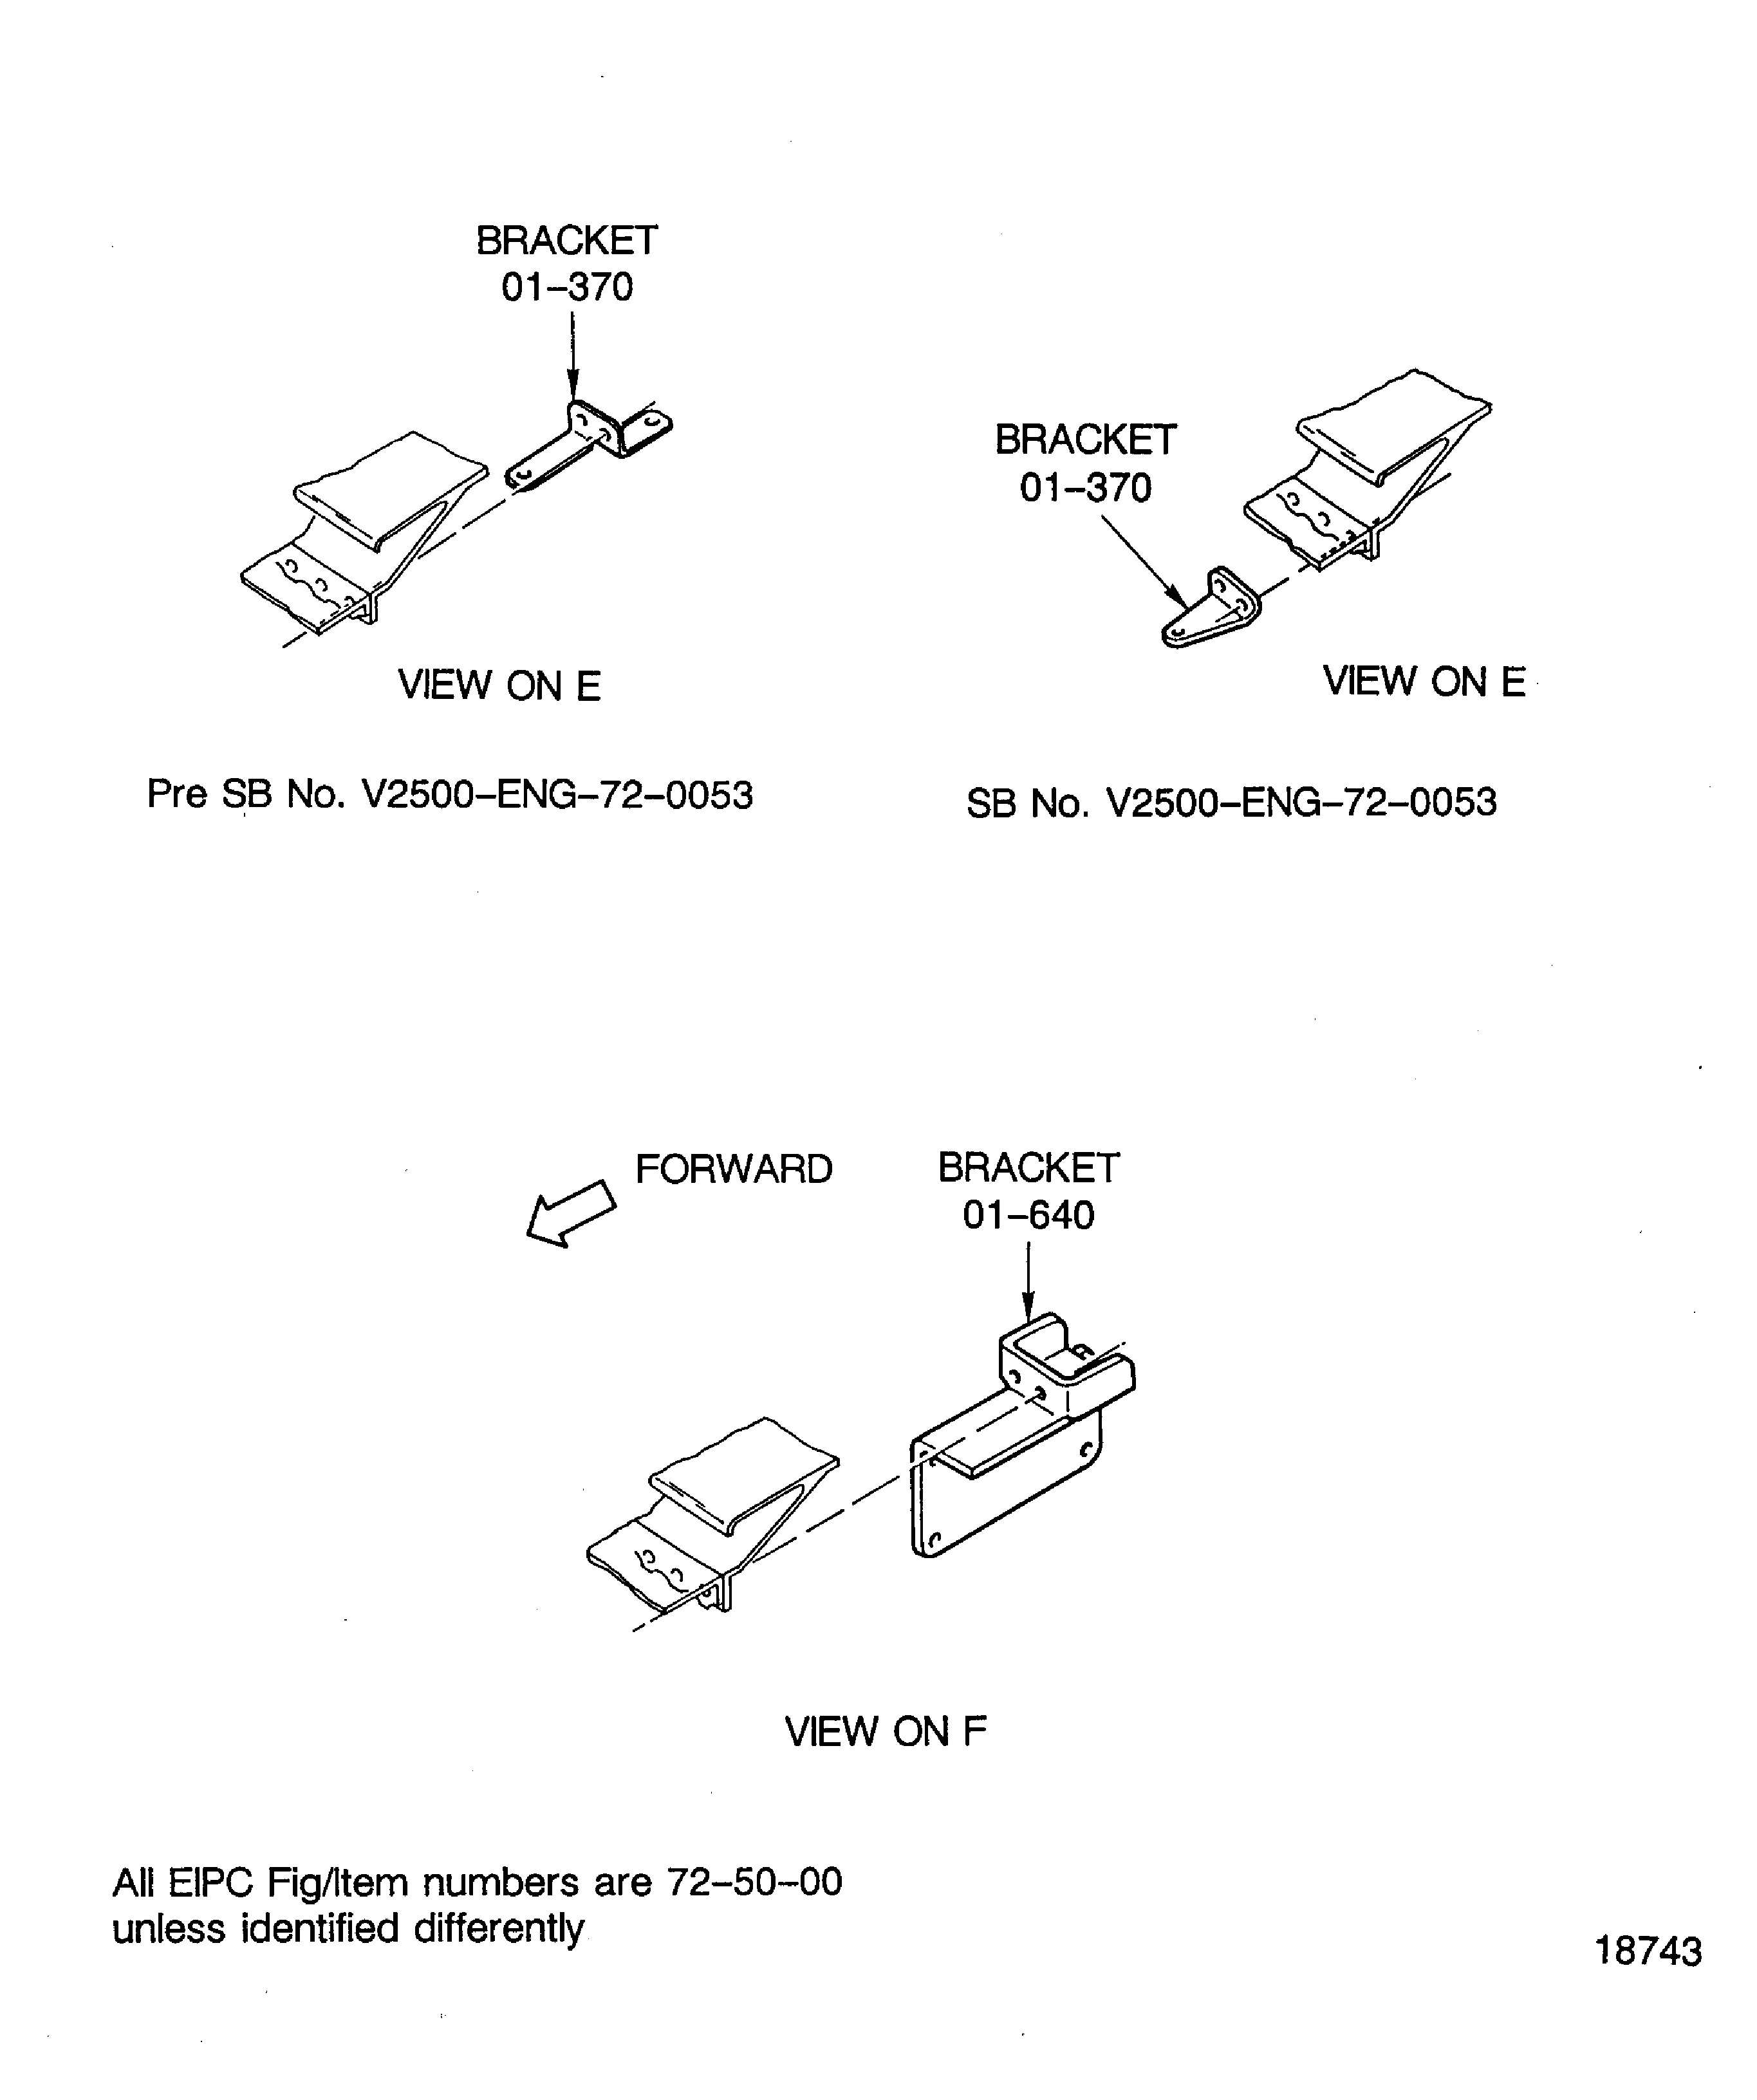
Figure: Installation of the Bolts and Brackets at the Front Flange of the Turbine Exhaust Case
Sheet 6
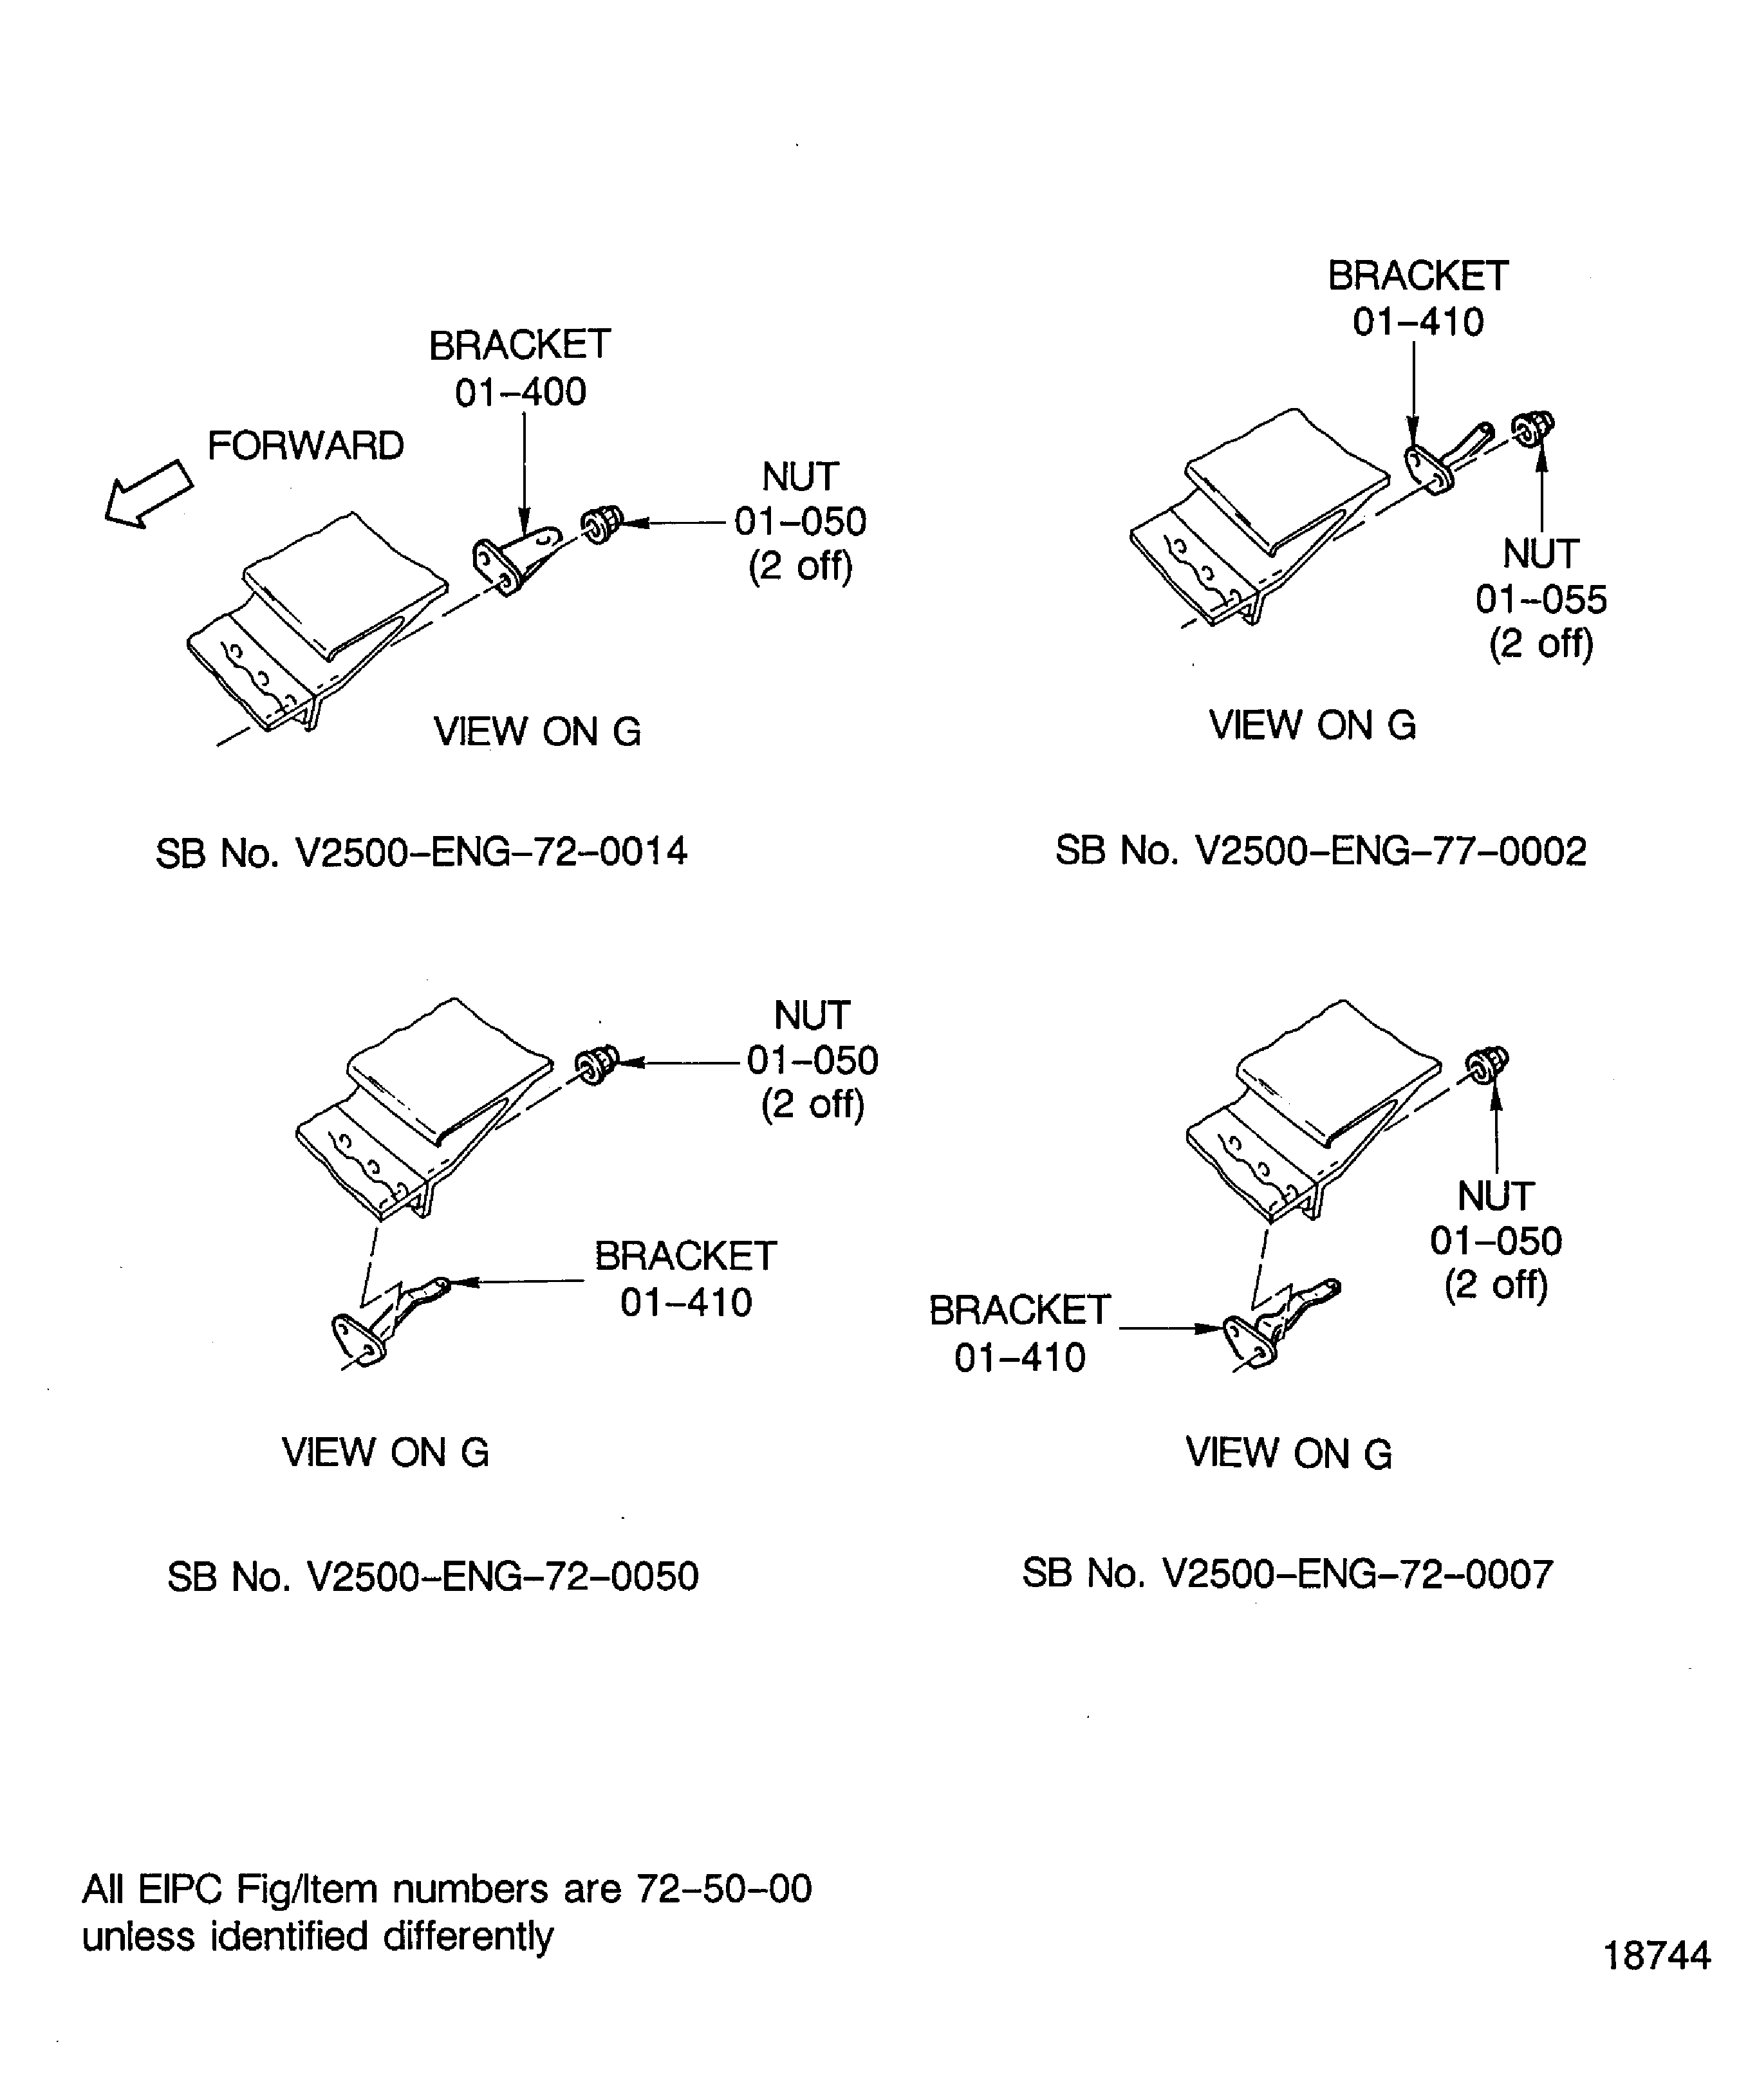
Figure: Installation of the Bolts and Brackets at the Front Flange of the Turbine Exhaust Case
Sheet 7
