Export Control
EAR Export Classification: Not subject to the EAR per 15 C.F.R. Chapter 1, Part 734.3(b)(3), except for the following Service Bulletins which are currently published as EAR Export Classification 9E991: SBE70-0992, SBE72-0483, SBE72-0580, SBE72-0588, SBE72-0640, SBE73-0209, SBE80-0024 and SBE80-0025.Copyright
© IAE International Aero Engines AG (2001, 2014 - 2021) The information contained in this document is the property of © IAE International Aero Engines AG and may not be copied or used for any purpose other than that for which it is supplied without the express written authority of © IAE International Aero Engines AG. (This does not preclude use by engine and aircraft operators for normal instructional, maintenance or overhaul purposes.).Applicability
All
Common Information
TASK 72-44-30-300-020 Inner Combustion Chamber Liner - Weld Repair At Row 5 And The Rear Flange - Repair-020 (VRS3745)
Effectivity
FIG/ITEM | PART NO. |
|---|---|
01-401 | 2A0549-01 |
01-401 | 2A1374 |
01-401 | 2A1398 |
01-401 | 2A1617 |
01-401 | 2A2034 |
01-401 | 2A2034-001 |
01-401 | 2A2722-01 |
01-401 | 2A2838-01 |
01-401 | 2A3344-01 |
01-401 | 2A3344-001 |
01-401 | 2A3344-002 |
01-401 | 2A3344-003 |
01-401 | 2A3344-004 |
01-401 | 2A3344-005 |
01-401 | 2A3344-006 |
01-401 | 2A3344-007 |
01-401 | 2A3351-01 |
01-401 | 2A3351-003 |
01-401 | 2A3351-004 |
01-401 | 2A4283-01 |
01-401 | 2A4311-01 |
01-401 | 2A4313-01 |
01-401 | 2A4315-01 |
01-401 | 2A4315-001 |
01-420 | 2A2718-01 |
General
Price and availability - refer to IAE.
The practices and processes referred to in the procedure by the TASK numbers are in SPM.
NOTE
Preliminary Requirements
Pre-Conditions
| Action/Condition | Data Module/Technical Publication |
|---|---|
| Make sure that all the cleaning and inspection procedures are done before this repair. | |
| Remove the liner segment | TASK 72-44-30-300-001 |
| Remove the gangnut channels | TASK 72-44-30-300-003 |
| If present, remove the plasma coat on the rear flange-to-vane platform seal face | TASK 72-44-30-300-002 |
| If present, remove the plasma coat on the rear mount flange | TASK 72-44-30-300-004 |
| If present, remove the plasma coat on the front outside diameter seal | TASK 72-44-30-300-007 |
| If present, remove the plasma coat on the rear flange inside diameter | TASK 72-44-30-300-008 |
| If present, remove the plasma coat on the front outside diameter seal | TASK 72-44-30-300-014 |
Support Equipment
NONEConsumables, Materials and Expendables
| Name | Manufacturer | Part Number / Identification | Quantity | Remark |
|---|---|---|---|---|
| CoMat 03-197 WELDING FILLER WIRE | LOCAL | CoMat 03-197 | ||
| CoMat 03-287 WELDING FILLER WIRE | LOCAL | CoMat 03-287 |
Spares
NONESafety Requirements
NONEProcedure
Refer to SPM TASK 70-37-24-370-501.
Perform a solution heat treatment of the part by Cycle 22 except use argon or vacuum atmosphere only.
SUBTASK 72-44-30-370-065 Solution Heat Treat the Combustion Chamber Inner Liner
Refer to TASK 70-23-03-230-501 or TASK 70-23-08-230-501.
Fluorescent Penetrant Inspect the Combustion Chamber Liner.
SUBTASK 72-44-30-230-070 Examine the Damaged Combustion Chamber Inner Liner
Refer to Figure.
SUBTASK 72-44-30-350-221 Rout the Repair Area
Refer to SPM TASK 70-23-05-230-501. Use High Sensitivity.
Local Fluorescent Penetrant Inspect the Repair Area.
SUBTASK 72-44-30-230-071 Examine the Damaged Combustion Chamber Inner Liner
Refer to Figure.
Refer to SPM TASK 70-31-03-310-501.
Use rotary austenitic stainless steel wire brush or silicon carbide abrasive wheels to remove oxides and prepare the repair area(s) for weld.
Refer to SPM TASK 70-11-26-300-503.
Clean the Repair Area(S) by Solvent Wipe Method.
SUBTASK 72-44-30-380-010 Prepare the Repair Area(s) For Weld
Refer to SPM TASK 70-31-13-310-501.
No weld is allowed within 0.030 in. (0.762 mm) axially from the cooling holes.
Weld the repair area(s) by IAE 16-3. Use Manual Gas Tungsten Arc Weld Method (GTAW-MA). Use the applicable weld wire as per Figure.
SUBTASK 72-44-30-310-058 Weld Repair the Inner Liner
Refer to SPM TASK 70-37-24-370-501.
Perform a solution heat treatment of the part by Cycle 22 except use Argon or Vacuum atmosphere only.
SUBTASK 72-44-30-370-065 Solution Heat Treat the Combustion Chamber Inner Liner
Refer to SPM TASK 70-31-13-310-501.
Finish flushed the weld at the Row 5 trailing edge and the Rear Flange Faces.
SUBTASK 72-44-30-320-008 Finish the Repair Area
If the part does not meet dimensional requirements of Figure and Figure, restore the Inner Combustion Chamber Liner Shell by the applicable dimensional restoration repairs. (Refer to Repair, VRS3265 TASK 72-44-30-300-002 (REPAIR-002), Repair, VRS3170 TASK 72-44-30-300-004 (REPAIR-004), Repair, VRS3266 TASK 72-44-30-300-008 (REPAIR-008), Repair, VRS3628 TASK 72-44-30-300-017 (REPAIR-017) and Repair, VRS3813 TASK 72-44-30-300-021 (REPAIR-021)).
SUBTASK 72-44-30-220-103 Dimensionally Inspect the Combustor Inner Liner Shell Row 5
Refer to Figure.
SUBTASK 72-44-30-320-009 Machine the Rear Flange Boltholes
Refer to Figure.
SUBTASK 72-44-30-220-104 Dimensionally Inspect the Combustor Inner Liner Rear Flange Boltholes
Refer to SPM TASK 70-11-03-300-503.
Clean the Combustor Inner Liner by Aqueous Degreasing.
SUBTASK 72-44-30-110-071 Clean the Combustor Inner Liner
Refer to SPM TASK 70-23-03-230-501 or TASK 70-23-08-230-501.
Fluorescent Penetrant Inspect the Combustion Chamber Liner.
SUBTASK 72-44-30-230-072 Examine the Repaired Combustor Inner Liner
Figure: Inner Combustion Chamber Assembly - Weld Repair at Row 5 and the Rear Flange (VRS3745)
Inner Combustion Chamber Assembly - Weld Repair at Row 5 and the Rear Flange (VRS3745)
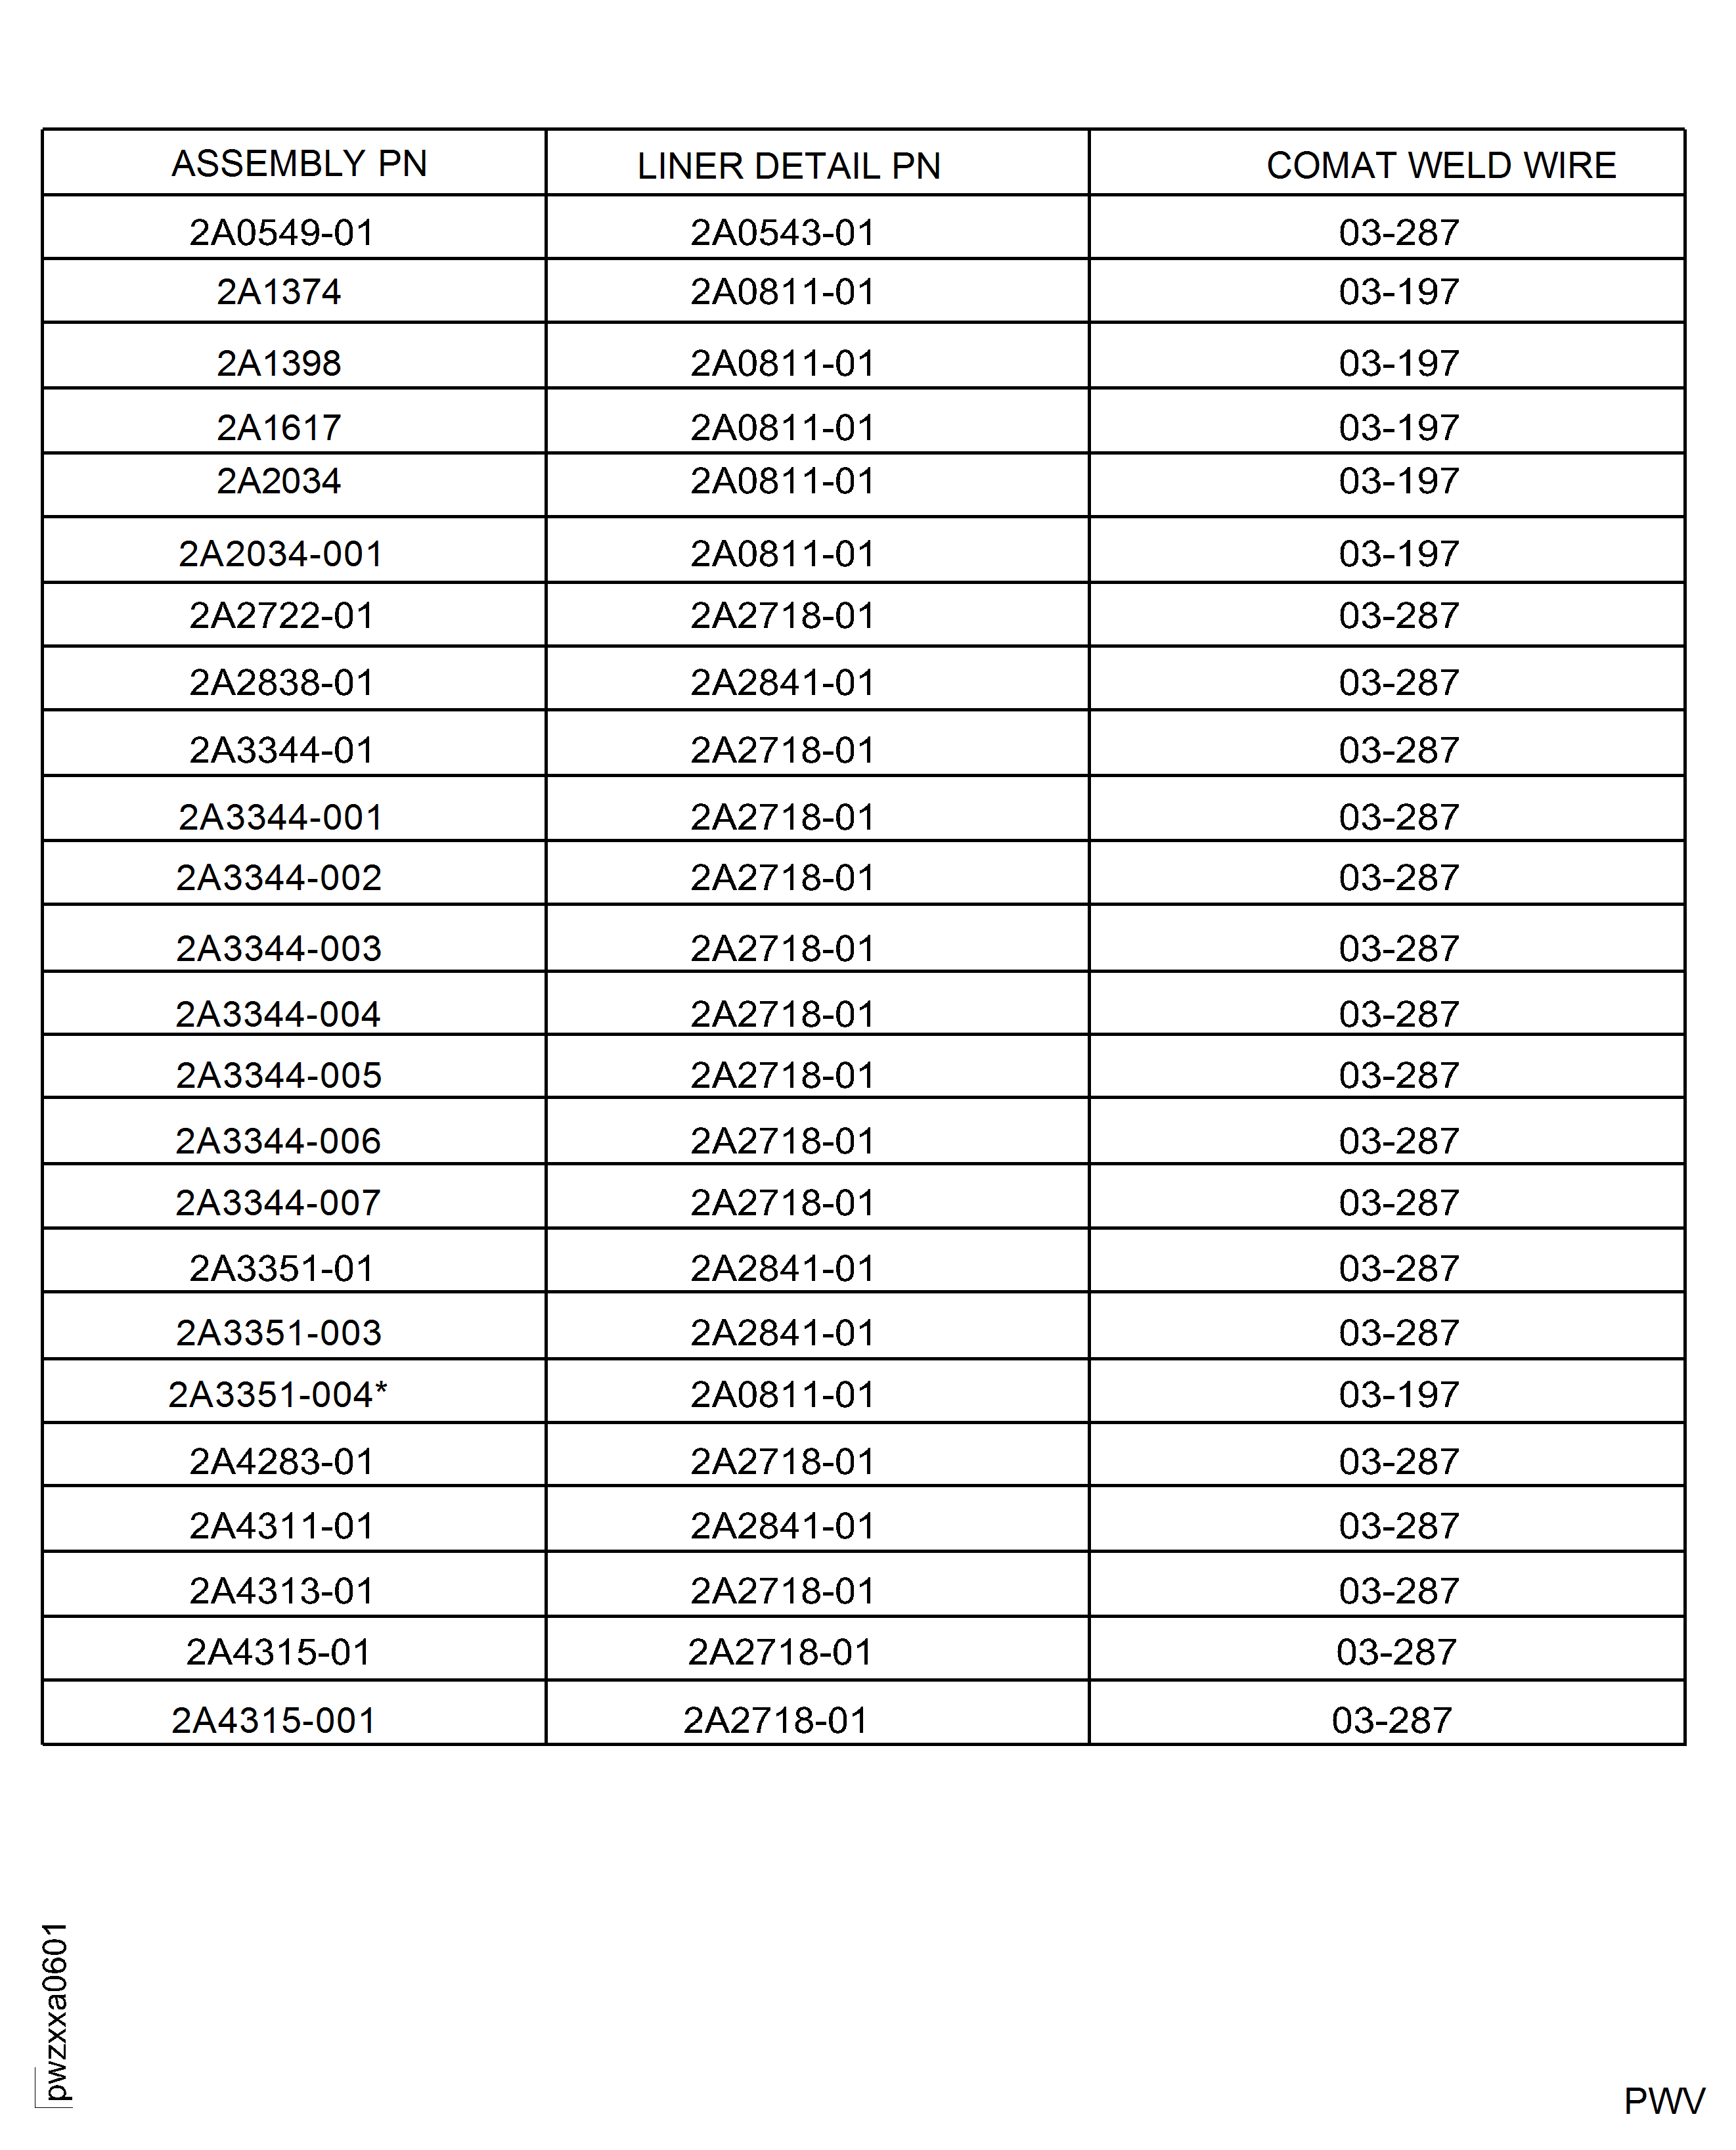
Figure: Inner Combustion Chamber Liner - Weld Repair at Row 5 and the Rear Flange - Repair-020 (VRS3745)
Cooling Holes, No Weld Allowed Within 0.030 Inch (0.762 mm) Of Cooling Holes
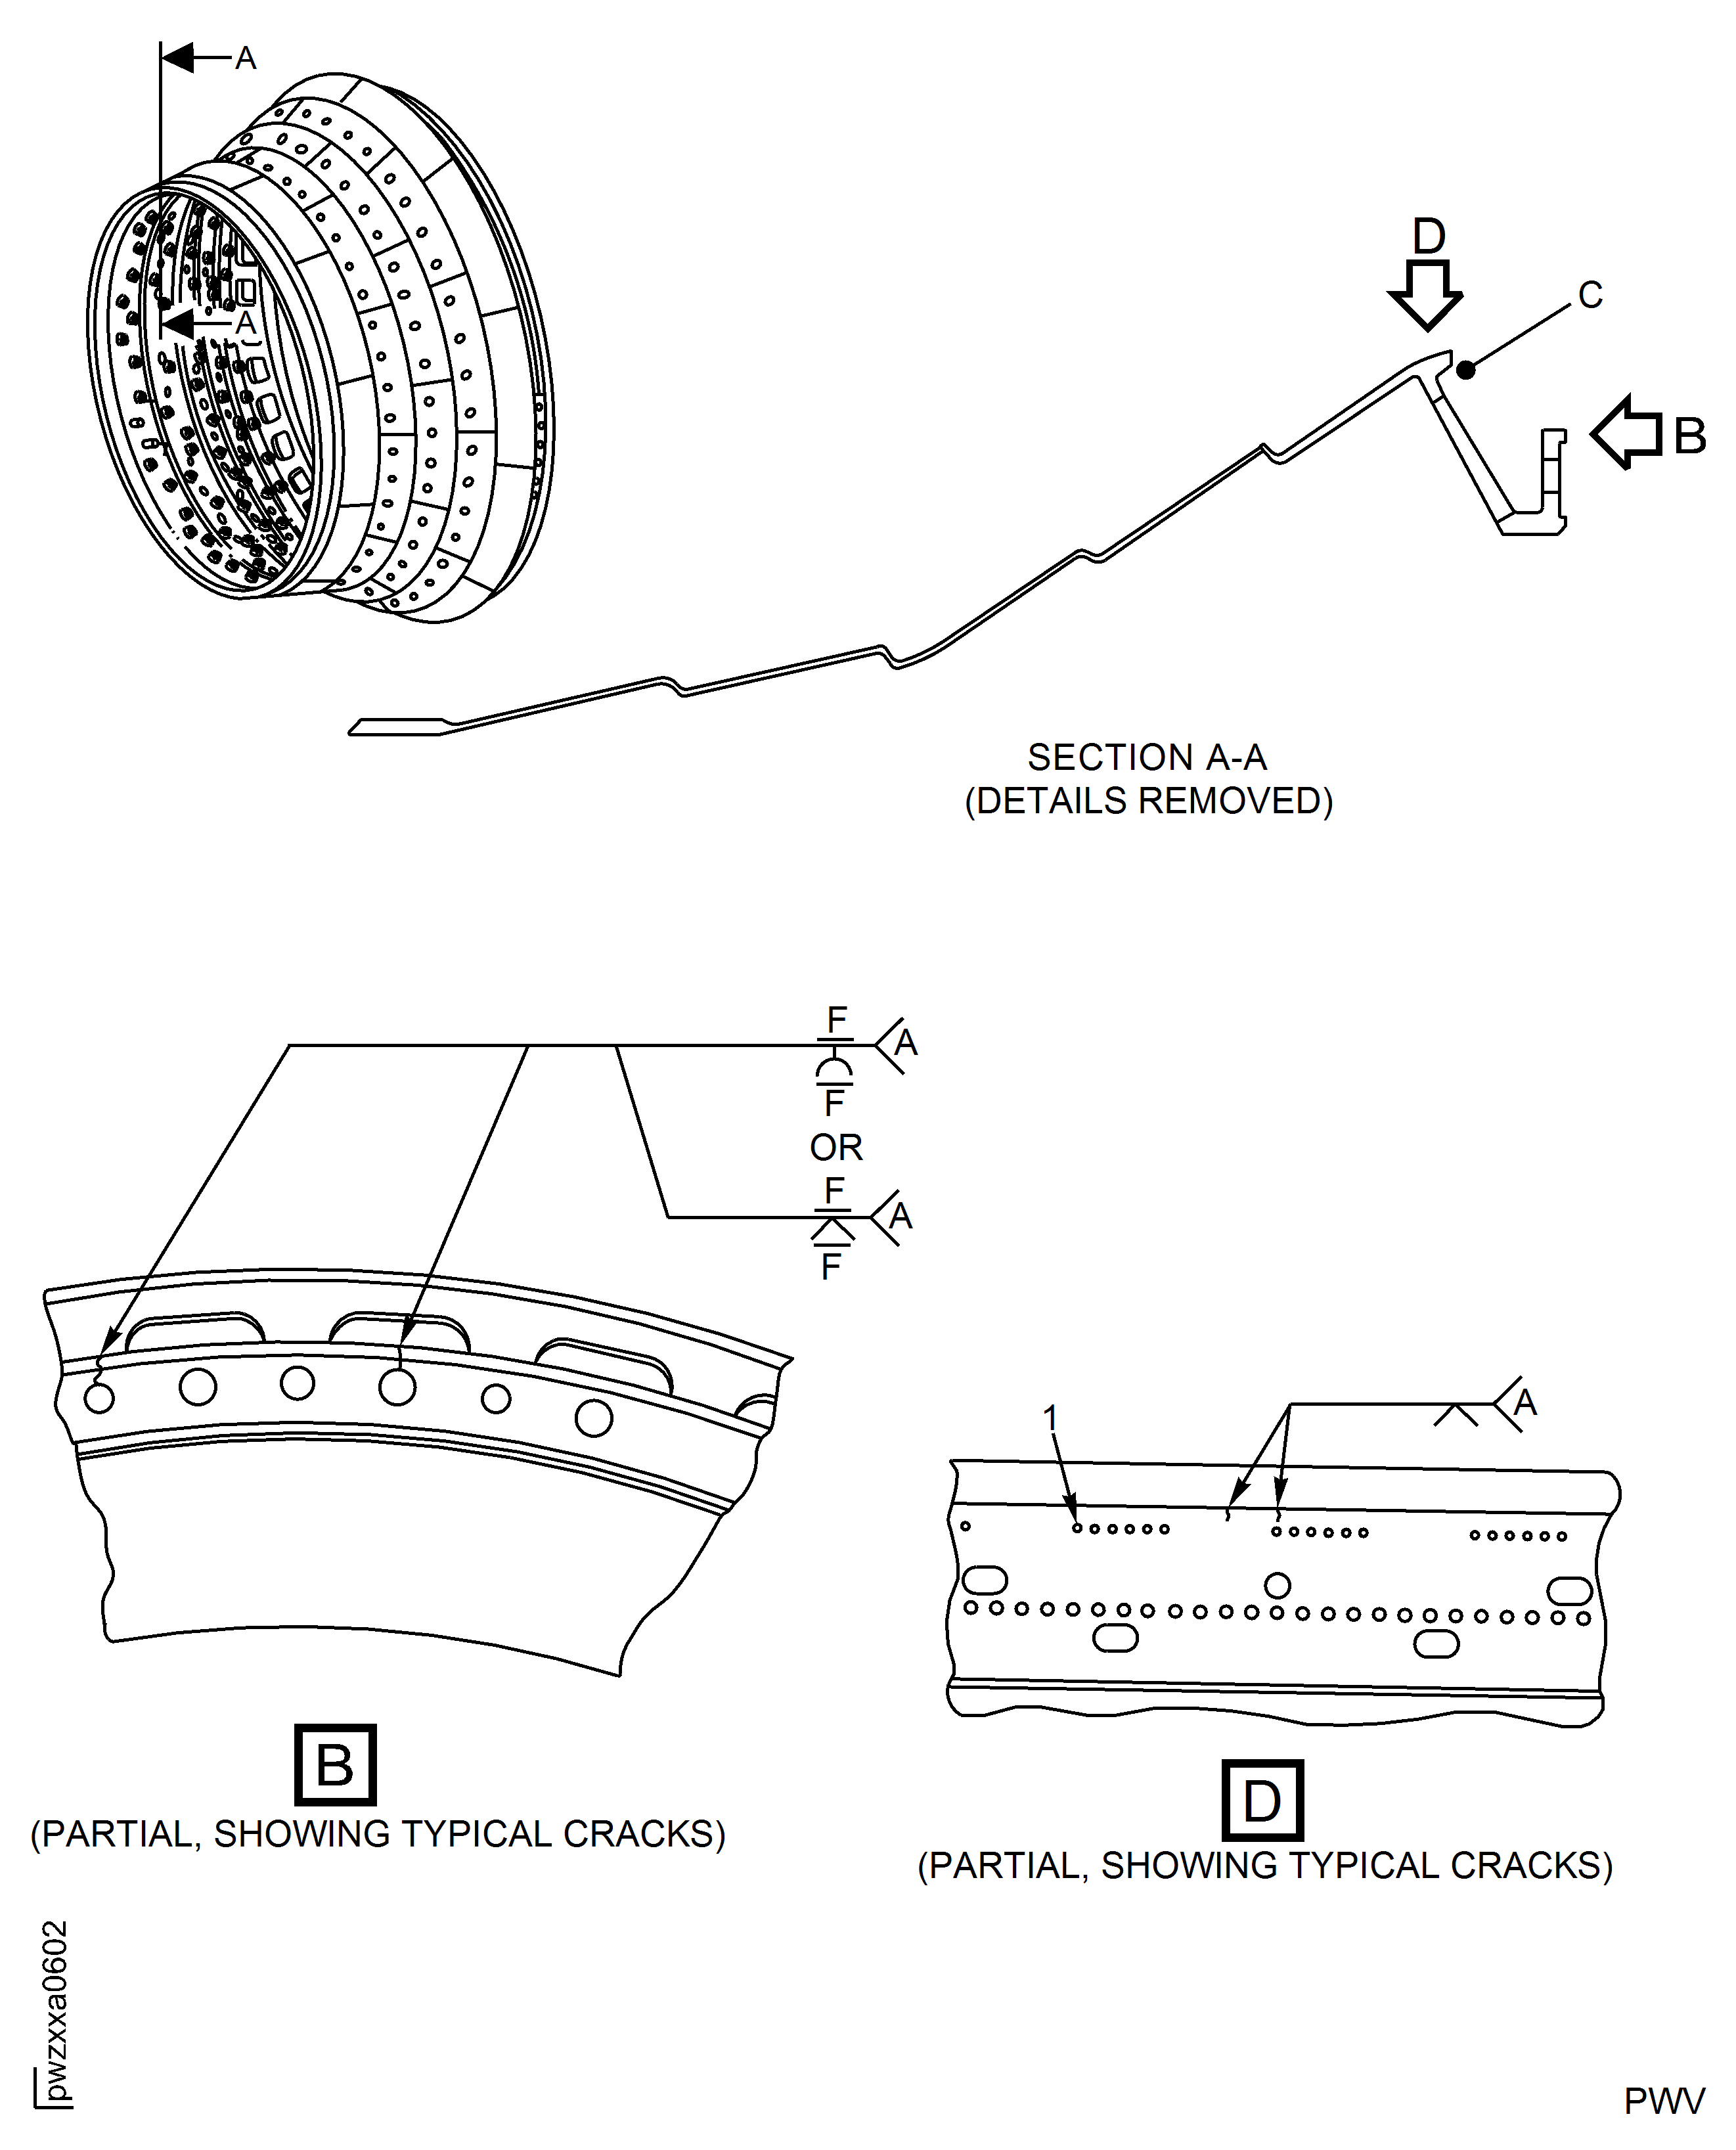
Figure: Inner Combustion Chamber Liner - Weld Repair at Row 5 and the Rear Flange - Repair-020 (VRS3745) Dimension Requirements
0.047 - 0.078 Inch (1.194 - 1.981 mm) Radius
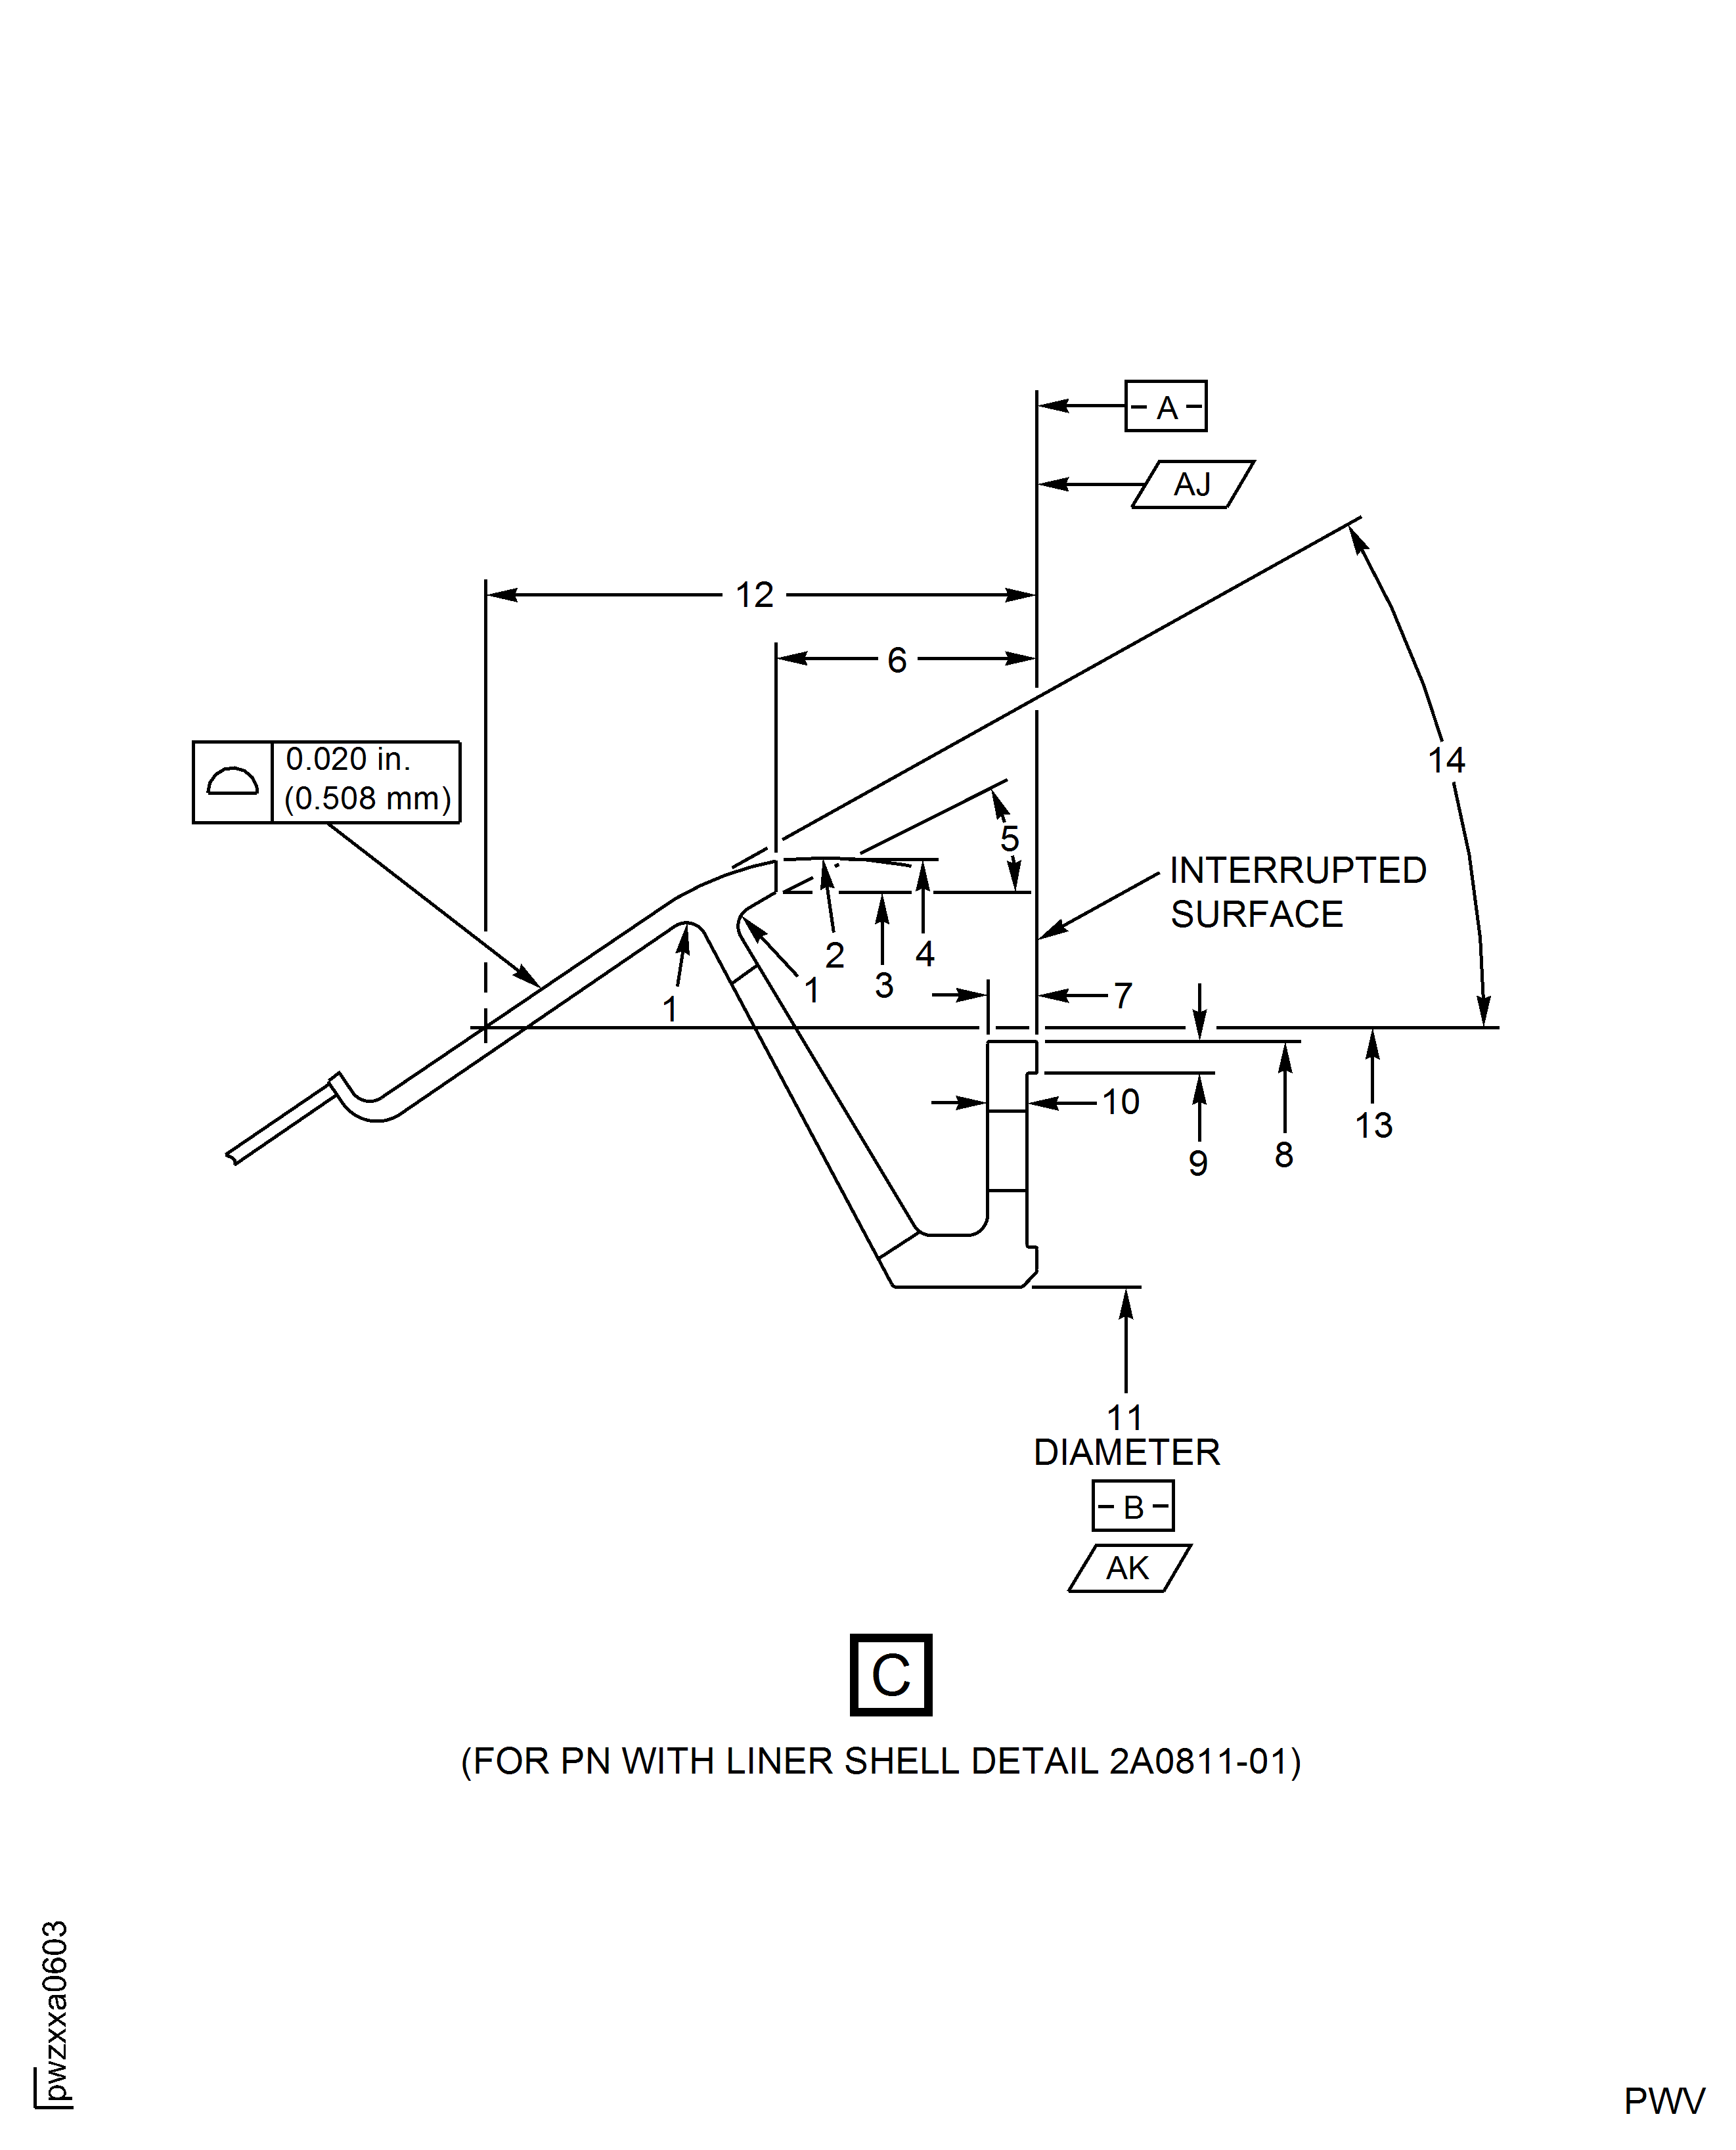
Figure: Inner Combustion Chamber Liner - Weld Repair at Row 5 and the Rear Flange - Repair-020 (VRS3745) Dimension Requirements
For PN With Liner Shell Detail 2A2718-01 and 2A2841-01: 0.047 - 0.140 Inch (1.194 - 3.556 mm) Radius.
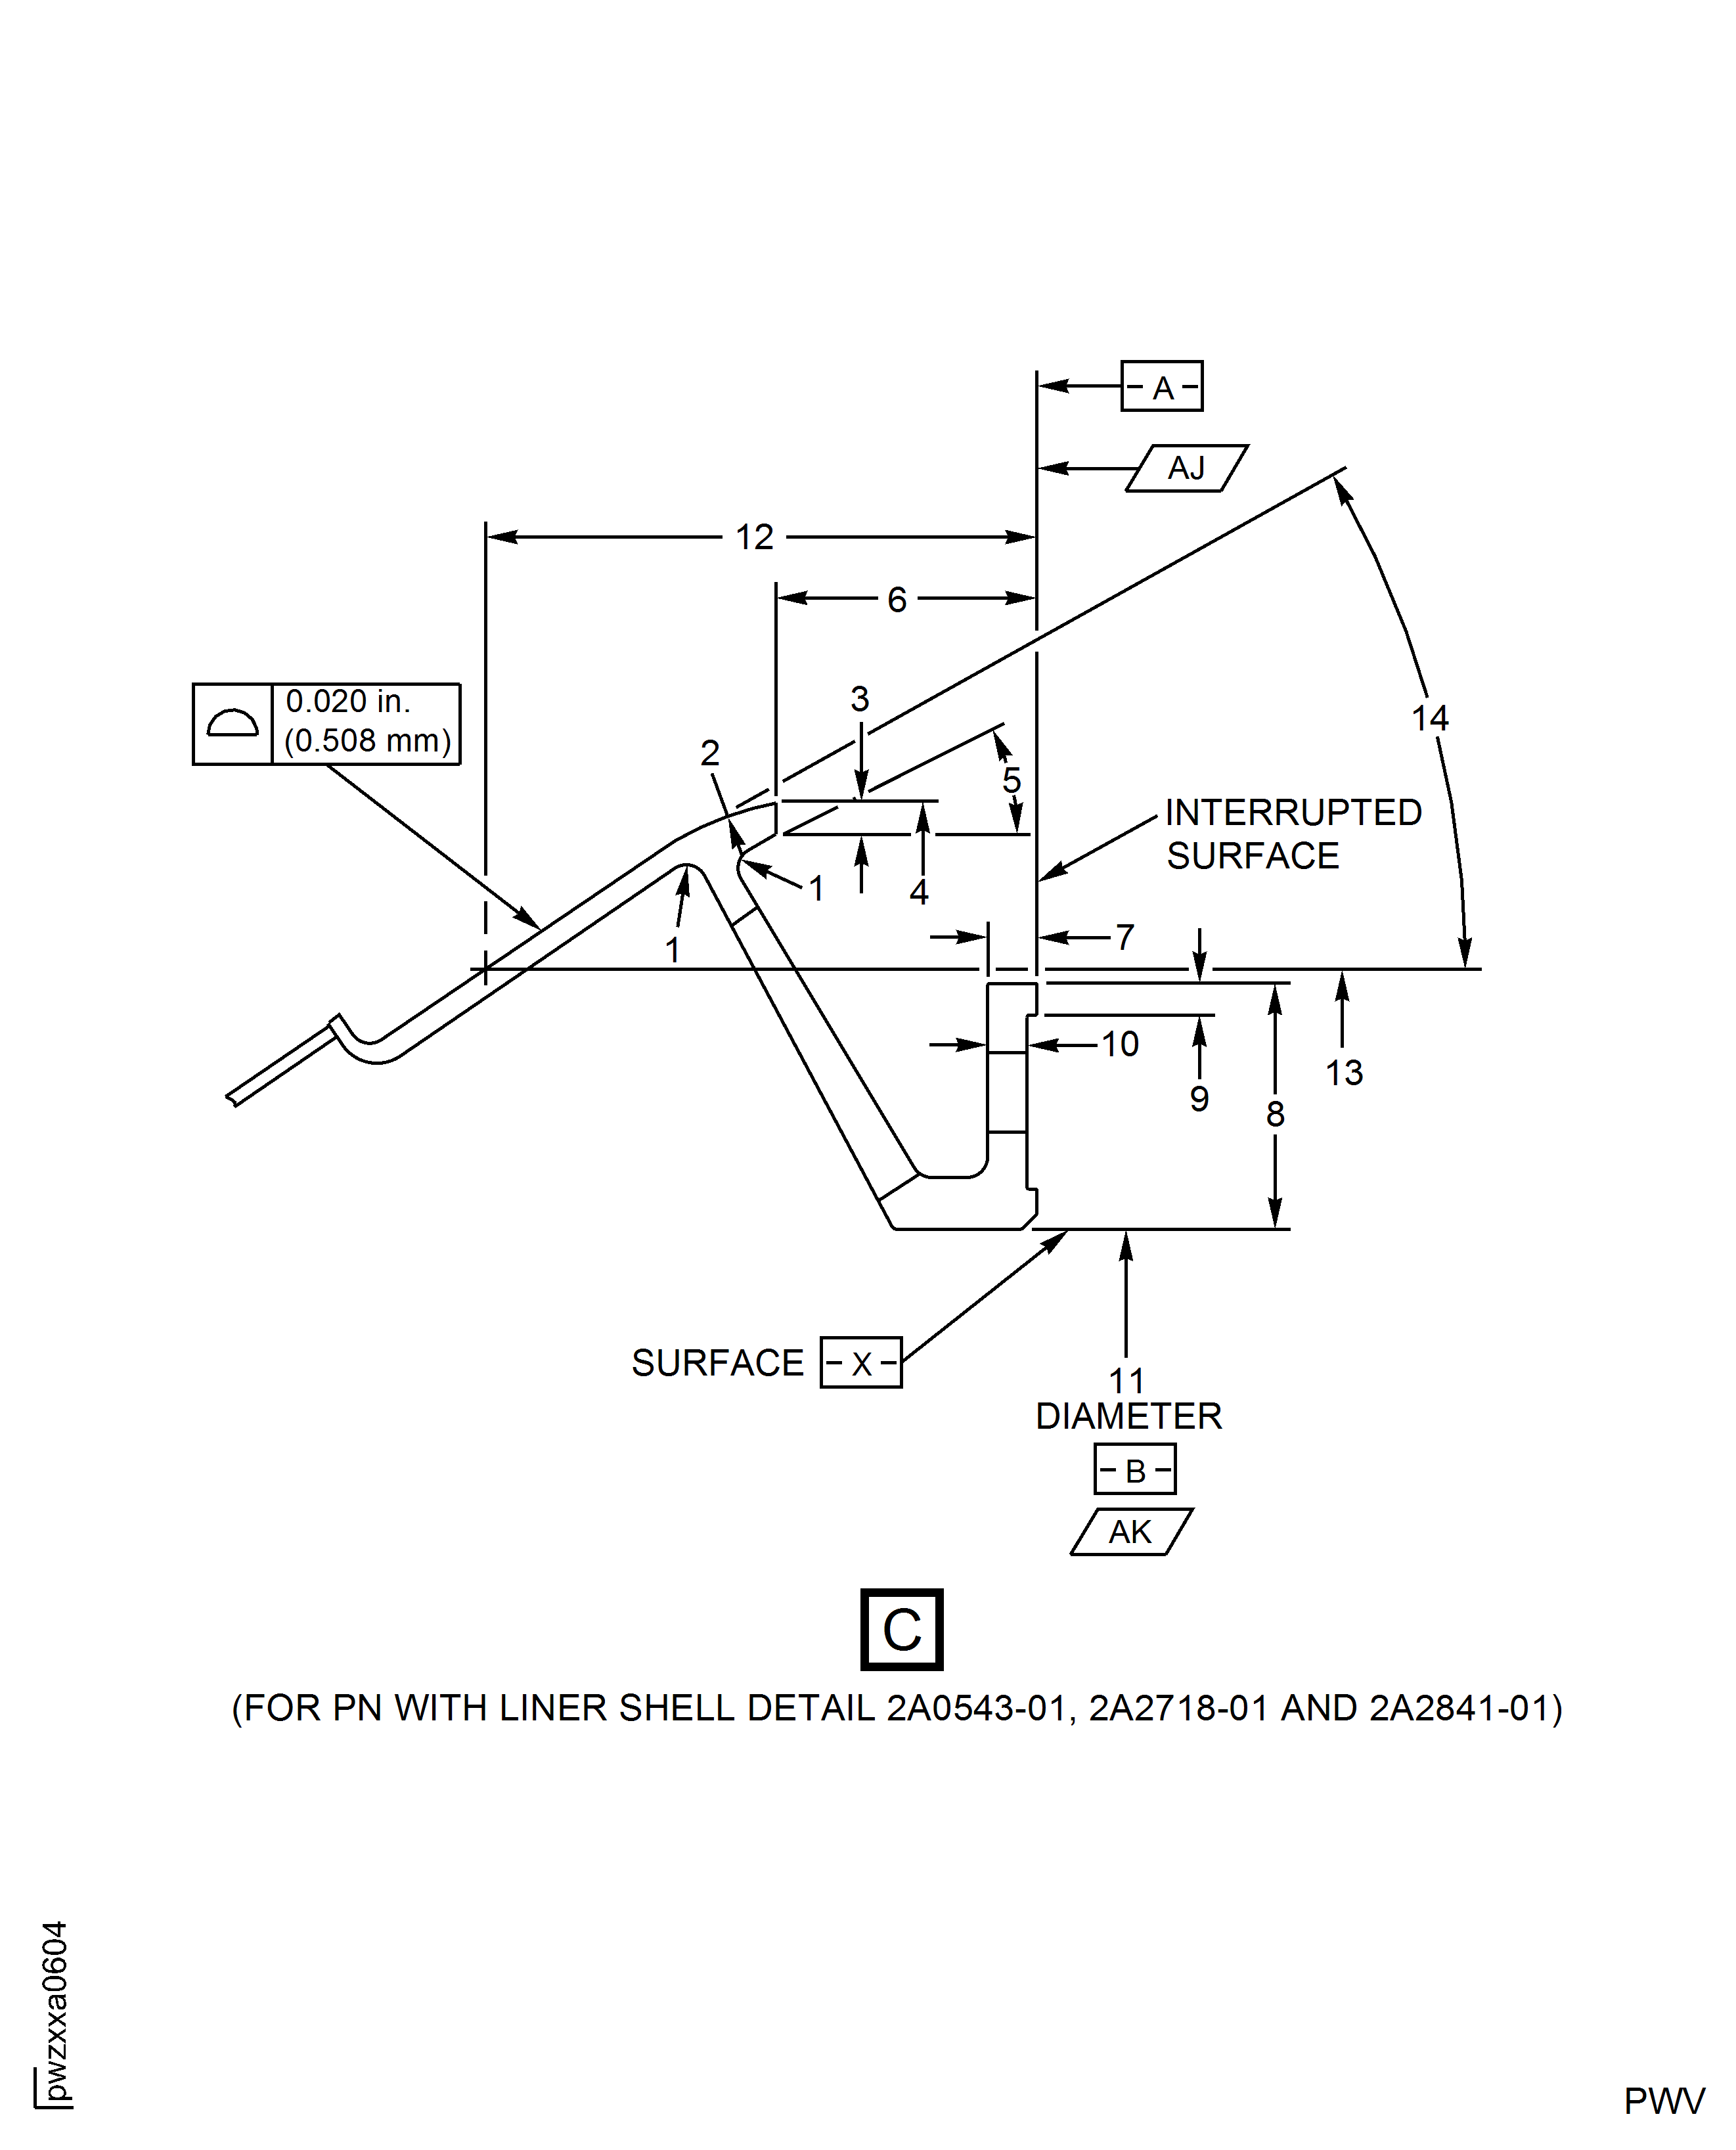
Figure: Inner Combustion Chamber Liner - Weld Repair at Row 5 and the Rear Flange - Repair-020 (VRS3745) Dimension Requirements
0.208 - 0.228 Inch (5.284 - 5.791 mm) Diameter, 20 Holes Equally Spaced.
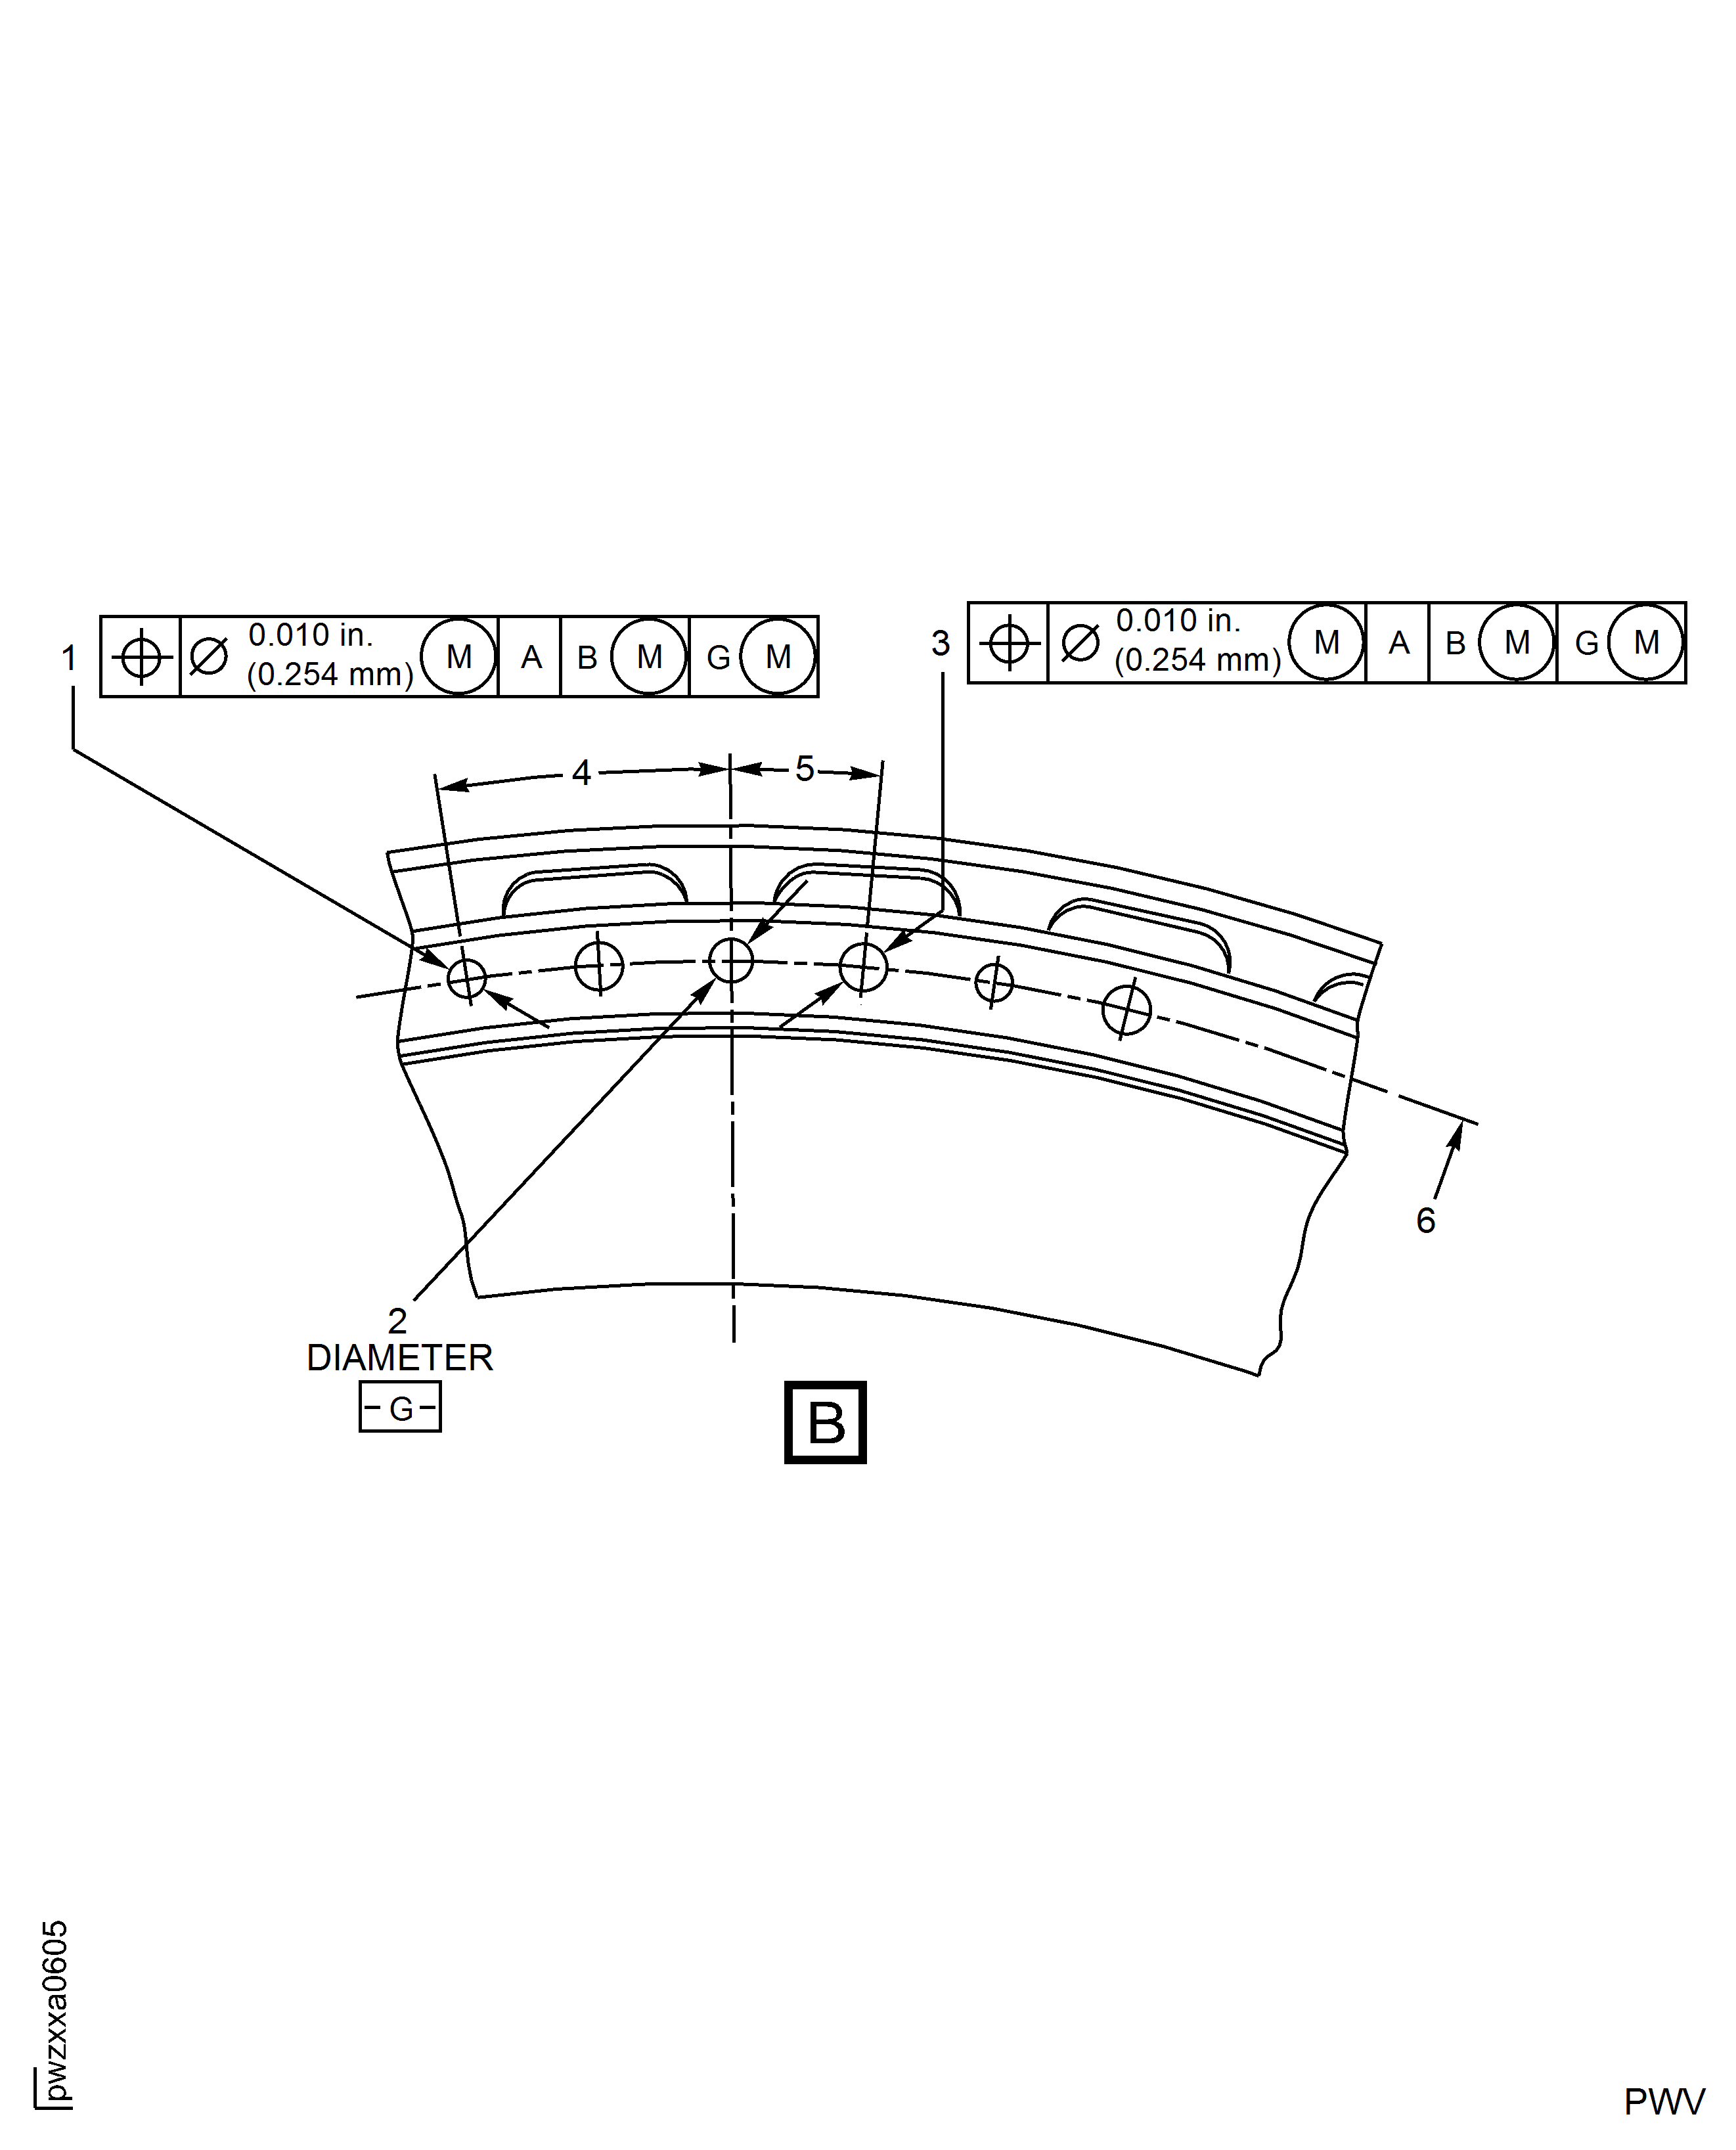
NOTEUnless otherwise specified, all dimensions apply when Surface AJ is flat within 0.010 in. (0.254 mm) and Diameter AK maintains a clearance envelope of 19.391 in. (492.531 mm), in free state or constrained. Constraint contact allowed only on Surface AJ and Diameter AK. NOTEIn free state Surface AJ is flat within 0.030 in. (0.762 mm) and Diameter AK is 19.372 in. - 19.418 in. (492.049 - 493.217 mm). NOTEUnless otherwise specified, all surfaces texture should be 125 micro-inches (3.175 micro-meters). NOTEUnless otherwise specified, break edges to 0.003 in. - 0.015 in. (0.077 - 0.381 mm). NOTEUnless otherwise specified, all diameter have true position at Surface A and Surface B has 0.010 in. (0.254 mm) tolerance with regardless of feature size. |
Requirements After Job Completion
Follow-On Conditions
| Action/Condition | Data Module/Technical Publication |
|---|---|
| If removed and not re-applied in the procedure, re-apply the plasma coat on the rear flange-to-vane platform seal face | TASK 72-44-30-300-002 |
| If removed and not re-applied in the procedure, re-apply the plasma coat on the rear mount flange | TASK 72-44-30-300-004 |
| If removed and not re-applied in the procedure, re-apply the plasma coat on the front outside diameter seal | TASK 72-44-30-300-007 |
| If removed and not re-applied in the procedure, re-apply the plasma coat on the rear flange inside diameter | TASK 72-44-30-300-008 |
| If removed and not re-applied in the procedure, re-apply the plasma coat on the front outside diameter seal | TASK 72-44-30-300-014 |
| If (VRS3813) was performed to restore the axial dimension of the rear flange-to-vane platform seal face by welding, it is permissible not to perform dimensional restoration by plasma coat | TASK 72-44-30-300-021 |
| Install the liner segments | TASK 72-44-30-300-001 |
| Install the gangnut channels | TASK 72-44-30-300-003 |
| Inspect the inner combustion chamber assembly | TASK 72-44-30-200-000 |
