Export Control
EAR Export Classification: Not subject to the EAR per 15 C.F.R. Chapter 1, Part 734.3(b)(3), except for the following Service Bulletins which are currently published as EAR Export Classification 9E991: SBE70-0992, SBE72-0483, SBE72-0580, SBE72-0588, SBE72-0640, SBE73-0209, SBE80-0024 and SBE80-0025.Copyright
© IAE International Aero Engines AG (2001, 2014 - 2021) The information contained in this document is the property of © IAE International Aero Engines AG and may not be copied or used for any purpose other than that for which it is supplied without the express written authority of © IAE International Aero Engines AG. (This does not preclude use by engine and aircraft operators for normal instructional, maintenance or overhaul purposes.).Applicability
All
Common Information
TASK 72-44-50-200-001-F00 HPT Stage 1 Cooling (TOBI) Duct - Examine, Inspection-001
General
This TASK gives the procedure for the inspection of the stage 1 HPT cooling duct. For the other part of the stage 1 HPT cooling duct assembly, refer to CoMat and SupEquip #s will be corrected once TIR is finalized. This comment serves as a blanket response for all comments related to CoMats and Support Equip in this document unless stated otherwise.CoMat and SupEquip #s will be corrected once TIR is finalized. This comment serves as a blanket response for all comments related to CoMats and Support Equip in this document unless stated otherwise.TASK 72-44-50-200-000 (INSPECTION/CHECK-000).
Fig/item numbers in parentheses in the procedure agree with those used in the IPC.
The policy that is necessary for inspection is given in the SPM TASK 70-20-00-200-501.
All the parts must be cleaned before any part is examined. Refer to the SPM TASK 70-10-00-100-501.
All parts must be visually examined for damage, corrosion and wear. Any defects that are not identified in the procedure must be referred to IAE.
The procedure for those parts which must have a crack test is given in Step and Step. Do the test before the part is visually examined.
Do not discard any part until you are sure there are no repairs available. Refer to the instructions in Repair before a discarded part is used again or oversize parts are installed.
Parts which should be discarded can be held although no repair is available. The repair of a discarded part could be shown to be necessary at a later date.
All parts must be examined to make sure that all the repairs have been completed satisfactorily.
The practices and processes referred to in the procedure by the TASK numbers are in the SPM.
References
Refer to the SPM for data on these items.
Definitions of Damage, SPM TASK 70-02-02-350-501
Inspection of Damage, SPM TASK 70-20-00-200-501
Record and Control of the Lives of Parts, SPM TASK 70-05-00-220-501
Some data on these items is contained in this TASK. For more data on these items refer to the SPM.
Method of Testing for Crack Indications
Chemical Processes
Surface Protection
Preliminary Requirements
Pre-Conditions
NONESupport Equipment
| Name | Manufacturer | Part Number / Identification | Quantity | Remark |
|---|---|---|---|---|
| IAE 2P16018 Airflow fixture | 0AM53 | IAE 2P16018 | 1 | |
| IAE 2P16019 Airflow adapter | 0AM53 | IAE 2P16019 | 1 | |
| IAE 2P16020 Leak test ring | 0AM53 | IAE 2P16020 | 1 | |
| IAE 2P16021 Airflow master | 0AM53 | IAE 2P16021 | 1 | |
| IAE 6P16080 Test bench | 0AM53 | IAE 6P16080 | 1 |
Consumables, Materials and Expendables
| Name | Manufacturer | Part Number / Identification | Quantity | Remark |
|---|---|---|---|---|
| CoMat 10-045 LEAK CHECK FLUID, BUBBLES-TYPE | 03530 | CoMat 10-045 |
Spares
NONESafety Requirements
NONEProcedure
Clean the Part. Refer to TASK 72-44-50-100-000 (CLEANING-000).
Repair, VRS3558 TASK 72-44-50-300-011 (REPAIR-011)
Cracks in the outer flange that extend outward from the bolt holes
Repair, VRS3558 TASK 72-44-50-300-011 (REPAIR-011)
Cracks in the outer flange that extend inward from the bolt holes 0.125 in. (3.18 mm) or less
Repair, VRS3587 TASK 72-44-50-300-012 (REPAIR-012)
Cracks not more than 0.500 in. (12.70 mm), with more than 0.100 in. (2.54 mm) from either side of a corner radius of a snap diameter. Multiple cracks must be separated by a minimum of one-half the length of the longest crack
Repair, VRS3587 TASK 72-44-50-300-012 (REPAIR-012)
Cracks in the groove at location 9 not more than 0.250 in. (6.35 mm) long and a minimum distance of 2.000 in. (50.80 mm) between cracks
Repair, VRS3587 TASK 72-44-50-300-012 (REPAIR-012)
Cracks in the rear side of the nozzle at location 2 and the cover plate weld at location 4
Repair, VRS3808 TASK 72-44-50-300-017 (Repair-017)
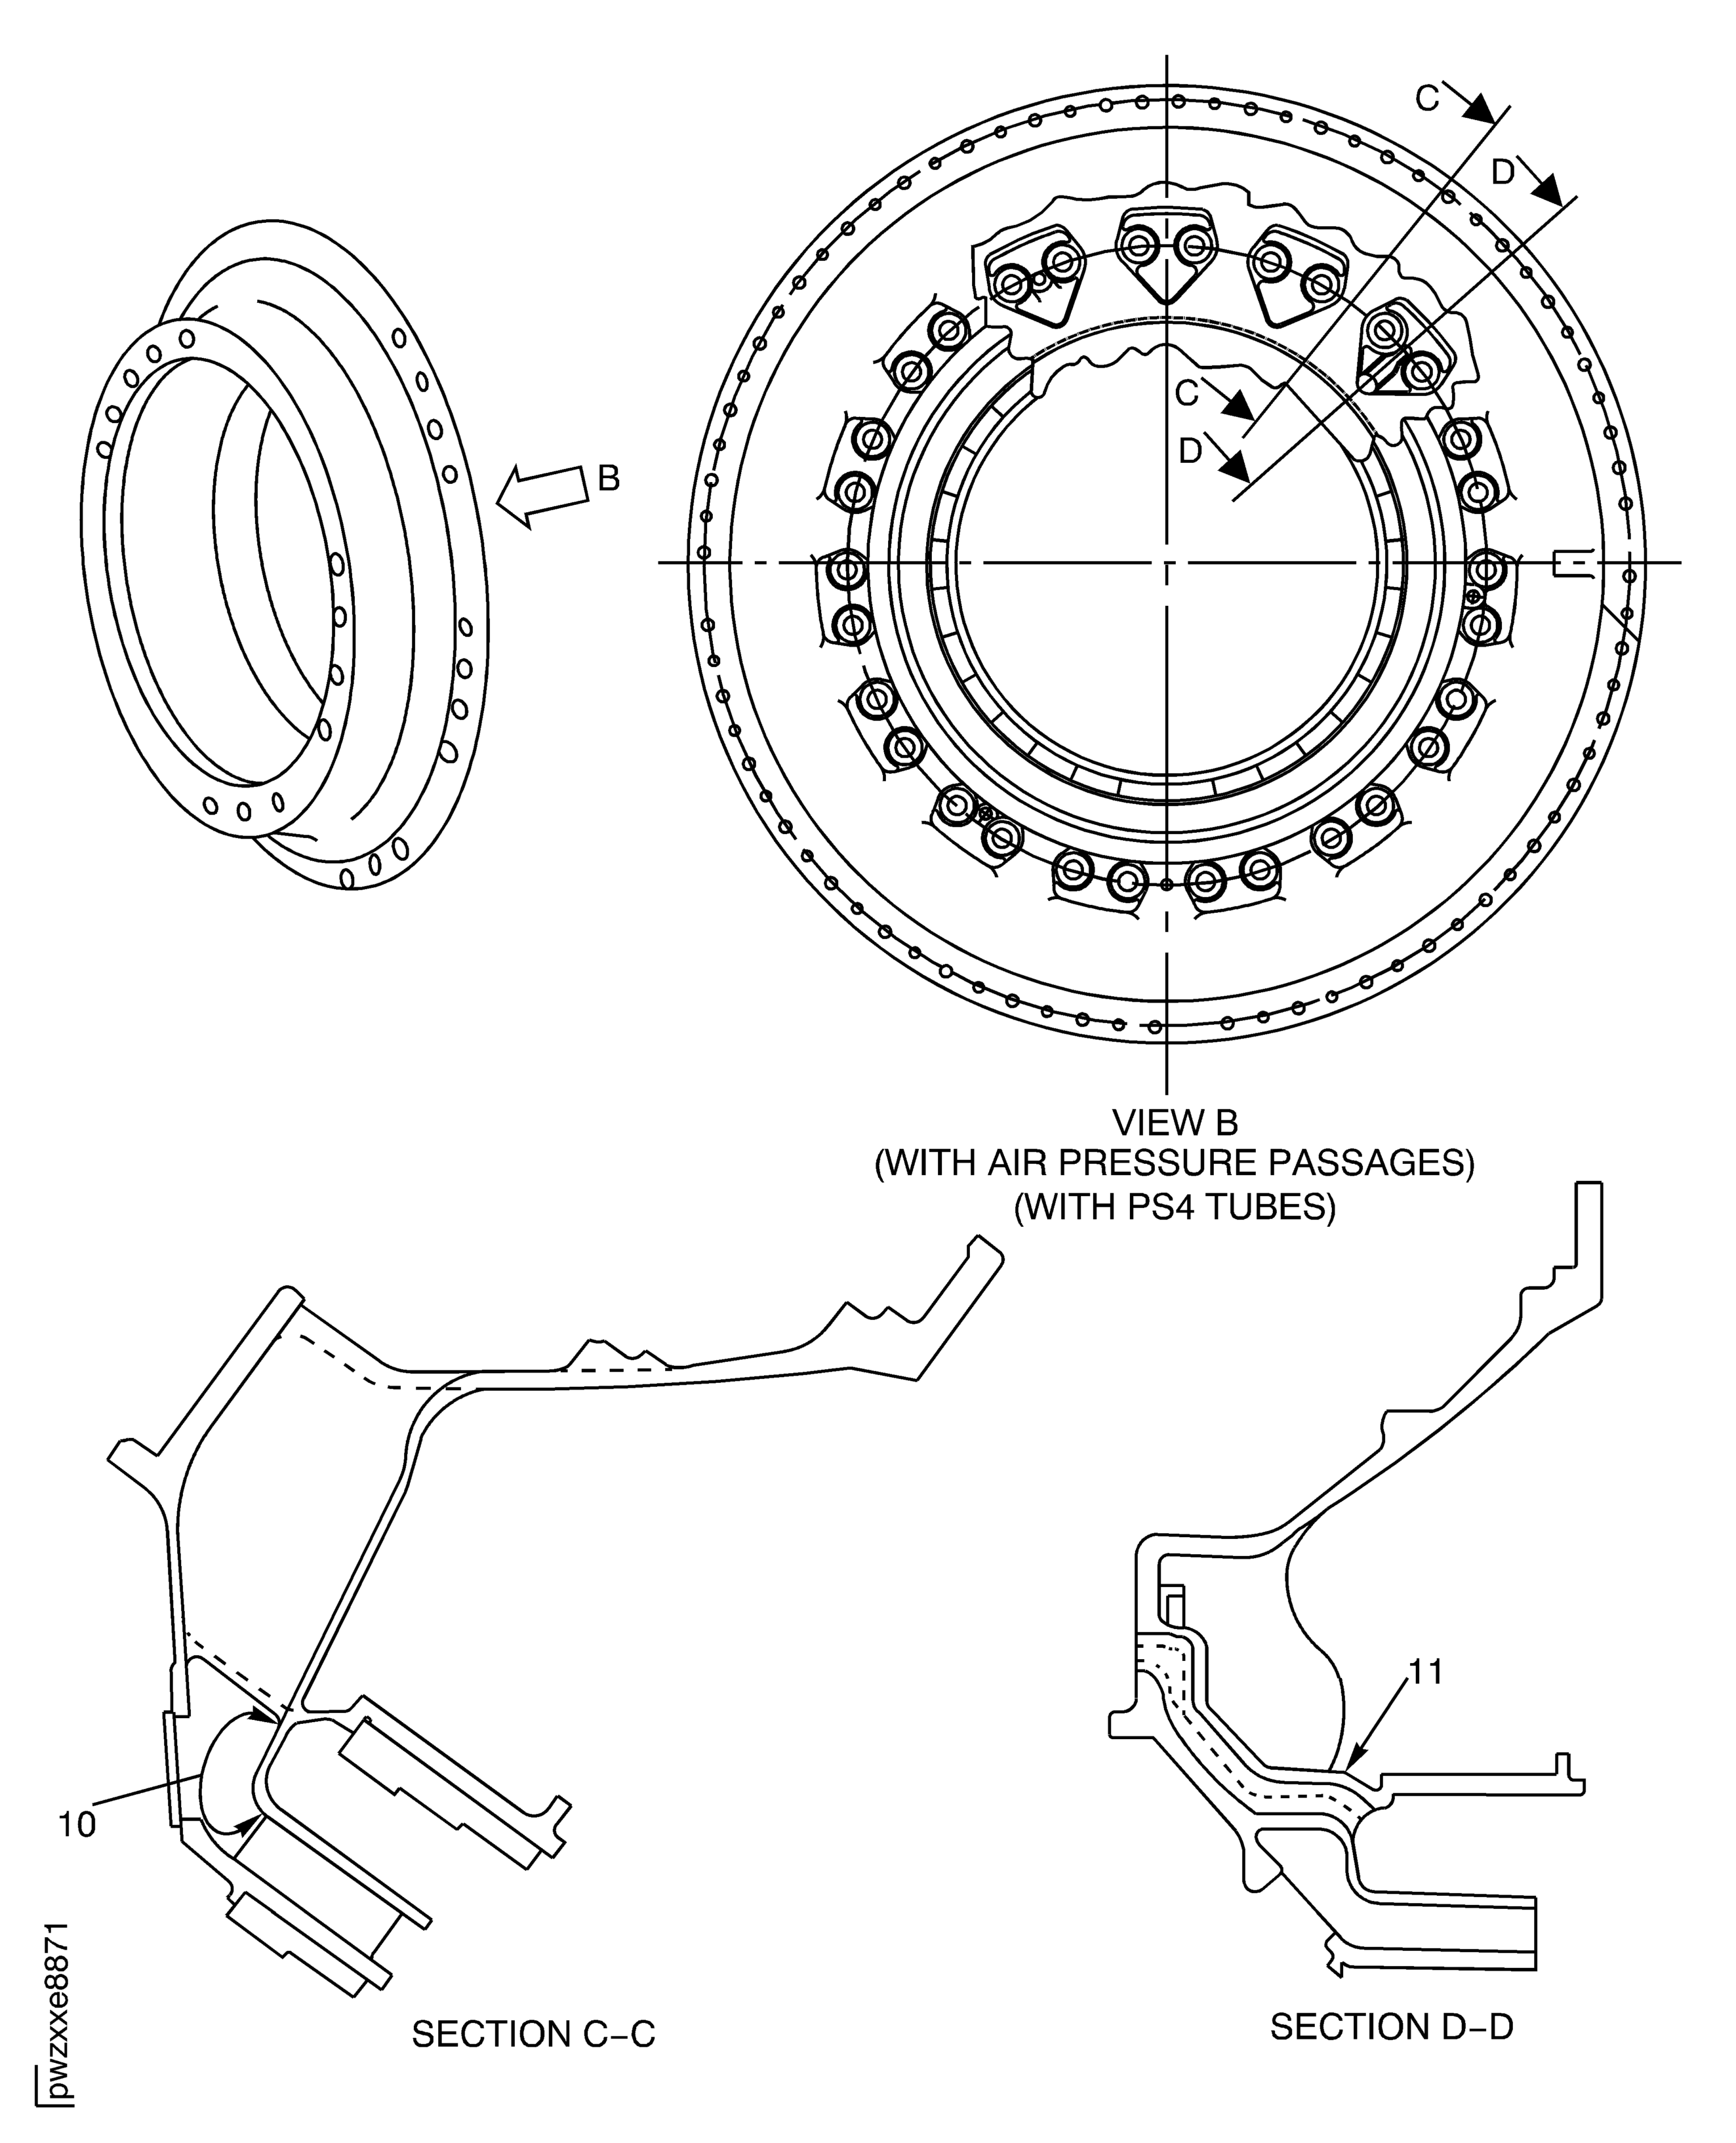
Cracks in the air pressure passage at Location 11
Cracks
Do the crack test on the part that is given below. Carefully examine the bolt flange at location 1, the rear side of the nozzle at location 2 and the cover plate weld at location 4. Use the applicable penetrant inspection procedures.
PART IDENT
TASK/SUBTASK
Stage 1 HPT cooling duct
SUBTASK 72-44-50-230-068-001 Examine the Stage 1 HPT Cooling Duct (01-010) for Cracks
Clean the Part. Refer to TASK 72-44-50-100-000 (CLEANING-000).
Repair, VRS3558 TASK 72-44-50-300-011 (REPAIR-011)
Cracks in the outer flange that extend outward from the bolt holes
Repair, VRS3558 TASK 72-44-50-300-011 (REPAIR-011)
Cracks in the outer flange that extend inward from the bolt holes 0.125 in. (3.18 mm) or less
Repair, VRS3587 TASK 72-44-50-300-012 (REPAIR-012)
Cracks not more than 0.500 in. (12.70 mm), with more than 0.100 in. (2.54 mm) from either side of a corner radius of a snap diameter. Multiple cracks must be separated by a minimum of one-half the length of the longest crack
Repair, VRS3587 TASK 72-44-50-300-012 (REPAIR-012)
Cracks in the groove at location 9 not more than 0.250 in. (6.35 mm) long and a minimum distance of 2.000 in. (50.80 mm) between cracks
Repair, VRS3587 TASK 72-44-50-300-012 (REPAIR-012)
Cracks in the rear side of the nozzle at location 2 and the cover plate weld at location 4
Repair, VRS3808 TASK 72-44-50-300-017 (Repair-017)
Cracks in the air pressure passage at Location 11
Cracks
Do the crack test on the part that is given below. Carefully examine the bolt flange at location 1, the rear side of the nozzle at location 2 and the cover plate weld at location 4. Use the applicable penetrant inspection procedures.
PART IDENT
TASK/SUBTASK
Stage 1 HPT cooling duct
SUBTASK 72-44-50-230-068-002 Examine the Stage 1 HPT Cooling Duct (01-010) for Cracks
Refer to Figure.
Repair, VRS3180 TASK 72-44-50-300-002 (REPAIR-002)
Nicks
Repair, VRS3180 TASK 72-44-50-300-002 (REPAIR-002)
Corrosion
Dents with rounded bottoms not more than 0.010 in. (0.25 mm) in depth and not more than 0.500 in. (12.70 mm) diameter. The areas shown in Figure must not have dents
Repair, VRS3180 TASK 72-44-50-300-002 (REPAIR-002)
Other than Step
Repair, VRS3558 TASK 72-44-50-300-011 (REPAIR-011) or Repair, VRS3593 TASK 72-44-50-300-013, (REPAIR-013)
Burned sections with a maximum arc length of 1.50 in. (38.1 mm)
Repair, VRS3558 TASK 72-44-50-300-011 (REPAIR-011) or Repair, VRS3593 TASK 72-44-50-300-013, (REPAIR-013)
Burned section that do not extend beyond the top of the bolt holes. Only one location per flange is permitted.
Repair, VRS3601 TASK 72-44-50-300-014 (REPAIR-014)
Dents
Examine the cooling duct for nicks, corrosion, dents and burns.
SUBTASK 72-44-50-220-109 Examine the Stage 1 HPT Cooling Duct (01-010) for Nicks, Corrosion, Dents and Burns
Refer to Figure.
SUBTASK 72-44-50-220-110 Examine the Stage 1 HPT Cooling Duct (01-010) Nozzles for Unwanted Material
Refer to Figure.
Repair, VRS3179 TASK 72-44-50-300-003 (REPAIR-003)
Pieces that are broken away
Repair, VRS3179 TASK 72-44-50-300-003 (REPAIR-003)
Flat cells
Repair, VRS3179 TASK 72-44-50-300-003 (REPAIR-003)
Other than Step
Damaged or bent cells (except in the knife edge seal wear areas).
Repair, VRS3179 TASK 72-44-50-300-003 (REPAIR-003)
Other than Step
Grooves
Examine the cooling duct honeycomb seal lands at location 3, for pieces that are broken away, flat cells and grooves.
SUBTASK 72-44-50-220-111 Examine the Stage 1 HPT Cooling Duct (01-010) Honeycomb Seal Lands for Pieces that are Broken Away, Flat Cells and Grooves
Refer to Figure.
SUBTASK 72-44-50-220-112 Examine the Stage 1 HPT Cooling Duct (01-010) Outside Diameter Contacts for Wear and Galling
Refer to Figure.
Other than Step
Wear or galling.
Examine the cooling duct at location 1, for wear and galling on the bolt flange contact surface.
Other than Step
Wear or galling.
Examine the cooling duct at location 6, for wear and galling on the front contact surface.
SUBTASK 72-44-50-220-113 Examine the Stage 1 HPT Cooling Duct (01-010) Contact Surfaces for Wear and Galling
Refer to Figure.
Repair, VRS3506 TASK 72-44-50-300-009 (REPAIR-009), Repair, VRS3618 TASK 72-44-50-300-015 (REPAIR-015)
Other than Step
Axial dimension.
NOTE
If the measured axial dimensions in a free condition are not satisfactory, a held condition is permitted. All dimensions apply when Surface N is flat by 0.002 in. (0.05 mm) and Diameter L maintains a clearance envelope of 13.040 in. (331.22 mm) diameter in a free or held condition. Hold the duct only on Surfaces N, M and W, and Diameter L.Examine the cooling duct at location 1, for the axial dimension.
Repair, VRS3183 TASK 72-44-50-300-004 (REPAIR-004)
Other than Step
Axial dimension.
Examine the cooling duct at location 2, for the axial dimension of the outside diameter flange.
SUBTASK 72-44-50-220-114 Examine the Stage 1 HPT Cooling Duct (01-010) for the Axial Dimensions of the Outside Diameter Flange
NOTE
If the measured diameters in a free condition are not satisfactory, a held condition is permitted. All dimensions apply when Surface N is flat by 0.002 in. (0.05 mm) and Diameter L maintains a clearance envelope of 13.040 in. (331.22 mm) diameter in a free or held condition. Hold the duct only on Surfaces N, M and W, and Diameter L.Refer to Fig. 72-44-50-990-047.
NOTE
This part can be used only if the mating part has a diameter that will result in a fit of reference No. 2000. Refer to TASK 72-44-10-100-001-B00 (ASSEMBLY, CONFIG-002).If the diameter is between 19.393 and 19.402 in. (492.58 and 492.81 mm)
Repair, VRS3181TASK 72-44-50-300-005 (REPAIR-005)
Examine the cooling duct at location 2000, for the diameter.
Repair, VRS3178 TASK 72-44-50-300-006 (REPAIR-006)
Other than Step
Examine the cooling duct at location 2006, for the diameter.
Repair, VRS3307 TASK 72-44-50-300-007 (REPAIR-007)
Other than Step
Examine the cooling duct at location 2263, for the diameter.
SUBTASK 72-44-50-220-115 Examine the Stage 1 HPT Cooling Duct (01-010) Diameters
Refer to Figure.
Repair, VRS3179 TASK 72-44-50-300-003 (REPAIR-003)
Other than Step
Circumferential grooves.
Repair, VRS3179 TASK 72-44-50-300-003 (REPAIR-003)
Other than the above
Axial grooves.
Examine the cooling duct at location 3, for grooves in the honeycomb seal lands (6 locations).
SUBTASK 72-44-50-220-116 Examine the Stage 1 HPT Cooling Duct (01-010) Honeycomb Seal Lands for Grooves
Select the sonic nozzle with the correct throat diameter. Use the mathematical or the graphic method of nozzle selection given in the SPM TASK 70-72-01-720-501.
Install the IAE 2P16018 Airflow fixture 1 off on the test bench.
Secure the IAE 2P16019 Airflow adapter 1 off with the IAE 2P16020 Leak test ring 1 off, detail screws and washers.
Install the IAE 2P16020 Leak test ring 1 off on the inner ring of the adapter. Secure it with detail screws.
Set up the IAE 6P16080 Test bench.
Do an airflow restriction check each time you install the IAE 2P16018 Airflow fixture 1 off.
Clamp the IAE 2P16021 Airflow master 1 off in position on the fixture.
Install rubber stoppers into all the holes of the IAE 2P16021 Airflow master 1 off.
Do a shutoff valve leak check on the IAE 6P16080 Test bench 1 off.
If the pressure decrease is more than 7.0 psig (48.3 kPa) in 14 seconds, use CoMat 10-045 LEAK CHECK FLUID, BUBBLES-TYPE or a soap and water solution to find the source of the leak. The leaks must be repaired before you continue the airflow check.
NOTE
Do the leak check each day, before each time the airflow check is done or the test bench is repaired.Do leak check on the IAE 2P16018 Airflow fixture 1 off.
Select the calibration curve on which the calibration point, or the intersection of the flow parameter and pressure ratio lines, is within the airflow test limits so that you can do a test on the cooling duct. Refer to the SPM TASK 70-72-01-720-501.
NOTE
The procedure is valid only if the acoustical damper causes an increase in pressure that is less than 0.1 psig (0.69 kPa) or 0.2 in. (5.08 mm) of Hg. Refer to the SPM TASK 70-72-01-720-501 for the requirement to measure the increase in pressure that is caused by the acoustical damaper.Install an acoustical damper around the master. Refer to the SPM TASK 70-72-01-720-501.

CAUTION
WHEN YOU FLOW LARGE QUANTITIES OF AIR IN A SMALL, CLOSED ROOM, YOU CAN PRESSURIZE THE ROOM. IN THIS SITUATION, A BAROMETER MUST BE PUT INTO THE ROOM. USE ROOM PRESSURE, NOT ATMOSPHERIC PRESSURE, FOR TEST CALCULATIONS.With the master mounted on the test bench, do a one-point test bench calibration. Refer to the SPM TASK 70-72-02-720-501.
NOTE
One master tool is usually calibrated to more than one set of airflow test limits. For each calibration or set of test limits, a separate calibration curve is given. Each curve gives co-ordinates of calibration point and a system of letters that are metal-stamped near the air holes. These letters indicate which air holes were open during calibration.Set up and do an airflow check of the IAE 2P16021 Airflow master 1 off.
NOTE
This airflow check is necessary only if the airflow is changed by a service bulletin or the cooling duct vanes are repaired.NOTE
To get accurate results, you must do a leak check and calibrate the test bench.NOTE
If the test bench has absolute pressure gages, add the psig value given in the procedure to the current atmospheric pressure to get the psia value.Set up and do a leak check of the IAE 2P16018 Airflow fixture 1 off and the IAE 6P16080 Test bench 1 off.
Visually check the condition of the IAE 2P16018 Airflow fixture 1 off.
Mount the cooling duct on the IAE 2P16018 Airflow fixture 1 off as follows:
Install the IAE 2P16020 Leak test ring 1 off. Align the offset dowel pin hole in the ring with the dowel pin in the IAE 2P16018 Airflow fixture 1 off. Secure the ring with cap screws.
If the rate of pressure decrease if more than 7.0 psig (48.3 kPa) in 14 seconds, use CoMat 10-045 LEAK CHECK FLUID, BUBBLES-TYPE or a soap and water solution to find the source of the leak. The leaks must be repaired before you continue the airflow check.
Remove the IAE 2P16020 Leak test ring 1 off.
Do the air leak check each time you mount a cooling duct on the test fixture as follows:
NOTE
The procedure is valid only if the acoustical damper causes an increase in pressure that is less than 0.1 psig (0.69 kPa) or 0.2 in. (5.08mm) of Hg. Refer to the SPM TASK 70-72-01-720-501 for the requirement to measure the increase in pressure that is caused by the acoustical damper.Install an acoustical damper around the cooling duct. Refer to the SPM TASK 70-72-01-720-501 for the installation procedure.

CAUTION
THE AIRFLOW MEASUREMENTS OF THE COOLING DUCT MUST BE ACCURATE. THE COOLING DUCT CONTROLS THE COOLING AIRFLOW TO THE ROTATING PARTS IN THE HPT. THIS AIRFLOW IS VERY IMPORTANT FOR THE DURABILITY OF THE PART, THE THRUST BALANCE ON THE NO. 3 BEARING, AND ENGINE PERFORMANCE.
CAUTION
WHEN YOU FLOW LARGE QUANTITIES OF AIR IN A SMALL, CLOSED ROOM, YOU CAN PRESSURIZE THE ROOM. IN THIS SITUATION, A BAROMETER MUST BE PUT INTO THE ROOM. USE ROOM PRESSURE, NOT ATMOSPHERIC PRESSURE, FOR TEST CALCULATIONS.Do an airflow check of the cooling duct. Use the airflow check limits given in Figure.
Repair, VRS3177 TASK 72-44-50-300-010 (REPAIR-010)
Cooling ducts that are not within the limits
Set up and do an airflow check of the cooling duct.
SUBTASK 72-44-50-280-055 Examine the Stage 1 HPT Cooling Duct (01-010) by the Airflow Check
Figure: Stage 1 HPT Cooling Duct Inspection Locations
Stage 1 HPT Cooling Duct Inspection Locations
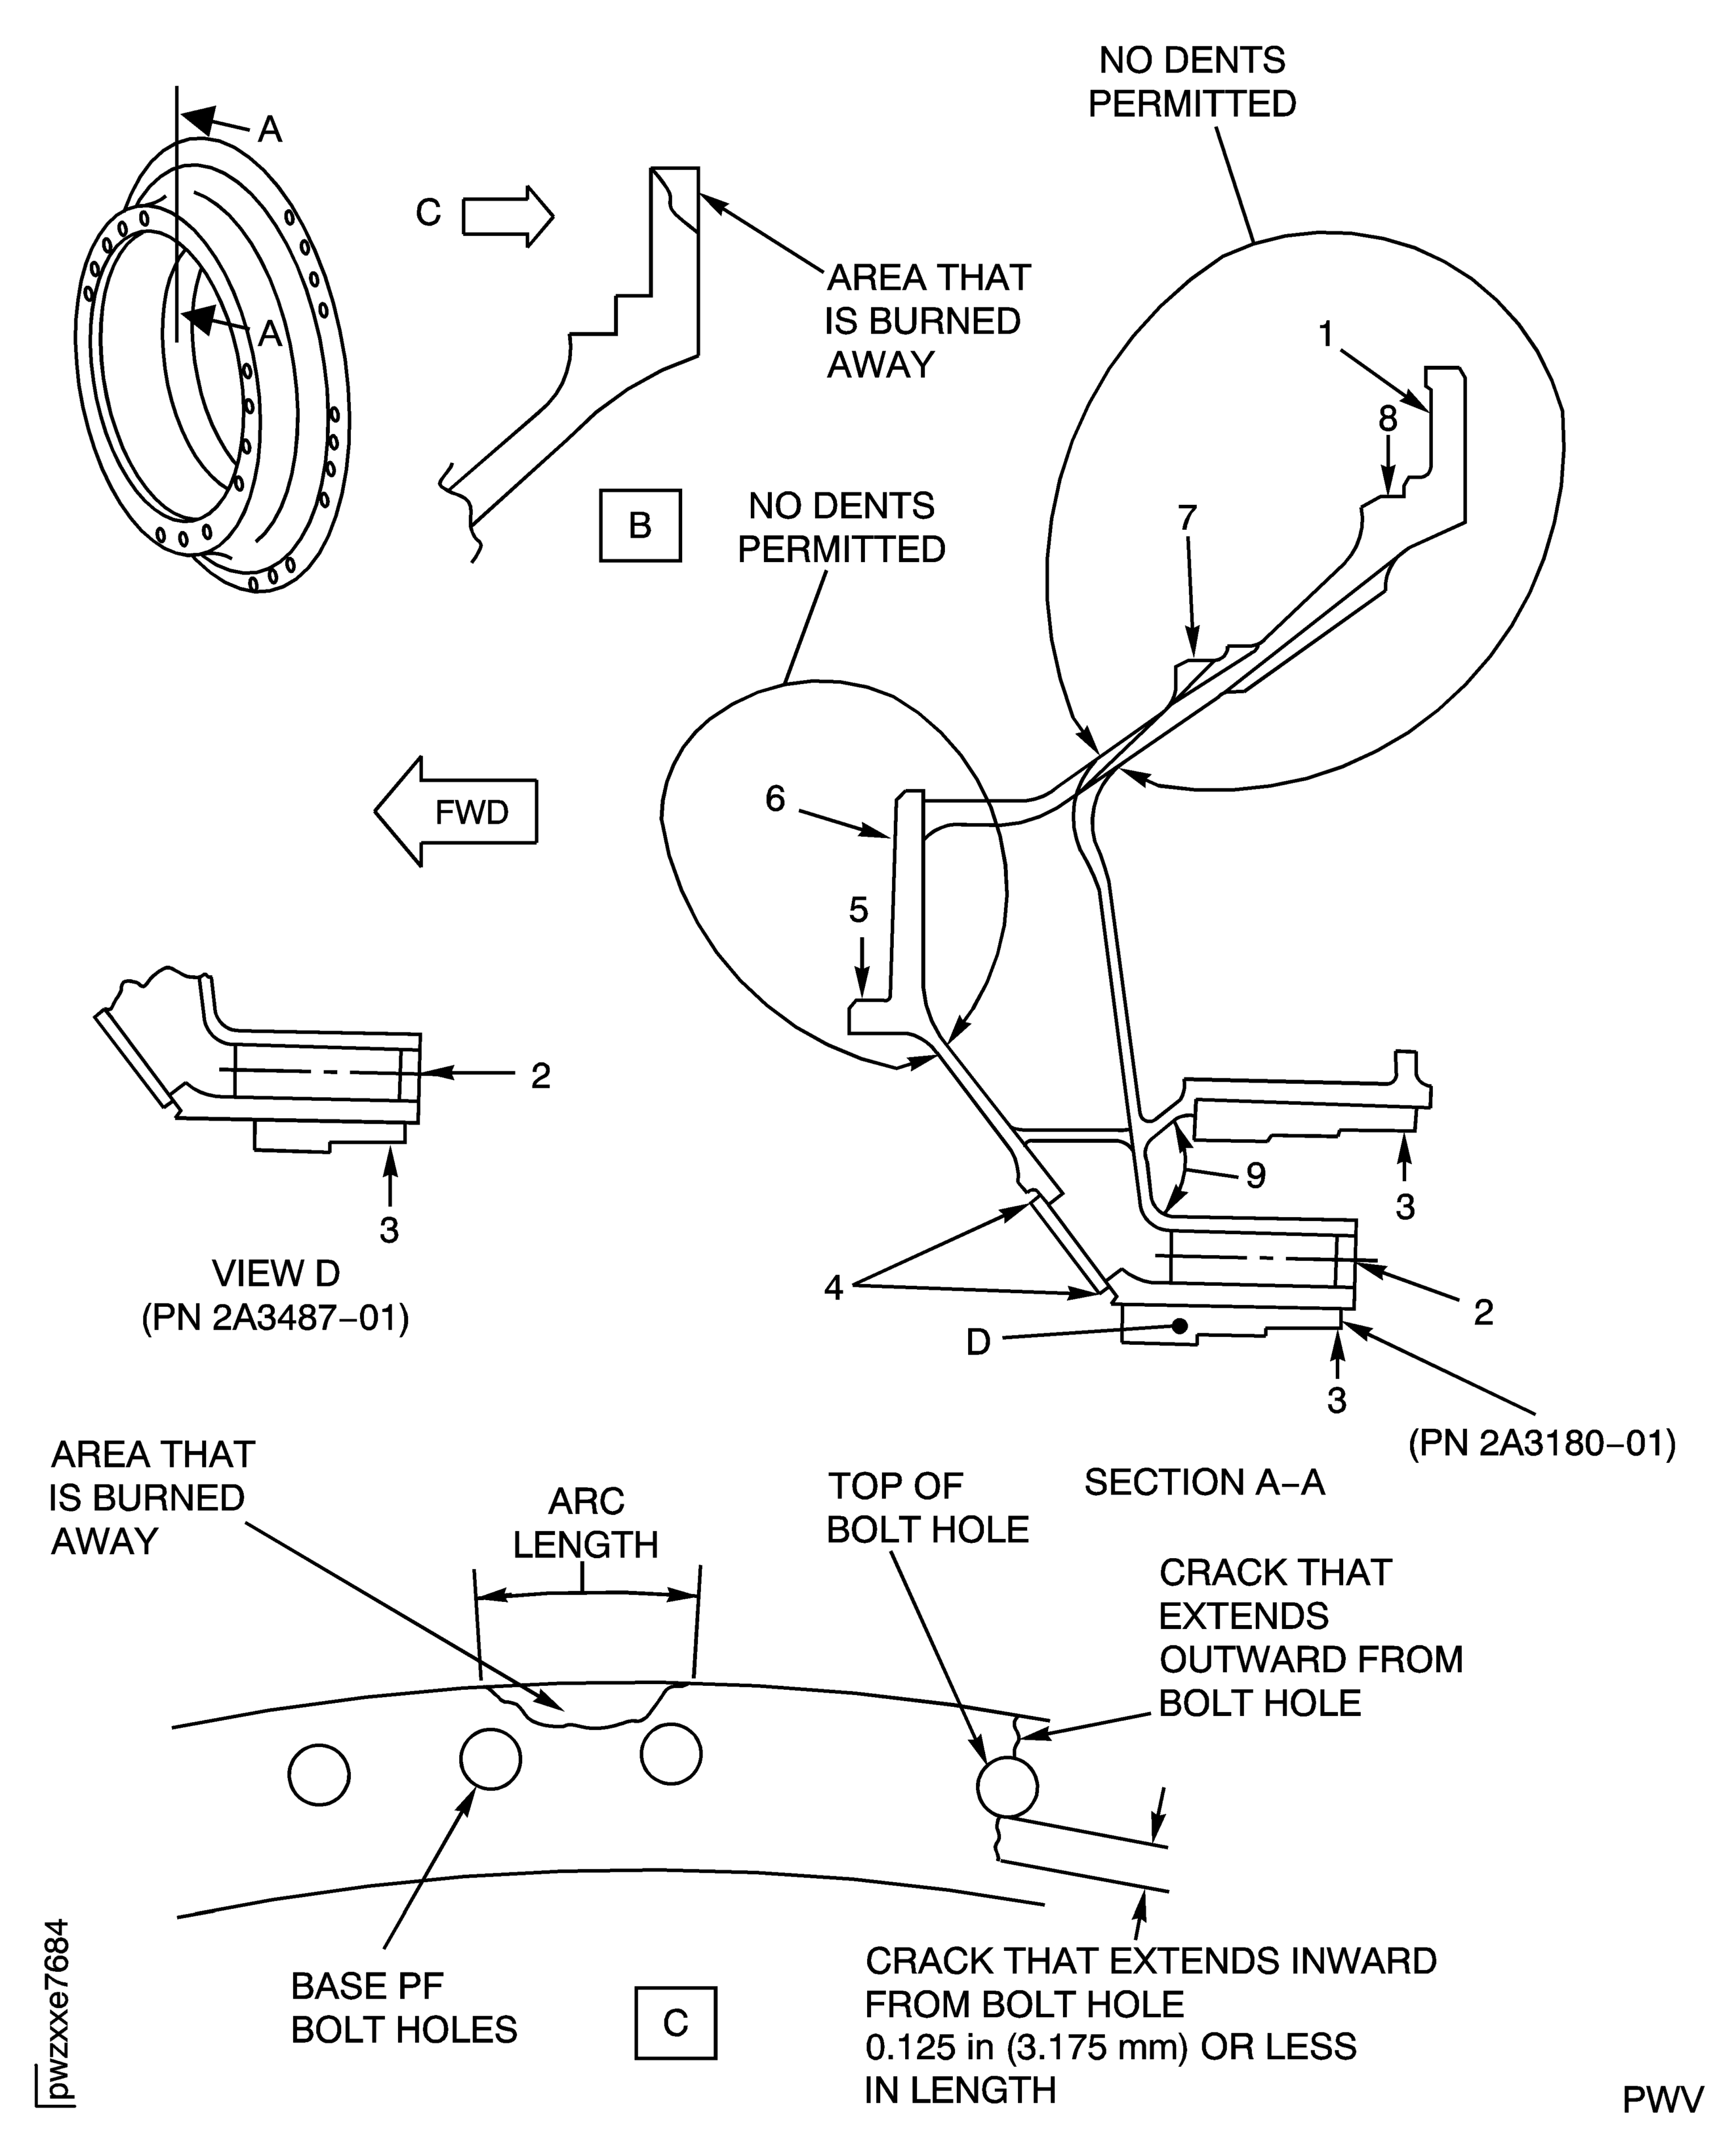
Figure: Stage 1 HPT Cooling Duct Inspection Location
Stage 1 HPT Cooling Duct Inspection Location
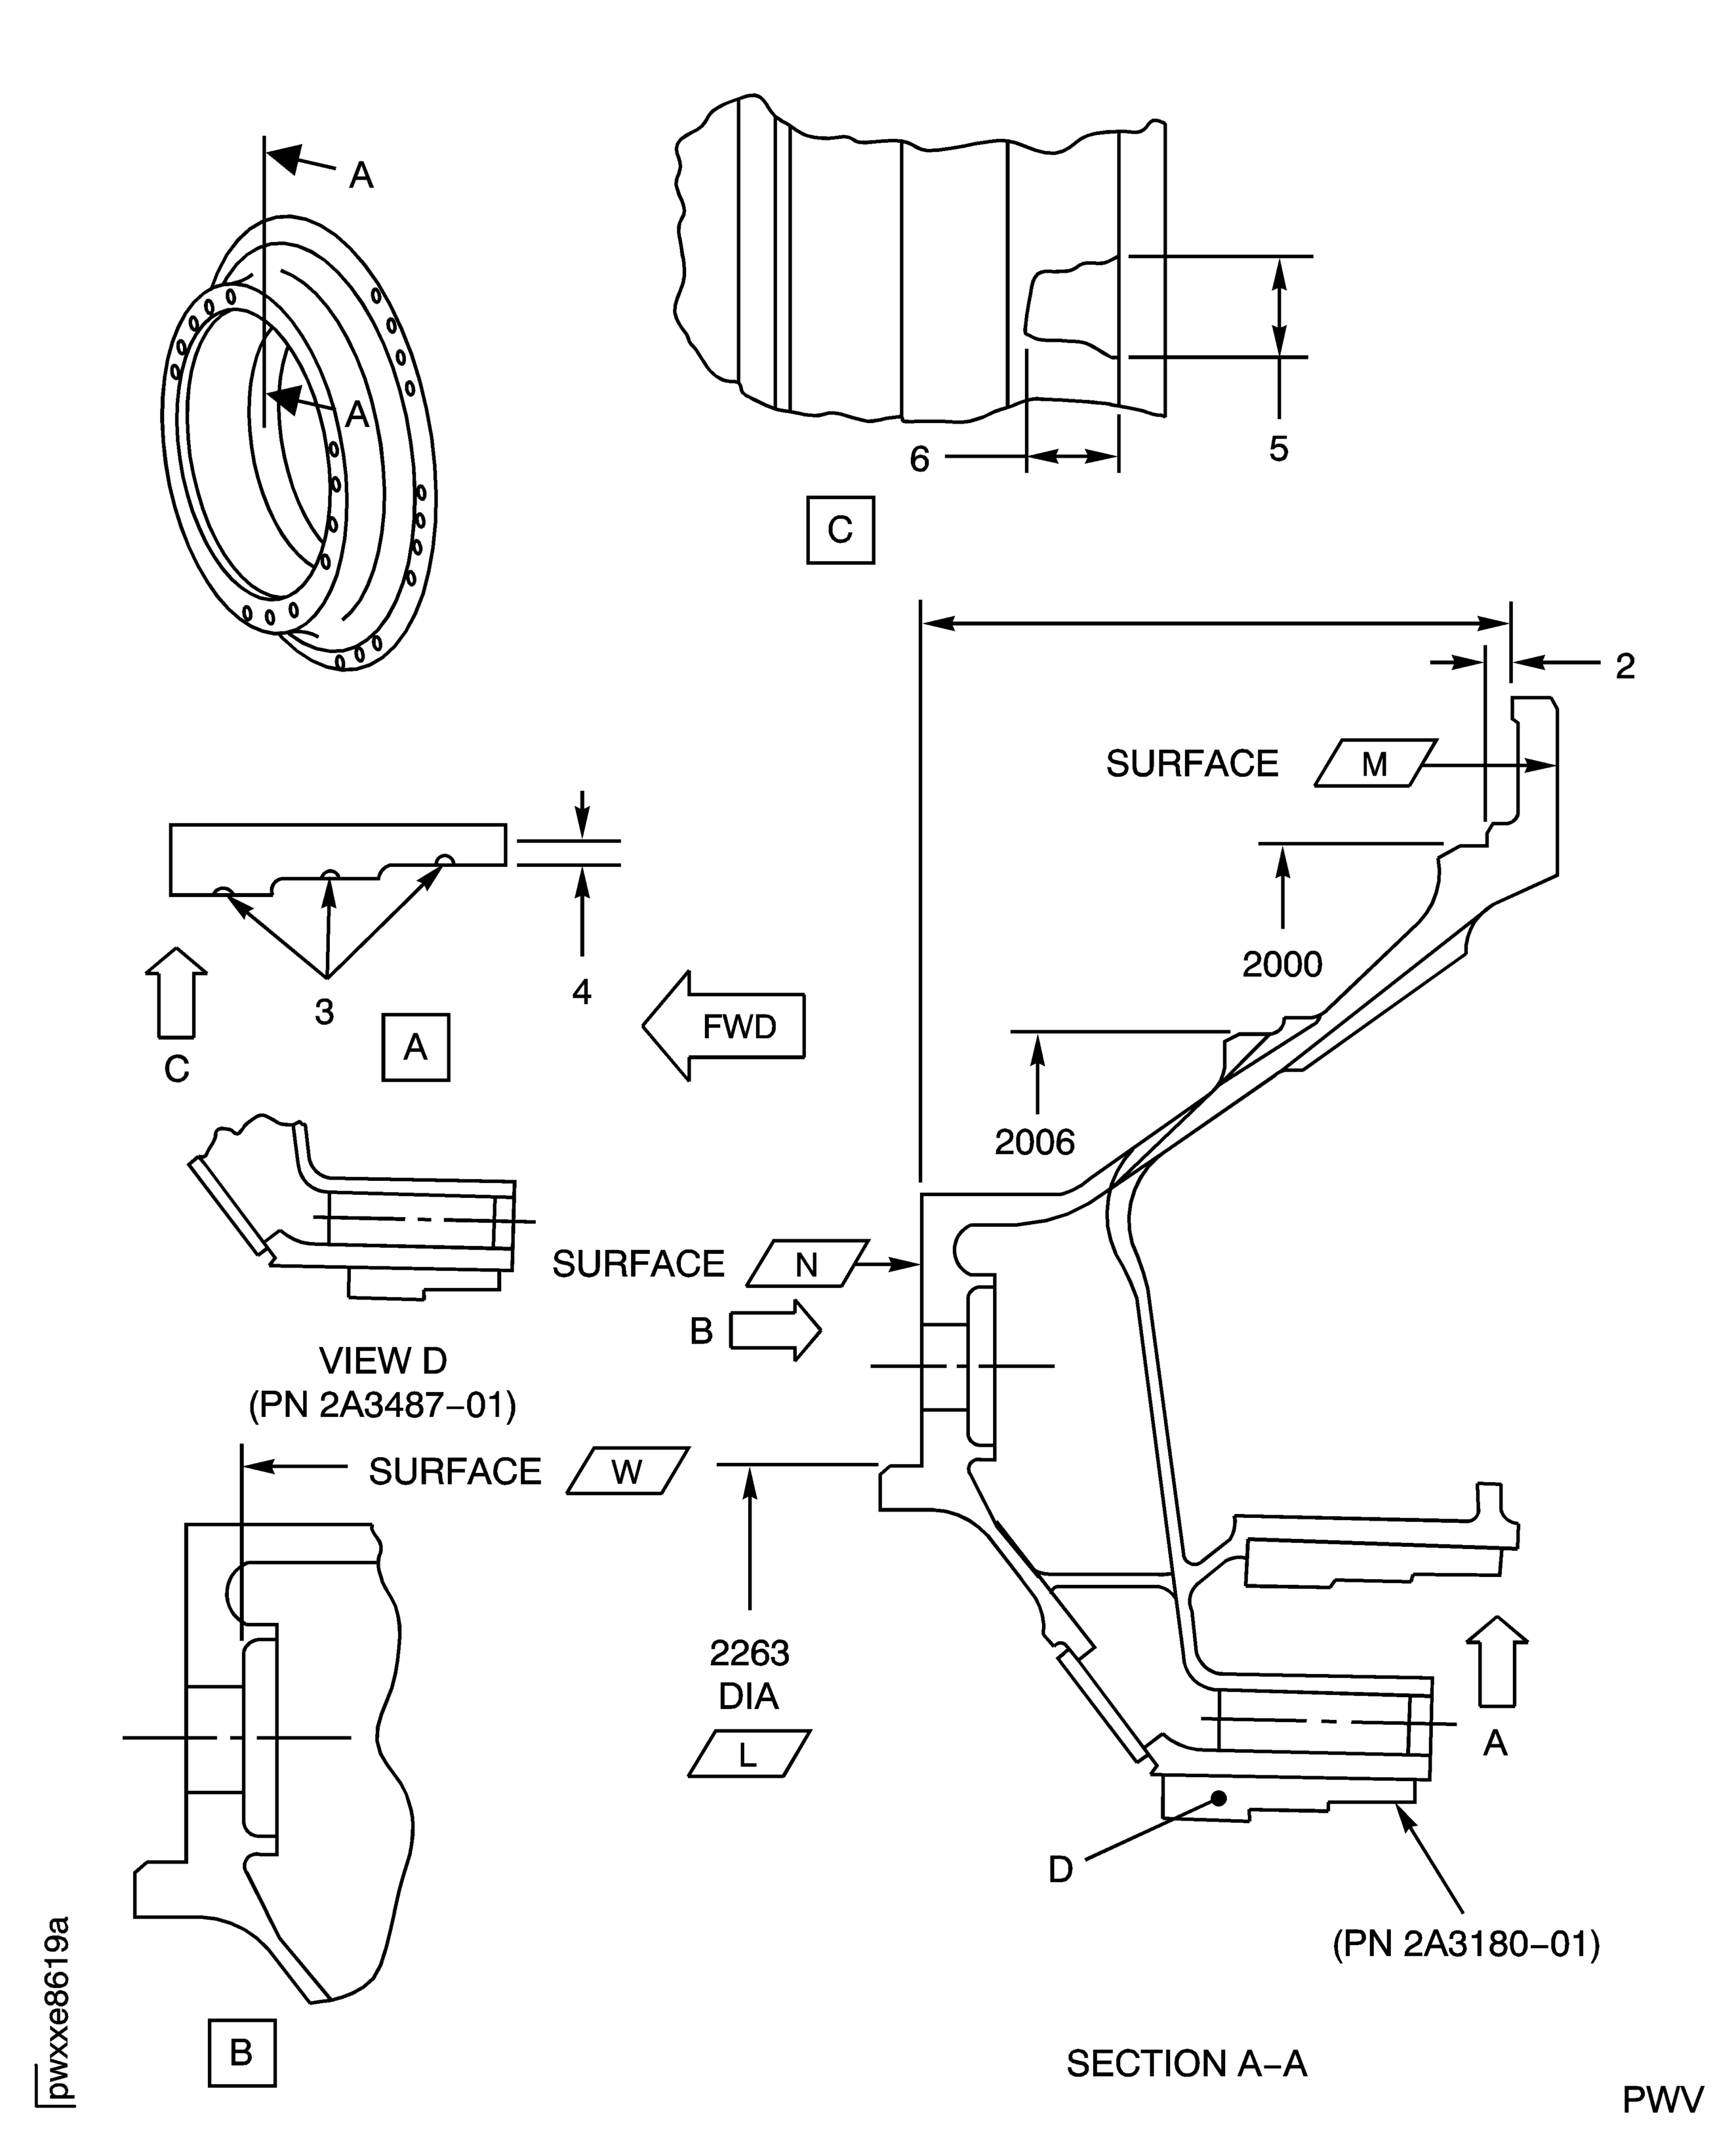
Figure: Stage 1 HPT Cooling Duct Installation on the IAE 6P16080 Airflow Test Bench
Stage 1 HPT Cooling Duct Installation on the IAE 6P16080 Airflow Test Bench
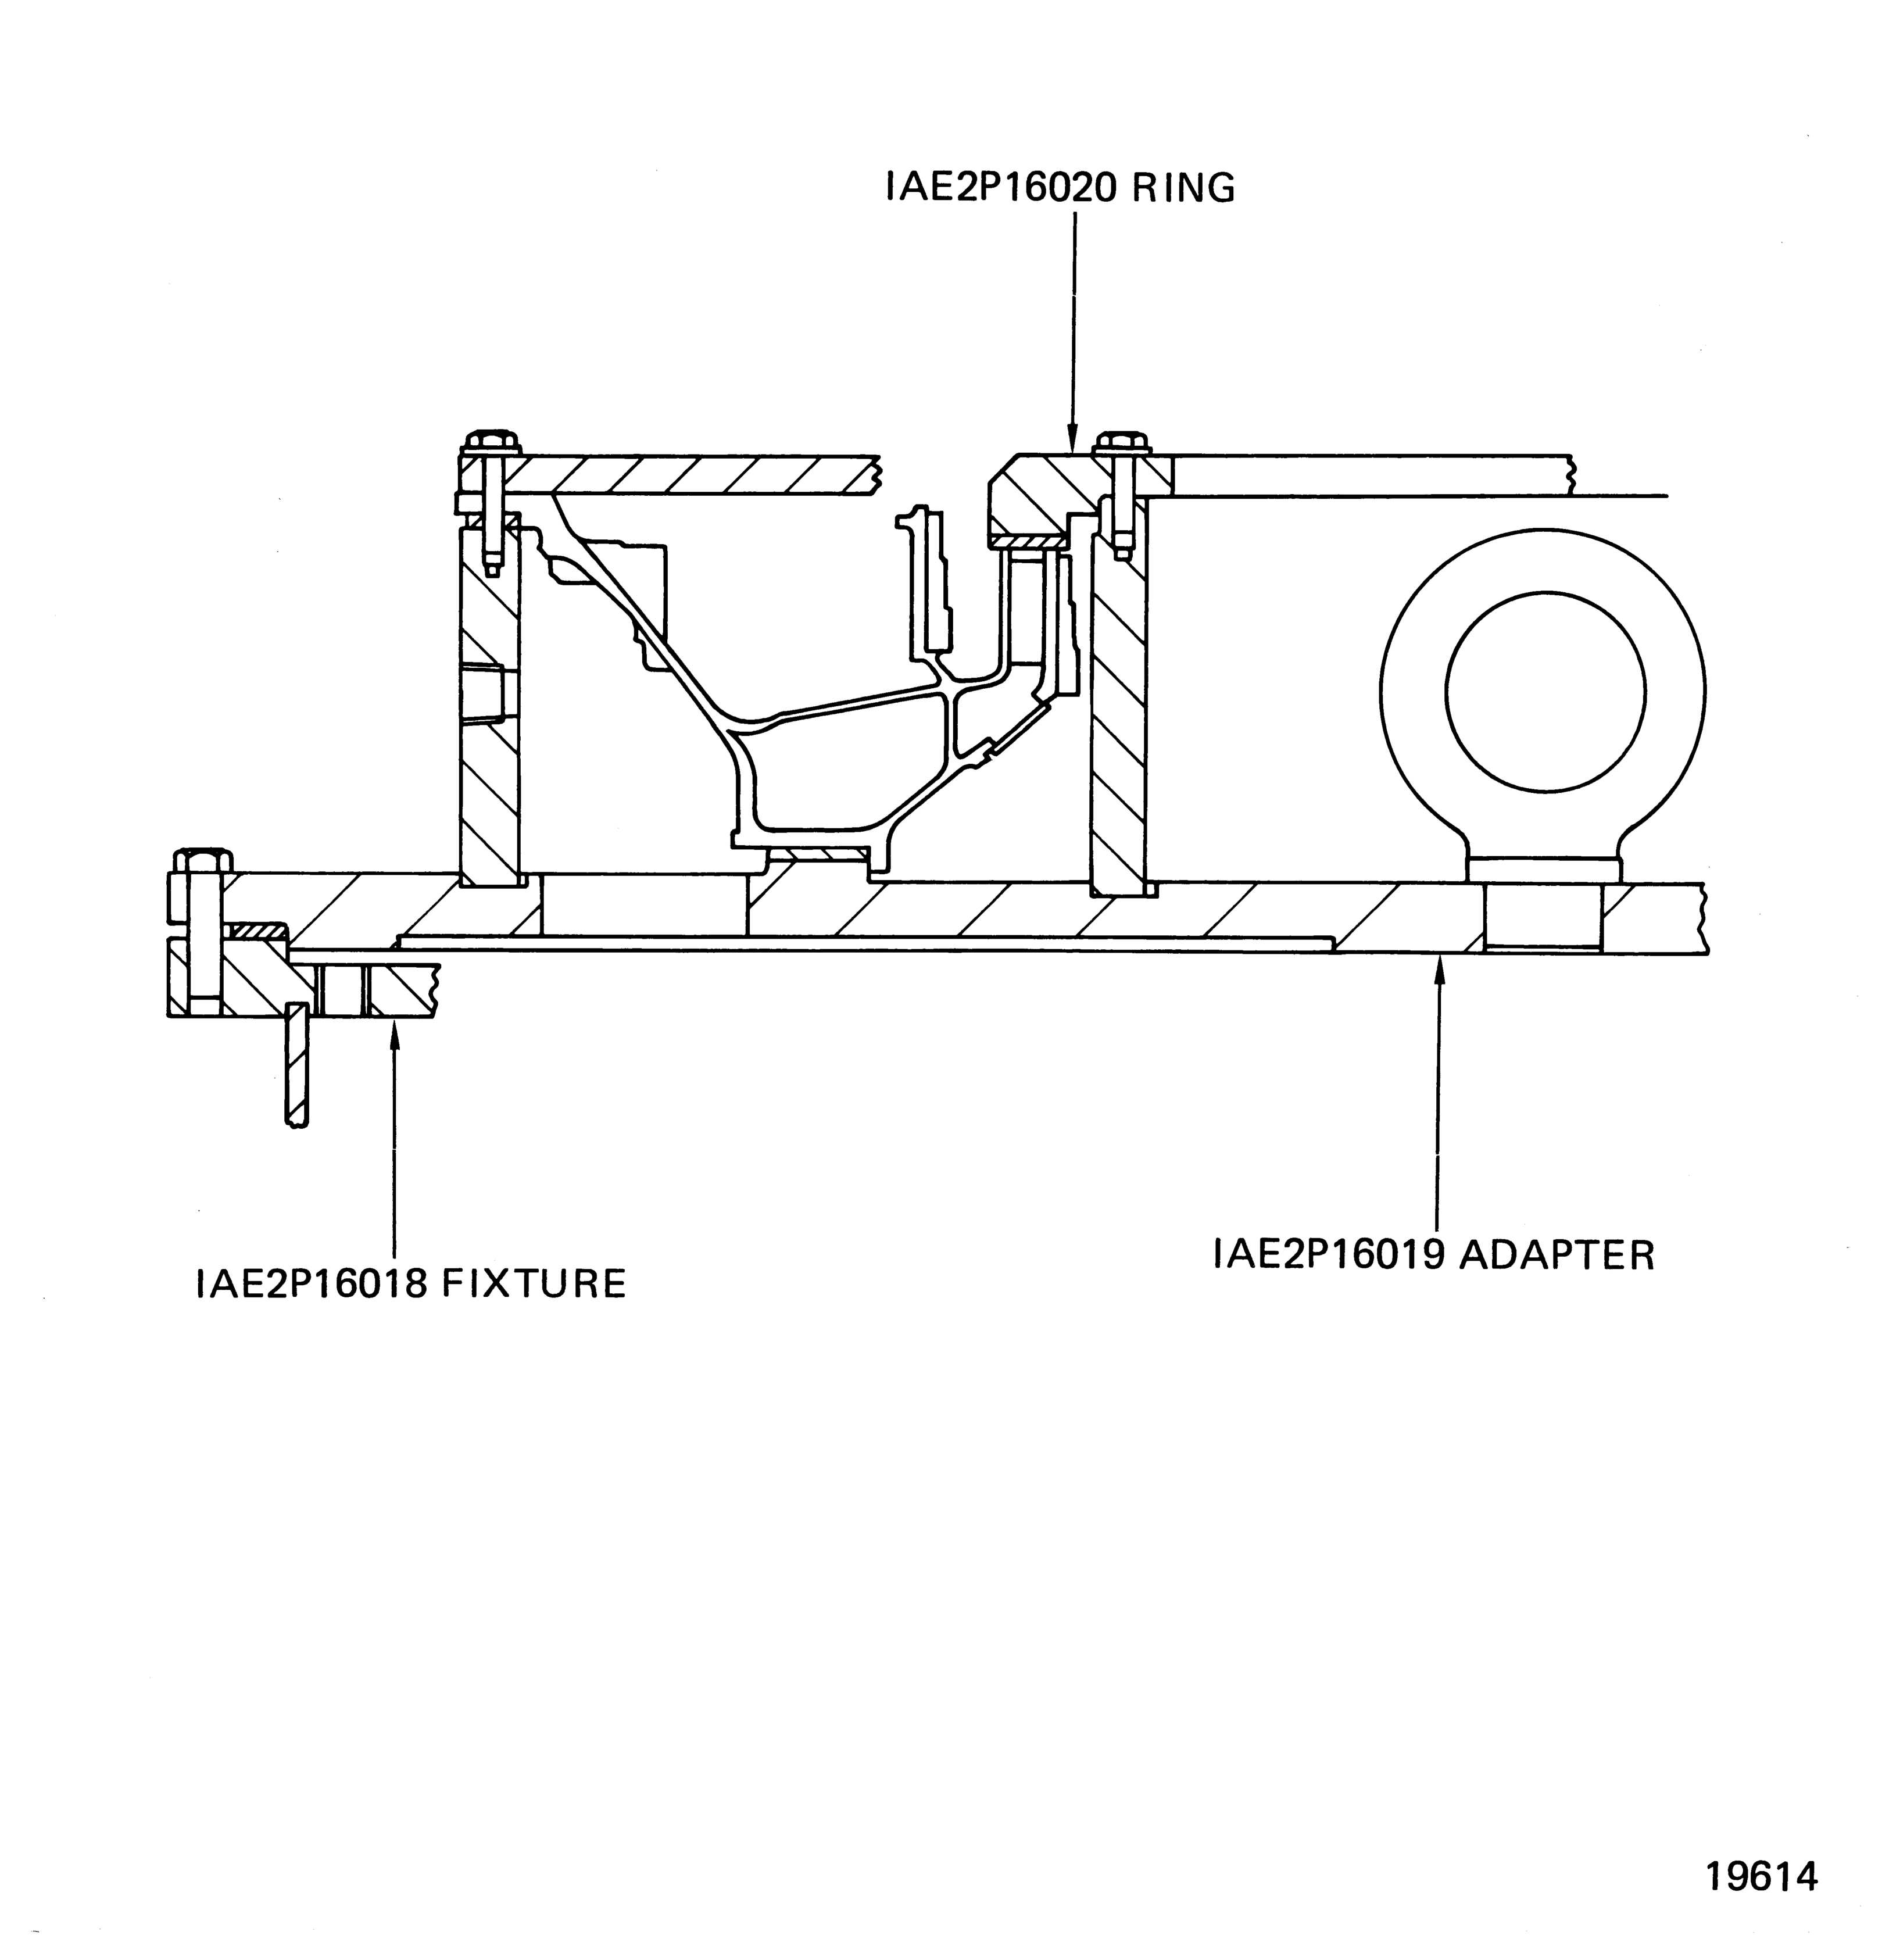
Figure: Stage 1 HPT Cooling Duct Airflow Check Limits
Stage 1 HPT Cooling Duct Airflow Check Limits
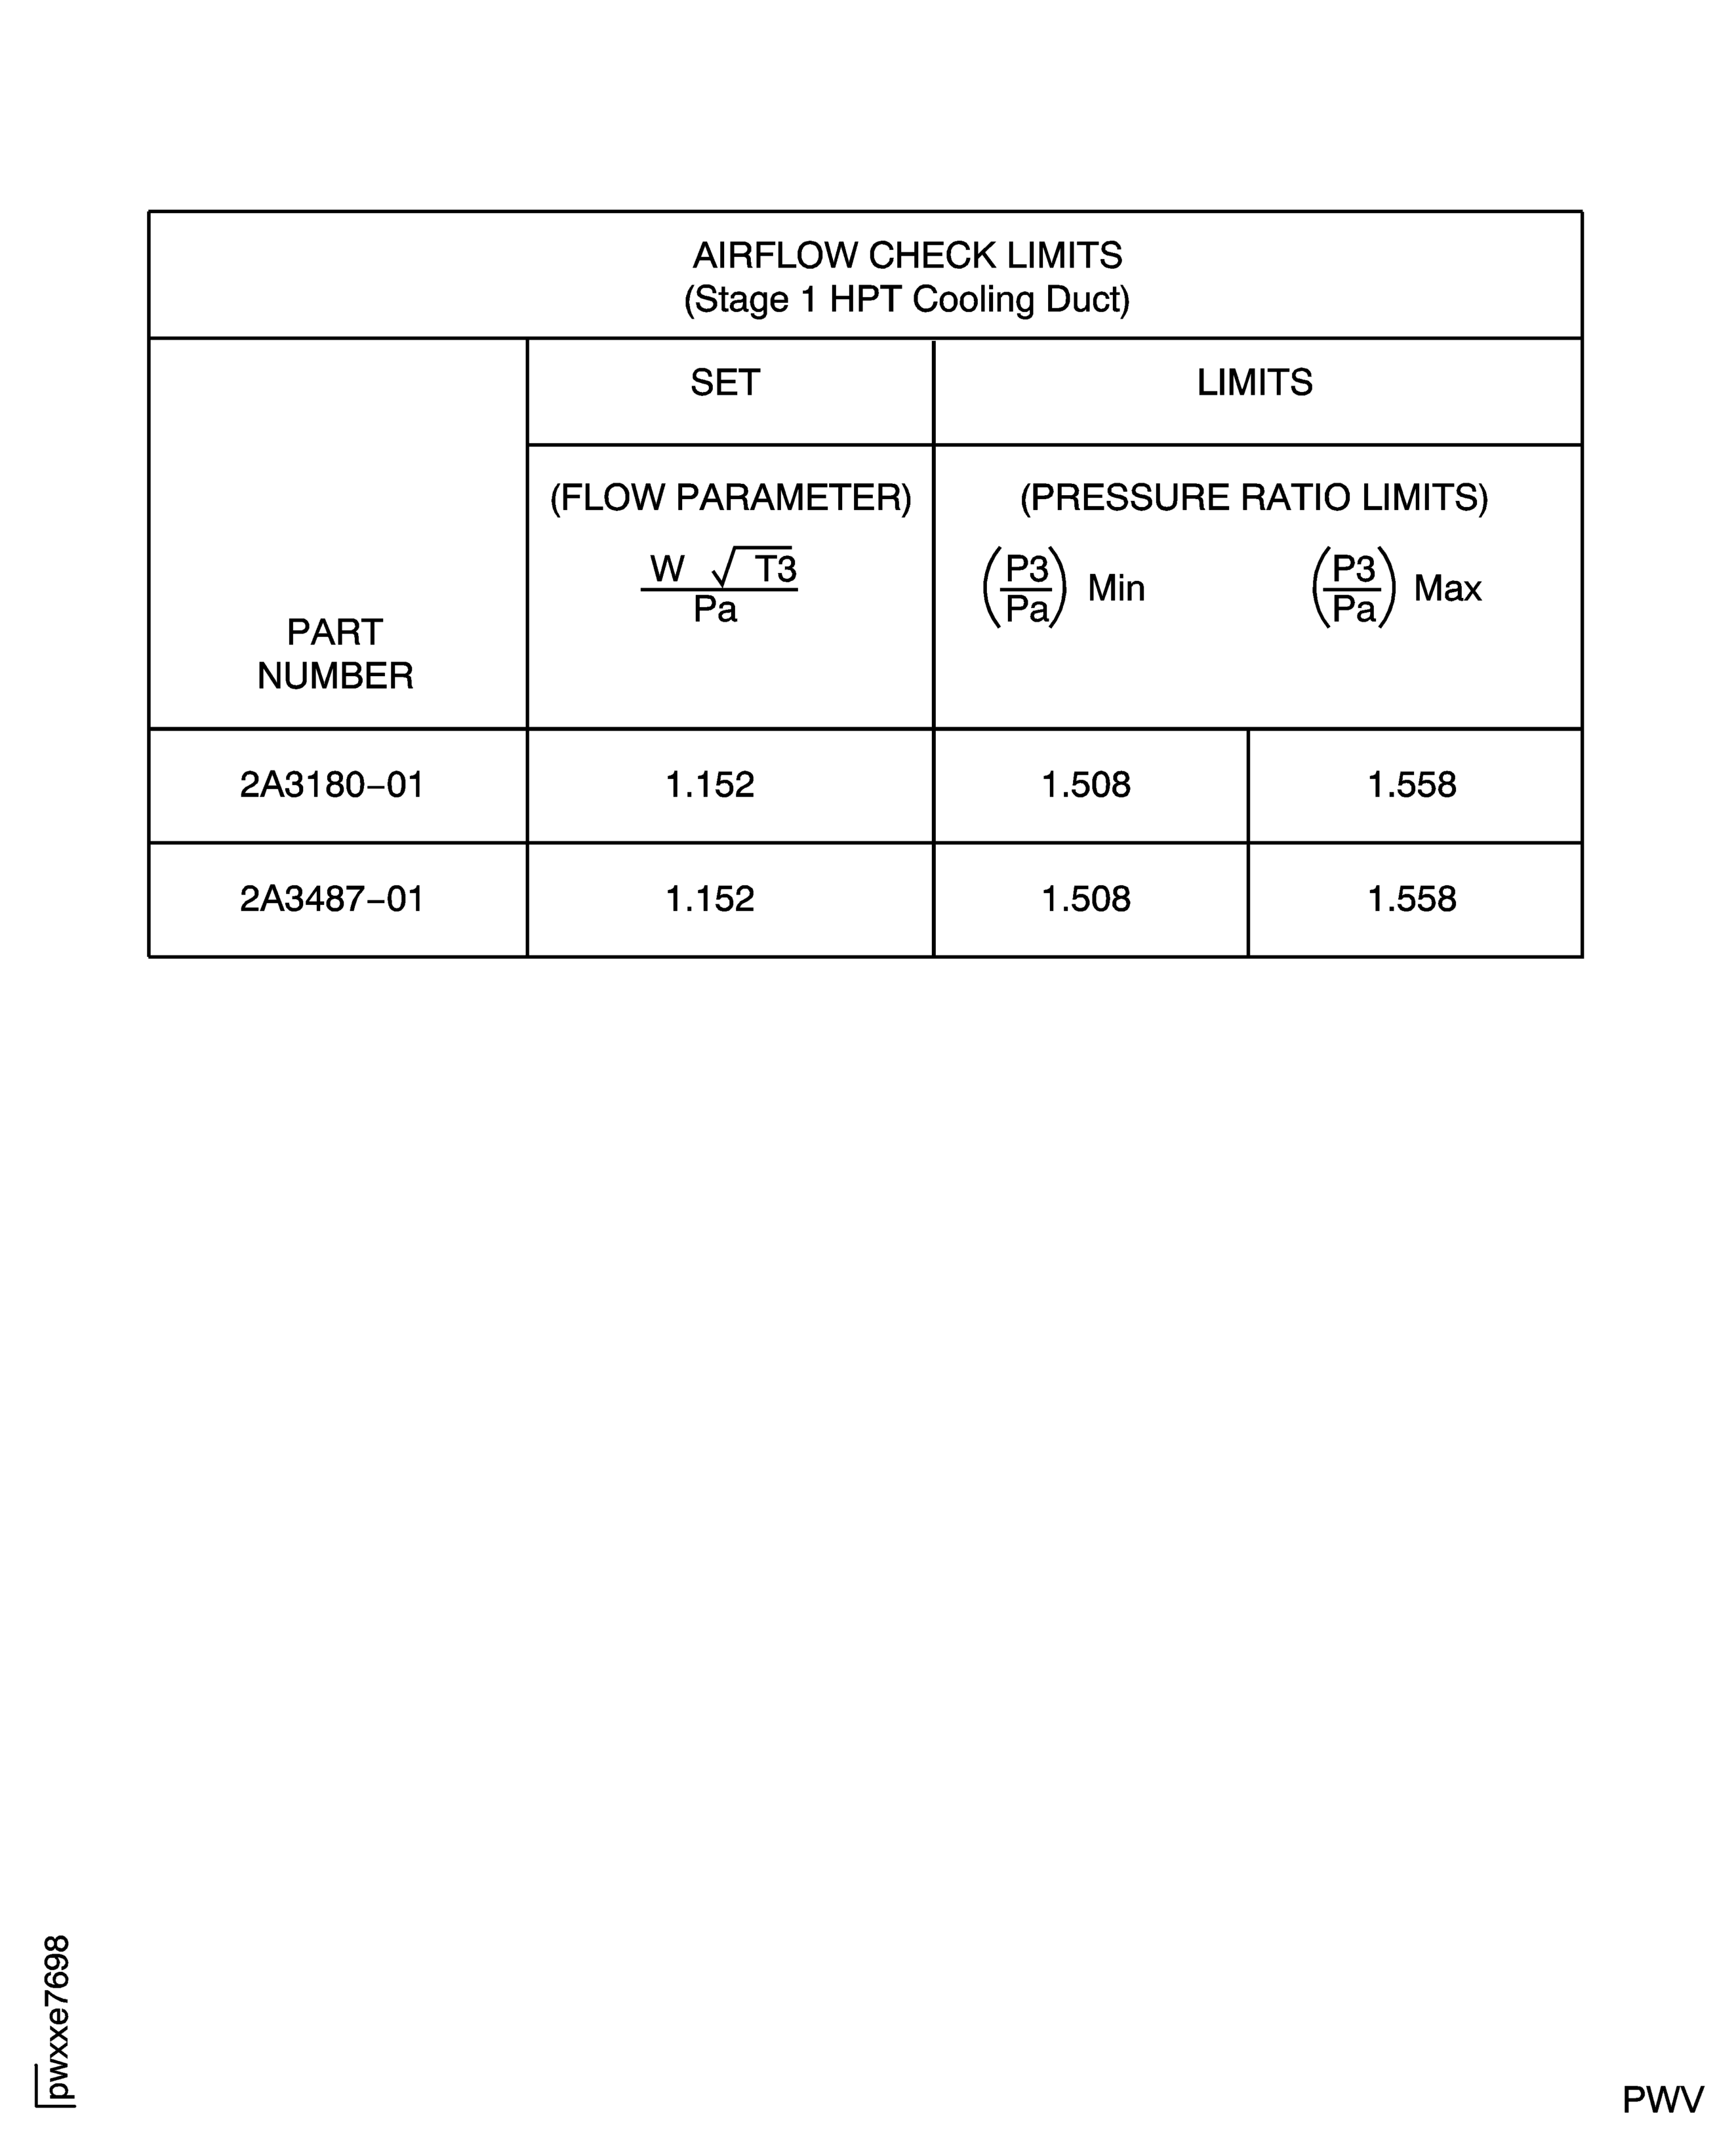
Figure: Stage 1 HPT Cooling Duct Airflow Check - Pressure Ratio Method
Sheet 1
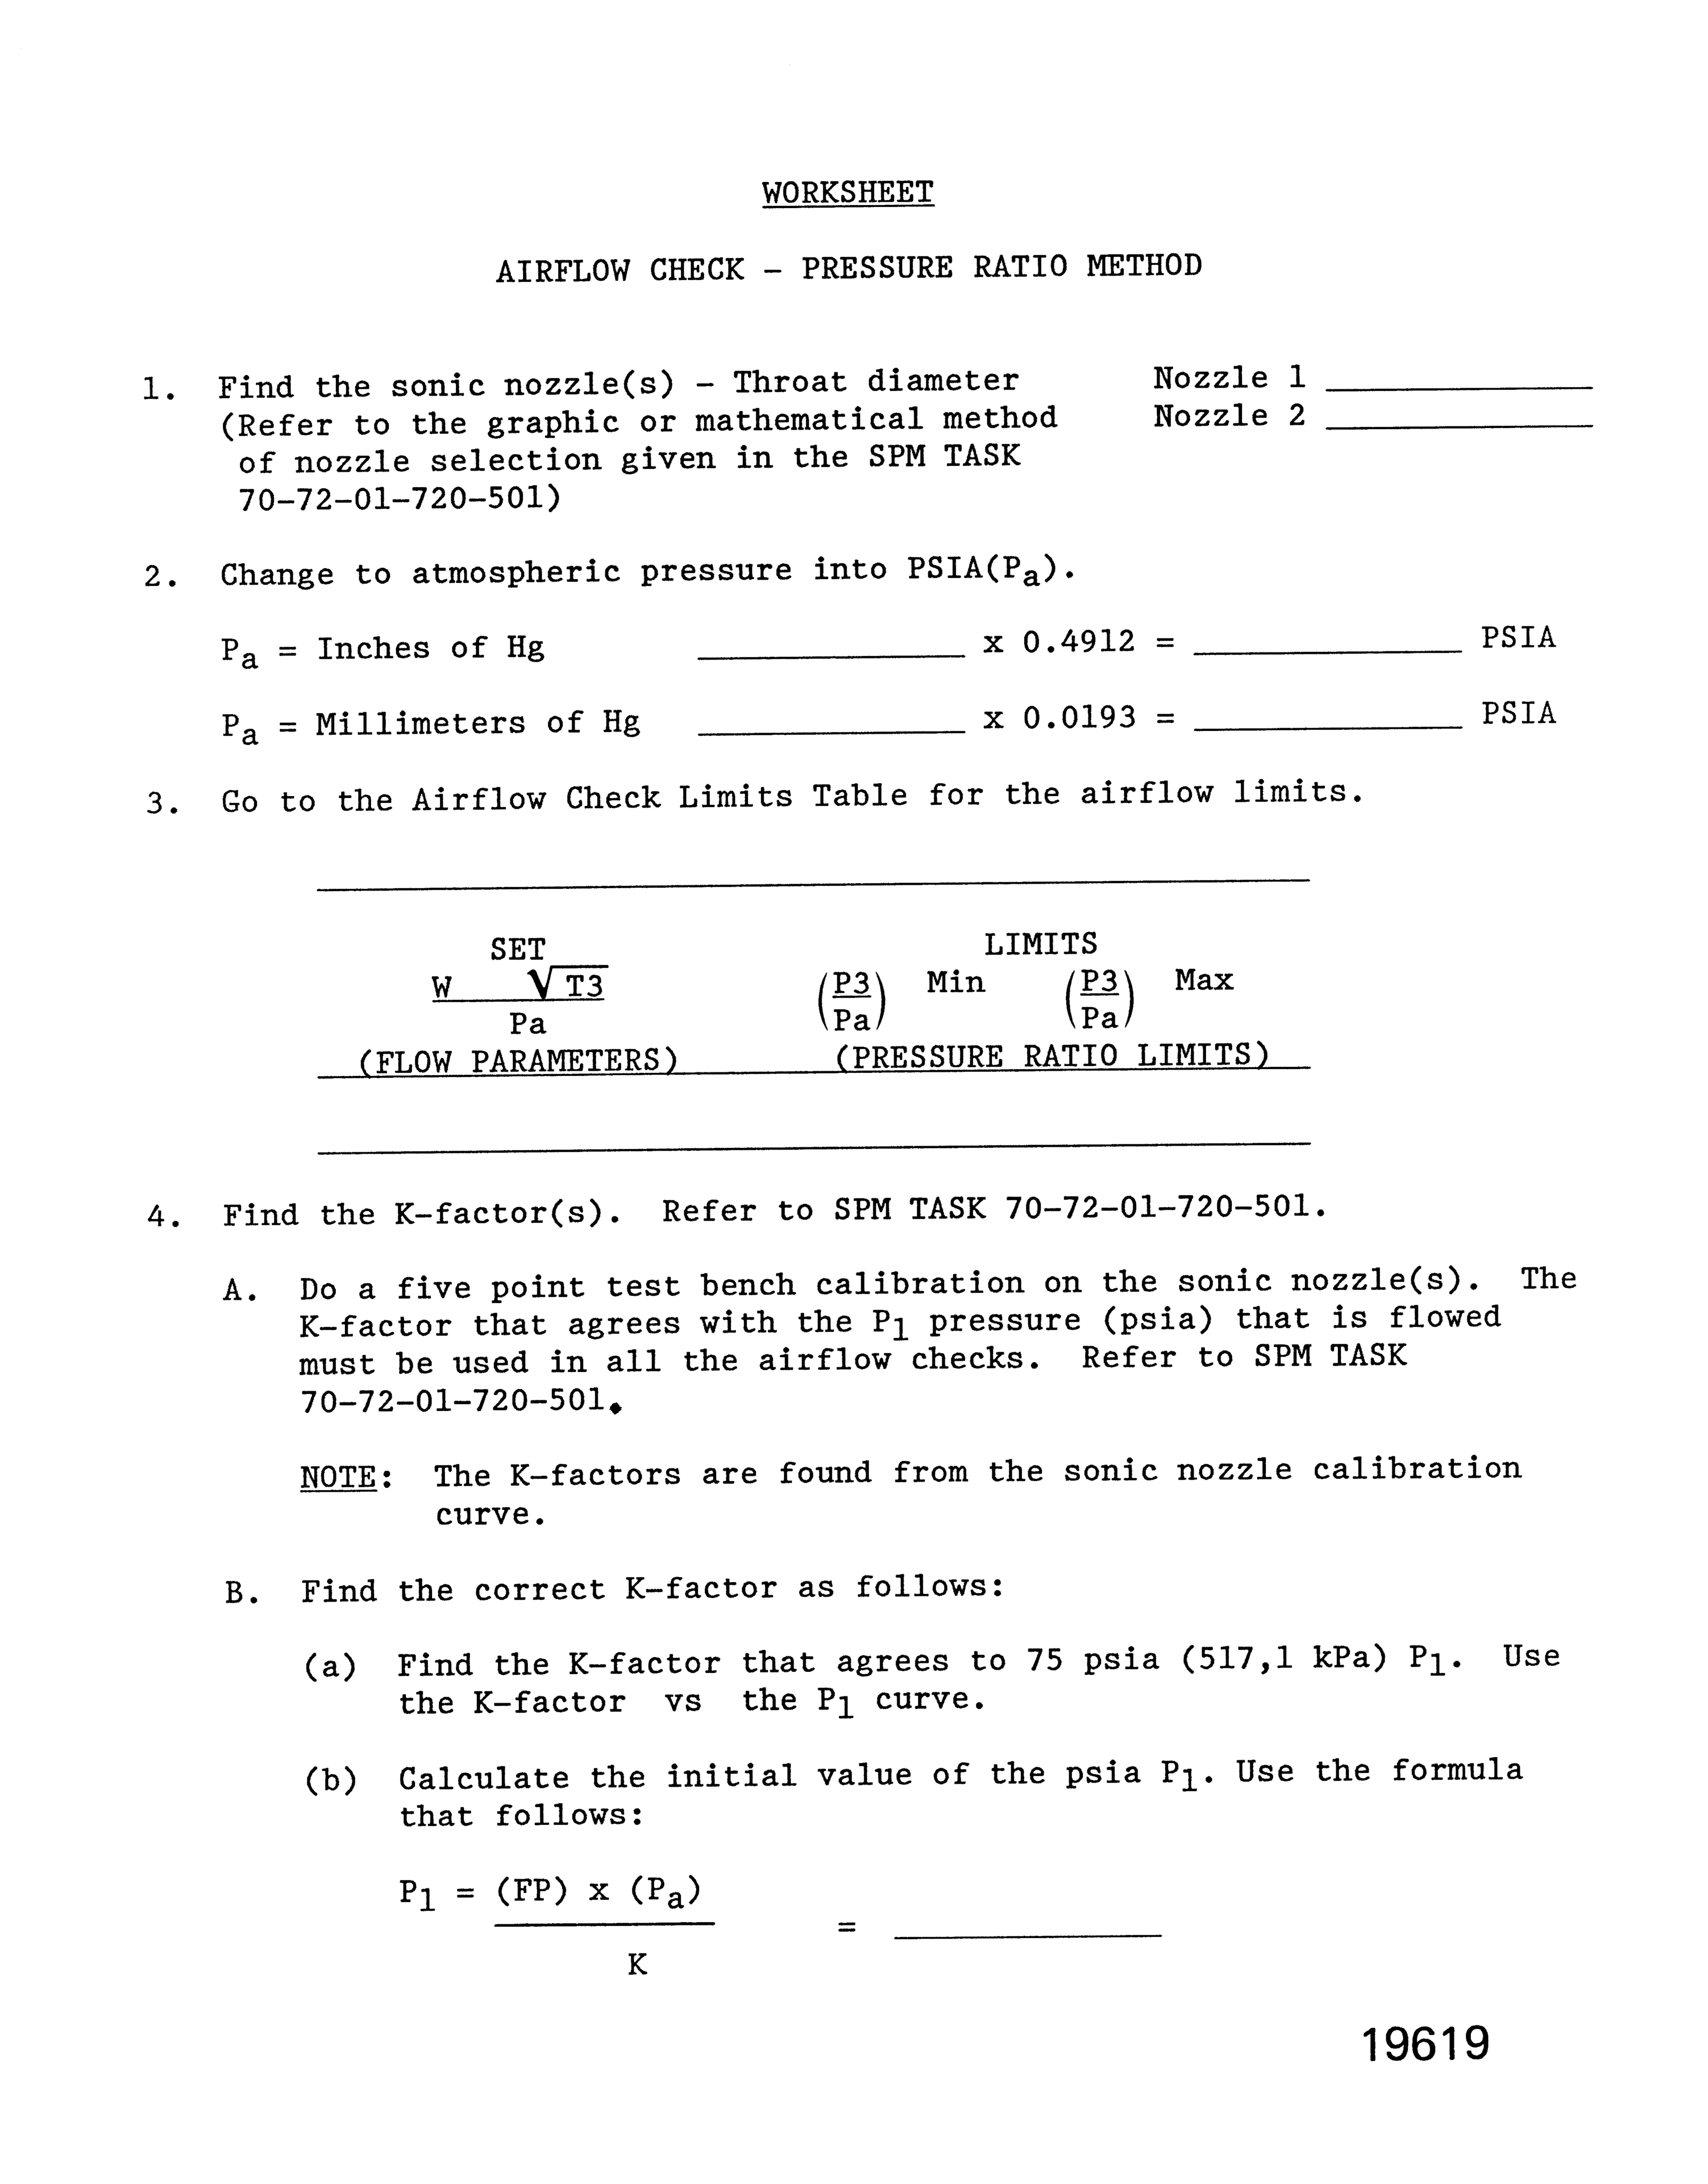
Figure: Stage 1 HPT Cooling Duct Airflow Check - Pressure Ratio Method
Sheet 2
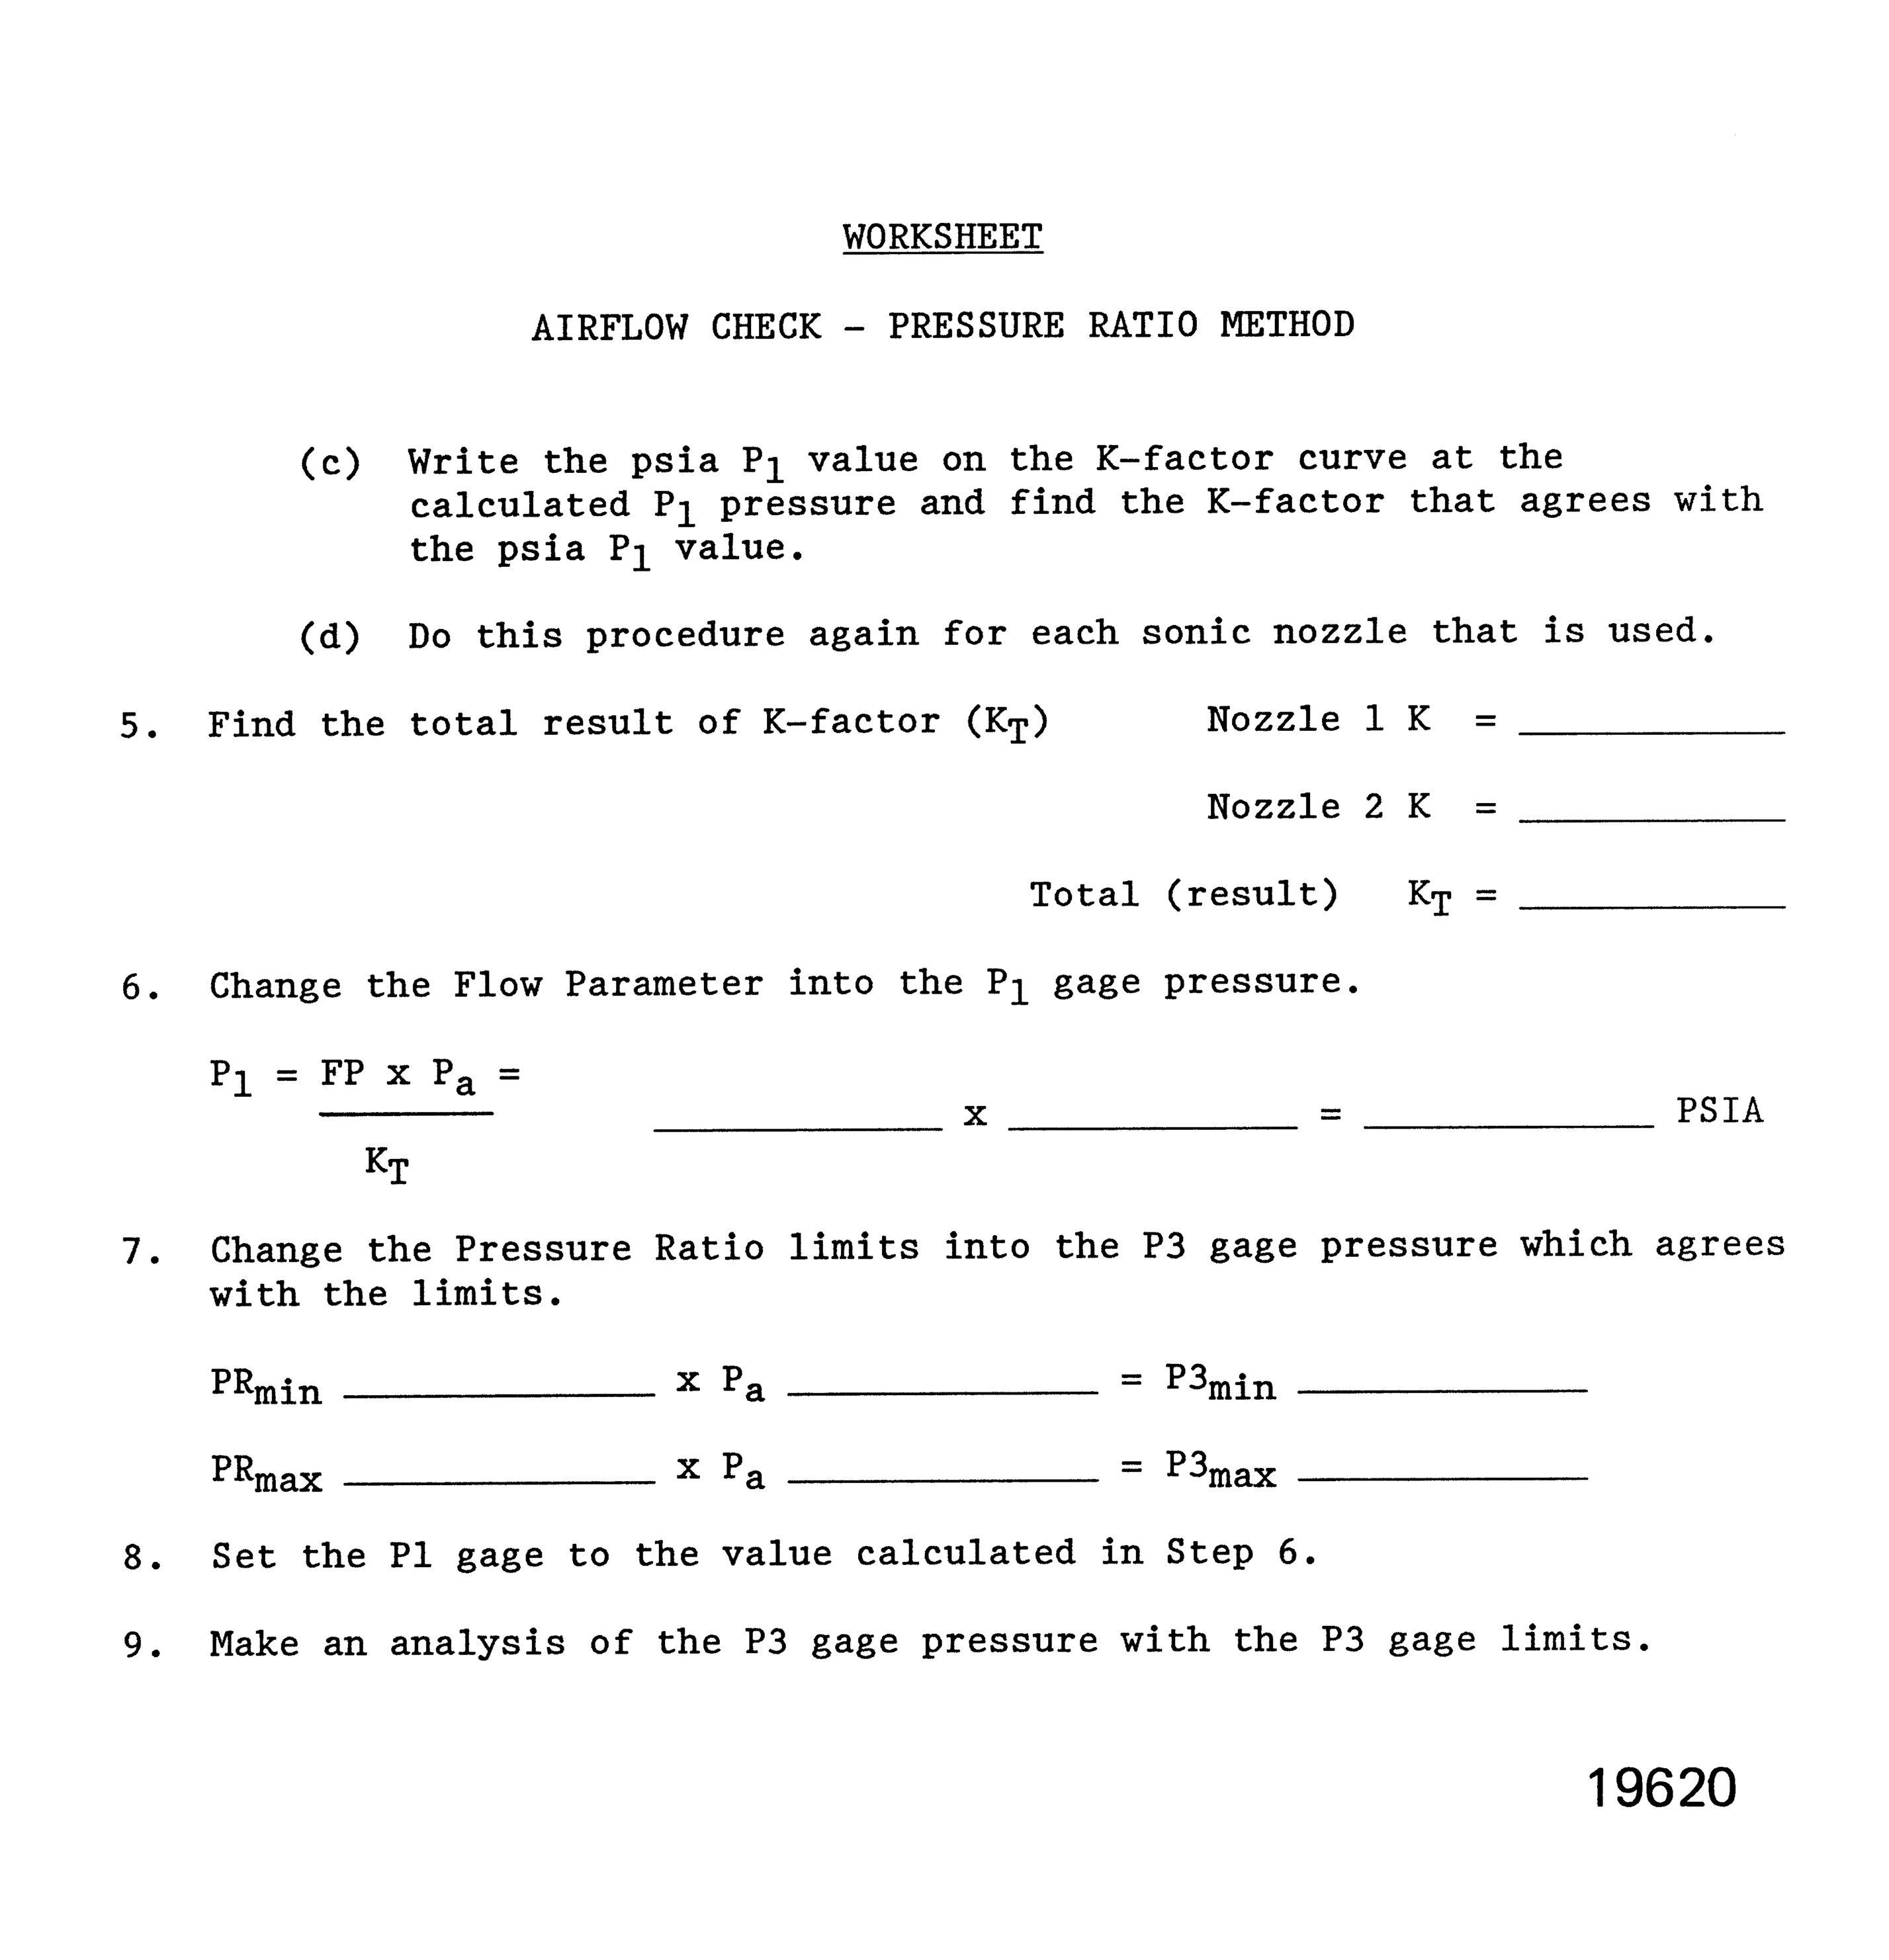
Figure: Stage 1 HPT Cooling Duct Inspection Locations
Stage 1 HPT Cooling Duct Inspection Locations
