Export Control
EAR Export Classification: Not subject to the EAR per 15 C.F.R. Chapter 1, Part 734.3(b)(3), except for the following Service Bulletins which are currently published as EAR Export Classification 9E991: SBE70-0992, SBE72-0483, SBE72-0580, SBE72-0588, SBE72-0640, SBE73-0209, SBE80-0024 and SBE80-0025.Copyright
© IAE International Aero Engines AG (2001, 2014 - 2021) The information contained in this document is the property of © IAE International Aero Engines AG and may not be copied or used for any purpose other than that for which it is supplied without the express written authority of © IAE International Aero Engines AG. (This does not preclude use by engine and aircraft operators for normal instructional, maintenance or overhaul purposes.).Applicability
All
Common Information
TASK 72-45-14-200-001-B00 HPT Stage 1 Blade - Examine, Inspection-001
Effectivity
FIG/ITEM PART NO. | |
|---|---|
01-010 | 2A8321-002 |
01-010 | 2A8321-003 |
01-010 | 2A8321-004 |
01-010 | 2A8521-002 |
01-010 | 2A8521-003 |
01-010 | 2A8521-004 |
01-010 | 2A8521-005 |
01-010 | 2A8701-001 |
01-010 | 2A8701-002 |
01-010 | 2A9001 |
01-010 | 2A9101 |
01-010 | 2A9201 |
General
This TASK gives the procedure for the inspection of the stage 1 HPT blade. For the other part of the stage 1 HPT blade assembly, refer to TASK 72-45-14-200-000 (INSPECTION/CHECK-000).
Fig/item numbers in parentheses in the procedure agree with those used in the IPC.
The policy that is necessary for inspection is given in the SPM TASK 70-20-00-200-501.
All the parts must be cleaned before any part is examined. Refer to the SPM TASK 70-10-00-100-501.
VRS3484 Repair-011, contains a special cleaning and inspection procedure for the under-platform stress corrosion. You must do this repair in conjuction with the inspection requirements in this task.
All parts must be visually examined for damage, corrosion and wear. Any defects that are not identified in the procedure must be referred to IAE.
The procedure for those parts which must have a crack test is given in Step or Step. Do the test for cracks only if the visual examination of the blade is unsatisfactory.
Do not discard any part until you are sure there are no repairs available. Refer to the instructions in Repair before a discarded part is used again or oversize parts are installed.
Parts which should be discarded can be held although no repair is available. The repair of a discarded part could be shown to be necessary at a later date.
All parts must be examined to make sure that all the repairs have been completed satisfactorily.
The practices and processes referred to in the procedure by the TASK numbers are in the SPM.
References
Refer to the SPM for data on these items:
Definitions of Damage, SPM TASK 70-02-02-350-501,
Metal Temperature Analysis (Nickel Base Alloys), SPM TASK 70-02-03-220-501,
Vapor degrease, SPM TASK 70-11-01-300-503,
Procedure to Moderately Clean, SPM TASK 70-11-03-300-503,
Cleaning, SPM TASK 70-12-09-120-501,
Fluorescent Penetrant Inspection, SPM TASK 70-23-08-230-501,
Shotpeening, SPM TASK 70-38-13-380-501,
Radiograph Inspection Procedure, SPM TASK 70-26-01-260-501,
Airflow - Turbine Blades and Vanes, SPM TASK 70-72-01-720-501,
Ultrasonic Clean all Metal (but not Magnesium), SPM TASK 70-13-01-100-501,
Inspection of Parts, SPM TASK 70-20-01-200-501,
Precipitation Heat Treatment of Nickel Castings, SPM TASK 70-37-27-370-501.
Some data on these items is contained in this TASK. For more data on these items refer to the SPM:
Method of Testing for Crack Indications,
Chemical Processes,
Surface Protection.
NOTE
NOTE
Preliminary Requirements
Pre-Conditions
NONESupport Equipment
| Name | Manufacturer | Part Number / Identification | Quantity | Remark |
|---|---|---|---|---|
| Oven | LOCAL | Oven | ||
| Oven | LOCAL | Oven | (Air furnace) | |
| IAE 2P16101 Airflow base | 0AM53 | IAE 2P16101 | 1 | |
| IAE 2P16113 Airflow fixture | 0AM53 | IAE 2P16113 | 1 | |
| IAE 2P16114 Airflow insert | 0AM53 | IAE 2P16114 | 1 | |
| IAE 2P16408 Airflow master | 0AM53 | IAE 2P16408 | 1 | |
| IAE 2P16409 Airflow master | 0AM53 | IAE 2P16409 | 1 | |
| IAE 2P16439 Airflow master | 0AM53 | IAE 2P16439 | 1 | |
| IAE 2P16440 Airflow master | 0AM53 | IAE 2P16440 | 1 | |
| IAE 2P16446 Airflow master | 0AM53 | IAE 2P16446 | ||
| IAE 2P16372 Stage 1 HPT Blade Length Gage | 0AM53 | IAE 2P16372 | 1 | |
| IAE 2P16508 Reference card | 0AM53 | IAE 2P16508 | 1 |
Consumables, Materials and Expendables
| Name | Manufacturer | Part Number / Identification | Quantity | Remark |
|---|---|---|---|---|
| CoMat 03-010 ARGON GAS | LOCAL | CoMat 03-010 | ||
| CoMat 03-117 ARGON GAS | 0AM53 | CoMat 03-117 | ||
| CoMat 03-118 ARGON GAS | 0AM53 | CoMat 03-118 | ||
| CoMat 05-029 CAST STEEL SHOT, S110 | LOCAL | CoMat 05-029 | ||
| CoMat 05-030 CAST STEEL SHOT DELETED | 0AM53 | CoMat 05-030 | ||
| CoMat 05-031 CAST STEEL SHOT DELETED | 0AM53 | CoMat 05-031 | ||
| CoMat 05-032 CAST STEEL SHOT, S170 | 42736 | CoMat 05-032 | ||
| CoMat 05-033 CAST STEEL SHOT DELETED | 0AM53 | CoMat 05-033 | ||
| CoMat 05-034 CAST STEEL SHOT DELETED | 0AM53 | CoMat 05-034 | ||
| CoMat 05-138 SHOT, CAST STEEL, S110 | 81349 | CoMat 05-138 | ||
| CoMat 05-176 CAST STEEL SHOT, S170 | 42736 | CoMat 05-176 | ||
| CoMat 05-177 CUT WIRE SHOT,CW-14 | LOCAL | CoMat 05-177 | ||
| CoMat 05-178 CUT WIRE SHOT, CW-20 | LOCAL | CoMat 05-178 | ||
| CoMat 05-234 CAST STEEL SHOT, HIGH HARDNESS, S110 | LOCAL | CoMat 05-234 |
Spares
NONESafety Requirements
NONEProcedure
Repair VRS3042, TASK 72-45-14-300-009 (REPAIR-009) or VRS3645, TASK 72-45-14-300-024 (REPAIR-024)
Other than (1)
Examine the blade platform area for corrosion and burned areas.
Repair VRS3042, TASK 72-45-14-300-009 (REPAIR-009) or VRS3645, TASK 72-45-14-300-024 (REPAIR-014)
Other than (1)
Examine the blade platform area for cracks, nicked coating, cracked coating and chipped coating. Use a white light and 10X magnification to examine for cracks.
Repair VRS3042, TASK 72-45-14-300-009 (REPAIR-009) or VRS3645, TASK 72-45-14-300-024 (REPAIR-024)
Other than (1)
Examine the blade platform area for dents at locations 2 and 3.
Repair VRS3616, TASK 72-45-14-300-022 (REPAIR-022)
Cracks which come from cooling holes, that are a maximum of 0.040 in. (1.02 mm) in length
Repair VRS3686, TASK 72-45-14-300-023 (REPAIR-023)
Cracks which come from cooling holes, that are a maximum of 0.080 in. (2.03 mm) in length
Examine the underplatform of the blade for cracks, Figure.
SUBTASK 72-45-14-220-070 Examine the Stage 1 HPT Blade (01-010) Blade Platform Area
Repair VRS3042, TASK 72-45-14-300-009 (REPAIR-009) or VRS3645, TASK 72-45-14-300-024 (REPAIR-024)
Other than (1)
Examine the blade airfoil surfaces for burned areas, corrosion and erosion.
Repair VRS3042, TASK 72-45-14-300-009 (REPAIR-009) or VRS3645, TASK 72-45-14-300-024 (REPAIR-024)
Nicked or chipped coating
Repair VRS3203, TASK 72-45-14-300-002 (REPAIR-002)
Nicked or chipped coating after Repair VRS3042, TASK 72-45-14-300-009 (REPAIR-009) or VRS3645, TASK 72-45-14-300-024 (REPAIR-024) has been done
Examine the blade airfoil surfaces for nicked and chipped coating.
Remove the coating, Repair VRS3042, TASK 72-45-14-300-009 (REPAIR-009) or VRS3645, TASK 72-45-14-300-024 (REPAIR-024) and examine for cracks again
Other than (a)
Cracks in Area A.
Remove the coating, Repair VRS3042, TASK 72-45-14-300-009 (REPAIR-009) or VRS3645, TASK 72-45-14-300-024 (REPAIR-024) and examine for crack again
Other than (a)
Cracks in Area B.
Examine the blade concave and convex surfaces and the leading edge cooling air holes for cracks. Use a white light and a 10X magnification.
Examine the blade airfoil surfaces for additional cooling holes, Figure.
Repair VRS3042, TASK 72-45-14-300-009 (REPAIR-009) or VRS3645, TASK 72-45-14-300-024 (REPAIR-024)
Other than (1) and (2)
Examine the blade concave and convex surfaces for dents, Figure.
SUBTASK 72-45-14-220-071 Examine the Stage 1 HPT Blade (01-010) Airfoil
Refer to Figure.
Repair VRS3042, TASK 72-45-14-300-009 (REPAIR-009) or VRS3645, TASK 72-45-14-300-024 (REPAIR-024)
NOTE
The base metal/tip interface is shown at location 6.
There is base metal that shows on the base metal/tip interface at location 2
Repair VRS3042, TASK 72-45-14-300-009 (REPAIR-009) or VRS3645, TASK 72-45-14-300-024 (REPAIR-024)
Other than (2) or (3)
Examine the blade abrasive tip for base metal that shows.
Repair VRS3042, TASK 72-45-14-300-009 (REPAIR-009) or VRS3645, TASK 72-45-14-300-024 (REPAIR-024)
Other than (1)
Examine the blade abrasive tip for cracks at location 3.
Repair VRS3042, TASK 72-45-14-300-009 (REPAIR-009) or VRS3645, TASK 72-45-14-300-024 (REPAIR-024)
Other than (1)
Examine the blade abrasive tip for taper on the trailing edge at location 5.
SUBTASK 72-45-14-220-072 Examine the Stage 1 HPT Blade (01-010) Abrasive Tip
Install the blade assembly into the IAE 2P16372 Stage 1 HPT Blade Length Gage 1 off.
Repair VRS3042, TASK 72-45-14-300-009 (REPAIR-009) or VRS3645, TASK 72-45-14-300-024 (REPAIR-024)
Other than (a)
Use the dial indicator to measure the distance from the end surface of the gage to the surface of the trailing edge pin.
Examine the blade assembly for the blade length dimension.
SUBTASK 72-45-14-220-073-B00 Examine the Stage 1 HPT Blade Assembly (01-010) (PN 2A8321-002, 2A8321-003, 2A8321-004, 2A8521-002, 2A8521-003, 2A8521-004, 2A8521-005, 2A8701-002, 2A9001, 2A9101 and 2A9201) Blade Length
Refer to Figure.
Repairs VRS3042, TASK 72-45-14-300-009 (REPAIR-009) or VRS3645, TASK 72-45-14-300-024 (REPAIR-024)
NOTE
Example of a crack is shown at location 1.
Cracks at the trailing edge at location 3
Repair VRS3042, TASK 72-45-14-300-009 (REPAIR-009) or VRS3645, TASK 72-45-14-300-024 (REPAIR-024)
Cracks that extend from the concave surface of the cooling air slots at location 2
Examine the blade trailing edge for cracks. Use a white light and a 10X magnification.
Use a wire probe and power flush or pencil grit blast and high pressure air blast or Repair VRS3357, TASK 72-45-14-300-005 (REPAIR-005) or Repair VRS3042, TASK 72-45-14-300-009 (REPAIR-009)
NOTE
Example of a cooling air slot is shown at location 4.
Plugging
Examine the blade trailing edge cooling air slots at location 3, for plugging.
SUBTASK 72-45-14-220-074 Examine the Stage 1 HPT Blade (01-010) Trailing Edge
Refer to Figure.
Repair VRS3042, TASK 72-45-14-300-009 (REPAIR-009) or VRS3645, TASK 72-45-14-300-024 (REPAIR-024)
Other than (1)
Examine the blade surface at locations 2 and 3, for signs of rub with the stage 1 HPT duct segment seal or the stage 1 HPT vane platform.
SUBTASK 72-45-14-220-075 Examine the Stage 1 HPT Blade (01-010) Leading Edge Platform
Refer to Figure.
SUBTASK 72-45-14-220-076 Examine the Stage 1 HPT Blade (01-010) Damper Contact Area
Repair VRS3484, TASK 72-45-14-300-011 (REPAIR-011)
Cracks on the top serration
Examine the blade root attachment area for pitting, nicks and cracks at locations 2. Use a white light and a 10X magnification to examine for cracks.
Repair VRS3484, TASK 72-45-14-300-011 (REPAIR-011)
Any corrosion or pitting in Areas 6 and 13
Repair VRS3484, TASK 72-45-14-300-011 (REPAIR-011)
Other than (2)
Examine the blade underplatform area for corrosion and pitting by Figure and Figure by the following requirements:
SUBTASK 72-45-14-220-077 Examine the Stage 1 HPT Blade (01-010) Root Attachment Area
Refer to Step for crack limits.
Examine the bottom root cooling slots.
SUBTASK 72-45-14-220-078 Examine the Stage 1 HPT Blade (01-010) Root Area
Refer to Figure.
Repair VRS3203, TASK 72-45-14-300-002 (REPAIR-002)
Sharp nicks
Examine the blade root area for the blends and dents.
SUBTASK 72-45-14-220-079 Examine the Stage 1 HPT Blade Root Area
Refer to Figure.
Cut the blade at location 1 to get the airfoil sample to be analyzed. Refer to SPM TASK 70-02-03-220-501.
NOTE
The small vee shaped groove will make a mark for the blade airfoil sample surface to be analyzed.Attach and polish the blade samples by the SPM TASK 70-02-03-220-501 as follows:
Examine the microstructure of the blade samples, refer to the SPM TASK 70-02-03-220-501.
SUBTASK 72-45-14-280-056 Examine the Stage 1 HPT Blade (01-010) for Overtemperature
NOTE
Blades that were at temperatures more than the limit of 2150 deg F (1176.7 deg C) for a short time will cause a change in the alloy microstructure of the blade.NOTE
In the case of an EGT overtemperature, such that the AMM requires metallurgical analysis, the stage 2 HPT blades must be examined for overtemperature even if the stage 1 HPT blades are not rejected for overtemperature.Refer to Figure.
Clean the part. Refer to TASK 72-45-14-100-000 (CLEANING-000).
Heat the blade to between 1950 and 2000 deg F (1086 and 1093 deg C) in an oven and hold for 30 minutes minimum to four hours in a vacuum or argon protected atmosphere. Use CoMat 03-010 ARGON GASCoMat 03-117 ARGON GAS or CoMat 03-118 ARGON GAS. Refer to the SPM TASK 70-37-26-370-501.

CAUTION
FAILURE TO STRESS RELIEVE THE BLADE BEFORE FLUORESCENT PENETRANT EXAMINATION CAN CAUSE DAMAGE TO THE BLADE.Heat the blade by one of the methods that follow:

WARNING
IT IS THE RESPONSILIBILTY OF THE OPERATOR TO OBTAIN AND OBSERVE THE MANUFACTURERS MATERIAL SAFETY SHEETS FROM THE CONSUMABLE MATERIALS INFORMATION SUCH AS HAZARDOUS INGREDIENTS, PHYSICAL/CHEMICAL CHARACTERISTICS, FIRE, EXPLOSION, REACTIVITY, HEALTH HAZARD DATA, PRECAUTIONS FOR SAFE HANDLING, USE AND CONTROL MEASURES AND ALSO TO TAKE LOCAL REGULATIONS INTO CONSIDERATION.Stress-relieve the blade.
Examine the root cooling slots carefully. See Figure.
If you find any crack indications that are more than the limits given above, make a temporary mark on the indications with one of the approved temporary markers in the SPM TASK 70-09-00-400-501.
Heat the blade to between 1575 and 1625 deg F (857 and 885 deg C) in a vacuum or argon atmosphere and keep at this temperature for 32 hours. Refer to the SPM TASK 70-37-27-370-501 (IAE 1480).
Precipitation heat treat (PHT) the blade assembly.
Use CoMat 05-029 CAST STEEL SHOT, S110, CoMat 05-030 CAST STEEL SHOT DELETED, CoMat 05-031 CAST STEEL SHOT DELETED, CoMat 05-032 CAST STEEL SHOT, S170, CoMat 05-033 CAST STEEL SHOT DELETED, CoMat 05-034 CAST STEEL SHOT DELETED, CoMat 05-138 SHOT, CAST STEEL, S110, CoMat 05-176 CAST STEEL SHOT, S170, CoMat 05-234 CAST STEEL SHOT, HIGH HARDNESS, S110 or CoMat 05-177 CUT WIRE SHOT,CW-14, CoMat 05-178 CUT WIRE SHOT, CW-20. Peen with an intensity of 6A. Refer to the SPM TASK 70-38-13-380-501, SUBTASK 70-38-13-380-006.
Shot peen the blade root area as given in the SPM TASK 70-38-13-380-501. Refer to Figure.
SUBTASK 72-45-14-230-053-001 Examine the Stage 1 HPT Blade (01-010) for Cracks
NOTE
Do this procedure only if the visual examination of the blade is unsatisfactory.If you cannot do this procedure, do the procedure given in Step.
CAUTION
FAILURE TO STRESS RELIEVE THE BLADE BEFORE FLUORESCENT PENETRANT EXAMINATION CAN CAUSE DAMAGE TO THE BLADE.When you cannot stress relieve the blade, you must send the blade to the approved source that follows:
PRATT and WHITNEY AFTERMARKET SERVICES (PWAS)
Connecticut Airfoil Repair Operations (CARO)
400 Main St., Well 11
East Hartford, CT 06108-0969 USA
Tel: (860) 565-3922
Fax: (860) 557-8247
SUBTASK 72-45-14-230-053-002 Examine the Stage 1 HPT Blade (01-010) for Cracks
NOTE
Do this procedure only if the visual examination of the blade is unsatisfactory.If you cannot do Step do this procedure.Moderately clean the blade by the SPM TASK 70-11-03-300-503 or vapor degrease the blade by SPM TASK 70-11-01-300-503.

CAUTION
DO NOT DRY BLAST THE BLADE COATED AREA TOO MUCH. THIS CAUSES THE COATING TO BE REMOVED.Clean the blade by the SPM TASK 70-12-09-120-501.
Repair VRS3042, TASK 72-45-14-300-009 (REPAIR-009) or VRS3645, TASK 72-45-14-300-024 (REPAIR-024)
Blue color that is not shiny shows the blade has no coating
Heat tint.
Examine the blade coating for heat tint.
SUBTASK 72-45-14-280-057 Examine the Stage 1 HPT Blade (01-010) Coating by Heat Tint
Do a radiographic inspection in Positions A and B, Figure by the SPM TASK 70-26-01-260-501.
NOTE
Surface indications that are acceptable to the visual inspection is not cause to be rejected by radiographic inspection.Power flush or Repair, VRS3357 TASK 72-45-14-300-005 (REPAIR-005)
NOTE
If there are any indications of shot peen and/or other forms of foreign material, e.g. metal chips or broken wire that are distinguishable by their shape, form or density, the parts shall be rejected.After cleaning the internal cavities refer to VRS3357, TASK 72-45-14-300-005 (REPAIR-005), unwanted metal and material are acceptable provided the size, density and location of the indication(s) has remained unchanged from step (2) (b). Refer to the limits in Figure and Figure.
Unwanted material in the internal cavities
Make an analysis on the radiographic indications.
Examine the blade for internal cracks and unwanted material by radiographic inspection.
SUBTASK 72-45-14-260-052 Examine the Stage 1 HPT Blade (01-010) for Internal Cracks and Unwanted Material by Radiographic Inspection
Do the airflow procedure for the stage 1 HPT blade assembly by the procedure given in VRS3712 TASK 72-45-14-300-033.
SUBTASK 72-45-14-280-067 Examine the Stage 1 HPT Blade Assembly (01-010) by Airflow Check
NOTE
Do all the inspections and repairs on the blade assembly before you do the airflow check.Refer to Figure.
Do steps (1), (2) and (3) of the waterflow check again.
NOTE
Casting chaplet holes that are not mismatched or double drilled holes are acceptable. Chaplet holes may or may not exist. EDM toolmarks and/or double drilled holes are acceptable if they are not blocked and the blades meet airflow requirements. Refer to Figure for typical chaplet and double drilled holes.
Do the waterflow check to examine the blade.
SUBTASK 72-45-14-280-071 Examine the Stage 1 HPT Blade Assembly (01-010) by Waterflow Check
Examine the base of the underplatform damper pins for casting voids by visual inspection with a white light and a minimum of 3X magnification. These voids must be smooth, shallow in depth, and flat-bottomed. IAE 2P16508 Reference card 1 off shows an example of an acceptable casting void. These casting voids are a maximum of 0.0300 in. (0.762 mm) in diameter. Any quantity of voids is permitted.
Examine the base of the underplatform damper pins for anomalies by visual inspection with a white light and a minimum of 10X magnification. Acceptable anomalies have a length of 0.0700 in. (1.778 mm) or less. Indications that go from the centerline of the damper pin radius to the blade root, are not acceptable. Indications on the blade root are not acceptable. Any quantity of linear anomalies is permitted. IAE 2P16508 Reference card 1 off shows examples of acceptable linear anomalies. Cracks inside or which start from linear anomalies are not permitted. Fluorescent penetrant inspect questionable indications. Acceptable linear anomalies will not retain fluorescent penetrant fluid.
SUBTASK 72-45-14-230-060 Examine the Stage 1 HPT Blade (01-010) for Casting Flow Lines and Imperfections
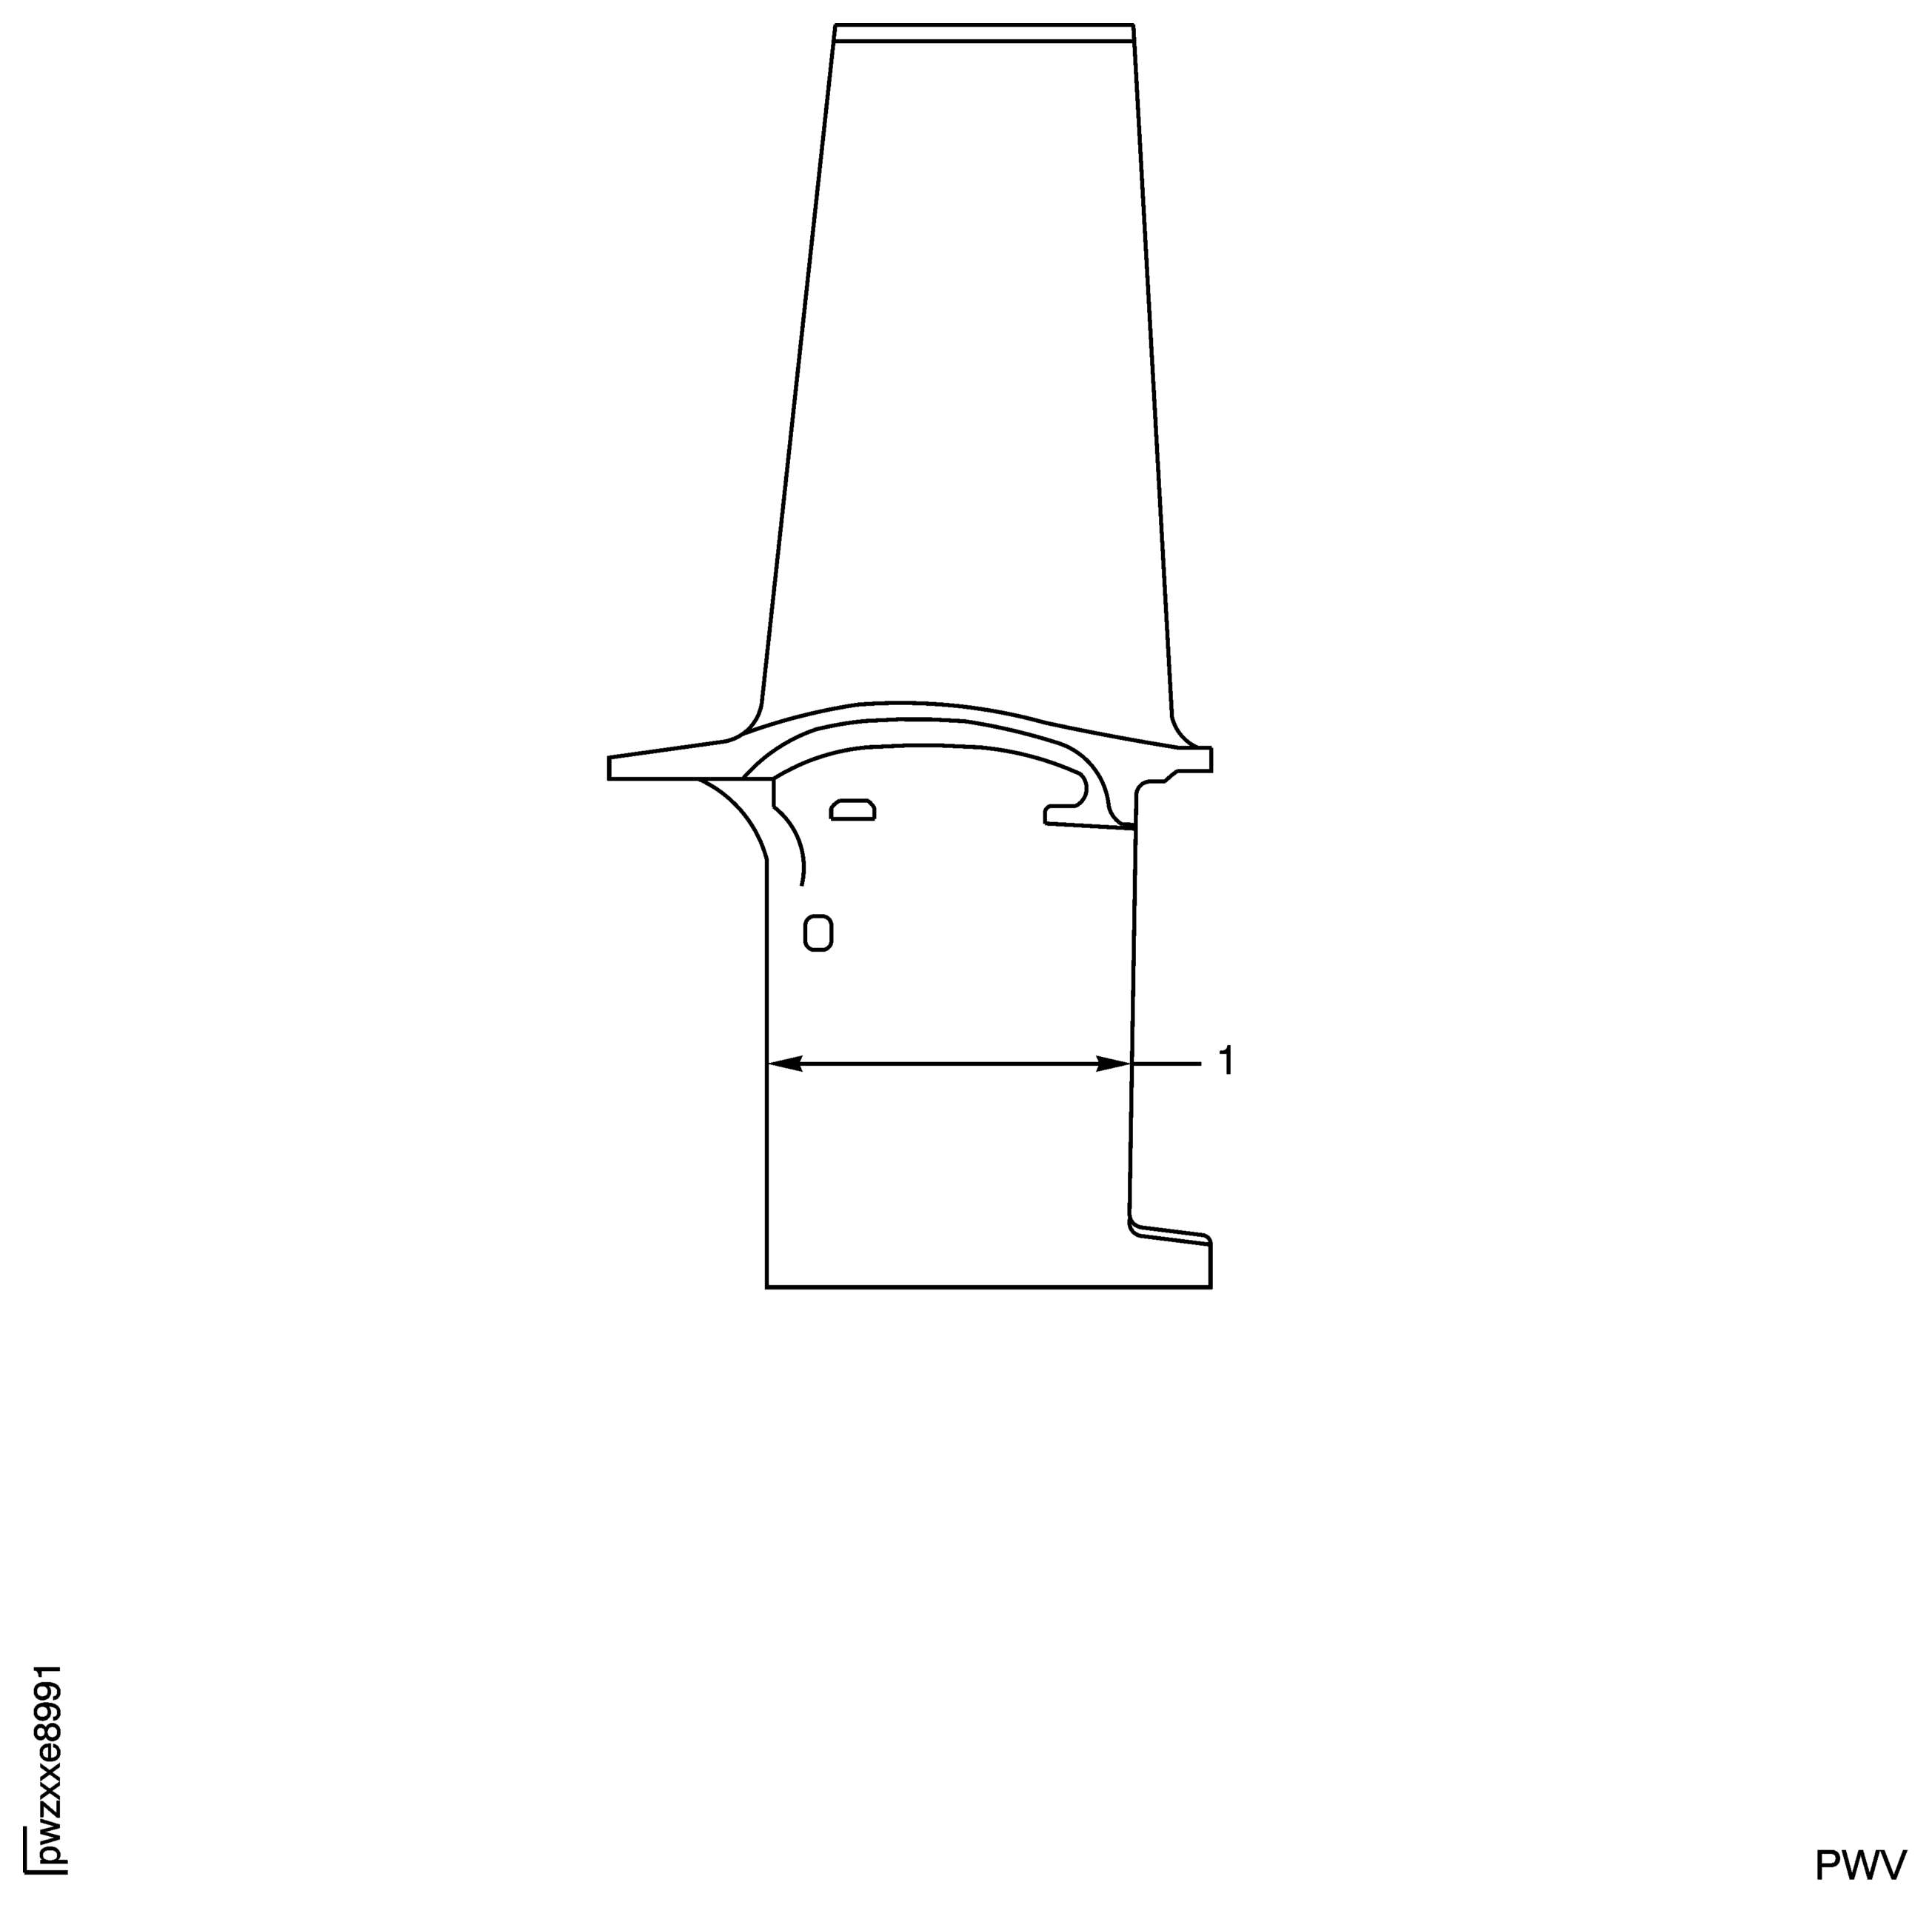
Refer to Figure.
SUBTASK 72-45-14-220-101 Examine the Stage 1 HPT Blade (01-010) for Blade Width Dimensions

CAUTION
YOU MUST DO AN INSPECTION FOR ALL THE SIXTY FOUR (64) BLADES INDIVIDUALLY. IF THE INDIVIDUAL INSPECTION IS UNSATISFACTOY, IT CAN CAUSE FIT PROBLEMS DURING ASSEMBLY PROCEDURE.
Figure: Stage 1 HPT Blade (For PN's see Table, CONFIG-002) Platform Inspection Locations
Stage 1 HPT Blade (For PN's see Table, CONFIG-002) Platform Inspection Locations
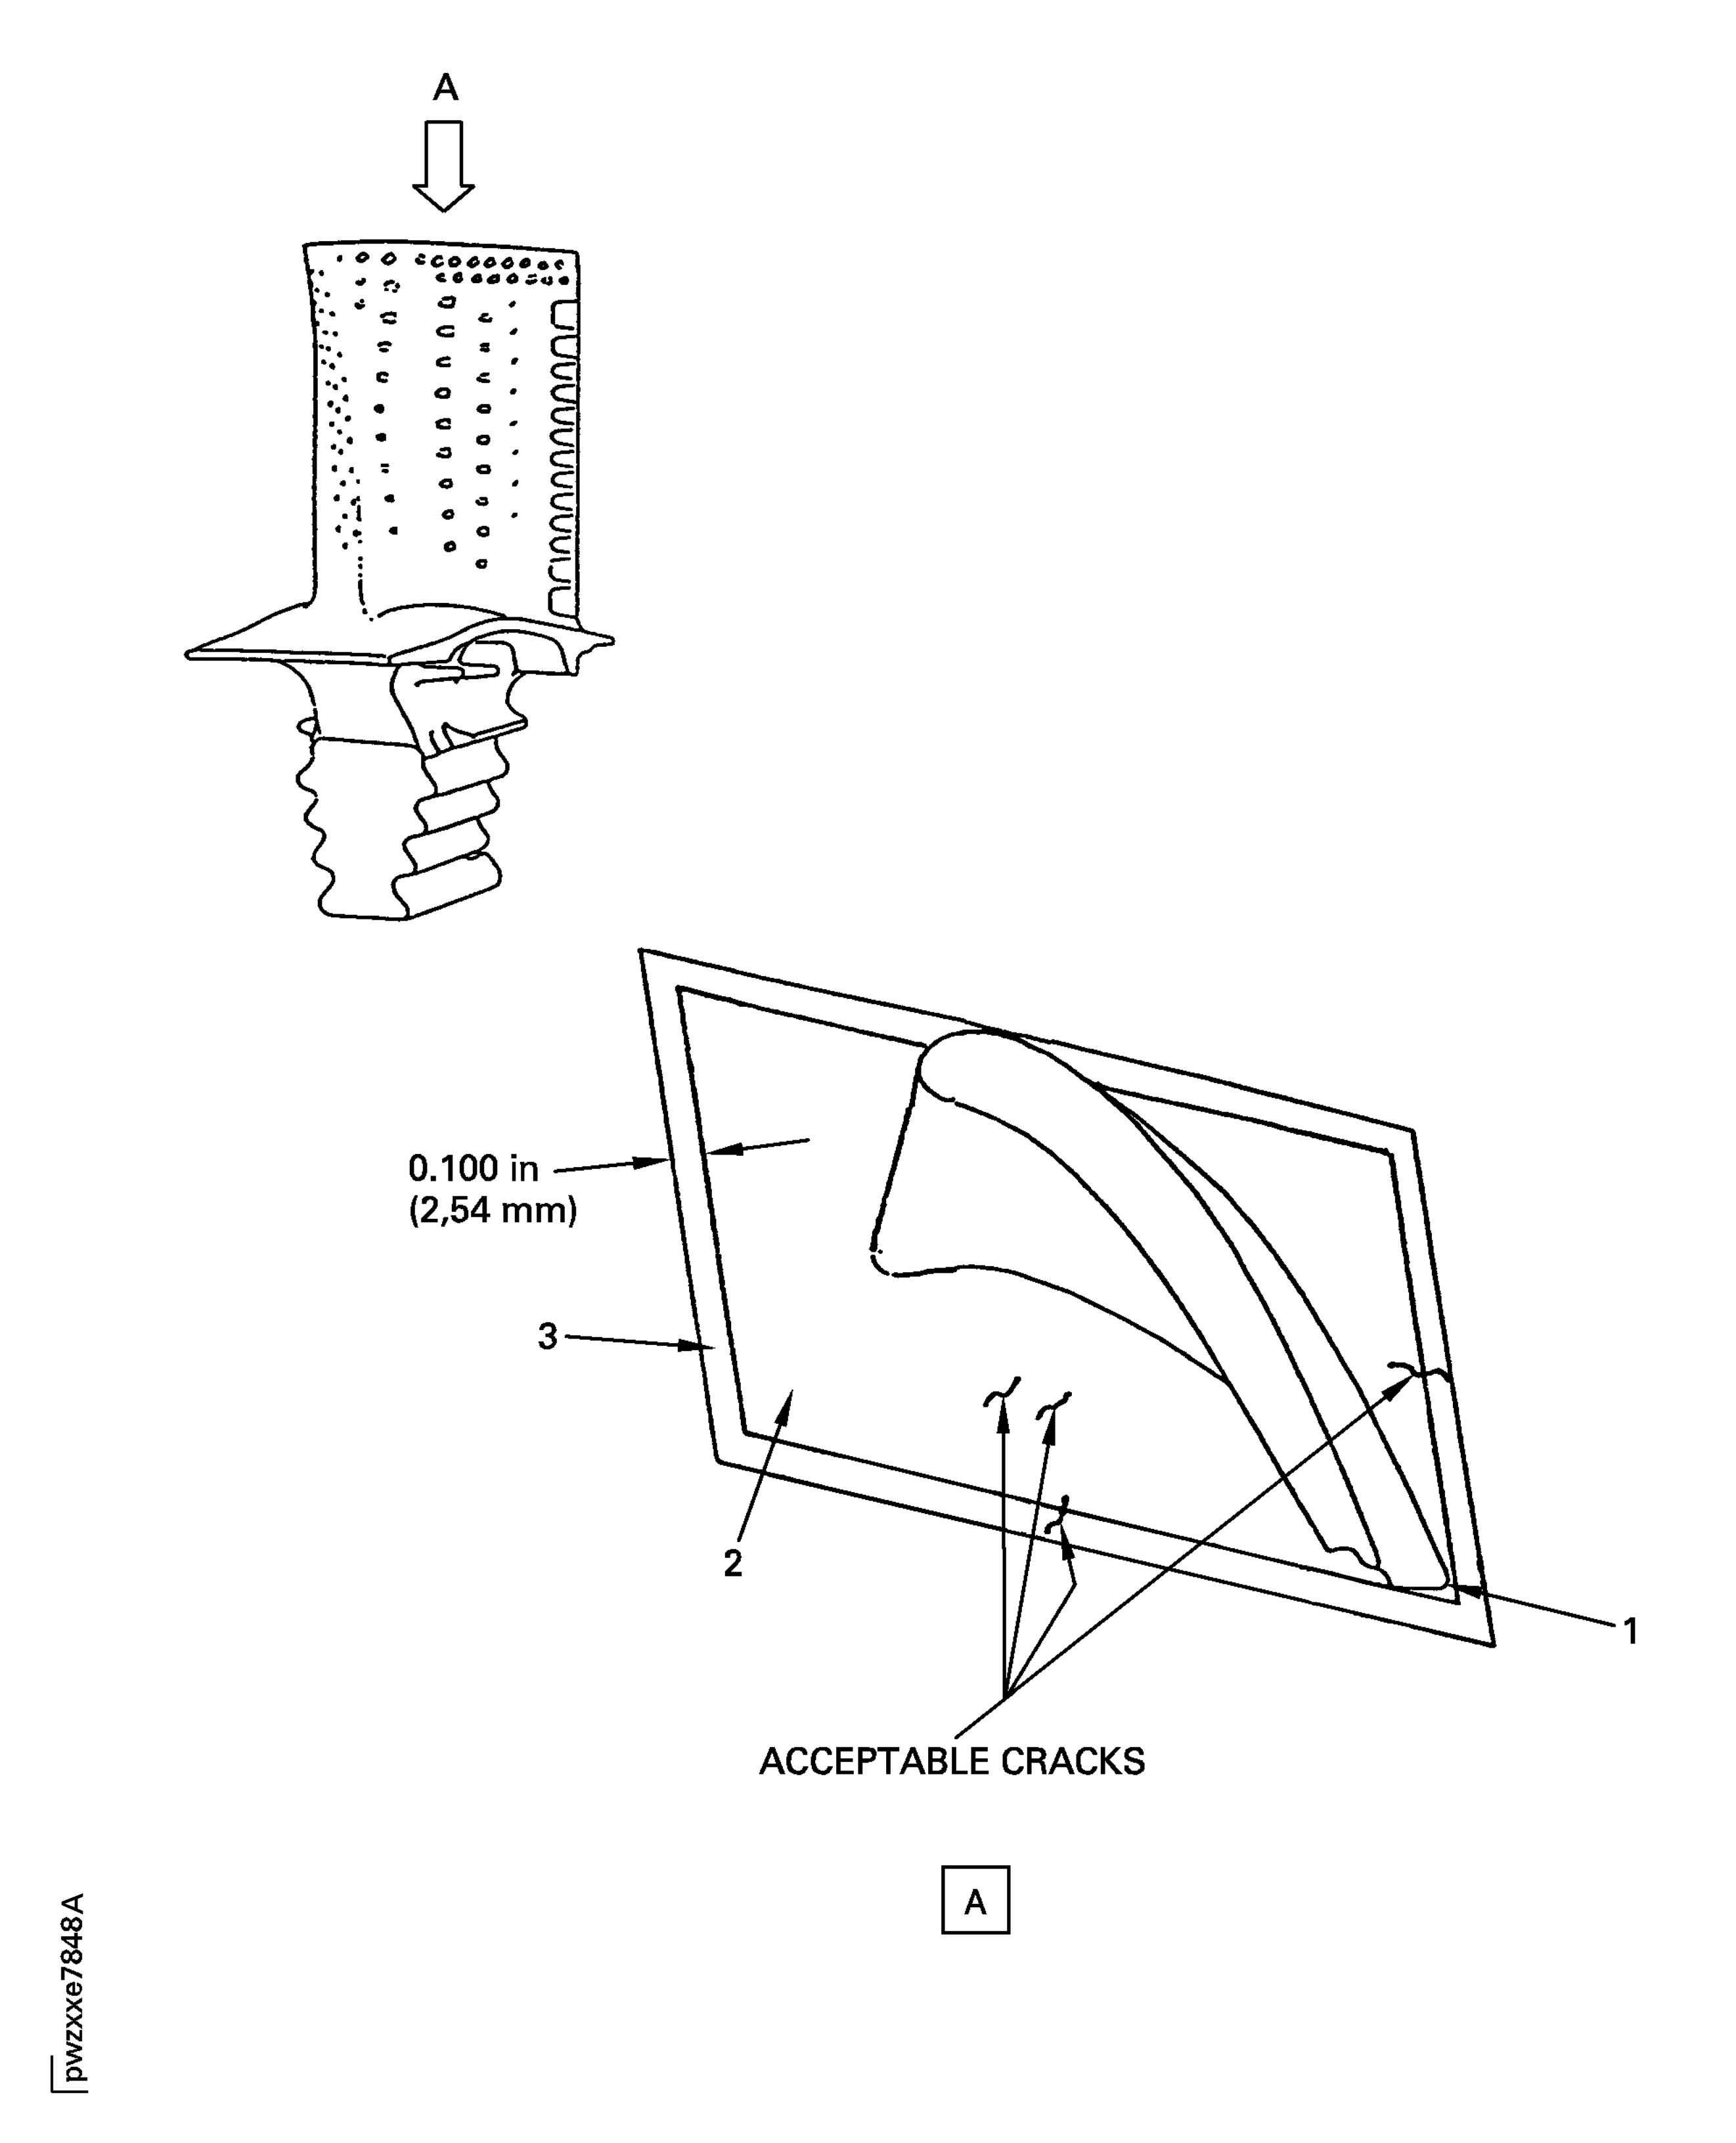
Figure: Stage 1 HPT Blade (2A8521-001 and 2A8801) Platform Inspection Locations
Stage 1 HPT Blade (2A8521-001 and 2A8801) Platform Inspection Locations

Figure: Stage 1 HPT Blade Crack Inspection
Stage 1 HPT Blade Crack Inspection
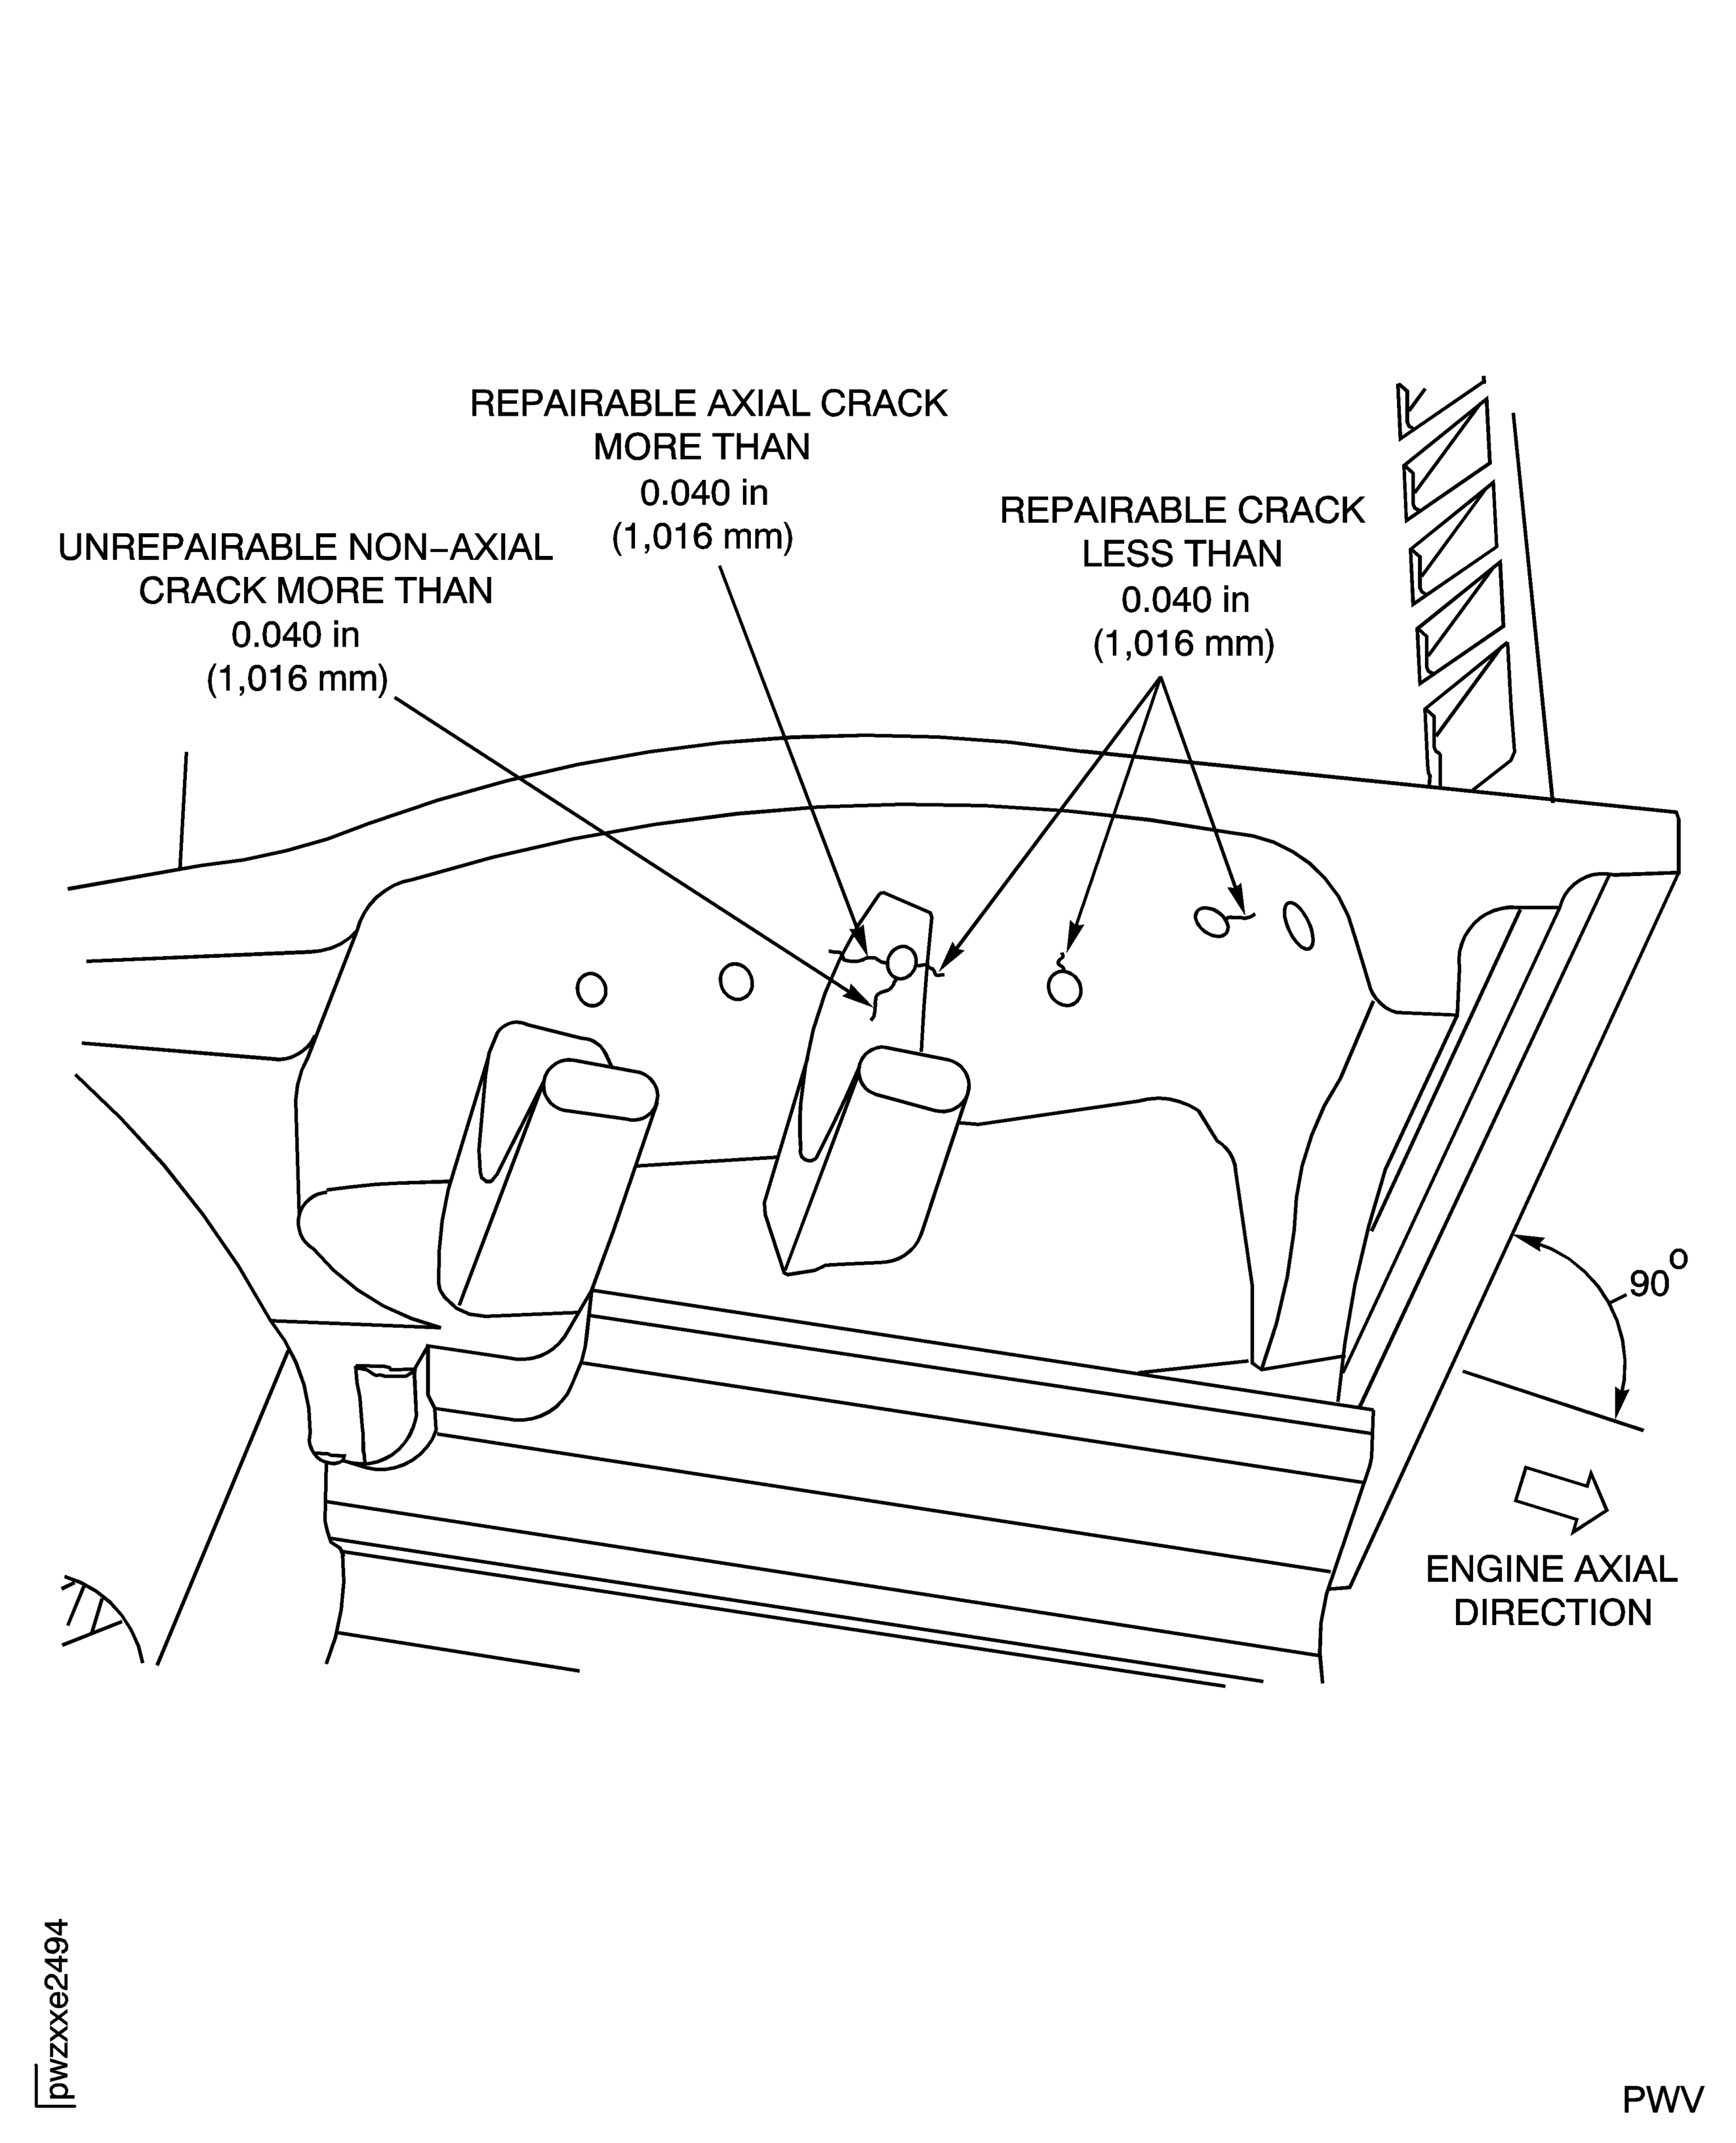
Figure: Stage 1 HPT Blade Cooling Air Holes Inspection Locations
Stage 1 HPT Blade Cooling Air Holes Inspection Locations
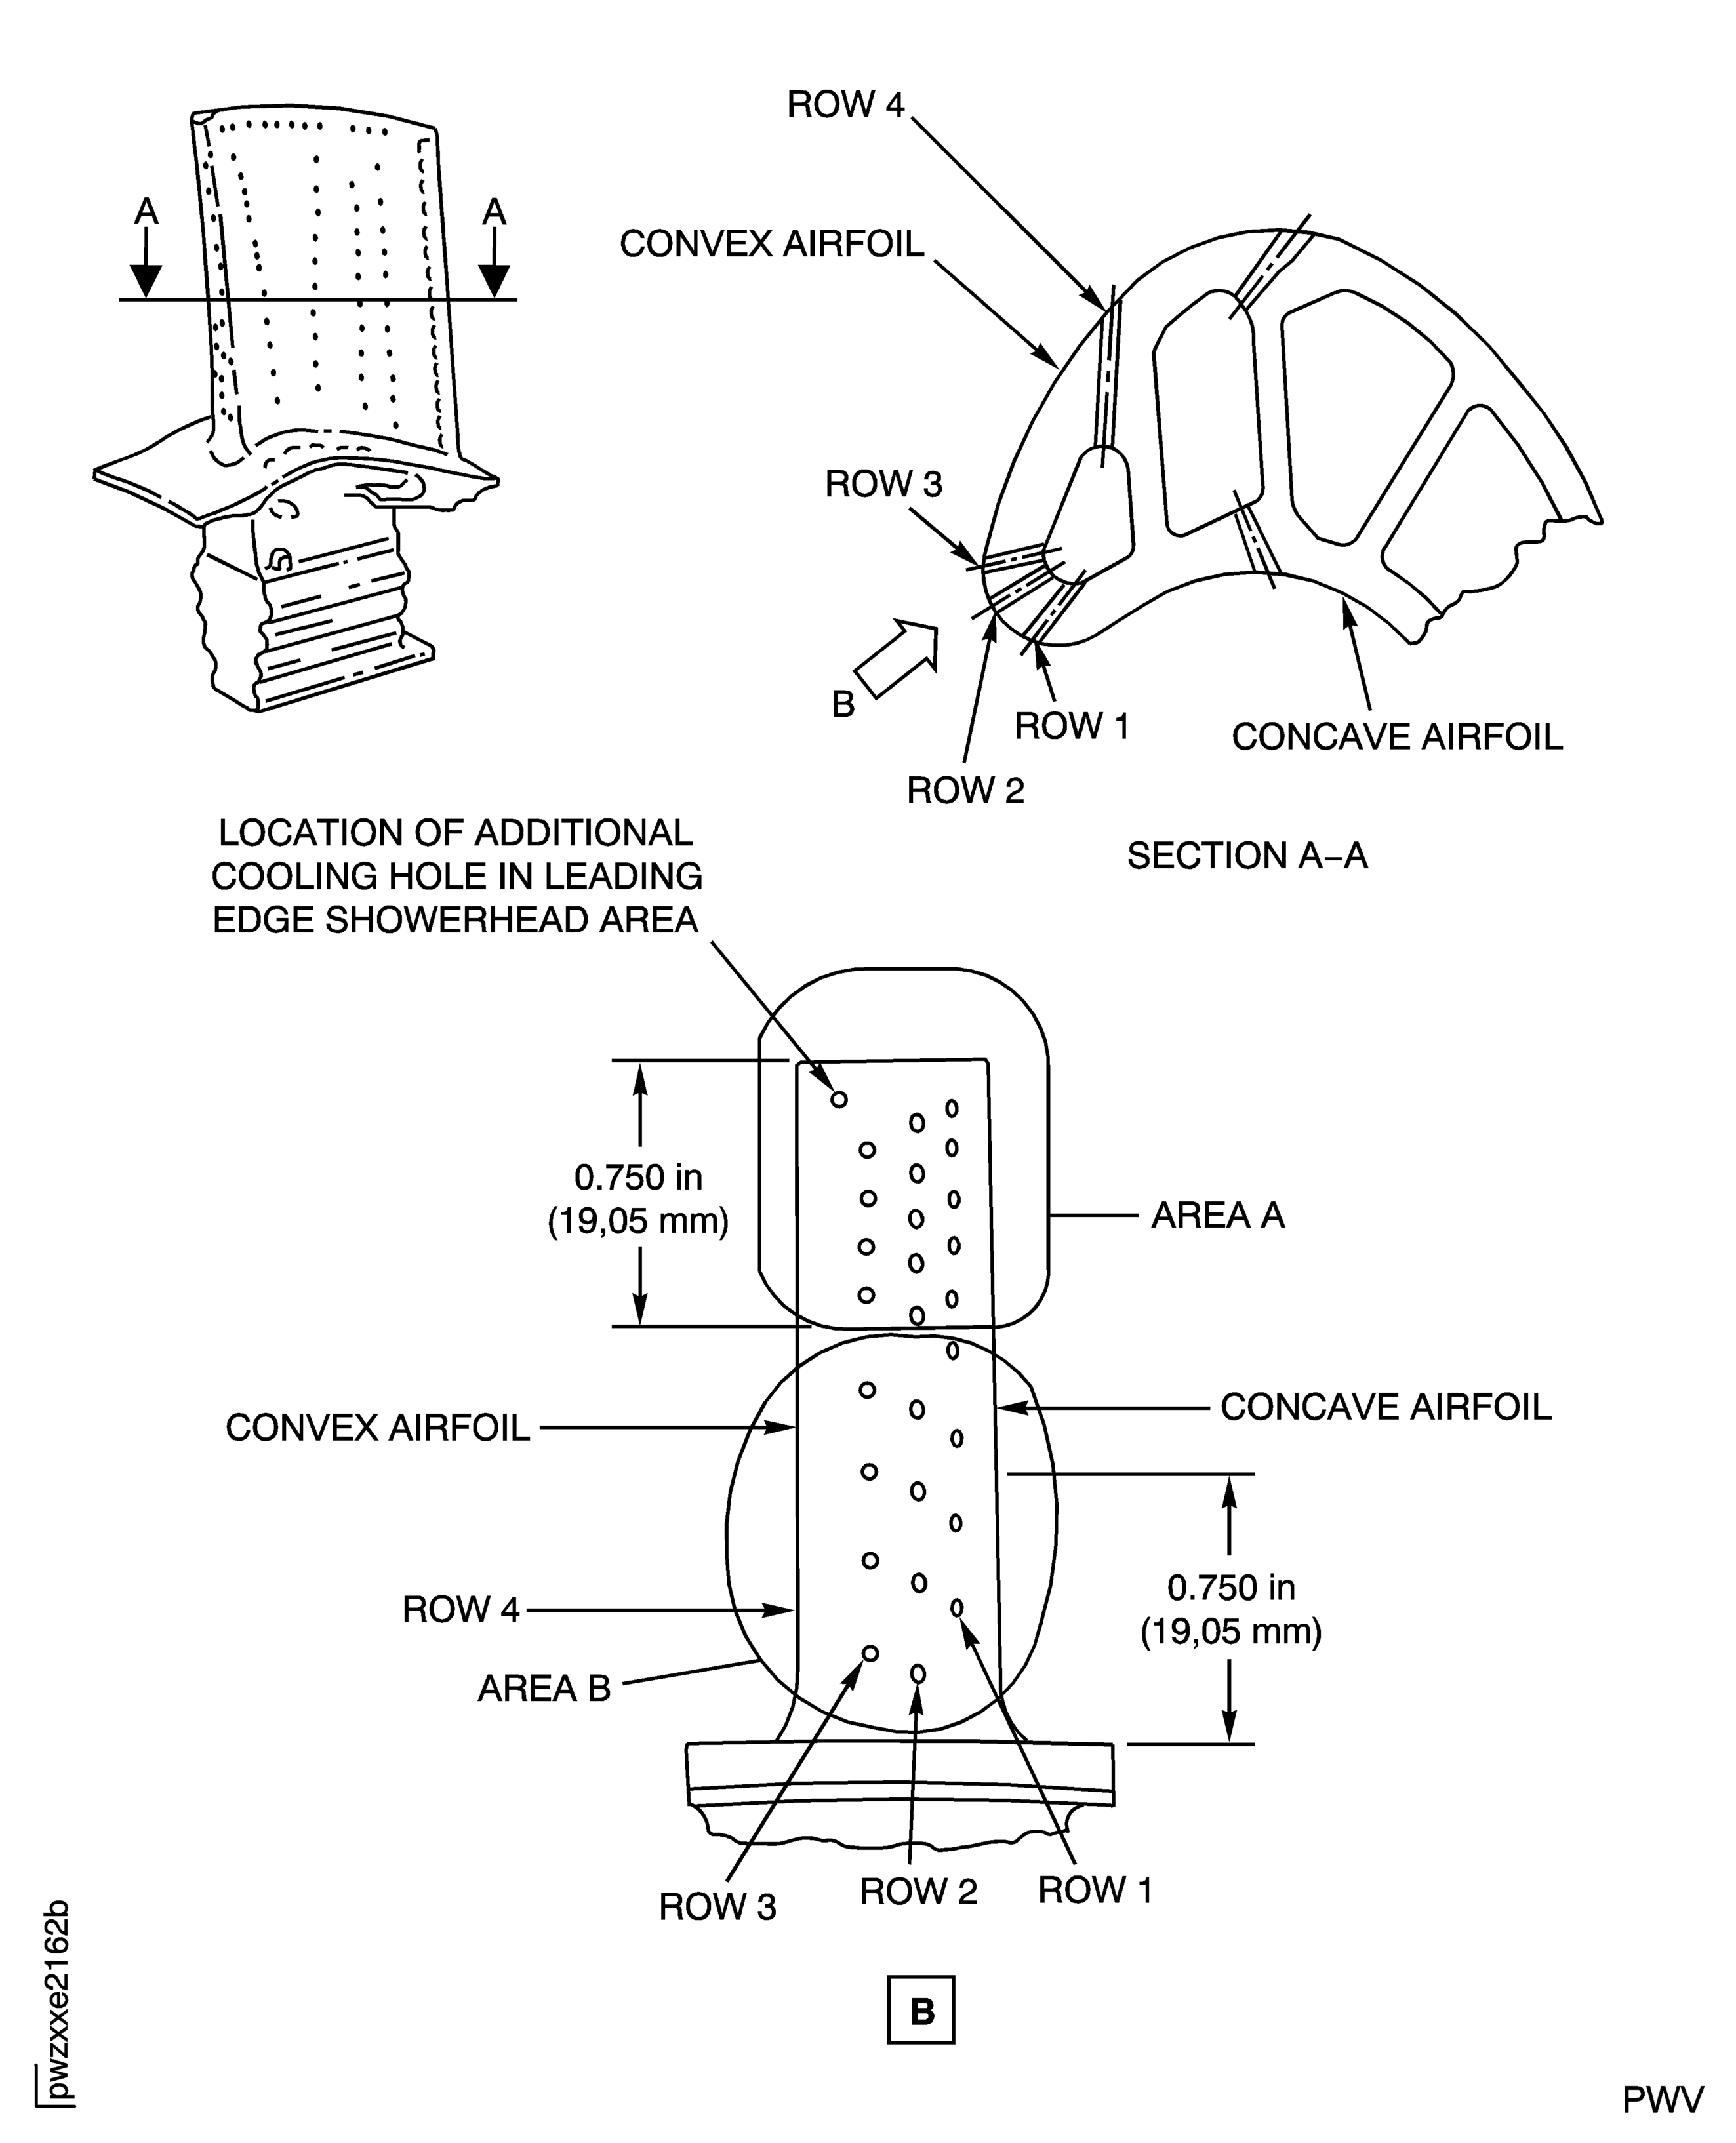
Figure: Stage 1 HPT Blade Airfoil Inspection Locations
Stage 1 HPT Blade Airfoil Inspection Locations
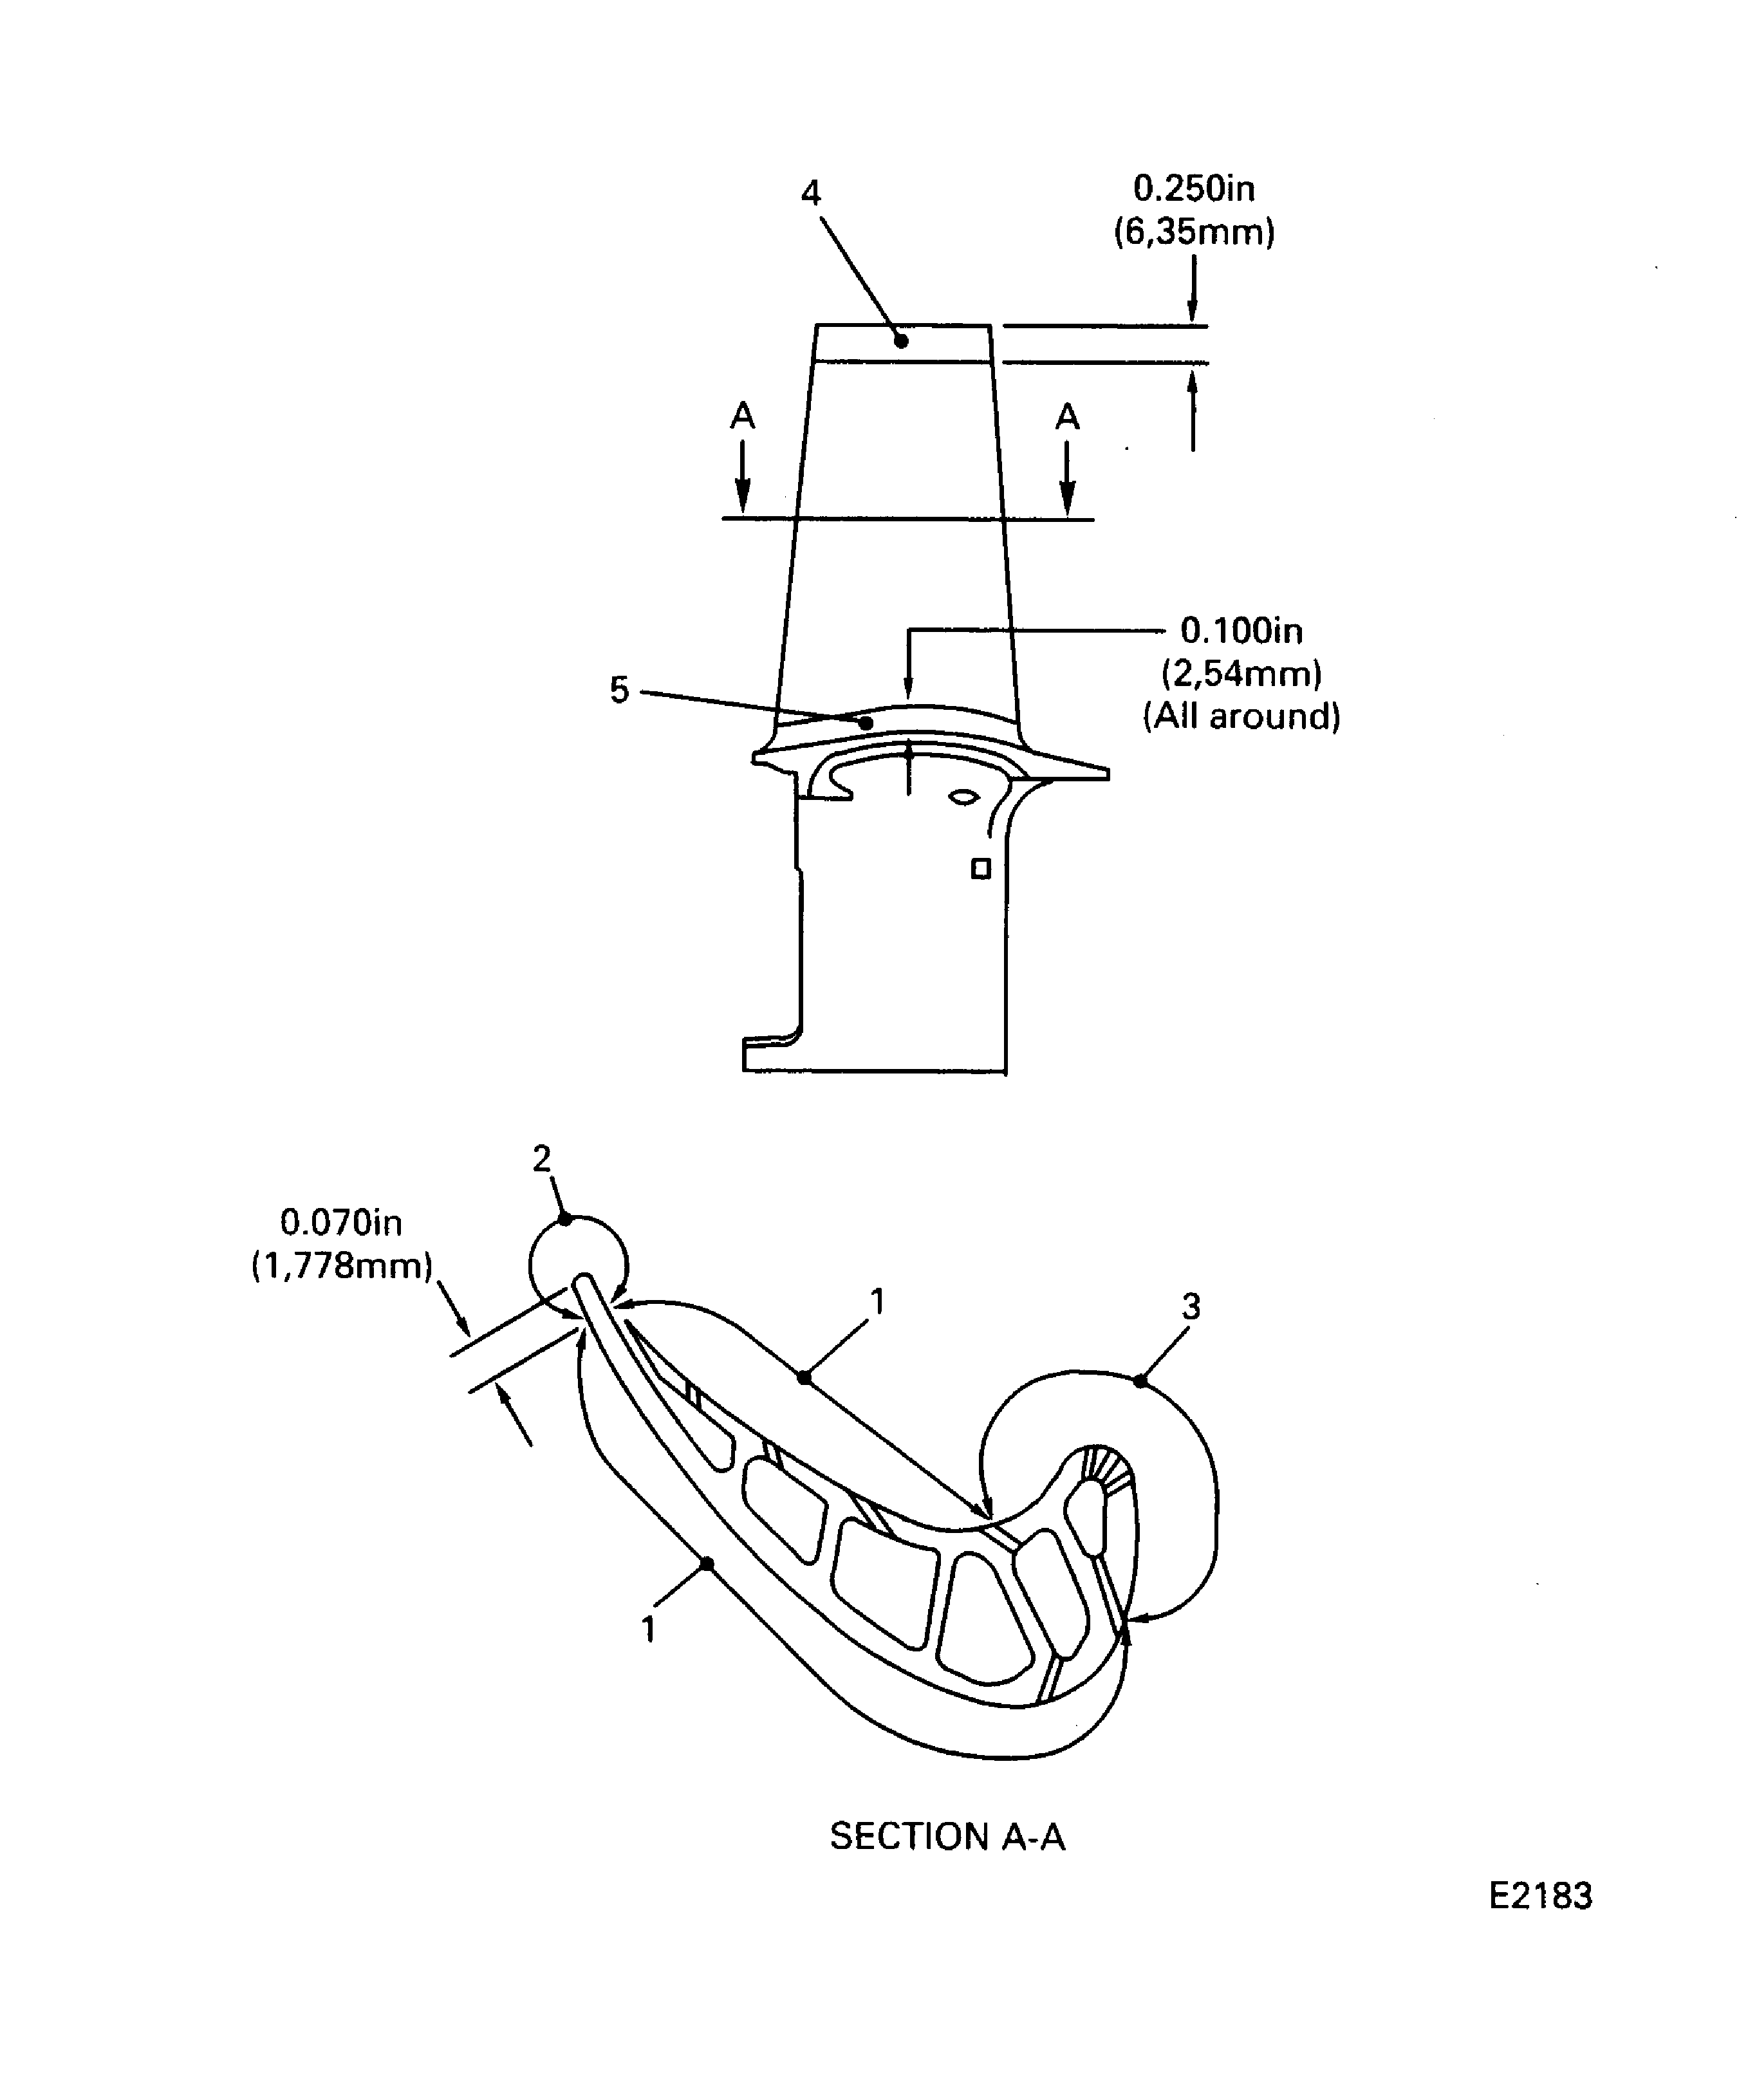
Figure: Stage 1 HPT Blade Abrasive Tip Inspection Locations
Stage 1 HPT Blade Abrasive Tip Inspection Locations
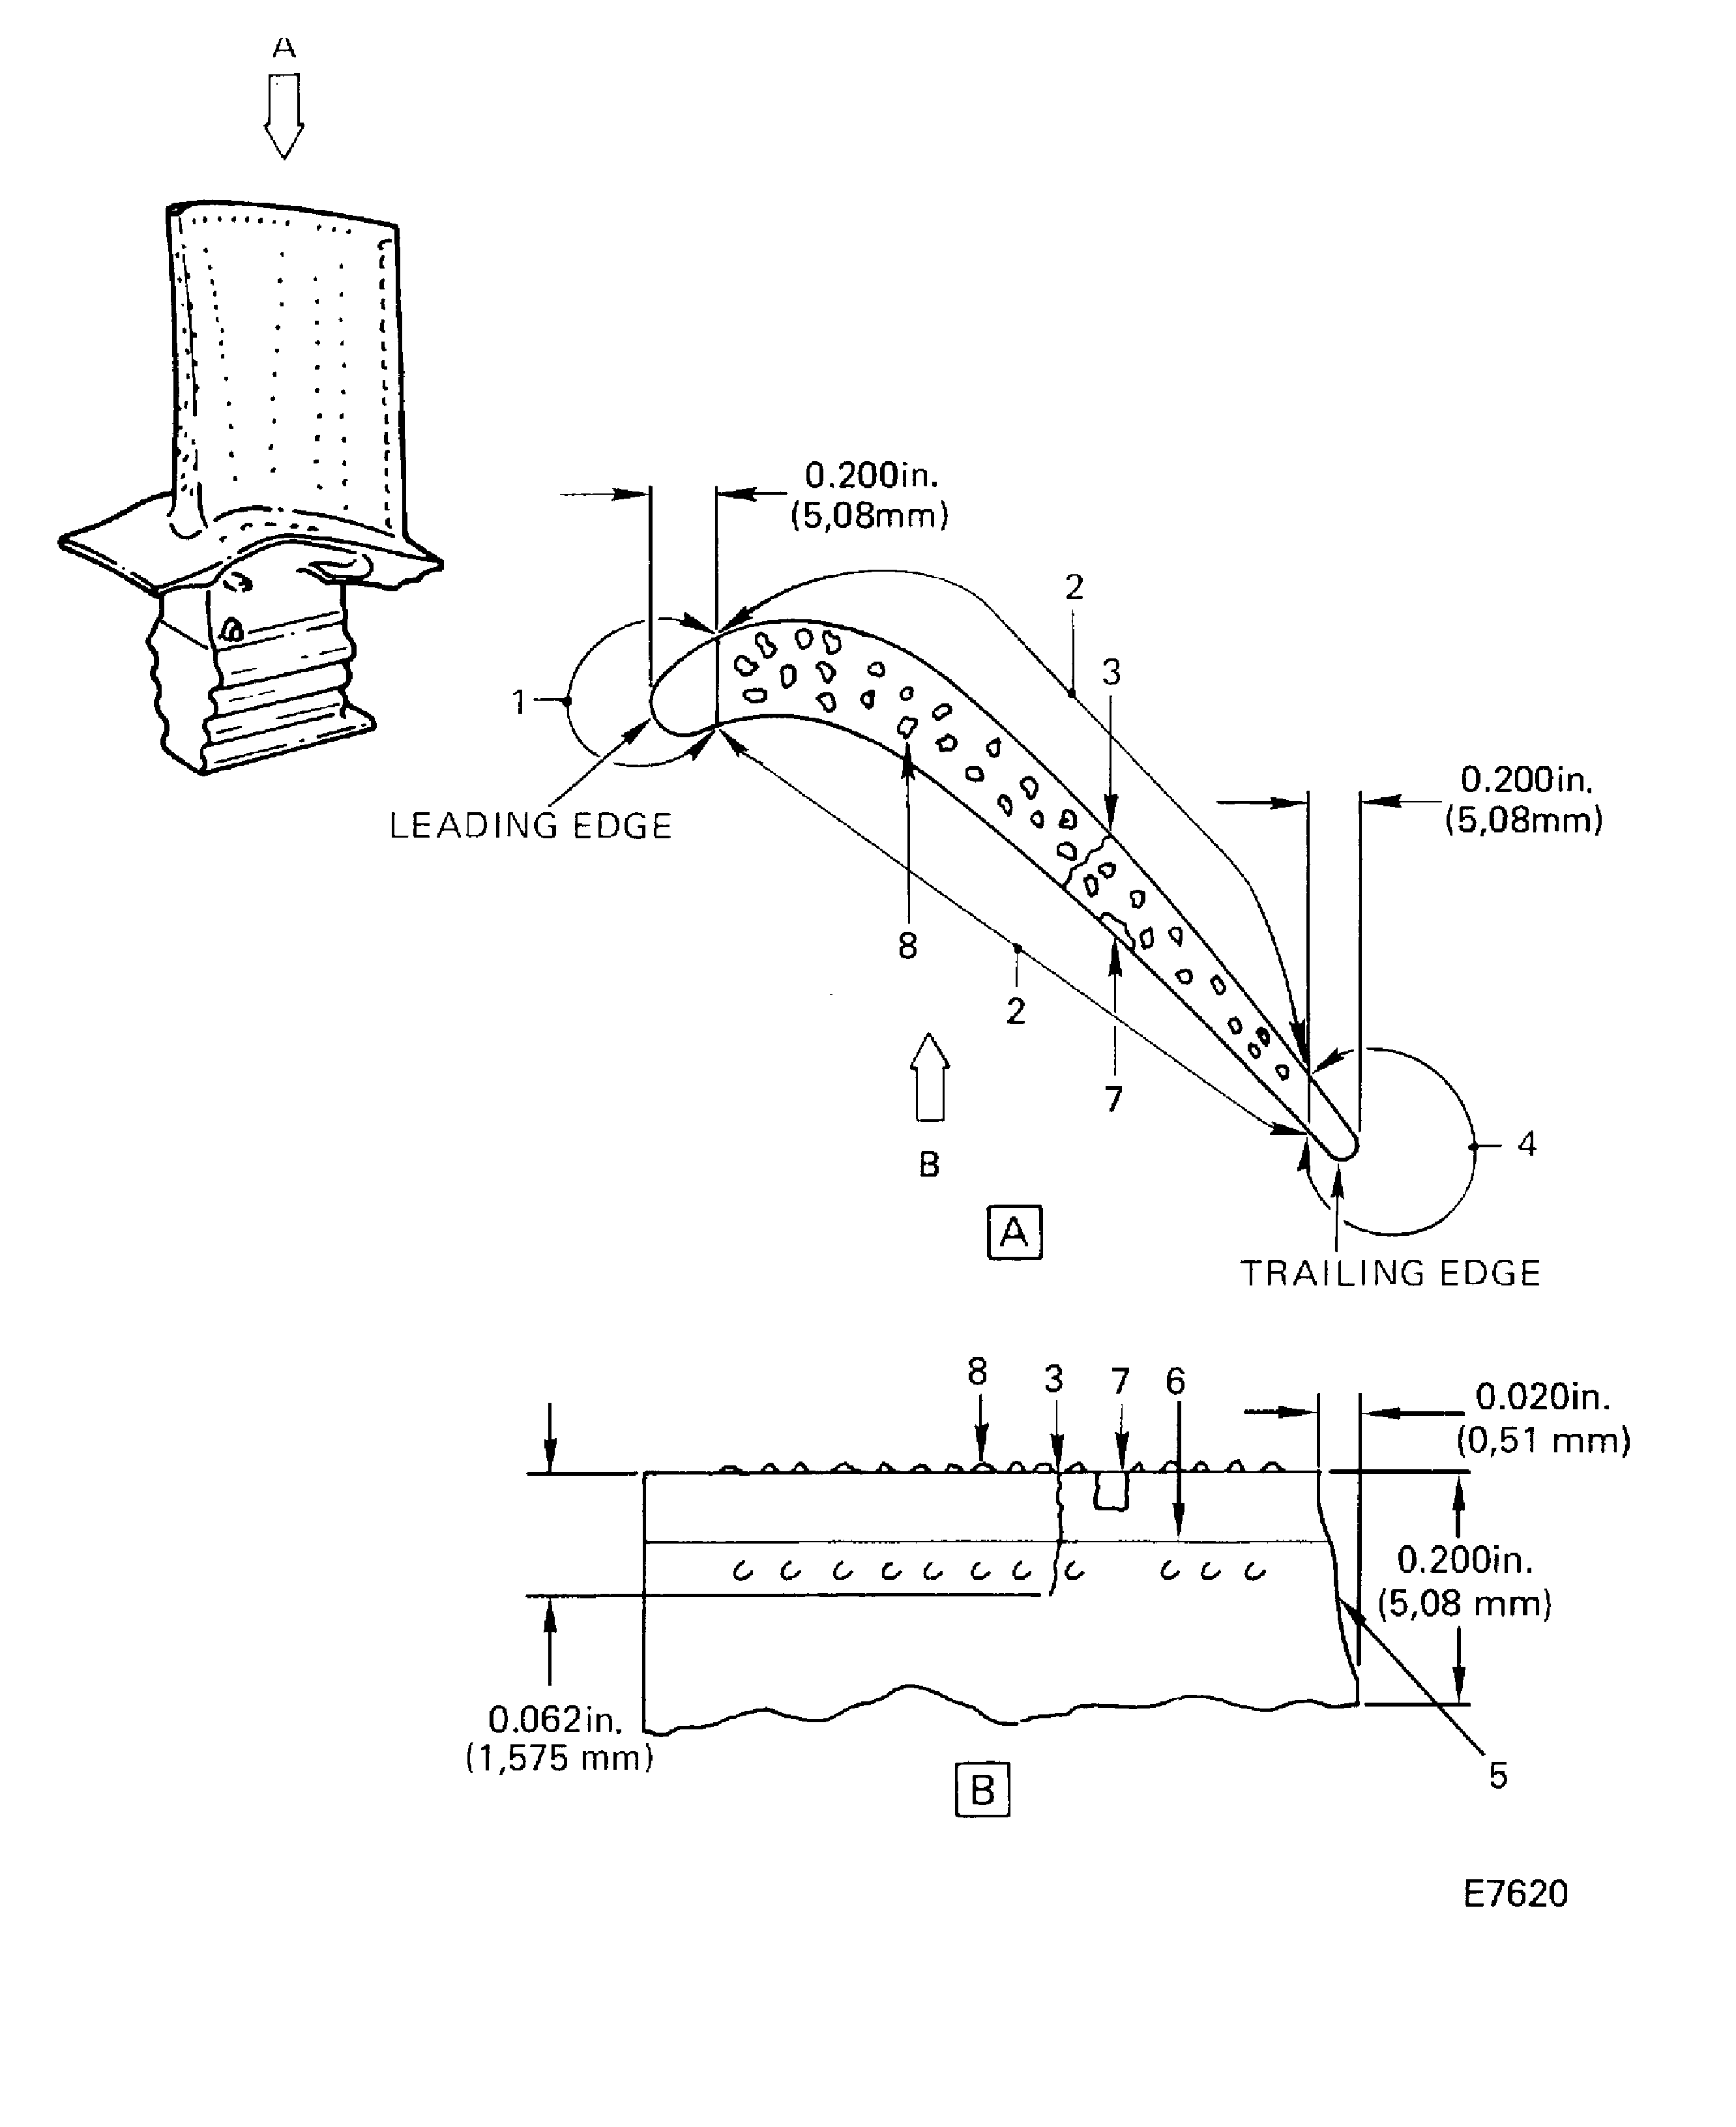
Figure: Stage 1 HPT Blade Trailing Edge Inspection Locations
Stage 1 HPT Blade Trailing Edge Inspection Locations
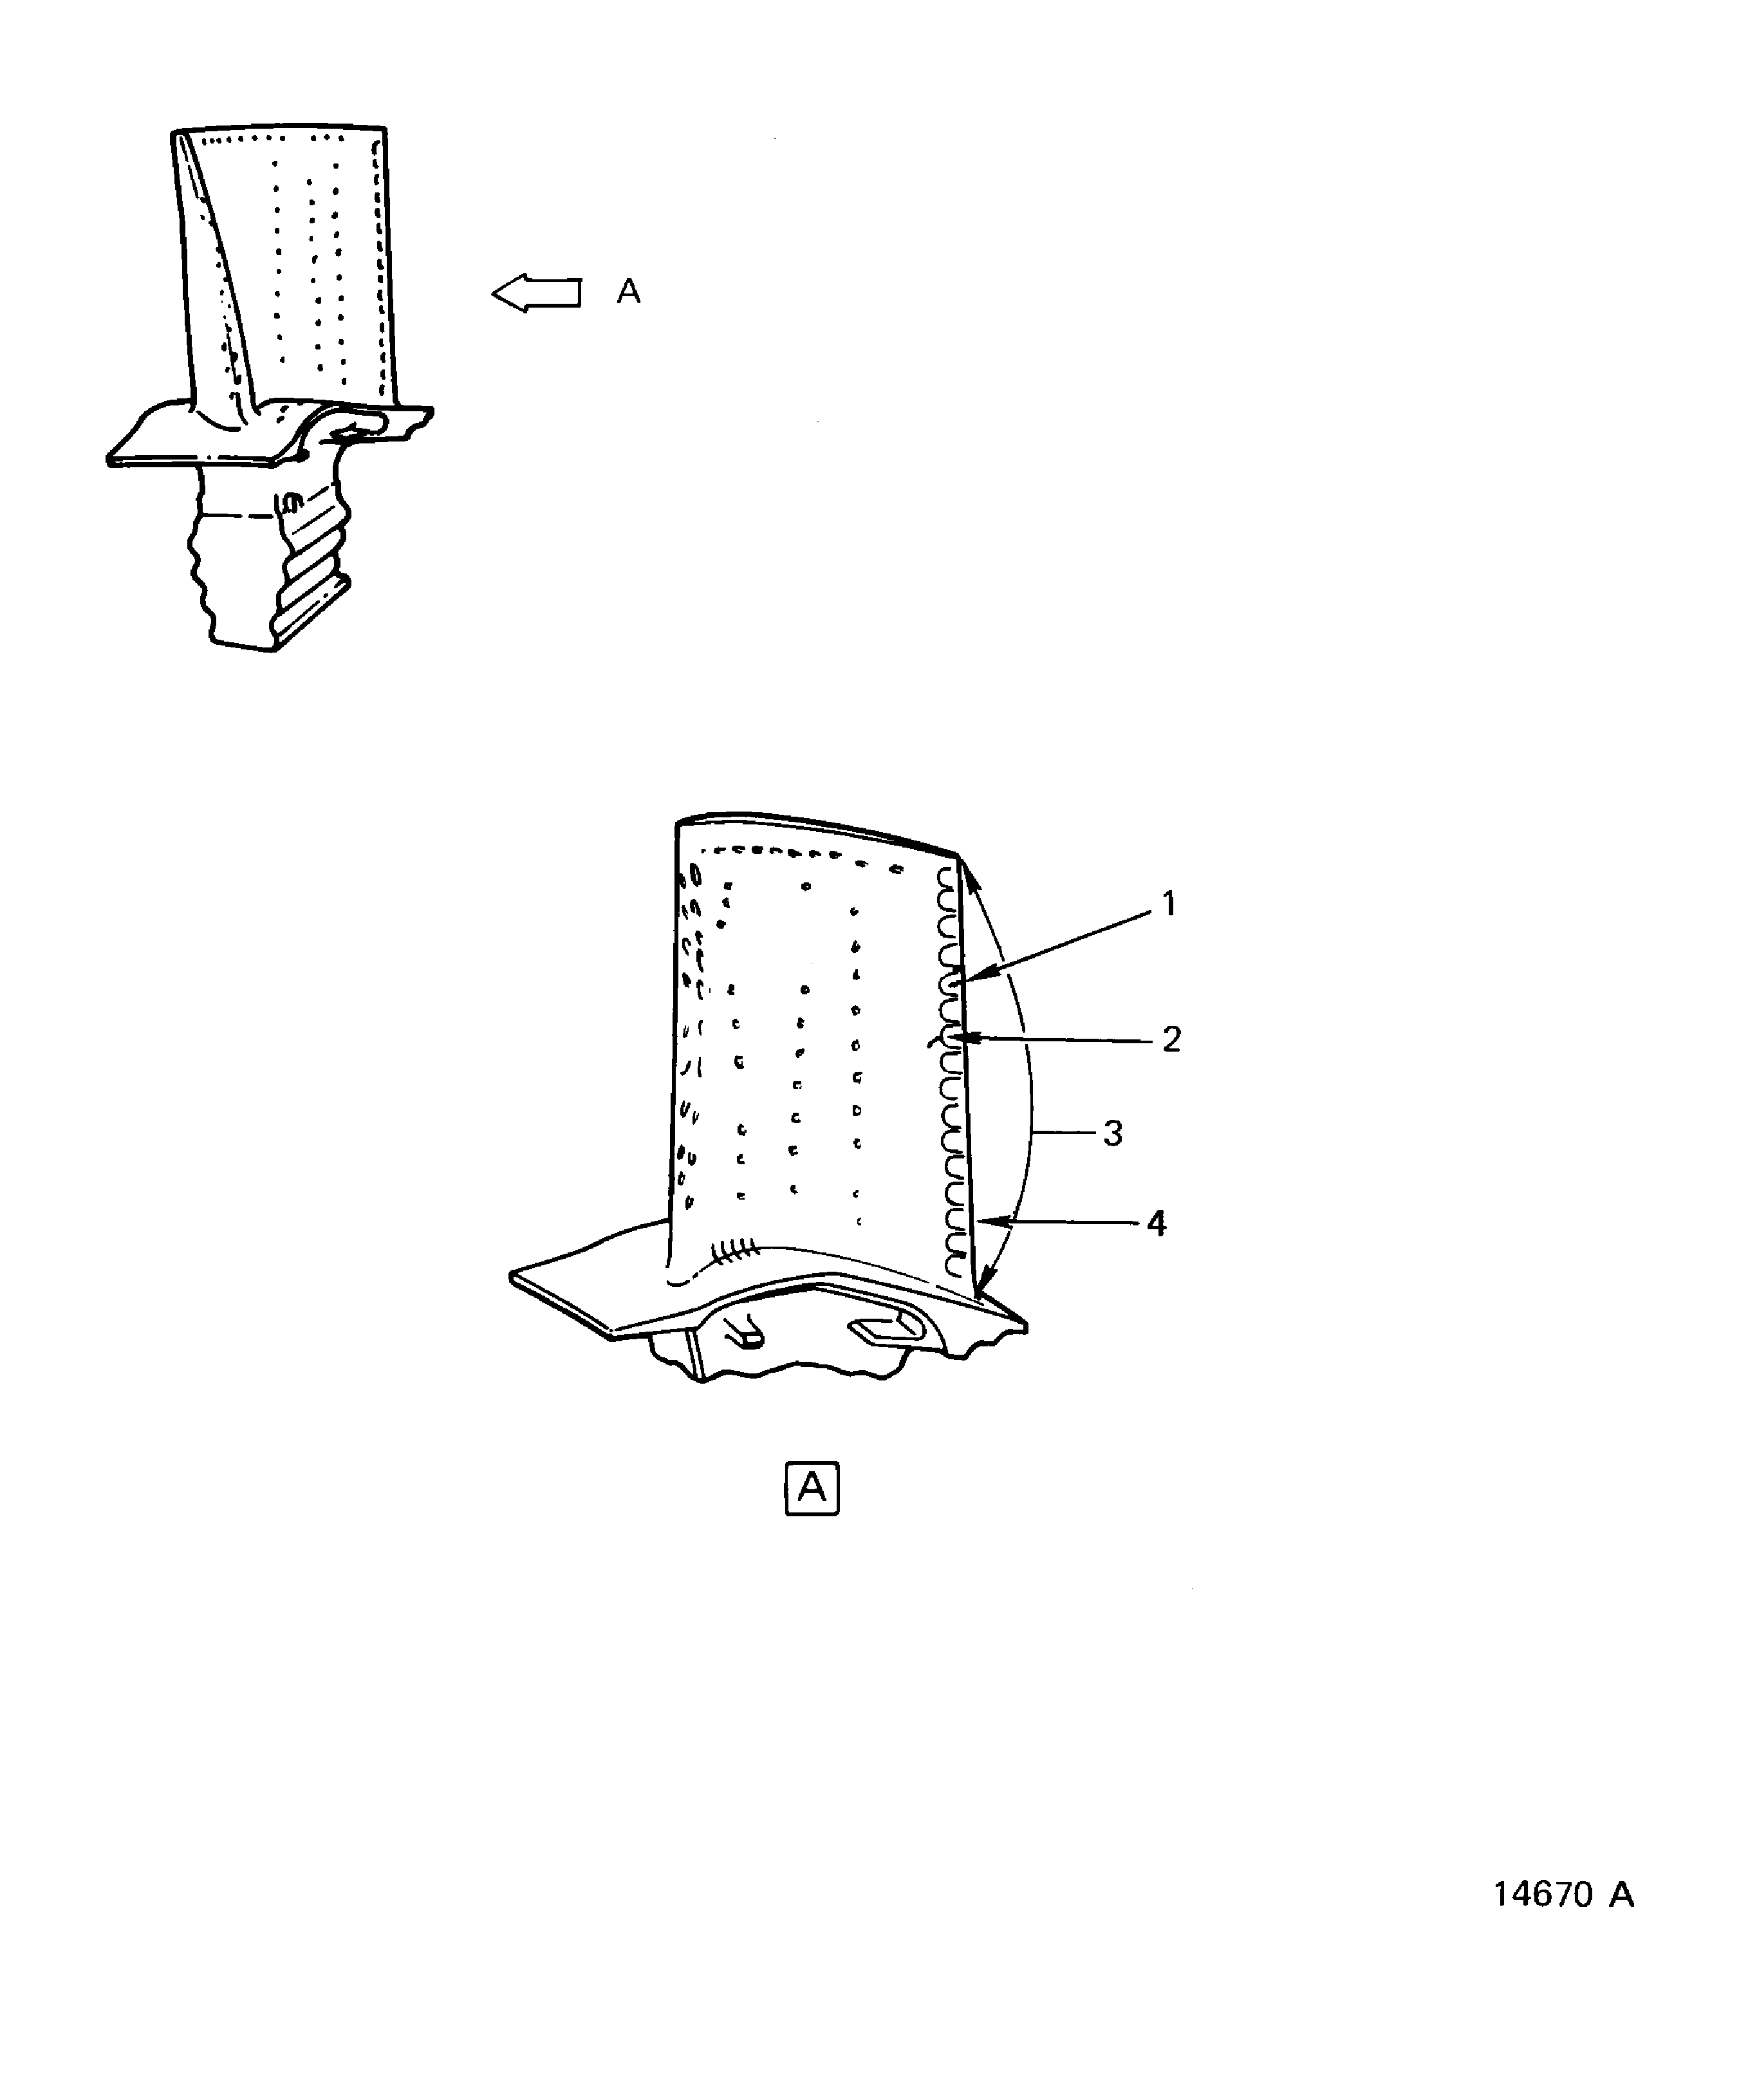
Figure: Stage 1 HPT Blade Platform Surfaces Inspection Locations
Stage 1 HPT Blade Platform Surfaces Inspection Locations
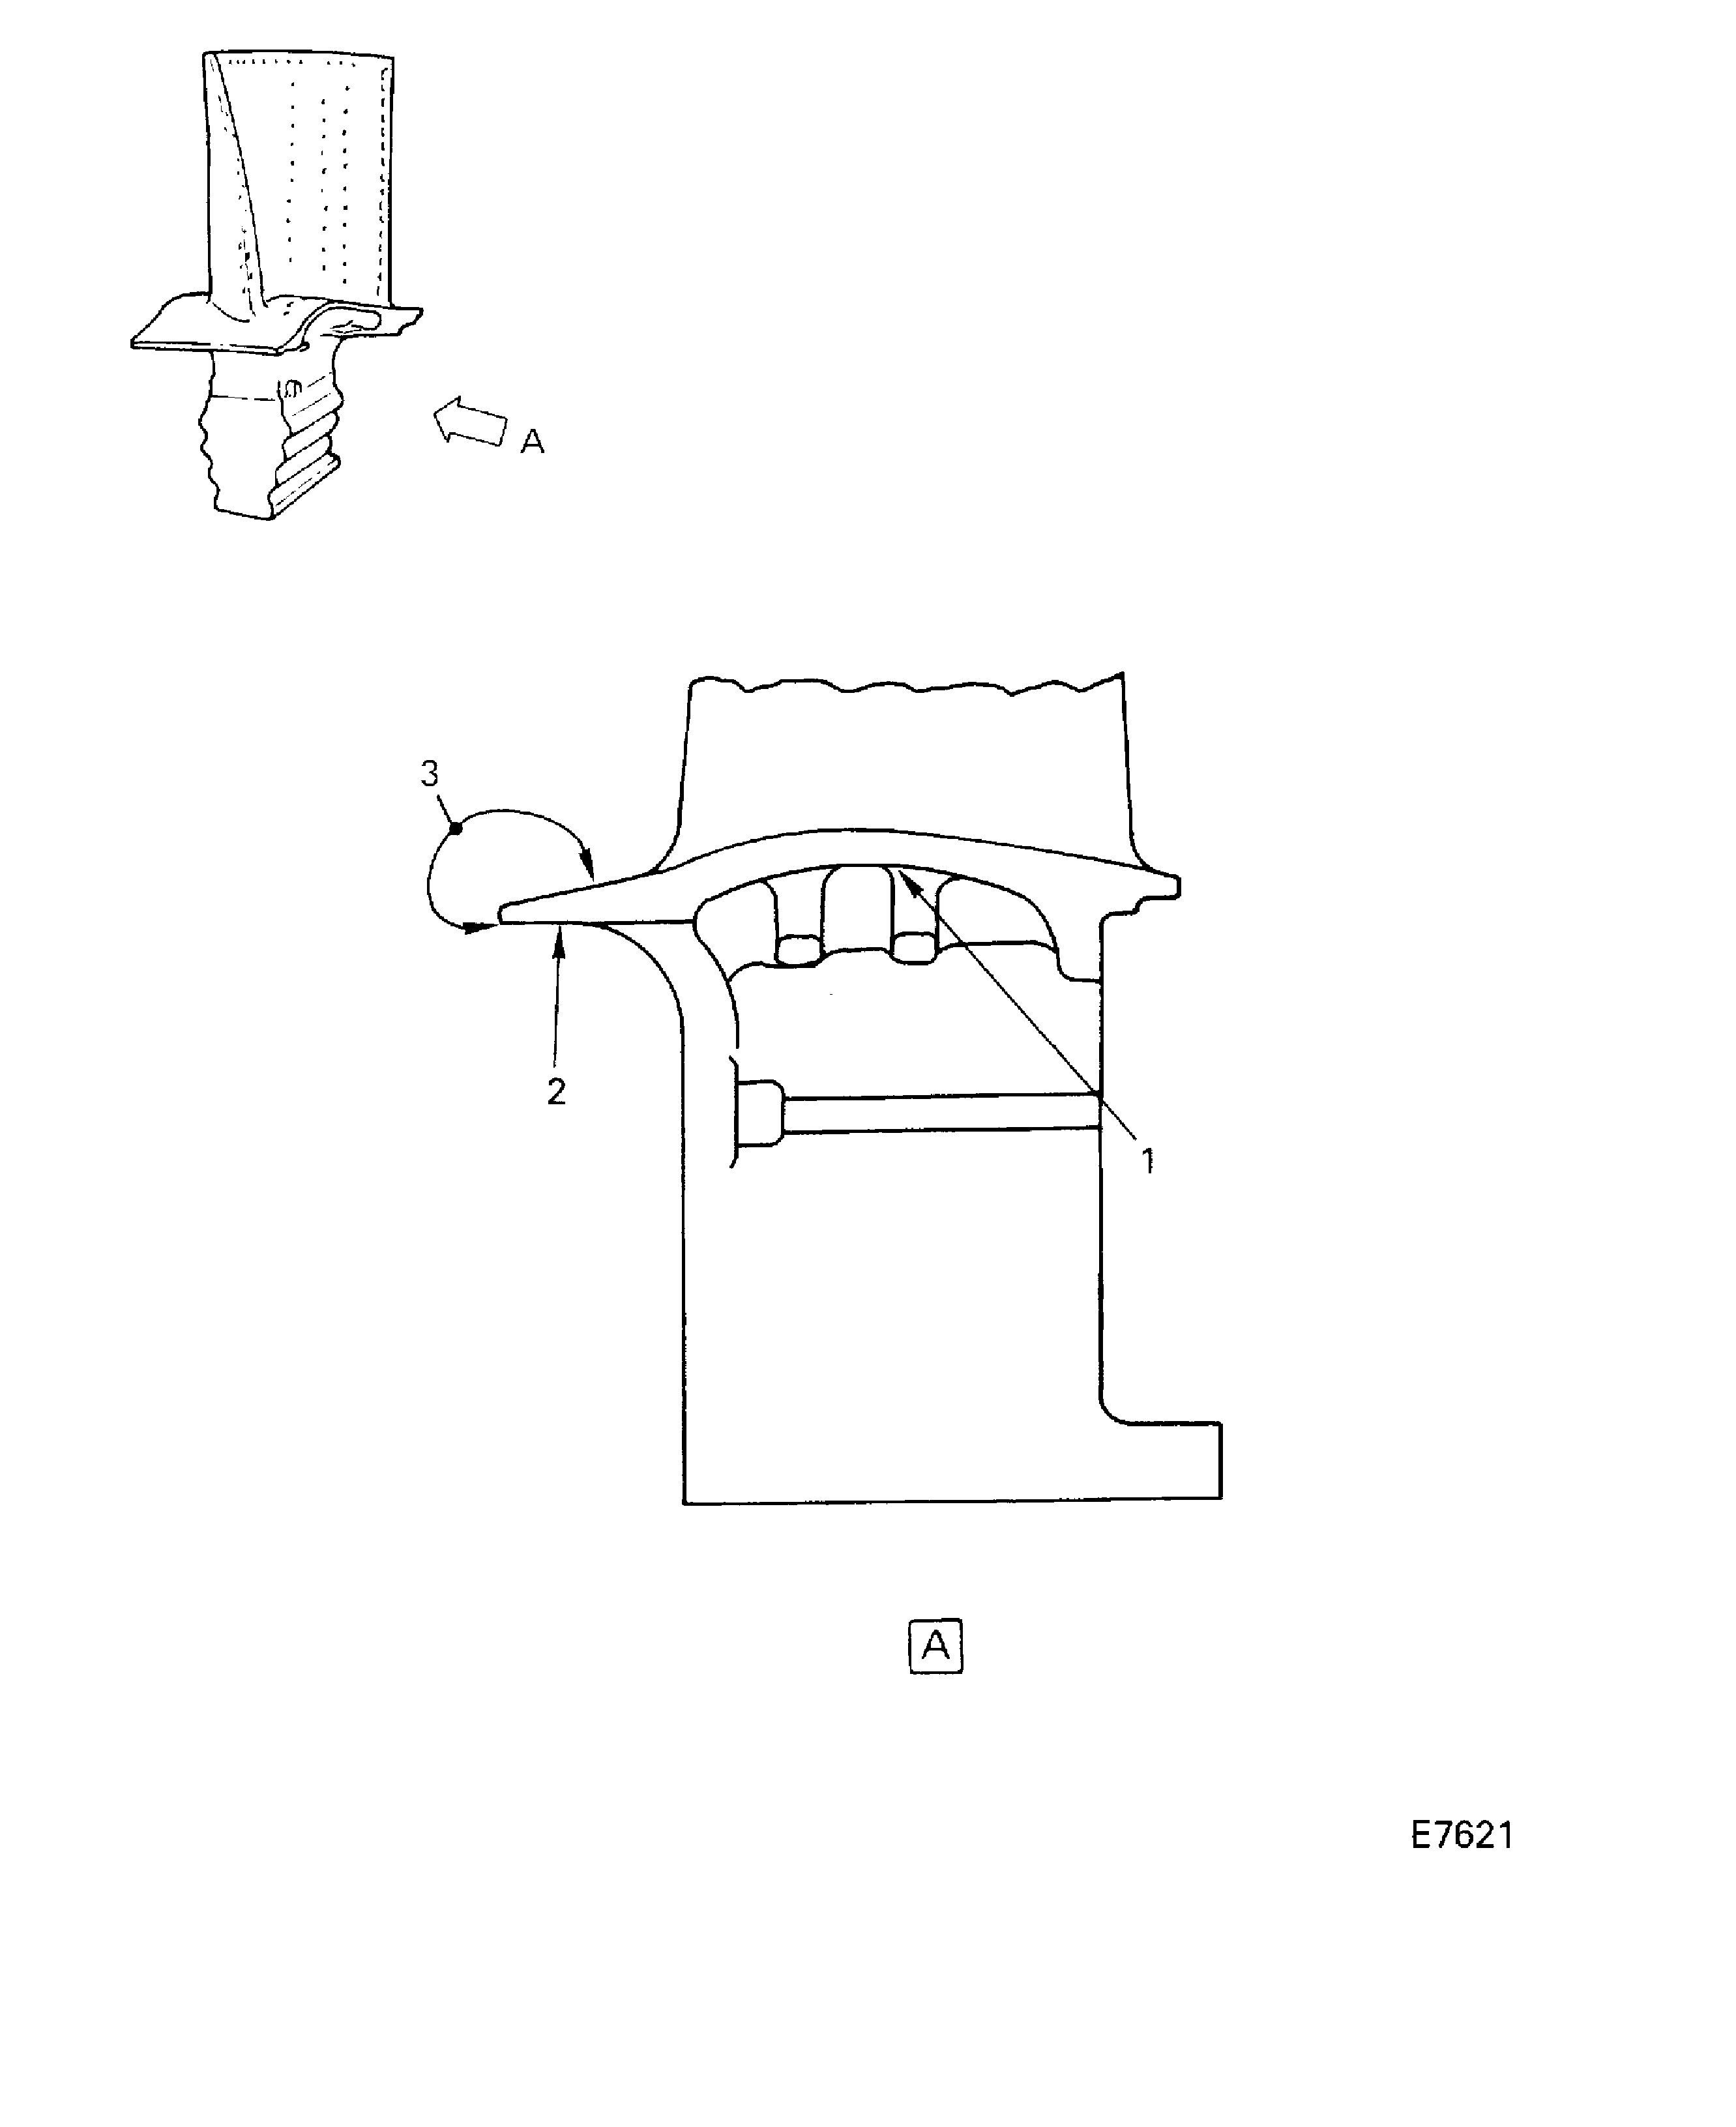
Figure: Stage 1 HPT Blade Root and Attachment Area Inspection Locations
Sheet 1
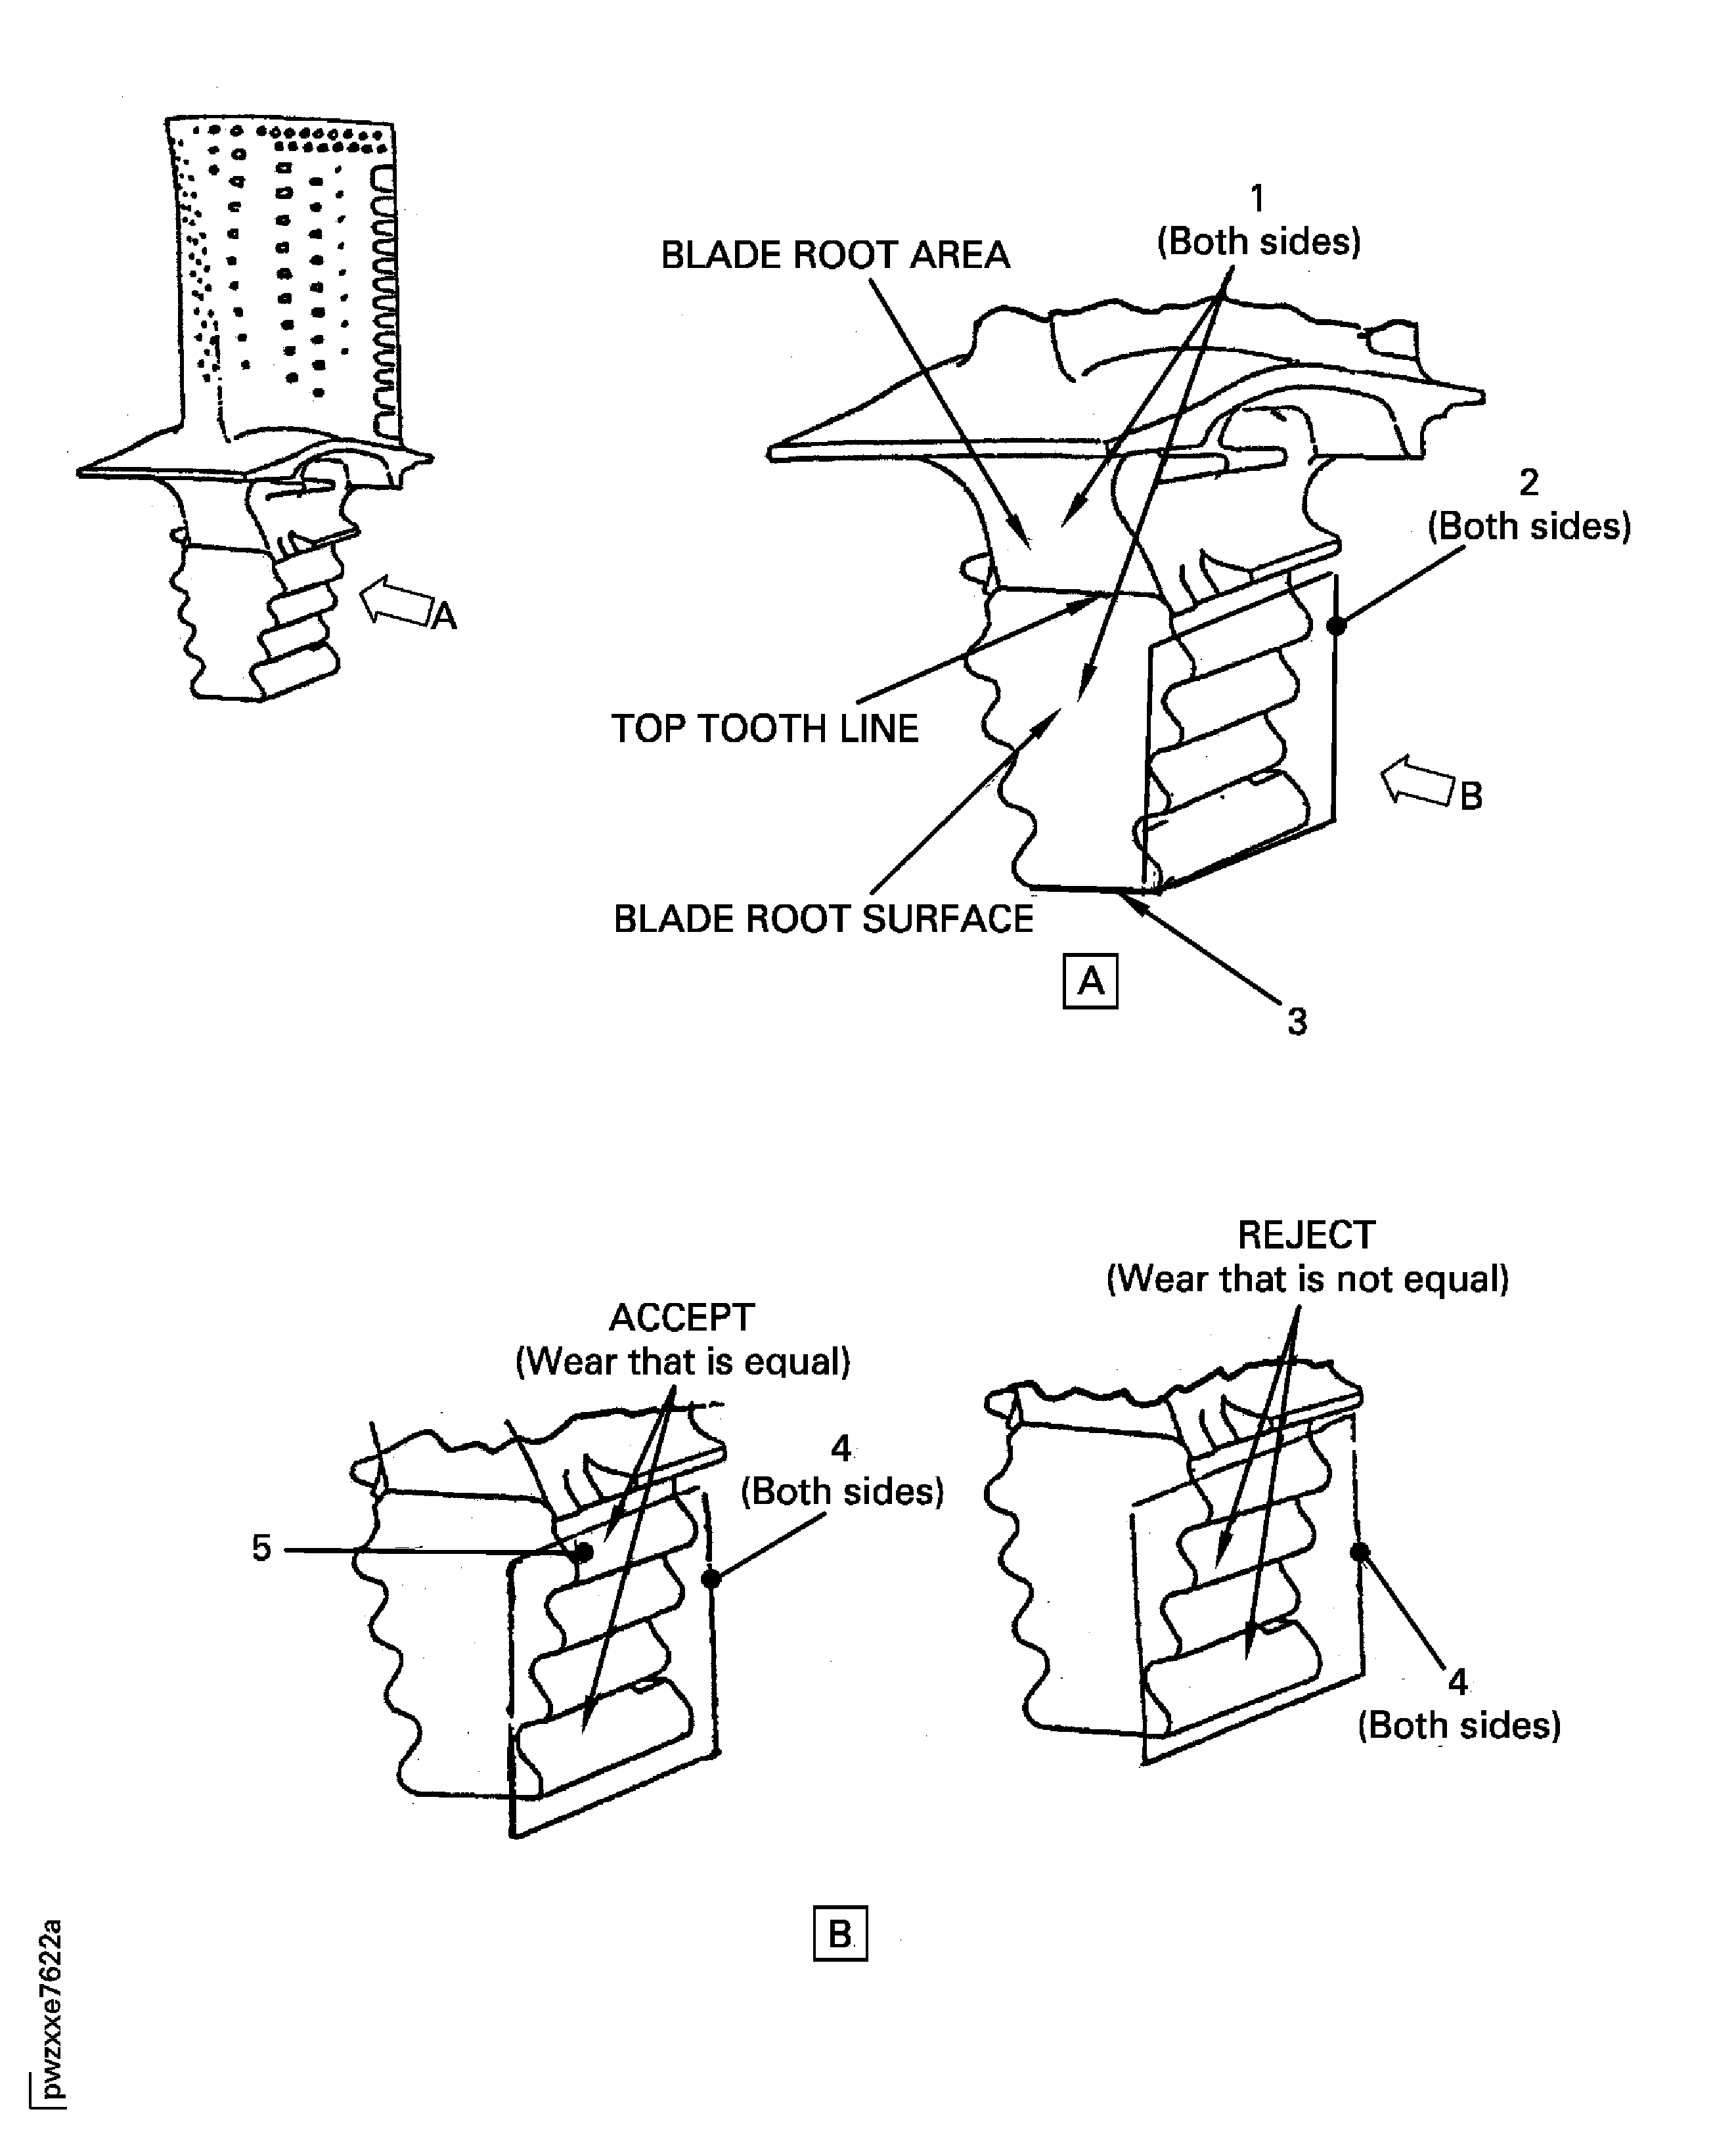
Figure: Stage 1 HPT Blade Root and Attachment Area Inspection Locations
Sheet 2
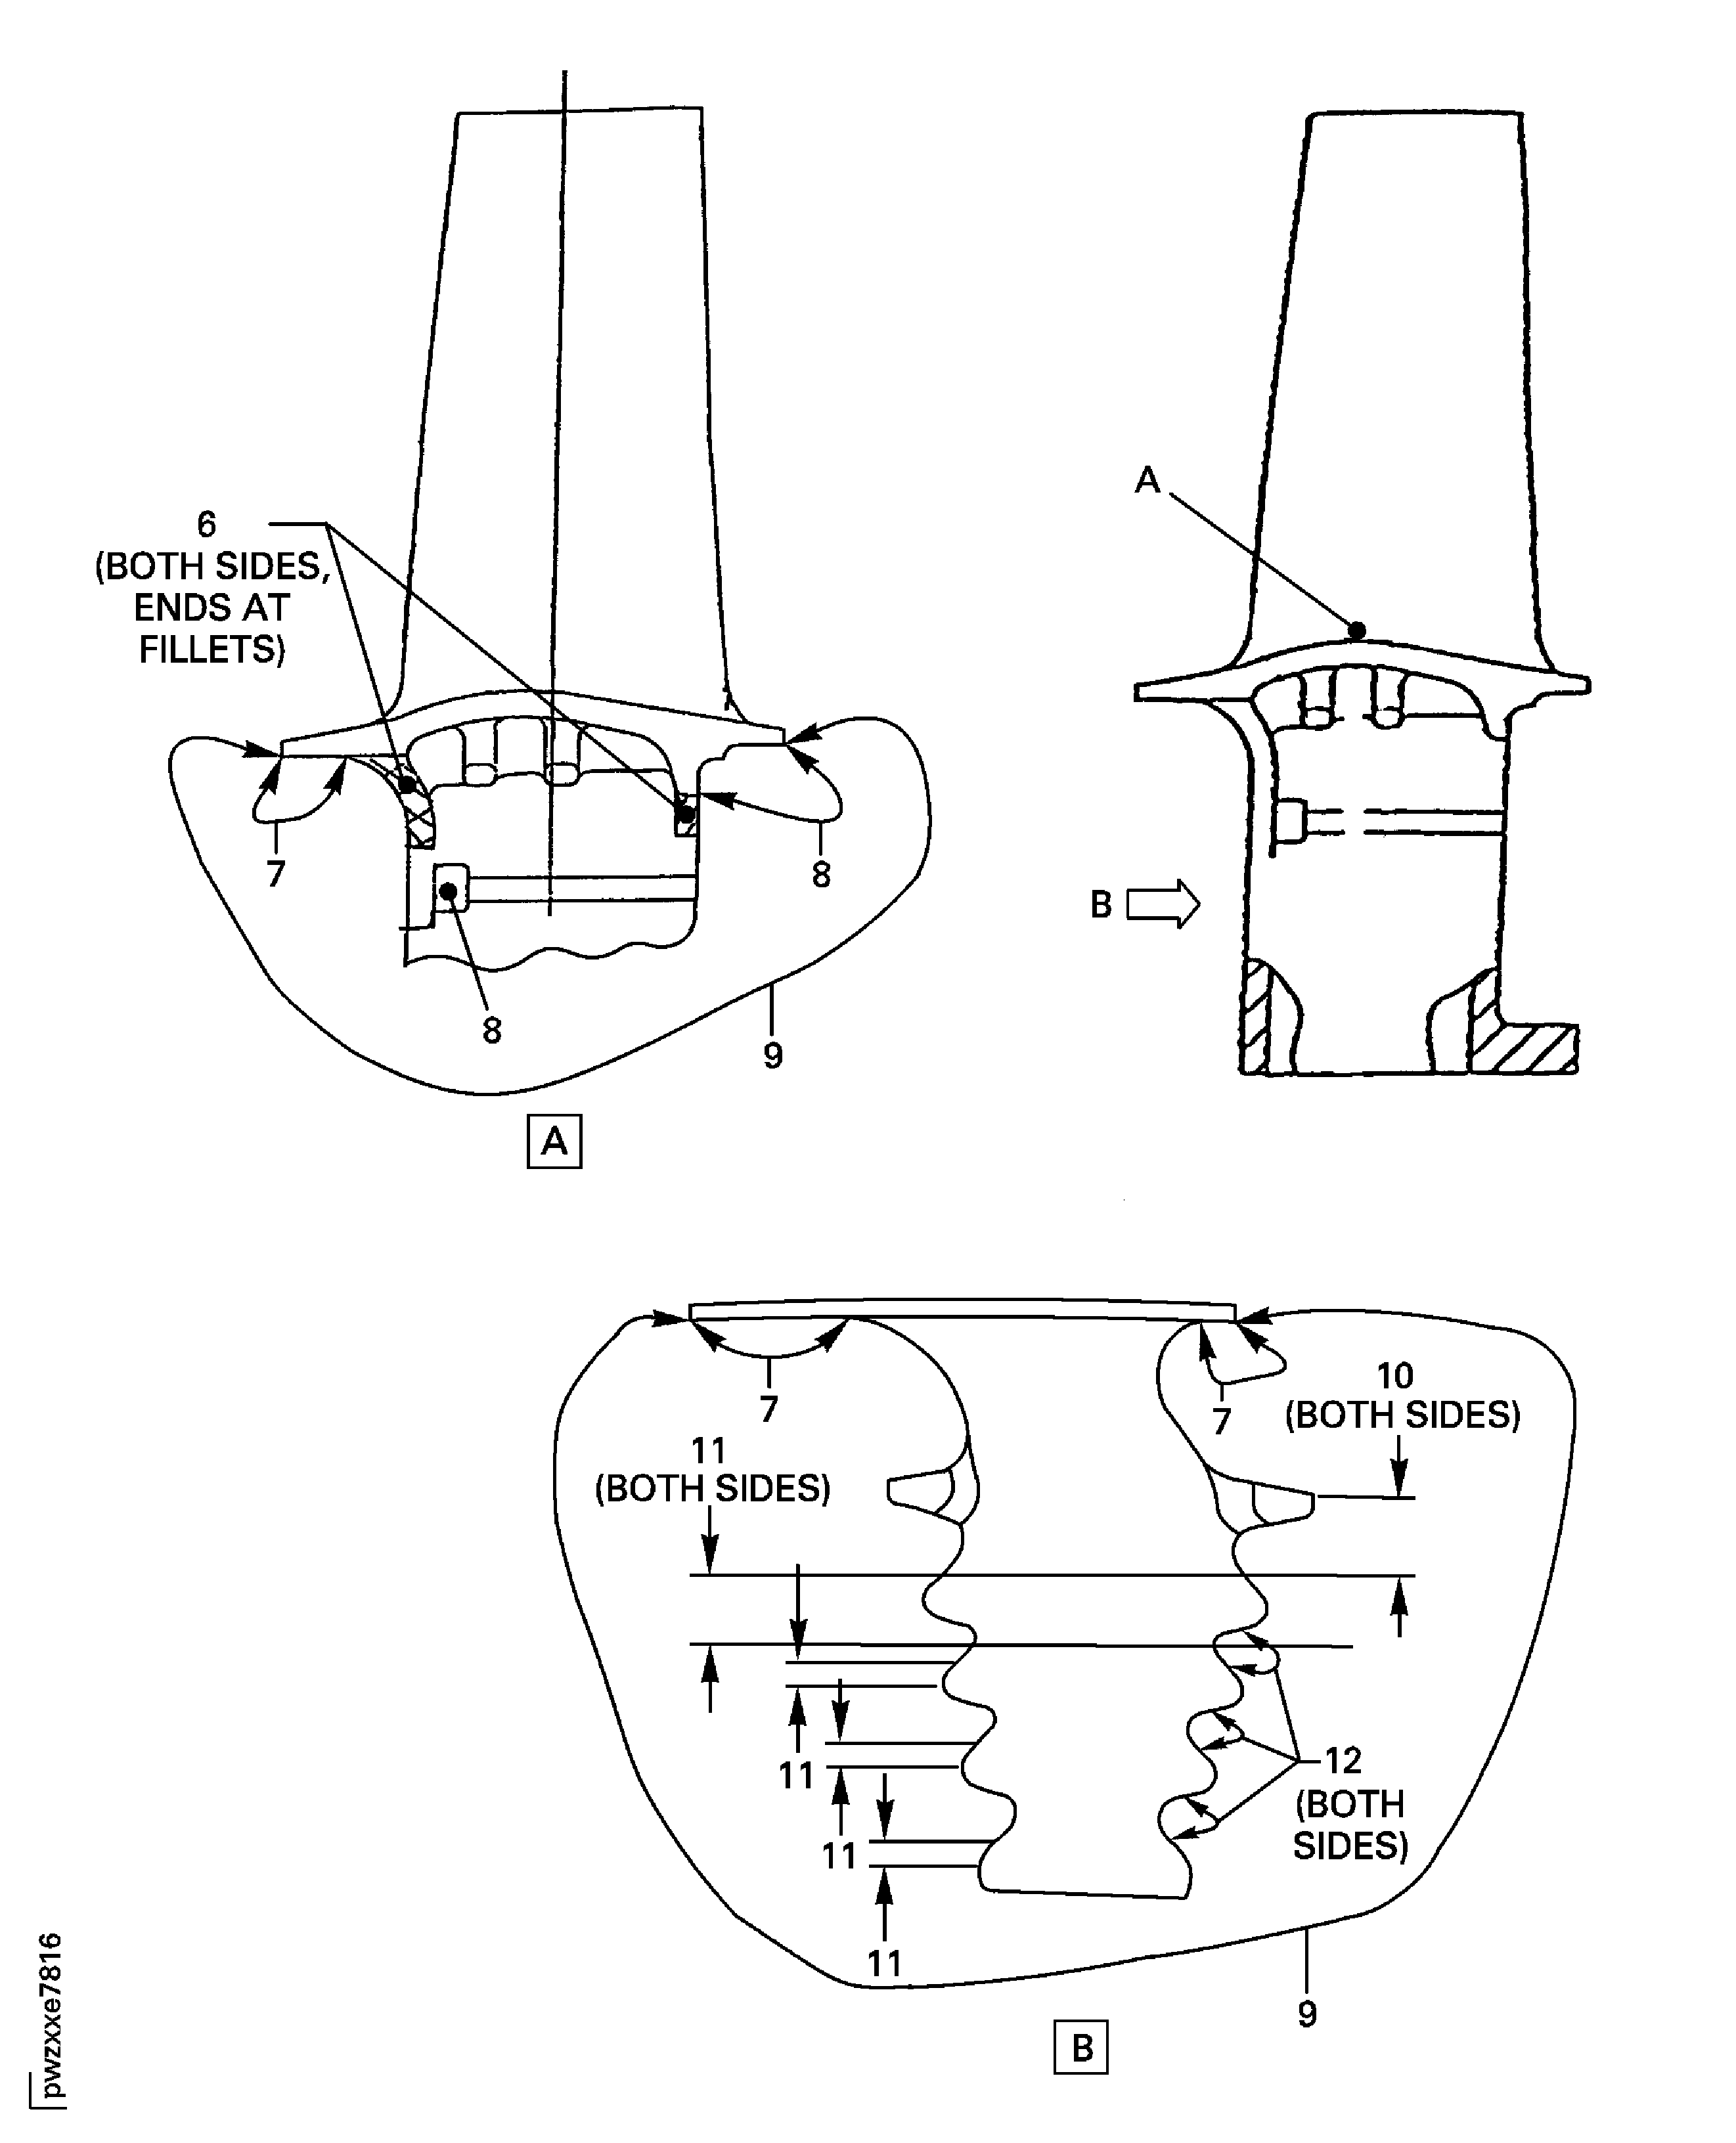
Figure: Stage 1 HPT Blade Root and Attachment Area Inspection Locations
Sheet 3
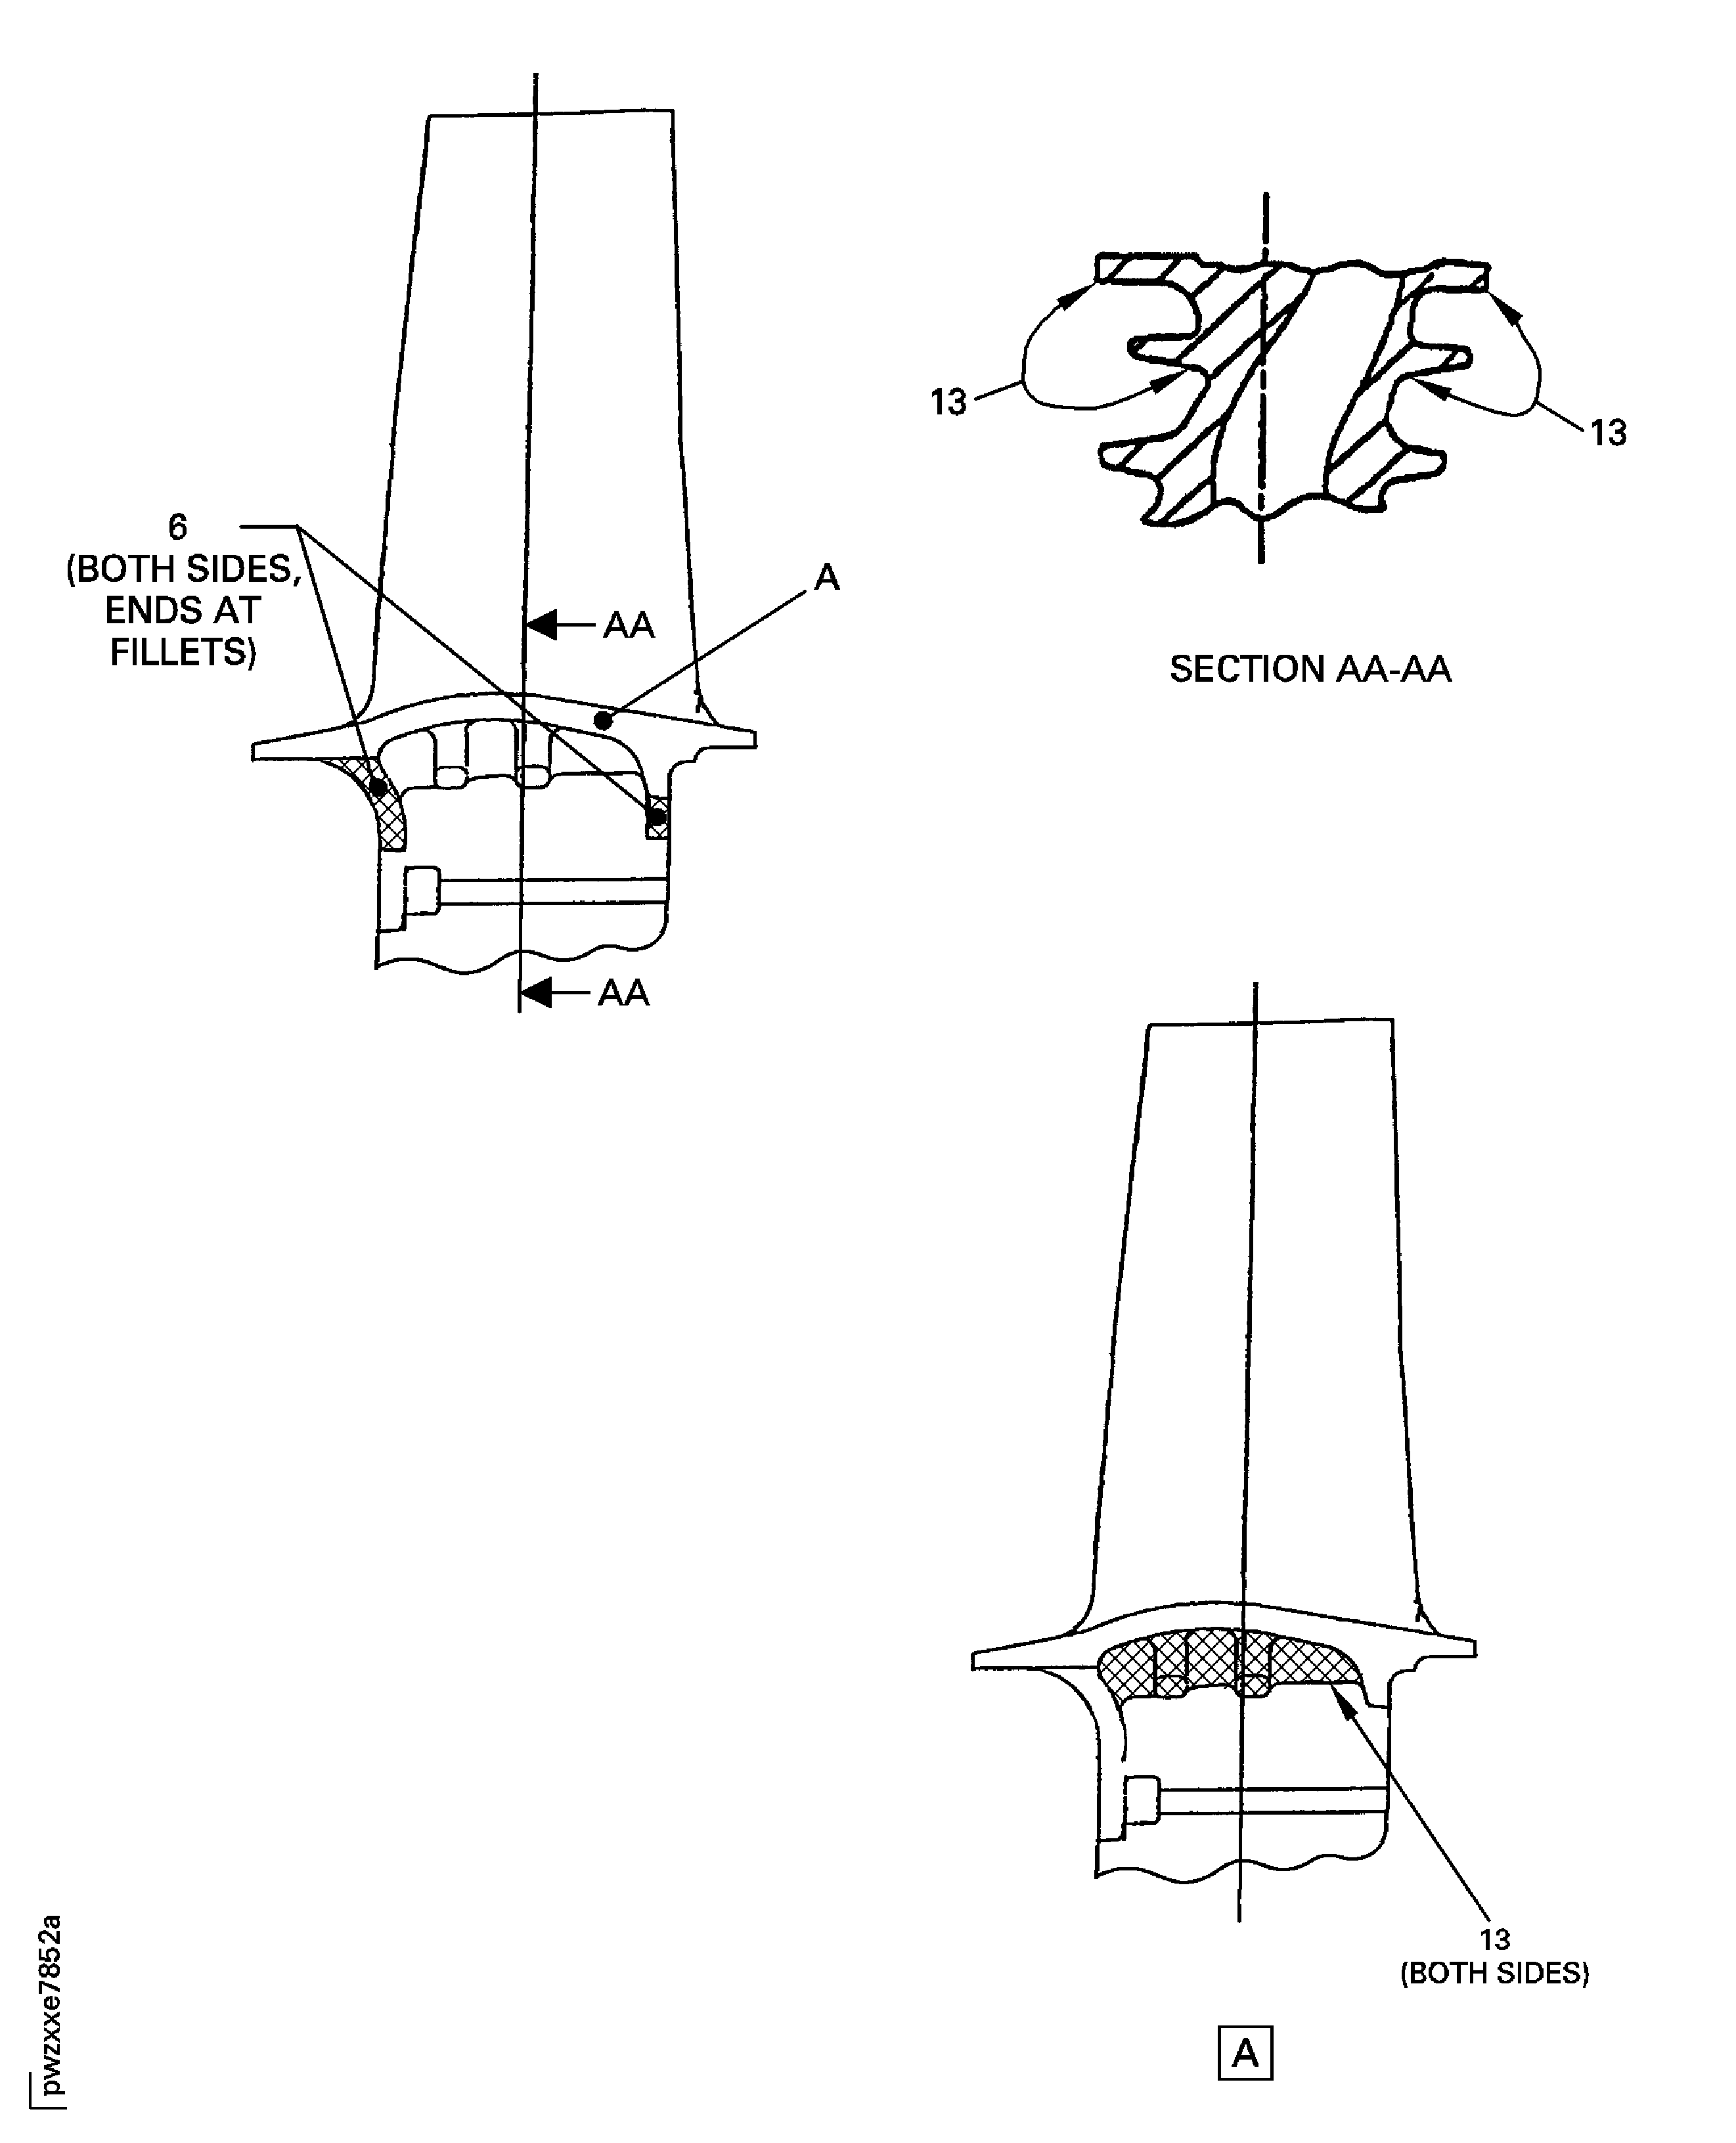
Figure: Stage 1 HPT Blade Root Bottom Inspection Areas for Root Rip Cracks
Sheet 4
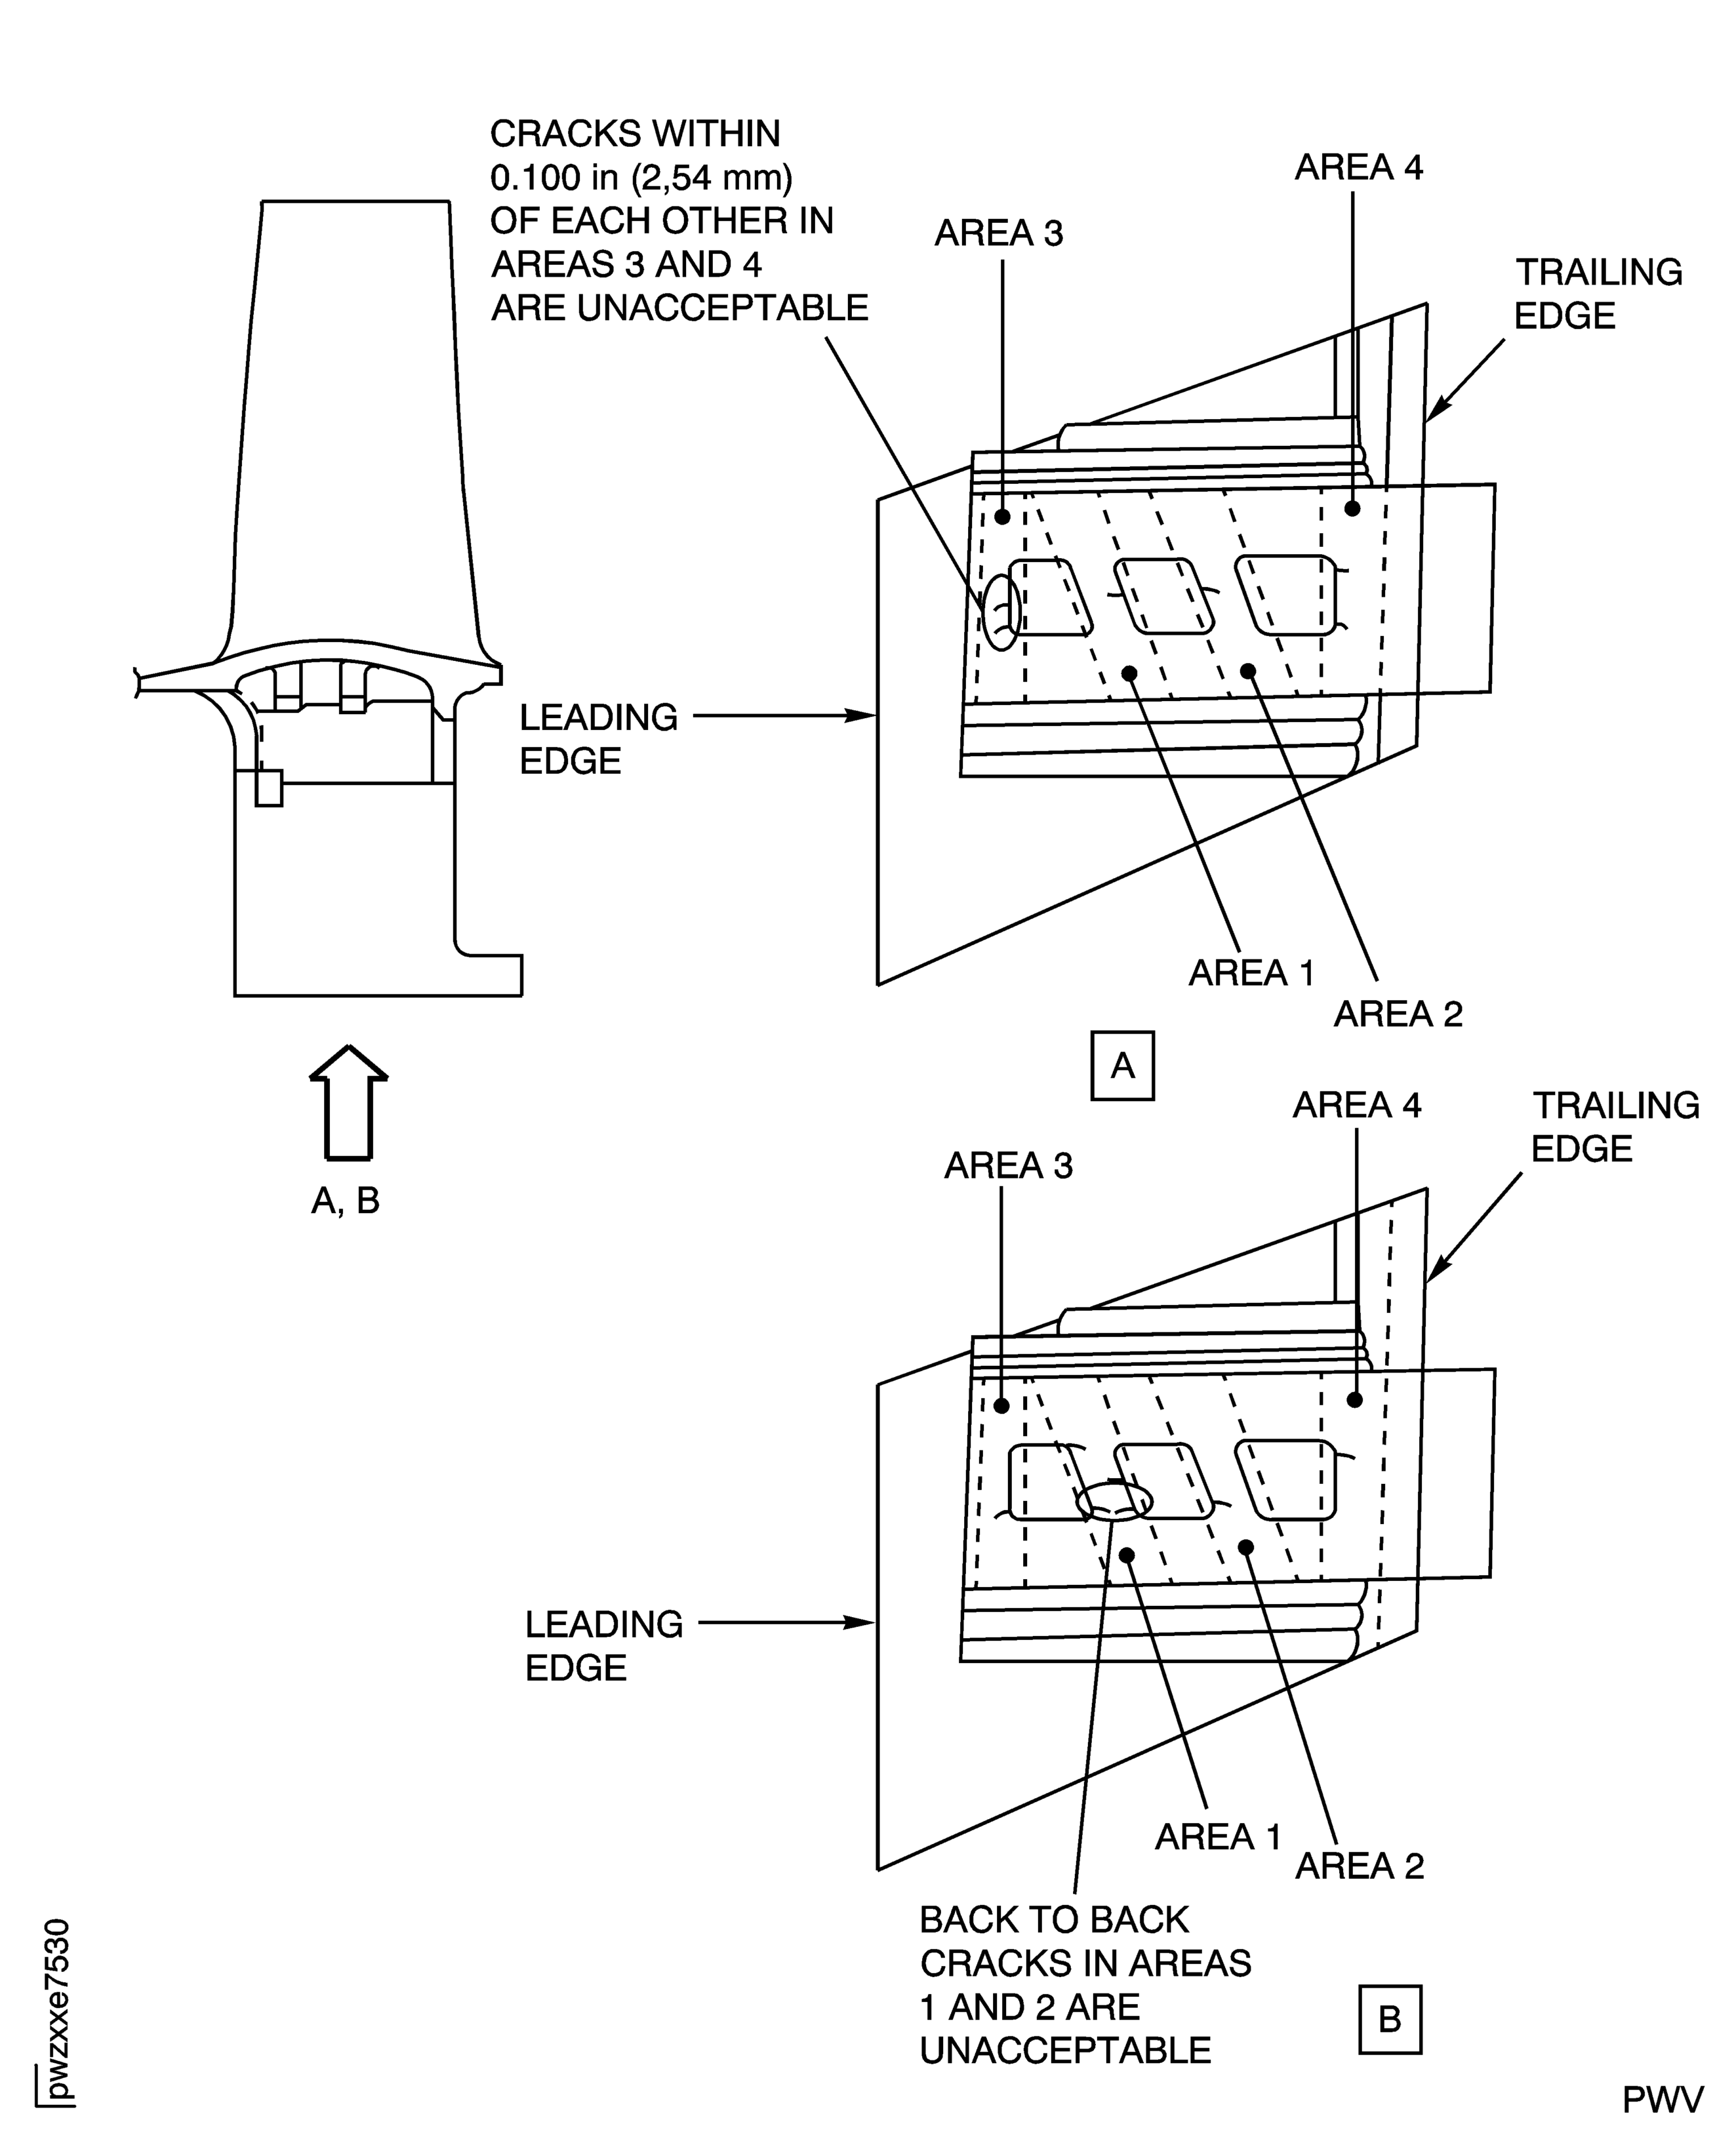
Figure: Stage 1 HPT Blade Root and Attachment Area Inspection Locations
Stage 1 HPT Blade Root and Attachment Area Inspection Locations
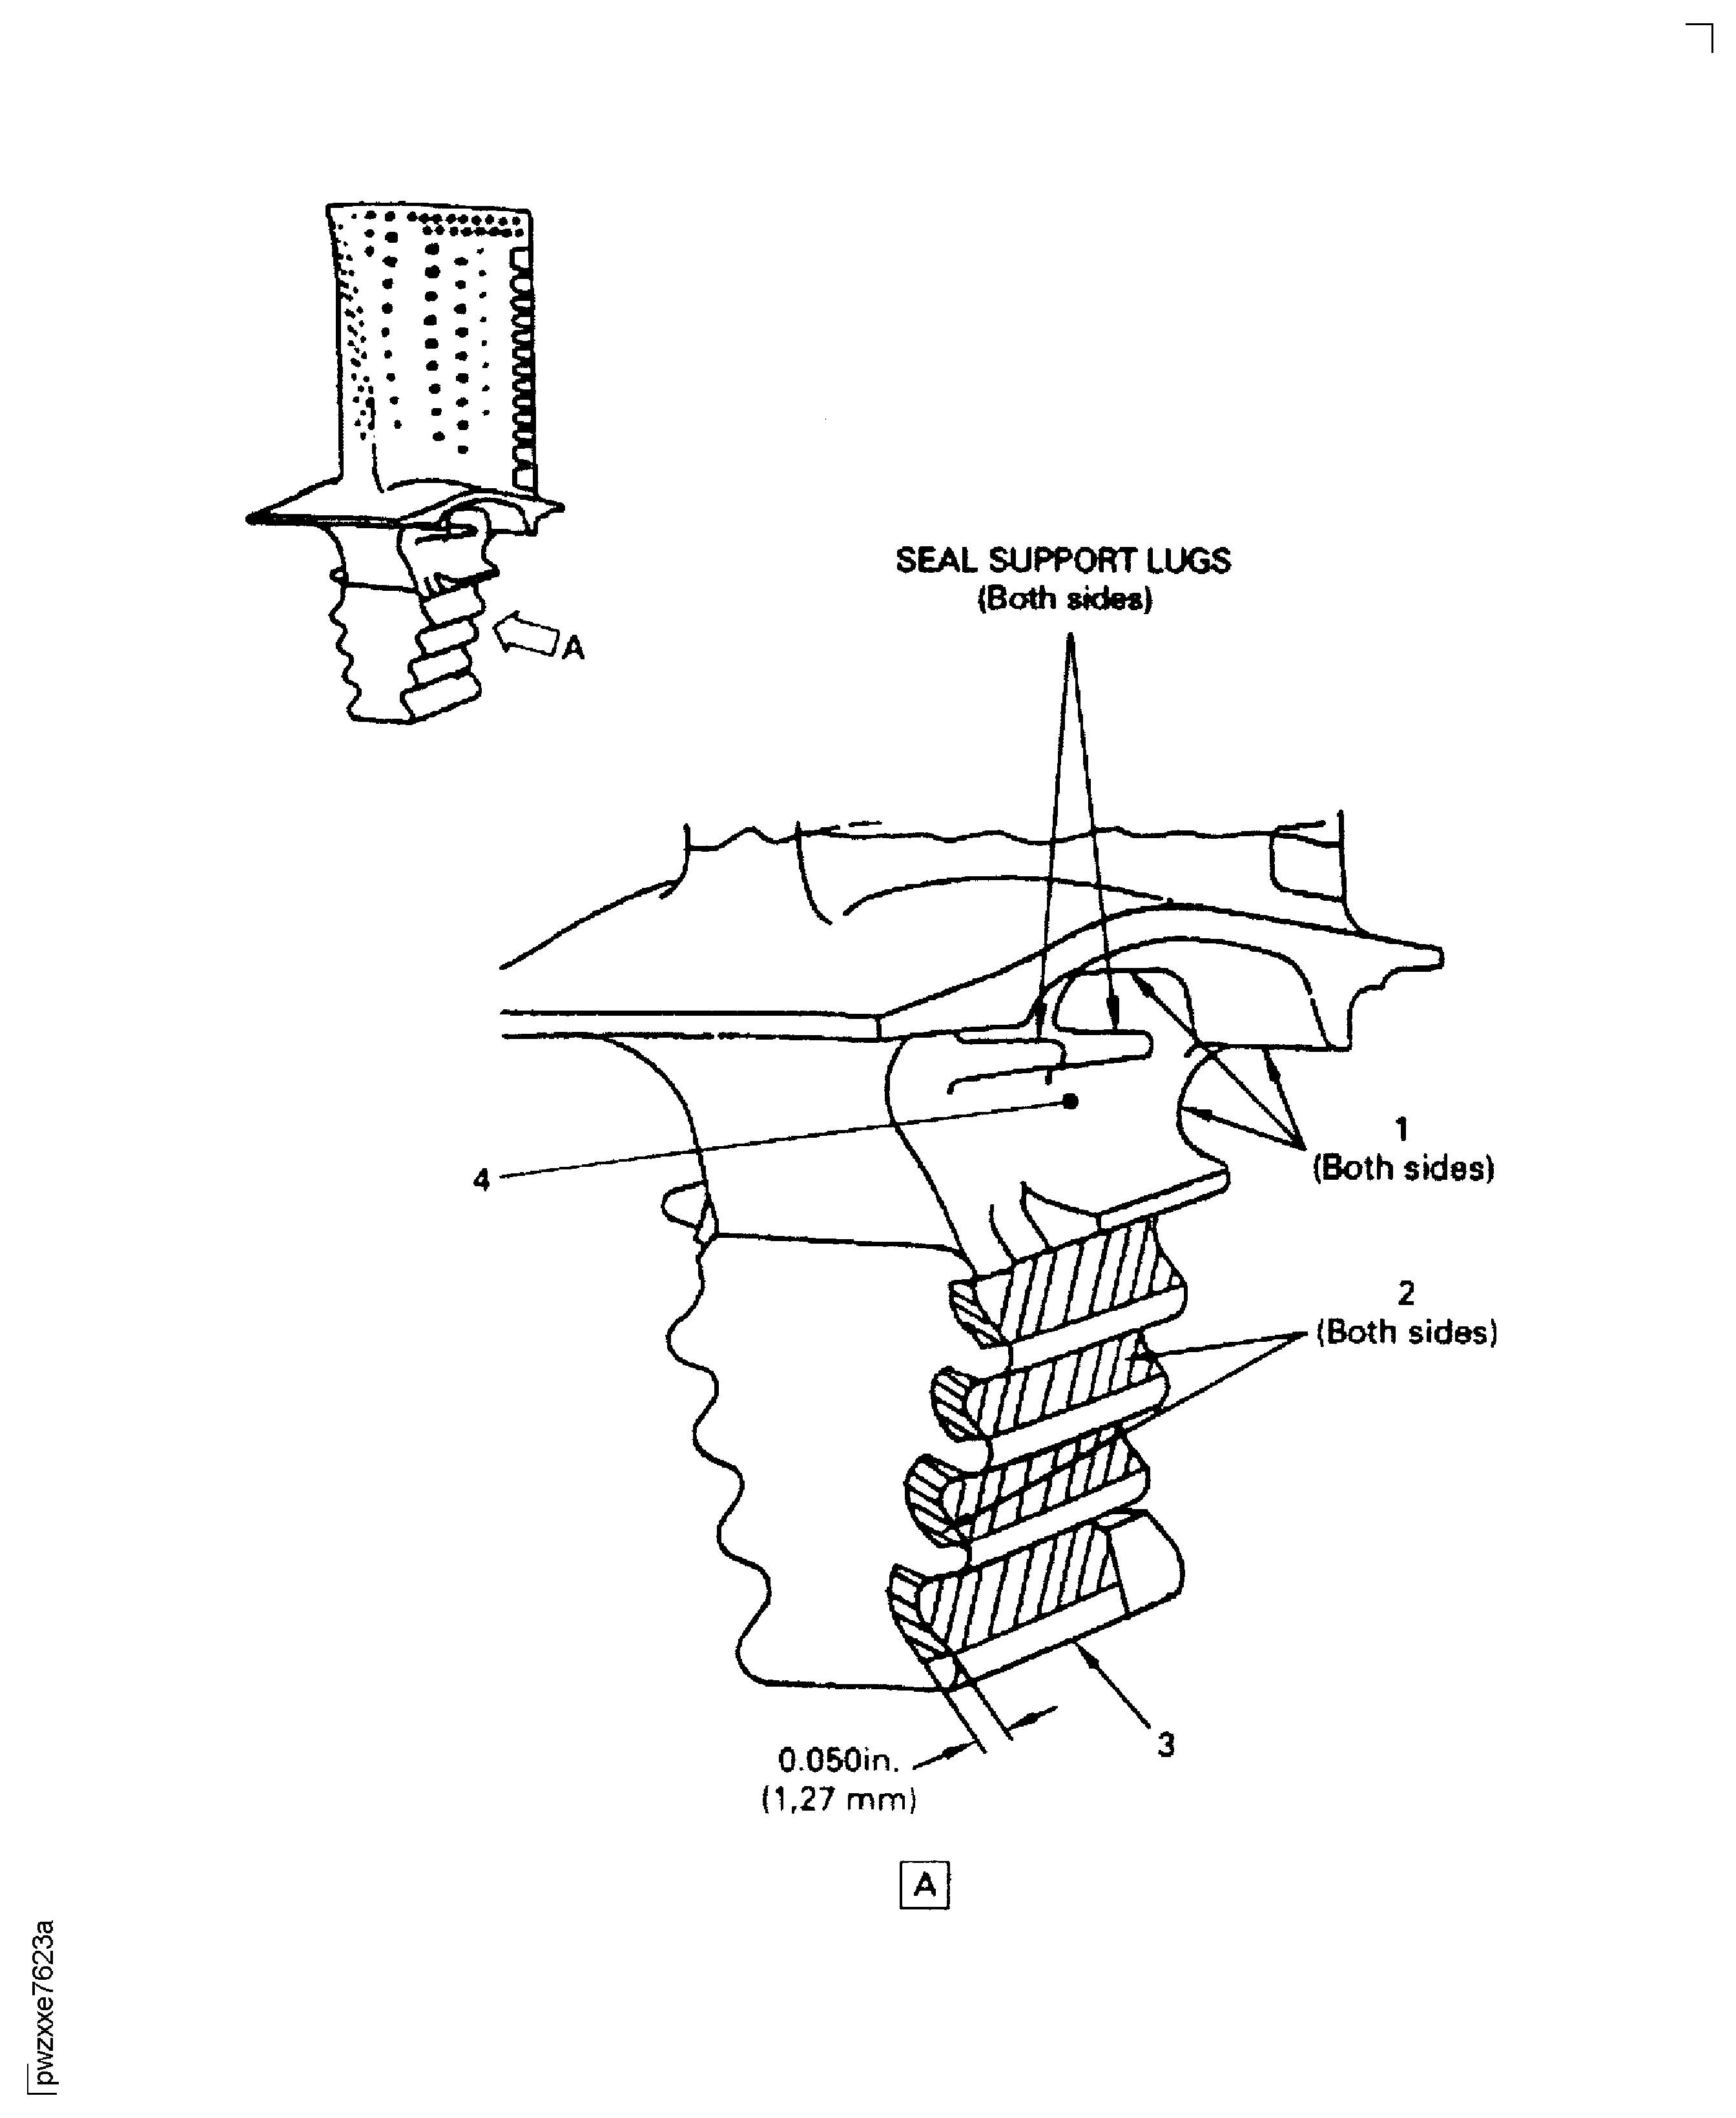
Figure: Stage 1 HPT Blade Metal Temperature Analysis Locations
Stage 1 HPT Blade Metal Temperature Analysis Locations
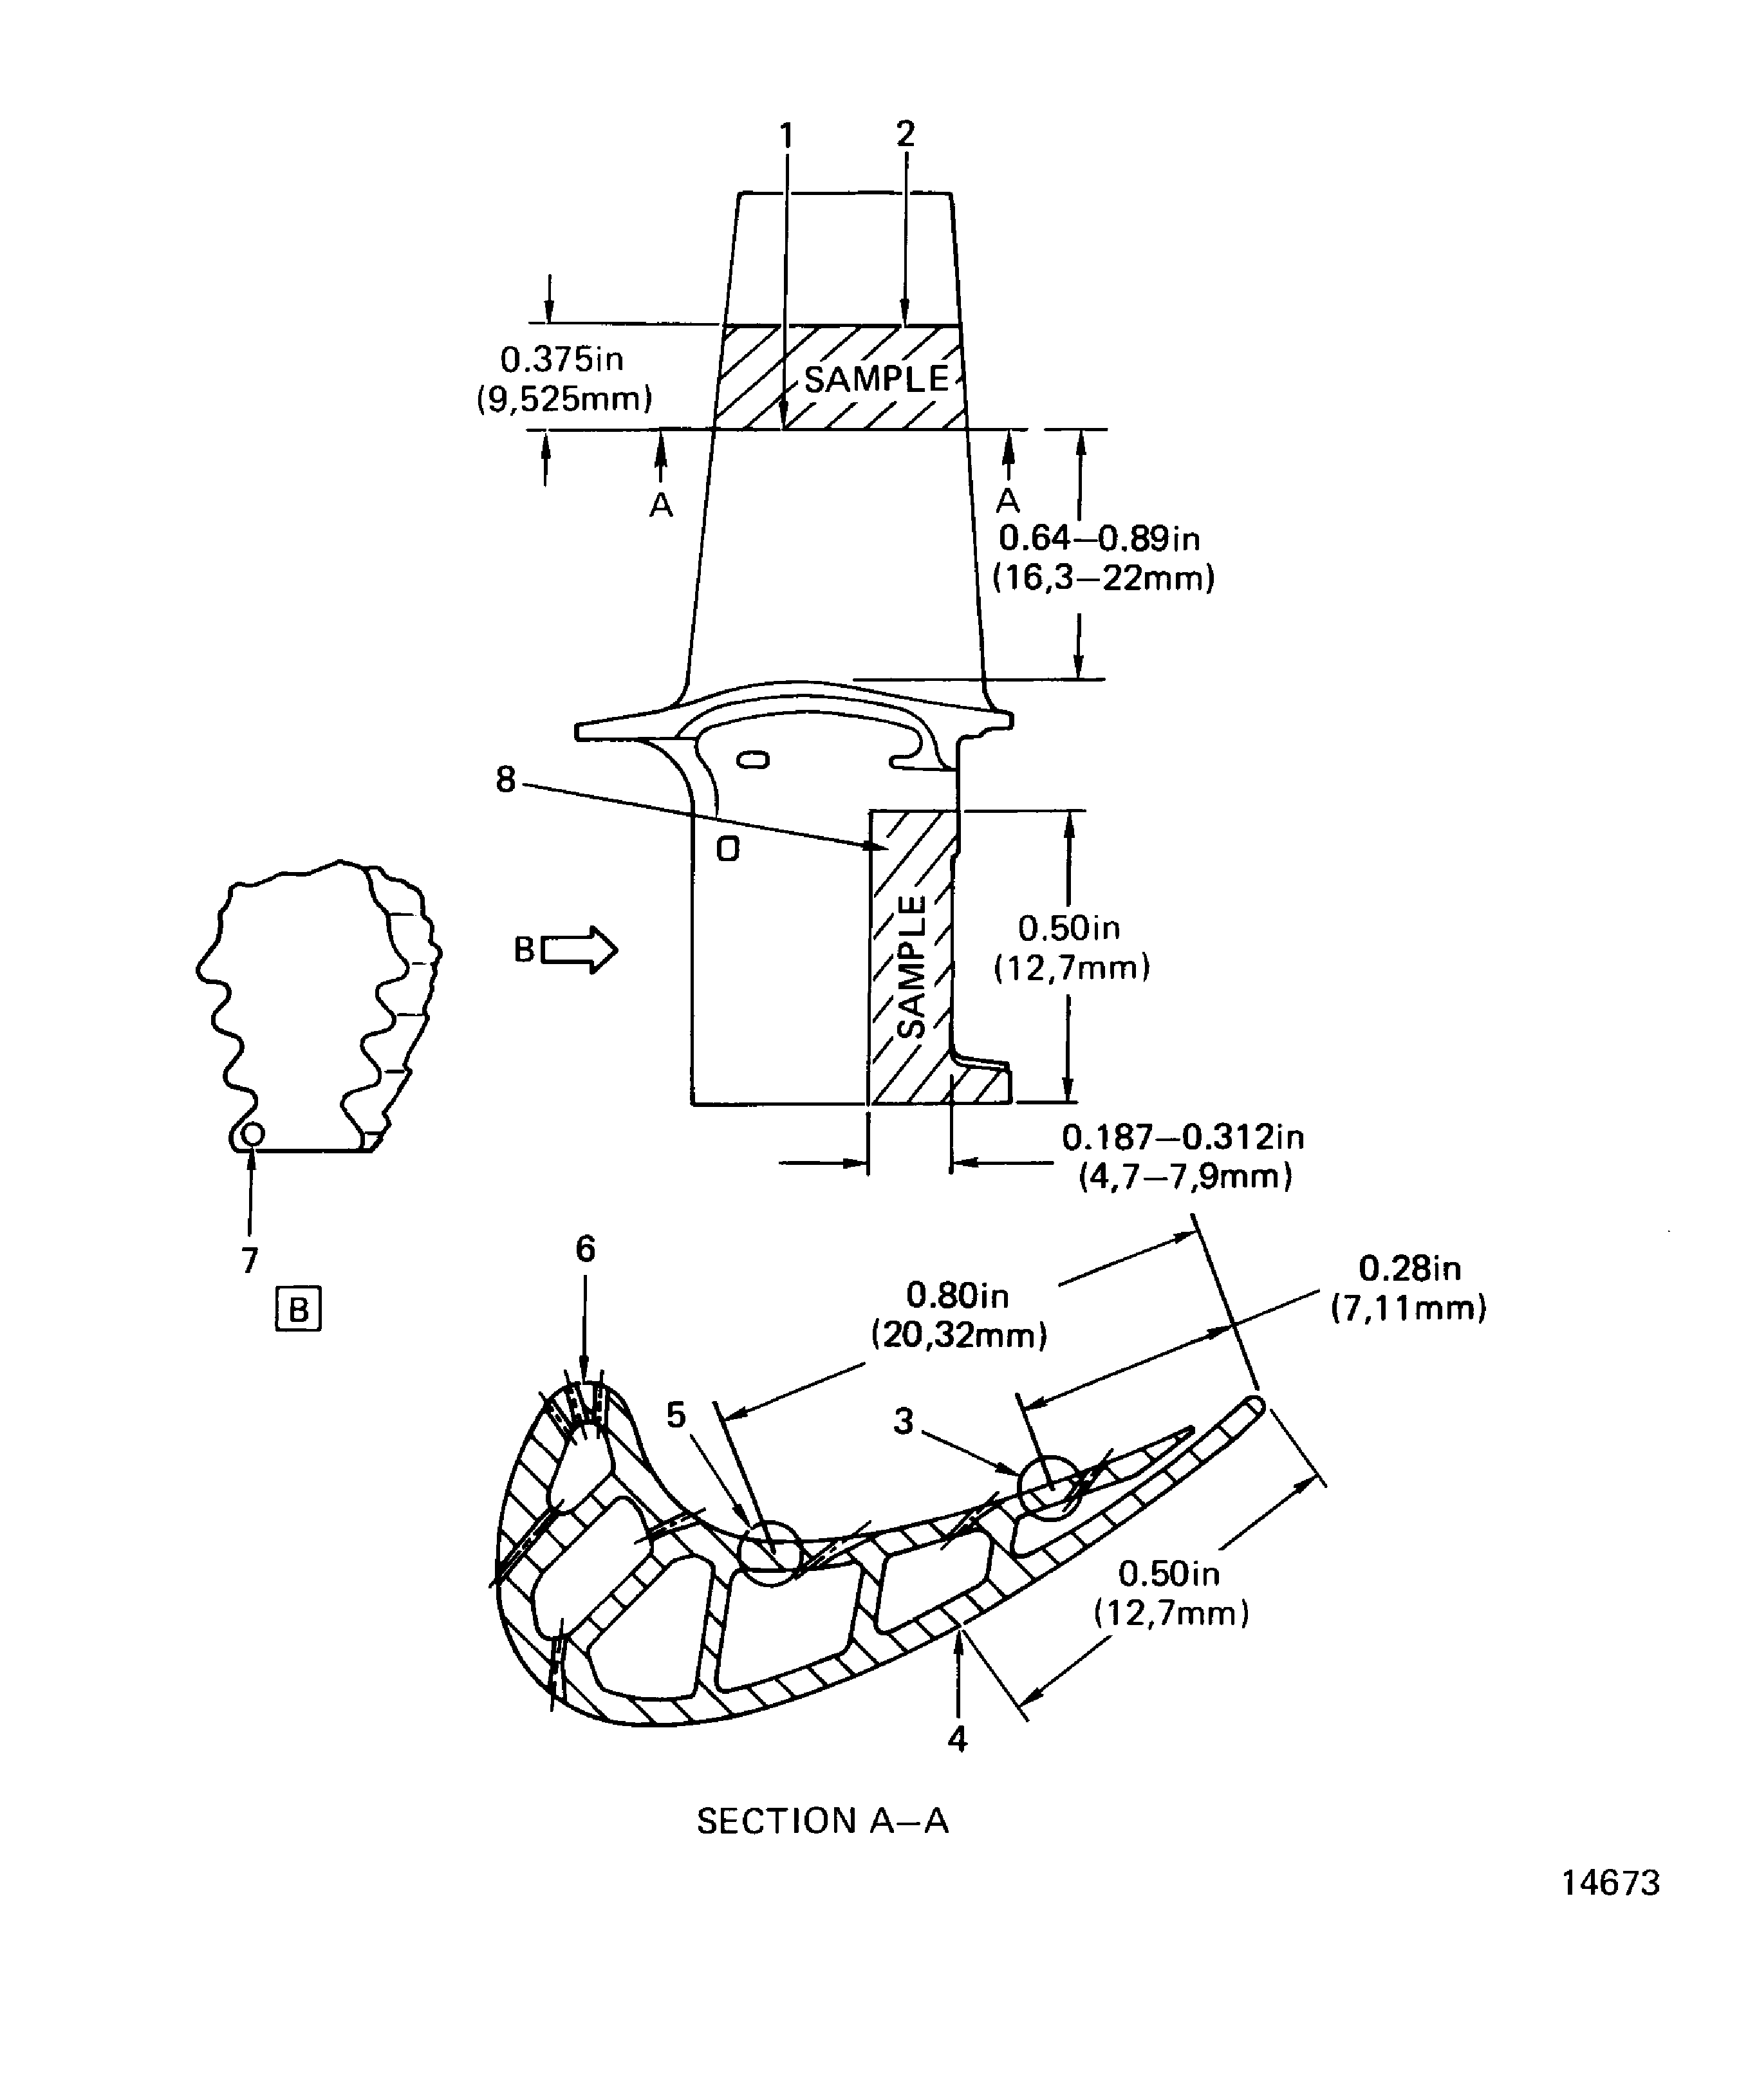
Figure: Stage 1 HPT Blade Assembly Shot Peen Locations
Sheet 1
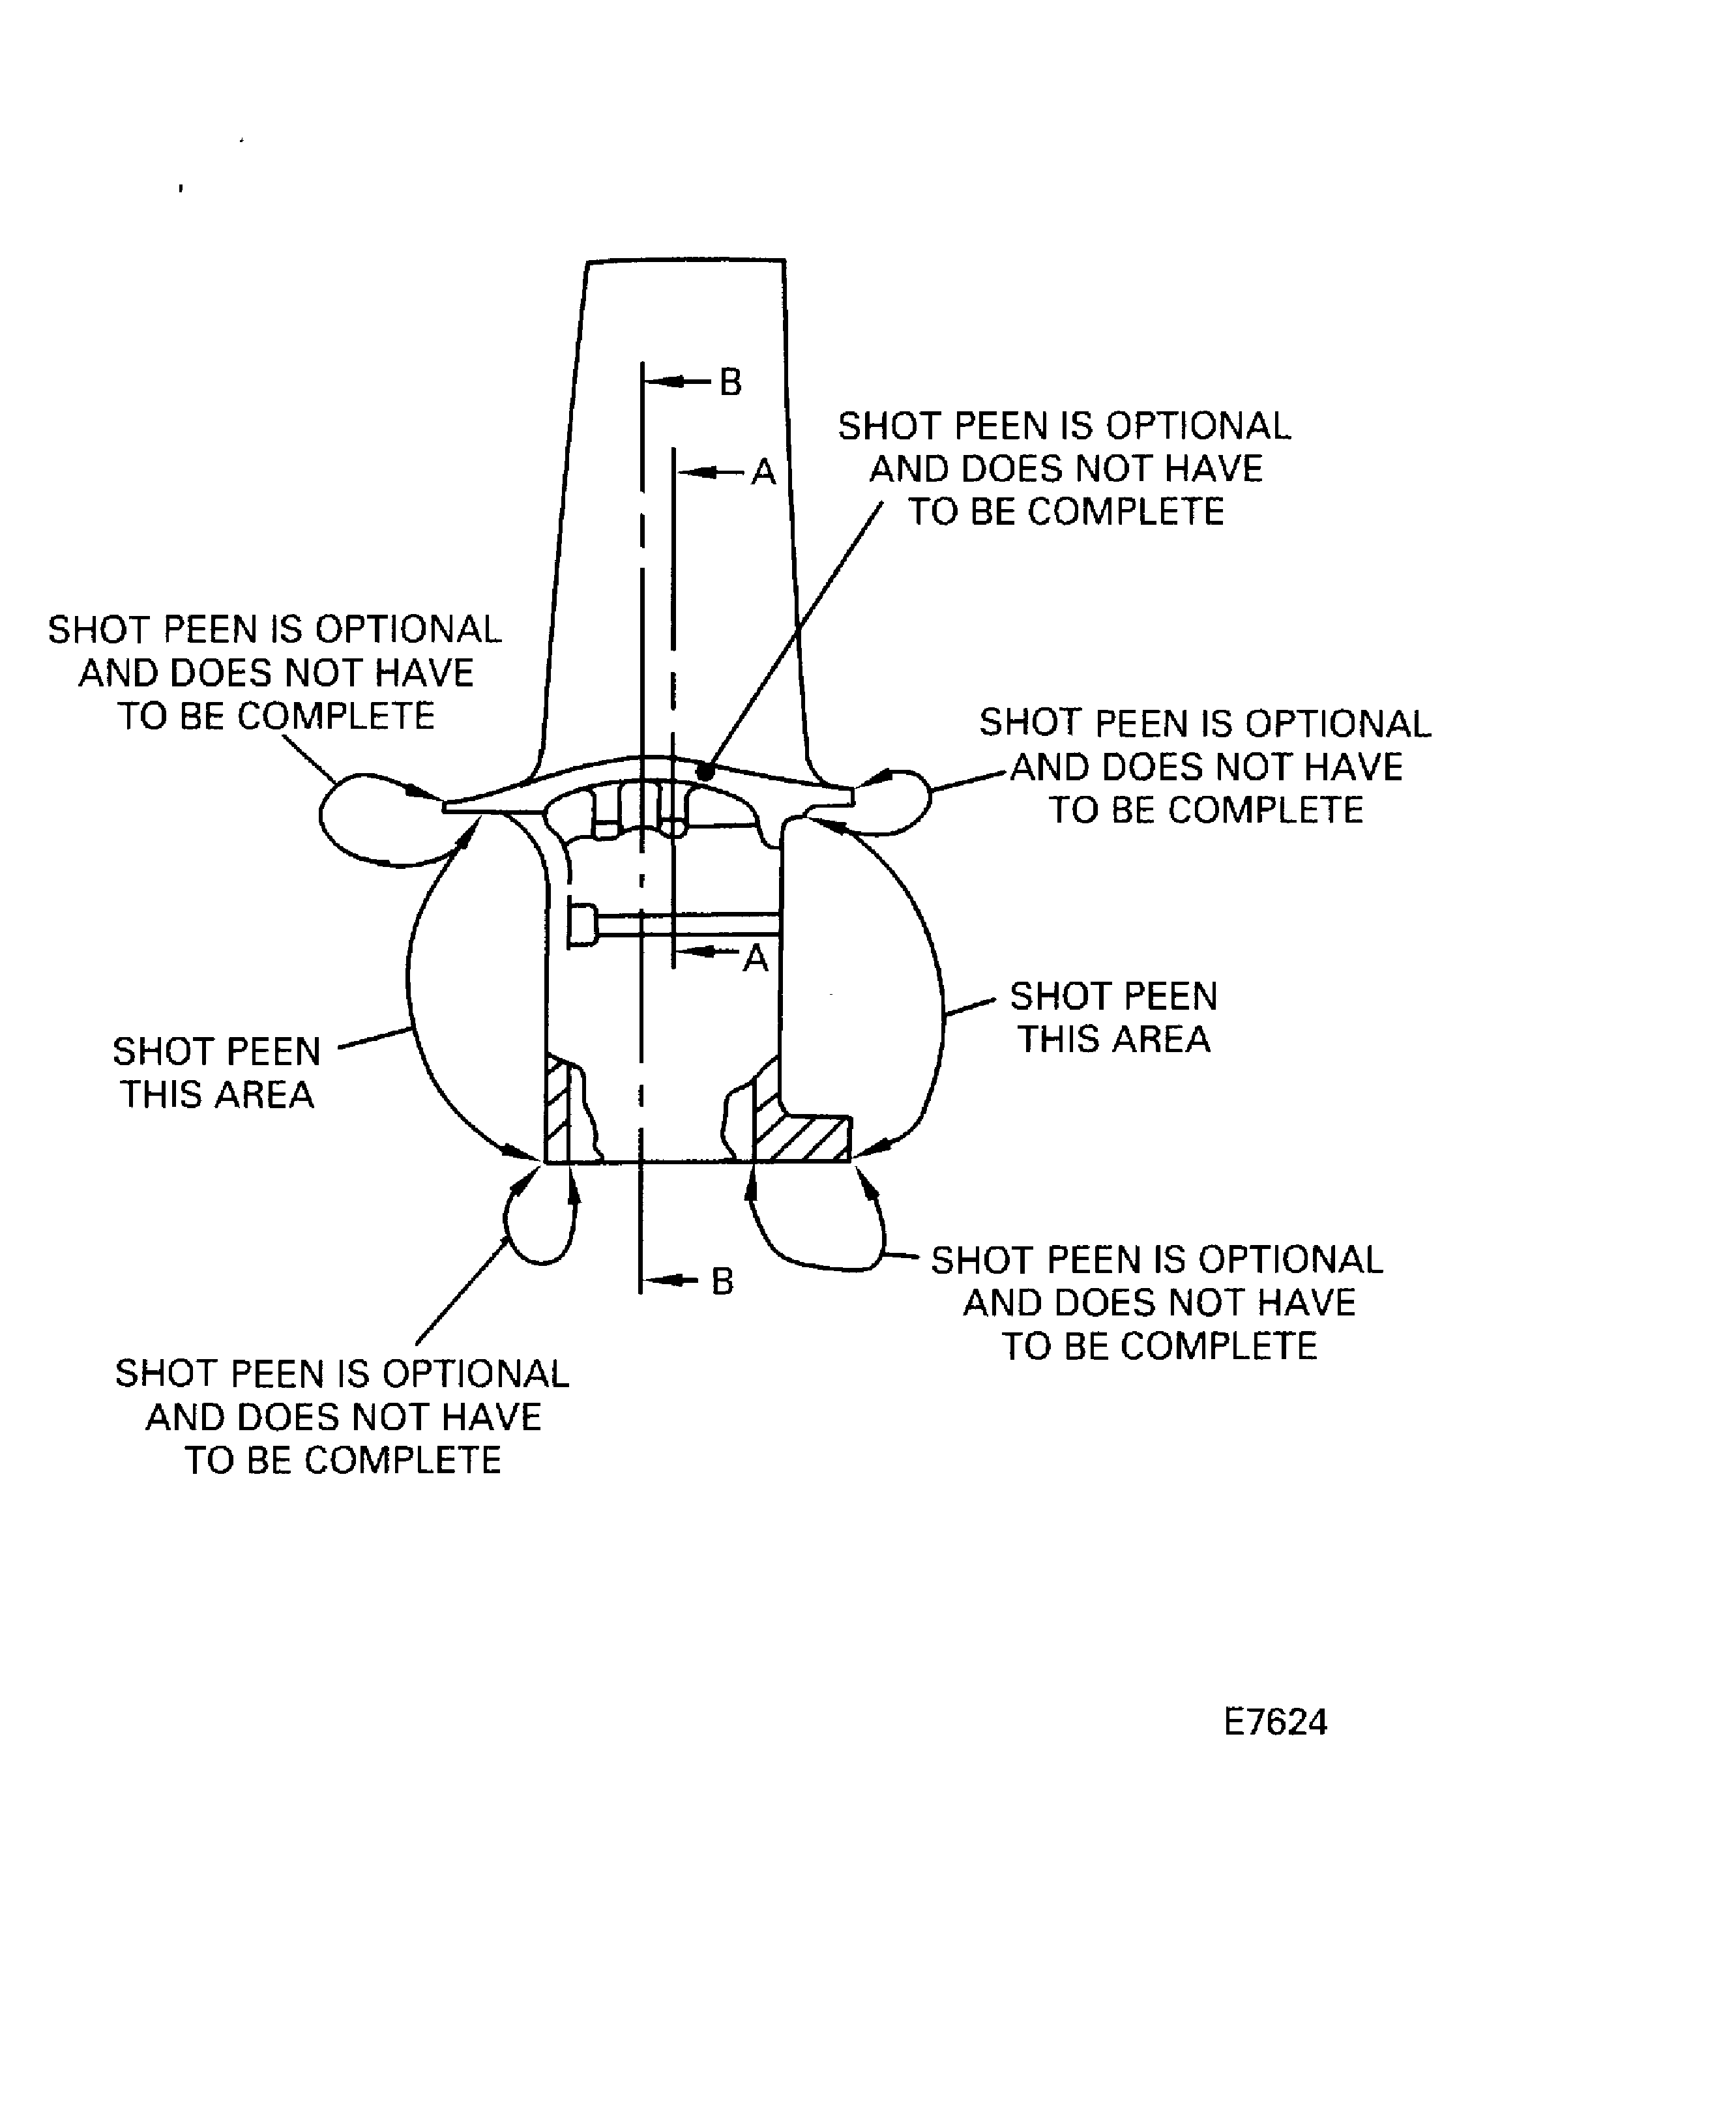
Figure: Stage 1 HPT Blade Assembly Shot Peen Locations
Sheet 2
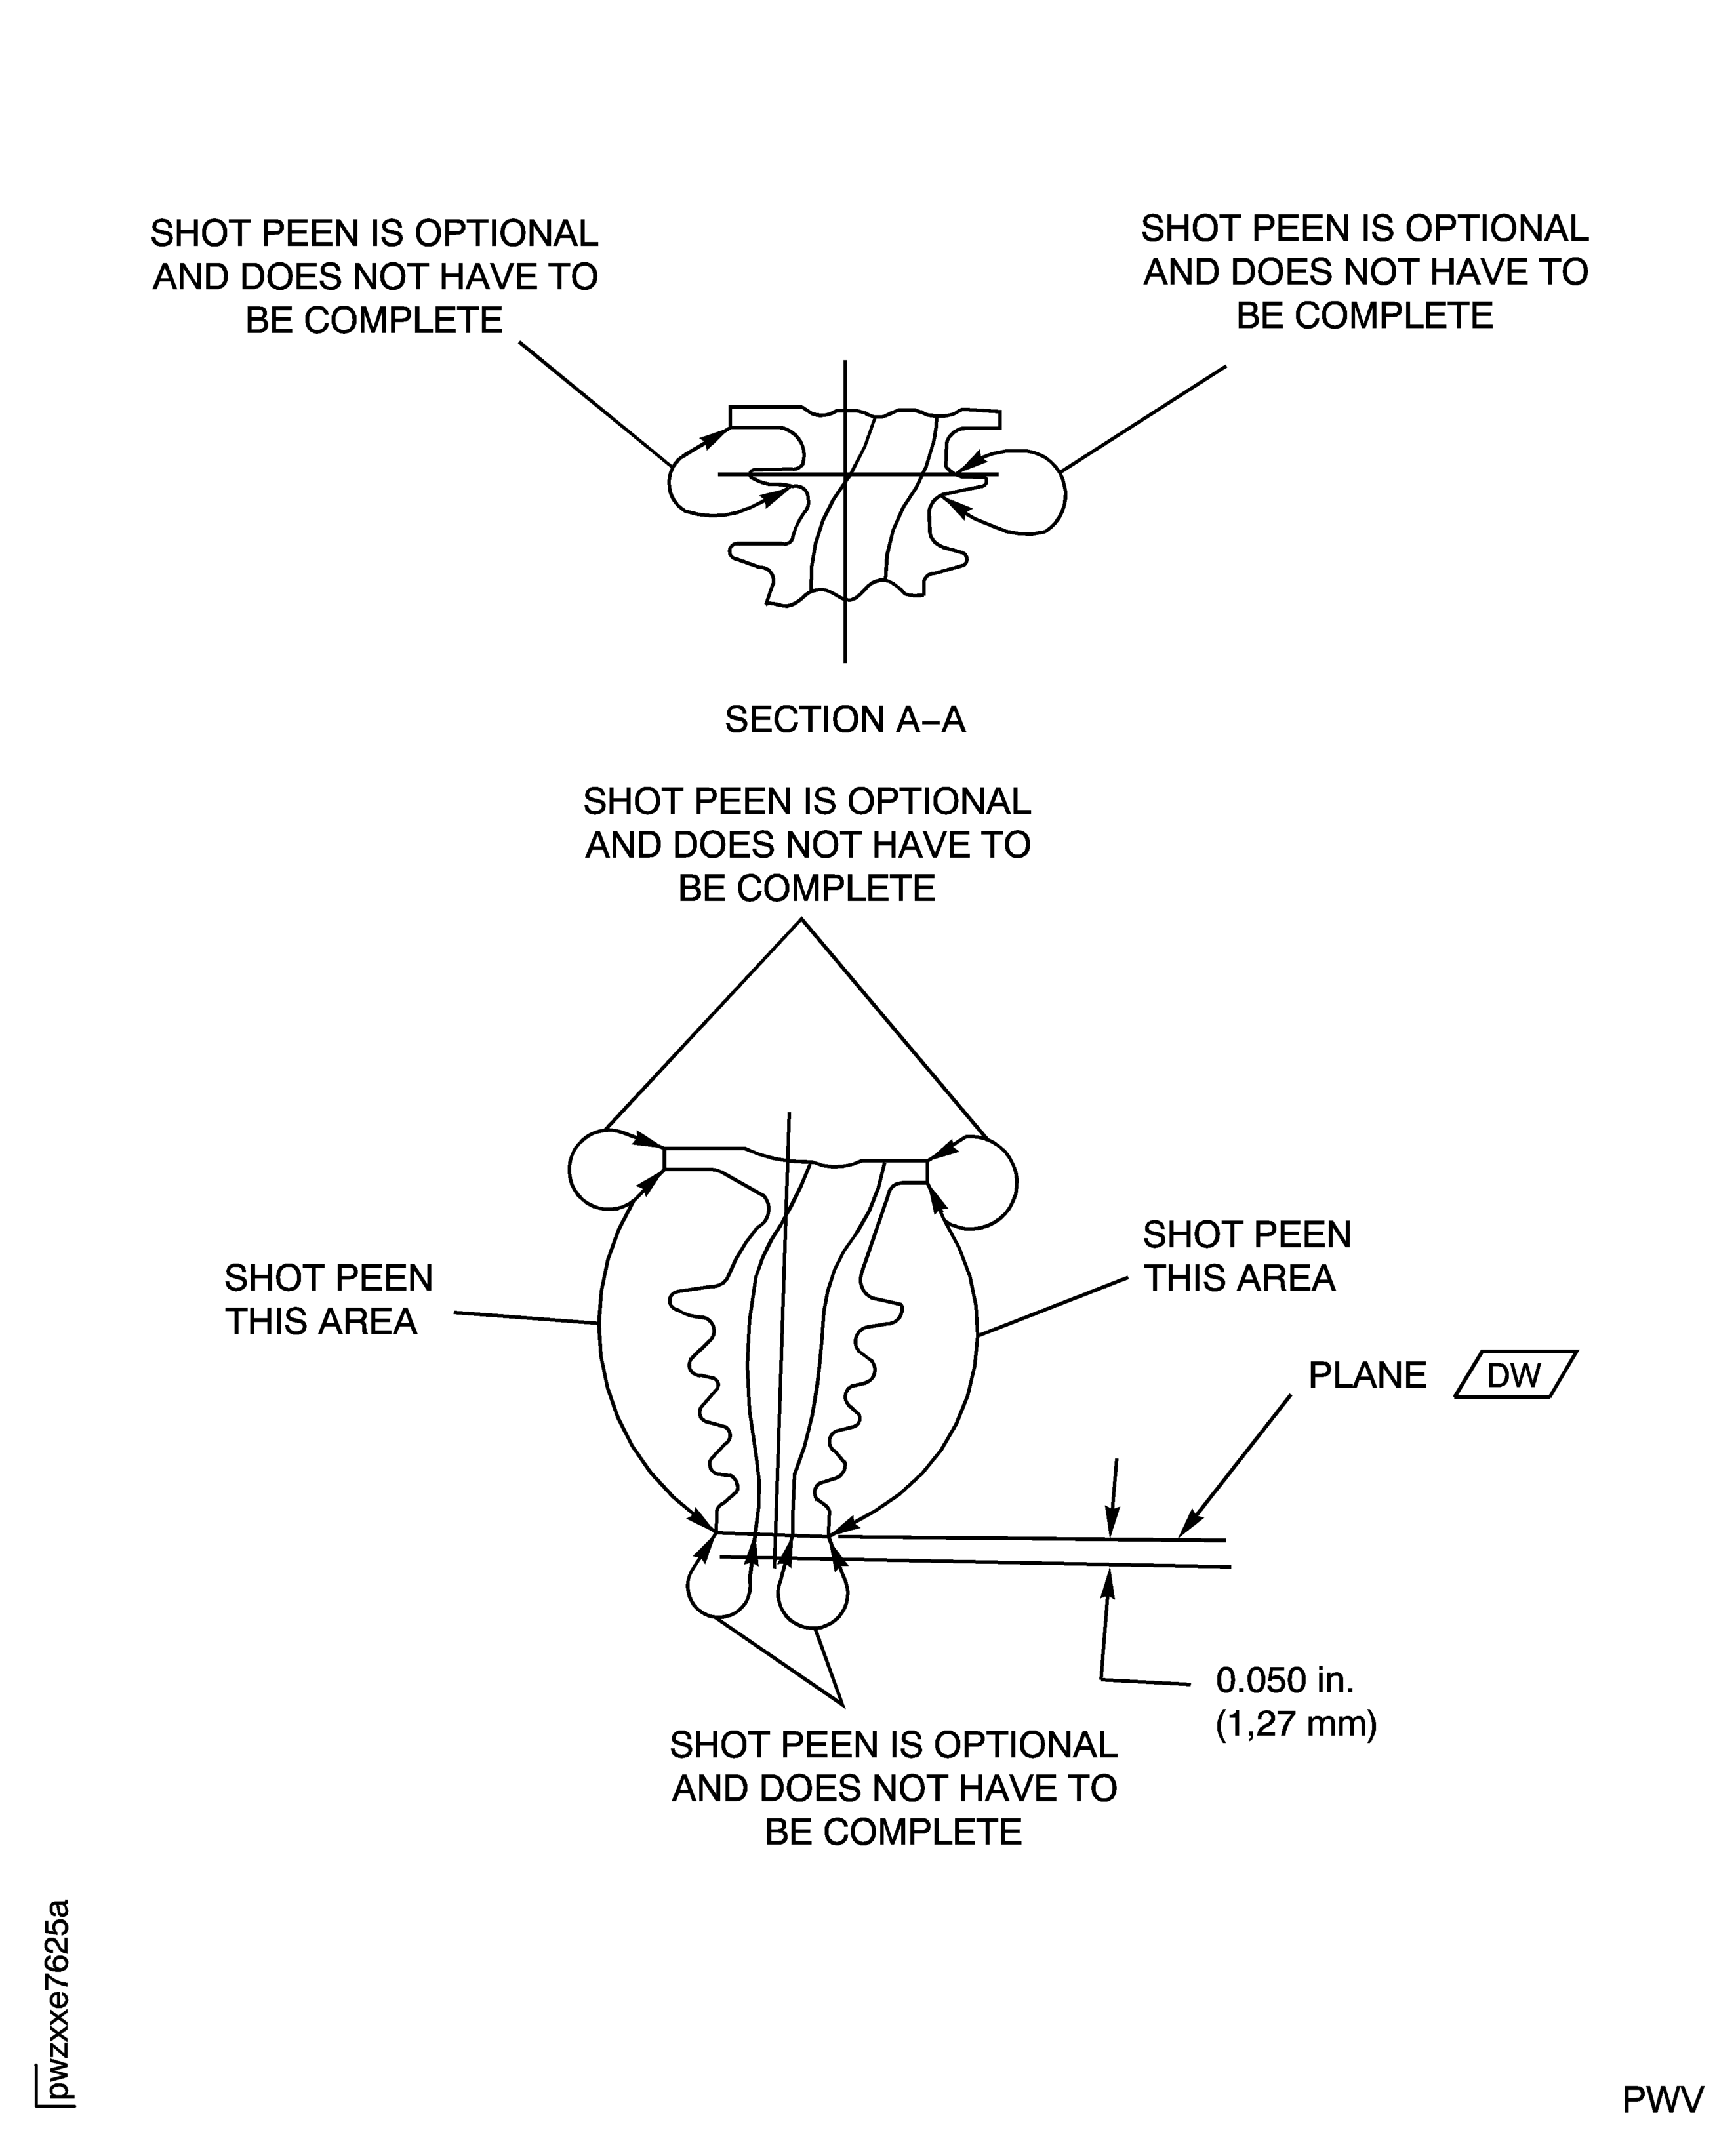
Figure: Stage 1 HPT Blade Assembly Airfoil Cooling Hole Inspection
Sheet 3
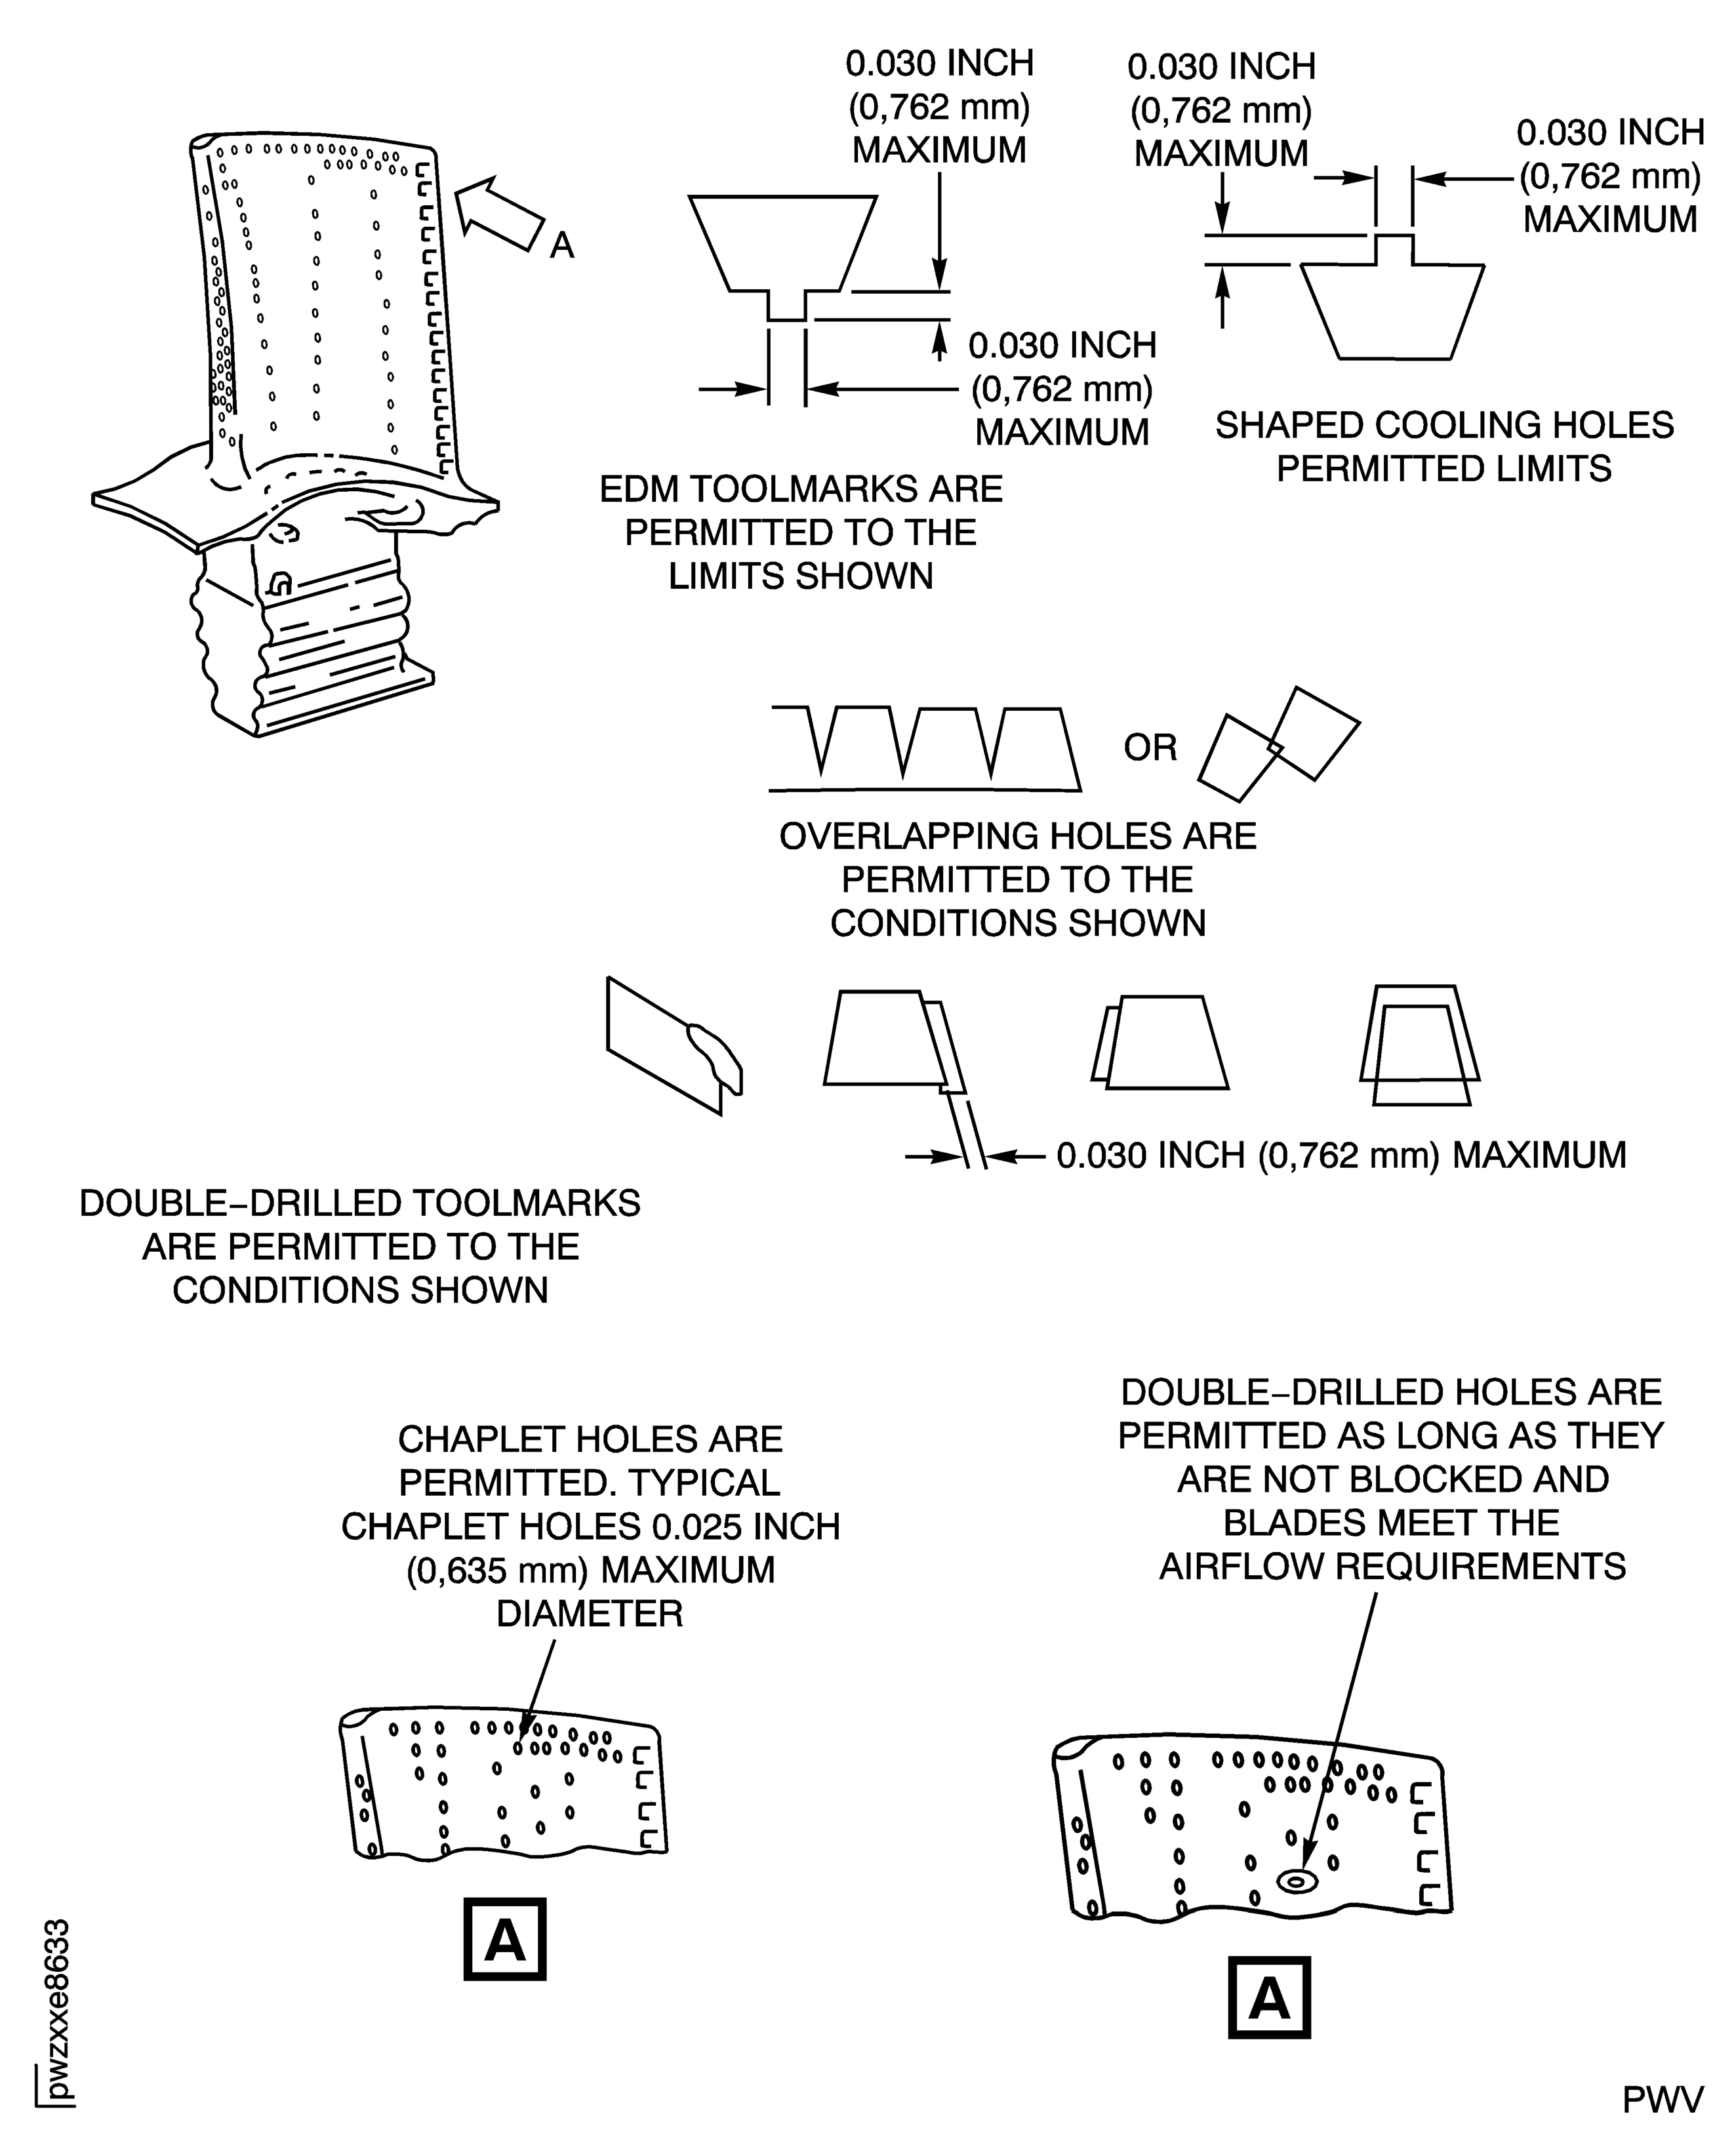
Figure: Stage 1 HPT Blade Radiographic Positions Inspection Locations
Stage 1 HPT Blade Radiographic Positions Inspection Locations
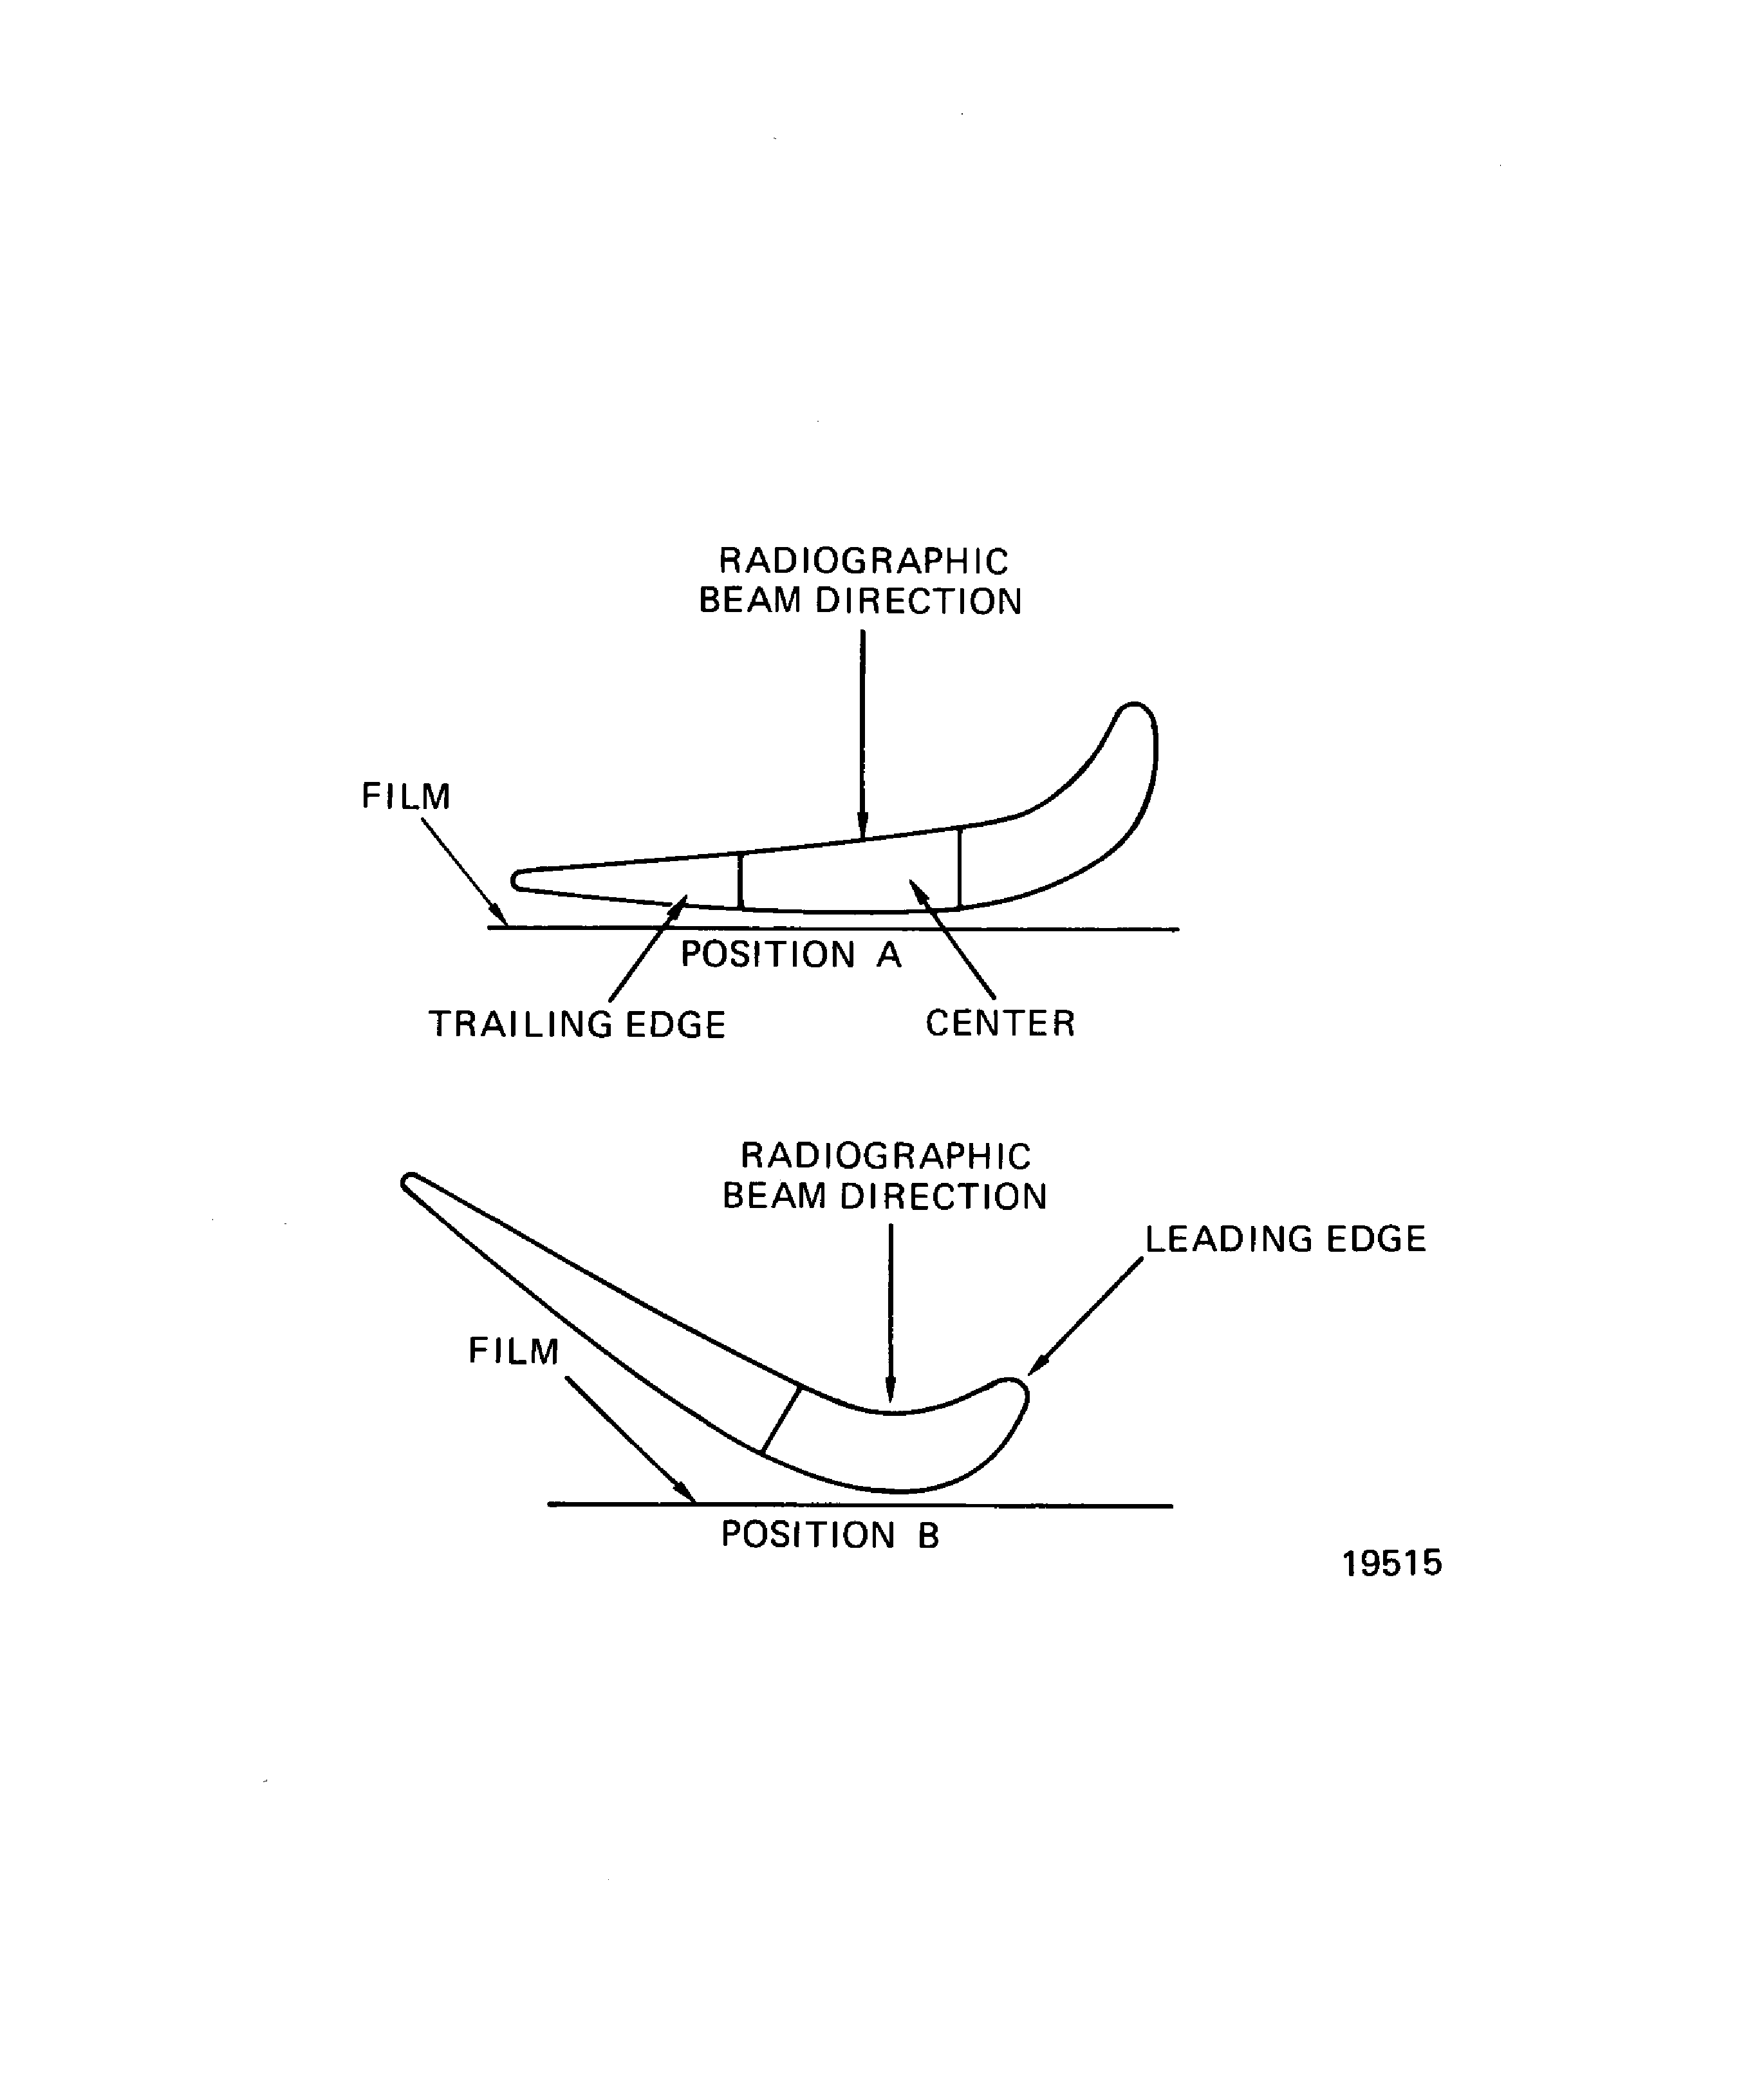
Figure: X-Ray Inspection Internal Cavity
X-Ray Inspection Internal Cavity
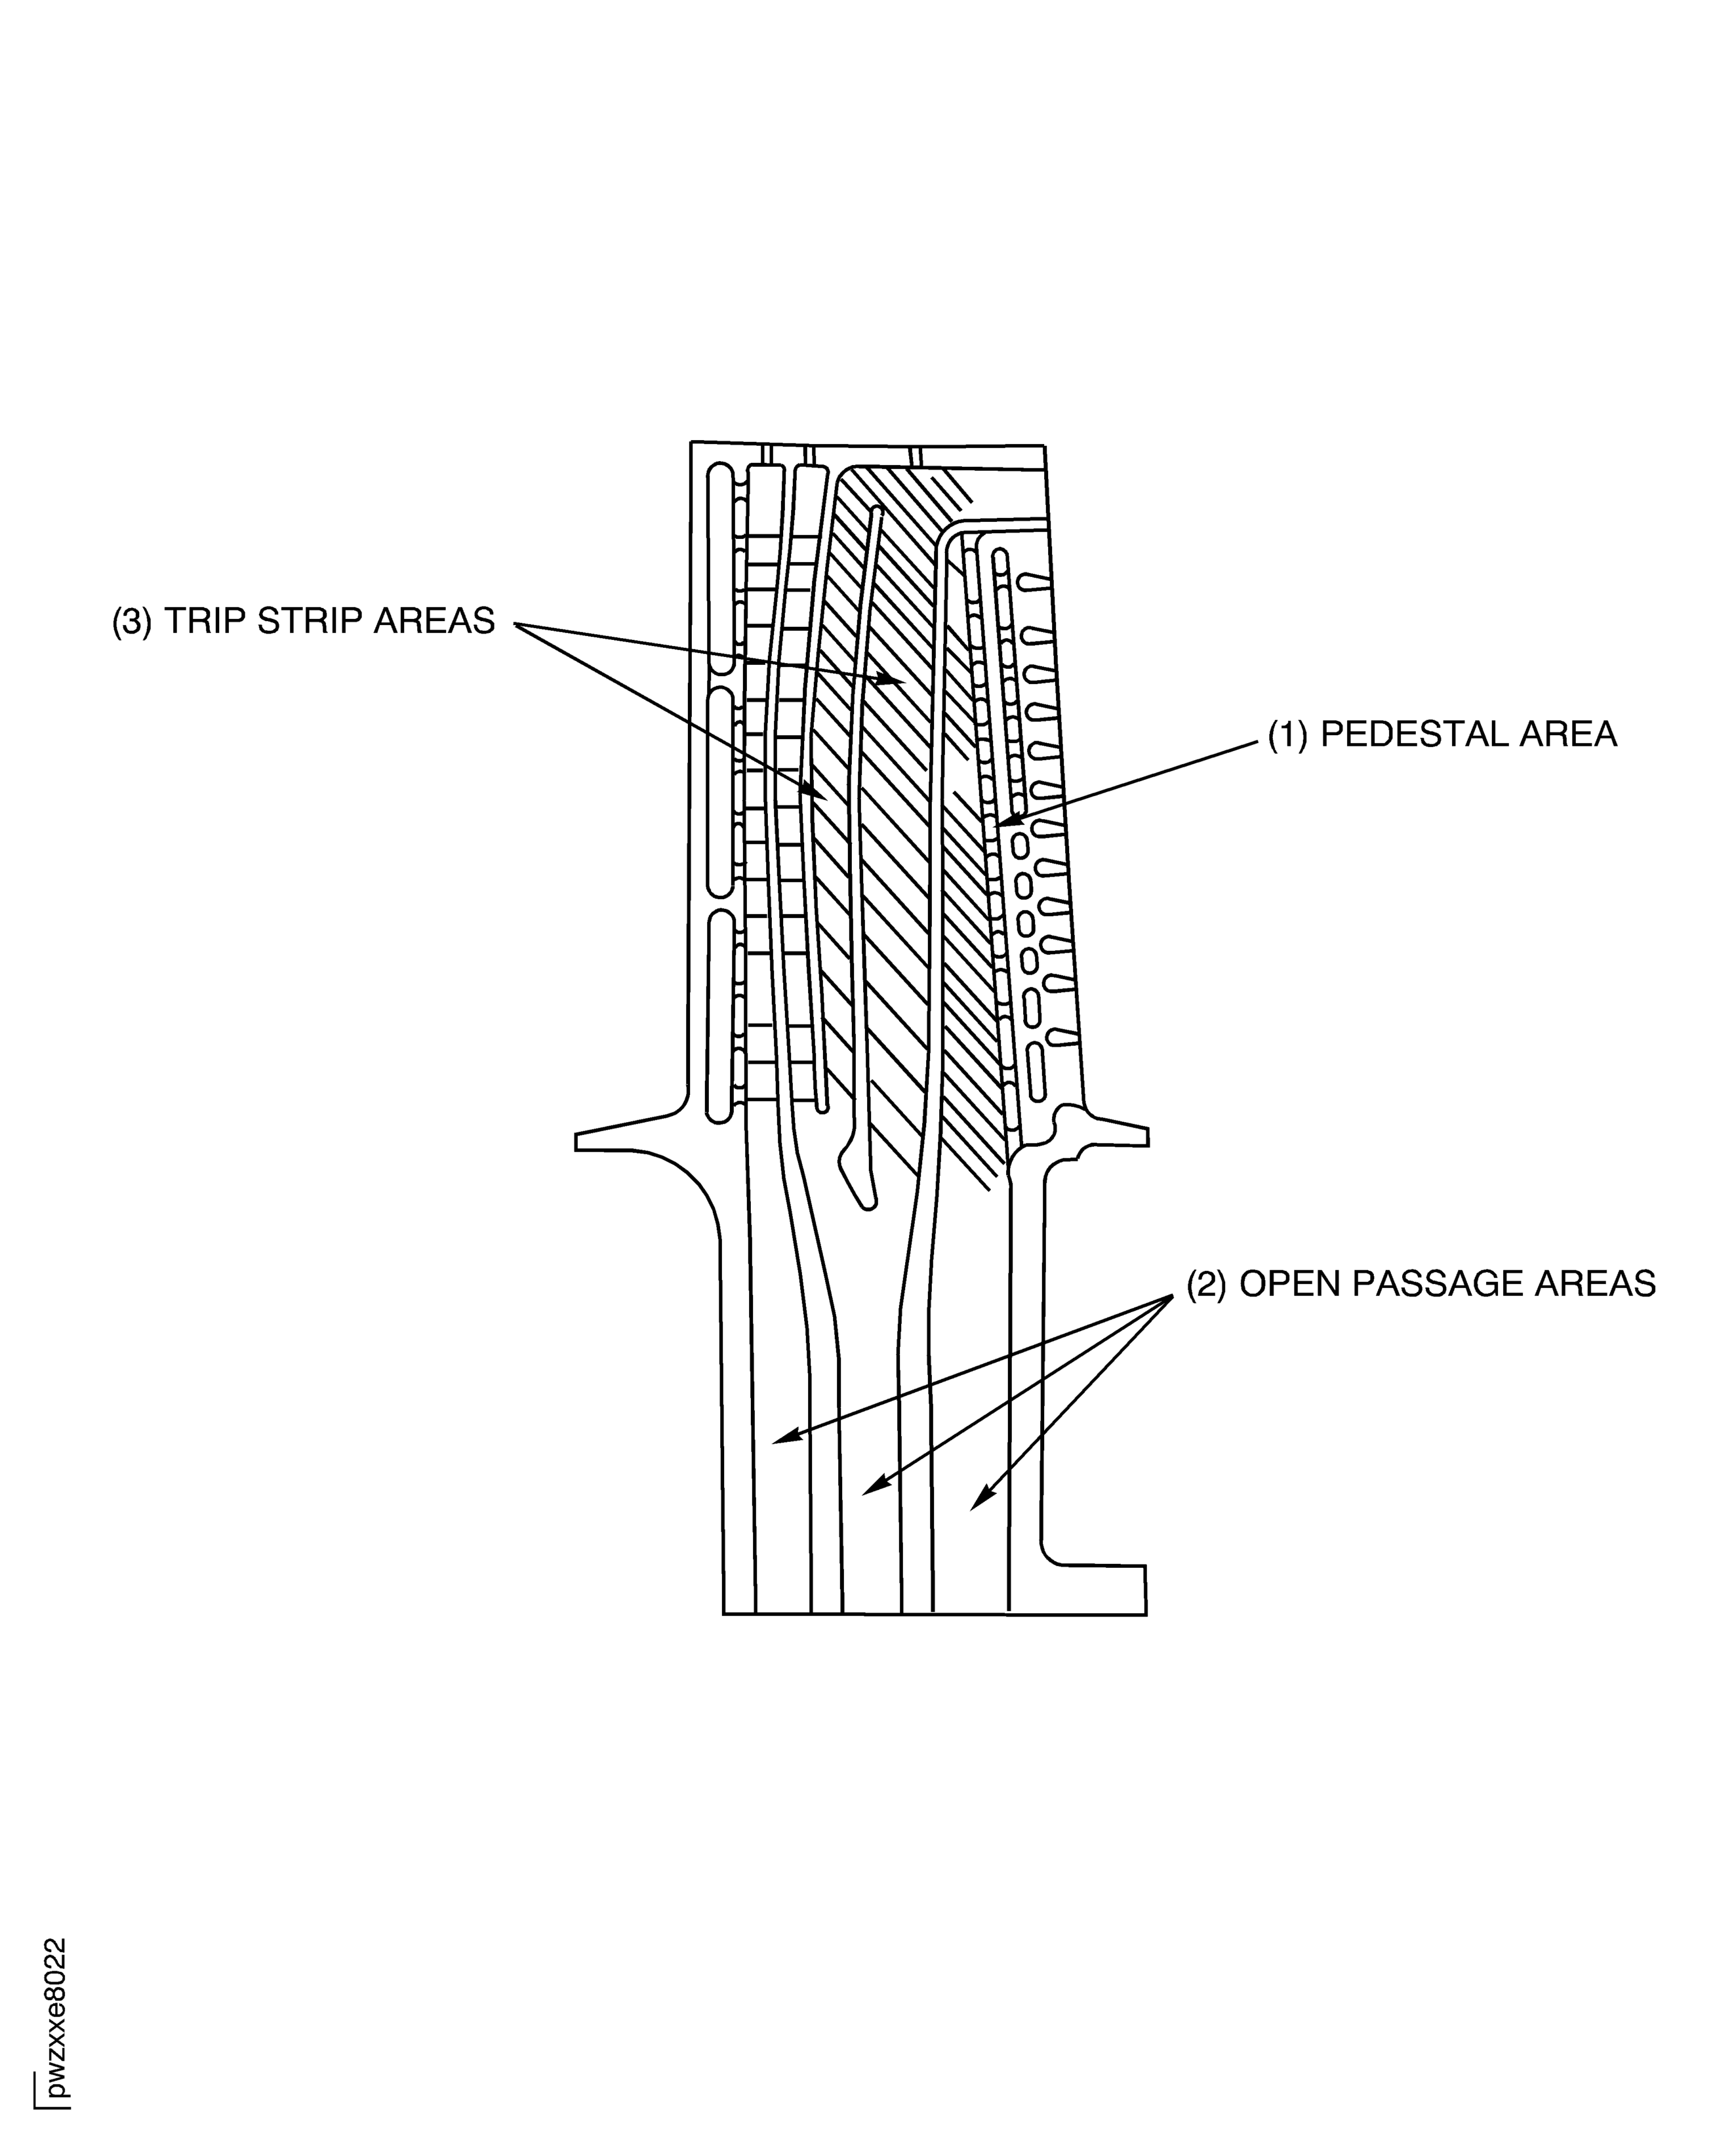
Figure: Stage 1 HPT Blade Assembly Casting Flow Line Inspection
Stage 1 HPT Blade Assembly Casting Flow Line Inspection
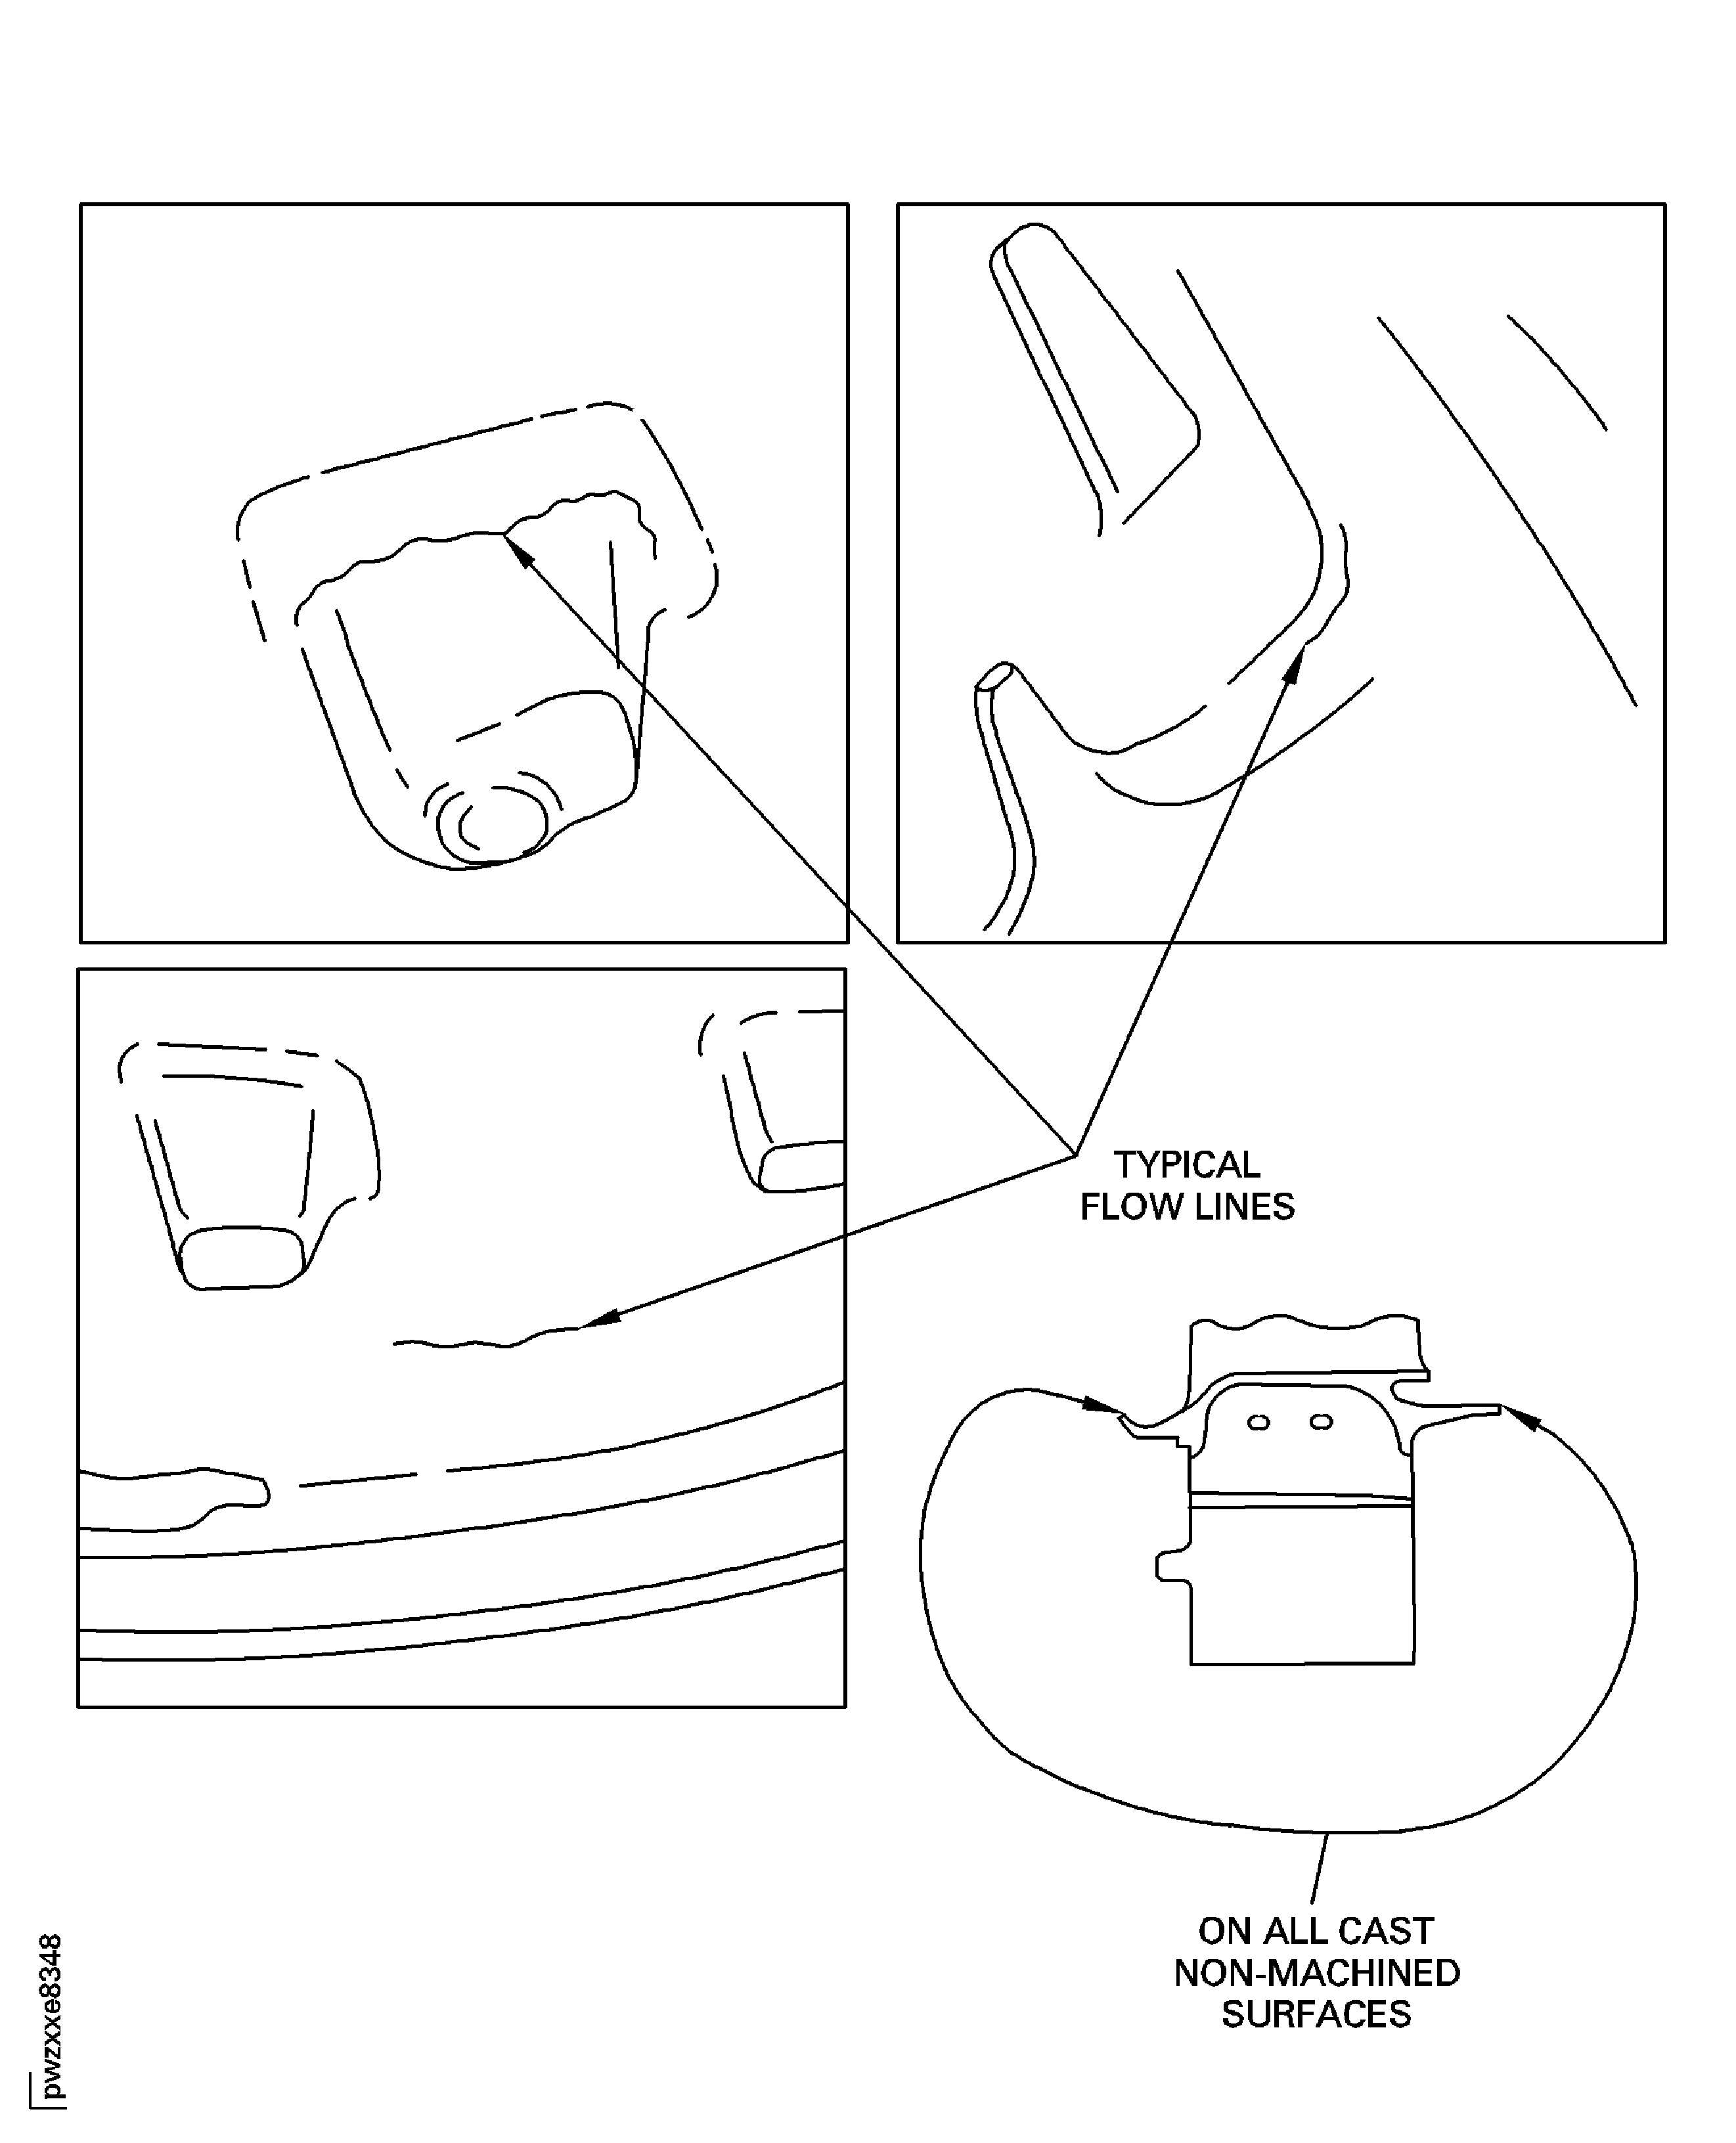
Figure: Excess Metal and Foreign Material Limits (after Cleaning)
Excess Metal and Foreign Material Limits (after Cleaning)
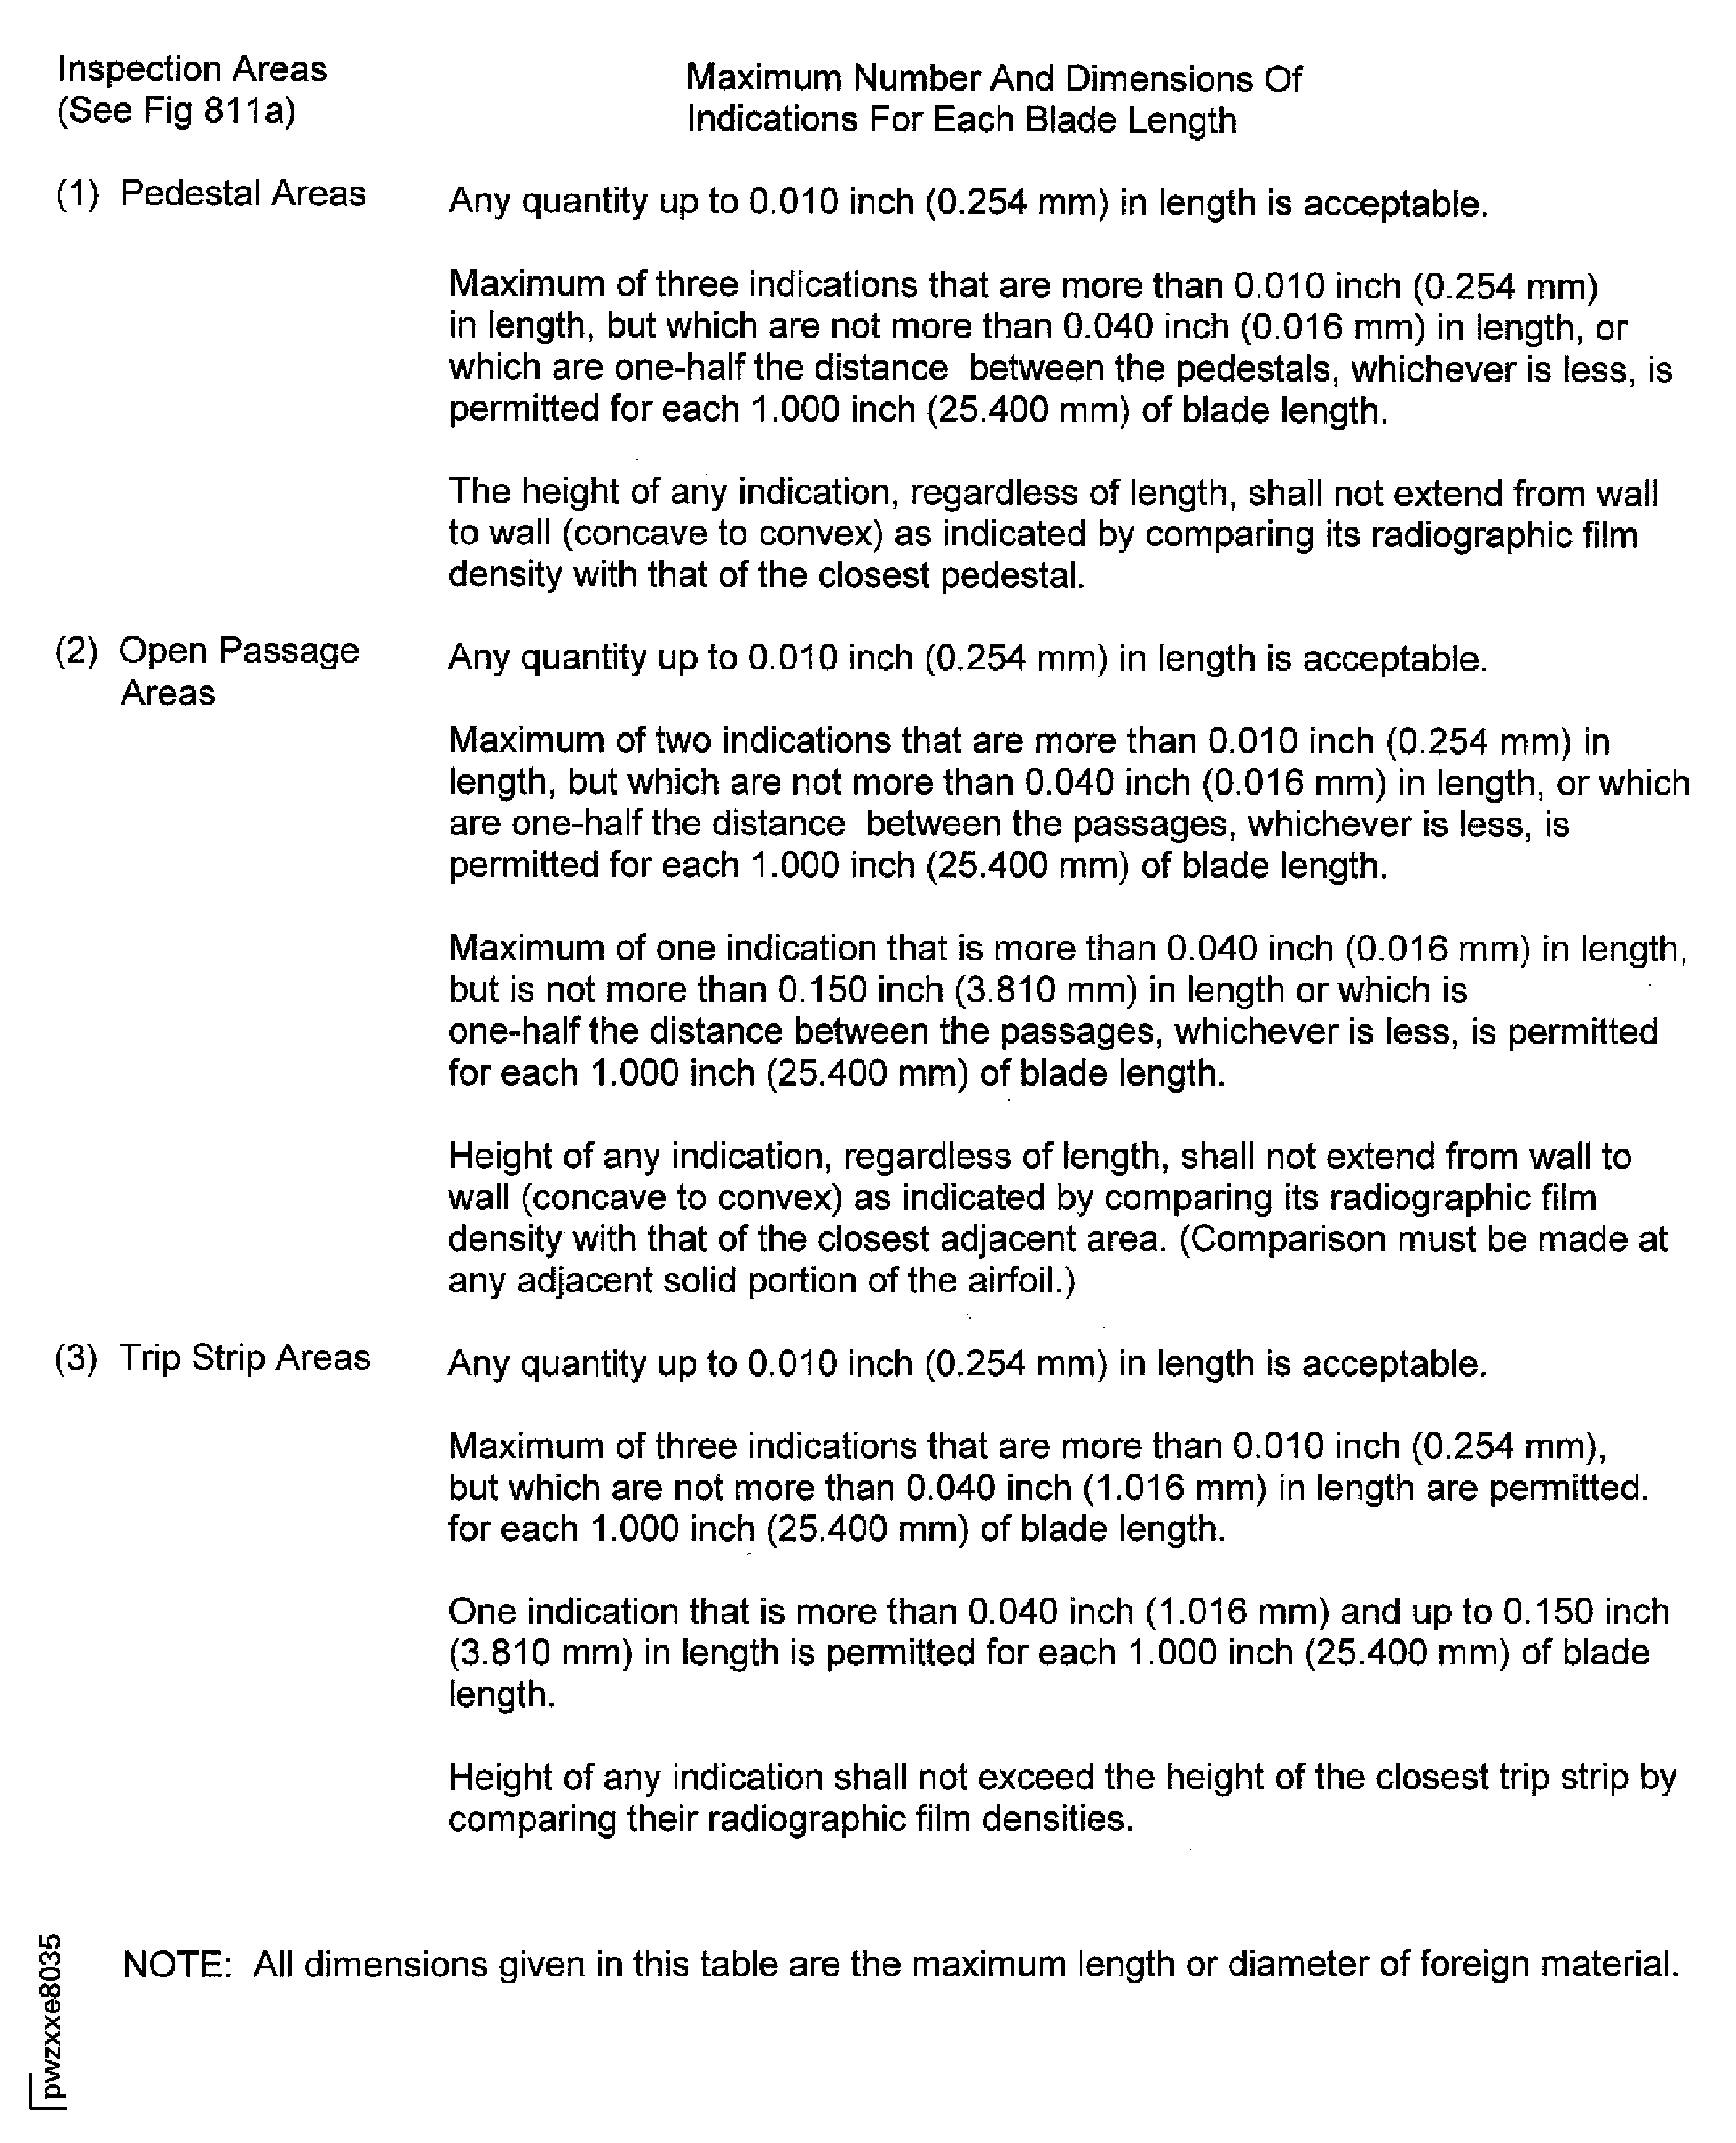
Figure: Stage 1 HPT Blade Dimensional Inspection for Blade Width
Stage 1 HPT Blade Dimensional Inspection for Blade Width
