Export Control
EAR Export Classification: Not subject to the EAR per 15 C.F.R. Chapter 1, Part 734.3(b)(3), except for the following Service Bulletins which are currently published as EAR Export Classification 9E991: SBE70-0992, SBE72-0483, SBE72-0580, SBE72-0588, SBE72-0640, SBE73-0209, SBE80-0024 and SBE80-0025.Copyright
© IAE International Aero Engines AG (2001, 2014 - 2021) The information contained in this document is the property of © IAE International Aero Engines AG and may not be copied or used for any purpose other than that for which it is supplied without the express written authority of © IAE International Aero Engines AG. (This does not preclude use by engine and aircraft operators for normal instructional, maintenance or overhaul purposes.).Applicability
All
Common Information
TASK 72-45-24-200-002-A00 HPT Stage 2 Ring Segment And Vane Cluster - Examine, Inspection-002
Effectivity
FIG/ITEM | PART NO. |
|---|---|
02-070 | 2A0172CL21 |
02-071 | 2A0172CL22 |
02-072 | 2A0172CL23 |
02-073 | 2A0172CL24 |
02-074 | 2A0172CL25 |
02-075 | 2A0172CL26 |
02-076 | 2A0172CL27 |
02-077 | 2A0172CL28 |
02-078 | 2A0172CL29 |
02-079 | 2A0172CL30 |
02-080 | 2A0172CL31 |
02-081 | 2A0172CL32 |
02-082 | 2A0172CL33 |
02-083 | 2A0172CL34 |
02-084 | 2A0172CL35 |
02-087 | 2A0172CL38 |
02-088 | 2A0172CL39 |
02-089 | 2A0172CL40 |
02-090 | 2A0172CL41 |
02-093 | 2A0172CL36 |
02-094 | 2A0172CL36-5 |
02-095 | 2A0172CL37 |
02-096 | 2A0172CL37-5 |
02-270 | 2A1072CL21 |
02-271 | 2A1072CL22 |
02-272 | 2A1072CL23 |
02-273 | 2A1072CL24 |
02-274 | 2A1072CL25 |
02-275 | 2A1072CL26 |
02-276 | 2A1072CL27 |
02-277 | 2A1072CL28 |
02-278 | 2A1072CL29 |
02-279 | 2A1072CL30 |
02-280 | 2A1072CL31 |
02-281 | 2A1072CL32 |
02-282 | 2A1072CL33 |
02-283 | 2A1072CL34 |
02-284 | 2A1072CL35 |
02-285 | 2A1072CL36 |
02-286 | 2A1072CL37 |
02-287 | 2A1072CL38 |
02-288 | 2A1072CL39 |
02-289 | 2A1072CL40 |
02-290 | 2A1072CL41 |
02-293 | 2A1072CL36 |
02-294 | 2A1072CL36-5 |
02-295 | 2A1072CL37 |
02-296 | 2A1072CL37-5 |
General
This TASK gives the procedure for the inspection of the stage 2 HPT ring segment and vane clusters.
Fig/item numbers in parentheses in the procedure agree with those used in the IPC.
The policy that is necessary for inspection is given in the SPM TASK 70-20-00-200-501.
All the parts must be cleaned before any part is examined. Refer to the SPM TASK 70-10-00-100-501.
All parts must be visually examined for damage, corrosion and wear. Any defects (distress, missing hardware etc.) that are not identified in the procedure must be documented and referred to IAE Technical Services.
The procedure for those parts which must have a crack test is given in SUBTASK 72-45-24-230-053. Do the test only if the visual examination of the vane cluster is unsatisfactory.
A ** following repair referenced in this inspection indicates that the repair is not yet published in the current revision of the manual and the part must be rejected. Contact IAE for additional information concerning FAA approved repair date.
Do not discard any part until you are sure there are no repairs available. Refer to the instructions in Repair before a discarded part is used again or oversize parts are installed.
Parts which should be discarded can be held although no repair is available. The repair of a discarded part could be shown to be necessary at a later date.
All parts must be examined to make sure that all the repairs have been completed satisfactorily.
The practices and processes referred to in the procedure by the TASK numbers are in the SPM.
References
Refer to the SPM for data on these items.
Definitions of Damage, SPM TASK 70-02-02-350-501
Cleaning, SPM TASK 70-12-09-120-501
Inspection of Parts, SPM TASK 70-20-01-200-501
Airflow - Turbine blades and vanes, SPM TASK 70-72-01-720-501
Heat Tint Test, SPM TASK 70-28-01-280-501
Preliminary Requirements
Pre-Conditions
NONESupport Equipment
NONEConsumables, Materials and Expendables
NONESpares
NONESafety Requirements
NONEProcedure
Clean the parts. Refer to TASK 72-45-24-100-000 (CLEANING-000).
Repair, VRS3218 TASK 72-45-24-300-001 (REPAIR-001) and VRS3221 TASK 72-45-24-300-007 (REPAIR-007) or VRS3492 TASK 72-45-24-300-015 (REPAIR-015)
Cracks at locations 1 and 2
Repair, VRS3218 TASK 72-45-24-300-001 (REPAIR-001) or Repair, VRS3492 TASK 72-45-24-300-015 (REPAIR-015)
Other than (a) and (b)
Repair, VRS3218 TASK 72-45-24-300-001 (REPAIR-001) or Repair, VRS3219 TASK 72-45-24-300-017 (REPAIR-017)
Cracks that if extended would go through into a different crack.
Crack at locations 3 and 5
Repair, VRS3218 TASK 72-45-24-300-001 (REPAIR-001) or VRS3219 TASK 72-45-24-300-017 (REPAIR-017)
Other than (a)
Cracks at location 4.
Repair, VRS3218 TASK 72-45-24-300-001 (REPAIR-001) or VRS3219 TASK 72-45-24-300-017 (REPAIR-017)
Other than (a)
Cracks at locations 6 and 7.
Do the crack test on the parts that are given below. Use the applicable penetrant inspection procedure. Look carefully at the airfoil-to-platform fillet radii, platform edges, convex side of airfoil and honeycomb seal braze.
PART IDENT
TASK/SUBTASK
Stage 2 HPT ring segment
and vane clusters
(Spray)
SUBTASK 72-45-24-230-053-001 Examine the Stage 2 HPT Ring Segment and Vane Clusters (02-070 thru 02-090 and 02-270 thru 02-290) for Cracks
Clean the parts. Refer to TASK 72-45-24-100-000 (CLEANING-000).
Repair, VRS3218 TASK 72-45-24-300-001 (REPAIR-001) and VRS3221 TASK 72-45-24-300-007 (REPAIR-007) or VRS3492 TASK 72-45-24-300-015 (REPAIR-015)
Cracks at locations 1 and 2
Repair, VRS3218 TASK 72-45-24-300-001 (REPAIR-001) or Repair, VRS3492 TASK 72-45-24-300-015 (REPAIR-015)
Other than (a) and (b)
Repair, VRS3218 TASK 72-45-24-300-001 (REPAIR-001) or Repair, VRS3219 TASK 72-45-24-300-017 (REPAIR-017)
Cracks that if extended would go through into a different crack.
Cracks at location 3 and 5
Repair, VRS3218 TASK 72-45-24-300-001 (REPAIR-001) or VRS3219 TASK 72-45-24-300-017 (REPAIR-017)
Other than (a)
Cracks at location 4.
Repair, VRS3218 TASK 72-45-24-300-001 (REPAIR-001) or VRS3219 TASK 72-45-24-300-017 (REPAIR-017)
Other than (a)
Cracks at locations 6 and 7.
Do the crack test on the parts that are given below. Use the applicable penetrant inspection procedure. Look carefully at the airfoil-to-platform fillet radii, platform edges, convex side of airfoil and honeycomb seal braze.
PART IDENT
TASK/SUBTASK
Stage 2 HPT ring segment
and vane clusters
(Spray)
SUBTASK 72-45-24-230-053-002 Examine the Stage 2 HPT Ring Segment and Vane Clusters (02-070 thru 02-090 and 02-270 thru 02-290) for Cracks
Repairs, VRS3217 TASK 72-45-24-300-002 (REPAIR-002), VRS3222 TASK 72-45-24-300-003 (REPAIR-003) and VRS3417 TASK 72-45-24-300-004 (REPAIR-004)
Corrosion and burned areas at locations 1, 2, 3, 4, 7 and 8
Examine the vane clusters airfoil and platform for corrosion and burned areas. Use a white light and 10X magnification.
Repair VRS3226 TASK 72-45-24-300-011 (REPAIR-011)
If the base metal is shown at locations 2, 3, 7 and 8
Accept
NOTE
To find if the base metal is shown, use the heat tint test in the SPM TASK 70-28-01-280-501.
Less than 0.050in. (1.27 mm) from any film cooling hole on the platform, at location 7
Repair, VRS3217 TASK 72-45-24-300-002 (REPAIR-002), VRS3222 TASK 72-45-24-300-003 (REPAIR-003) and VRS3417 TASK 72-45-24-300-004 (REPAIR-004)
Other than (4)
Examine the vane cluster airfoil and platform for chips and erosion. Use a white light and 10X magnification.
Repairs, VRS3217 TASK 72-45-24-300-002 (REPAIR-002), VRS3222 TASK 72-45-24-300-003 (REPAIR-003) and VRS3417 TASK 72-45-24-300-004 (REPAIR-004)
Other than (1) through (3)
Examine the vane clusters for nicks and dents. All dents must have a round bottom. All nicks and dents must not show base metal. Use a white light and 10X magnification.
SUBTASK 72-45-24-220-053 Examine the Stage 2 HPT ring Segment and Vane Clusters (02-070 thru 02-090 and 02-270 thru 02-290) Airfoil and Platform
Repair, VRS3217 TASK 72-45-24-300-002 (REPAIR-002)
Other than (1)
Examine the vane clusters outer diameter borescope hole for chipped coating at location 1512.
Repair, VRS3708 TASK 72-45-24-300-028 (REPAIR-028)
Other than (1)
Examine the vane clusters outer diameter borescope hole diameter at location 1512.
SUBTASK 72-45-24-220-054 Examine the Stage 2 HPT Ring Segment and Vane Clusters (02-270 thru 02-290) Outer Diameter Borescope Hole
Refer to: Figure
Repair, VRS3218 TASK 72-45-24-300-001 (REPAIR-001)
Other than (a)
Wear.
Examine the vane clusters outer diameter positioning lugs for wear at locations 3 and 4.
SUBTASK 72-45-24-220-055 Examine the Stage 2 HPT Ring Segment and Vane Clusters (02-070 thru 02-090 and 02-270 thru 02-290) Outer Diameter Positioning Lugs
Refer to: Figure
Repair, VRS3218 TASK 72-45-24-300-001 (REPAIR-001)
Other than (a)
Wear.
Examine the vane clusters outer diameter vane buttress for wear at locations 1 and 2.
SUBTASK 72-45-24-220-056 Examine the Stage 2 HPT Ring Segment and Vane Clusters (02-070 thru 02-090 and 02-270 thru 02-290) Outer Diameter Vane Buttress
Refer to: Figure
Repair, VRS3223 TASK 72-45-24-300-006 (REPAIR-006)
Burns
Repair, VRS3223 TASK 72-45-24-300-006 (REPAIR-006)
Other than (a)
Wear.
Repair, VRS3223 TASK 72-45-24-300-006 (REPAIR-006)
Voids in bonded edges, loose honeycomb and missing braze material (not bonded)
Repair, VRS3223 TASK 72-45-24-300-006 (REPAIR-006)
Crushed or broken honeycomb
Examine the vane clusters inner diameter honeycomb (front and rear) for burns, damage, bond and wear at locations 1 and 4.
SUBTASK 72-45-24-220-057 Examine the Stage 2 HPT Ring Segment and Vane Clusters (02-070 thru 02-090 and 02-270 thru 02-290) Inner Diameter Platform Honeycomb
Refer to: Figure
Repair, VRS3221 TASK 72-45-24-300-007 (REPAIR-007) or VRS3380 TASK 72-45-24-300-016 (REPAIR-016) or VRS3492 TASK 72-45-24-300-015 (REPAIR-015)
Burns
Repair, VRS3221 TASK 72-45-24-300-007 (REPAIR-007) or VRS3380 TASK 72-45-24-300-016 (REPAIR-016) or VRS3492 TASK 72-45-24-300-015 (REPAIR-015)
Other than (a)
Wear
Repair, VRS3221 TASK 72-45-24-300-007 (REPAIR-007) or VRS3380 TASK 72-45-24-300-016 (REPAIR-016) or VRS3492 TASK 72-45-24-300-015 (REPAIR-015)
Voids in bonded edges, loose honeycomb and missing braze material (not bonded)
Repair, VRS3221 TASK 72-45-24-300-007 (REPAIR-007) or VRS3380 TASK 72-45-24-300-016 (REPAIR-016) or VRS 3492 TASK 72-45-24-300-015 (REPAIR-015)
Crushed or broken honeycomb
Examine the ring segment honeycomb for burns, damage, bond and wear at location 3.
SUBTASK 72-45-24-220-058 Examine the Stage 2 HPT Ring Segment and Vane Clusters (02-070 thru 02-090 and 02-270 thru 02-290) Ring Segment Inner Diameter Honeycomb
Refer to: Figure
Repair, VRS3319 TASK 72-45-24-300-009 (REPAIR-009)
Loose rivets
Examine the air seal ring segment for loose rivets at location 2.
SUBTASK 72-45-24-220-059 Examine the Stage 2 HPT Ring Segment and Vane Clusters (02-070 thru 02-090 and 02-270 thru 02-290) Air Seal Ring Segment Rivets
Refer to: Figure
Repair, VRS3321 TASK 72-45-24-300-014 (REPAIR-014)
Other than (a)
Oval diameter.
Examine the air seal ring segment for oval rivet holes at location 2.
Repair, VRS3321 TASK 72-45-24-300-014 (REPAIR-014)
More than 0.165in. (4.191 mm) in diameter
Examine the air seal ring segment for oversize rivet holes at location 2.
Repair, VRS3321 TASK 72-45-24-300-014 (REPAIR-014)
Cracks
Examine the air seal ring segment rivet holes at location 2.
SUBTASK 72-45-24-220-065 Examine the Stage 2 HPT Ring Segment and Vane Clusters (02-070 thru 02-090 and 02-270 thru 02-290) Air Seal Ring Segment Rivet Holes
NOTE
If the vane cluster and ring segment rivets are removed do this inspection.Refer to: Figure
Repair, VRS3317 TASK 72-45-24-300-010 (REPAIR-010)
Plugging
Examine the vane clusters trailing edge cooling air slots for plugging at location 7.
SUBTASK 72-45-24-220-060 Examine the Stage 2 HPT Ring Segment and Vane Clusters (02-070 thru 02-090 and 02-270 thru 02-290) Trailing Edge Cooling Air Slots
Refer to: Figure
Repair, VRS3218 TASK 72-45-24-300-001 (REPAIR-001)
Other than (1)
Examine the vane clusters for feather seals between the detail vanes at locations 1, 2 and 3.
SUBTASK 72-45-24-220-061 Examine the Stage 2 HPT Ring Segment and Vane Clusters (02-070 thru 02-090 and 02-270 thru 02-290) for Feather Seals
Refer to: Figure
SUBTASK 72-45-24-220-062 Examine the Stage 2 HPT Ring Segment and Vane Clusters (02-070 thru 02-090 and 02-270 thru 02-290) Feather Seal Slots
Do the heat tint procedure for the stage 2 ring segment and vane cluster assembly by the procedure given in the SPM TASK 70-28-01-280-501.
SUBTASK 72-45-24-280-051 Examine the Stage 2 HPT Ring Segment and Vane Clusters (02-070 thru 02-090 and 02-270 thru 02-290) Vane Coat by Heat Tint
Do the airflow check by the procedure given in VRS3219 TASK 72-45-24-300-017 (REPAIR-017).
SUBTASK 72-45-24-280-052 Examine the Stage 2 HPT Ring Segment and Vane Clusters (02-070 thru 02-090 and 02-270 thru 02-290) by the Airflow Check
NOTE
Do all the inspections and repairs on the vane before you do the airflow check.Refer to: Figure
SUBTASK 72-45-24-220-066 Examine the Stage 2 HPT Ring Segment and Vane Clusters (02-070 thru 02-090 and 02-270 thru 02-290) Feather Seal Slots where vanes mated
NOTE
If the vane cluster and ring segment rivets are removed do this inspection.Refer to: Figure
Repair, VRS3318 TASK 72-45-24-300-013 (REPAIR-013)
Other than (a)
Oval diameter.
Examine the vane rivet hole for the oval diameter at location 2.
Repair, VRS3318 TASK 72-45-24-300-013 (REPAIR-013)
More than 0.165in. (4.191 mm) in diameter
Examine the vane rivet hole for oversize diameter at location 2.
Repair, VRS3318 TASK 72-45-24-300-013 (REPAIR-013)
Cracks
Examine the vane rivet hole for cracks at location 2.
SUBTASK 72-45-24-220-067 Examine the Stage 2 HPT Ring Segment and Vane Clusters (02-070 thru 02-090 and 02-270 thru 02-290) Rivet Holes
NOTE
If the vane cluster and ring segment rivets are removed do this inspection.Refer to Figure.
Repair, VRS3570 TASK 72-45-24-300-026 (REPAIR-026)
Not more than 0.030 in. (0.76 mm) maximum
Examine the air sealing ring segment flange for wear.
SUBTASK 72-45-24-220-145 Examine the Stage 2 HPT Air Sealing Ring Segment
Repair, VRS3783 TASK 72-45-24-300-033 (REPAIR-033)
NOTE
If the vane cluster and ring segment rivets are removed, do this inspection.
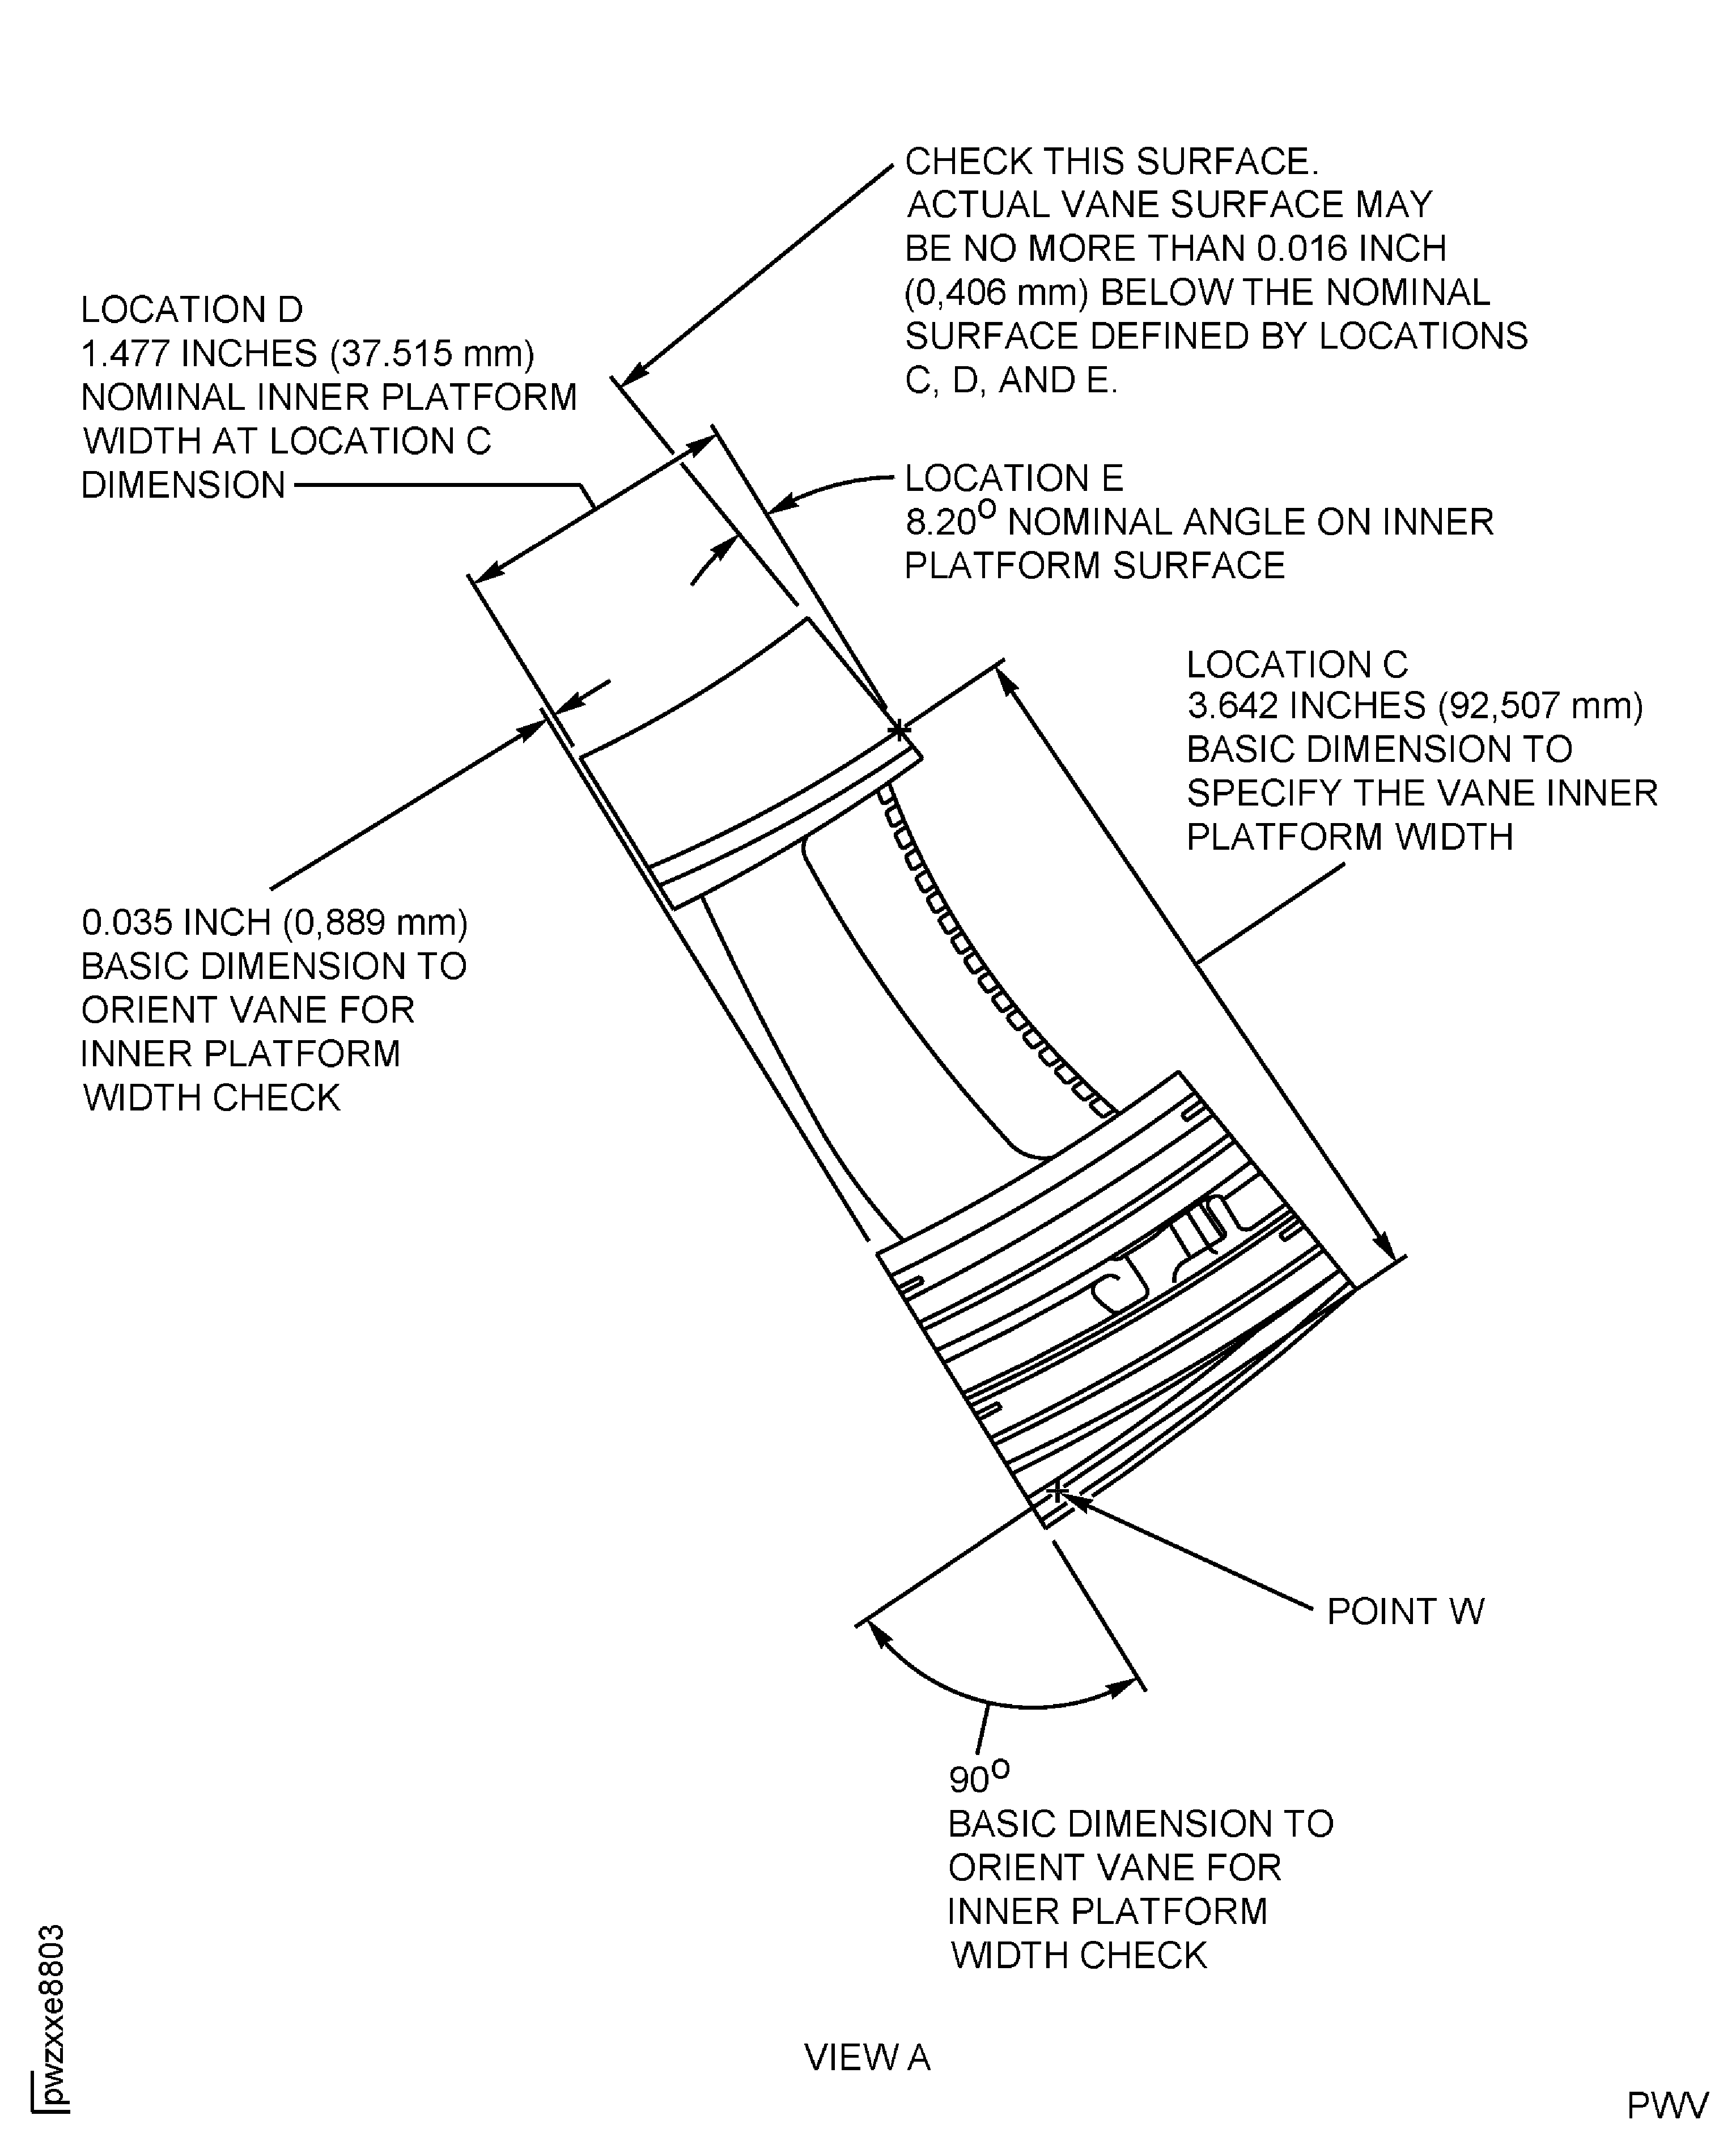
More than 0.016 in. (0.41 mm) below nominal
Examine the vane inner mateface dimension.
SUBTASK 72-45-24-220-219 Examine the Stage 2 HPT Ring Segment and Vane Clusters (02-070 thru 02-090 and 02-093 thru 02-096 and 02-270 thru 02-290 and 02-293 thru 02-296) Inner Diameter Mateface
Figure: Stage 2 HPT Ring Segment and Vane Cluster Fluorescent Penetrant Inspection Locations
Sheet 1
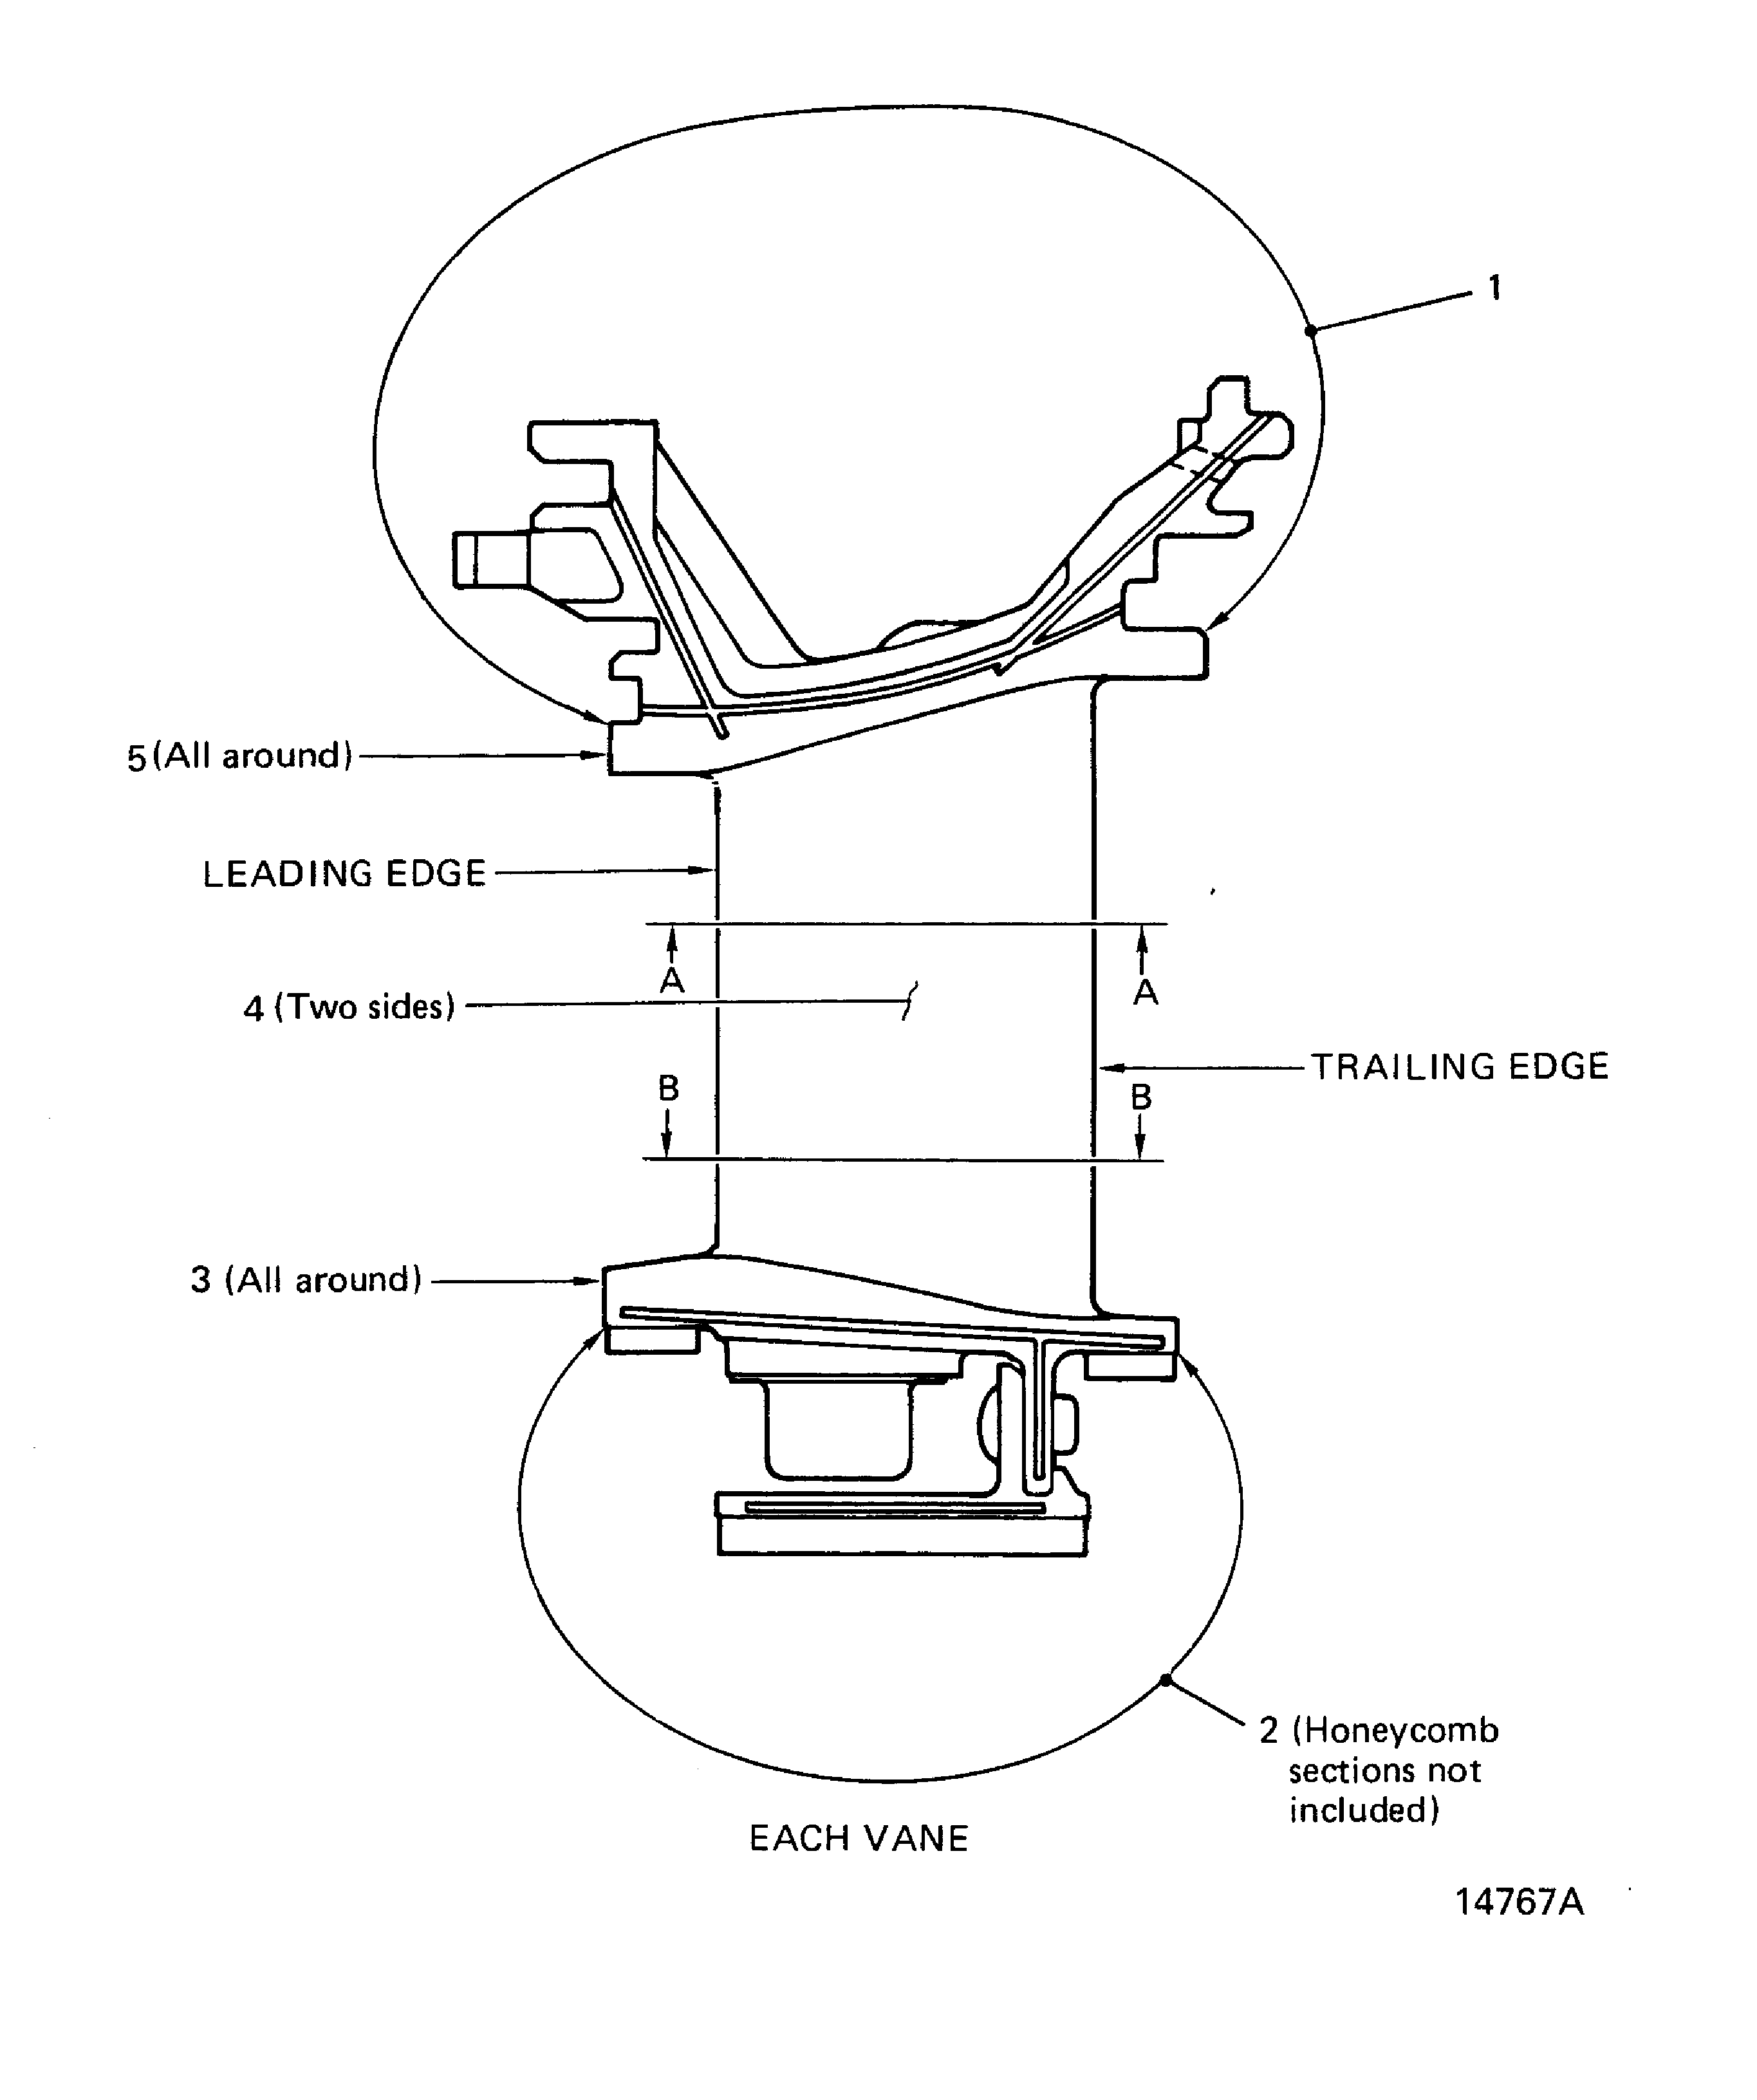
Figure: Stage 2 HPT Ring Segment and Vane Cluster Fluorescent Penetrant Inspection Locations
Sheet 2
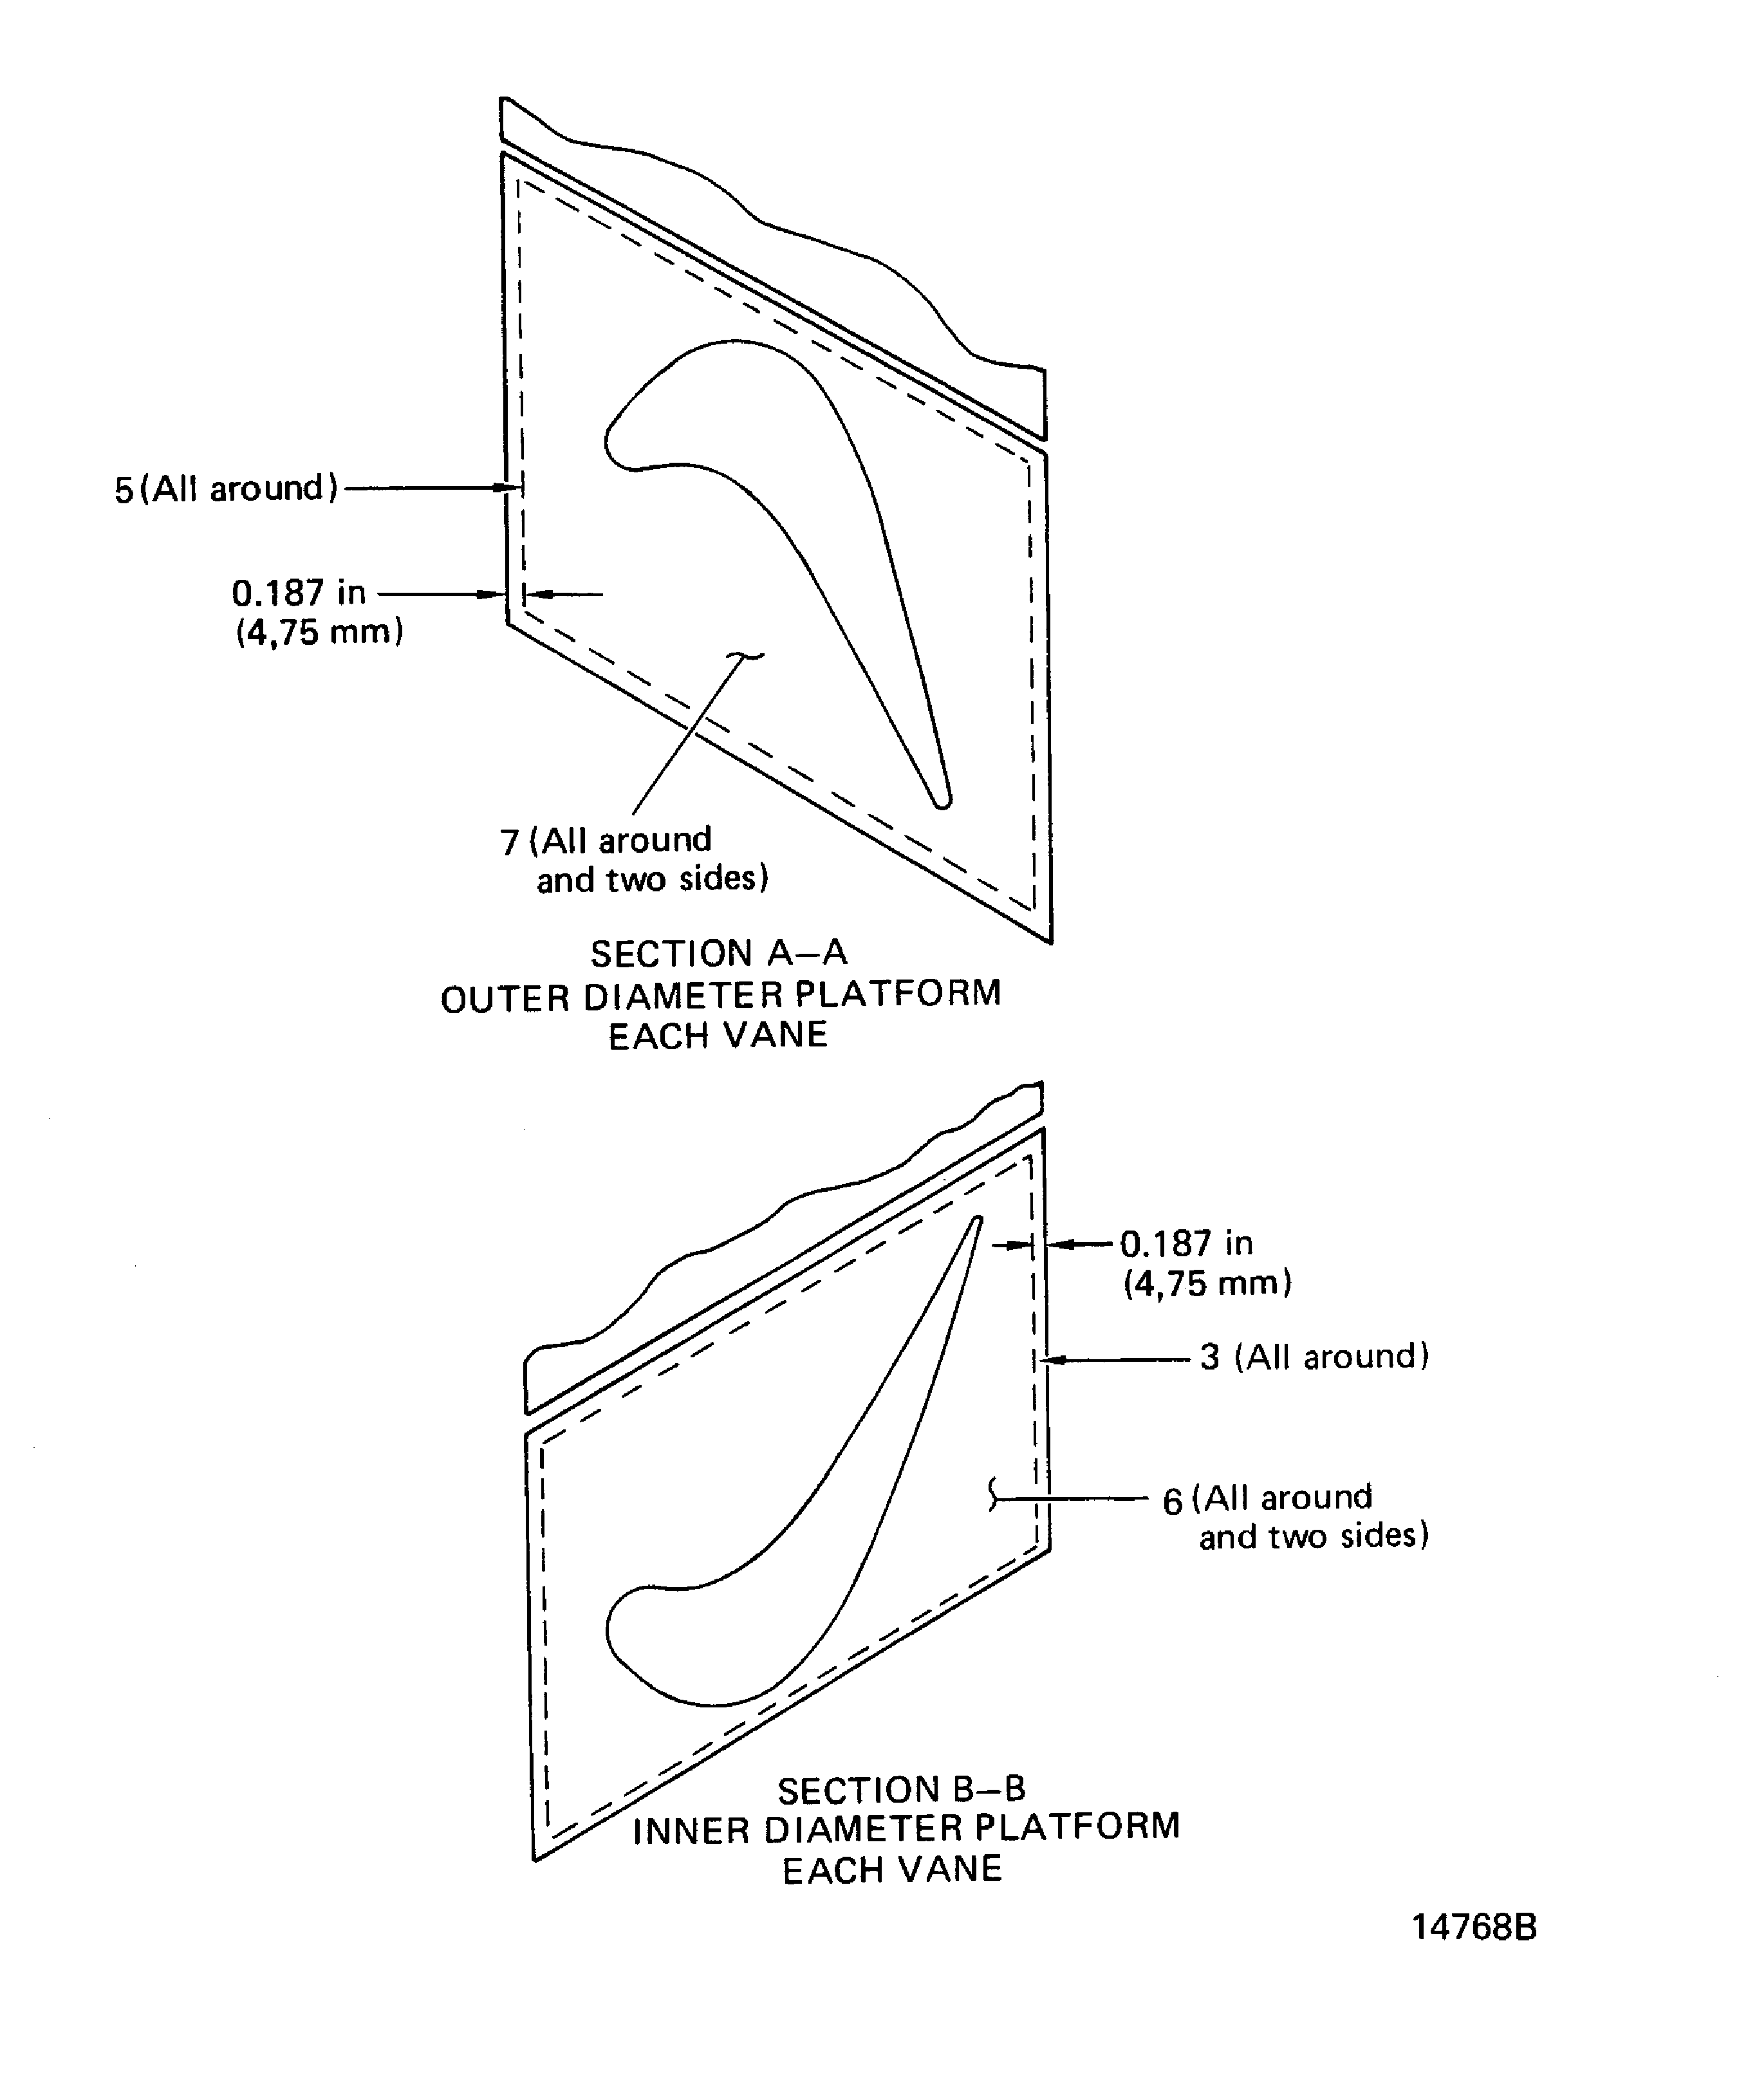
Figure: Stage 2 HPT Ring Segment and Vane Cluster Airfoil and Platform Inspection Locations
Sheet 1
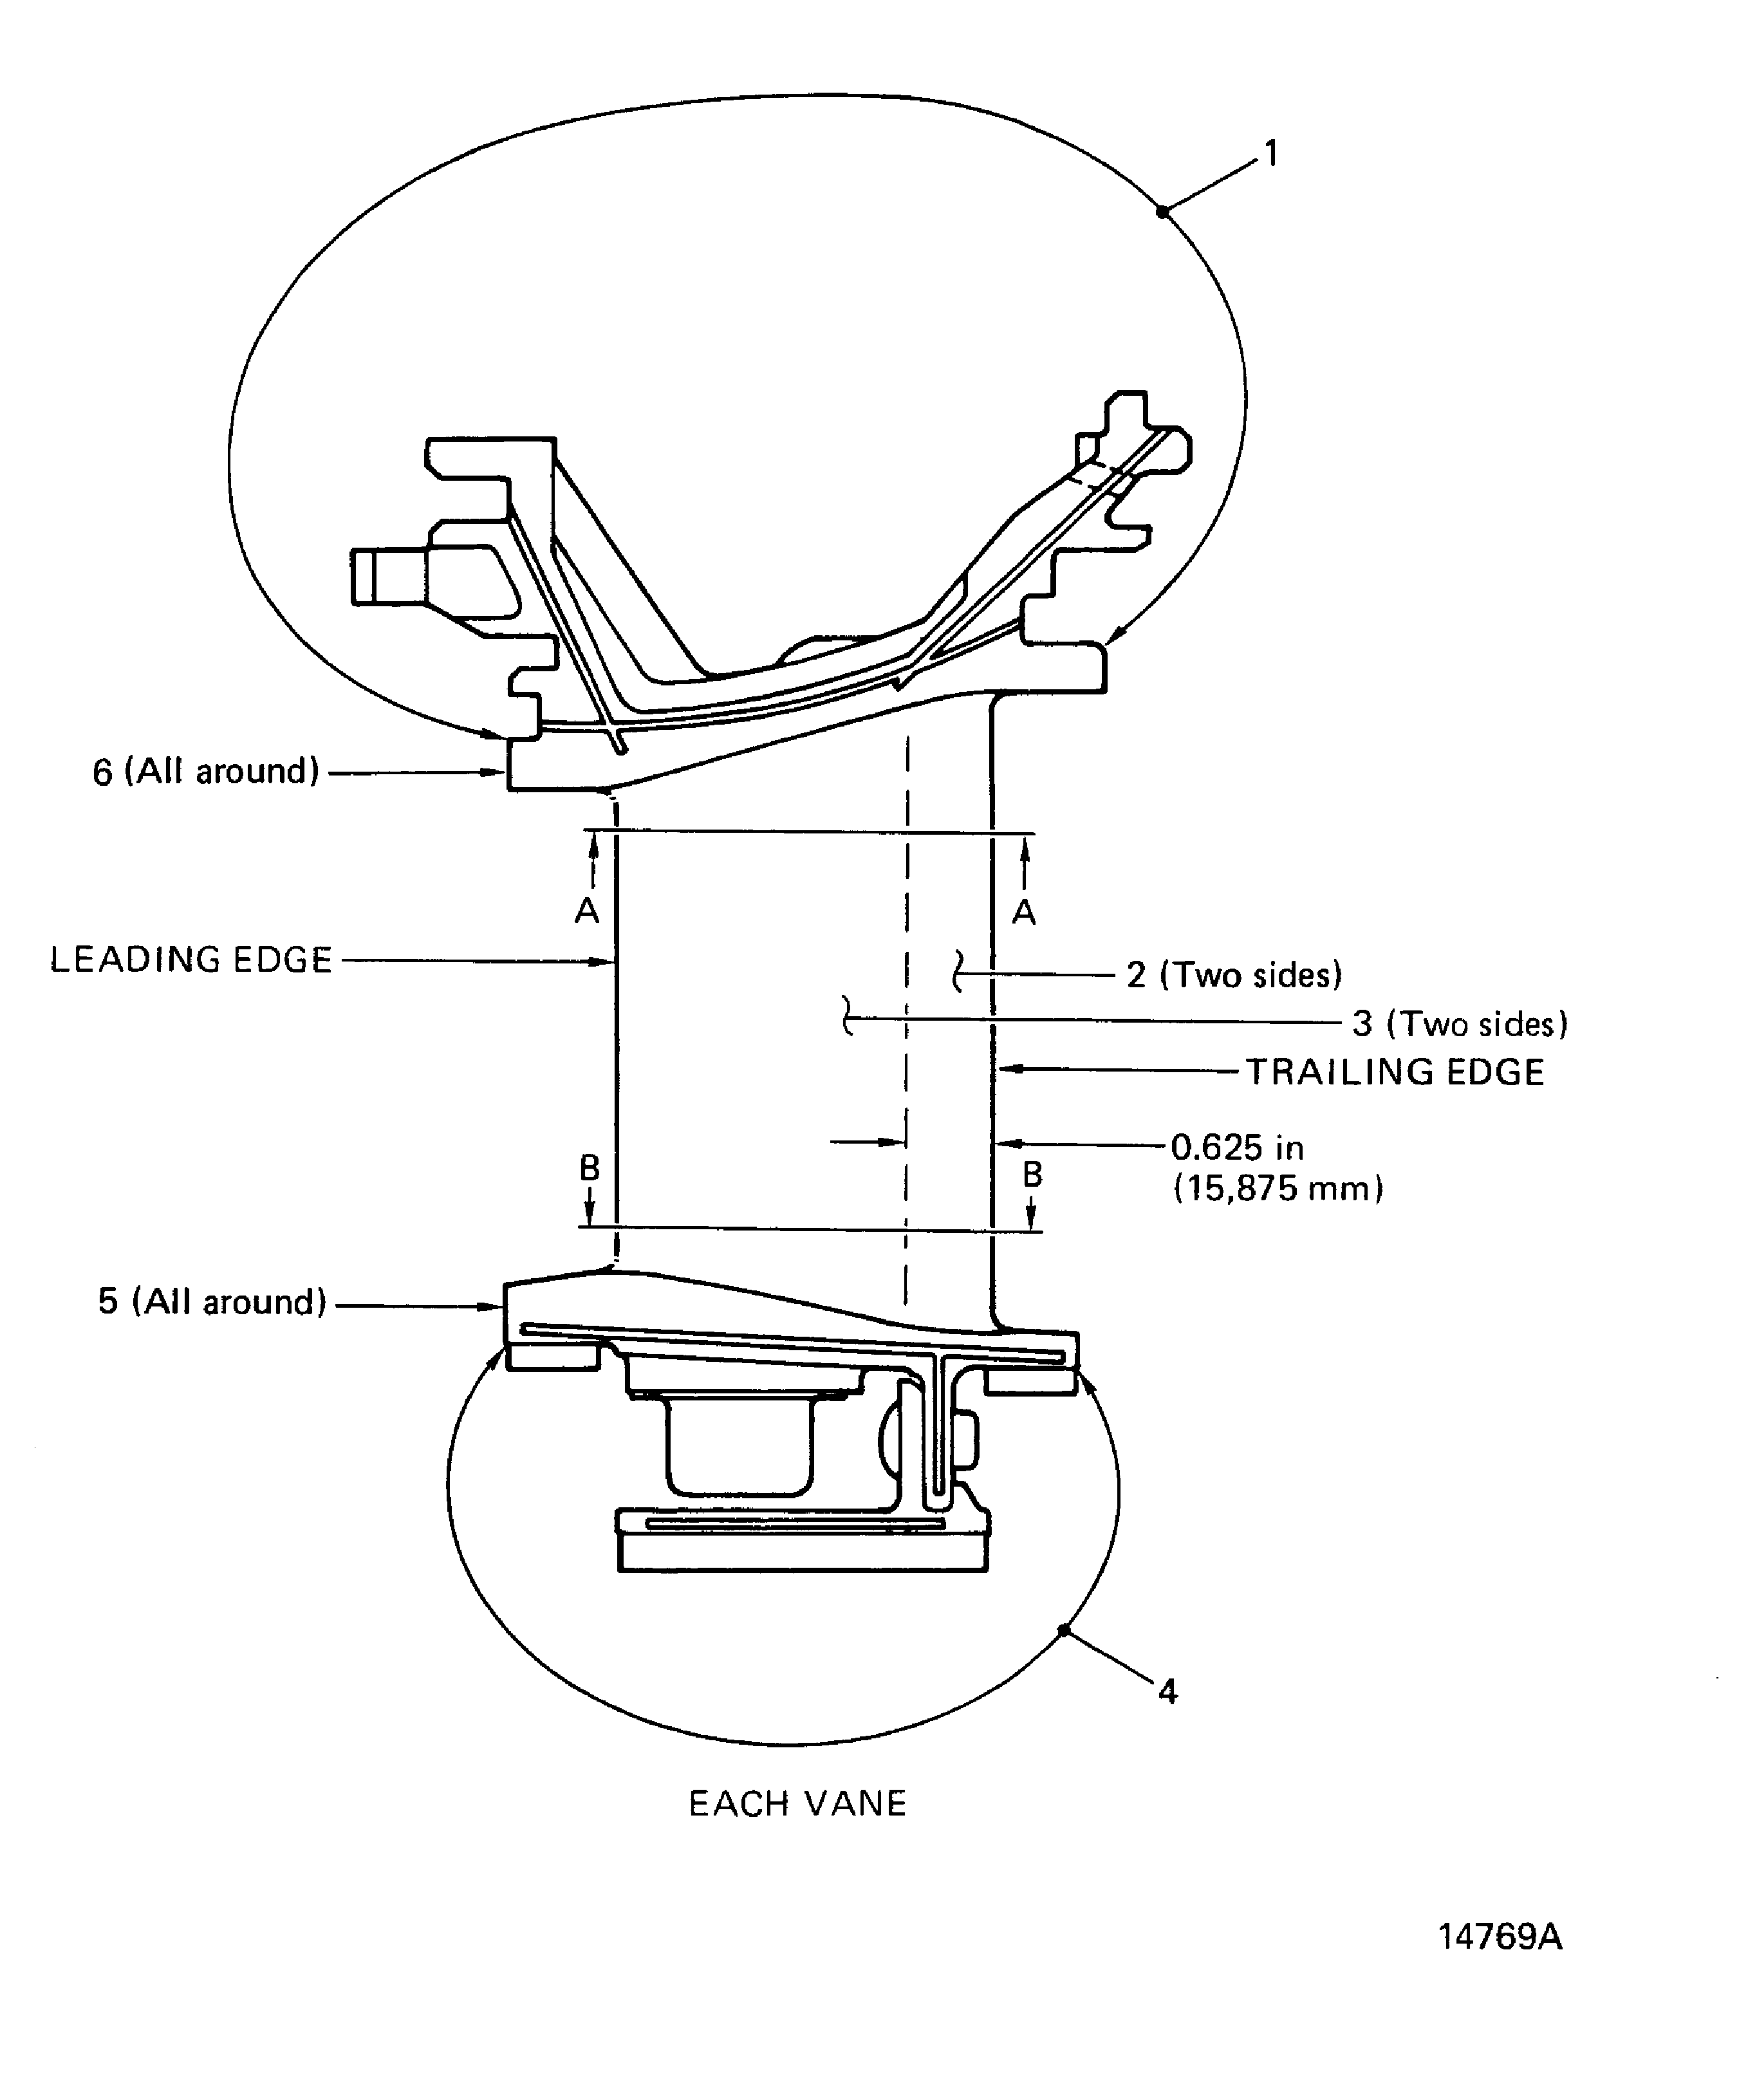
Figure: Stage 2 HPT Ring Segment and Vane Cluster Airfoil and Platform Inspection Locations
Sheet 2
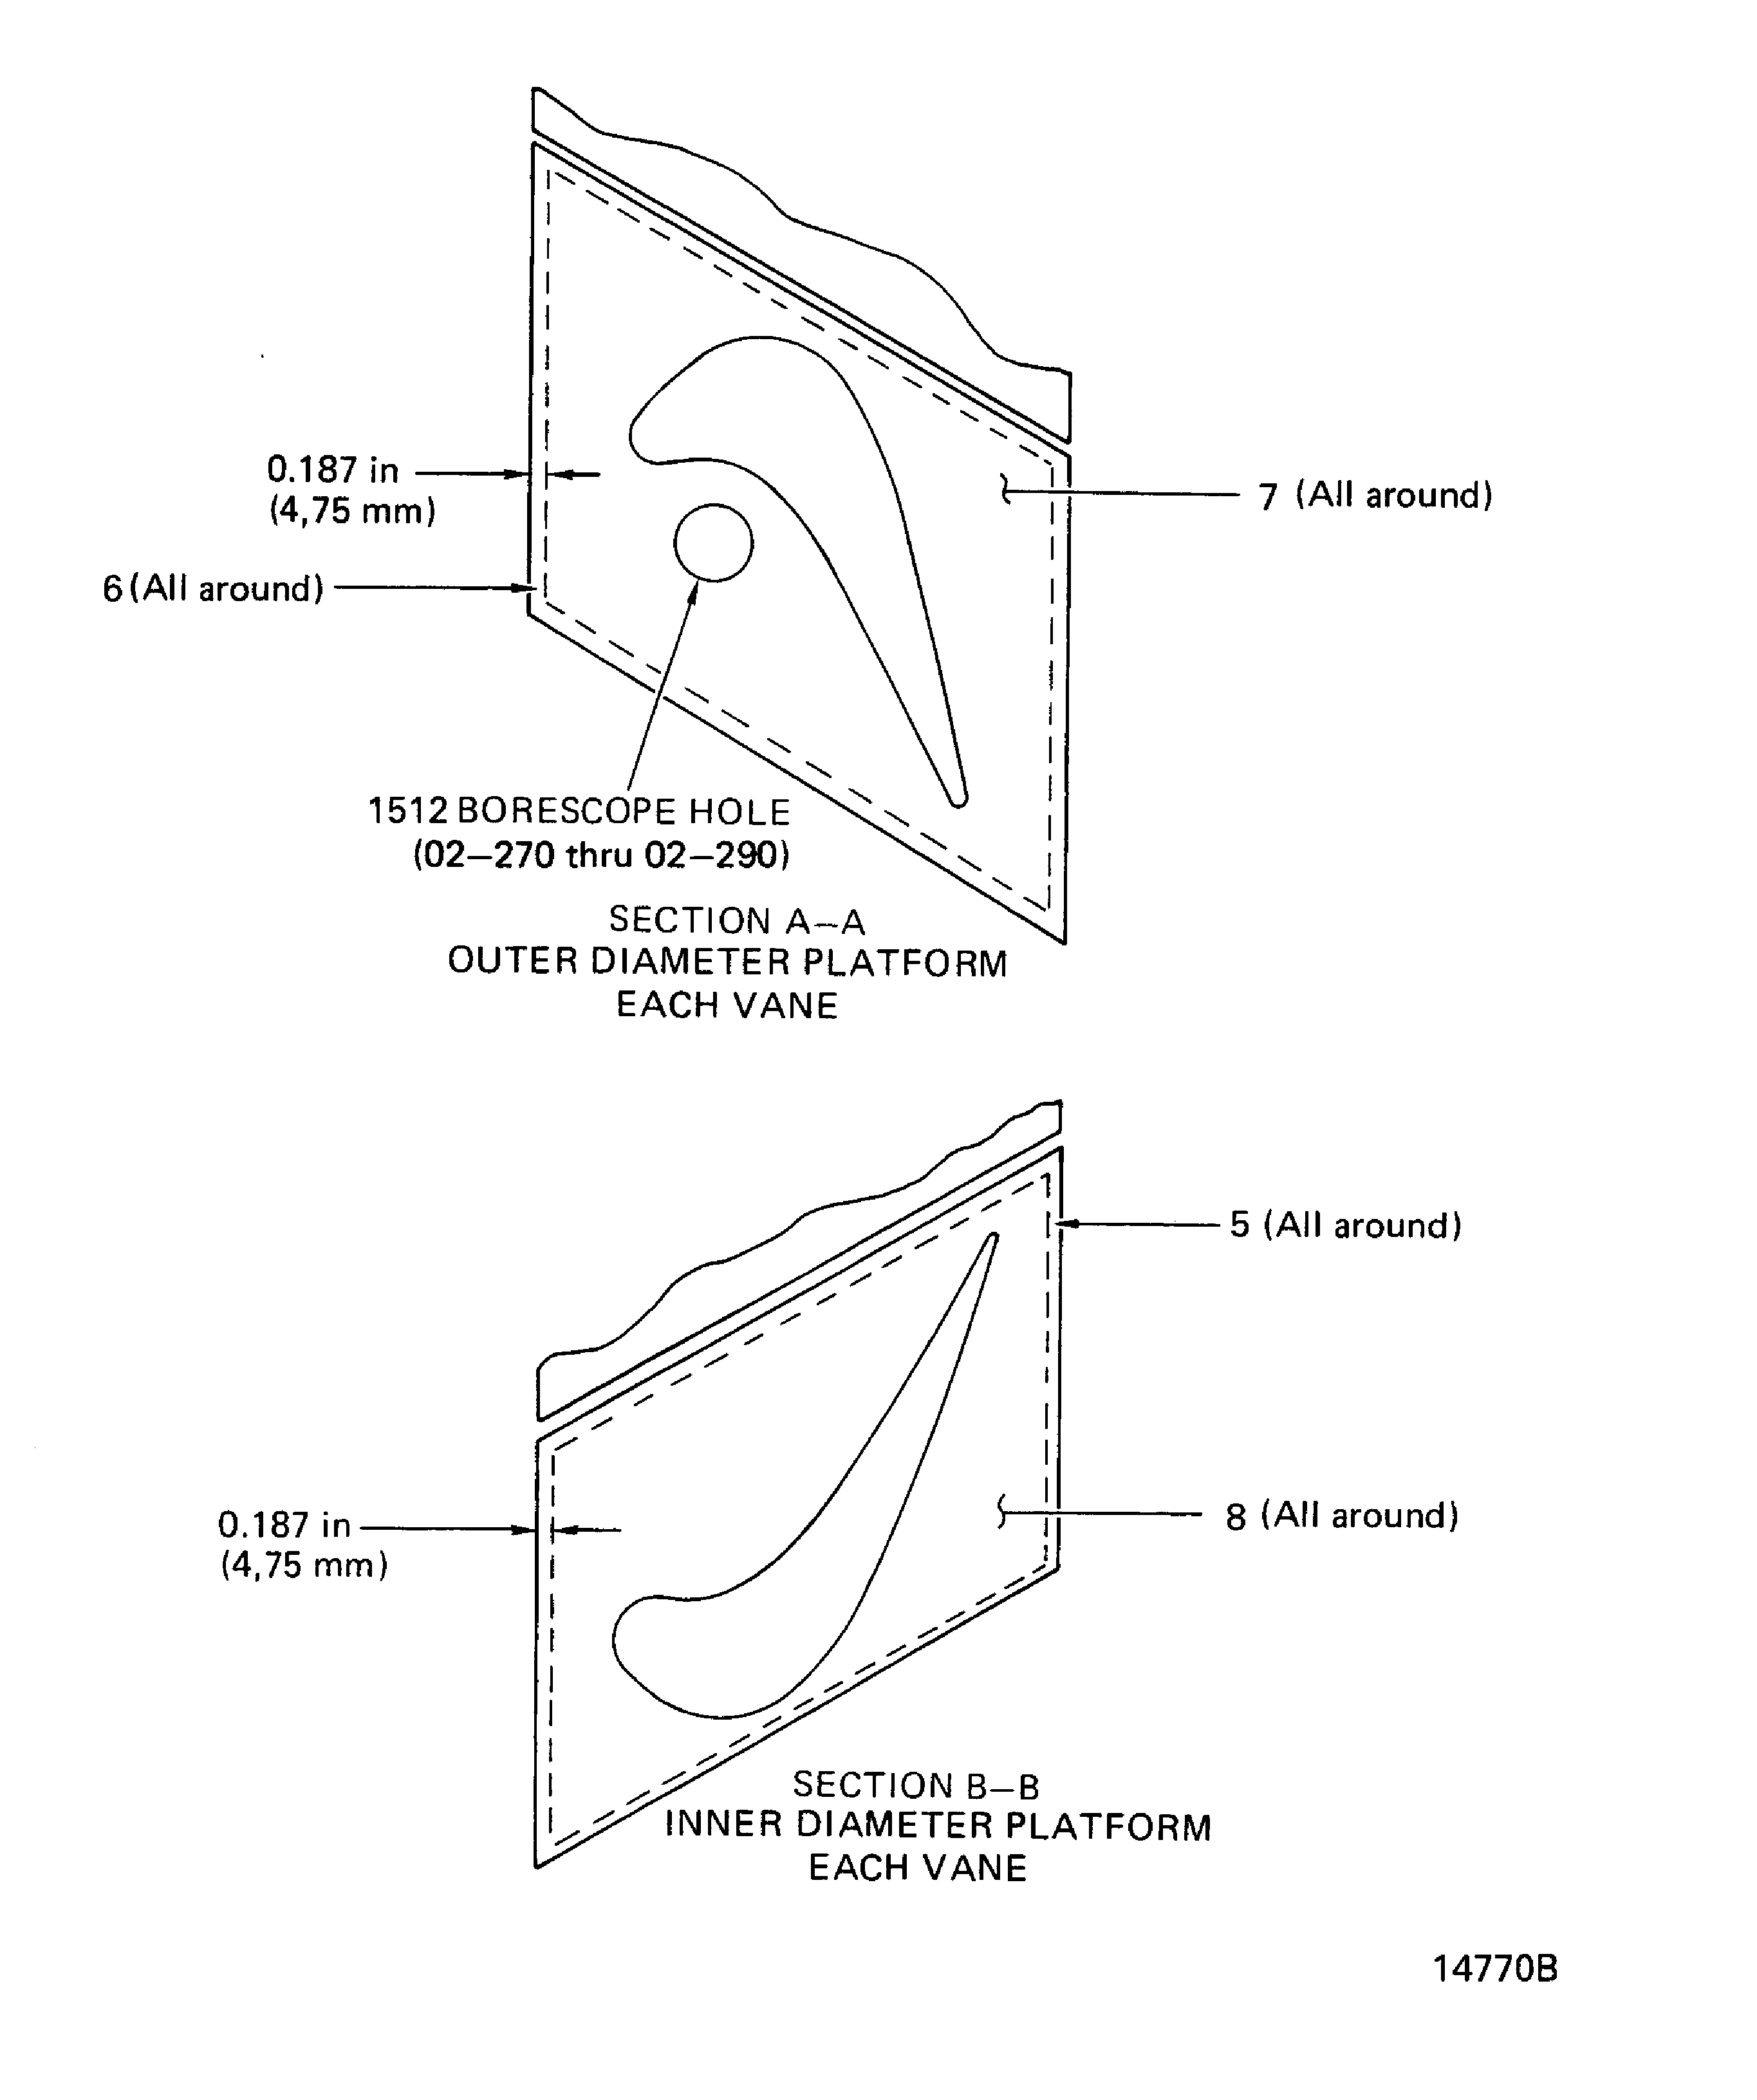
Figure: Stage 2 HPT Ring Segment and Vane Cluster Positioning Lugs and Buttress Inspection Locations
Stage 2 HPT Ring Segment and Vane Cluster Positioning Lugs and Buttress Inspection Locations
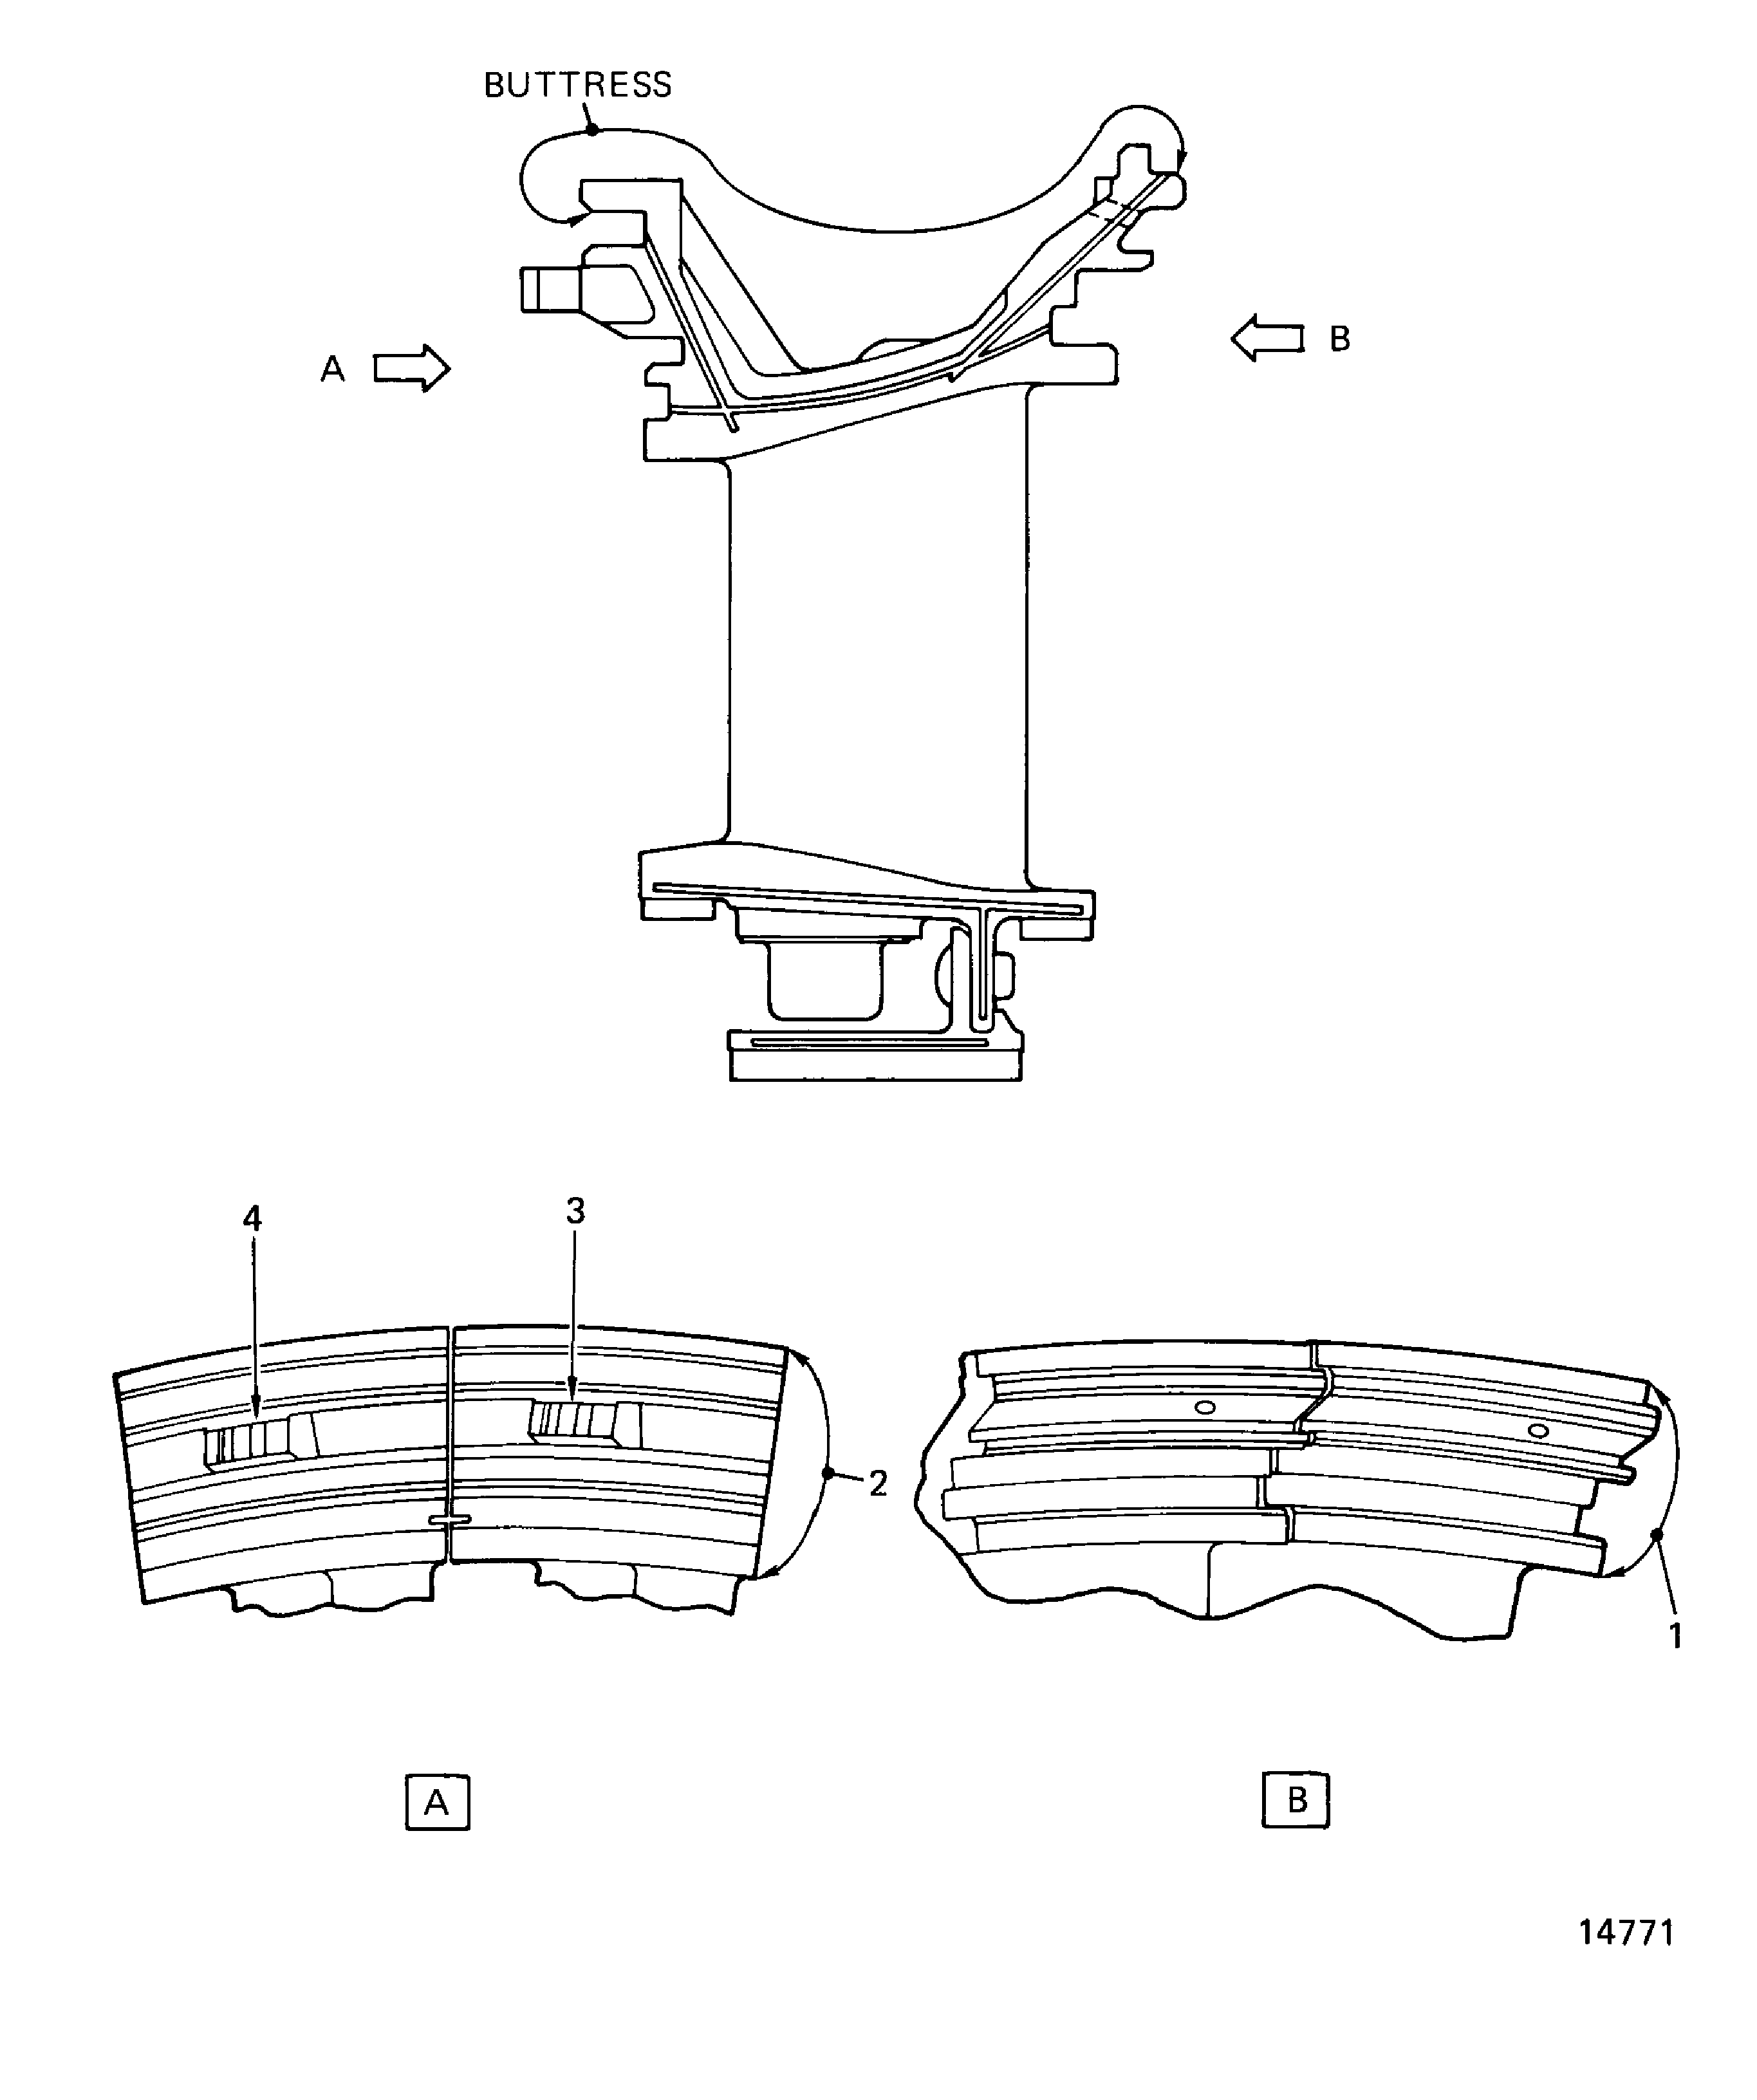
Figure: Stage 2 HPT Riing Segment and Vane Cluster Honeycomb Inspection Locations
Stage 2 HPT Riing Segment and Vane Cluster Honeycomb Inspection Locations

Figure: Stage 2 HPT Ring Segment and Vane Cluster Trailing Edge and Feather Seal Inspection Locations
Stage 2 HPT Ring Segment and Vane Cluster Trailing Edge and Feather Seal Inspection Locations
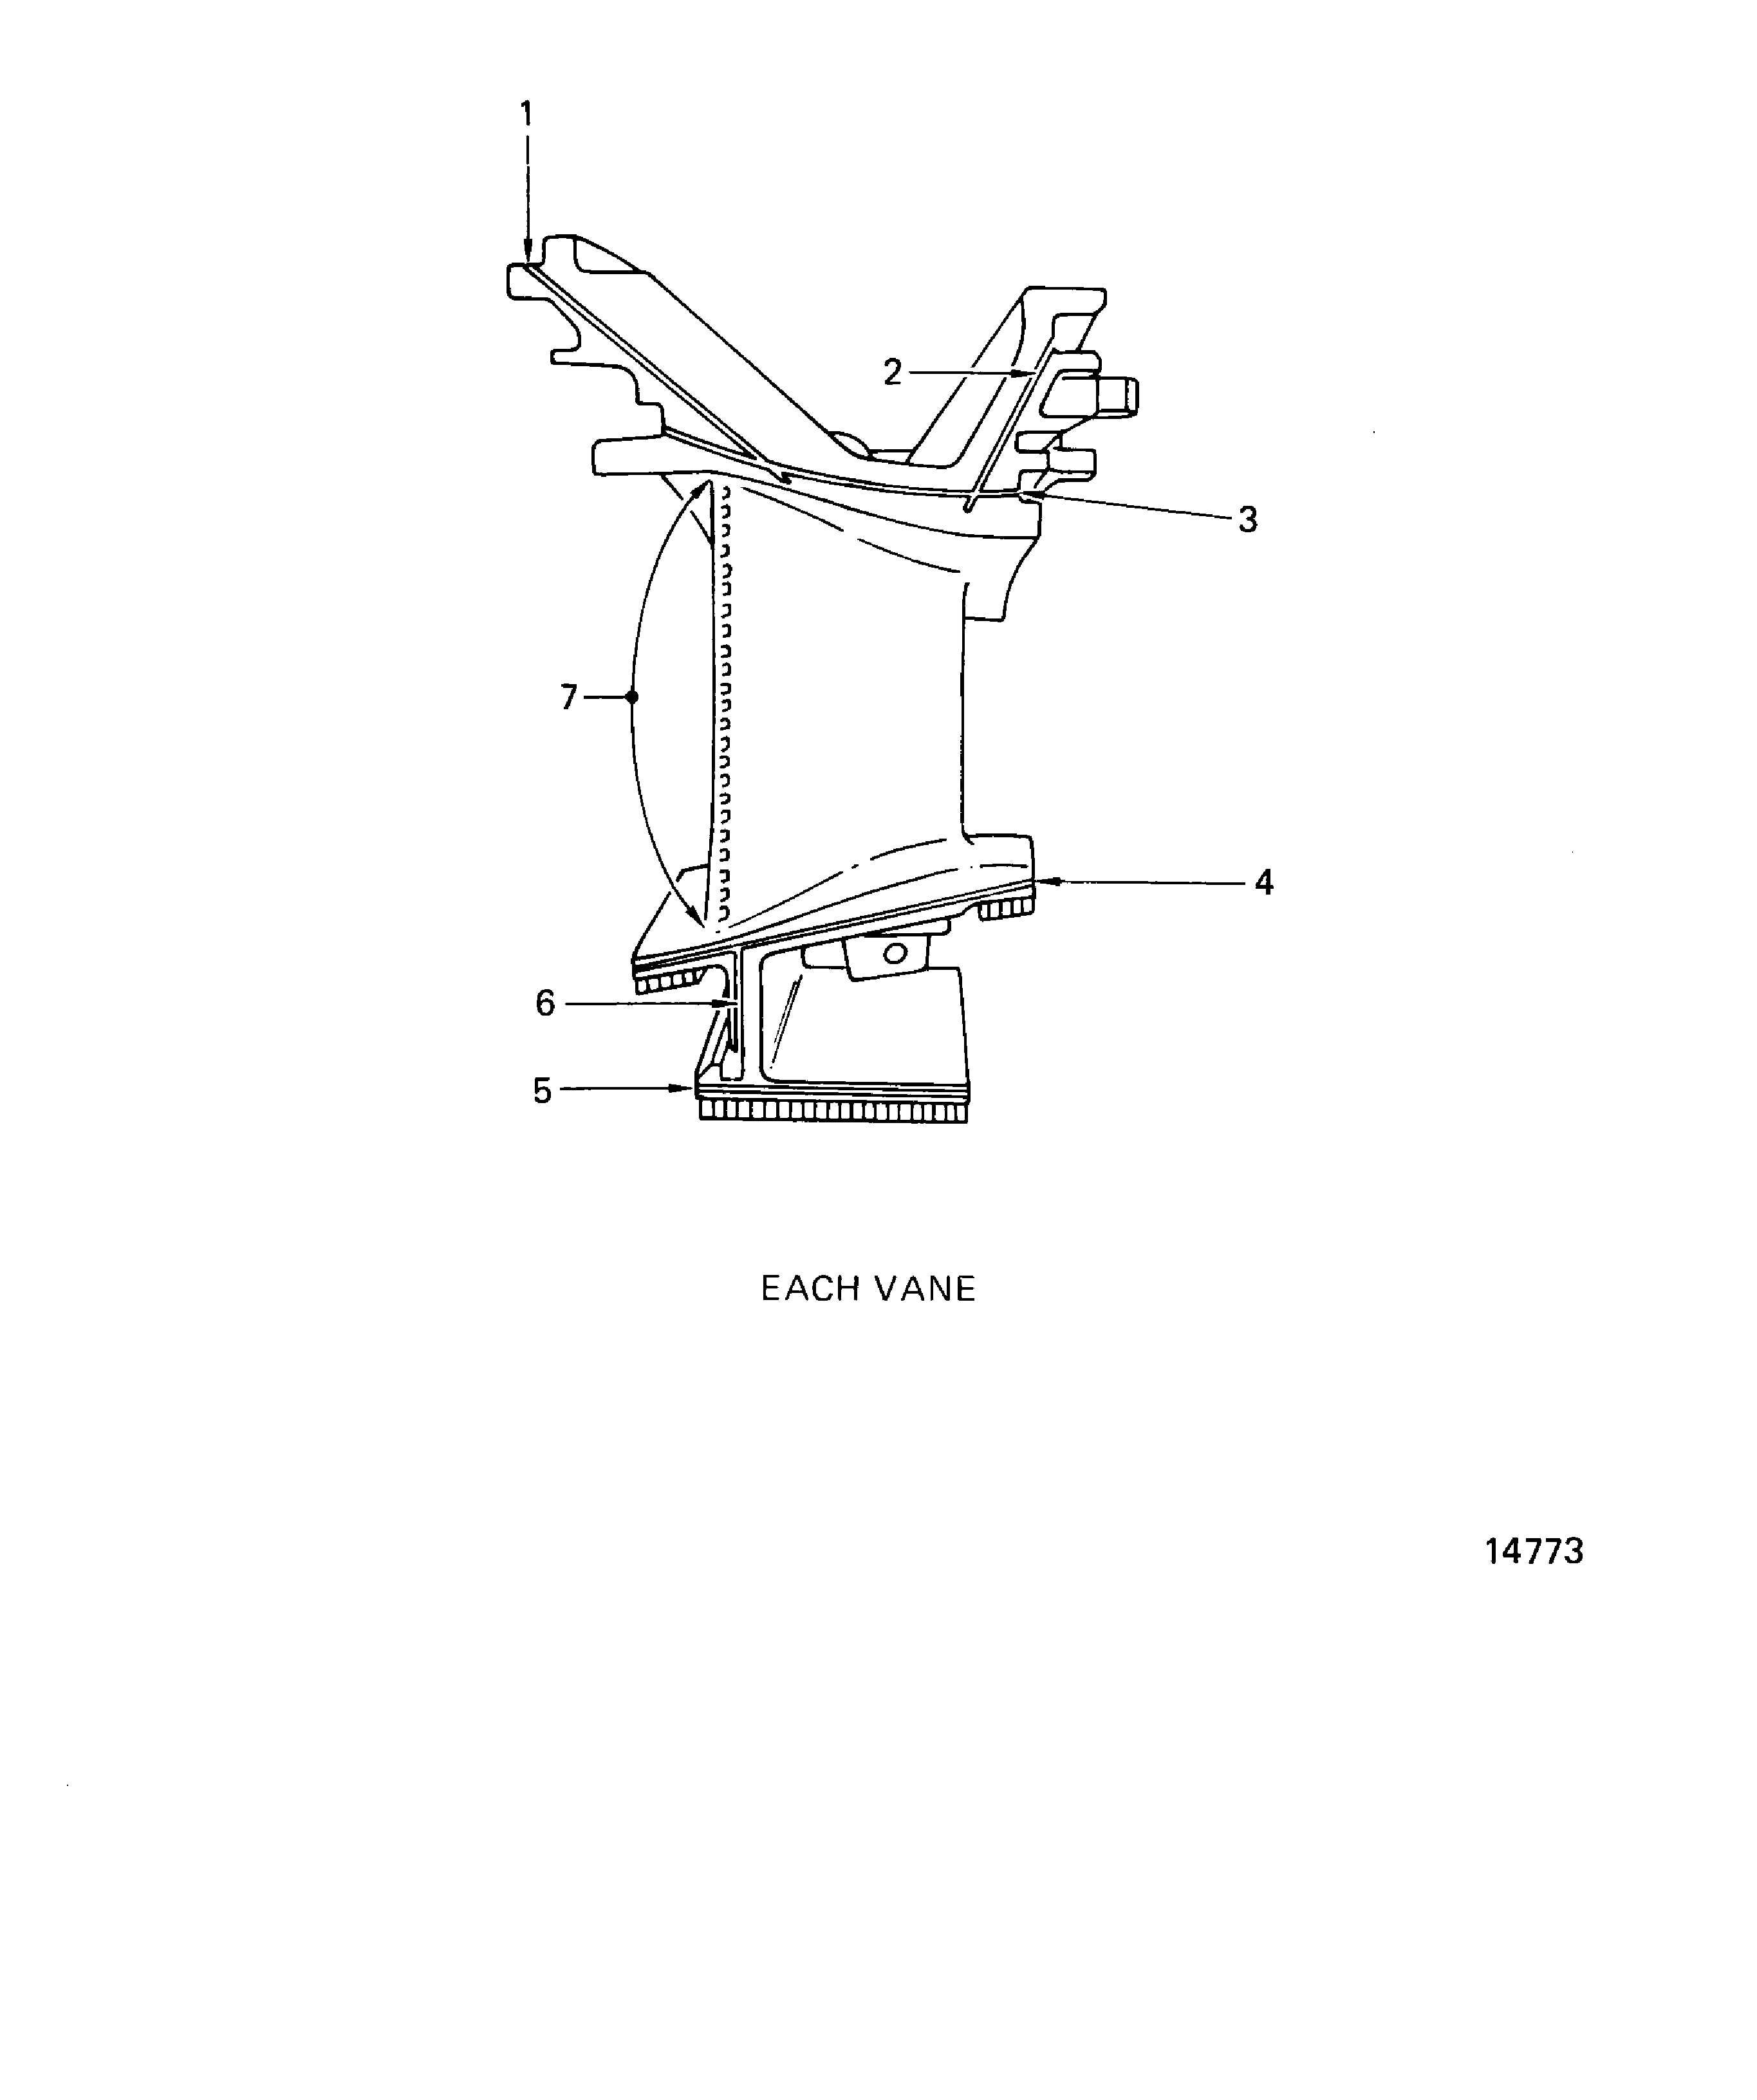
Figure: Stage 2 HPT Ring Segment and Vane Cluster Feather Seals Inspection Locations
Stage 2 HPT Ring Segment and Vane Cluster Feather Seals Inspection Locations
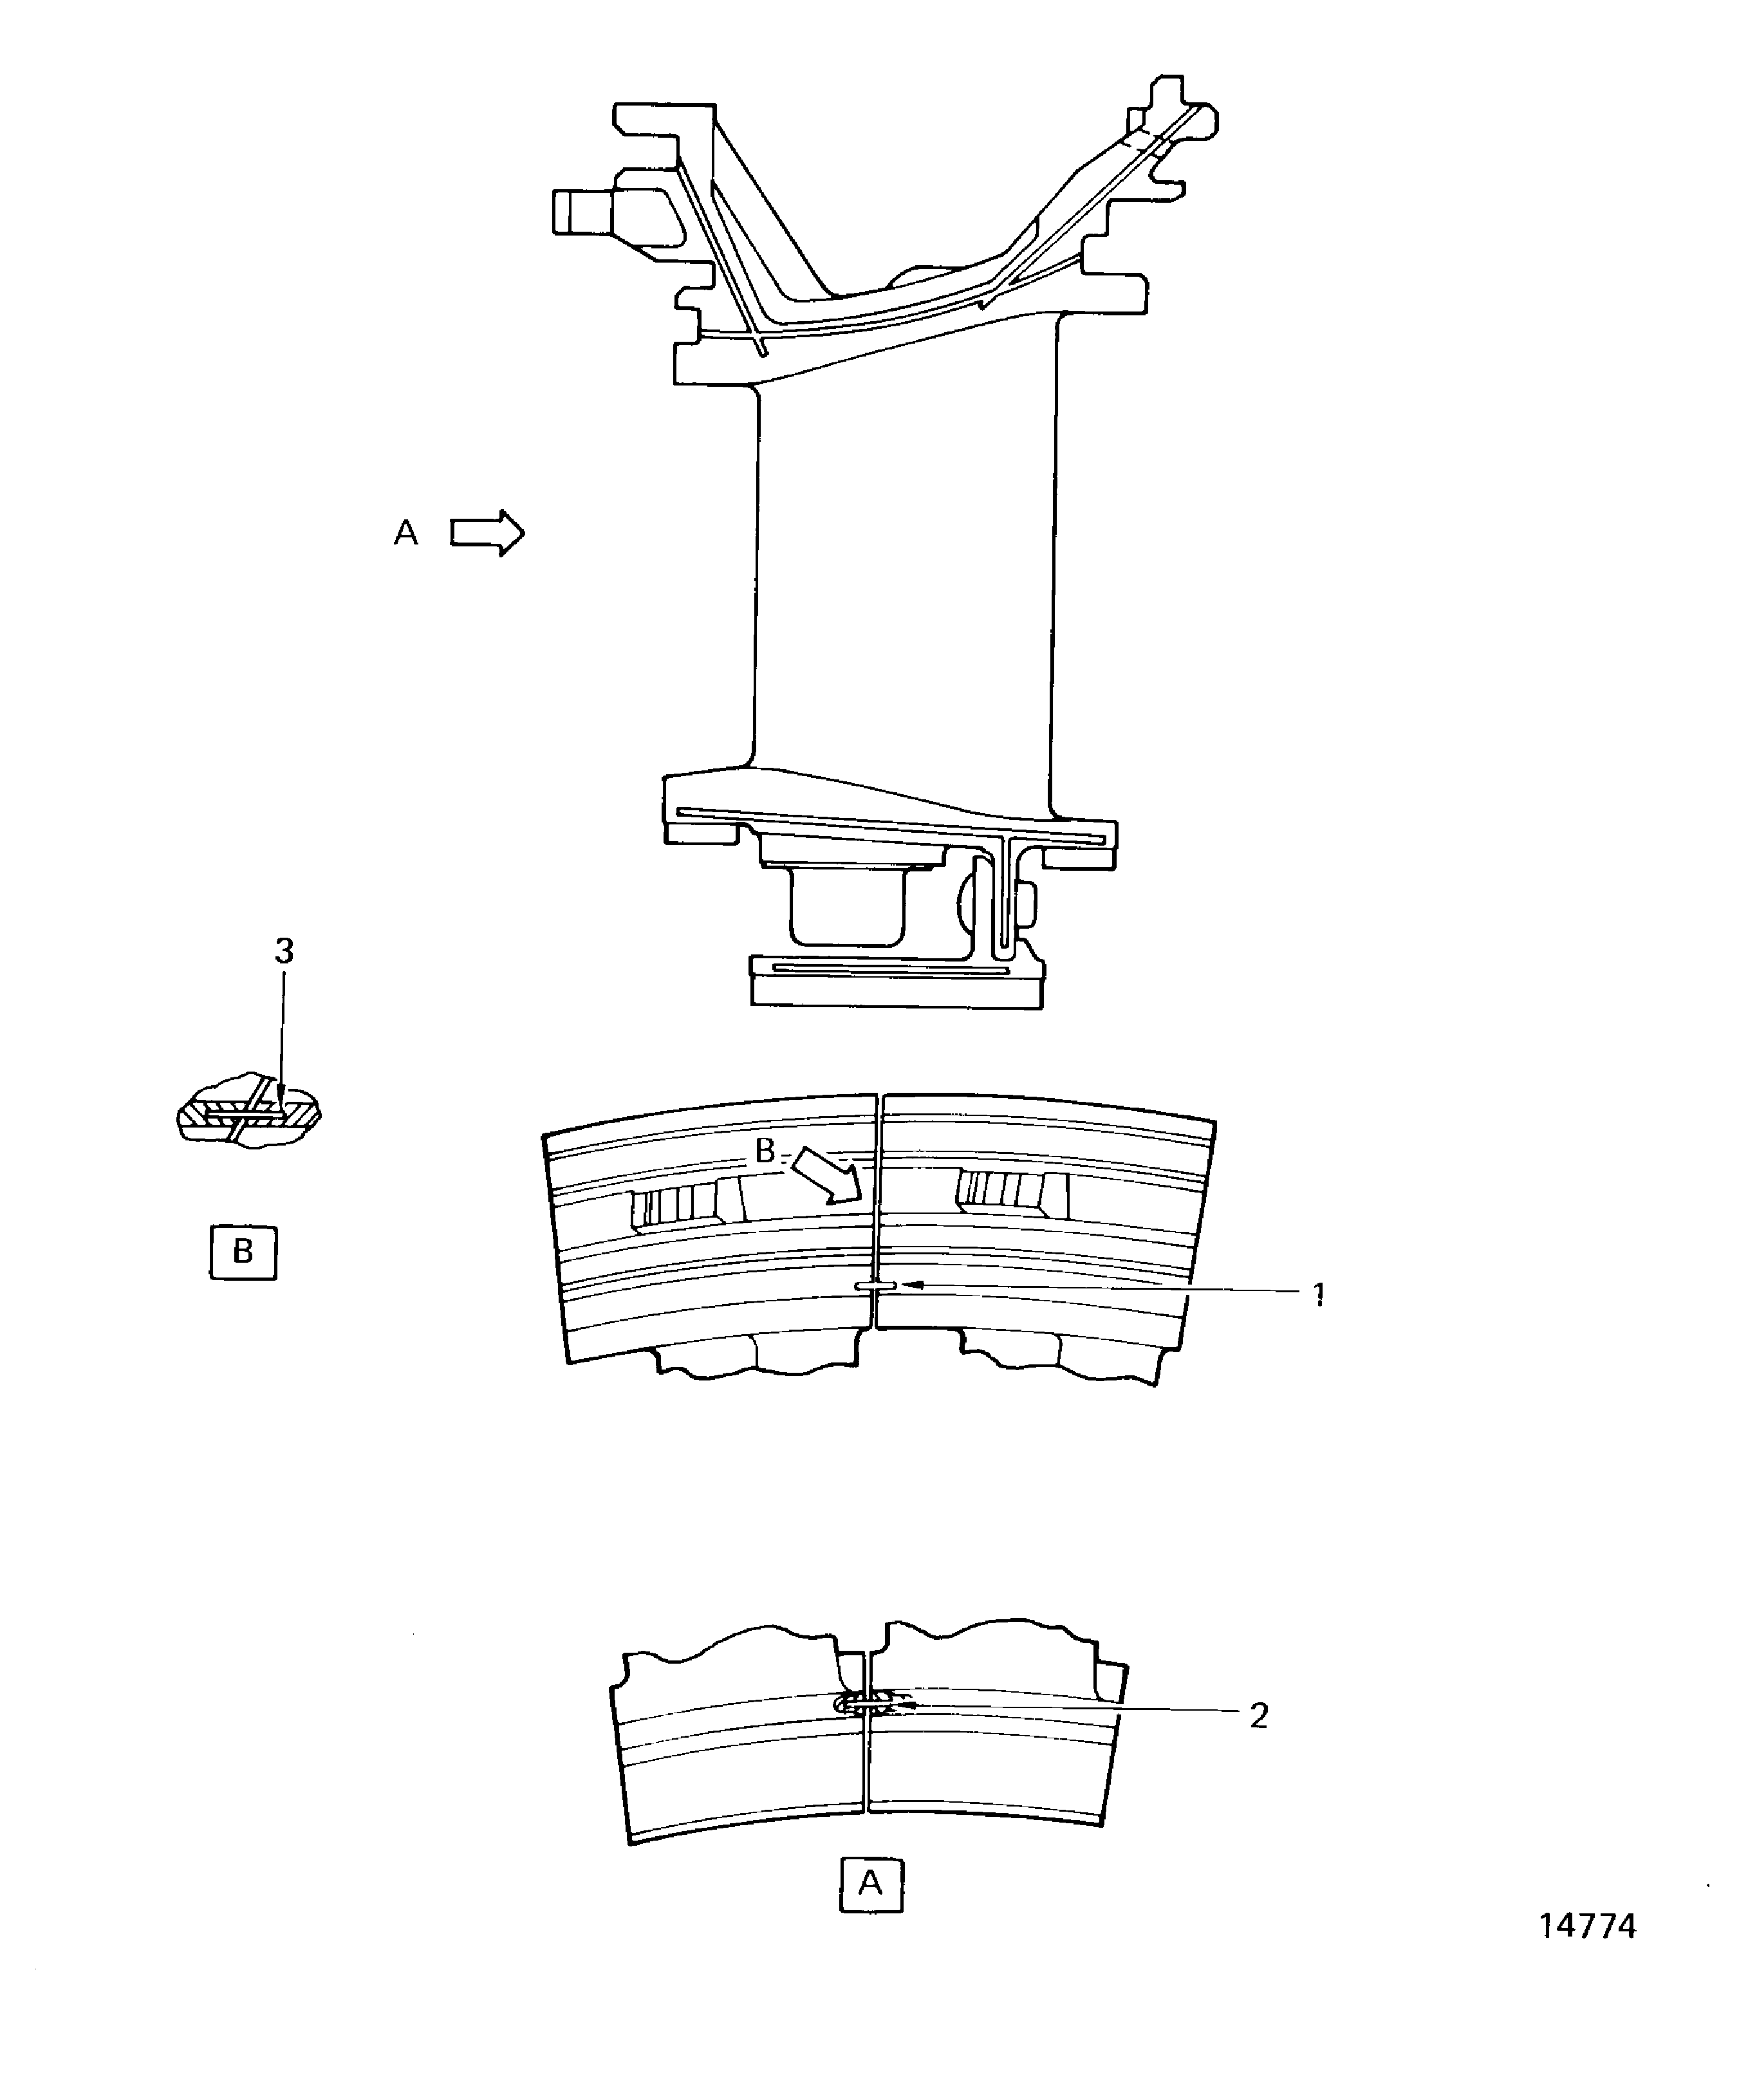
Figure: Stage 2 HPT Ring Segment Inspection/Check
Stage 2 HPT Ring Segment Inspection/Check
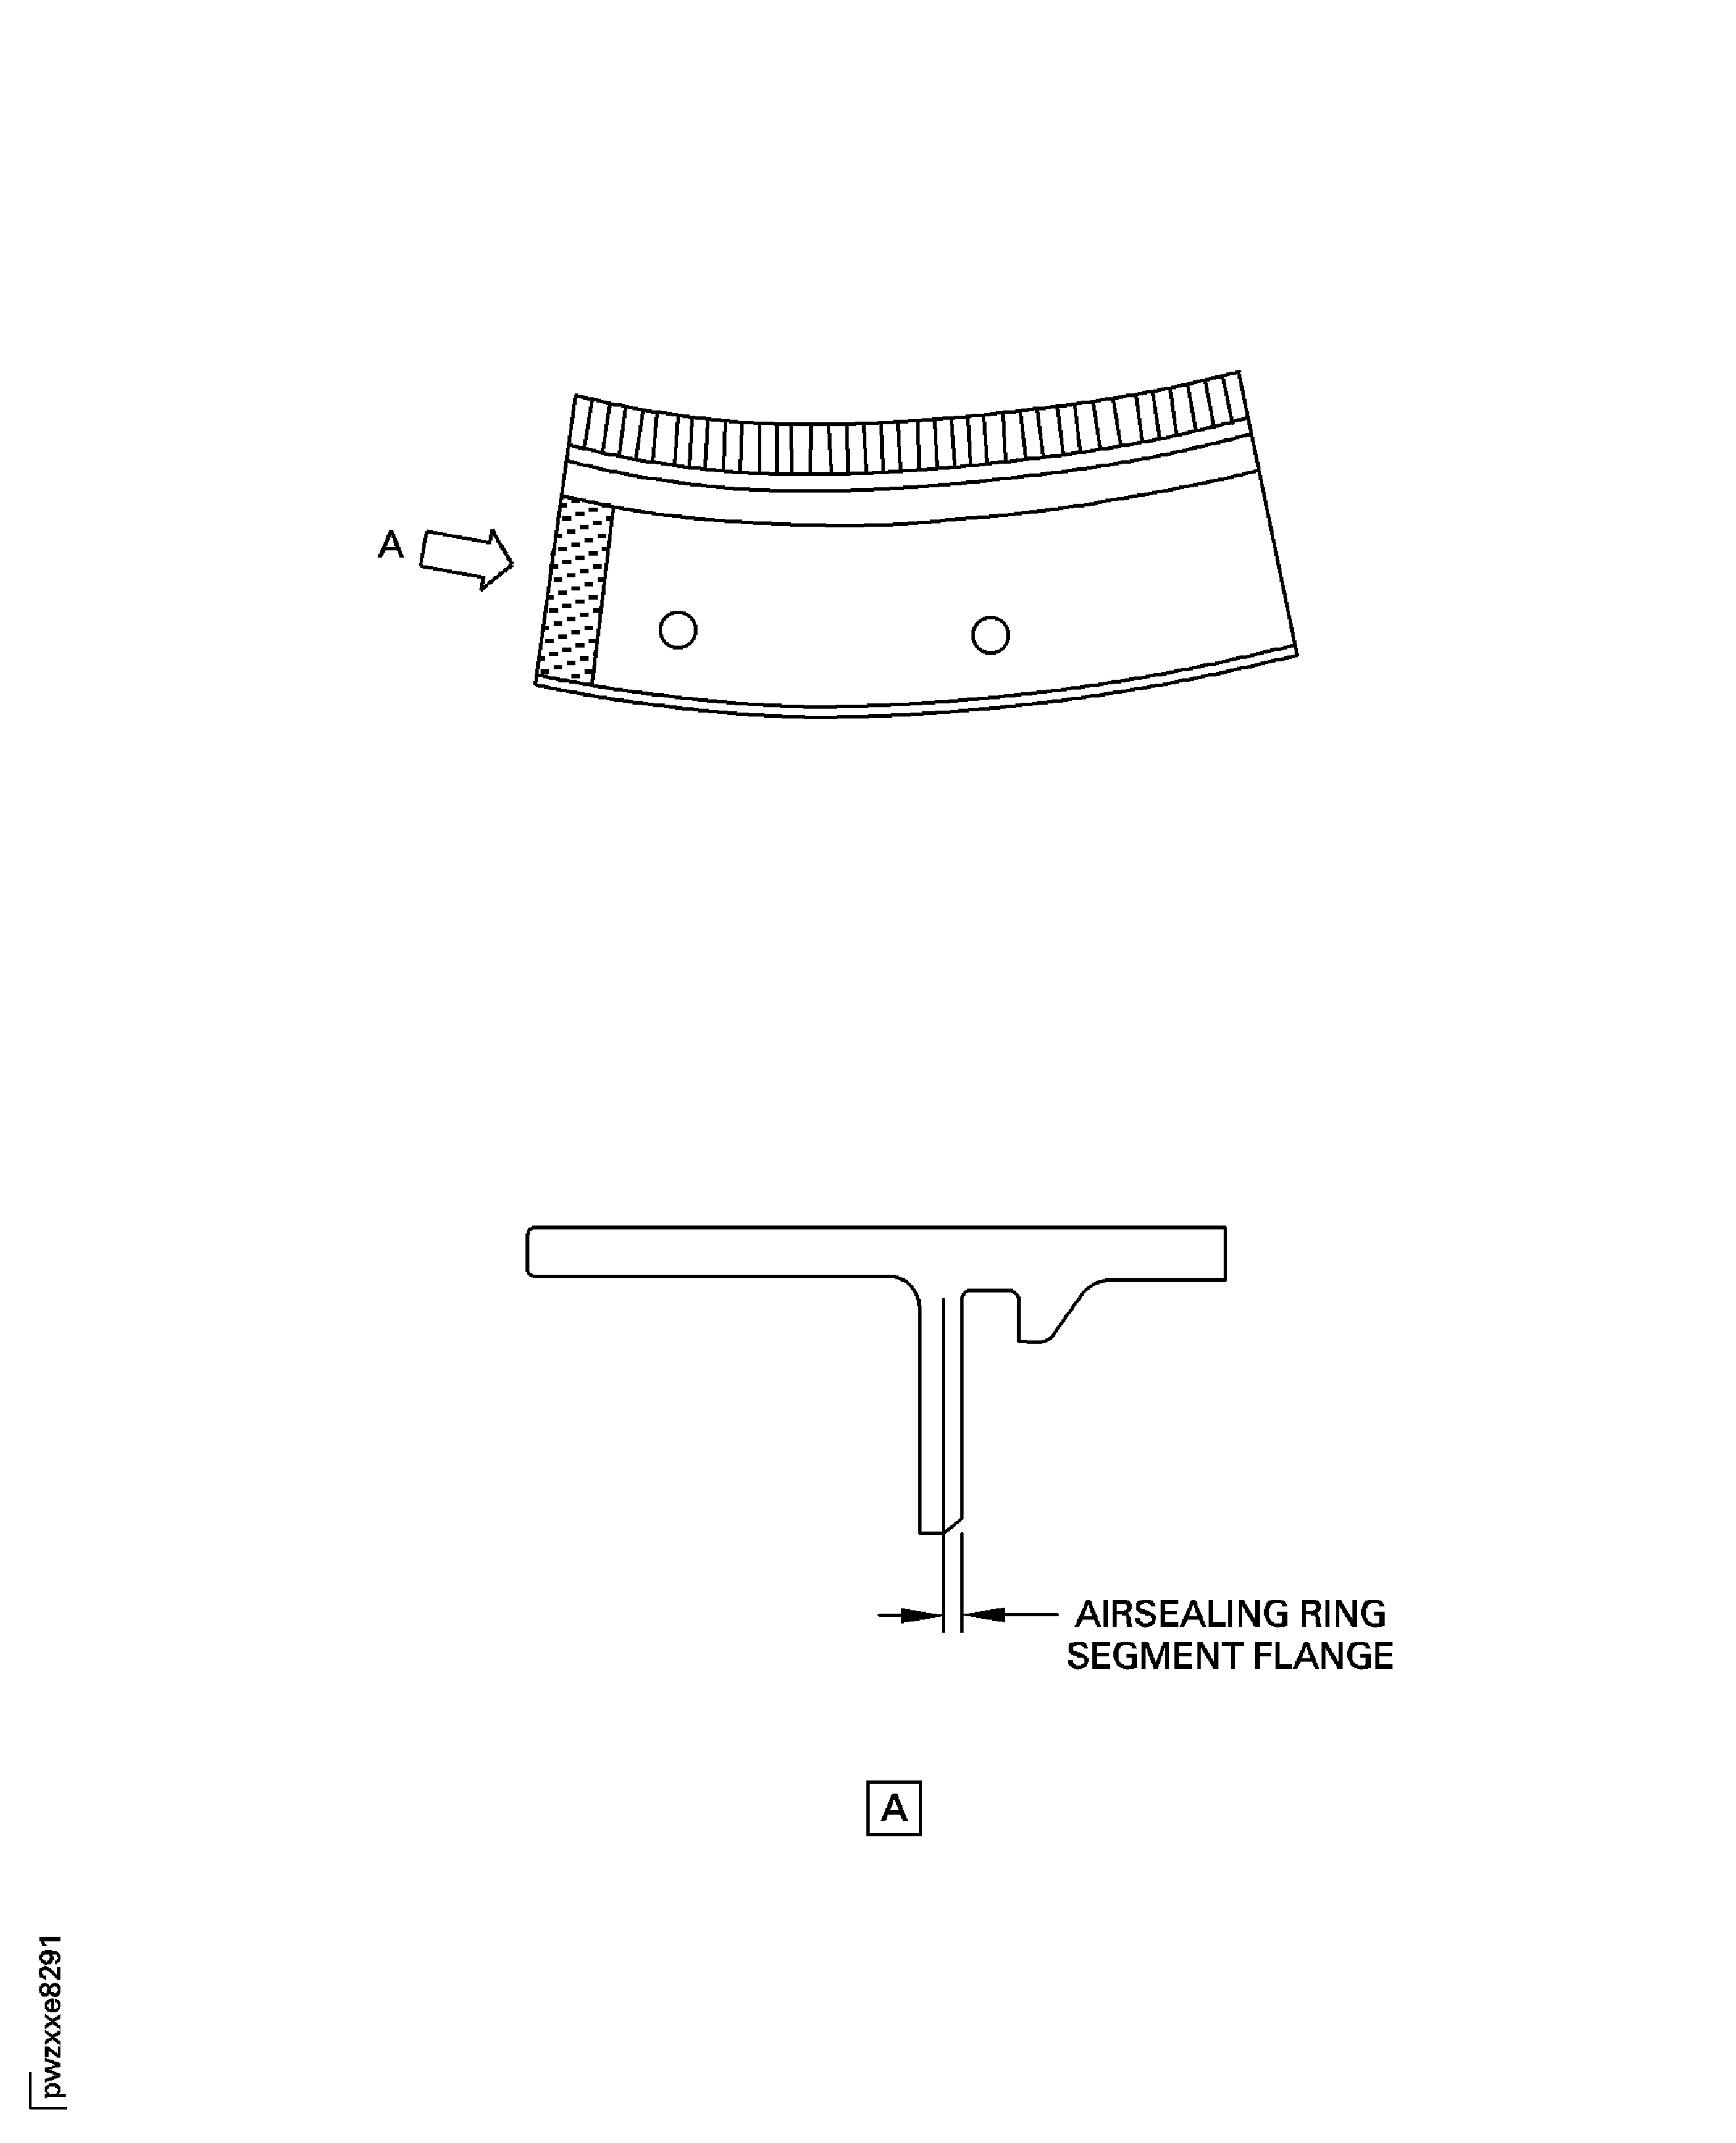
Figure: Stage 2 HPT Vane - Mateface Dimensional Restoration
Sheet 1
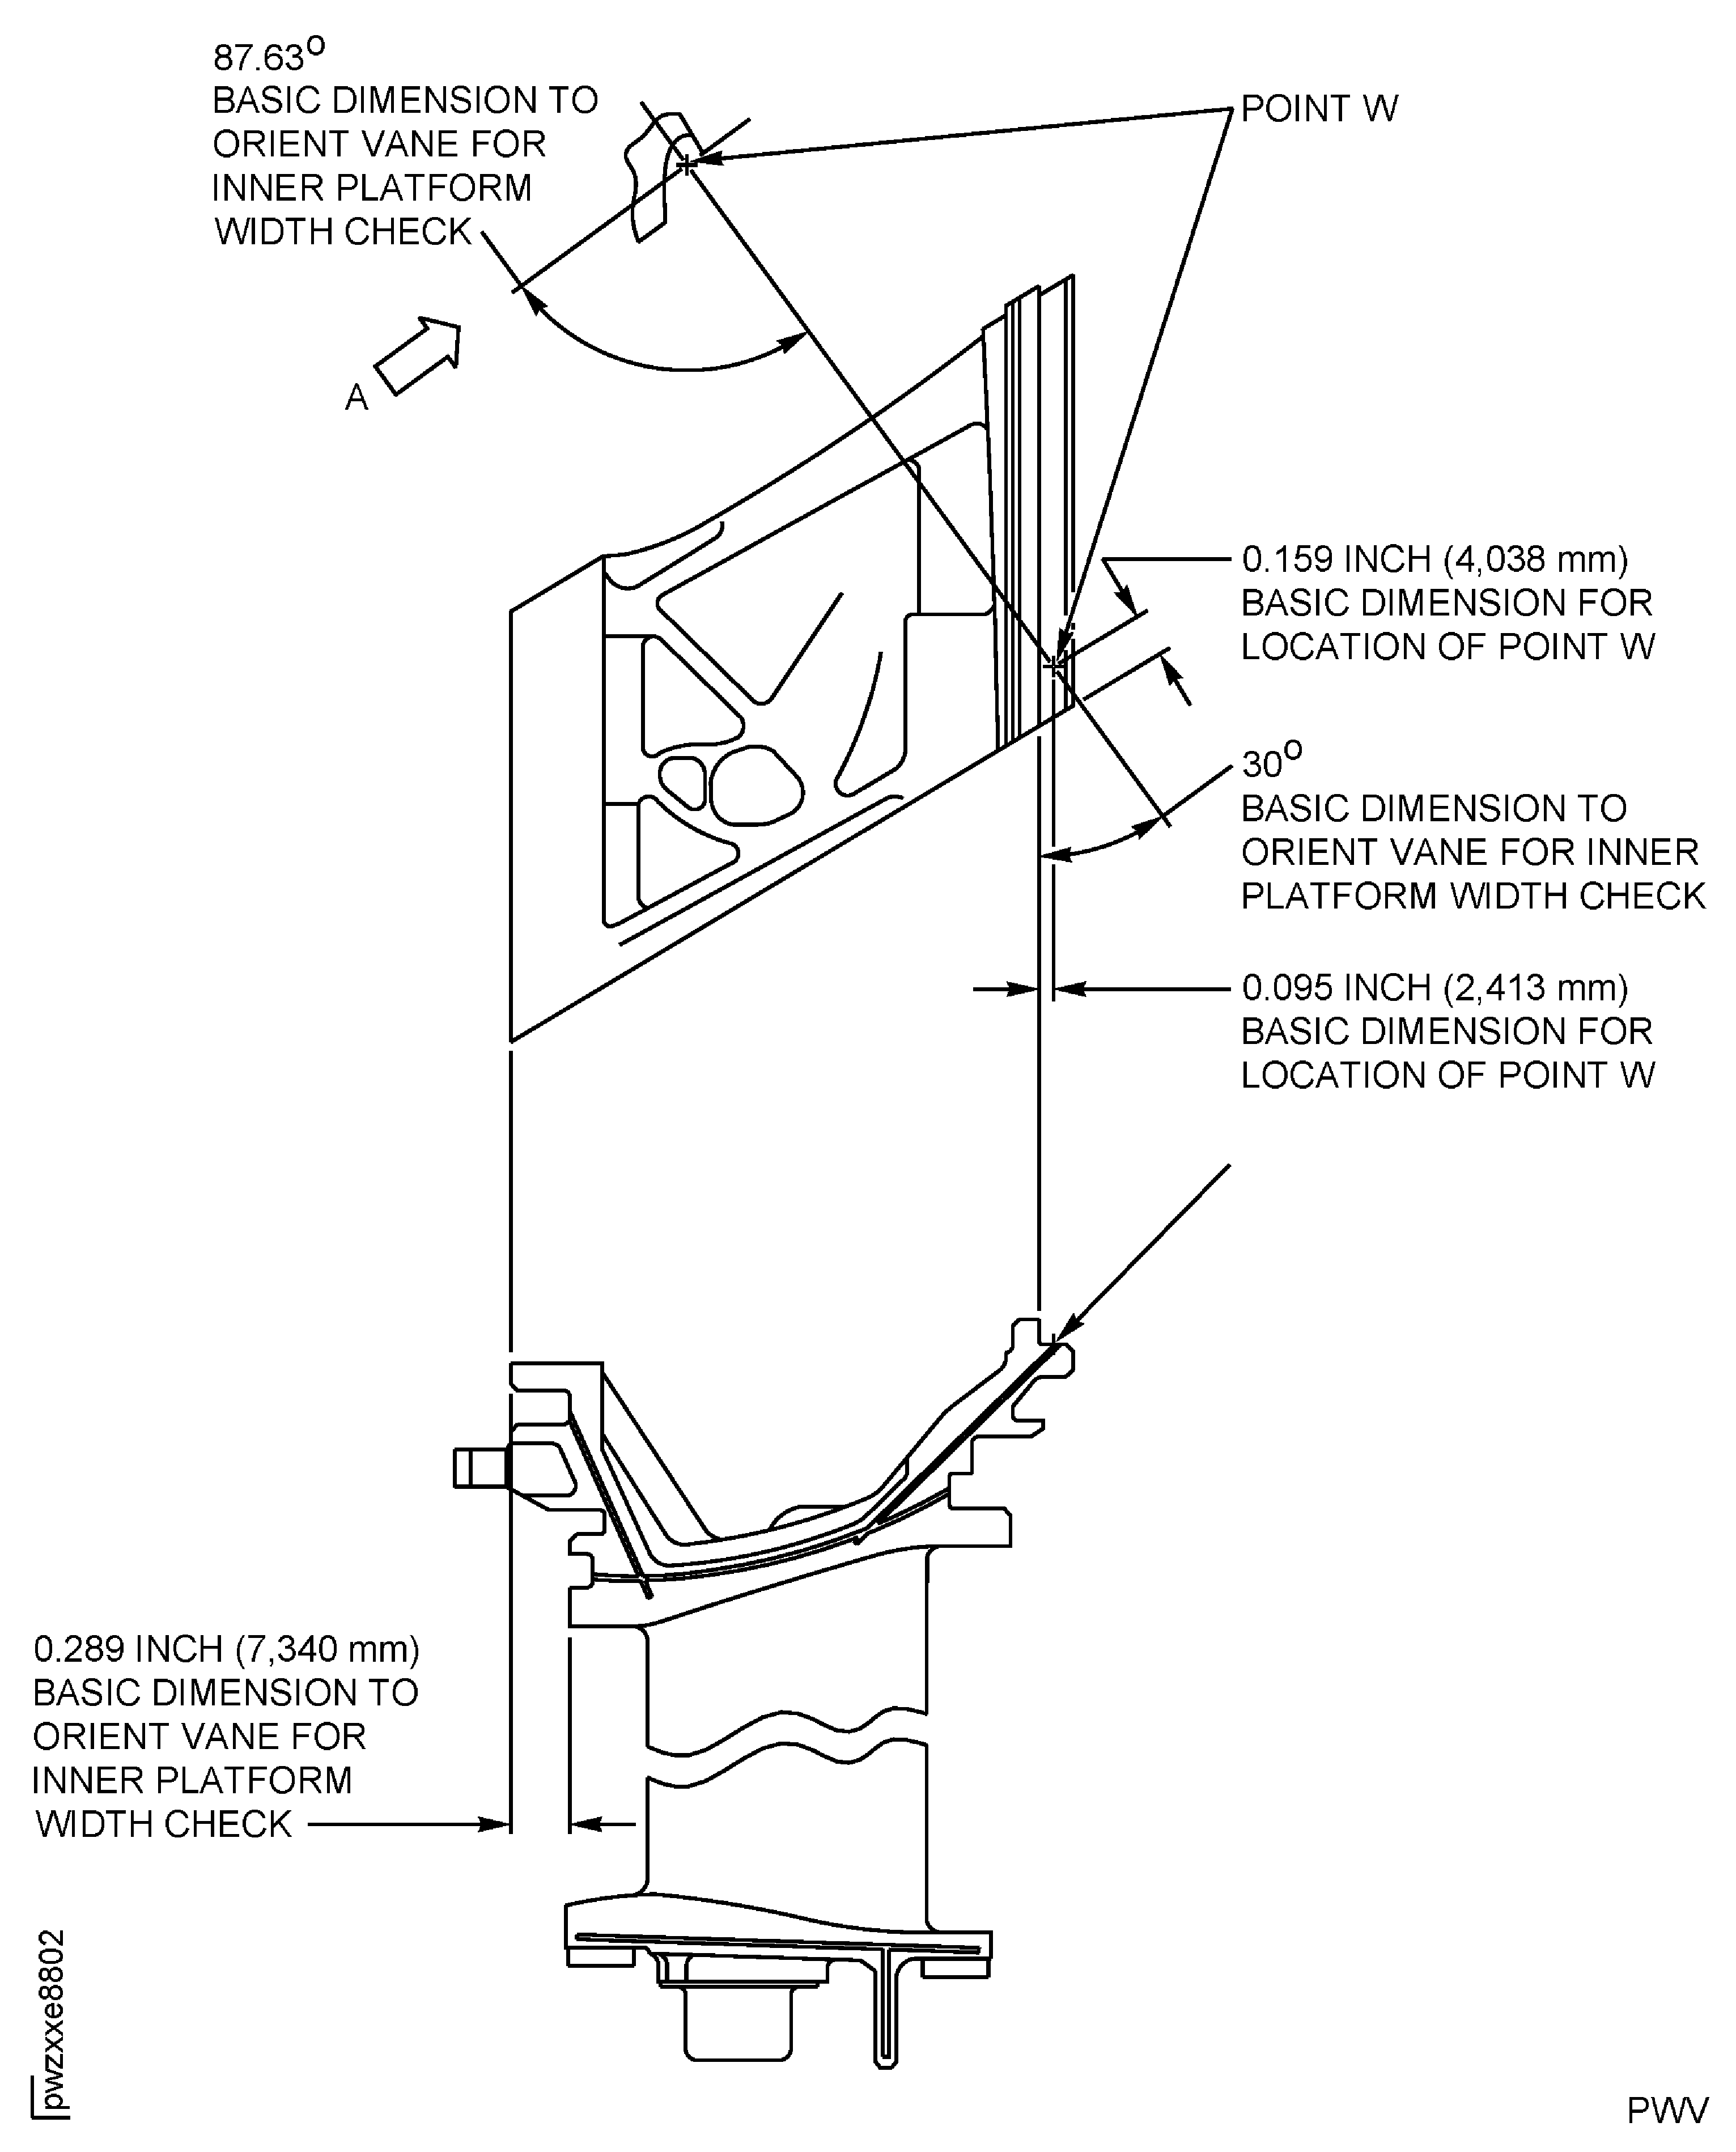
Figure: Stage 2 HPT Vane - Mateface Dimensional Restoration
Sheet 2
