Export Control
EAR Export Classification: Not subject to the EAR per 15 C.F.R. Chapter 1, Part 734.3(b)(3), except for the following Service Bulletins which are currently published as EAR Export Classification 9E991: SBE70-0992, SBE72-0483, SBE72-0580, SBE72-0588, SBE72-0640, SBE73-0209, SBE80-0024 and SBE80-0025.Copyright
© IAE International Aero Engines AG (2001, 2014 - 2021) The information contained in this document is the property of © IAE International Aero Engines AG and may not be copied or used for any purpose other than that for which it is supplied without the express written authority of © IAE International Aero Engines AG. (This does not preclude use by engine and aircraft operators for normal instructional, maintenance or overhaul purposes.).Applicability
V2500-A5 and POST SBE 72-0562 and POST SBE 72-0522
Common Information
TASK 72-45-20-440-002-C00 HPT Case And Vane Assembly - Final Assembly The Case And Vane Assembly, Assembly-002 - SBE 72-0562 - HPT V2500 SelectOne Production And Retrofit And SBE 72-0522: New Stage 2 Vane With Increased Cooling Air
General
Fig/item numbers in parentheses in the procedure agree with those used in the IPC. Only the primary Fig/item numbers are used. For the service bulletin alpha variants refer to the IPC.
For all parts identified in a different Chapter/Section/Subject, the applicable Chapter/Section/Subject comes before the Fig/item number.
For standard torque data and procedures, refer to SPM TASK 70-41-00-400-501 and SPM TASK 70-41-02-400-501.
Special torque data and assembly tolerances are included in the procedure.
Lubricate all threads and abutment faces of nuts and bolts with CoMat 10-077 APPROVED ENGINE OILS, unless other lubricants are referred to in the procedure.
To identify, lubricate and install seal rings, refer to SPM TASK 70-44-01-400-501.
The number for each radial location must be identified in a clockwise direction. These start at the engine top position when you look from the rear of the engine, unless stated differently in the procedure.
NOTE
NOTE
Preliminary Requirements
Pre-Conditions
NONESupport Equipment
| Name | Manufacturer | Part Number / Identification | Quantity | Remark |
|---|---|---|---|---|
| Torque wrench, range 0 to 100 lbfin (0 to 11.298 Nm) | LOCAL | Torque Wrench 0 to 100 | ||
| IAE 1P16013 Fixture | 0AM53 | IAE 1P16013 | 1 | |
| IAE 1P16026 Assembly fixture | 0AM53 | IAE 1P16026 | 1 | |
| IAE 1P16173 Lift sling | 0AM53 | IAE 1P16173 | 1 | |
| IAE 1P16177 Marking plate | 0AM53 | IAE 1P16177 | 1 | |
| IAE 1P16466 Orientation ring | 0AM53 | IAE 1P16466 | 1 | |
| IAE 1P16549 Orientation adapter | 0AM53 | IAE 1P16549 | 19 | |
| IAE 1P16563 Holding plate | 0AM53 | IAE 1P16563 | 1 | |
| IAE 1P16568 Supportfixture | 0AM53 | IAE 1P16568 | 1 | |
| IAE 1P16569 Lift and turn fixture | 0AM53 | IAE 1P16569 | 1 | |
| IAE 1P17016 Seating fixture | 0AM53 | IAE 1P17016 | 1 | |
| IAE 1P17756 Parallel measuring bar | 0AM53 | IAE 1P17756 | 1 | |
| IAE 1P17758 Protective cover | 0AM53 | IAE 1P17758 | 1 | |
| IAE 1P17772 Socket | 0AM53 | IAE 1P17772 | 1 |
Consumables, Materials and Expendables
| Name | Manufacturer | Part Number / Identification | Quantity | Remark |
|---|---|---|---|---|
| CoMat 01-573 WAX BLEND, PARAFFIN | 24269 | CoMat 01-573 | ||
| CoMat 02-141 LOCKWIRE | LOCAL | CoMat 02-141 | ||
| CoMat 10-077 APPROVED ENGINE OILS | X333X | CoMat 10-077 | ||
| CoMat 10-094 ANTI-SEIZE COMPOUND, PURE Ni-SPECIAL | K2147 | CoMat 10-094 | ||
| CoMat 10-129 ANTI-SEIZE PASTE | 34568 | CoMat 10-129 |
Safety Requirements
NONEProcedure
Refer to Figure.
Reference interference at location 1510. If required use the data written as a note in TASK 72-45-21-200-001 and TASK 72-45-27-200-001-B00.
Table 1. Fits and Clearances (all dimensions are in inches) NEW PART
WORN PART
DIMENSIONS
DIMENSIONS
PART IDENT
Size
Clearance
Non-select
REJECT IF
MORE THAN
LOCATION 1510
HP Turbine Case Assembly HPT Case And Related Parts (72-45-21, 01-010), Bore
Stage 2 HPT Support Assembly ENGINE-STAGE 2 HPT SUPPORT ASSEMBLY (72-45-27, 01-010), Location Diameter
HP Turbine Case Assembly Bore
28.583
Intf
28.583
Intf
28.577
0.002
28.577
0.002
Stage 2 HPT Support Assembly Location Diameter
28.591
0.014
28.591
0.014
28.585
Intf
28.580
Intf
Table 2. Fits and Clearances (all dimensions are in millimeters) NEW PART
WORN PART
DIMENSIONS
DIMENSIONS
PART IDENT
Size
Clearance
Non-select
REJECT IF
MORE THAN
LOCATION 1510
HP Turbine Case Assembly HPT Case And Related Parts (72-45-21, 01-010), Bore
Stage 2 HPT Support Assembly ENGINE-STAGE 2 HPT SUPPORT ASSEMBLY (72-45-27, 01-010), Location Diameter
HP Turbine Case Assembly Bore
726.008
Intf
726.008
Intf
725.856
0.051
725.856
0.051
Stage 2 HPT Support Assembly Location Diameter
726.211
0.356
726.211
0.356
726.059
Intf
725.932
Intf
SUBTASK 72-45-20-220-140 Reference the Fits and Clearances of the HP Turbine Case and Vane Assembly at Location 1510
Refer to Figure.
Reference clearance at location 1512. If required use the data written as a note in TASK 72-45-00-200-001 and TASK 72-45-24-200-001.
Table 3. Fits and Clearances (all dimensions are in inches) NEW PART
WORN PART
DIMENSIONS
DIMENSIONS
PART IDENT
Size
Clearance
Non-select
REJECT IF
MORE THAN
LOCATION 1512
Instrumentation Plug HP Turbine (HPT) Rotor And Stator Assembly (72-45-00, 01-140), Location Diameter
Stage 2 HPT Ring Segment And Vane Cluster Assembly (72-45-24, 02-270 Thru 02-290), Location Diameter
Instrumentation Plug Location Diameter
0.498
Clear
0.503
0.001
Stage 2 HPT Ring Segment And Vane Cluster Assembly Location Diameter
0.504
0.012
0.510
Clear
Table 4. Fits and Clearances (all dimensions are in millimeters) NEW PART
WORN PART
DIMENSIONS
DIMENSIONS
PART IDENT
Size
Clearance
Non-select
REJECT IF
MORE THAN
LOCATION 1512
Instrumentation Plug HP Turbine (HPT) Rotor And Stator Assembly (72-45-00, 01-140), Location Diameter
Stage 2 HPT Ring Segment And Vane Cluster Assembly (72-45-24, 02-270) Thru (02-090), Location Diameter
Instrumentation Plug Location Diameter
12.650
Clear
12.776
0.03
Stage 2 Band Segment And Vane Cluster Assembly Location Diameter
12.802
0.30
12.954
Clear
SUBTASK 72-45-20-220-141 Reference Fits and Clearances of the HP Turbine Case and Vane Assembly at Location 1512
Refer to Figure.
Reference clearance at location 1513. If required use the data written as a note in TASK 72-45-00-200-001 and TASK 72-45-21-200-001.
Table 5. Fits and Clearances (all dimensions are in inches) NEW PART
WORN PART
DIMENSIONS
DIMENSIONS
PART IDENT
Size
Clearance
Non-select
REJECT IF
MORE THAN
LOCATION 1513
Instrumentation Plug HP Turbine (HPT) Rotor And Stator Assembly (72-45-00, 01-140), Location Diameter
HP Turbine Case Assembly HPT Case And Related Parts (72-45-21, 01-010), Location Diameter
Instrumentation Plug Location Diameter
0.733
Clear
0.743
0.002
HP Turbine Case Assembly Location Diameter
0.745
0.022
0.755
Clear
Table 6. Fits and Clearances (all dimensions are in millimeters) NEW PART
WORN PART
DIMENSIONS
DIMENSIONS
PART IDENT
Size
Clearance
Non-select
REJECT IF
MORE THAN
LOCATION 1513
Instrumentation Plug HP Turbine (HPT) Rotor And Stator Assembly (72-45-00, 01-140), Location Diameter
HP Turbine Case Assembly HPT Case And Related Parts (72-45-21, 01-010), Location Diameter
Instrumentation Plug Location Diameter
18.62
Clear
18.87
0.05
HP Turbine Case Assembly Location Diameter
18.92
0.56
19.18
Clear
SUBTASK 72-45-20-220-142 Reference Fits and Clearances of the HP Turbine Case and Vane Assembly at Location 1513
Refer to Figure.
Put the IAE 1P16177 Marking plate 1 off on a work bench.
Mark the identification numbers 1 thru 19 and the mating number between the two rivets on the Vane Assemblies. Use the vibration pen method. Refer to SPM TASK 70-09-00-400-501.
Put the 17 Stage 2 HPT ring segment and vane cluster assemblies HPT Stage 2 Ring Segment And Vane Cluster (72-45-24, 02-050) and two Stage 2 HPT ring segment and Vane Cluster Assemblies HPT Stage 2 Ring Segment And Vane Cluster (72-45-24, 02-260) on the marking plate with the leading edge down.
SUBTASK 72-45-20-440-122 Put the Stage 2 HPT Ring Segment and Vane Cluster Assemblies on the Marking Plate
Refer to Figure.
Install a seal HPT Stage 2 Ring Segment And Vane Cluster (72-45-24, 02-190) into the slot with the longer leg parallel to the outer vane platform and the short leg in the slot adjacent to the anti-rotation lug on the vane, on the right side of the vane.
Install a seal HPT Stage 2 Ring Segment And Vane Cluster (72-45-24, 02-200) into the slot that remains on the outer vane platform, opposite to HPT Stage 2 Ring Segment And Vane Cluster (72-45-24, 02-190), on the right side of the vane.
Install a seal HPT Stage 2 Ring Segment And Vane Cluster (72-45-24, 02-197) in between the clustered vanes.
Install a seal HPT Stage 2 Ring Segment And Vane Cluster (72-45-24, 02-197) into the slot parallel to the outer vane platform.
Install a seal HPT Stage 2 Ring Segment And Vane Cluster (72-45-24, 02-220) into the slot of the ring segment.
Install a seal HPT Stage 2 Ring Segment And Vane Cluster (72-45-24, 02-180) into the slot of the outer vane platform with the short leg of the seal to the ring segment.
Install the seals by the procedures given below. Put the seal in the slots located on the right side of the 19 vane assemblies. Use CoMat 01-573 WAX BLEND, PARAFFIN to hold in position. Remove the wax that is not necessary at all locations.
SUBTASK 72-45-20-440-123 Install the Seals in the Stage 2 HPT Ring Segment and Vane Cluster Assembly Slots
Refer to Figure.
Install a standard two cable sling to the IAE 1P16026 Assembly fixture 1 off. Attach the sling to a hoist and position the fixture on a work bench with the legs down. Remove the sling and hoist.
Carefully align the seals in the number two vane with the seal slots in the number one vane and engage the seals. Make sure no damage occurs to the seals.
NOTE
When you install the vane assemblies, the adjacent vane assemblies can be moved out to engage the seals correctly.
Make sure the two vane assemblies with the instrumentation holes are at the location on the fixture that is identified as borescope.
Install the Vane Assembly identified as number two in a clockwise direction when you look down from the rear of the fixture.
Install the Vane Assemblies that remain, by number, in a clockwise direction by the procedure given in Step.
Install the Stage 2 HPT ring segment and vane cluster assemblies in the fixture.
SUBTASK 72-45-20-440-124 Install the Stage 2 HPT Ring Segment and Vane Cluster Assemblies in the Fixture
Install the gasket HPT Stage 2 Ring Segment And Vane Cluster (72-45-24, 02-020) in the outer groove of the Stage 2 HPT ring segment and Vane Cluster Assemblies.
Install the IAE 1P16173 Lift sling 1 off to the front flange of the Turbine Case Assembly (flange with the dowel pin) and attach with the washers and nuts.
Put the case and second stage vane assembly on IAE 1P16568 Supportfixture or wooden blocks. Refer to Figure.
SUBTASK 72-45-20-440-125 Install the HP Turbine Case Assembly
Install the gasket ENGINE-STAGE 2 HPT DUCT SEGMENT (72-45-25, 01-010) in the inner diameter groove of the stage 2 ring segment and vane cluster assemblies, Figure.
Install the Stage 2 HPT band segment assembly ENGINE-STAGE 2 HPT DUCT SEGMENT (72-45-25, 01-040) in the Vane Assembly groove with the cooling air holes down.
Install the Stage 2 HPT band segment assemblies ENGINE-STAGE 2 HPT DUCT SEGMENT (72-45-25, 01-020) number 2 and 3 band segments in the Vane Assembly groove in a clockwise direction. Position the tab end of the band segment to the outer side of the adjacent segments.
Install the Stage 2 HPT band segment assemblies.
Use CoMat 01-573 WAX BLEND, PARAFFIN to hold the seal in position.
Install a Stage 2 HPT duct seal ENGINE-STAGE 2 HPT DUCT SEGMENT (72-45-25, 01-080) in the recess slot on the right side of each duct segment. Position the short 90 degree end of the seal in the slot of the duct segment lug.
Install the Stage 2 HPT duct segments.
Install the gasket ENGINE-SECOND STAGE HPT DUCT SUPPORT (72-45-26, 01-010) in the slot of the Stage 2 HPT duct segment assemblies.
Install the IAE 1P16466 Orientation ring 1 off, Figure.
SUBTASK 72-45-20-440-126 Install the Stage 2 HPT Band Segment Assemblies and the Stage 2 Duct Segments in the Turbine Case Assembly
Refer to Figure.
Attach a standard three cable sling to the three lifting eyes on the IAE 1P17016 Seating fixture 1 off.
Install the stage 2 HPT seal ENGINE-STAGE 2 HPT SUPPORT ASSEMBLY (72-45-27, 01-060) in the inner diameter of the fixture with the outer diameter of the seal down.
Install the Stage 2 HPT Support Assembly ENGINE-STAGE 2 HPT SUPPORT ASSEMBLY (72-45-27, 01-010) with the tapered outer diameter down and align the dowel pin in the fixture with the dowel hole in the support assembly flange.
Use CoMat 01-573 WAX BLEND, PARAFFIN to hold the seal in position.
Install a stage 2 HPT duct support seal ENGINE-SECOND STAGE HPT DUCT SUPPORT (72-45-26, 01-060) in the slot on the right side of each Duct Support Assembly. Engage the short side of the seal in the recess slot.
Do Step again until all the duct support assemblies are seated in the Duct Support Assembly.
Seat the Stage 2 HPT duct support assemblies in the Stage 2 HPT Support Assembly.
NOTE
The duct support assemblies must be seated equally.
Install the Stage 2 HPT duct support assemblies ENGINE-SECOND STAGE HPT DUCT SUPPORT (72-45-26, 01-020).
SUBTASK 72-45-20-440-127 Assemble the Stage 2 HPT Seal, Stage 2 HPT Duct Support Assemblies and Stage 2 HPT Support Assembly in the Seating Fixture
Install the assembled Stage 2 HPT seal, stage 2 duct support assemblies and Stage 2 HPT Support Assembly in the IAE 1P16013 Fixture 1 off.
Apply CoMat 10-094 ANTI-SEIZE COMPOUND, PURE Ni-SPECIAL or CoMat 10-129 ANTI-SEIZE PASTE to the threads of the eight screws ENGINE-STAGE 2 HPT SUPPORT ASSEMBLY (72-45-27, 01-040).
Install the screws in the eight chamfered holes in the Support Assembly. Torque the screws to 23 lbfin to 26 lbfin (2.599 Nm to 2.938 Nm).
NOTE
This is the distance from the rear surface of the Stage 2 Support Assembly flange to each of the rear surfaces of the Stage 2 HPT duct support assemblies. This will make sure all the parts are fully engaged.
Attach the Stage 2 HPT Support Assembly to the Turbine Case Assembly flange.
Measure the distance at Dimension F at 19 locations. Use the IAE 1P17756 Parallel measuring bar 1 off and a depth micrometer.
Measure the distance at Dimension F.
Flip case and vane assembly over and use IAE 1P16569 Lift and turn fixture (reference Figure).
Examine the clearance at Dimension E between the 38 stage 1 duct segments.
SUBTASK 72-45-20-440-128 Install the Assembled Stage 2 HPT Seal, Stage 2 HPT Duct Support Assemblies and Stage 2 HPT Support Assembly
Install the gasket HPT Stage 2 Ring Segment And Vane Cluster (72-45-24, 02-010) in the inner groove of the stage 2 ring segment and vane cluster assemblies, Figure.
Install IAE 1P16563 Holding plate on front inner flange of Stage 2 HPT Vane Assembly.
Install the Stage 1 HPT band segment ENGINE-STAGE 1 HPT DUCT SEGMENT (72-45-23, 01-040) in the groove of the Vane Assemblies with the large outer diameter down.
Install the two Stage 1 HPT band segments ENGINE-STAGE 1 HPT DUCT SEGMENT (72-45-23, 01-020) in the groove of the Vane Assemblies. Make sure the band segments do not go over each other.
Install the Stage 1 HPT band segments.
Install one IAE 1P16549 Orientation adapter on the inner flange of the case assembly adjacent to the first two duct segments.
NOTE
The orientation adapter shows the relative position of the duct segments to the bolt hole in the case.
Install the Stage 1 HPT duct segment assemblies ENGINE-STAGE 1 HPT DUCT SEGMENT (72-45-23, 01-060).
Install a Stage 1 HPT duct seal ENGINE-STAGE 1 HPT DUCT SEGMENT (72-45-23, 01-080) between each of the duct segments.
Install gasket HPT Stage 2 Ring Segment And Vane Cluster (72-45-24, 02-205) in front of the stage 1 duct segment.
Use CoMat 01-573 WAX BLEND, PARAFFIN to hold the seal in position.
Install a Stage 1 HPT duct support seal HPT Stage 1 Duct Support Segment (72-45-22, 01-60) in the recess slot located on the right side of each duct support. Put the short side of the seal in the slot, Figure.
Apply CoMat 10-094 ANTI-SEIZE COMPOUND, PURE Ni-SPECIAL or CoMat 10-129 ANTI-SEIZE PASTE to the threads of the bolts HPT Stage 1 Duct Support Segment (72-45-22, 01-100).
Remove one IAE 1P16549 Orientation adapter at top vertical centerline. Install a duct support in the inner flange of the Case Assembly and position the support at the top vertical centerline.
Remove IAE 1P16549 Orientation adapter one at a time. Install the duct supports that remain, by number, in a clockwise direction by the procedures given in Step.
Torque the bolts 180 degrees apart to 62 lbfin to 72 lbfin (7.005 Nm to 8.135 Nm). Use the IAE 1P17772 Socket 1 off.
NOTE
This is the distance from the front flange of the case assembly to inner diameter front surface of each stage 1 duct support.Measure the distance at Dimension D at 19 locations. Use the IAE 1P17756 Parallel measuring bar 1 off and a depth micrometer.
Measure the distance at Dimension D.
Remove IAE 1P16563 Holding plate.
Install the Stage 1 HPT duct supports HPT Stage 1 Duct Support Segment (72-45-22, 01-010).
SUBTASK 72-45-20-440-130 Install the Stage 1 HPT Band Segments, Stage 1 HPT Duct Segment Assemblies and Stage 1 HPT Duct Supports
Refer to Figure.
SUBTASK 72-45-20-440-131 Turn the HP Turbine Case Assembly
Install the gaskets HP Turbine (HPT) Rotor And Stator Assembly (72-45-00, 01-120) in the two borescope bosses on the Turbine Case Assembly.
Install the instrumentation plugs HP Turbine (HPT) Rotor And Stator Assembly (72-45-00, 01-140) in the two borescope bosses.
Install the two retaining bolts HP Turbine (HPT) Rotor And Stator Assembly (72-45-00, 01-160) that attach the instrumentation plug at each location.
Torque the bolts to 65 lbfin to 85 lbfin (7.344 Nm to 9.604 Nm). Safety the bolts with CoMat 02-141 LOCKWIRE.
SUBTASK 72-45-20-440-132 Install the Instrumentation Plugs
Refer to Figure.
Install the bolts HP Turbine (HPT) Rotor And Stator Assembly (72-45-00, 01-220) through the plate and bracket and attach them with the nuts HP Turbine (HPT) Rotor And Stator Assembly (72-45-00, 01-200).
If necessary, install the HPT rotor and stator identification plate HP Turbine (HPT) Rotor And Stator Assembly (72-45-00, 01-240) to the bracket on the front flange of the Turbine Case Assembly.
SUBTASK 72-45-20-440-133 Install the HPT Rotor and Stator Identification Plate
Refer to Figure.
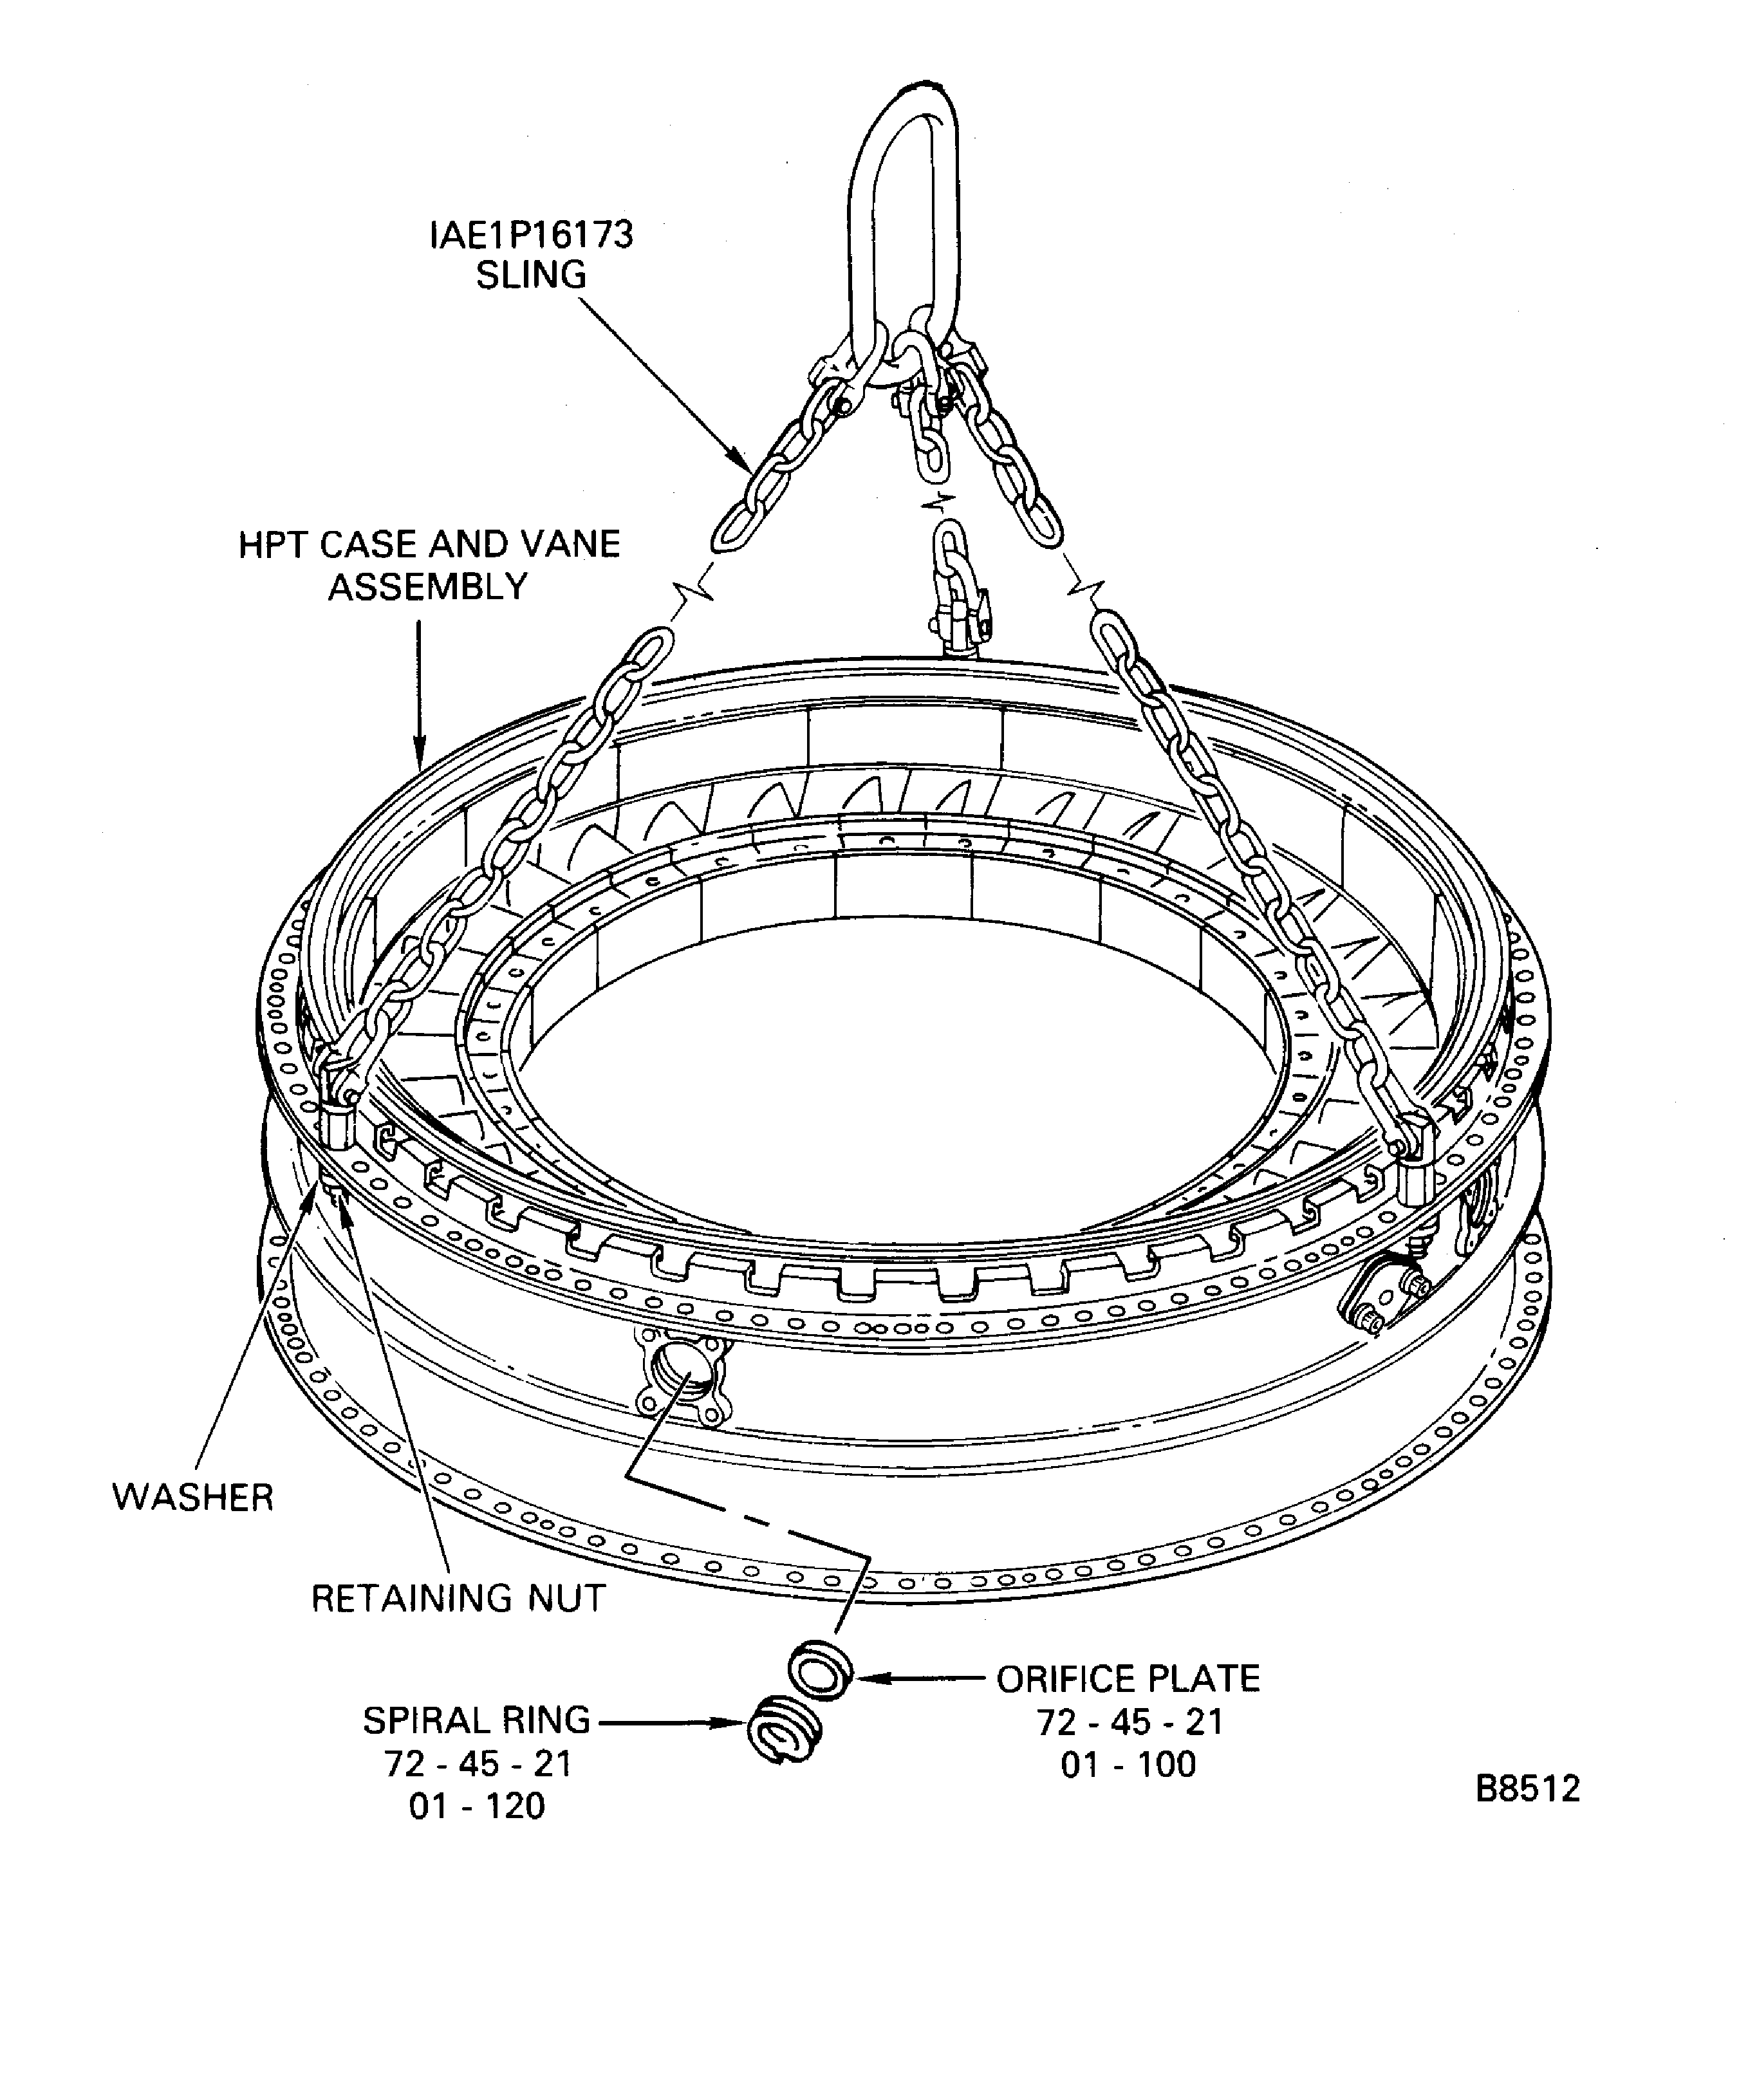
Install the spiral ring HPT Case And Related Parts (72-45-21, 01-120) in the groove of the boss to hold the orifice plate in position.
If necessary, install the orifice plates HPT Case And Related Parts (72-45-21, 01-100) in the four bosses on the outer diameter of the Turbine Case Assembly.
SUBTASK 72-45-20-440-134 Install the Orifice Plates
Refer to Figure.
Install the IAE 1P16173 Lift sling 1 off to the rear flange of the Turbine Case Assembly (flange with the dowel pin) and attach with the washers and nuts.
Install the IAE 1P17758 Protective cover 1 off on the rear flange of the case and Vane Assembly.
SUBTASK 72-45-20-440-135 Put the HP Turbine Case and Vane Assembly on a Pallet
Figure: HP Turbine Case and Vane Assembly Fits and Clearances
HP Turbine Case and Vane Assembly Fits and Clearances

Figure: Stage 2 HPT Ring Segment and Vane Cluster Assembly Identification
Stage 2 HPT Ring Segment and Vane Cluster Assembly Identification
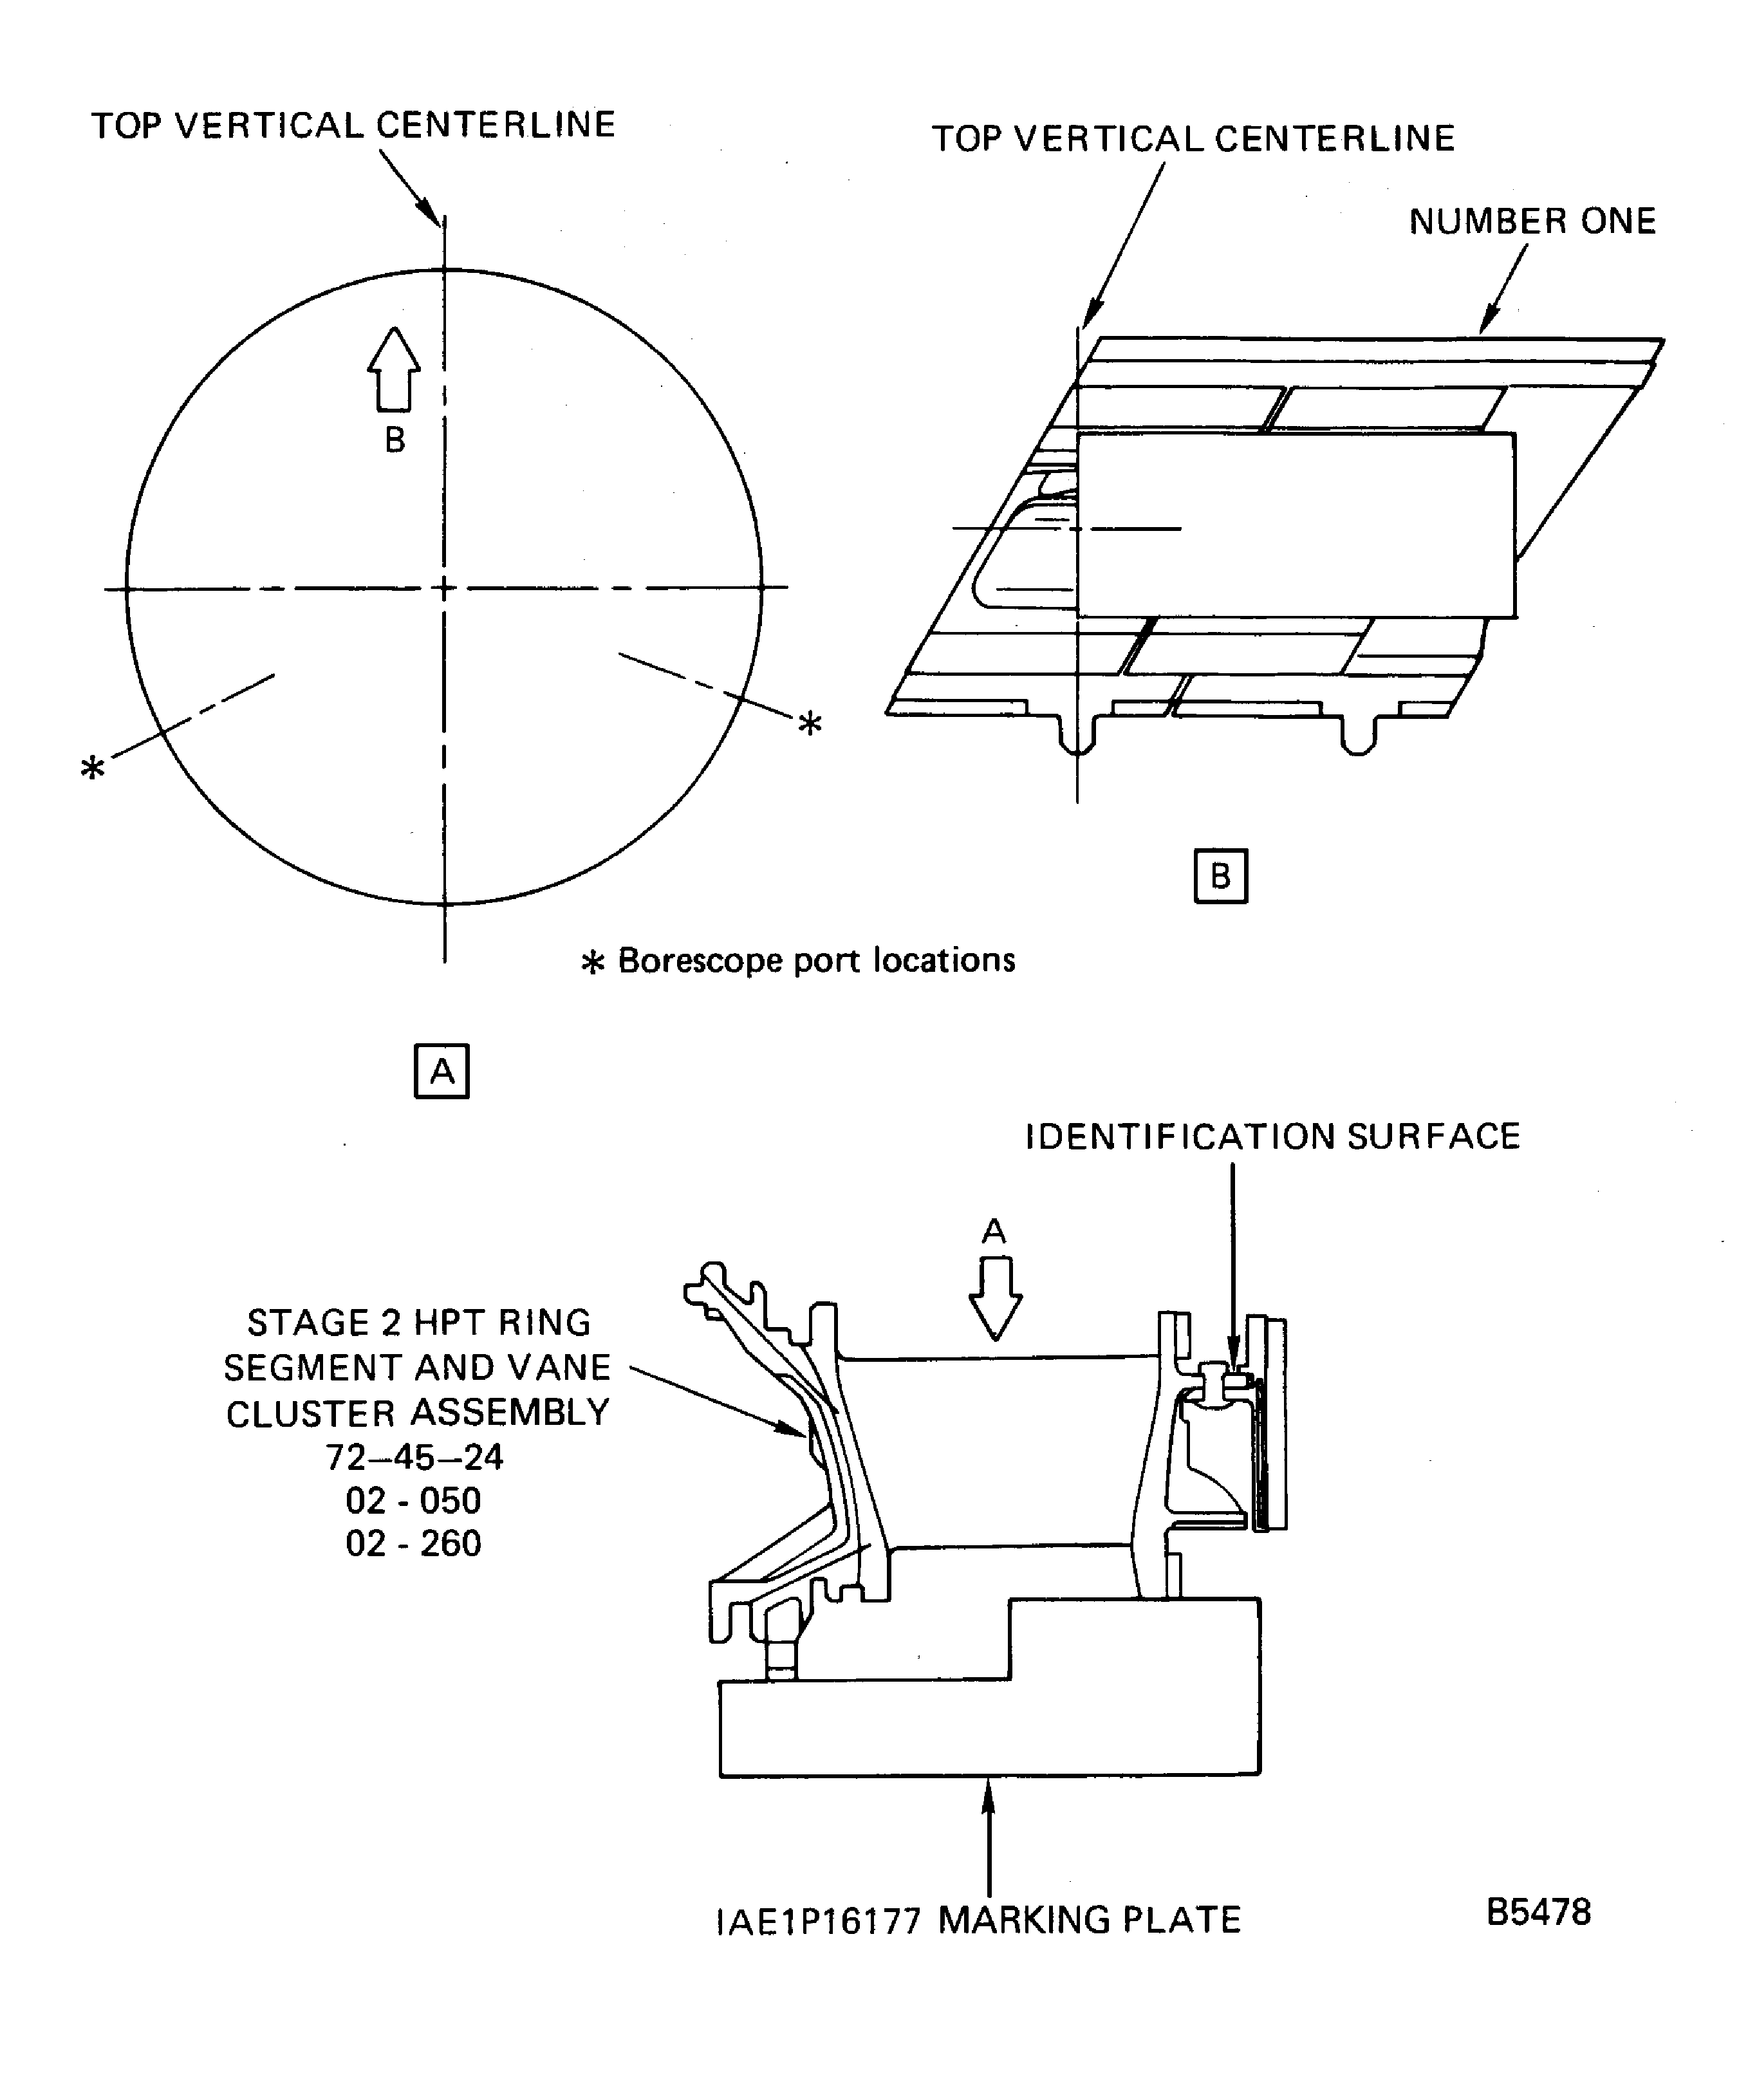
Figure: Install the Seals in the Ring Segment and Vane Cluster Assembly
Install the Seals in the Ring Segment and Vane Cluster Assembly

Figure: Stage 2 HPT Ring Segment and Vane Cluster Assemblies in the Fixture
Stage 2 HPT Ring Segment and Vane Cluster Assemblies in the Fixture

Figure: Install the HP Turbine Case Assembly
Install the HP Turbine Case Assembly
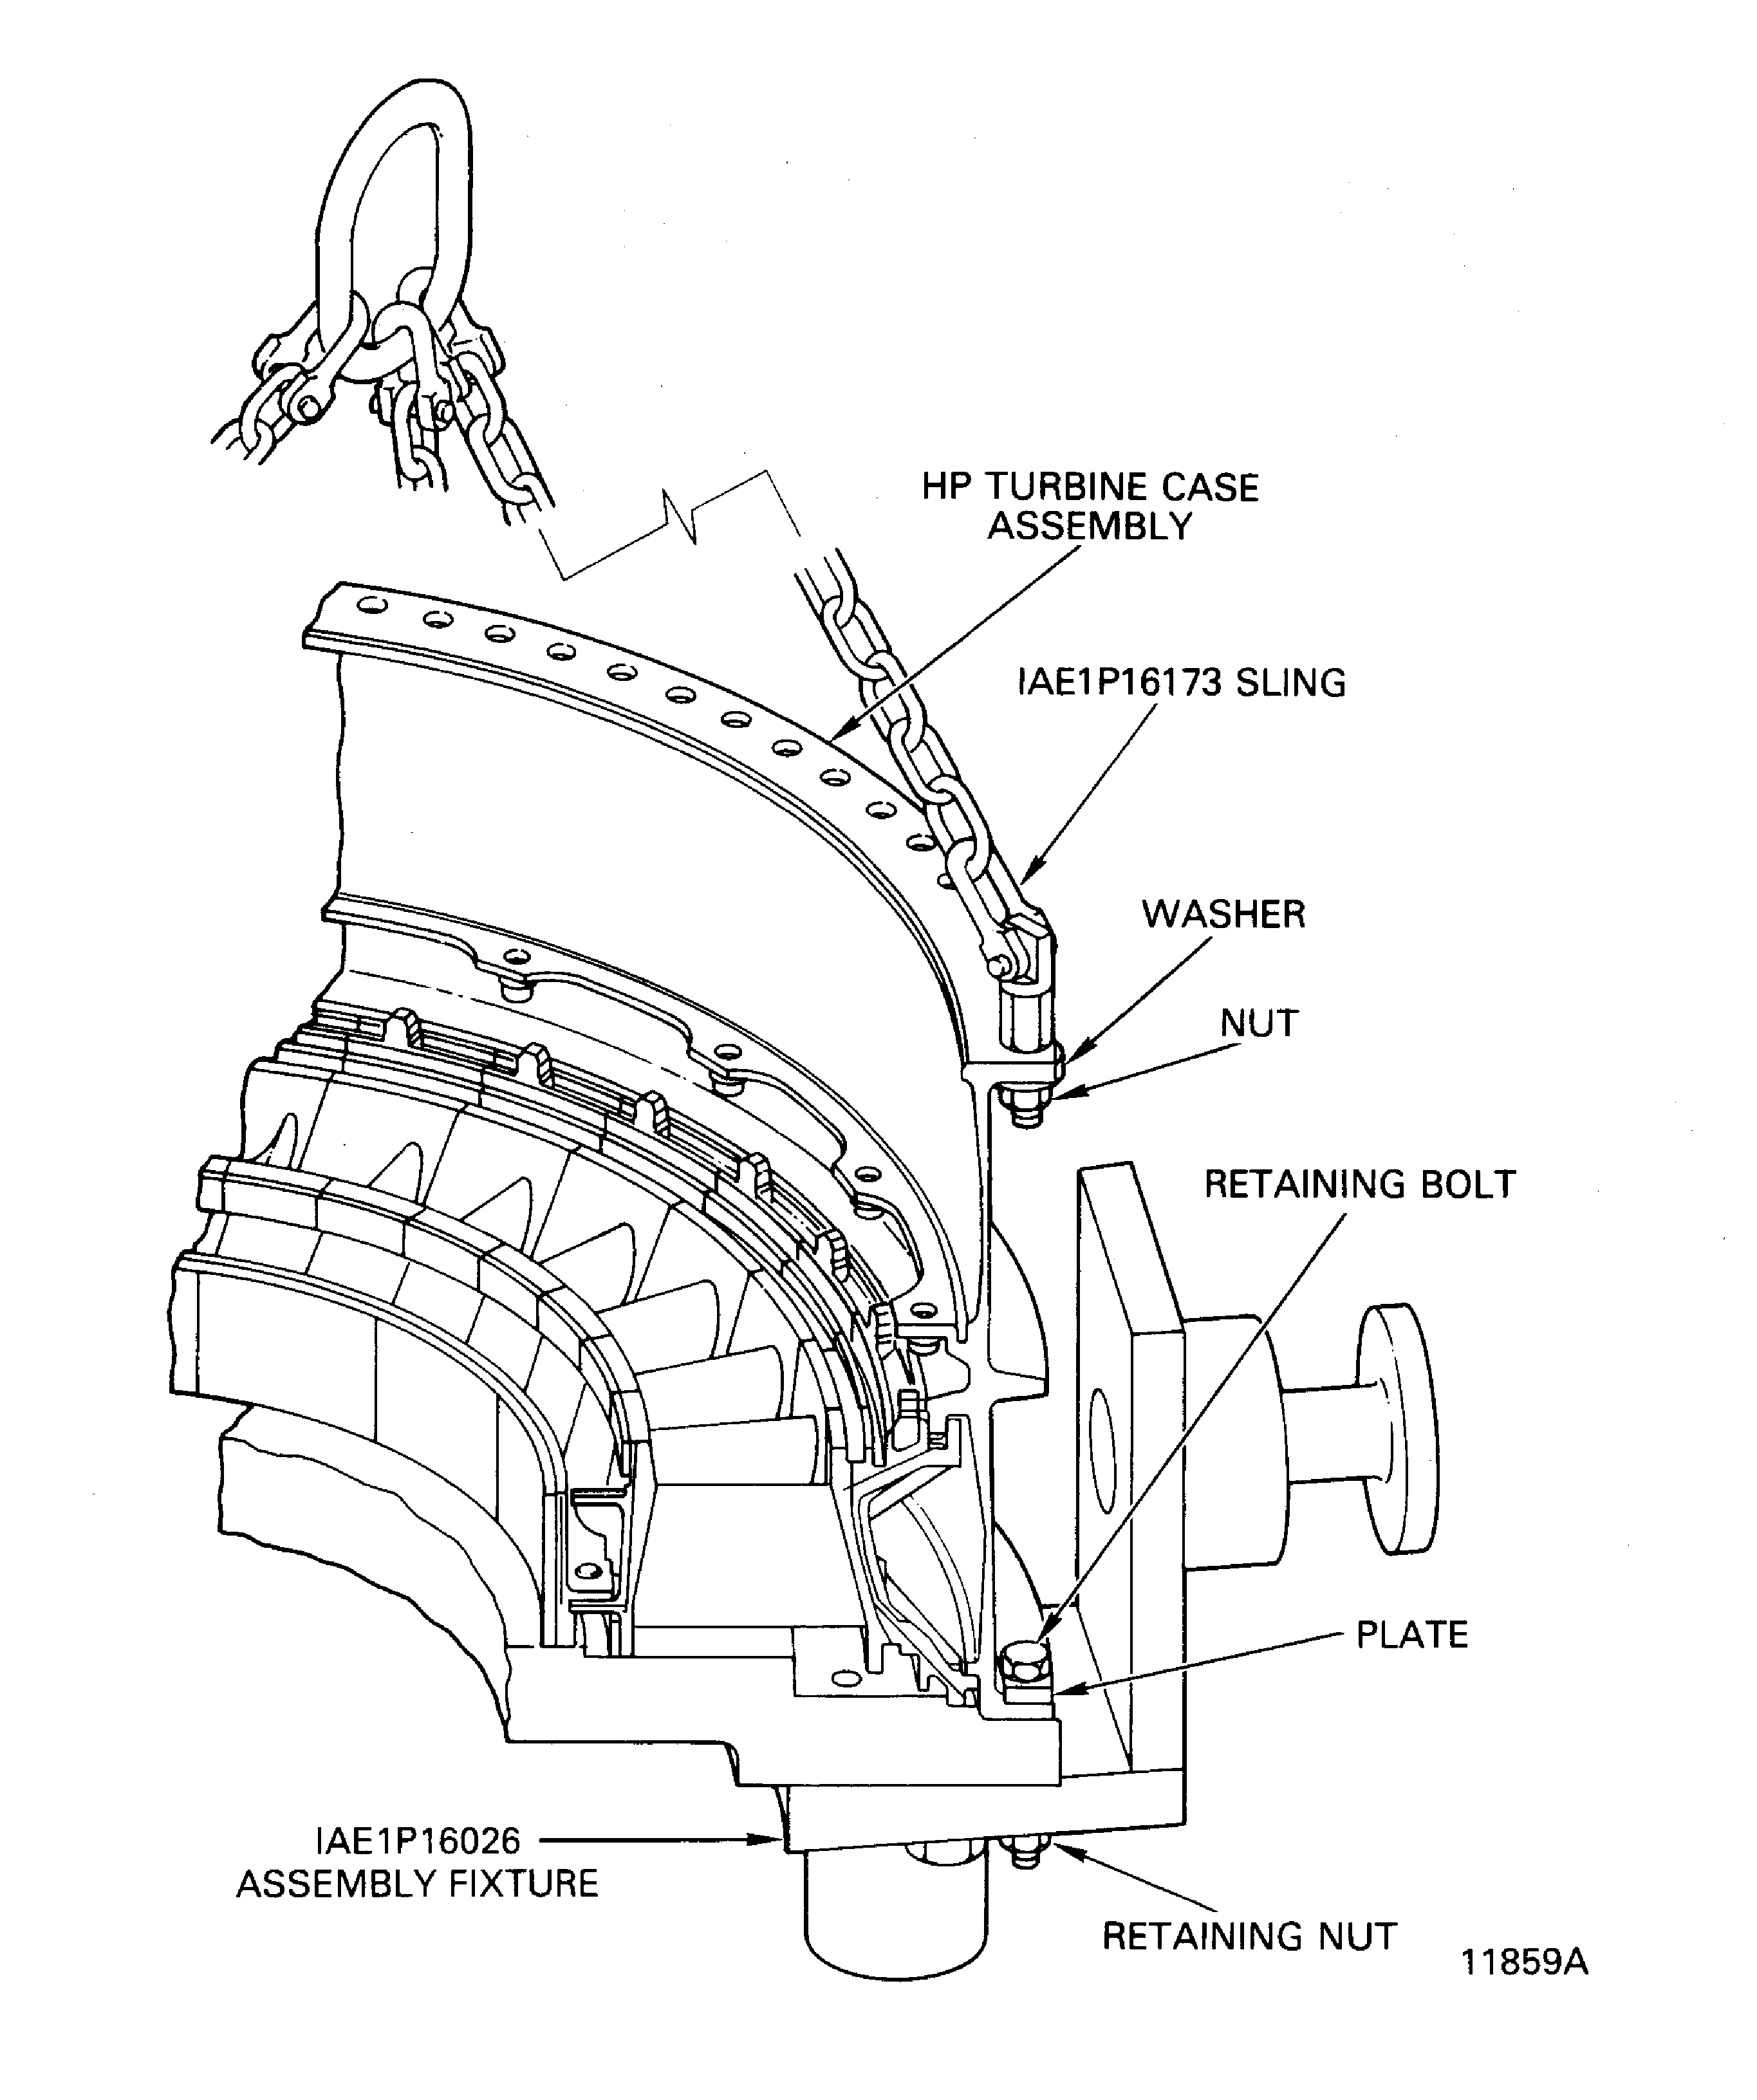
Figure: IAE 1P16568 Support Fixture
IAE 1P16568 Support Fixture

Figure: Install the Stage 2 HPT Duct Segments and the Stage 2 HPT Band Segement Assemblies
Install the Stage 2 HPT Duct Segments and the Stage 2 HPT Band Segement Assemblies

Figure: Stage 2 HPT Band Segment and Stage 2 HPT Duct Segments
Stage 2 HPT Band Segment and Stage 2 HPT Duct Segments

Figure: Assemble the Stage 2 HPT Duct Support Assembly, Stage 2 HPT Duct Support Assemblies and Stage 2 HPT Seal
Assemble the Stage 2 HPT Duct Support Assembly, Stage 2 HPT Duct Support Assemblies and Stage 2 HPT Seal
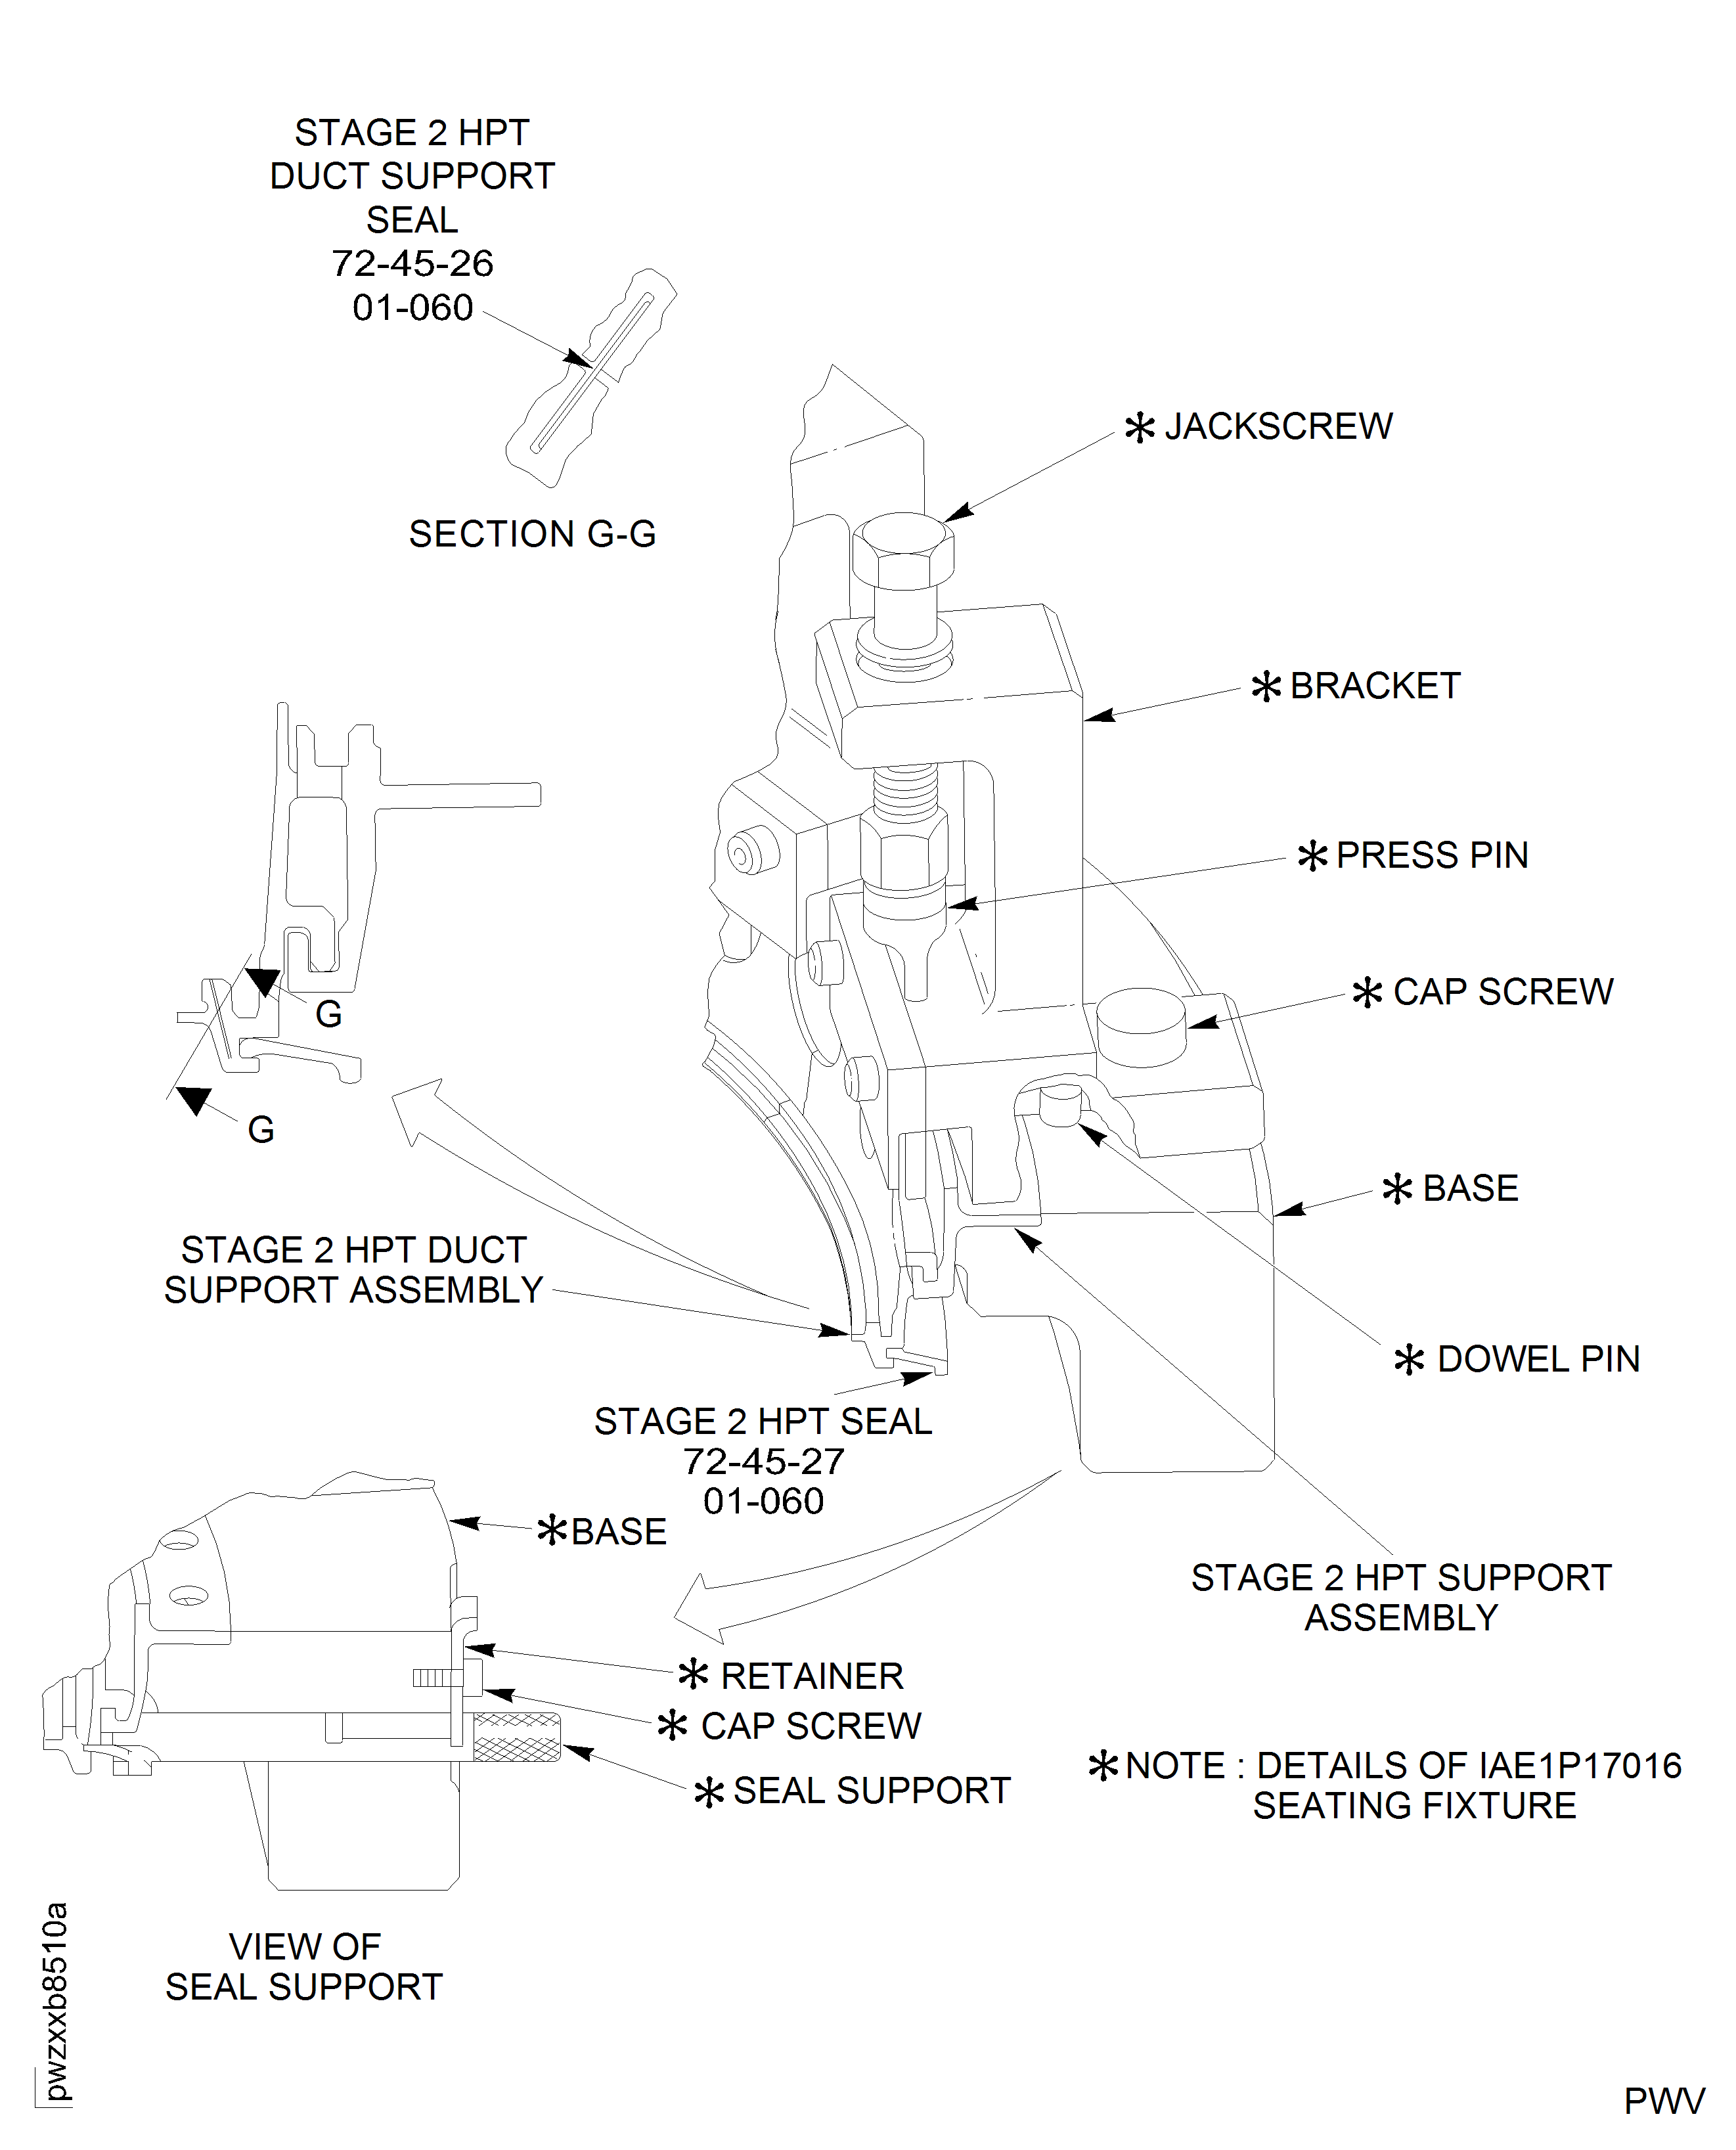
Figure: Stage 2 HPT Support Assembly, Stage 2 HPT Duct Support Assemblies and Stage 2 HPT Seal in the Fixture
Stage 2 HPT Support Assembly, Stage 2 HPT Duct Support Assemblies and Stage 2 HPT Seal in the Fixture
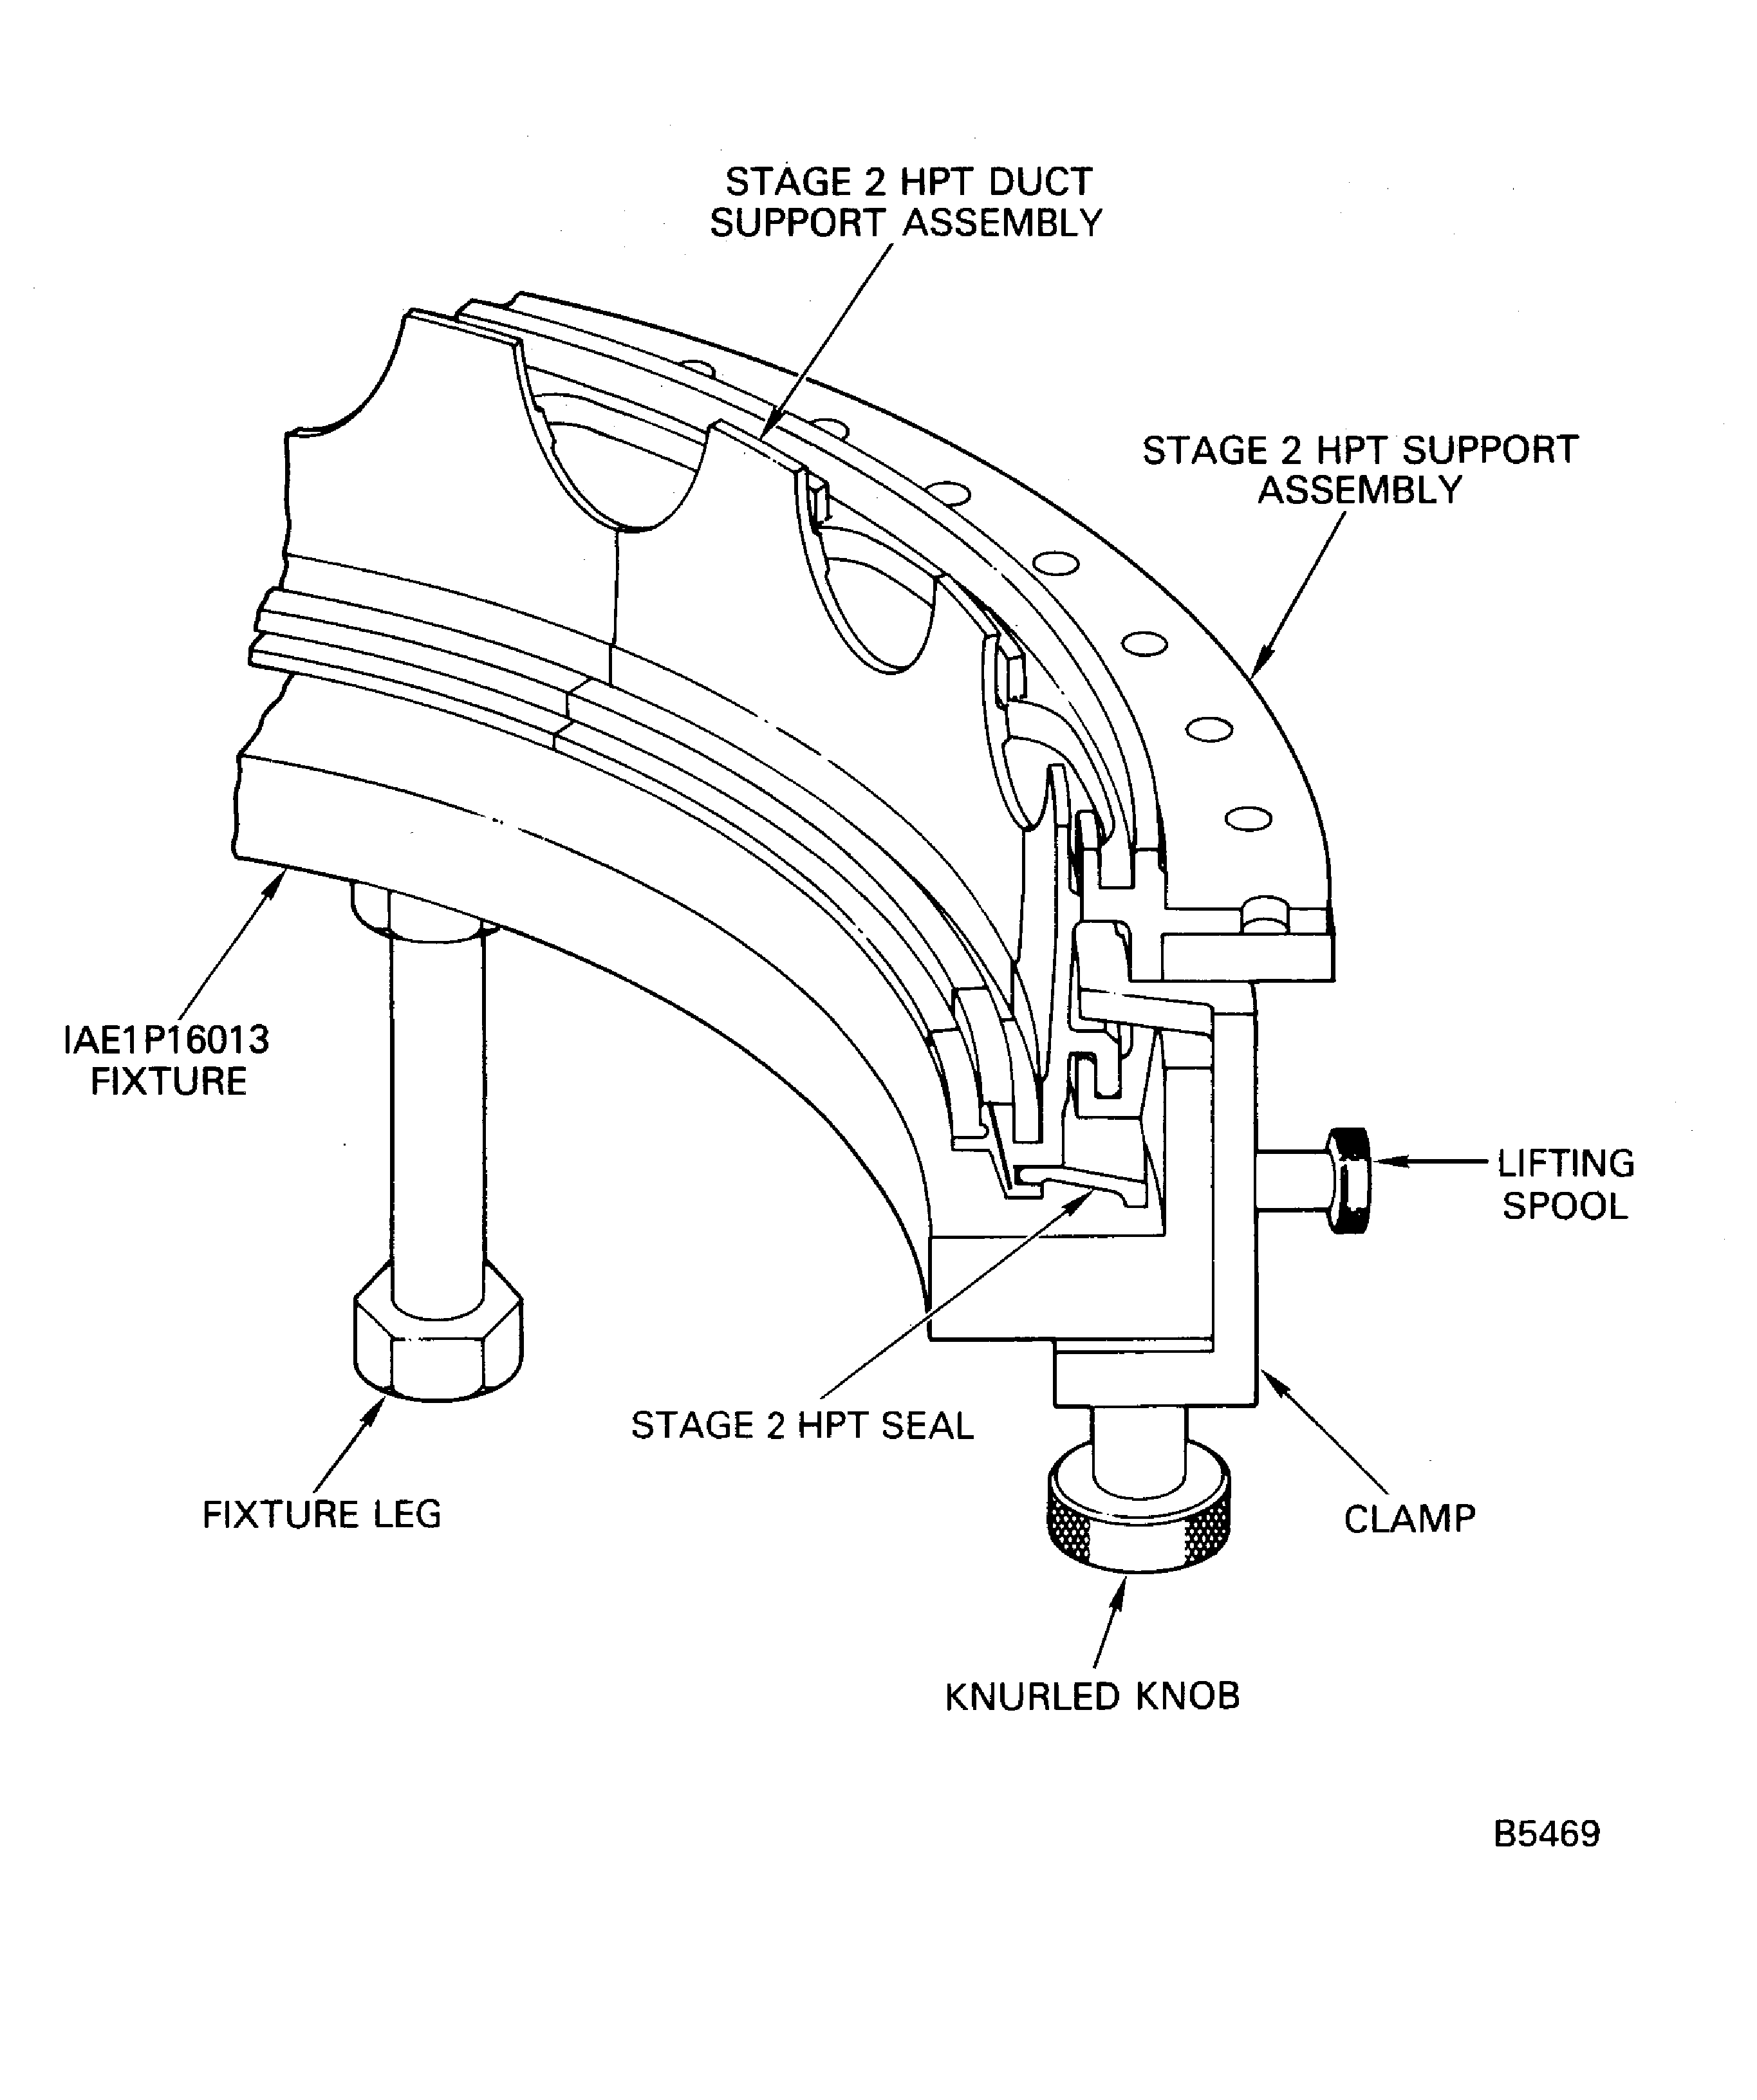
Figure: Stage 2 HPT Support Assembly, Stage 2 HPT Duct Support Assembly and Stage 2 HPT Seal Installation
Stage 2 HPT Support Assembly, Stage 2 HPT Duct Support Assembly and Stage 2 HPT Seal Installation
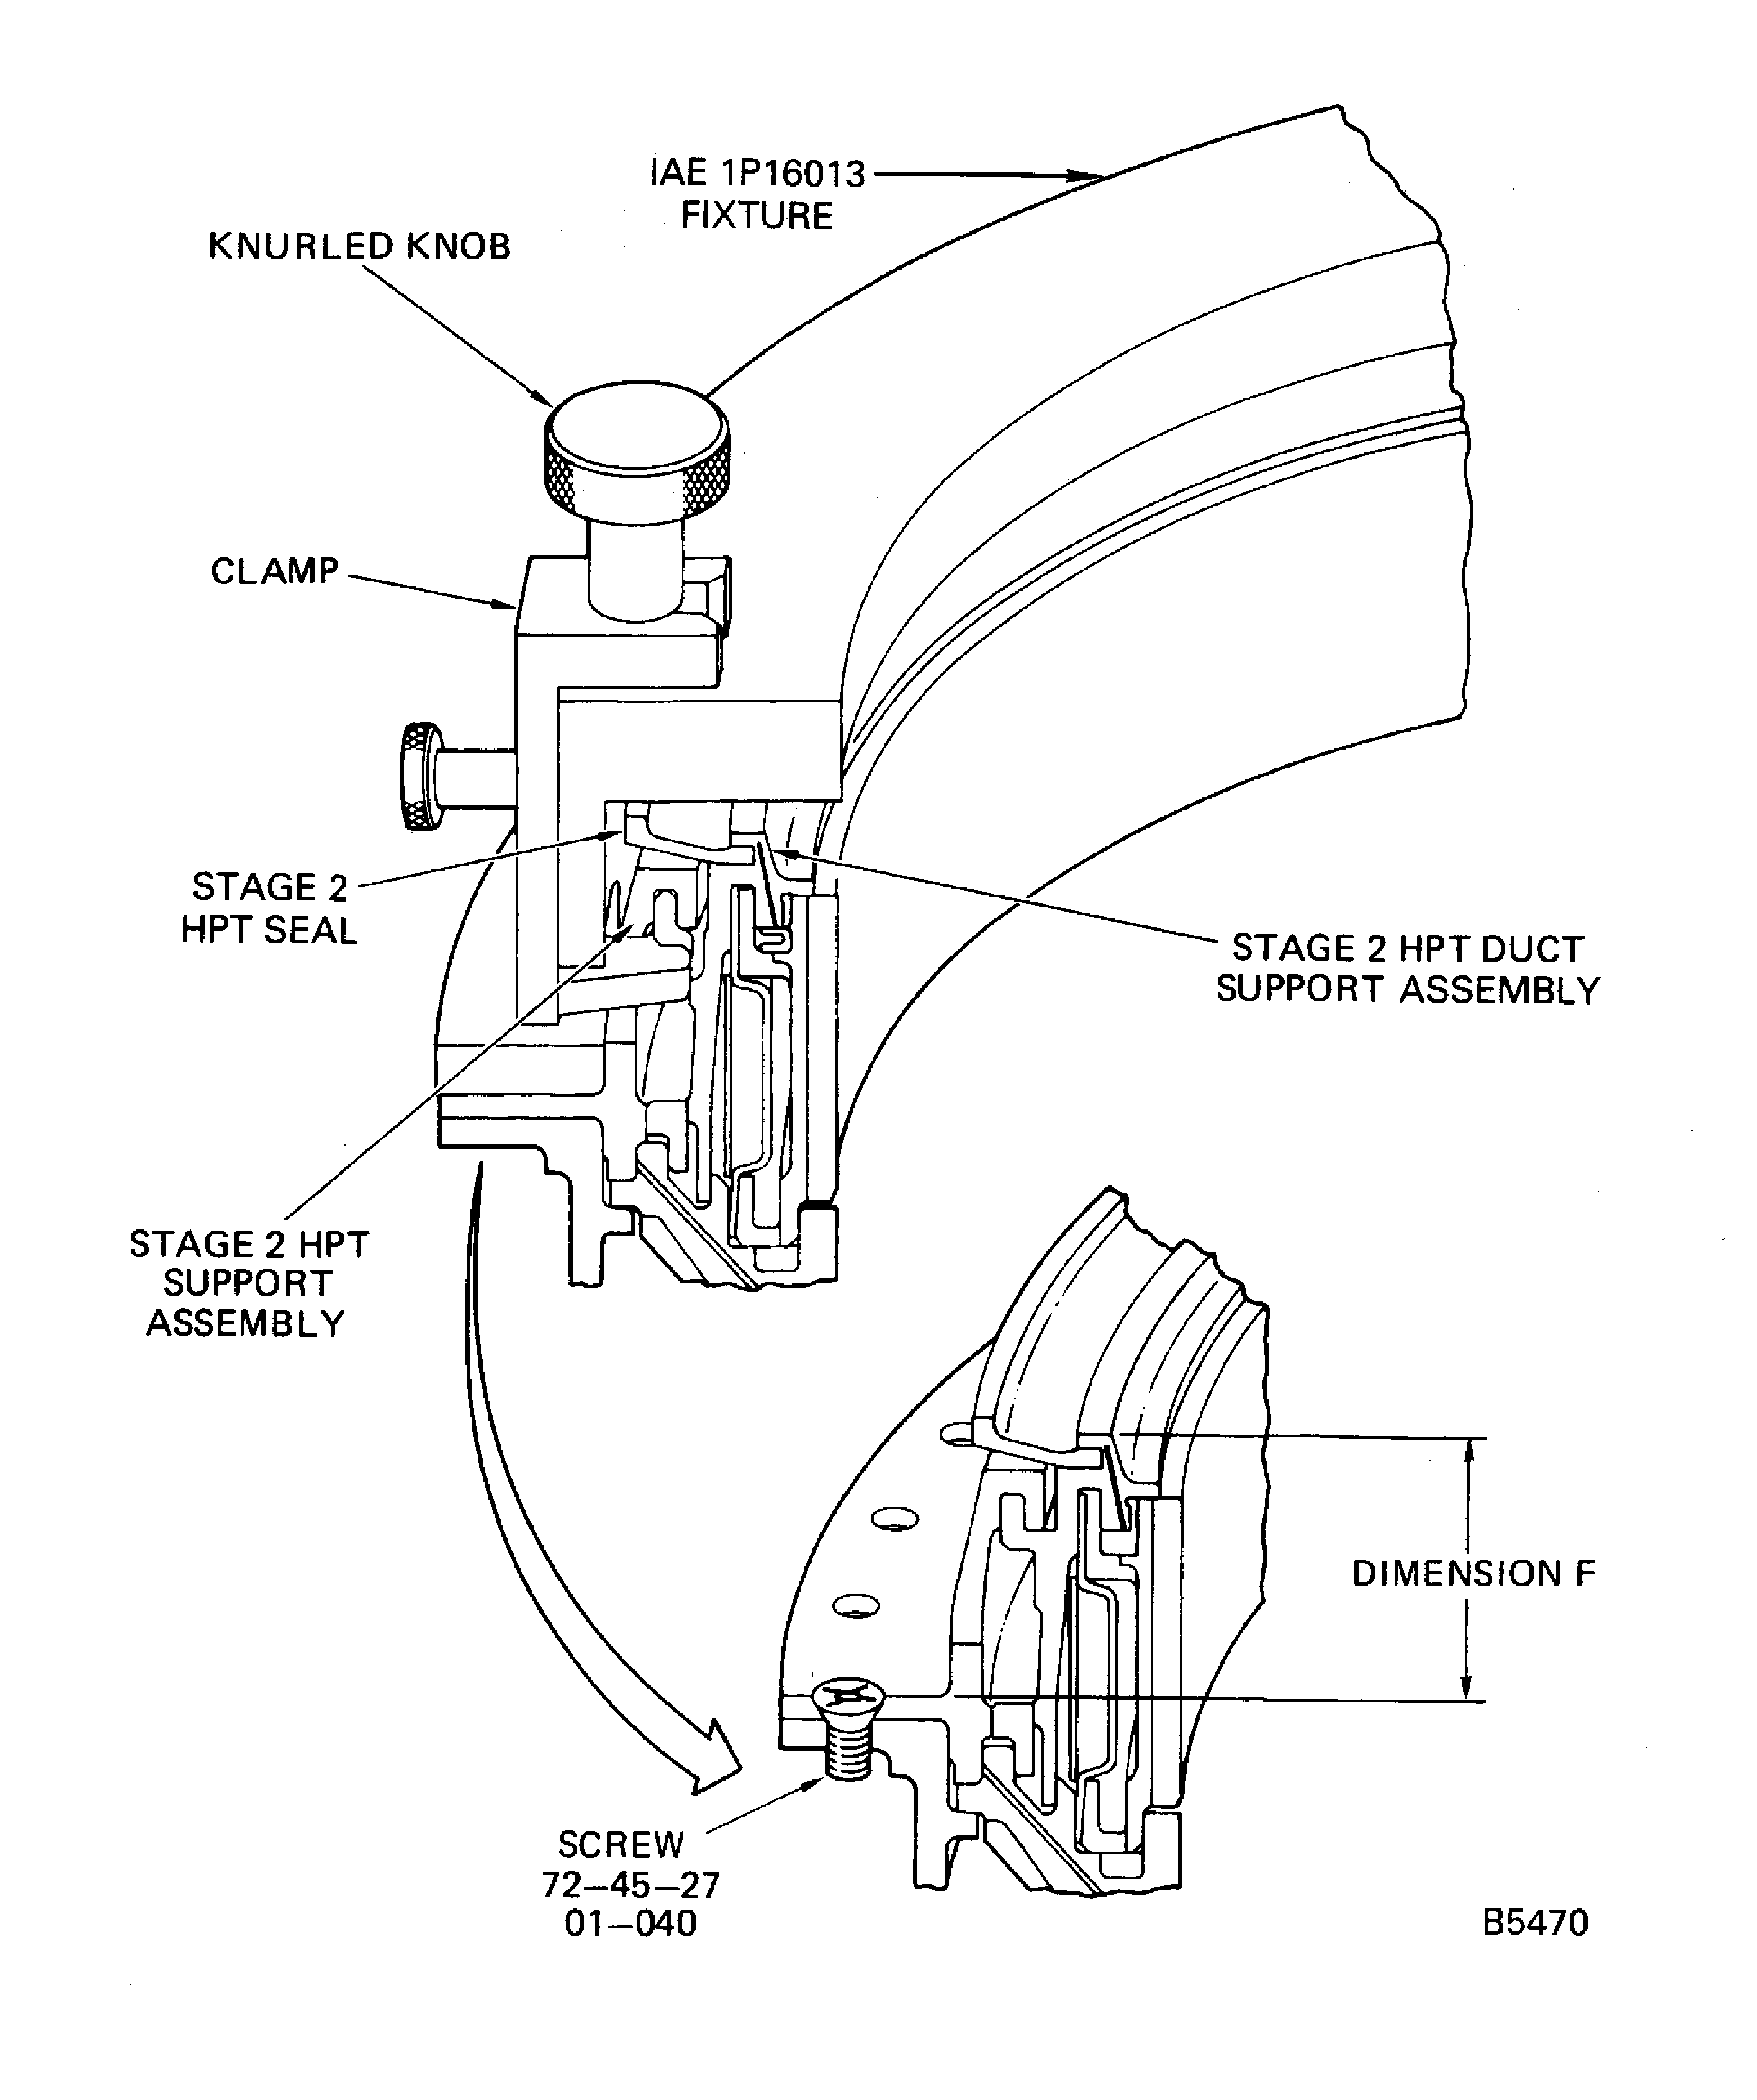
Figure: IAE 1P16569 Lift and Turn/Assembly Fixture
IAE 1P16569 Lift and Turn/Assembly Fixture

Figure: Stage 1 HPT Band Segments Identification
Stage 1 HPT Band Segments Identification

Figure: Stage 1 HPT Duct Segment Assemblies Identification
Stage 1 HPT Duct Segment Assemblies Identification

Stage 1 HPT Duct Segment Assemblies Identification

Figure: Stage 1 HPT Duct Supports Identification
Stage 1 HPT Duct Supports Identification

Figure: Install the Stage 1 HPT Duct Segment Assemblies and the Stage 1 HPT Band Segments
Install the Stage 1 HPT Duct Segment Assemblies and the Stage 1 HPT Band Segments

Figure: Install the Stage 1 HPT Duct Supports
Install the Stage 1 HPT Duct Supports
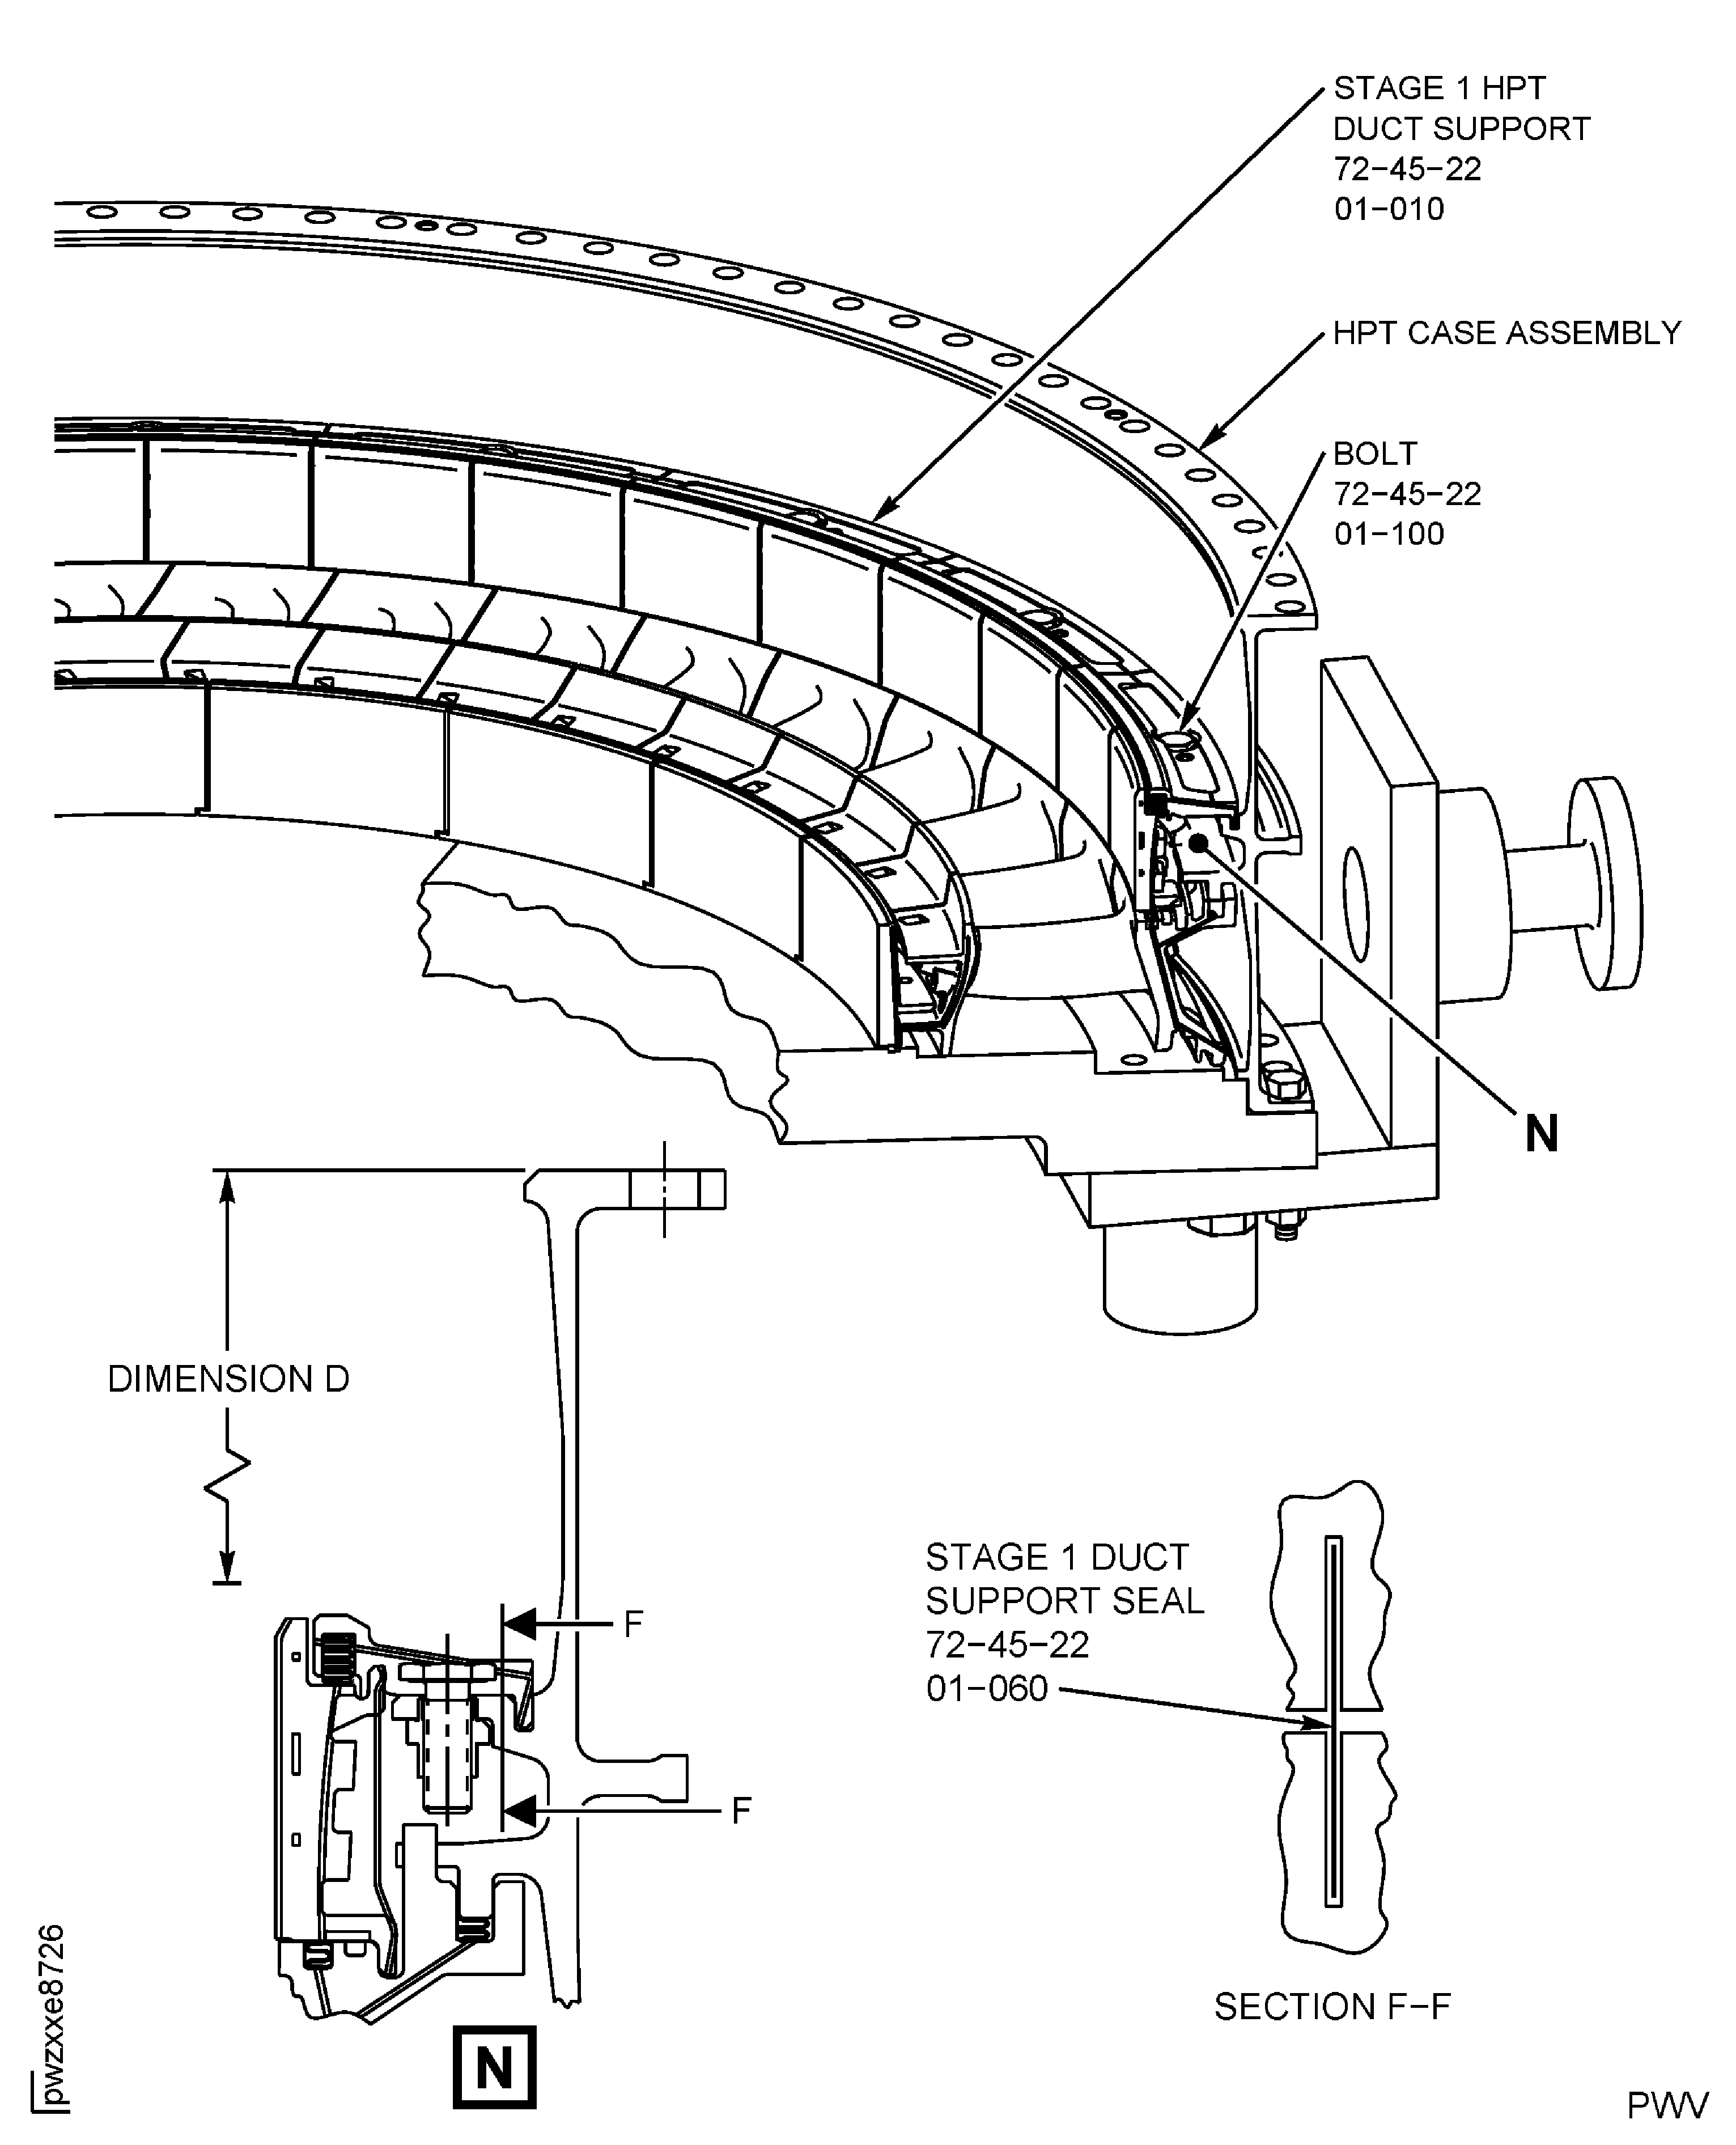
Figure: Remove the IAE 1P16026 Assembly Fixture
Remove the IAE 1P16026 Assembly Fixture
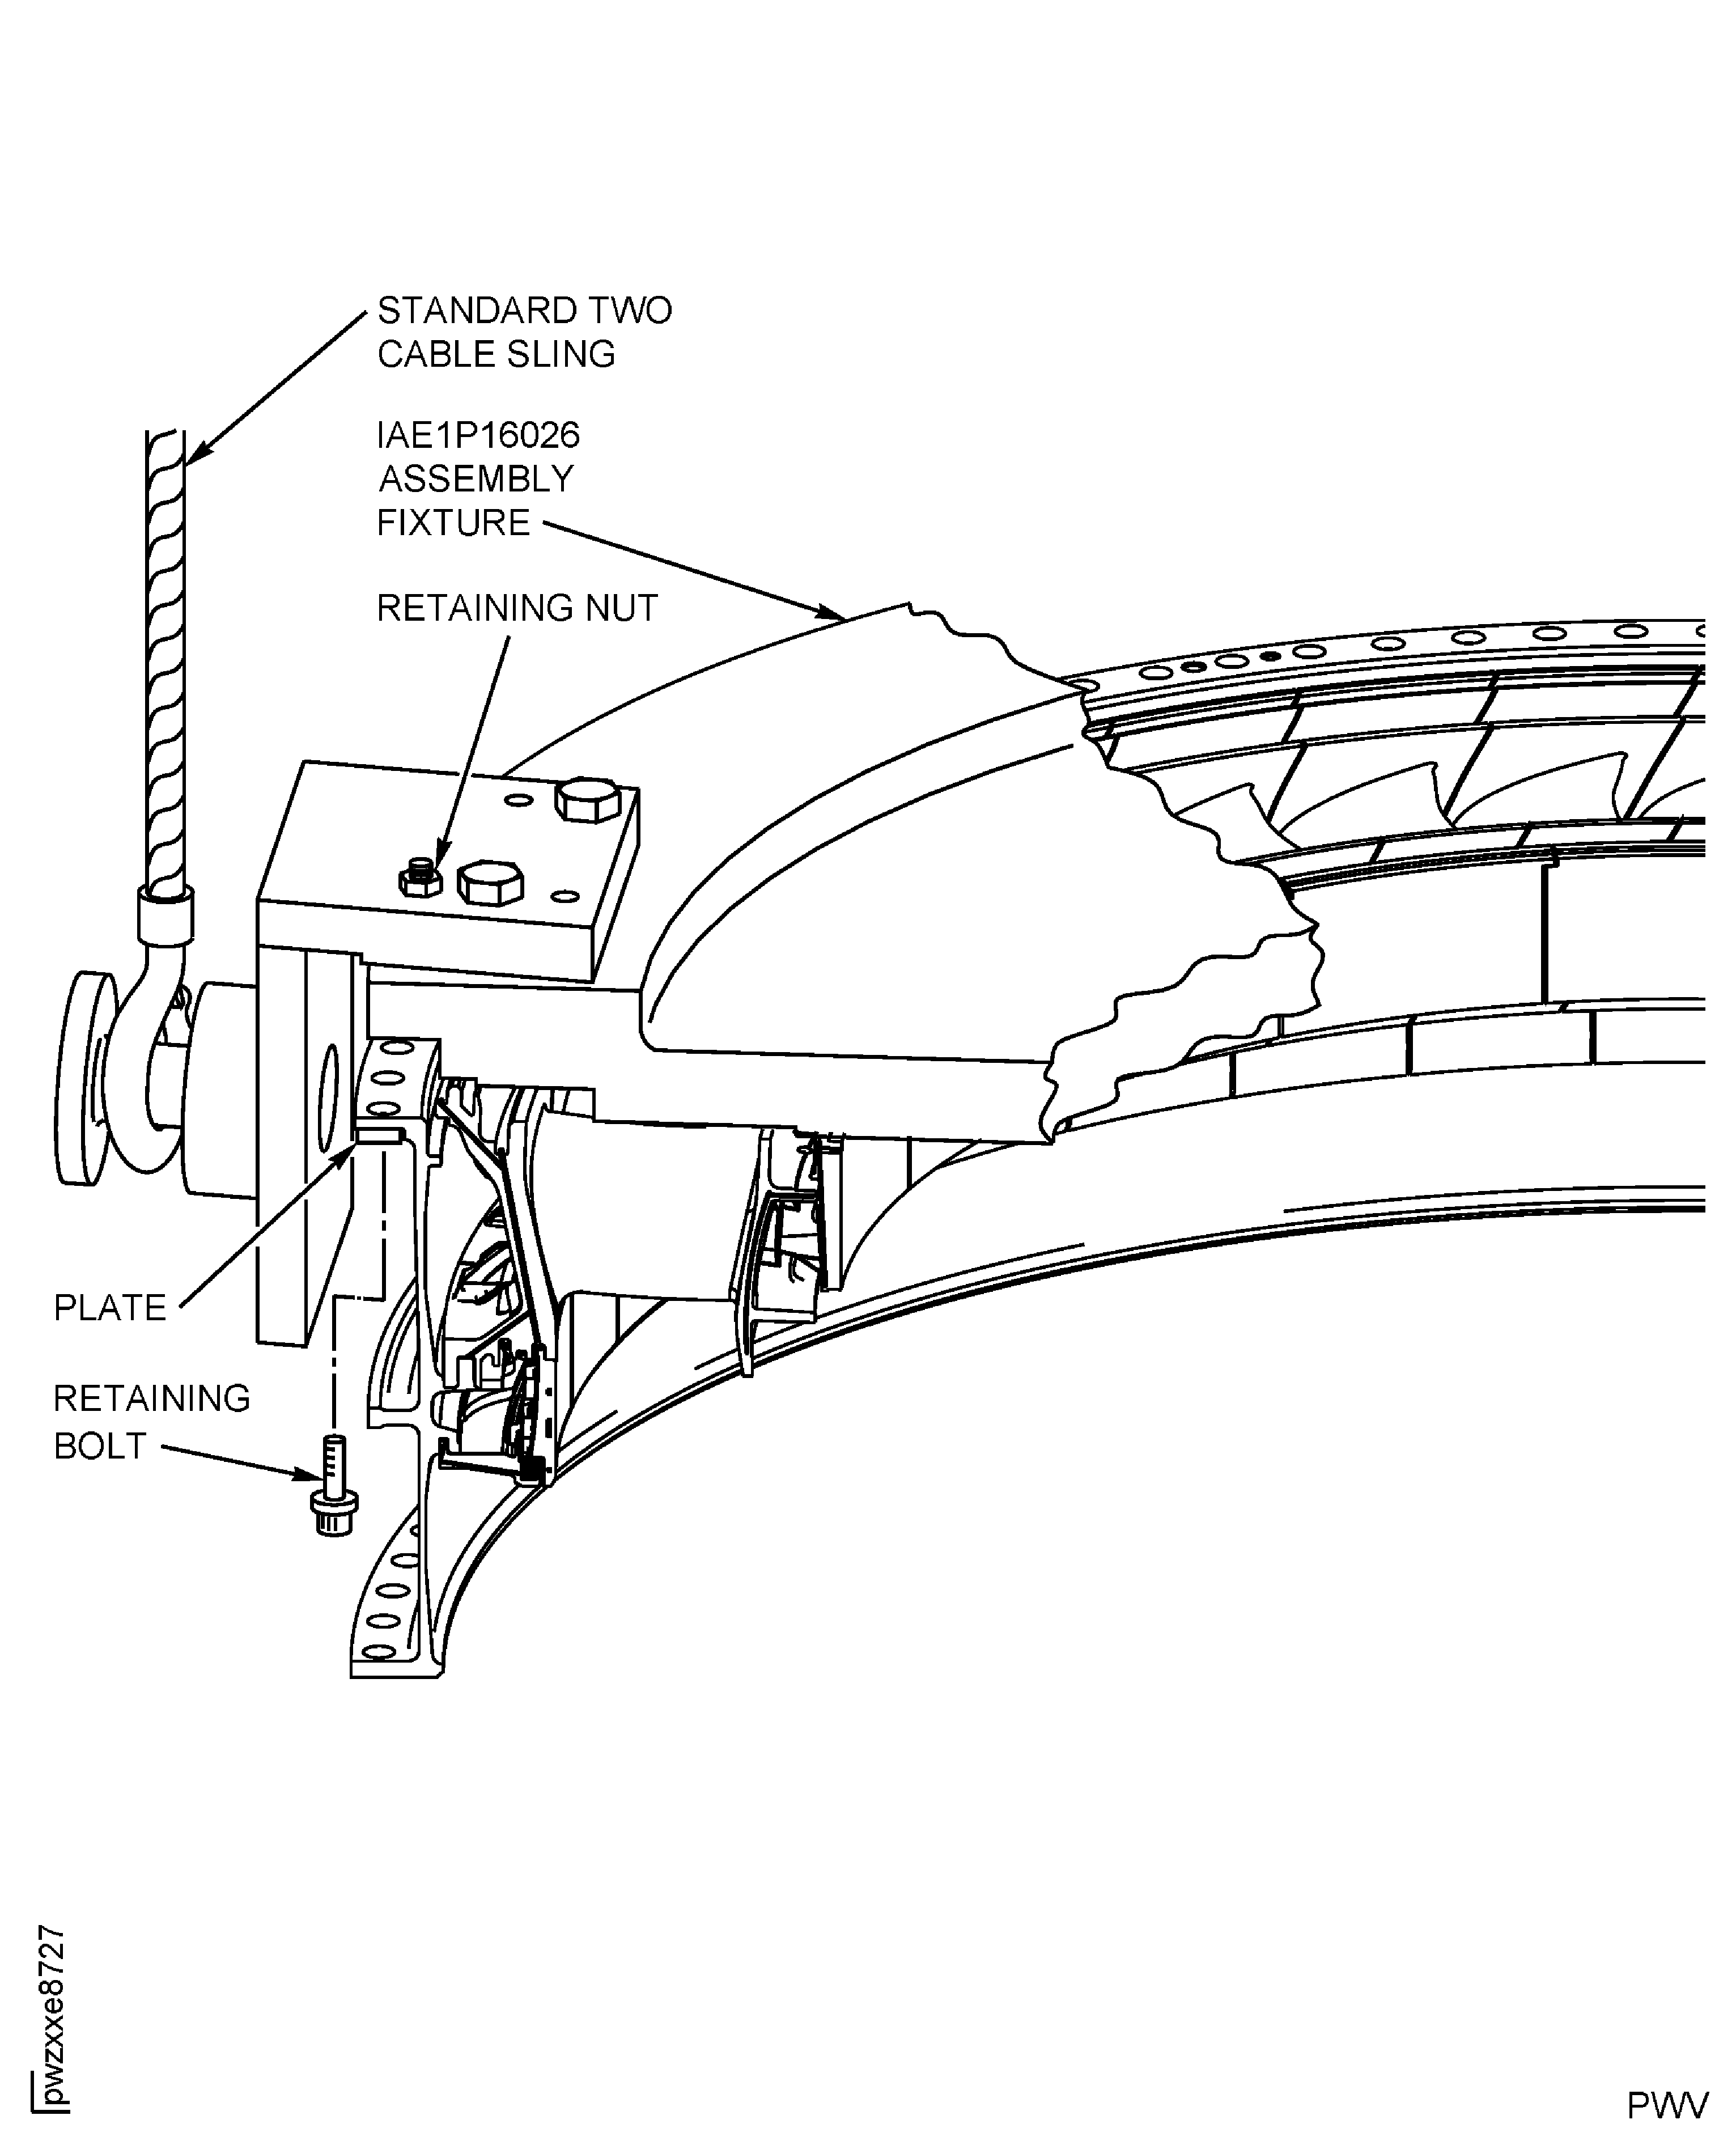
Figure: Install the Instrumentation Plugs
Install the Instrumentation Plugs
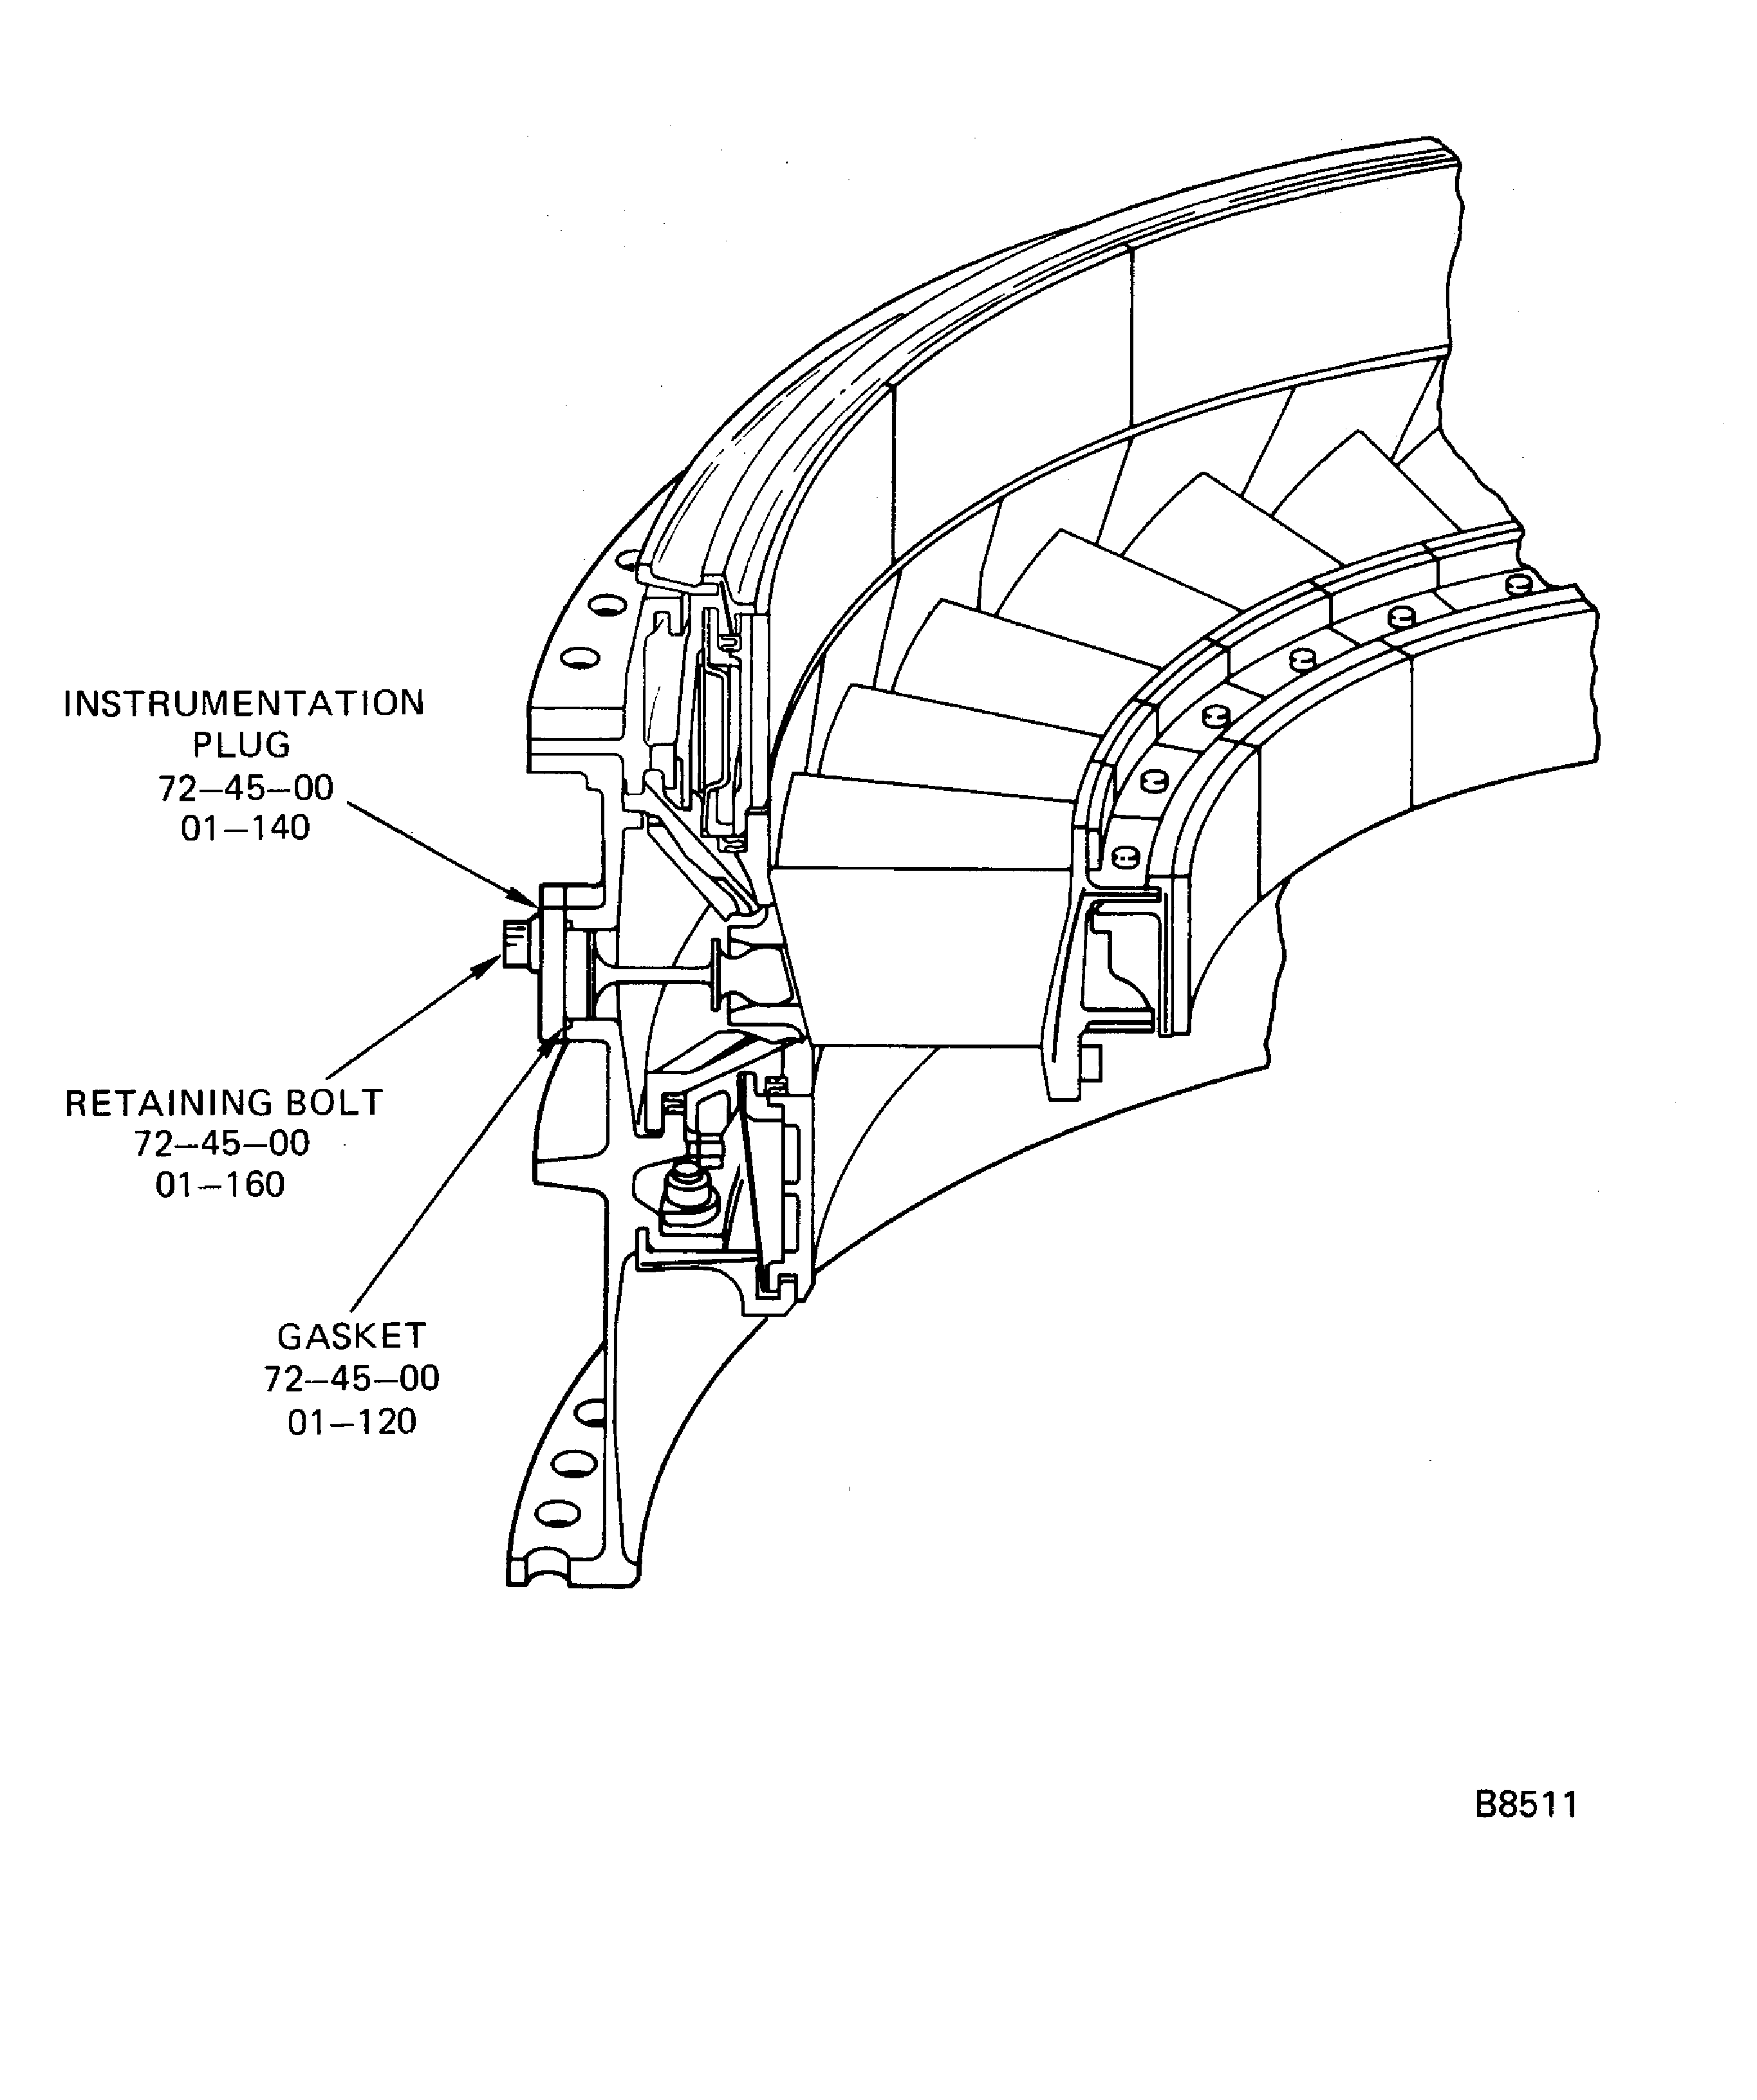
Figure: HPT Rotor and Stator Identification Plate Installation
HPT Rotor and Stator Identification Plate Installation
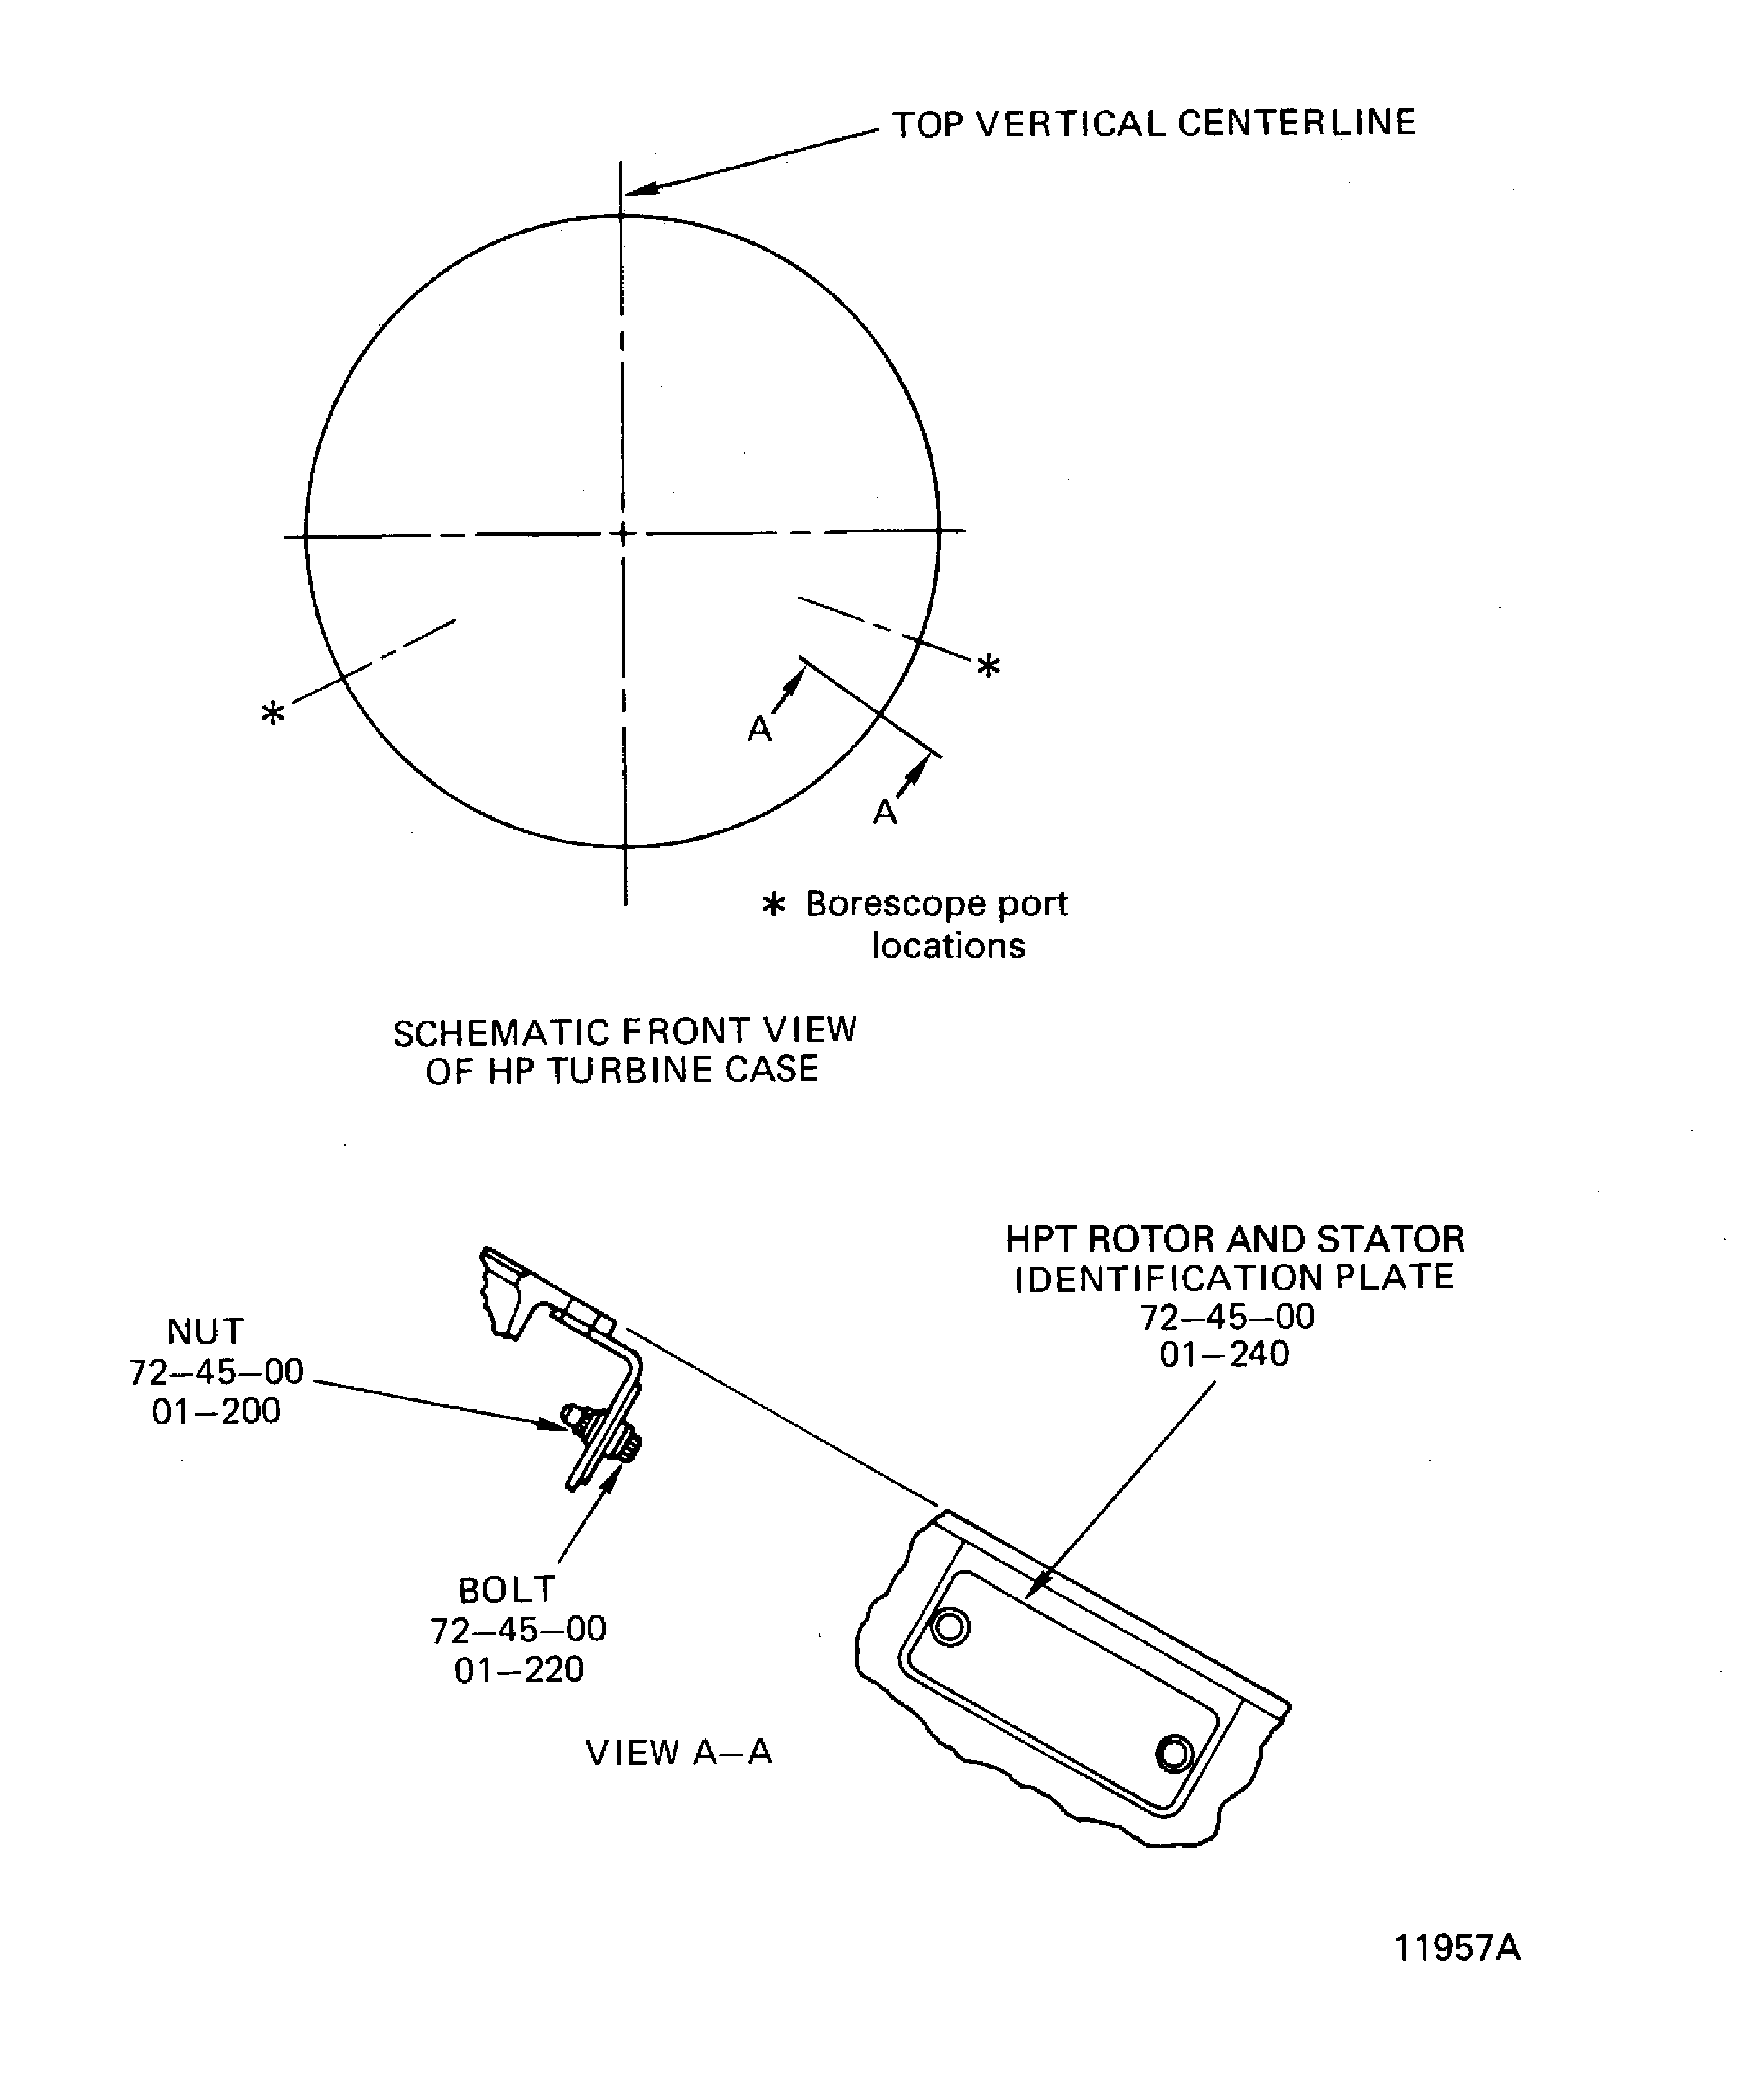
Figure: Install the Orifice Plates and Rings
Install the Orifice Plates and Rings
