Export Control
EAR Export Classification: Not subject to the EAR per 15 C.F.R. Chapter 1, Part 734.3(b)(3), except for the following Service Bulletins which are currently published as EAR Export Classification 9E991: SBE70-0992, SBE72-0483, SBE72-0580, SBE72-0588, SBE72-0640, SBE73-0209, SBE80-0024 and SBE80-0025.Copyright
© IAE International Aero Engines AG (2001, 2014 - 2021) The information contained in this document is the property of © IAE International Aero Engines AG and may not be copied or used for any purpose other than that for which it is supplied without the express written authority of © IAE International Aero Engines AG. (This does not preclude use by engine and aircraft operators for normal instructional, maintenance or overhaul purposes.).Applicability
All
Common Information
TASK 72-41-23-200-001-B00 HPC Rear Outer Case - Examine, Inspection-001
General
This TASK gives the procedure for the inspection of the rear outer case.
Fig/item numbers in parentheses in the procedure agree with those used in the IPC. Only the primary Fig/item numbers are used. For service bulletin alpha variants refer to the IPC.
The policy that is necessary for inspection is given in SPM TASK 70-20-01-200-501.
All the parts must be cleaned before any part is examined.
All the parts must be visually examined for damage, corrosion and wear. Any defects that are not identified in the procedure must be referred to IAE.
The procedure for the parts which must have a crack test is given in Step. Do the crack test before the part is visually examined.
Do not discard any part until you are sure there are no repairs available. Refer to the instructions in Repair before a discarded part is used again or oversize parts are installed.
Parts which should be discarded can be held although no repair is available. The repair of a discarded part can be shown to be necessary at a subsequent date.
All the parts must be examined to make sure that all the repairs have been completed satisfactory.
The practices and processes referred to in the procedure by the TASK/SUBTASK numbers are in SPM.
References
Refer to SPM for data on these items:
Definition of Damage, SPM TASK 70-02-02-350-501,
Inspection of Parts, SPM TASK 70-20-01-200-501.
Some data on these items are contained in this TASK. For more data on these items refer to SPM:
Methods of Testing for Crack Indications,
Chemical Processes,
Surface Protection.
Preliminary Requirements
Pre-Conditions
NONESupport Equipment
NONEConsumables, Materials and Expendables
NONESpares
NONESafety Requirements
NONEProcedure
Refer to Figure.
Remove shank nuts. Refer to Repair VRS6279, TASK 72-41-23-300-011 (REPAIR-011).
Clean the parts. Refer to TASK 72-41-23-100-000 (CLEANING-000).
Repair, VRS6530 TASK 72-41-23-300-024 (REPAIR-024).
Cracked at rear flange face 1.
Do the test for cracks on the parts that is given below.
PART IDENT
TASK/SUBTASK
Rear outer case
SUBTASK 72-41-23-230-064 Examine the Rear Outer Case for Cracks
Refer to Figure.
Repair, VRS6104 TASK 72-41-23-300-001 (REPAIR-001).
More than in Step.
Galled.
Repair, VRS6104 TASK 72-41-23-300-001 (REPAIR-001).
More than in Step.
Worn.
Repair, VRS6104 TASK 72-41-23-300-001 (REPAIR-001).
More than in Step.
Scored.
Repair, VRS6104 TASK 72-41-23-300-001 (REPAIR-001).
More than in Step with local damage not more than 0.008 in. (0.20 mm) in depth, separated by more than 1.772 in. (45.00 mm) between damage area centres.
Repair, VRS6528 TASK 72-41-23-300-023 (REPAIR-023).
More than in Step with general damage not more than 0.008 in. (0.20 mm) in depth separated by less than 1.772 in. (45.00 mm) between damage area centres.
Faces 1 and 4.
Repair, VRS6104 TASK 72-41-23-300-001 (REPAIR-001).
More than in Step and not more than 0.010 in. (0.25 mm) in depth, with damage segregation not necessary.
Faces 2 and 3.
Pitted and surface damaged.
SUBTASK 72-41-23-220-098 Examine the Rear Outer Case Front and Rear Flanges at Face Locations 1 to 4
Refer to Figure.
Repair, VRS6179 TASK 72-41-23-300-002 (REPAIR-002).
More than in Step.
Scored.
Repair, VRS6179 TASK 72-41-23-300-002 (REPAIR-002).
More than in Step.
Scratched.
Repair, VRS6179 TASK 72-41-23-300-002 (REPAIR-002).
Chipped.
Repair, VRS6179 TASK 72-41-23-300-002 (REPAIR-002).
More than in Step.
Worn.
Repair, VRS6179 TASK 72-41-23-300-002 (REPAIR-002).
If cracks are found.
Cracked.
SUBTASK 72-41-23-220-099 Examine the Rear Outer Case (72-41-23,02-400) Coated Face at Location 5
Refer to Figure.
Repair, VRS6104 TASK 72-41-23-300-001 (REPAIR-001).
Burred edges
Repair, VRS6104 TASK 72-41-23-300-001 (REPAIR-001).
Repair, VRS6528 TASK 72-41-23-300-023 (REPAIR-023).
More than in (a) and not more than 0.027 in. (0.68 mm) in depth
Hole 6 - bore surface.
Repair, VRS6528 TASK 72-41-23-300-023 (REPAIR-023).
More than in (a) and not more than 0.020 in. (0.50 mm) in depth
Hole 7 - counter bore surface.
Repair, VRS6528 TASK 72-41-23-300-023 (REPAIR-023).
More than in (a) and not more than 0.020 in. (0.50 mm) in depth
Hole 8 - bore surface.
Pitted and surface damaged.
Scratched
SUBTASK 72-41-23-220-100 Examine the Rear Outer Case Bolt Holes at Locations 6 to 9
Refer to Figure.
Repair, VRS6104 TASK 72-41-23-300-001 (REPAIR-001).
From impact damage not more than 0.041 in. (1.04 mm) in depth in dowel hole axial direction
Burred and/or raised edges.
SUBTASK 72-41-23-220-101 Examine the Rear Outer Case Dowel Holes at Locations 10 and 11
Refer to Figure.
Repair, VRS6104 TASK 72-41-23-300-001 (REPAIR-001).
More than in (1)
Galled surfaces.
Repair, VRS6104 TASK 72-41-23-300-001 (REPAIR-001).
More than in (1)
Scored surfaces.
Repair, VRS6104 TASK 72-41-23-300-001 (REPAIR-001).
More than in (a) with local pitting not more than 0.030 in. (0.75 mm) in depth, separated by more than 1.772 in. (45.00 mm) between damage area centres
Repair, VRS6528 TASK 72-41-23-300-023 (REPAIR-023).
More than in (a) with general pitting not more than 0.030 in. (0.75 mm) in depth, separated by less than 1.772 in. (45.00 mm) between damage area centres
External boss surfaces.
Repair, VRS6104 TASK 72-41-23-300-001 (REPAIR-001).
More than in (a) and not more than 0.012 in. (0.30 mm) in depth and in radius 0.236 in. (6.00 mm) of hole centre
Internal casing surface local to fastener holes.
Pitted surfaces.
Repair, VRS6104 TASK 72-41-23-300-001 (REPAIR-001).
Burred edges
SUBTASK 72-41-23-220-102 Examine the Rear Outer Case Bleed Ports at Locations 12 to 16 and Cooling Air Ports at Locations 17 to 21
Refer to Figure.
Repair, VRS6104 TASK 72-41-23-300-001 (REPAIR-001).
More than in (1)
Scored.
Repair, VRS6104 TASK 72-41-23-300-001 (REPAIR-001).
More than (1)
Galled.
Repair, VRS6104 TASK 72-41-23-300-001 (REPAIR-001).
More than in (a) with local pitting not more than 0.030 in. (0.75 mm) in depth, separated by more than 1.772 in. (45.00 mm) between damage area centres
Repair, VRS6528 TASK 72-41-23-300-023 (REPAIR-023).
More than in (a) with general pitting not more than 0.030 in. (0.75 mm) in depth, separated by less than 1.772 in. (45.00 mm) between damage area centres
External boss surfaces.
Repair, VRS6104 TASK 72-41-23-300-001 (REPAIR-001).
More than in (a) and not more than 0.012 in. (0.30 mm) in depth and in radius 0.236 in. (6.00 mm) of hole centre
Internal casing surface local to fastener holes.
Repair, VRS6528 TASK 72-41-23-300-023 (REPAIR-023).
More than in (a) and not more than 0.024 in. (0.60 mm) in depth.
Borescope bores for PN 6A3557.
Refer to Repair, VRS6528 TASK 72-41-23-300-023 (REPAIR - 023).
More than in Step
Borescope bores for PNs 6A4154 and 6A5495.
Pitted and surface damaged.
Repair, VRS6104 TASK 72-41-23-300-001 (REPAIR-001).
Burred edges.
SUBTASK 72-41-23-220-104 Examine the Rear Outer Case Stage 7 to 11 Borescope Holes at Locations 22 and 23
Refer to Figure.
Repair, VRS6279 TASK 72-41-23-300-011 (REPAIR-001).
Loose
Repair, VRS6279 TASK 72-41-23-300-011 (REPAIR-011).
Damaged
SUBTASK 72-41-23-220-105 Examine the Rear Outer Case Shank Nuts at Locations 24 and 25
Refer to Figure.
Repair, VRS6278 TASK 72-41-23-300-021 (REPAIR-021).
Burred
Repair, VRS6278 TASK 72-41-23-300-021 (REPAIR-021).
Scored
Repair, VRS6278 TASK 72-41-23-300-021 (REPAIR-021).
Loose
SUBTASK 72-41-23-220-106 Examine the Rear Outer Case Pins at Location 26
Repair, VRS6306 TASK 72-41-23-300-019 (REPAIR-019).
Broken
Repair, VRS6306 TASK 72-41-23-300-019 (REPAIR-019).
Loose
Repair, VRS6306 TASK 72-41-23-300-019 (REPAIR-019).
Worn
Repair, VRS6306 TASK 72-41-23-300-019 (REPAIR-019).
Crossed thread
Repair, VRS6306 TASK 72-41-23-300-019 (REPAIR-019).
Stripped thread
SUBTASK 72-41-23-220-107 Examine the Rear Outer Case Screw Thread Inserts
Repair, VRS6526 TASK 72-41-23-300-022 (REPAIR-022).
Worn.
Repair, VRS6526 TASK 72-41-23-300-022 (REPAIR-022).
Missing threads/serrations.
Repair, VRS6526 TASK 72-41-23-300-022 (REPAIR-022).
Damaged.
Repair, VRS6540 72-41-23-300-026 (REPAIR-026).
Damage requiring oversized inserts.
Repair, VRS6526 TASK 72-41-23-300-022 (REPAIR-022).
Inspect for KEENSERTS (for PNs 6A4154 and 6A5495).
SUBTASK 72-41-23-220-175 Examine the Rear Outer Case Screw Thread Insert Holes
Repair, VRS6178 TASK 72-41-23-300-003 (REPAIR-003).
Damaged.
SUBTASK 72-41-23-220-108 Examine the Rear Outer Case Surface Protection
Refer to Figure.
Repair, VRS6104 TASK 72-41-23-300-001 (REPAIR-001).
More than in (1)
Scored.
Repair, VRS6104 TASK 72-41-23-300-001 (REPAIR-001).
More than in (1)
Galled.
SUBTASK 72-41-23-220-109 Examine the Rear Outer Case Face at Location 1118
Refer to Figure.
Repair, VRS6104 TASK 72-41-23-300-001 (REPAIR-001).
More than in (1)
Scored.
Repair, VRS6104 TASK 72-41-23-300-001 (REPAIR-001).
More than in (1)
Galled.
Repair, VRS6104 TASK 72-41-23-300-001 (REPAIR-001).
Not more than 0.002 in. (0.05 mm) in depth for an arc length of 1.968 in. (50.00 mm) in 7.874 in. (200.00 mm) circumferential length
Repair, VRS6339 TASK 72-41-23-300-013 (REPAIR-013).
More than in (1)
Worn.
SUBTASK 72-41-23-220-110 Examine the Rear Outer Case Face at Location 27
Refer to Figure.
Repair, VRS6104 TASK 72-41-23-300-001 (REPAIR-001).
More than in (a) with local pitting not more than 0.013 in. (0.33 mm) in depth, separated by more than 1.772 in (45.00 mm) between damage area centres and not in the damage exclusion zone diameter 0.610 in. (15.50 mm) centred on fastener hole
Repair, VRS6528, TASK 72-41-23-300-023 (REPAIR-023).
More than in (a) with general pitting not more than 0.0160 in. (0.40 mm) in depth or pitting in the exclusion zone
Face 33.
Repair, VRS6104 TASK 72-41-23-300-001 (REPAIR-001).
More than in (a) with local pitting not more than 0.013 in. (0.33 mm) in depth, separated by more than 1.772 in. (45.00 mm) between damage area centres and not in the damage exclusion zone diameter 0.610 in. (15.50 mm) centred on fastener hole
Repair, VRS6528 TASK 72-41-23-300-023 (REPAIR-023).
More than in (a) with general pitting not more than 0.020 in. (0.50 mm) in depth or pitting in the exclusion zone
Face 34.
Pitted and surface damaged.
SUBTASK 72-41-23-220-194 Examine the Rear Outer Case Front Flange Rear Face and Rear Flange Front Face at Locations 33 and 34
Refer to Figure.
Repair, VRS6104 TASK 72-41-23-300-001 (REPAIR-001).
More than in (a) with local pitting not more than 0.013 in. (0.33 mm) in depth, separated by more than 1.772 in. (45.00 mm) between damage area centres and not in the damage exclusion zone diameter 0.630 in. (16.00 mm) centred on fastener hole
Repair, VRS6528 TASK 72-41-23-300-023 (REPAIR-023).
More than in (a) with general pitting not more than 0.024 in. (0.60 mm) in depth or pitting in the exclusion zone
Face 30 (recess diameter).
Repair, VRS6104 TASK 72-41-23-300-001 (REPAIR-001).
More than in (a) with local pitting not more than 0.009 in. (0.25 mm) in depth
Repair, VRS6528 TASK 72-41-23-300-023 (REPAIR-023).
More than in (a) with heavy pitting not more than 0.017 in. (0.43 mm) in depth or pitting in the exclusion zone
Face 31 (rear face).
Repair VRS6104, TASK 72-41-23-300-001 (REPAIR-001)
More than in (a) with local pitting not more than 0.030 in. (0.75 mm) in depth
Repair, VRS6528 TASK 72-41-23-300-023 (REPAIR-023).
More than in (a) with heavy pitting not more than 0.045 in. (1.15 mm) in depth
Face 32 (inner diameter).
Pitted and surface damaged.
SUBTASK 72-41-23-220-195 Examine the Rear Outer Case Front Inner Flange Recess Diameter, Rear Face and Internal Diameter at Locations 30, 31 and 32
Repair, VRS6104 TASK 72-41-23-300-001 (REPAIR-001).
More than in step A.(1)
Nicked, dented and scratched.
SUBTASK 72-41-23-220-111 Examine the Rear Outer Case all Remaining Machined Surfaces
Repair, VRS6104 TASK 72-41-23-300-001 (REPAIR-001).
More than in step A.(1)
Nicked, dented and scratched.
SUBTASK 72-41-23-220-112 Examine the Rear Outer Case all Remaining Cast Surfaces
Repair, VRS6178 TASK 72-41-23-300-003 (REPAIR-003)
Apply surface protection and examine
Repair, VRS6279 TASK 72-41-23-300-011 (REPAIR-011).
Replace shank nuts
SUBTASK 72-41-23-350-121 Replace Surface Protection and Shank Nuts
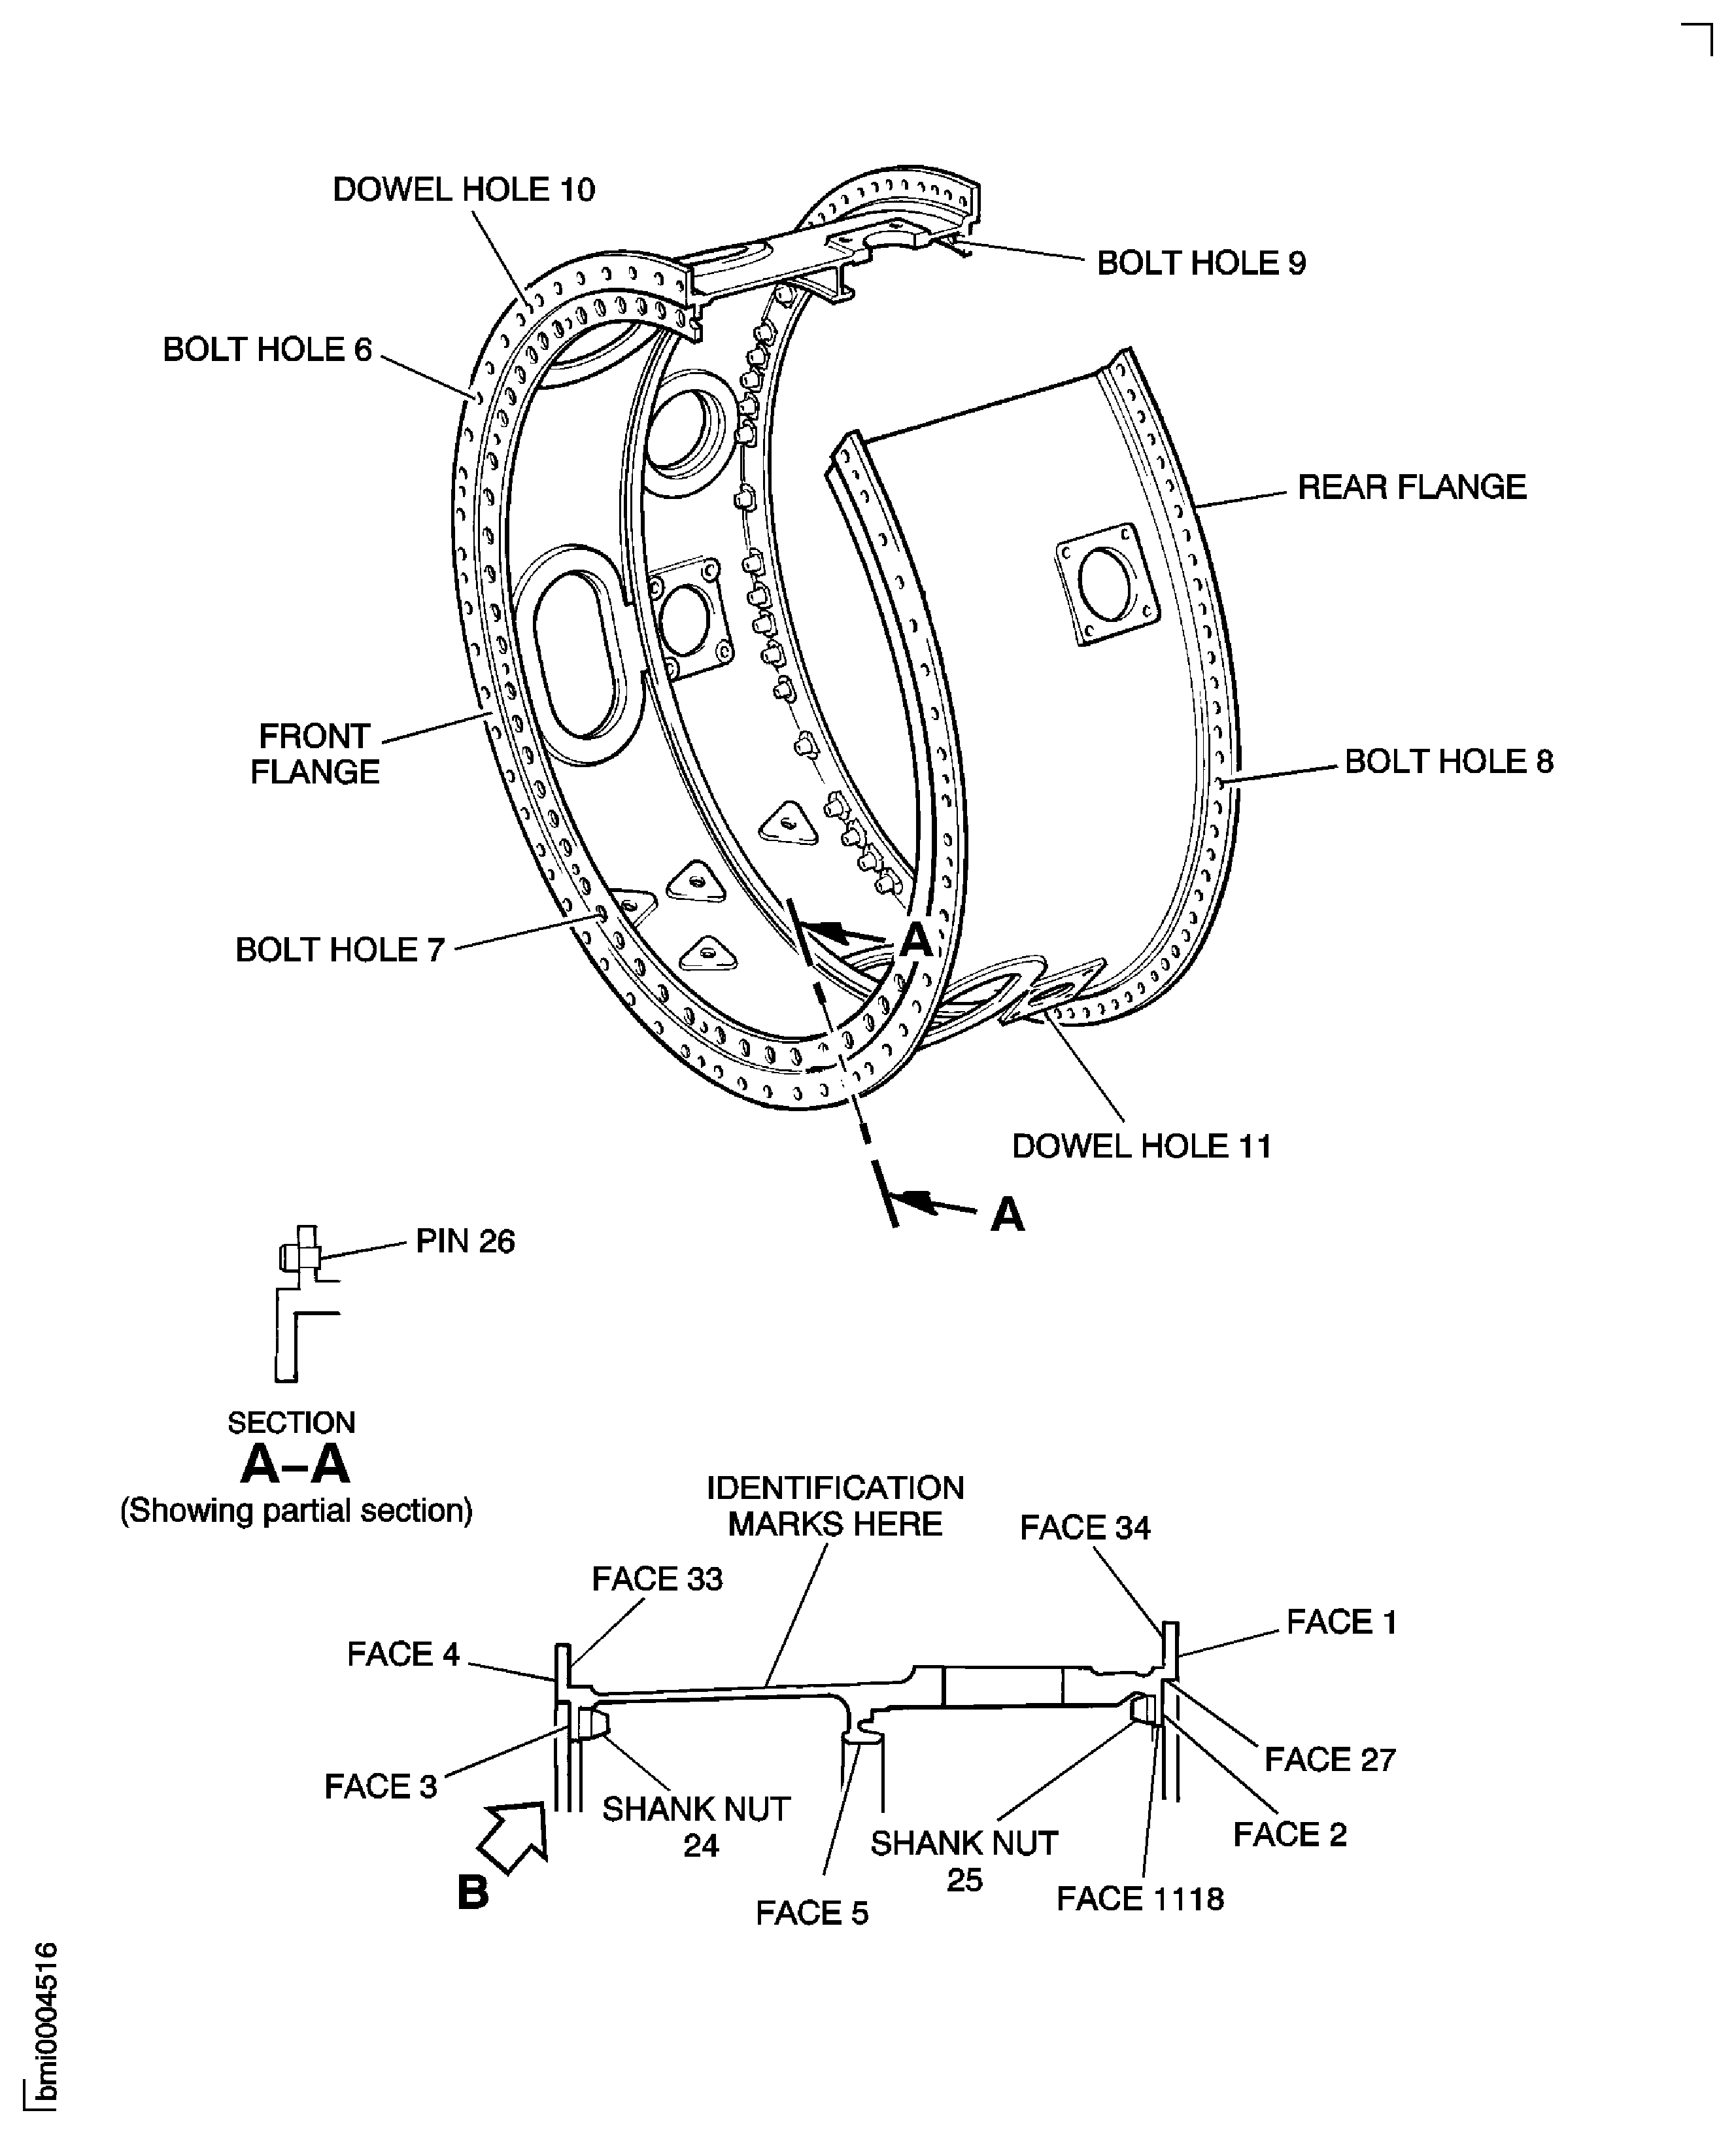
Figure: Rear Outer Case - Inspection Locations
Sheet 1

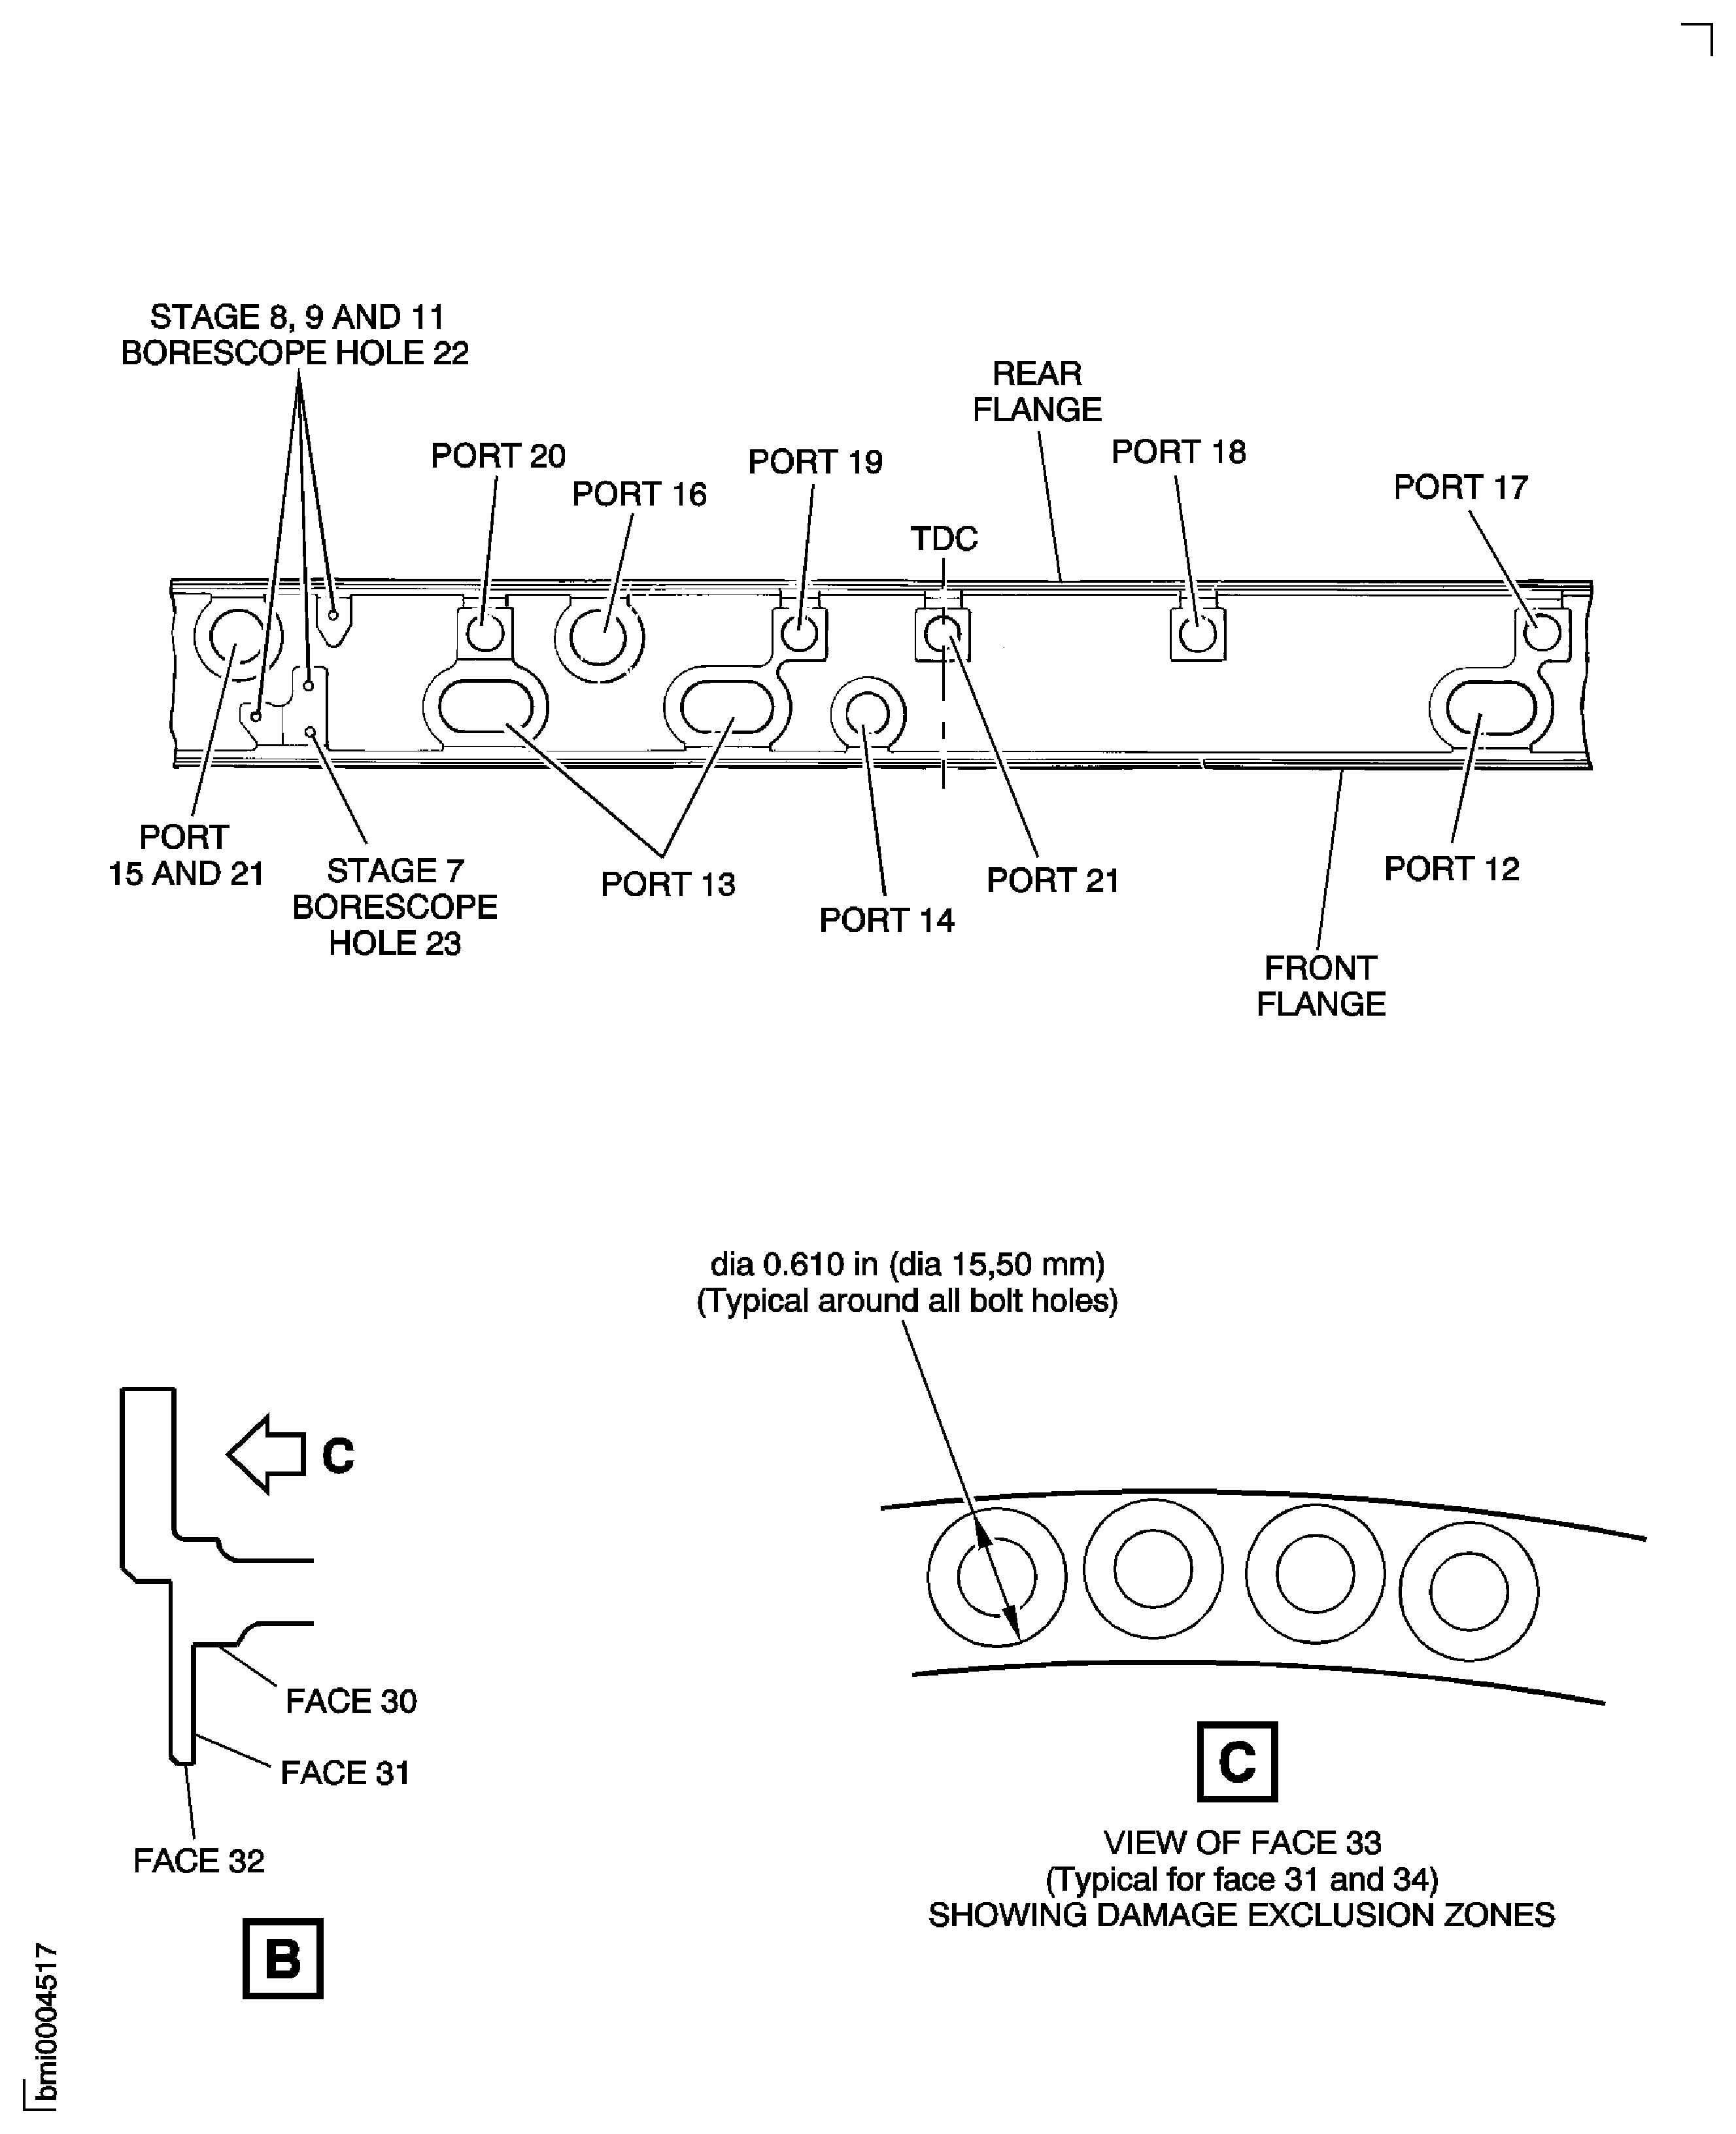
Figure: Rear Outer Case - Inspection Locations
Sheet 2

