Export Control
EAR Export Classification: Not subject to the EAR per 15 C.F.R. Chapter 1, Part 734.3(b)(3), except for the following Service Bulletins which are currently published as EAR Export Classification 9E991: SBE70-0992, SBE72-0483, SBE72-0580, SBE72-0588, SBE72-0640, SBE73-0209, SBE80-0024 and SBE80-0025.Copyright
© IAE International Aero Engines AG (2001, 2014 - 2021) The information contained in this document is the property of © IAE International Aero Engines AG and may not be copied or used for any purpose other than that for which it is supplied without the express written authority of © IAE International Aero Engines AG. (This does not preclude use by engine and aircraft operators for normal instructional, maintenance or overhaul purposes.).Applicability
All
Common Information
TASK 72-45-32-200-001-A00 HPT Stage 2 Blade - Examine, Inspection-001
Effectivity
FIG/ITEM PART NO. | |
|---|---|
01-010 | 2A0402 |
01-010 | 2A0402-001 |
01-010 | 2A1102 |
01-010 | 2A1102-001 |
01-010 | 2A1102-002 |
01-010 | 2A8602 |
01-010 | 2A8902 |
General
This TASK gives the procedure for the inspection of the stage 2 HPT blade assembly. For the other stage 2 HPT blade assembly parts, refer to TASK 72-45-32-200-000 (INSPECTION/CHECK-000).
Fig/item numbers in parentheses in the procedure agree with those used in the IPC.
The policy that is necessary for inspection is given in the SPM TASK 70-20-00-200-501.
All the parts must be cleaned before any part is examined. Refer to the SPM TASK 70-10-00-100-501.
All parts must be visually examined for damage, corrosion and wear. Any defects that are not identified in the procedure must be referred to IAE.
The procedure for those parts which must have a crack test is given in SUBTASK 72-45-32-230-052. Do the test for cracks only if the visual examination of the blade is unsatisfactory.
Do not discard any part until you are sure there are no repairs available. Refer to the instructions in Repair before a discarded part is used again or oversize parts are installed.
Parts which should be discarded can be held although no repair is available. The repair of a discarded part could be shown to be necessary at a later date.
All parts must be examined to make sure that all the repairs have been completed satisfactorily.
The practices and processes referred to in the procedure by the TASK numbers are in the SPM.
References
Refer to the SPM for data on these items.
Definitions of Damage, SPM TASK 70-02-02-350-501
Metal Temperature Analysis (Nickel Base Alloys), SPM TASK 70-02-03-220-501
Vapor Degrease, SPM TASK 70-11-01-300-503
Cleaning, SPM TASK 70-12-09-120-501
Fluorescent Penetrant Inspection, SPM TASK 70-23-08-230-501
Shotpeening, SPM TASK 70-38-13-380-501
Radiograph Inspection Procedure, SPM TASK 70-26-01-260-501
Airflow - Turbine Blades and Vanes, SPM TASK 70-72-02-720-501
Inspection of Parts, SPM TASK 70-20-01-200-501
Precipitation Heat Treatment of Nickel Castings, SPM TASK 70-37-27-370-501
Some data on these items is contained in this TASK. For more data on these items refer to the SPM.
Method of Testing for Crack Indications
Chemical Processes
Surface Protection
NOTE
NOTE
Preliminary Requirements
Pre-Conditions
NONESupport Equipment
| Name | Manufacturer | Part Number / Identification | Quantity | Remark |
|---|---|---|---|---|
| Oven | LOCAL | Oven | ||
| Magnetoscope | LOCAL | Magnetoscope | Model 1.069, Model 1.067, or 1.068 or equivalent Manufacturer: Institute Dr. Foerster GmbH und Co, KM Im Laisen 70, D-72766, Reutlingen, Germany or Permeability Probe PN 1.069.01-3001 Adapter, Probe PN 9064001 Reference Standard PN 1.067-101-12 Manufacturer: Foerster Instruments Inc., RIDC Park West, 140 Industry Drive, Pittsburgh, PA 15275 USA or equivalent | |
| IAE 2P16101 Airflow base | 0AM53 | IAE 2P16101 | 1 | |
| IAE 2P16113 Airflow fixture | 0AM53 | IAE 2P16113 | 1 | |
| IAE 2P16119 Airflow insert | 0AM53 | IAE 2P16119 | 1 | |
| IAE 2P16121 Master airflow test | 0AM53 | IAE 2P16121 | 1 | |
| IAE 2P16207 Stages 1 and 2 HPT Blade Length Optical Gage | 0AM53 | IAE 2P16207 | 1 | |
| IAE 2P16211 Stage 2 HPT Turbine Blade Holder | 0AM53 | IAE 2P16211 | 1 | |
| IAE 2P16212 Stage 2 HPT Turbine Blade Gage - Master | 0AM53 | IAE 2P16212 | 1 | |
| IAE 2P16213 Stage 2 HPT Turbine Blade Reticle | 0AM53 | IAE 2P16213 | 1 | |
| IAE 2P16358 Blade Length Gage | 0AM53 | IAE 2P16358 | 1 | |
| IAE 2P16508 Reference card | 0AM53 | IAE 2P16508 | 1 |
Consumables, Materials and Expendables
| Name | Manufacturer | Part Number / Identification | Quantity | Remark |
|---|---|---|---|---|
| CoMat 03-010 ARGON GAS | LOCAL | CoMat 03-010 | ||
| CoMat 03-117 ARGON GAS | 0AM53 | CoMat 03-117 | ||
| CoMat 03-118 ARGON GAS | 0AM53 | CoMat 03-118 | ||
| CoMat 05-029 CAST STEEL SHOT, S110 | LOCAL | CoMat 05-029 | ||
| CoMat 05-030 CAST STEEL SHOT DELETED | 0AM53 | CoMat 05-030 | ||
| CoMat 05-031 CAST STEEL SHOT DELETED | 0AM53 | CoMat 05-031 | ||
| CoMat 05-032 CAST STEEL SHOT, S170 | 42736 | CoMat 05-032 | ||
| CoMat 05-033 CAST STEEL SHOT DELETED | 0AM53 | CoMat 05-033 | ||
| CoMat 05-034 CAST STEEL SHOT DELETED | 0AM53 | CoMat 05-034 | ||
| CoMat 05-138 SHOT, CAST STEEL, S110 | 81349 | CoMat 05-138 | ||
| CoMat 05-176 CAST STEEL SHOT, S170 | 42736 | CoMat 05-176 | ||
| CoMat 05-177 CUT WIRE SHOT,CW-14 | LOCAL | CoMat 05-177 | ||
| CoMat 05-178 CUT WIRE SHOT, CW-20 | LOCAL | CoMat 05-178 | ||
| CoMat 05-187 STAINLESS STEEL CUT WIRE SHOT, SCW-20 | LOCAL | CoMat 05-187 | ||
| CoMat 05-188 STAINLESS STEEL CUT WIRE SHOT, SPECIAL CONDITIONED, SCW-20 | LOCAL | CoMat 05-188 | ||
| CoMat 05-234 CAST STEEL SHOT, HIGH HARDNESS, S110 | LOCAL | CoMat 05-234 | ||
| CoMat 06-110 PENCIL | 0AM53 | CoMat 06-110 | ||
| CoMat 06-111 PENCIL | 0AM53 | CoMat 06-111 |
Spares
NONESafety Requirements
NONEProcedure
NOTE
It is permitted to clean the external blade surfaces by the SPM TASK 70-11-03-300-503 or SPM TASK 70-12-09-120-501 before you do this inspection.It is recommended that you read the Magnetoscop 1.069 description and operation instruction manual before you do this inspection.
If you use the older permeability probes to do this inspection, PN 1.005-1522 permeability probe provides a 1X sensitivity or PN 1.005-1532 permeability probe has a 10X sensitivity designed for the Magnetoscop 1.067 and 1.068 models, it will be necessary to use a PN 9064001 probe adapter with the Magnetoscop 1.069 model.
Use a CoMat 06-110 PENCIL or CoMat 06-111 PENCIL to mark the HPT blades. Refer to the SPM TASK 70-09-01-400-501 for the procedure to temporary mark the parts.
PN 1.069-01-3001 permeability probe is used for this inspection procedure.
NOTE

CAUTION
DO NOT PERMIT THE PERMANENT MAGNET OF THE PROBE TO BECOME DEMAGNETIZED BY BEING EXPOSED TO MAGNETIC MATERIAL, PERMANENT MAGNETS OR STRONG ALTERNATING CURRENTS.
CAUTION
REMOVE THE PROTECTIVE CAP ON THE PROBE END ONLY DURING THE CALIBRATION PROCEDURE AND WHEN MEASUREMENTS ARE TO BE TAKEN DURING THE INSPECTION.NOTE
The inspection area must be free from magnetic materials, permanent magnets and strong alternating current fields such as electric motors which will influence the meter needle deflection.Put the Magnetoscop on a suitable work bench with a non-magnetic work surface and remove the top cover.
Connect the permeability probe to the Magnetoscop field intensity meter.
NOTE
The Magnetoscop will find what type of probe is being used. If one of the old Magnetoscop 1.067 or 1.068 probes is used, a 1.069 probe adapter PN 9064001 will be needed to connect the probe to the unit. A menu on the magnetoscop will give a list of probes. You can then select the applicable probe to use. If you use the new probe designed for the Magnetoscop 1.069 model, the probe will be detected automatically.
Magnetoscop Calibration Procedure.

CAUTION
PERMEABILITY LIMITS WERE ESTABLISHED FOR SERVICE RUN BLADE CONDITIONS BEFORE TASK 72-45-32-100-003, CLEANING-003 IS COMPLETED ON THE BLADES. DO NOT CLEAN THE BLADE AND THE BLADE INTERNAL CAVITIES BEFORE YOU DO THIS INSPECTION. CLEANING CAN REMOVE THE SULFIDATION PRODUCT AND REDUCE THE PERMEABILITY VALUE. THIS WILL CHANGE THE CALIBRATED REALTIONSHIP BETWEEN THE PERMEABILITY AND REMAINING BLADE WALL THICKNESS. THIS WILL RESULT IN BLADES WITH WALL THICKNESS THAT ARE NOT ACCEPTABLE TO CONTINUE-IN-SERVICE.Record the maximum permeability at the corresponding location on the airfoil surface. Use only CoMat 06-110 PENCIL or CoMat 06-111 PENCIL to mark the blade airfoil.
Permeability Inspection Procedure.
Information on the Permeability Probes.
SUBTASK 72-45-32-220-112 Do a Permeability Inspection of the Stage 2 HPT blade Assembly Internal Airfoil Surfaces

CAUTION
DO NOT CLEAN THE INTERNAL CAVITIES OF THE ENGINE RUN BLADES BEFORE YOU DO THIS INSPECTION.Refer to Figure.
Repair, VRS3240 TASK 72-45-32-300-001 (REPAIR-001) or VRS3242 TASK 72-45-32-300-002 (REPAIR-002) or VRS3053 TASK 72-45-32-300-011 (REPAIR-011) or VRS3496 TASK 72-45-32-300-010 (REPAIR-010) or VRS3243 TASK 72-45-32-300-003 (REPAIR-003) or VRS3494 TASK 72-45-32-300-009 (REPAIR-009)
Other than (1)
Examine the blade platform area for corrosion and burned areas.
Repair, VRS3240 TASK 72-45-32-300-001 (REPAIR-001) or VRS3242 TASK 72-45-32-300-002 (REPAIR-002) or VRS3053 TASK 72-45-32-300-011 (REPAIR-011) or VRS3496 TASK 72-45-32-300-010 (REPAIR-010) or VRS3243 TASK 72-45-32-300-003 (REPAIR-003) or VRS3494 TASK 72-45-32-300-009 (REPAIR-009)
Cracks at the knife edge location 1.
Repair, VRS3240 TASK 72-45-32-300-001 (REPAIR-001) or VRS3242 TASK 72-45-32-300-002 (REPAIR-002) or VRS3053 TASK 72-45-32-300-011 (REPAIR-011) or VRS3496 TASK 72-45-32-300-010 (REPAIR-010) or VRS3243 TASK 72-45-32-300-003 (REPAIR-003) or VRS3494 TASK 72-45-32-300-009 (REPAIR-009)
Cracks, nicks and chipped coating at location 2.
Examine the blade platform area for cracks, nicks and chipped coating. Use a white light and 10X magnification to examine for cracks.
Repair, VRS3240 TASK 72-45-32-300-001 (REPAIR-001) or VRS3242 TASK 72-45-32-300-002 (REPAIR-002) or VRS3053 TASK 72-45-32-300-011 (REPAIR-011) or VRS3496 TASK 72-45-32-300-010 (REPAIR-010) or VRS3243 TASK 72-45-32-300-003 (REPAIR-003) or VRS3494 TASK 72-45-32-300-009 (REPAIR-009)
Other than Step.
Examine the blade platform area for dents at locations 2 and 3.
SUBTASK 72-45-32-220-053 Examine the Stage 2 HPT Blade Assembly (01-010) Blade Platform Area
NOTE
To find if the base metal is shown, use the heat tint examination in Step.Repair, VRS3240 TASK 72-45-32-300-001 (REPAIR-001) or VRS3242 TASK 72-45-32-300-002 (REPAIR-002) or VRS3053 TASK 72-45-32-300-011 (REPAIR-011) or VRS3496 TASK 72-45-32-300-010 (REPAIR-010) or VRS3243 TASK 72-45-32-300-003 (REPAIR-003) or VRS3494 TASK 72-45-32-300-009 (REPAIR-009)
Other than Step.
Examine the blade airfoil surfaces at locations 1 and 2, for burned areas, corrosion and erosion, Figure.
Repair, VRS3240 TASK 72-45-32-300-001 (REPAIR-001) or VRS3242 TASK 72-45-32-300-002 (REPAIR-002) or VRS3053 TASK 72-45-32-300-011 (REPAIR-011) or VRS3496 TASK 72-45-32-300-010 (REPAIR-010) or VRS3243 TASK 72-45-32-300-003 (REPAIR-003) or VRS3494 TASK 72-45-32-300-009 (REPAIR-009)
NOTE
Refer to Step for cracks on the trailing edge.
Chipped and nicked coating.
Examine the blade airfoil surfaces at locations 1 and 2, for chipped coating, Figure.
Repair, VRS3240 TASK 72-45-32-300-001 (REPAIR-001) or VRS3242 TASK 72-45-32-300-002 (REPAIR-002) or VRS3053 TASK 72-45-32-300-011 (REPAIR-011) or VRS3496 TASK 72-45-32-300-010 (REPAIR-010) or VRS3243 TASK 72-45-32-300-003 (REPAIR-003) or VRS3494 TASK 72-45-32-300-009 (REPAIR-009)
Cracks
Examine the blade airfoil surfaces at location 1, for cracks. Use a white light and 10X magnification, Figure.
Repair, VRS3240 TASK 72-45-32-300-001 (REPAIR-001) or VRS3242 TASK 72-45-32-300-002 (72-45-32, REPAIR 002 or VRS3053 TASK 72-45-32-300-011 (REPAIR-011) or VRS3496 TASK 72-45-32-300-010 (REPAIR-010) or VRS3243 TASK 72-45-32-300-003 (REPAIR-003) or VRS3494 TASK 72-45-32-300-009 (REPAIR-009)
Examine the blade airfoil surfaces for dents, Figure.
SUBTASK 72-45-32-220-054 Examine the Stage 2 HPT Blade Assembly (01-010) Airfoil
NOTE
To find if the base metal is shown, use the heat tint examination in Step.Refer to: Figure.
Repair, VRS3496 TASK 72-45-32-300-010 (REPAIR-010) or VRS3494 TASK 72-45-32-300-009 (REPAIR-009) or VRS3243 TASK 72-45-32-300-003 (REPAIR-003)
NOTE
The base metal/tip interface is shown at location 4.
If there is base metal shown on the base metal/tip interface at location 2.
Repair, VRS3496 TASK 72-45-32-300-010 (REPAIR-010) or VRS3494 TASK 72-45-32-300-009 (REPAIR-009) or VRS3243 TASK 72-45-32-300-003 (REPAIR-003)
Other than Step.
Examine the blade tip to see if the base metal is shown.
SUBTASK 72-45-32-220-055 Examine the Stage 2 HPT Blade Assembly (01-010) Abrasive Tip
NOTE
To find if the base metal is shown, use the heat tint examination in Step.Refer to Figure.
NOTE
If the blades were repaired before, a repair code will be marked on the blade root area. Some code will have ten digits or more before the code.These repair codes will indicate how the blade was repaired. More than one repair code can be shown on the blade root.Only the latest repair codes will not have a straight line through them.Install the blade assembly into the IAE 2P16358 Blade Length Gage 1 off.
Repair, VRS3496 TASK 72-45-32-300-010 (REPAIR-010) or VRS3494 TASK 72-45-32-300-009 (REPAIR-009) or VRS3243 TASK 72-45-32-300-003 (REPAIR-003)
Other than (a) through (d).
Measure the dimension for the distance from the end surface of the gage to the surface of the middle pin.
Examine the blade assembly at location 1, for the blade length dimension.
There are blades which were rejected by the blade stretch measurement technique in TASK 72-45-32-200-001-A00.
A blade set is suspect if:
Examine the blades that you suspect have incorrect marking.
Do the procedure in Step below if you think a blade has incorrect markings.
SUBTASK 72-45-32-220-070 Examine the Stage 2 HPT Blade Assembly (01-010) Blade Length
Refer to Figure.
Define a lot of standard, non-suspect blades (a minimum of 15 parts). Measure the dimension from the top edge of the second trailing edge slot in from the tip to the bottom edge of the second trailing edge slot in from the platform as shown in Figure, for the lot.
Find the average of the values you measured in the step above, subtract the average stretch of the non-suspect blades. This is the trailing edge base dimension.
Example: A non-suspect blade lot trailing edges average 2.155 in. Average growth of the non-suspect blades is 0.003 in. The trailing edge base dimension is set at 2.152 in.
For each suspect blade, measure the dimension from the top edge of the second trailing edge slot in from the tip to the bottom edge of the second trailing edge slot in from the platform, as shown in Figure.
Subtract the trailing edge base dimension from the trailing edge dimension of each suspect blade to calculate the growth of each suspect blade.
Example: A non-suspect blade lot has an average growth of 0.003 in. (0.076 mm). The trailing edge base dimension is 2.152 in. The suspect blade trailing edge measures 2.154 in., so the calculated growth of the suspect blade is 0.002 in. (0.051 mm) (0.001 in. (0.025 mm)) less than the average established by the non-suspect blades in the set.
If the calculated growth is 0.010 in. (0.254 mm) or less, do steps (3) and (4) below. Negative calculated growth must be considered zero growth.
If the calculated growth is more than 0.010 in. (0.254 mm), scrap the part.
If fewer than 75 per cent of the blades in the set are suspect, do the steps that follow:
For each suspect blade, measure the dimension from the top edge of the second trailing edge slot in from the tip of the bottom edge of the second trailing edge slot in from the platform, as shown in Figure.
Subtract the standard trailing edge base dimension of 2.149 in. from the trailing edge dimension of each suspect blade to calculate the growth of each suspect blade.
Example: A second stage HPT blade has a base trailing edge dimension that is 2.149 in. The suspect blade trailing edge measures 2.152 in., so the calculated growth of the suspect blade is 0.003 in. (0.076 mm).
If 75 per cent or more of the blades in the set are suspect, or if the set is very small (less than a total of 10 blades), do the steps that follow:
Subtract the calculated growth from the measured length to find the Original Equipment Manufacturers (OEM) length of a suspect blade.
Example: A blade measures 3.459 in., but the OEM length is marked 436 (3.436 in.). The calculated growth of the blade is determined to be 0.002 in. (0.051 mm). The initial blade marking should be 457.
Make a mark on the suspect blades only, of the calculated length from the step above. Mark the last three digits of the measurements, rounded to the nearest 0.001 in. For example, if the length were 3.657 in., mark 657. Cross out the initial marked length. Use the vibro-peen or dot-peen method. Refer to the SPM TASK 70-09-00-400-501. Make a mark in the same area as the initial mark.
Find the quantity of suspect readings.
SUBTASK 72-45-32-220-091 Examine the Stage 2 HPT Blade Assembly (01-010) Blade Length
NOTE
This procedure applies only to first time repair blades.Refer to: Figure
Repair, VRS3240 TASK 72-45-32-300-001 (REPAIR-001) or VRS3242 TASK 72-45-32-300-002 (REPAIR-002) or VRS3053 TASK 72-45-32-300-011 (REPAIR-011) or VRS3496 TASK 72-45-32-300-010 (REPAIR-010) or VRS3243 TASK 72-45-32-300-003 (REPAIR-003) or VRS3494 TASK 72-45-32-300-009 (REPAIR-009)
NOTE
Example of a crack is shown at location 1.
Cracks at the trailing edge at location 3
Examine the blade trailing edge for cracks. Use a white light and a 10X magnification.

CAUTION
WHEN YOU DO PENCIL GRIT BLAST, BE CAREFUL NOT TO ERODE THE TRAILING EDGE SLOT.NOTE
Example of a cooling air slot is shown at location 4.Unplug with a wire probe and power flush or pencil grit blast and high pressure air blast or Repair, VRS3360 TASK 72-45-32-300-005 (REPAIR-005).
SUBTASK 72-45-32-220-056 Examine the Stage 2 HPT Blade Assembly (01-010) Trailing Edge
Refer to: Figure
Repair, VRS3409 TASK 72-45-32-300-006 (REPAIR-006)
NOTE
Rubbing must not go past the tapered area or into the fillet radius.
Up to 25 per cent of the local, total platform thickness at location 7, or up to 0.025 in. (0.635 mm) in depth, whichever is less
Rub.
Examine the trailing edge platform at location 2, for signs of rub with the LPT inner duct.
SUBTASK 72-45-32-220-057 Examine the Stage 2 HPT Blade Assembly (01-010) Leading and Trailing Edge Platform
Refer to: Figure
SUBTASK 72-45-32-220-058 Examine the Stage 2 HPT Blade Assembly (01-010) Damper Contact Area
Repair, VRS3240 TASK 72-45-32-300-001 (REPAIR-001) or Repair, VRS3595 TASK 72-45-32-300-022 (REPAIR-022)
Cracks or nicks
Examine the blade root attachment area for nicks and cracks at locations 2, 4 and 5. Use a white light and a 10X magnification to examine for cracks.
SUBTASK 72-45-32-220-059 Examine the Stage 2 HPT Blade Assembly (01-010) Blade Root Attachment Area
Refer to: Figure
Acceptable if it does not continue into the break edge. Refer to Figure
0.005 in. (0.127 mm) in depth linear wear indication extending across the length of the top most serration of the blade root, at the edge of the disk contact pattern, on the concave and/or convex side
Do a visual inspection of the blade root top most serration with a white light and no magnification.
Acceptable. Refer to Figure
Indications are limited to the wear groove of the top serration only on convex and/or concave sides
Do a visual inspection of the blade root top most serration with a white light and 10X magnification.
Acceptable. Refer to Figure
Indications are limited to the wear groove of the top serration only on convex and concave sides
Do a fluorescent penetrant inspection of the serration on both the concave and convex side of the blade by the SPM TASK 70-23-02-230-501 (normal sensitivity) or SPM TASK 70-23-08-230-501.
SUBTASK 72-45-32-220-094 Examine the Stage 2 HPT Blade Assembly (01-010) Top Most Serration
Refer to: Figure
Repair, VRS3361 TASK 72-45-32-300-008 (REPAIR-008)
More than one crack on each blade
Examine the blade root metering plate welds at location 5 (four locations) for cracks.
SUBTASK 72-45-32-220-068 Examine the Stage 2 HPT Blade Assembly (01-010) Root Metering Plate Welds
Blades that were at temperatures more than the limit of 2000 deg F (1093 deg C) for a short time will cause a change in the alloy microstructure of the blade.
In the case of an EGT overtemperature, such that the AMM requires metallurgical analysis, the stage 2 HPT blades must be examined for overtemperature even if the stage 1 HPT blades are not rejected for overtemperature.
Refer to Figure.
Cut the blade at location 1 to get the airfoil sample to be analyzed. Refer to the SPM TASK 70-02-03-220-501.
NOTE
The small vee shaped groove will mark the blade airfoil sample surface to be analyzed.Attach and polish the blade samples, refer to the SPM TASK 70-02-03-220-501 as follows:
Examine the microstructure of the blade samples. Refer to the SPM TASK 70-02-03-220-501.
SUBTASK 72-45-32-280-051 Examine the Stage 2 HPT Blade Assembly (01-010) for Overtemperature
NOTE
Refer to Figure.
Remove the root cover plate. Refer to VRS3361 TASK 72-45-32-300-008 (REPAIR 008).
Clean the internal cavities of the blade. Refer to VRS3360 TASK 72-45-32-300-005 (REPAIR 005).
Reject blades and contact IAE Technical Services.
Cracks.
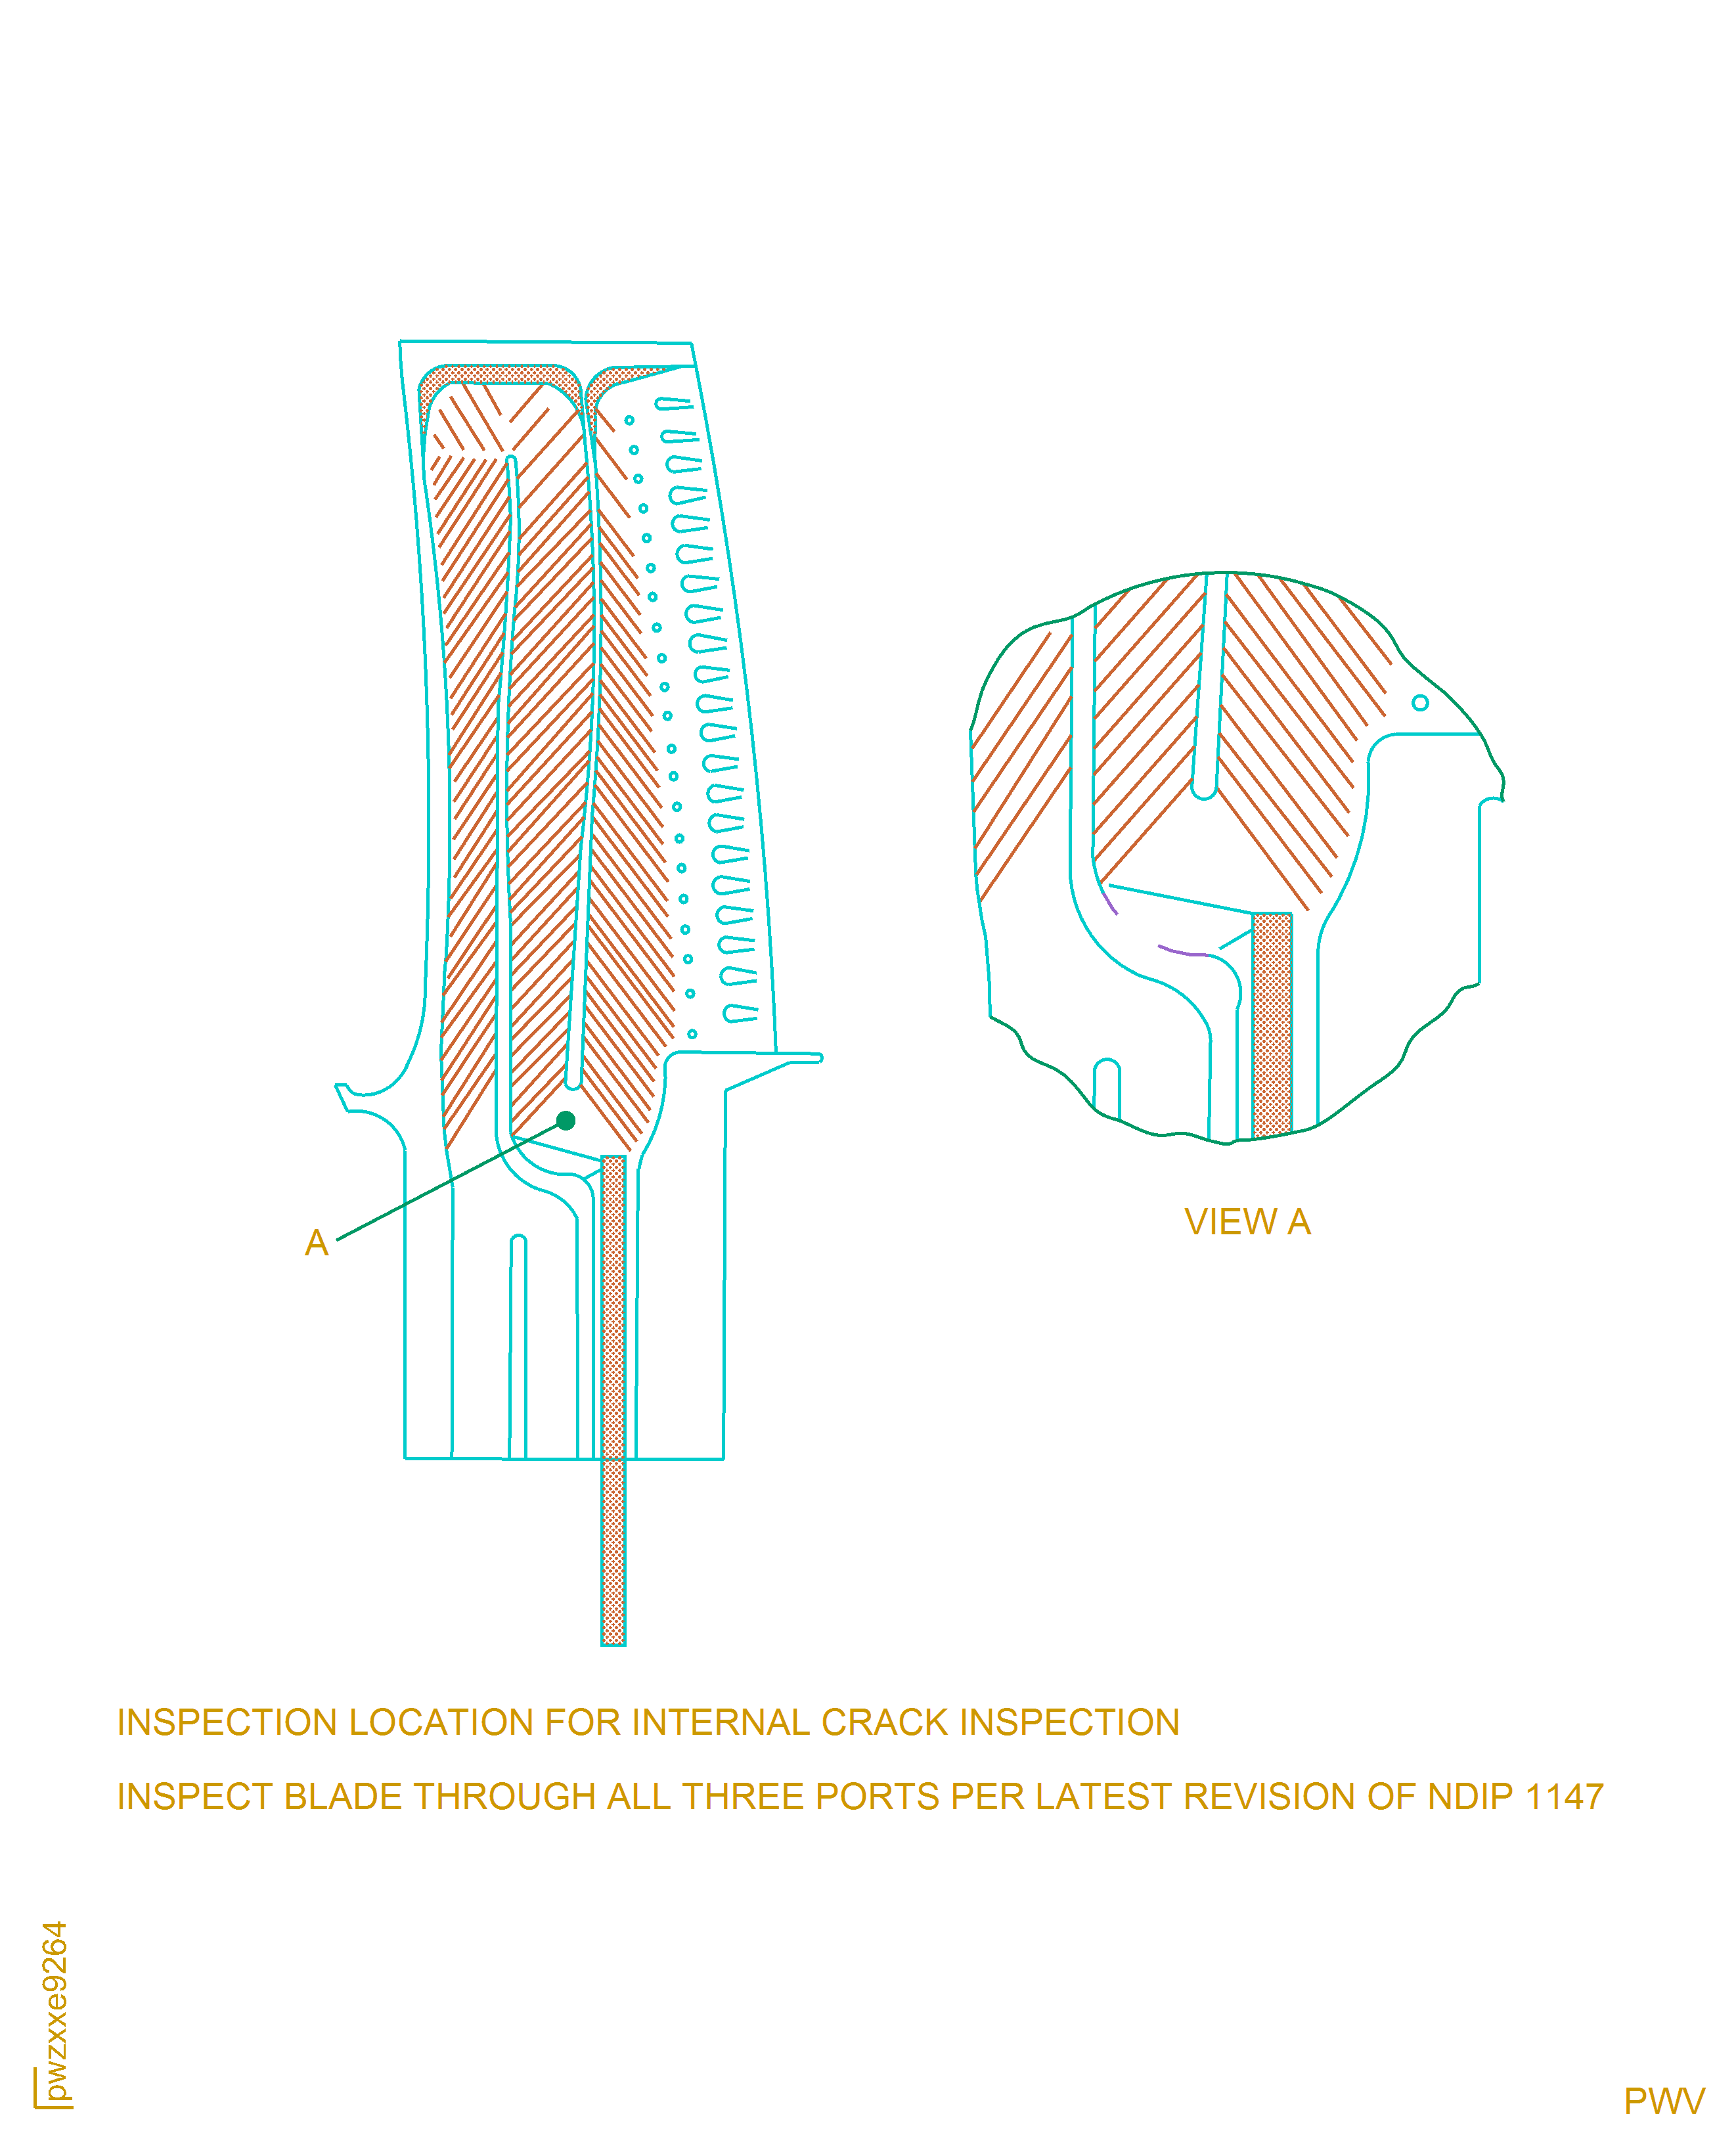
Do a boroscope inspection of the internal cavities of the blade per latest revision of NDIP-1147.
Replace the root cover plate prior to completion of blade airflow inspection/check Step. Refer to VRS3361 TASK 72-45-32-300-008 (REPAIR 008).
SUBTASK 72-45-32-220-052-001 Examine the Stage 2 HPT Blade (01-010) for Internal Stress Corrosion Cracks
Clean the part. Refer to TASK 72-45-32-100-003 (CLEANING-003, CONFIG-01).
NOTE
Removal of root cover plate and cleaning the blade may have been already performed per the previous step.
CAUTION
FAILURE TO STRESS RELIEVE THE BLADE BEFORE FLUORESCENT PENETRANT EXAMINATION CAN CAUSE DAMAGE TO THE BLADE.Heat the blade to between 1950 and 2000 deg F (1066 and 1093 deg C) in an oven and hold for 30 minutes minimum to four hours in a vacuum or argon protected atmosphere. Use CoMat 03-010 ARGON GAS, CoMat 03-117 ARGON GAS or CoMat 03-118 ARGON GAS. Refer to the SPM TASK 70-37-26-370-501.

WARNING
IT IS THE RESPONSIBILITY OF THE OPERATOR TO OBTAIN AND OBSERVE THE MANUFACTURERS MATERIAL SAFETY DATA SHEETS FOR CONSUMABLE MATERIALS INFORMATION SUCH AS HAZARDOUS INGREDIENTS, PHYSICAL/CHEMICAL CHARACTERISTICS, FIRE, EXPLOSION, REACTIVITY, HEALTH HAZARD DATA, PRECAUTIONS FOR SAFE HANDLING, USE AND CONTROL MEASURES AND ALSO TO TAKE LOCAL REGULATIONS INTO CONSIDERATION.Stress relieve the blade (PN 2A0402 and 2A0402-001 only).
If you find any crack indications, make a temporary mark on the indications with one of the approved temporary markers in the SPM TASK 70-09-00-400-501.
Heat the blade assembly to between (PN 2A0402 and 2A0402-001) 1575 and 1625 deg F (857 to 885 deg C) in an oven and hold for 32 hours. Refer to the SPM TASK 70-37-27-370-501. The PHT is optional for these part numbers.
Heat the assembly (PN 2A1102, 2A8602 and 2A8902) to between 1575 and 1625 deg F (857 to 885 deg C) in an oven and hold for 8, 12 or 32 hours. Refer to the SPM TASK 70-37-27-370-501.
Precipitation heat treat (PHT) the blade assembly.
Use CoMat 05-029 CAST STEEL SHOT, S110, CoMat 05-030 CAST STEEL SHOT DELETED, CoMat 05-031 CAST STEEL SHOT DELETED, CoMat 05-032 CAST STEEL SHOT, S170, CoMat 05-033 CAST STEEL SHOT DELETED, CoMat 05-034 CAST STEEL SHOT DELETED, CoMat 05-138 SHOT, CAST STEEL, S110, CoMat 05-176 CAST STEEL SHOT, S170, CoMat 05-234 CAST STEEL SHOT, HIGH HARDNESS, S110 or CoMat 05-177 CUT WIRE SHOT,CW-14, CoMat 05-178 CUT WIRE SHOT, CW-20 or CoMat 05-187 STAINLESS STEEL CUT WIRE SHOT, SCW-20, CoMat 05-188 STAINLESS STEEL CUT WIRE SHOT, SPECIAL CONDITIONED, SCW-20. Peen with an intensity of 6A. Refer to the SPM TASK 70-38-13-380-501, SUBTASK 70-38-13-380-006.
Shot peen the blade root area by the SPM TASK 70-38-13-380-501. Refer to Figure.
SUBTASK 72-45-32-230-052-002 Examine the Stage 2 HPT Blade (01-010) for Cracks.
NOTE
Do this procedure only if the visual examination of the blade is unsatisfactory.If you cannot do this procedure, do the procedure in Step.
CAUTION
FAILURE TO STRESS RELIEF THE BLADE BEFORE FLUORESCENT PENETRANT EXAMINATION CAN CAUSE DAMAGE TO THE BLADE (PN 2A0402 AND 2A0402-001).When you cannot stress relief the blade, you must send the blade to one of the approved sources that follows:
Pratt and Whitney Aftermarket Services (PWAS)
Connecticut Airfoil Repair Operations
400 Main Street, Well 11
East Hartford, CT 06108-0969 USA
Tel: (860) 565 3922
Fax: (860) 557 8247
Sequa Corp.,
Chromalloy Research and Technology Division
108 Blaisdell Road
Orangeburg, New York 10962 USA
Tel: (845) 359-4700
Fax: (845) 359-4409
SUBTASK 72-45-32-230-052-003 Examine the Stage 2 HPT Blade Assembly (01-010) for Cracks
NOTE
Do this procedure only if the visual examination of the blade is unsatisfactory.If you cannot do Step, do this procedure.Vapor degrease the blade assembly by the SPM TASK 70-11-01-300-503.

CAUTION
DO NOT DRY BLAST THE BLADE ASSEMBLY COATED AREA TOO MUCH. THIS CAUSES THE COATING TO BE REMOVED.Clean the blade assembly by the SPM TASK 70-12-09-120-501.
Repair, VRS3242 TASK 72-45-32-300-002 (REPAIR-002) or VRS3053 TASK 72-45-32-300-011 (REPAIR-011) or VRS3496 TASK 72-45-32-300-010 (REPAIR-010) or VRS3243 TASK 72-45-32-300-003 (REPAIR-003) or VRS3494 TASK 72-45-32-300-009 (REPAIR-009)
Blue color that is not shiny shows the blade has no coating
Heat tint.
Examine the blade assembly coating for heat tint.
SUBTASK 72-45-32-280-052 Examine the Stage 2 HPT Blade Assembly (01-010) Coating by Heat Tint
Do a radiographic inspection in Positions A and B, Figure by the SPM TASK 70-26-01-260-501.
NOTE
The radiographic inspection in positions A and B may require different exposure and film speeds in order to provide adequate contrast to inspect for cracks, due to the thicker section at the root with respect to the airfoil (Refer to TASK 70-26-01-260-501, Section 7).NOTE
Surface indications that are acceptable to the visual inspection is not cause to be rejected by radiographic inspection.Reject
NOTE
The entire blade should be inspected for cracks with a focus inspection at the root area as shown in Figure.
Cracks
Power flush or Repair, VRS3360 TASK 72-45-32-300-005 (REPAIR-005). After you clean the internal cavities refer to VRS3360, TASK 72-45-32-300-005 (REPAIR-005). Unwanted metal and material are acceptable if the size, density and location of the indication(s) has remained unchanged from step (2) (b). Refer to the limits in Figure and Table 801
NOTE
If there are any indications of shot peen and/or other forms of foreign material, such as metal chips or broken wire, reject the parts.
Unwanted material in the internal cavities
Make an analysis on the radiographic indications.
Examine the blade assembly for internal cracks and unwanted material by radiographic inspection.
SUBTASK 72-45-32-260-051 Examine the Stage 2 HPT Blade Assembly (01-010) for Internal Cracks and Unwanted Material by Radiographic Inspection
Center the optical gage adjustable work table with the three hand knobs refer to Figure.
Remove the blade master.
NOTE
When the blade assembly is manufactured, the blade length is measured to the nearest 0.001in. (0.026 mm) at location 1. The last two numbers for PN 2A0402 or 2A0402-001 or the last three numbers for PN 2A1102 or 2A8602 of this dimension are roll-marked on the trailing edge root shank surface at location 2. Refer Figure.Record the two numbers for PN 2A0402 or 2A0402-001 or three numbers for PN 2A1102 or 2A8602 located on the blade assembly root shank surface.
EXAMPLE: If the measured length at the time of manufacture was 3.504in. (89.002 mm), the PN 2A0402 or 2A0402-100 blade is marked at location 2 with the numbers 04 and the PN 2A1102 or 2A8602 blade is marked at location 2 with the numbers 504. This is the reference number from which the blade growth is found.
Use IAE 2P16207 Stages 1 and 2 HPT Blade Length Optical Gage 1 off, IAE 2P16211 Stage 2 HPT Turbine Blade Holder 1 off, IAE 2P16212 Stage 2 HPT Turbine Blade Gage - Master 1 off and IAE 2P16213 Stage 2 HPT Turbine Blade Reticle 1 off to measure the blade growth as follows:
Examine the blade assembly for the growth measurement.
NOTE
The thinner airfoils can be identified when the internal shape of the blade design becomes visible. External surfaces between shapes will be damaged.
SUBTASK 72-45-32-280-053 Examine the Stage 2 HPT Blade Assembly (01-010) for the Growth Measurement
Wall thickness inspection details have been removed. Refer to Repair, VRS3552 TASK 72-45-32-300-016 (REPAIR-016) for inspection details.
Examine the blade assembly for the wall thickness dimension only when the coating is removed and you can see erosion, or when airfoil blending has removed the coating locally.
SUBTASK 72-45-32-280-054 Examine the Stage 2 HPT Blade Assembly (01-010) for the Wall Thickness Dimension
Do the airflow procedure for the stage 2 HPT blade assembly by the procedure given in VRS3711 TASK 72-45-32-300-027 (REPAIR-027).
SUBTASK 72-45-32-280-069 Examine the Stage 2 HPT Blade Assembly (01-010) by Airflow Check
NOTE
Do all the inspections and repairs on the blade assembly before you do the airflow check.Refer to Figure.
Examine the base of the underplatform damper pins for casting voids by visual inspection with a white light and a minimum of 3X magnification. These voids must be smooth, shallow in depth, and flat-bottomed. IAE 2P16508 Reference card 1 off shows an example of an acceptable casting void. These casting voids are a maximum of 0.030 in. (0.762 mm) in diameter. Any quantity of voids is permitted.
Examine the base of the underplatform damper pins for anomalies by visual inspection with a white light and a minimum of 10X magnification. Acceptable anomalies have a length of 0.070 in. (1.778 mm) or less. Indications that go from the centerline of the damper pin radius to the blade root, are not acceptable. Indications on the blade root are not acceptable. Any quantity of linear anomalies is permitted. IAE 2P16508 Reference card 1 off shows examples of acceptable linear anomalies. Cracks inside or which start from linear anomalies are not permitted. Fluorescent penetrant inspect questionable indications. Acceptable linear anomalies will not retain fluorescent penetrant fluid.
SUBTASK 72-45-32-230-061 Examine the Stage 2 HPT Blade (01-010) for Casting Flow Lines and Imperfections
Refer to Figure.
SUBTASK 72-45-32-280-062 Examine the Stage 2 HPT Blade (01-010) for Porosity and Shrinkage
Figure: Stage 2 HPT Blade Assembly Platform Inspection Locations
Stage 2 HPT Blade Assembly Platform Inspection Locations
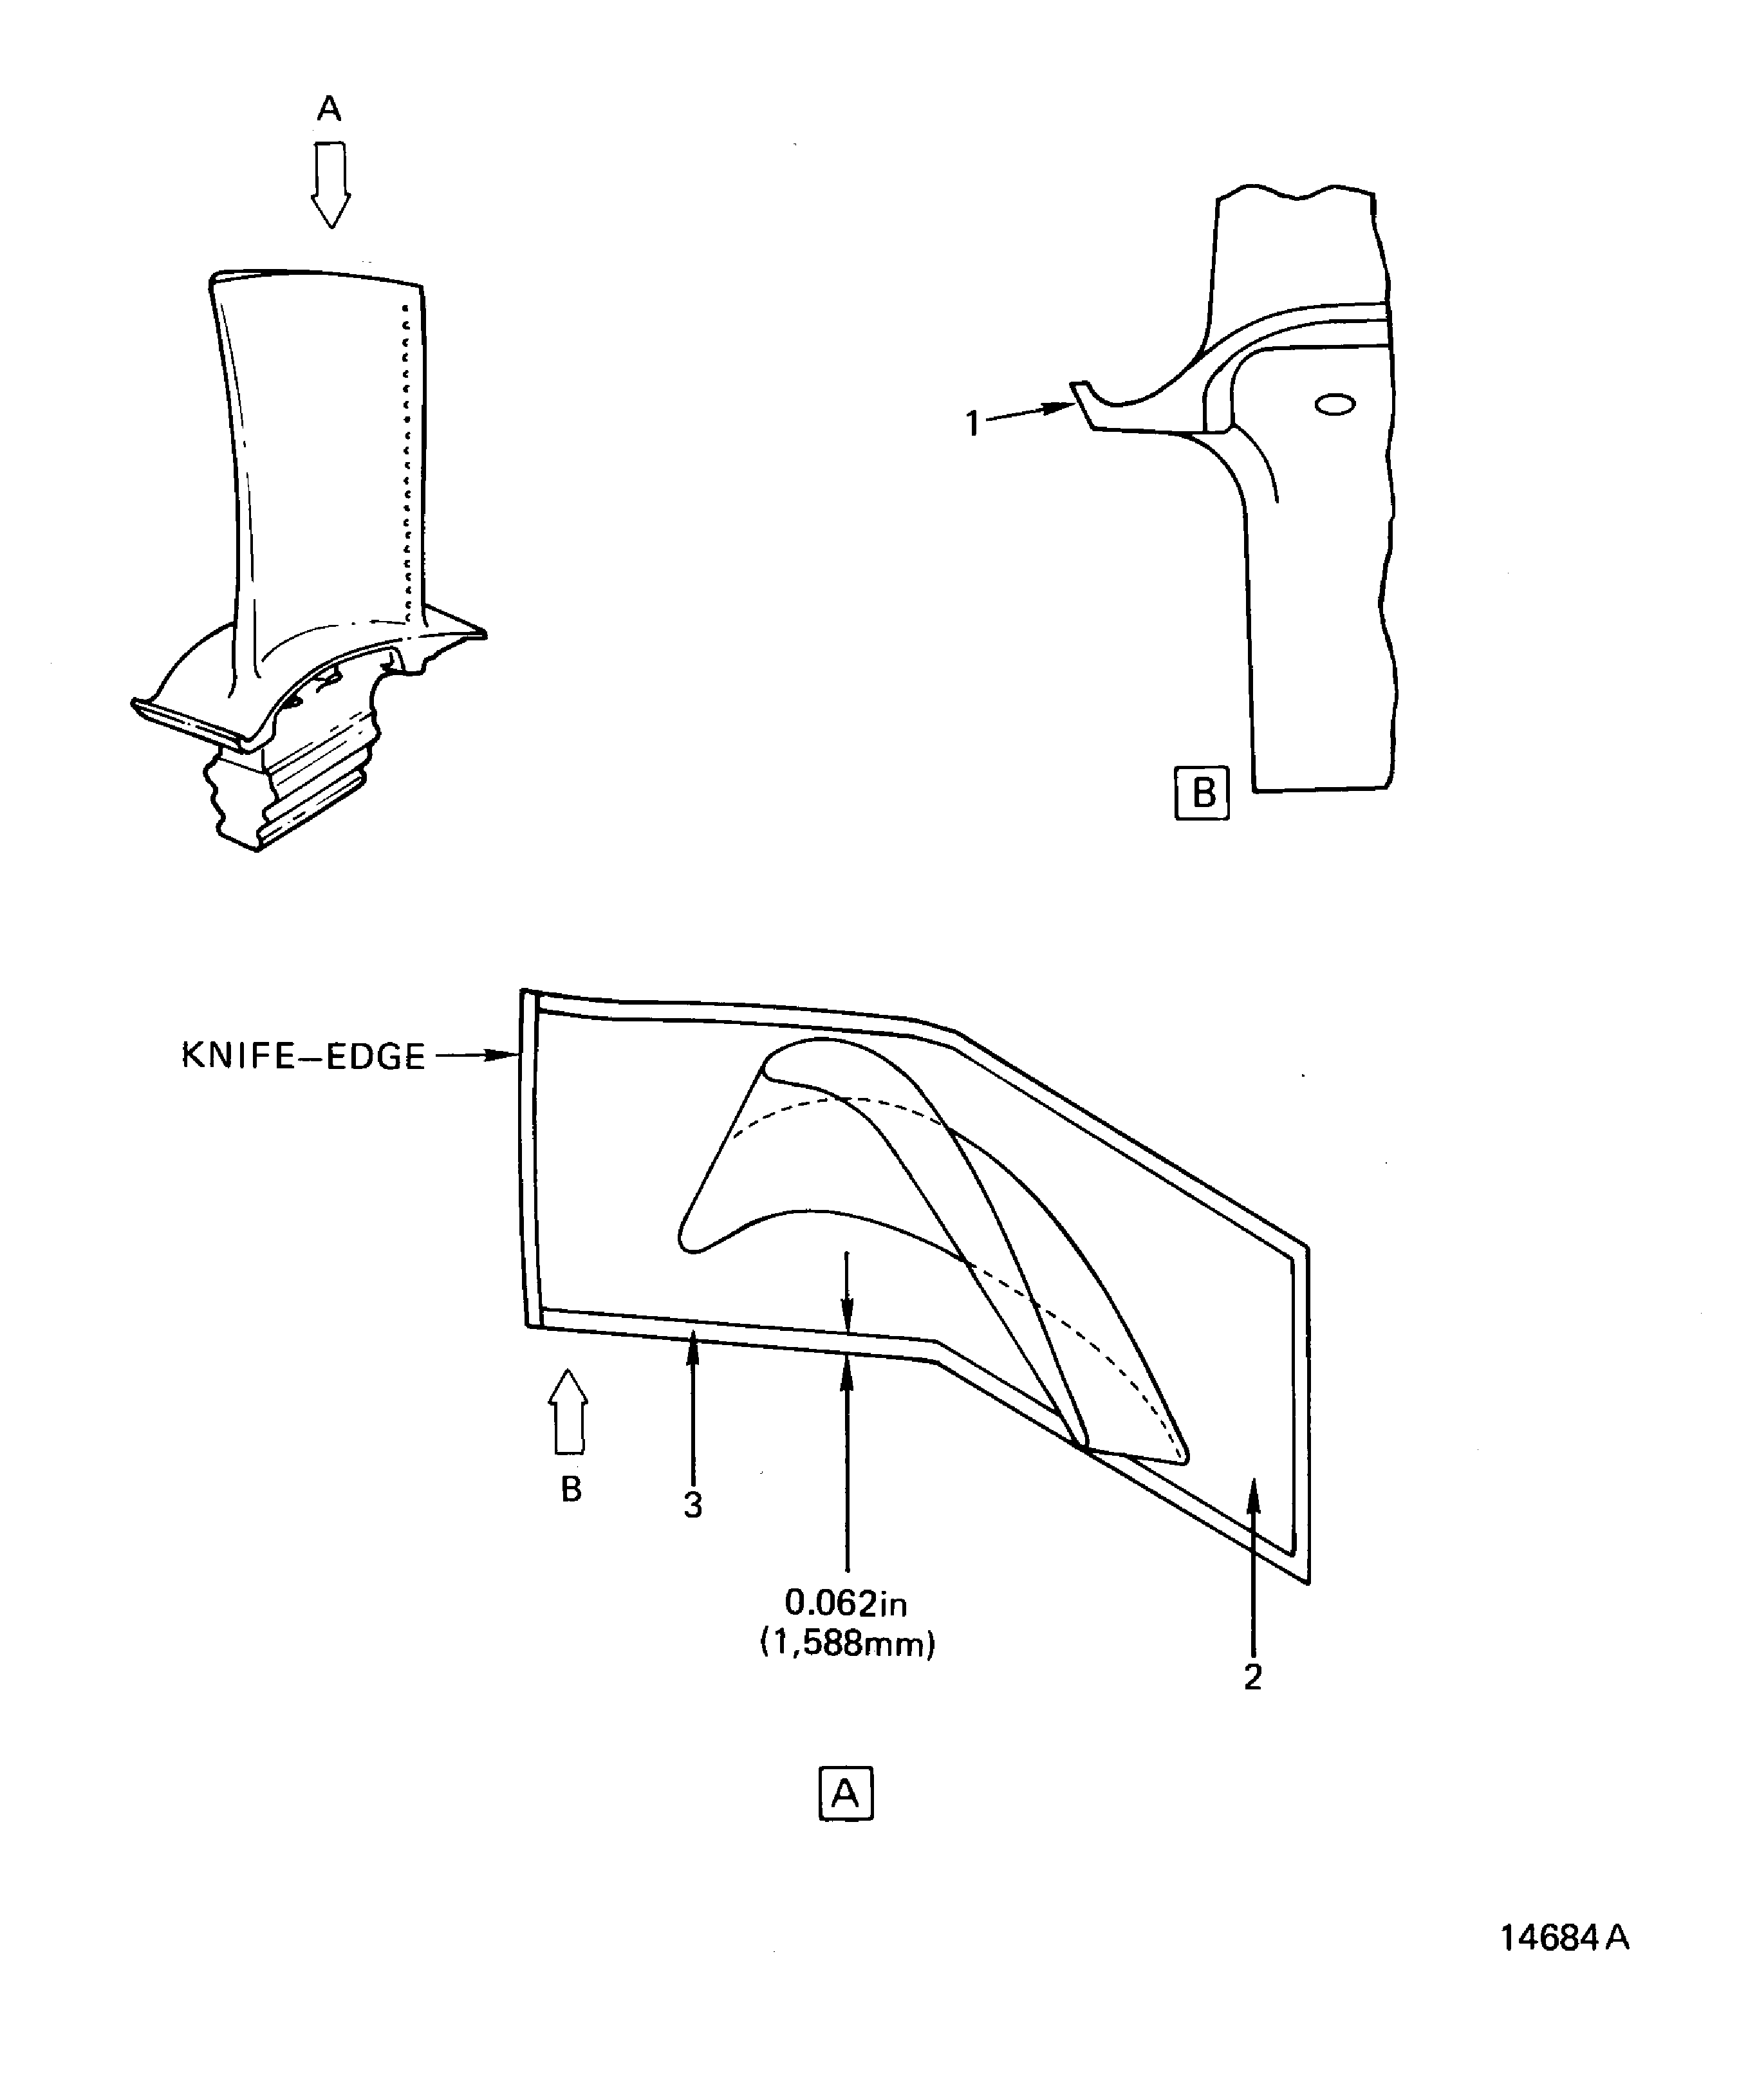
Figure: Stage 2 HPT Blade Assembly Airfoil Inspection Locations
Stage 2 HPT Blade Assembly Airfoil Inspection Locations
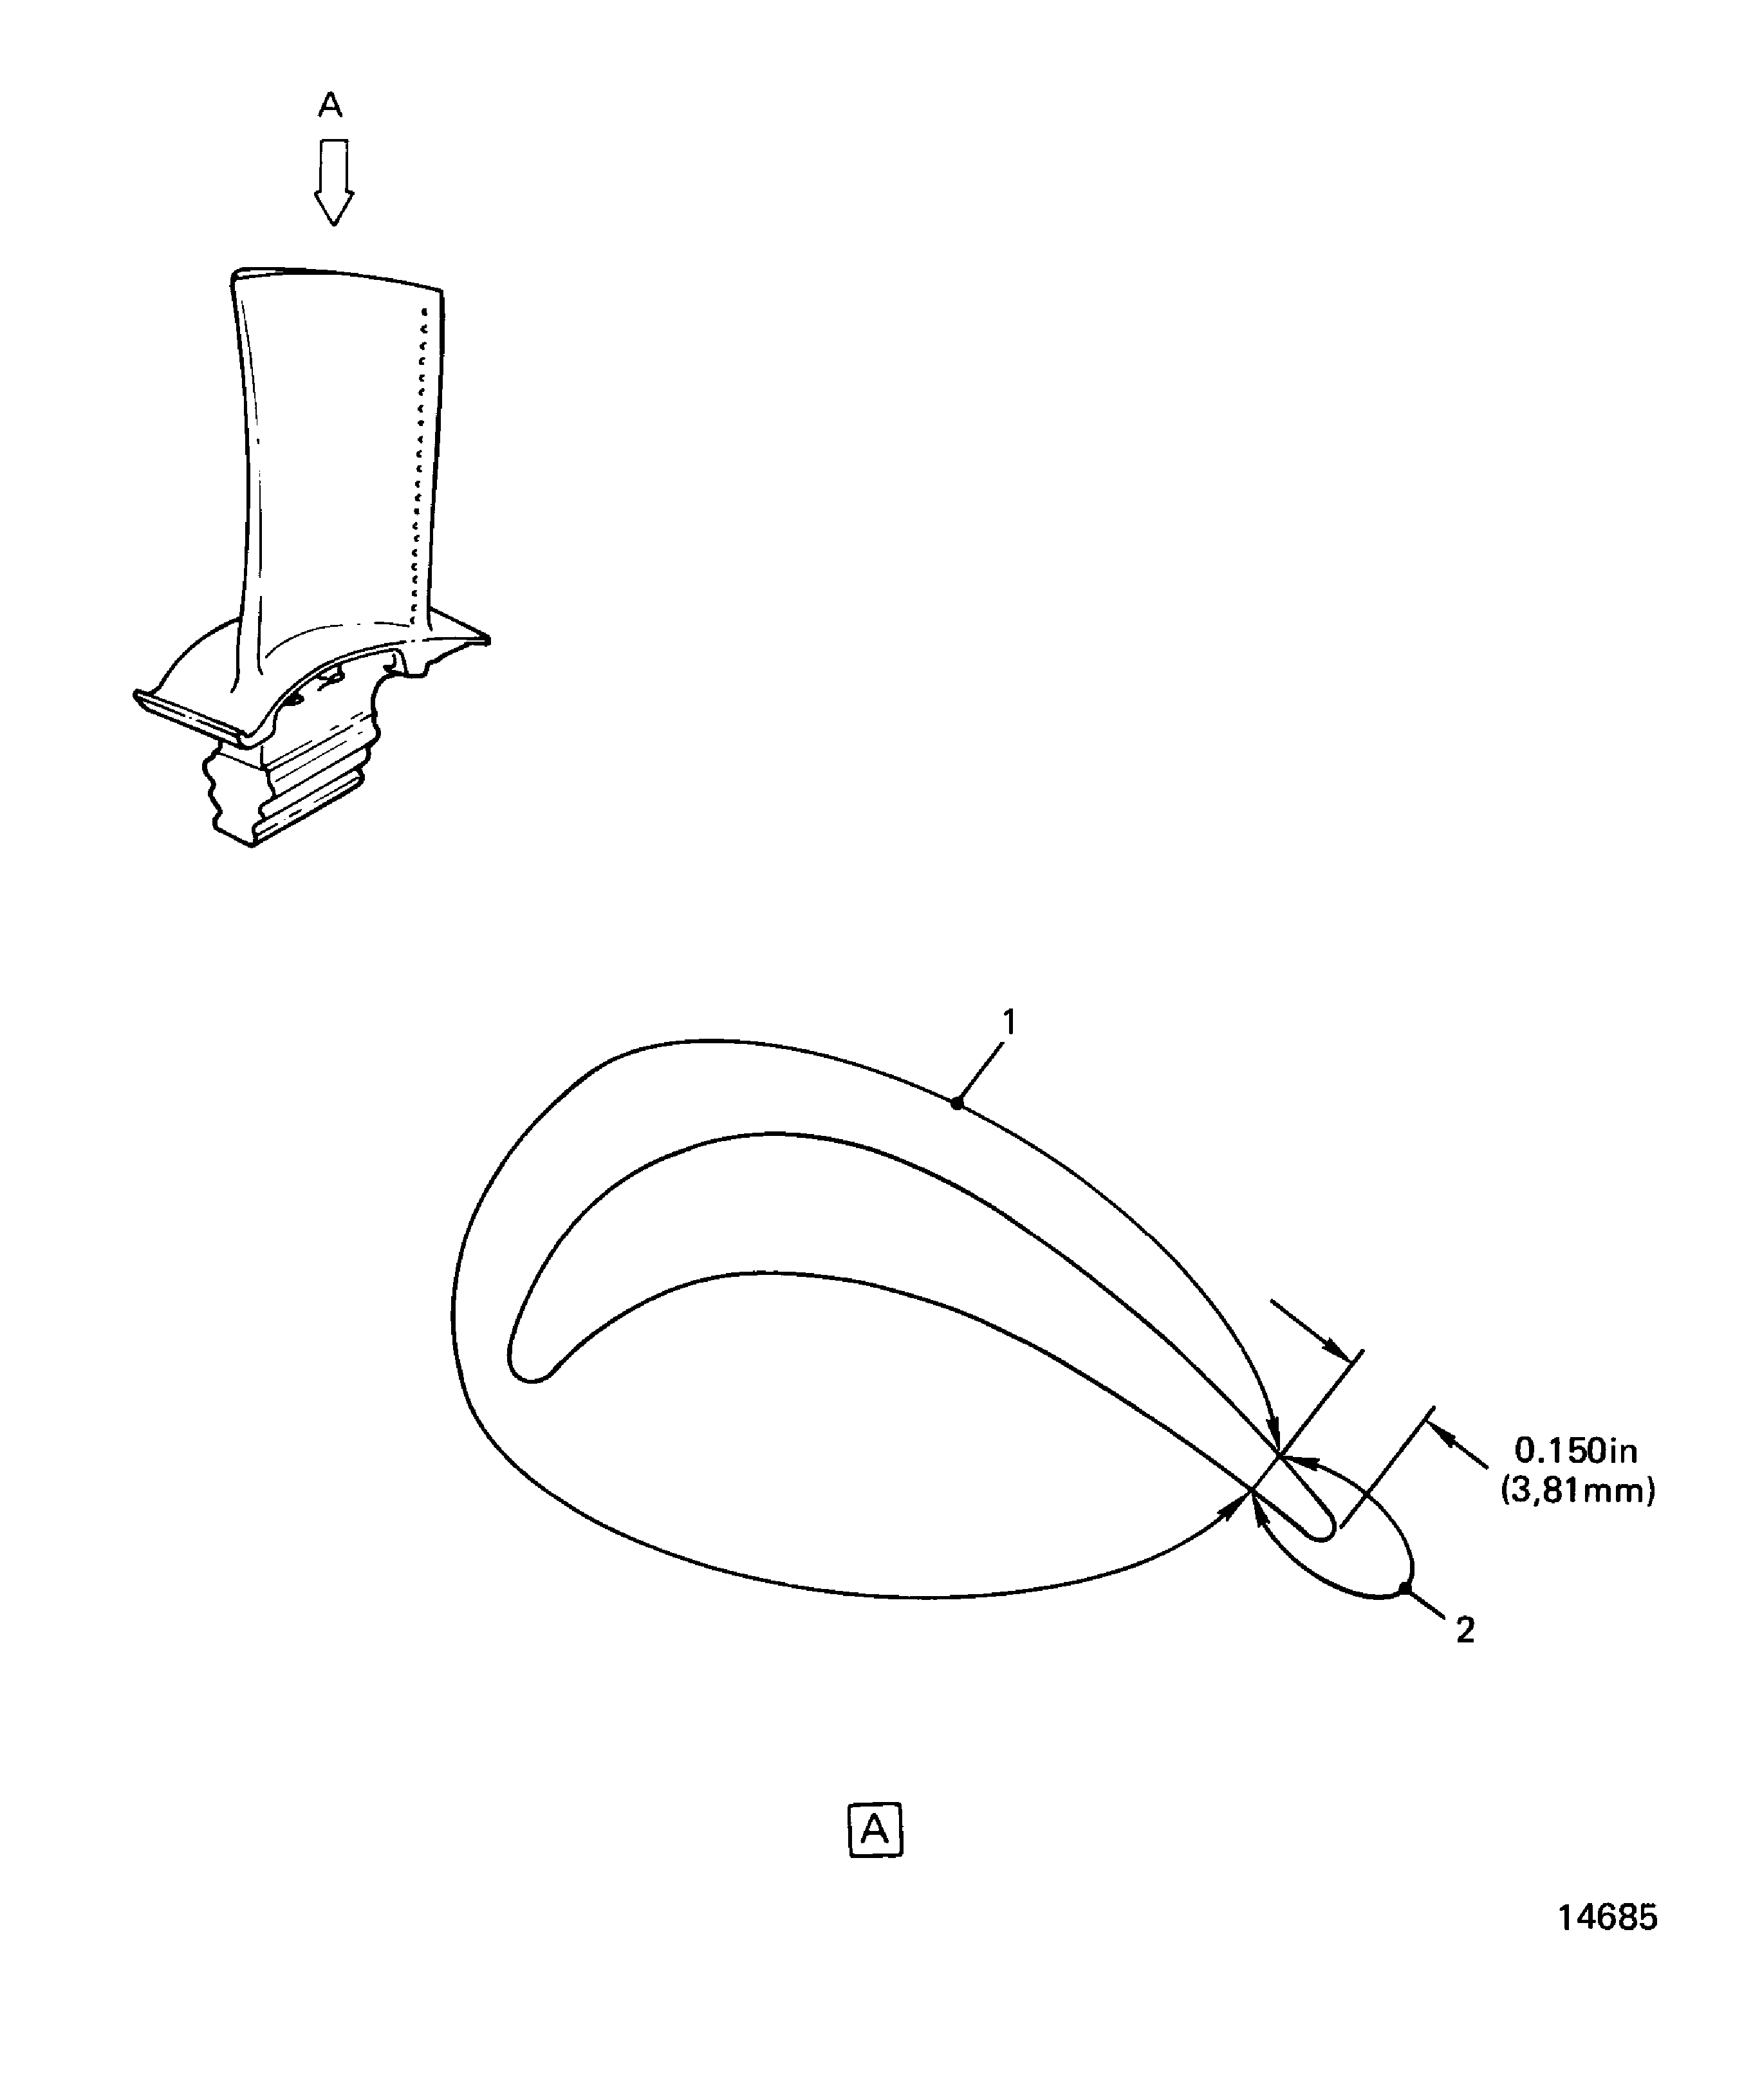
Figure: Stage 2 HPT Blade Assembly Airfoil Dents Inspection Loations
Stage 2 HPT Blade Assembly Airfoil Dents Inspection Loations
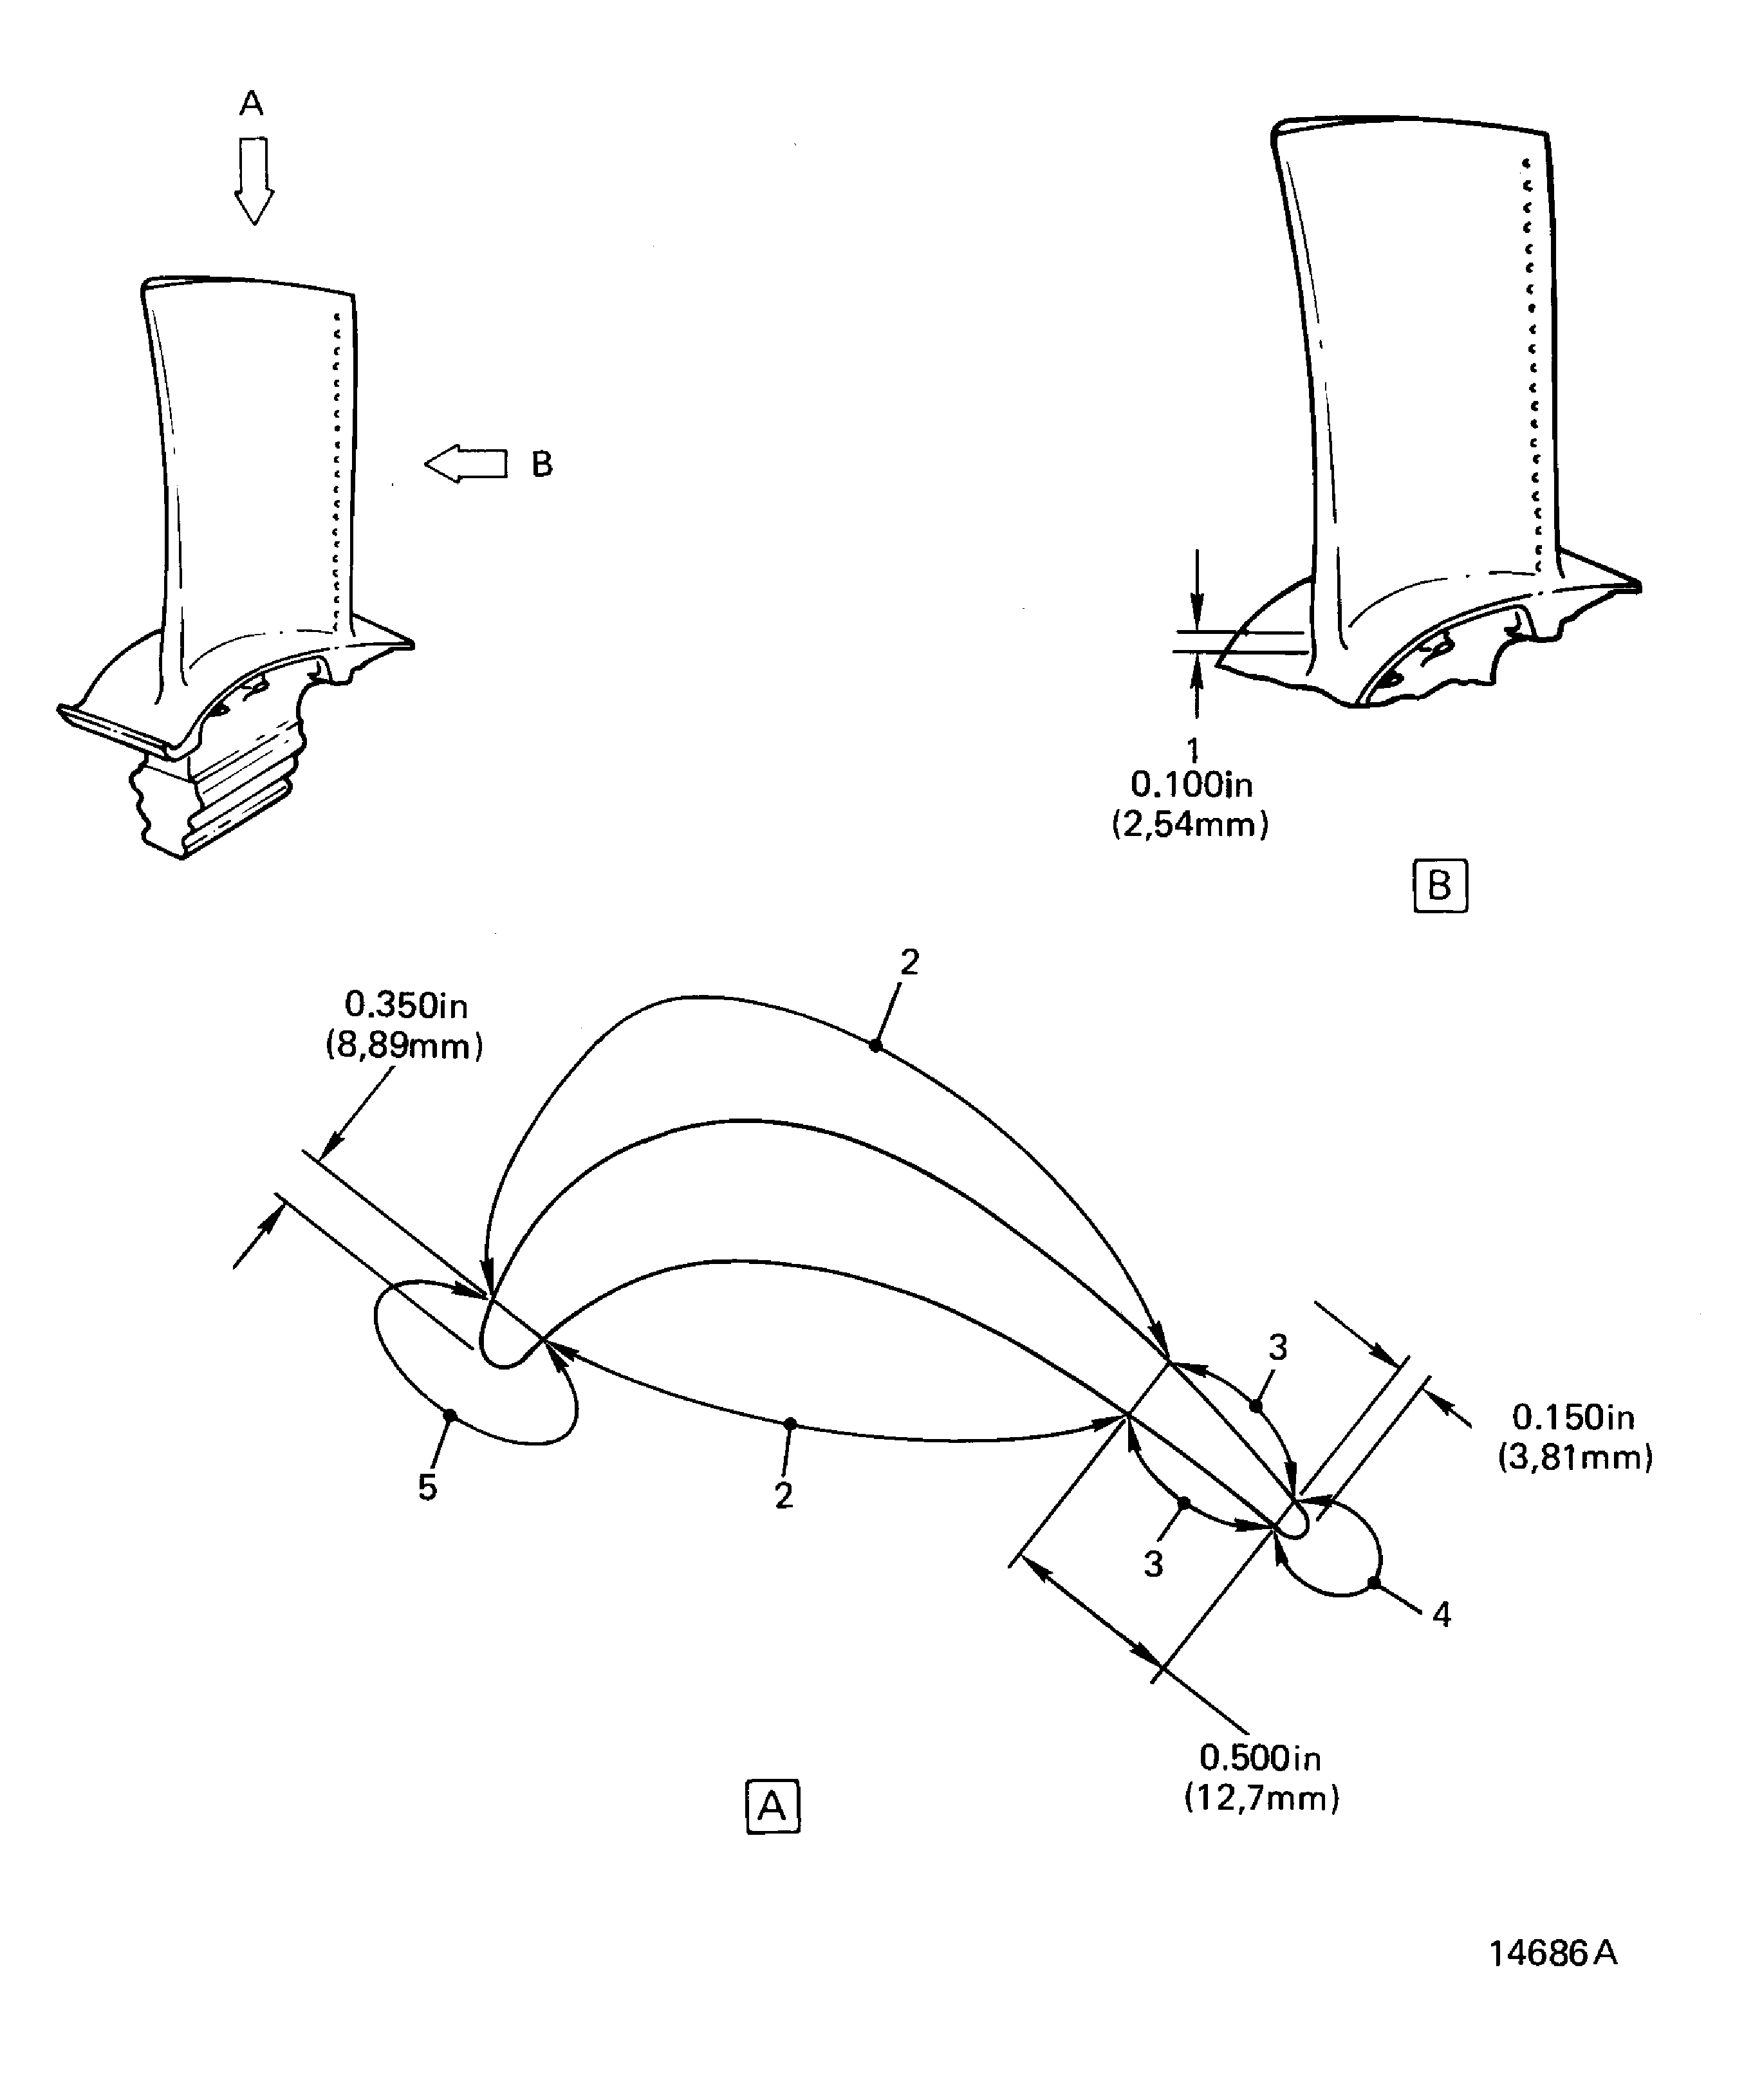
Figure: Stage 2 HPT Blade Assembly Abrasive Tip Inspection Locations
Stage 2 HPT Blade Assembly Abrasive Tip Inspection Locations
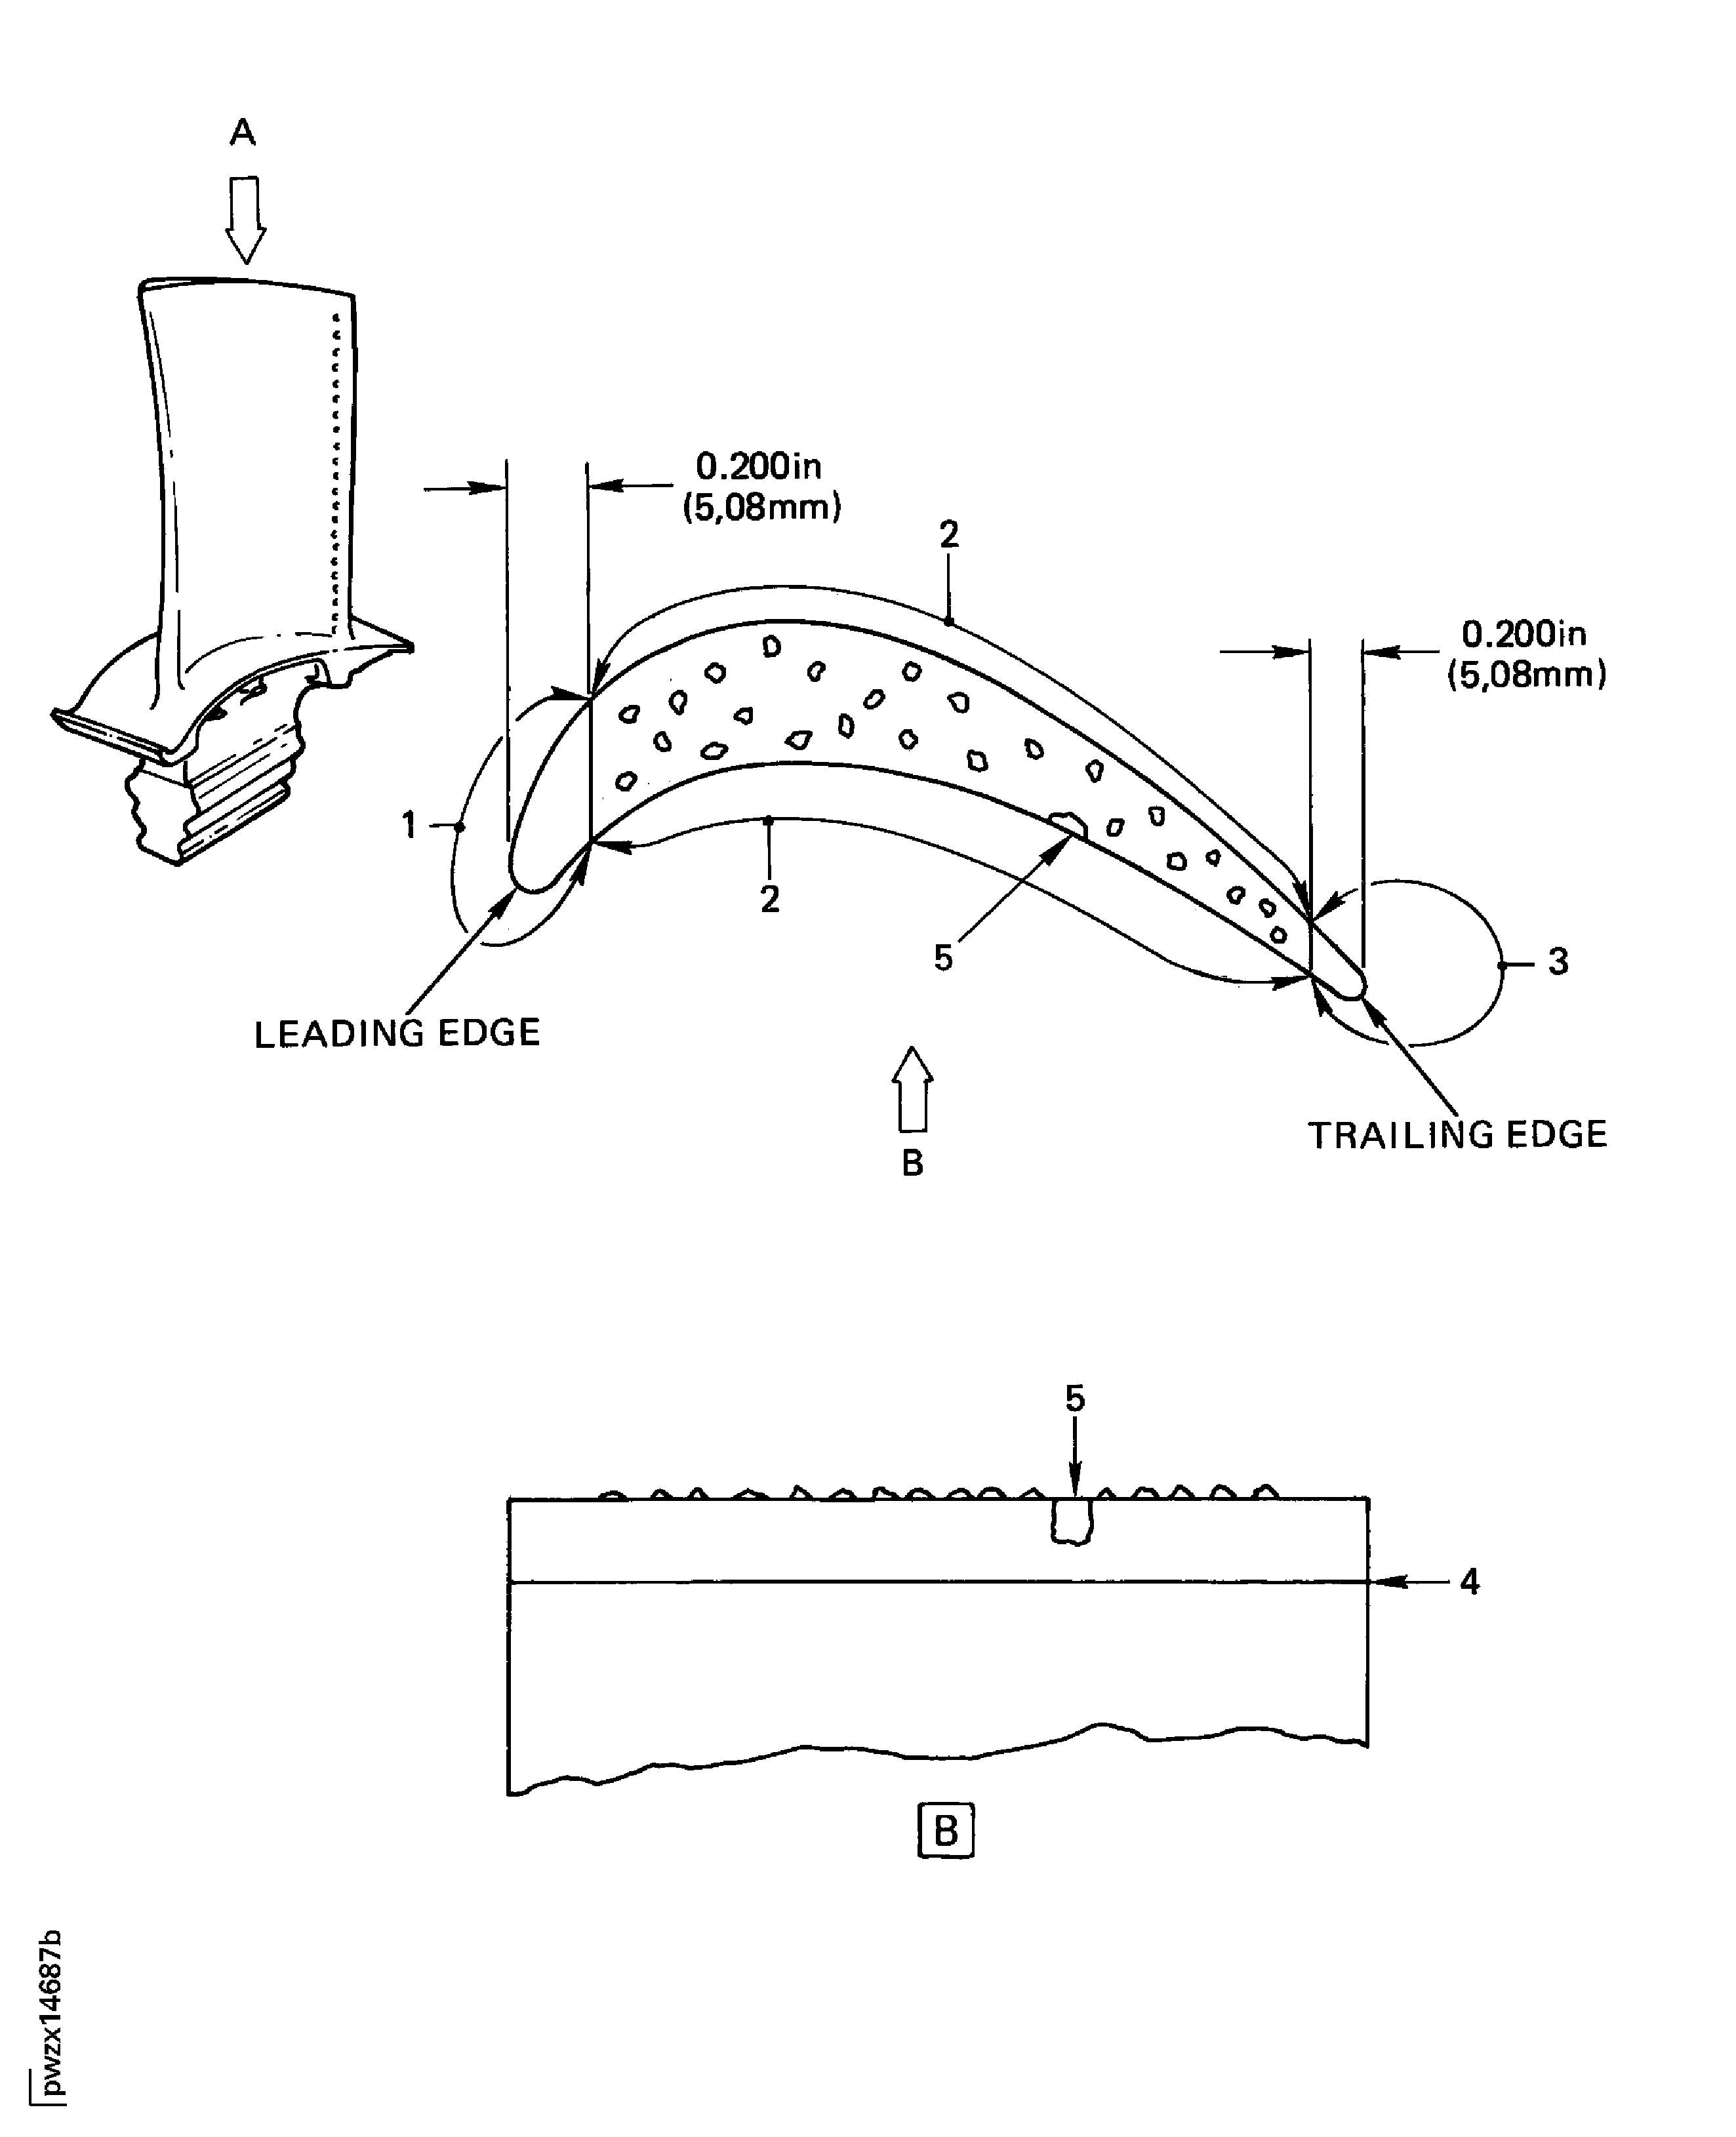
Figure: Stage 2 HPT Blade Assembly Trailing Edge Inspection Locations
Stage 2 HPT Blade Assembly Trailing Edge Inspection Locations
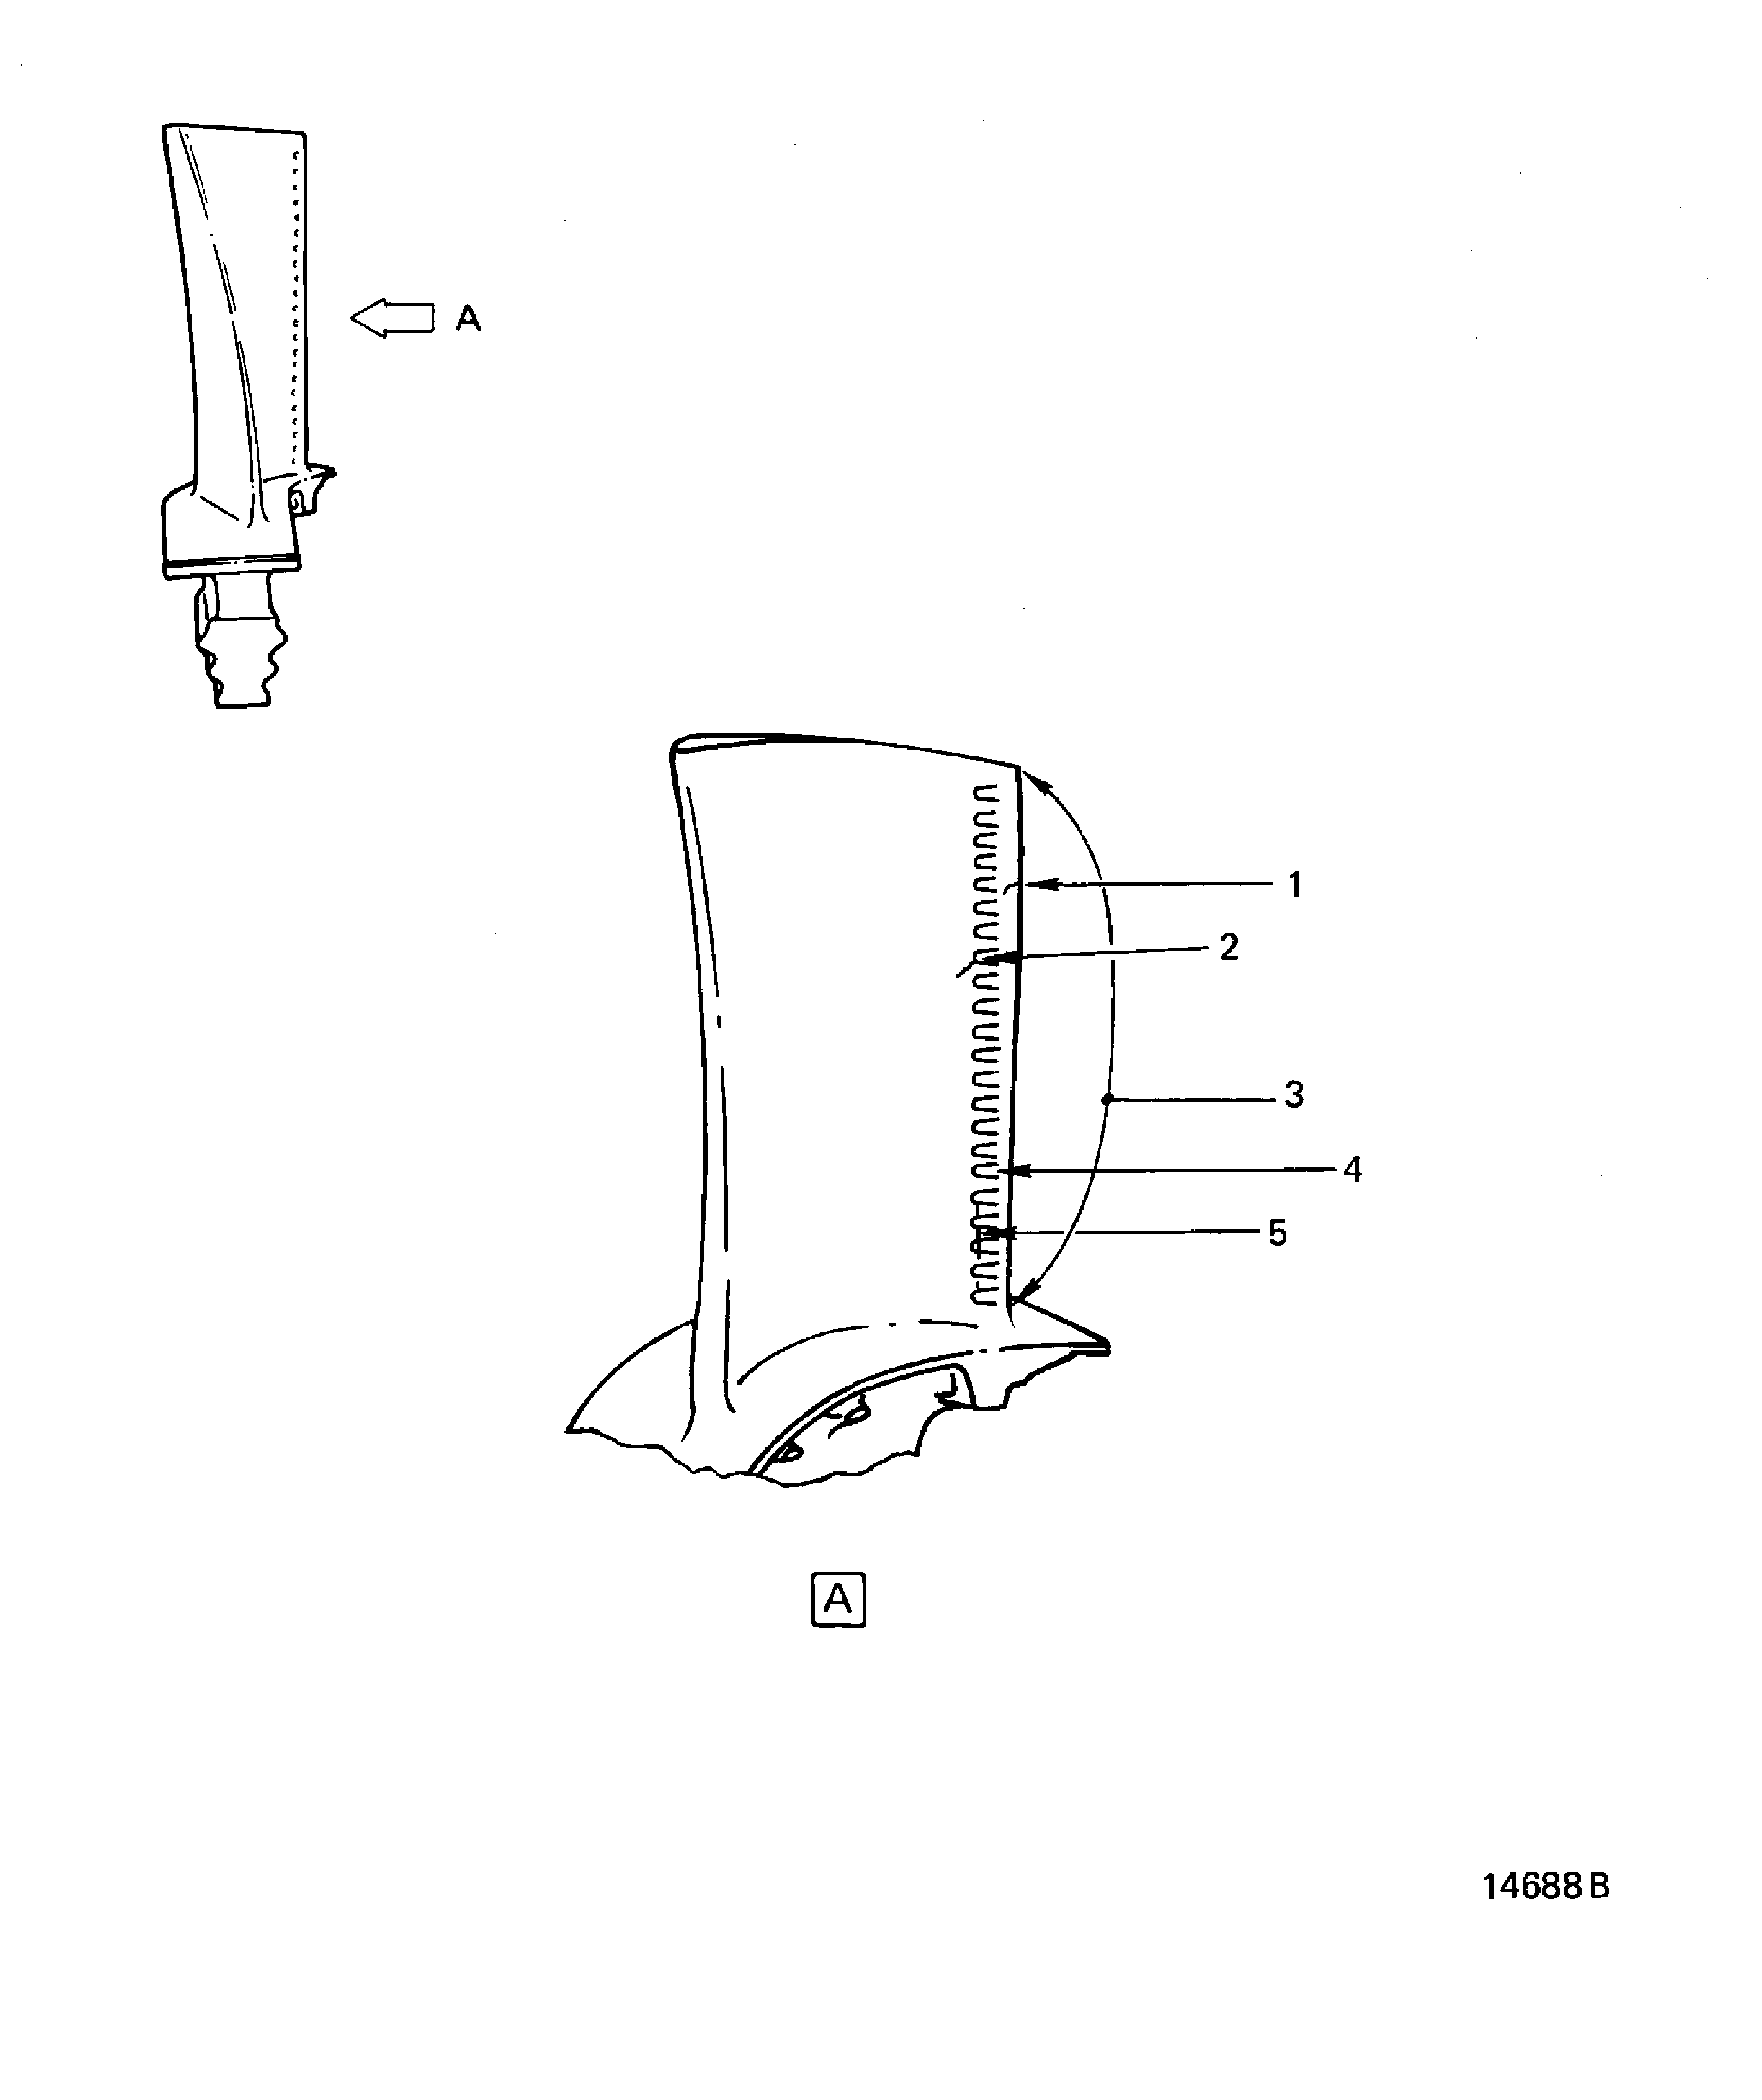
Figure: Stage 2 HPT Blade Assembly Platform Surfaces Inspection Locations
Stage 2 HPT Blade Assembly Platform Surfaces Inspection Locations
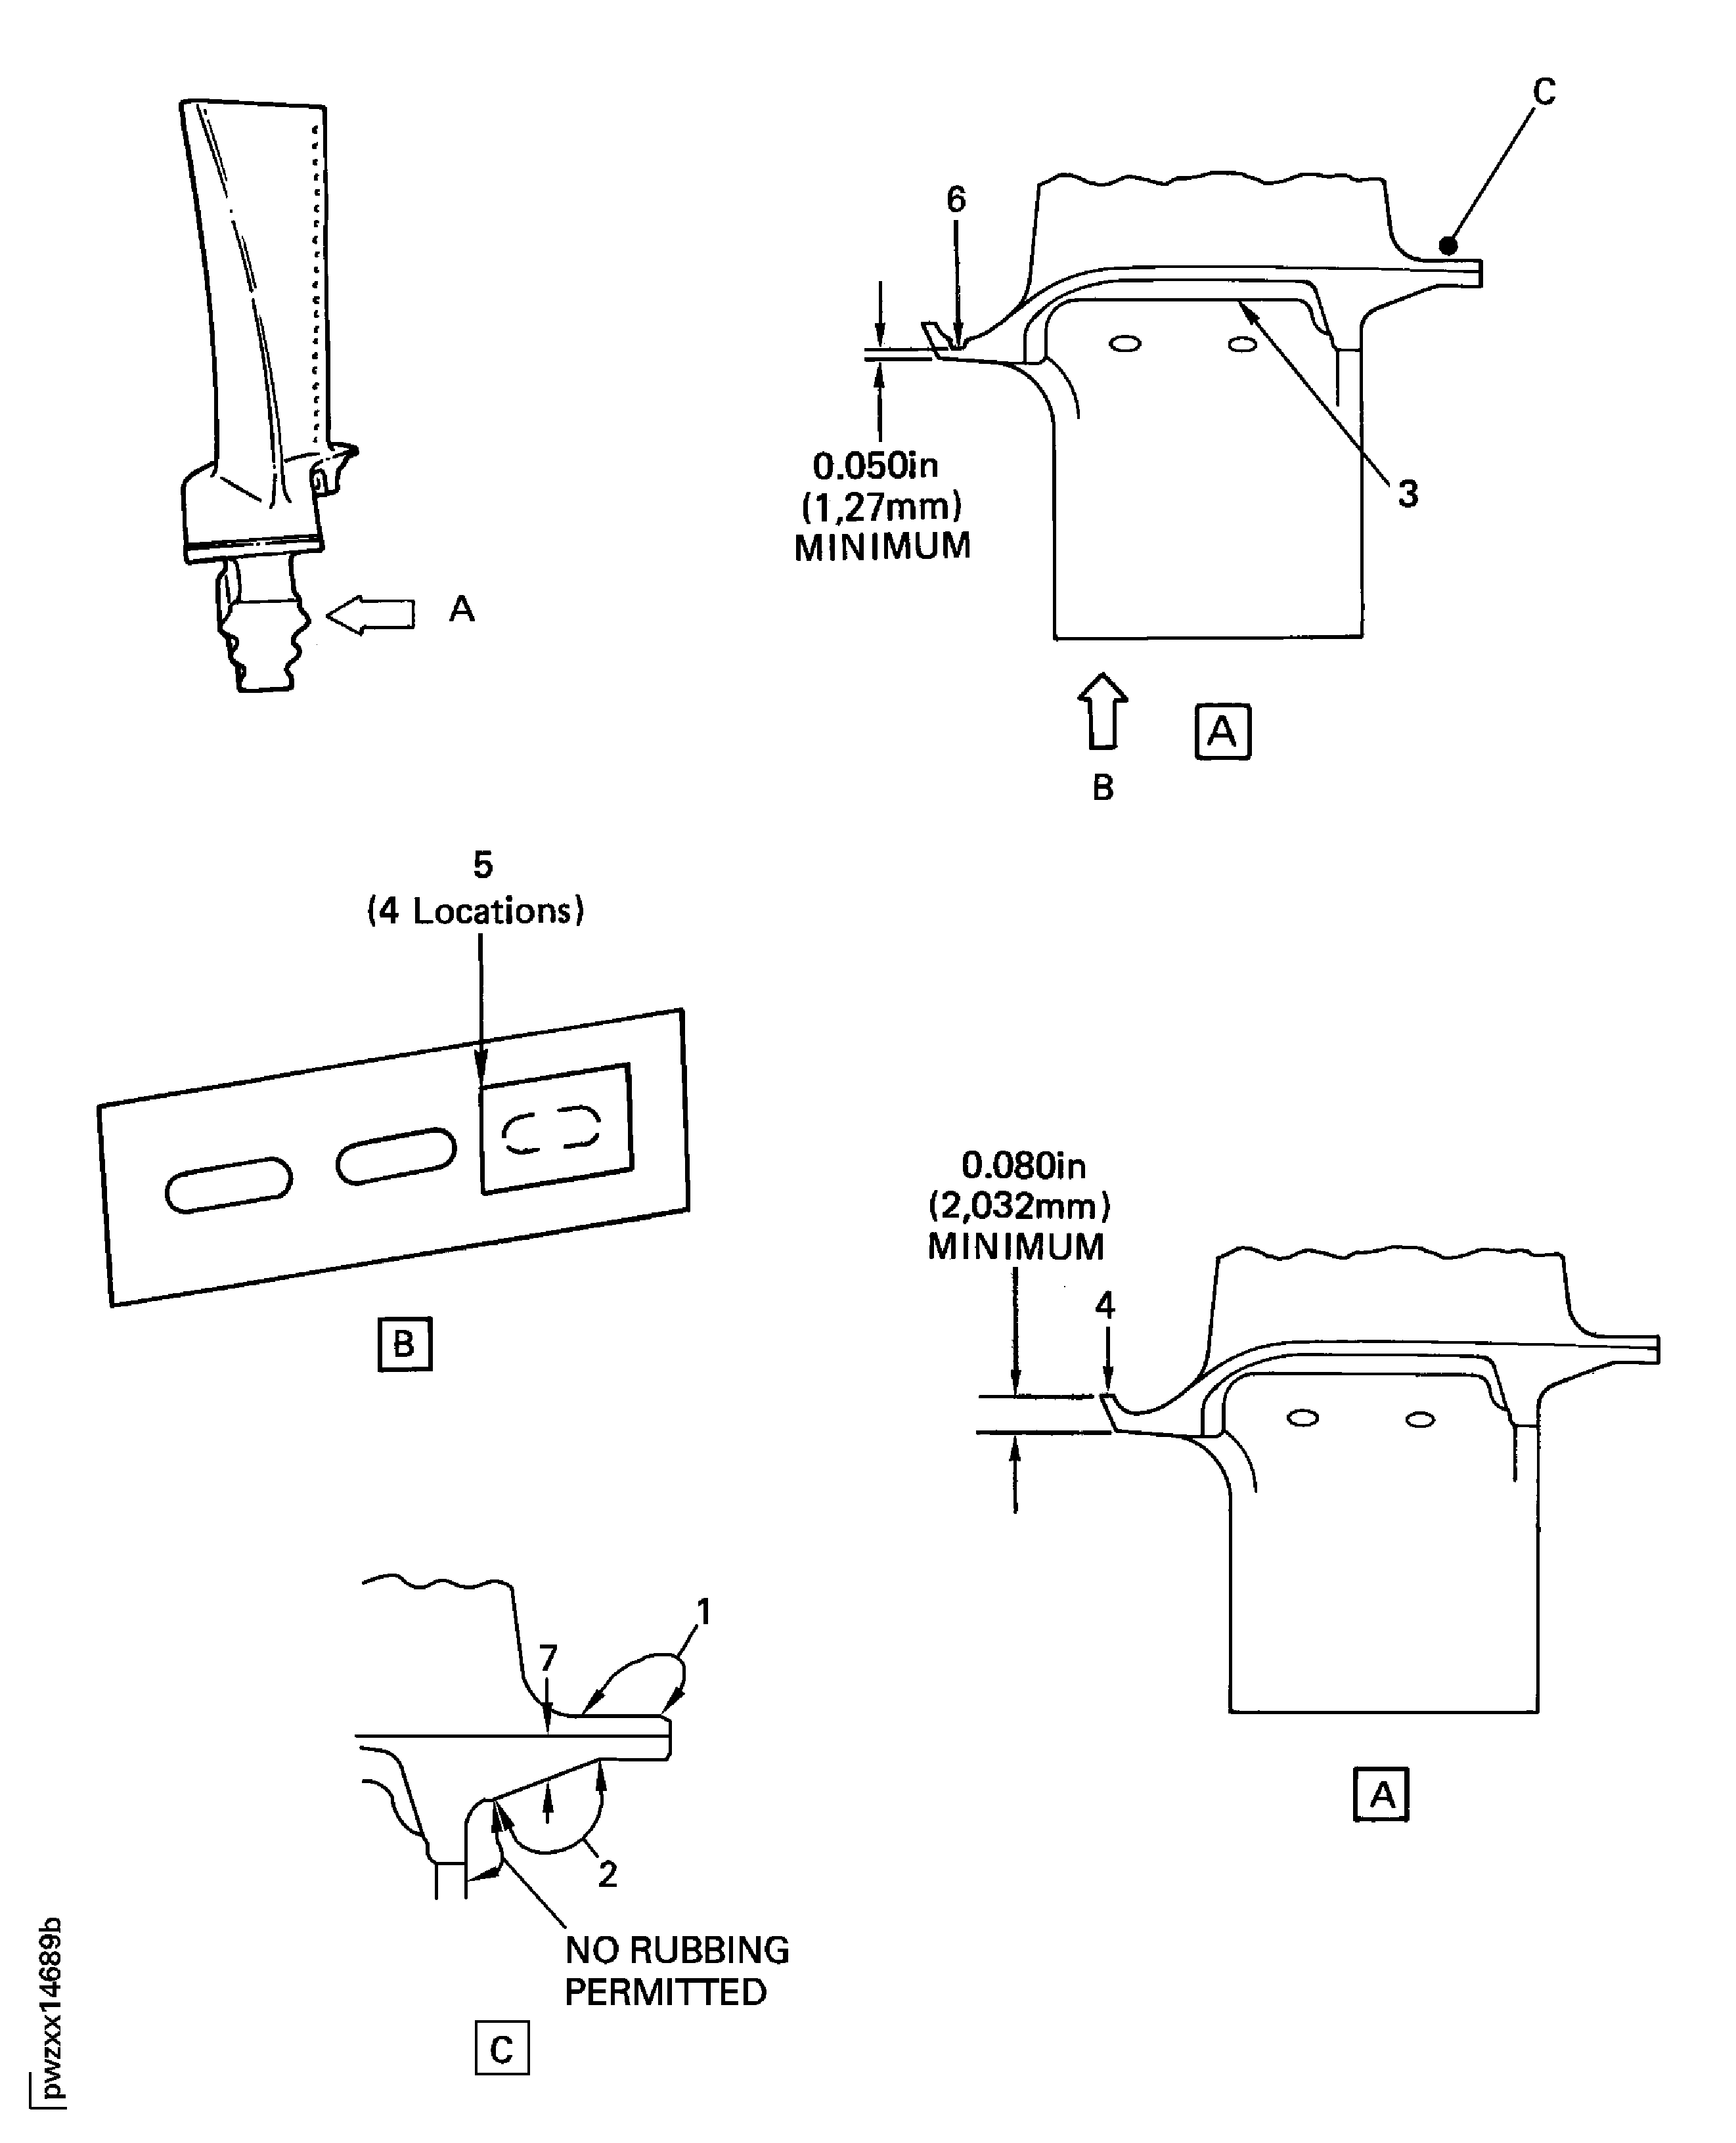
Figure: Stage 2 HPT Blade Root and Root Attachment Area Inspection Locations and Limits
Sheet 1
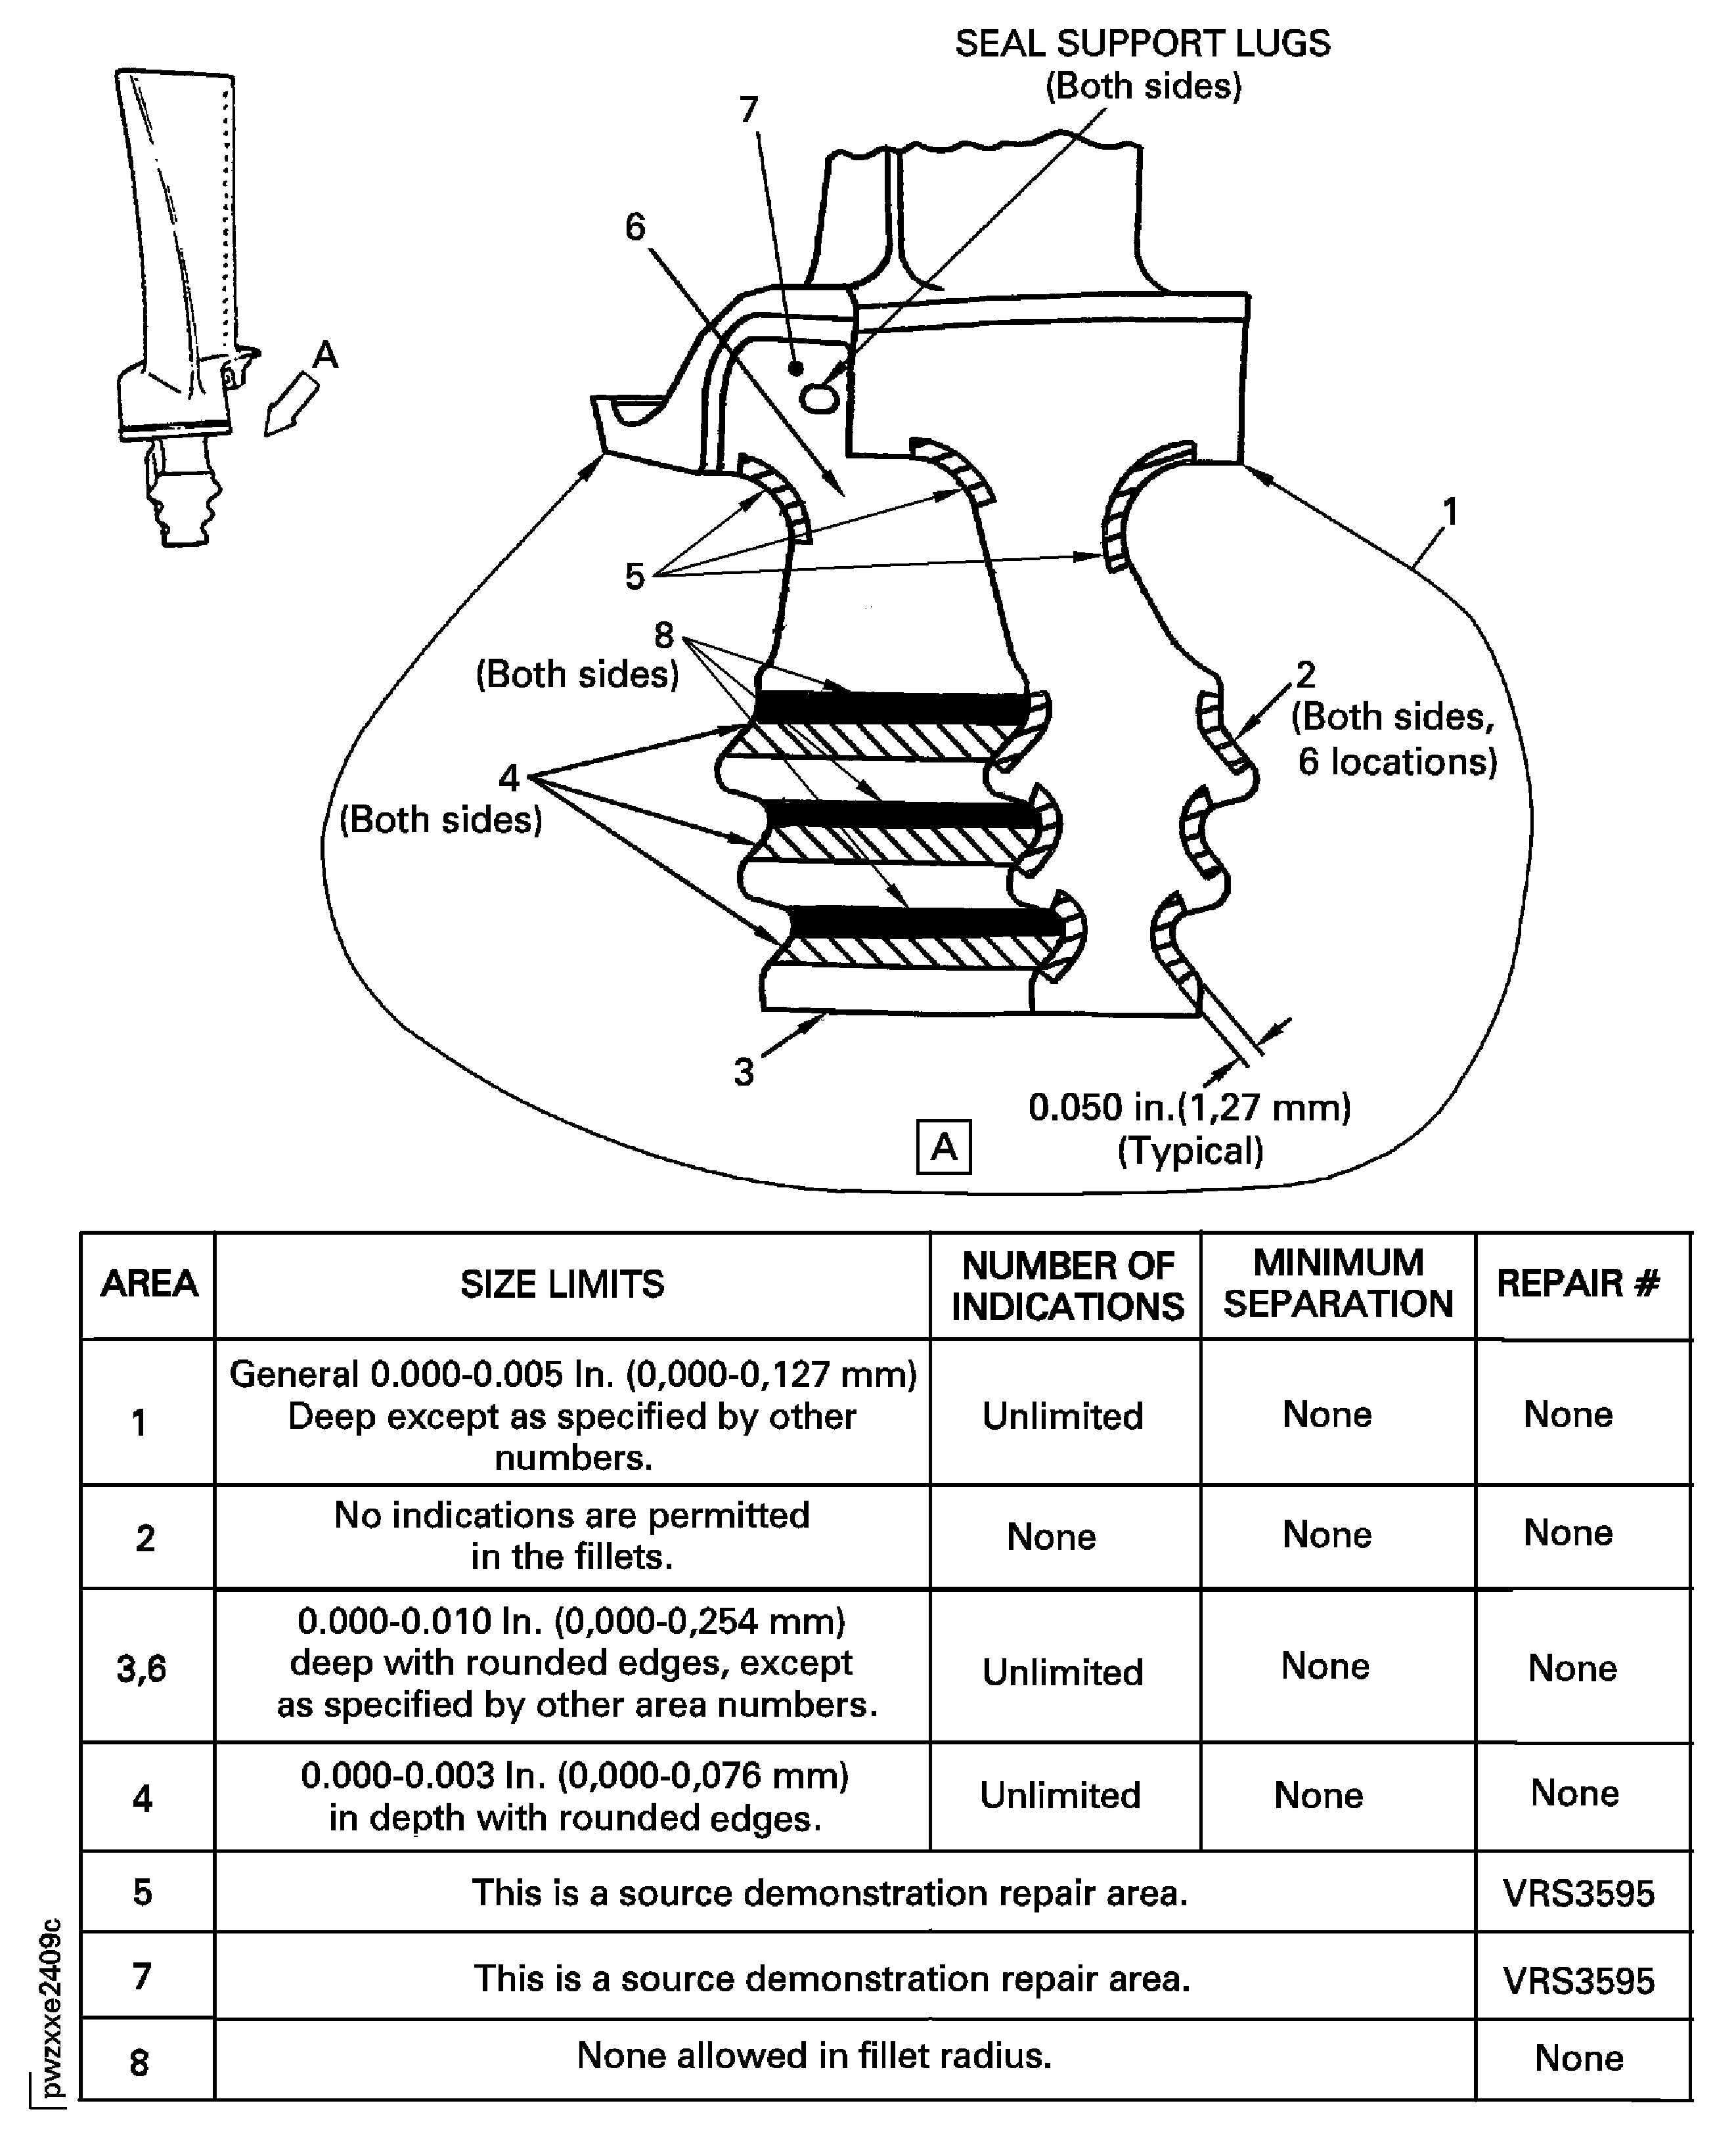
Figure: Stage 2 HPT Blade Root and Root Attachment Area Inspection Locations and Limits
Sheet 2
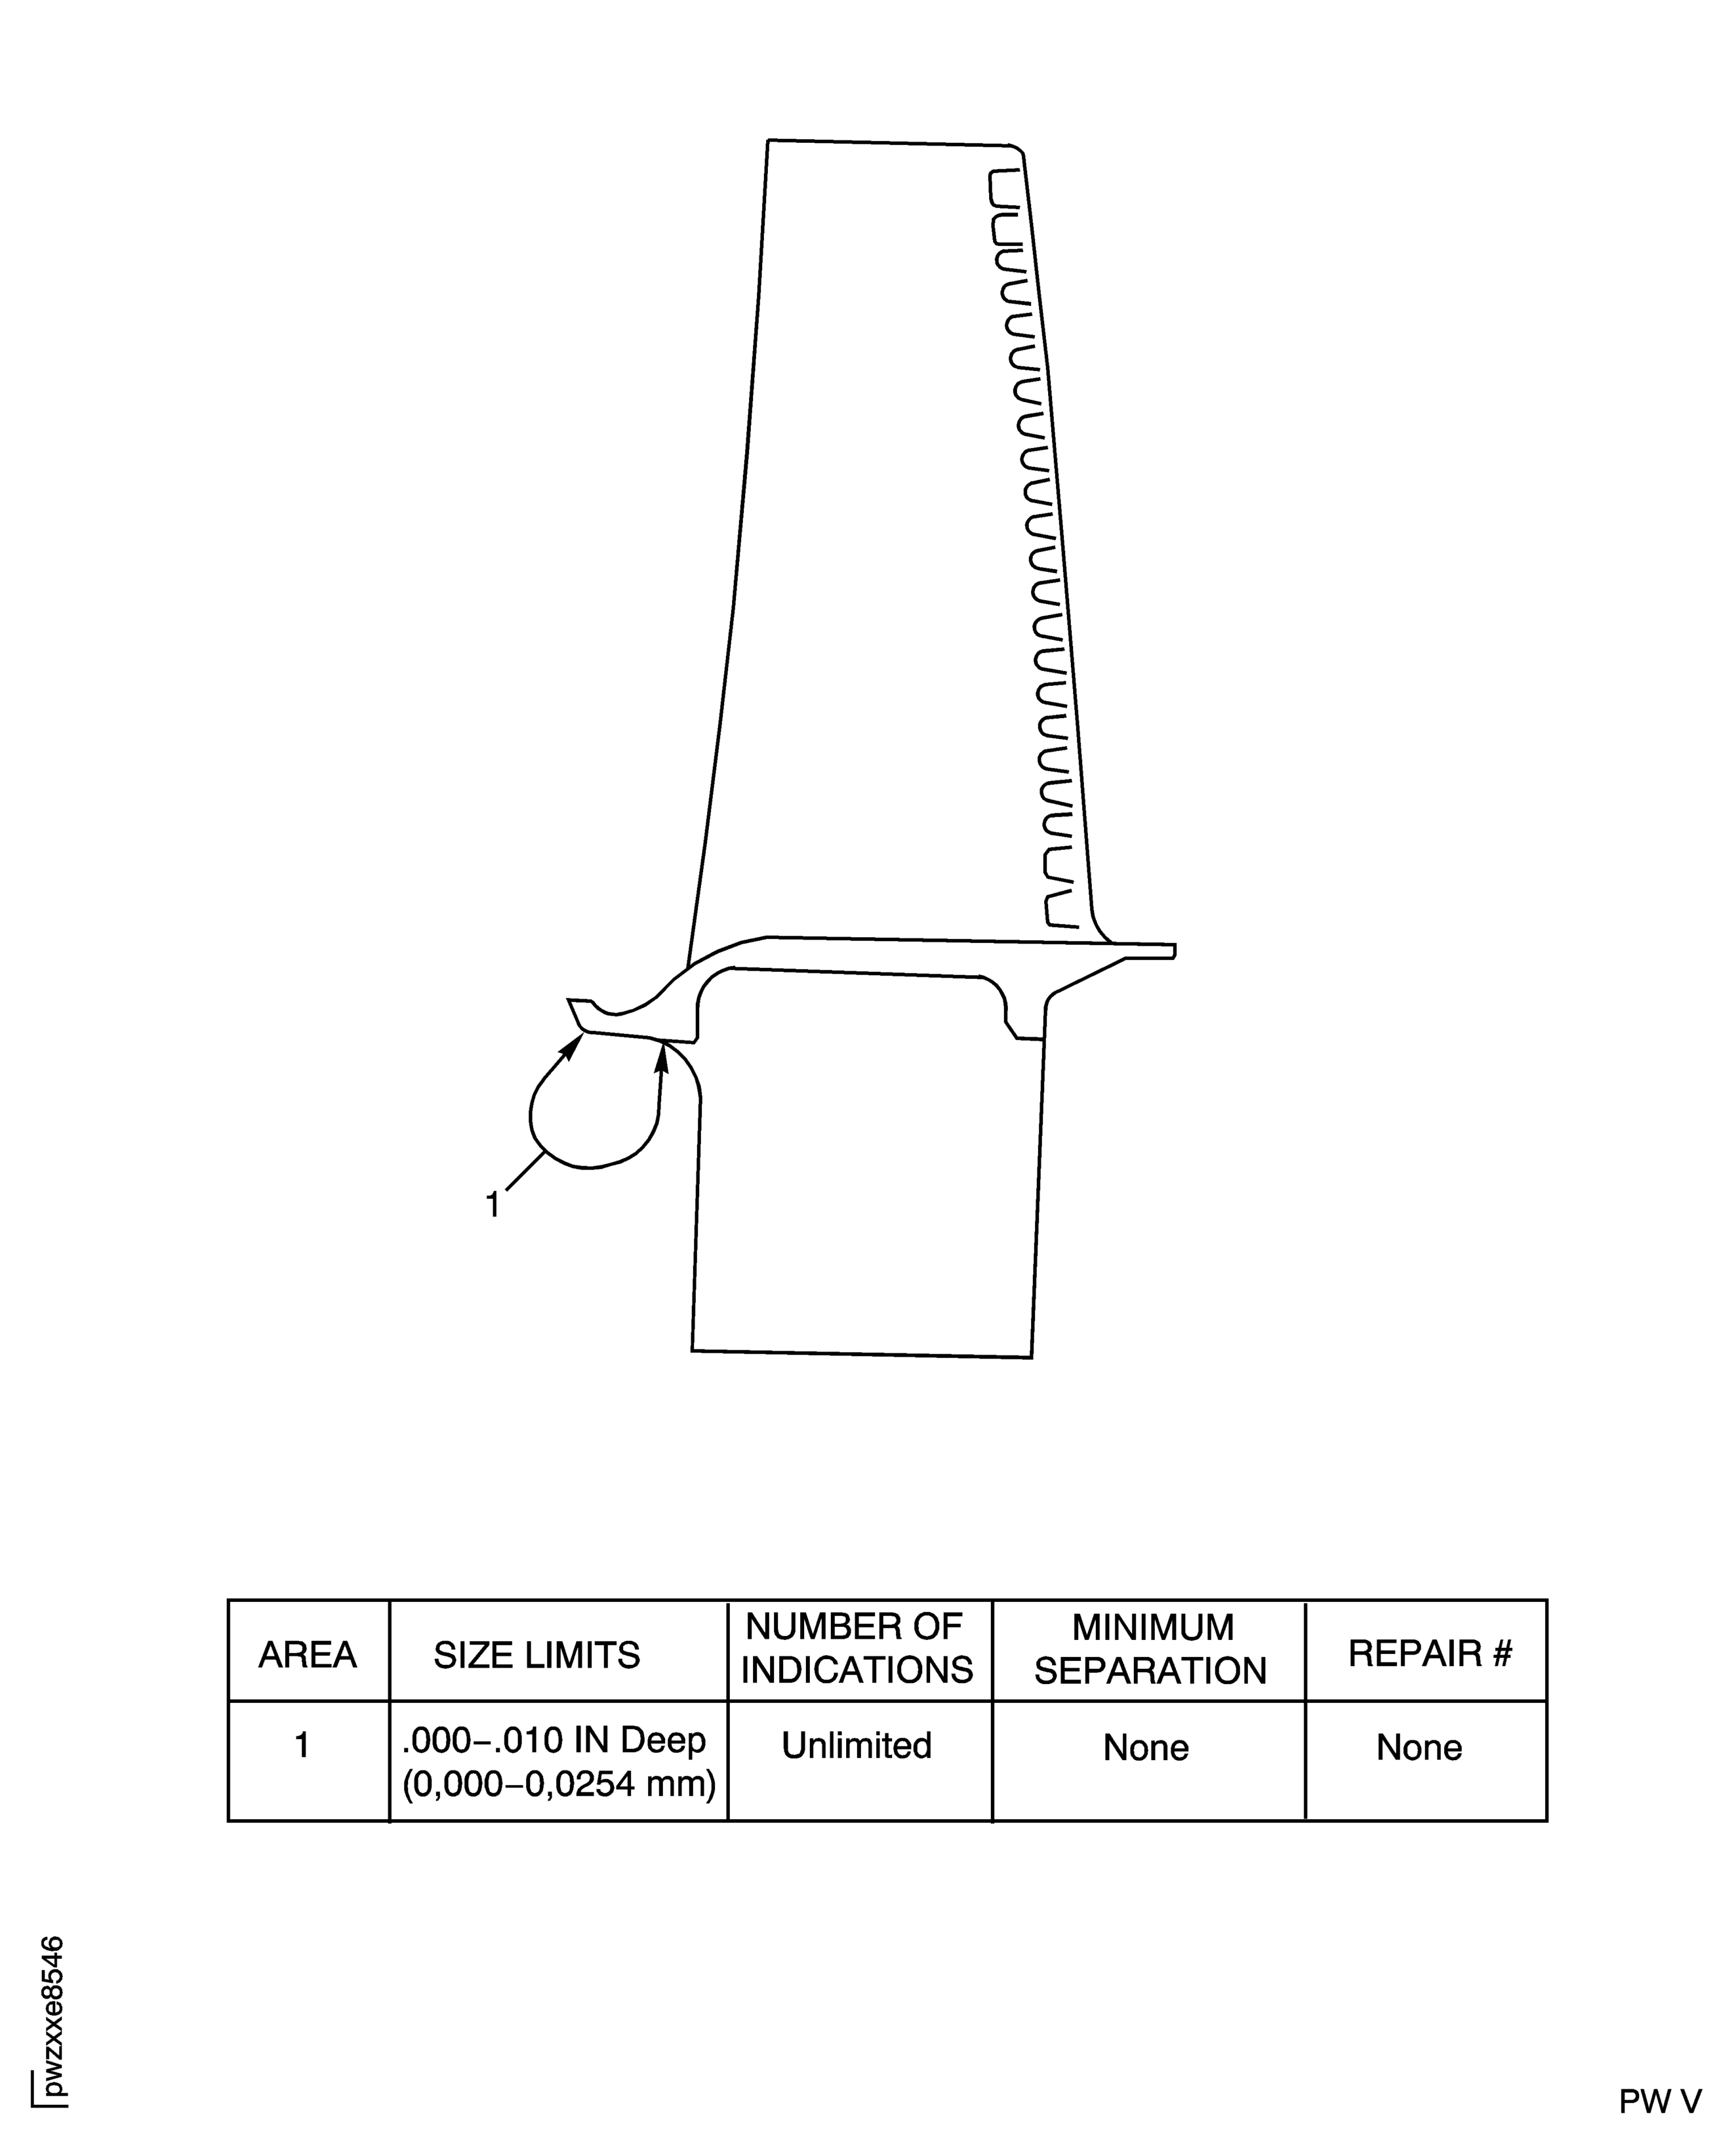
Figure: Stage 2 HPT Blade Assembly Top Most Serration Inspection Locations
Stage 2 HPT Blade Assembly Top Most Serration Inspection Locations
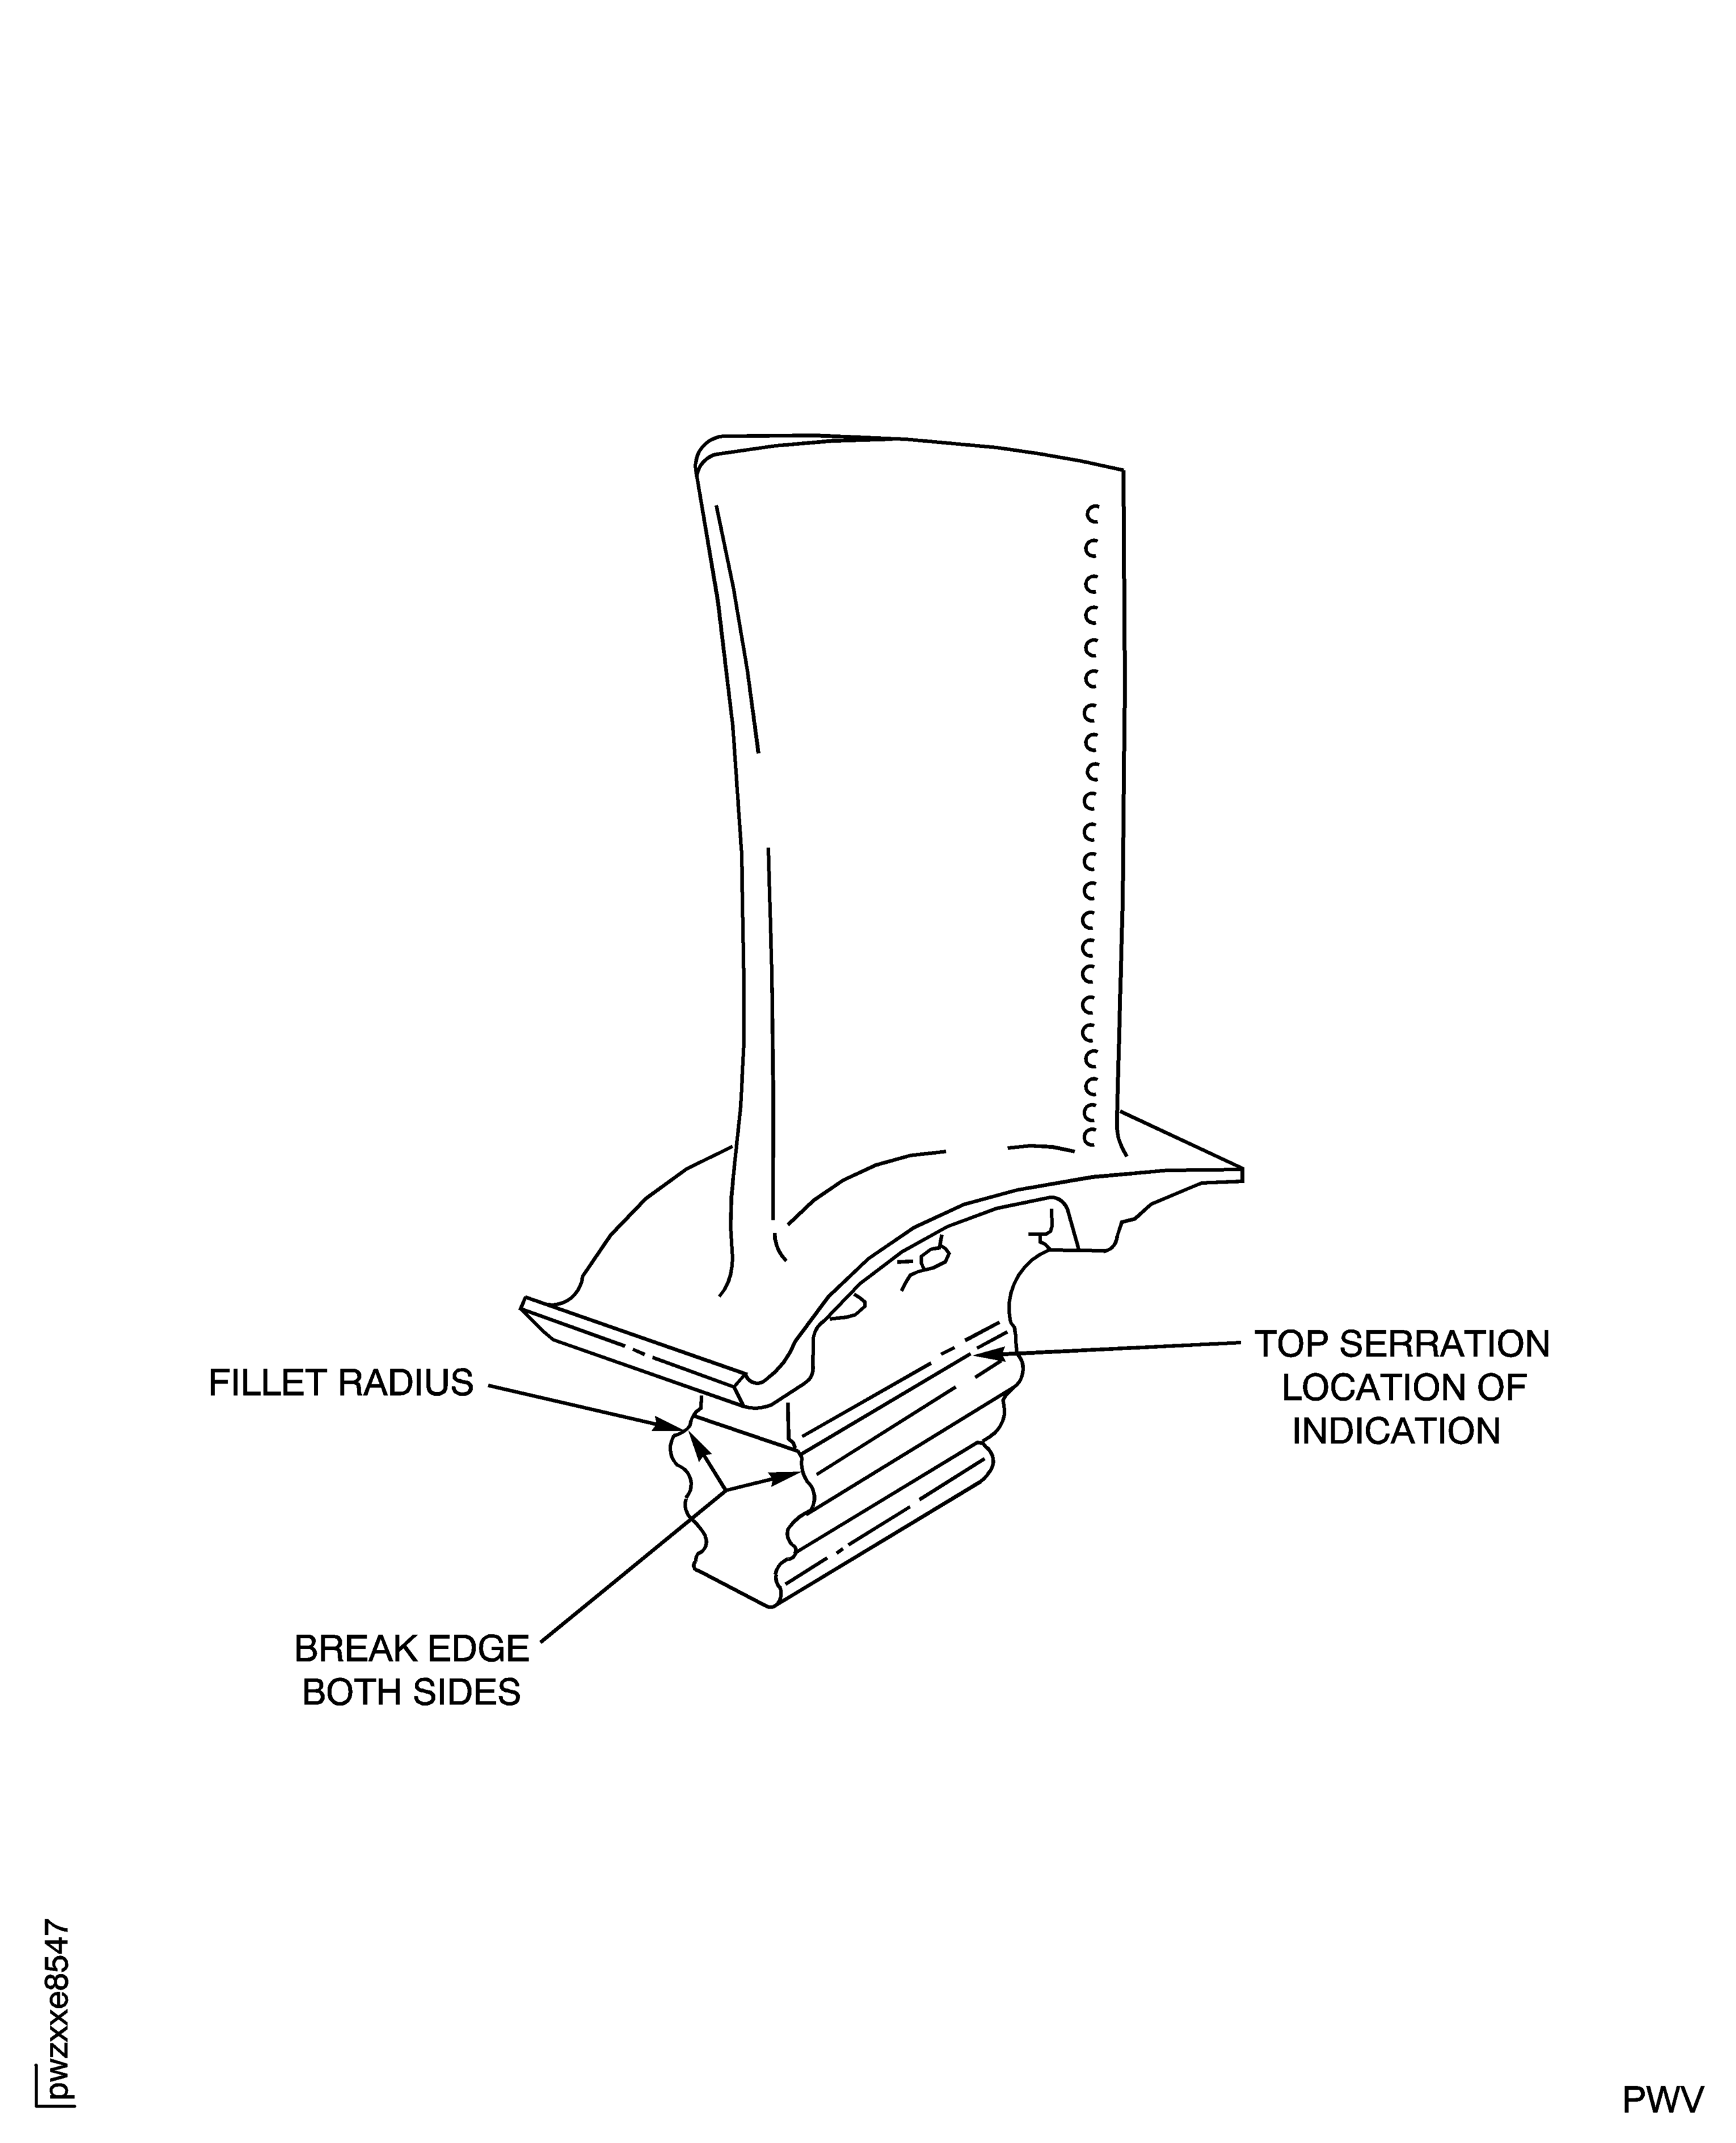
Figure: Stage 2 HPT Blade Metal Temperature Analysis Locations
Stage 2 HPT Blade Metal Temperature Analysis Locations
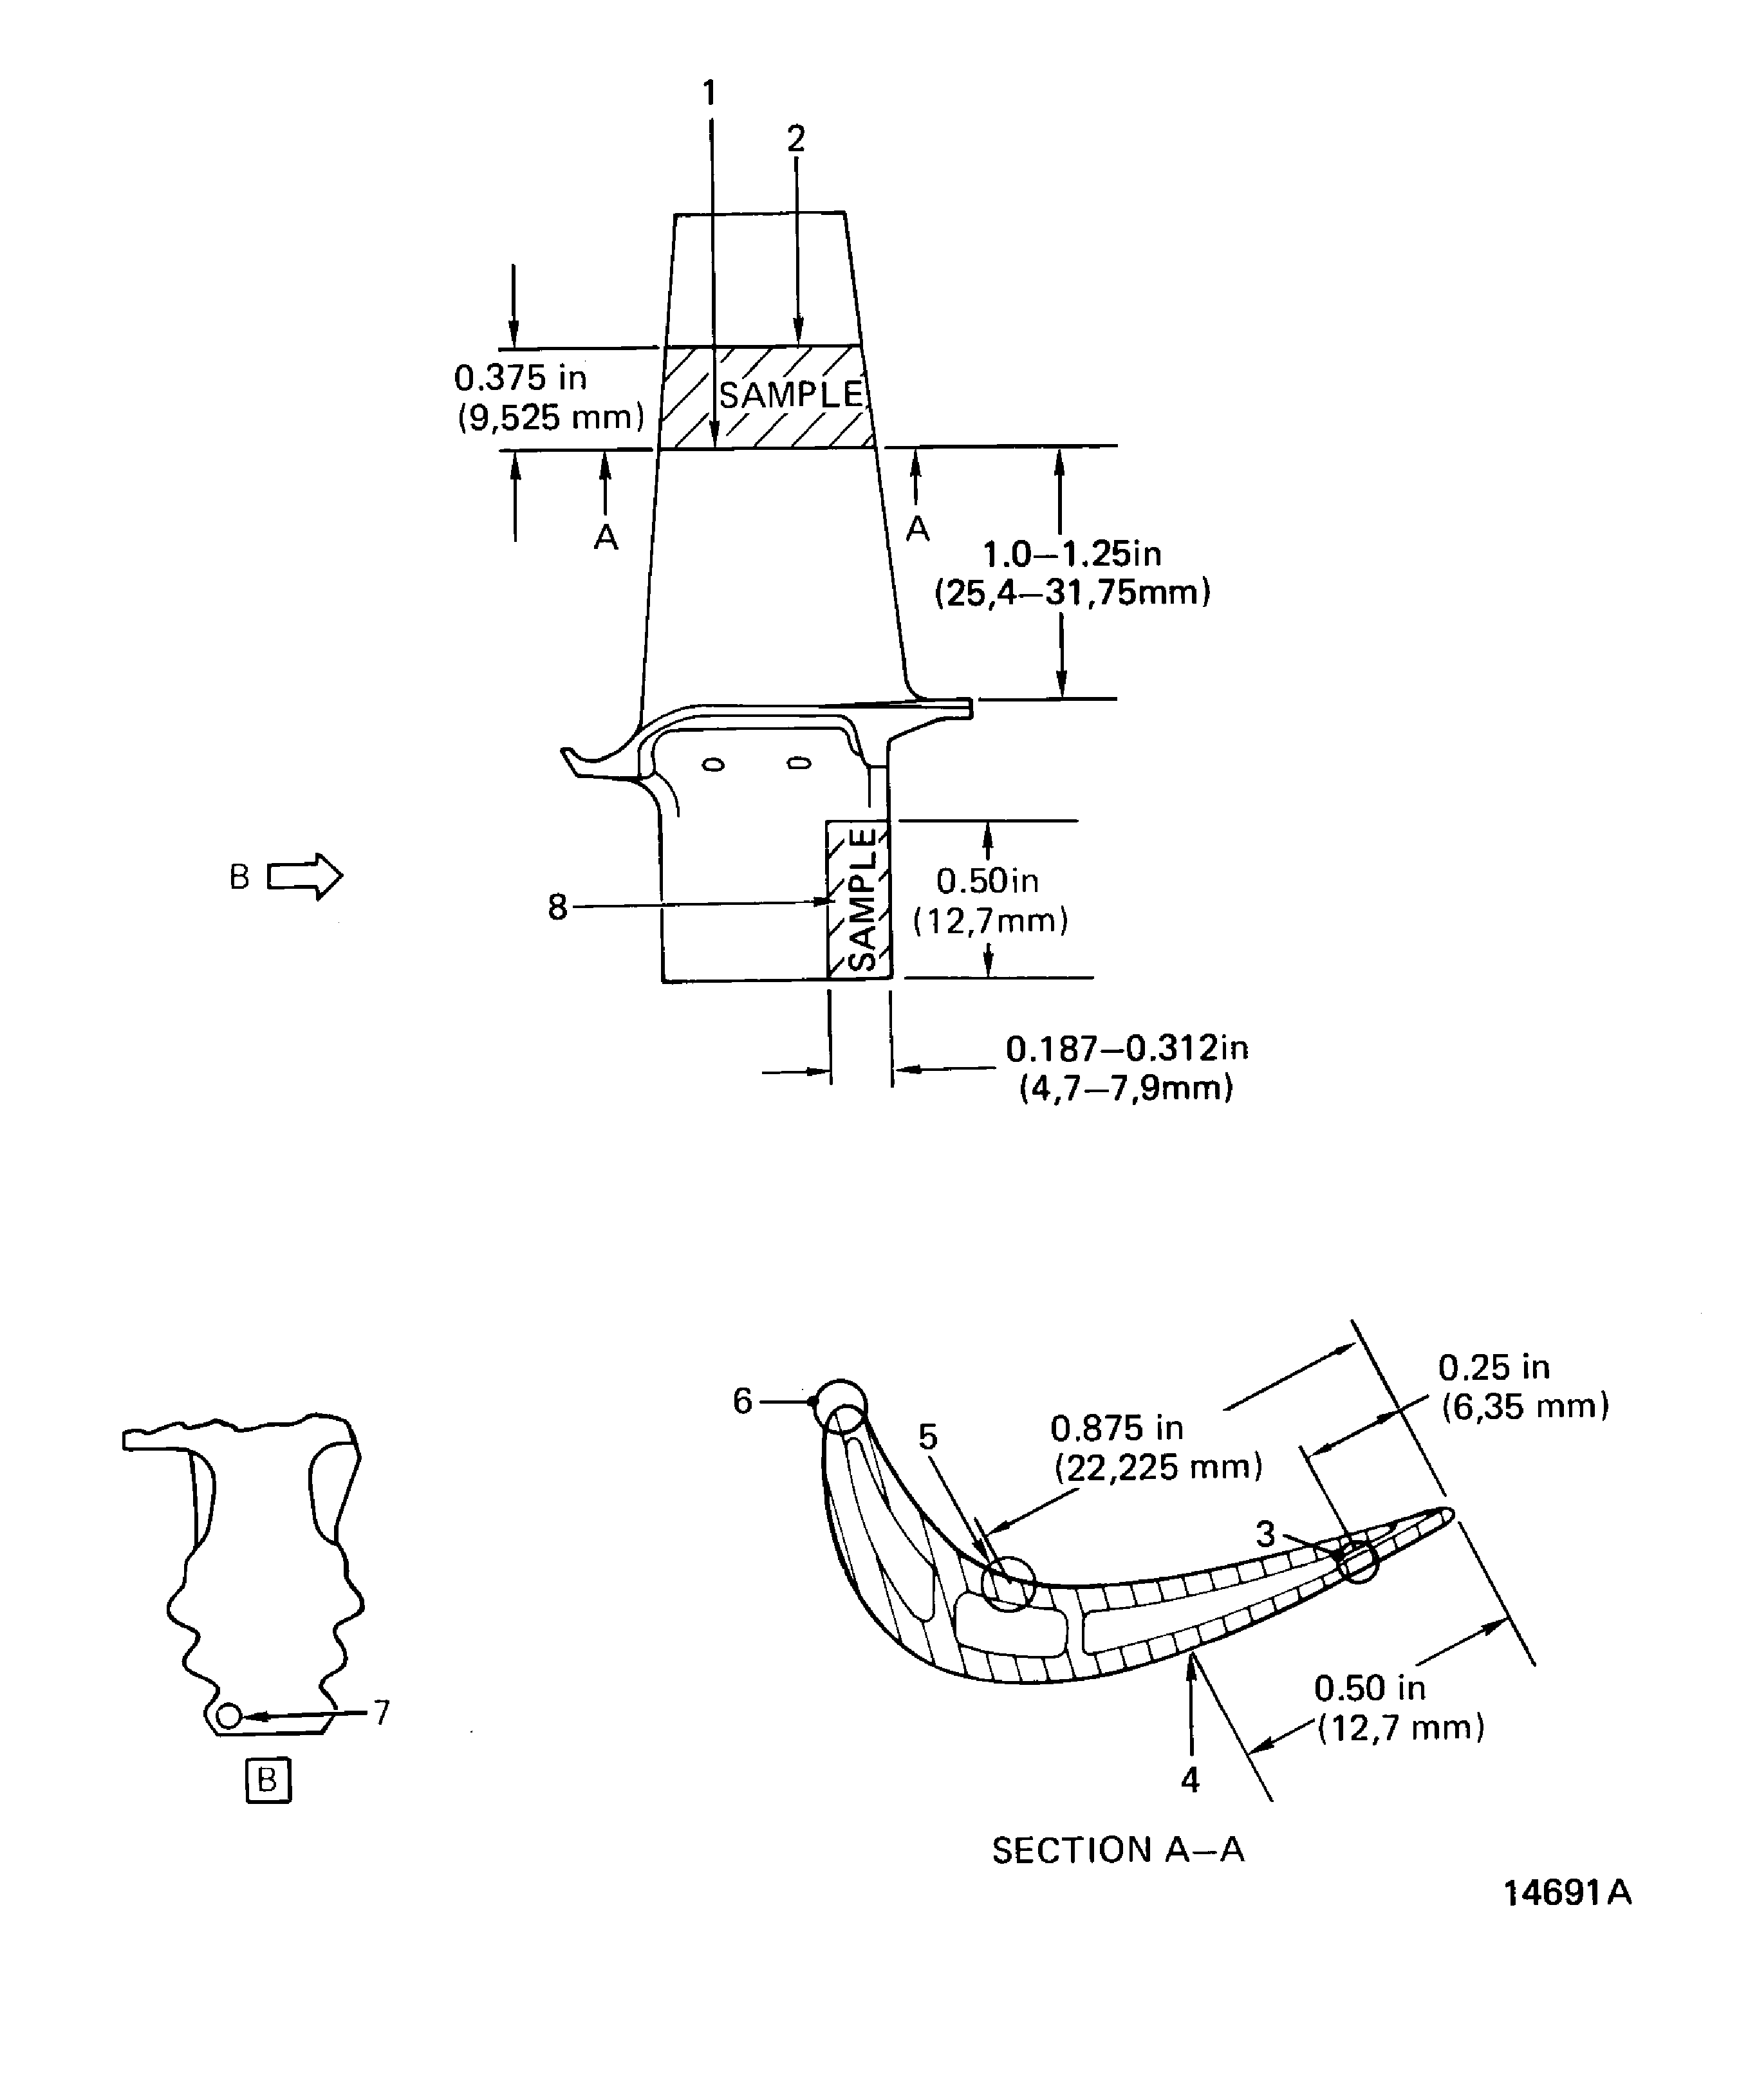
Figure: Excess Metal and Foreign Material Limits (After Cleaning)
Excess Metal and Foreign Material Limits (After Cleaning)
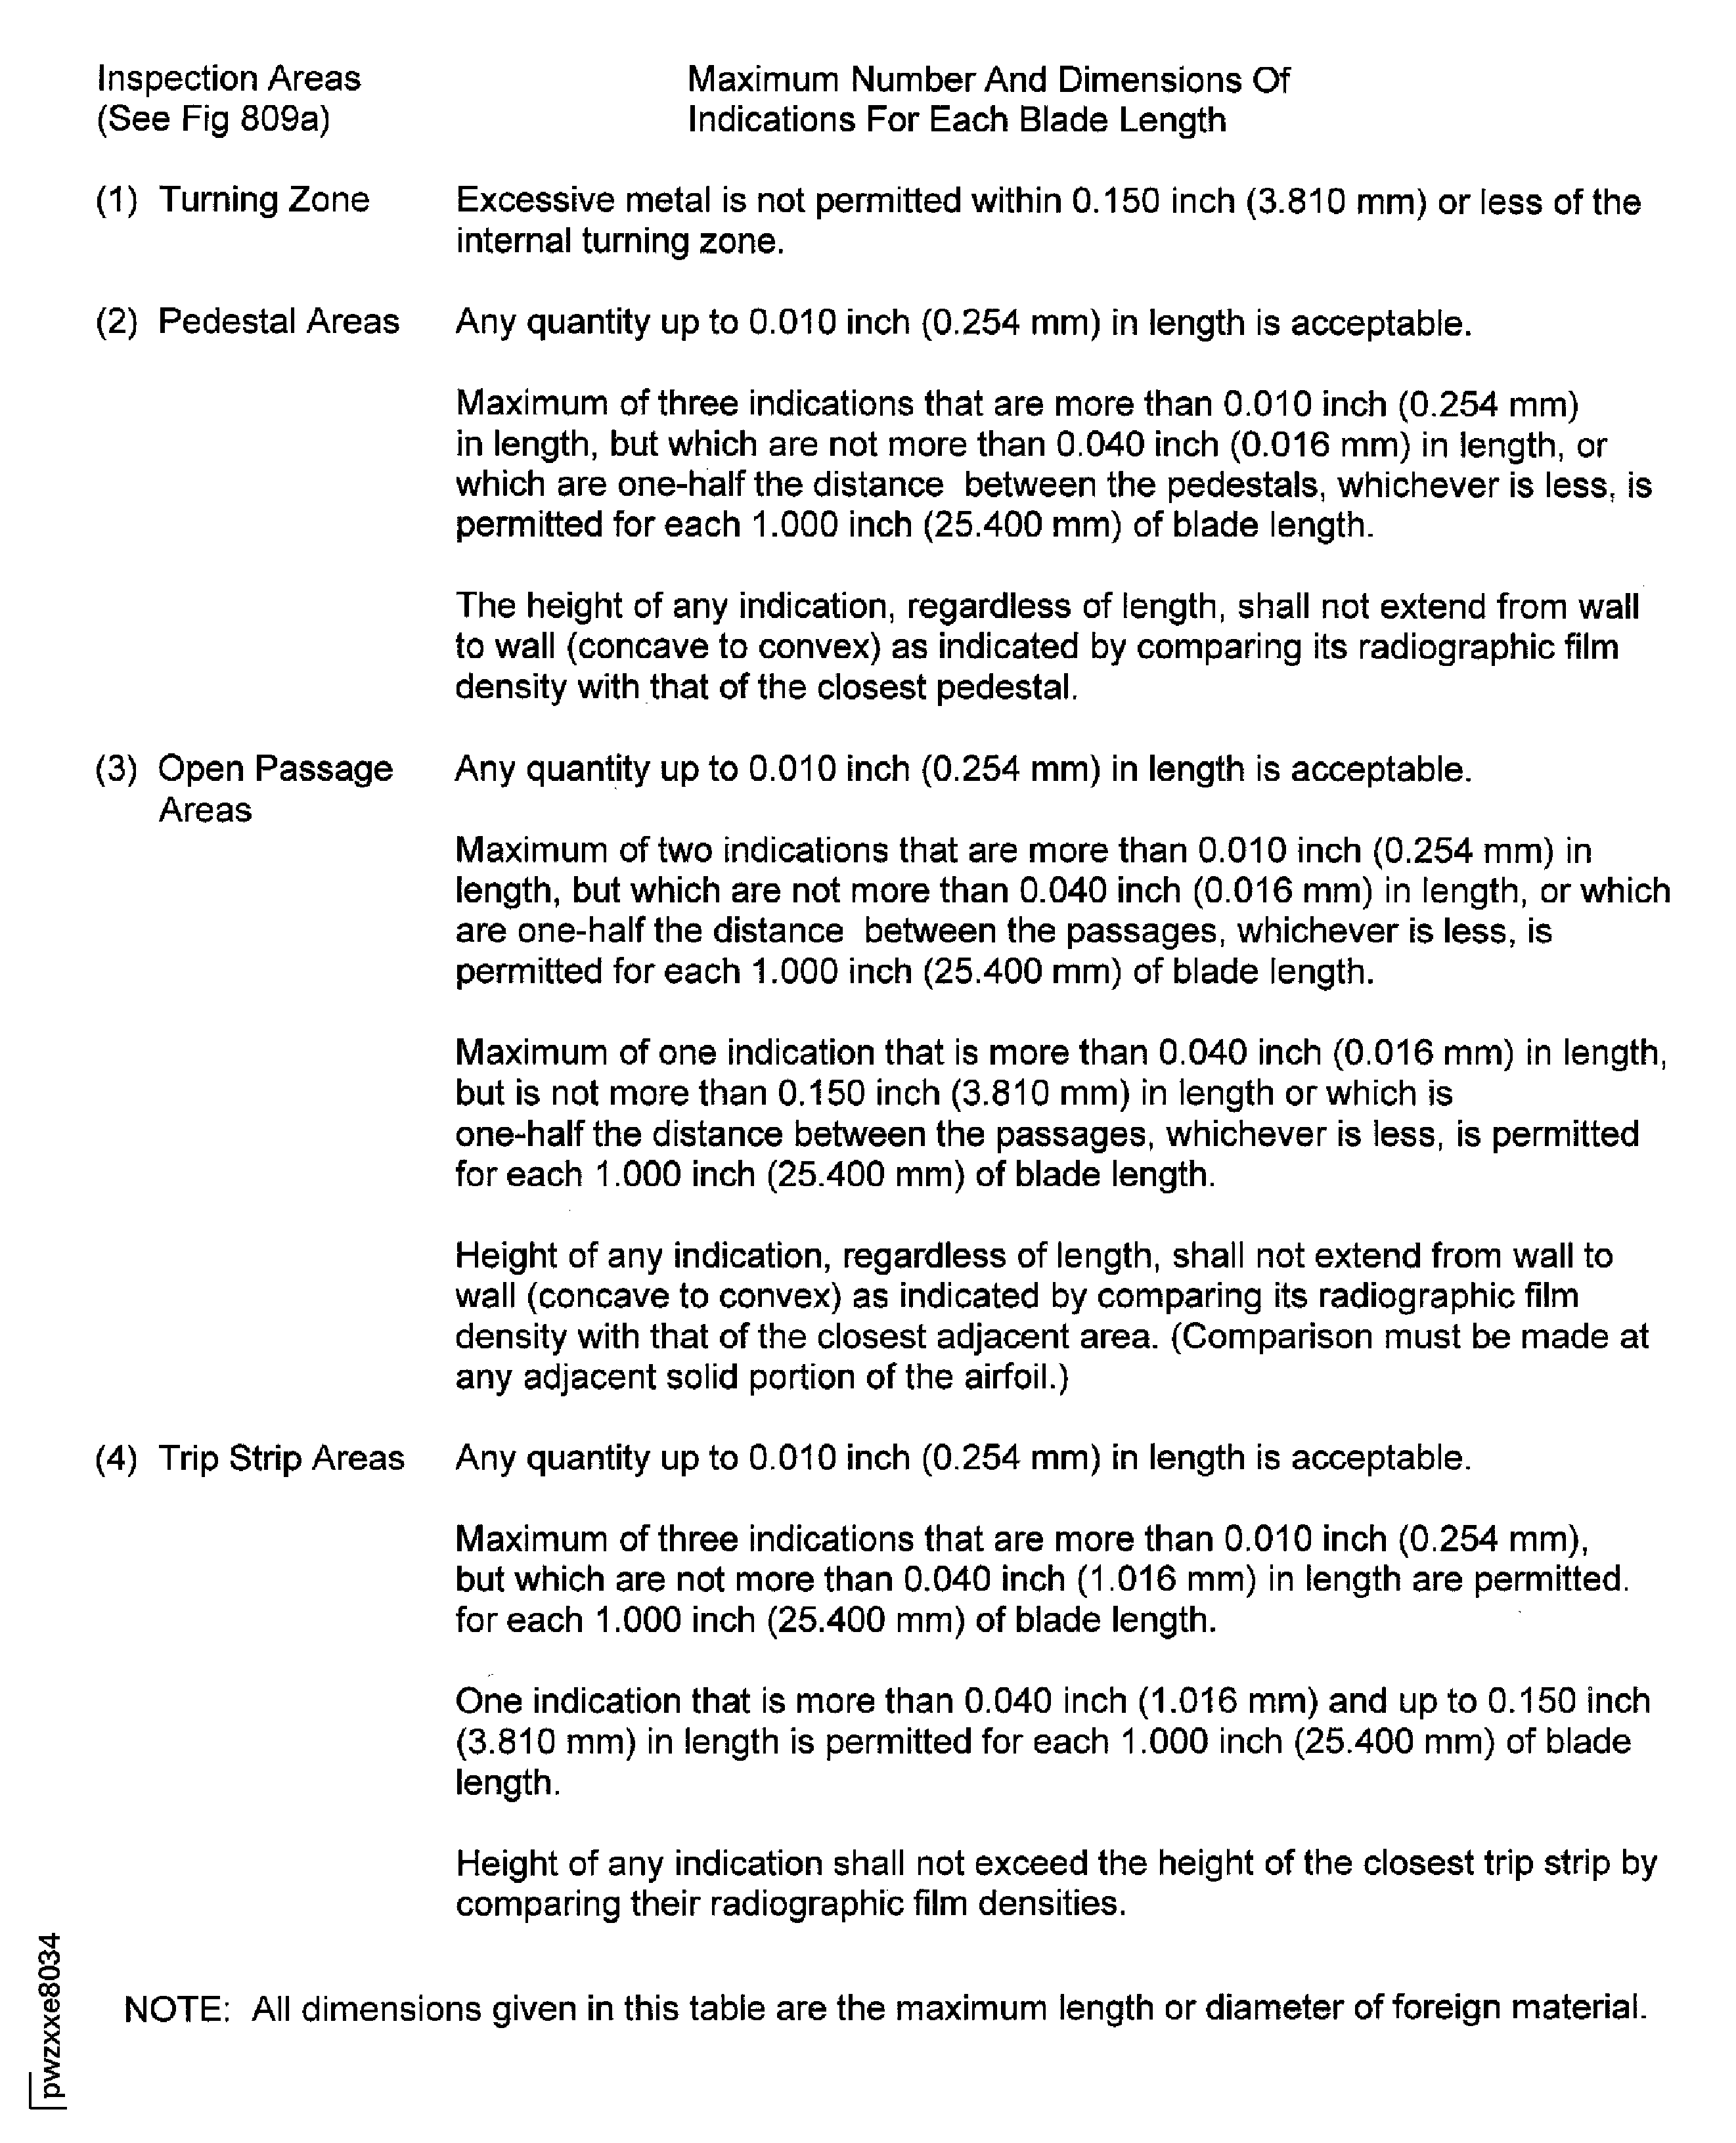
Figure: Stage 2 HPT Blade Assembly Radiographic Positions Inspection Locations
Stage 2 HPT Blade Assembly Radiographic Positions Inspection Locations
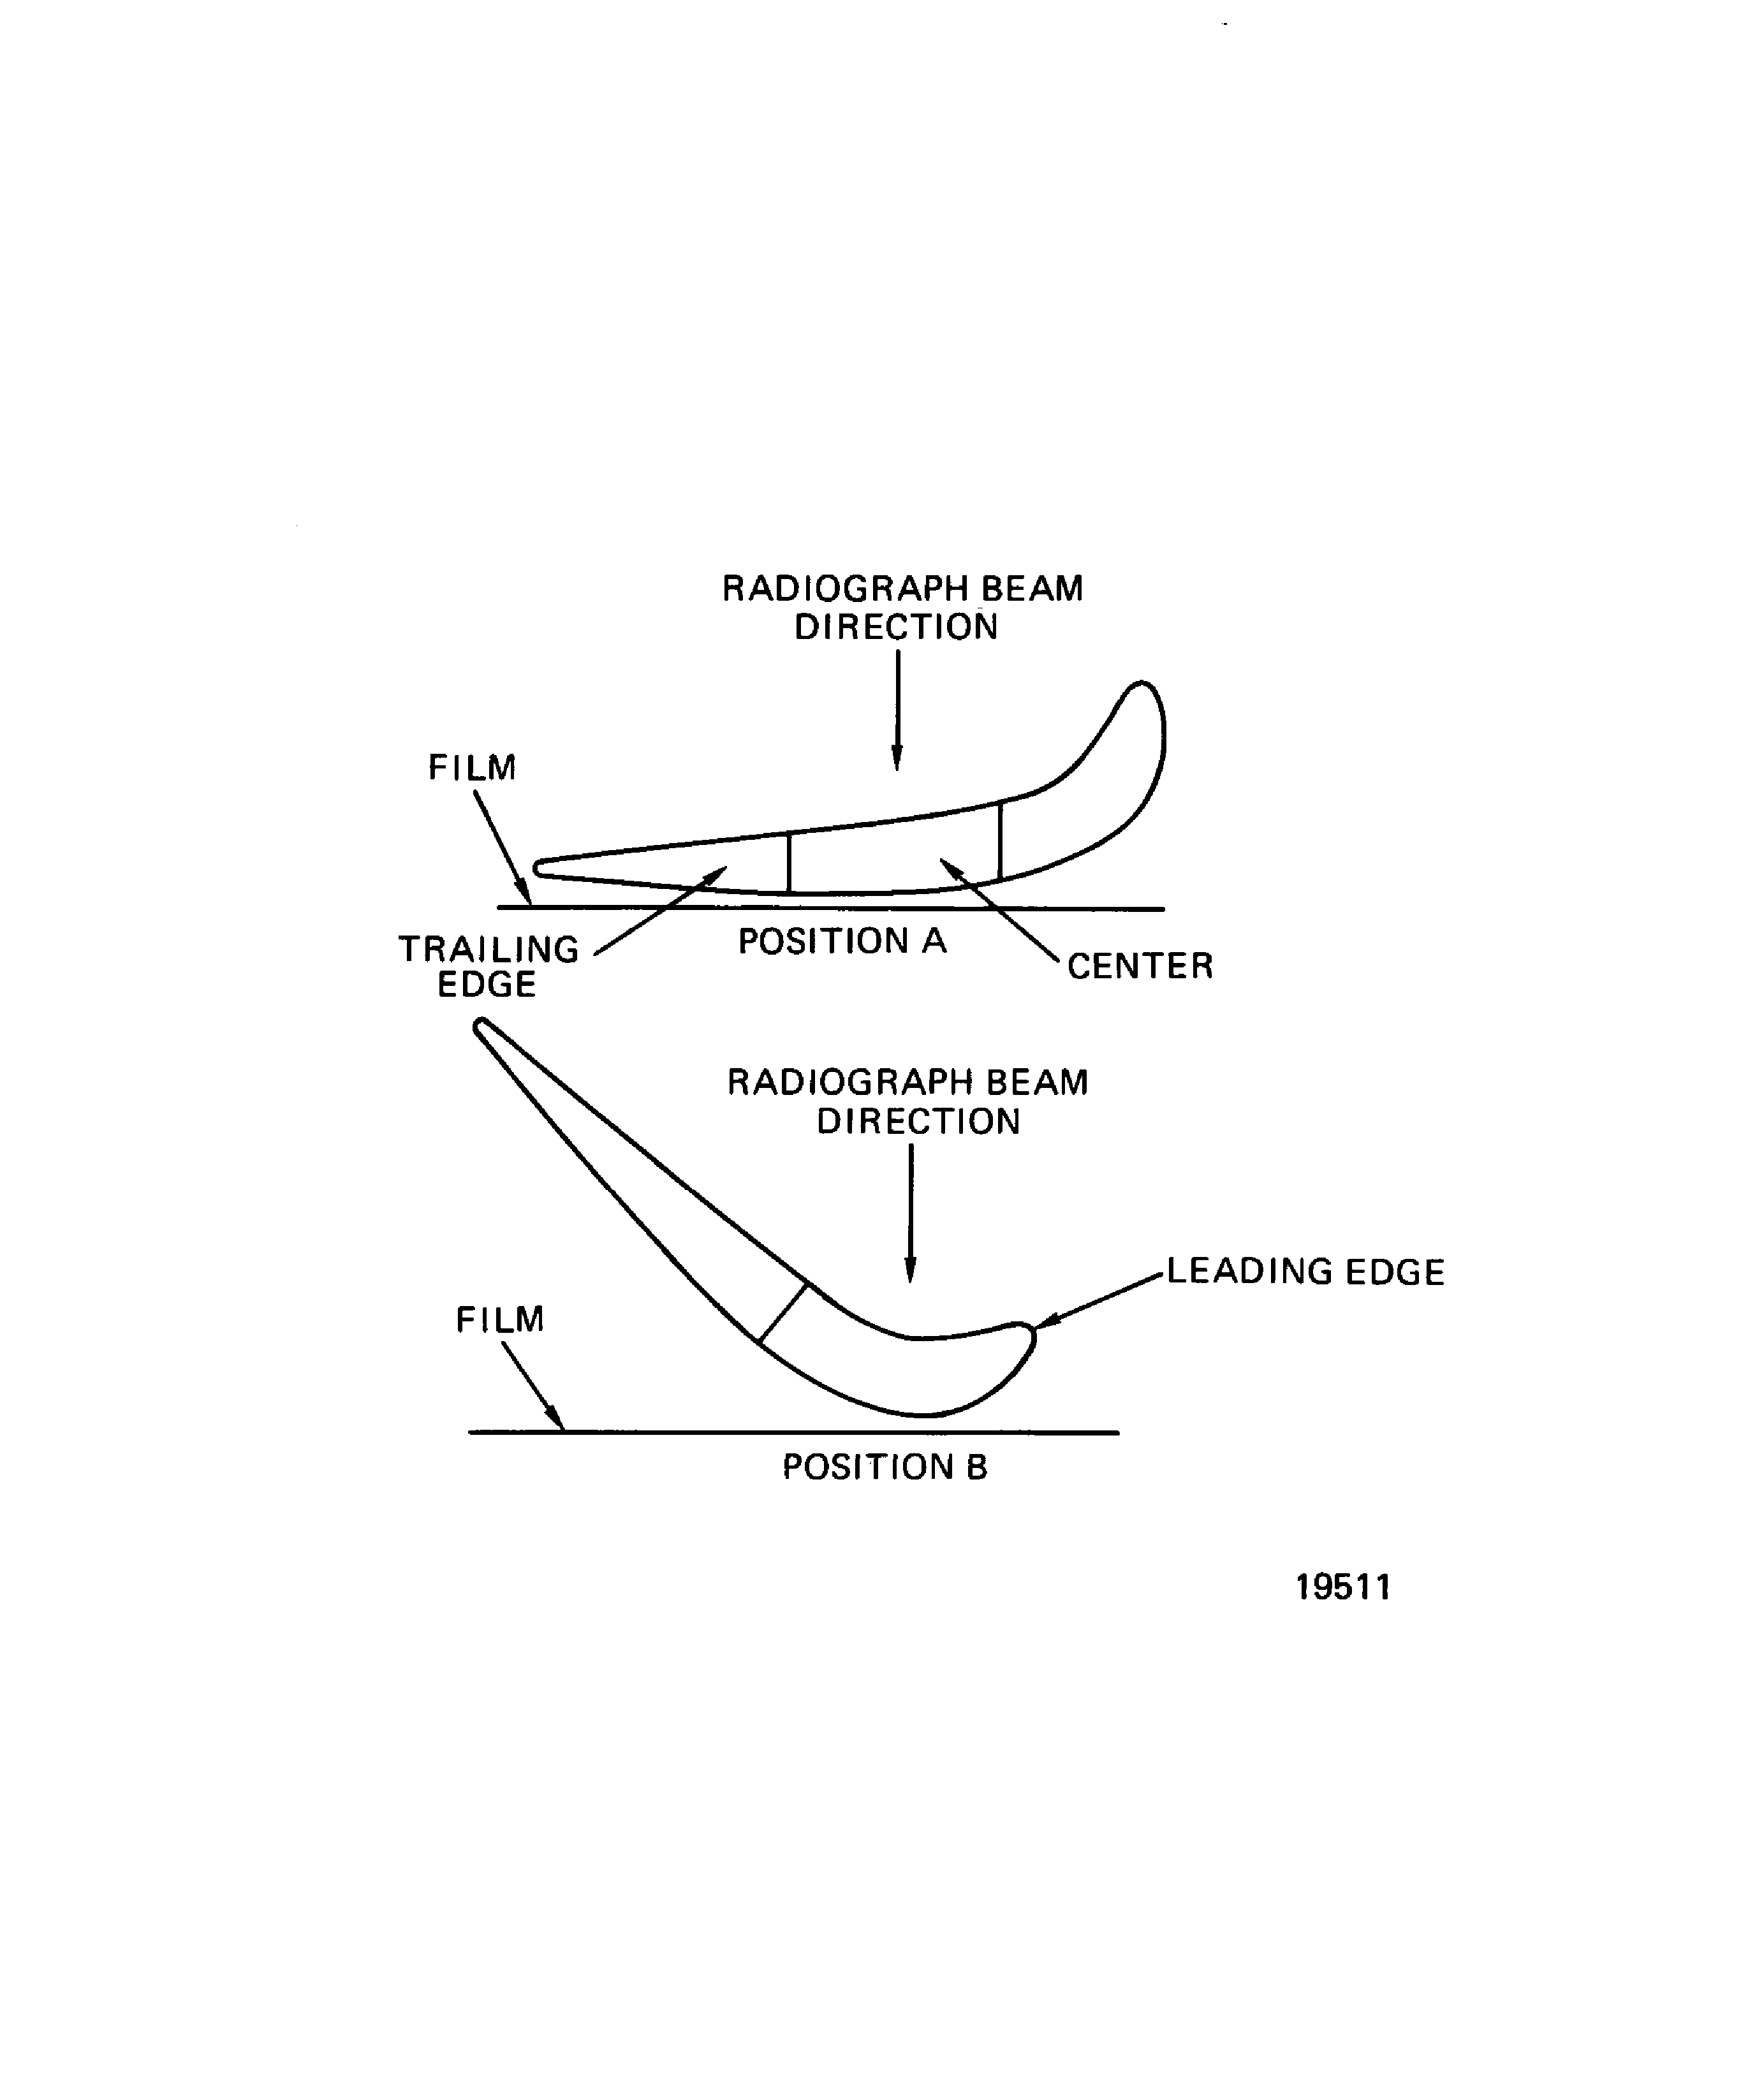
Figure: X-Ray Inspection Internal Cavity (After Cleaning)
X-Ray Inspection Internal Cavity (After Cleaning)
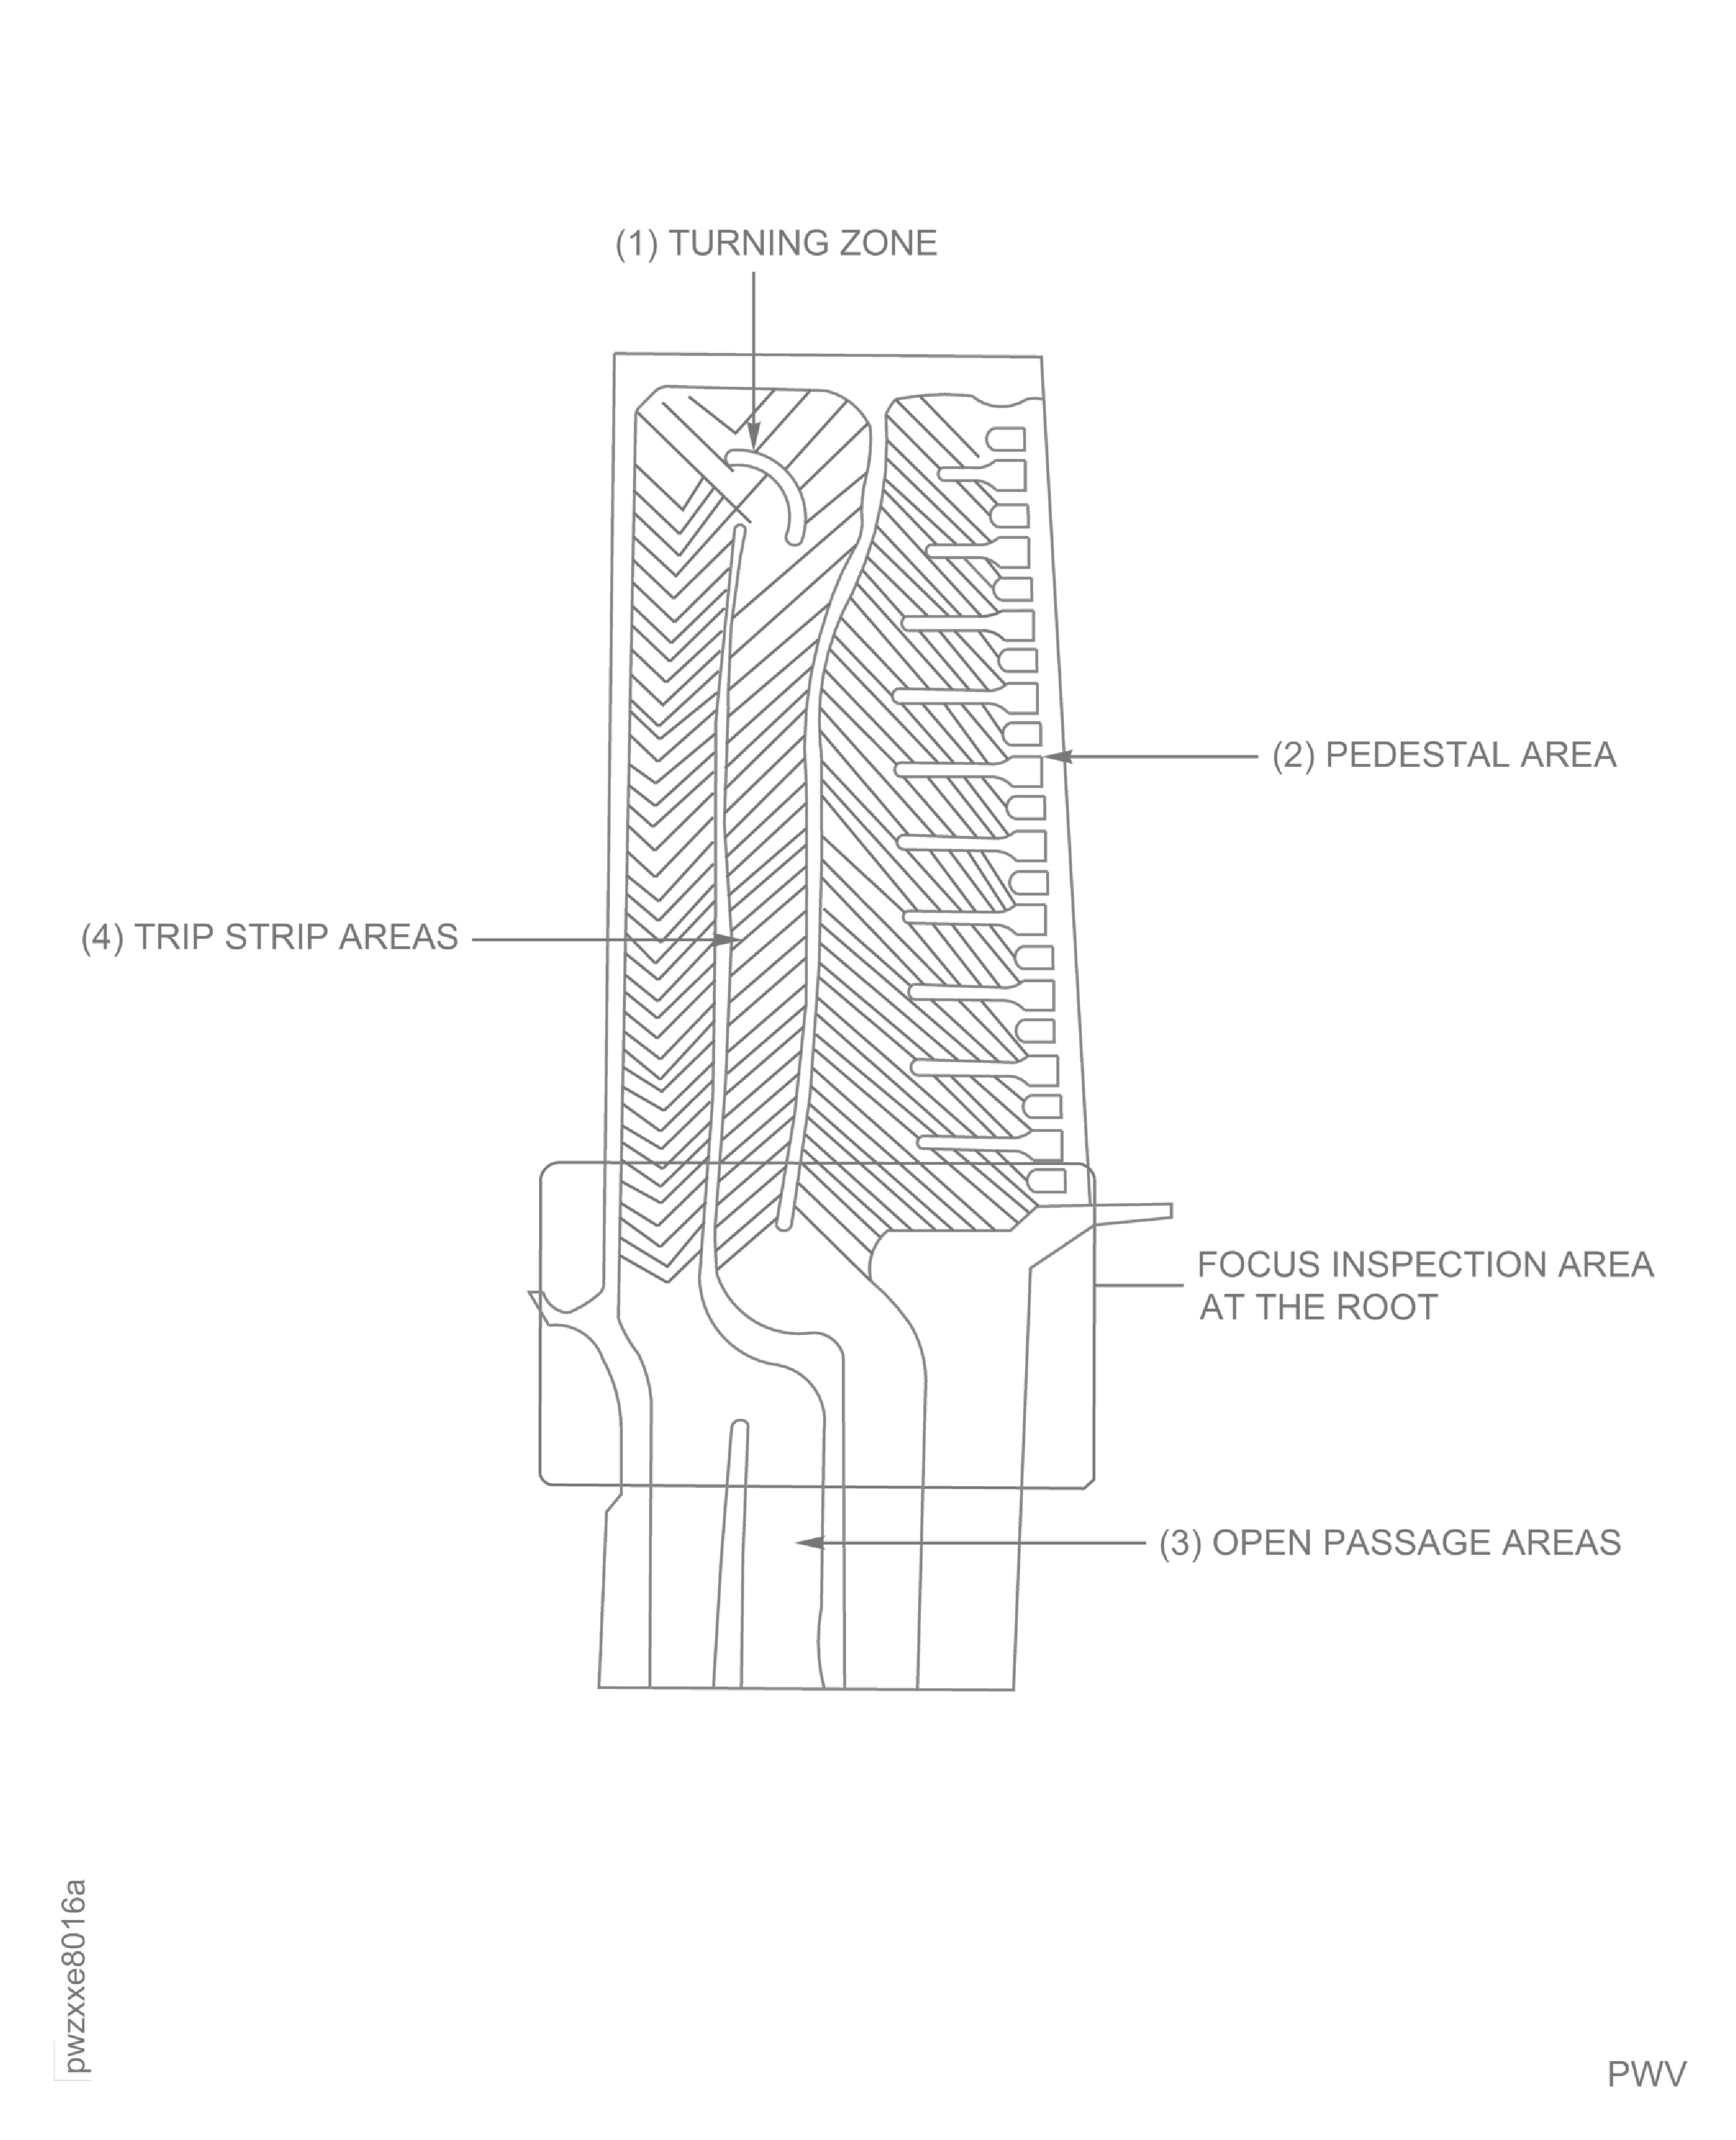
Figure: Stage 2 HPT Blade Assembly Growth Tools
Stage 2 HPT Blade Assembly Growth Tools
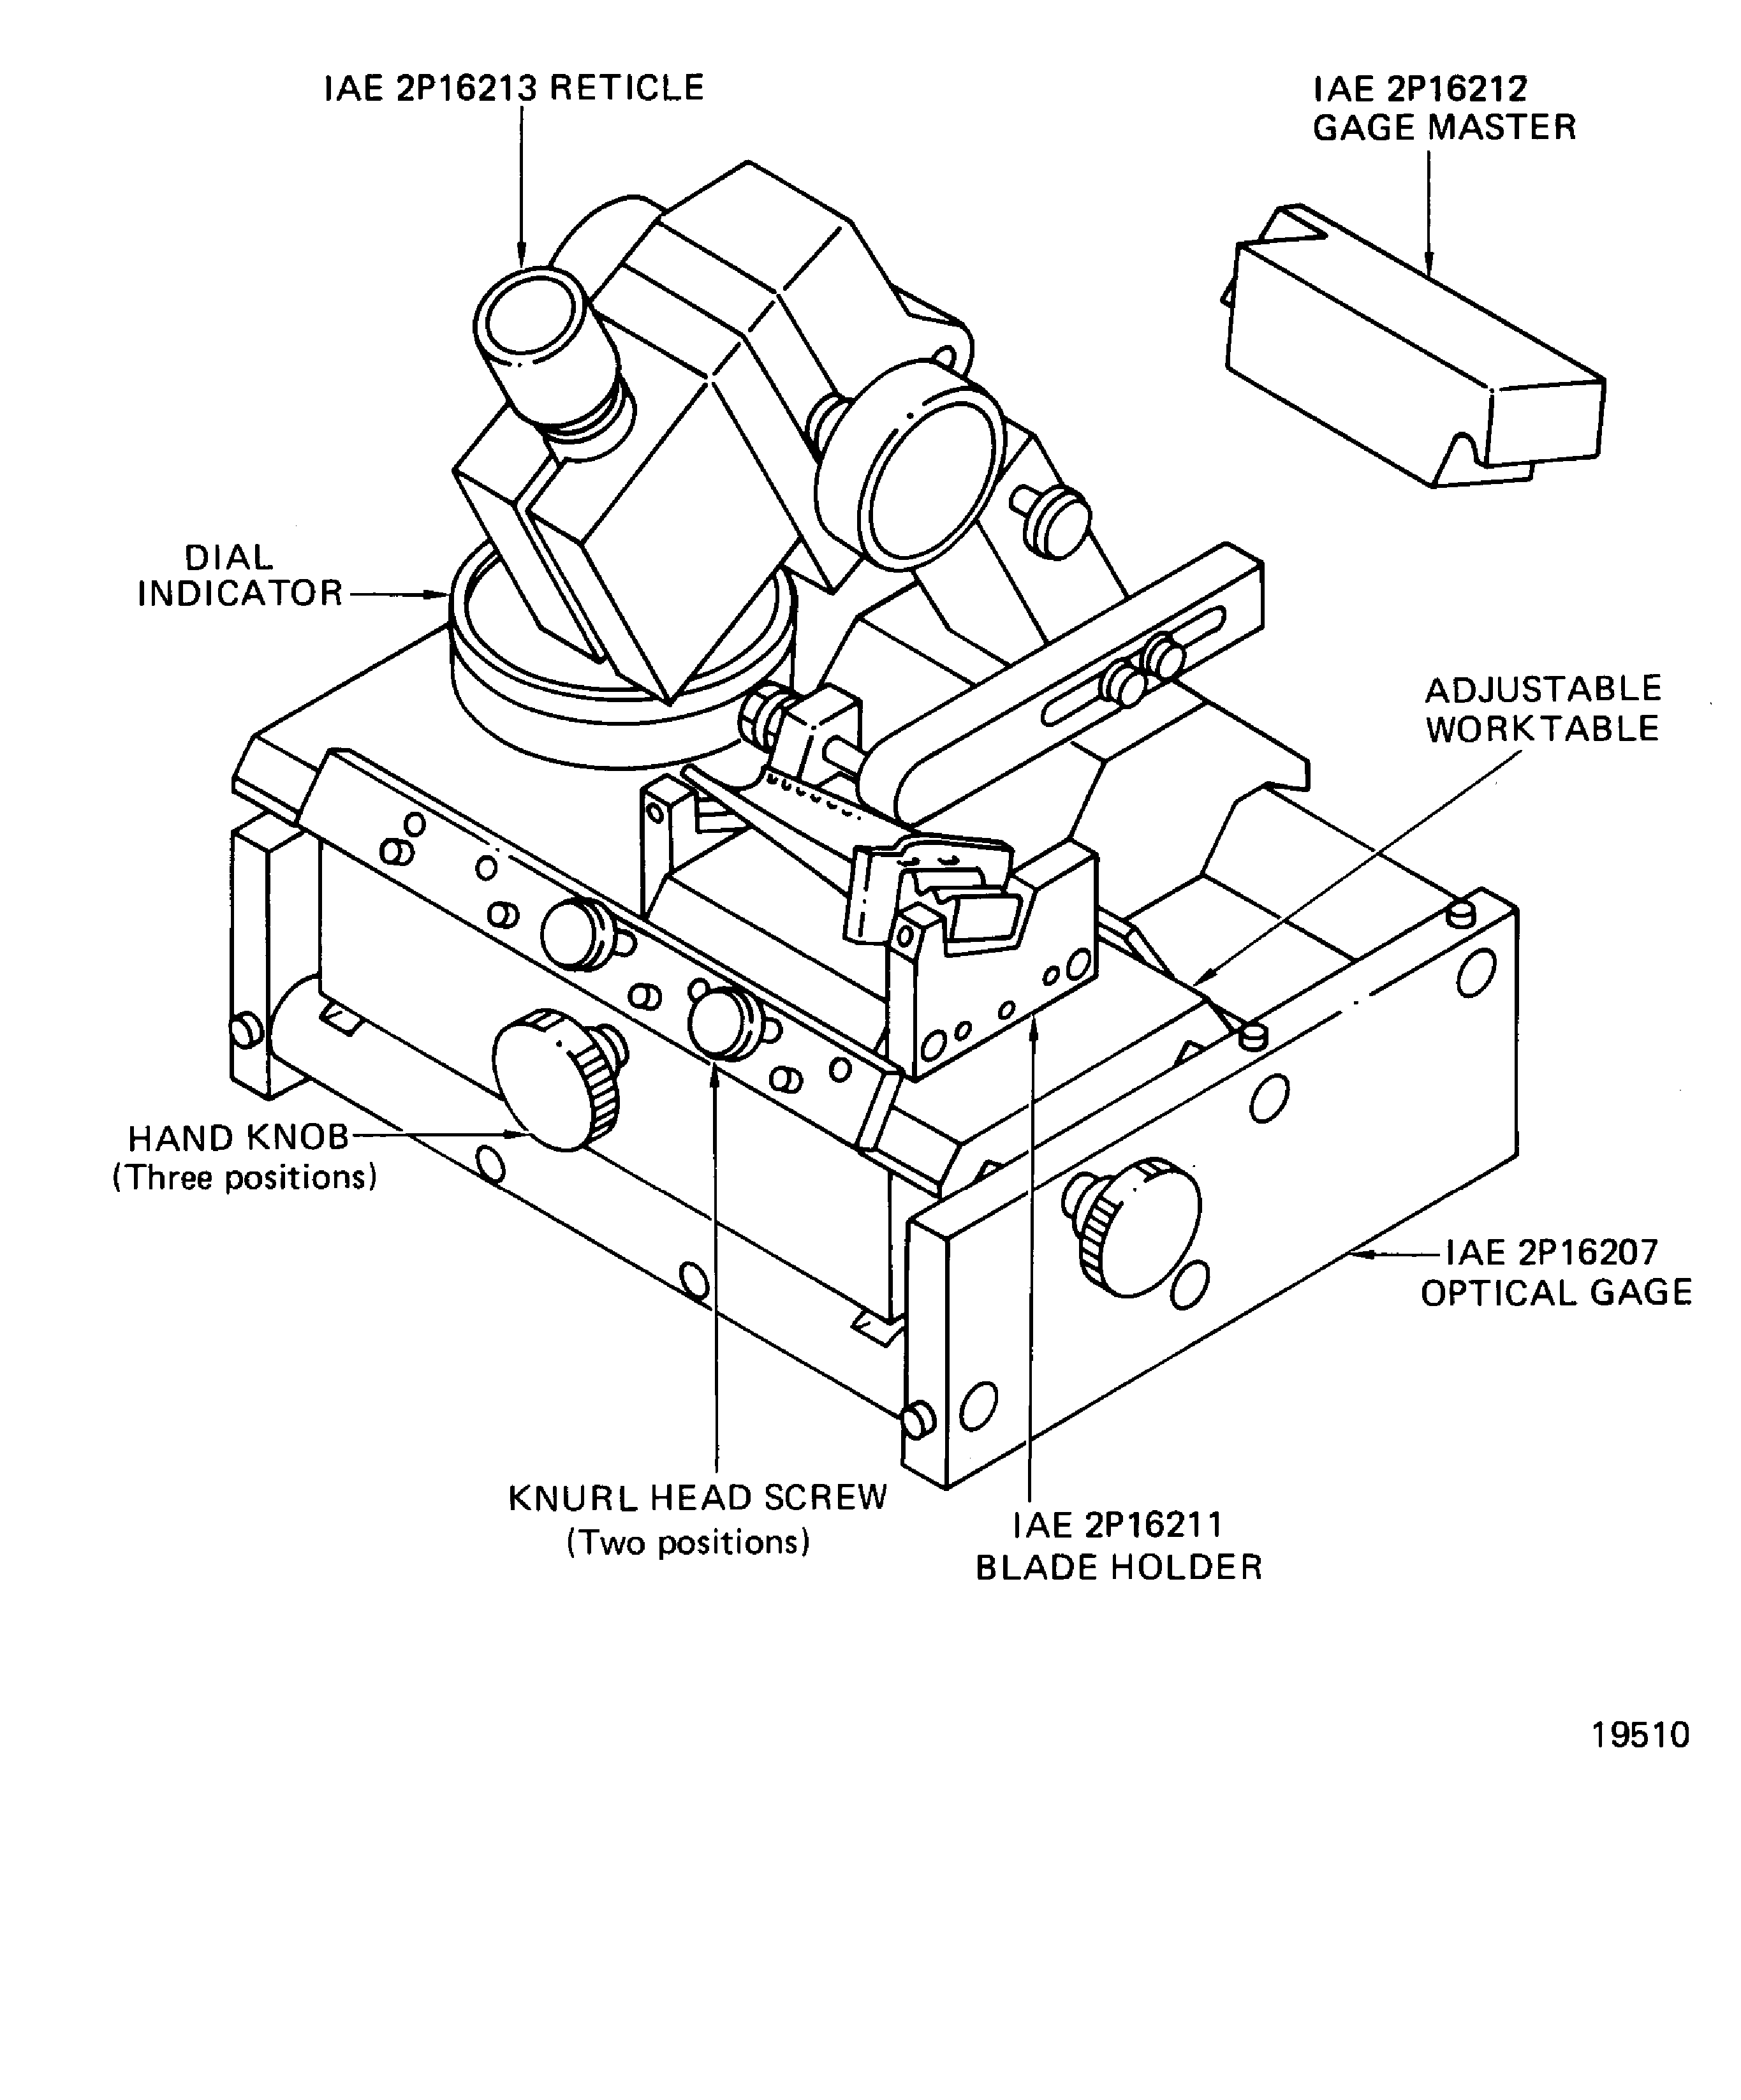
Figure: Stage 2 HPT Blade Assembly Growth Measurement Inspection Locations
Stage 2 HPT Blade Assembly Growth Measurement Inspection Locations
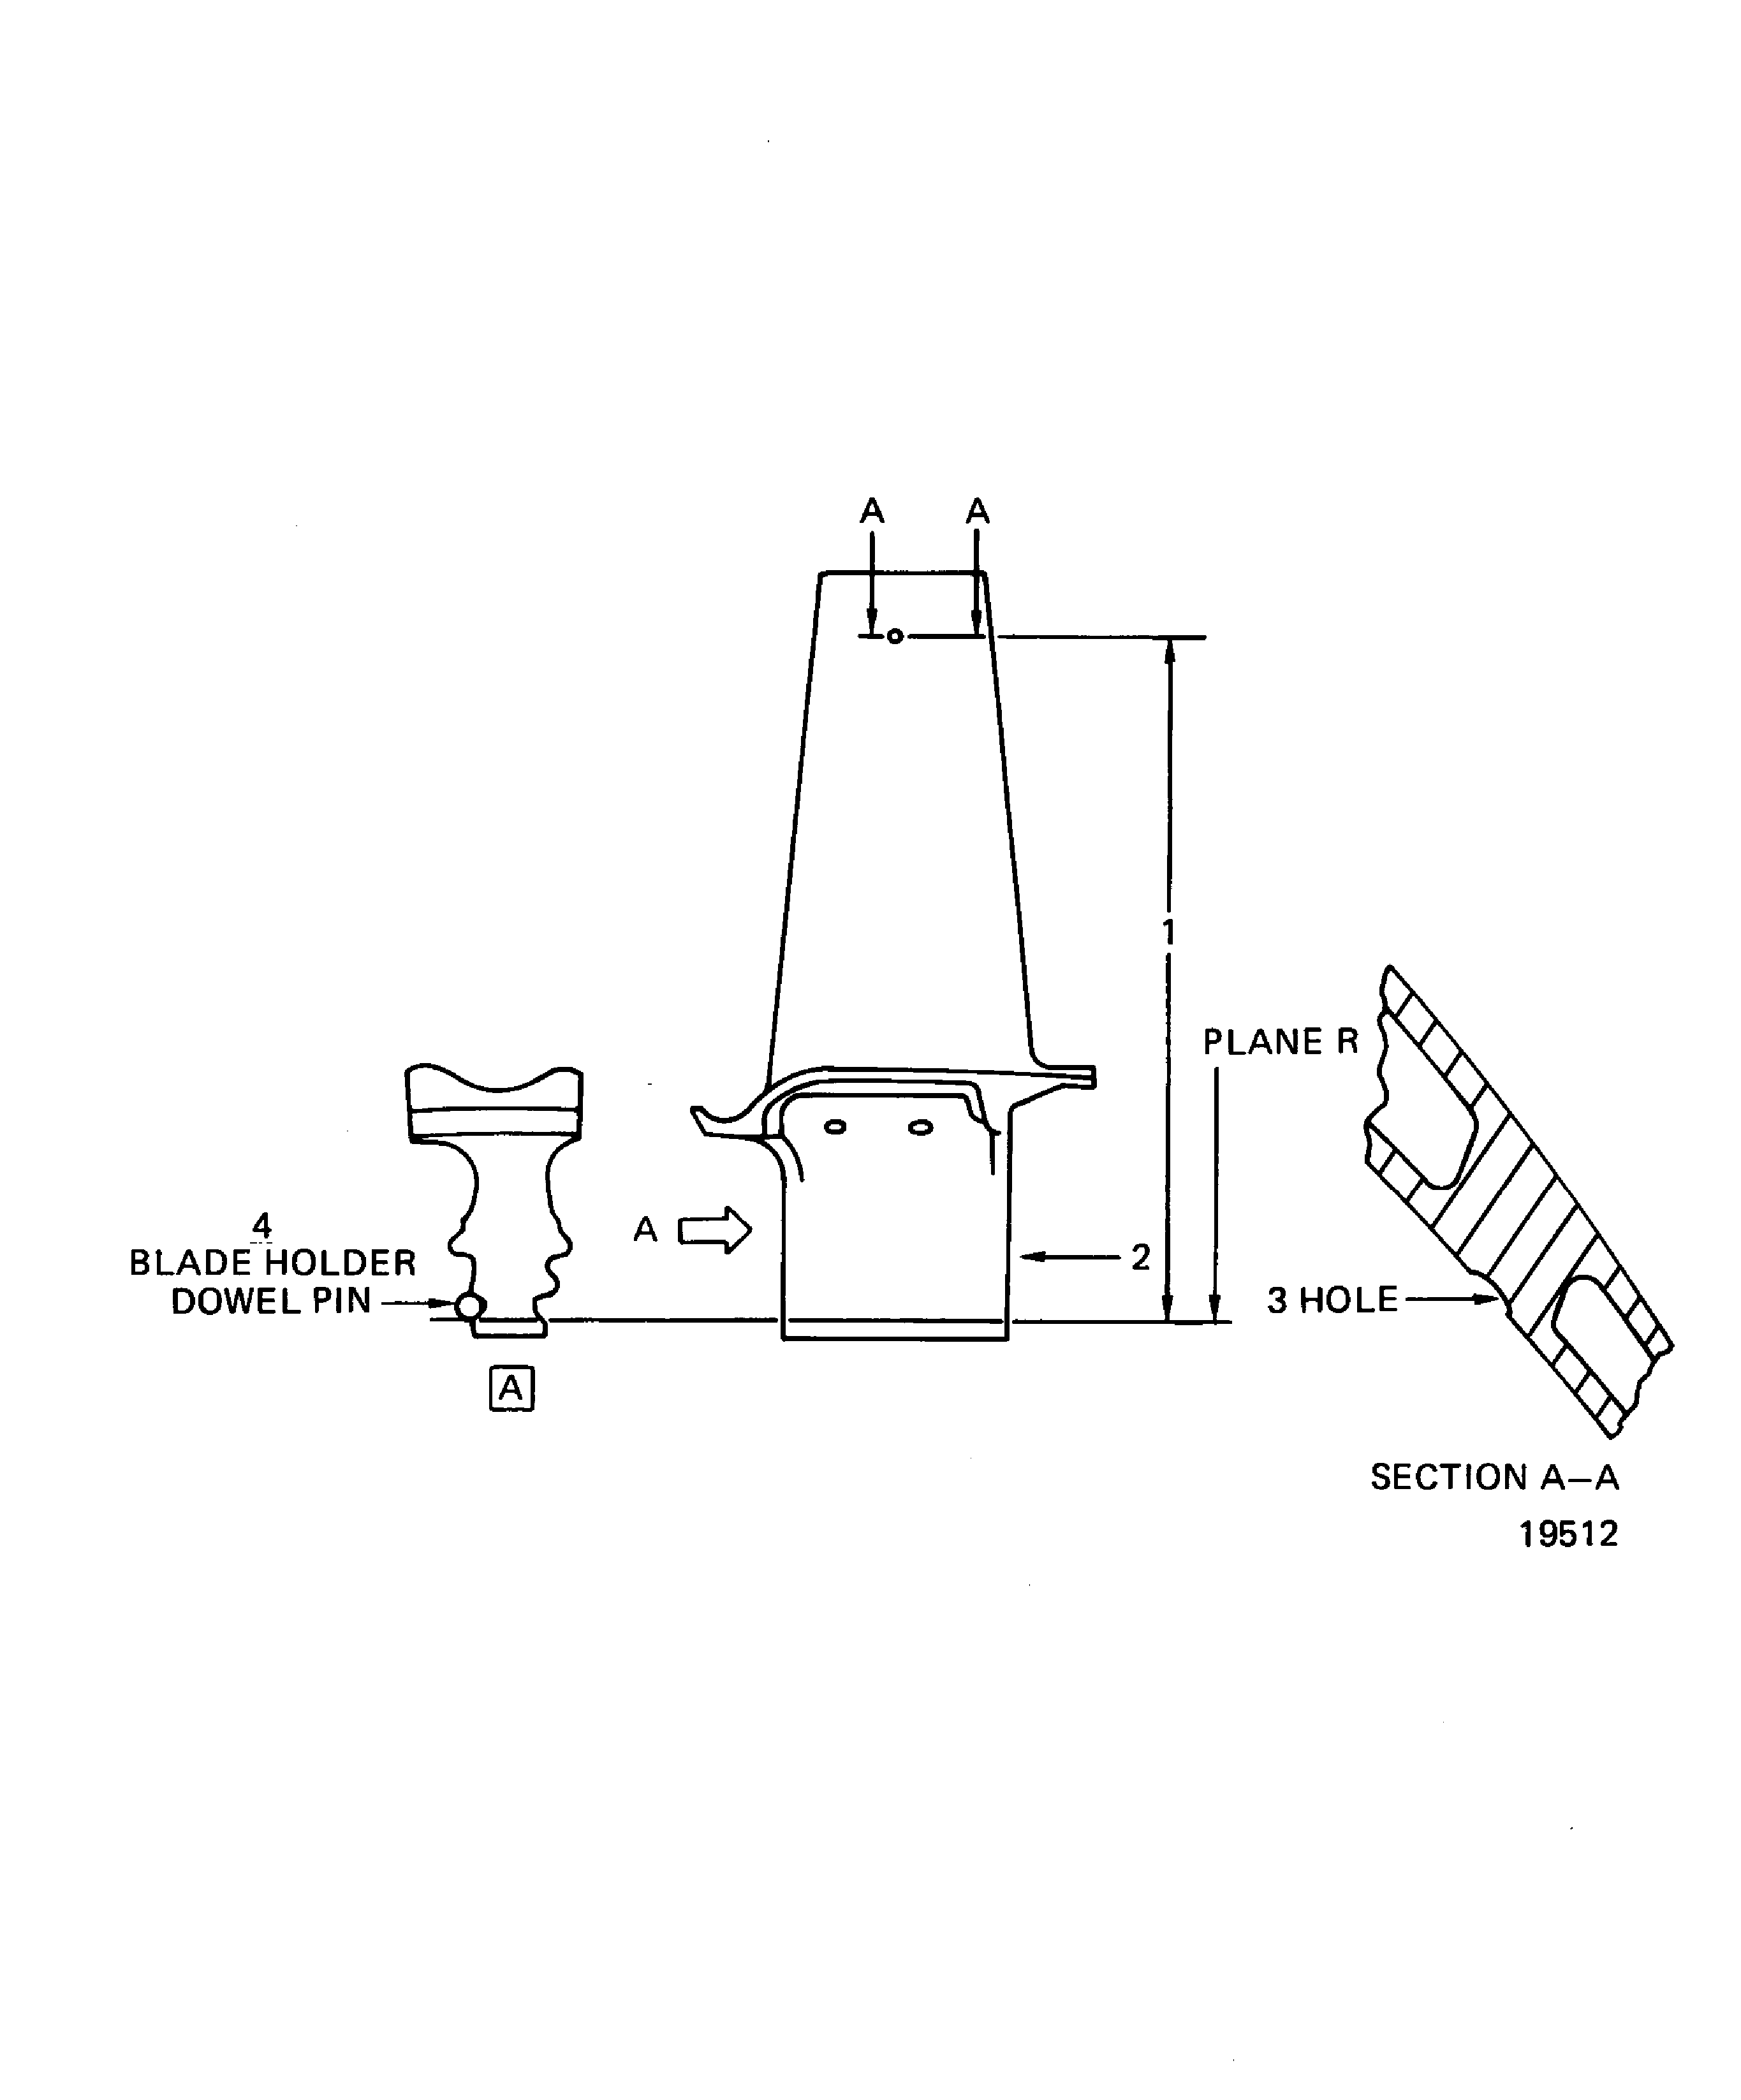
Figure: Stage 2 HPT Blade Assembly Shot Peen Locations
Stage 2 HPT Blade Assembly Shot Peen Locations
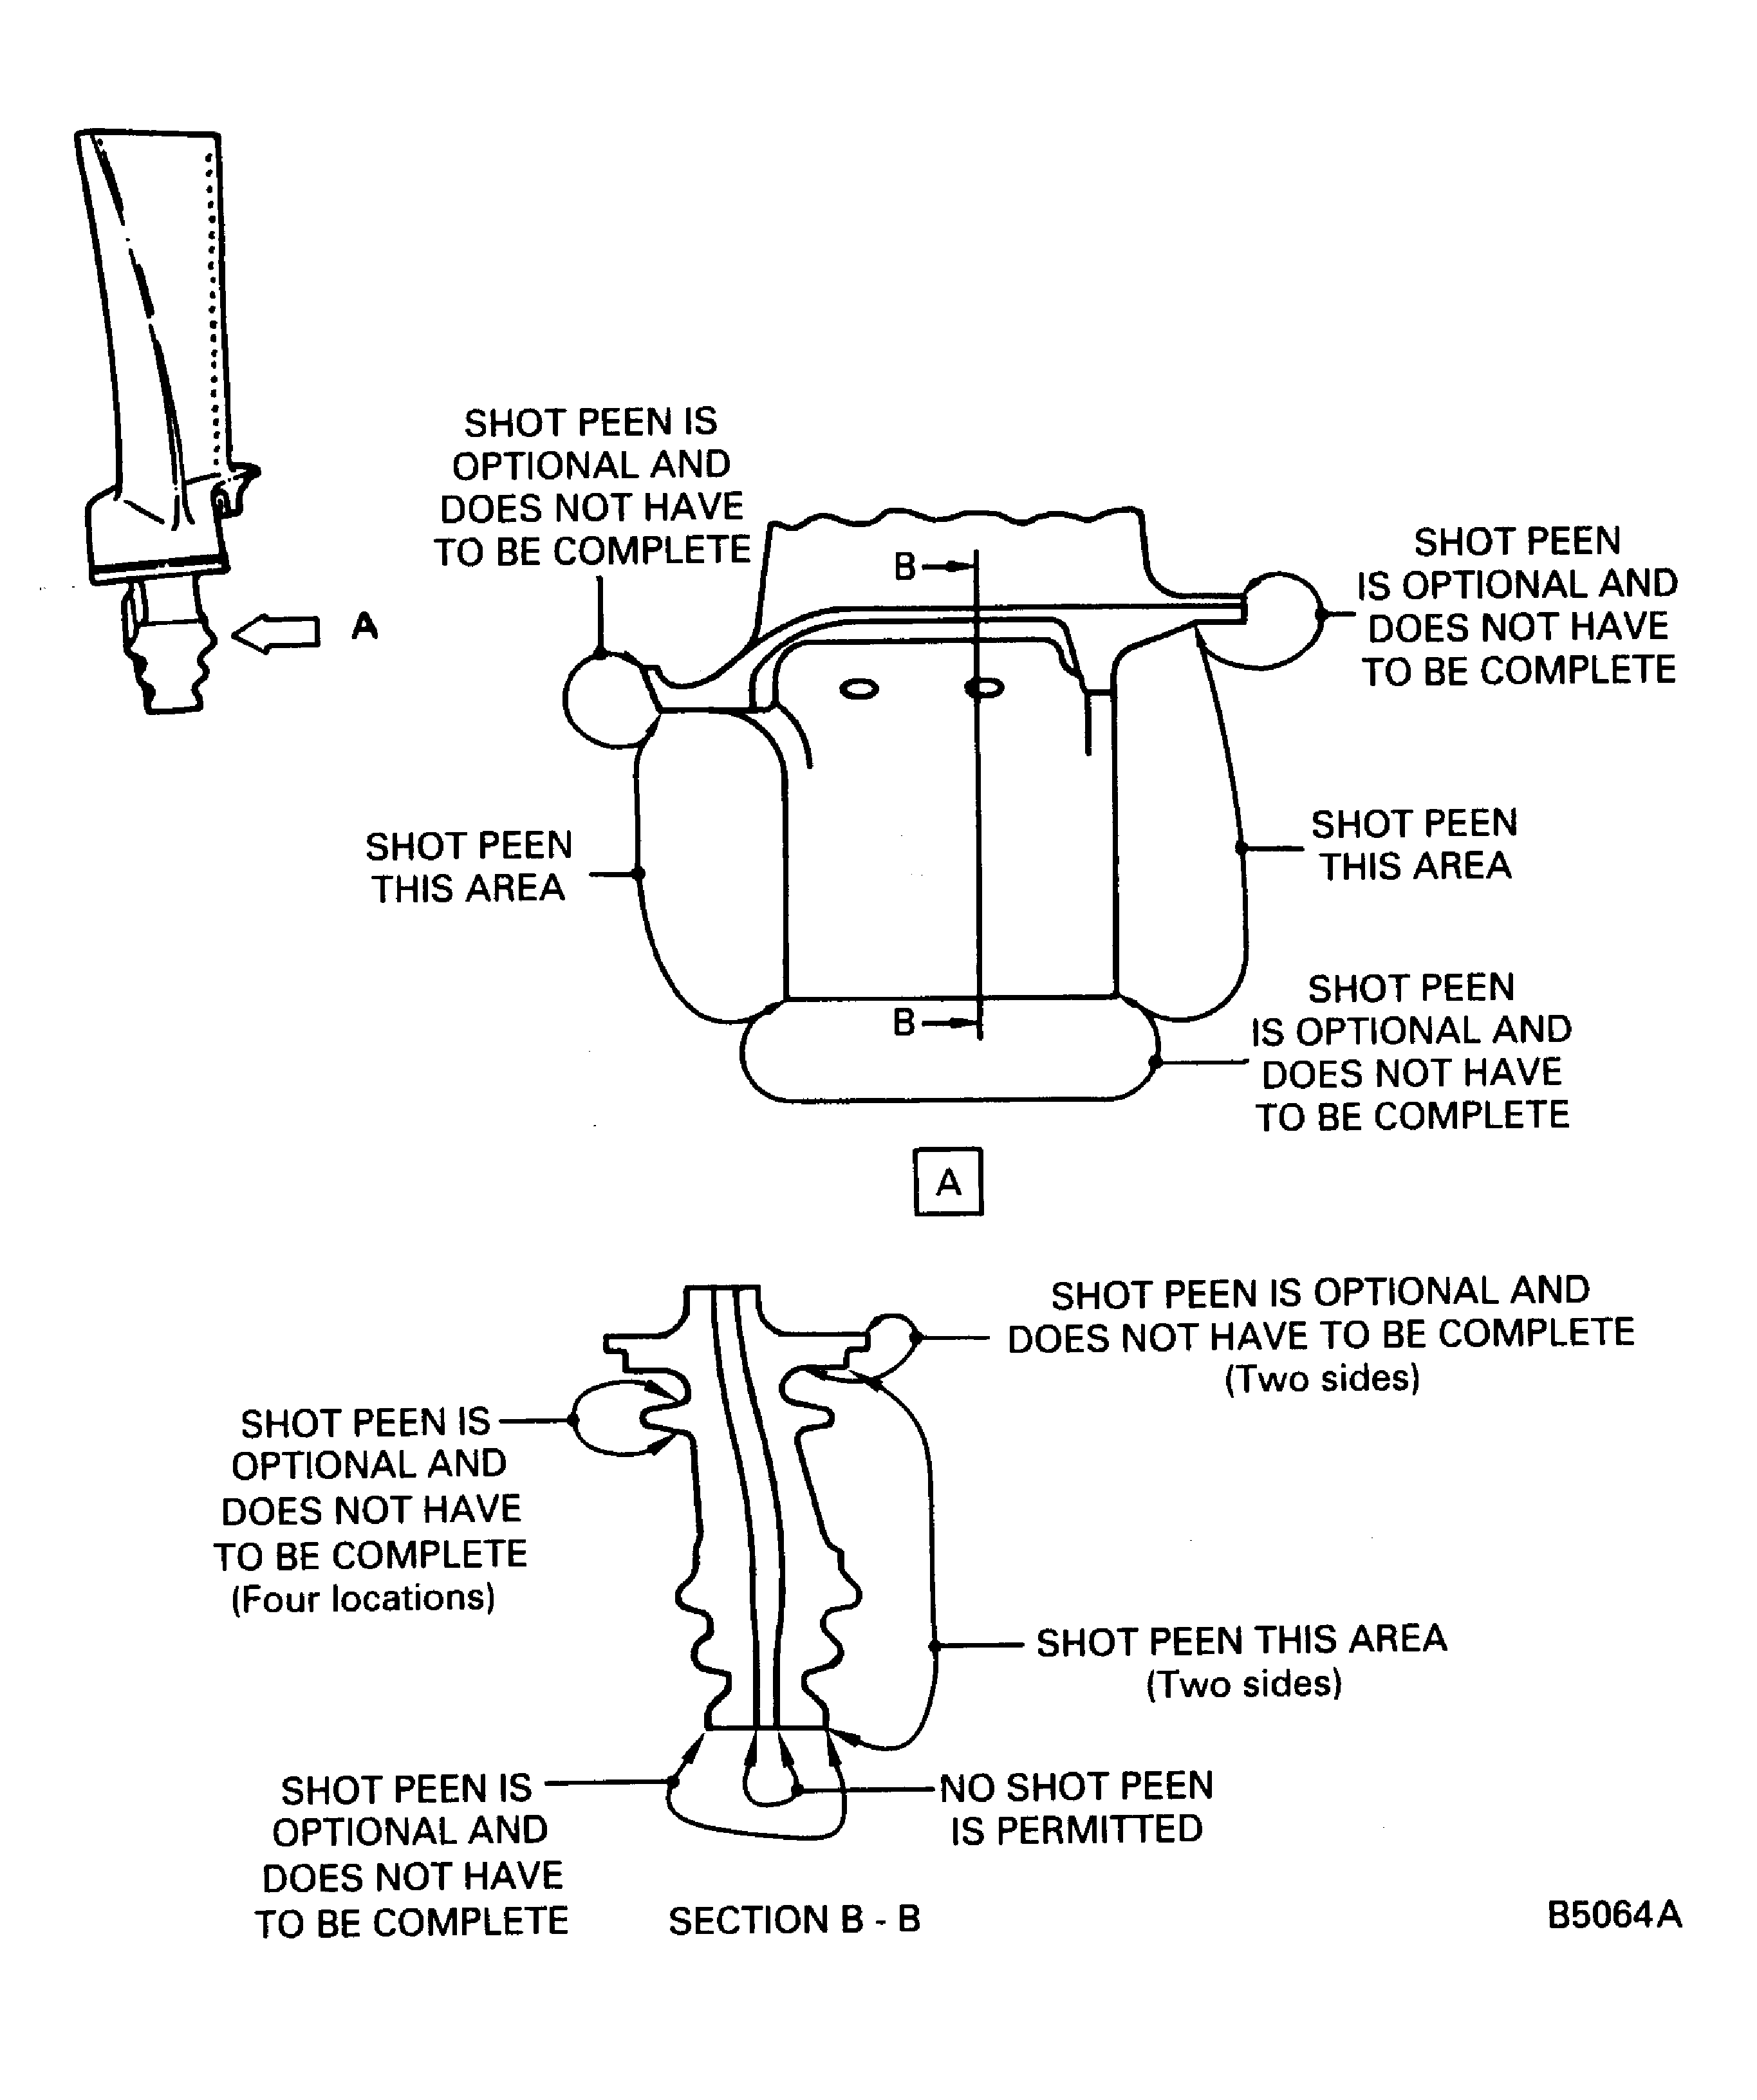
Figure: Stage 2 HPT Blade Assembly Blade Length Locations
Stage 2 HPT Blade Assembly Blade Length Locations
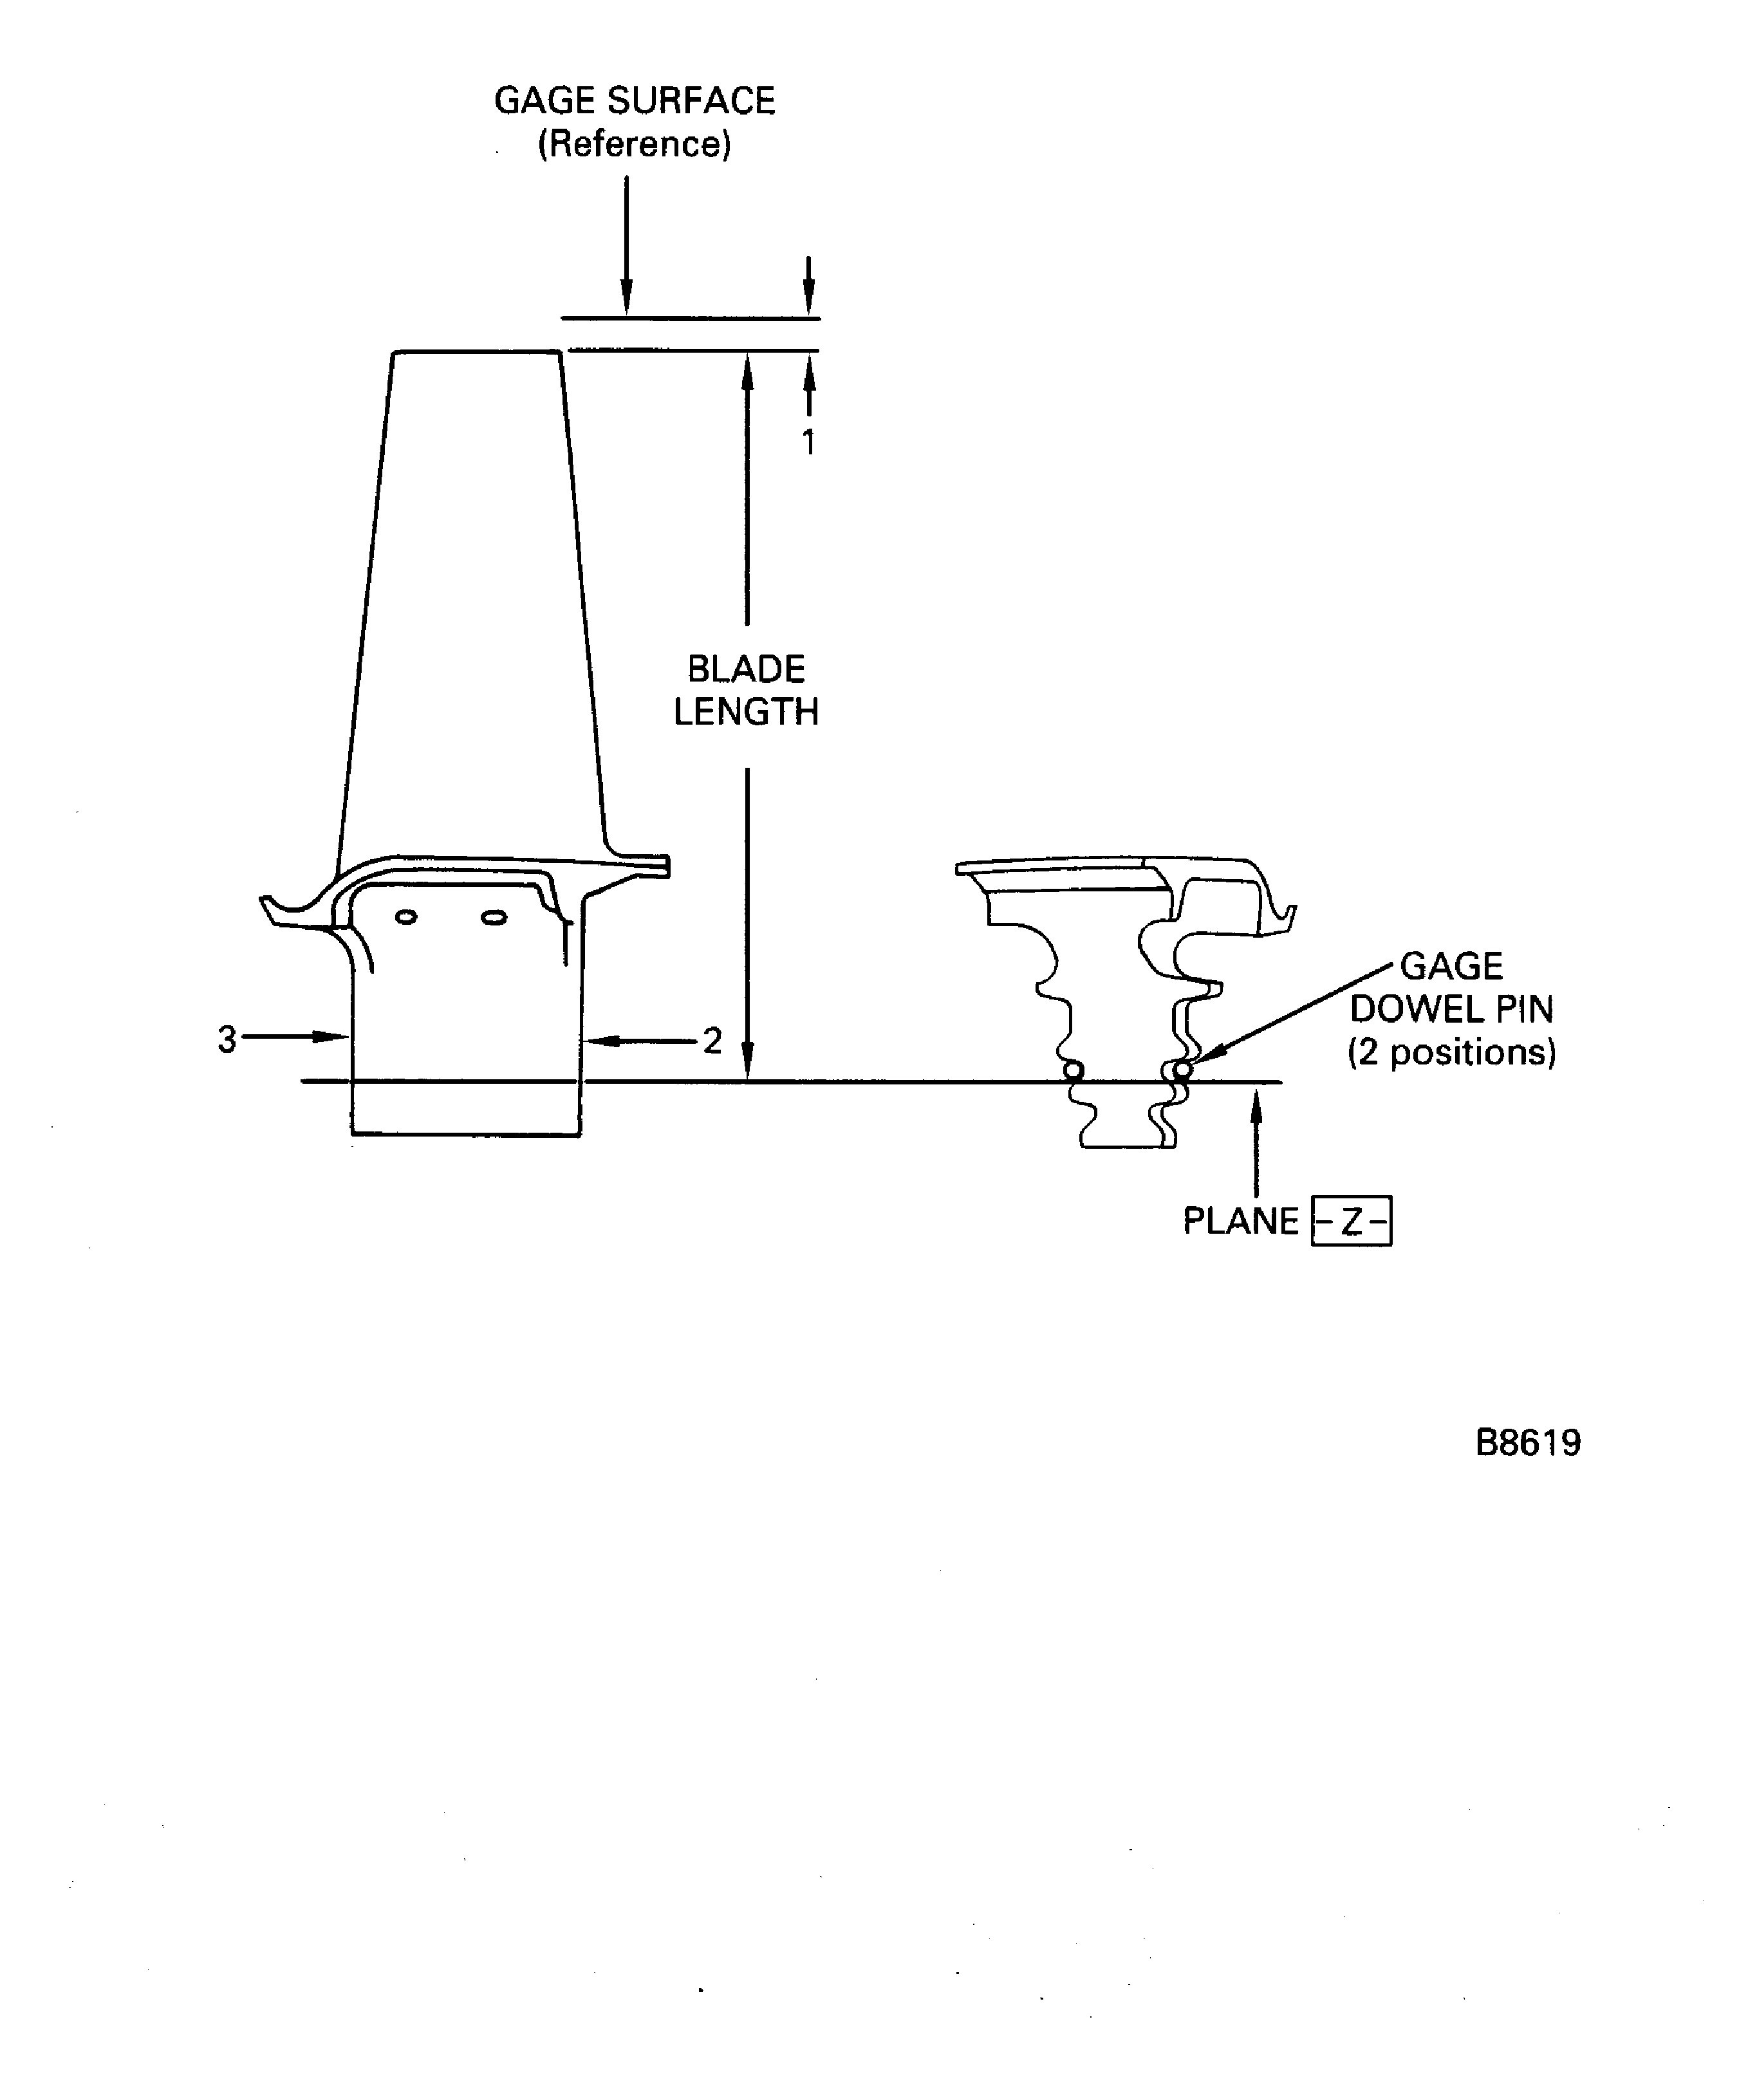
Figure: Stage 2 HPT Blade Assembly Blade Length
Stage 2 HPT Blade Assembly Blade Length
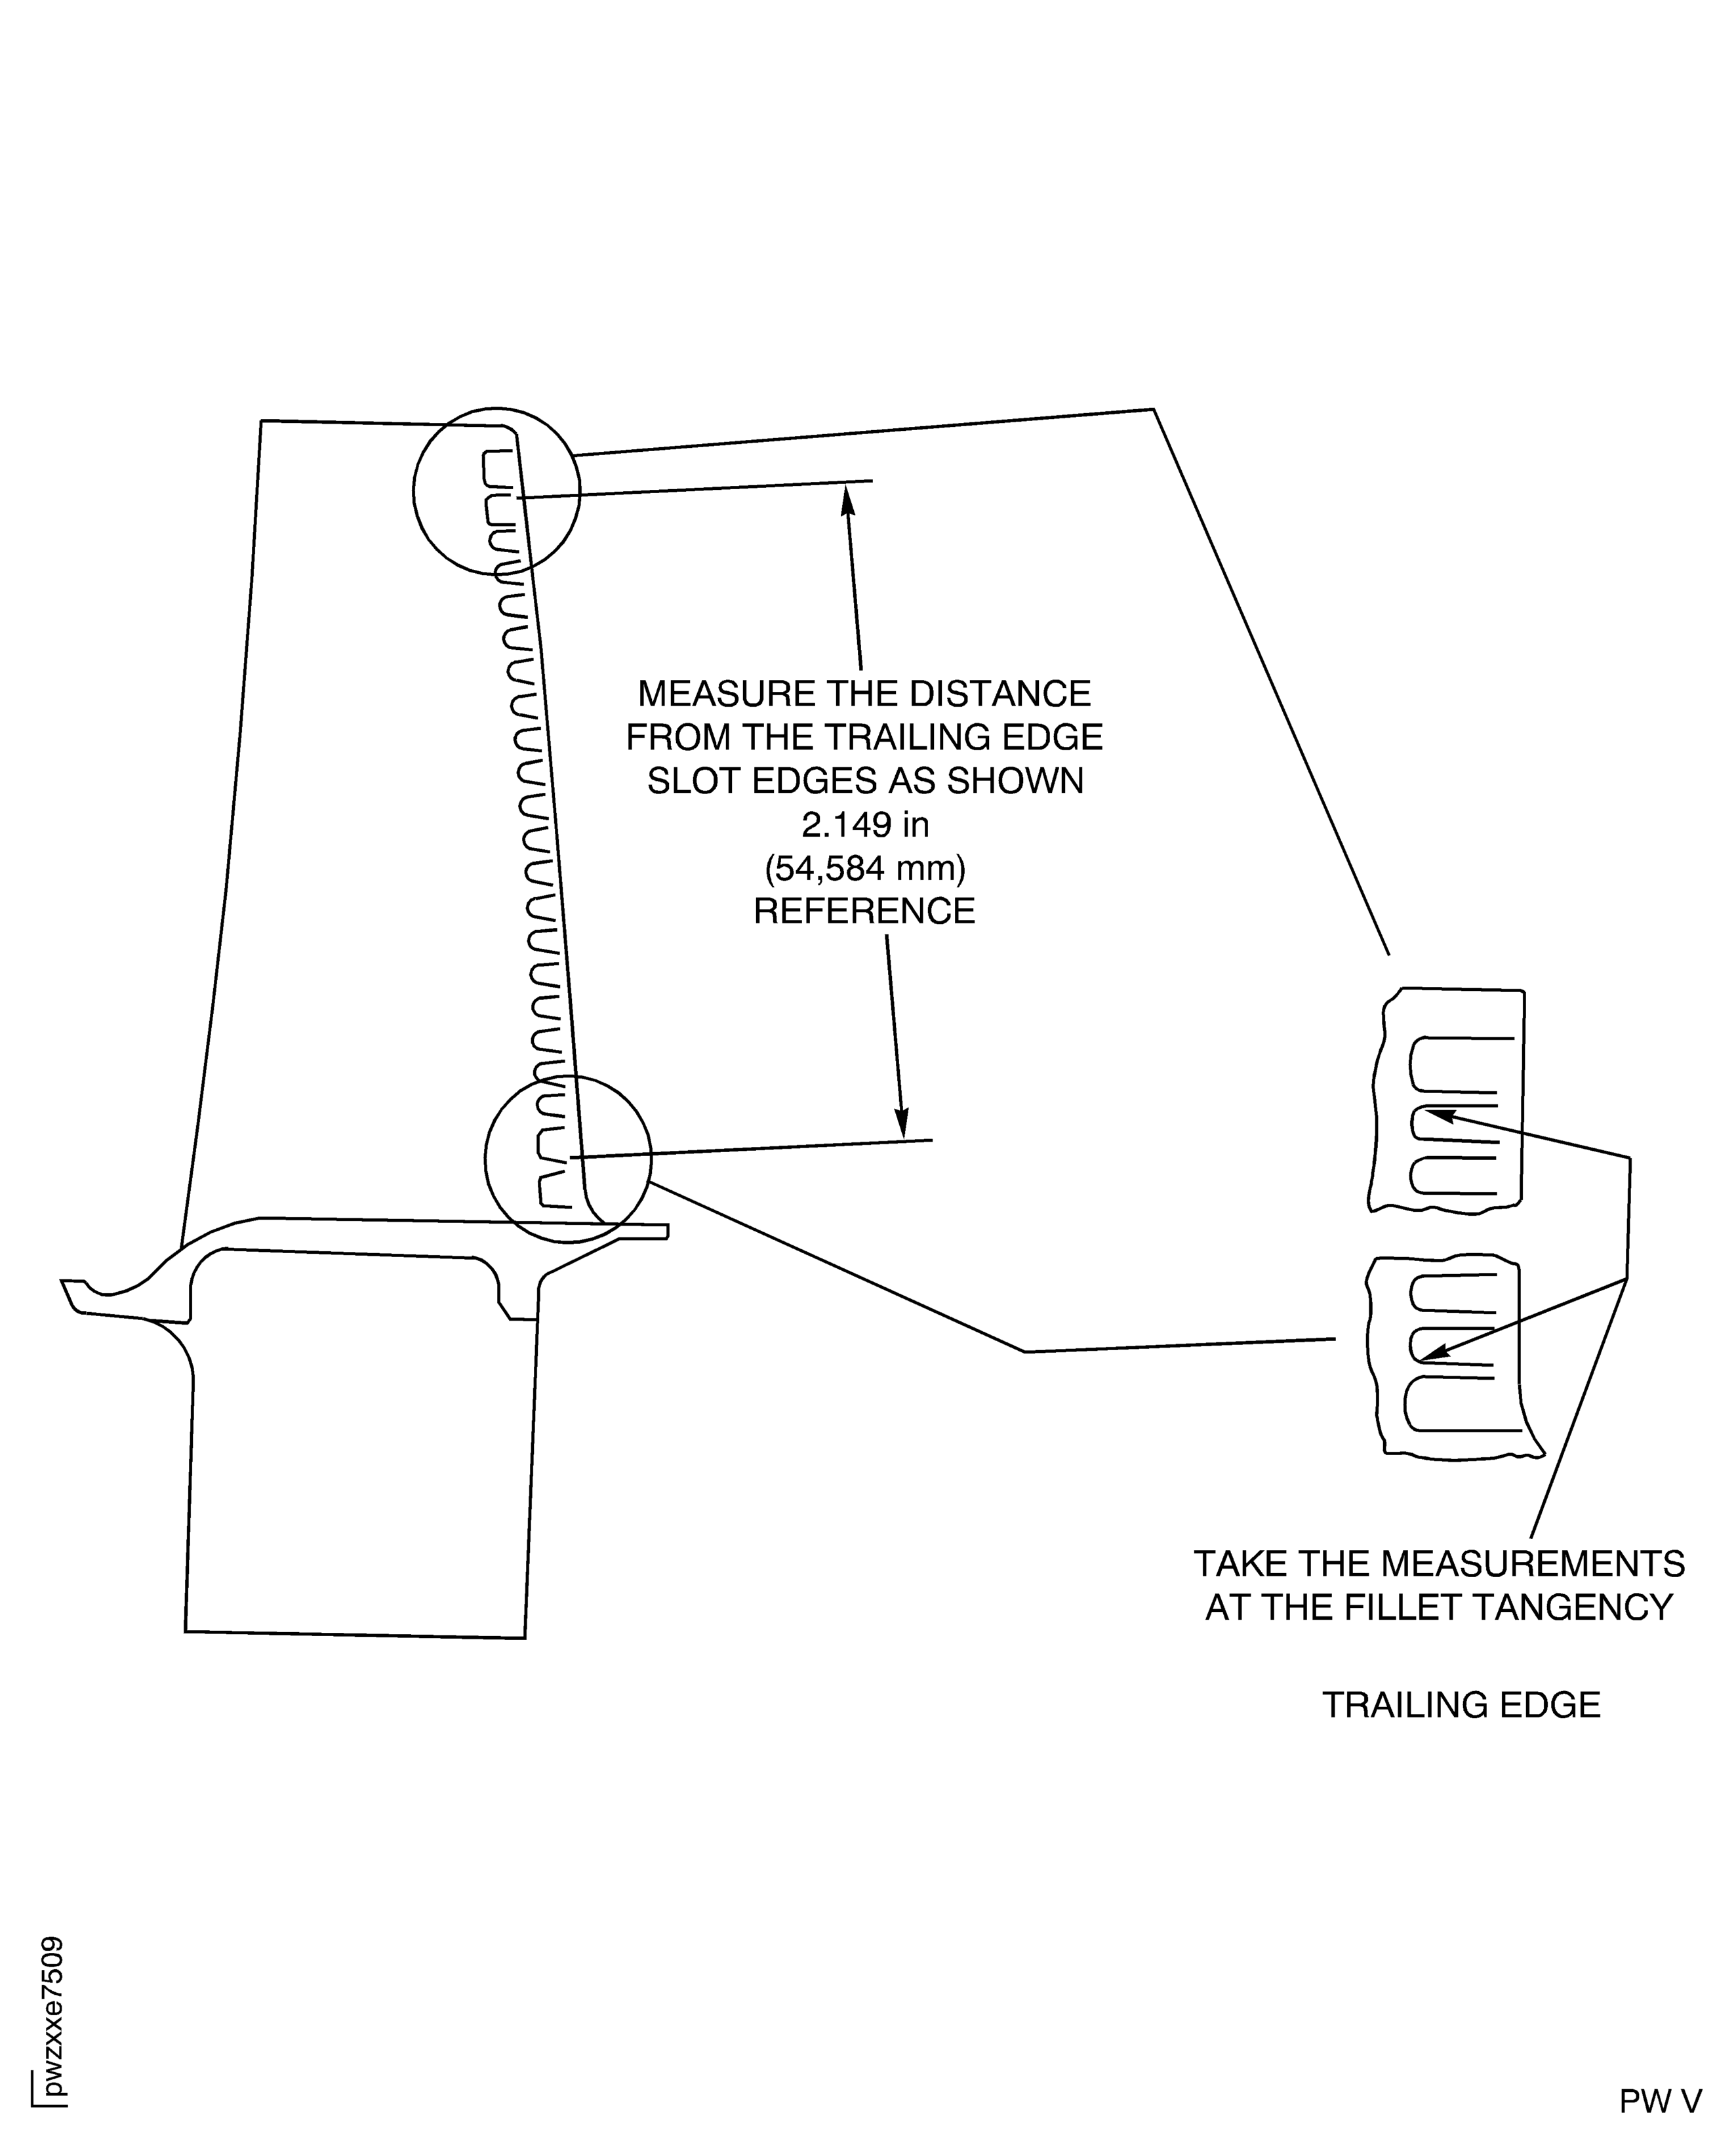
Figure: Stage 2 HPT Blade Assembly Casting Flow Line Inspection
Stage 2 HPT Blade Assembly Casting Flow Line Inspection
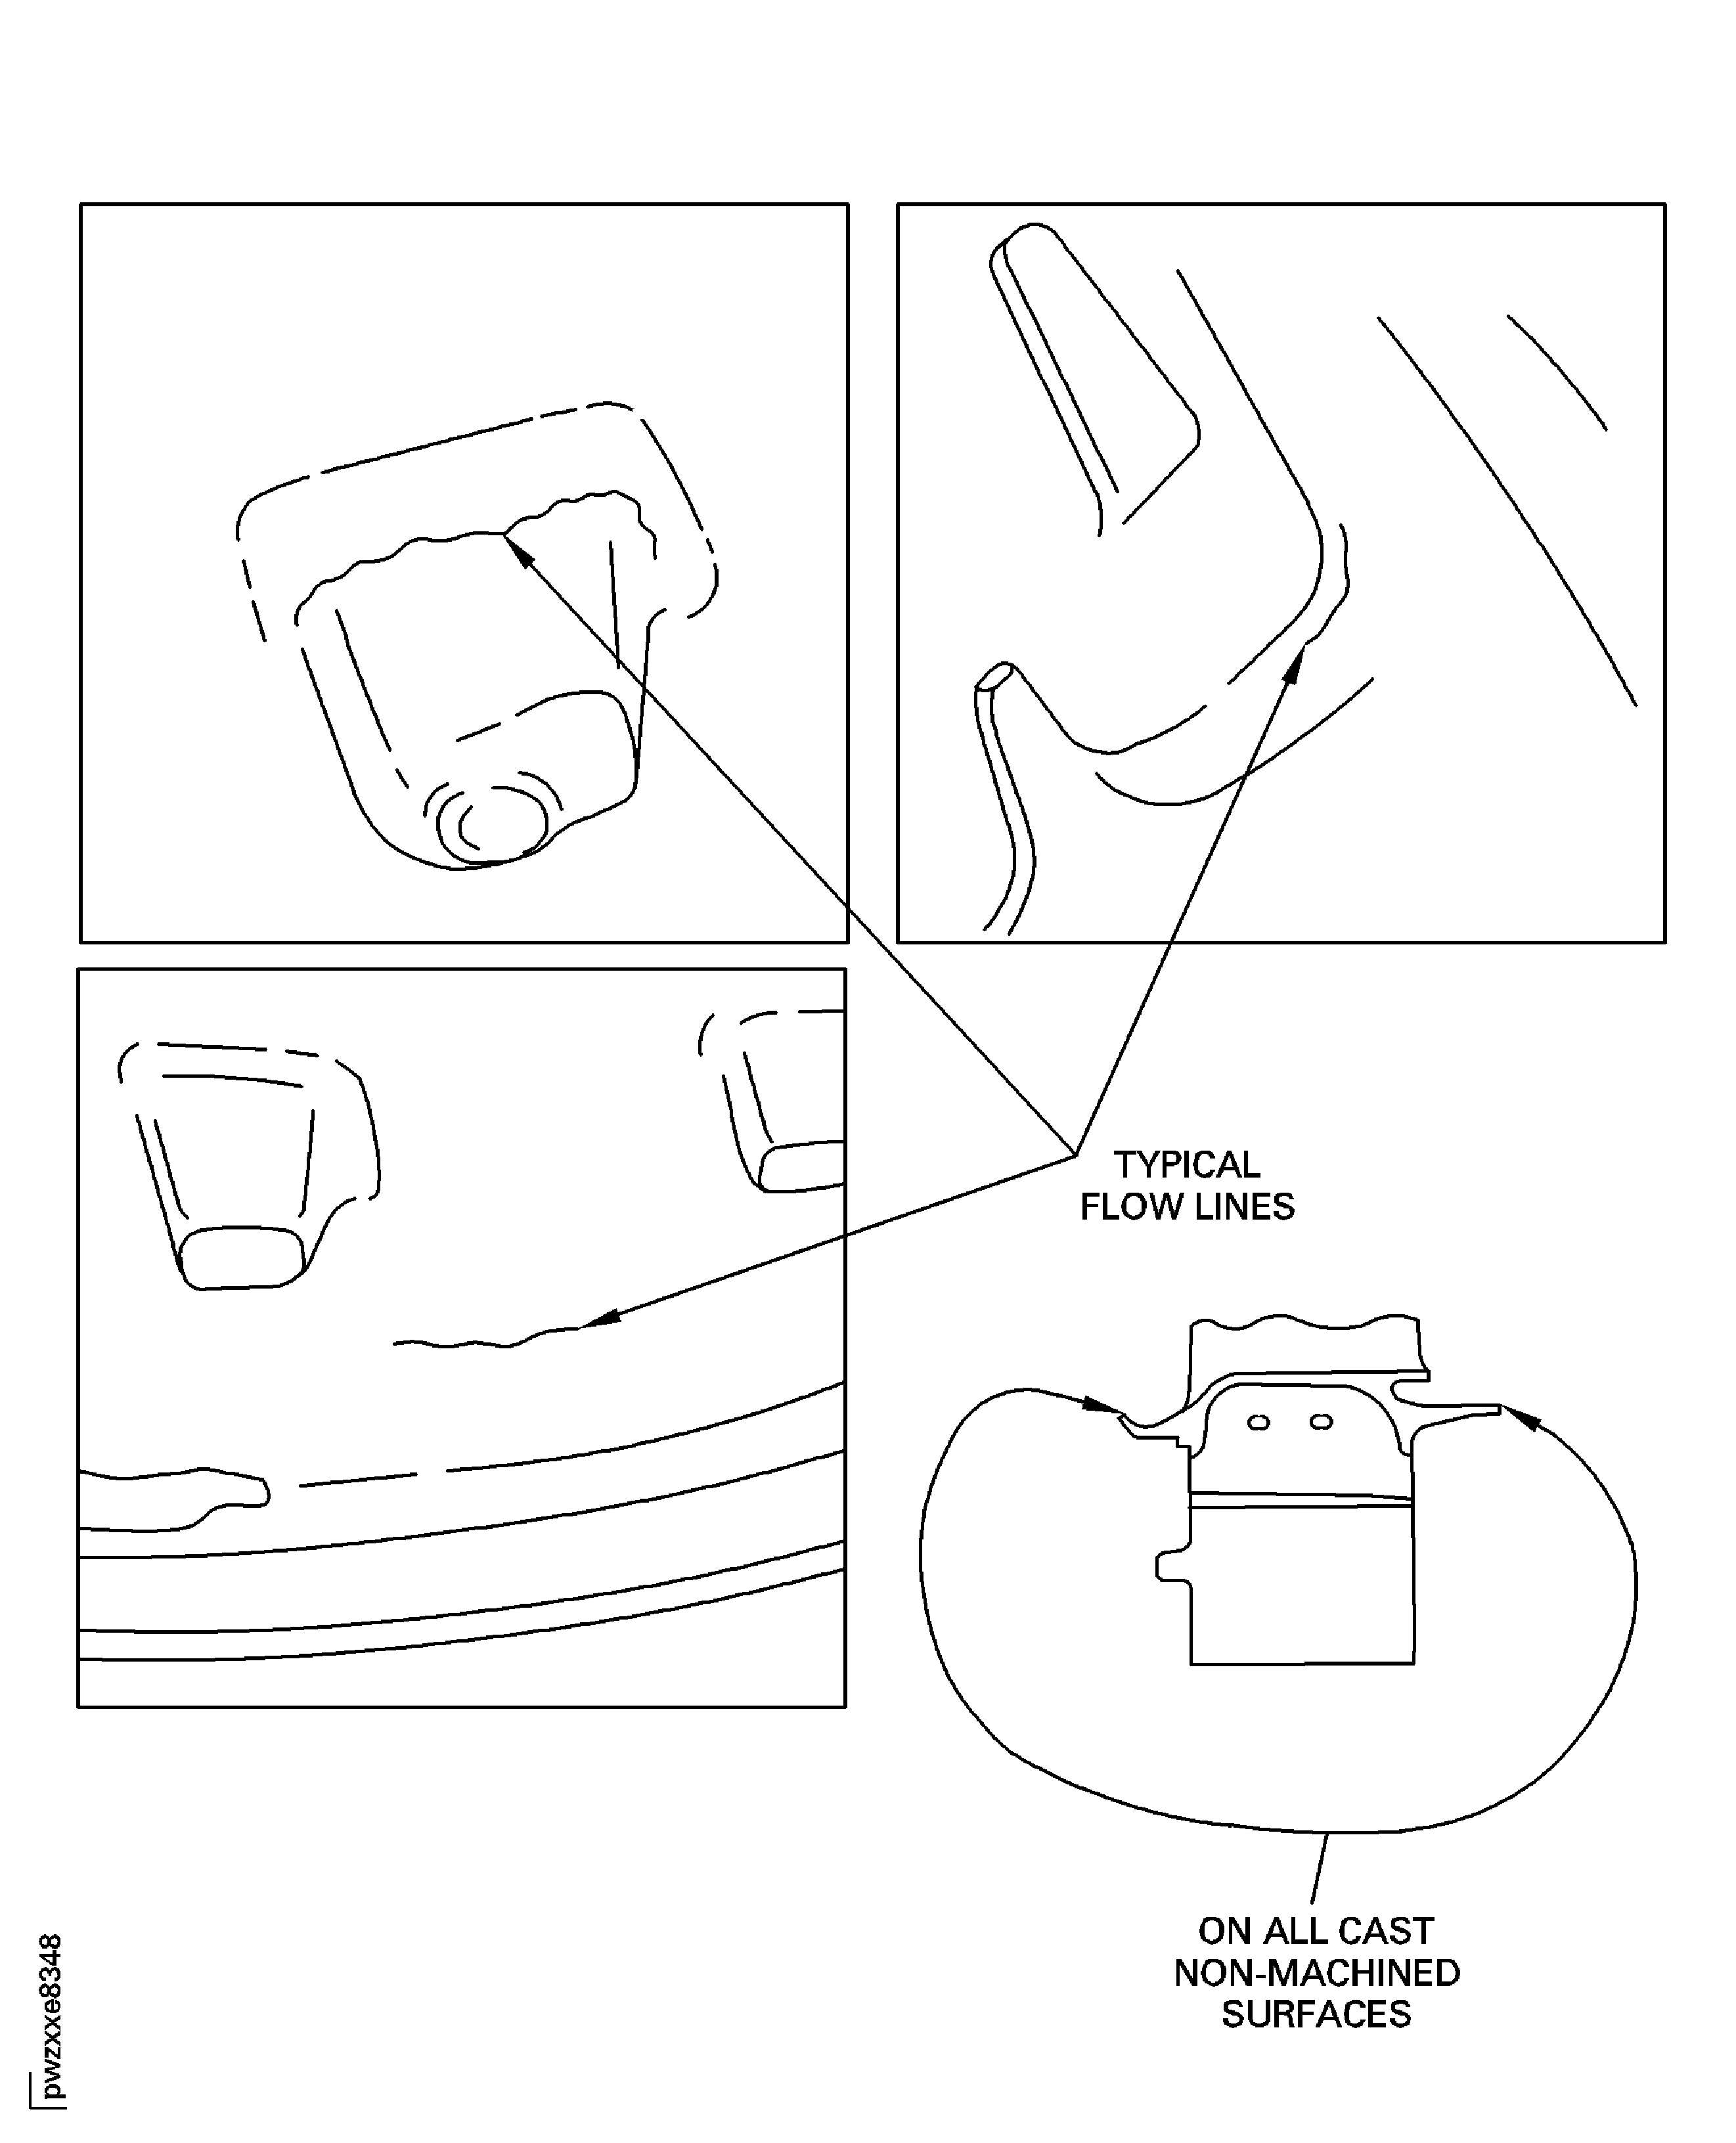
Figure: Stage 2 HPT Blade Assembly Inspection for Porosity and Shrinkage
Stage 2 HPT Blade Assembly Inspection for Porosity and Shrinkage
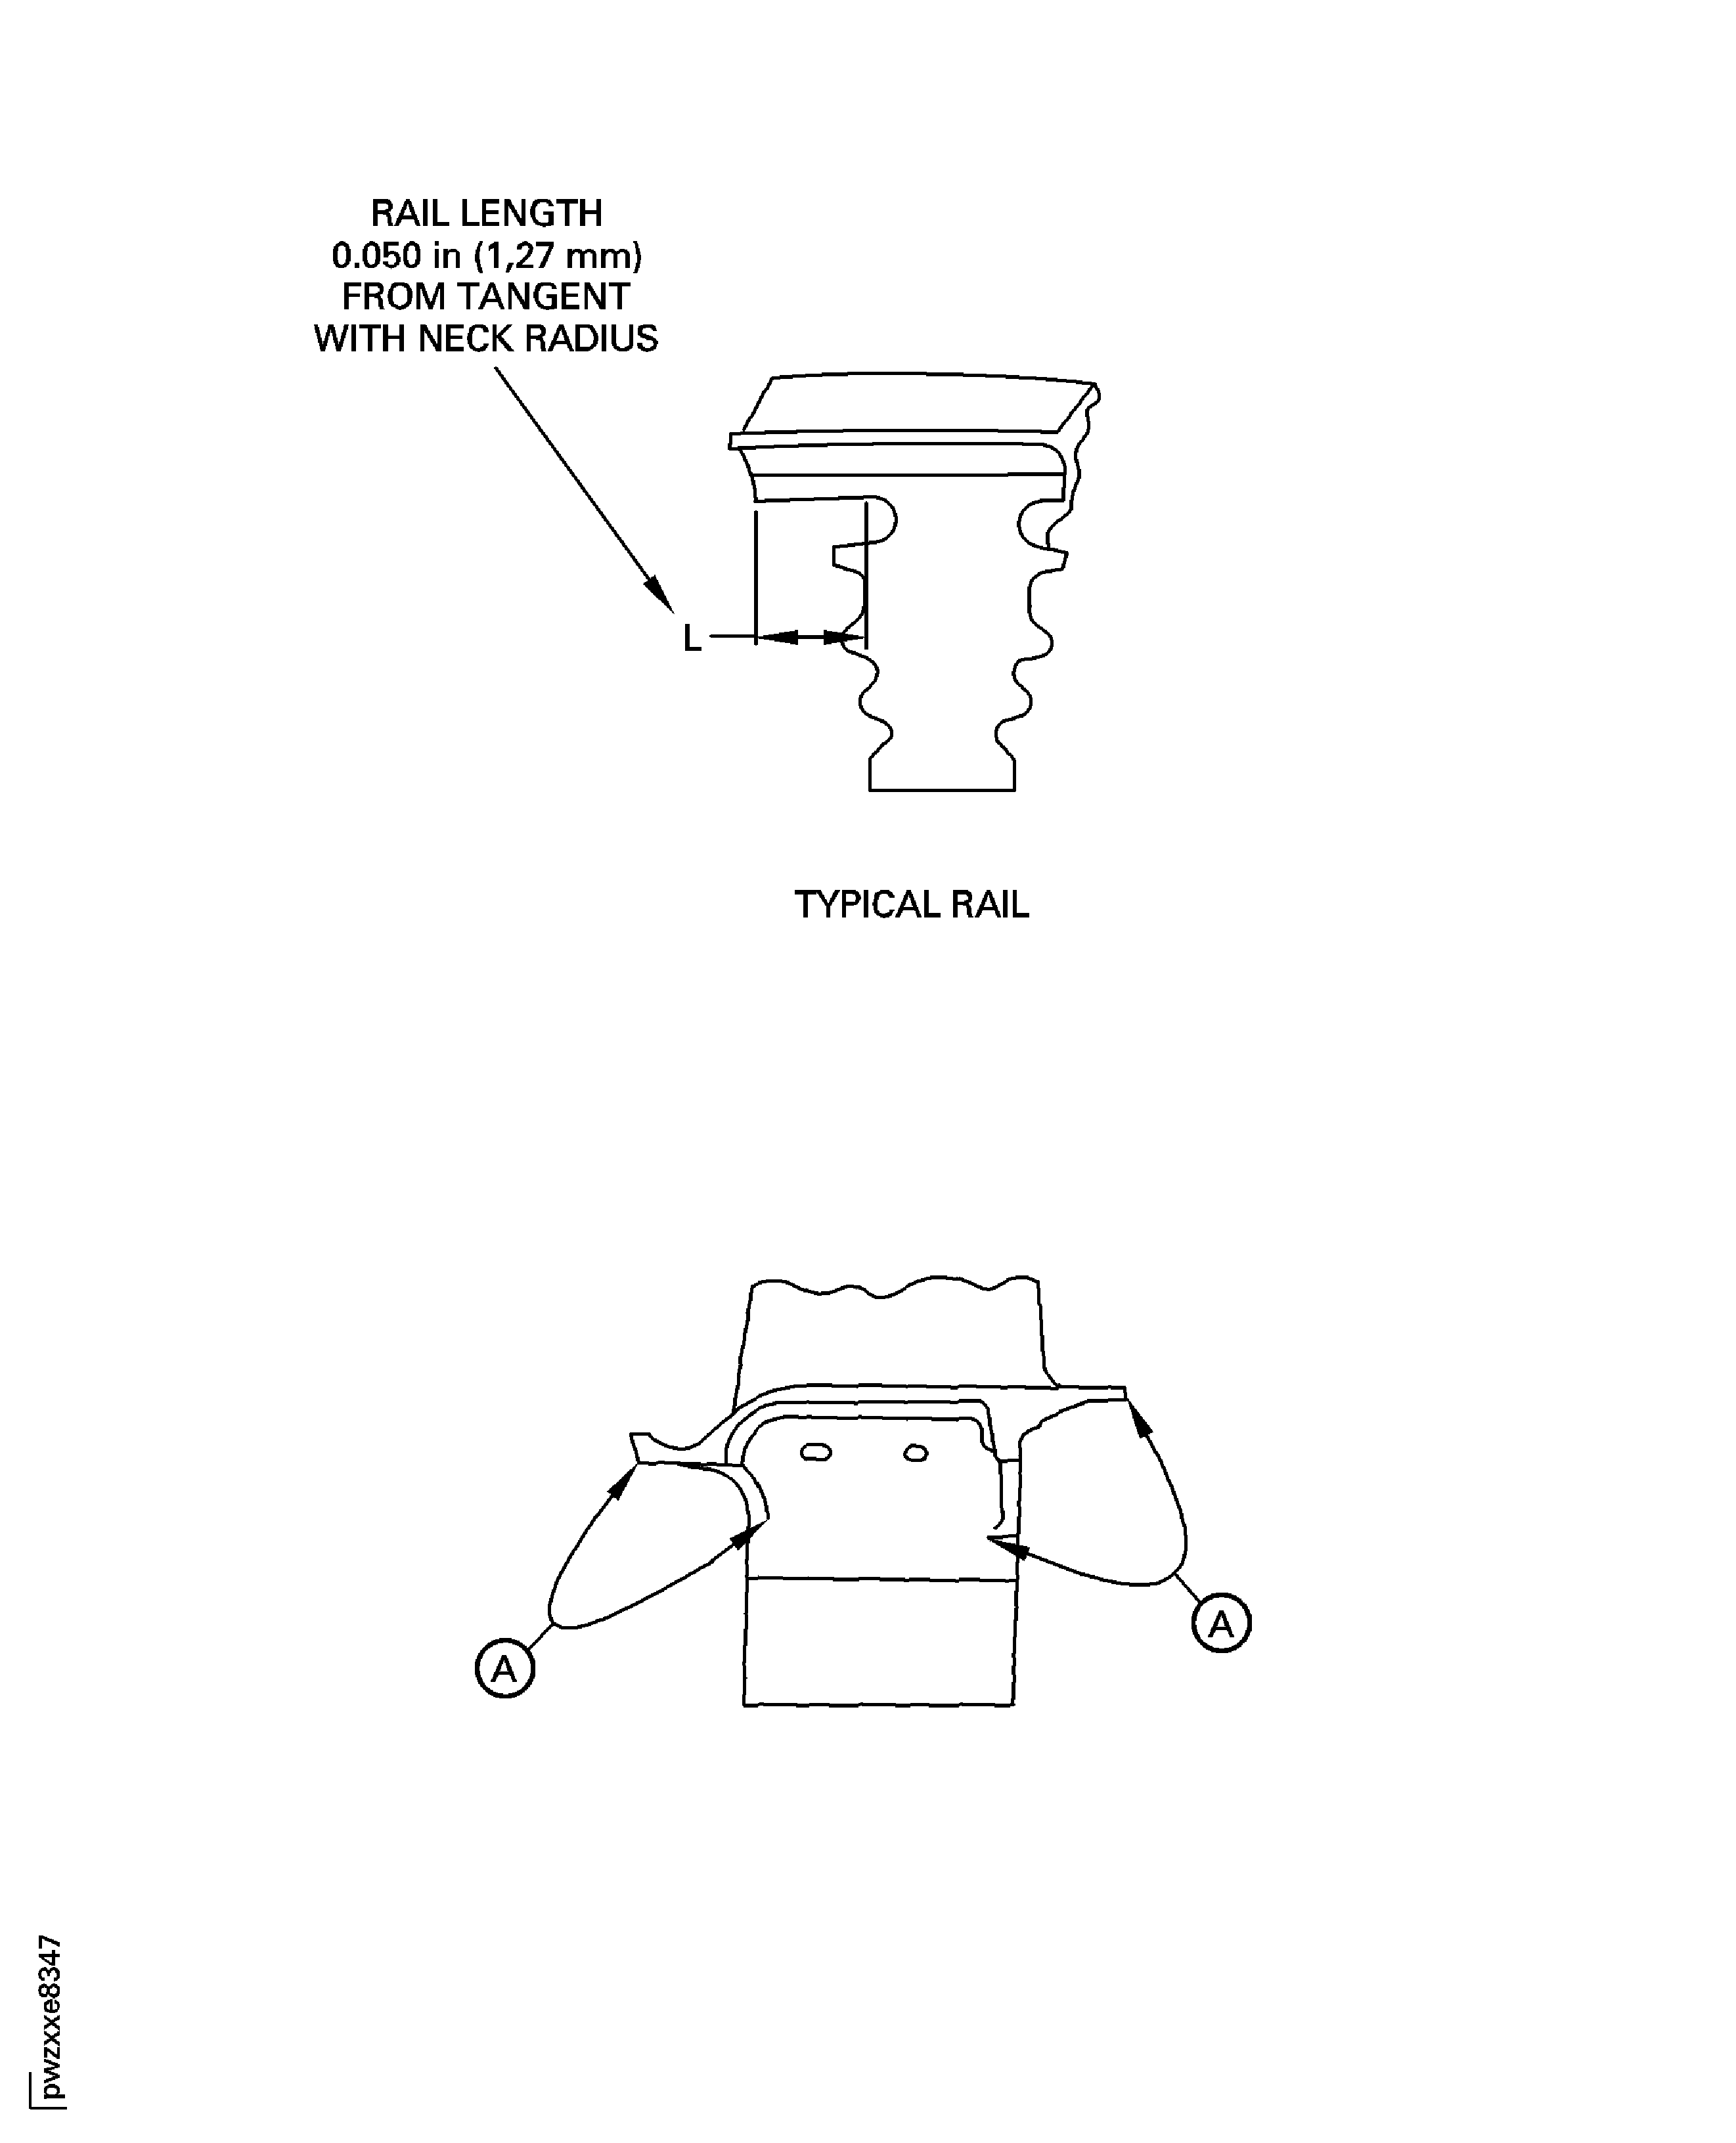
Figure: Stage 2 HPT Blade Permeability Tools
Sheet 1
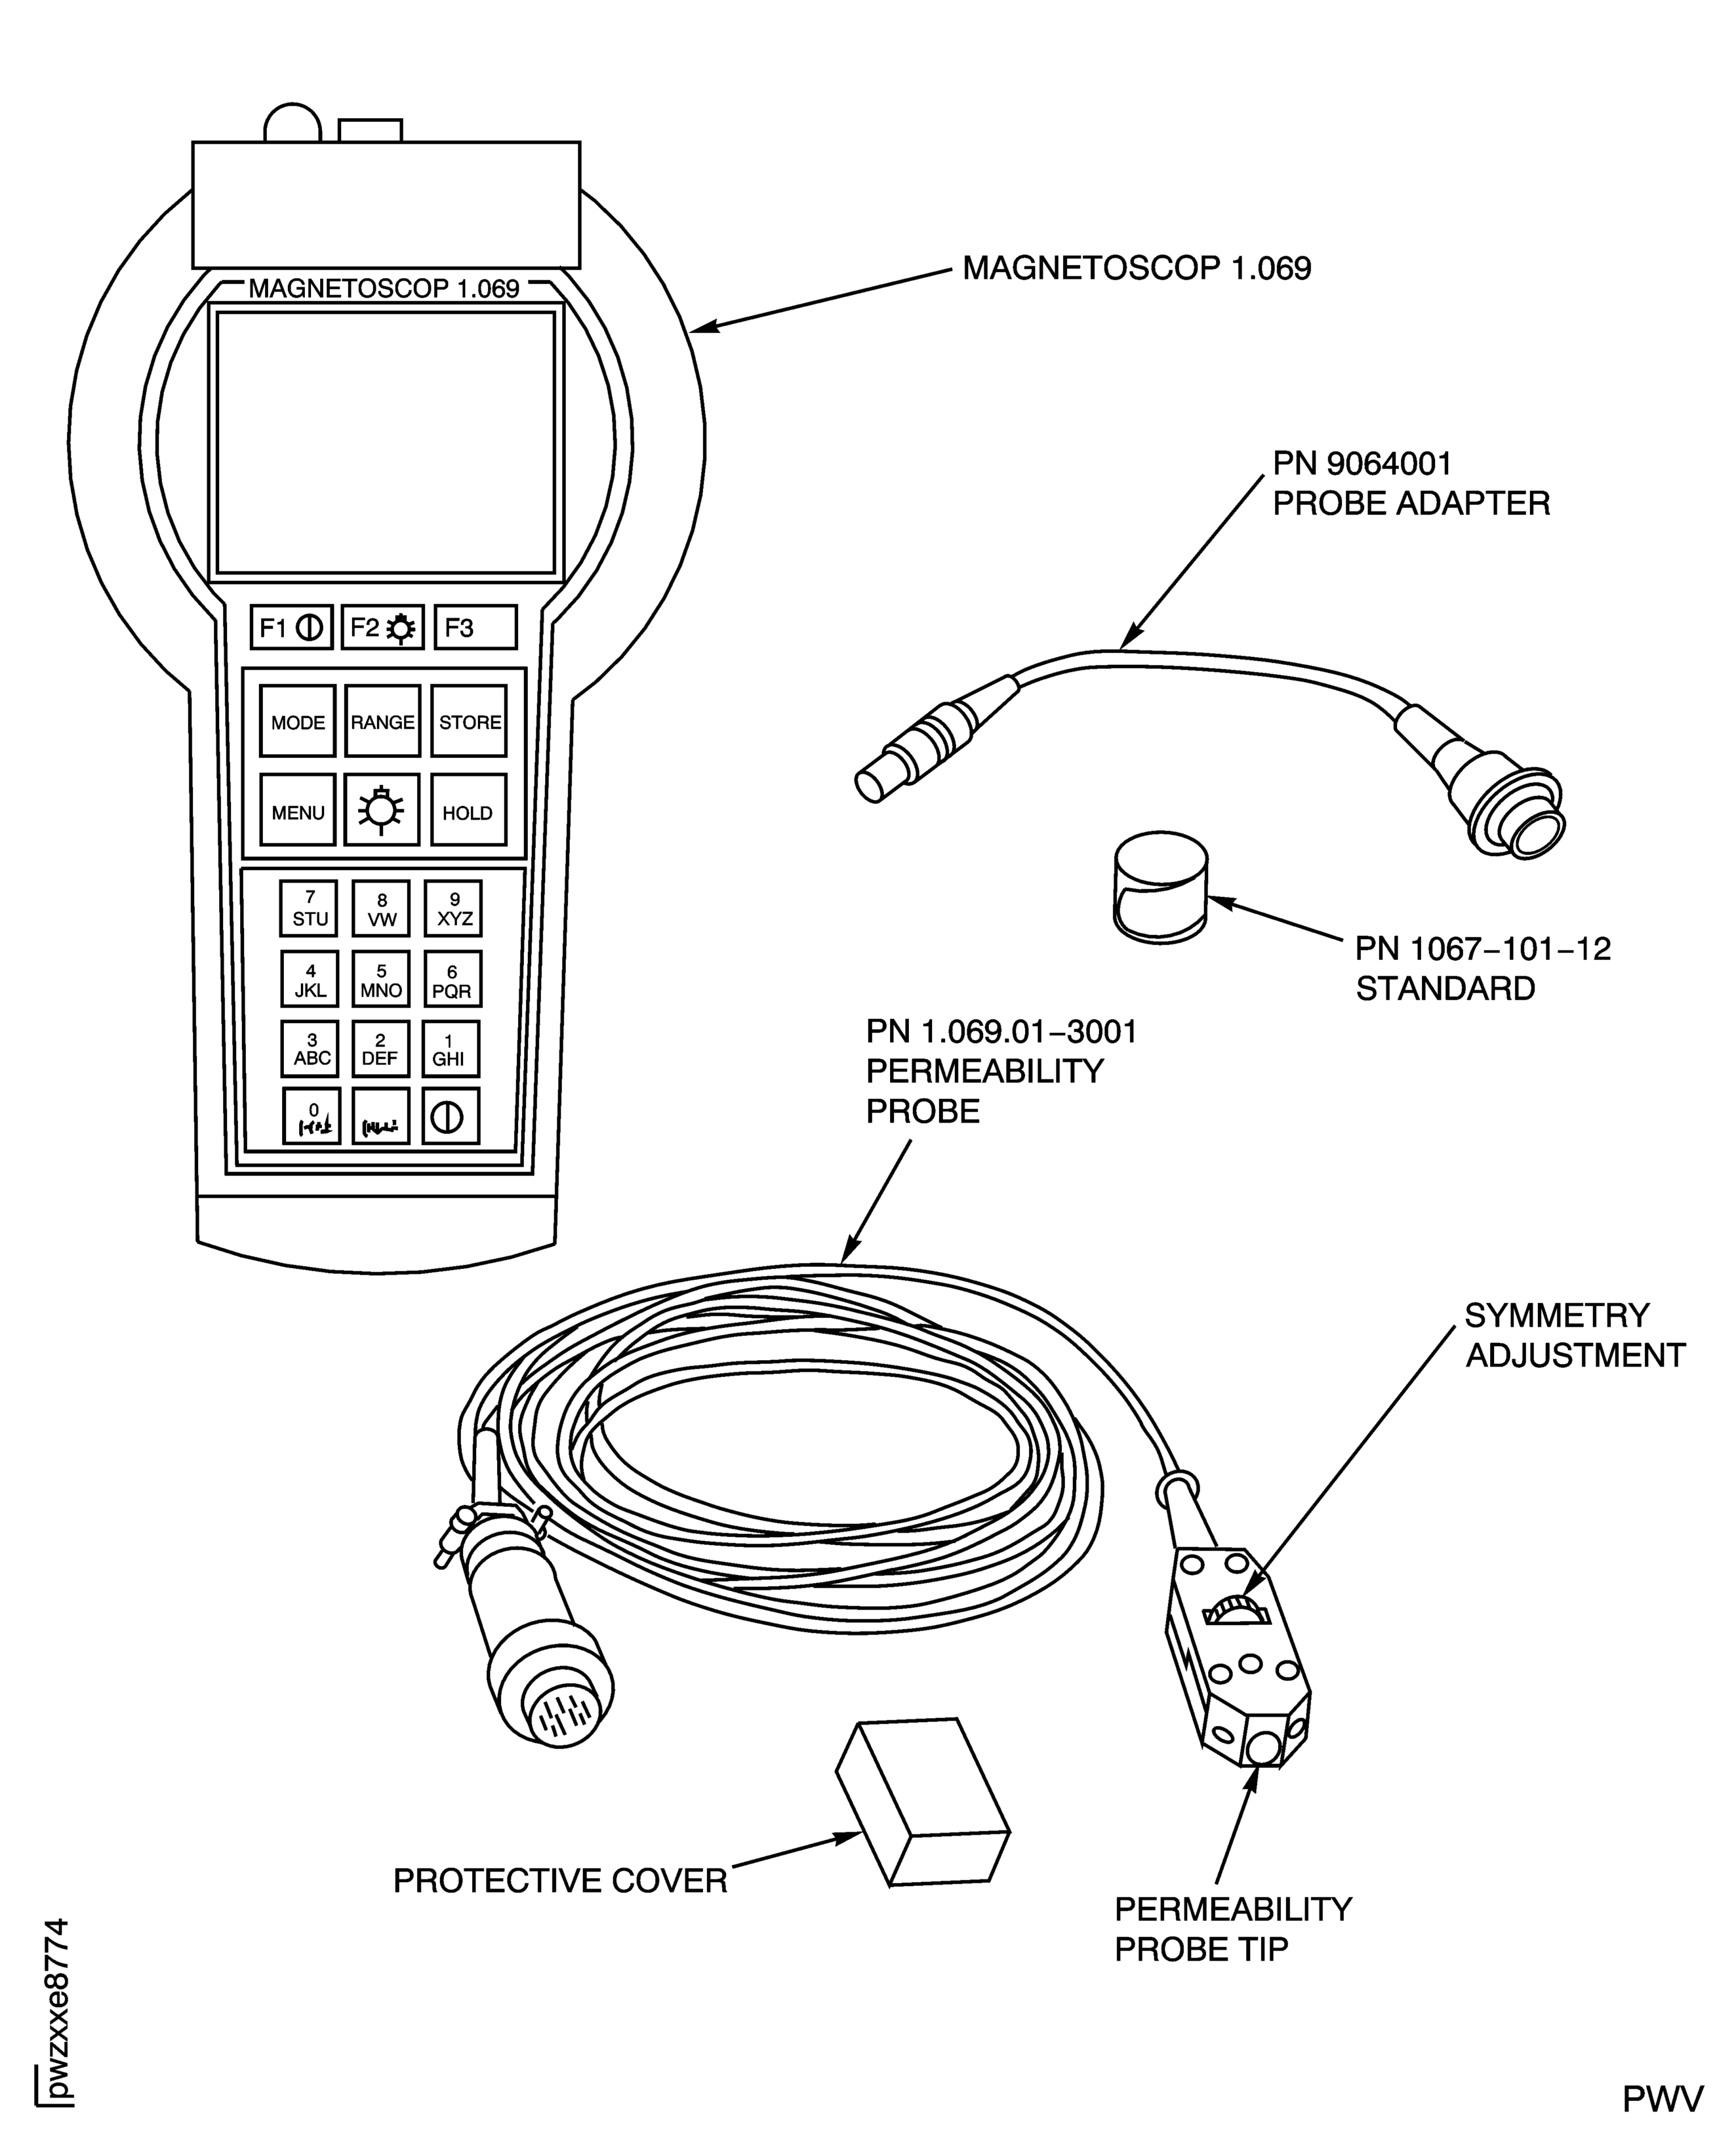
Figure: Stage 2 HPT Blade Permeability Tools
Sheet 2
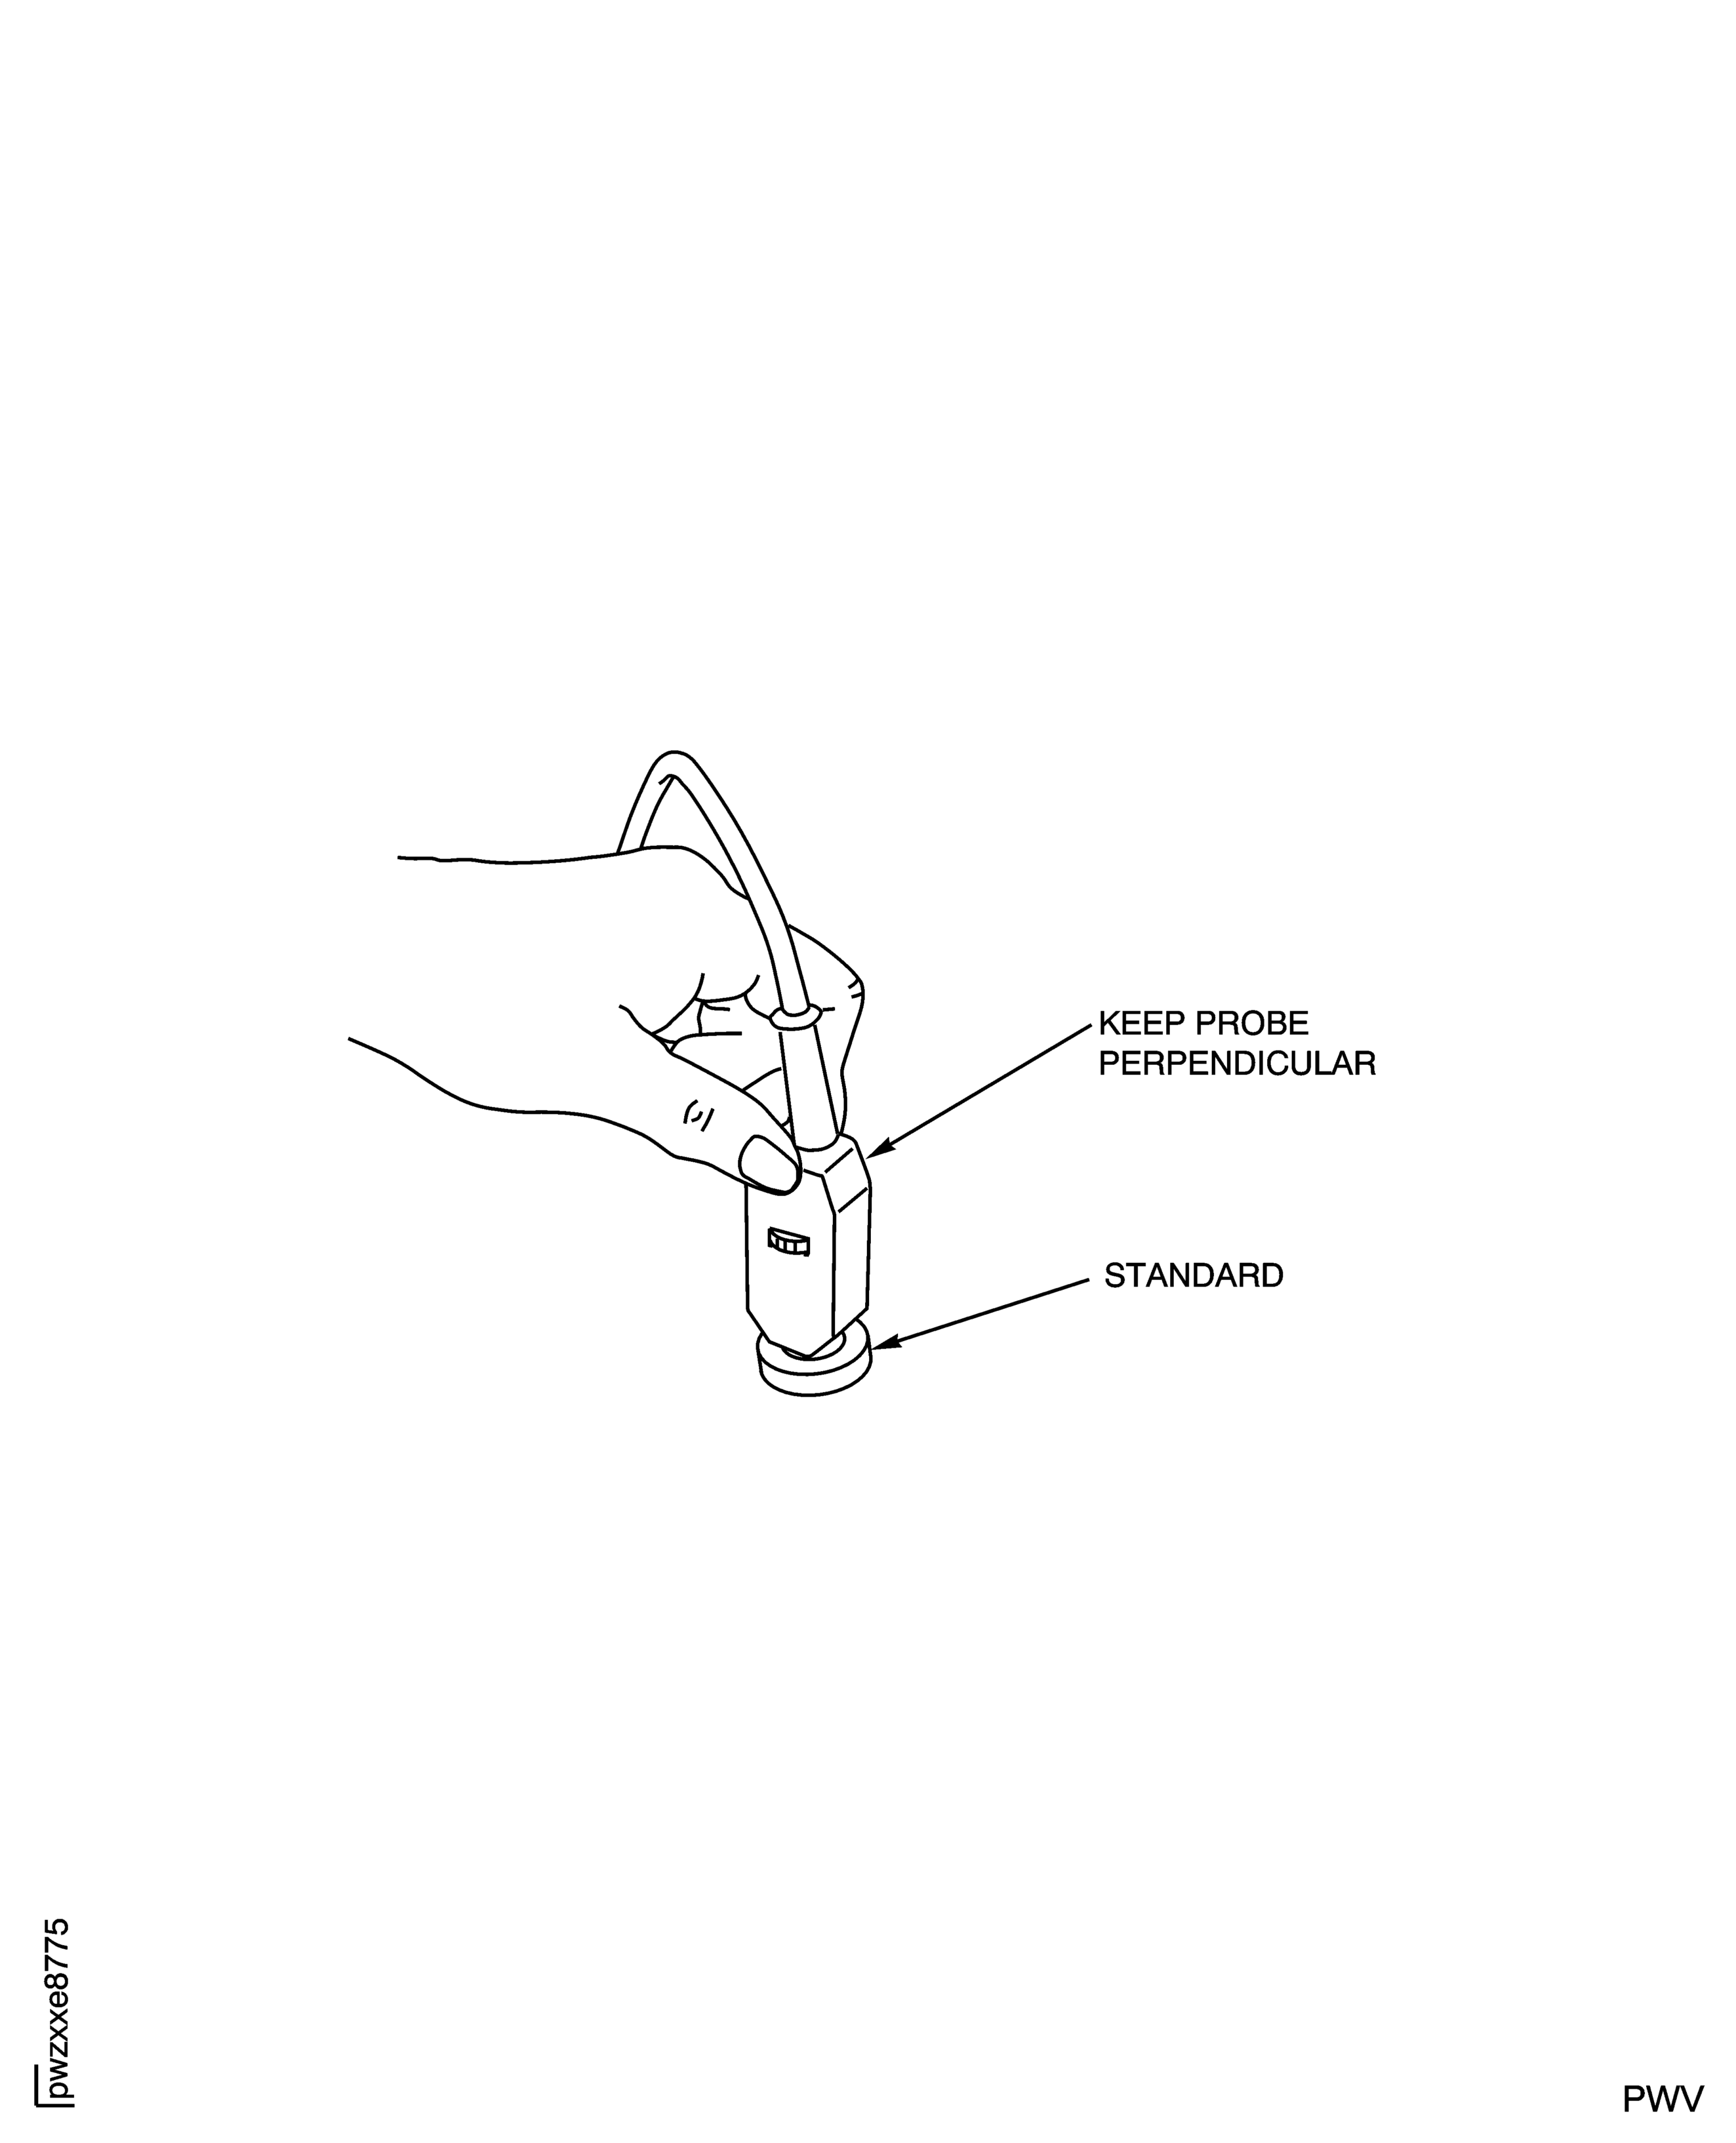
Figure: Stage 2 HPT Blade Permeability Inspection Areas
Stage 2 HPT Blade Permeability Inspection Areas
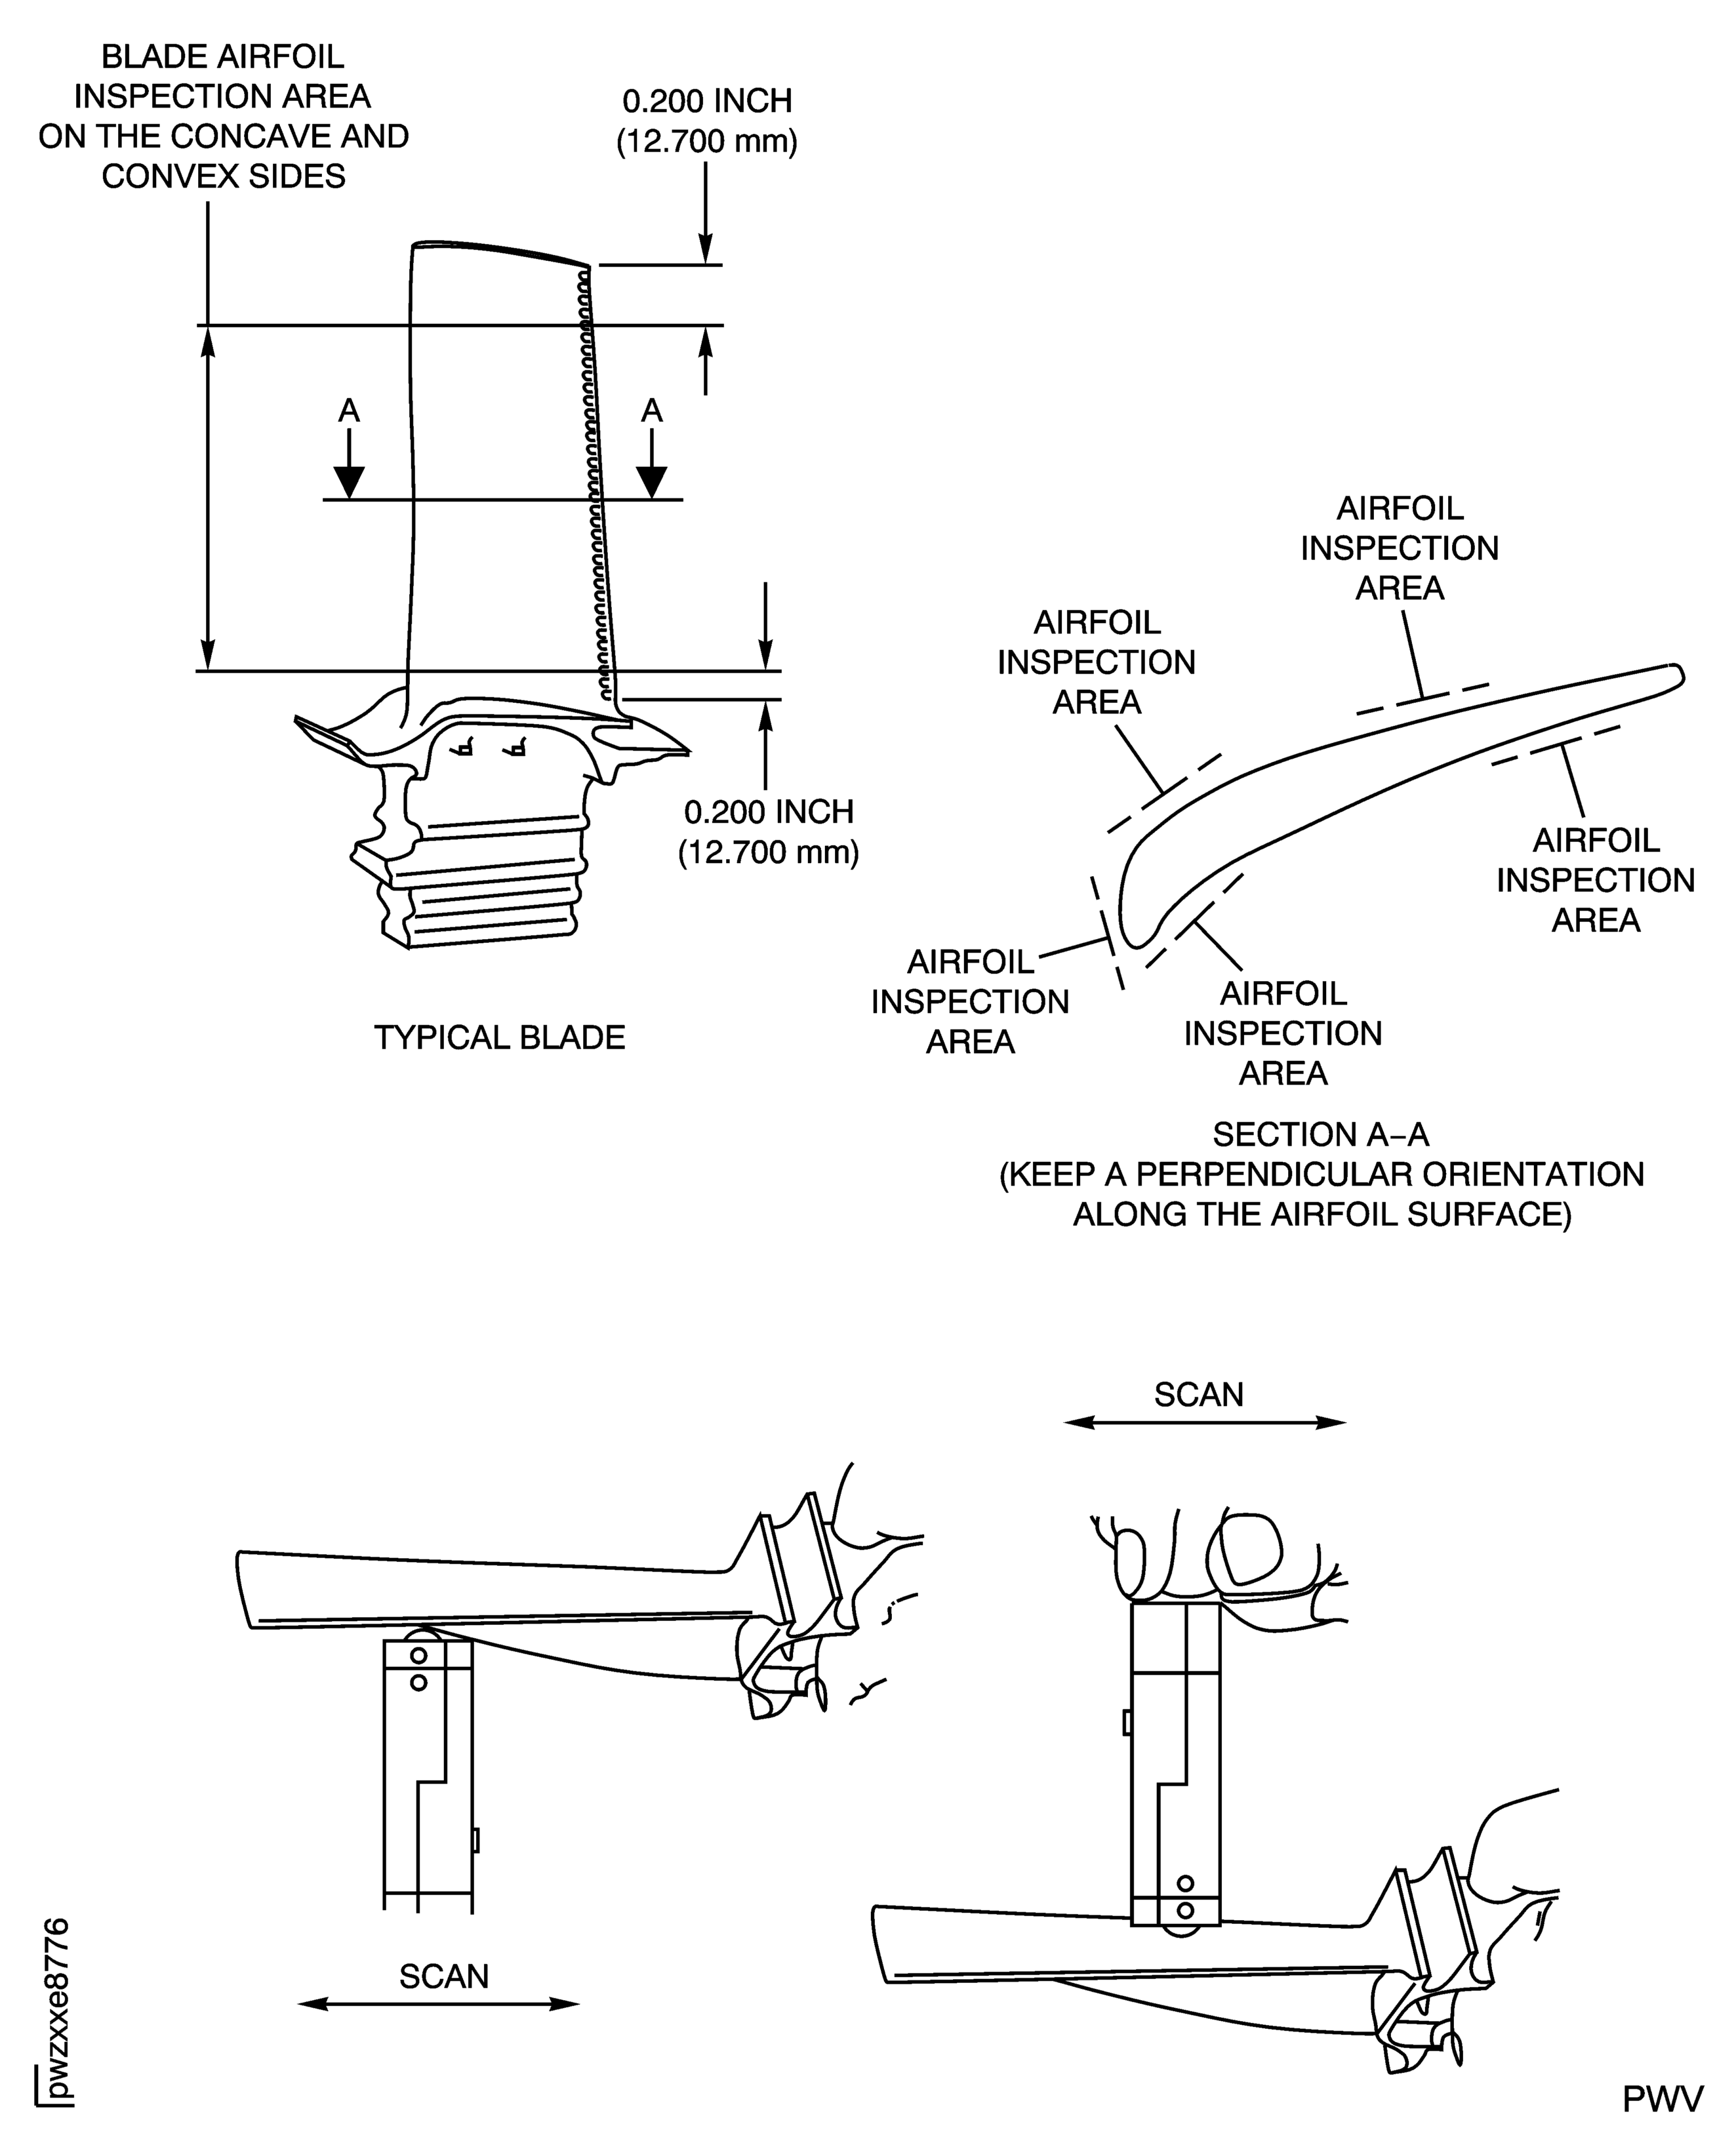
Figure: BSI Inspection of HPT Stage 2 Blade Through Port 3 of The Blade
BSI Inspection of HPT Stage 2 Blade Through Port 3 of The Blade
