Export Control
EAR Export Classification: Not subject to the EAR per 15 C.F.R. Chapter 1, Part 734.3(b)(3), except for the following Service Bulletins which are currently published as EAR Export Classification 9E991: SBE70-0992, SBE72-0483, SBE72-0580, SBE72-0588, SBE72-0640, SBE73-0209, SBE80-0024 and SBE80-0025.Copyright
© IAE International Aero Engines AG (2001, 2014 - 2021) The information contained in this document is the property of © IAE International Aero Engines AG and may not be copied or used for any purpose other than that for which it is supplied without the express written authority of © IAE International Aero Engines AG. (This does not preclude use by engine and aircraft operators for normal instructional, maintenance or overhaul purposes.).Applicability
V2500-A5
Common Information
TASK 72-50-41-200-003-B00 LPT Shaft - Examine, Inspection-003
General
This TASK gives the procedure for the inspection of the LP turbine shaft. For the other LP turbine shaft parts, refer to TASK 72-50-41-200-000 (INSPECTION-000).
Fig/item numbers in parentheses in the procedure agree with those used in the IPC.
The policy that is necessary for inspection is given in the SPM TASK 70-20-01-200-501.
All the parts must be cleaned before any part is examined. Refer to the SPM TASK 70-11-14-300-503.
All parts must be visually examined for damage, corrosion and wear. Any defects that are not identified in the procedure must be referred to IAE.
The procedure for those parts which must have a crack test is given in Step and Step. Do the test before the part is visually examined. Limits for cracks are given in the SUBTASK for each part.
Do not discard any parts until you are sure there are no repairs available. Refer to the instructions in Repair before a discarded part is used again or oversize parts are installed.
Parts which should be discarded can be held although no repair is available. The repair of a discarded part could be shown to be necessary at a later date.
All parts must be examined to make sure that all the repairs have been completed satisfactorily.
The practices and processes referred to in the procedure by the TASK numbers are in the SPM.
References
Refer to the SPM for data on these items.
Definitions of Damage, SPM TASK 70-02-02-350-501
Record and Control of the Lives of Parts, SPM TASK 70-05-00-220-501
Inspection of Parts, SPM TASK 70-20-01-200-501
Some data on these items are contained in this TASK. For more data on these items refer to the SPM.
Method of Testing for Crack Indications
Chemical Processes
Surface Protection
NOTE
NOTE
Preliminary Requirements
Pre-Conditions
NONESupport Equipment
| Name | Manufacturer | Part Number / Identification | Quantity | Remark |
|---|---|---|---|---|
| Magnetic particle inspection equipment | LOCAL | Magnetic particle inspection equipment | ||
| Fluorescent Penetrant Inspection Equipment | LOCAL | Fluorescent Penetrant Inspection Equipment | ||
| Vickers hardness tester | LOCAL | Vickers hardness tester | ||
| Binocular 15X | LOCAL | Binocular 15X | ||
| IAE 2J12611 Sling | 0AM53 | IAE 2J12611 | 1 |
Consumables, Materials and Expendables
| Name | Manufacturer | Part Number / Identification | Quantity | Remark |
|---|---|---|---|---|
| CoMat 06-011 MAGNETIC PARTICLES, FLUORESCENT, DRY POWDER | X222X | CoMat 06-011 | ||
| CoMat 06-018 FLUORESCENT PENETRANT (POST-EMULSIFIED HIGH SENSITIVITY) | X222X | CoMat 06-018 |
Spares
NONESafety Requirements
NONEProcedure
If necessary, remove paint from the LP turbine shaft before magnetic particle inspection. Refer to TASK 72-50-41-100-000, (CLEANING-000).
For the method to clean the part, refer to the SPM TASK 70-11-14-300-503.
Clean as referred to in TASK 72-50-41-100-000, (CLEANING-000).
Magnetic particle examine for cracks, refer to Step.
Do the test for cracks.
NOTE
SUBTASK 72-50-41-240-068 Examine the LP Turbine Shaft (01-200) for Cracks
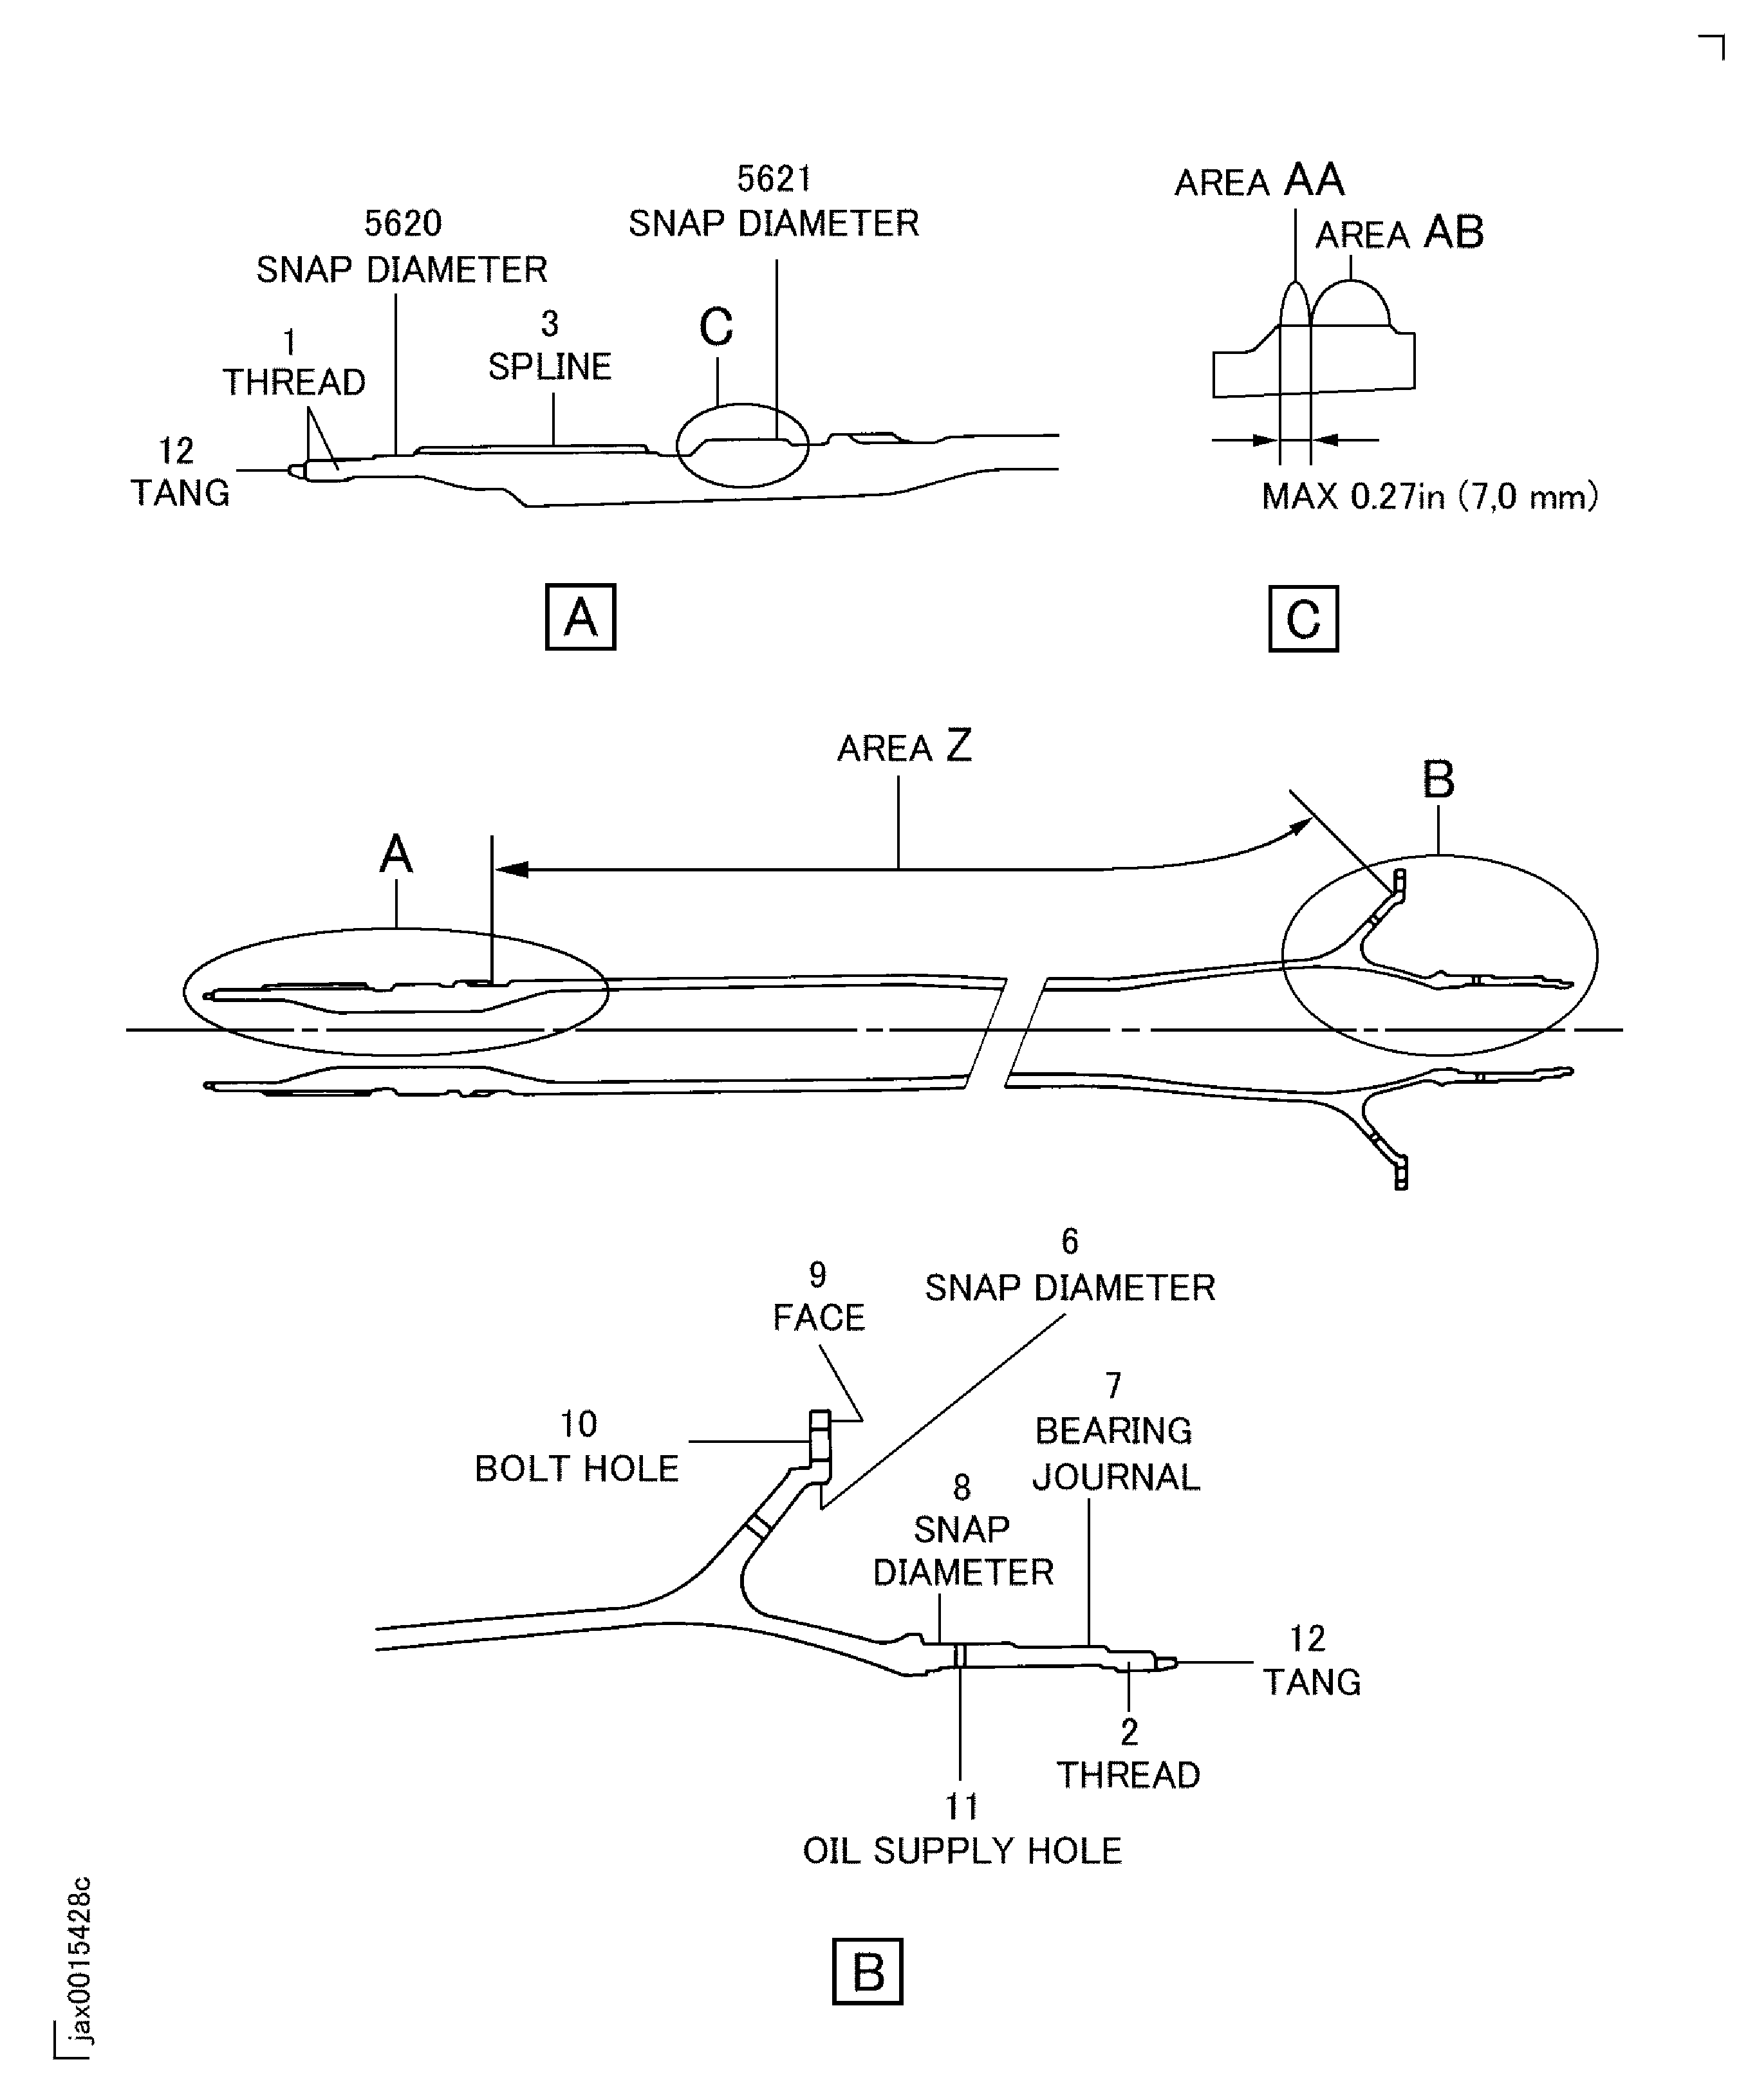
Refer to Figure.
Remove heat discoloration and depression marks made by the hardness check, refer to VRS1491, TASK 72-50-41-300-003, (REPAIR-003)
If hardness is 406 - 454 HV
Do the hardness check using Vickers hardness tester or equivalent if there are heat discolorations.
Examine area Z for heat discoloration.
NOTE
Check hardness at minimum two positions on each heat discoloration area. If the heat discoloration is all around on circumferential surface of the shaft, check hardness equally spaced at eight positions on heat discoloration area.
SUBTASK 72-50-41-220-095 Examine the LP Turbine Shaft (01-200) for Heat Discoloration
Refer to Figure.
Repair, VRS1492 TASK 72-50-41-300-001, (REPAIR-001)
Damaged
Examine the threads at locations 1 and 2.
SUBTASK 72-50-41-220-096 Examine the LP Turbine Shaft (01-200) Threads
Refer to Figure.
Repair, VRS1493 TASK 72-50-41-300-002, (REPAIR-002)
Not more than 0.004 in. (0.10 mm) in depth
Galled.
Examine the spline at location 3.
SUBTASK 72-50-41-220-097 Examine the LP Turbine Shaft (01-200) Spline
Refer to Figure.
Repair, VRS1491, TASK 72-50-41-300-003, (REPAIR-003)
Not more than 0.004 in. (0.10 mm)
Repair, VRS1493, TASK 72-50-41-300-002, (REPAIR-002)
If number of damage is within 10 places
Repair, VRS1498 TASK 72-50-41-300-004, (REPAIR-004)
If number of damage is more than 10 places
Between 0.004 and 0.006 in. (0.10 and 0.15 mm) in depth
Repair, VRS1493, TASK 72-50-41-300-002, (REPAIR-002)
If distance of damage is more than 2 in. (50.6 mm)
Repair, VRS1498 TASK 72-50-41-300-004, (REPAIR-004)
If distance of damage is less than 2 in. (50.6 mm)
Between 0.006 and 0.027 in. (0.15 and 0.70 mm) in depth
Repair, VRS1493, TASK 72-50-41-300-002, (REPAIR-002)
If distance of damage is more than 2 in. (50.8 mm)
Between 0.027 and 0.035 in. (0.70 and 0.90 mm) in depth
Scratched or scored.
Repair, VRS1498 TASK 72-50-41-300-004, (REPAIR-004)
Less than 3.5454 in. (90.051 mm)
Worn.
Examine the snap diameter at location 5620.
SUBTASK 72-50-41-220-093 Examine the LP Turbine Shaft (01-200) Snap Diameter
Refer to Figure.
Repair, VRS1491, TASK 72-50-41-300-003, (REPAIR-003)
Not more than 0.004 in. (0.10 mm)
Repair, VRS1493, TASK 72-50-41-300-002, (REPAIR-002)
If number of damage is within 10 places
Repair, VRS1499, TASK 72-50-41-300-005, (REPAIR-005)
If number of damage is more than 10 places
Between 0.004 and 0.006 in. (0.10 and 0.15 mm) in depth
Repair, VRS1493, TASK 72-50-41-300-002, (REPAIR-002)
If distance of damage is more than 2 in. (50.8 mm)
Repair, VRS1499 TASK 72-50-41-300-005, (REPAIR-005)
If distance of damage is less than 2 in. (50.8 mm)
Between 0.006 and 0.027 in. (0.15 and 0.70 mm) in depth
Repair, VRS1493, TASK 72-50-41-300-002, (REPAIR-002)
If distance of damage is more than 2 in. (50.8 mm)
Between 0.027 and 0.035 in. (0.70 and 0.90 mm) in depth
Scratched or scored.
Repair, VRS1499 TASK 72-50-41-300-005, (REPAIR-005)
Less than 3.9385 in. (100.037 mm)
Worn.
Examine the snap diameter at area AA location 5621.
Repair, VRS1491, TASK 72-50-41-300-003, (REPAIR-003)
Not more than 0.004 in. (0.10 mm)
Repair, VRS1493, TASK 72-50-41-300-002, (REPAIR-002)
If number of damage is within 10 places
Repair, VRS1499, TASK 72-50-41-300-005, (REPAIR-005)
If number of damage is more than 10 places
Between 0.004 and 0.006 in. (0.10 and 0.15 mm) in depth
Repair, VRS1493, TASK 72-50-41-300-002, (REPAIR-002)
If distance of damage is more than 2 in. (50.8 mm)
Between 0.006 and 0.035 in. (0.15 and 0.90 mm) in depth
Scratched or scored.
Repair, VRS1499 TASK 72-50-41-300-005, (REPAIR-005)
Less than 3.9385 in. (100.037 mm)
Worn.
Examine the snap diameter at area AB of location 5621.
SUBTASK 72-50-41-220-098 Examine the LP Turbine Shaft (01-200) Snap Diameter
Refer to Figure.
Repair, VRS1491 TASK 72-50-41-300-003, (REPAIR-003)
Not more than 0.004 in. (0.10 mm) in depth
Nicked and Scratched.
Repair, VRS1496 TASK 72-50-41-300-006, (REPAIR-006)
If the snap diameter is more than 8.9776 in. (228.032 mm)
Worn.
Examine the snap diameter at location 6.
SUBTASK 72-50-41-220-099 Examine the LP Turbine Shaft (01-200) Snap Diameter
Refer to Figure.
Repair, VRS1497 TASK 72-50-41-300-007, (REPAIR-007)
Not more than 0.003 in. (0.07 mm) in depth
Scored.
Repair, VRS1497 TASK 72-50-41-300-007, (REPAIR-007)
Not more than 0.003 in. (0.07 mm) in depth
Galled.
Repair, VRS1497 TASK 72-50-41-300-007, (REPAIR-007)
Less than 3.6224 in. (92.008 mm)
Worn.
Examine the bearing journal at location 7.
SUBTASK 72-50-41-220-094 Examine the LP Turbine Shaft (01-200) Bearing Journal
Refer to Figure.
Repair, VRS1491 TASK 72-50-41-300-003, (REPAIR-003)
Not more than 0.003 in. (0.07 mm) in depth
Nicked and scratched.
Repair, VRS1502 TASK 72-50-41-300-008, (REPAIR-008)
Less than 3.7392 in. (94.975 mm)
Worn.
Examine the snap diameter at location 8.
SUBTASK 72-50-41-220-100 Examine the LP Turbine Shaft (01-200) Snap Diameter
Refer to Figure.
Repair, VRS1491 TASK 72-50-41-300-003, (REPAIR-003)
Light galling
Galled.
Examine the face at location 9.
SUBTASK 72-50-41-220-101 Examine the LP Turbine Shaft (01-200) Face
Refer to Figure.
Repair, VRS1491 TASK 72-50-41-300-003, (REPAIR-003)
Light axial scores
Scored.
Examine the bolt holes at location 10.
SUBTASK 72-50-41-220-102 Examine the LP Turbine Shaft (01-200) Bolt Holes
Refer to Figure.
SUBTASK 72-50-41-220-103 Examine the LP Turbine Shaft (01-200) Oil Holes
Refer to Figure.
If there are no cracks after local fluorescent penetrant inspection and there is no interference with installation of locking ring, refer to the SPM TASK 70-23-05-230-501. Use CoMat 06-018 FLUORESCENT PENETRANT (POST-EMULSIFIED HIGH SENSITIVITY).
Bent.
Repair, VRS1491 TASK 72-50-41-300-003, (REPAIR-003)
Not more than 0.019 in. (0.50 mm) in depth
Grooved, nicked, dented and scratched.
Repair, VRS1491 TASK 72-50-41-300-003 (REPAIR-003)
Not more than 0.098 in. (2.5 mm) in axial direction and not more than 0.098 in. (2.5 mm) in circumferential direction at corner from one side
Missing material.
Examine the tangs (forward and aft end) at location 12.
SUBTASK 72-50-41-220-104 Examine the LP turbine Shaft (01-200) Tangs
Refer to Figure.
Repair, VRS1491 TASK 72-50-41-300-003, (REPAIR-003)
Not more than 0.004 in. (0.10 mm) in depth
Nicked and scratched.
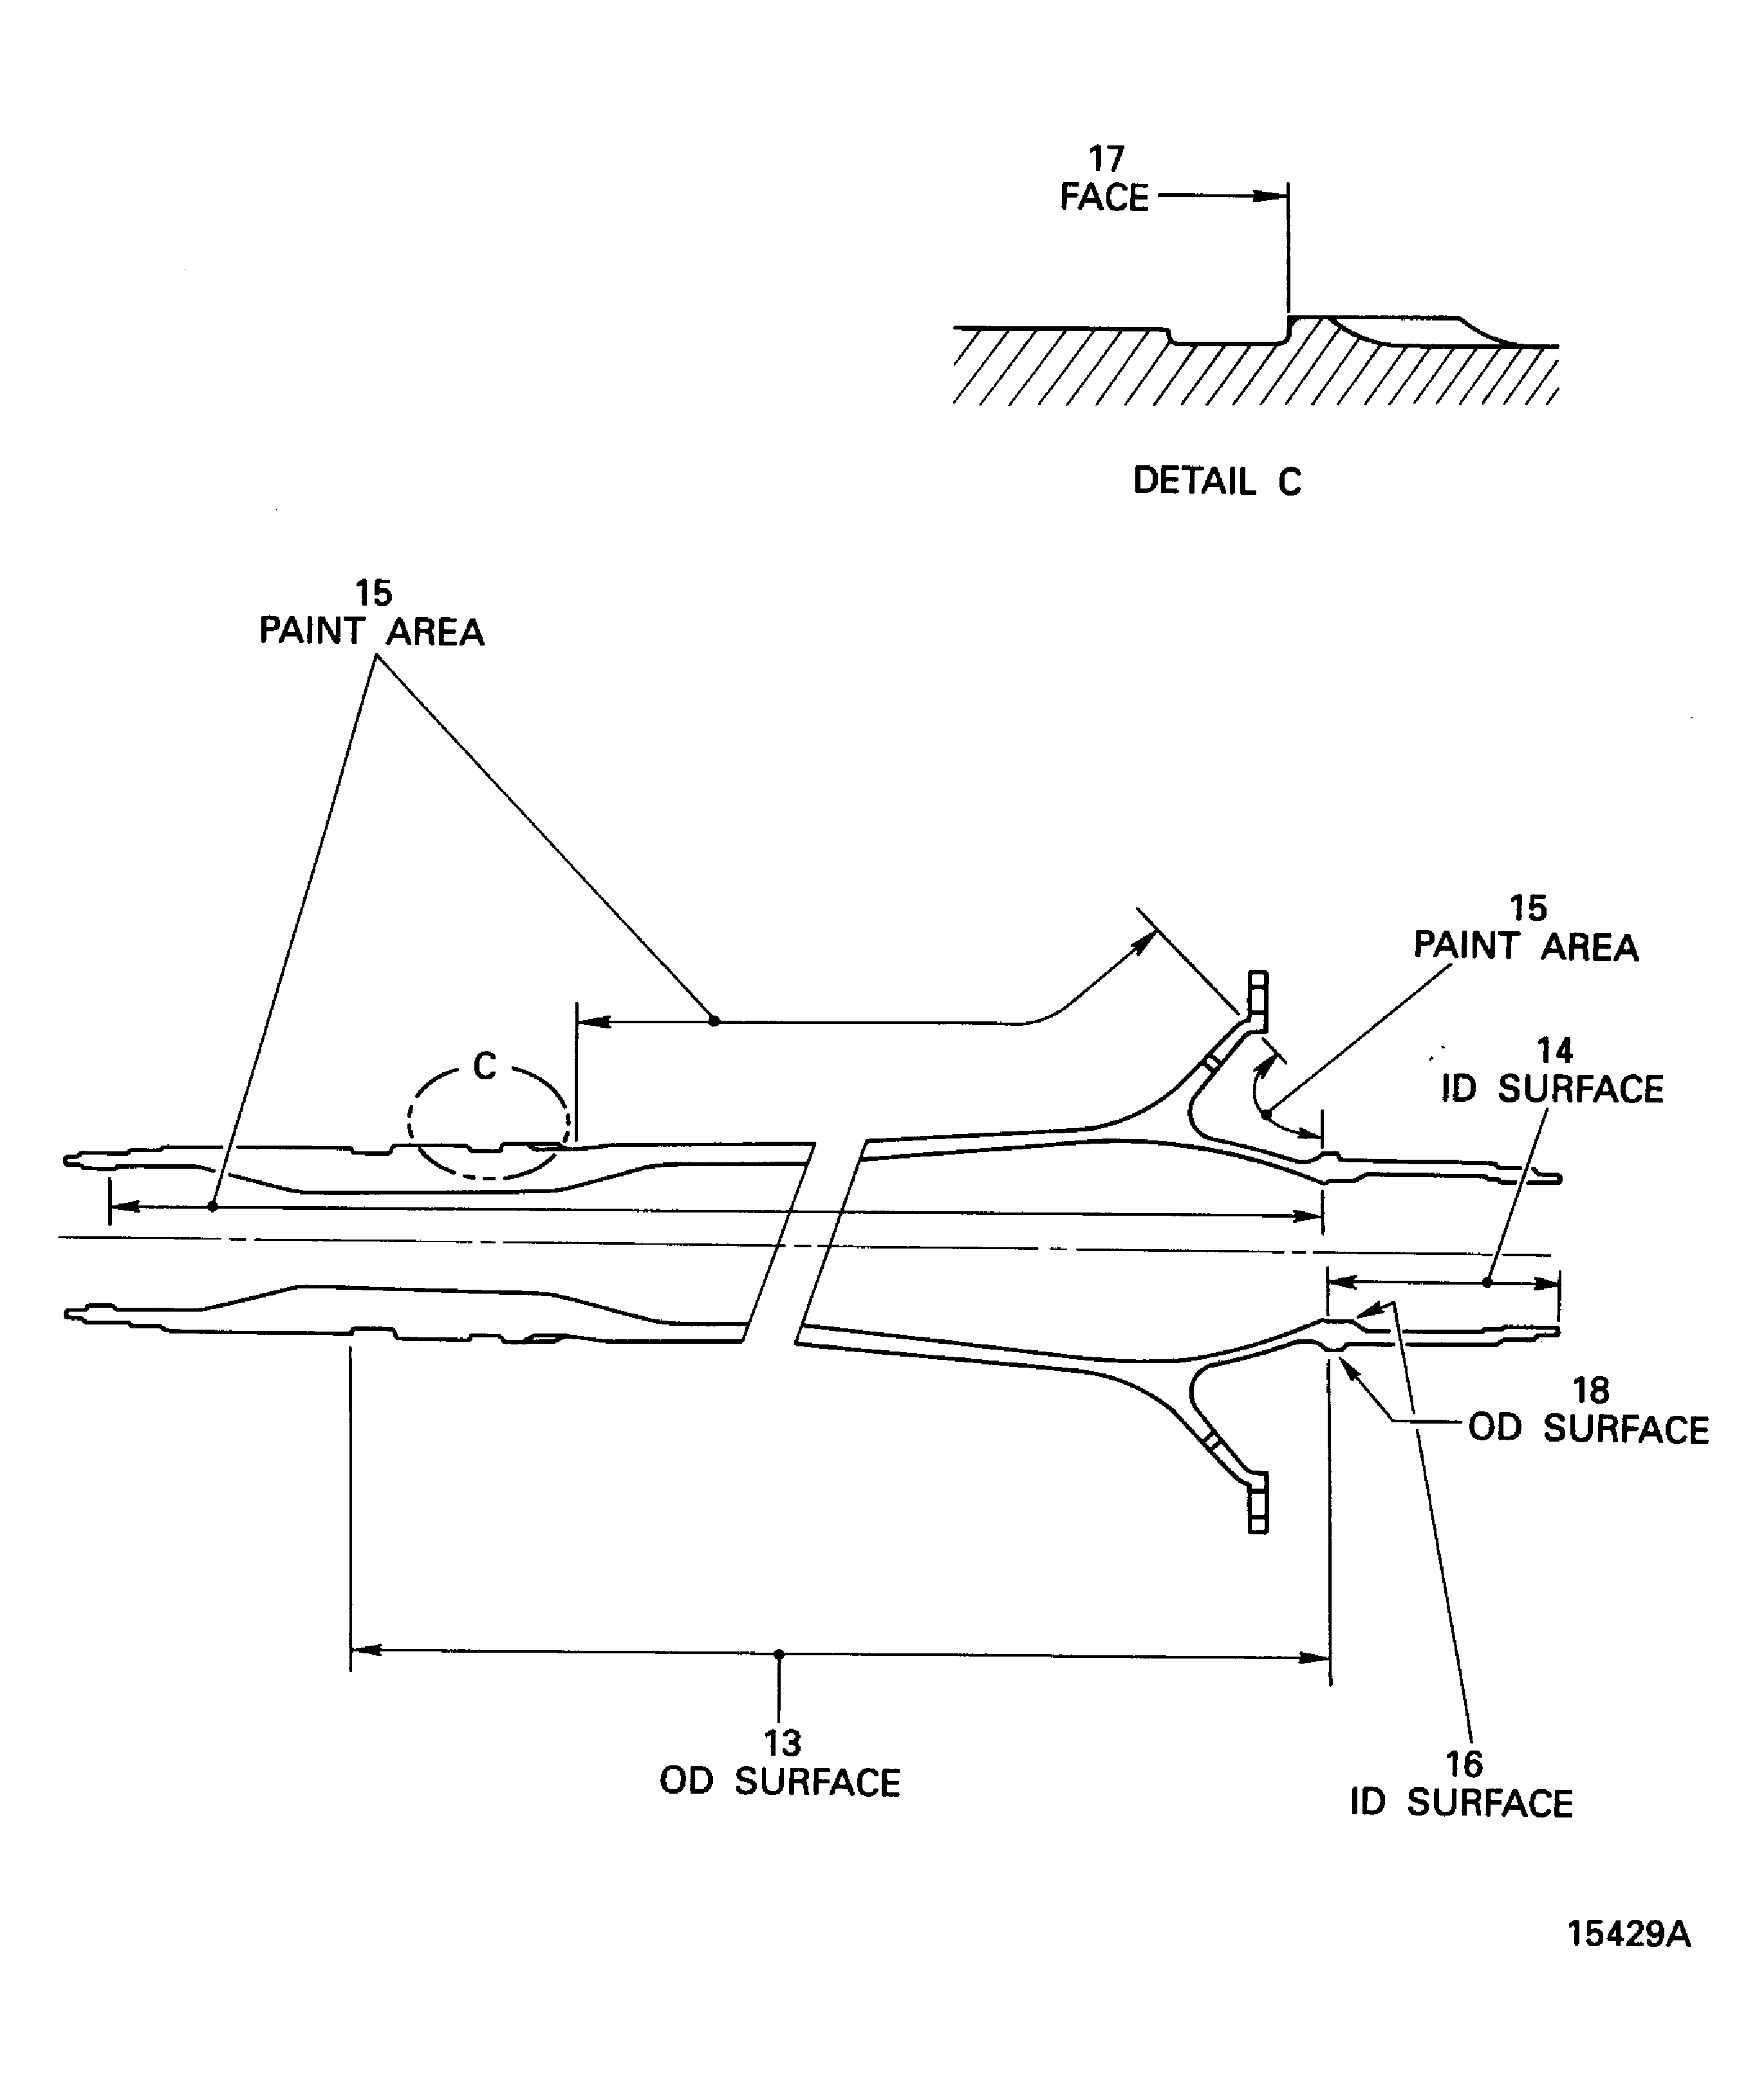
Examine the OD surface at location 13.
SUBTASK 72-50-41-220-105 Examine the LP Turbine Shaft (01-200) OD Surface
Refer to Figure.
SUBTASK 72-50-41-220-106 Examine the LP Turbine Shaft (01-200) ID Surface
Refer to Figure.
Repair, VRS1494 TASK 72-50-41-300-012, (REPAIR-012)
Total of missing paint area and area touched up by VRS1494 is less than 100 sq in. (64516 sq mm)
Repair, VRS1495 TASK 72-50-41-300-011, (REPAIR-011)
More than (1)
Examine the paint at location 15.
SUBTASK 72-50-41-220-107 Examine the LP Turbine Shaft (01-200) Paint
Refer to Figure.
Repair, VRS1491 TASK 72-50-41-300-003, (REPAIR-003)
Not more than 0.003 in. (0.07 mm)
Galled.
Examine the ID surface at location 16.
SUBTASK 72-50-41-220-108 Examine the LP Turbine Shaft (01-200) ID Surface
Refer to Figure.
Repair, VRS1491 TASK 72-50-41-300-003, (REPAIR-003)
For quantities not more than 0.003 in. (0.07 mm)
Repair, VRS1491 TASK 72-50-41-300-003 (REPAIR-003) or Repair, VRS1501 TASK 72-50-41-300-019, (REPAIR-019)
Not more than 0.0098 in. (0.25 mm) in depth if the damage area is not more than 5 per cent of the total circumferential length
Repair, VRS1501 TASK 72-50-41-300-019 (REPAIR-019)
For quantities not more than 0.0098 in. (0.25 mm) in depth
Galled.
Examine the face at location 17.
SUBTASK 72-50-41-220-109 Examine the LP Turbine Shaft (01-200) Face
NOTE
During magnetic inspection, it is recommended to use CoMat 06-011 MAGNETIC PARTICLES, FLUORESCENT, DRY POWDER.Do a crack test on the part that follows:
PART IDENT
PROCEDURE
CURRENT/INSPECT
TASK/SUBTASK
LP turbine
shaft
(1) TB using continuous wet simultaneous inking with the CoMat 06-011 MAGNETIC PARTICLES, FLUORESCENT, DRY POWDER
2000 amp Shaft Outside diameter visually examine for longitudinal and radial defects. Check doubtful indications using low power magnification. If necessary, examine under white light at X15 binocular
5000 amp Flange area. Examine as for shaft outside diameter
(2) Solenoid coil using continous wet or simultaneous inking
6500 A/T Do again the magnetisation and inspection along shaft length. Visually examine for circumferential defects. Check doubtful indications using low power magnification. If necessary, examine under white light at X15 binocular
SUBTASK 72-50-41-240-069 Do a Crack Test on the LP Turbine Shaft (01-200)
Refer to Figure.
Vibro-engrave the new total number at location 18, refer to SPM TASK 70-09-00-400-501.
Mark the new total number of engine cycles on the LP turbine shaft at location 18.
SUBTASK 72-50-41-220-110 Examine the LP Turbine Shaft (01-200) for the Engine Cycles of the Part)
Figure: Locations on the LP Turbine Shaft
Locations on the LP Turbine Shaft

Figure: Locations on the LP Turbine Shaft
Locations on the LP Turbine Shaft

