Export Control
EAR Export Classification: Not subject to the EAR per 15 C.F.R. Chapter 1, Part 734.3(b)(3), except for the following Service Bulletins which are currently published as EAR Export Classification 9E991: SBE70-0992, SBE72-0483, SBE72-0580, SBE72-0588, SBE72-0640, SBE73-0209, SBE80-0024 and SBE80-0025.Copyright
© IAE International Aero Engines AG (2001, 2014 - 2021) The information contained in this document is the property of © IAE International Aero Engines AG and may not be copied or used for any purpose other than that for which it is supplied without the express written authority of © IAE International Aero Engines AG. (This does not preclude use by engine and aircraft operators for normal instructional, maintenance or overhaul purposes.).Applicability
V2500-A1
Common Information
TASK 72-41-00-040-001-A00 HPC Assembly - Disassemble The HPC Cases And Vanes From The Rotor Assembly, Disassembly-001
General
Fig./item numbers in parentheses in the procedure agree with those used in the IPC. Only the primary Fig./item numbers are used. For the Service Bulletin alpha variants refer to the IPC.
Apply the approved penetrating oil before the removal of threaded parts and parts with an interference fit. Let the parts soak before removal. For the approved oils and procedures, refer to the SPM TASK 70-64-00-640-501.
Discard all rubber seal rings, cotter pins and keywashers removed in this procedure.
Remove and discard the CoMat 02-126 LOCKWIRE before any part is disconnected or removed.
Refer to Figure for a sectional view of the HP compressor assembly.
As each item is removed it must be identified with its position on the mini-module.
As each rotor path ring and case is removed it must be put in to IAE 1R18281 Storage rack 1 off.
NOTE
NOTE
Preliminary Requirements
Pre-Conditions
NONESupport Equipment
| Name | Manufacturer | Part Number / Identification | Quantity | Remark |
|---|---|---|---|---|
| Three legged sling | LOCAL | Three legged sling | ||
| IAE 1R18031 Checking fixture | 0AM53 | IAE 1R18031 | 1 | |
| IAE 1R18032 Transducer carrier | 0AM53 | IAE 1R18032 | 1 | |
| IAE 1R18033 Gage mounting plate | 0AM53 | IAE 1R18033 | 1 | |
| IAE 1R18035 Distance sleeve | 0AM53 | IAE 1R18035 | 1 | |
| IAE 1R18037 Distance sleeve | 0AM53 | IAE 1R18037 | 1 | |
| IAE 1R18040 Setting button | 0AM53 | IAE 1R18040 | 1 | |
| IAE 1R18042 Transducer carrier | 0AM53 | IAE 1R18042 | 1 | |
| IAE 1R18045 Distance sleeve | 0AM53 | IAE 1R18045 | 1 | |
| IAE 1R18090 Safety support stand | 0AM53 | IAE 1R18090 | 1 | |
| IAE 1R18214 Build stand | 0AM53 | IAE 1R18214 | 1 | |
| IAE 1R18217 Lift fixture | 0AM53 | IAE 1R18217 | 1 | (alternative to IAE 1R18221) |
| IAE 1R18219 Support ring | 0AM53 | IAE 1R18219 | 1 | |
| IAE 1R18220 Holding fixture | 0AM53 | IAE 1R18220 | 1 | |
| IAE 1R18221 Puller extractor | 0AM53 | IAE 1R18221 | 1 | (alternative to IAE 1R18217) |
| IAE 1R18240 Extractor | 0AM53 | IAE 1R18240 | 3 | |
| IAE 1R18242 Extractor | 0AM53 | IAE 1R18242 | 3 | |
| IAE 1R18243 Extractor | 0AM53 | IAE 1R18243 | 3 | |
| IAE 1R18250 Split ring assembly | 0AM53 | IAE 1R18250 | 1 | |
| IAE 1R18281 Storage rack | 0AM53 | IAE 1R18281 | 1 | |
| IAE 1R18401 Support stand | 0AM53 | IAE 1R18401 | 1 | |
| IAE 1R18434 Case extractor | 0AM53 | IAE 1R18434 | 3 | (alternative to IAE 1R18684) |
| IAE 1R18441 Lifting adapter | 0AM53 | IAE 1R18441 | 1 | |
| IAE 1R18514 Measuring sleeve | 0AM53 | IAE 1R18514 | 1 | |
| IAE 1R18515 Measuring sleeve | 0AM53 | IAE 1R18515 | 1 | |
| IAE 1R18516 Measuring sleeve | 0AM53 | IAE 1R18516 | 1 | |
| IAE 1R18517 Measuring sleeve | 0AM53 | IAE 1R18517 | 1 | |
| IAE 1R18518 Measuring sleeve | 0AM53 | IAE 1R18518 | 1 | |
| IAE 1R18519 Measuring sleeve | 0AM53 | IAE 1R18519 | 1 | |
| IAE 1R18520 Measuring sleeve | 0AM53 | IAE 1R18520 | 1 | |
| IAE 1R18521 Measuring sleeve | 0AM53 | IAE 1R18521 | 1 | |
| IAE 1R18522 Measuring sleeve | 0AM53 | IAE 1R18522 | 1 | |
| IAE 1R18523 Measuring sleeve | 0AM53 | IAE 1R18523 | 1 | |
| IAE 1R18524 Distance sleeve | 0AM53 | IAE 1R18524 | 1 | |
| IAE 1R18525 Measuring sleeve | 0AM53 | IAE 1R18525 | 1 | |
| IAE 1R18526 Measuring sleeve | 0AM53 | IAE 1R18526 | 1 | |
| IAE 1R18527 Measuring sleeve | 0AM53 | IAE 1R18527 | 1 | |
| IAE 1R18528 Measuring sleeve | 0AM53 | IAE 1R18528 | 1 | |
| IAE 1R18529 Measuring sleeve | 0AM53 | IAE 1R18529 | 1 | |
| IAE 1R18530 Measuring sleeve | 0AM53 | IAE 1R18530 | 1 | |
| IAE 1R18531 Measuring sleeve | 0AM53 | IAE 1R18531 | 1 | |
| IAE 1R18533 Setting base | 0AM53 | IAE 1R18533 | 1 | |
| IAE 1R18534 Location ring | 0AM53 | IAE 1R18534 | 1 | |
| IAE 1R18537 Setting plate | 0AM53 | IAE 1R18537 | 1 | |
| IAE 1R18538 Transducer carrier | 0AM53 | IAE 1R18538 | 1 | |
| IAE 1R18539 Transducer carrier | 0AM53 | IAE 1R18539 | 1 | |
| IAE 1R18593 Gage mounting plate | 0AM53 | IAE 1R18593 | 1 | |
| IAE 1R18594 Gage mounting plate | 0AM53 | IAE 1R18594 | 1 | |
| IAE 1R18635 Spanner wrench | 0AM53 | IAE 1R18635 | 1 | |
| IAE 1R18648 Puller extractor | 0AM53 | IAE 1R18648 | 1 | |
| IAE 1R18684 Case extractor | 0AM53 | IAE 1R18684 | 1 | (alternative to IAE 1R18434) |
| IAE 1R18722 Setting button | 0AM53 | IAE 1R18722 | 1 | |
| IAE 1R19633 Split ring assembly | 0AM53 | IAE 1R19633 | 1 | |
| IAE 1R19633 Split ring assembly | 0AM53 | IAE 1R19633 | 1 |
Consumables, Materials and Expendables
| Name | Manufacturer | Part Number / Identification | Quantity | Remark |
|---|---|---|---|---|
| CoMat 02-126 LOCKWIRE | K6835 | CoMat 02-126 | ||
| CoMat 10-058 PENETRATING OIL | X222X | CoMat 10-058 |
Spares
NONESafety Requirements
NONEProcedure
Remove nut, washer, and bolt which attach the control rod to the crankshaft.
Remove nut, washer, and bolt which attach the control rod to the actuator arm.
Remove the control rod.
Remove the actuating control rod.
SUBTASK 72-41-00-040-069 Remove the Crankshaft Assembly from the HP Compressor Front Case
Pre SBE 72-0385 or SBE 72-0416: Remove the four bolts and the four hollow dowels which attach the right hand connector to the upper and lower actuating rings.
SBE 72-0385 or SBE 72-0416: Remove the four bolts which attach the right hand connector to the upper and lower actuating rings.
Remove the VIGV actuating ring left hand and right hand connectors.
SUBTASK 72-41-00-040-051 Remove the Variable Inlet Guide Vanes (VIGV) Actuation Ring Connectors (Pre SBE 72-0385 or SBE 72-0416: and SBE 72-0385or SBE 72-0416:)
Install IAE 1R18217 Lift fixture 1 off or IAE 1R18221 Puller extractor 1 off on the HP compressor assembly.
Install IAE 1R18441 Lifting adapter 1 off on the compressor shaft.
SUBTASK 72-41-00-040-102 Install the Lifting Fixture and the Lifting Adapter on to the HP Compressor Assembly
Refer to Figure.
Remove the six bolts that attach the HP compressor assembly to the IAE 1R18219 Support ring 1 off on the IAE 1R18214 Build stand 1 off.
NOTE
Do not remove the hoist.Install the HP compressor assembly on IAE 1R18090 Safety support stand 1 off. Only lower the HP compressor assembly sufficiently until it is on the support stand.
SUBTASK 72-41-00-040-103 Install the HP Compressor Assembly on the Safety Support Stand
Refer to Figure.
Pre SBE 72-0422: Install IAE 1R18250 Split ring assembly 1 off.
SBE 72-0422: Install IAE 1R19633 Split ring assembly 1 off.
SUBTASK 72-41-00-040-104 Remove the Variable Inlet Guide Vane (VIGV) Front Shroud (Pre SBE 72-0422 and SBE 72-0422)
Use the hoist installed in Step and lift the HP compressor assembly from the support stand.
Install the HP compressor assembly on IAE 1R18214 Build stand 1 off.
SUBTASK 72-41-00-040-105 Install the HP Compressor Assembly in the Build Stand
Refer to Figure.
Pre SBE 72-0385 or SBE 72-0416: Remove the five bolts and the five hollow dowels which attach the right hand connector to the upper and lower actuating rings.
SBE 72-0385 or SBE 72-0416: Remove the five bolts and one washer which attach the right hand connector to the upper and lower actuating rings.
Pre SBE 72-0385 or SBE 72-0416: Remove the four bolts and the four hollow dowels which attach the left hand connector to the upper and lower actuating rings.
SBE 72-0385 or SBE 72-0416: Remove the four bolts which attach the left hand connector to the upper and lower actuating rings.
Remove the stage 3 actuating ring left hand and right hand connector.
SUBTASK 72-41-00-040-052 Remove the Stage 3 Actuating Ring Connectors (Pre SBE 72-0385 or SBE 72-0416: and SBE 72-0385 or SBE 72-0416:)
Refer to Figure.
Pre SBE 72-0348: Remove the four bolts and the four hollow dowels which attach the right hand connector to the upper and lower actuating rings.
Pre SBE 72-0385 or SBE 72-0416: Remove the four bolts and the four washers which attach the right hand connector to the upper and lower actuating rings.
SBE 72-0348: Remove the four bolts and four washers which attach the right hand connector to the upper and lower actuating rings.
SBE 72-0385 or SBE 72-0416: Remove the four bolts and two washers which attach the right hand connector to the upper and lower actuating rings.
Remove the stage 4 actuating ring left hand and right hand connector.
SUBTASK 72-41-00-040-053 Remove the Stage 4 Actuating Ring Connector (Pre SBE 72-0348, Pre SBE 72-0385 or SBE 72-0416:, SBE 72-0348 and SBE 72-0385 or SBE 72-0416:)
Refer to Figure.
Pre SBE 72-0348: Remove the four bolts and the four hollow dowels which attach the right hand connector to the upper and lower actuating rings.
Pre SBE 72-0385 or SBE 72-0416: Remove the four bolts and the four washers which attach the right hand connector to the upper and lower actuating rings.
SBE 72-0348: Remove the four bolts and four washers which attach the right hand connector to the upper and lower actuating rings.
SBE 72-0385 or SBE 72-0416: Remove the four bolts and two washers which attach the right hand connector to the upper and lower actuating rings.
Remove the stage 5 actuating ring left hand and right hand connectors.
SUBTASK 72-41-00-040-054 Remove the Stage 5 Actuating Ring Connectors (Pre SBE 72-0348, Pre SBE 72-0385 or SBE 72-0416:, SBE 72-0348 and SBE 72-0385 or SBE 72-0416:)
Refer to Figure.
SUBTASK 72-41-00-040-055 Remove the Stage 6 Actuating Ring Connectors
Refer to Figure.
Put IAE 1R18220 Holding fixture 1 off on the compressor rear outer case and the HP compressor shaft.
SUBTASK 72-41-00-040-056 Install the Holding Fixture on the Compressor Rear Outer Case
Refer to Figure.
Adjust the position of the holding fixture. Refer to Figure.
Seperate the two halves of the HP compressor front case and remove the sealing strips from each side of the split line. Remove the two halves of the HP compressor front case. Refer to Figure.
NOTE
The support ring is installed on the build stand.Remove the HP compressor front case and the support ring.
Install IAE 1R18401 Support stand 1 off and IAE 1R18219 Support ring 1 off on the build stand.
Make sure the front support cone stiffening ring is correctly installed in the support ring. Refer to Figure.
Remove the holding fixture.
SUBTASK 72-41-00-040-058 Remove the HP Compressor Front Case
Refer to Figure.
SUBTASK 72-41-00-040-059-A00 Remove the Cross Key Location Segments and the Rear Seal Housing (Pre SBE 72-0263)
Refer to Figure.
SUBTASK 72-41-00-040-059-B00 Remove the Cross Key Location Segments (SBE 72-0263)
Install the IAE 1R18648 Puller extractor 1 off in the threaded hole in the blanking plug. Use the puller to remove the plug.
Remove the three stage 8, 9 and 11 borescope access blanking plugs.
SUBTASK 72-41-00-040-077-A00 Remove the Stages 7, 8, 9 and 11 Borescope Access Blanking Plugs and Cover (Pre SBE 72-0100)
Install two of the bolts removed in Step into the threaded bolt holes in the blanking plug. Tighten the bolts slowly by equal amounts to push the plug from the compressor case.
Remove the stages 8, 9 and 11 borescope access blanking plugs.
SUBTASK 72-41-00-040-077-B00 Remove the Stages 7, 8, 9 and 11 Borescope Access Blanking Plugs and Cover,and 72-41-00-990-107-004 (SBE 72-0100 and SBE 70-0368)
Install IAE 1R18217 Lift fixture 1 off on the compressor rear outer case.
SUBTASK 72-41-00-040-060-A00 Remove the Compressor Rear Outer Case (Pre SBE 72-0025)
Install IAE 1R18217 Lift fixture 1 off on the compressor rear outer case.
Use the hoist and the three legged sling installed in Step. Lift the compressor rear outer case vertically from the HP compressor assembly.
Remove the compressor rear outer case.
SUBTASK 72-41-00-040-060-B00 Remove the Compressor Rear Outer Case (SBE 72-0025)
Refer to Figure.
SUBTASK 72-41-00-040-061 Remove the Stage 12 Rotor Path Heatshields and the Cross Key Location Ring
Refer to Figure.
Remove the 10 nuts, bolts and washers which attach the stage 10 front heatshield to the stage 10 case. Remove the two halves of the stage 10 front heatshield. Use IAE 1R18635 Spanner wrench 1 off to hold the bolts. Refer to Figure.
Use IAE 1R18240 Extractor 3 off. Install the three extractors at equal distances around the stage 11 case.
Remove the stage 12 rotor path ring. Refer to detail A on Figure.
Use IAE 1R18240 Extractor 3 off. Install the three extractors at equal distances around the stage 11 case.
Do Step again until the stage 11 case is removed.
Remove the stage 11 case. Refer to detail B on Figure.
Remove the stage 11 rotor path ring. If the stage 11 rotor path ring is a tight fit use the extractors used in Step to remove it.
SUBTASK 72-41-00-040-062-00 Remove the Stage 12 Rotor Path Ring, the Stage 11 Case, Stator Vanes and Rotor Path Ring
Refer to Figure.
Remove the 37 nuts and bolts which attach the stage 10 case and rotor path ring to the stage 9 case. Use IAE 1R18635 Spanner wrench 1 off to remove the nuts.
Use IAE 1R18240 Extractor 3 off to remove the stage 10 case.
Do Step again until the stage 10 case is removed.
Remove the stage 10 case. Refer to detail B on Figure.
Remove the stage 10 rotor path ring. If the stage 10 rotor path ring is a tight fit use the extractors used in Step to remove it.
SUBTASK 72-41-00-040-063 Remove the Stage 10 Case, Stator Vanes and Rotor Path Ring
Refer to Figure.
Use IAE 1R18240 Extractor 3 off to remove the stage 9 case.
Do Step again until the stage 9 case is removed.
Remove the stage 9 case. Refer to detail B on Figure.
SUBTASK 72-41-00-040-064 Remove the Stage 9 Case, Rotor Path Ring and Stator Vanes
Use IAE 1R18240 Extractor 3 off to remove the stage 8 case.
Do Step again until the stage 8 case is removed.
Remove the stage 8 case. Refer to detail B on Figure.
Use IAE 1R18684 Case extractor 3 off to remove the stage 8 rotor path ring.
Do Step again until the stage 8 rotor path ring is removed. Do not remove the three case extractors.
Remove the stage 8 rotor path ring. Refer to detail A on Figure.
Remove the 37 nuts and bolts which attach the stage 7 case to the stage 7 rotor path ring and the front support cone. Figure.
Install IAE 1R18684 Case extractor or IAE 1R18434 Case extractor, 3 off.
Do Step again until the stage 7 case is removed.
Remove the stage 7 case. Refer to detail A on Figure.
SUBTASK 72-41-00-040-065 Remove the Stage 8 Case, Rotor Path Ring, Stator Vanes and the Stage 7 Case
Use IAE 1R18242 Extractor 3 off to remove the stage 7 rotor path ring.
Do Step until the stage 7 rotor path ring is removed.
Remove the stage 7 rotor path ring. Refer to detail B on Figure.
SUBTASK 72-41-00-040-066 Remove the Stage 7 Stator Vanes and Rotor Path Ring, and 72-41-00-990-051
Refer to Figure.
Use IAE 1R18243 Extractor 3 off to remove the front support cone.
Do Step until the front support cone is removed.
Remove the front support cone. Refer to detail C on Figure.
SUBTASK 72-41-00-040-067 Remove the Front Support Cone and the Front Support Cone Stiffening Ring
Refer to Figure.
SUBTASK 72-41-00-040-068 Remove the Support Ring and the Support Stand from the Build Stand
Assemble the HP compressor rear cases and vanes as given in TASK 72-41-20-440-001-A00, TASK 72-41-20-440-002-A00, TASK 72-41-20-440-003-A00, TASK 72-41-20-440-004 and TASK 72-41-20-440-005-A00. Assemble the assembly with the support cone stiffening ring front flange down on a clean work surface.
SUBTASK 72-41-00-040-070 Assemble the HP Compressor Rear Cases and Vanes
Install the compressor rear outer case as given in TASK 72-41-00-440-001-A00.
Install the seal housing and cross key location ring as given in TASK 72-41-00-440-001-A00.
SUBTASK 72-41-00-040-071 Install the Compressor Rear Outer Case on the HP Compressor Rear Cases and Vanes
Refer to Figure.
Use a suitable hoist and lift the IAE 1R18217 Lift fixture 1 off to the HP compressor rear outer case.
SUBTASK 72-41-00-040-072 Install the Lifting Fixture on the HP Compressor Rear Outer Case
Refer to Figure.
NOTE
Optional procedure to measure the HP compressor rear case rotor path linings is to use a 3 axis measurement machine.Install IAE 1R18534 Location ring 1 off on the IAE 1R18031 Checking fixture 1 off.
SUBTASK 72-41-00-040-073 Install the HP Compressor Rear Cases and Vanes in the Checking Fixture
Refer to Figure.
Install IAE 1R18537 Setting plate 1 off on the IAE 1R18533 Setting base 1 off.
Install the IAE 1R18722 Setting button 1 off in the setting plate and setting base. Locate the setting button in the stage 12 rotor path ring location in the setting plate. Align the setting button and setting plate with the slot in the setting base. The tools are correctly set when the setting button goes through the setting plate in to the slot in the setting base.
Install the IAE 1R18033 Gage mounting plate 1 off on the pillar of the setting base.
Install the two handknobs and plates removed in Step.
Install the IAE 1R18032 Transducer carrier 1 off on the gage mounting plate.
Lock the transducer carrier in its initial position with the handknob released in Step.
Make sure the transducer carrier operates correctly.
SUBTASK 72-41-00-040-074 Assemble and set the Tools to Measure the Rotor Path Ring Radius
Refer to Figure.
Install the IAE 1R18525 Measuring sleeve 1 off on the pillar of IAE 1R18031 Checking fixture 1 off.
Remove IAE 1R18033 Gage mounting plate 1 off and the IAE 1R18032 Transducer carrier 1 off from the setting base.
Lock the transducer carrier in its initial position with the handknob released in Step.
Move the puller, moved in Step to its initial position.
Set the tool to measure the stage 12 rotor path ring radius.
NOTE
Refer to TASK 72-41-21-200-014-A00, SUBTASK 72-41-21-220-147 (INSPECTION/CHECK-014, CONFIG-001).Write down the values given on the measuring instrument at eight (8) equal angular locations.
Measure the stage 12 rotor path ring radius.
SUBTASK 72-41-00-040-075 Measure the Stage 12 Rotor Path Ring Radius
Refer to Figure.
Locate the IAE 1R18722 Setting button 1 off through the correct location in IAE 1R18537 Setting plate 1 off on the IAE 1R18533 Setting base 1 off.
Install the IAE 1R18032 Transducer carrier 1 off and IAE 1R18033 Gage mounting plate 1 off on the setting base.
Use the procedure in Step to set the tools to the correct value.
Install the IAE 1R18524 Distance sleeve 1 off on the IAE 1R18031 Checking fixture 1 off.
Install the transducer carrier and gage mounting plate on the distance sleeve on the checking fixture. Refer to the procedure given in Step.
Turn the HP compressor rear cases smoothly in a clockwise direction.
NOTE
Refer to TASK 72-41-21-200-012-A00, SUBTASK 72-41-21-220-132 (INSPECTION/CHECK-010, CONFIG-001).Calculate and write down the eight (8) values of the stage 11 rotor path ring radius.
Radius = A - B
where A = tool setting radius = 10.165 in. (258.20 mm)
B = Measuring instrument values
Refer to Step for examples to calculate the radius
Measure the stage 11 rotor path ring radius.
SUBTASK 72-41-00-040-076 Measure the Stage 11 Rotor Path Ring Radius
Refer to Figure.
Locate the IAE 1R18722 Setting button 1 off through the correct location in the IAE 1R18537 Setting plate 1 off on the IAE 1R18533 Setting base 1 off.
Install the IAE 1R18032 Transducer carrier 1 off and IAE 1R18033 Gage mounting plate 1 off on the setting base.
Use the procedure given in Step to set the tools to the correct value.
Install the IAE 1R18523 Measuring sleeve 1 off on the IAE 1R18031 Checking fixture 1 off.
Install the transducer carrier and gage mounting plate on the measuring sleeve on the checking fixture. Refer to Step for the procedure.
Turn the HP compressor rear cases smoothly in a clockwise direction.
NOTE
Refer to TASK 72-41-21-200-009-A00, SUBTASK 72-41-21-220-114 (INSPECTION/CHECK-009, CONFIG-001).Calculate and write down the eight (8) values of the stage 10 rotor path ring radius.
Radius = A - B
where A = tool setting radius = 10.205 in (259.20 mm)
B = Measuring instrument values
Refer to Step for examples to calculate the radius
Measure the stage 10 rotor path ring radius.
SUBTASK 72-41-00-040-077 Measure the Stage 10 Rotor Path Ring Radius
Refer to Figure.
Locate the IAE 1R18722 Setting button 1 off through the correct location in the IAE 1R18537 Setting plate 1 off on the IAE 1R18533 Setting base 1 off.
Install the IAE 1R18032 Transducer carrier 1 off and IAE 1R18033 Gage mounting plate 1 off on the setting base.
Use the procedure given in Step to set the tools to the correct value.
Install the IAE 1R18522 Measuring sleeve 1 off on the IAE 1R18031 Checking fixture 1 off.
Install the transducer carrier and gage mounting plate on the measuring sleeve on the checking fixture. Refer to Step for the procedure.
NOTE
Refer to TASK 72-41-21-200-008-A00, SUBTASK 72-41-21-220-099 (INSPECTION/CHECK-008, CONFIG-001).Write down the values given on the measuring instrument at the eight (8) equal angular locations.
Calculate and write down the eight (8) values of the stage 9 rotor path ring radius.
Radius = A - B
Where A = Tool setting ring radius = 10.205 in. (259.20 mm)
B = Measuring instrument values
Refer to Step for examples to calculate the radius
Measure the stage 9 rotor path ring radius.
SUBTASK 72-41-00-040-078 Measure the Stage 9 Rotor Path Ring Radius
Refer to Figure.
Locate the IAE 1R18722 Setting button 1 off through the correct location in the IAE 1R18537 Setting plate 1 off on the IAE 1R18533 Setting base 1 off.
Install the IAE 1R18032 Transducer carrier 1 off and IAE 1R18033 Gage mounting plate 1 off on the setting base.
Use the procedure given in Step to set the tools to the correct values.
Install the IAE 1R18521 Measuring sleeve 1 off on the IAE 1R18031 Checking fixture 1 off.
Install the transducer carrier and gage mounting plate on the measuring sleeve on the checking fixture. Refer to Step for the procedure.
NOTE
Refer to TASK 72-41-21-200-002-A00, SUBTASK 72-41-21-220-084 (INSPECTION/CHECK-002, CONFIG-001).Write down the values given on the measuring instrument at eight (8) equal angular locations.
Calculate and write down the eight (8) values of the stage 8 rotor path ring radius.
Radius = A - B
where A = Tool setting radius = 10.224 in. (259.70 mm)
B = Measuring instrument values
Refer to Step for examples to calculate the radius
Measure the stage 8 rotor path ring radius.
SUBTASK 72-41-00-040-079 Measure the Stage 8 Rotor Path Ring Radius
Refer to Figure.
SBE 72-0463: Engine - HP compressor - Increase in tip clearance to stage 6 and stage 7 rotor paths
Locate the IAE 1R18722 Setting button 1 off through the correct location in the IAE 1R18537 Setting plate 1 off on the IAE 1R18533 Setting base 1 off.
Install the IAE 1R18032 Transducer carrier 1 off and IAE 1R18033 Gage mounting plate 1 off on the setting base.
Use the procedure given in Step to set the tools to the correct values.
Install the IAE 1R18520 Measuring sleeve 1 off on the IAE 1R18031 Checking fixture 1 off.
Install the transducer carrier and gage mounting plate on the measuring sleeve on the checking fixture. Refer to Step for the procedure.
NOTE
Refer to TASK 72-41-21-200-001-A00, SUBTASK 72-41-21-220-061 (INSPECTION/CHECK-001, CONFIG-001).Write down the values given on the measuring instrument at eight (8) equal angular locations.
Calculate and write down the eight (8) values of the stage 7 rotor path ring radius.
Radius = A - B
Pre SBE 73-0463: where A = Tool setting radius = 10.264 in (260.70 mm)
SBE 73-0463: where A = Tool setting radius = 10.283 in (261.20 mm)
B = Measuring instrument values
Refer to Step for examples to calculate the radius
Measure the stage 7 rotor path ring radius.
SUBTASK 72-41-00-040-080 Measure the Stage 7 Rotor Path Ring Radius (Pre SBE 72-0463 and SBE 72-0463)
Refer to Figure.
Use the IAE 1R18533 Setting base 1 off, IAE 1R18537 Setting plate 1 off and IAE 1R18040 Setting button 1 off assembled in Step.
Install the IAE 1R18538 Transducer carrier 1 off on the IAE 1R18593 Gage mounting plate 1 off.
Set the tools to measure the stage 11 stator vane radius. Refer to the procedure in Step for the procedure to set the tools.
SUBTASK 72-41-00-040-081 Assemble and Set the Tools to Measure the Stator Vane Tip Radii
Refer to Figure.
Install IAE 1R18530 Measuring sleeve 1 off on the IAE 1R18031 Checking fixture 1 off.
Install the IAE 1R18538 Transducer carrier 1 off and the IAE 1R18593 Gage mounting plate 1 off on the measuring sleeve on the checking fixture.
Calculate and write down the stage 11 stator vane tip radius.
Radius = A - B
where A = Tool setting radius = 9.350 in (237.50 mm)
B = Measuring instrument values
Refer to Step for examples to calculate the radius
All stage 11 stator vanes with a radius of more than 9.356 in. (237.64 mm) must be placed in a separate container. Identify each of the vanes with its radius. Refer to the SPM TASK 70-09-01-400-501.
SUBTASK 72-41-00-040-082 Measure the Stage 11 Stator Vane Tip Radius
Refer to Figure.
Locate the IAE 1R18040 Setting button 1 off through the correct location in the IAE 1R18537 Setting plate 1 off on the IAE 1R18533 Setting base 1 off.
Install the IAE 1R18538 Transducer carrier 1 off and the IAE 1R18593 Gage mounting plate 1 off on the setting base.
Set the tools to measure the stage 10 stator vane tip radius. Use the procedure given in Step.
Install the IAE 1R18529 Measuring sleeve 1 off on the IAE 1R18031 Checking fixture 1 off.
Calculate and write down the stage 10 stator vane tip radius.
Radius = A - B
where A = Tool setting radius = 9.350 in. (237.50 mm)
B = Measuring instrument values
Refer to Step for examples to calculate the radius
All the stage 10 stator vanes with a radius of more than 9.353 in (237.57 mm) must be placed in a separate container. Identify each of the vanes with its radius. Refer to the SPM TASK 70-09-01-400-501.
SUBTASK 72-41-00-040-083 Measure the Stage 10 Stator Vane Tip Radius
Refer to Figure.
Locate the IAE 1R18040 Setting button 1 off through the correct location in the IAE 1R18537 Setting plate 1 off on the IAE 1R18533 Setting base 1 off.
Install the IAE 1R18538 Transducer carrier 1 off and the IAE 1R18593 Gage mounting plate 1 off on the setting base.
Set the tools to measure the stage 9 stator vane tip radius. Use the procedure given in Step.
Install the IAE 1R18528 Measuring sleeve 1 off on the IAE 1R18031 Checking fixture 1 off.
Calculate and write down the stage 9 stator vane tip radius.
Radius = A - B
where A = Tool setting radius = 9.331 in. (237.00 mm)
B = Measuring instrument values
Refer to Step for examples to calculate the radius
All the stage 9 stator vanes with a radius of more than 9.334 in (237.08 mm) must be placed in a separate container. Identify each of the vanes with its radius. Refer to the SPM TASK 70-09-01-400-501.
SUBTASK 72-41-00-040-084 Measure the Stage 9 Stator Vane Tip Radius
Refer to Figure.
Locate the IAE 1R18040 Setting button 1 off through the correct location in the IAE 1R18537 Setting plate 1 off on the IAE 1R18533 Setting base 1 off.
Install the IAE 1R18538 Transducer carrier 1 off and the IAE 1R18593 Gage mounting plate 1 off on the setting base.
Set the tools to measure the stage 8 stator vane tip radius. Use the procedure given in Step.
Install the IAE 1R18527 Measuring sleeve 1 off on the IAE 1R18031 Checking fixture 1 off.
Calculate and write down the stage 8 stator vane tip radius.
Radius = A - B
where A = Tool setting radius = 9.193 in (233.50 mm)
B = Measuring instrument values
Refer to Step for examples to calculate the radius
All the stage 8 stator vanes with a radius of more than 9.20 in. (233.68 mm) must be placed in a separate container. Identify each of the vanes with its radius. Refer to the SPM TASK 70-09-01-400-501.
SUBTASK 72-41-00-040-085 Measure the Stage 8 Stator Vane Tip Radius
Refer to Figure.
Locate the IAE 1R18040 Setting button 1 off through the correct location in the IAE 1R18537 Setting plate 1 off in the IAE 1R18533 Setting base 1 off.
Install the IAE 1R18538 Transducer carrier 1 off and the IAE 1R18593 Gage mounting plate 1 off on the setting base.
Set the tools to measure the stage 7 stator vane tip radius. Use the procedure given in Step.
Install the IAE 1R18526 Measuring sleeve 1 off on the IAE 1R18031 Checking fixture 1 off.
Calculate and write down the stage 7 stator vane tip radius.
Radius = A - B
where A = Tool setting radius = 8.976 in (228.00 mm)
B = Measuring instrument values
Refer to Step for examples to calculate the radius
All the stage 7 stator vanes with a radius of more than 8.972 in. (227.88 mm) must be placed in a separate container. Identify each of the vanes with its radius. Refer to the SPM TASK 70-09-01-400-501.
SUBTASK 72-41-00-040-086 Measure the Stage 7 Stator Vane Tip Radius
Install the IAE 1R18217 Lift fixture 1 off on the HP compressor rear cases and vanes as given in SUBTASK 72-41-00-040-060.
SUBTASK 72-41-00-040-087 Remove the HP Compressor Rear Cases and Vanes from the Checking Fixture
Disassemble the HP compressor rear cases and vanes as given in TASK 72-41-00-040-001-A00 (DISASSEMBLY, CONFIG-001) and TASK 72-41-20-040-001 (DISASSEMBLY).
SUBTASK 72-41-00-040-088 Disassemble the HP Compressor Rear Cases and Vanes
Assemble the HP compressor front cases as given in TASK 72-41-30-440-001-A00 (ASSEMBLY-001, CONFIG-001), TASK 72-41-30-440-001-B00 (ASSEMBLY-001, CONFIG-002) and TASK 72-41-30-440-002-A00 (ASSEMBLY-002, CONFIG-001) to TASK 72-41-30-440-009-A00 (ASSEMBLY-009, CONFIG-001).
SUBTASK 72-41-00-040-089 Assemble the HP Compressor Front Cases
NOTE
Optional procedure to measure the HP compressor forward case rotor path linings, stages 3, 4 and 5 inner stator rings is to use a 3 axis measurement machine.Install the HP compressor front cases in the IAE 1R18031 Checking fixture 1 off as given in TASK 72-41-30-440-001-A00 (ASSEMBLY-001, CONFIG-001).
SUBTASK 72-41-00-040-090 Install the HP Compressor Front Cases in the Checking Fixture
Refer to Figure.
Install IAE 1R18537 Setting plate 1 off on the IAE 1R18533 Setting base 1 off.
Install the IAE 1R18722 Setting button 1 off through the stage 6 location in the setting plate. Make sure the setting button goes in the correct location in the setting base.
Install the IAE 1R18033 Gage mounting plate 1 off with the IAE 1R18032 Transducer carrier 1 off on the setting base.
Set the tools to measure the stage 6 rotor path ring radius. Use the procedure given in Step.
SUBTASK 72-41-00-040-091 Assemble and Set the Tools to Measure the Rotor Path Ring Radius
Refer to Figure.
Install IAE 1R18519 Measuring sleeve 1 off on the pillar of the checking fixture.
Install the IAE 1R18033 Gage mounting plate 1 off and IAE 1R18032 Transducer carrier 1 off on the measuring sleeve installed in step A.
NOTE
Refer to TASK 72-41-31-200-005-A00, SUBTASK 72-41-31-220-080 (INSPECTION/CHECK-005, CONFIG-001).Write down the values given on the measuring instrument at eight (8) equal angular locations.
Calculate and write down the eight (8) values of the stage 6 rotor path ring radius.
Radius = A - B
Pre SBE 72-0463: where A = Tool setting radius = 10.283 in (261.20 mm)
SBE 72-0463: where A = Tool setting radius = 10.315 in (262.00 mm)
B = Measuring instrument values
Refer to Step for examples to calculate the radius
Measure the stage 6 rotor path ring radius.
SUBTASK 72-41-00-040-092 Measure the Stage 6 Rotor Path Ring Radius (Pre SBE 72-0463 and SBE 72-0463)
Refer to Figure.
Locate the IAE 1R18722 Setting button 1 off through the stage 5 location in the IAE 1R18537 Setting plate 1 off on the IAE 1R18533 Setting base 1 off.
Install the IAE 1R18033 Gage mounting plate 1 off with the IAE 1R18032 Transducer carrier 1 off on the setting base.
Set the tools to measure the stage 5 rotor path ring radius. Use the procedure given in Step.
Install the IAE 1R18037 Distance sleeve 1 off on the pillar of the IAE 1R18031 Checking fixture 1 off.
Install the transducer carrier and gage mounting plate on the measuring sleeve on the checking fixture. Refer to Step for the procedure.
Calculate and write down the eight (8) values of the stage 5 rotor path ring radius.
Radius = A - B
where A = Tool setting radius = 10.362 in. (263.20 mm)
B = Measuring instrument values
Refer to Step for examples to calculate the radius
Measure the stage 5 rotor path ring radius.
SUBTASK 72-41-00-040-093 Measure the Stage 5 Rotor Path Ring Radius
Refer to Figure.
Locate the IAE 1R18722 Setting button 1 off through the stage 4 location in the IAE 1R18537 Setting plate 1 off on the IAE 1R18533 Setting base 1 off.
Install the IAE 1R18033 Gage mounting plate 1 off with the IAE 1R18032 Transducer carrier 1 off on the setting base.
Set the tools to measure the stage 4 rotor path ring radius. Use the procedure given in Step.
Install the IAE 1R18518 Measuring sleeve 1 off on the pillar of the IAE 1R18031 Checking fixture 1 off.
Install the transducer carrier and gage mounting plate on the measuring sleeve on the checking fixture. Refer to Step for the procedure.
NOTE
Refer to TASK 72-41-31-200-003-A00, SUBTASK 72-41-31-220-072 (INSPECTION/CHECK-003, CONFIG-001).Write down the value given on the measuring instrument at eight (8) equal angular locations.
Calculate and write down the eight (8) values of the stage 4 rotor path ring radius.
Radius = A - B
Pre SBE 72-0449: where A = Tool setting radius = 10.559 in. (268.20 mm)
SBE 72-0449: where A = Tool setting radius = 10.599 in. (269.20 mm)
B = Measuring instrument values
Refer to Step for examples to calculate the radius
Measure the stage 4 rotor path ring radius.
SUBTASK 72-41-00-040-094 Measure the Stage 4 Rotor Path Ring Radius (Pre SBE 72-0449 and SBE 72-0449)
Refer to Figure.
Locate the IAE 1R18722 Setting button 1 off through the stage 3 location in the IAE 1R18537 Setting plate 1 off on the IAE 1R18533 Setting base 1 off.
Install the IAE 1R18033 Gage mounting plate 1 off with the IAE 1R18032 Transducer carrier 1 off on the setting base.
Set the tools to measure the stage 3 rotor path ring radius. Use the procedure given in Step.
Install the IAE 1R18035 Distance sleeve 1 off on the pillar of the IAE 1R18031 Checking fixture 1 off.
Install the transducer carrier and gage mounting plate on the measuring sleeve on the checking fixture. Refer to Step for the procedure.
NOTE
Refer to TASK 72-41-31-200-001-A00, SUBTASK 72-41-31-220-052 (INSPECTION/CHECK-001, CONFIG-001).Write down the values given on the measuring instrument at eight (8) equal angular locations.
Calculate and write down the eight (8) values of the stage 3 rotor path ring radius.
Radius = A - B
where A = Tool setting radius = 11.070 in (281.20 mm)
B = Measuring instrument values
Refer to Step for examples to calculate the radius
Measure the stage 3 rotor path ring radius.
SUBTASK 72-41-00-040-095 Measure the Stage 3 Rotor Path Ring Radius
Locate the IAE 1R18040 Setting button 1 off through the correct location in the IAE 1R18537 Setting plate 1 off on the IAE 1R18533 Setting base 1 off.
Install the IAE 1R18594 Gage mounting plate 1 off, IAE 1R18539 Transducer carrier 1 off on the setting base.
Set the tools to measure the stage 3 half ring seal radius. Use the procedure in Step.
Install the IAE 1R18514 Measuring sleeve 1 off on the IAE 1R18031 Checking fixture 1 off.
Align the transducer on the stage 3 half ring seal. Refer to Step for the procedure.
NOTE
Refer to TASK 72-41-33-200-002, SUBTASK 72-41-33-220-061 (INSPECTION/CHECK-002, CONFIG-001).Write down the values given on the measuring instrument at eight (8) equal angular locations.
Calculate and write down the eight (8) values of the stage 3 half ring seal radius.
Radius = A - B
where A = Tool setting radius = 5.197 in (132.00 mm)
B = Measuring instrument values
Refer to Step for examples to calculate the radius
Measure the stage 3 half seal ring radius.
SUBTASK 72-41-00-040-096 Measure the Stage 3 Half Ring Seal Radius
Locate the IAE 1R18040 Setting button 1 off through the stage 4 lower location in the IAE 1R18537 Setting plate 1 off on the IAE 1R18533 Setting base 1 off.
Install the IAE 1R18594 Gage mounting plate 1 off, IAE 1R18539 Transducer carrier 1 off on the setting base.
Set the tools to measure the stage 4 lower (small diameter) half ring seal radius. Use the procedure given in Step.
Install IAE 1R18515 Measuring sleeve 1 off on the IAE 1R18031 Checking fixture 1 off.
Align the transducer on the stage 4 lower (small diameter) half ring seal. Refer to Step for the procedure.
NOTE
Refer to TASK 72-41-33-200-004, SUBTASK 72-41-33-220-074 (INSPECTION/CHECK-004, CONFIG-001).Write down the values given on the measuring instrument at eight (8) equal angular locations.
Calculate and write down the eight (8) values of the stage 4 lower half ring seal radius.
Radius = A - B
where A = Tool setting radius = 5.964 in (151.50 mm)
B = Measuring instrument values
Refer to Step for examples to calculate the radius
Measure the stage 4 lower (small diameter) half ring seal radius.
NOTE
Refer to TASK 72-41-33-200-004 (INSPECTION/CHECK-004, CONFIG-001) SUBTASK 72-41-33-220-074.Write down the values given on the measuring instrument at eight equal angular locations.
Calculate and write down the eight values of the stage 4 upper half ring seal radius.
Radius = A - B
where A = Tool setting radius = 6.153 in (156.30 mm)
B = Measuring instrument values
Refer to Step for examples to calculate the radius
Measure the stage 4 upper (large diameter) half seal ring radius. Use the procedure given in steps A. to H. Use IAE 1R18516 Measuring sleeve 1 off on the checking fixture and tool setting radius A=6.161 in (156.50 mm).
SUBTASK 72-41-00-040-097 Measure the Stage 4 Half Ring Seal Radius
Refer to Figure.
Locate the IAE 1R18040 Setting button 1 off through the stage 5 seal ring location in the IAE 1R18537 Setting plate 1 off on the IAE 1R18533 Setting base 1 off.
Install the IAE 1R18594 Gage mounting plate 1 off, IAE 1R18539 Transducer carrier 1 off on the setting base.
Set the tools to measure the stage 5 half ring seal radius. Refer to the procedure given in Step.
Install IAE 1R18517 Measuring sleeve 1 off on the IAE 1R18031 Checking fixture 1 off.
Align the transducer on the stage 5 half ring seal radius. Refer to Step for the procedure.
NOTE
Refer to TASK 72-41-33-200-006, SUBTASK 72-41-33-220-094 (INSPECTION/CHECK-006, CONFIG-001).Write down the values given on the measuring instrument at eight (8) equal angular locations.
Calculate and write down the eight (8) values of the stage 5 half ring seal radius.
Radius = A - B
where A = Tool setting radius = 6.968 in (177.00 mm) and spare
B = Measuring instrument values
Refer to Step for examples to calculate the radius
Measure the stage 5 half ring seal radius.
SUBTASK 72-41-00-040-098 Measure the Stage 5 Half Ring Seal Radius
Refer to Figure.
Locate the IAE 1R18040 Setting button 1 off through the stage 6 VSV location in the IAE 1R18537 Setting plate 1 off on the IAE 1R18533 Setting base 1 off.
Install the IAE 1R18042 Transducer carrier 1 off and IAE 1R18531 Measuring sleeve 1 off on the setting base.
Set the tools to measure the stage 6 VSV tip radius. Refer to the procedure given in Step.
Install the IAE IAE 1R18045 Distance sleeve 1 off on the IAE 1R18031 Checking fixture 1 off.
Calculate and write down the stage 6 VSV tip radius.
Radius = A - B
where A = Tool setting radius = 8.642 in (219.50 mm)
B = Measuring instrument values
Refer to Step for examples to calculate the radius
Measure the stage 6 VSV tip radius.
All the stage 6 stator vanes with a radius of more than 8.640 in. (219.46 mm) must be placed in a separate container. Identify each of the vanes with its radius. Refer to the SPM TASK 70-09-01-400-501.
SUBTASK 72-41-00-040-099 Measure the Stage 6 VSV Tip Radius
Remove the HP compressor front cases from the checking fixture as given in TASK 72-41-30-440-010-A00 (ASSEMBLY-010, CONFIG-001).
SUBTASK 72-41-00-040-100 Remove the HP Compressor Front Cases from the Checking Fixture
Disassemble the HP compressor front cases as given in TASK 72-41-00-040-001-A00 (DISASSEMBLY, CONFIG-001) and TASK 72-41-30-440-010-A00 (ASSEMBLY-010, CONFIG-001).
SUBTASK 72-41-00-040-101 Disassemble the HP Compressor Front Cases
Figure: View through the HP system module on the build stand
View through the HP system module on the build stand
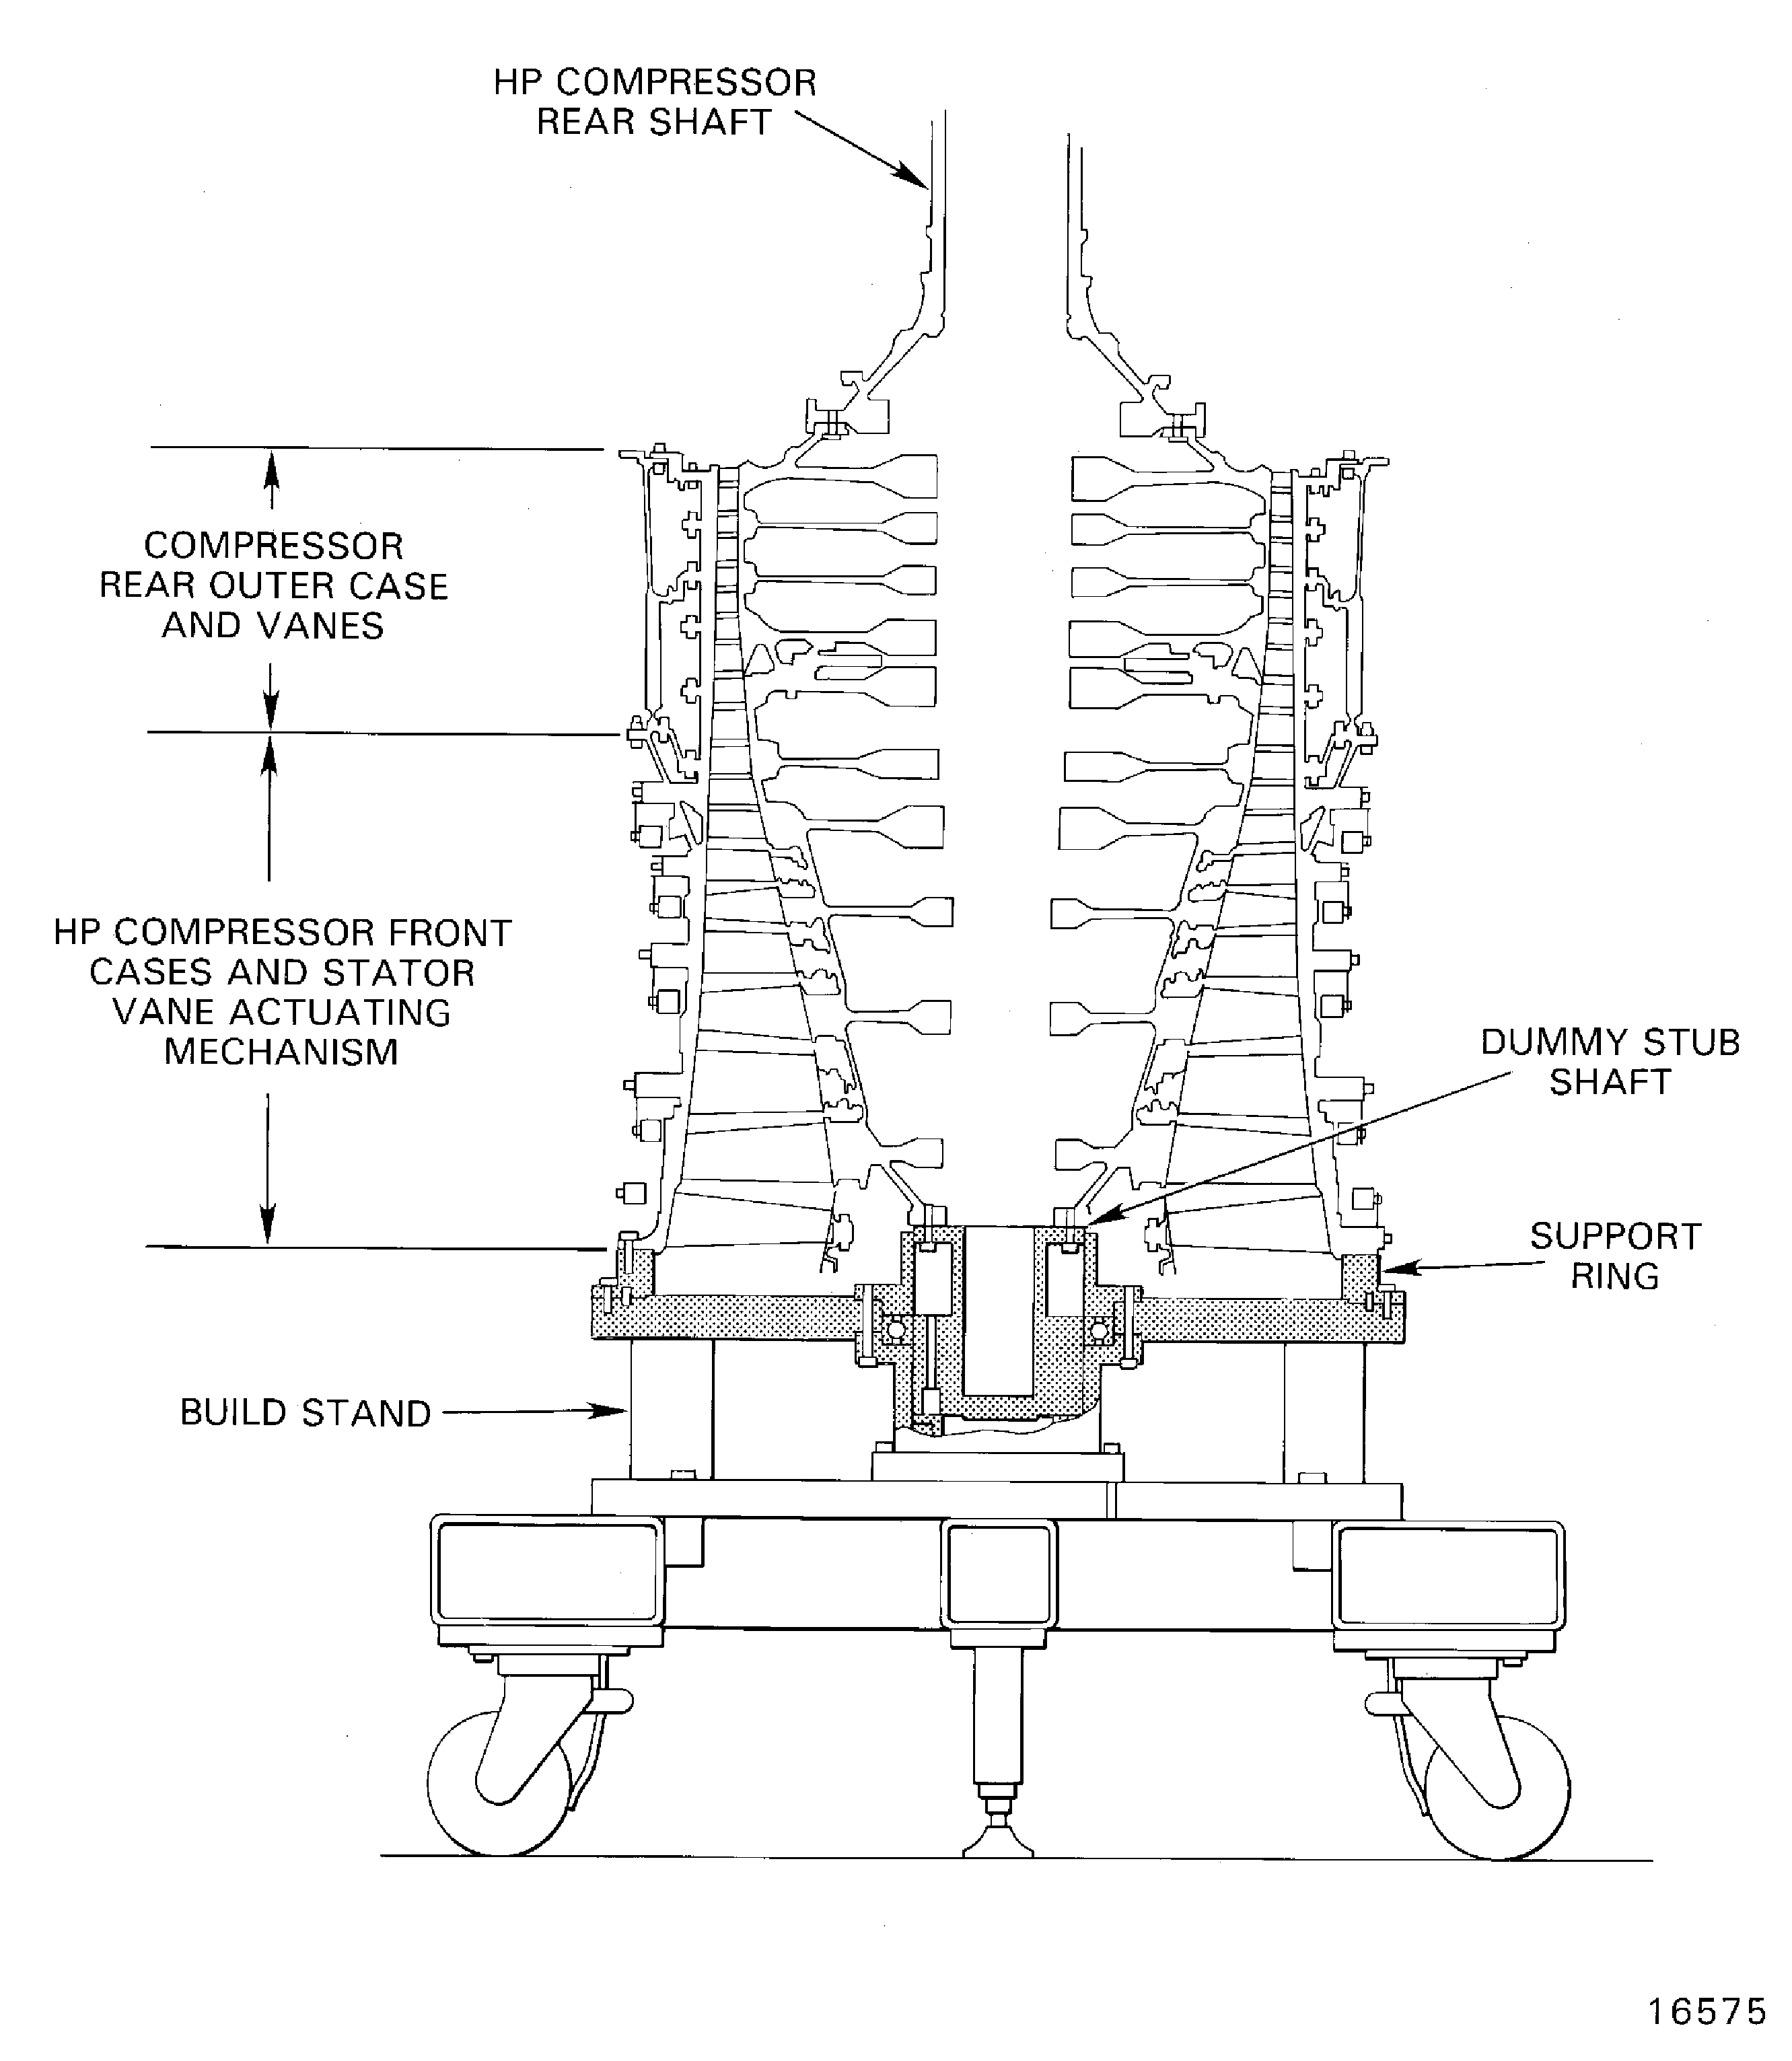
Figure: Pre SBE 72-0538 : Remove The VSV Crankshaft
Pre SBE 72-0538 : Remove The VSV Crankshaft
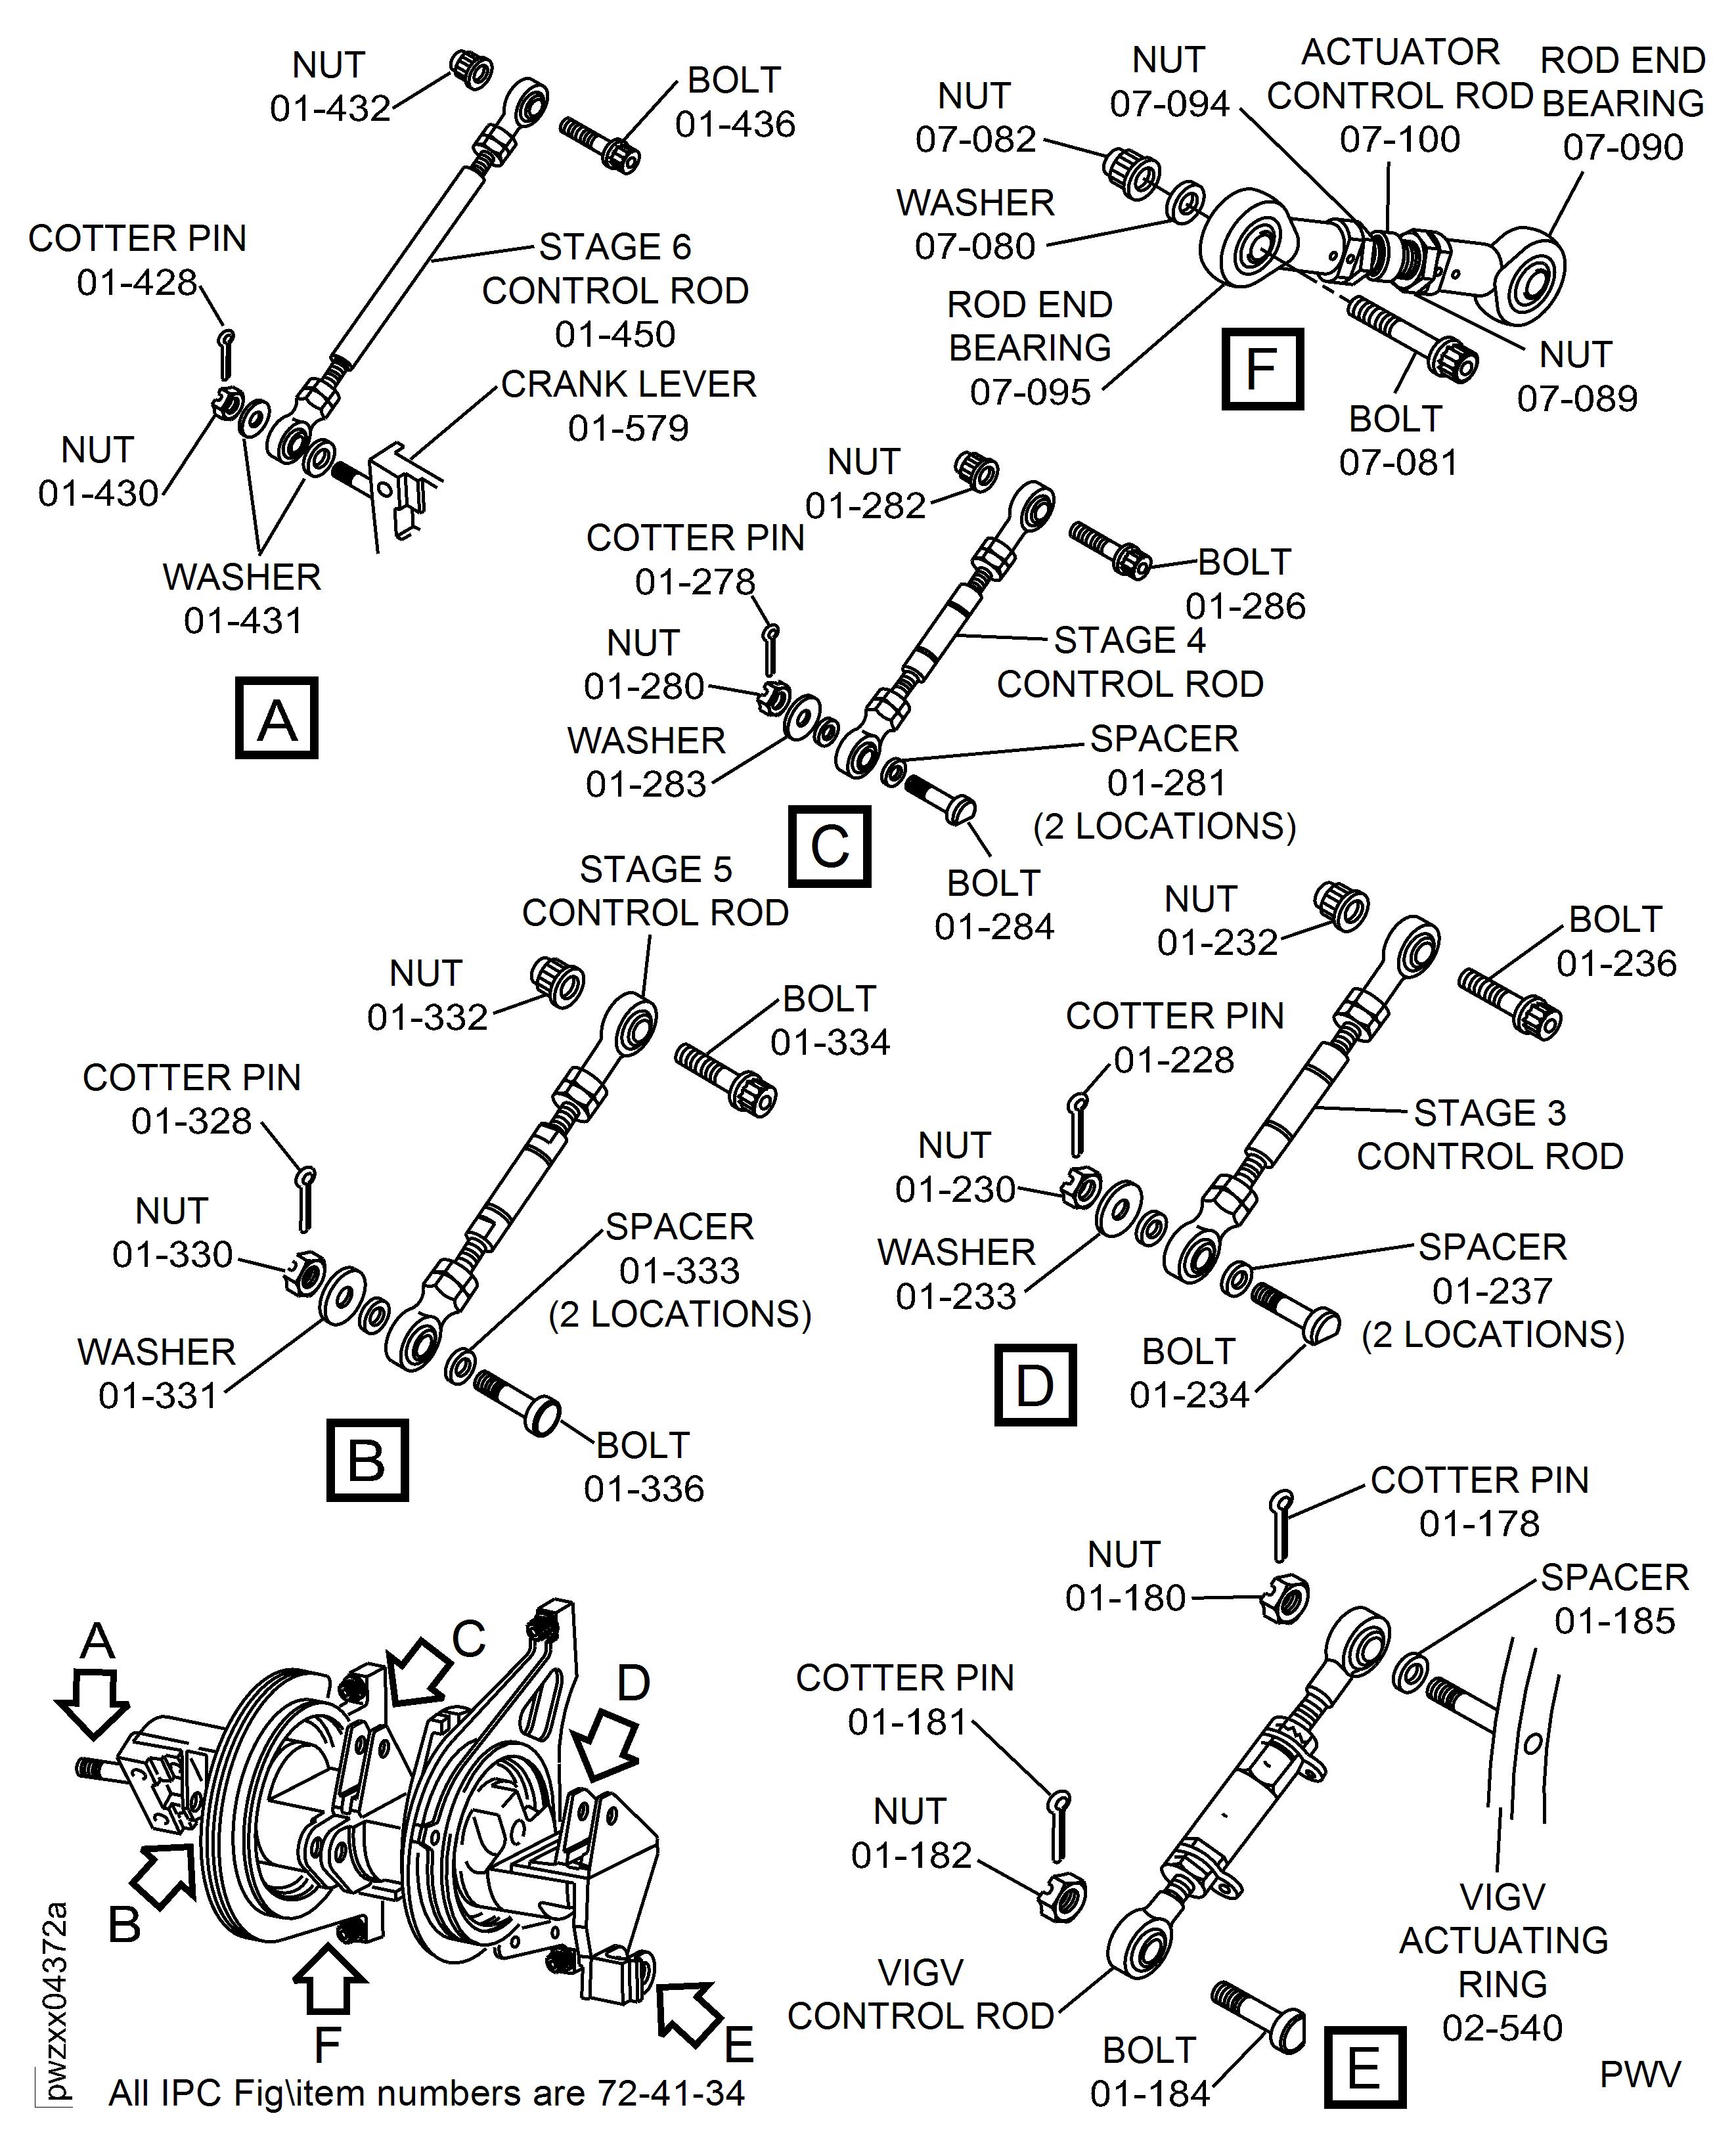
Figure: SBE 72-0538 : Remove The VSV Crankshaft
SBE 72-0538 : Remove The VSV Crankshaft
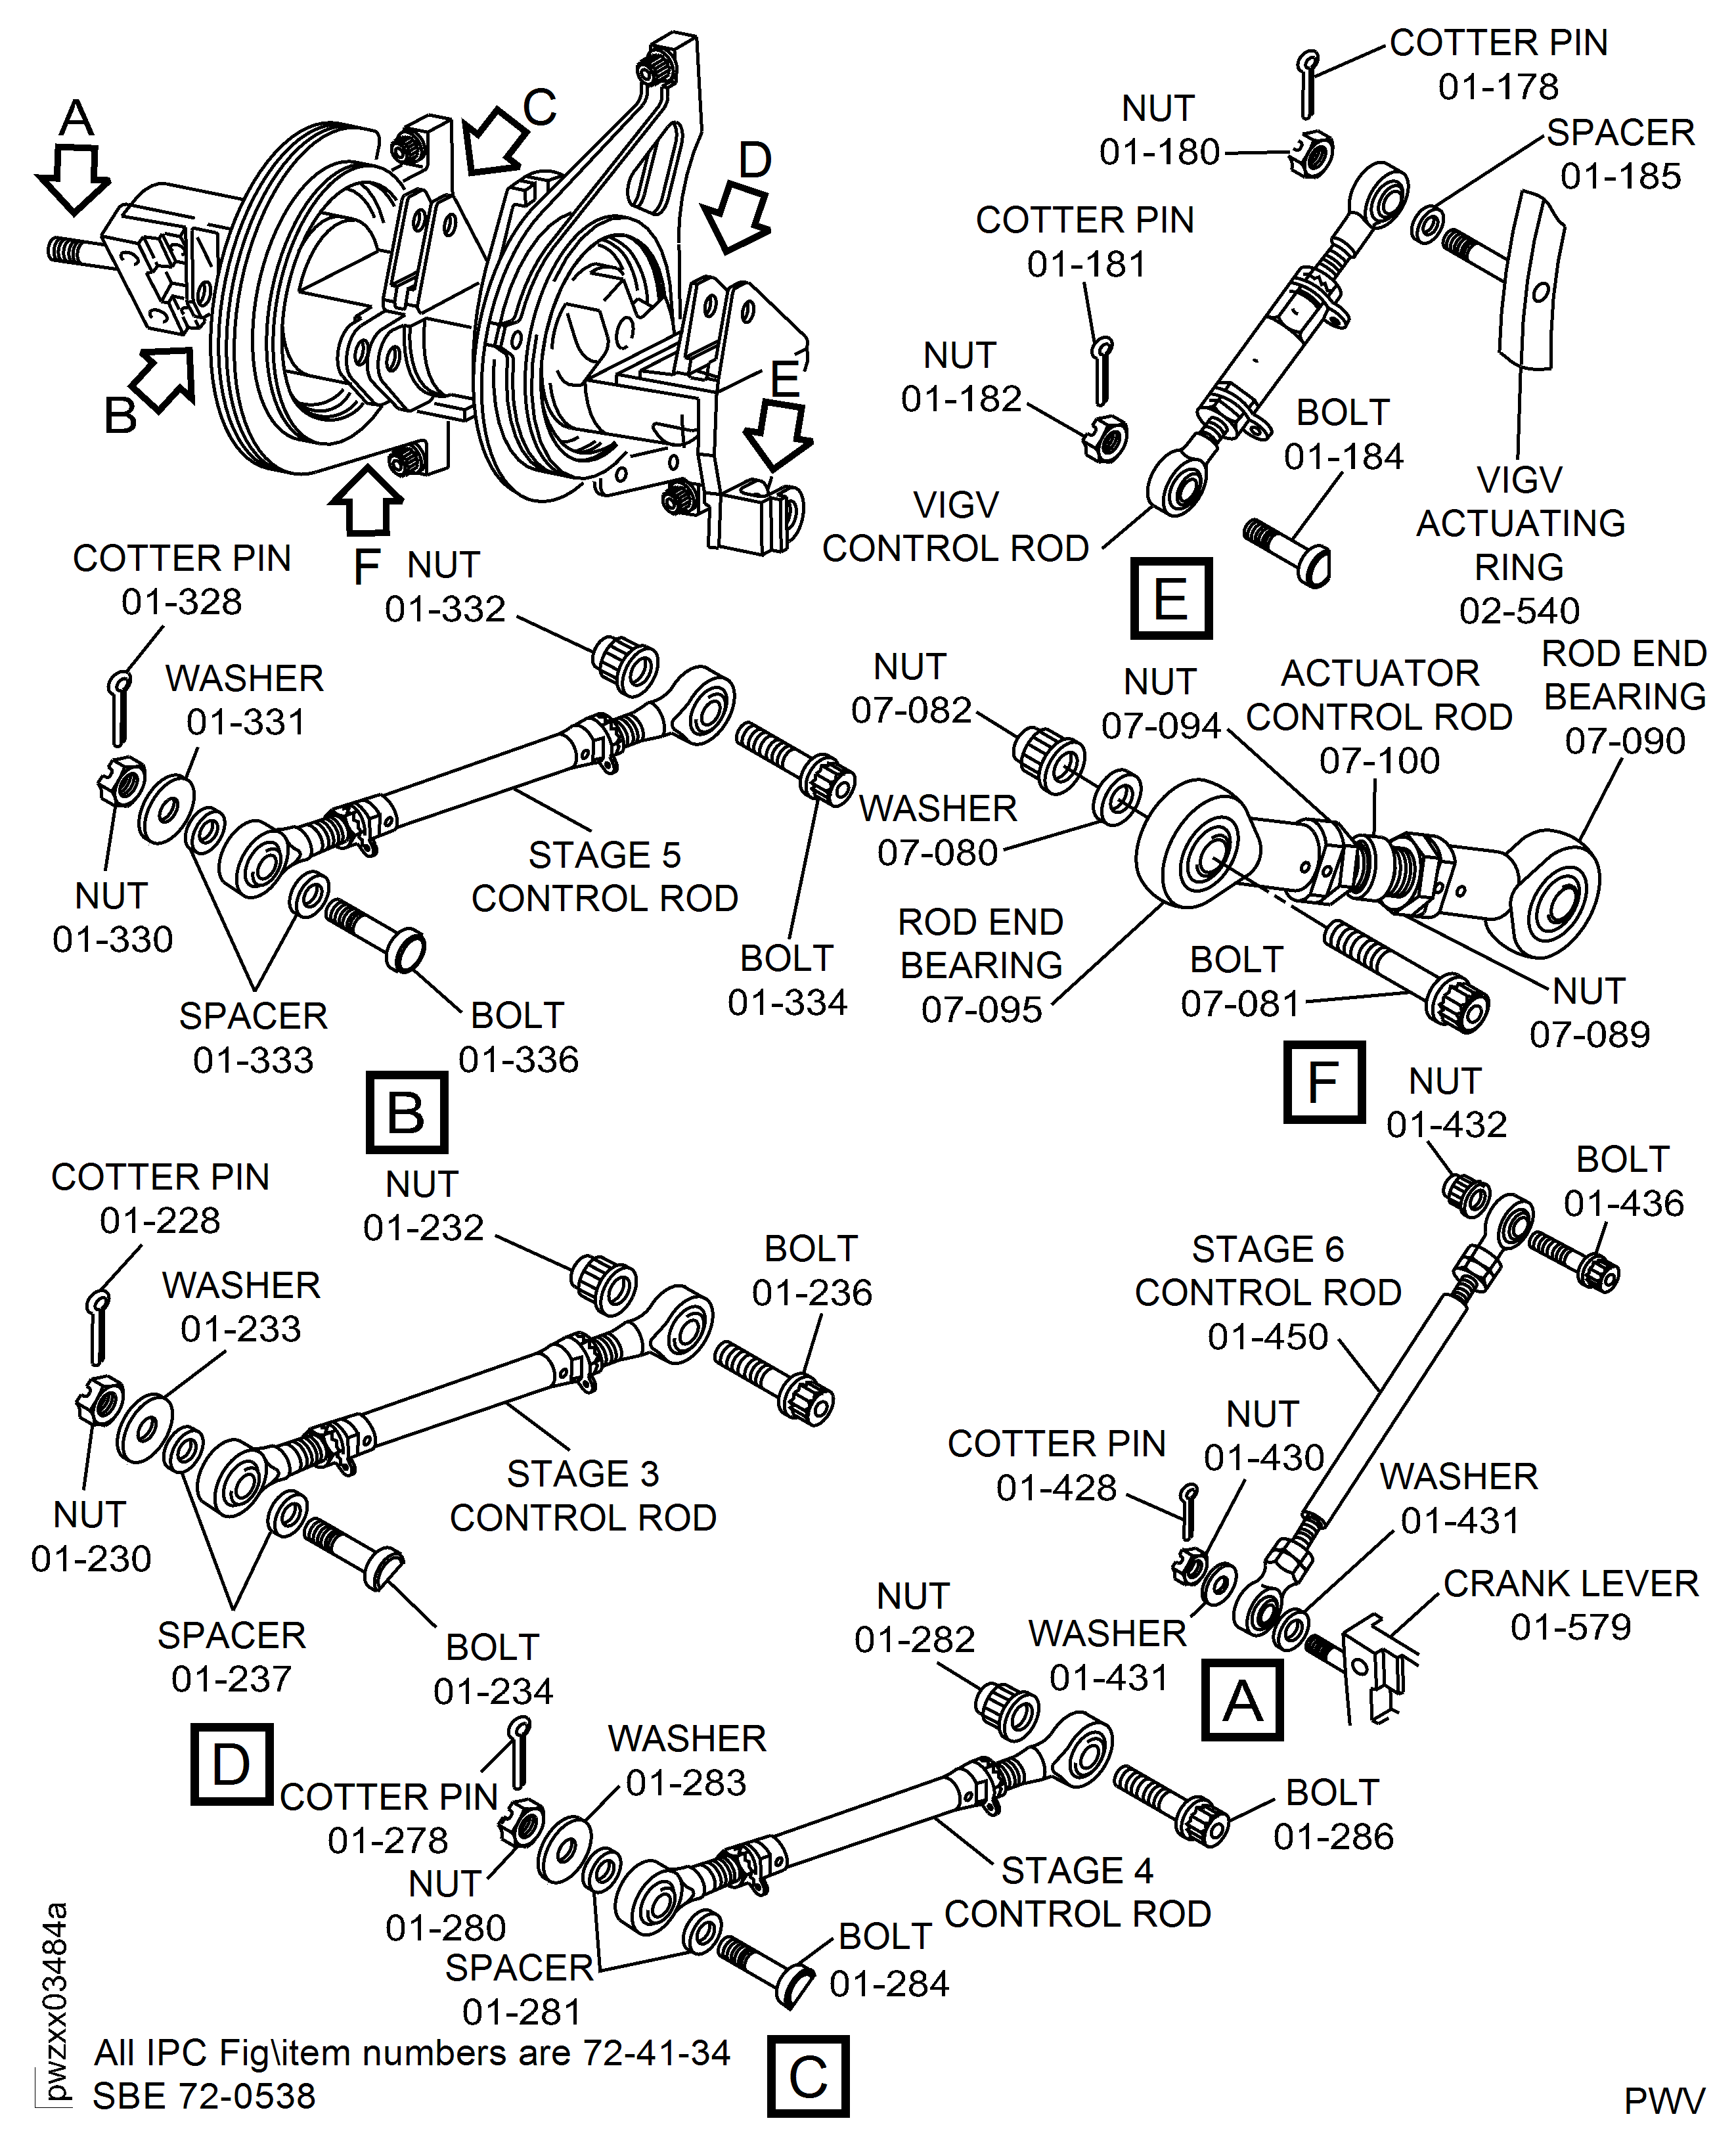
Figure: Remove the VSV Crankshaft
Remove the VSV Crankshaft
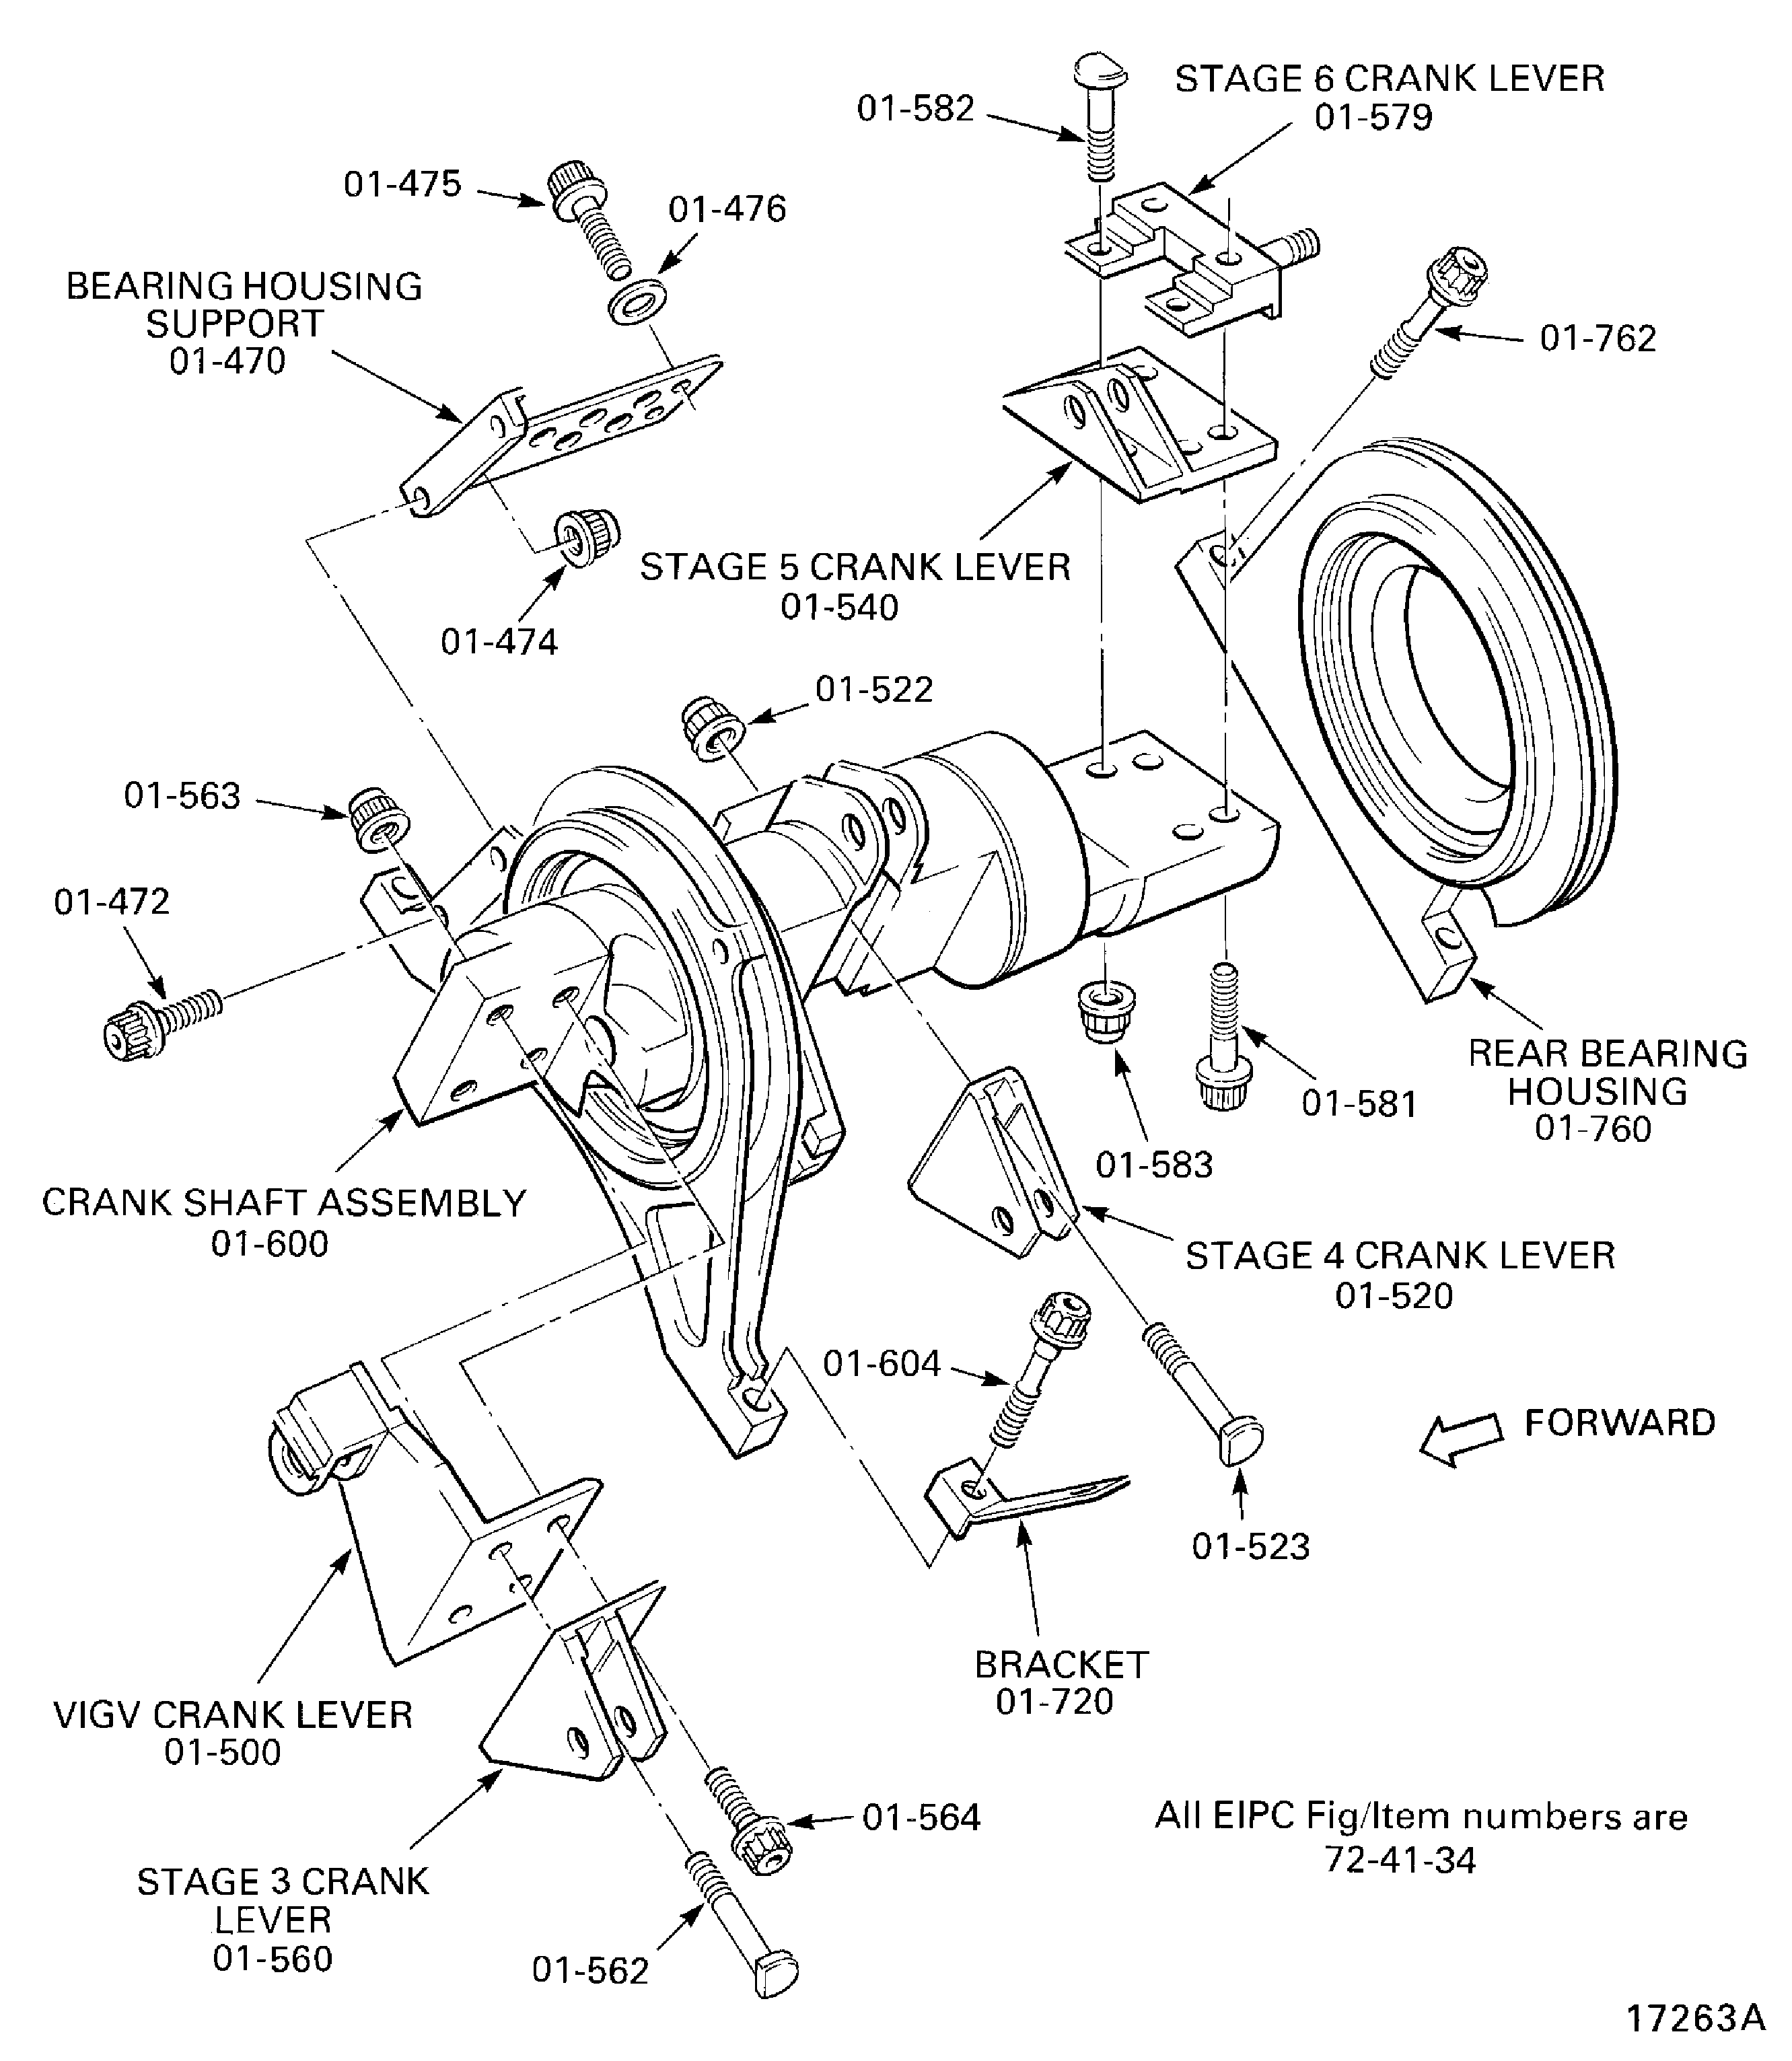
Figure: Remove the VIGV actuating ring connectors
Remove the VIGV actuating ring connectors
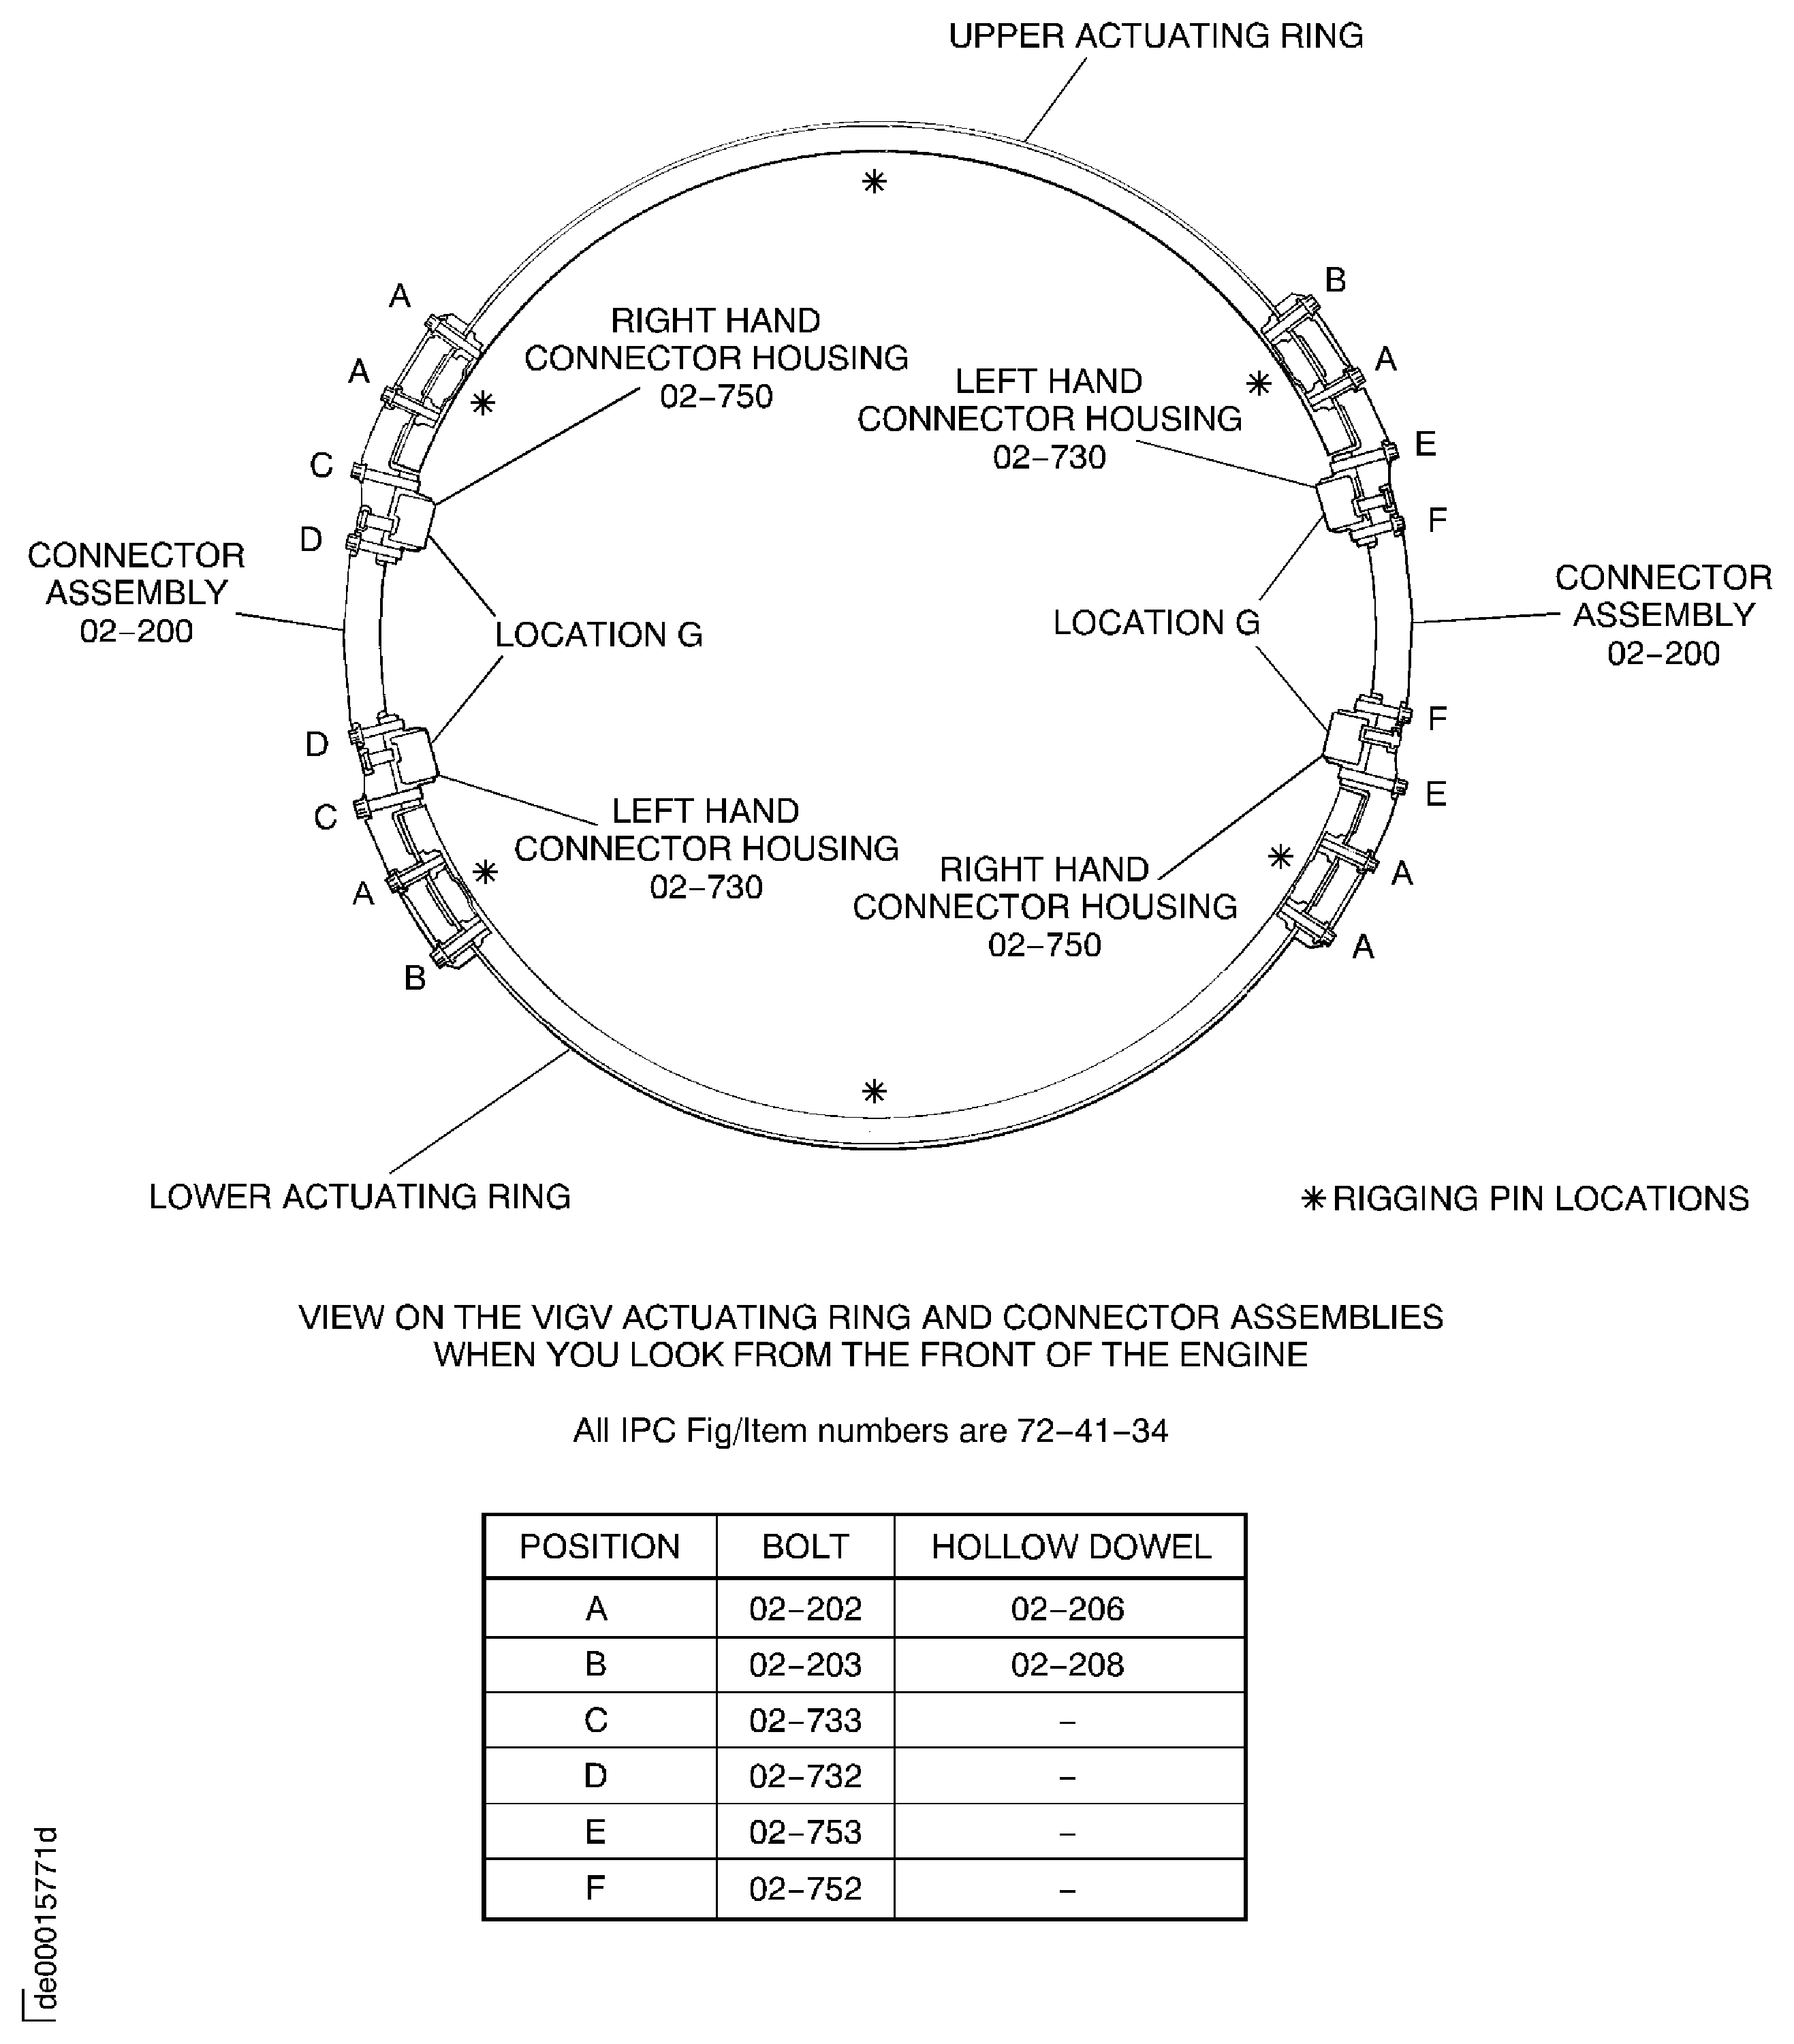
Figure: Remove the VIGV actuating ring connectors
Remove the VIGV actuating ring connectors
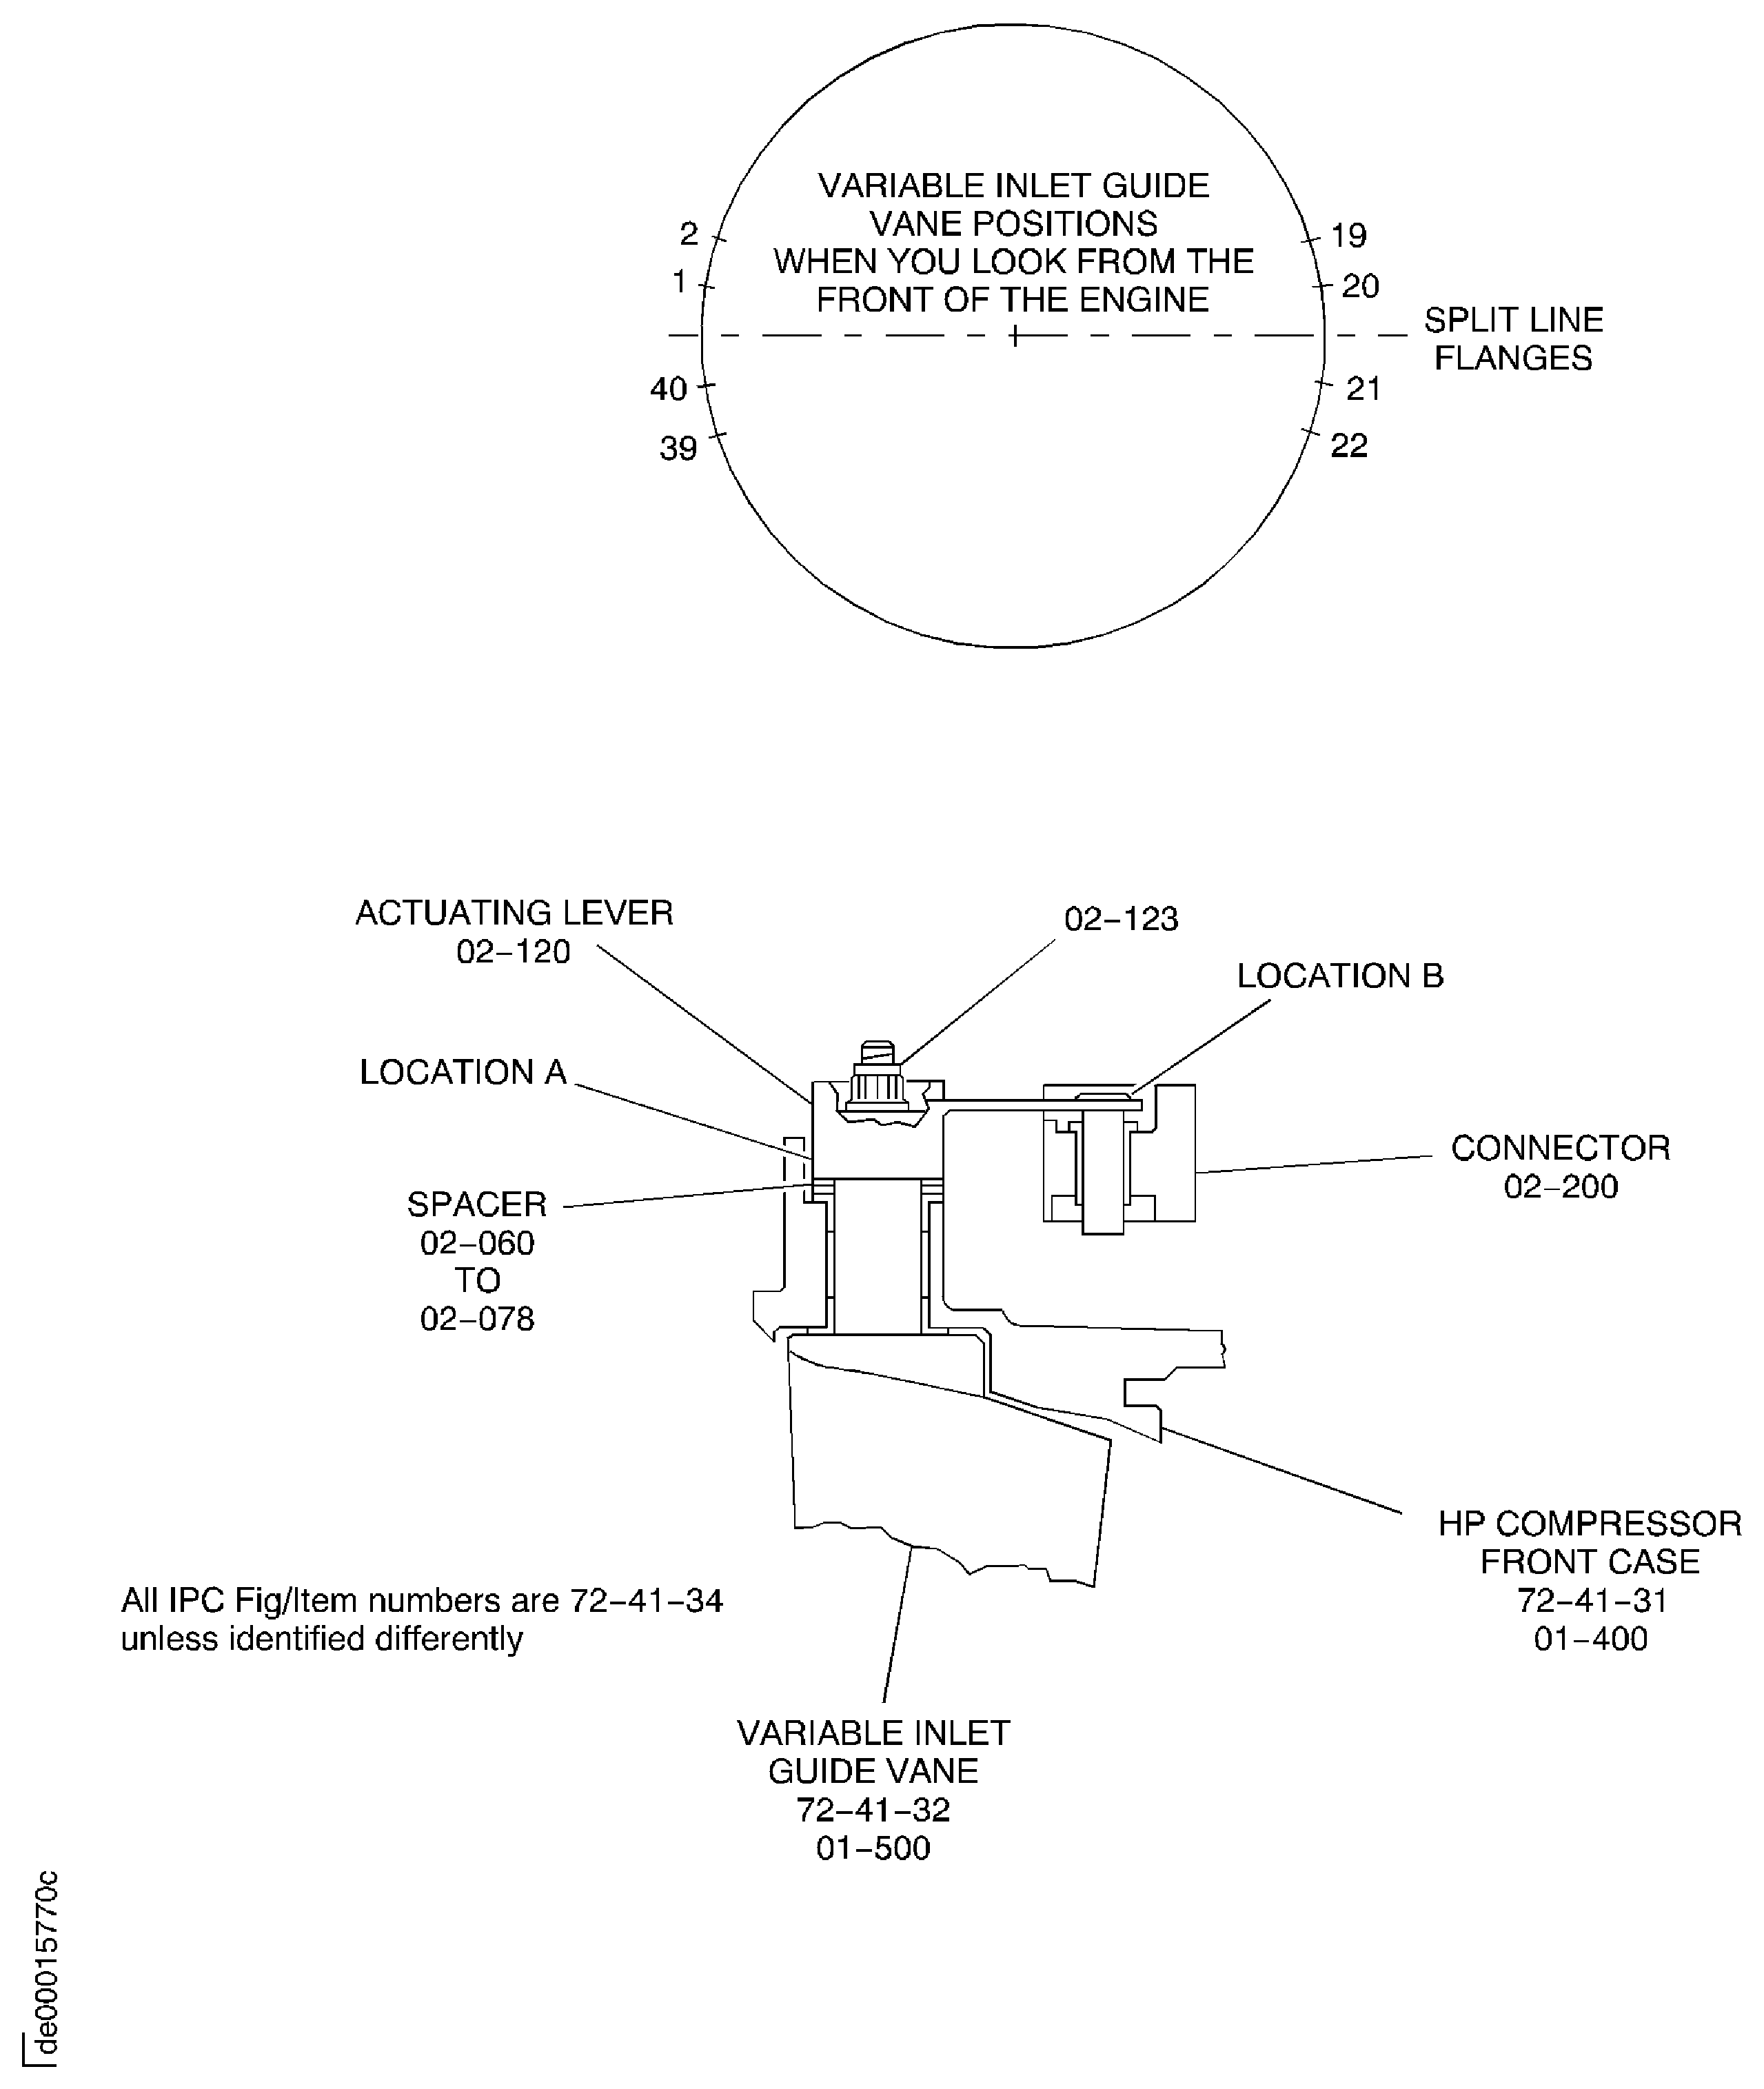
Figure: Install the lifting adapter on the HP compressor assembly
Install the lifting adapter on the HP compressor assembly
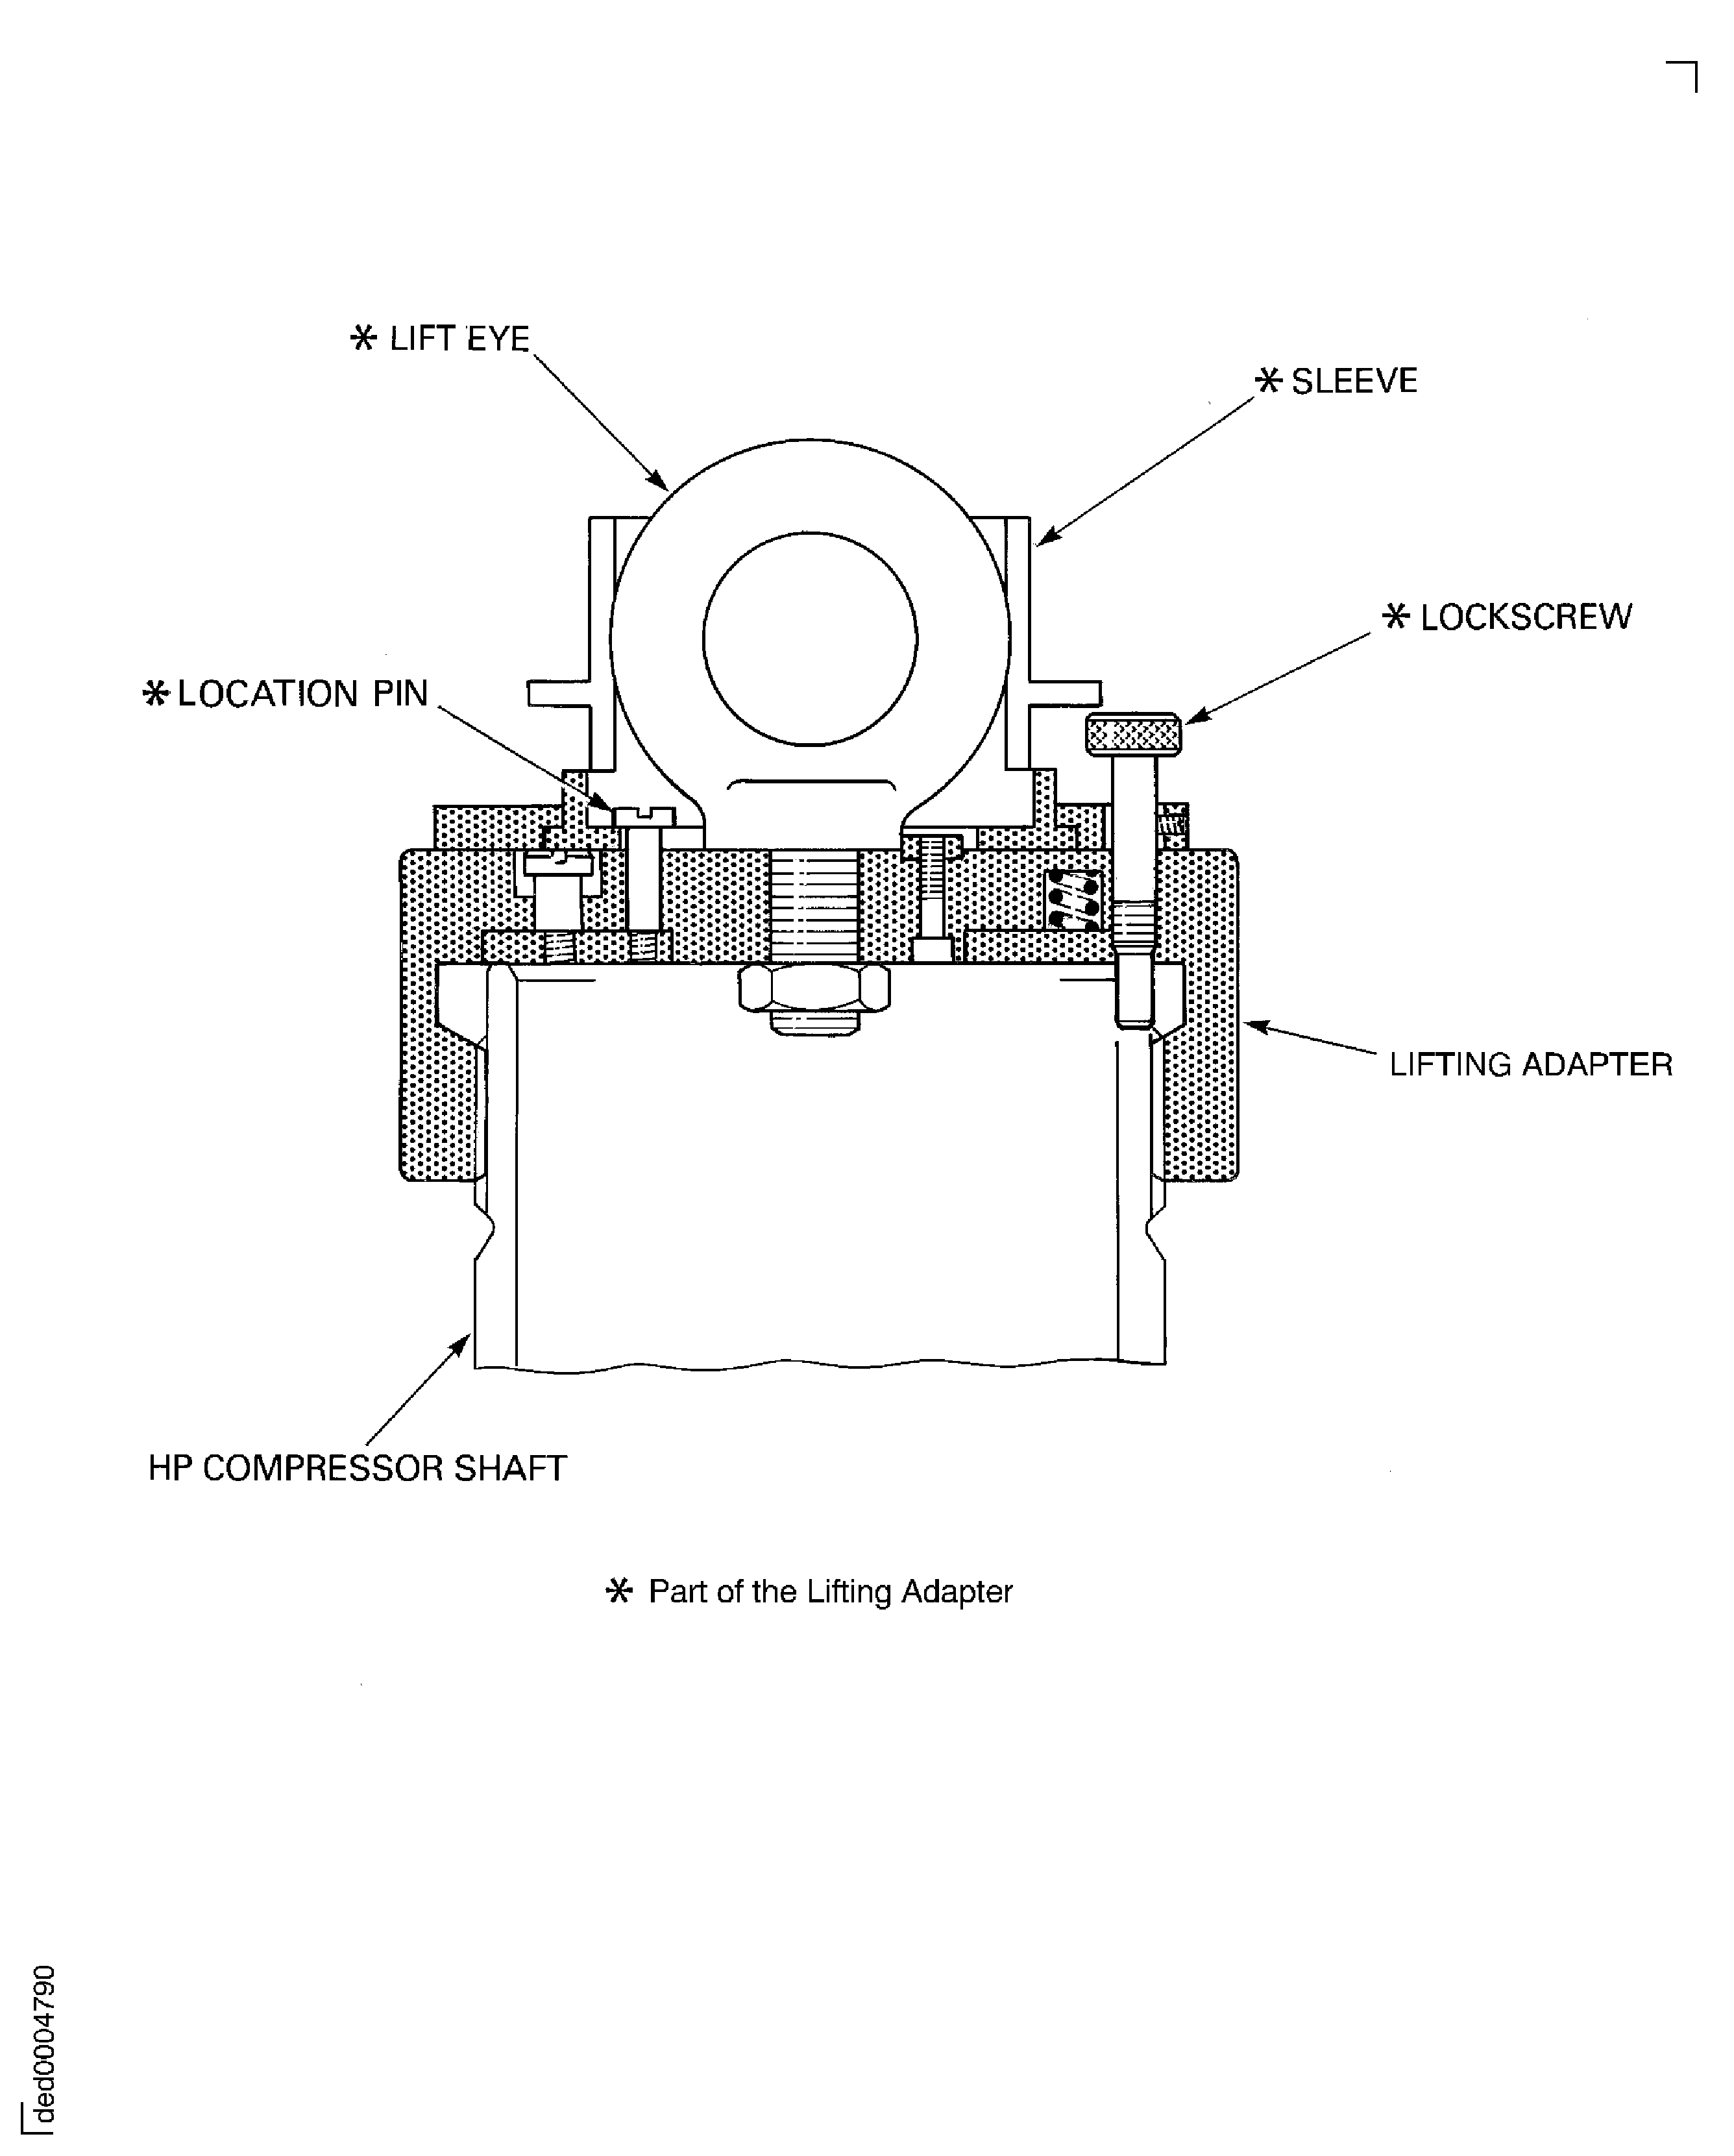
Figure: Install the HP compressor assembly on the support stand
Install the HP compressor assembly on the support stand
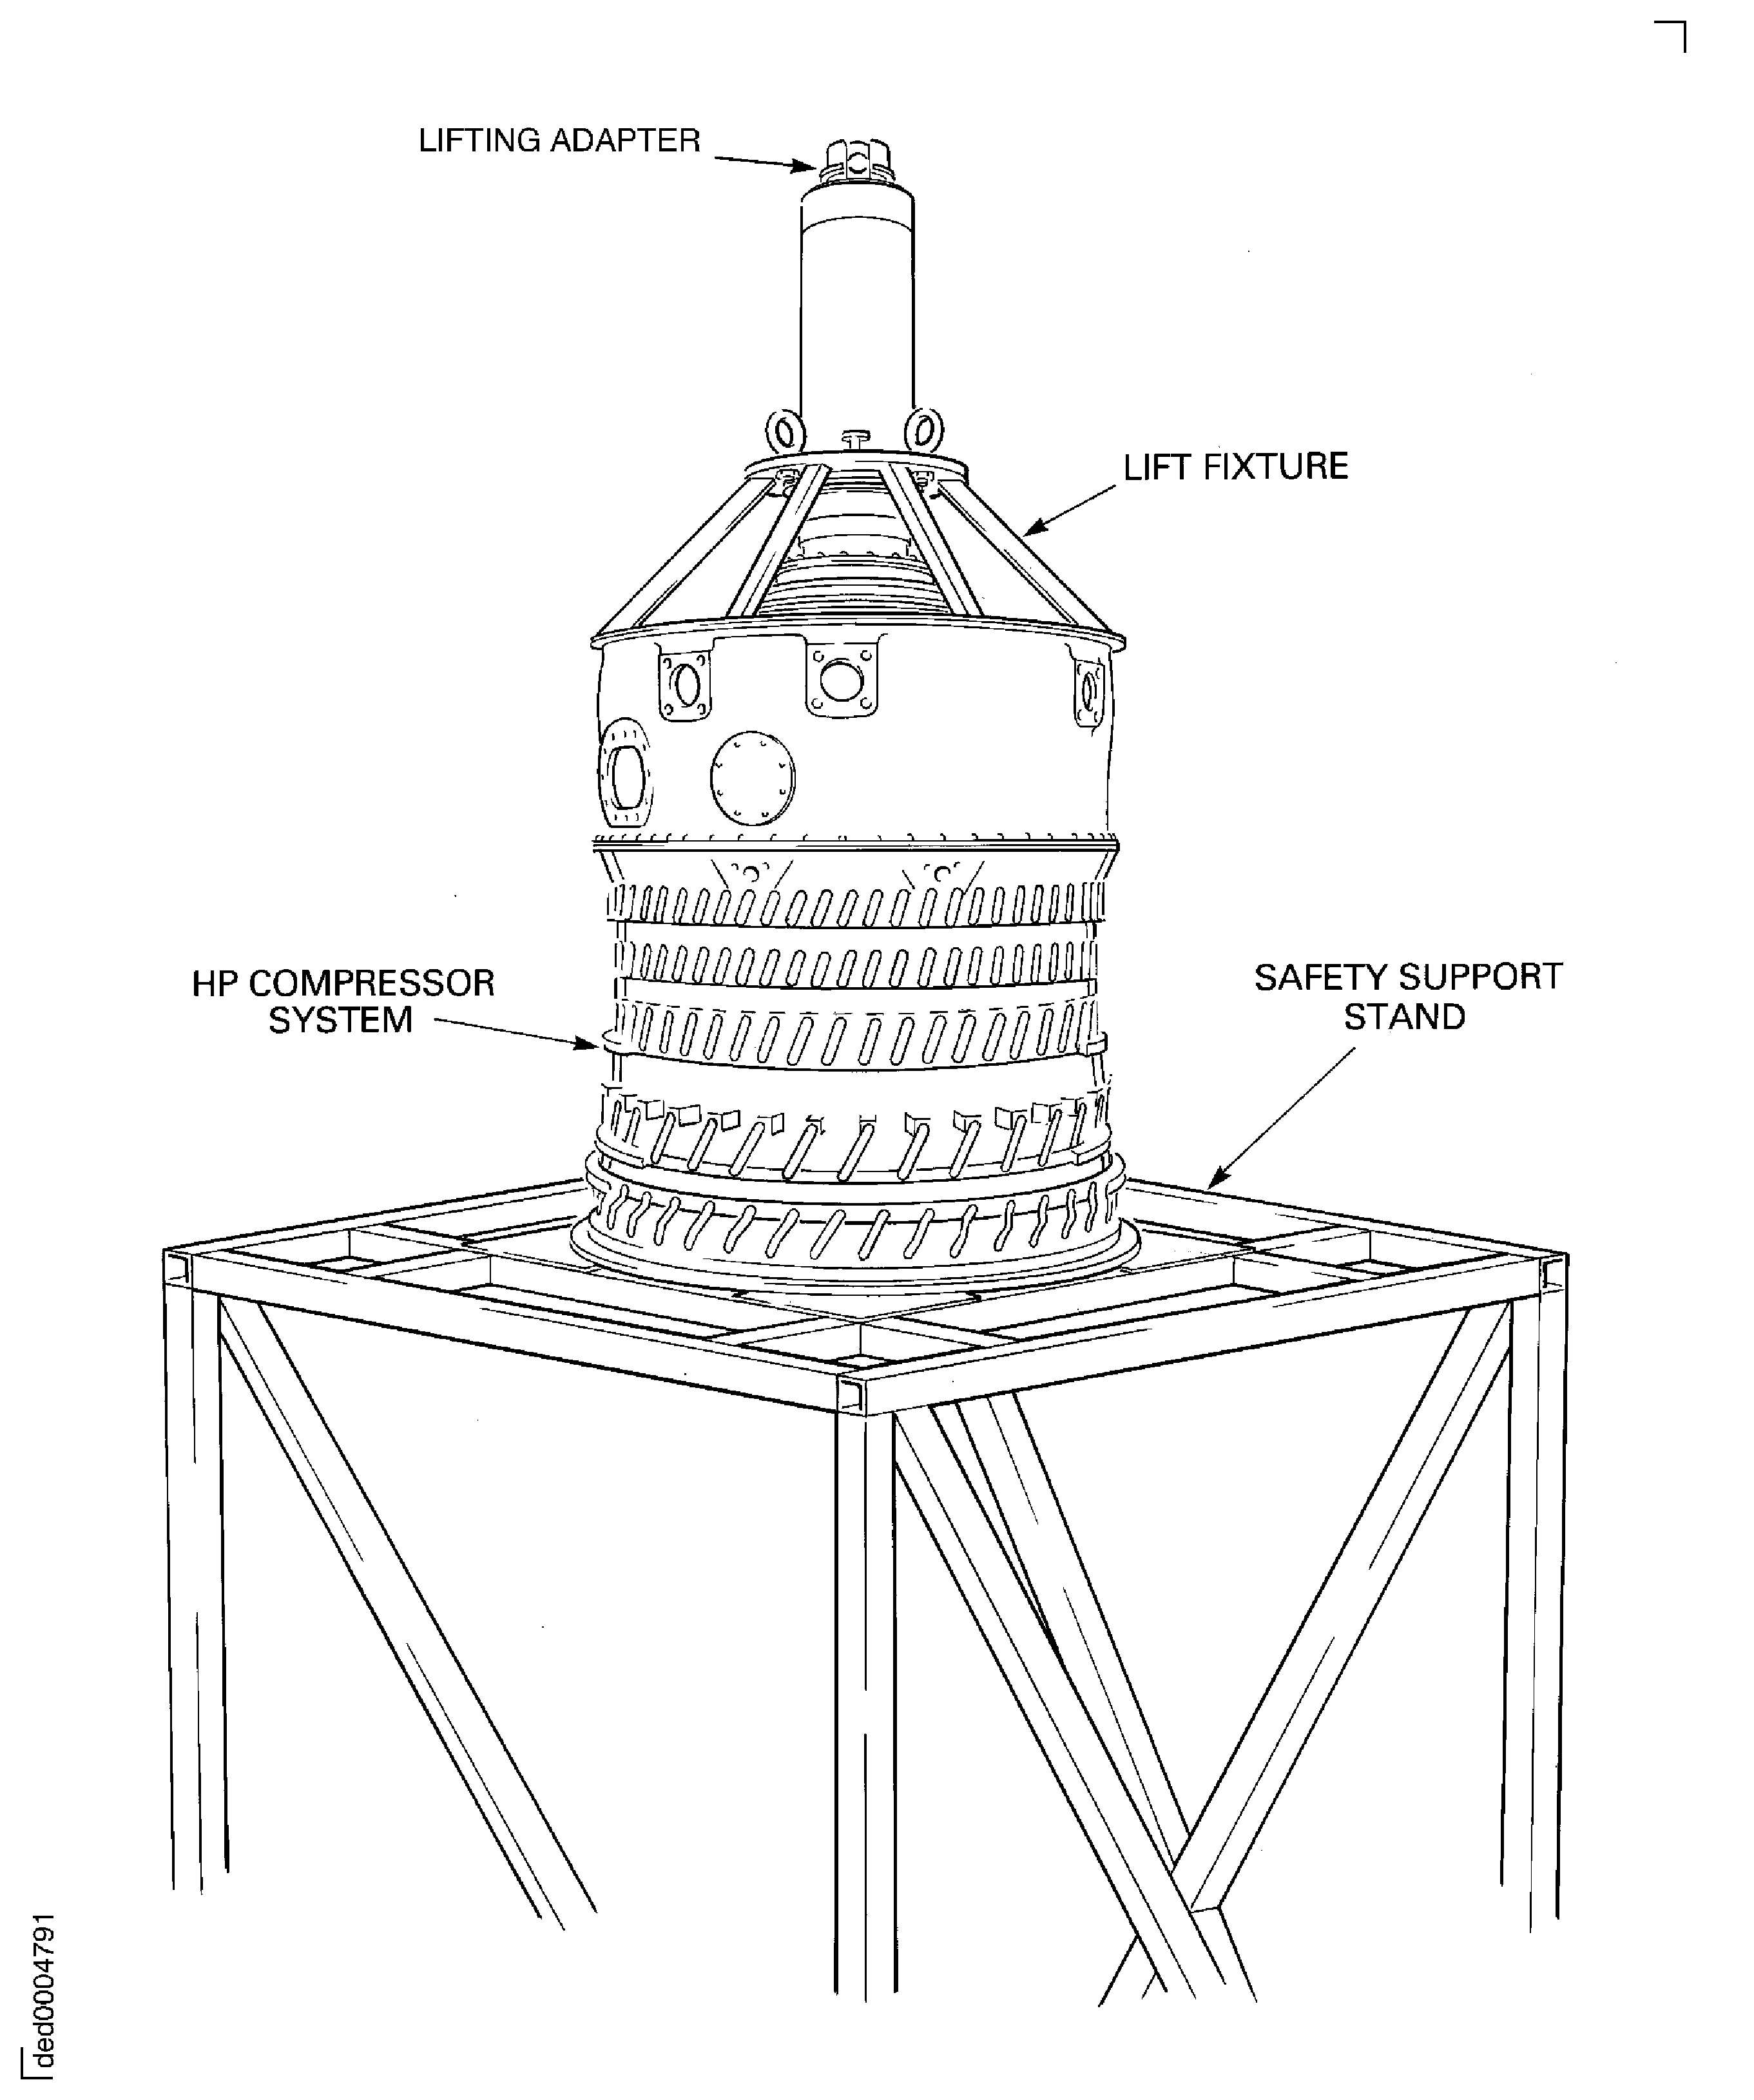
Figure: Remove the variable inlet guide vane front shroud
Remove the variable inlet guide vane front shroud
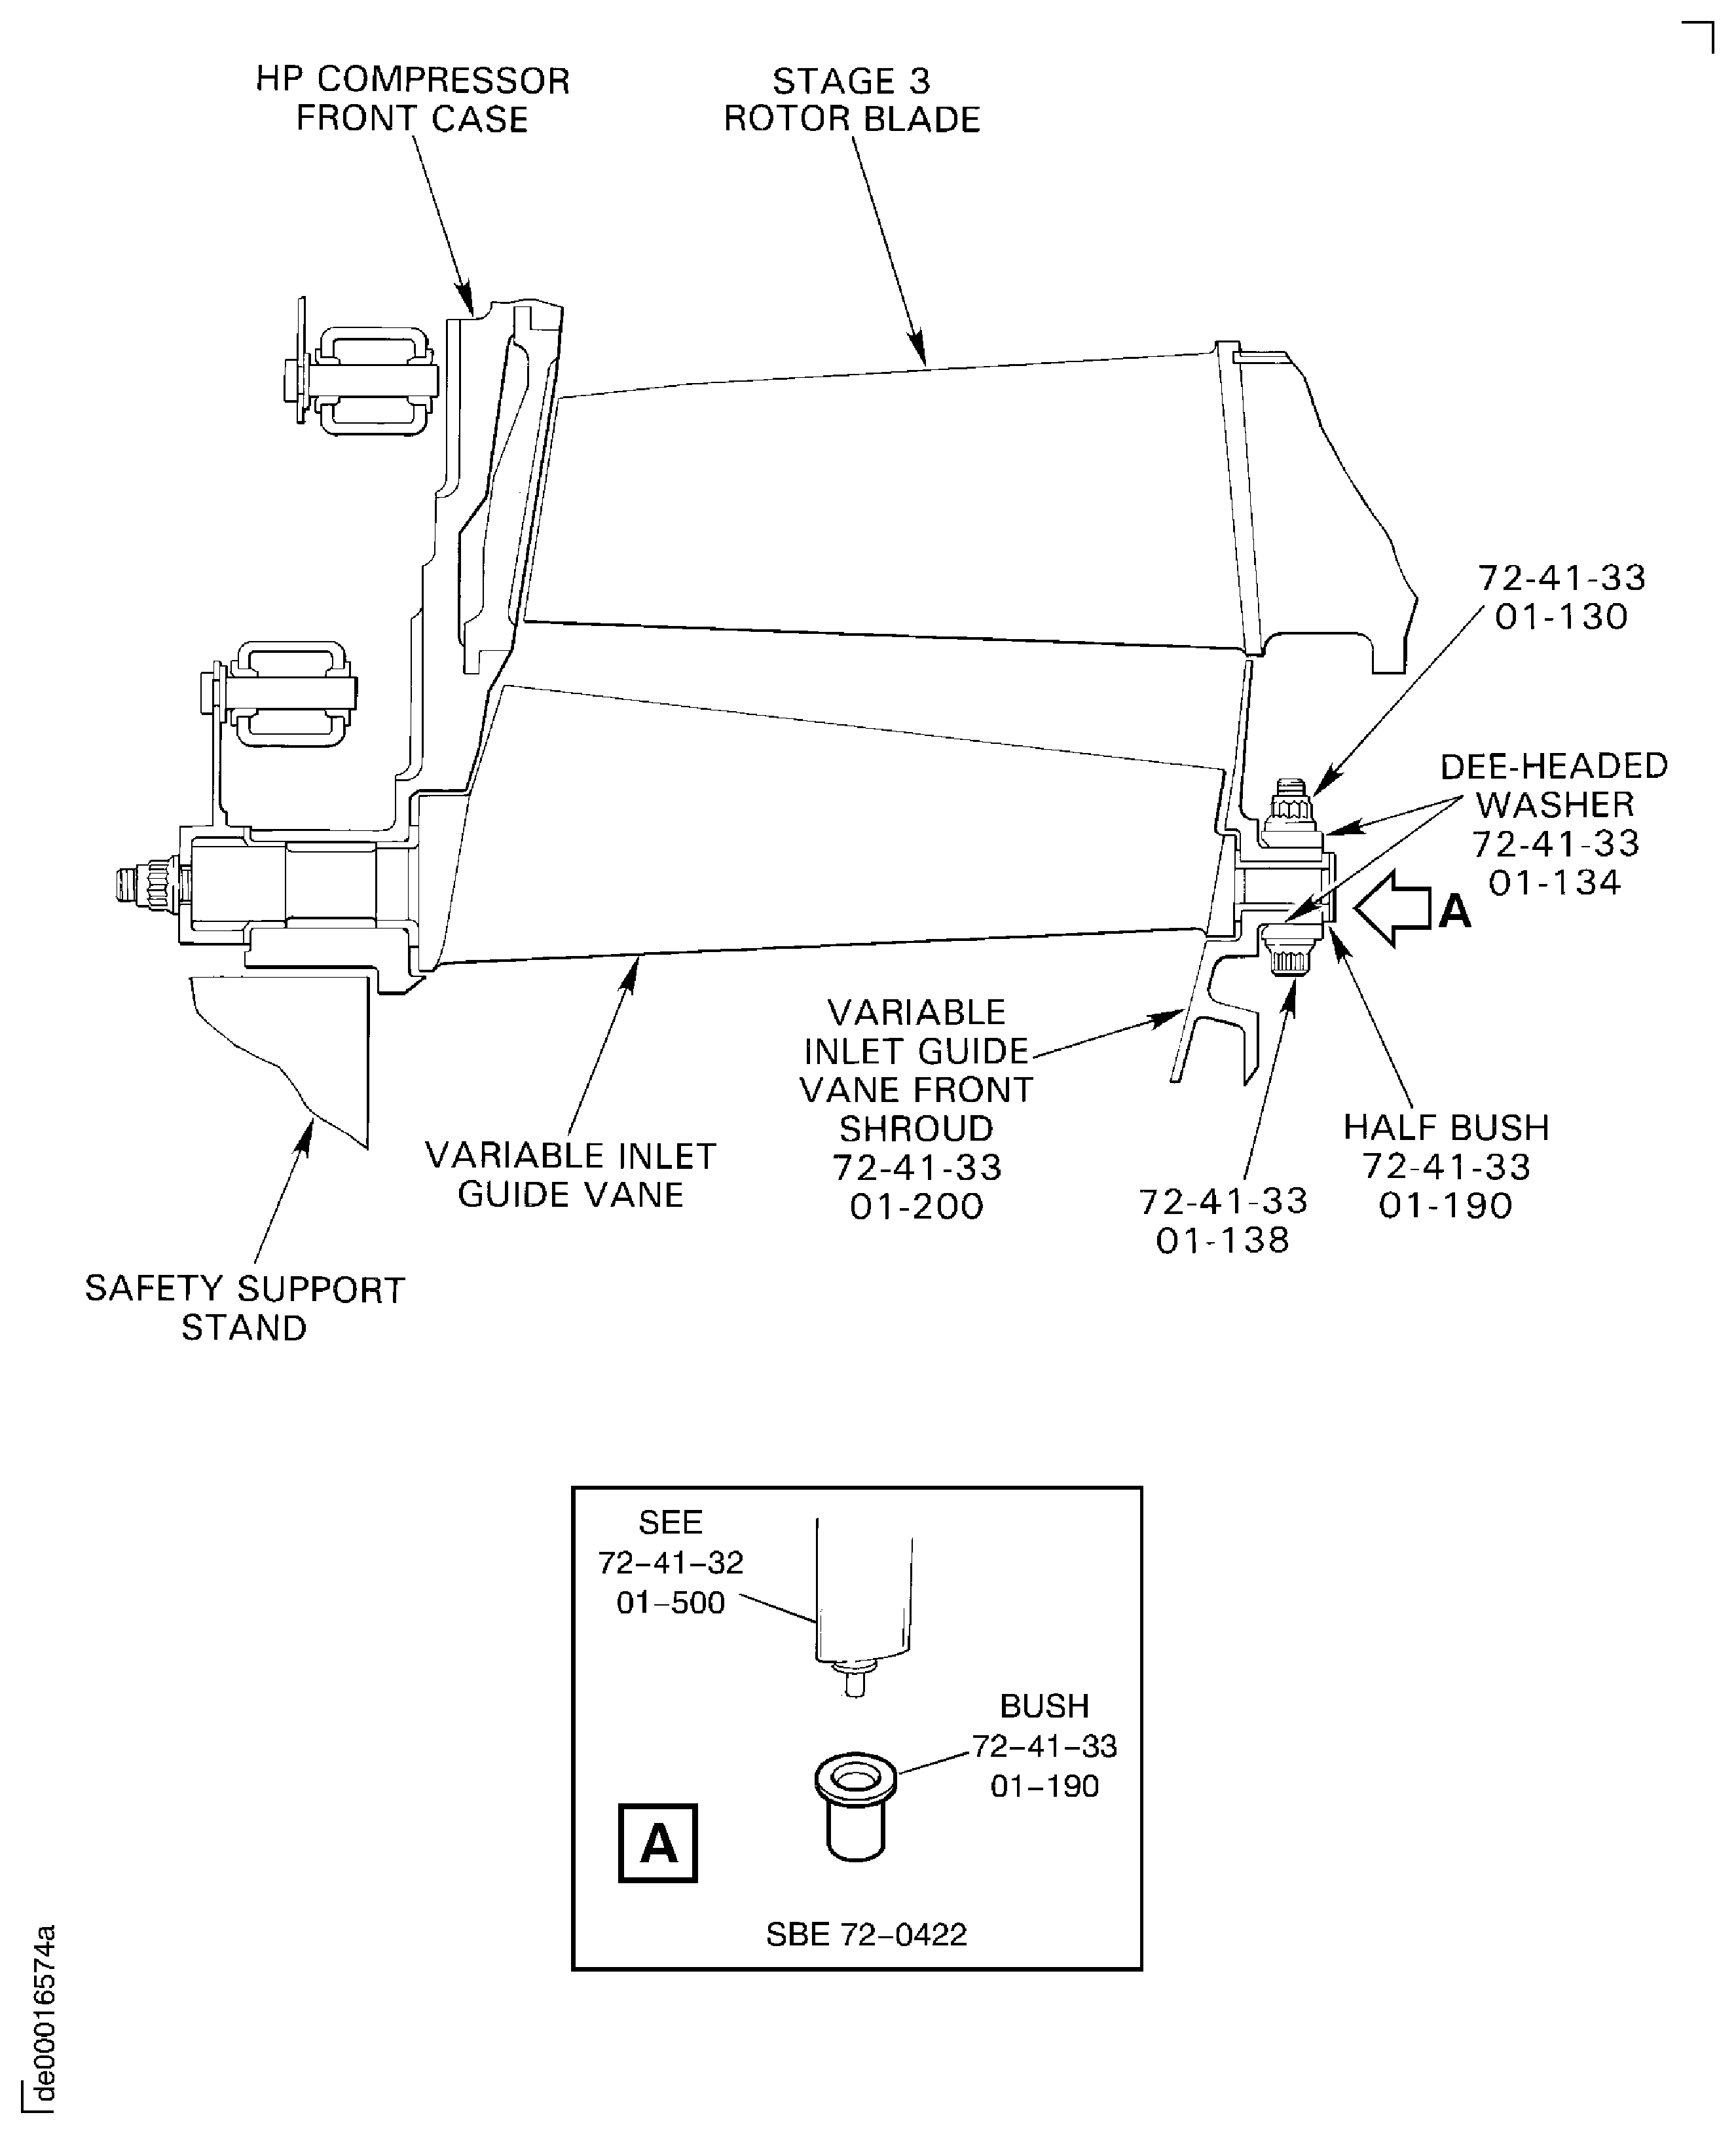
Figure: Install the HP compressor assembly in the build stand
Install the HP compressor assembly in the build stand

Figure: Install the HP compressor assembly in the build stand
Install the HP compressor assembly in the build stand
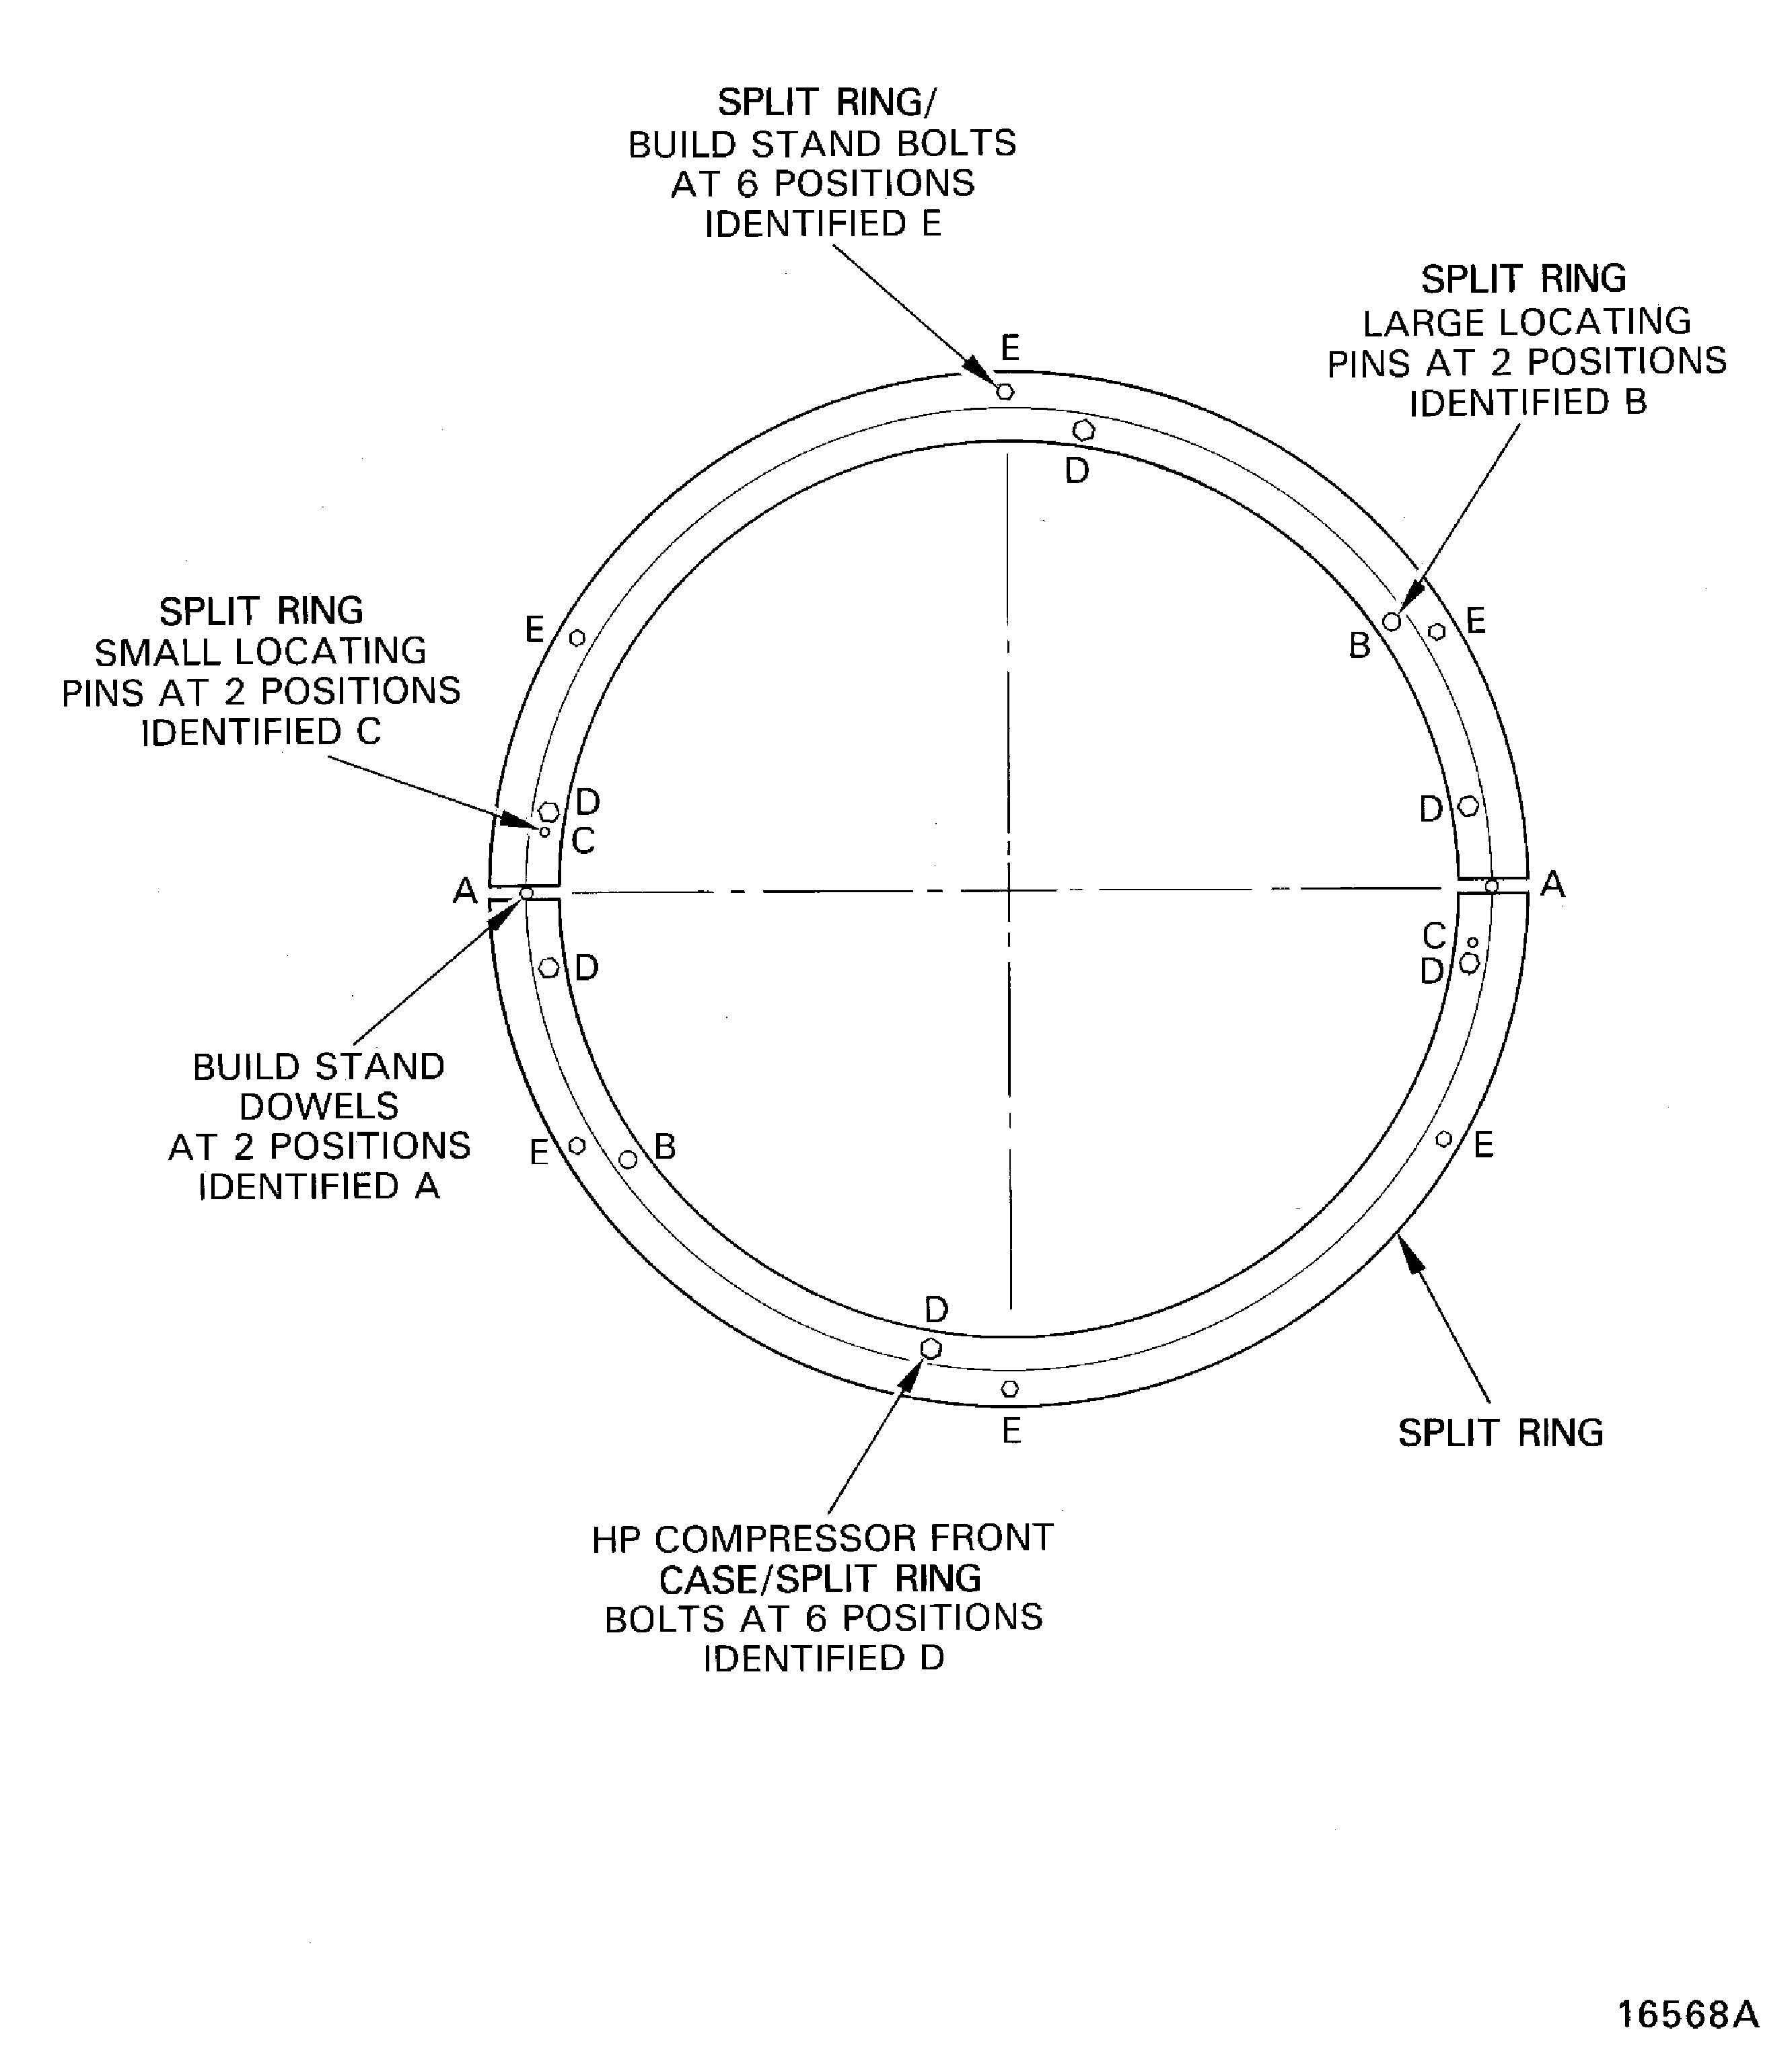
Figure: Remove the stage 3 actuating ring connectors
Remove the stage 3 actuating ring connectors
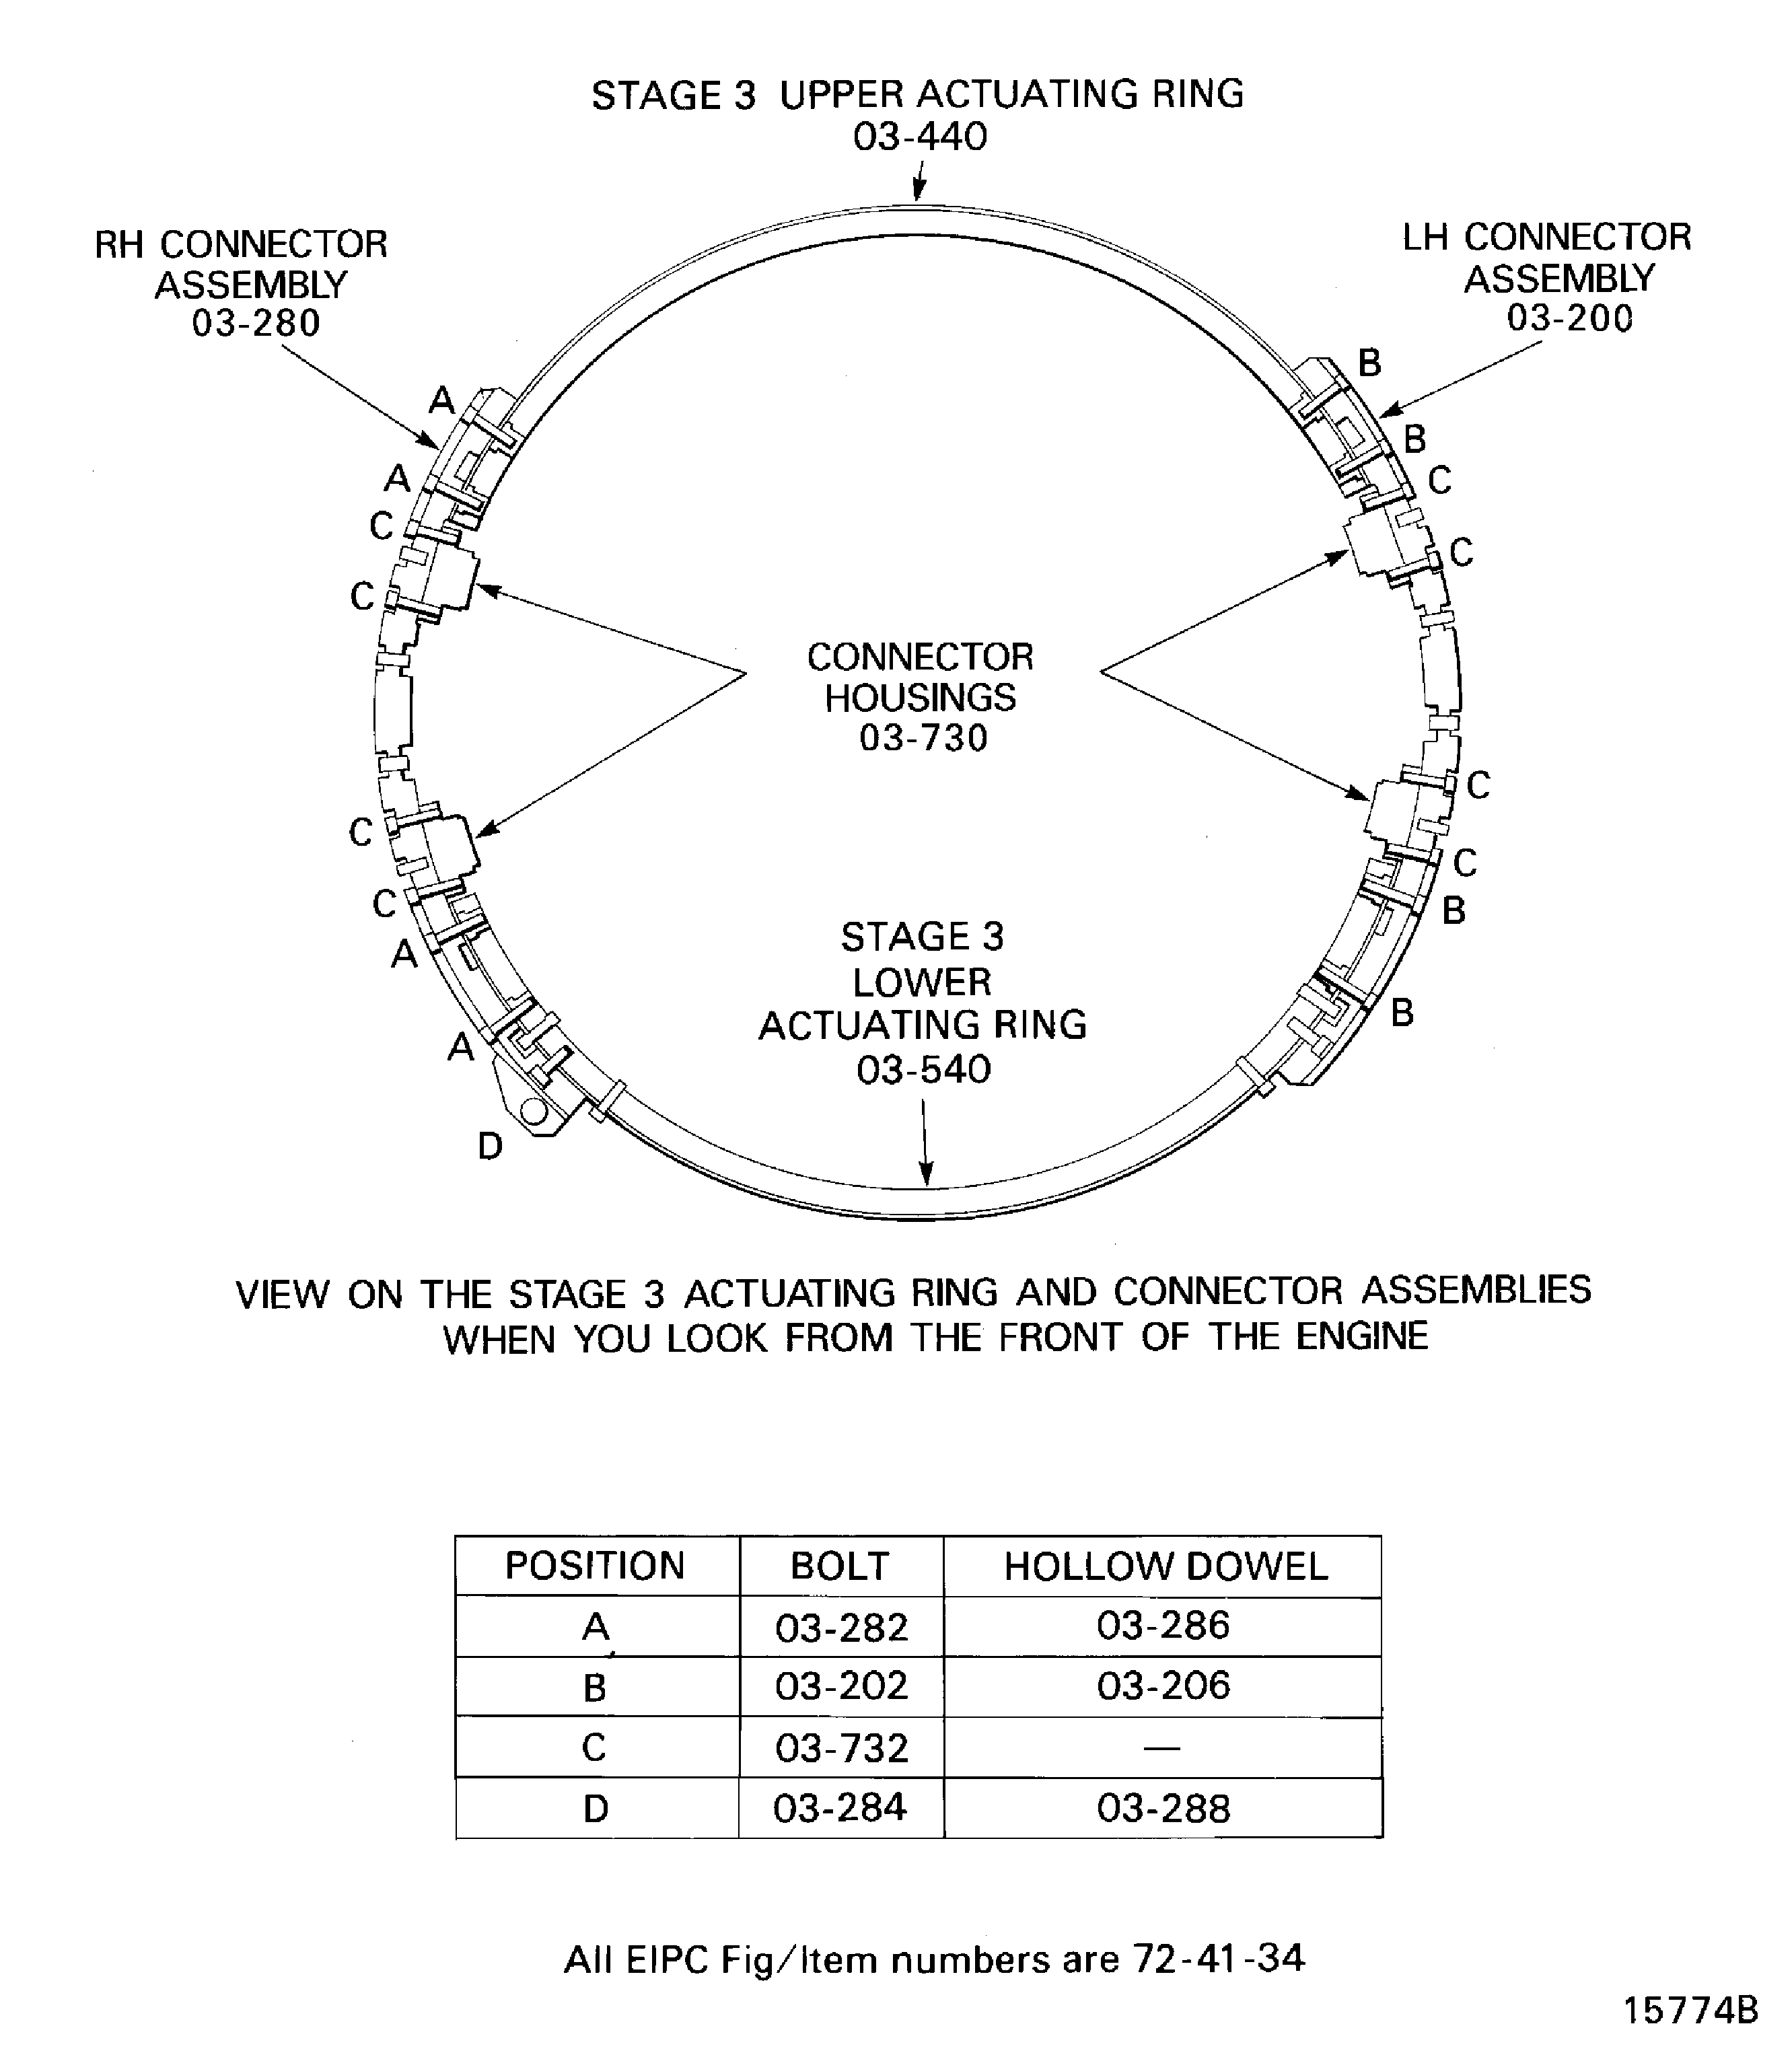
Figure: Remove the stage 4 actuating ring connectors
Remove the stage 4 actuating ring connectors
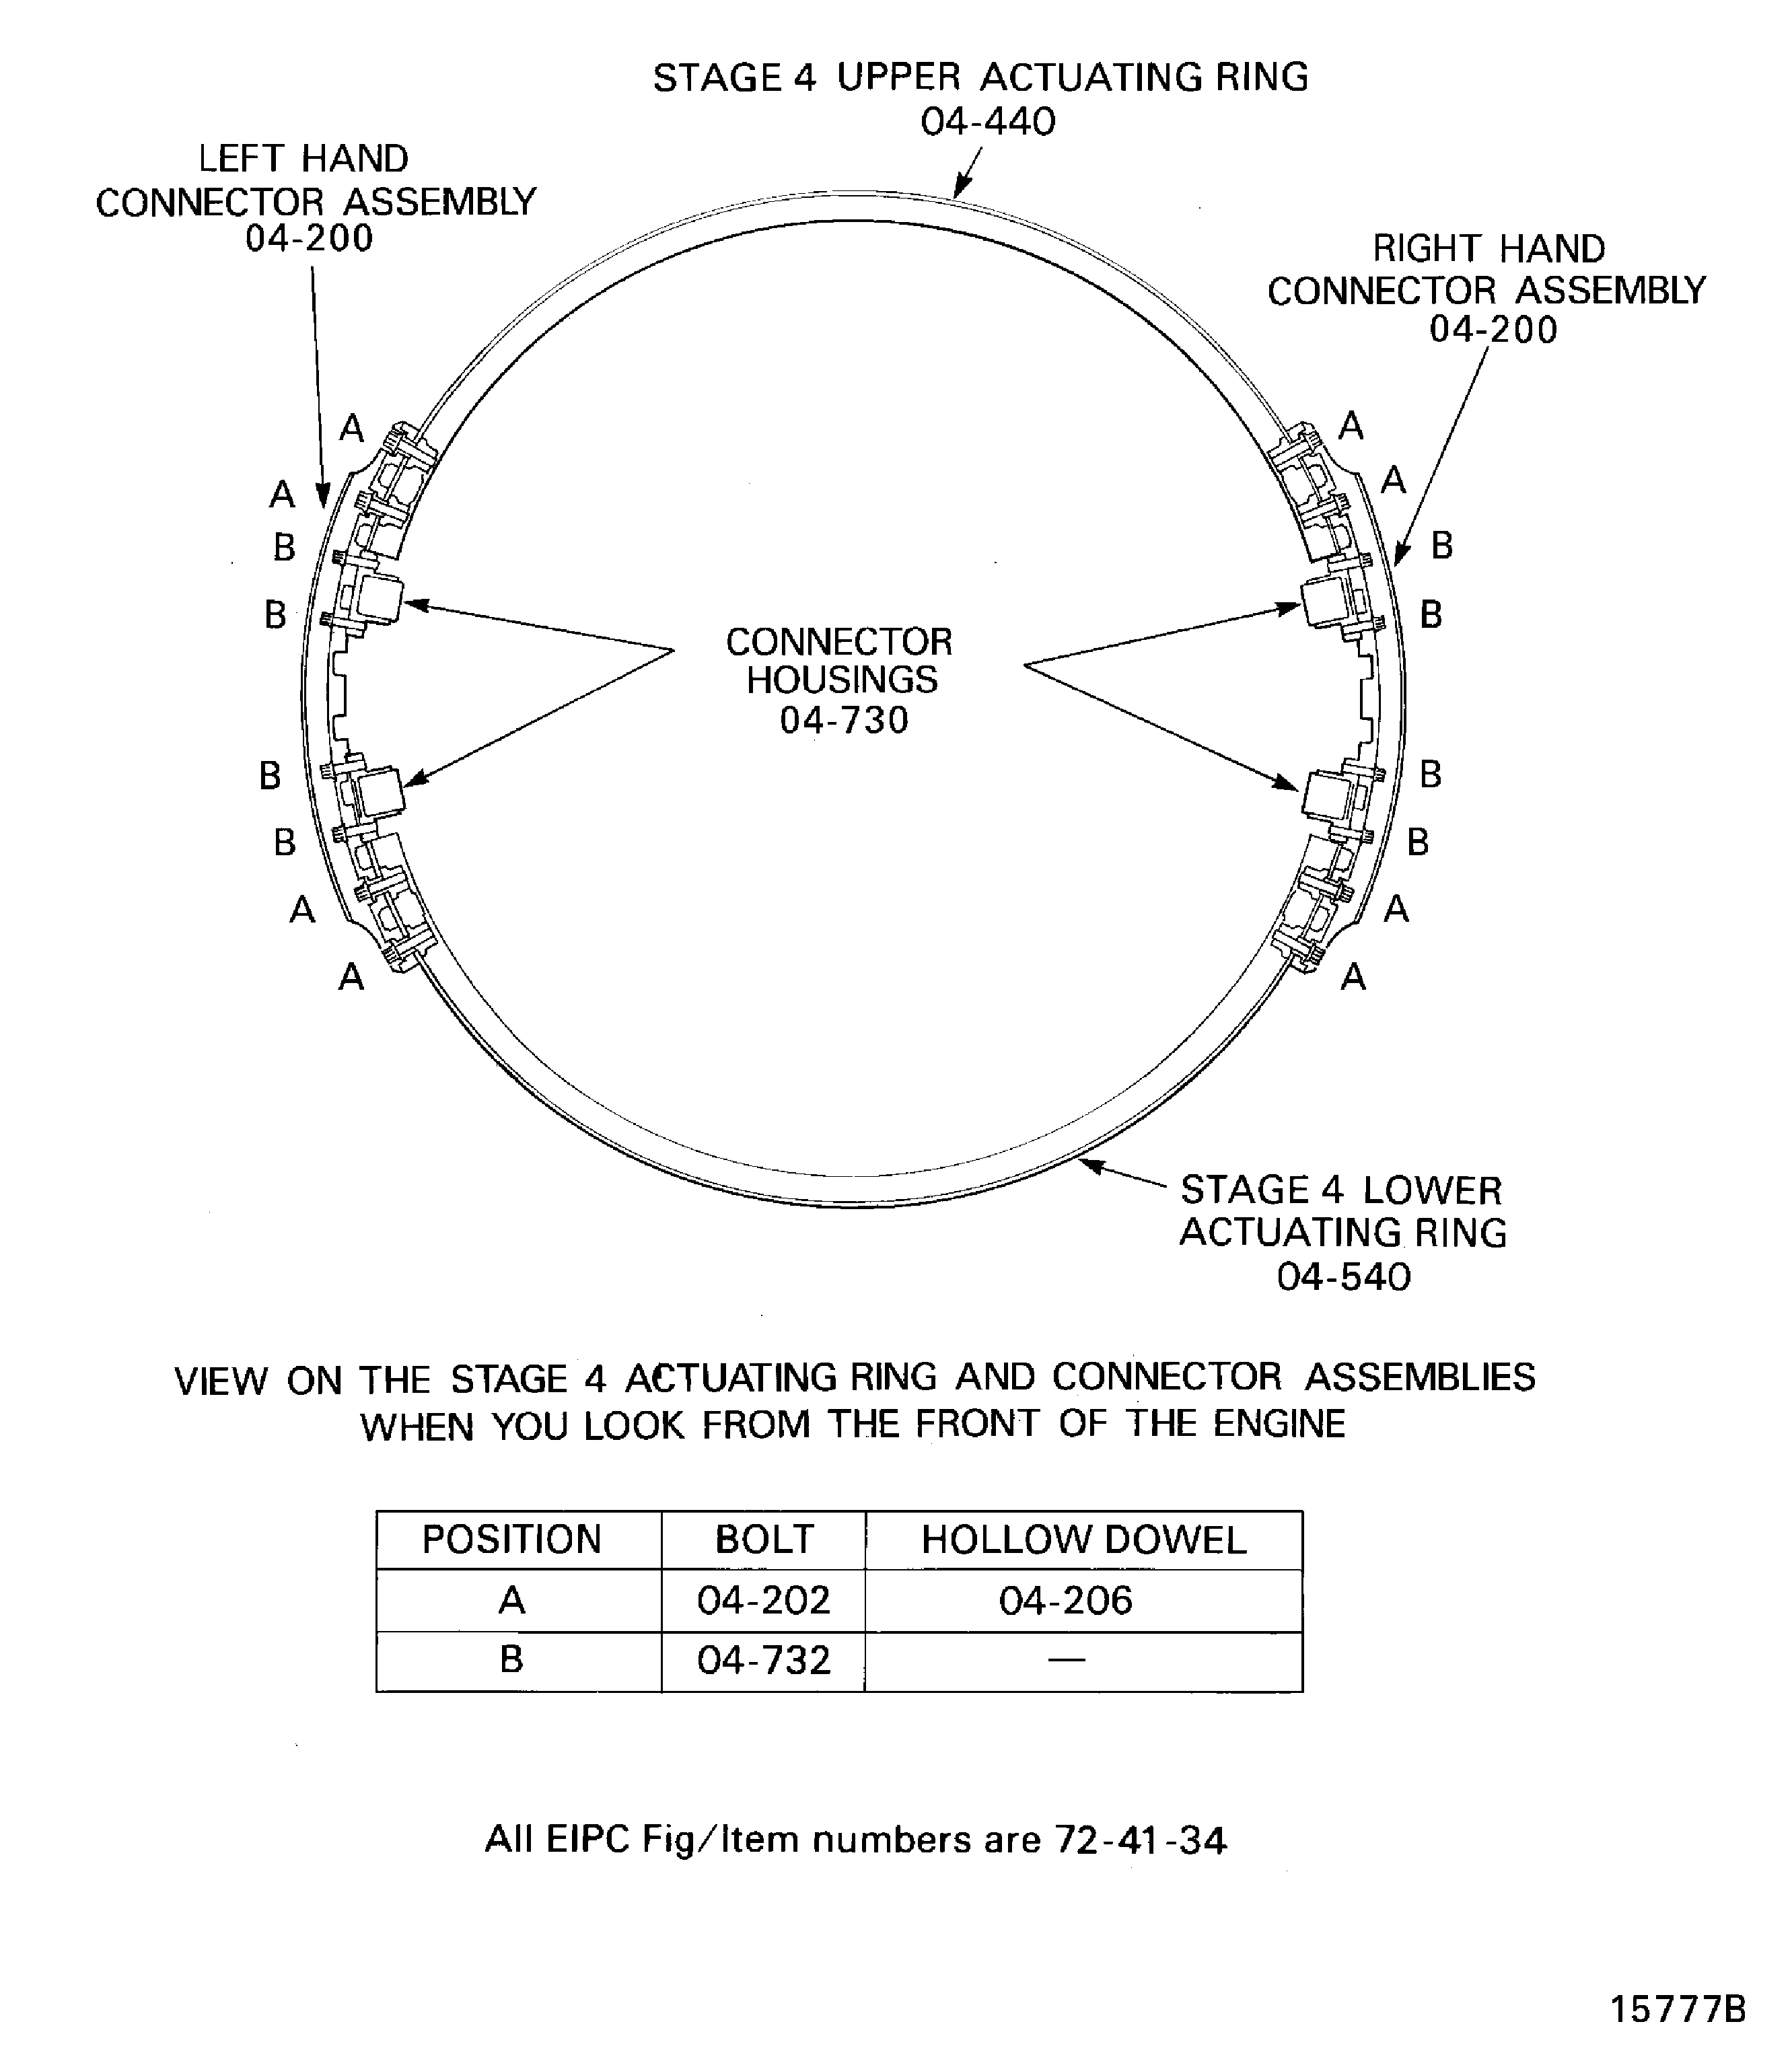
Figure: Remove the stage 5 actuating ring connectors
Remove the stage 5 actuating ring connectors
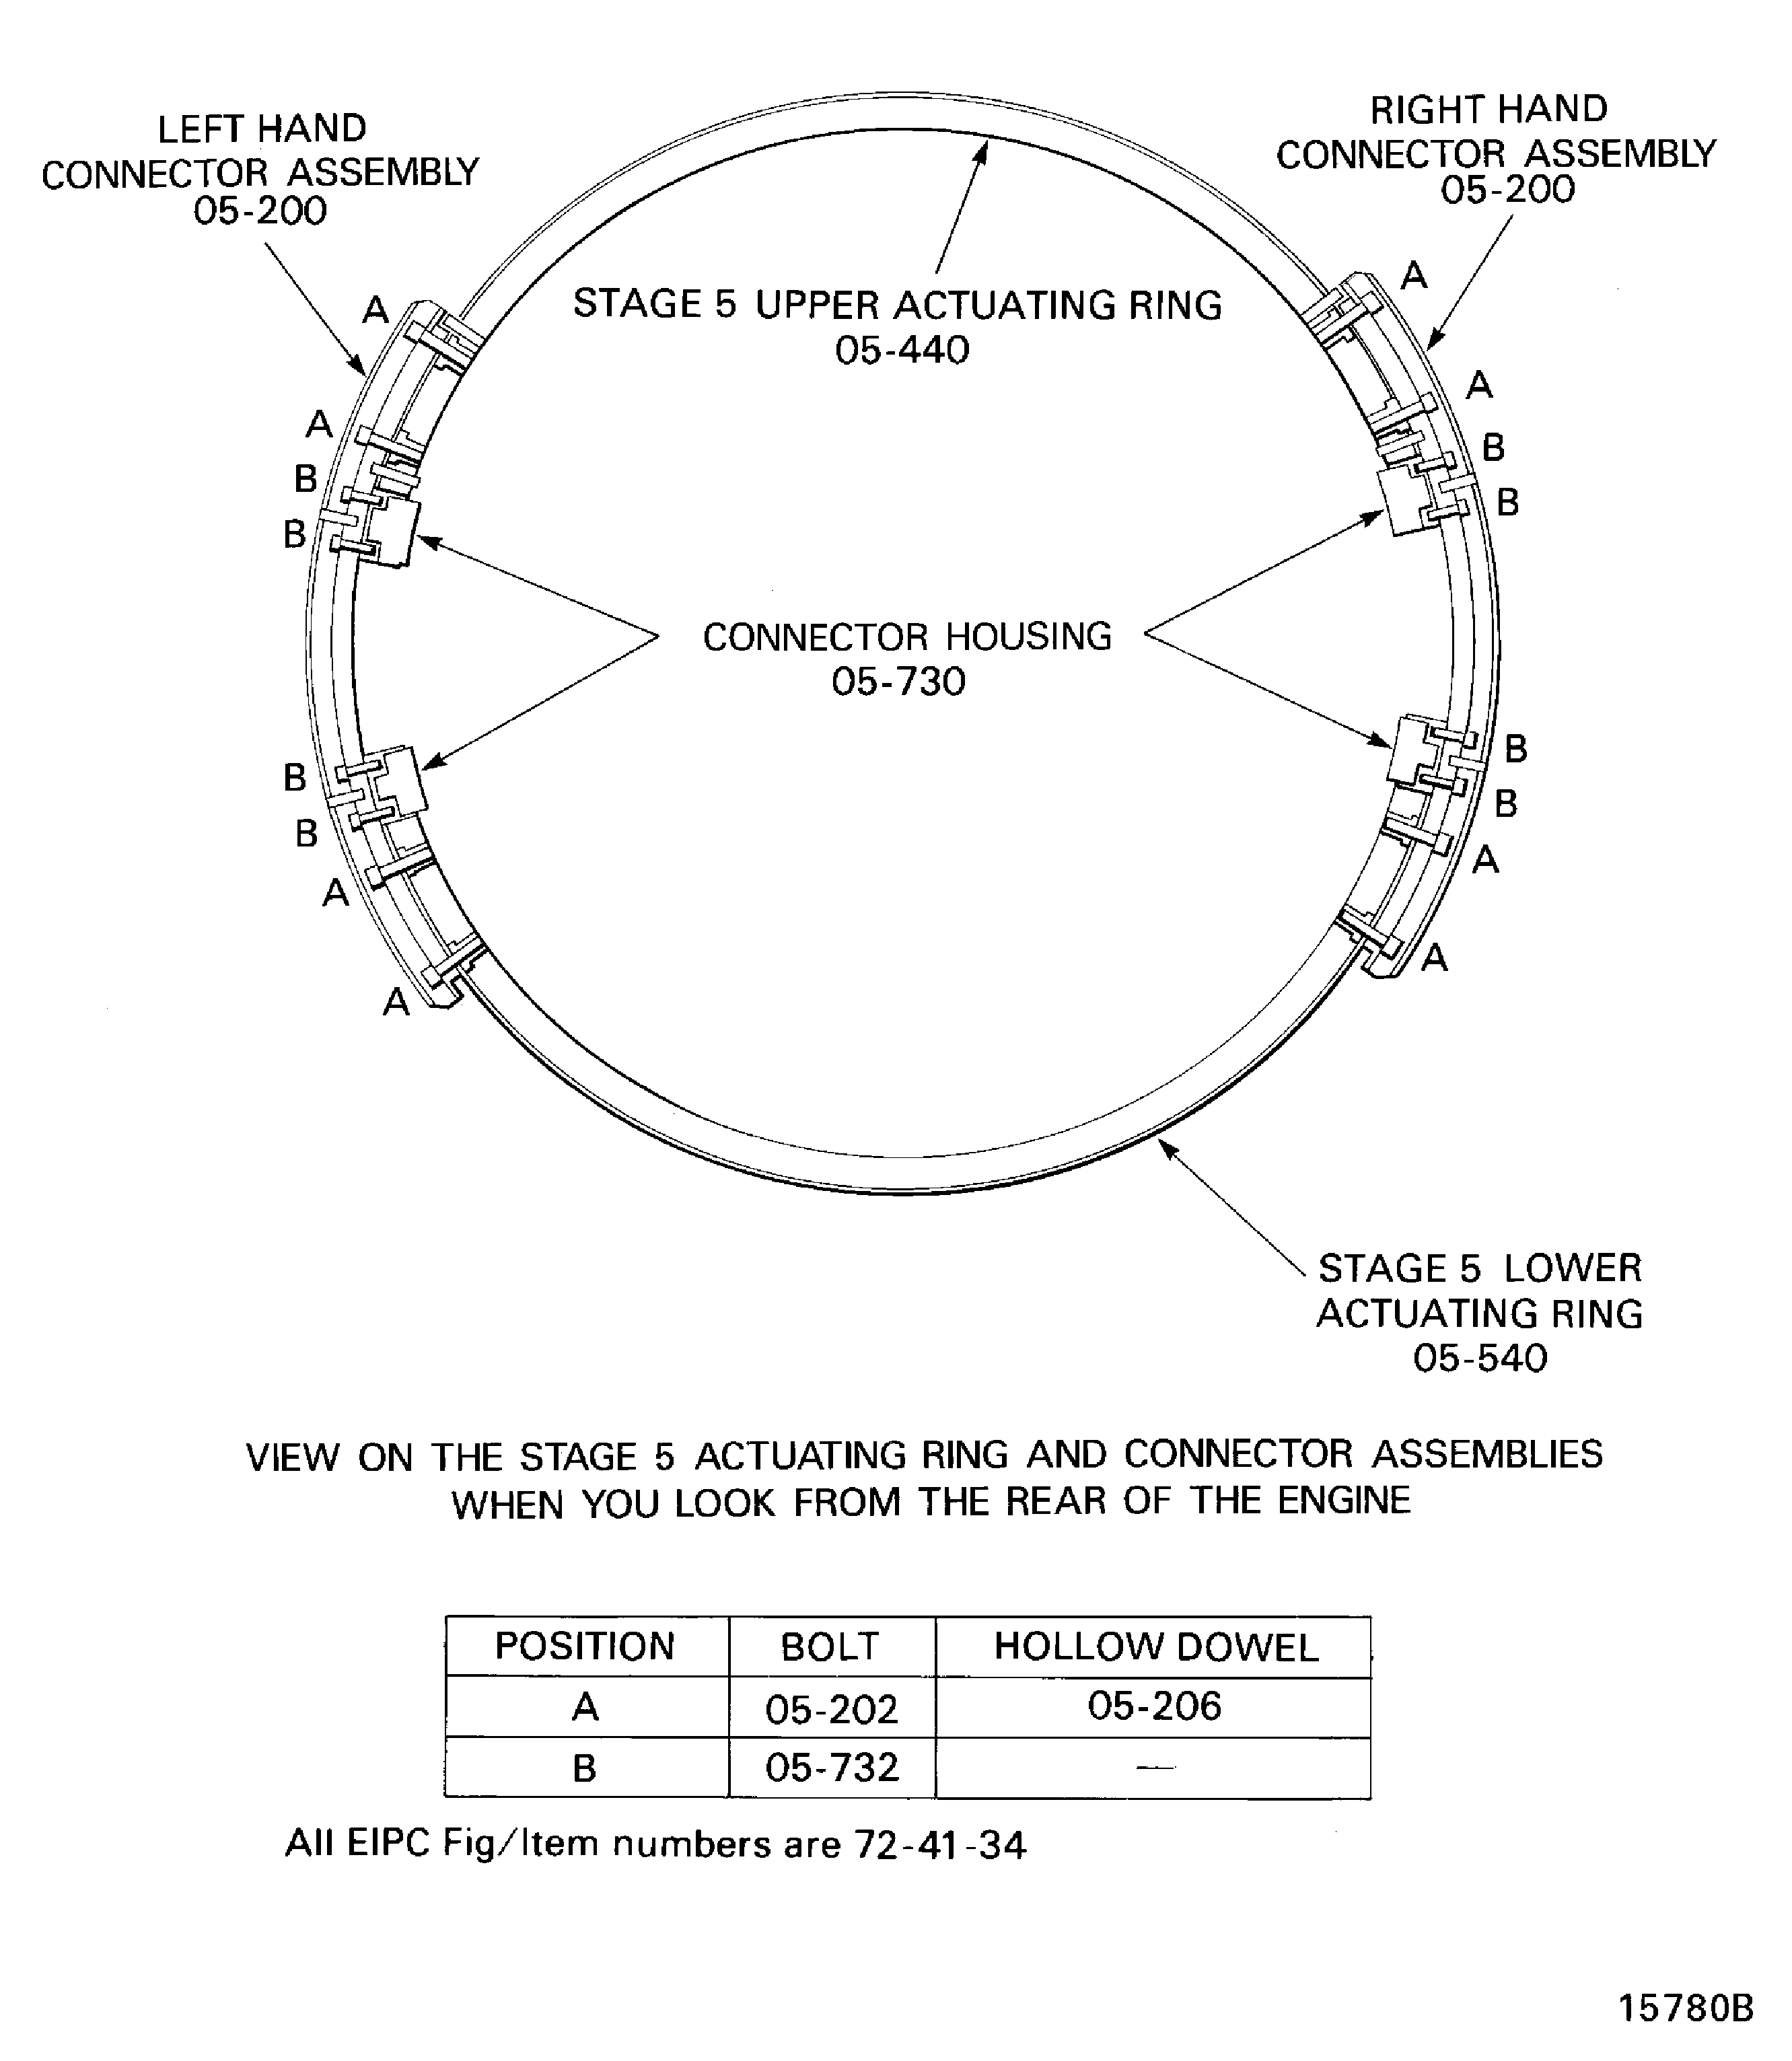
Figure: Remove the stage 6 actuating ring connectors
Remove the stage 6 actuating ring connectors
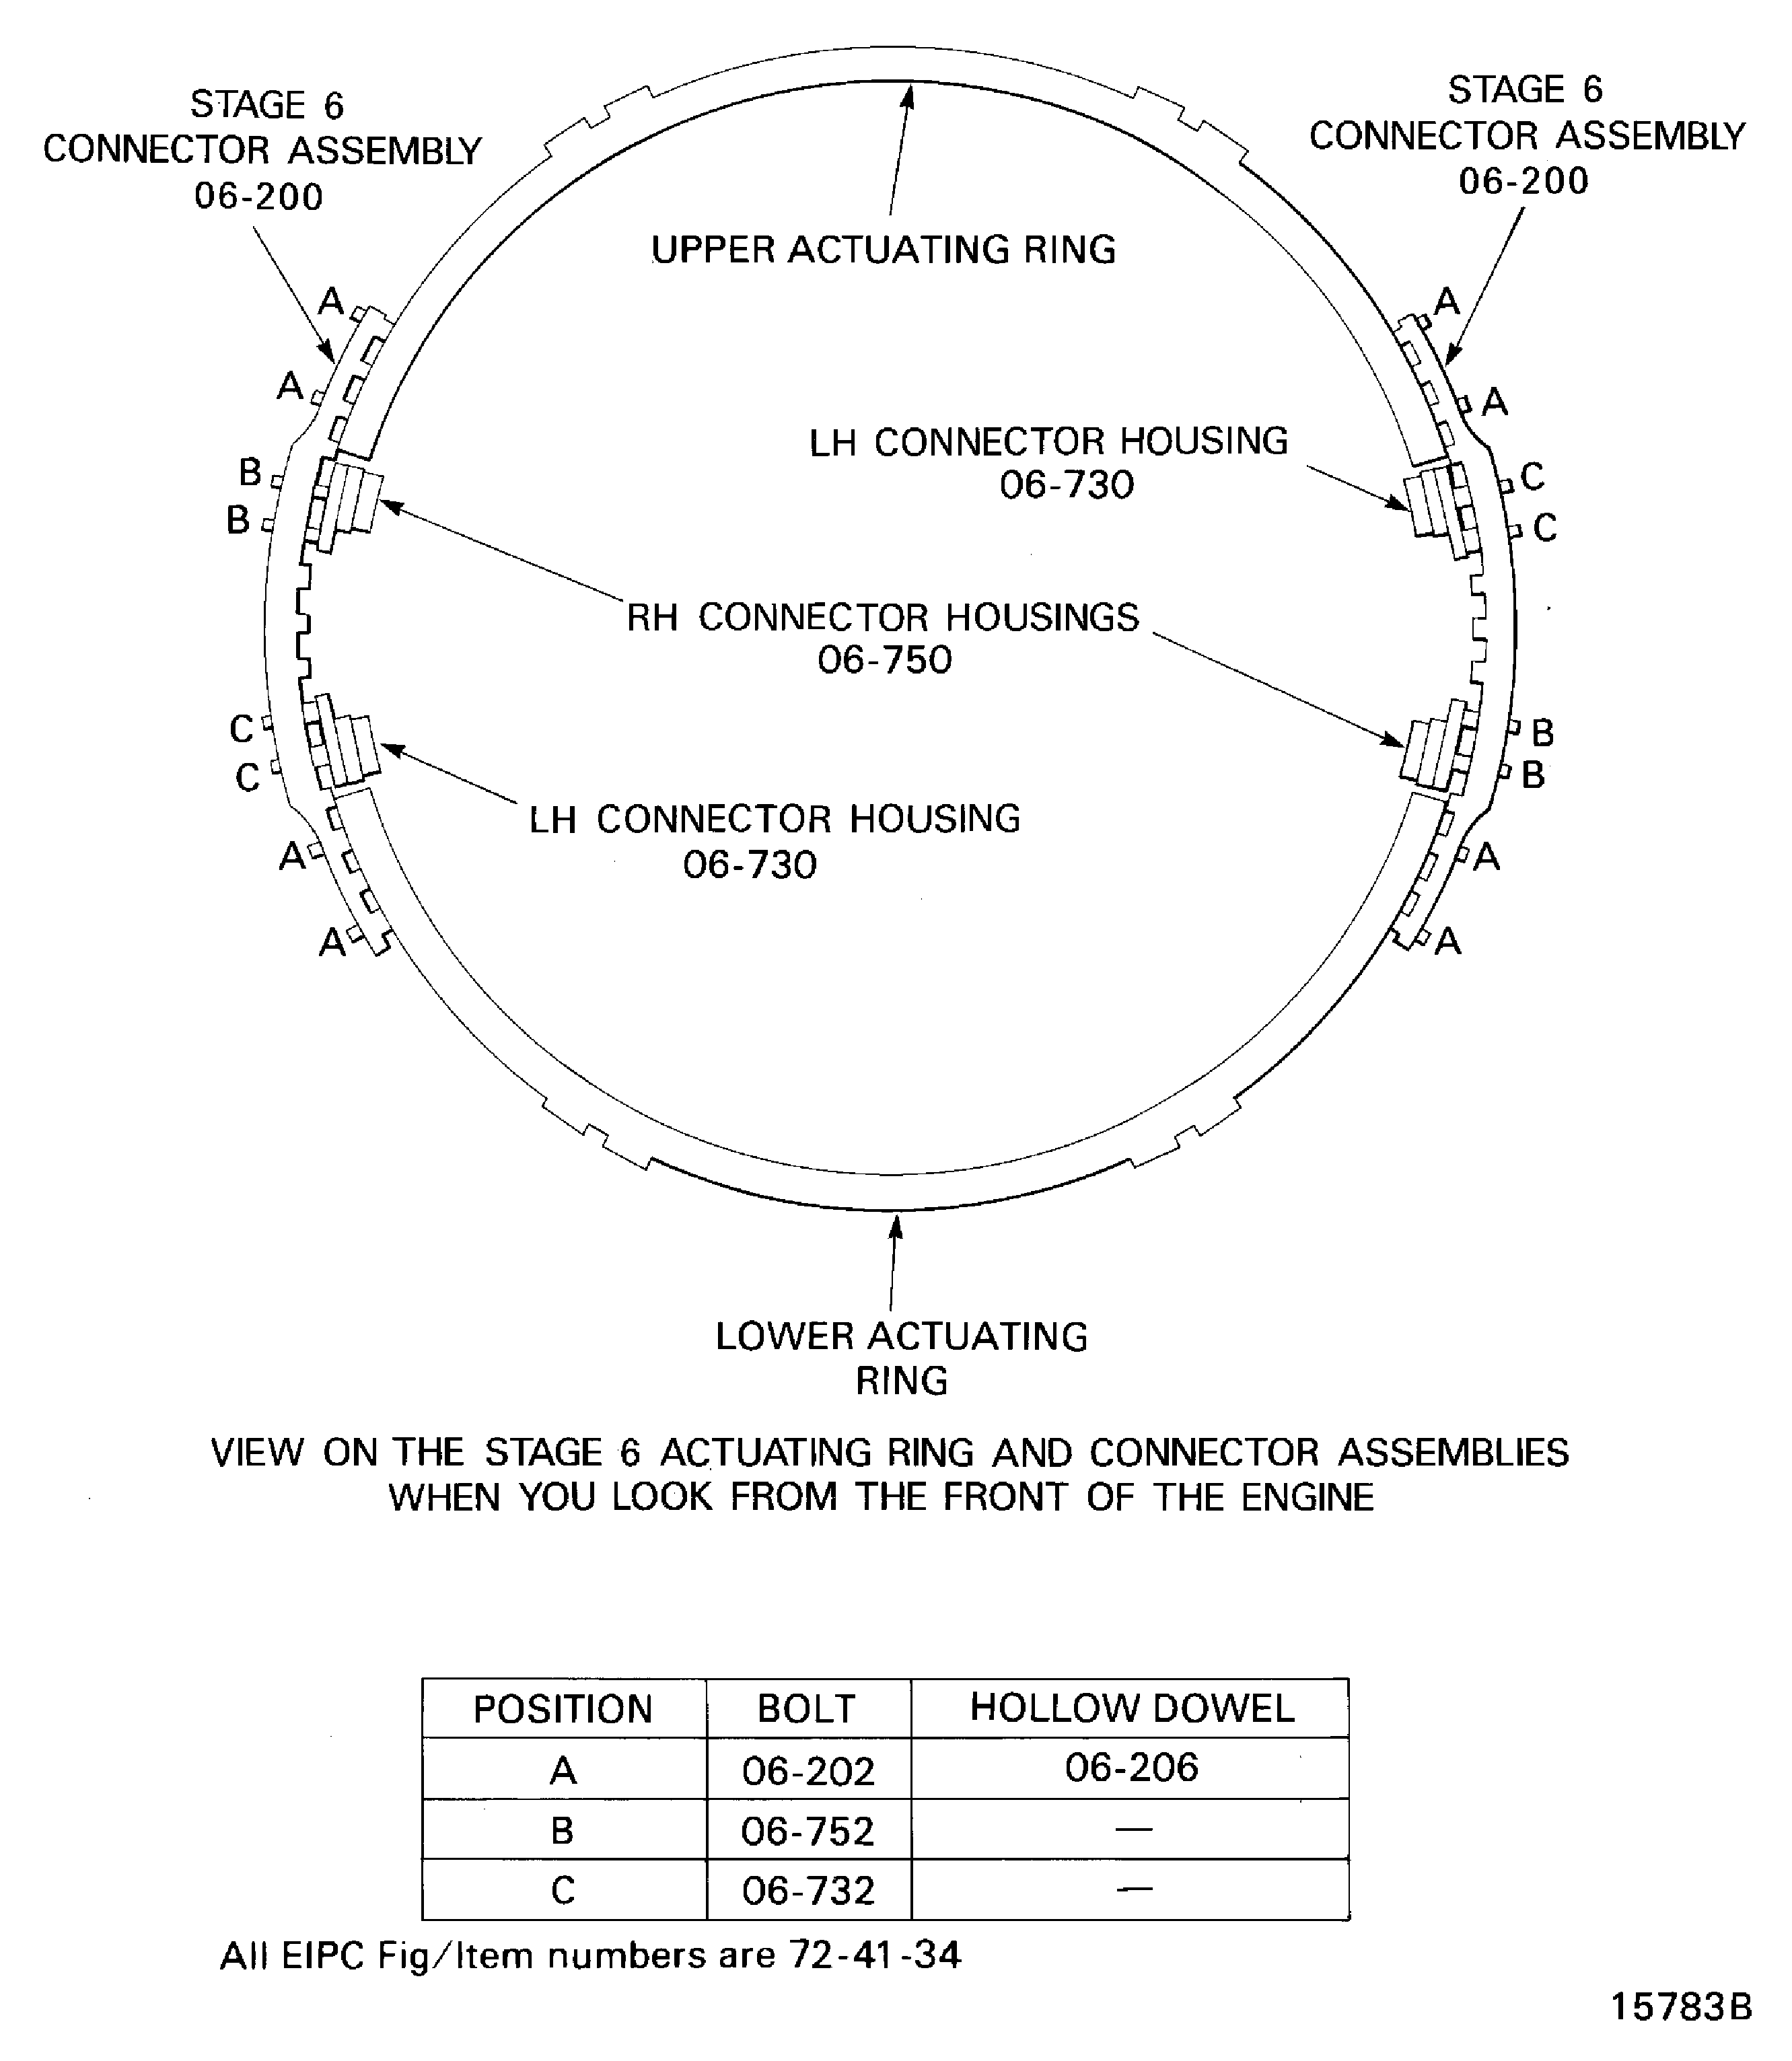
Figure: Install the holding fixture
Install the holding fixture
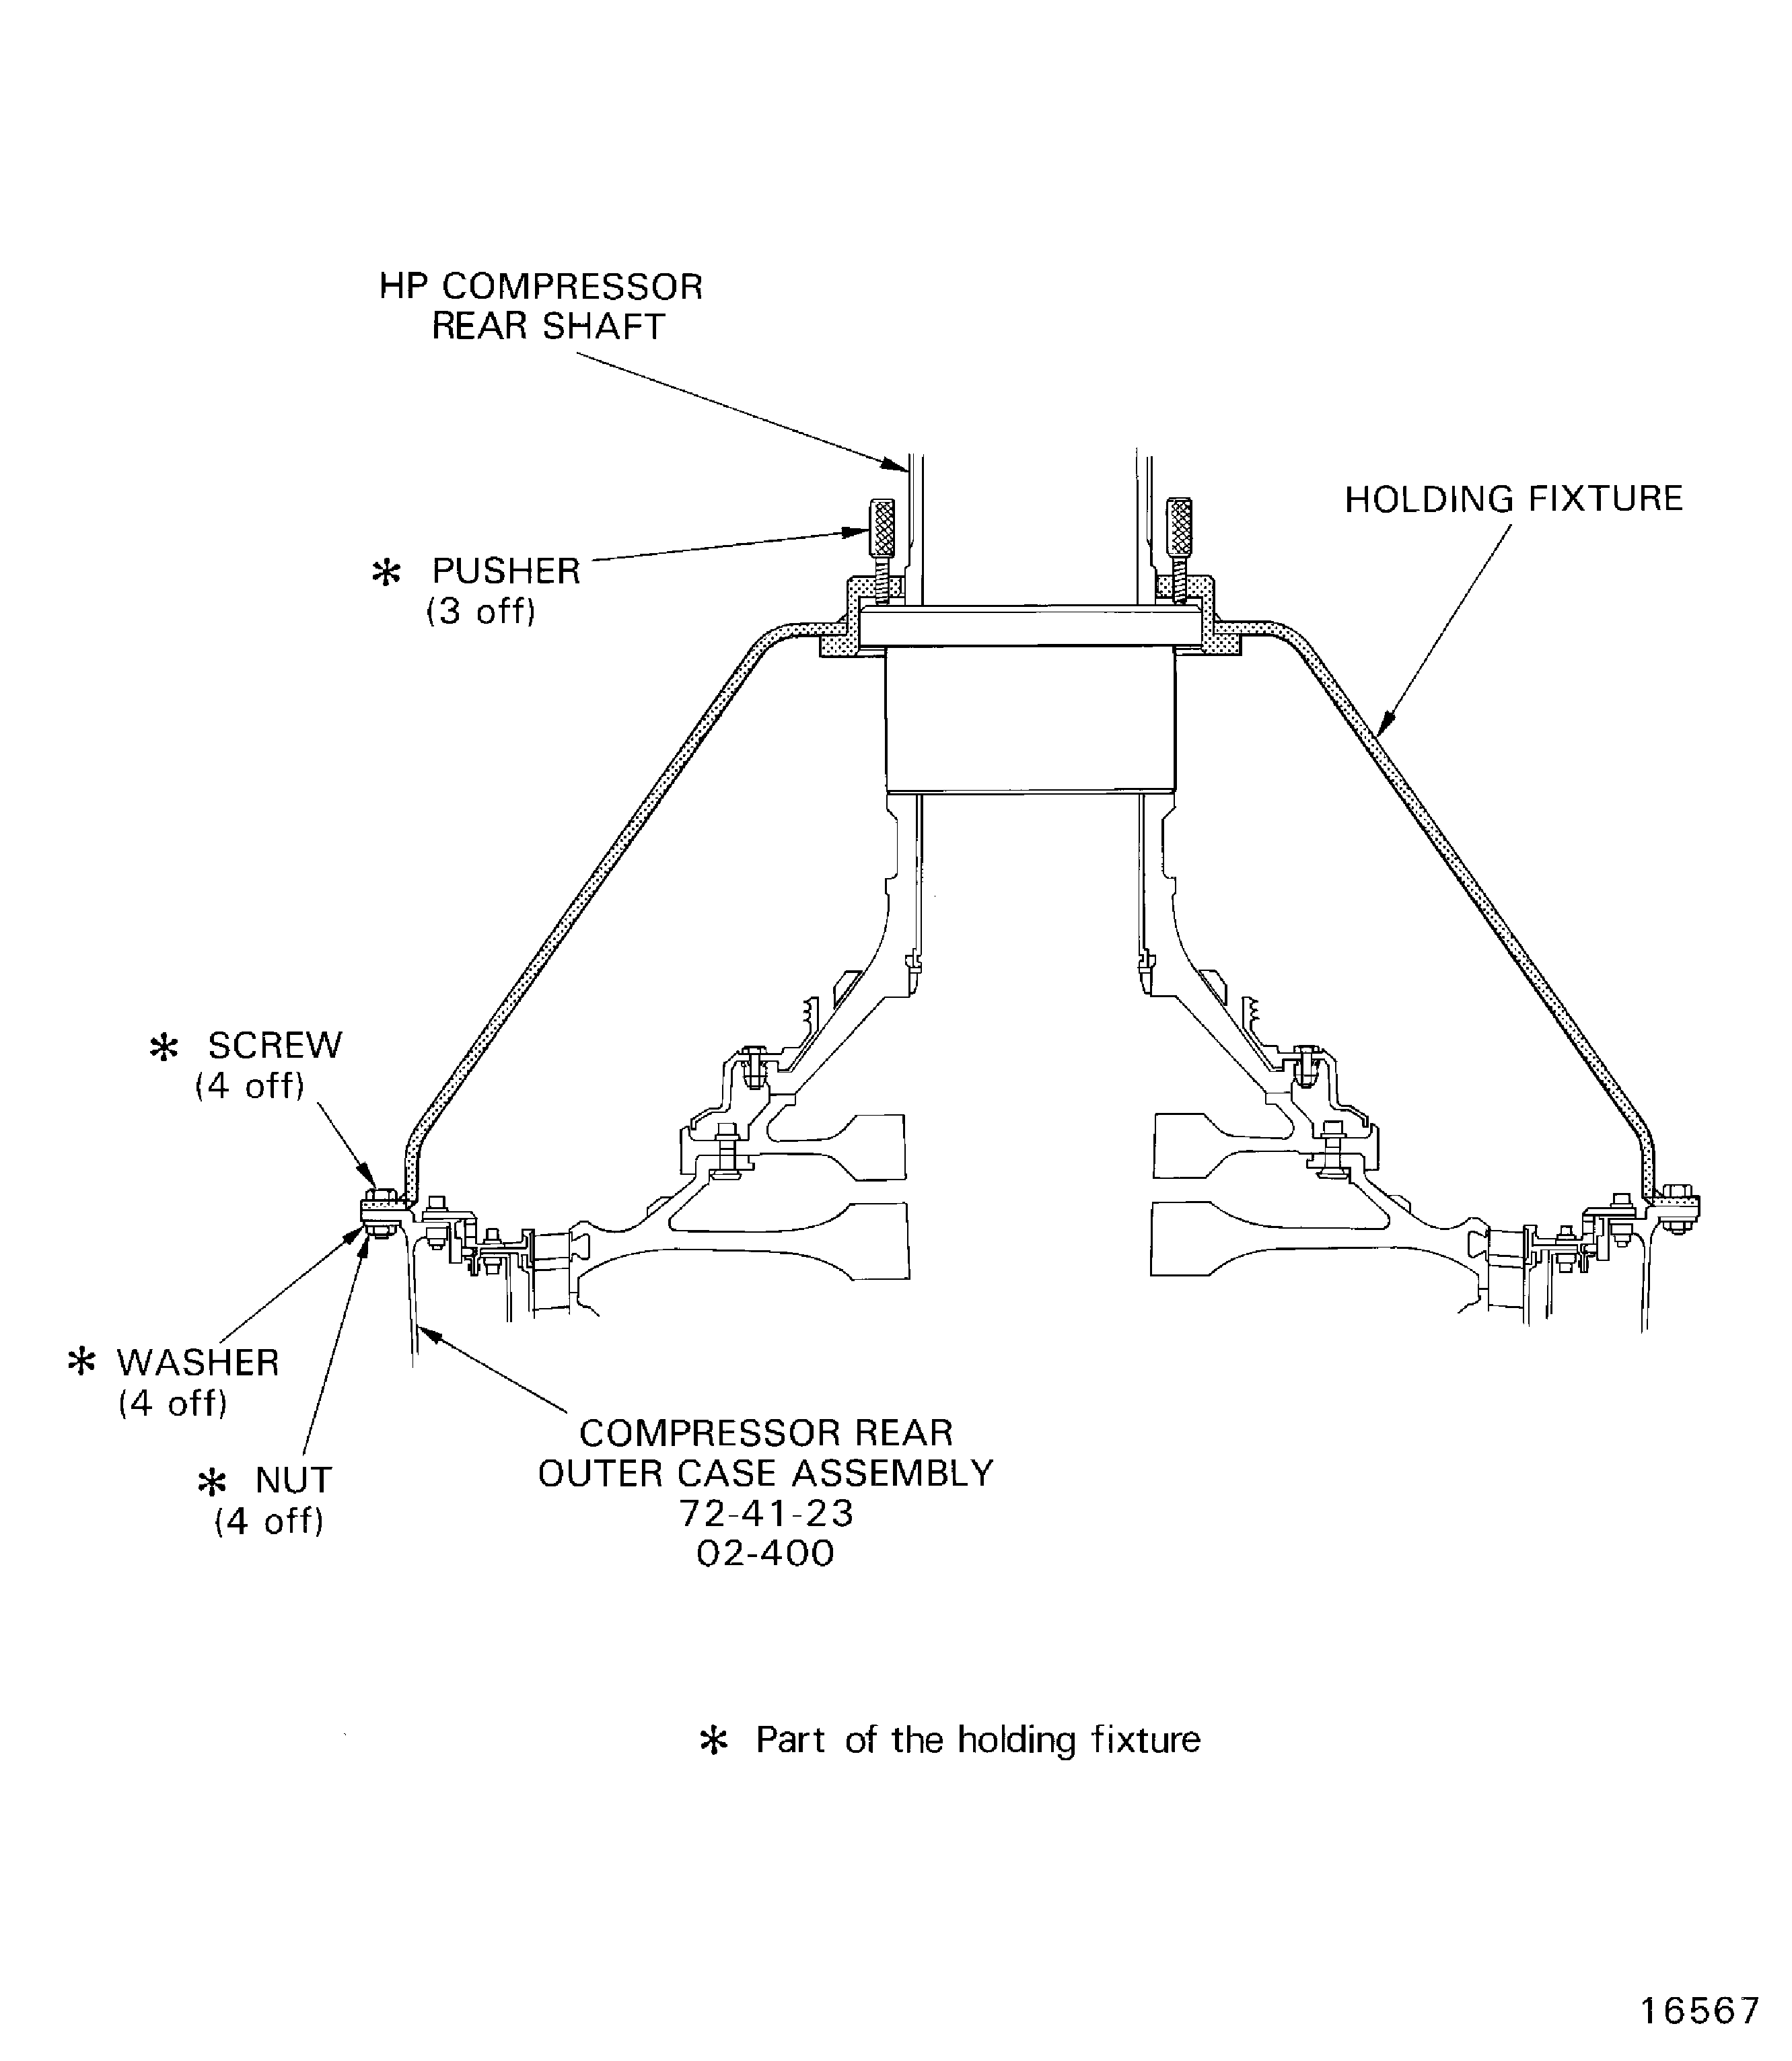
Figure: Remove the HP compressor front case split line and rear flange nuts, bolts and brackets
Remove the HP compressor front case split line and rear flange nuts, bolts and brackets
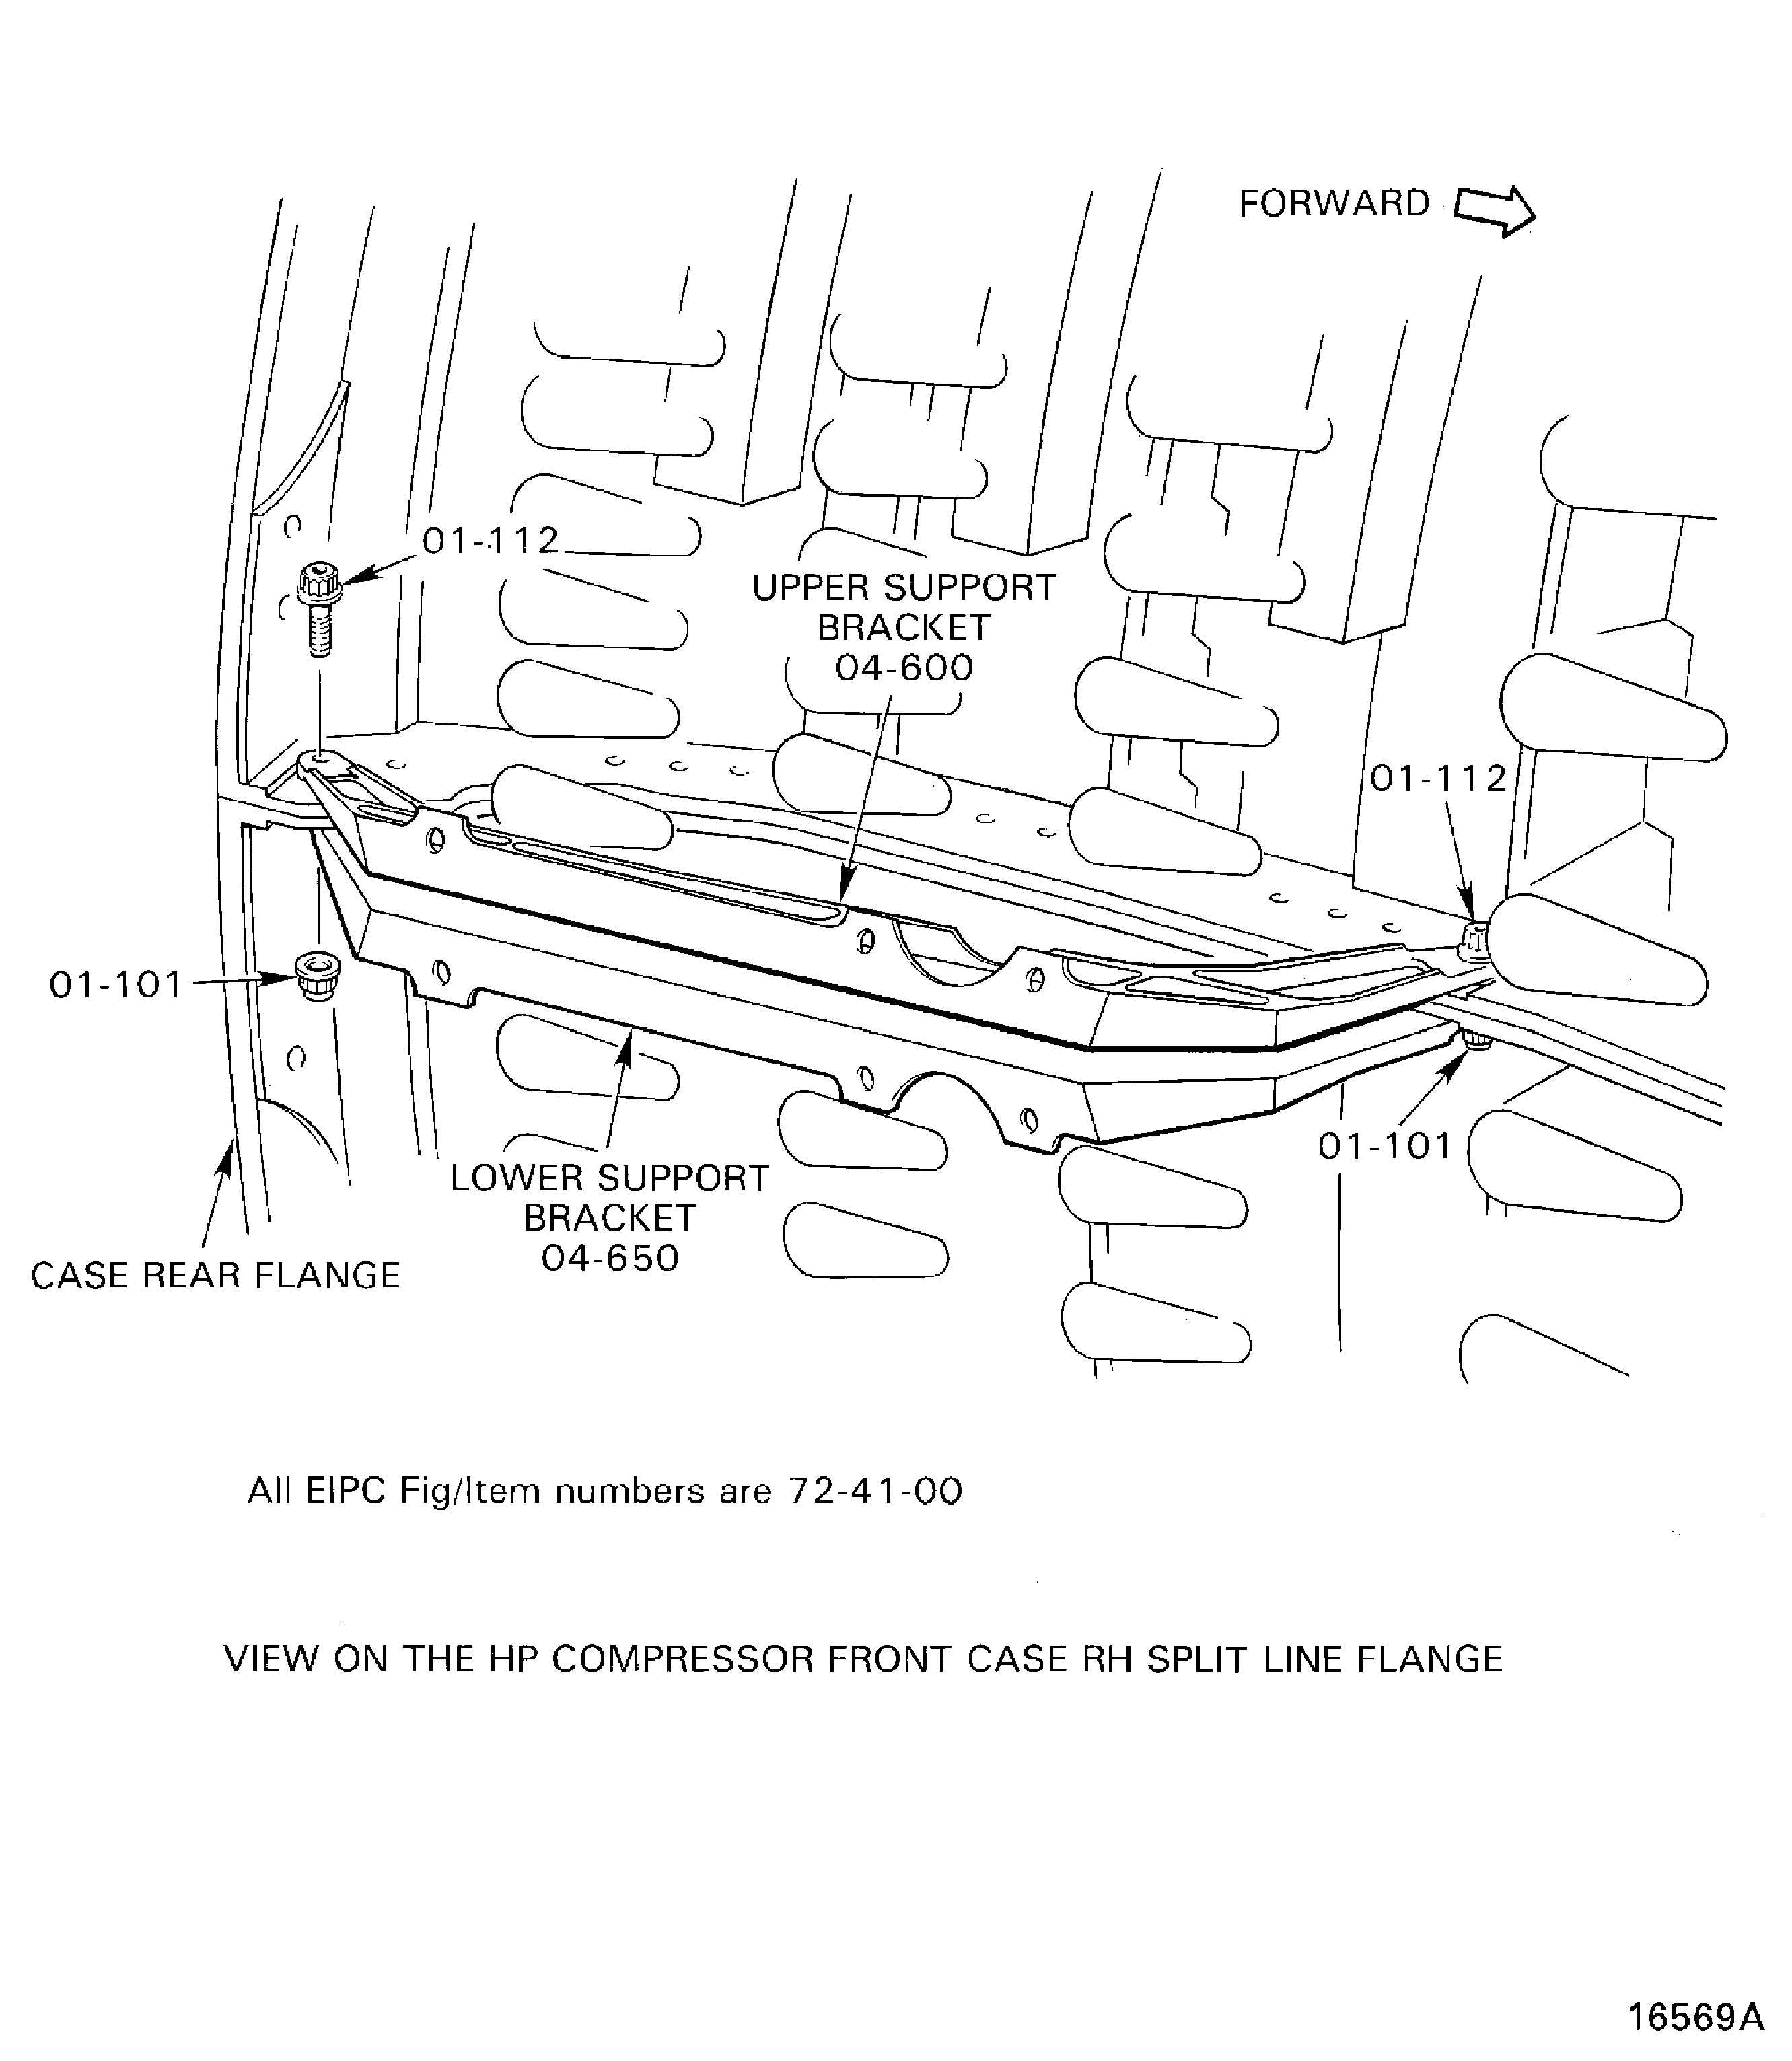
Figure: Remove the HP compressor front case split line and rear flange nuts, bolts and brackets
Remove the HP compressor front case split line and rear flange nuts, bolts and brackets
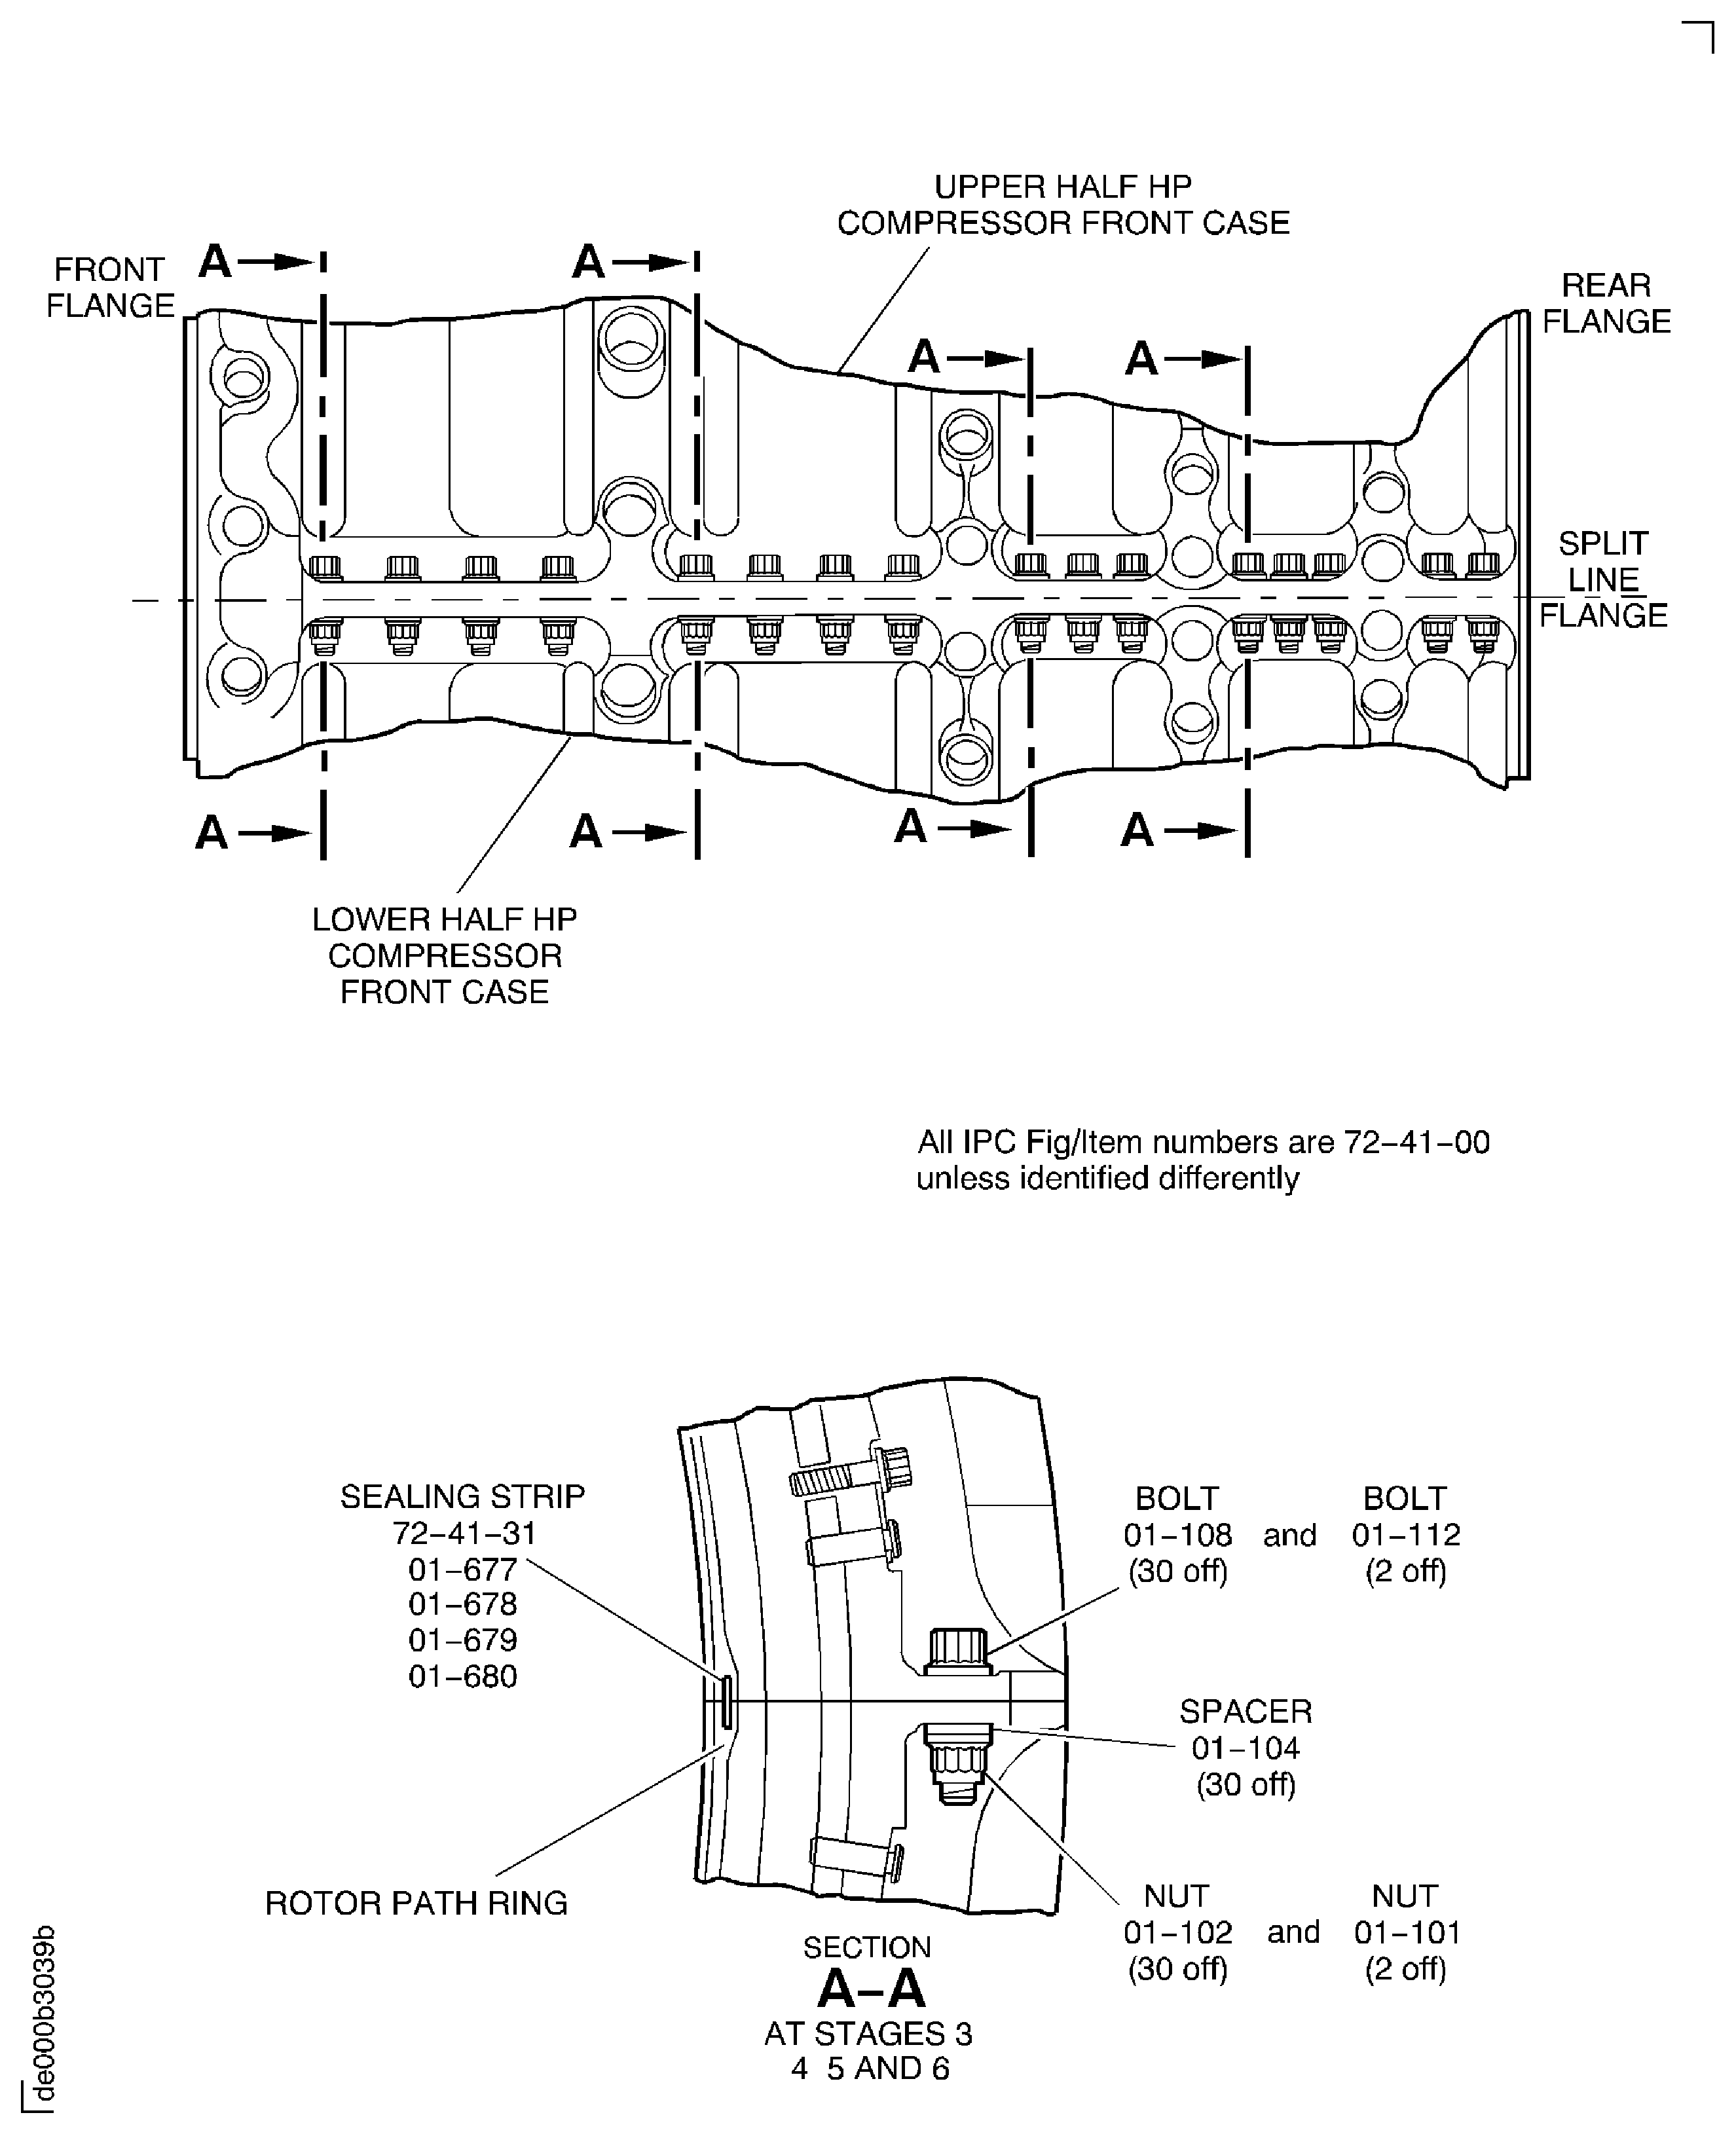
Figure: Remove the HP compressor front case
Remove the HP compressor front case
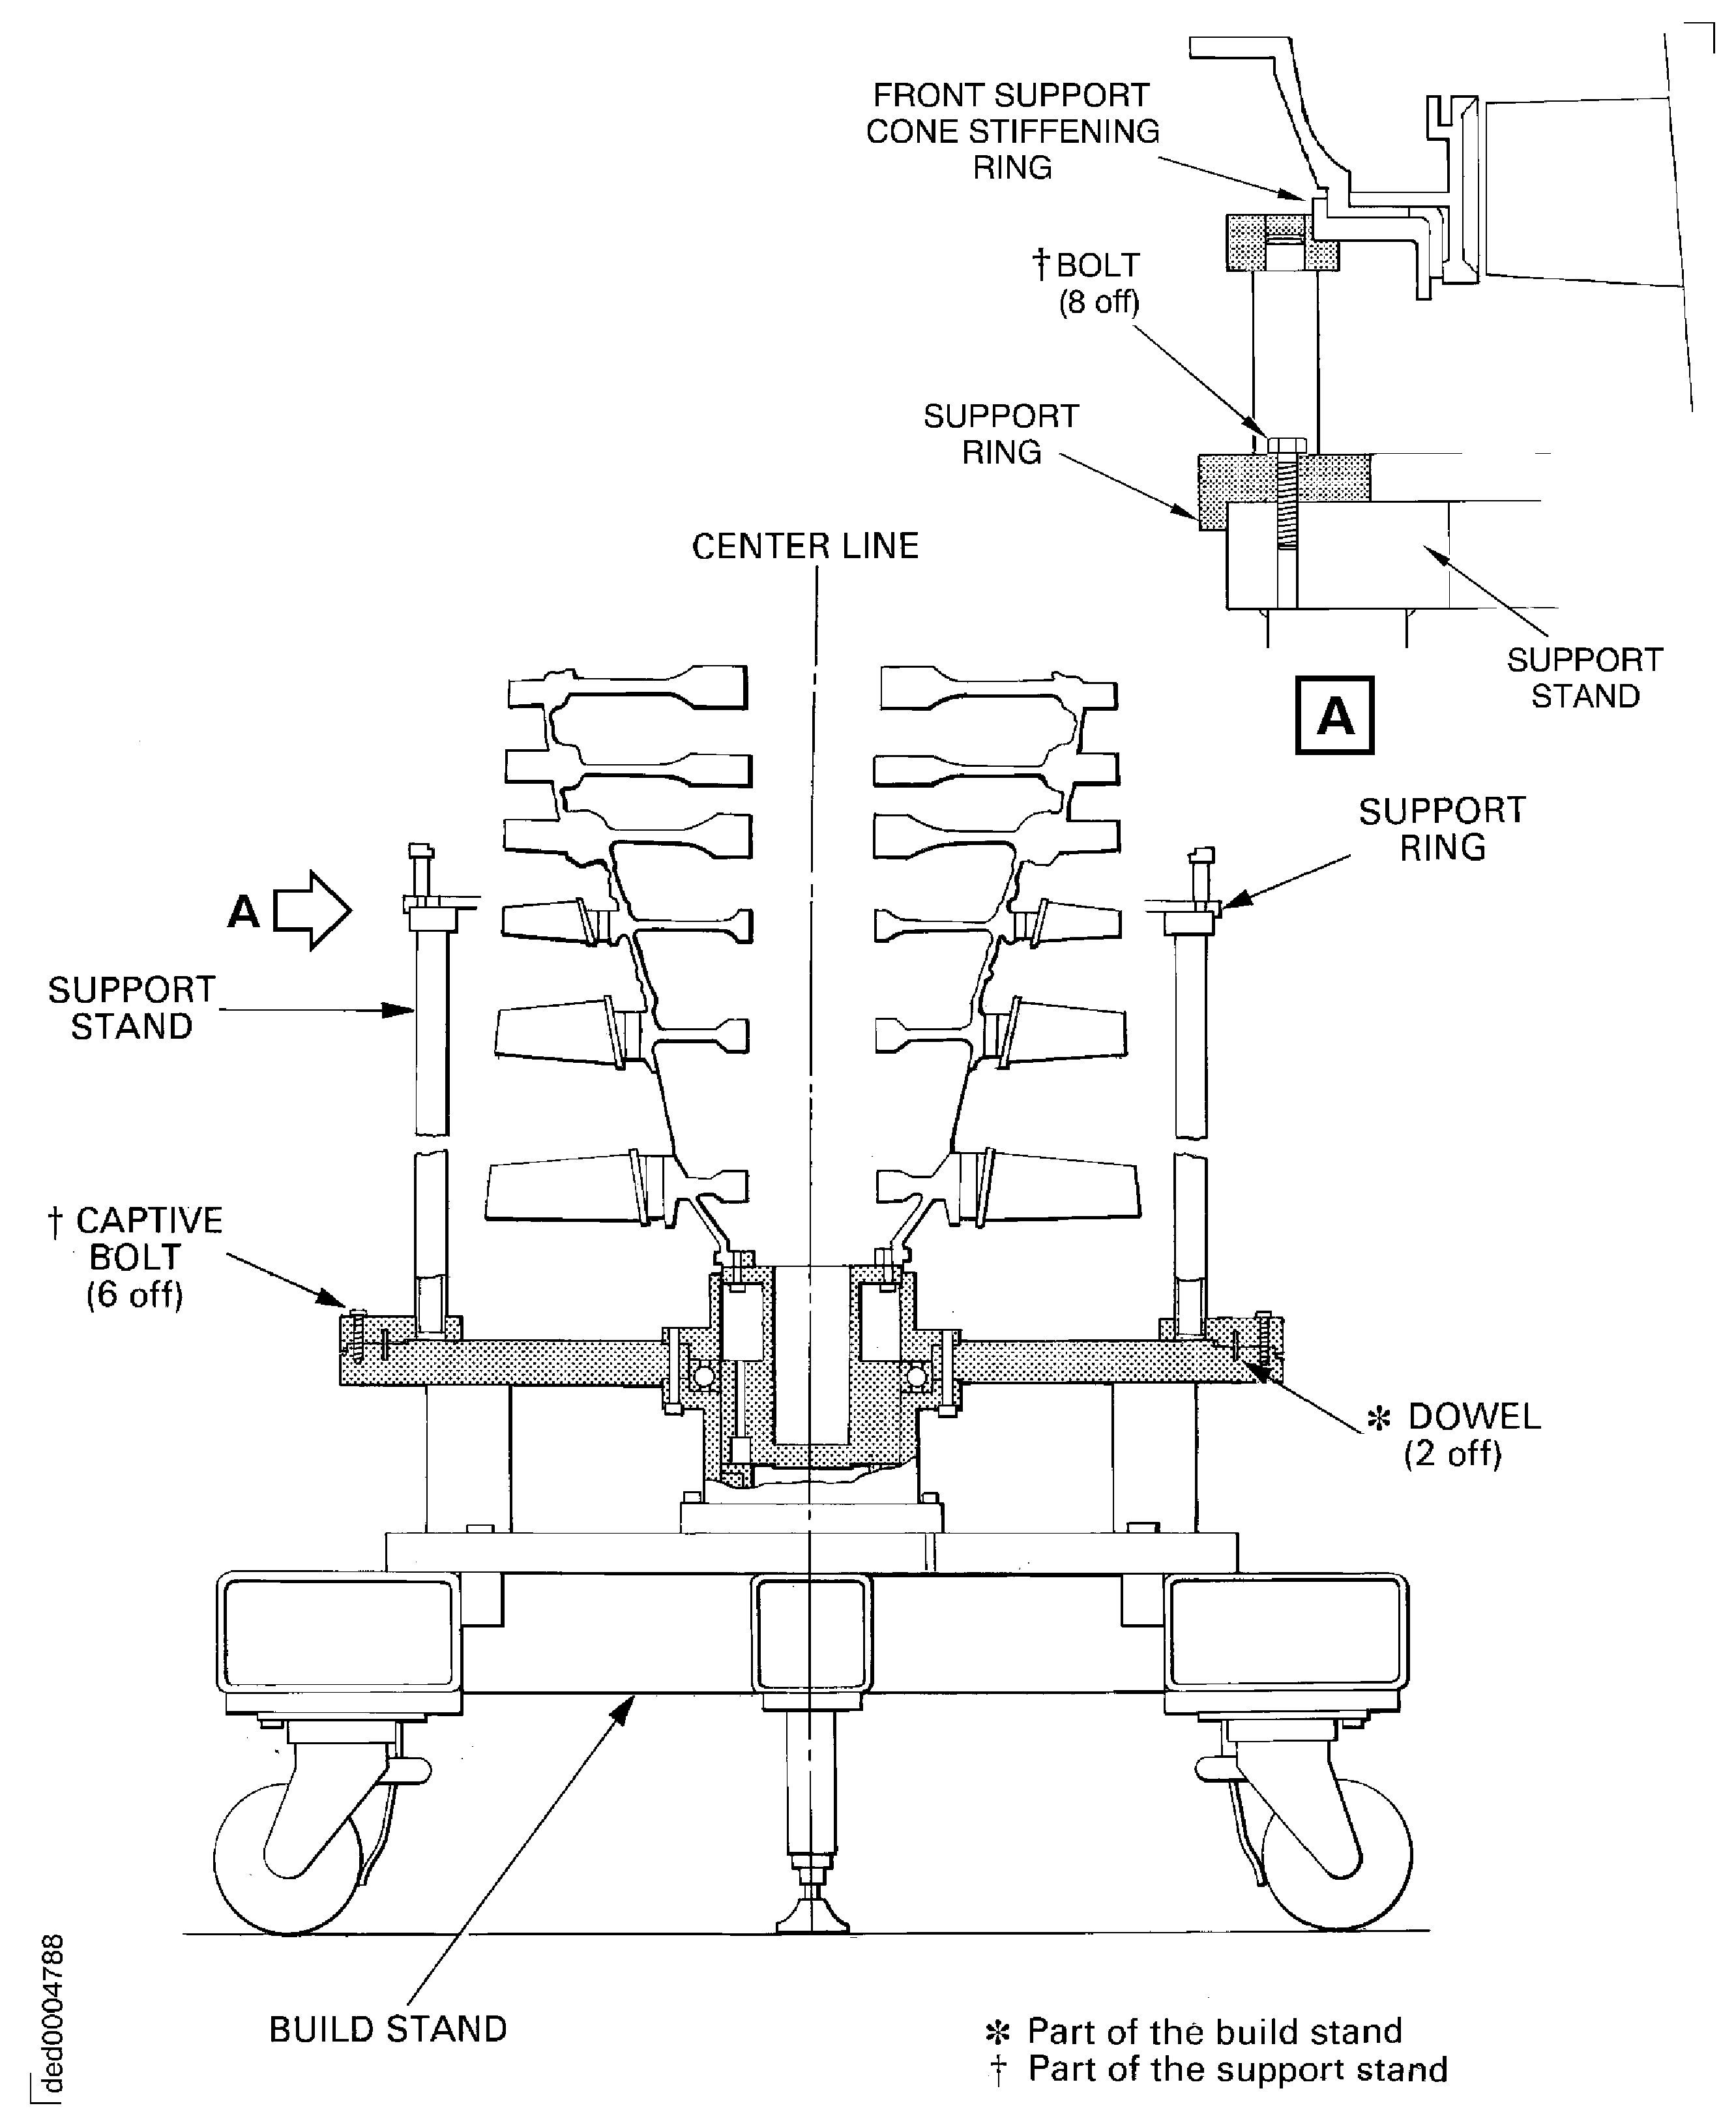
Figure: Remove the cross key location segments and the rear seal housing
Remove the cross key location segments and the rear seal housing
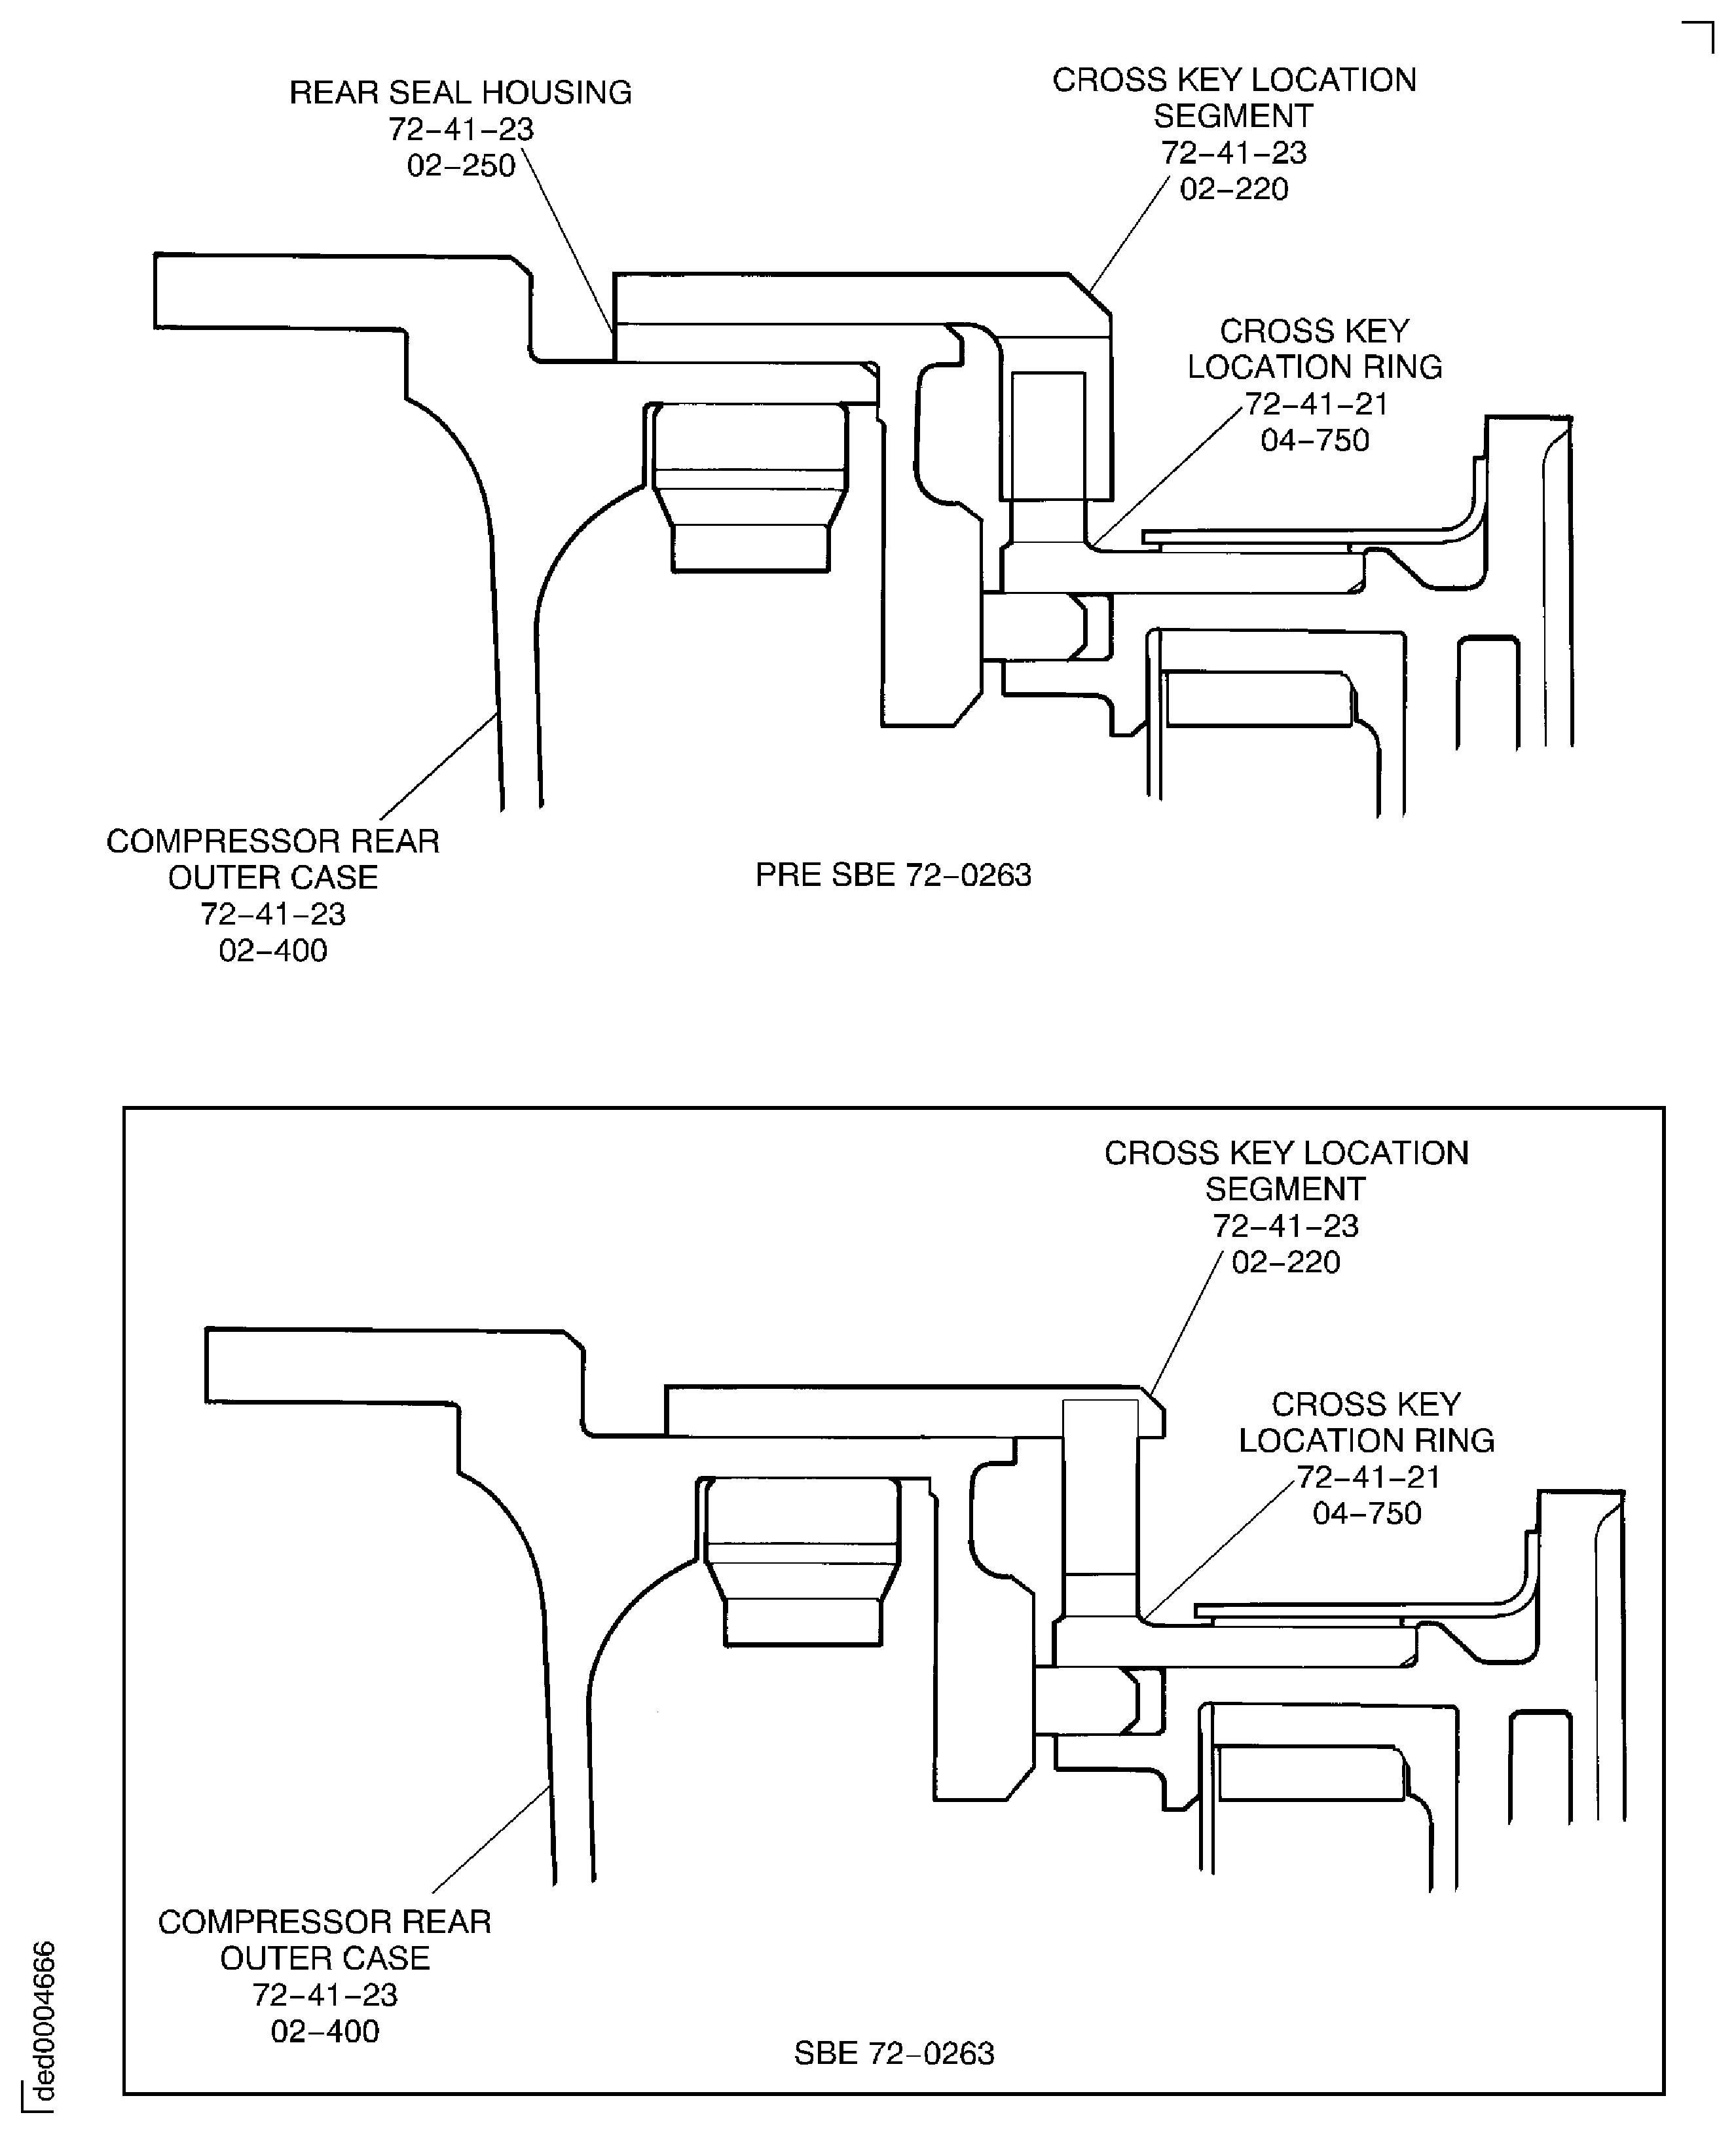
Figure: Remove the borescope access blanking plugs and cover
Remove the borescope access blanking plugs and cover
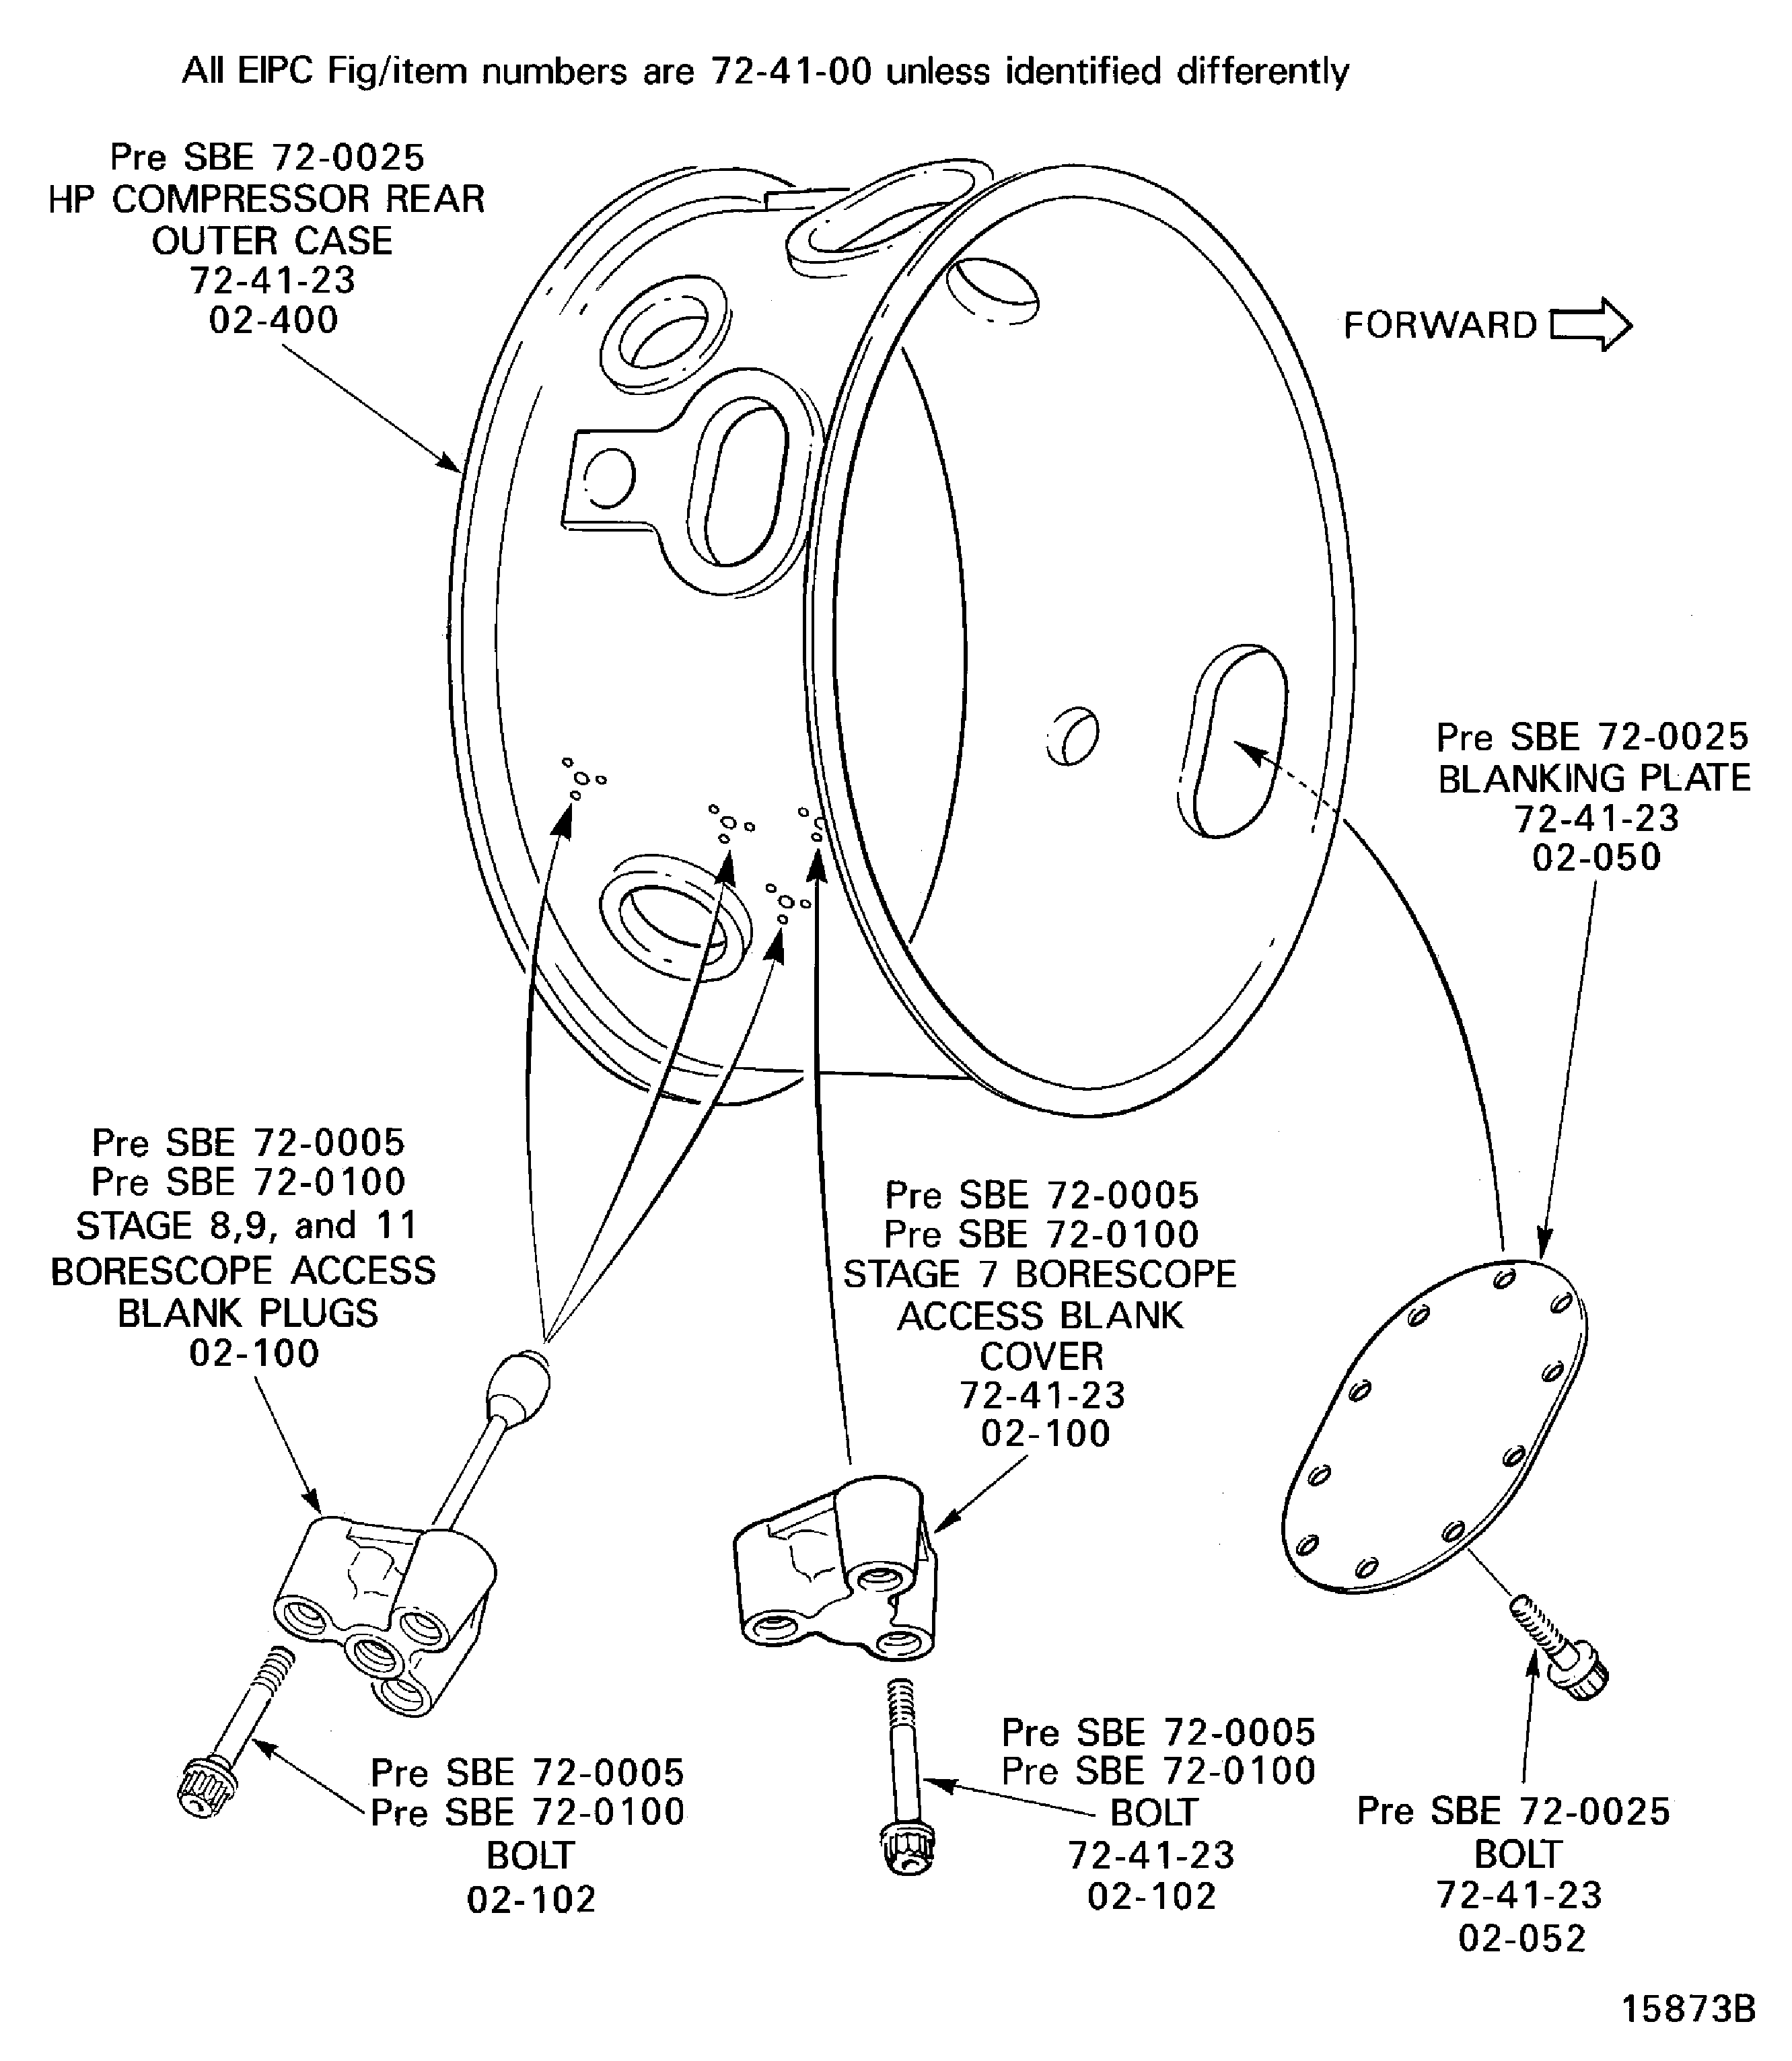
Figure: Remove the borescope access blanking plugs and cover
Remove the borescope access blanking plugs and cover
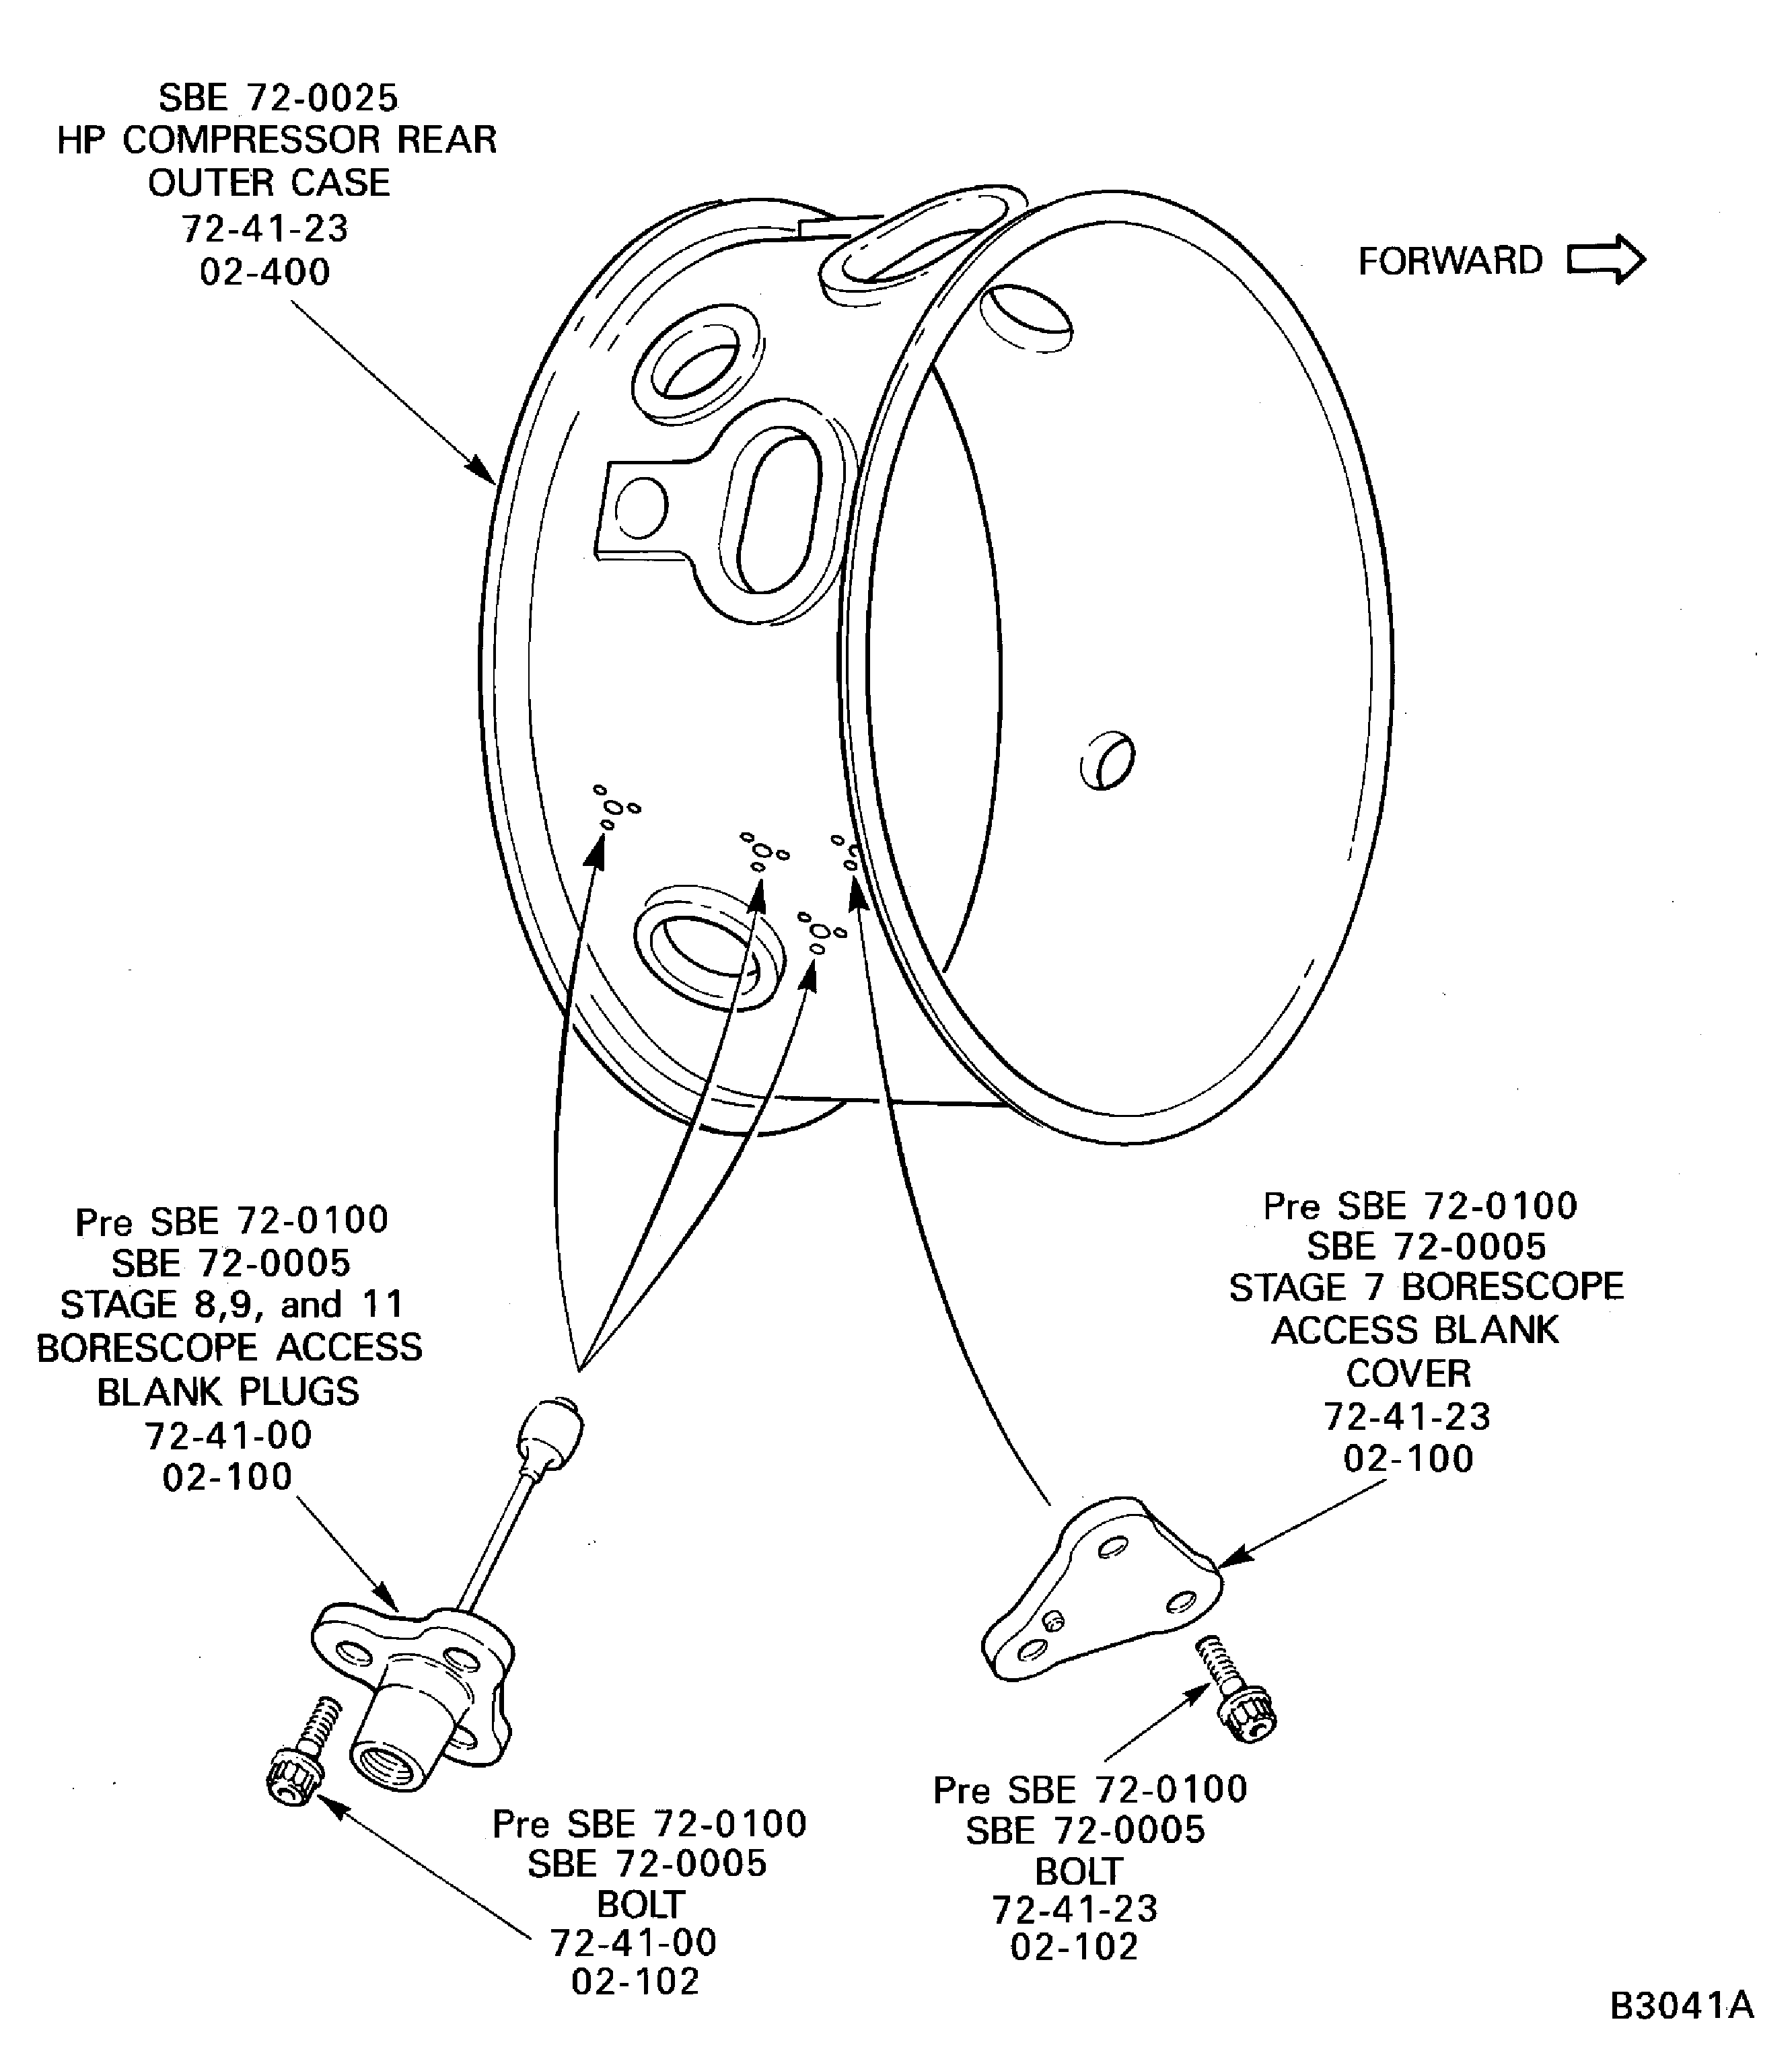
Figure: Remove the borescope access blanking plugs and cover
Remove the borescope access blanking plugs and cover
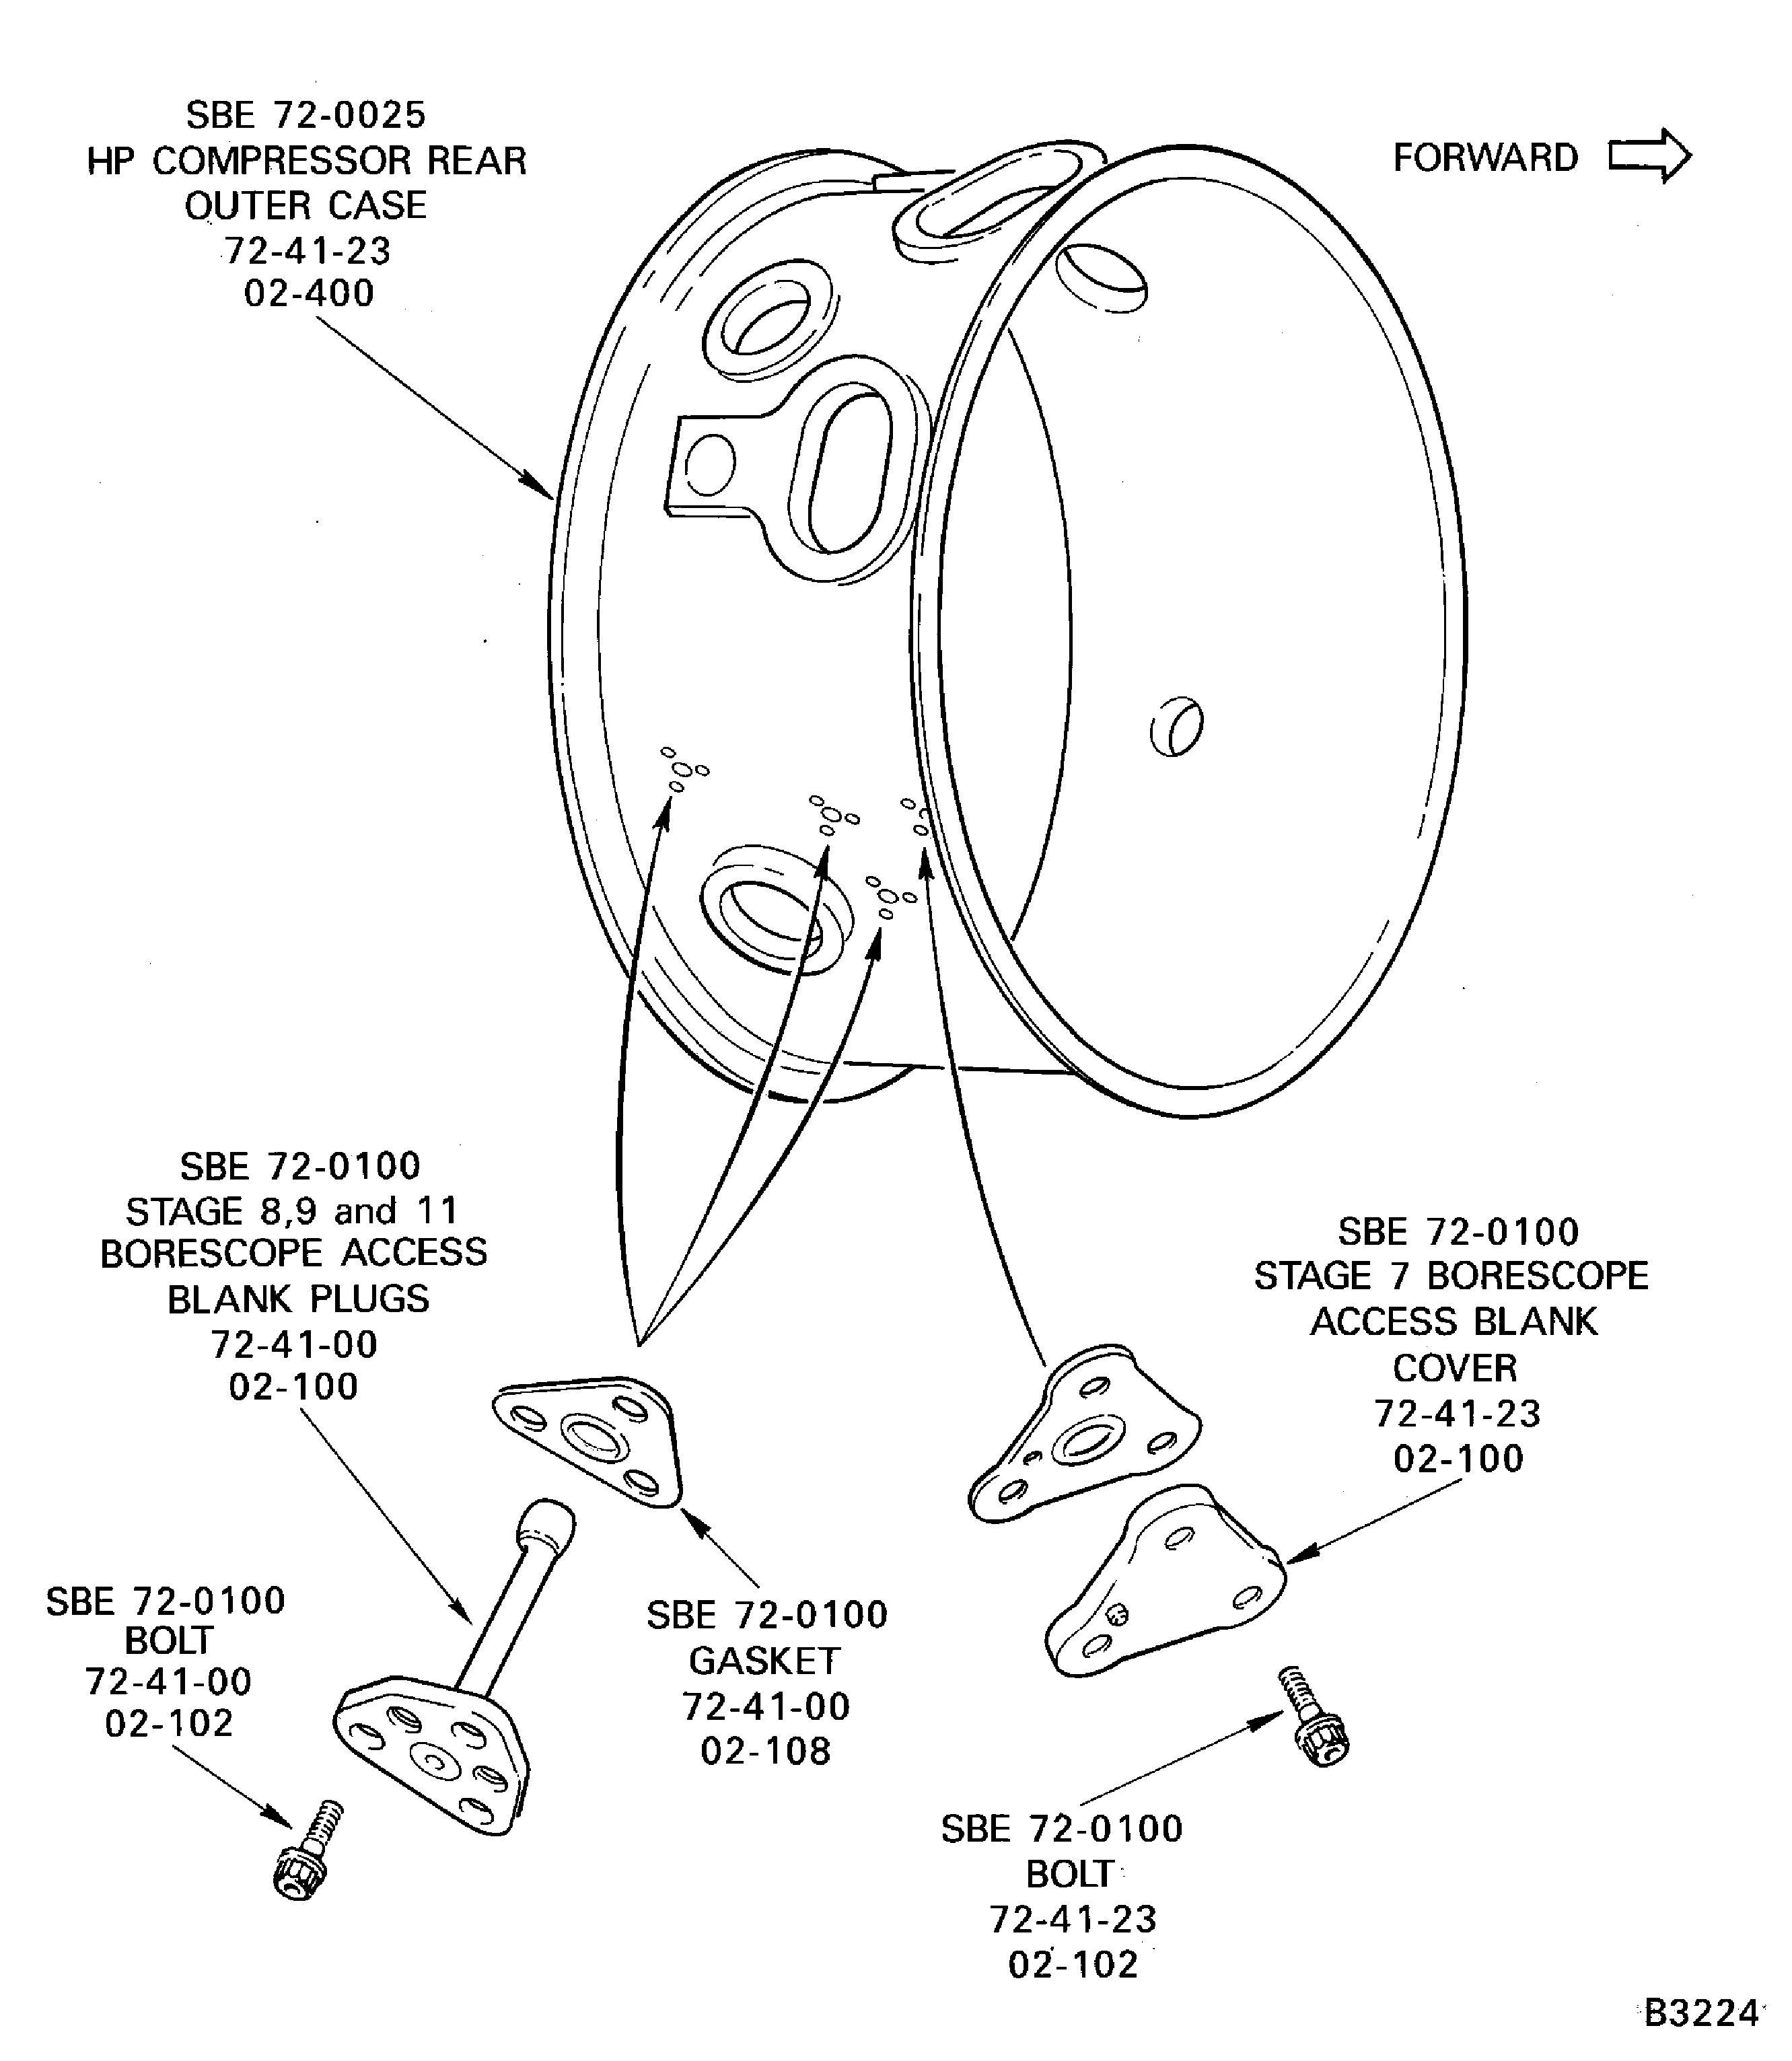
Figure: Remove the borescope access blanking plugs and cover
Remove the borescope access blanking plugs and cover
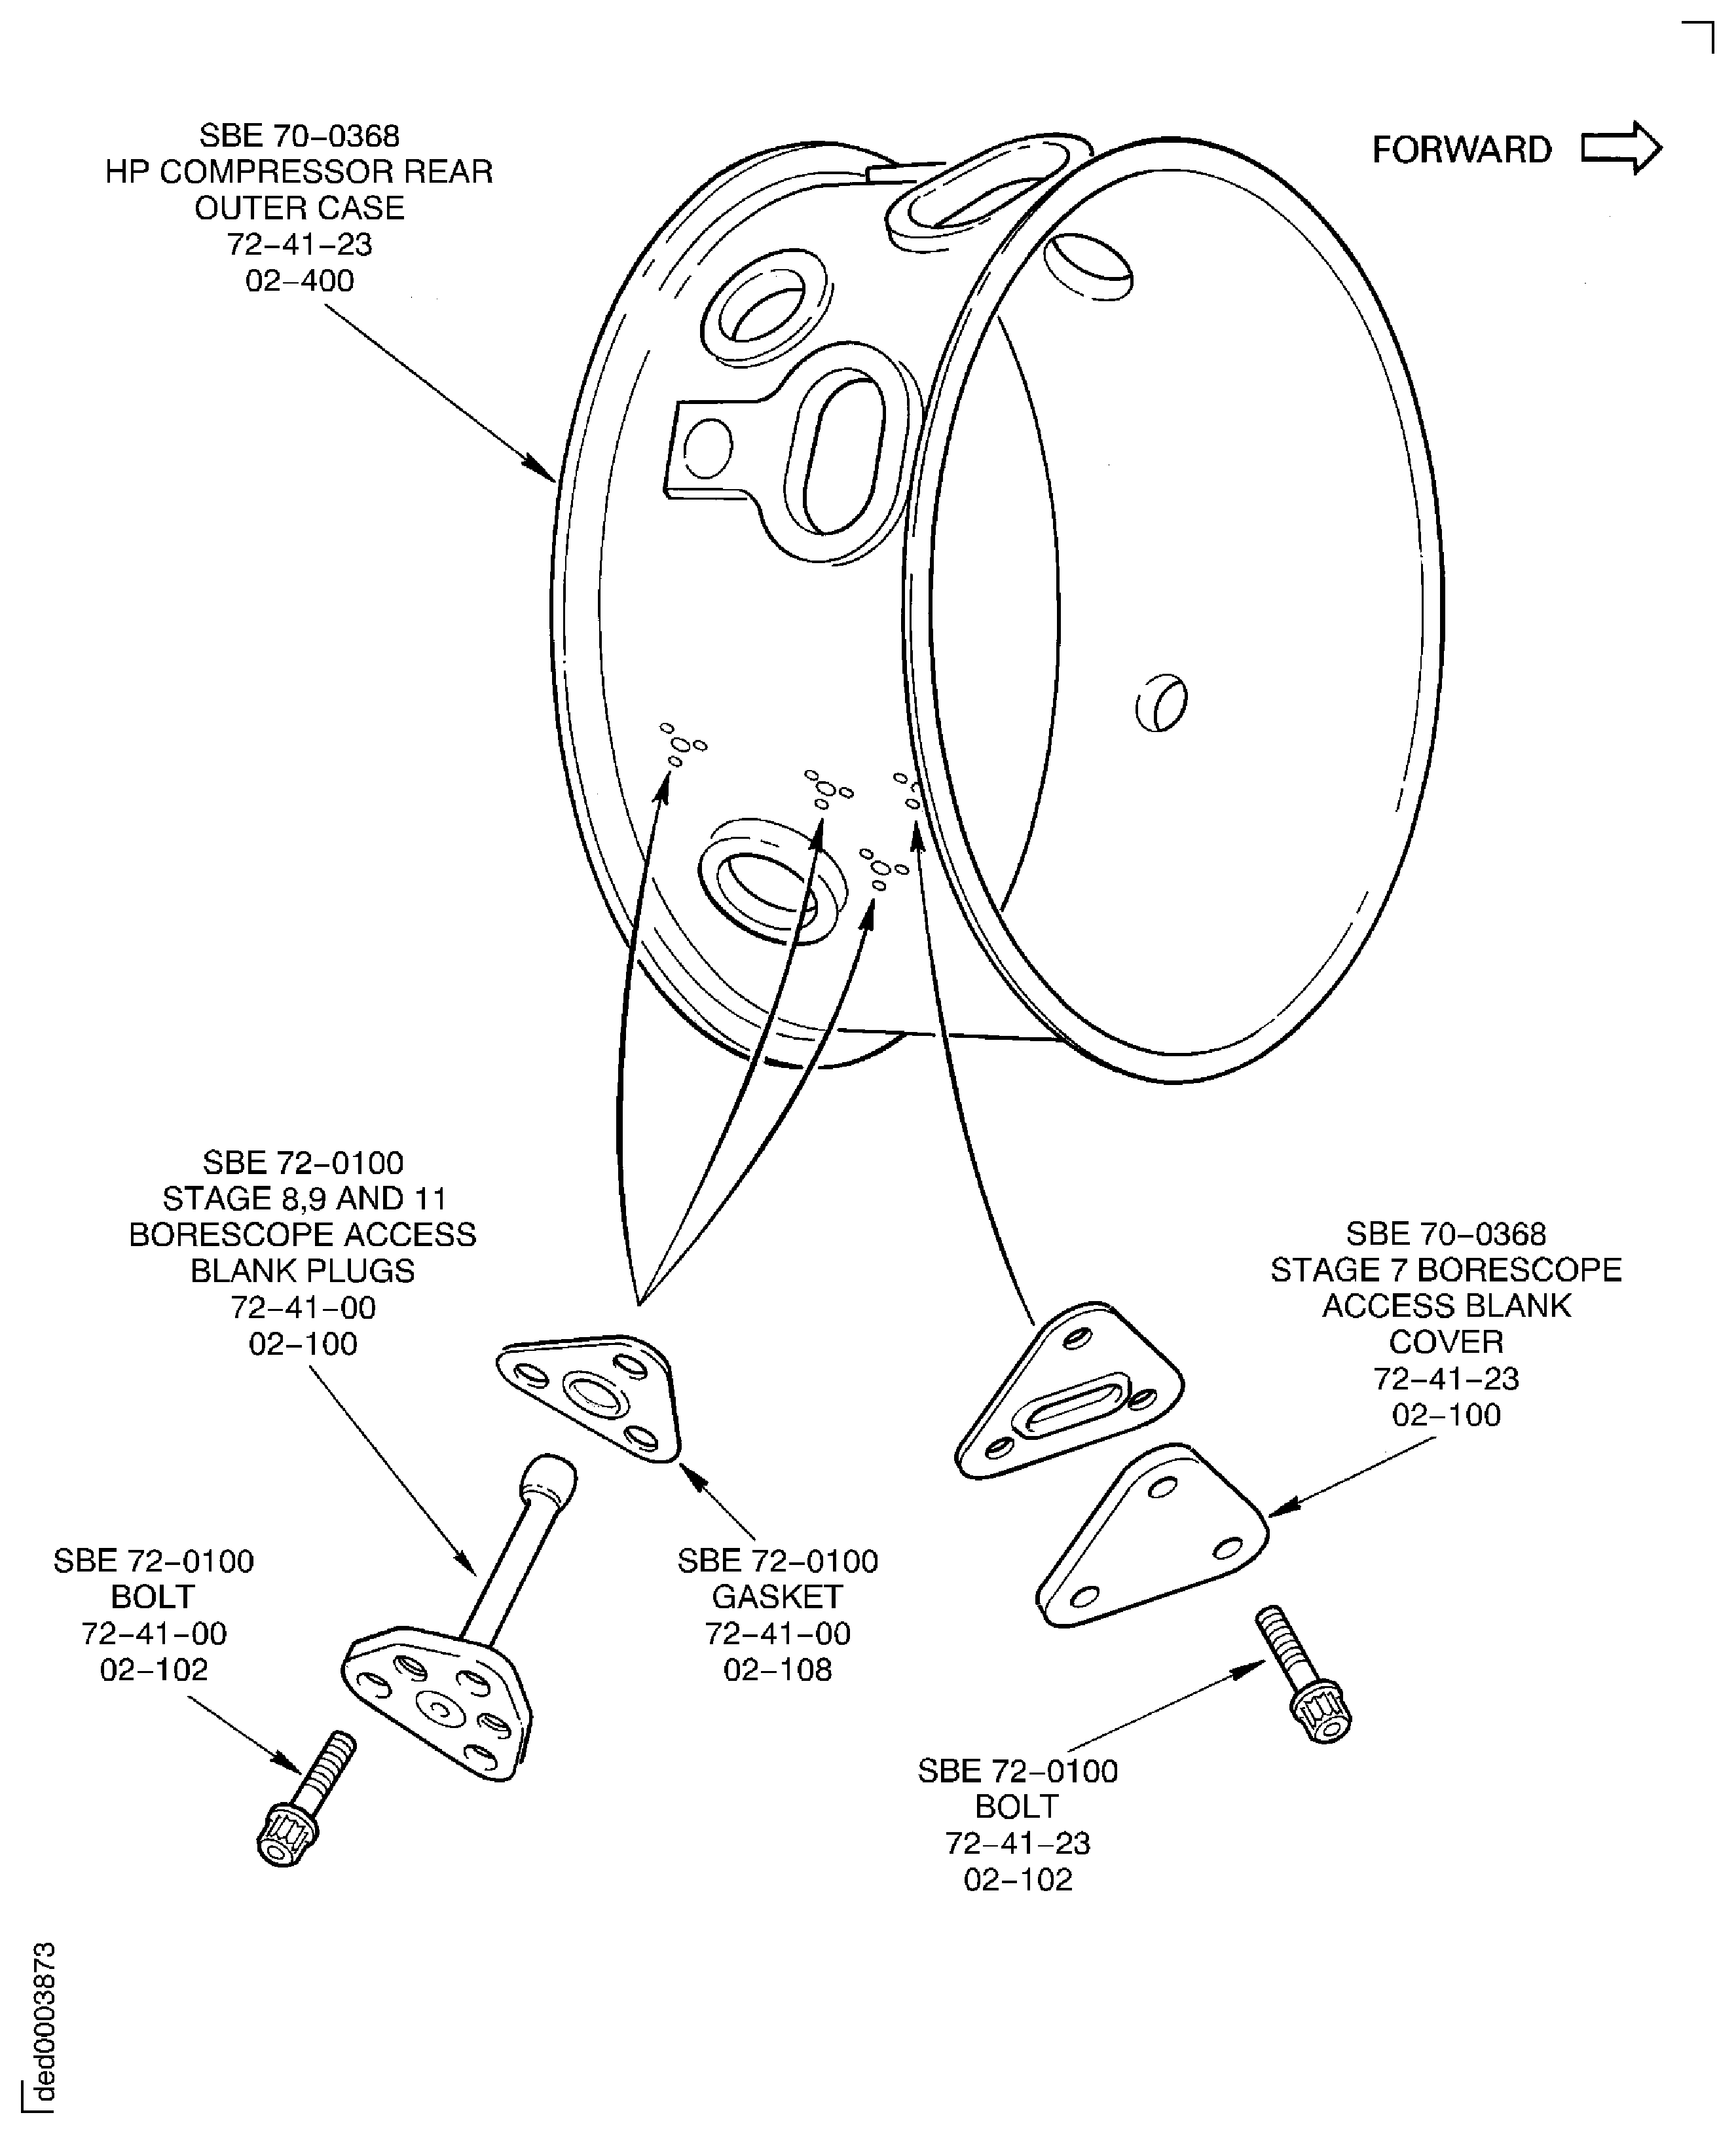
Figure: Remove the compressor rear outer case
Remove the compressor rear outer case
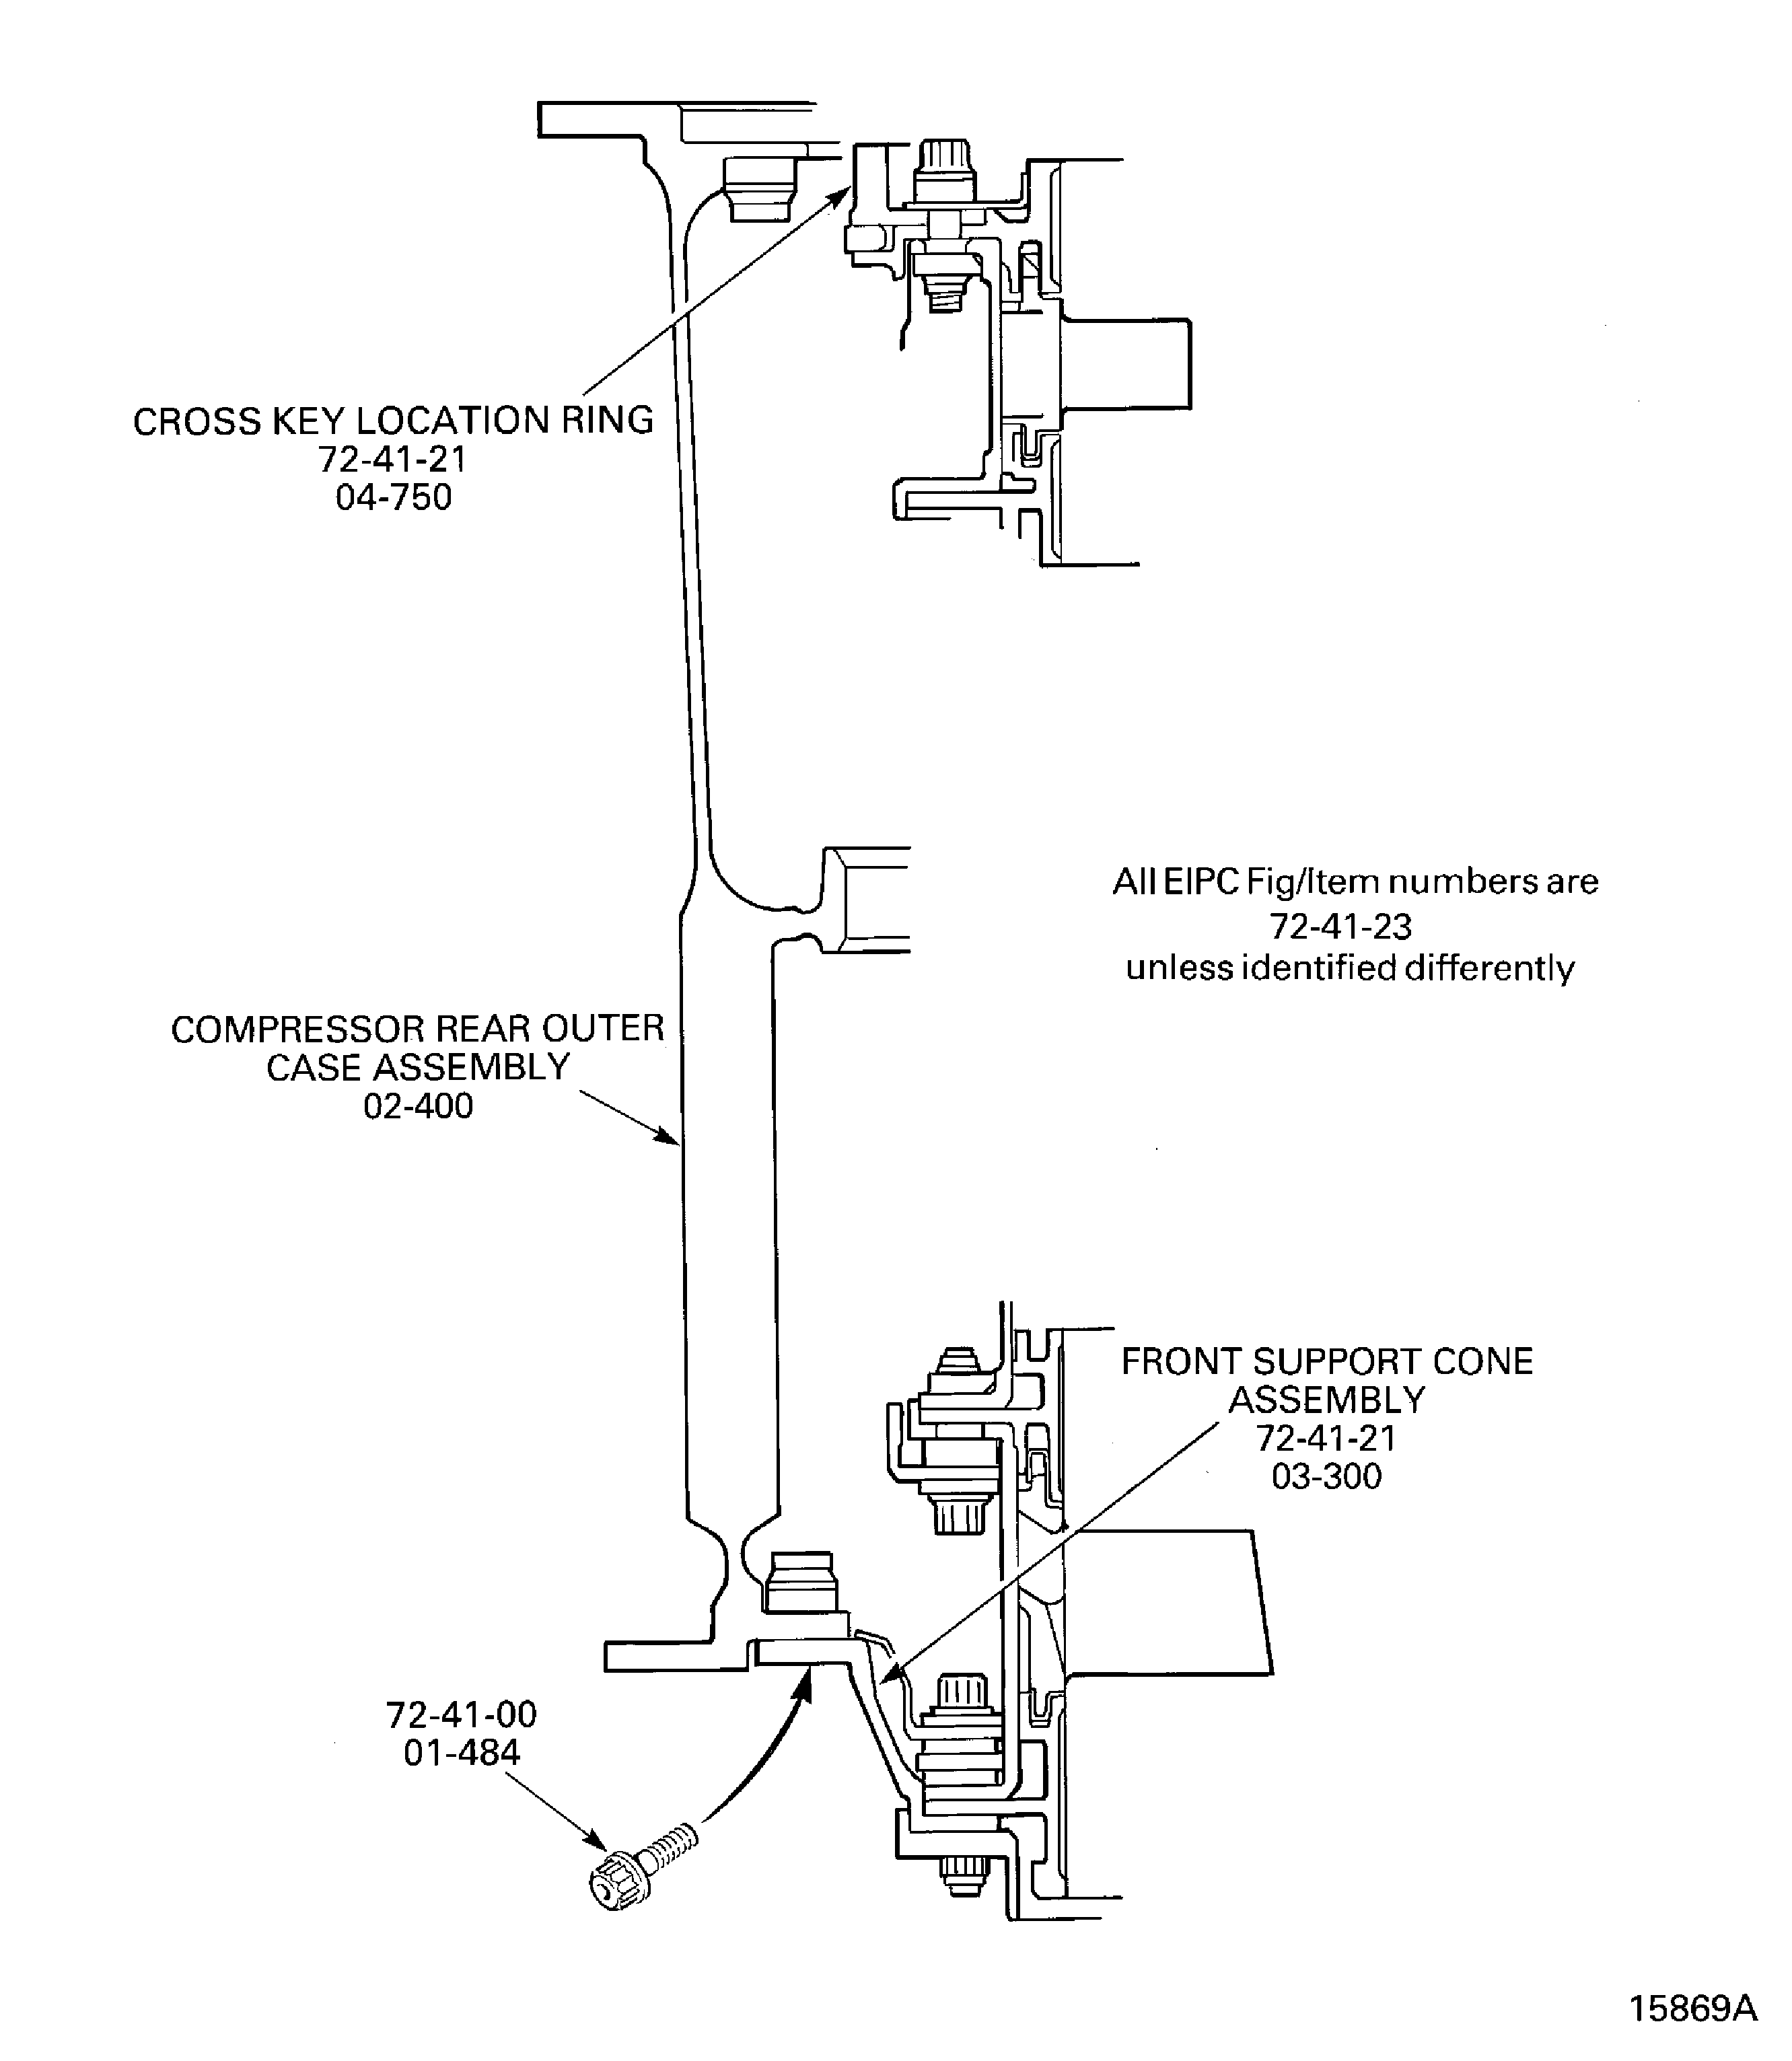
Figure: Remove the compressor rear outer case
Remove the compressor rear outer case
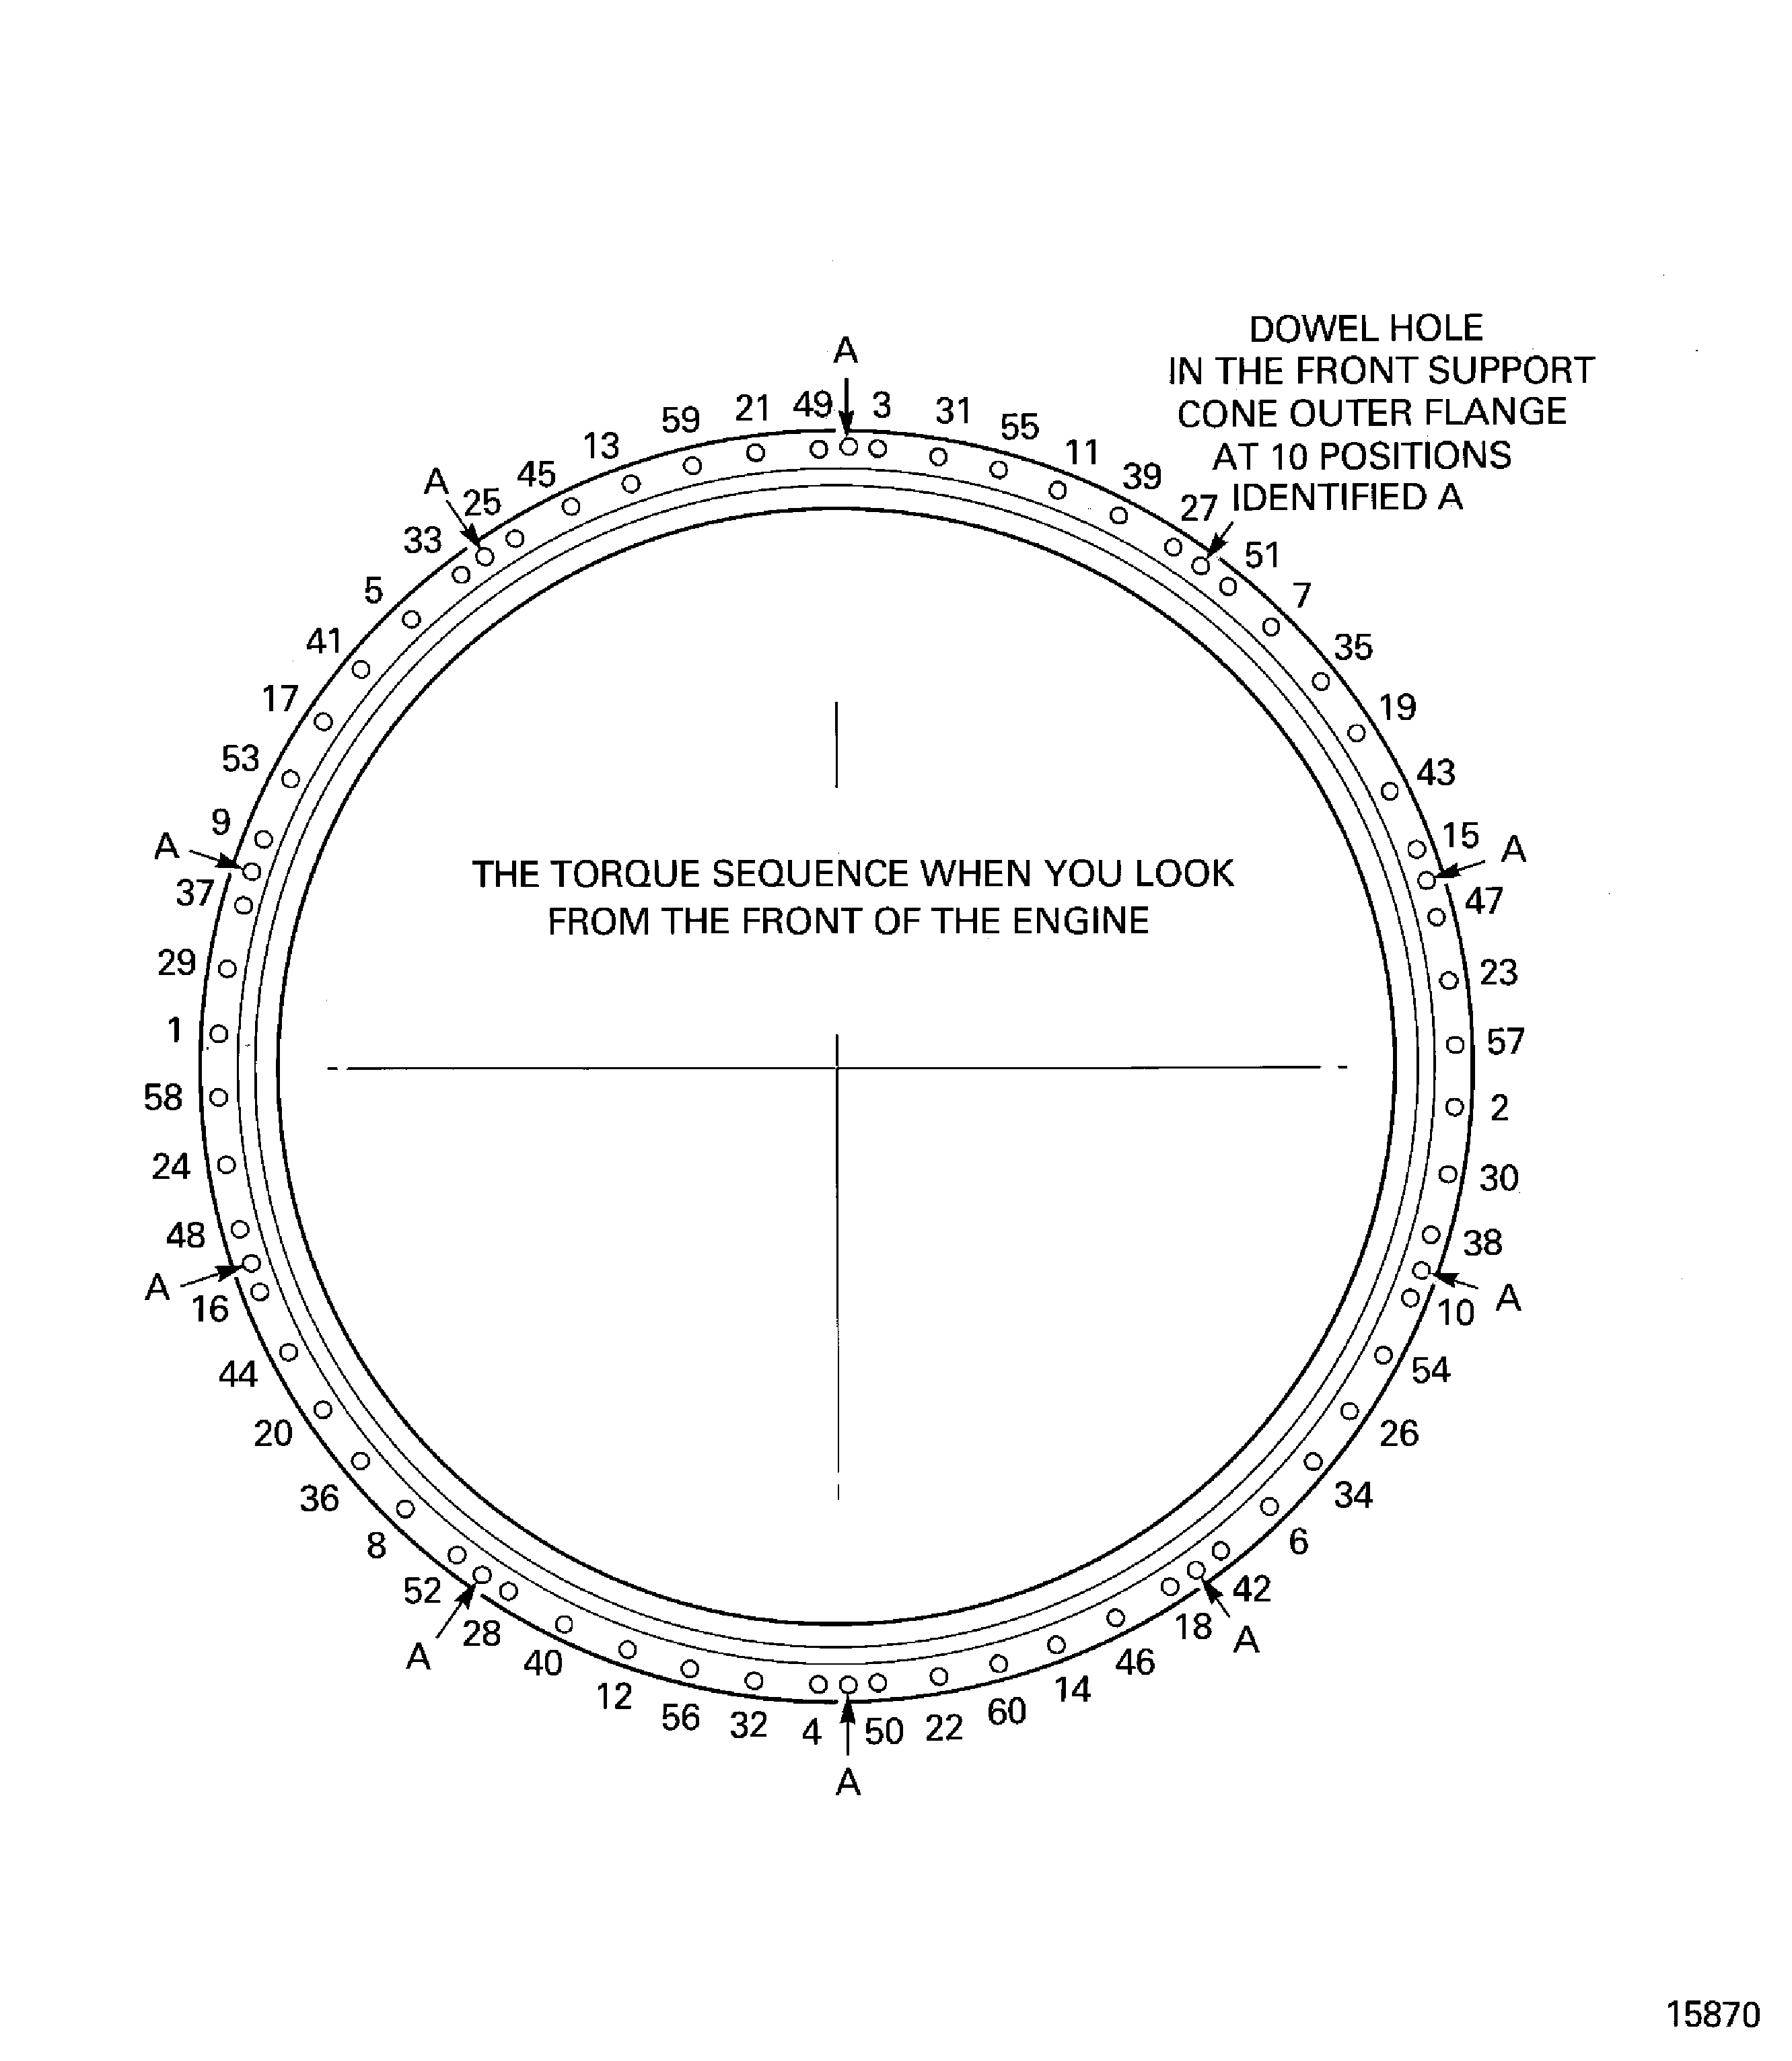
Figure: Remove the stage 12 rotor path heatshields and the cross key location seal carrier and the stage 11 stator vanes
Remove the stage 12 rotor path heatshields and the cross key location seal carrier and the stage 11 stator vanes
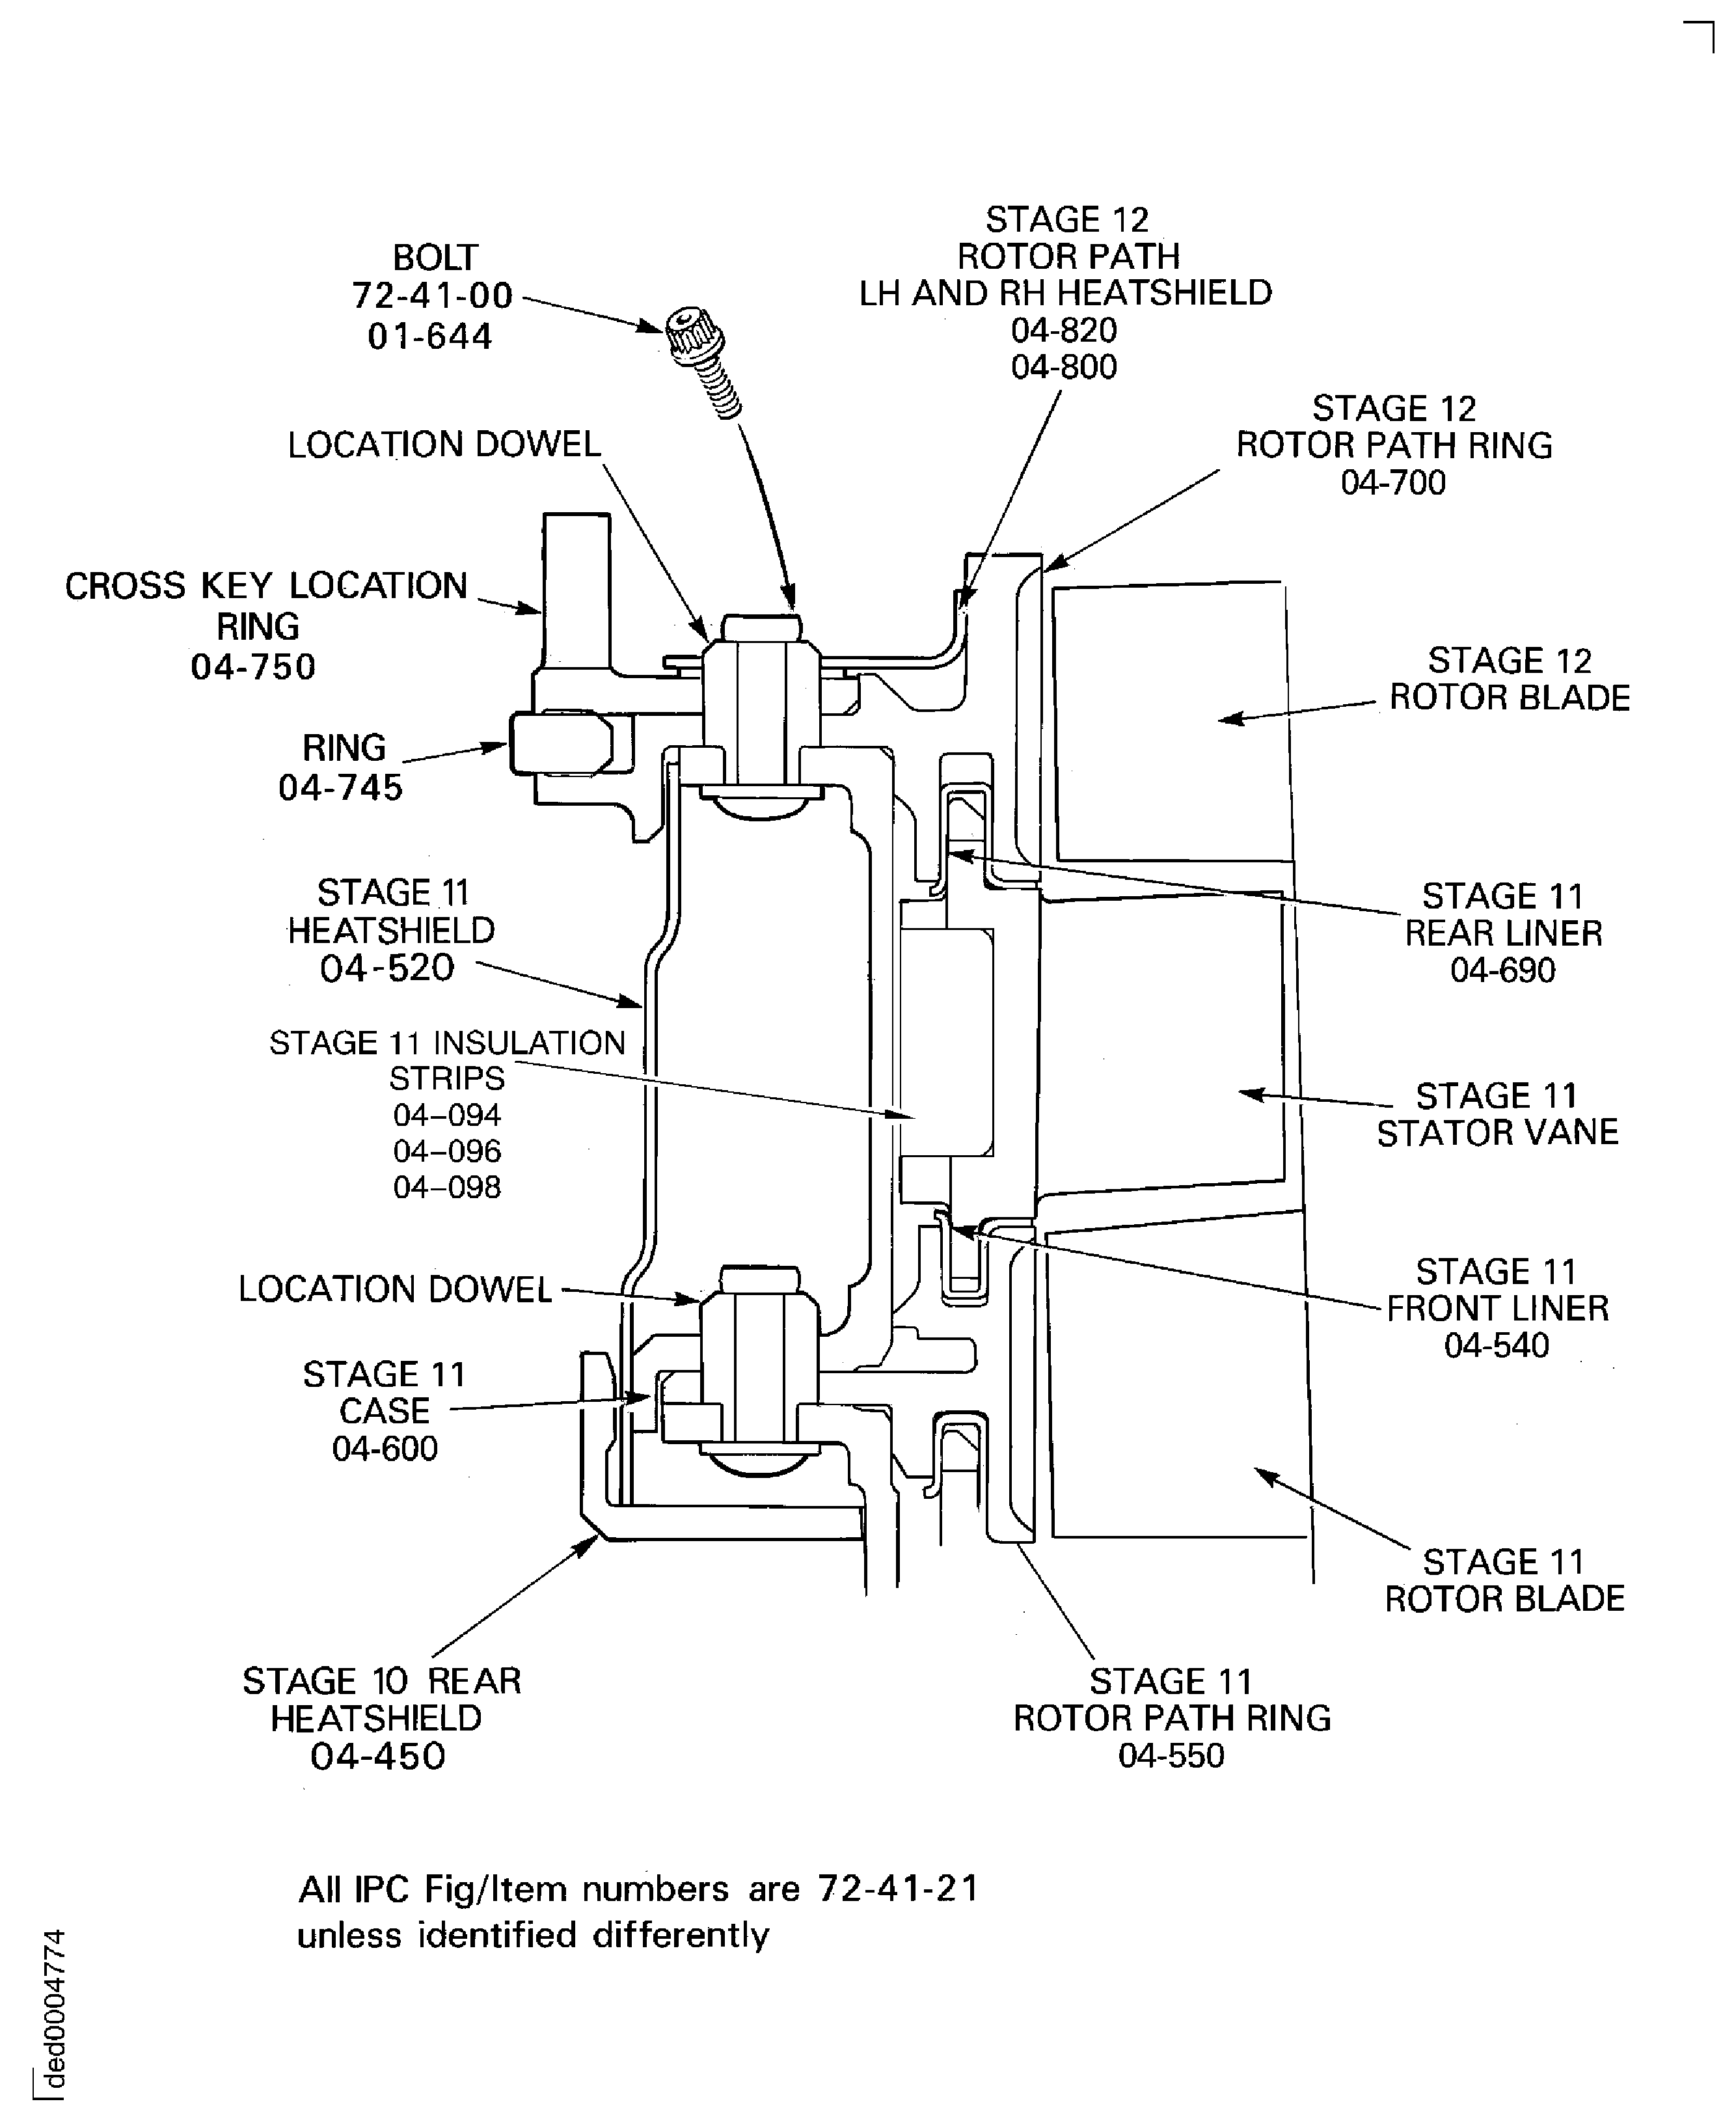
Figure: Tools to remove the rotor path rings and cases
Tools to remove the rotor path rings and cases
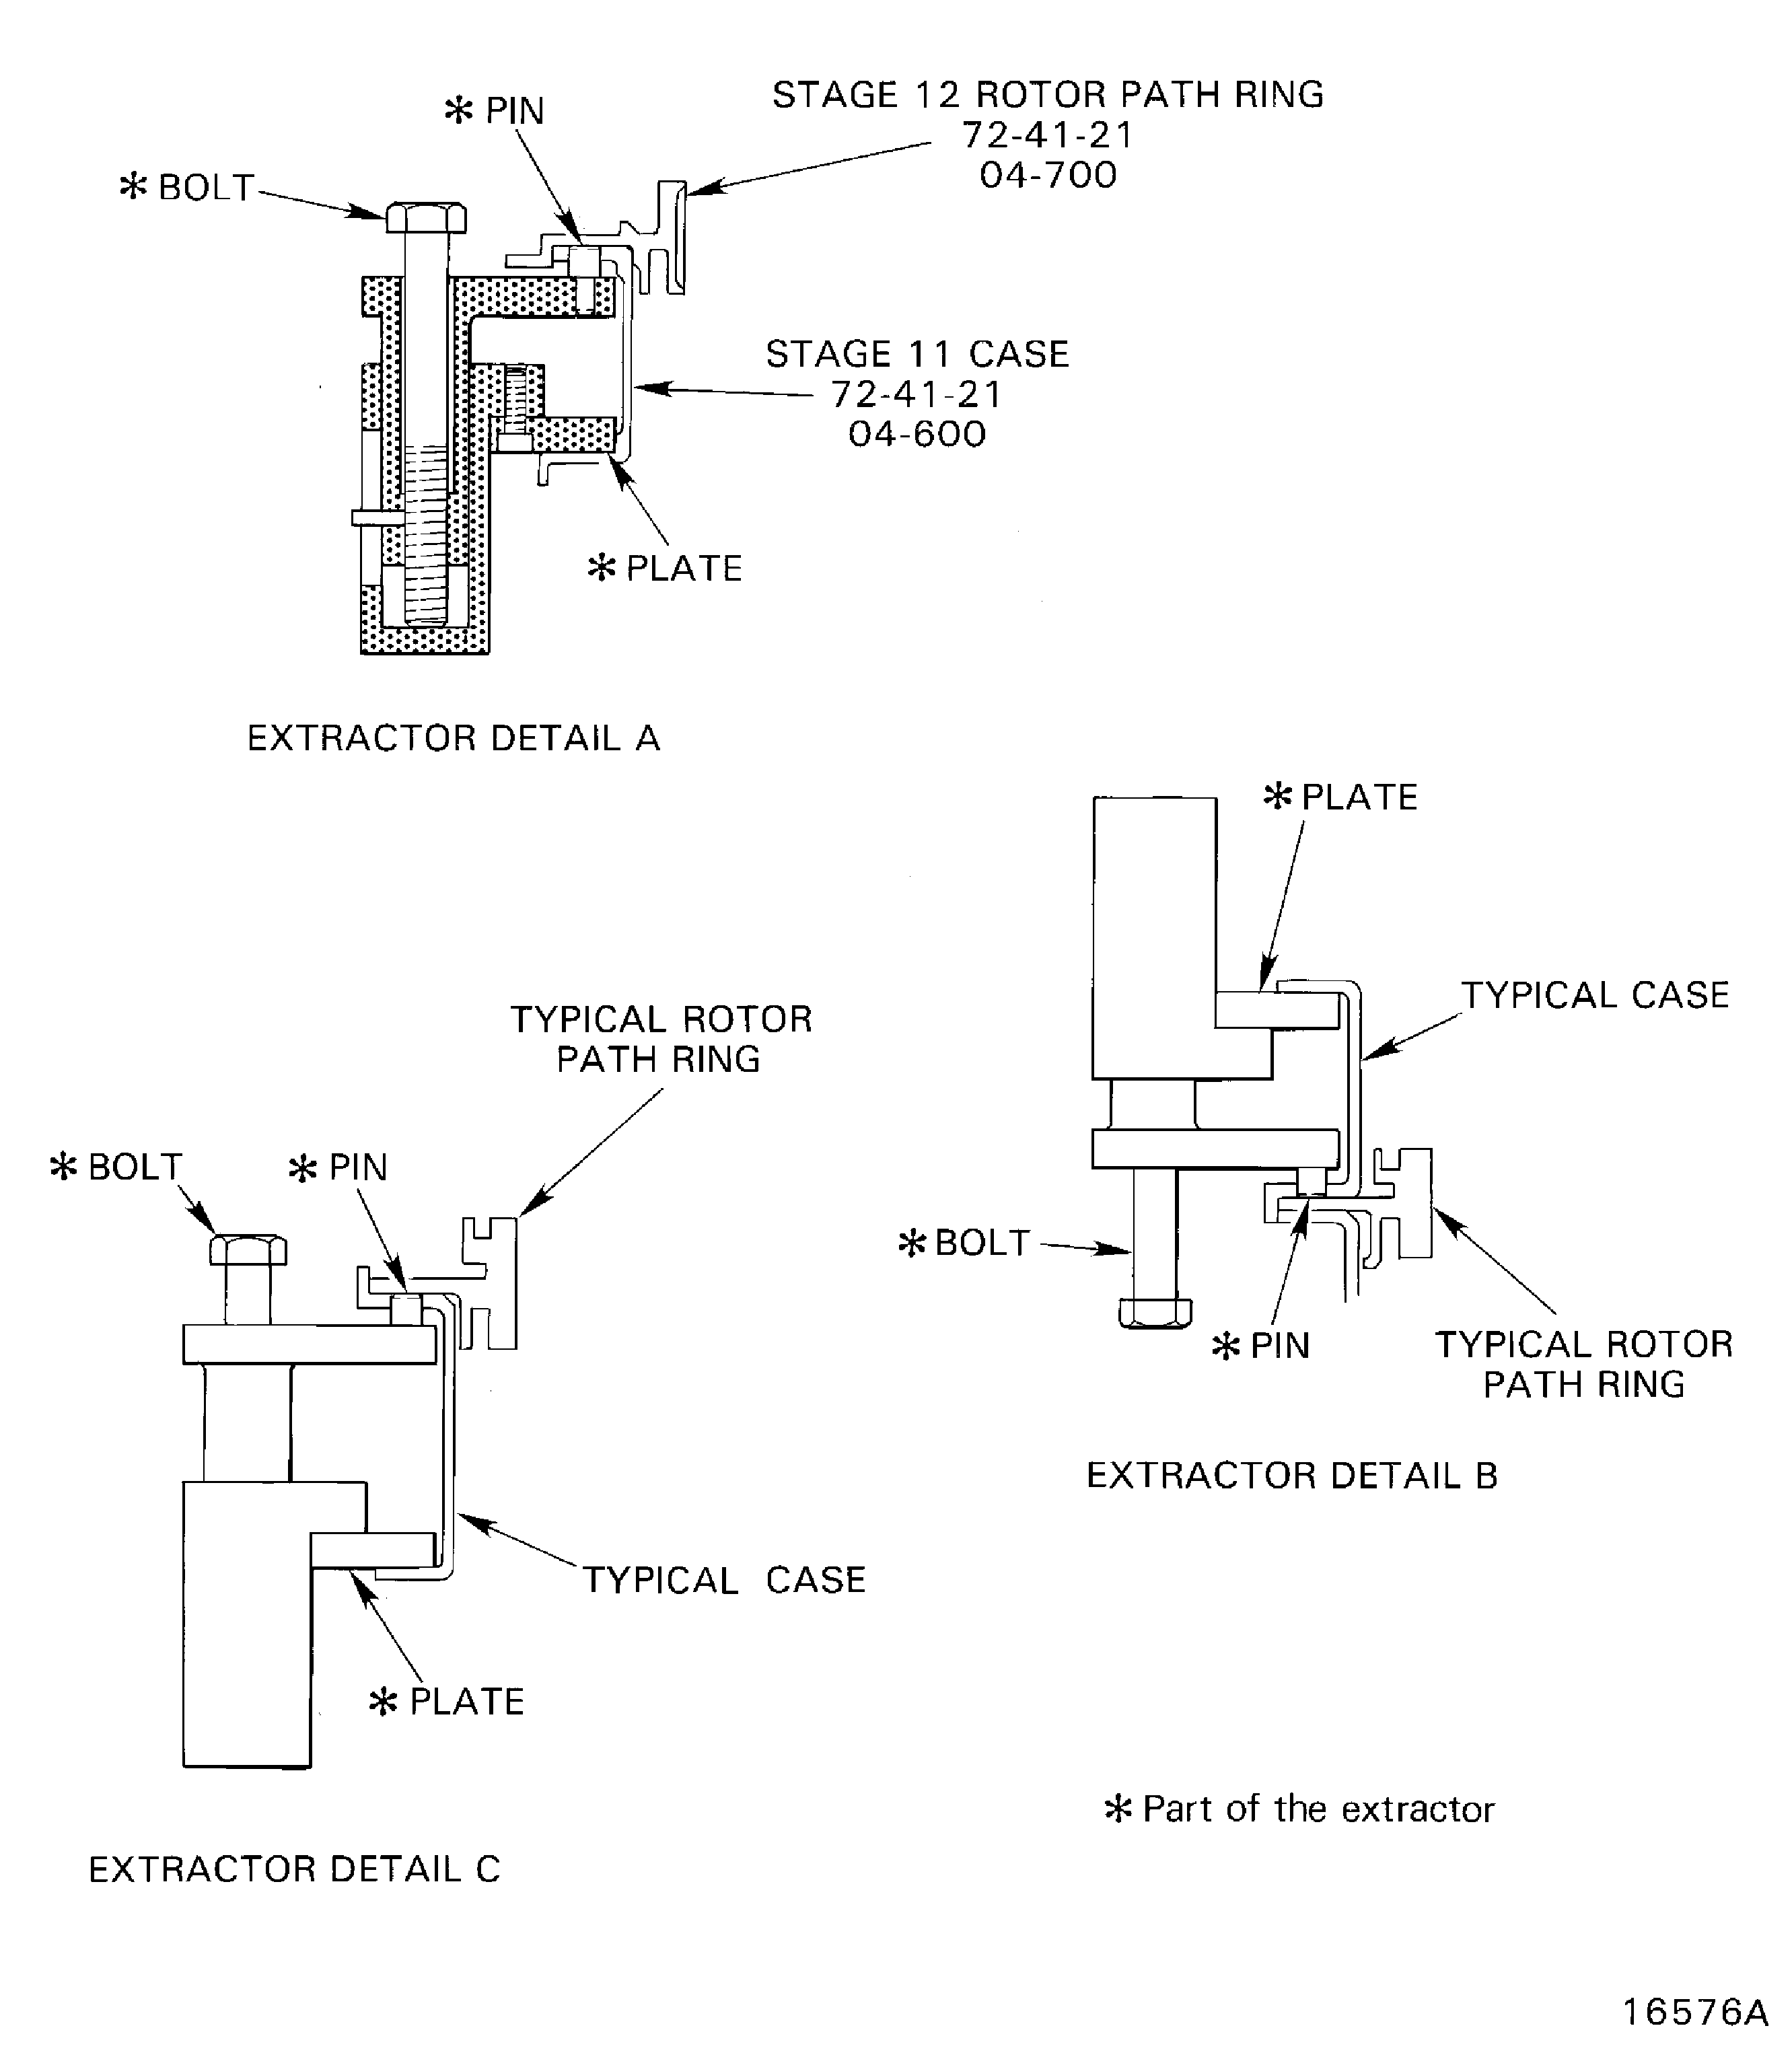
Figure: Remove the stage 10 case, stator vanes and rotor path ring
Remove the stage 10 case, stator vanes and rotor path ring
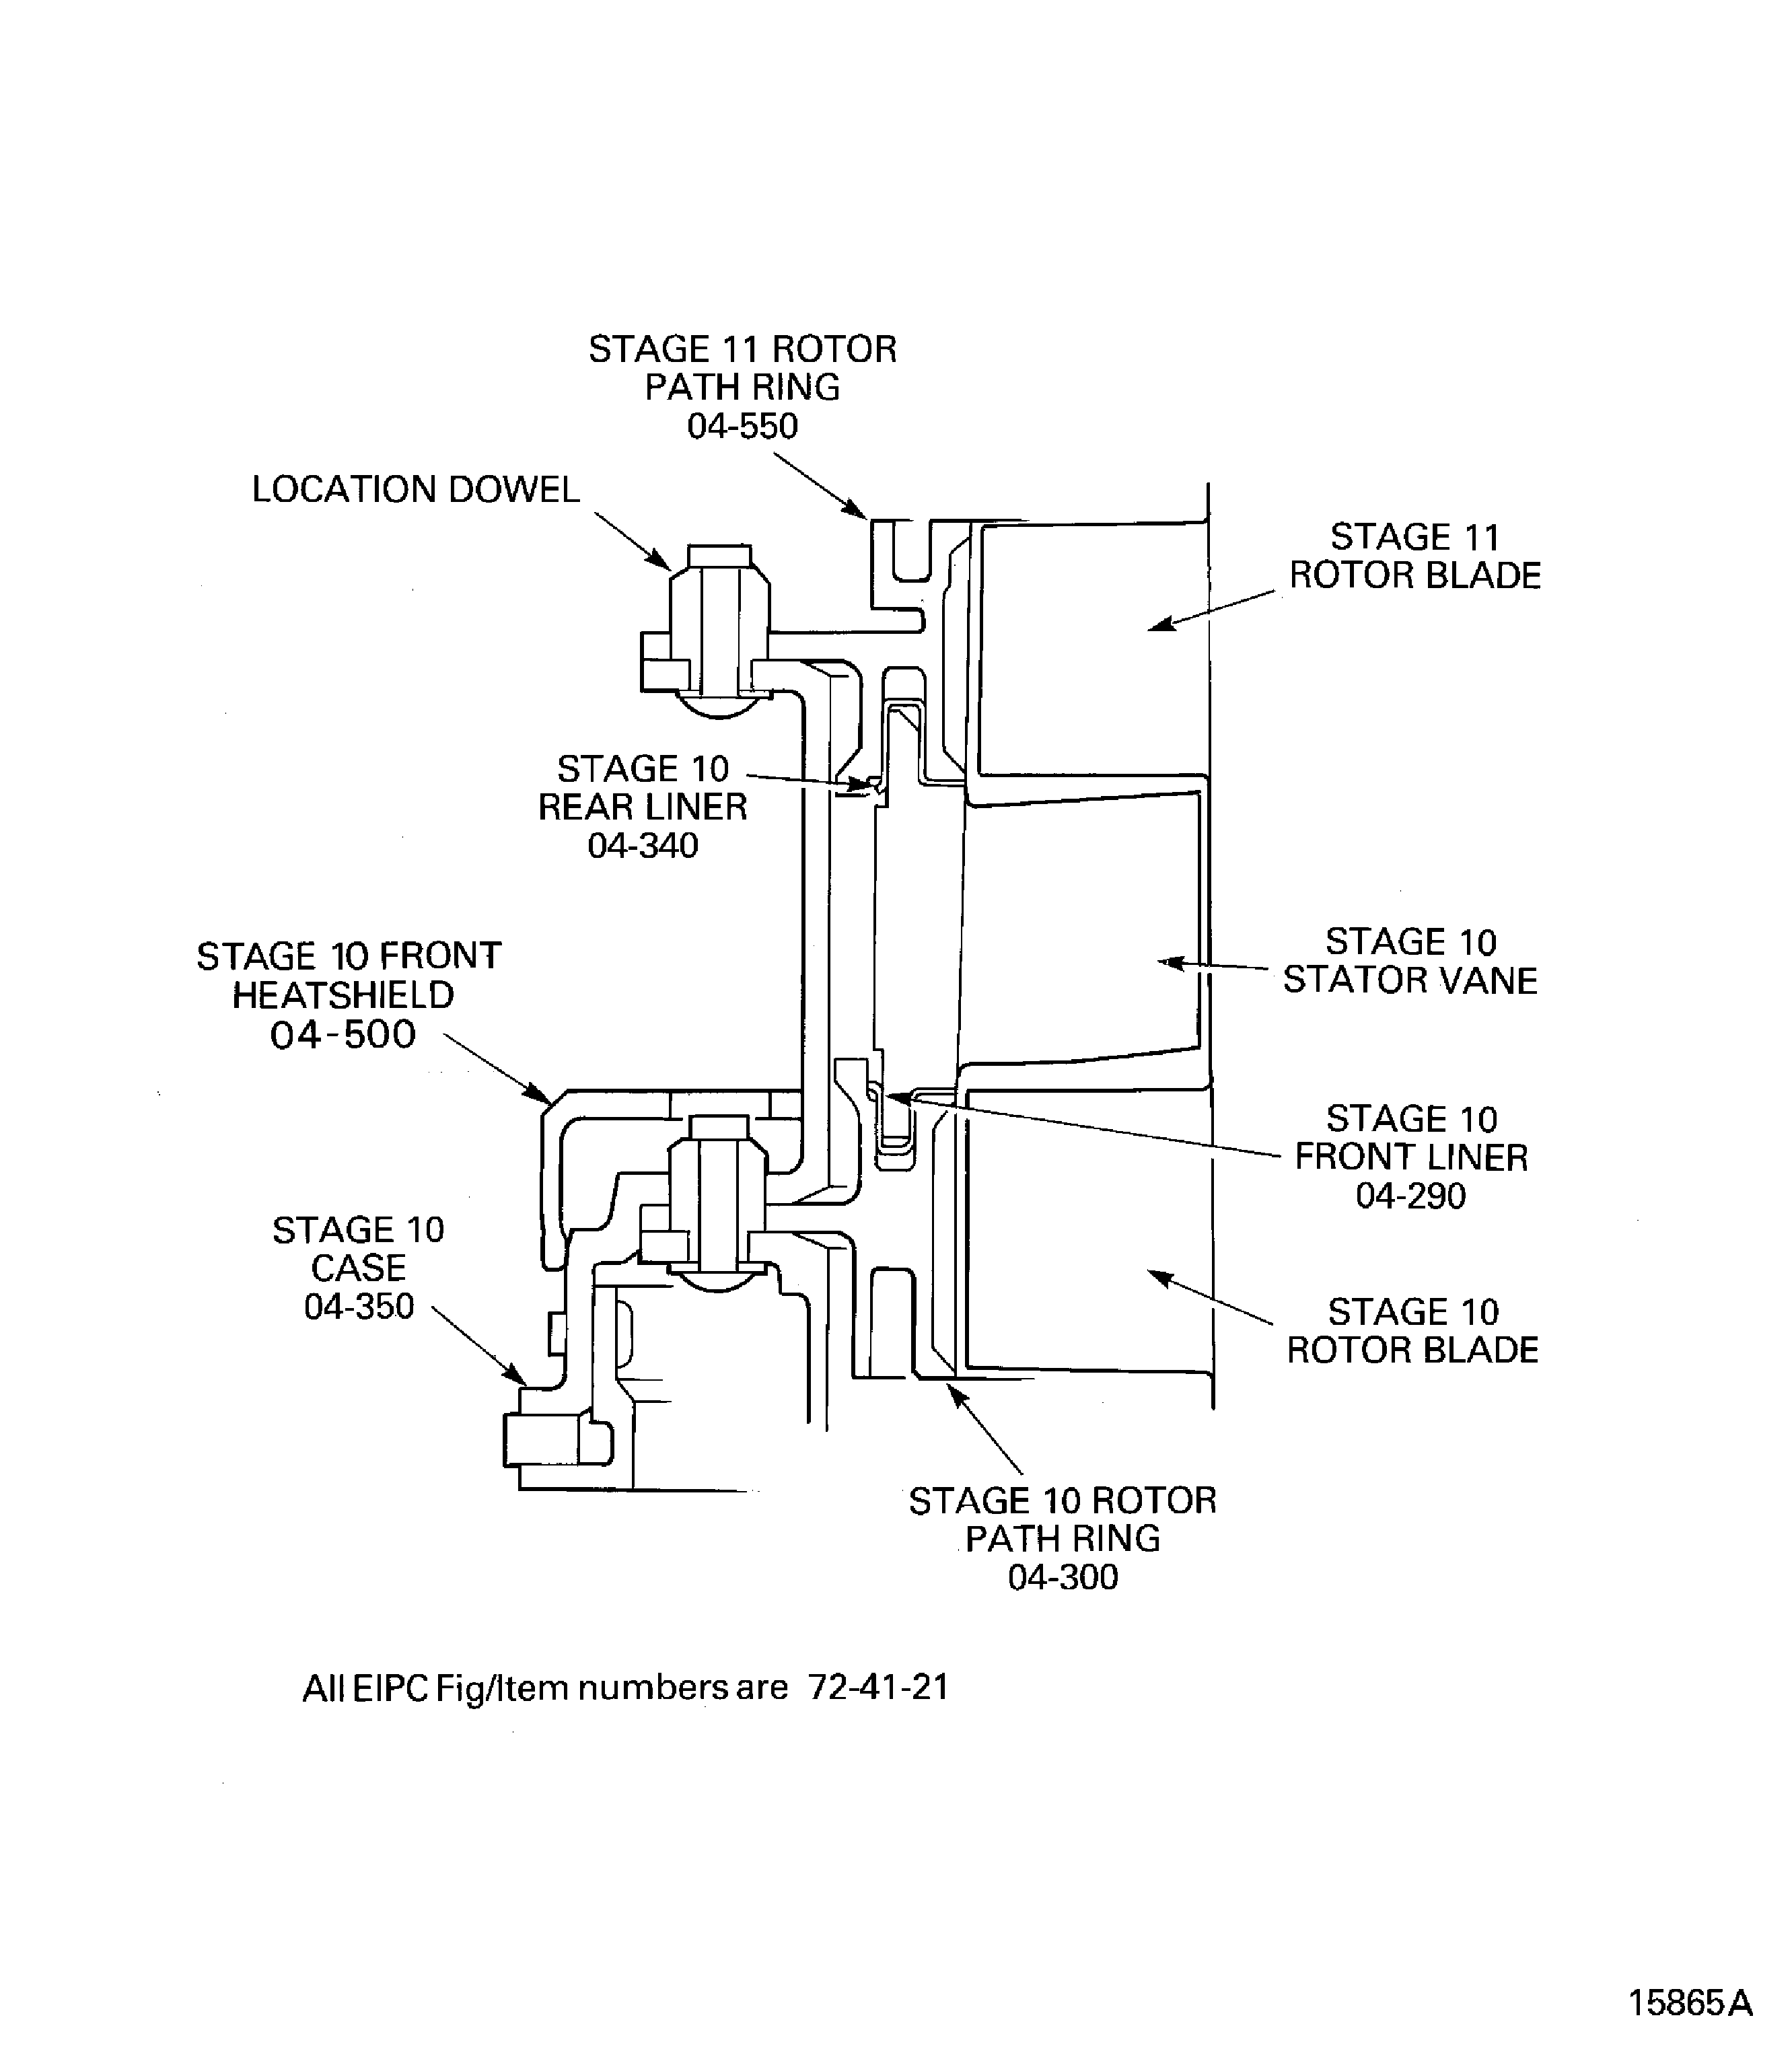
Figure: Remove the stage 9 case, rotor path ring and stator vanes
Remove the stage 9 case, rotor path ring and stator vanes
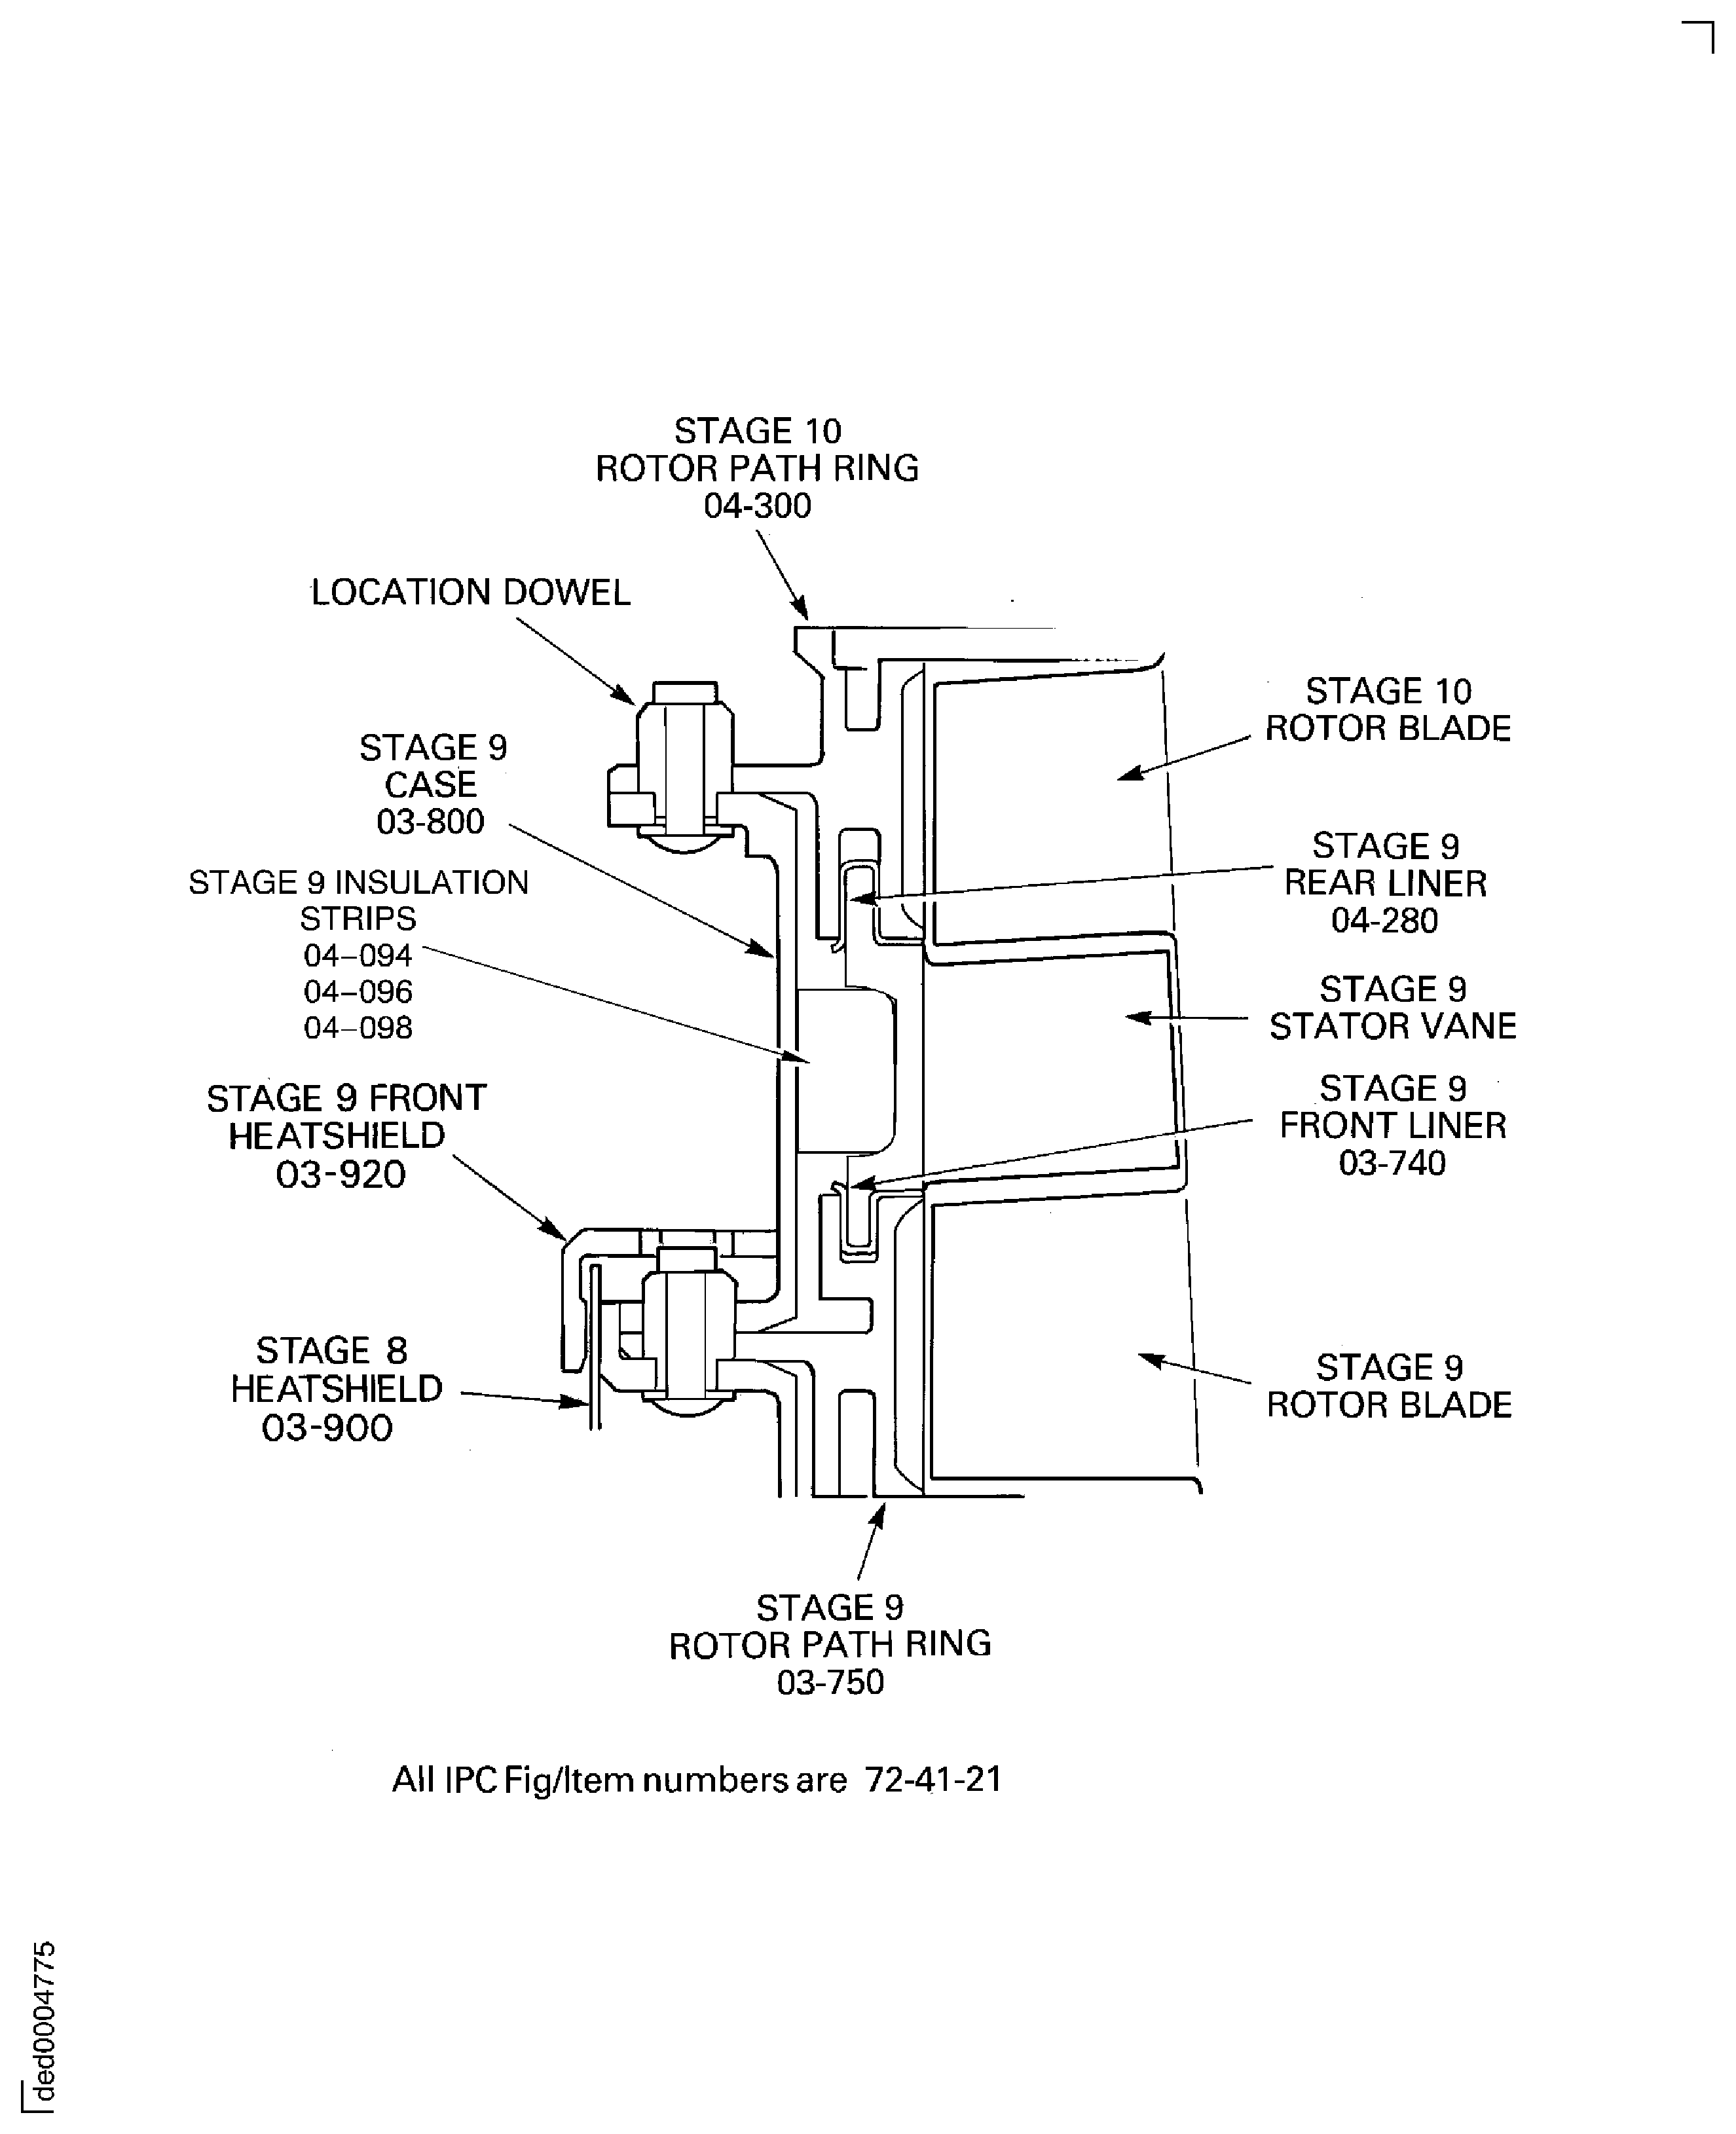
Figure: Remove the stage 8 case, rotor path ring, stator vanes and the stage 7 case
Remove the stage 8 case, rotor path ring, stator vanes and the stage 7 case
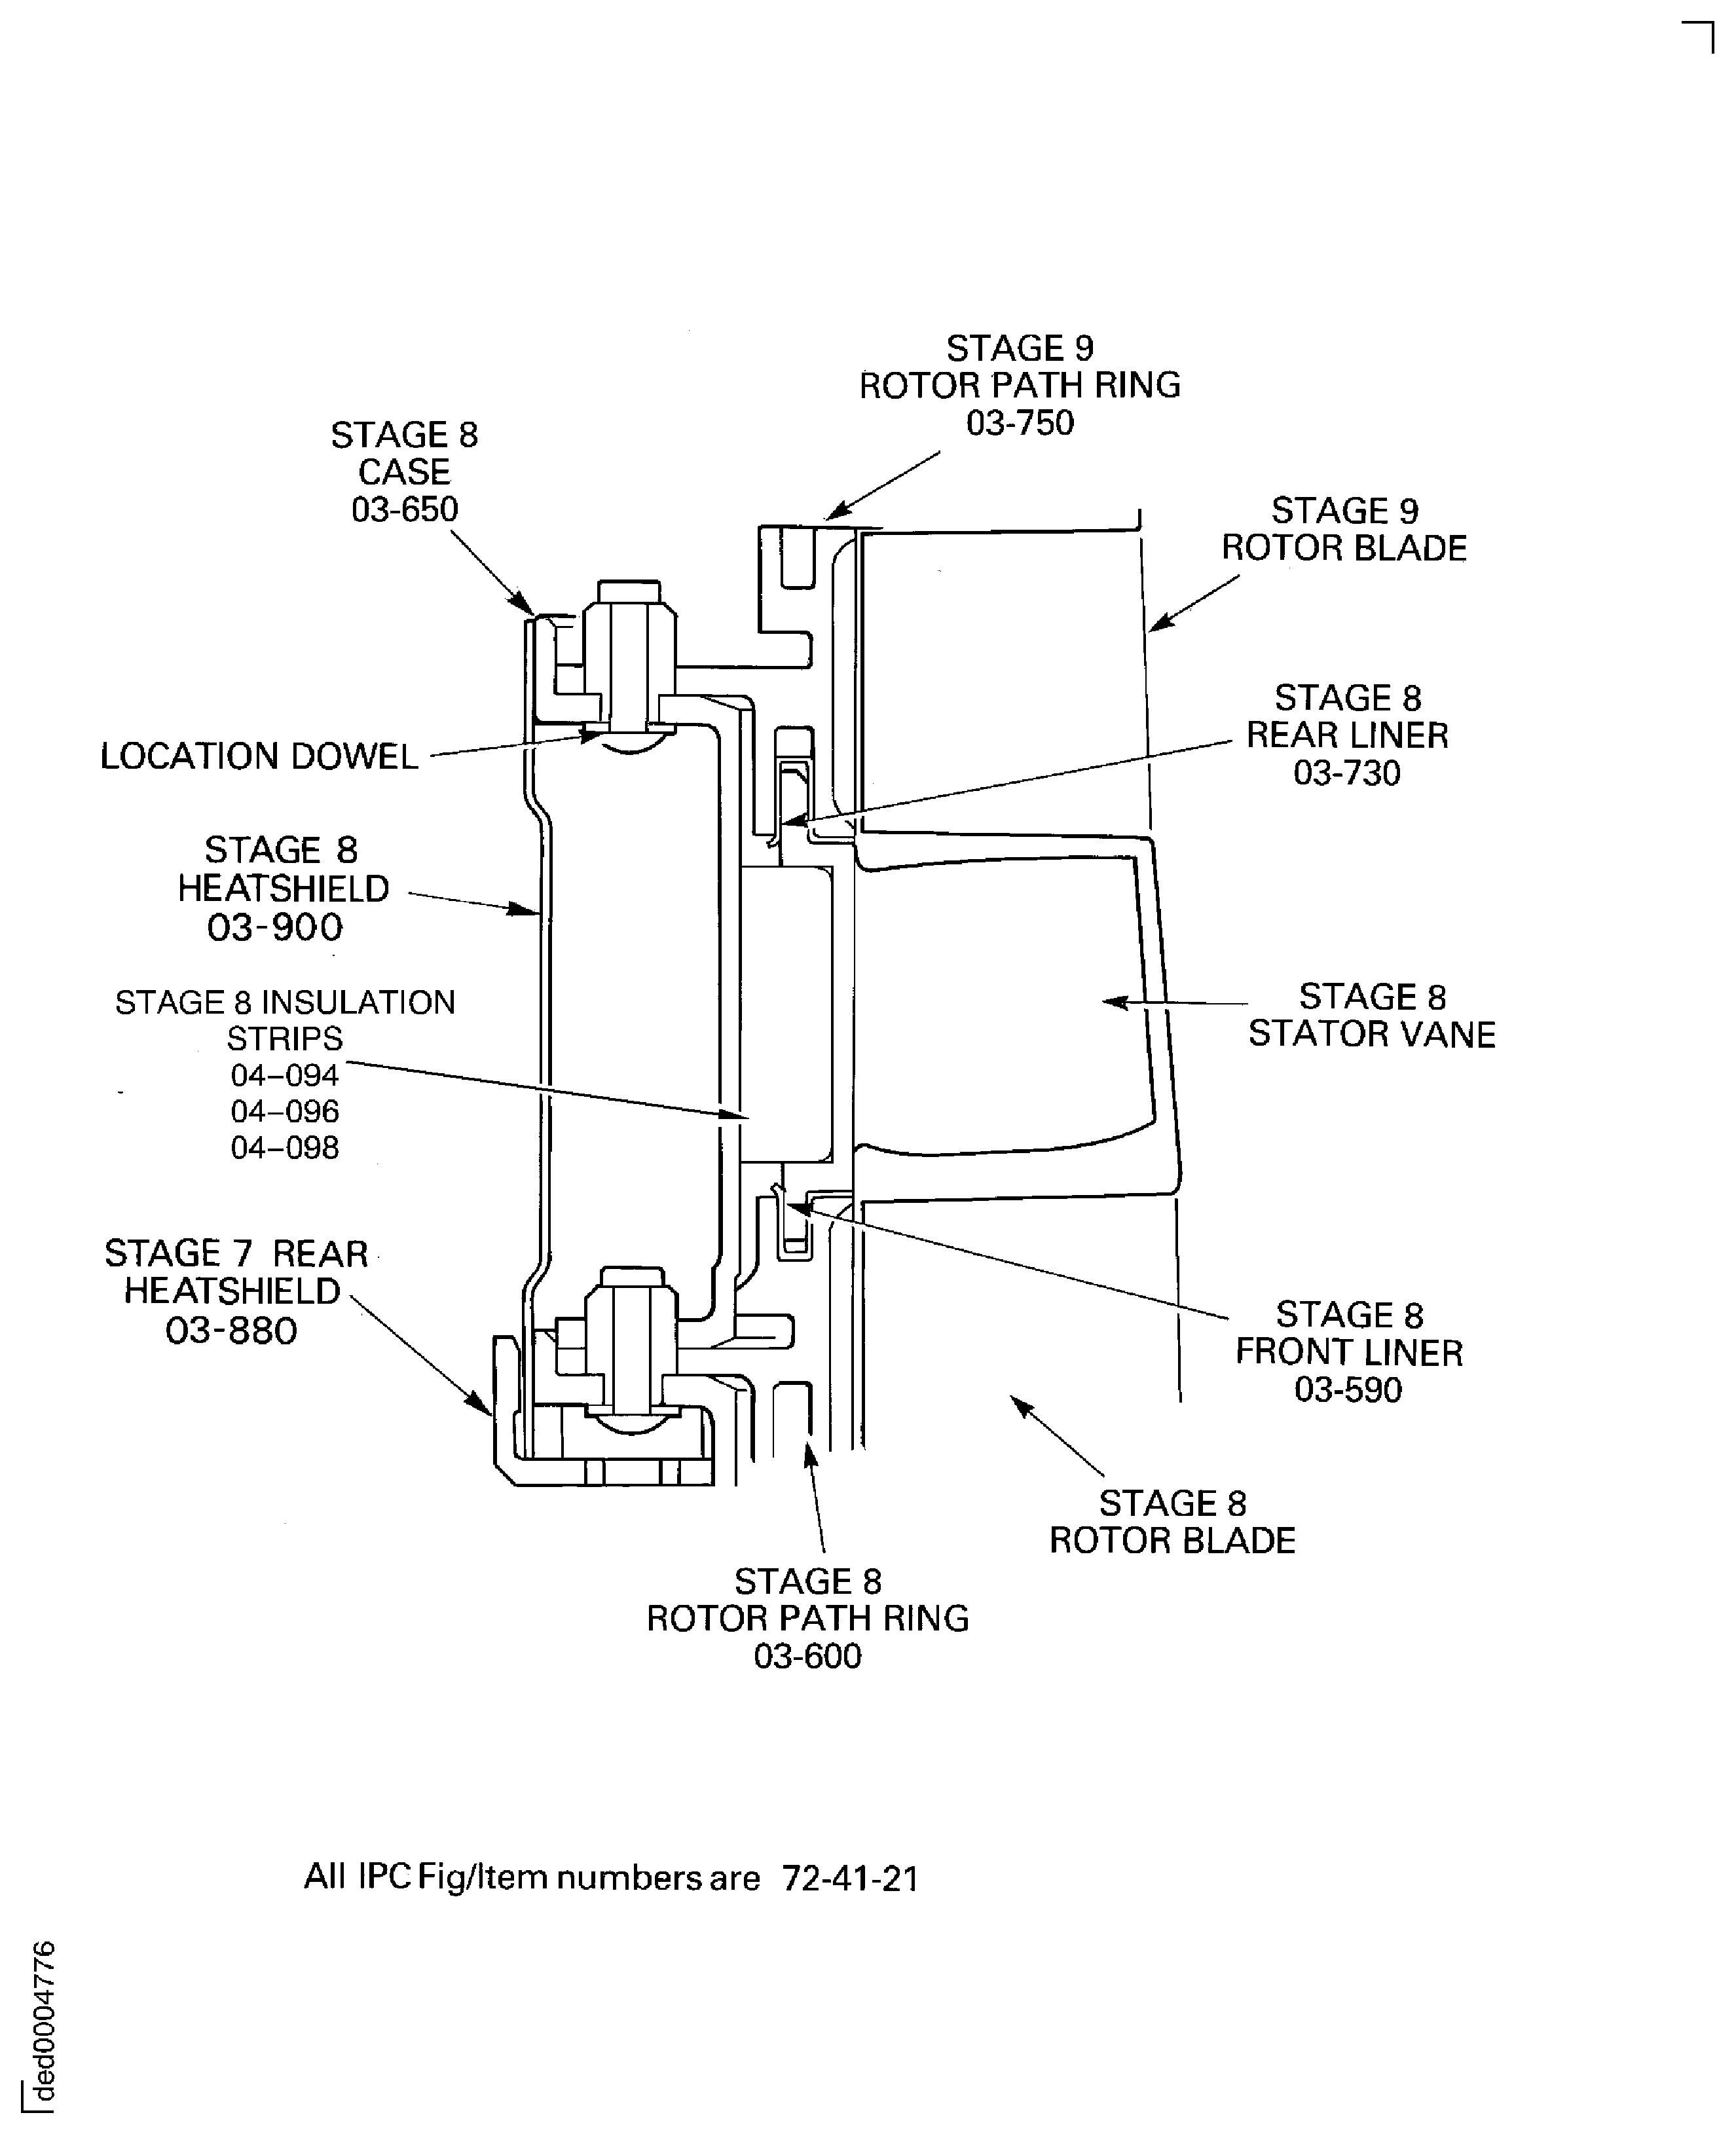
Figure: Remove the stage 8 case, rotor path ring, stator vanes and the stage 7 case
Remove the stage 8 case, rotor path ring, stator vanes and the stage 7 case
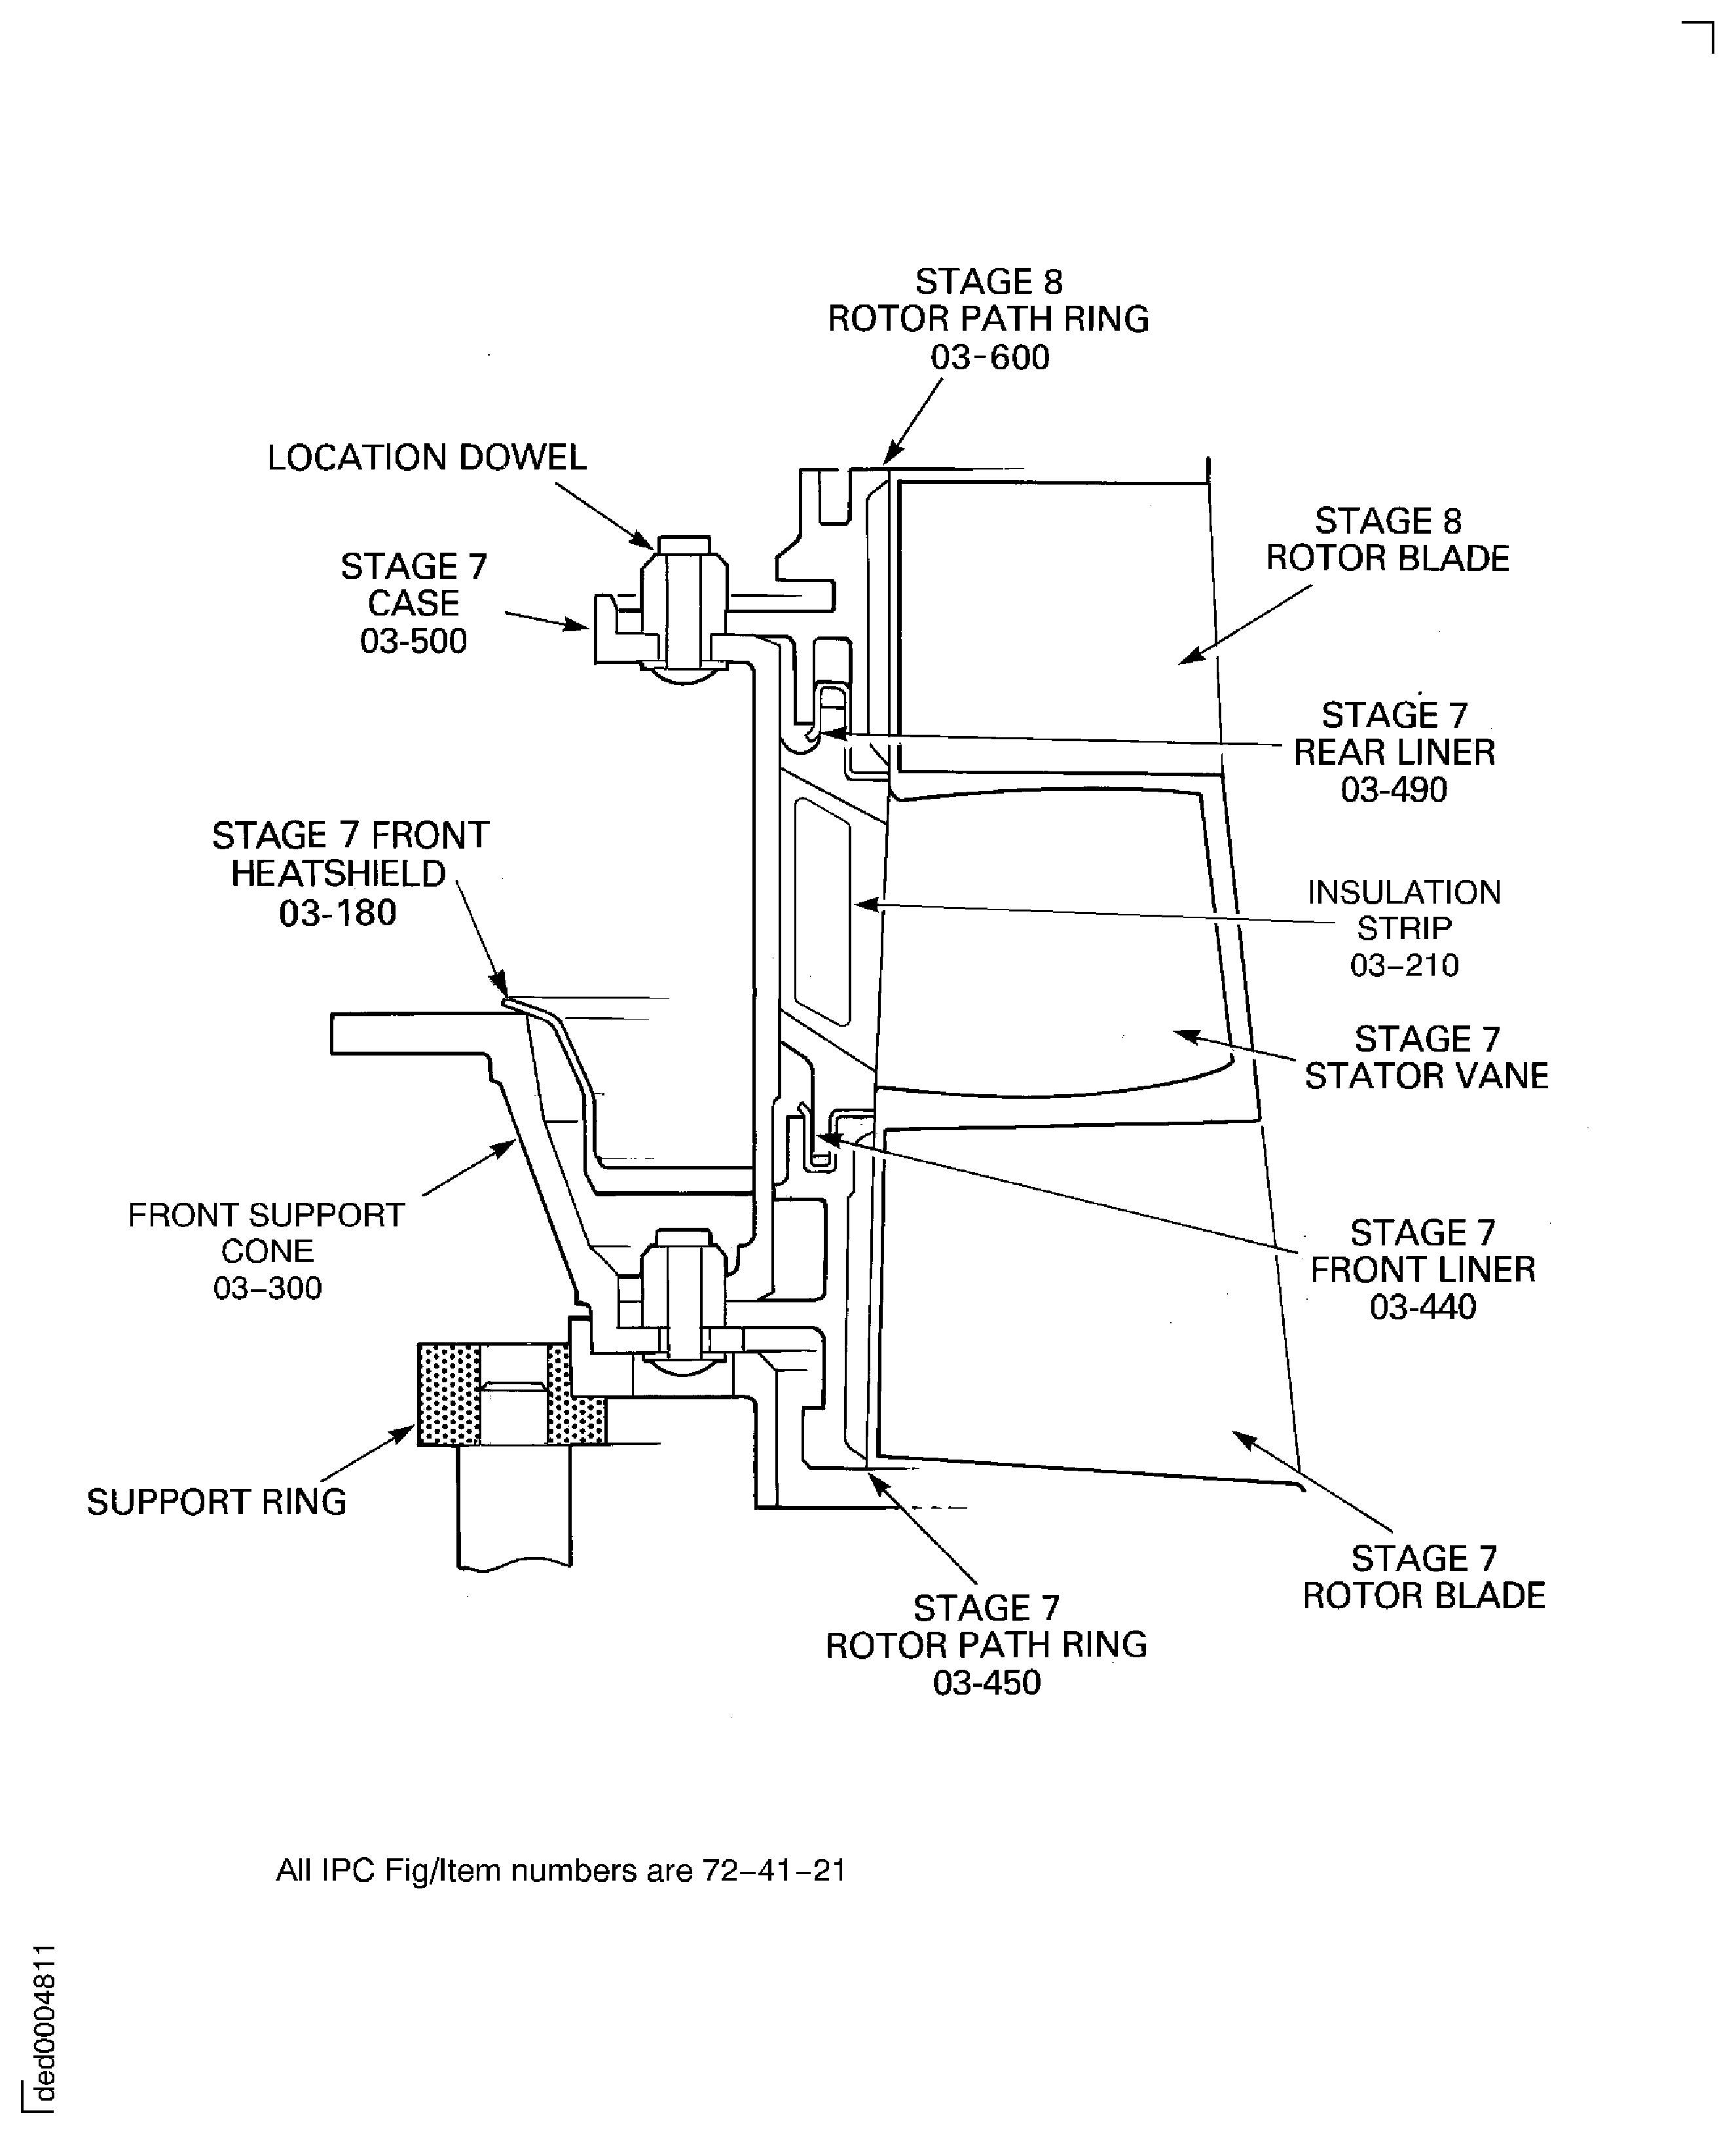
Figure: Tools to remove the rotor path rings and cases
Tools to remove the rotor path rings and cases
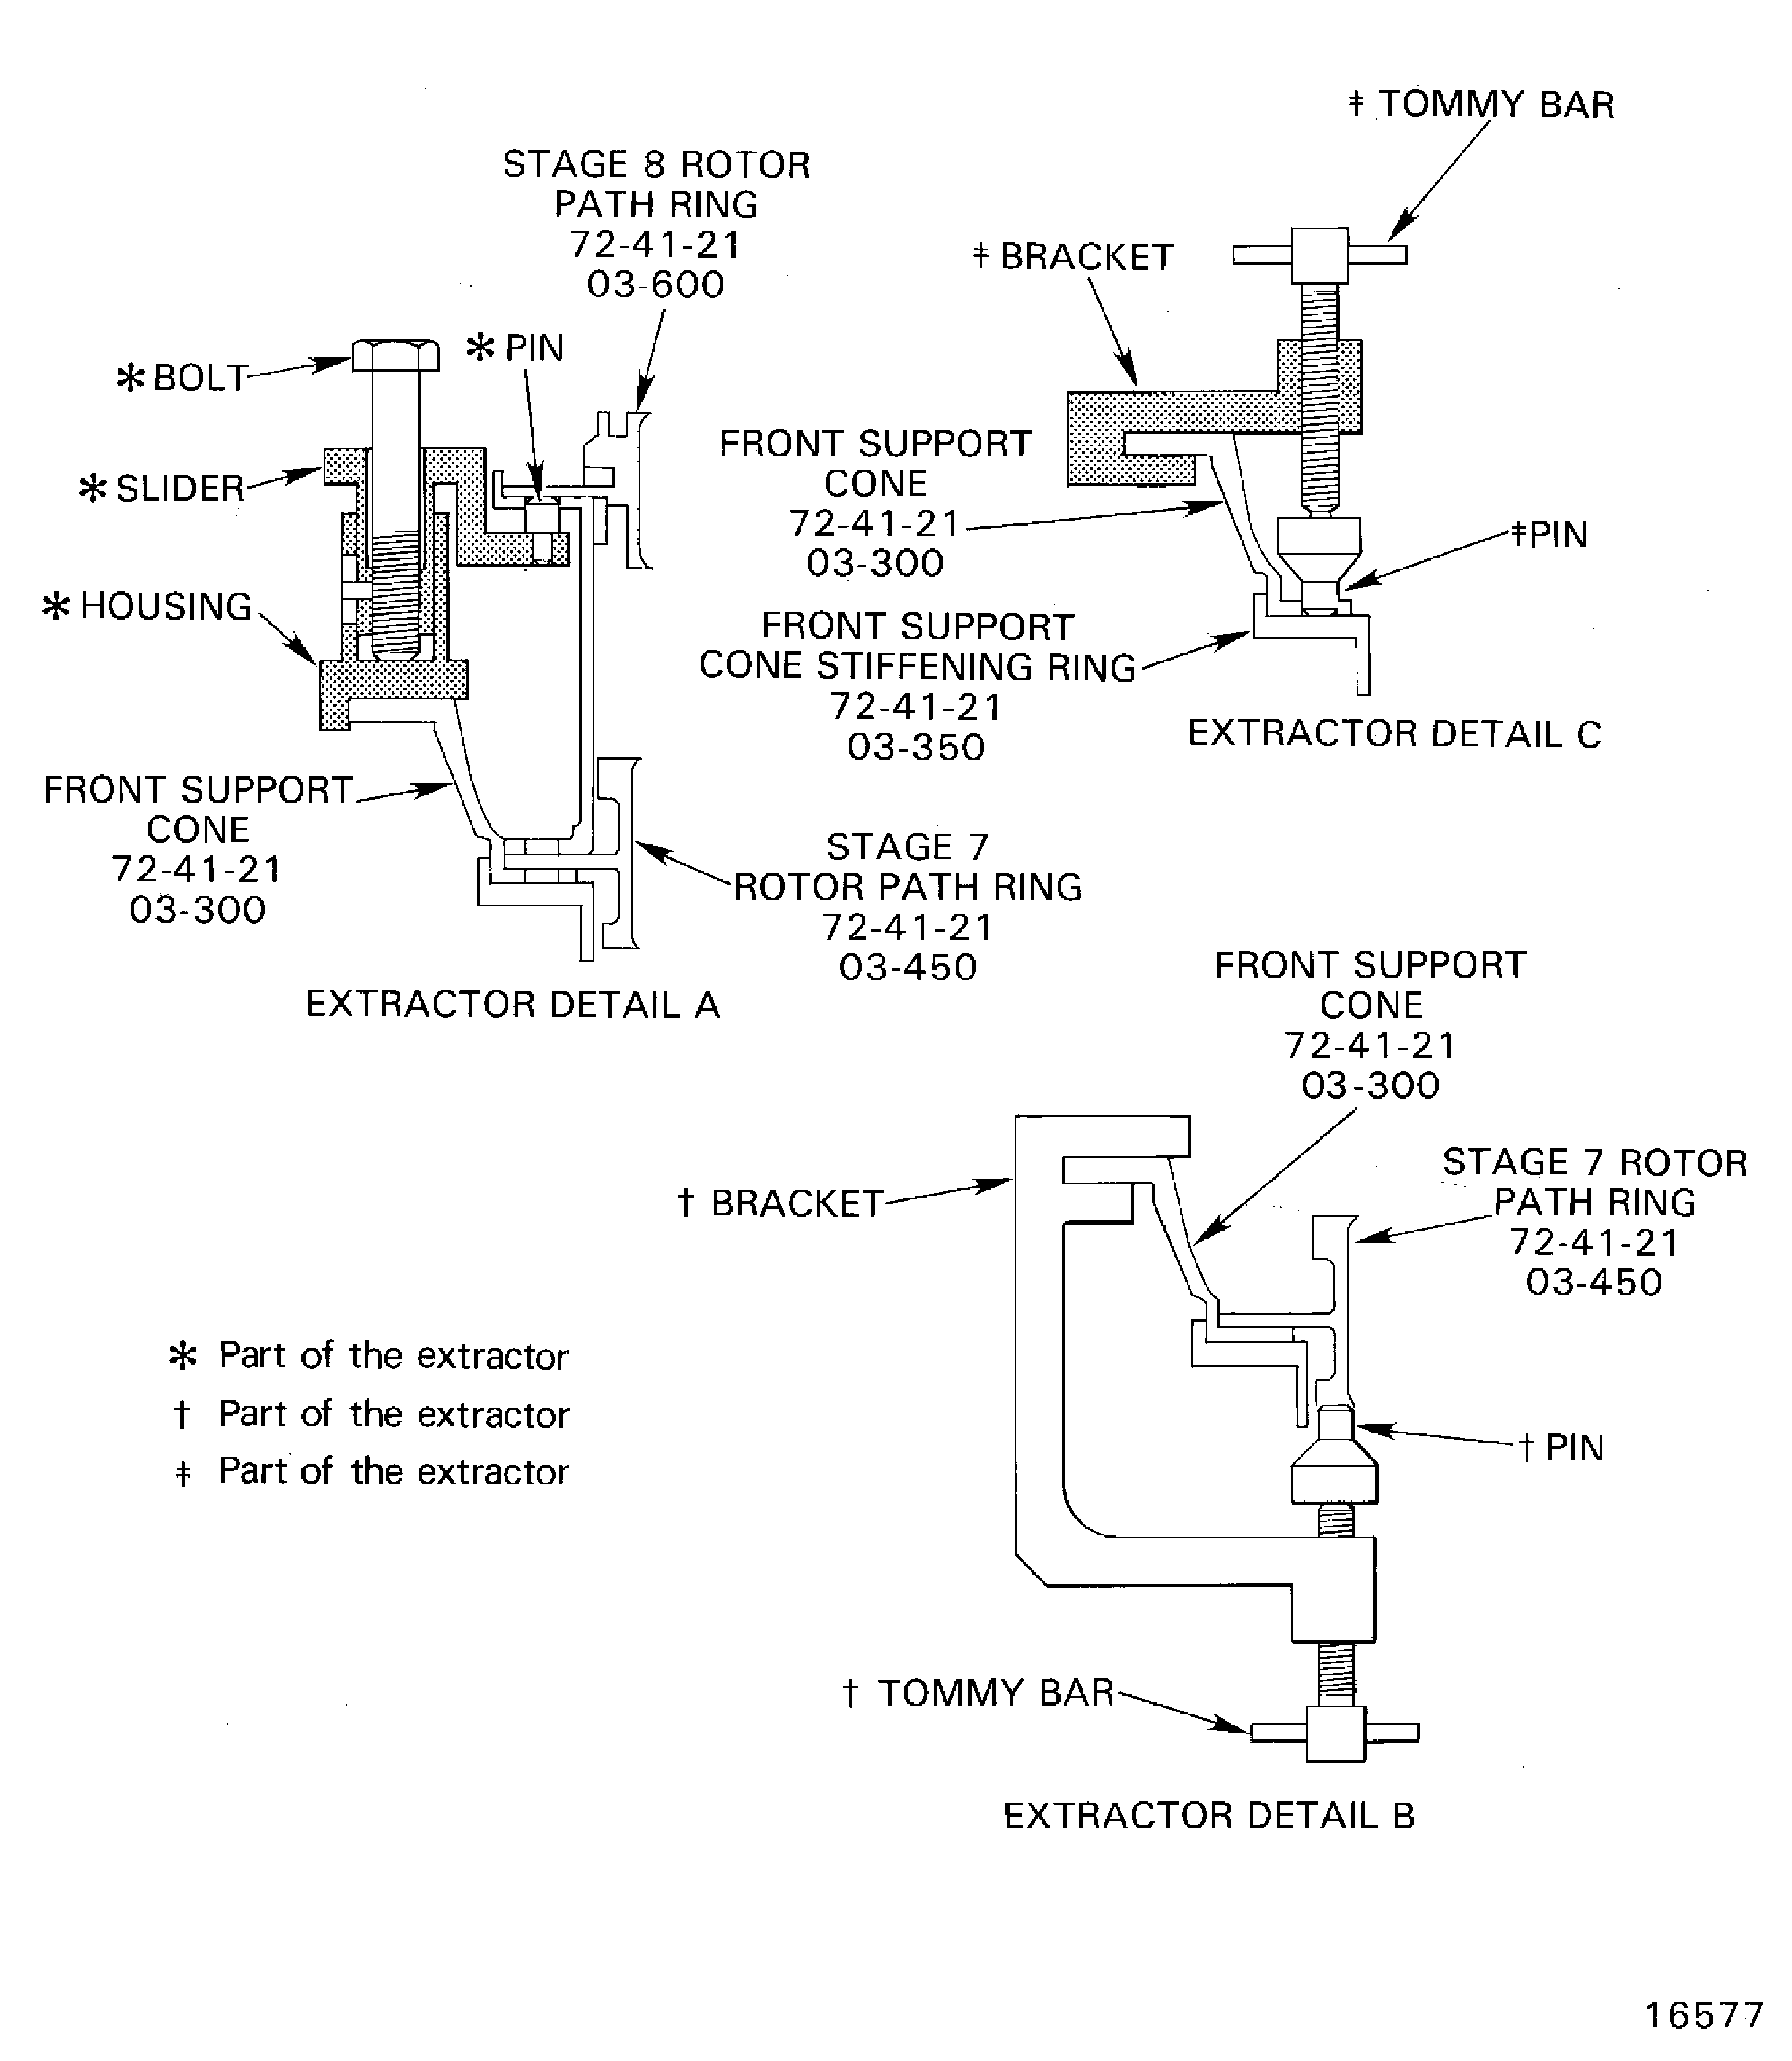
Figure: Remove the stage 7 stator vanes, rotor path ring and the front support cone
Remove the stage 7 stator vanes, rotor path ring and the front support cone
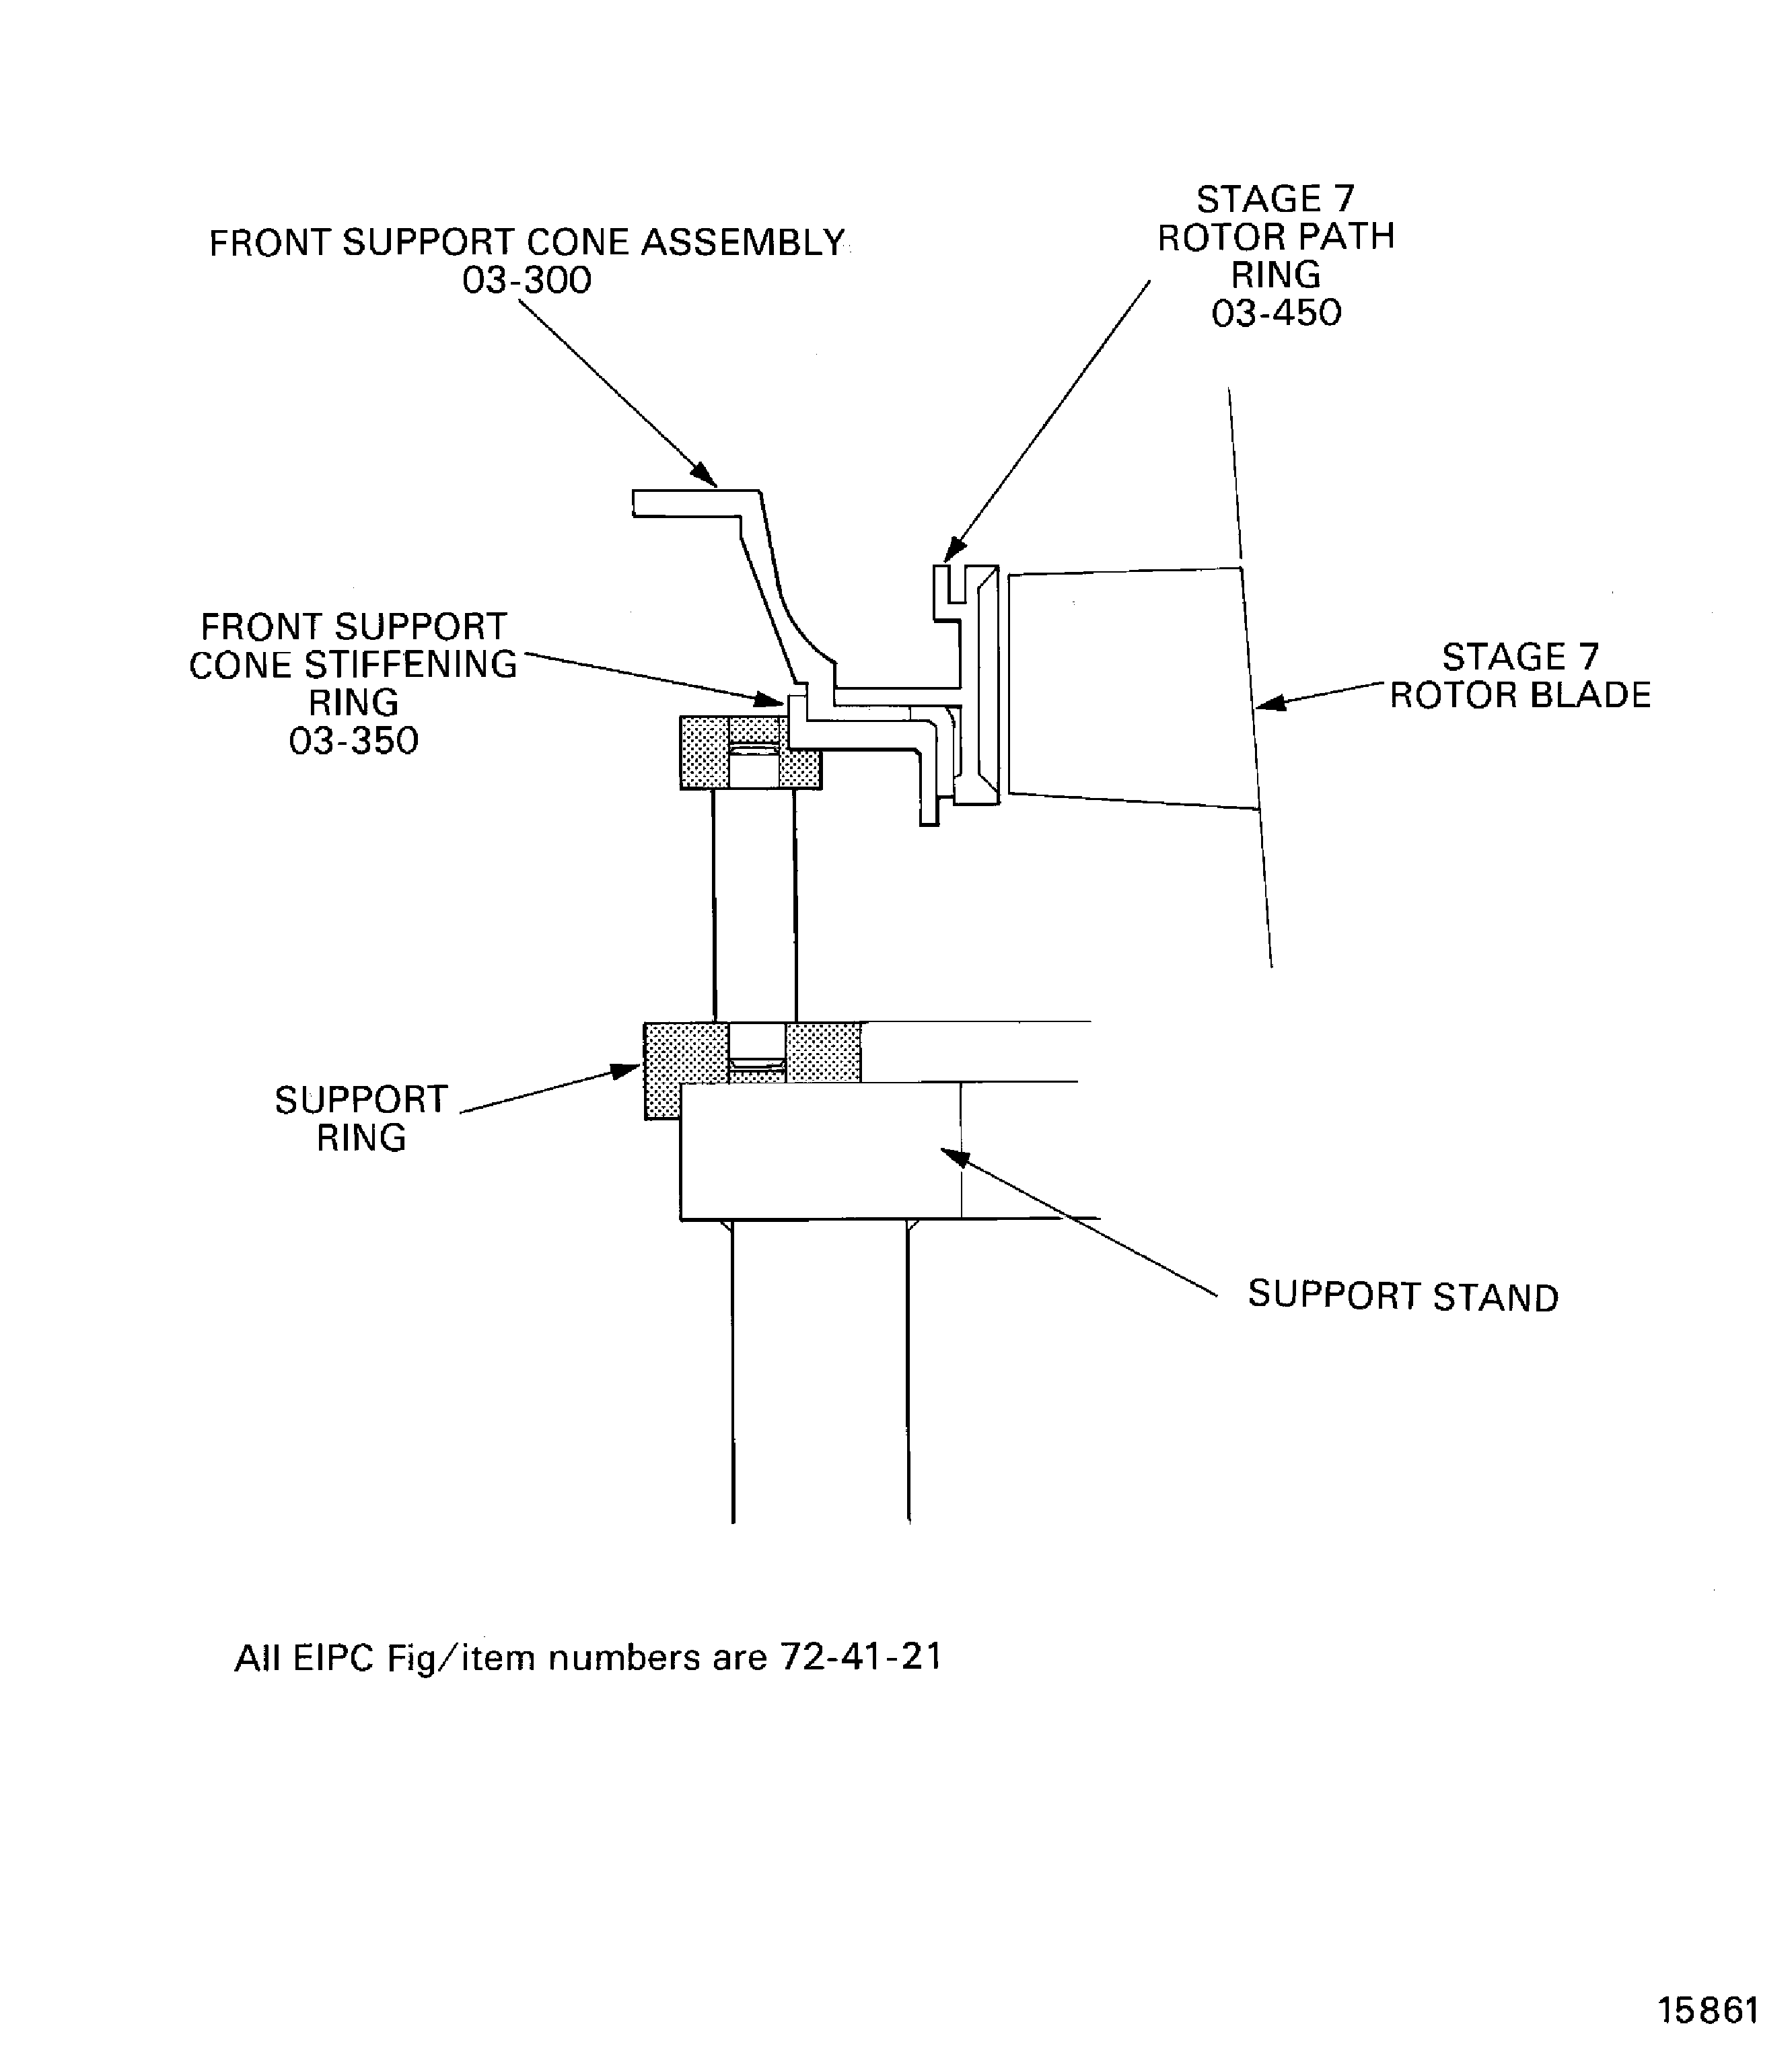
Figure: Install the lifting fixture
Install the lifting fixture
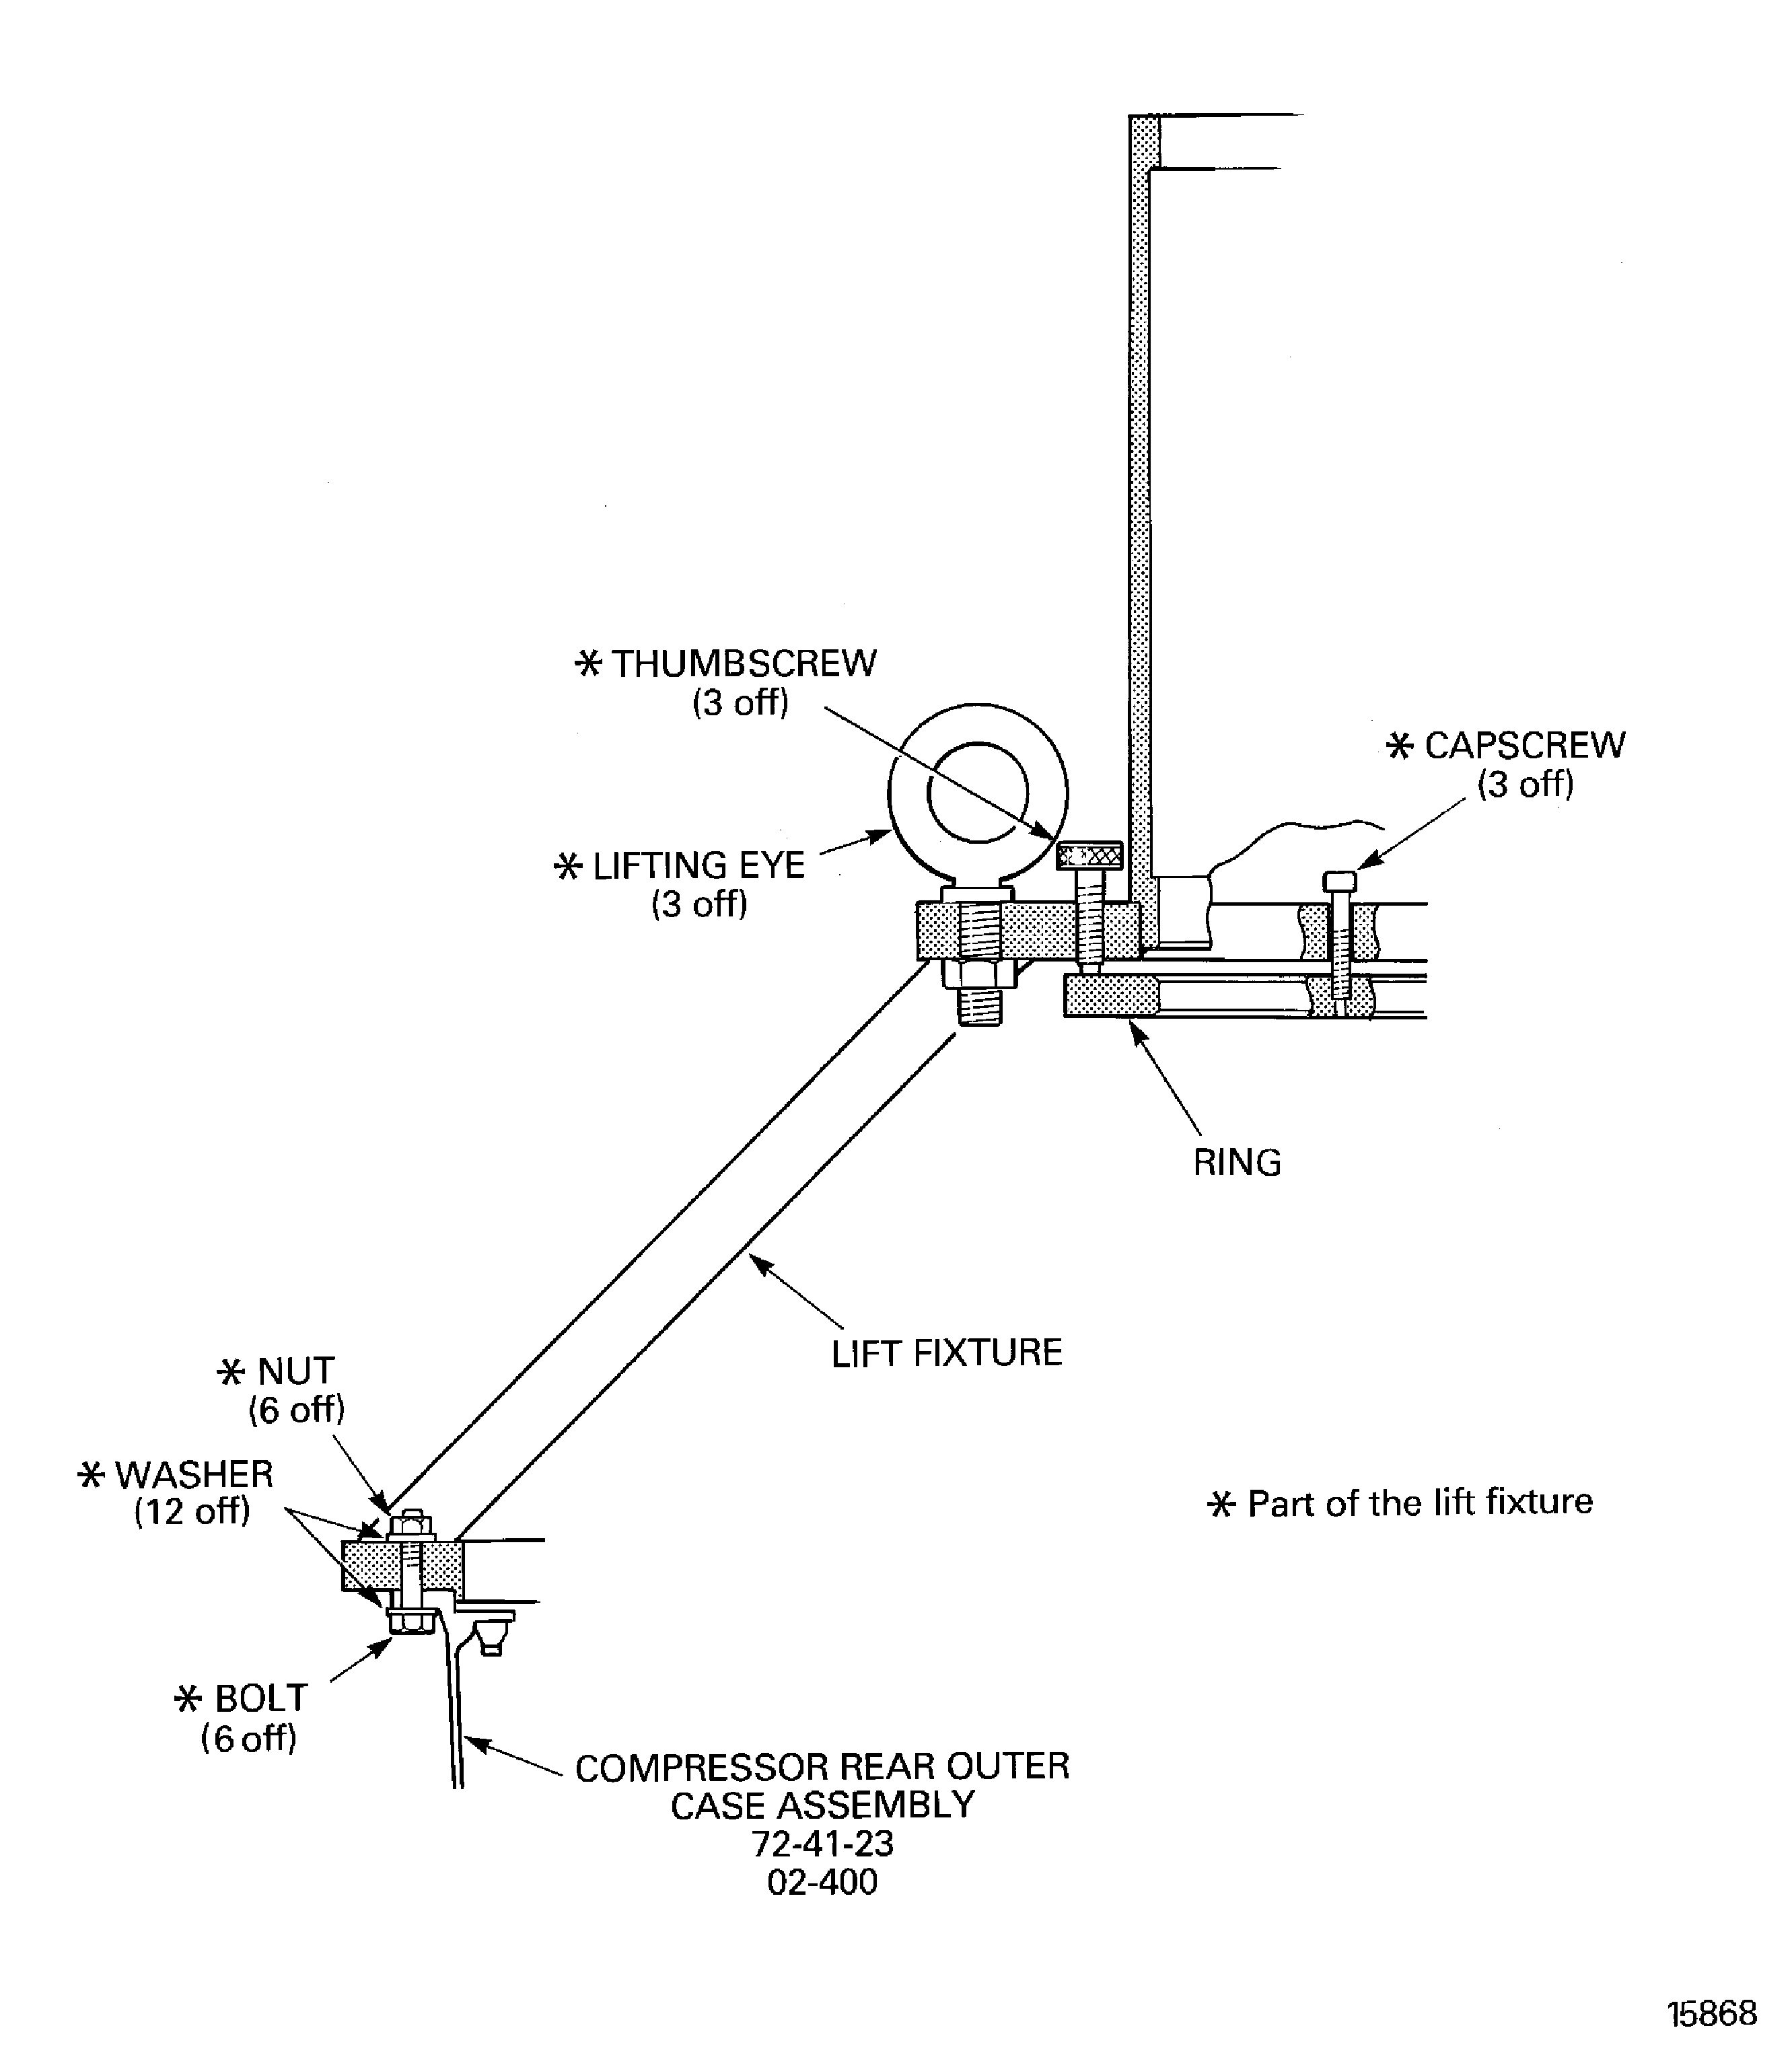
Figure: Measure the stage 7 to 11 rotor path ring radius
Measure the stage 7 to 11 rotor path ring radius
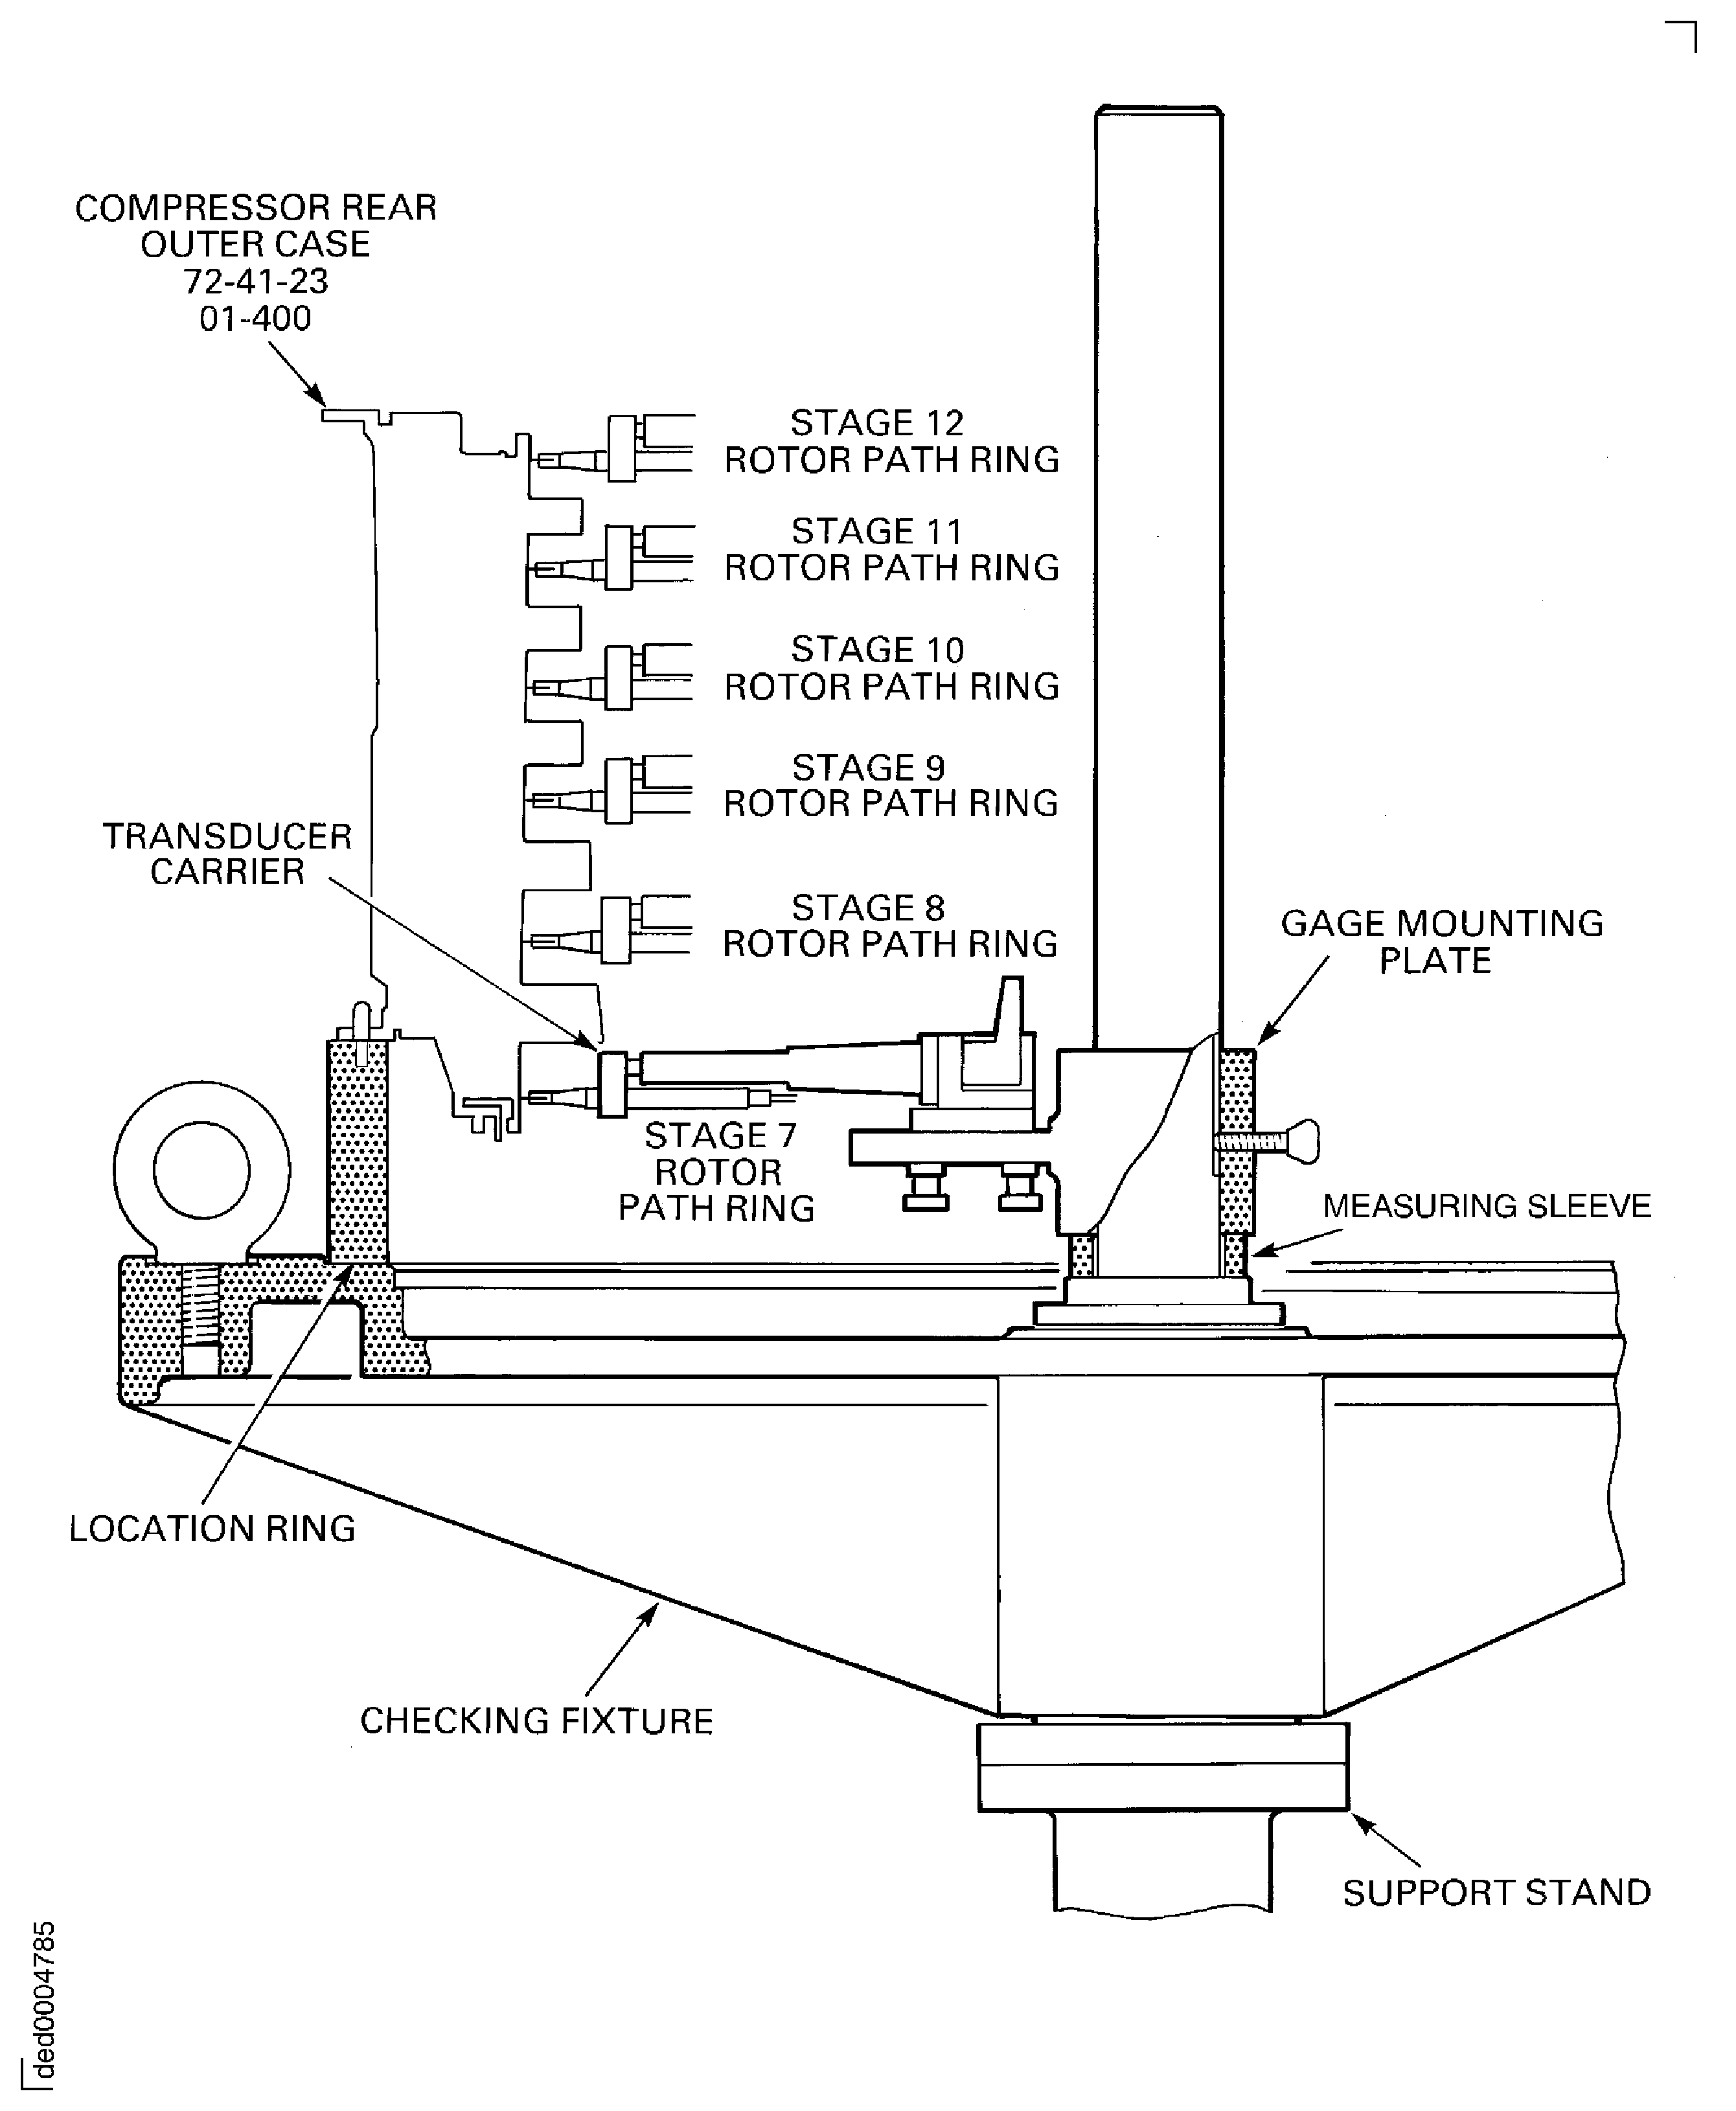
Figure: Set the tools to measure the cases
Set the tools to measure the cases
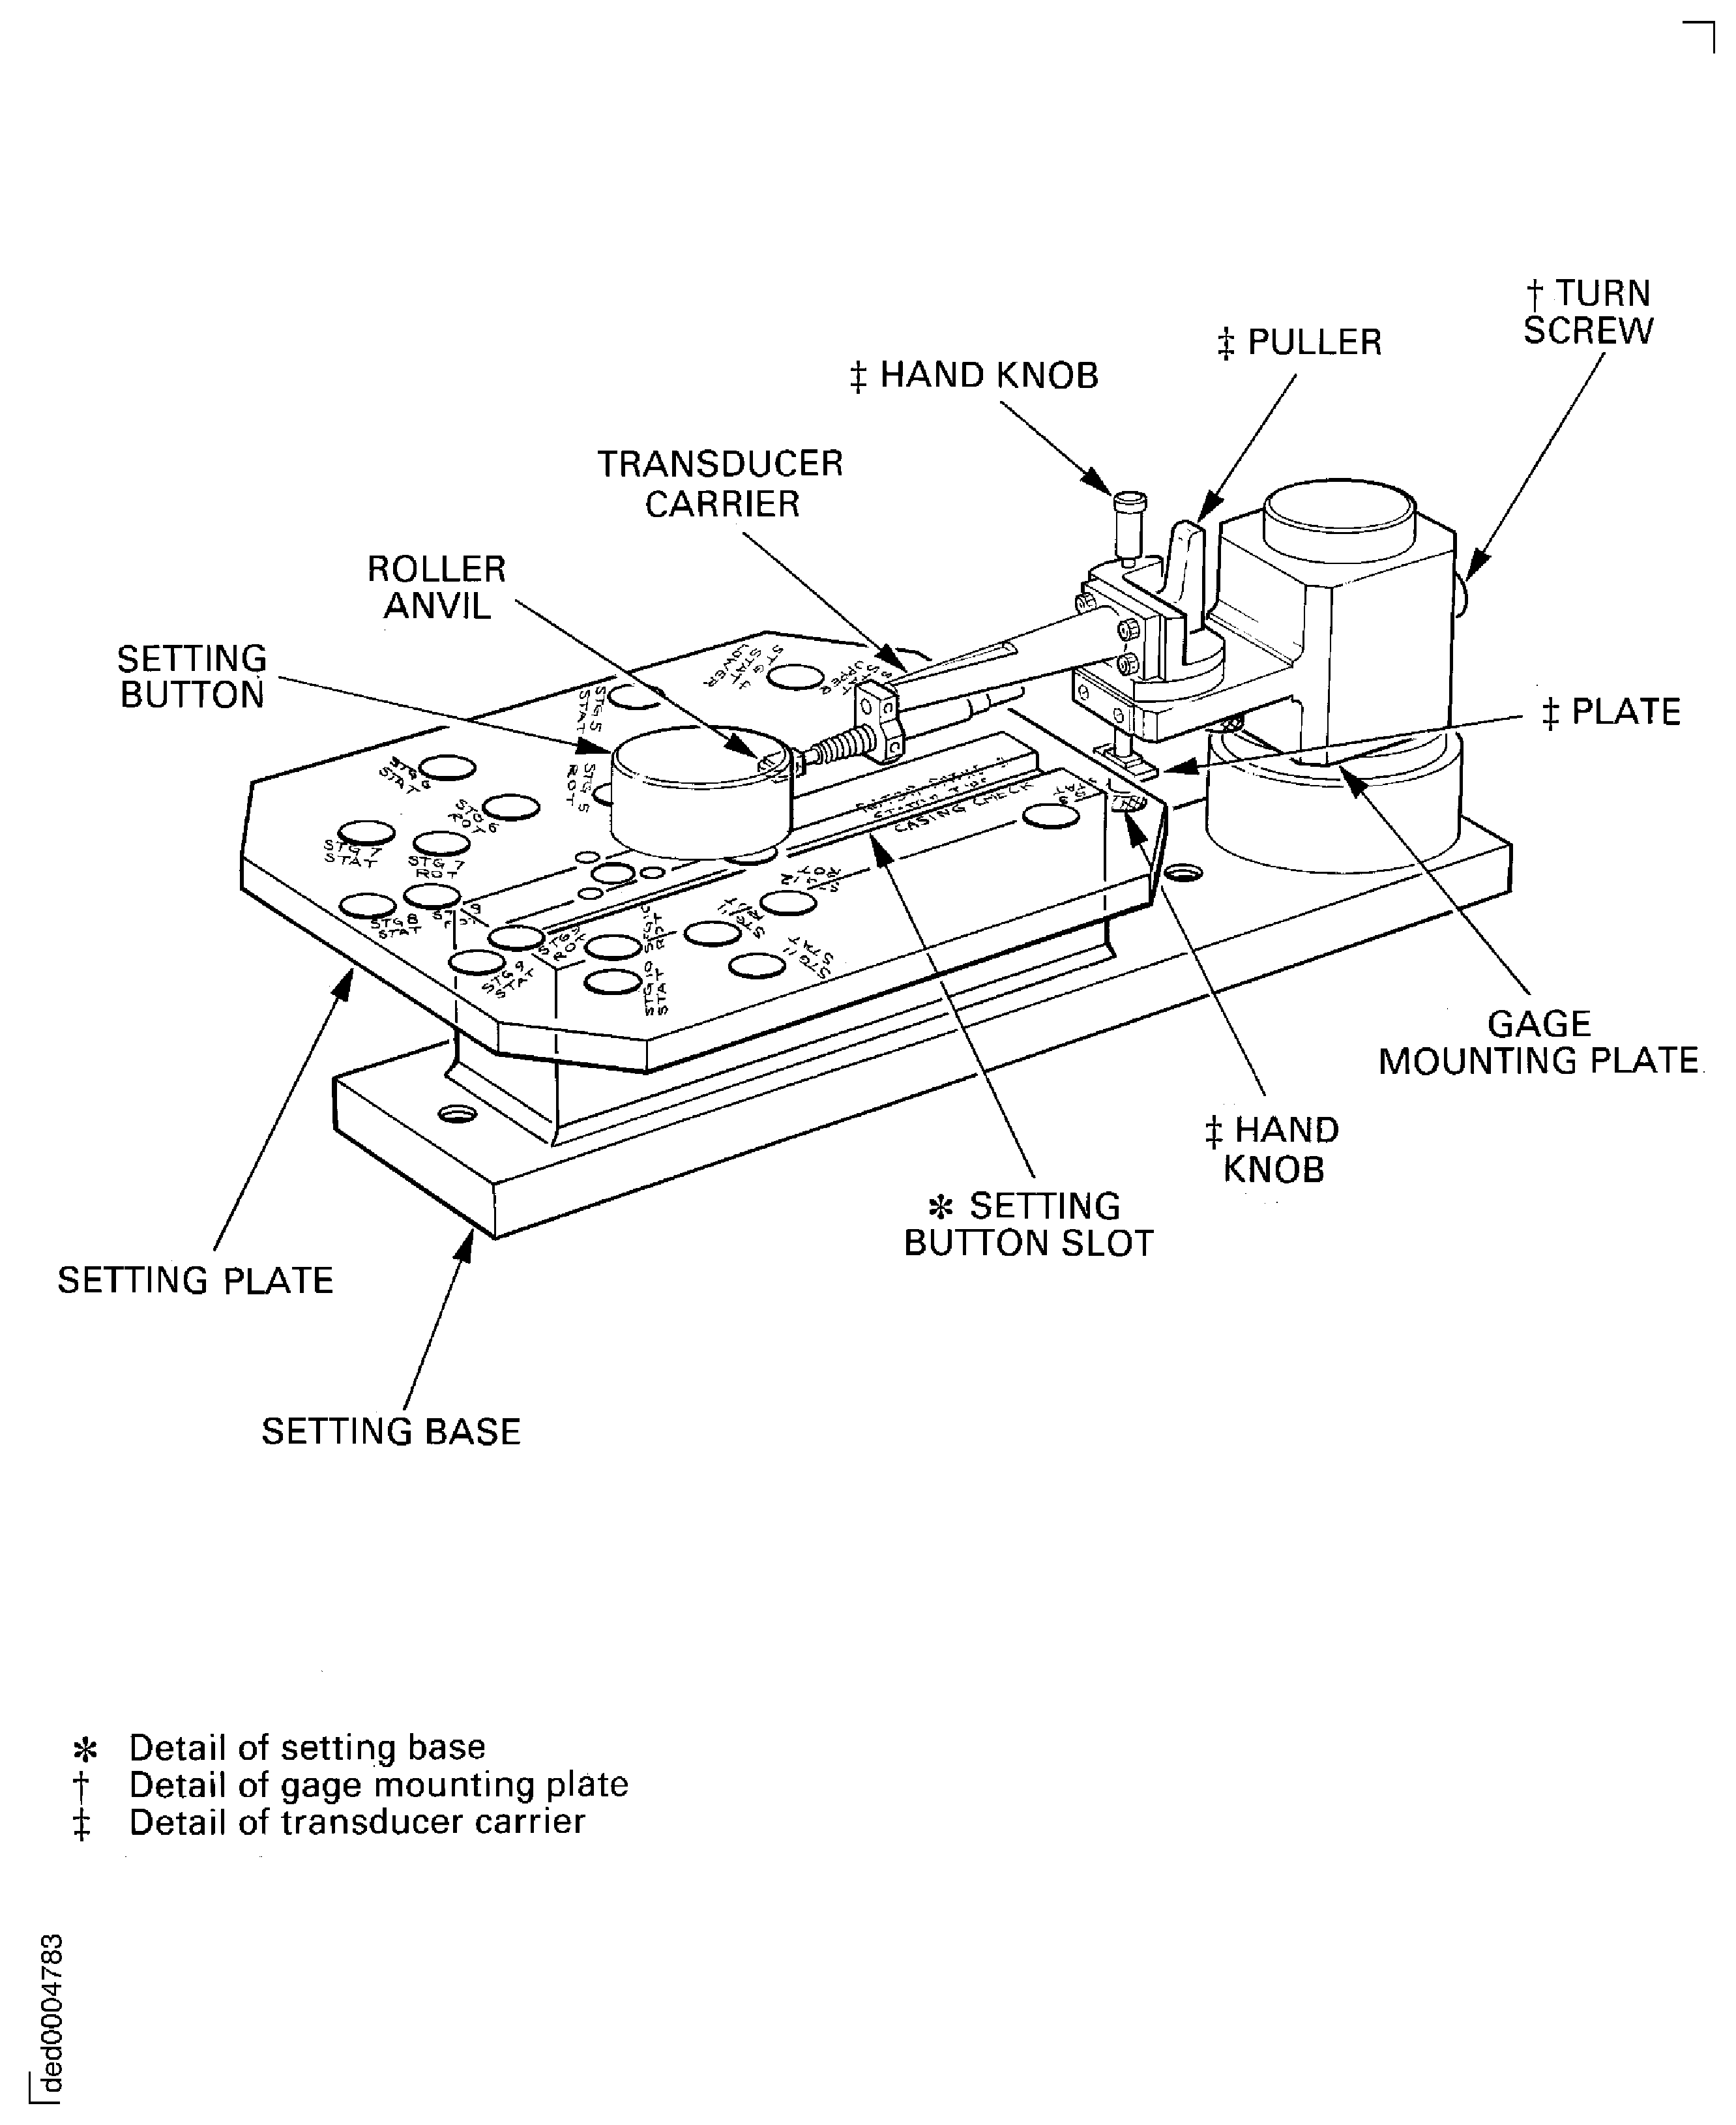
Figure: Measure the stage 7 to 11 stator vane tip radius
Measure the stage 7 to 11 stator vane tip radius
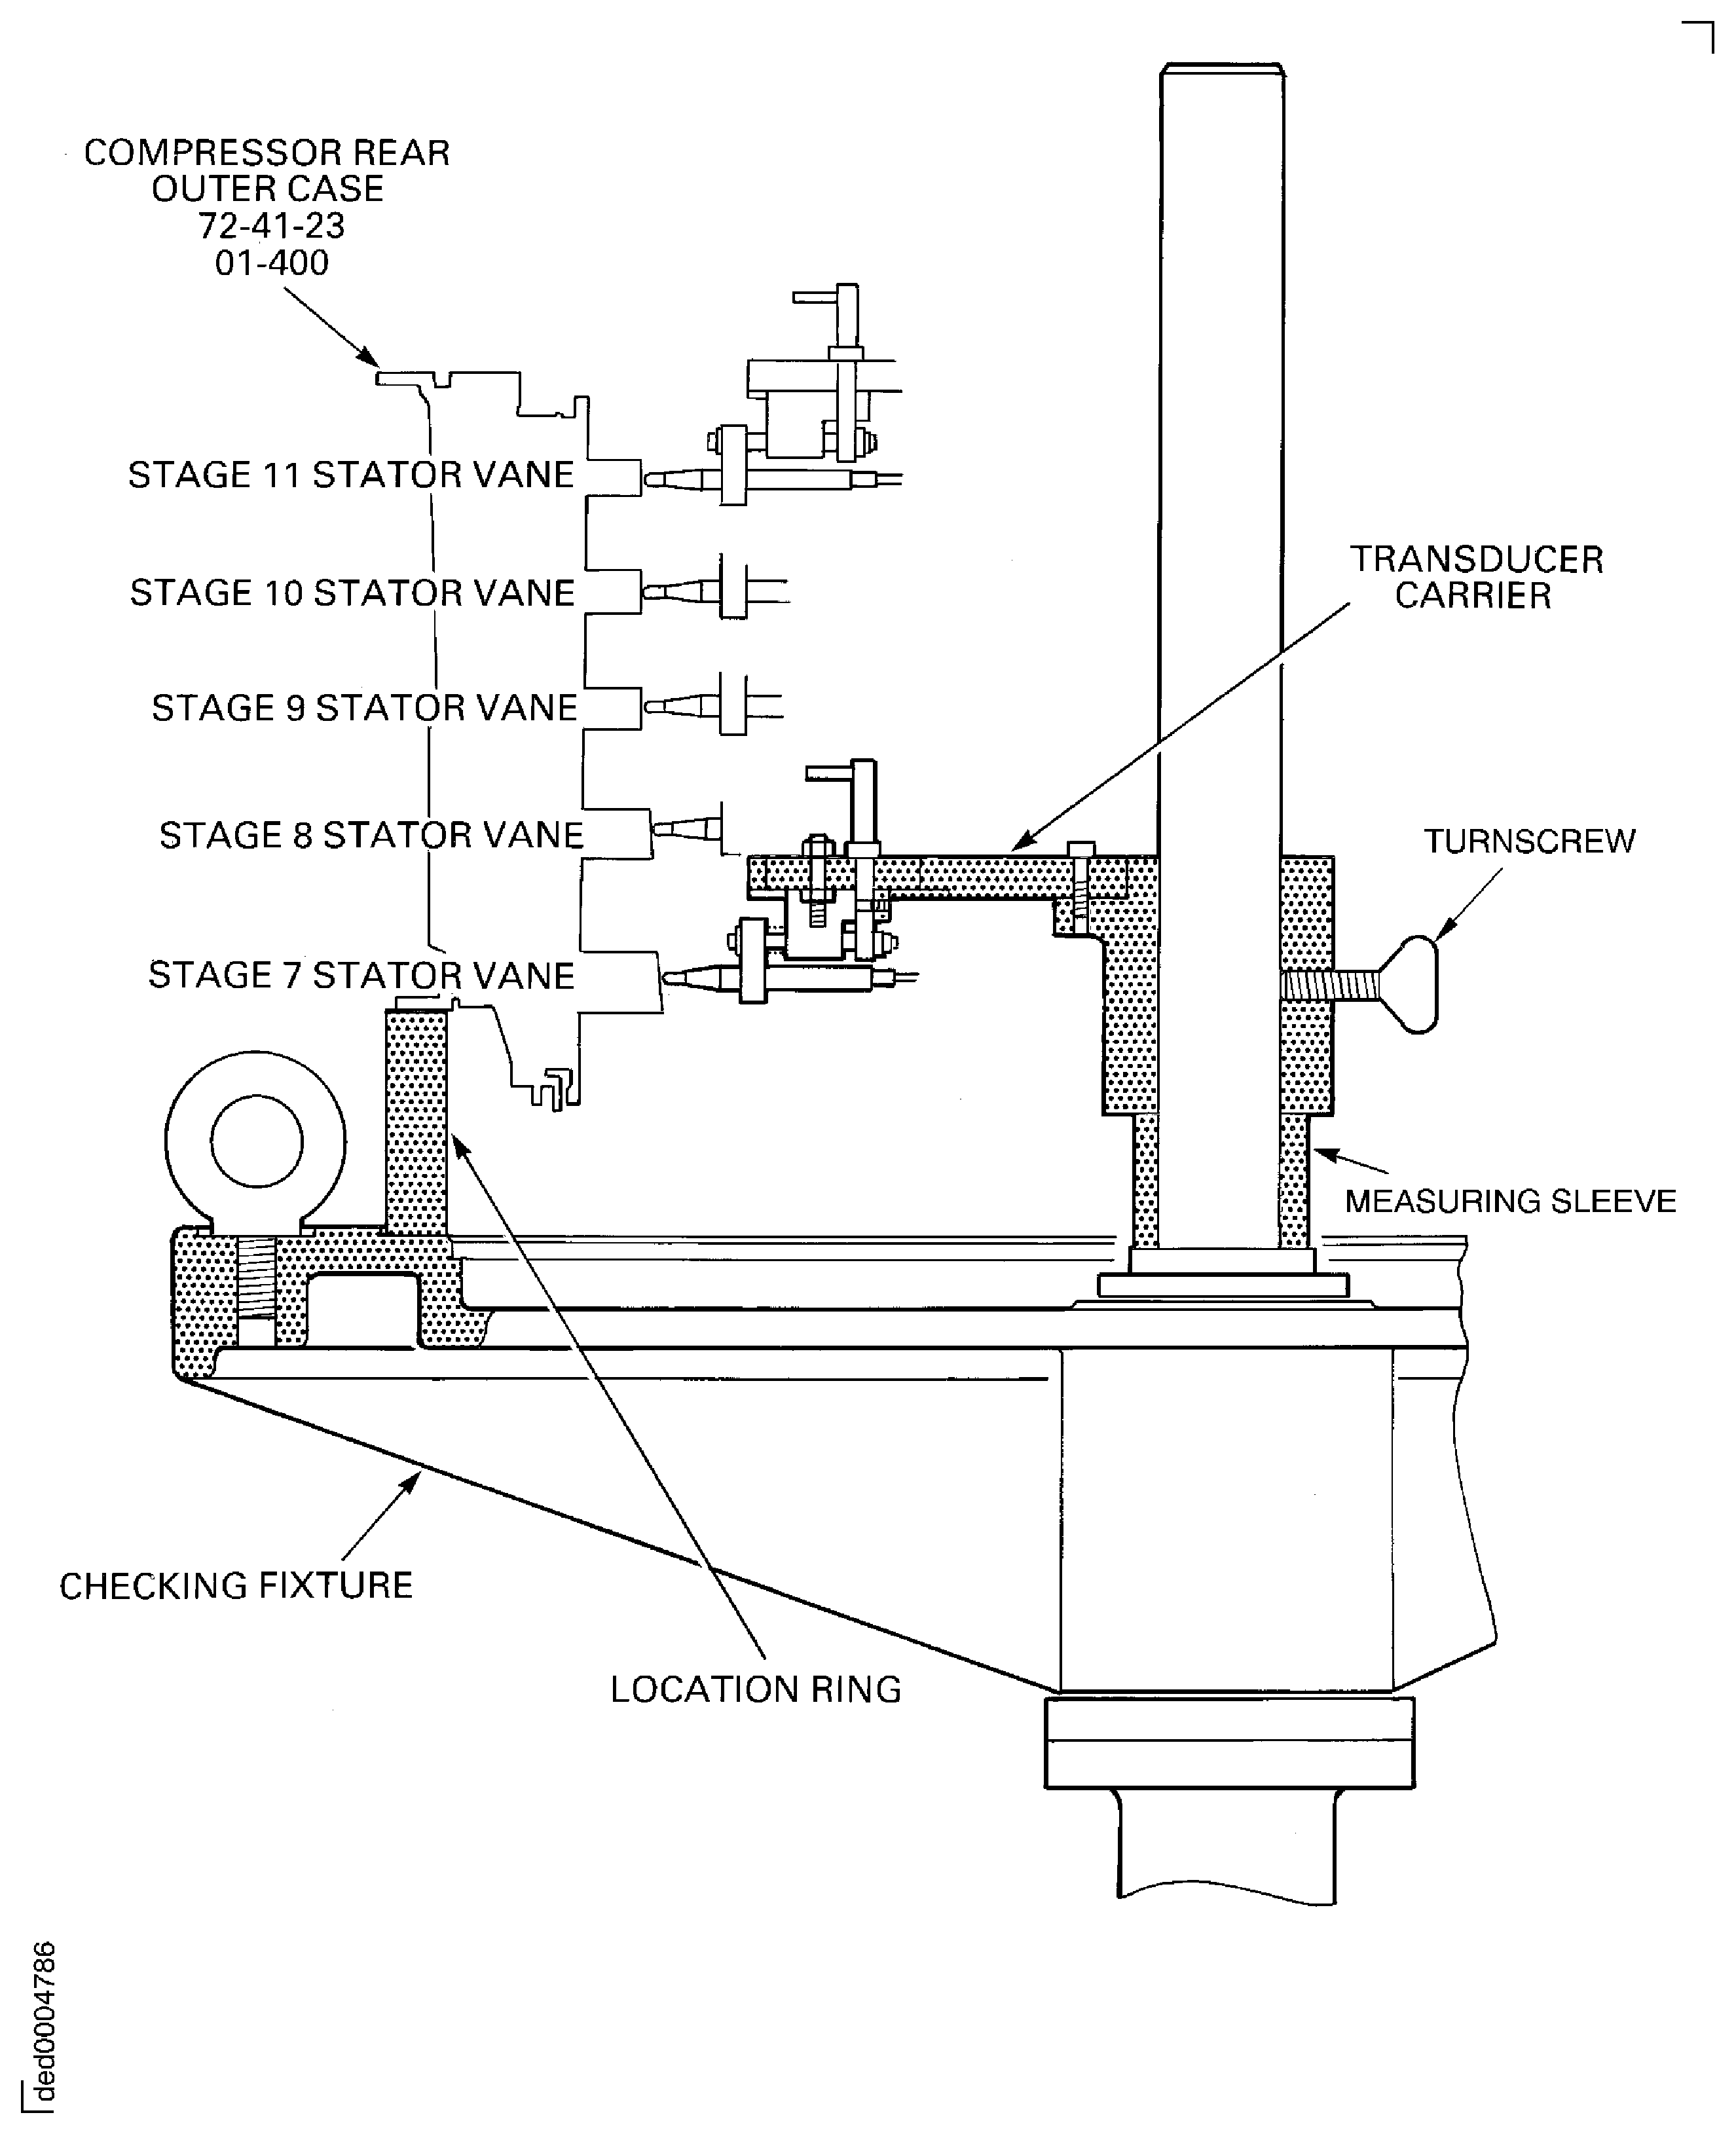
Figure: Measure the stage 3 to 6 rotor path ring radius
Measure the stage 3 to 6 rotor path ring radius
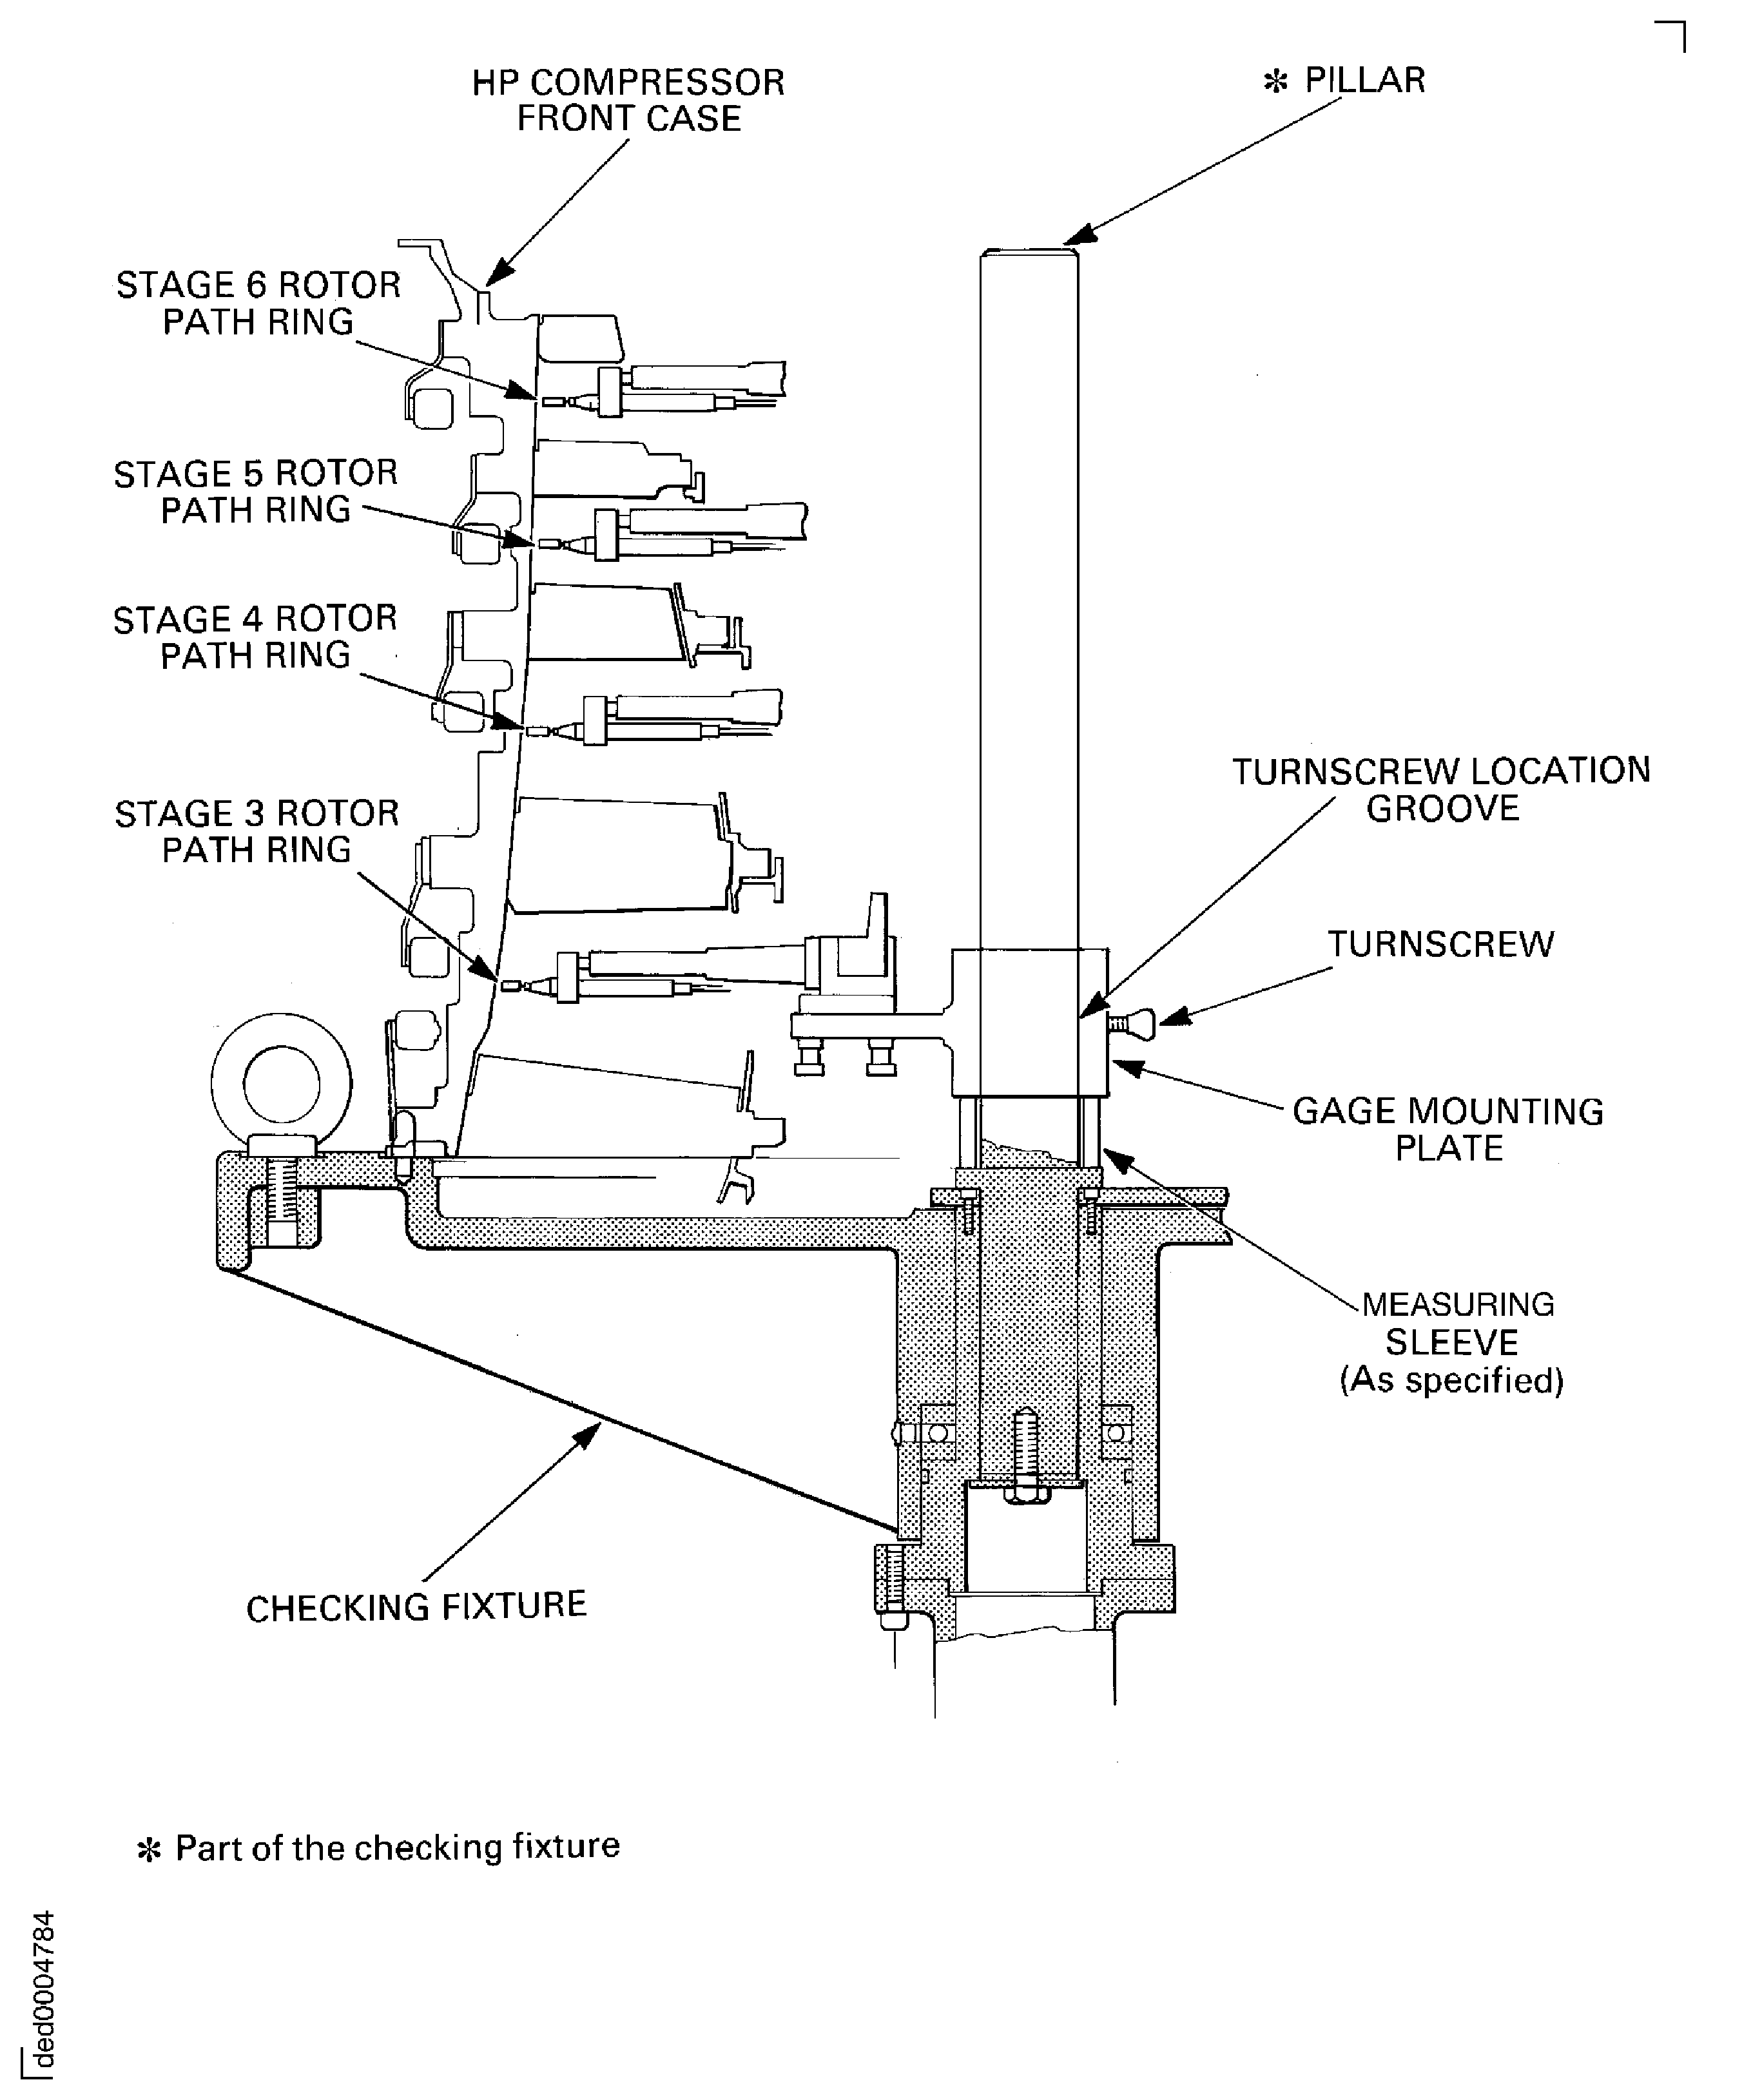
Figure: Measure the stator vane tip radius
Measure the stator vane tip radius
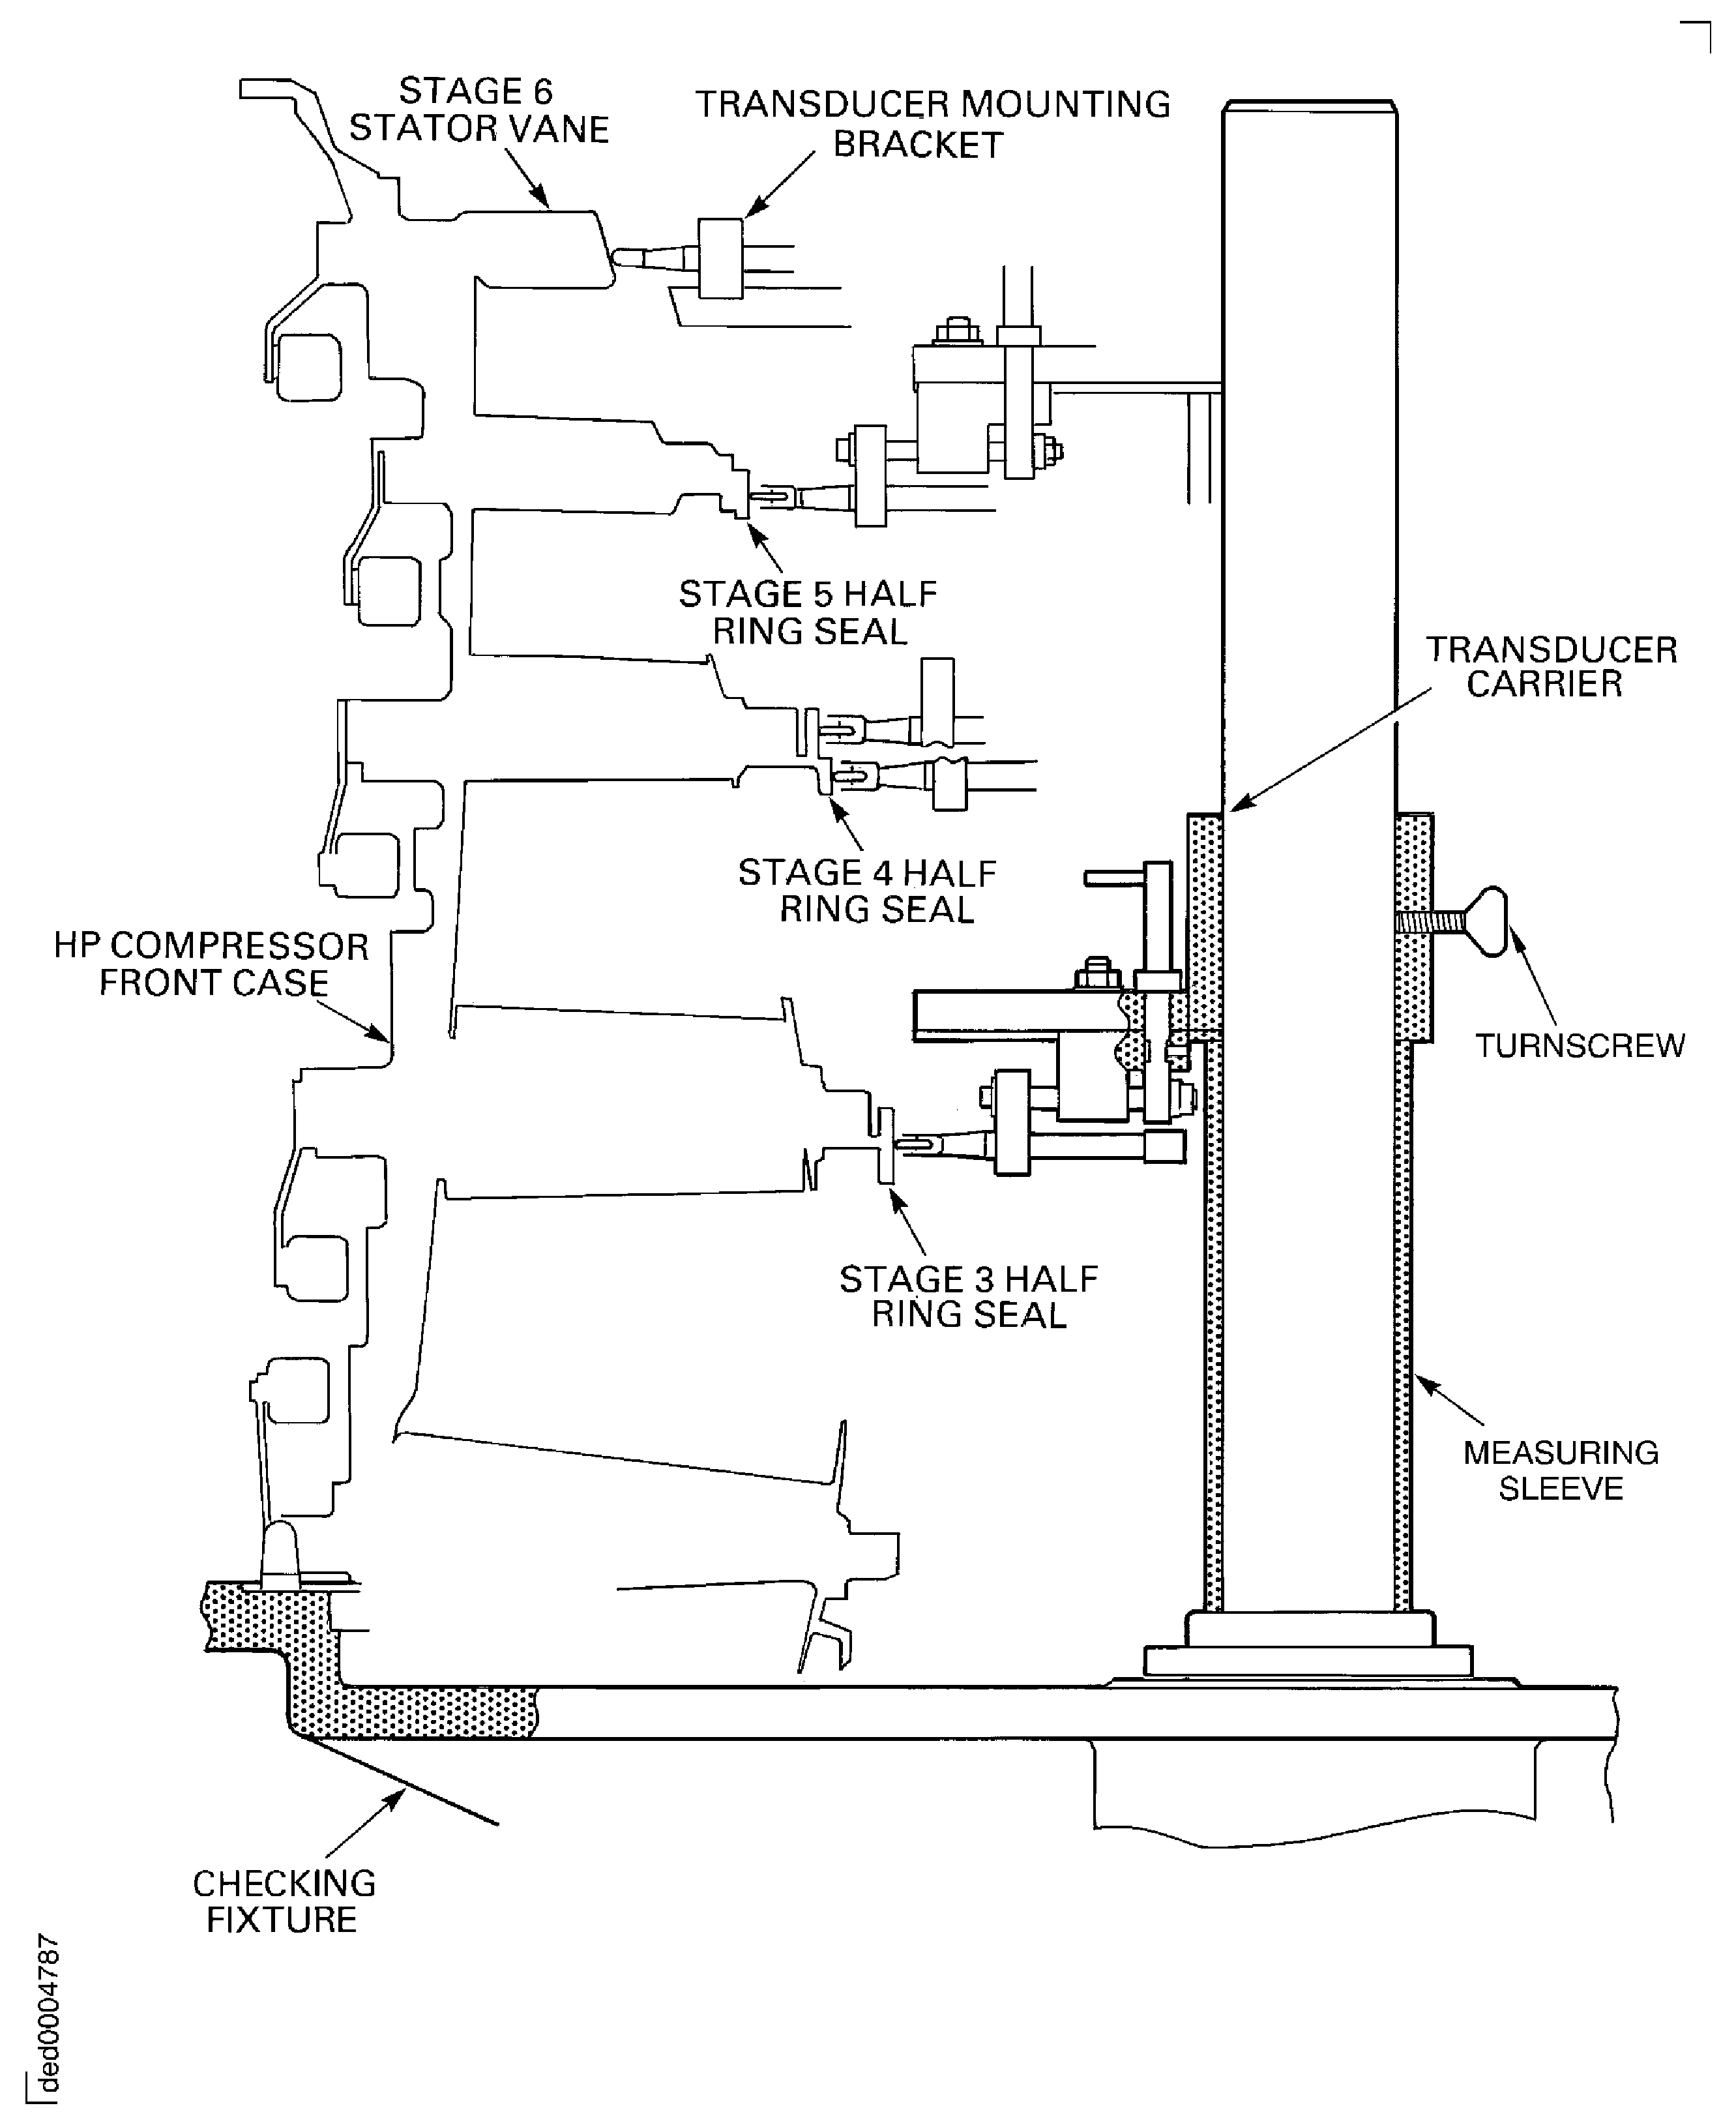
Figure: Remove the brackets, the pins, the bolts and the nuts at the HP compressor front case to the compressor rear outer case flange
Remove the brackets, the pins, the bolts and the nuts at the HP compressor front case to the compressor rear outer case flange
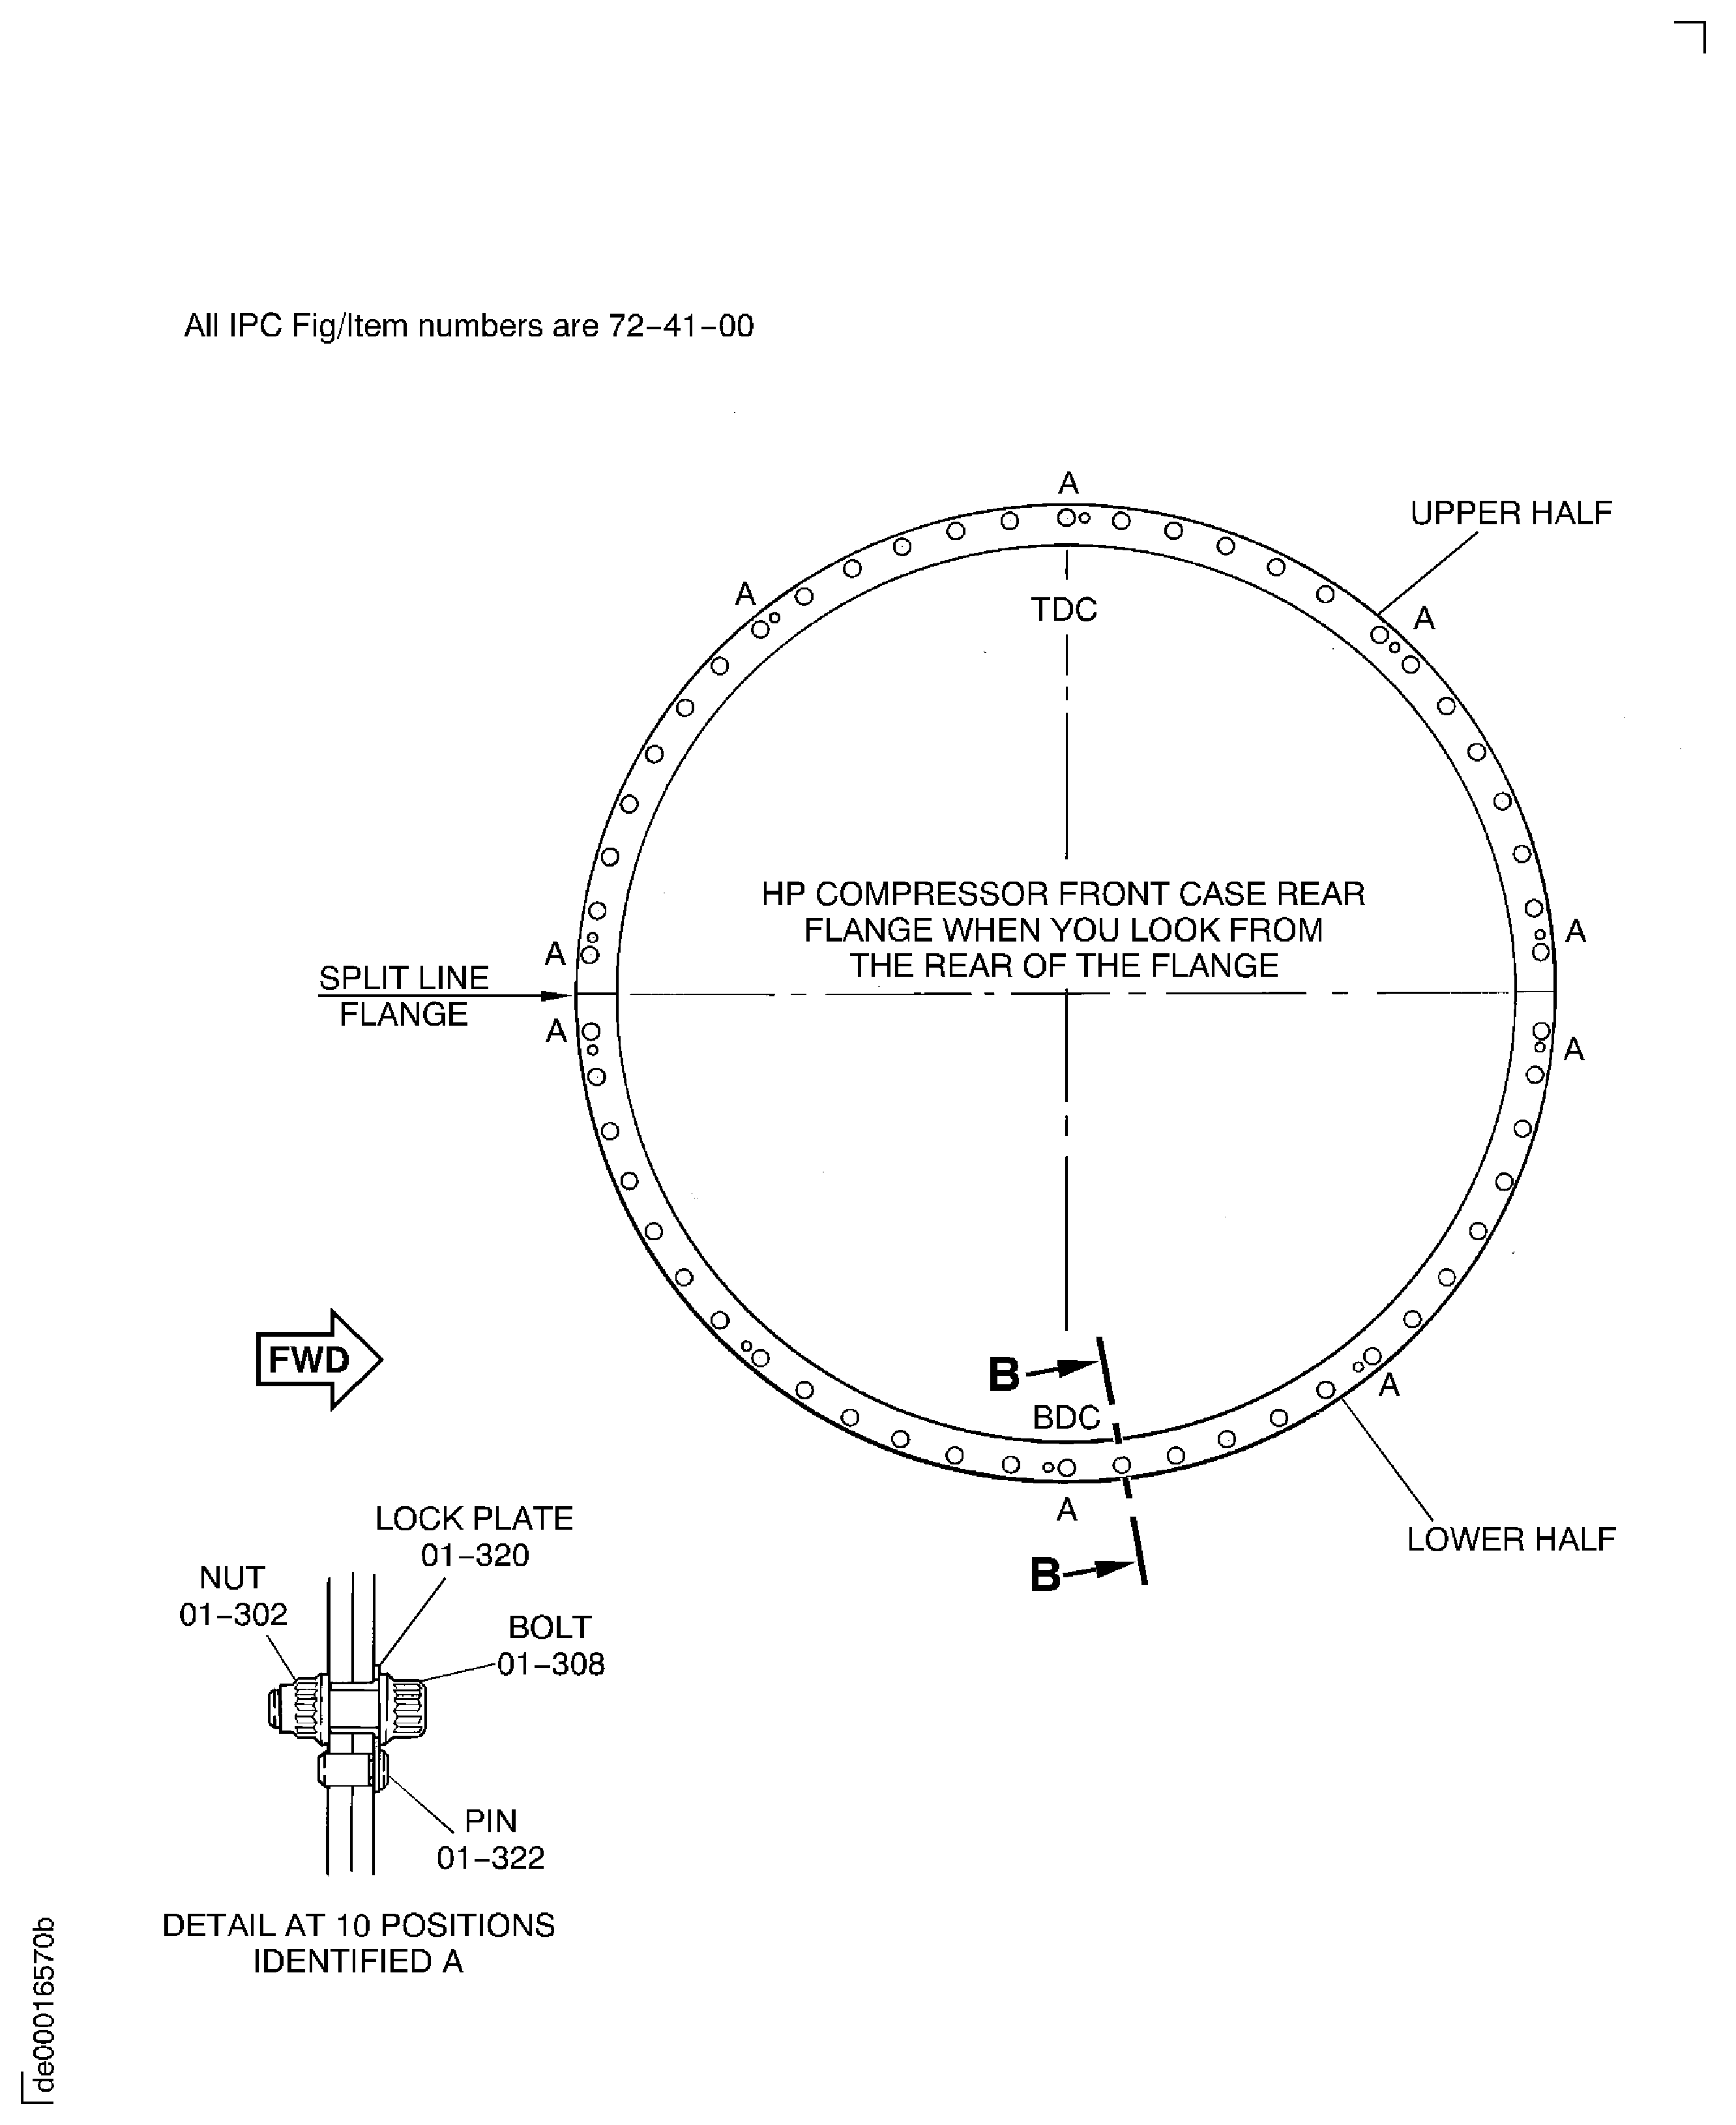
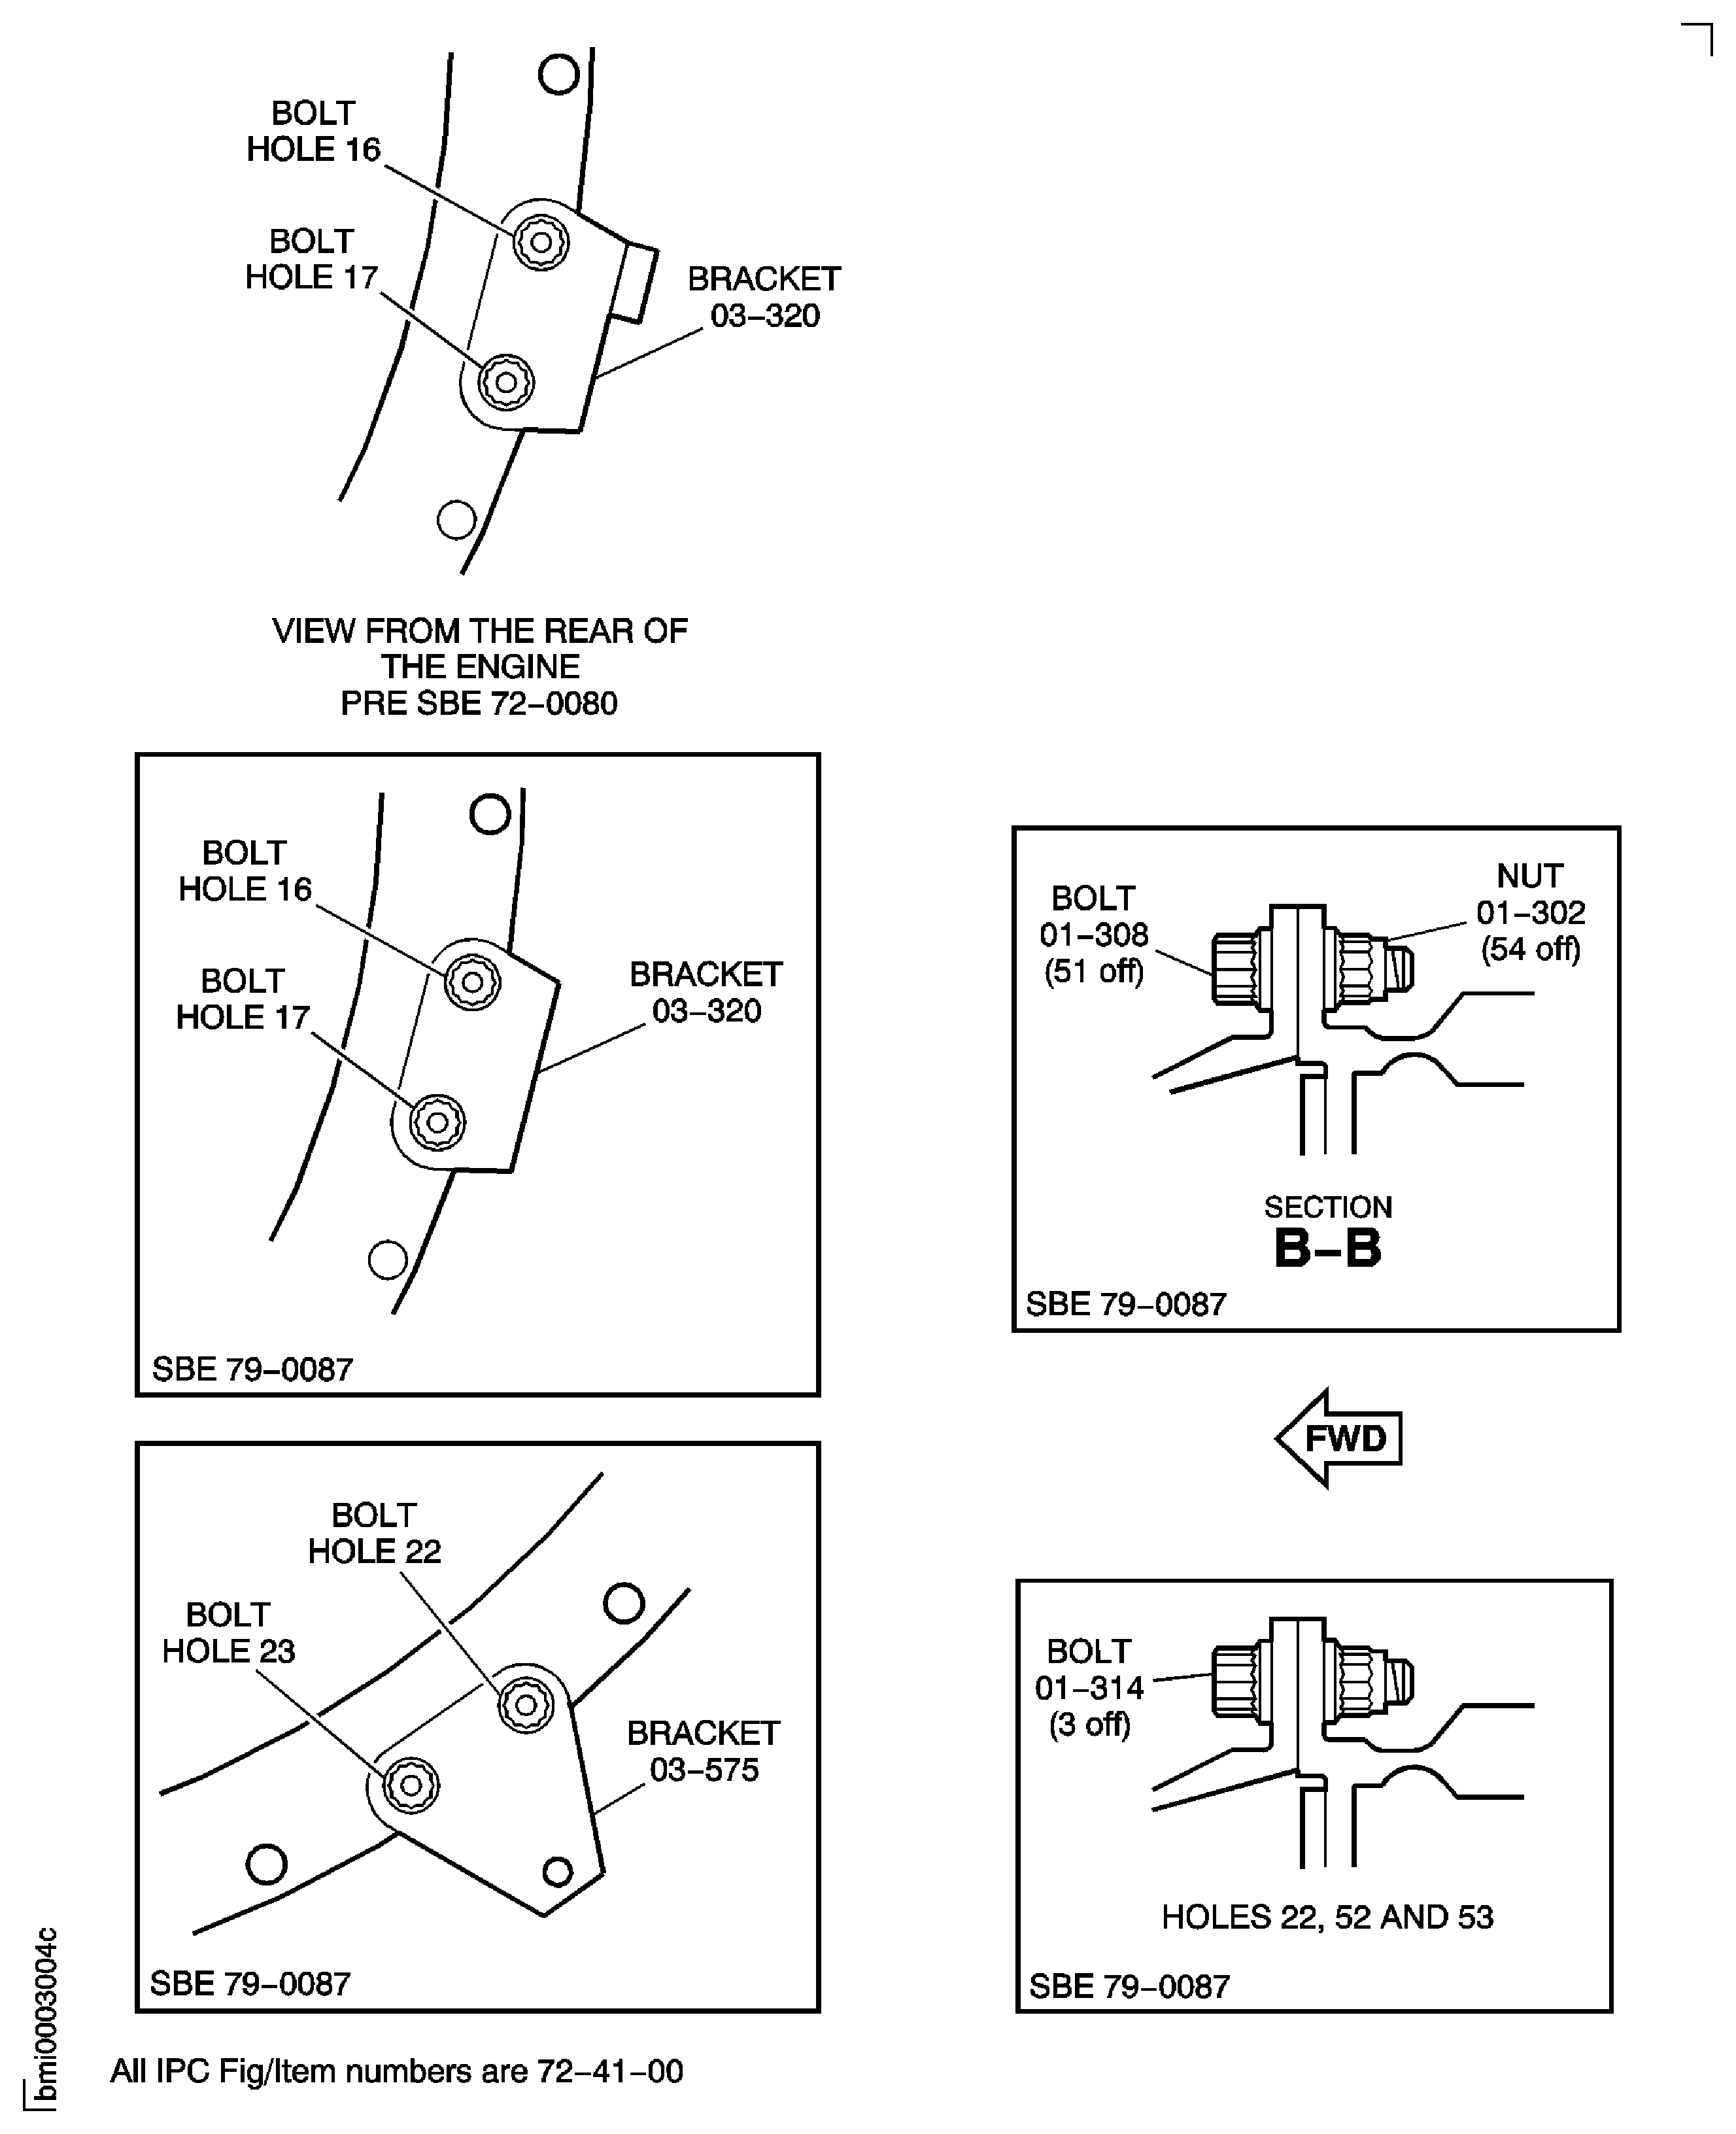
Figure: Remove the Brackets, the Pins, the Bolts and the Nuts at the HP Compressor Front Case to the Compressor Rear Outer Case Flange
Remove the Brackets, the Pins, the Bolts and the Nuts at the HP Compressor Front Case to the Compressor Rear Outer Case Flange
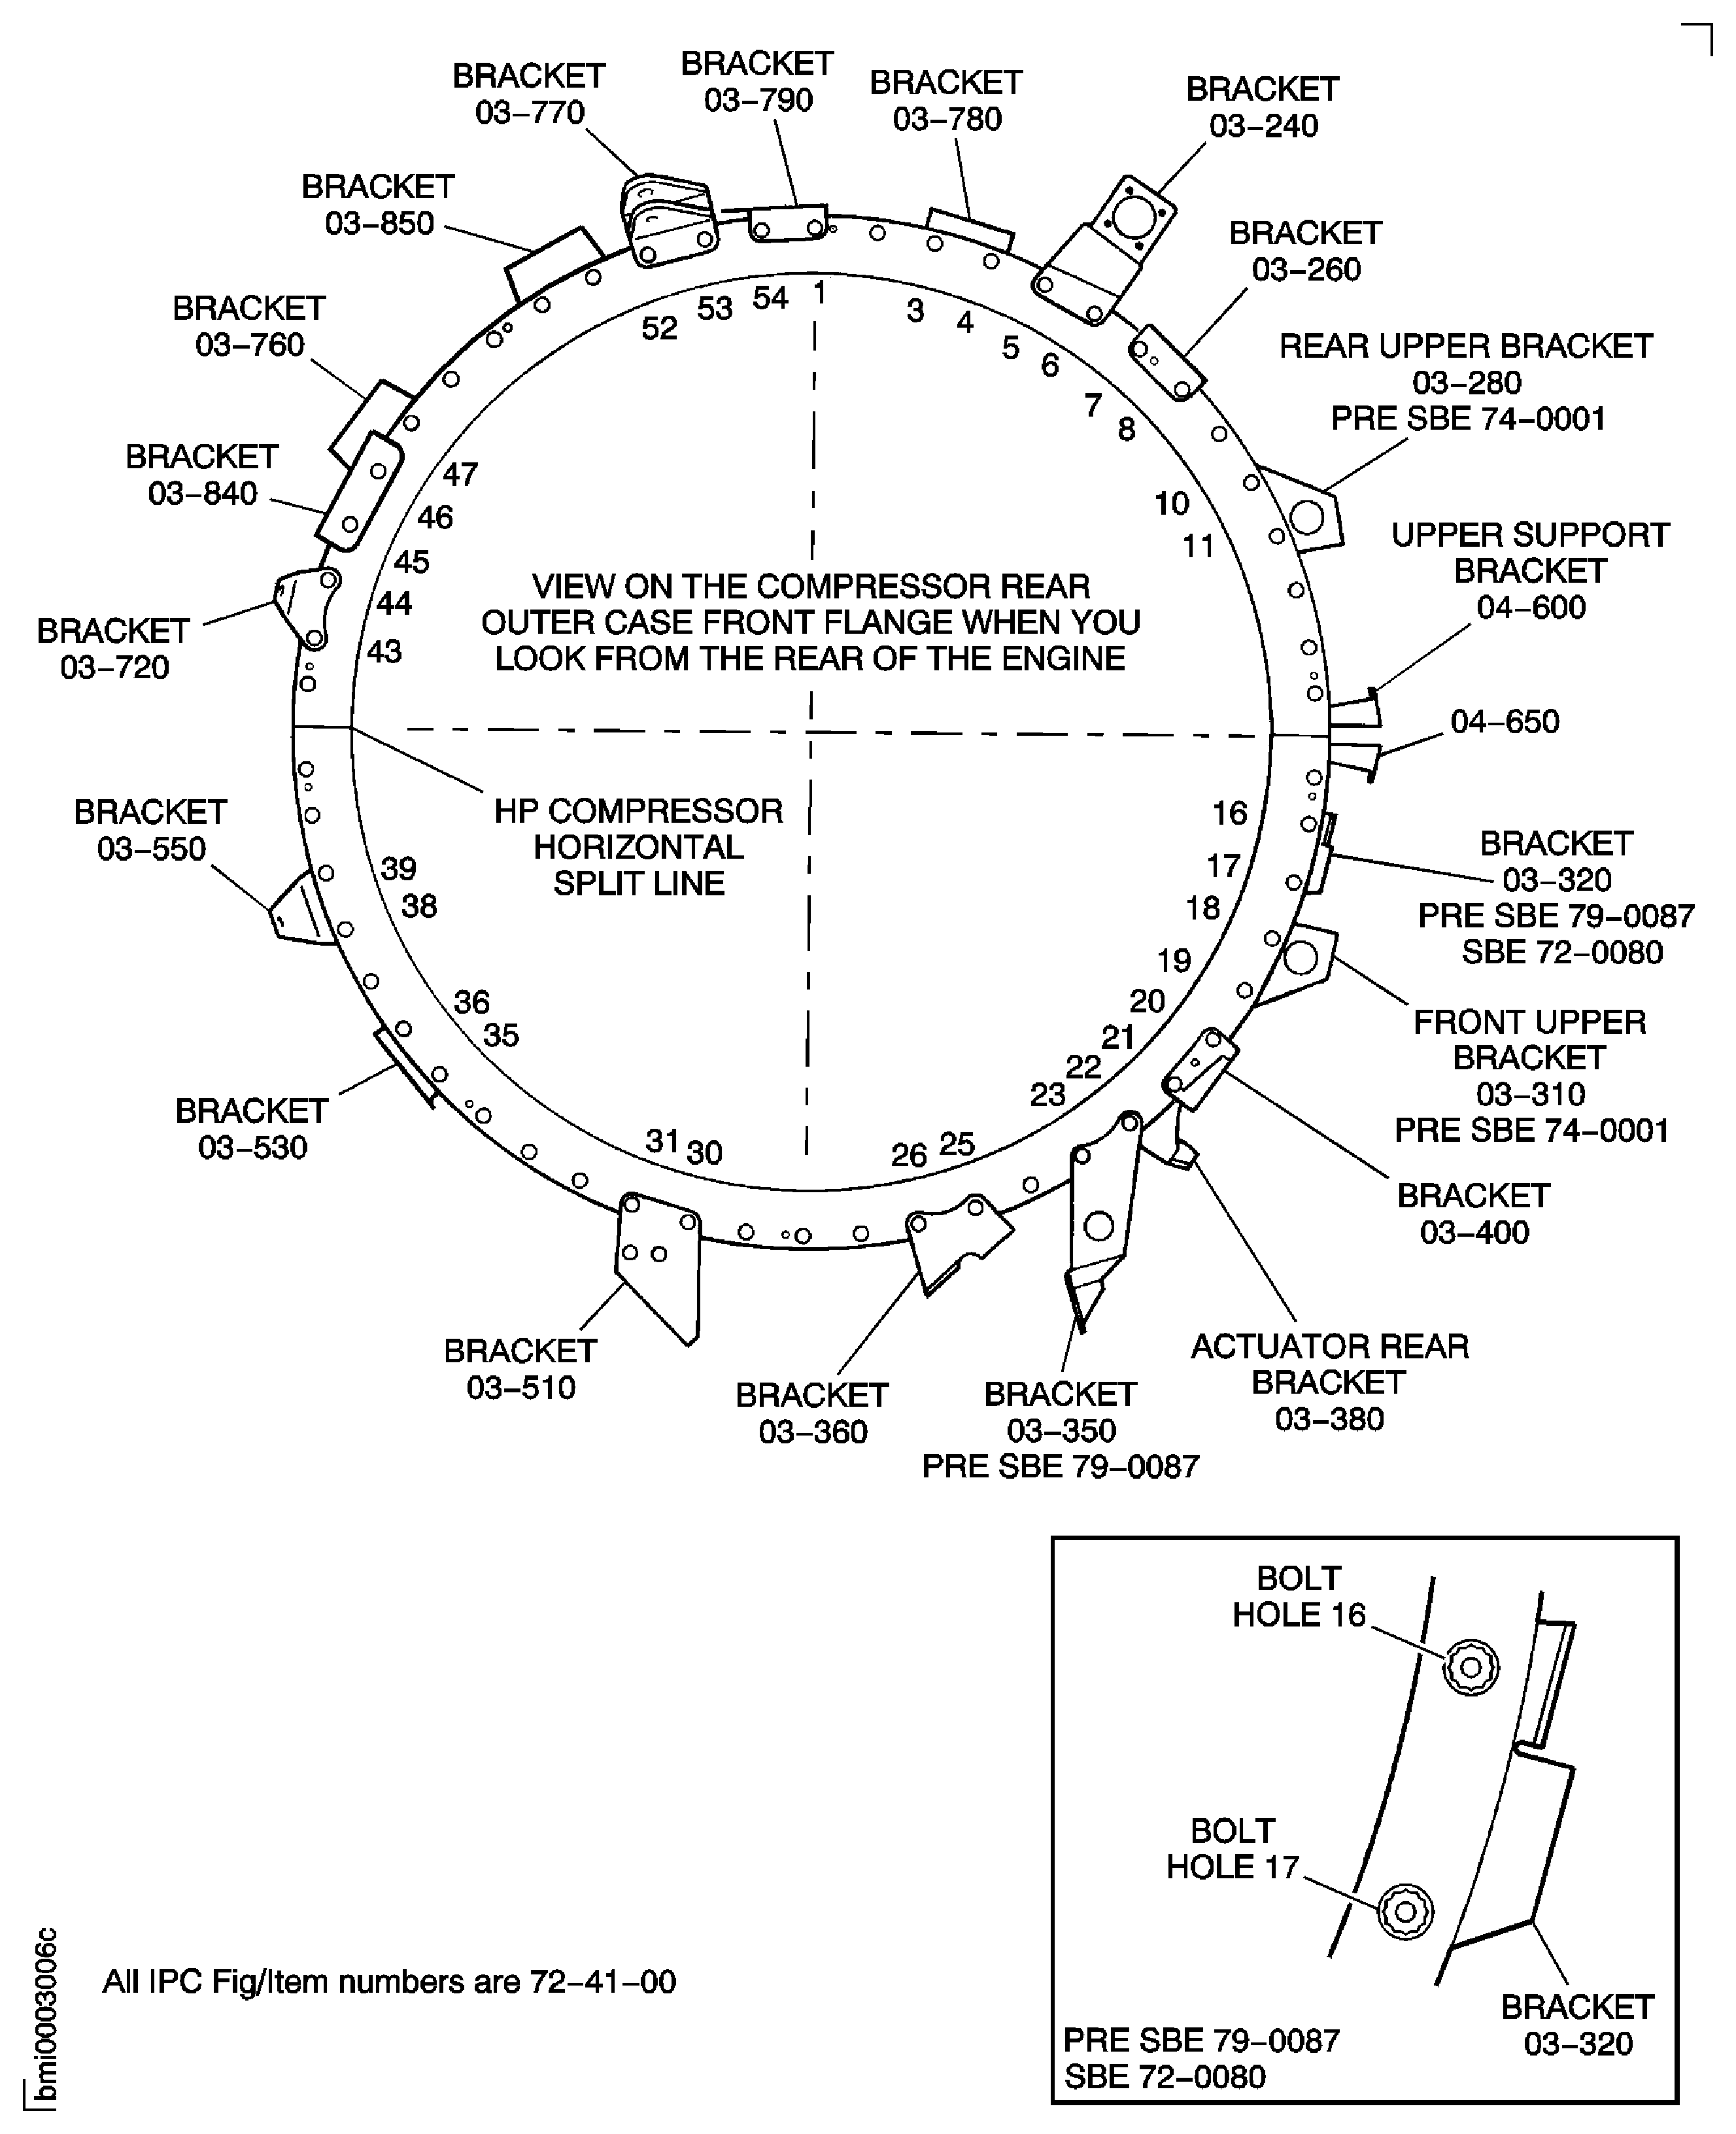
Figure: Pre SBE 79-0087: Remove the Brackets, the Pins, the Bolts and the Nuts at the HP Compressor Front Case to the Compressor Rear Outer Case Flange
Pre SBE 79-0087: Remove the Brackets, the Pins, the Bolts and the Nuts at the HP Compressor Front Case to the Compressor Rear Outer Case Flange
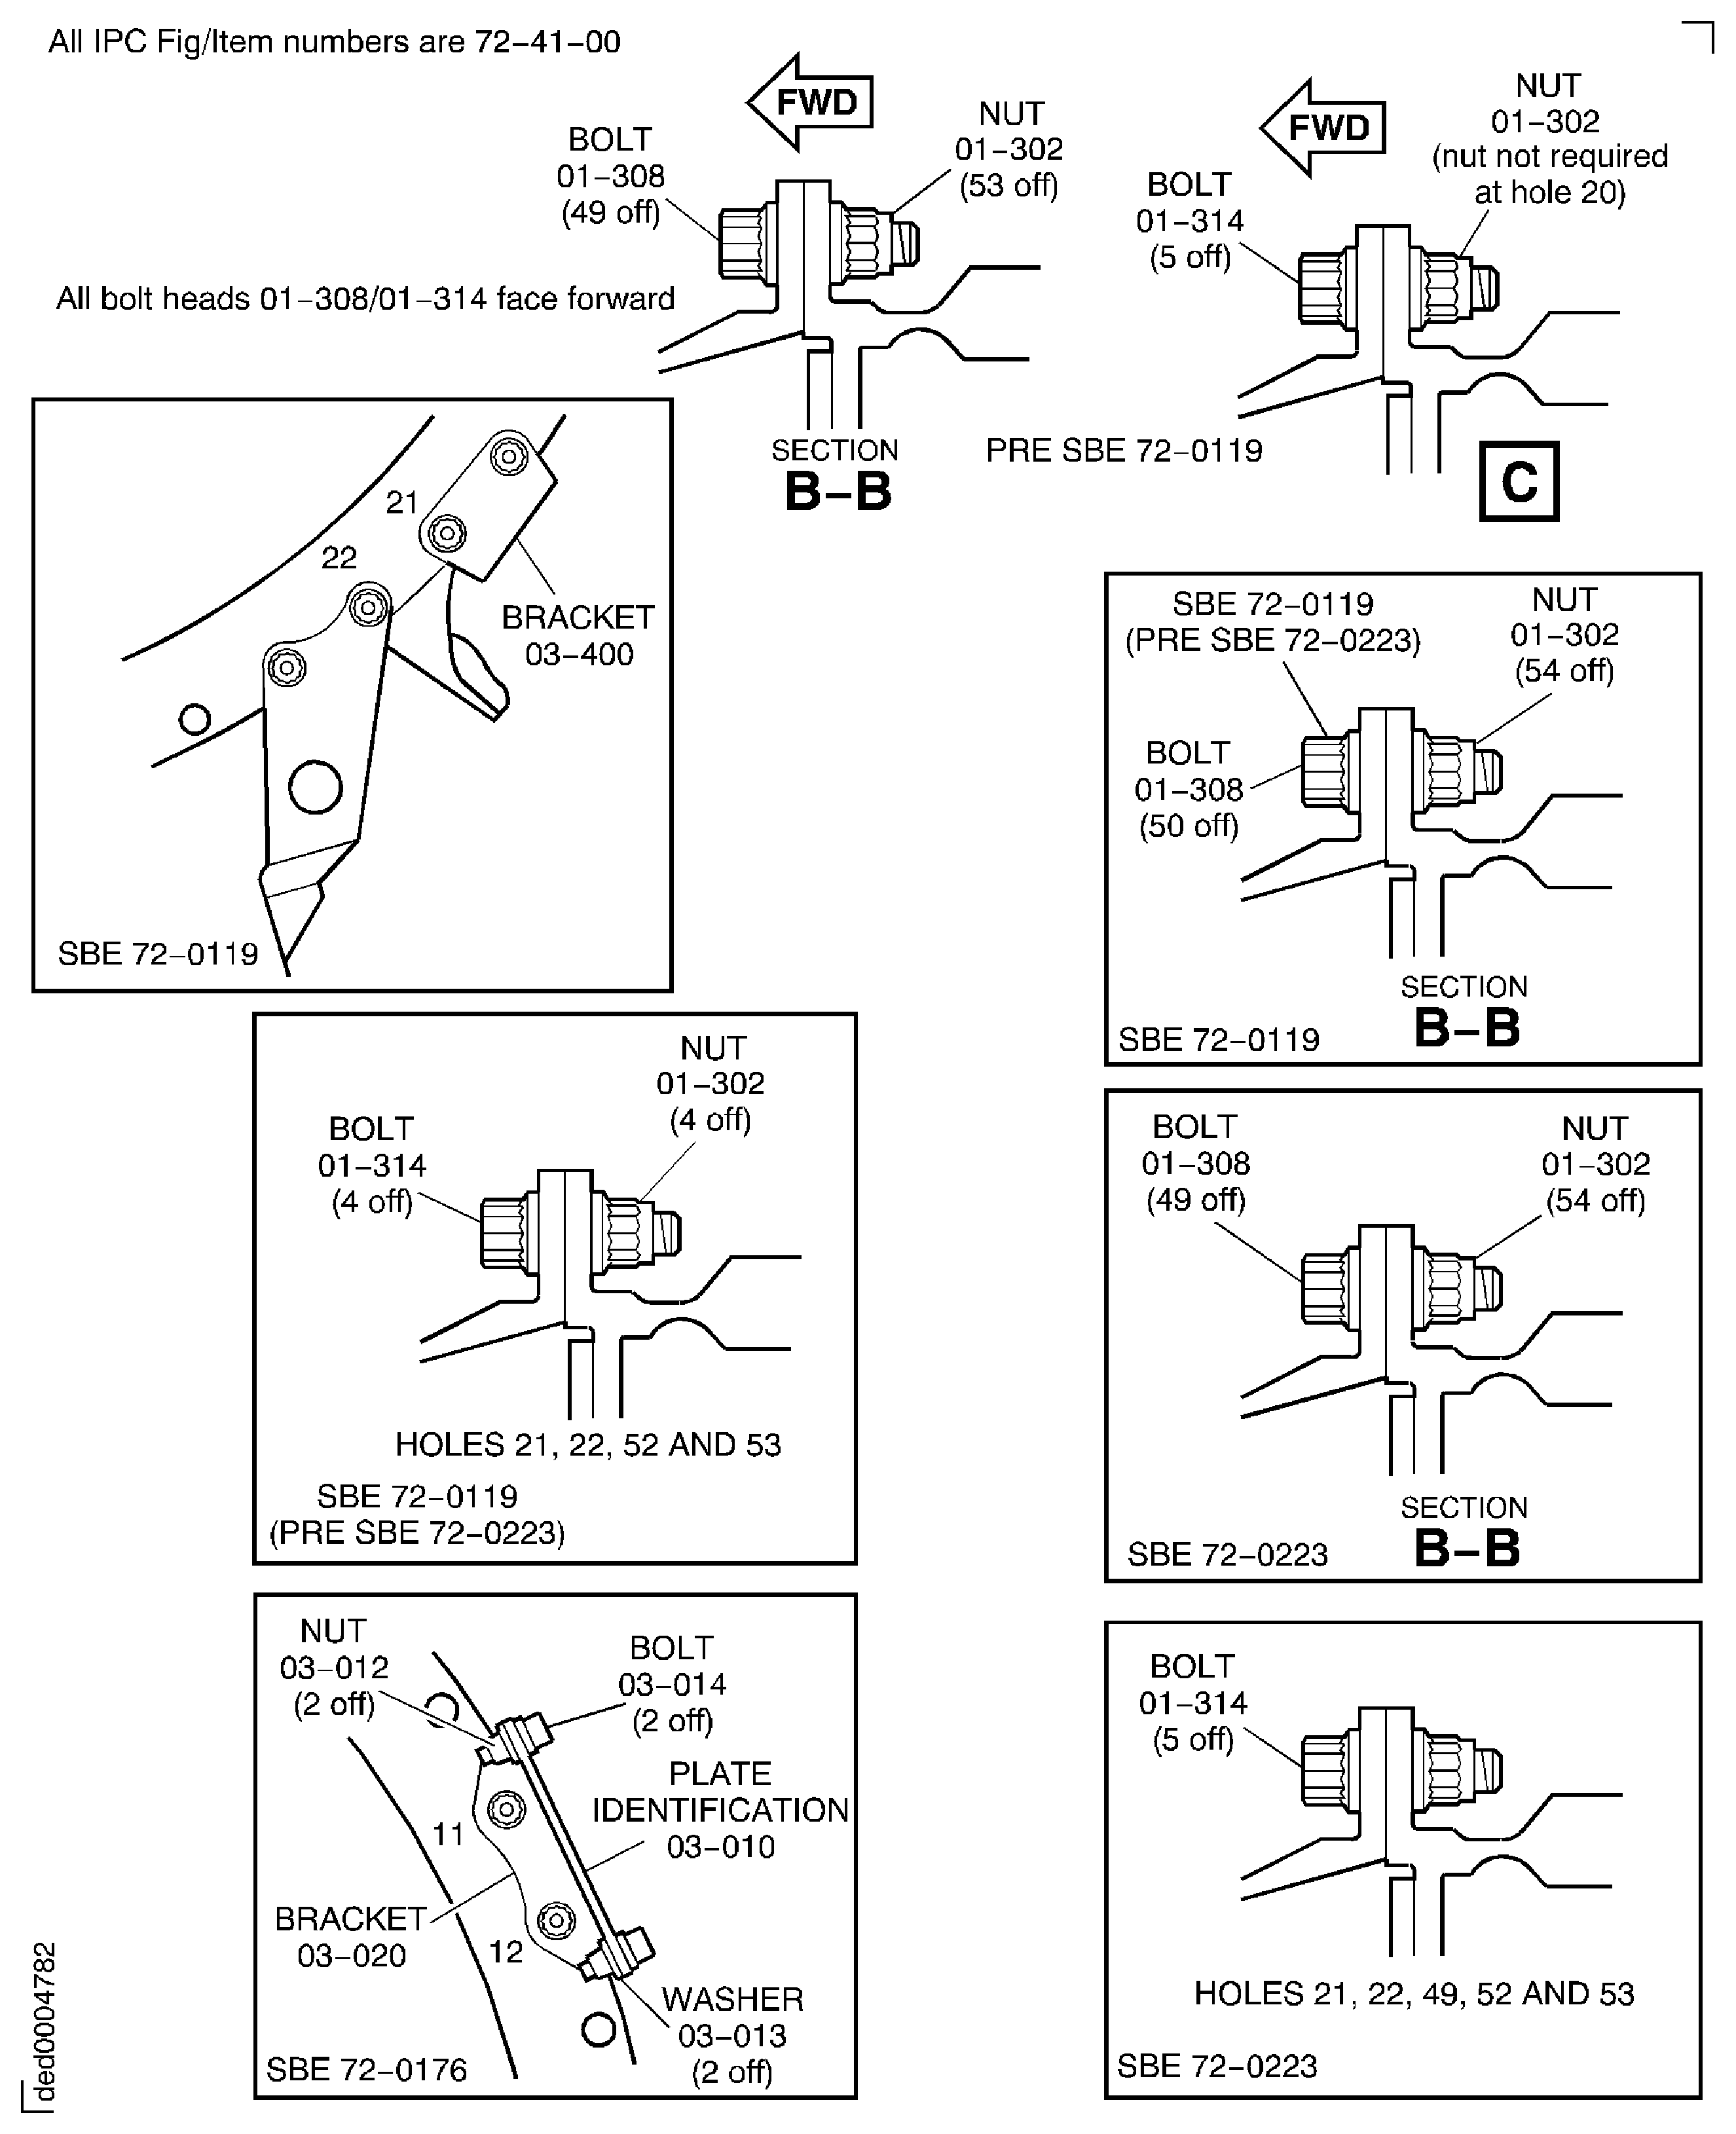
Figure: Remove the Brackets, the Pins, the Bolts and the Nuts at the HP Compressor Front Case to the Compressor Rear Outer Case Flange
Remove the Brackets, the Pins, the Bolts and the Nuts at the HP Compressor Front Case to the Compressor Rear Outer Case Flange
