Export Control
EAR Export Classification: Not subject to the EAR per 15 C.F.R. Chapter 1, Part 734.3(b)(3), except for the following Service Bulletins which are currently published as EAR Export Classification 9E991: SBE70-0992, SBE72-0483, SBE72-0580, SBE72-0588, SBE72-0640, SBE73-0209, SBE80-0024 and SBE80-0025.Copyright
© IAE International Aero Engines AG (2001, 2014 - 2021) The information contained in this document is the property of © IAE International Aero Engines AG and may not be copied or used for any purpose other than that for which it is supplied without the express written authority of © IAE International Aero Engines AG. (This does not preclude use by engine and aircraft operators for normal instructional, maintenance or overhaul purposes.).Applicability
All
Common Information
TASK 72-41-31-200-002-B00 HPC Front Cases - Examine, Inspection-002
General
This TASK gives the procedure for the inspection of the HP Compressor Front Cases.
Fig./item numbers in parentheses in the procedure agree with those used in the IPC. Only the primary Fig./item numbers are used. For the Service Bulletin alpha variants refer to the IPC.
The policy that is necessary for inspection is given in the SPM TASK 70-20-01-200-501.
All the parts must be cleaned before any part is examined (CLEANING-000).
All the parts must be visually examined for damage, corrosion and wear. Any defects that are not identified in the procedure must be referred to IAE.
The procedure for the parts which must have a crack test is given in Step. Do the crack test before a part is visually examined.
Do not discard any part until you are sure there are no repairs available. Refer to the instructions in repair before a discarded part is used again or oversize parts are installed.
Parts which should be discarded can be held although no repair is available. The repair of a discarded part can be shown to be necessary at a subsequent date.
All the parts must be examined to make sure that all the repairs have been completed satisfactorily.
The practices and processes referred to in the procedure by the TASK/SUBTASK number are in the SPM.
References
Refer to SPM for data on these items:
Definition of Damage, SPM TASK 70-02-02-350-501,
Inspection of Parts, SPM TASK 70-20-01-200-501.
Some data on these items is contained in this TASK. For more data on these items refer to the SPM:
Methods of Testing for Crack Indications,
Chemical Processes,
Surface Protection.
Preliminary Requirements
Pre-Conditions
NONESupport Equipment
NONEConsumables, Materials and Expendables
NONESpares
NONESafety Requirements
NONEProcedure
Clean the parts. Refer to TASK 72-41-31-100-000 (CLEANING-000).
SUBTASK 72-41-31-230-079 Examine the HP Compressor Front Cases for Cracks
Refer to Figure.
More than Step.
Stages 4, 5 wear on bore.
More than Step.
Stages 4, 5 scored on the bore.
Repair, VRS6618 TASK 72-41-31-300-024 (REPAIR-024)
More than Step.
Stage 6 wear on bore.
Repair, VRS6618 TASK 72-41-31-300-024 (REPAIR-024)
More than Step.
Stage 6 scored on the bore.
SUBTASK 72-41-31-220-147 Examine the HP Compressor Front Cases Stage 4, 5 and 6 VSV Bush Location at Location 3
Refer to Figure.
Repair, VRS6105 TASK 72-41-31-300-001 (REPAIR-001)
Burred edges/Scored
More than Step.
Worn.
SUBTASK 72-41-31-220-149 Examine the HP Compressor Front Cases Split Line Bolt Holes at Location 6
Refer to Figure.
Repair, VRS6105 TASK 72-41-31-300-001 (REPAIR-001)
More than Step.
Scored/Scratched/Galled.
SUBTASK 72-41-31-220-150 Examine the HP Compressor Front Cases Front and Rear Flanges at Location 7
Refer to Figure.
Repair, VRS6105 TASK 72-41-31-300-001 (REPAIR-001)
Burred edges/Scored
More than Step.
Worn.
SUBTASK 72-41-31-220-151 Examine the HP Compressor Front Cases Location Bolt Holes at Location 8
Refer to Figure.
Repair, VRS6105 TASK 72-41-31-300-001 (REPAIR-001)
More than Step.
Scored/Scratched.
SUBTASK 72-41-31-220-152 Examine the HP Compressor Front Cases Blank Access, Stage 3 and 5 Borescope Access at Locations 9, 10 and 15
Refer to Figure.
Repair, VRS6634 TASK 72-41-31-300-028 (REPAIR-028)
In the limits given in repair, VRS6634 TASK 72-41-31-300-028 (REPAIR-028)
Scored/Scratched/Fretted.
NOTE
Nominal Rotor Path Ring Slot is 0.1201 in. +/- 0.0010 in. (3.050 mm +/- 0.025 mm)
SUBTASK 72-41-31-220-153 Examine the HP Compressor Front Cases Rotor Path Ring Slots at Location 12
Refer to Figure.
Repair, VRS6517 TASK 72-41-31-300-030 (REPAIR-030)
Not more than 0.040 in. (1.02 mm) in depth over a localised arc of not more than 0.650 in. (16.51 mm) at no more than 3 locations in each half casing
Repair, VRS6661 TASK 72-41-31-300-029 (REPAIR-029)
Not more than 0.080 in. (2.03 mm) in depth over a localised arc of not more than 0.650 in. (16.51 mm) at no more than 3 locations in each half casing
Repair, VRS6634 TASK 72-41-31-300-028 (REPAIR-028)
Within the repair limits given in VRS6634
Scored/Scratched/Fretted.
SUBTASK 72-41-31-220-238 Examine the HP Compressor Front Cases Rotor Path Ring Slot Faces 21
Refer to Figure.
Repair, VRS6511 TASK 72-41-31-300-022 (REPAIR-022)
Not more than 0.078 in. (1.98 mm) in depth
More than Step.
Stages 3, 4, 5, 6 VSV location recess and adjacent wall area - Scored/Nicked.
SUBTASK 72-41-31-220-154 Examine the HP Compressor Front Cases VSV Location Recesses at Stages 3, 4, 5 and 6 at Location 13
Repair, VRS6345 TASK 72-41-31-300-011 (REPAIR-011)
Broken
Repair, VRS6345 TASK 72-41-31-300-011 (REPAIR-011)
Loose
Repair, VRS6345 TASK 72-41-31-300-011 (REPAIR-011)
Worn
Repair, VRS6345 TASK 72-41-31-300-011 (REPAIR-011)
Crossed thread
Repair, VRS6345 TASK 72-41-31-300-011 (REPAIR-011)
Stripped thread
Examine the screw thread inserts at the support tool blank, stage 6 off- takes and the stage 3 and 5 borescope blank mounts.
Repair, VRS6345 TASK 72-41-31-300-011 (REPAIR-011)
Broken
Repair, VRS6345 TASK 72-41-31-300-011 (REPAIR-011)
Loose
Repair, VRS6345 TASK 72-41-31-300-011 (REPAIR-011)
Worn
Repair, VRS6345 TASK 72-41-31-300-011 (REPAIR-011)
Crossed threads
Repair, VRS6345 TASK 72-41-31-300-011 (REPAIR-011)
Stripped thread
Examine the remaining screw thread inserts.
SUBTASK 72-41-31-220-155 Examine the HP Compressor Front Cases Screw Thread Inserts
Refer to Figure.
Repair VRS6105, TASK 72-41-31-300-001 (REPAIR-001)
Nicked/Dented/Scored
SUBTASK 72-41-31-220-156 Examine the HP Compressor Front Cases VSV Towers at Location 14
Refer to Figure.
Repair, VRS6105 TASK 72-41-31-300-001 (REPAIR-001) and Repair, VRS6501 TASK 72-41-31-300-021 (REPAIR-021)
More than Step.
Scored/Scratched
SUBTASK 72-41-31-220-157 Examine the HP Compressor Front Cases Surface Finish at Location 4
Repair, VRS6321 TASK 72-41-31-300-012 (REPAIR-012)
Loose
Repair, VRS6321 TASK 72-41-31-300-012 (REPAIR-012)
Burred edges
Repair, VRS6321 TASK 72-41-31-300-012 (REPAIR-012).
Less than Step.
Wear.
Active clearance control actuator location dowels.
Repair, VRS6321 TASK 72-41-31-300-012 (REPAIR-012)
Loose
Repair, VRS6321 TASK 72-41-31-300-012 (REPAIR-012)
Burred edges
Repair, VRS6321 TASK 72-41-31-300-012 (REPAIR-012).
Less than Step.
Wear on the larger dowels.
Repair, VRS6321 TASK 72-41-31-300-012 (REPAIR-012).
Less than Step.
Wear on the small dowels.
Crankshaft location dowels.
SUBTASK 72-41-31-220-158 Examine the HP Compressor Front Cases Dowels
Refer to Figure.
Repair, VRS6105 TASK 72-41-31-300-001 (REPAIR-001).
Burred edges.
Repair, VRS6105 TASK 72-41-31-300-001 (REPAIR-001) (Remove high spots and burrs only).
Not more than 0.225 in. (5.72 mm) in length, not more than 0.055 in. (1.40 mm) in width and not more than 0.032 in. (0.81 mm) in depth.
Reject.
More than Step.
Nicked/Dented/Gouged/Scored.
More than Step.
Wear at location 16.
More than Step.
Wear at location 17.
More than Step.
Wear at location 18.
SUBTASK 72-41-31-220-159 Examine the HP Compressor Front Cases Dowel Holes at Locations 16, 17 and 18
Refer to Figure.
Repair, VRS6105 TASK 72-41-31-300-001 (REPAIR-001)
More than Step.
Scored/Scratched/Worn/Nicked on inner surface at location 11.
Repair, VRS6105 TASK 72-41-31-300-001 (REPAIR-001)
Not more than 0.005 in. (0.127 mm) in depth
Repair, VRS6511 TASK 72-41-31-300-022 (REPAIR-022)
Not more than 0.025 in. (0.635 mm)
Repair, VRS6629 TASK 72-41-31-300-027 (REPAIR-027)
More than 0.025 in. (0.635 mm) and not more than 0.125 in. (3.17 mm) at the stage 6 VSV location
More than Step.
Scored/Scratched/Nicked/Worn on gas washed surfaces at location 22.
SUBTASK 72-41-31-220-160 Examine the HP Compressor Front Cases Gas Washed Surface at Location 22 and Internal Surfaces at Location 11
Refer to Figure.
Repair, VRS6500 TASK 72-41-31-300-020 (REPAIR-020)
More than Step.
Rotor path ring lining radius. Use the data written as a note in TASK 72-41-00-040-001 (DISASSEMBLY).
Repair, VRS6500 TASK 72-41-31-300-020 (REPAIR-020)
Gouged
Repair, VRS6500 TASK 72-41-31-300-020 (REPAIR-020)
More than Step.
Chipped.
Repair, VRS6500 TASK 72-41-31-300-020 (REPAIR-020)
More than Step.
Scored.
SUBTASK 72-41-31-220-161 Examine the Stage 3 Rotor Path Lining at Location 19
Refer to Figure.
Repair, VRS6500 TASK 72-41-31-300-020 (REPAIR-020)
More than Step.
Rotor path ring lining radius. Use the data written as a note in TASK 72-41-00-040-001 (DISASSEMBLY).
Repair, VRS6500 TASK 72-41-31-300-020 (REPAIR-020)
Gouged
Repair, VRS6500 TASK 72-41-31-300-020 (REPAIR-020)
More than Step.
Chipped.
Repair, VRS6500 TASK 72-41-31-300-020 (REPAIR-020)
More than Step.
Scored.
SUBTASK 72-41-31-220-162 Examine the Stage 4 Rotor Path Lining at Location 20
Refer to Figure.
Repair, VRS6501 TASK 72-41-31-300-021 (REPAIR-021)
Apply dry film lubricant
SUBTASK 72-41-31-380-053 Reprotect the HP Compressor Front Case at Location 4
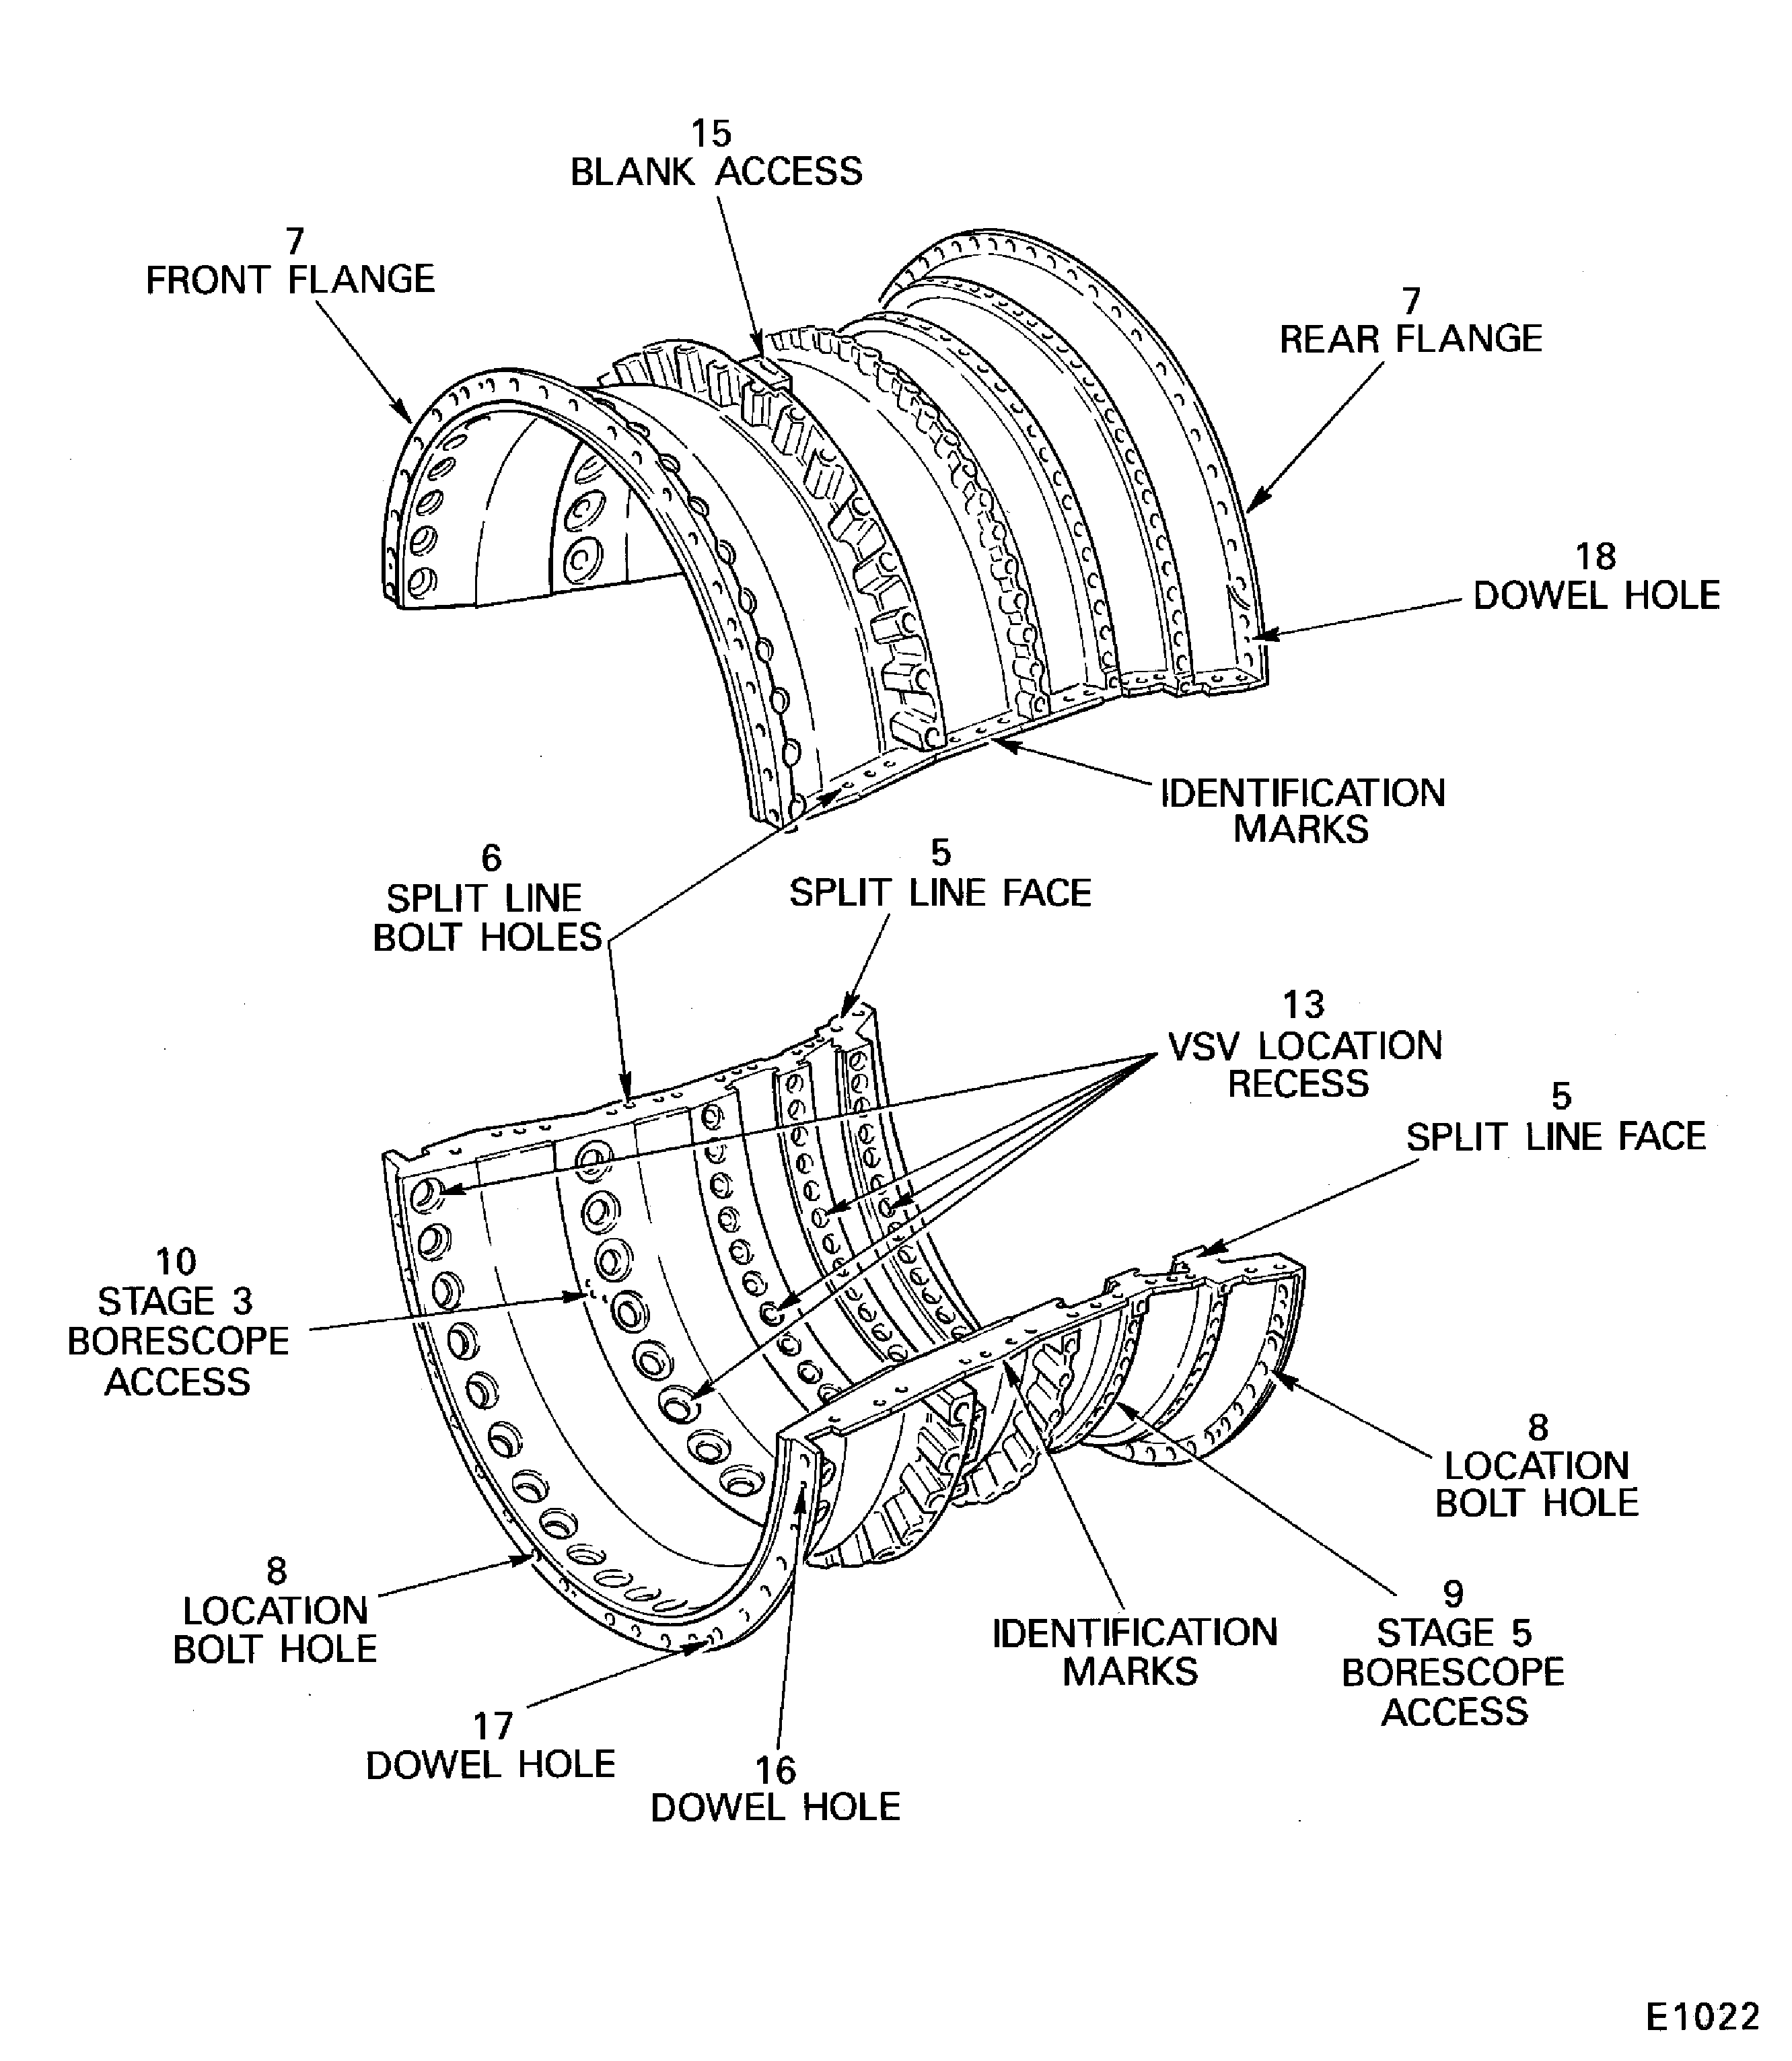
Figure: HP Compressor Front Cases - Inspection Locations
Sheet 1

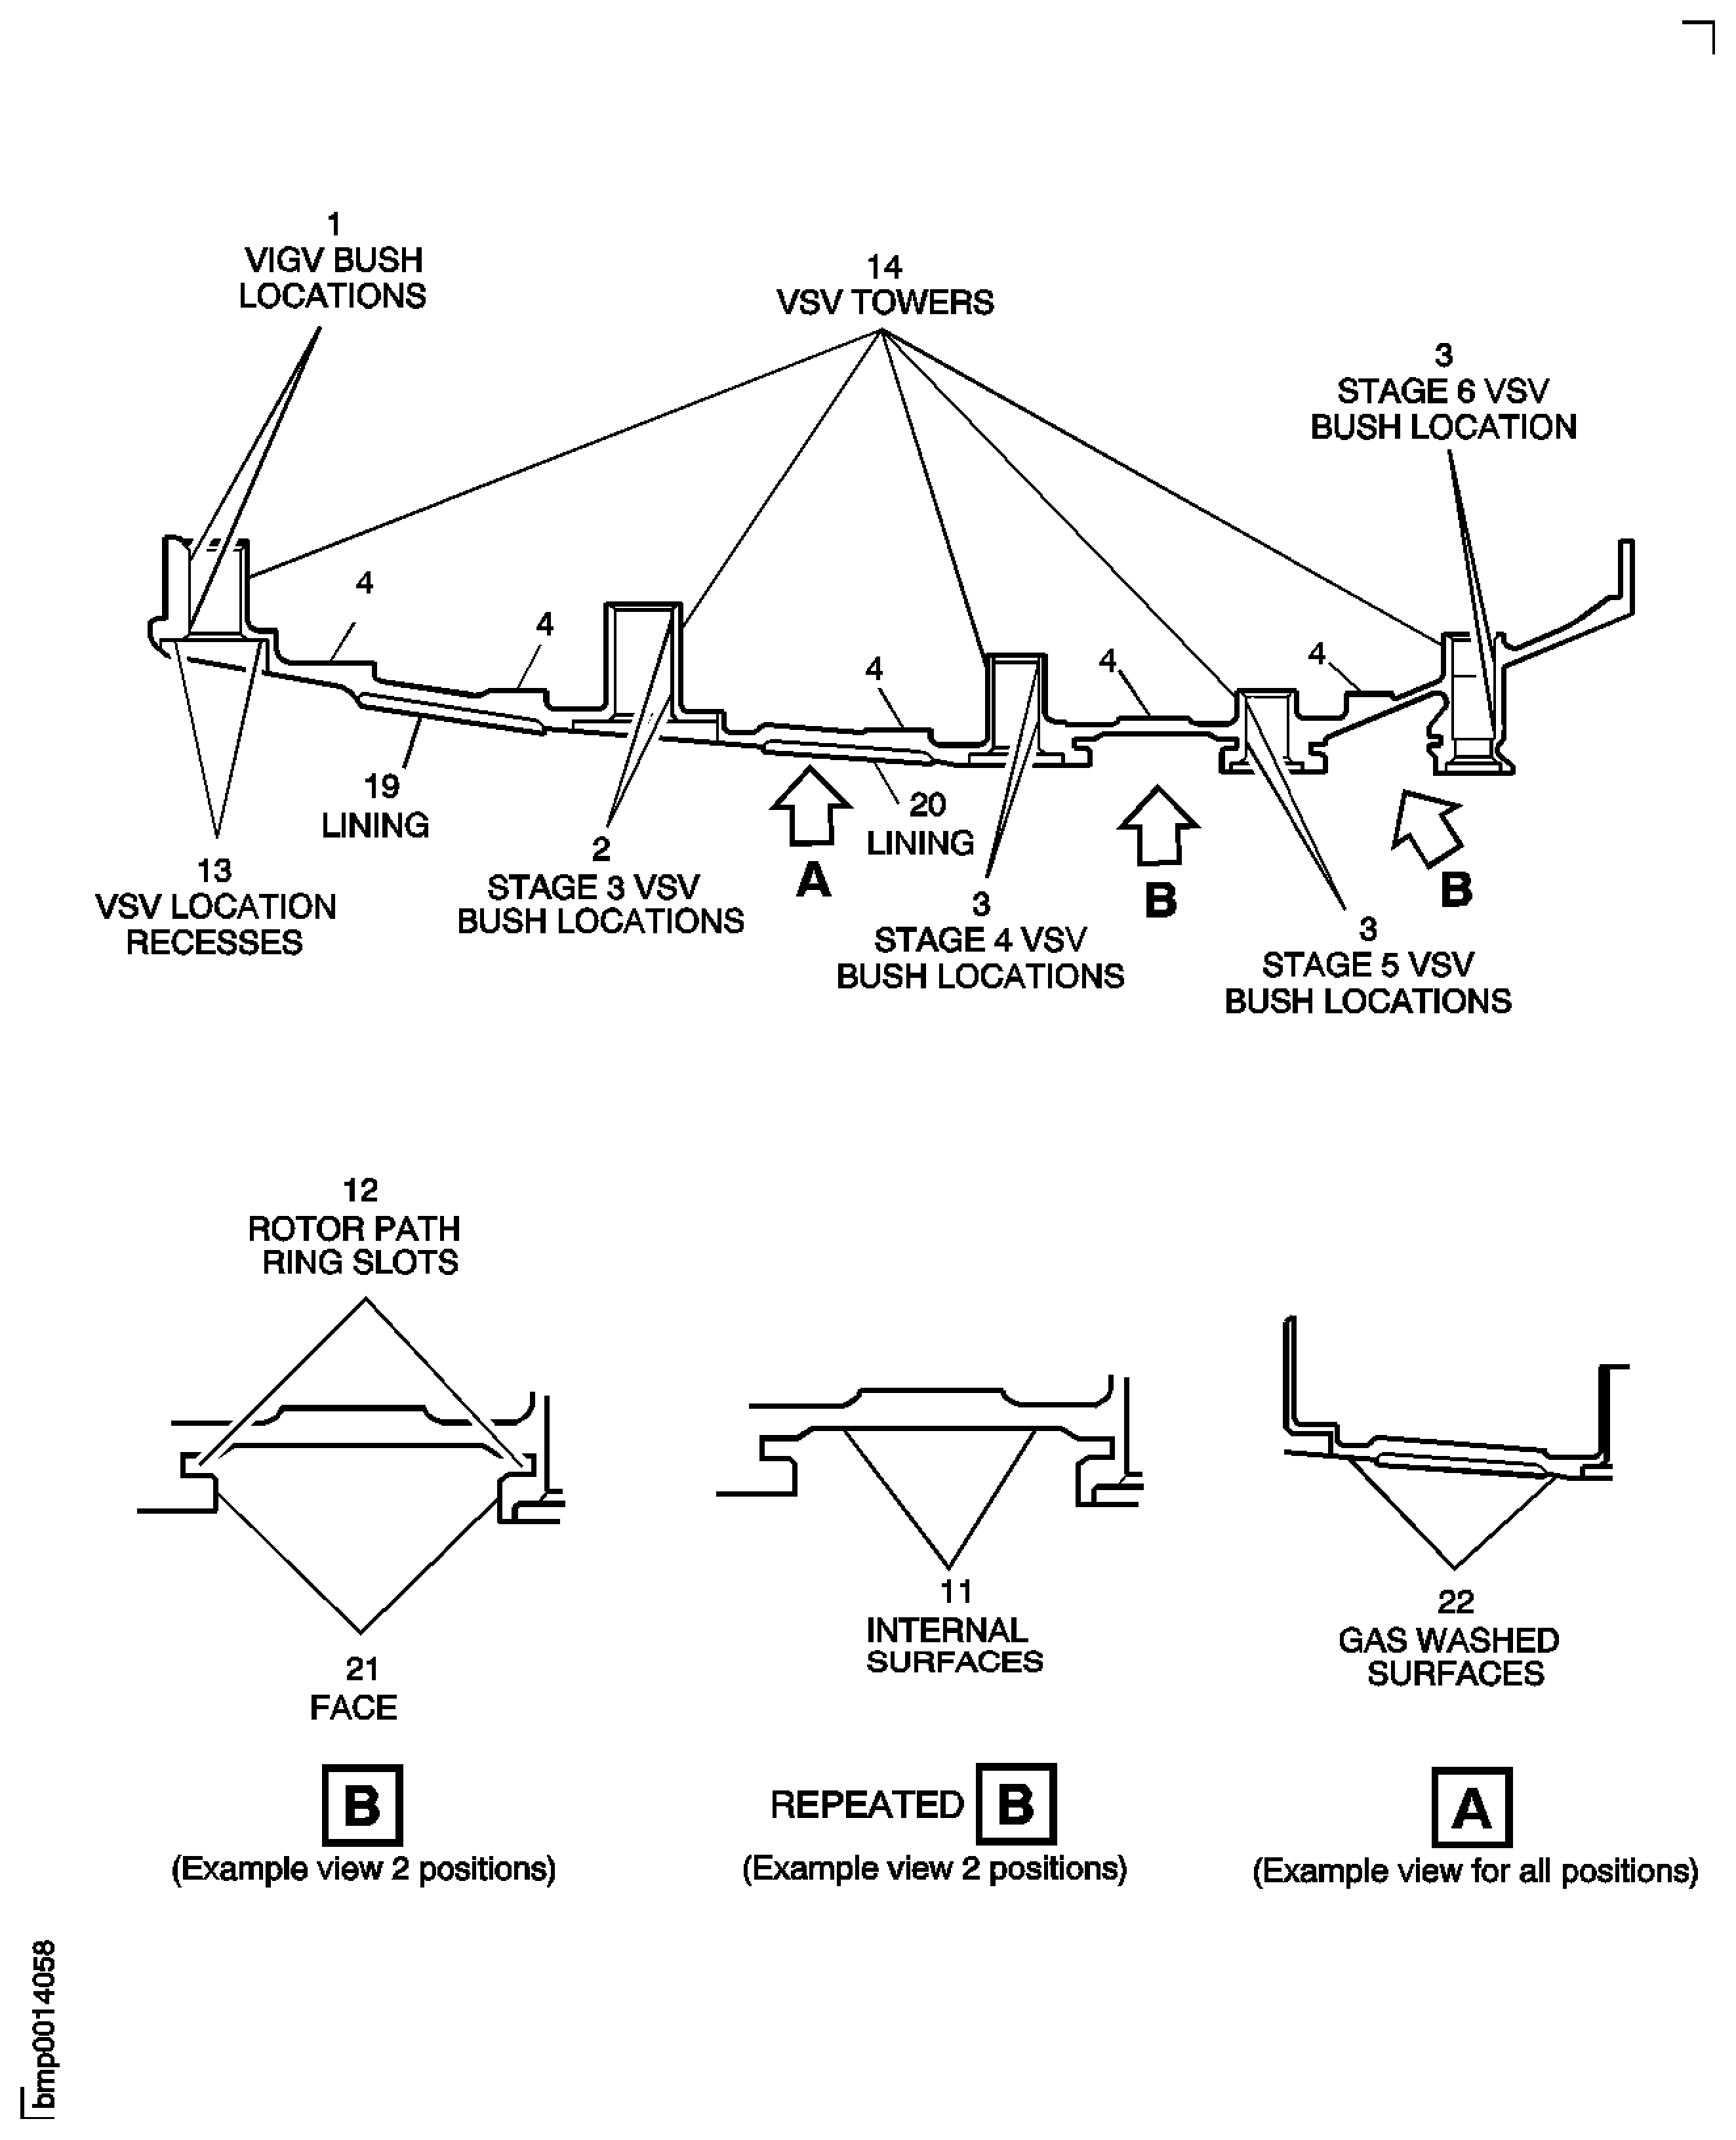
Figure: HP Compressor Front Cases - Inspection Locations
Sheet 2

