Export Control
EAR Export Classification: Not subject to the EAR per 15 C.F.R. Chapter 1, Part 734.3(b)(3), except for the following Service Bulletins which are currently published as EAR Export Classification 9E991: SBE70-0992, SBE72-0483, SBE72-0580, SBE72-0588, SBE72-0640, SBE73-0209, SBE80-0024 and SBE80-0025.Copyright
© IAE International Aero Engines AG (2001, 2014 - 2021) The information contained in this document is the property of © IAE International Aero Engines AG and may not be copied or used for any purpose other than that for which it is supplied without the express written authority of © IAE International Aero Engines AG. (This does not preclude use by engine and aircraft operators for normal instructional, maintenance or overhaul purposes.).Applicability
All
Common Information
TASK 72-60-41-200-001 Angle Gearbox Casing - Examine, Inspection-001
General
This TASK gives the procedure for the inspection of the angle gearbox casing. For the other parts of the angle gearbox casing assembly refer to TASK 72-60-41-200-000 (72-60-41, INSPECTION-00).
Fig/item numbers in parentheses in the procedure agree with those used in the IPC.
The policy that is necessary for inspection is given in SPM TASK 70-20-01-200-501.
All the parts must be cleaned before any part is examined. Refer to SPM TASK 70-11-03-300-503.
All parts must be visually examined for damage, corrosion and wear. Any defects that are not identified in the procedure must be referred to IAE.
The procedure for those parts which must have a crack test is given in SPM TASK 70-23-00-230-501. Do the test before the part is visually examined. Limits for cracks are given in the SUBTASK for each part.
A ** following repair referenced in this inspection indicates that the repair is not yet published in the current revision of the manual and the part must be rejected. Contact IAE for additional information concerning FAA approved repair date.
Do dimensional inspections only if the visual inspection or some other condition makes it necessary.
Do not discard any part until you are sure there are no repairs available. Refer to the instructions in repair before a discarded part is used again or oversize parts are installed.
Parts which should be discarded can be held although no repair is available. The repair of a discarded part could be shown to be necessary at a later date.
All parts must be examined to make sure that all the repairs have been completely satisfactorily.
The practices and processes referred to in the procedure by the TASK numbers are in SPM.
References
Refer to SPM for data on these items:
Definitions of Damage, SPM TASK 70-02-02-350-501,
Record and Control of the Lives of Parts, SPM TASK 70-05-00-220-501,
Inspection of Parts, SPM TASK 70-20-01-200-501.
Some data on these items are contained in this TASK. For more data on these items refer to SPM:
Method of Testing for Crack Indications,
Chemical Processes,
Surface Protection.
Preliminary Requirements
Pre-Conditions
NONESupport Equipment
| Name | Manufacturer | Part Number / Identification | Quantity | Remark |
|---|---|---|---|---|
| Workshop inspection equipment | LOCAL | Workshop inspection equipment | ||
| Fluorescent penetrant inspection equipment | LOCAL | Fluorescent Penetrant Inspection Equipment |
Consumables, Materials and Expendables
NONESpares
NONESafety Requirements
NONEProcedure
Clean the parts. Refer to TASK 72-60-41-100-000 (CLEANING-00).
SUBTASK 72-60-41-230-051 Do a Crack Test on the Angle Gearbox Casing (01-300) Fluorescent Penetrant
Refer to Figure.
Refer to Repair VRS5097, TASK 72-60-41-300-001 (REPAIR-001).
More than Step
Nicks, scores, dents or scratches
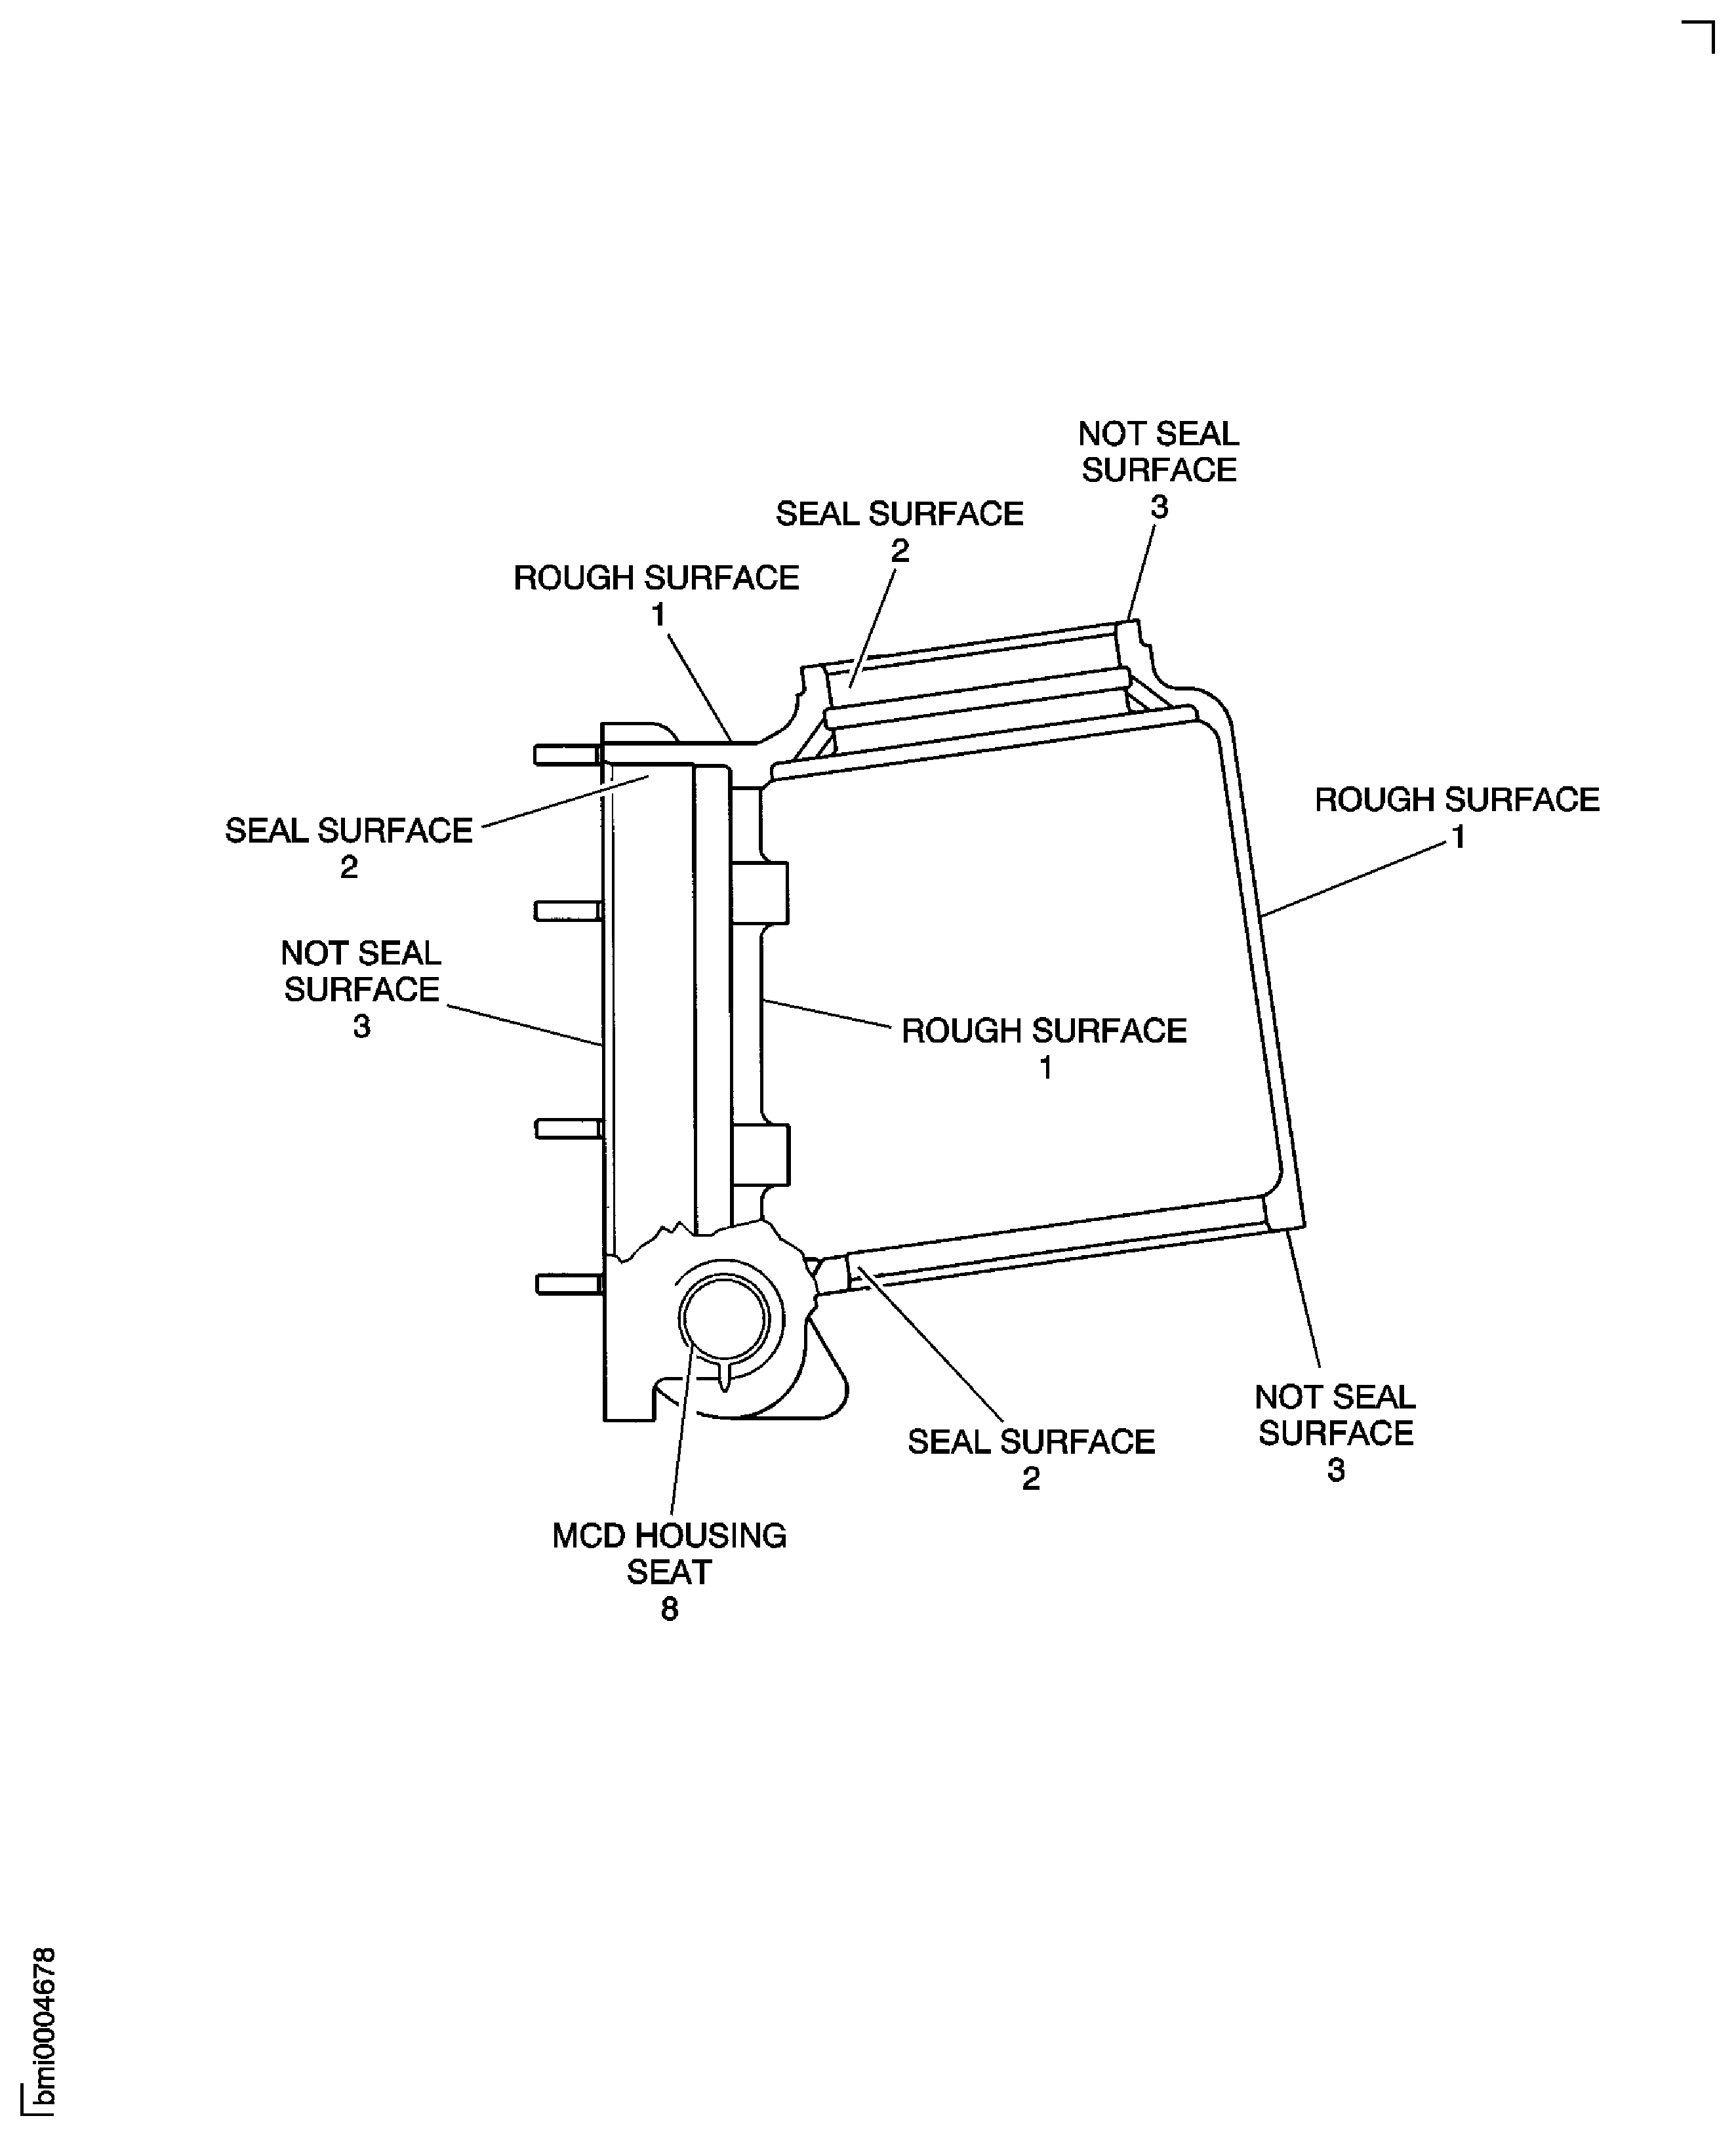
SUBTASK 72-60-41-220-052 Examine the Angle Gearbox Casing (01-300) Rough Surfaces at Location 1
Refer to Figure.
Refer to Repair VRS5097, TASK 72-60-41-300-001 (REPAIR-001).
More than Step
Nicks, scores, dents or scratches
SUBTASK 72-60-41-220-053 Examine the Angle Gearbox Casing (01-300) Machined Seal Surfaces at Location 2
Refer to Figure.
Refer to Repair VRS5097, TASK 72-60-41-300-001 (REPAIR-001).
More than Step
Nicks, scores, dents or scratches
SUBTASK 72-60-41-220-054 Examine the Angle Gearbox Casing (01-300) Machined not Seal Surfaces at Location 3
Refer to Repair, VRS5098 TASK 72-60-41-300-002 (REPAIR-002).
Light corrosion or pitting.
SUBTASK 72-60-41-220-055 Examine the Angle Gearbox Casing (01-300) Protective Finish
Refer to Repair, VRS5099 TASK 72-60-41-300-003 (REPAIR-003).
More than 0.0138 in. (0.35 mm) each 3.937 in. (100 mm). No axial movement is permitted (moved by hand).
Perpendicularity.
Refer to Repair, VRS5099 TASK 72-60-41-300-003 (REPAIR-003).
Thread damage or not there.
SUBTASK 72-60-41-220-056 Examine the Angle Gearbox Casing (01-300) Studs/Lockrings
Refer to Repair VRS5100, TASK 72-60-41-300-004 (REPAIR-004).
Loose, not there or with the internal thread damaged
SUBTASK 72-60-41-220-057 Examine the Angle Gearbox Casing (01-300) Threads Inserts/Lockrings
Refer to Figure.
Refer to Repair VRS5102, TASK 72-60-41-300-006 (REPAIR-006).
More than Step
Planarity
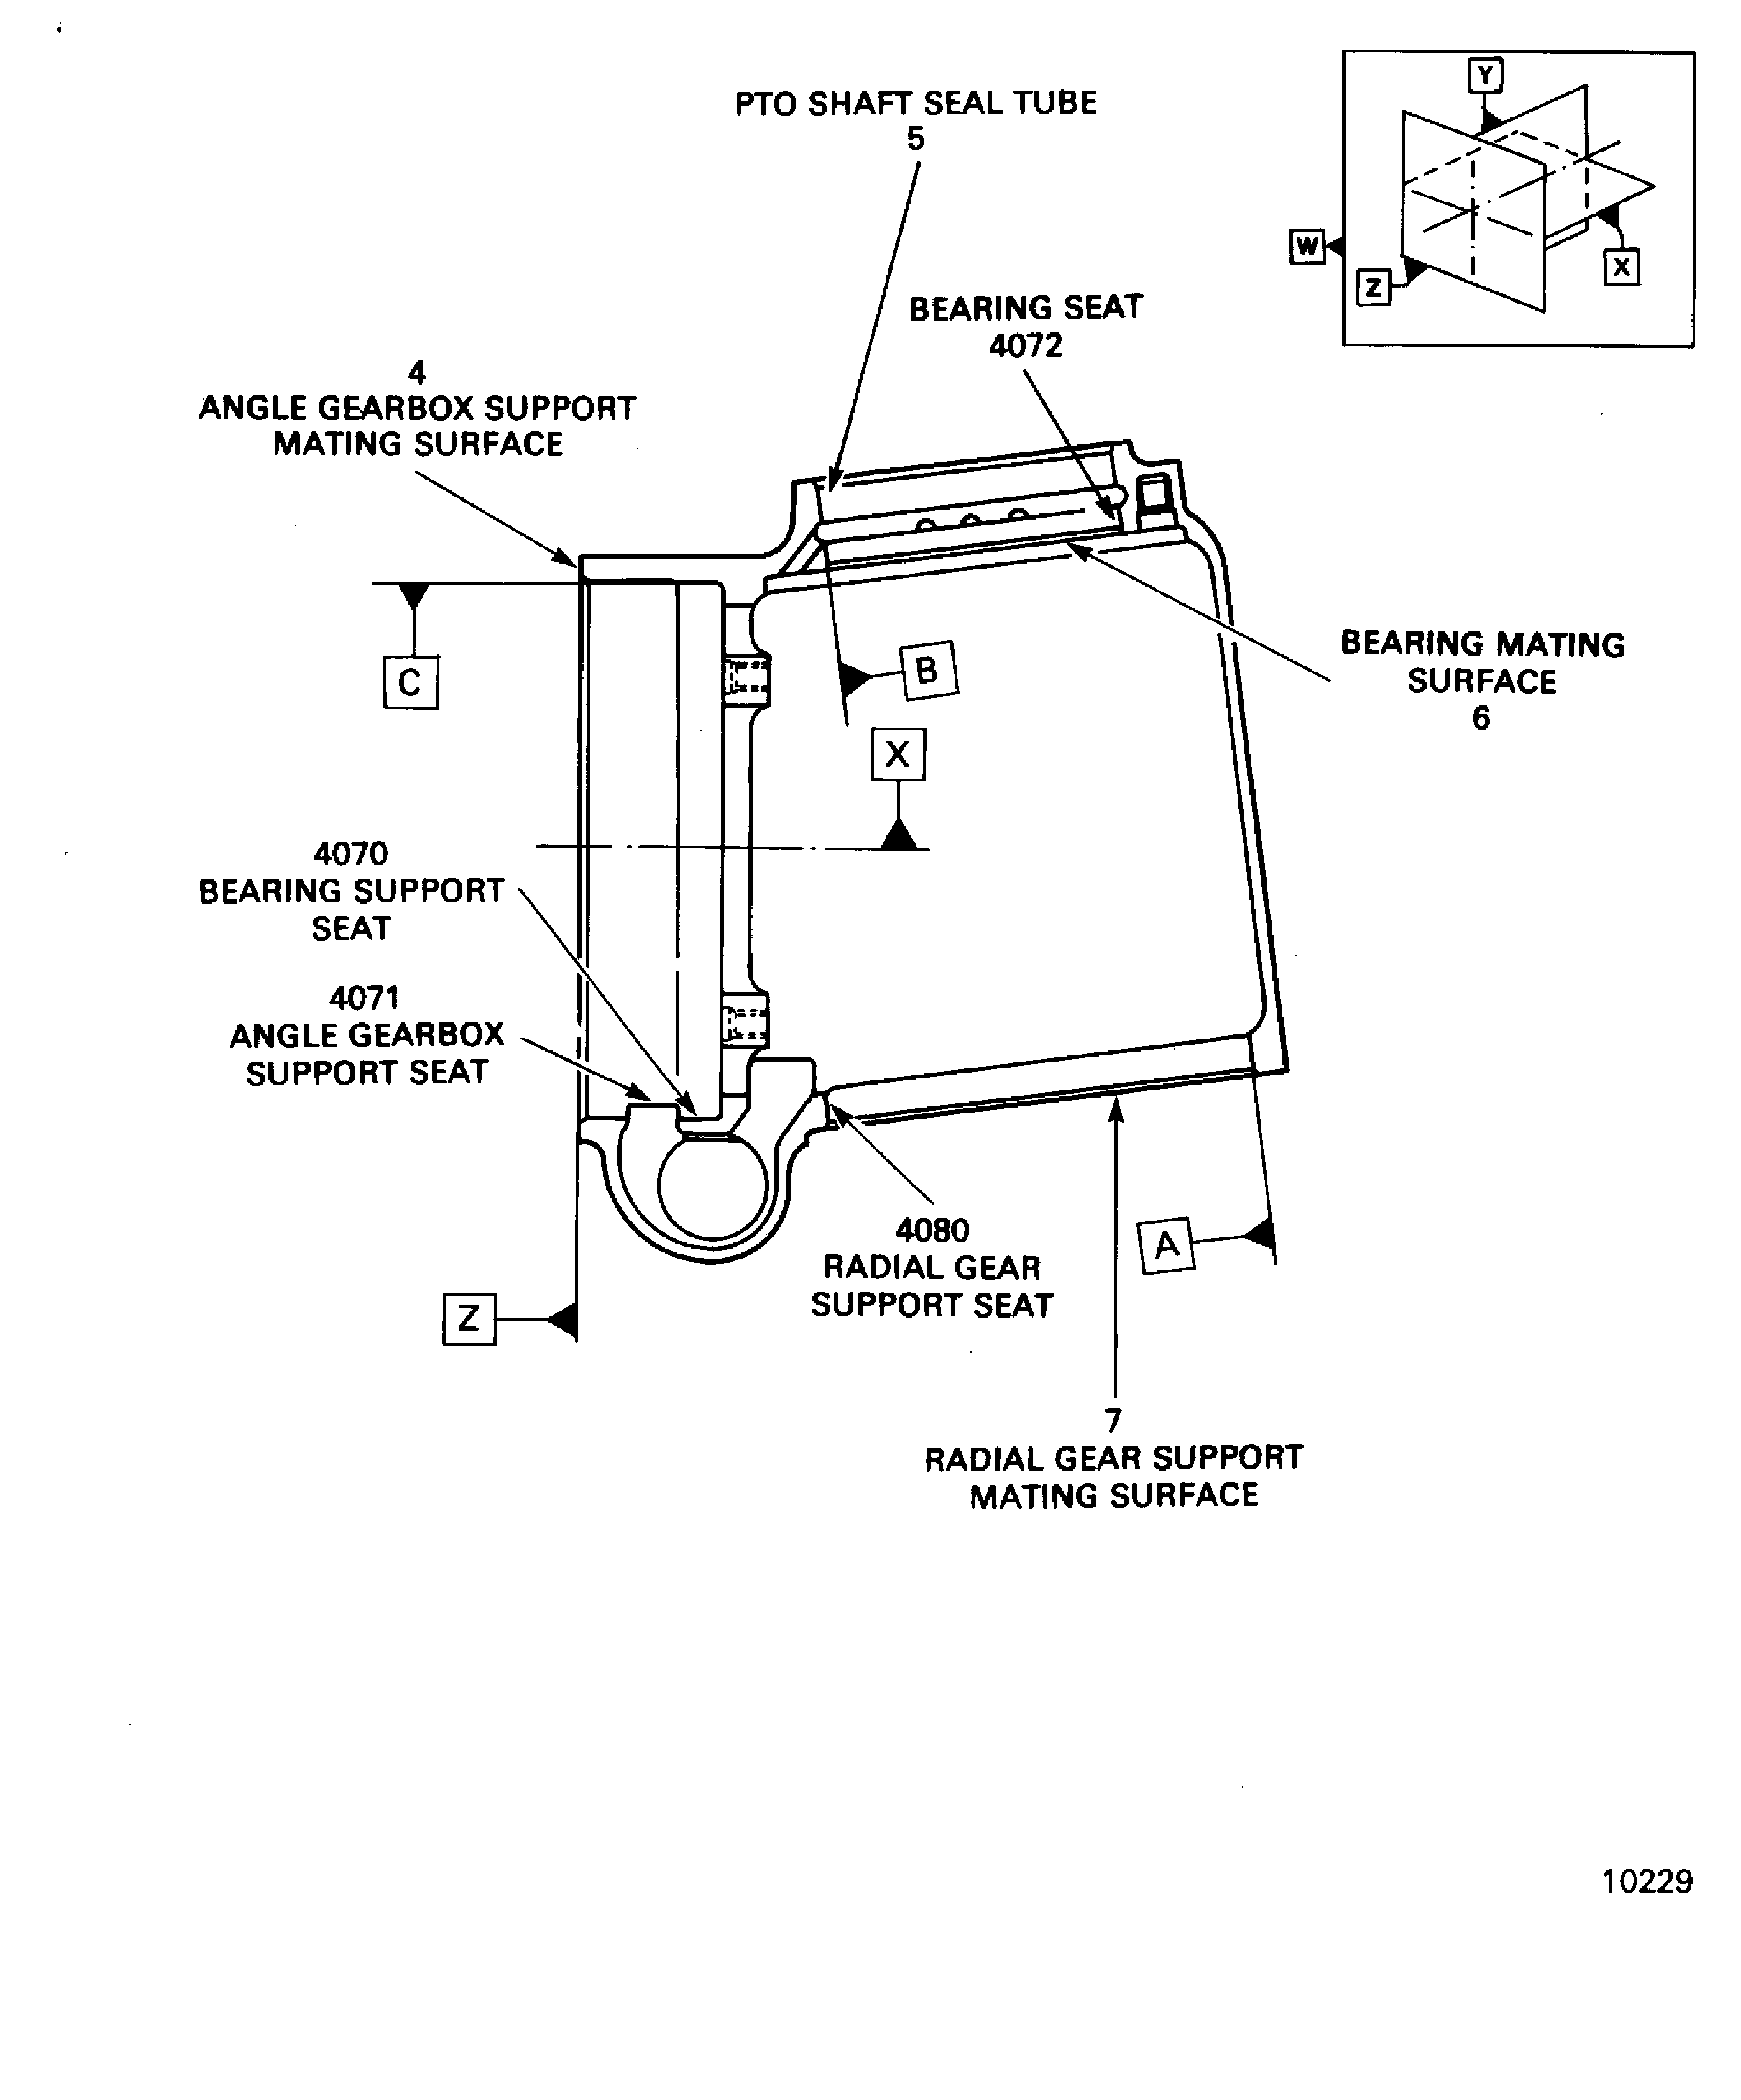
SUBTASK 72-60-41-220-059 Examine the Angle Gearbox Casing (72-60-41,01-300) Mating Surface at Location 4
Refer to Figure.
If Repair VRS5690 or VRS5703 have never been applied, refer to Repair VRS5103 TASK 72-60-41-300-007 (REPAIR-007).
If Repair VRS5690 or VRS5703 have been applied, refer to Repair VRS5690 TASK 72-60-41-300-015 (REPAIR-015) or VRS5703 TASK 72-60-41-300-016 (REPAIR-016).
Between 3.5053 in. and 3.5114 in. (89.035 mm and 89.190 mm)
Refer to Repair VRS5690 TASK 72-60-41-300-015 (REPAIR-015) or VRS5703 TASK 72-60-41-300-016 (REPAIR-016).
More than 3.5114 in. (89.190 mm).
Diameter
If Repair VRS5690 or VRS5703 have never been applied, refer to Repair VRS5103 TASK 72-60-41-300-007 (REPAIR-007).
If Repair VRS5690 or VRS5703 have been applied, refer to Repair VRS5690 TASK 72-60-41-300-015 (REPAIR-015) or VRS5703 TASK 72-60-41-300-016 (REPAIR-016).
More than Step.
Runout.
If Repair VRS5690 or VRS5703 have never been applied, refer to Repair VRS5103 TASK 72-60-41-300-007 (REPAIR-007).
If Repair VRS5690 or VRS5703 have been applied, refer to Repair VRS5690 TASK 72-60-41-300-015 (REPAIR-015) or VRS5703 TASK 72-60-41-300-016 (REPAIR-016).
Not more than 0.003 in. (0.080 mm) in depth
Refer to Repair VRS5690 TASK 72-60-41-300-015 (REPAIR-015) or VRS5703 TASK 72-60-41-300-016 (REPAIR-016).
More than Step
Frettage
SUBTASK 72-60-41-220-060 Examine the Angle Gearbox Casing (72-60-41,01-300) PTO Shaft Seal Tube at Location 5
Refer to Repair VRS5104, TASK 72-60-41-300-008 (REPAIR-008).
More than 3.5435 in. (90.004 mm)
Diameter
Refer to Repair VRS5104 TASK 72-60-41-300-008 (REPAIR-008).
More than Step
True position
SUBTASK 72-60-41-220-061 Examine the Angle Gearbox Casing (72-60-41,01-300) Bearing Seat at Location 4072
Refer to Figure.
Refer to Repair VRS5105 TASK 72-60-41-300-009 (REPAIR-009).
More than Step.
Perpendicularity.
Repair, VRS5105 TASK 72-60-41-300-009 (REPAIR-009).
Not more than 0.0078 in. (0.200 mm) in depth.
Reject.
More than Step.
Frettage.
SUBTASK 72-60-41-220-062 Examine the Angle Gearbox Casing (72-60-41,01-300) Bearing Mating Surface at Location 6
Refer to Repair VRS5107 TASK 72-60-41-300-011 (REPAIR-011).
More than 5.1197 in. (130.04 mm)
Diameter
Repair VRS5107 TASK 72-60-41-300-011 (REPAIR-011).
More than Step
True positions
SUBTASK 72-60-41-220-064 Examine the Angle Gearbox Casing (72-60-41, 01-300) Radial Gear Support Seat at Location 4080
Refer to Figure.
Refer to Repair VRS5108 TASK 72-60-41-300-012 (REPAIR-012).
More than 6.3402 in. (161.04 mm)
Diameter
Refer to Repair VRS5108 TASK 72-60-41-300-012 (REPAIR-012).
More than Step
Concentricity
SUBTASK 72-60-41-220-065 Examine the Angle Gearbox Casing (72-60-41,01-300) Support Seat at Location 4071
Refer to Repair VRS5109 TASK 72-60-41-300-013 (REPAIR-013).
More than 6.3008 in. (160.04 mm)
Diameter
Refer to Repair VRS5109 TASK 72-60-41-300-013 (REPAIR-013).
More than Step
True position
SUBTASK 72-60-41-220-066 Examine the Angle Gearbox Casing (72-60-41,01-300) Bearing Support Seat at Location 4070
Refer to Figure.
Refer to Repair VRS5430 TASK 72-60-41-300-014 (REPAIR-014).
Internal threads damaged
SUBTASK 72-60-41-220-067 Examine the Angle Gearbox Casing (72-60-41,01-300) MCD Housing Seat at Location 8
Refer to Repair VRS5694 TASK 72-60-41-300-017 (REPAIR-017).
Loose, missing or with internal thread damaged.
SUBTASK 72-60-41-220-106 Examine the Angle Gearbox Casing (72-60-41,01-300) Helicoil Inserts (SBE 72-0492)
Figure: Angle Gearbox Casing - Inspection Locations
Angle Gearbox Casing - Inspection Locations

Figure: Locations - Angle Gearbox Casing
Locations - Angle Gearbox Casing

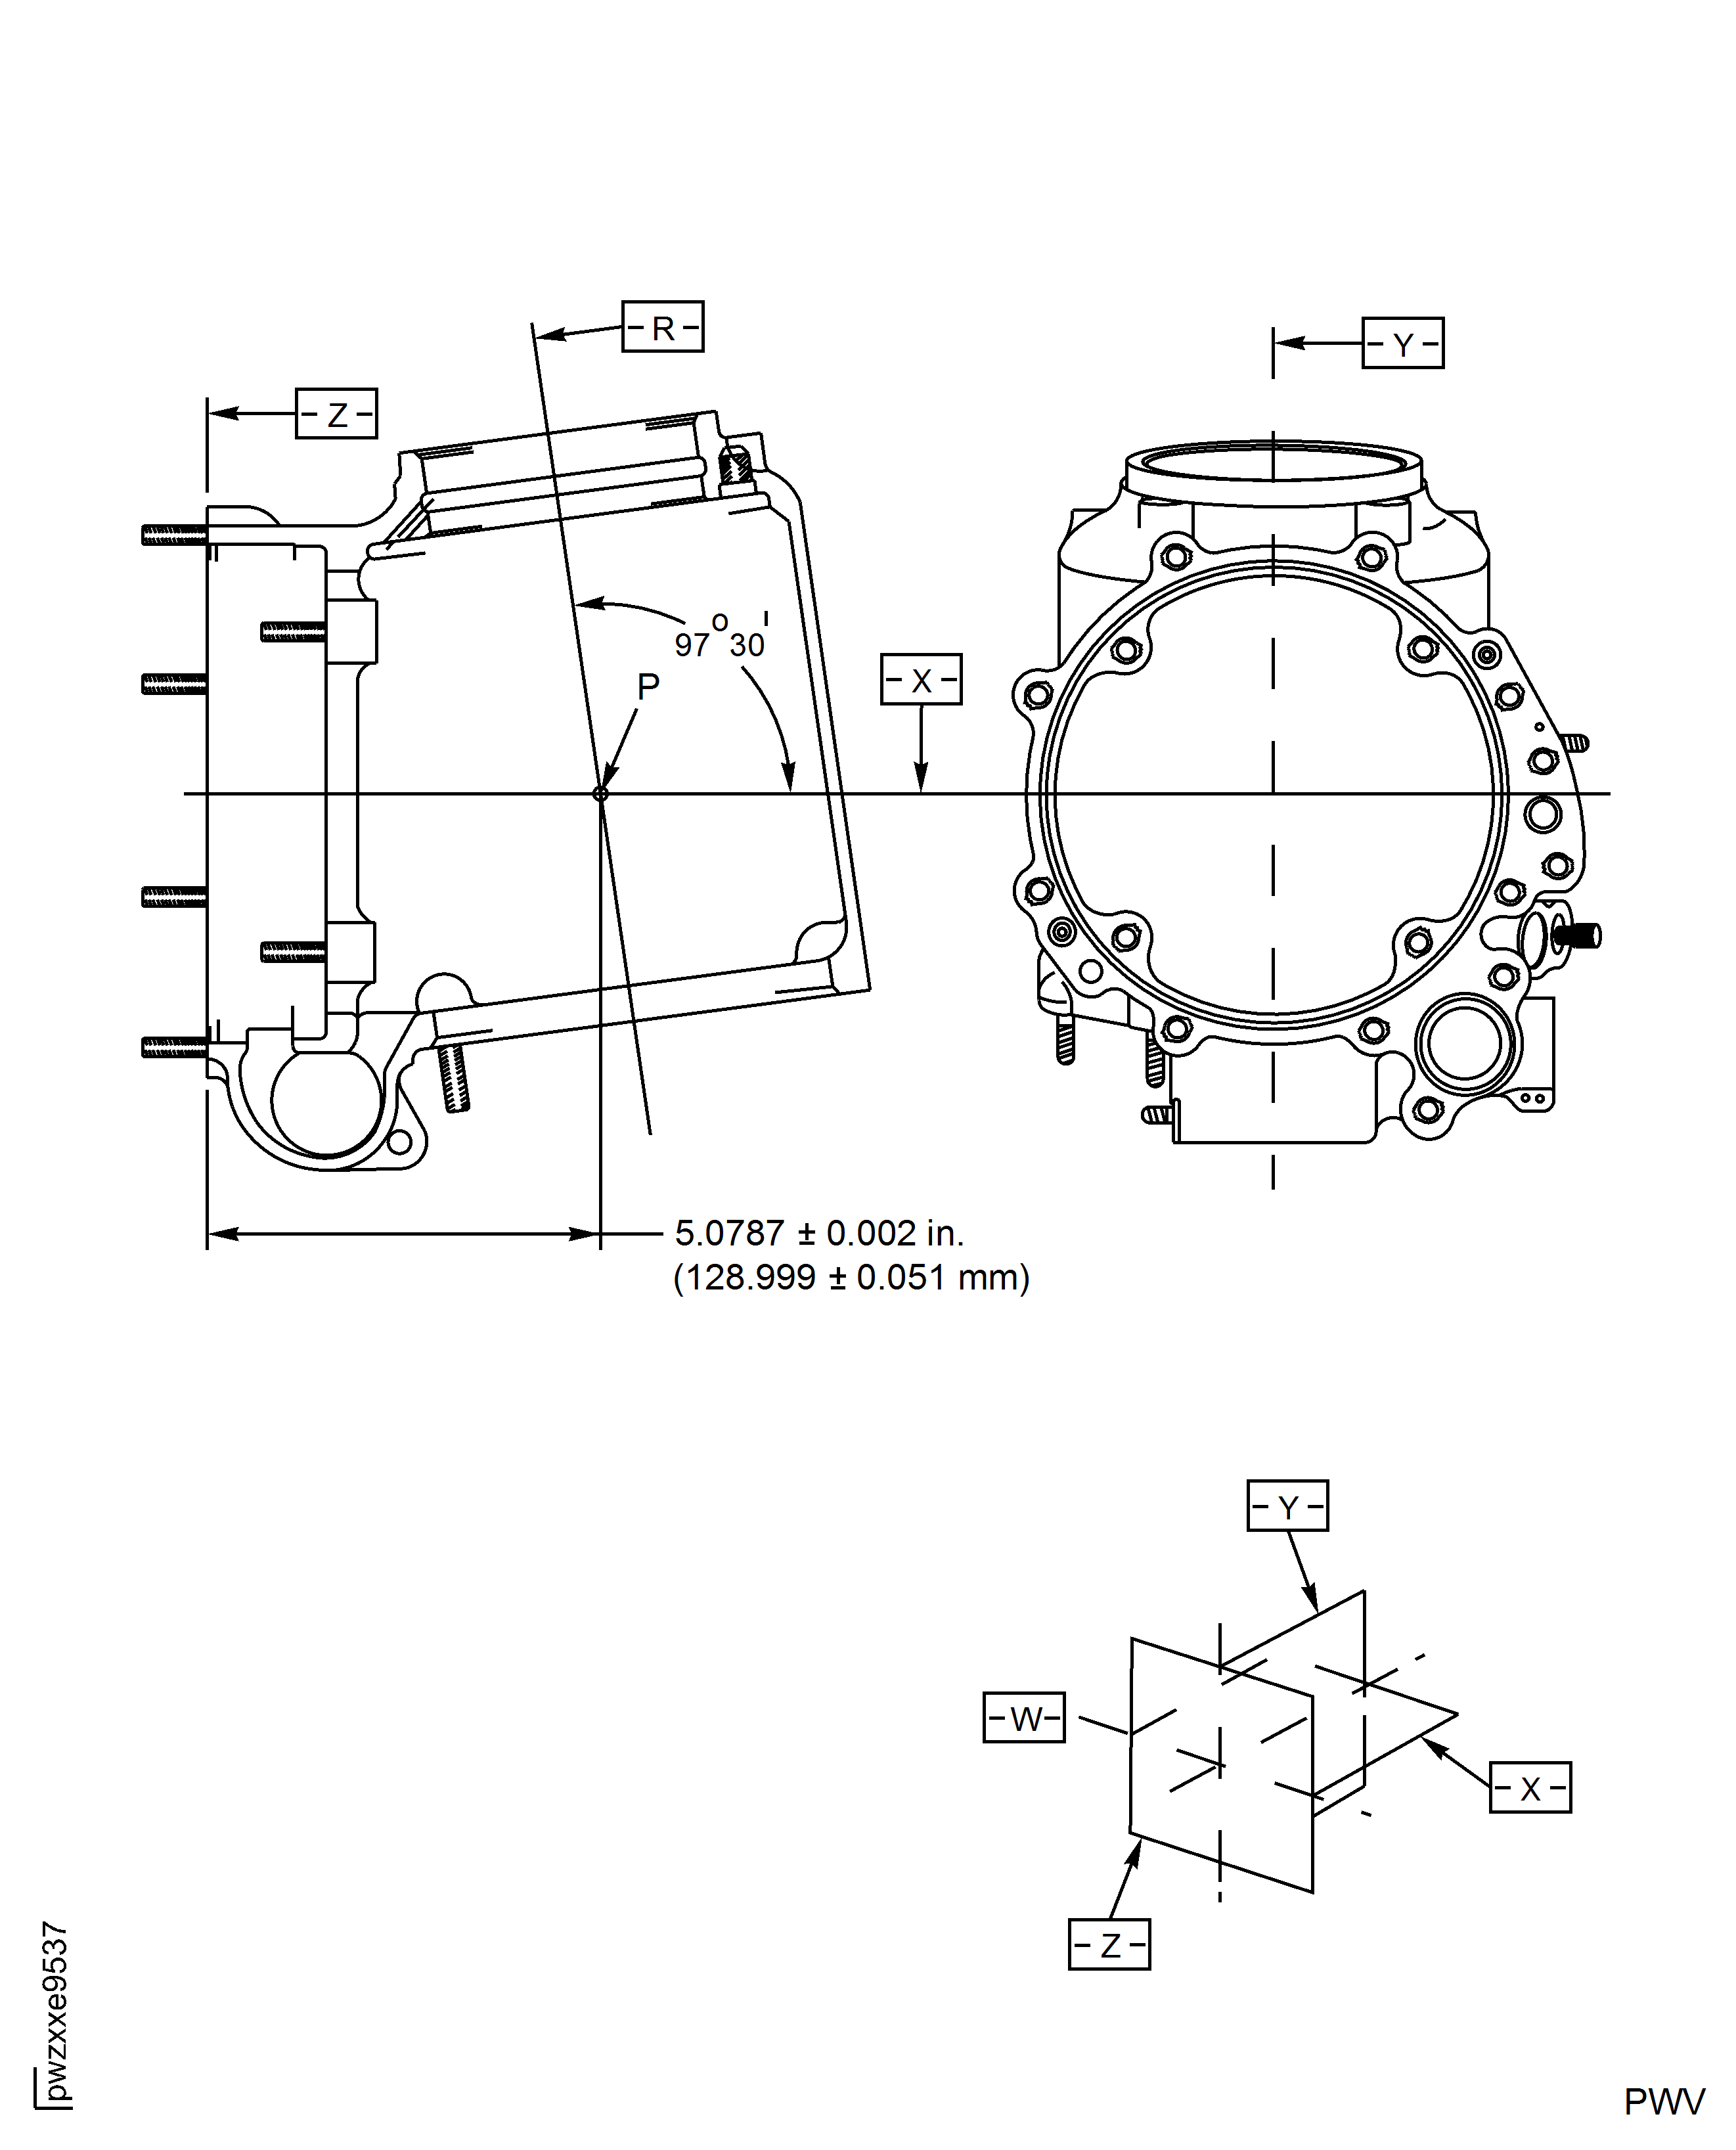
Figure: Locations - Angle Gearbox Casing W-System
Locations - Angle Gearbox Casing W-System

