Export Control
EAR Export Classification: Not subject to the EAR per 15 C.F.R. Chapter 1, Part 734.3(b)(3), except for the following Service Bulletins which are currently published as EAR Export Classification 9E991: SBE70-0992, SBE72-0483, SBE72-0580, SBE72-0588, SBE72-0640, SBE73-0209, SBE80-0024 and SBE80-0025.Copyright
© IAE International Aero Engines AG (2001, 2014 - 2021) The information contained in this document is the property of © IAE International Aero Engines AG and may not be copied or used for any purpose other than that for which it is supplied without the express written authority of © IAE International Aero Engines AG. (This does not preclude use by engine and aircraft operators for normal instructional, maintenance or overhaul purposes.).Applicability
All
Common Information
TASK 72-41-13-200-001-B00 HPC Rear Shaft - Examine, Inspection-001
General
This TASK gives the procedure for the inspection of the HPC Shaft Assembly. For all other parts of the HP compressor shaft, refer to TASK 72-41-13-200-000 (INSPECTION-000).
Fig/item numbers in parentheses in the procedure agree with those used in the IPC.
The policy that is necessary for inspection is given in the SPM TASK 70-20-00-200-501.
All the parts must be cleaned before any part is examined. Refer to the SPM TASK 70-10-00-100-501.
All parts must be visually examined for damage, corrosion and wear. Any defects that are not identified in the procedure must be referred to IAE.
The procedure for those parts which have a crack test is given in Step Do the test before the part is visually inspected.
Do not discard any part until you are sure there are no repairs available. Refer to the instructions in Repair before a discarded part is used again or oversize parts are installed.
Parts which should be discarded can be held although no repair is available. The repair of a discarded part could be shown to be necessary at a later date.
All parts must be examined to make sure that all the repairs have been completed satisfactorily.
The practices and processes referred to in the procedure by the TASK numbers are in the SPM.
References
Refer to the SPM for data on these items:
Definitions of damage, SPM TASK 70-02-02-350-501,
Surface texture, SPM TASK 70-35-09-350-501,
Inspection of parts, SPM TASK 70-20-01-200-501.
Some data on these items is contained in this TASK. For more data on these items refer to the SPM:
Method of testing for crack indications,
Chemical processes,
Surface protection.
NOTE
Preliminary Requirements
Pre-Conditions
NONESupport Equipment
NONEConsumables, Materials and Expendables
NONESpares
NONESafety Requirements
CAUTION
Procedure
Clean the Part. Refer to the TASK 72-41-13-100-000 (CLEANING-000).
SUBTASK 72-41-13-230-054 Examine the HPC Shaft Assembly (01-900) for Cracks
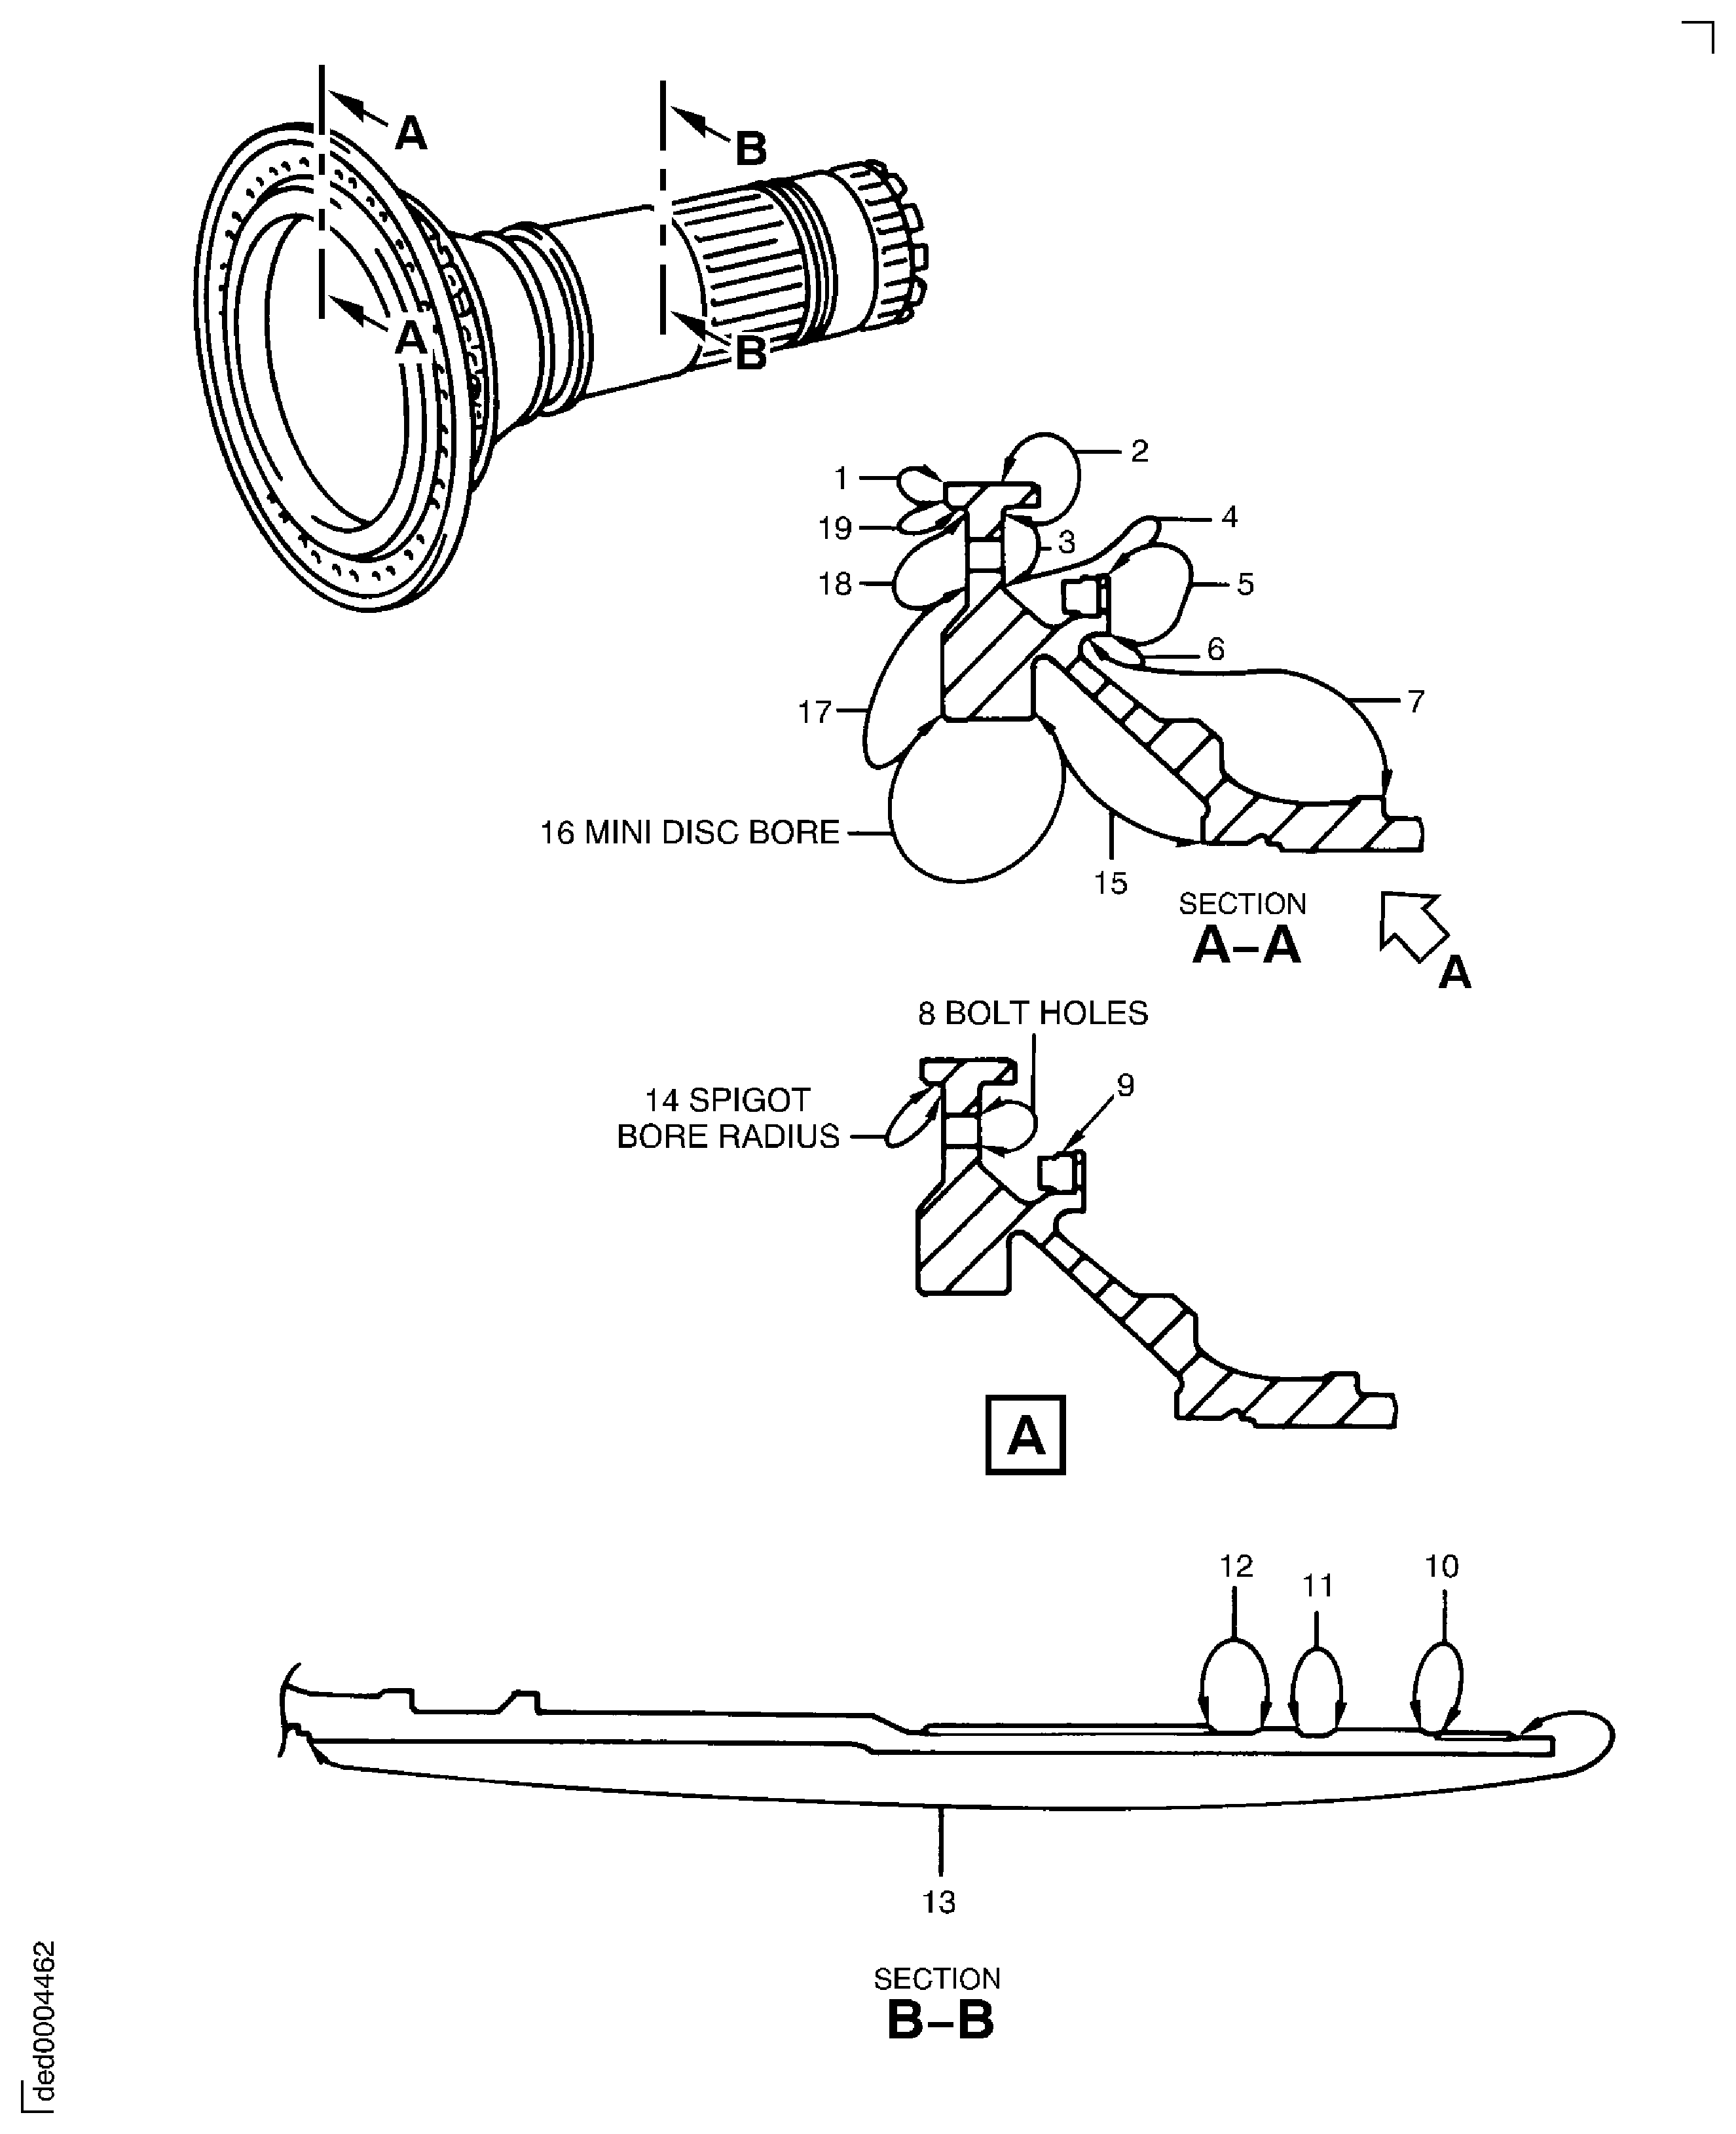
Do a focus inspection of the HPC Shaft Assembly according to TASK 72-41-13-200-010, Subtask 72-41-13-230-098.
SUBTASK 72-41-13-230-104 Focused Inspection of the HPC Shaft Assembly for Cracks
Refer to Figure.
Repair, VRS3519 TASK 72-41-13-300-017 (REPAIR-017)
Damage, burrs, and high metal
Examine the shaft assembly at locations 2 and 5 for damage, burrs and high metal on the threads.
SUBTASK 72-41-13-220-081 Examine the HPC Shaft Assembly (01-900) for Damage, Burrs and High Metal on all the Threads
Refer to Figure.
Repair, VRS3518 TASK 72-41-13-300-018 (REPAIR-018) and VRS3481 TASK 72-41-13-300-015 (REPAIR-015)
Burrs, damage, fretting, high metal and wear
Examine the shaft assembly at location 1 for burrs, damage, fretting, high metal and wear on the splines.
SUBTASK 72-41-13-220-082 Examine the HPC Shaft Assembly (01-900) for Burrs, Damage, and High Metal and Wear on the Splines
Refer to Figure.
Repairs, VRS3445 TASK 72-41-13-300-001 (REPAIR-001) and VRS3466 TASK 72-41-13-300-014 (REPAIR-014)
Examine the shaft assembly at location 4 for scoring scratches and galling on the shaft inner diameter.
SUBTASK 72-41-13-220-083 Examine the HPC Shaft Assembly (01-900) for Scoring, Scratches and Galling at the Location of the Heatshield on the Shaft Inner Diameter
Refer to Figure.
Repair, VRS3445 TASK 72-41-13-300-001 (REPAIR-001)
High metal in the slot or on the slot edges
Wear and damage.
Examine the shaft assembly at location 6 for wear and damage in the front slots (3 positions).
SUBTASK 72-41-13-220-084 Examine the HPC Shaft Assembly (01-900) for Wear and Damage in the Front Slots
Refer to Figure.
Repair, VRS6088 TASK 72-41-13-300-019 (REPAIR-019)
High metal in the slot or on the slot edge
Wear and damage.
NOTE
It is permissible for 2 tangs to be fully machined off and/or 1 tang to be half machined off at new production, Refer to Figure.Examine the shaft assembly at location 6 for wear and damage in the rear slots (10 positions).
SUBTASK 72-41-13-220-085 Examine the HPC Shaft Assembly (01-900) for Wear and Damage on the Rear Slots
Refer to Figure.
Repairs, VRS3445 TASK 72-41-13-300-001 (REPAIR-001), VRS3447 TASK 72-41-13-300-008 (REPAIR-008) and VRS3636 TASK 72-41-13-300-030 (REPAIR-030)
Examine the shaft assembly at location 1 and location 7 for scoring scratches and galling on the shaft outer diameter.
SUBTASK 72-41-13-220-086 Examine the HPC Shaft Assembly (01-900) for Scoring, Scratches and Galling at the Location of the Carbon Seal Plate and Oil Slinger Ring on the Shaft Outer Diameter
Refer to Figure.
Repair, VRS3461 TASK 72-41-13-300-002 (REPAIR-002)
Examine the shaft assembly at location 2 for galling, scoring and scratches at the No. 4 bearing location on the shaft outer diameter.
Repair, VRS3461 TASK 72-41-13-300-002 (REPAIR-002)
Examine the shaft assembly at location 3 for galling, scoring and scratches at the rear carbon seal plate, gage spacer and the Stage 1 turbine hub diameter locations on the shaft outer diameter.
Repair, VRS3461 TASK 72-41-13-300-002 (REPAIR-002)
Other than Step
Examine the shaft assembly at location 4 for scoring and scratches at the stage 2 turbine hub diameter location on the shaft outer diameter.
SUBTASK 72-41-13-220-087 Examine the HPC Shaft Assembly (01-900) for Galling, Scoring and Scratches on the Shaft Outer Diameters
Refer to Figure.
Repair, VRS3461 TASK 72-41-13-300-002 (REPAIR-002)
Other than Step
Examine the shaft assembly at location 5 for scoring and scratches on the outer diameter.
SUBTASK 72-41-13-220-088 Examine the HPC Shaft Assembly (01-900) for Scoring and Scratches at the HPT Nut Pilot Diameter Location on the Shaft Outer Diameter
Refer to Figure.
Repair, VRS3445 TASK 72-41-13-300-001 (REPAIR-001)
Surface damage that is not repaired
Examine the shaft assembly at locations 10, 14 and 16 for surface damage.
Repair, VRS3445 TASK 72-41-13-300-001 (REPAIR-001)
Other than Step
Examine the shaft assembly at locations 1, 2, 4, 7, 11, 12, 13, 15 and 17 for surface damage.
Repair, VRS3445 TASK 72-41-13-300-001 (REPAIR-001)
Other than Step
Examine the shaft assembly at locations 3, 5 and 18 for surface damage.
Repair, VRS3445 TASK 72-41-13-300-001 (REPAIR-001)
Other than Step
Examine the shaft assembly at location 8 for surface damage in the holes.
Repair, VRS3445 TASK 72-41-13-300-001 (REPAIR-001)
Other than Step
Examine the shaft assembly at locations 6 and 19 for surface damage.
SUBTASK 72-41-13-220-089 Examine the HPC Shaft Assembly (01-900) for all Other Surface Damage
Refer to Figure.
SUBTASK 72-41-13-220-090 Examine the HPC Shaft Assembly (01-900) for Loose Nuts and Damaged Threads on the Clinch Nuts
Refer to Figure.
Other than Step
Examine the shaft assembly at location 7 for the inner diameters.
Repair, VRS3449 TASK 72-41-13-300-010 (REPAIR-010)
Other than Step
Examine the shaft assembly at location 8 for the inner diameter.
Repair, VRS3466 TASK 72-41-13-300-014 (REPAIR-014)
Other than Step
Examine the shaft assembly at location 4 for the inner diameter.
SUBTASK 72-41-13-220-091 Examine the HPC Shaft Assembly (01-900) for the Inner Diameters
Refer to Figure.
Repair, VRS3450 TASK 72-41-13-300-011 (REPAIR-011)
Other than Step
Examine the shaft assembly at location 3 for the knife edge seal diameter.
SUBTASK 72-41-13-220-092 Examine the HPC Shaft Assembly (01-900) for the Knife Edge Seal Diameter
Refer to Figure.
Repair, VRS3447 TASK 72-41-13-300-008 (REPAIR-008)
Other than Step
Examine the shaft assembly at location 1 for the outer diameter (Reference No. 2229).
Repair, VRS3447 TASK 72-41-13-300-008 (REPAIR-008)
Other than Step
Examine the shaft assembly at location 2 for the outer diameter (Reference No. 2395).
Repair, VRS3447 TASK 72-41-13-300-008 (REPAIR-008)
Other than Step
Examine the shaft assembly at location 3 for the outer diameter (Reference No. 2246).
Repair, VRS3462 TASK 72-41-13-300-013 (REPAIR-013)
Other than Step
Examine the shaft assembly at location 4 for the outer diameter (Reference No. 2249).
Repair, VRS6662 TASK 72-41-13-300-029 (REPAIR-029)
Other than Step
Examine the shaft assembly at location 7 for axial location.
SUBTASK 72-41-13-220-093 Examine the HPC Shaft Assembly (01-900) for the Outer Diameters
Figure: HPC Shaft Assembly Inspection Locations
HPC Shaft Assembly Inspection Locations
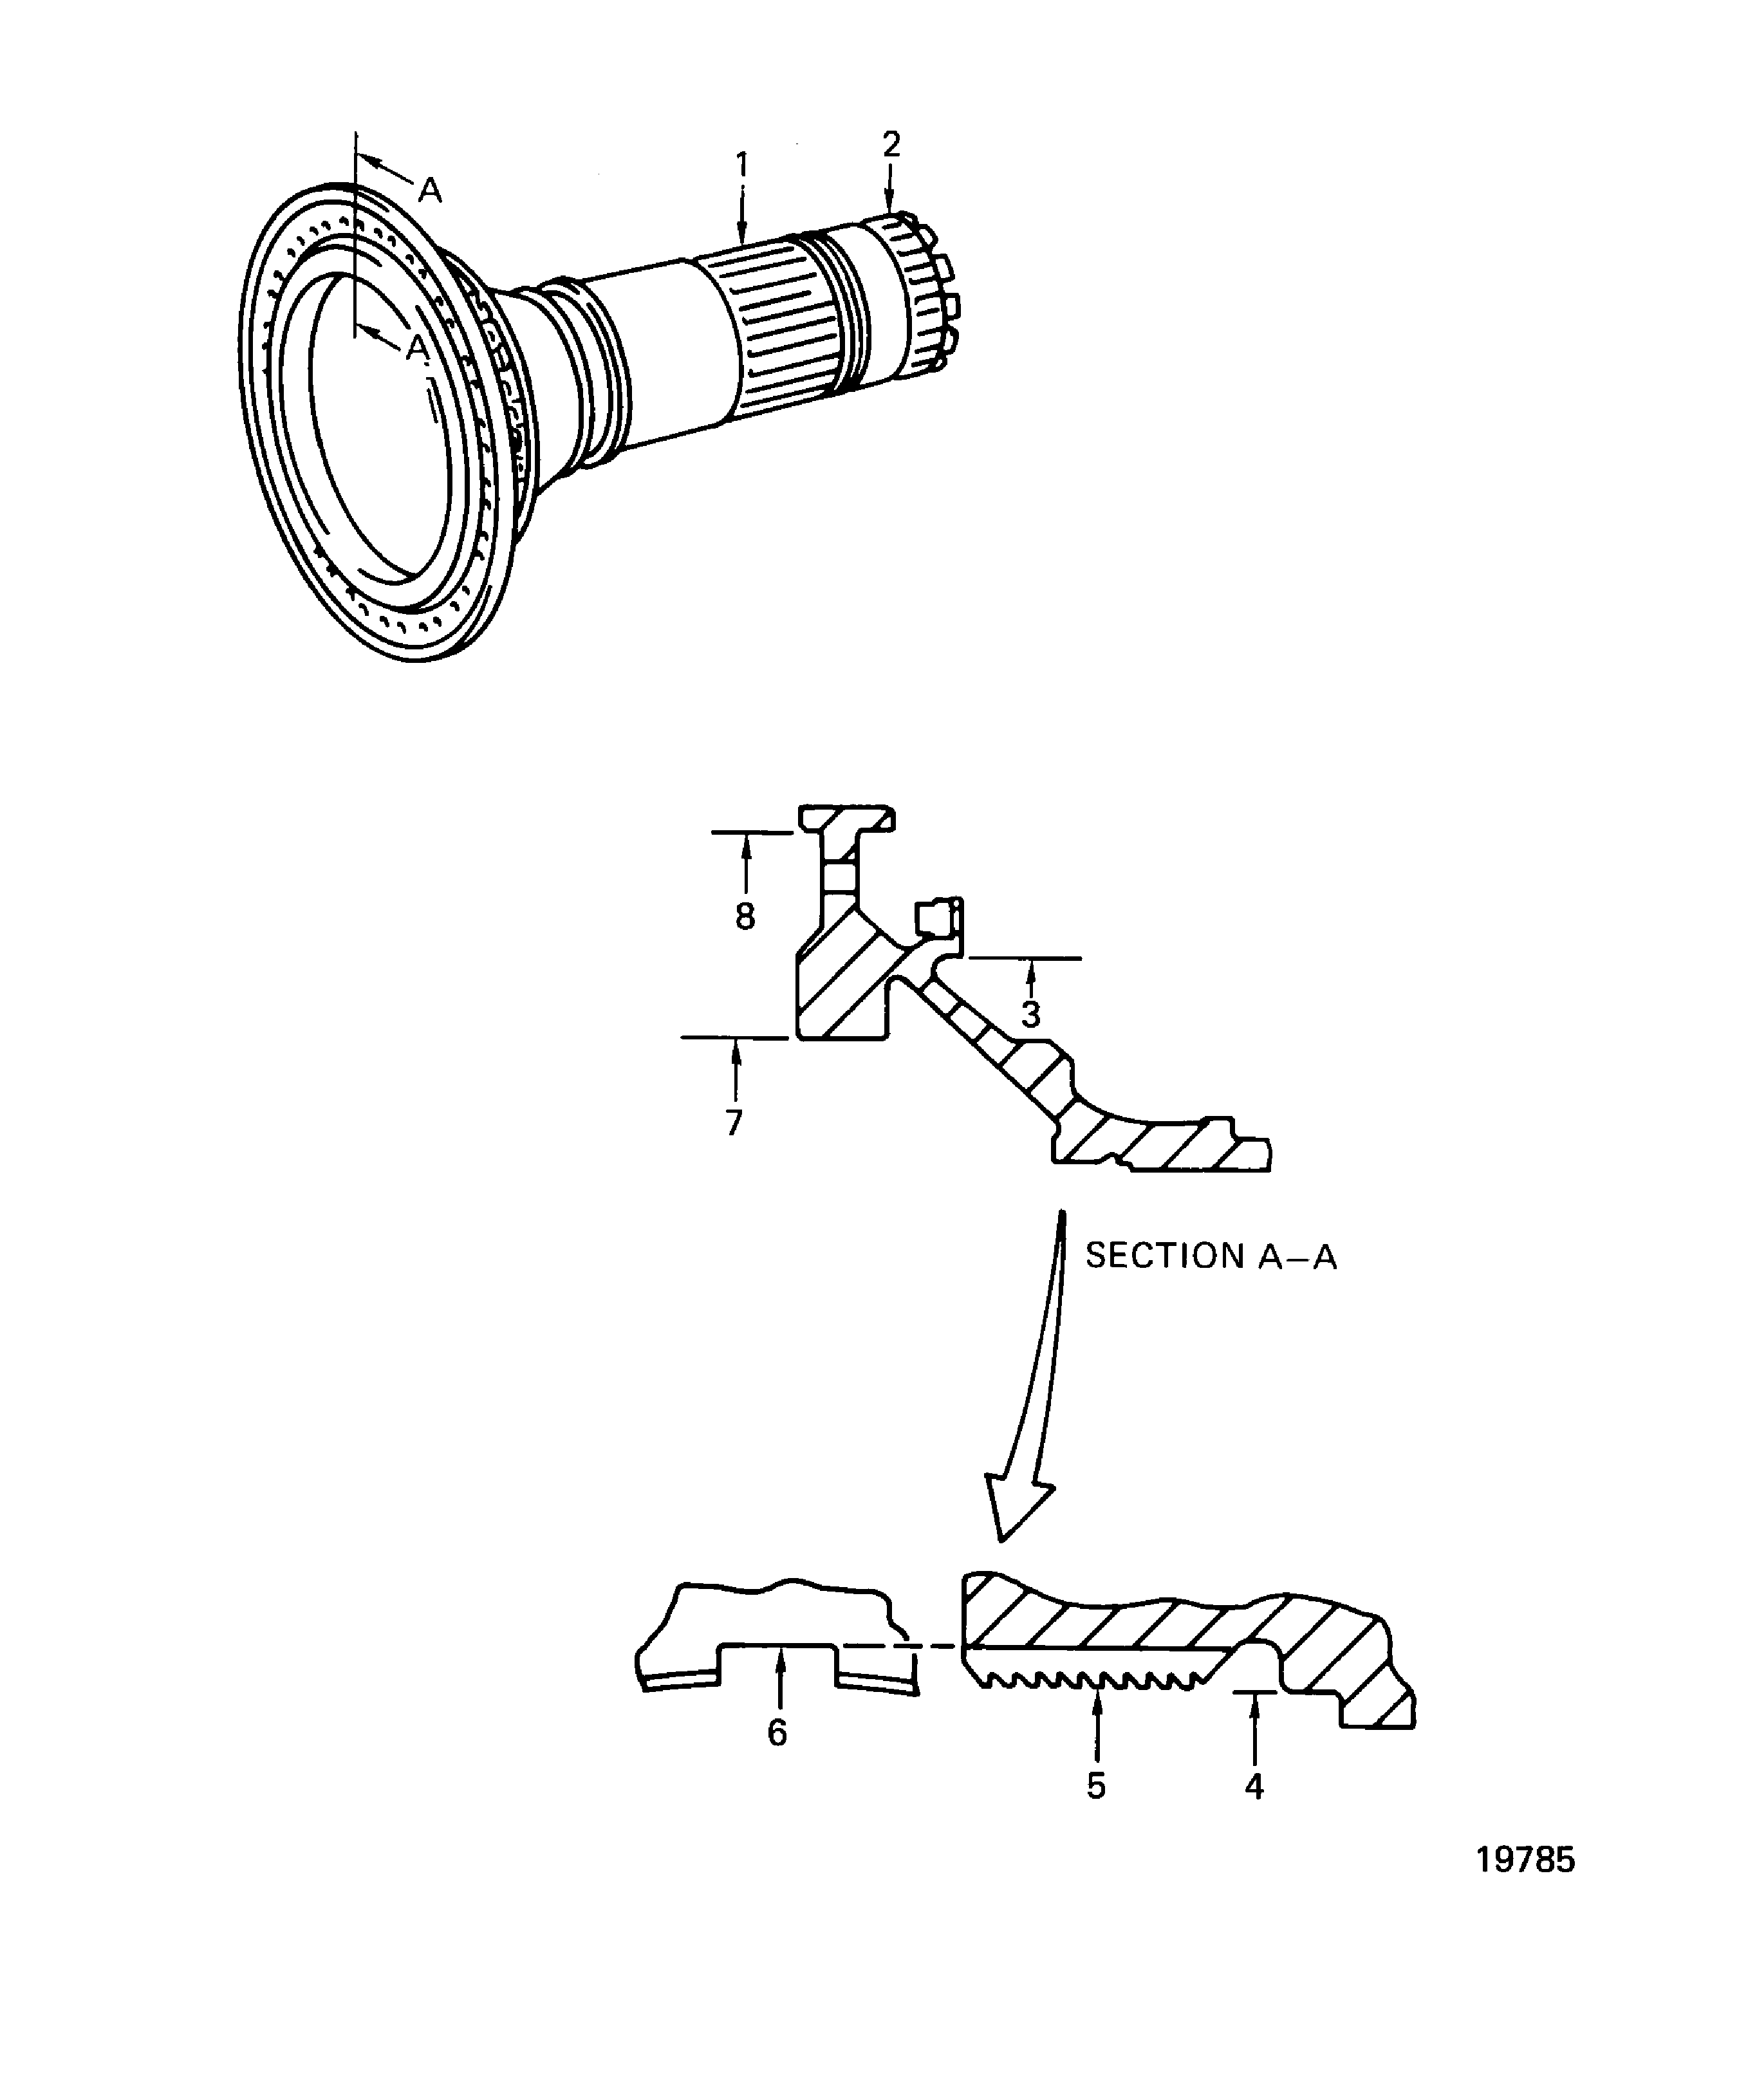
Figure: HPC Shaft Assembly Inspection Locations
HPC Shaft Assembly Inspection Locations
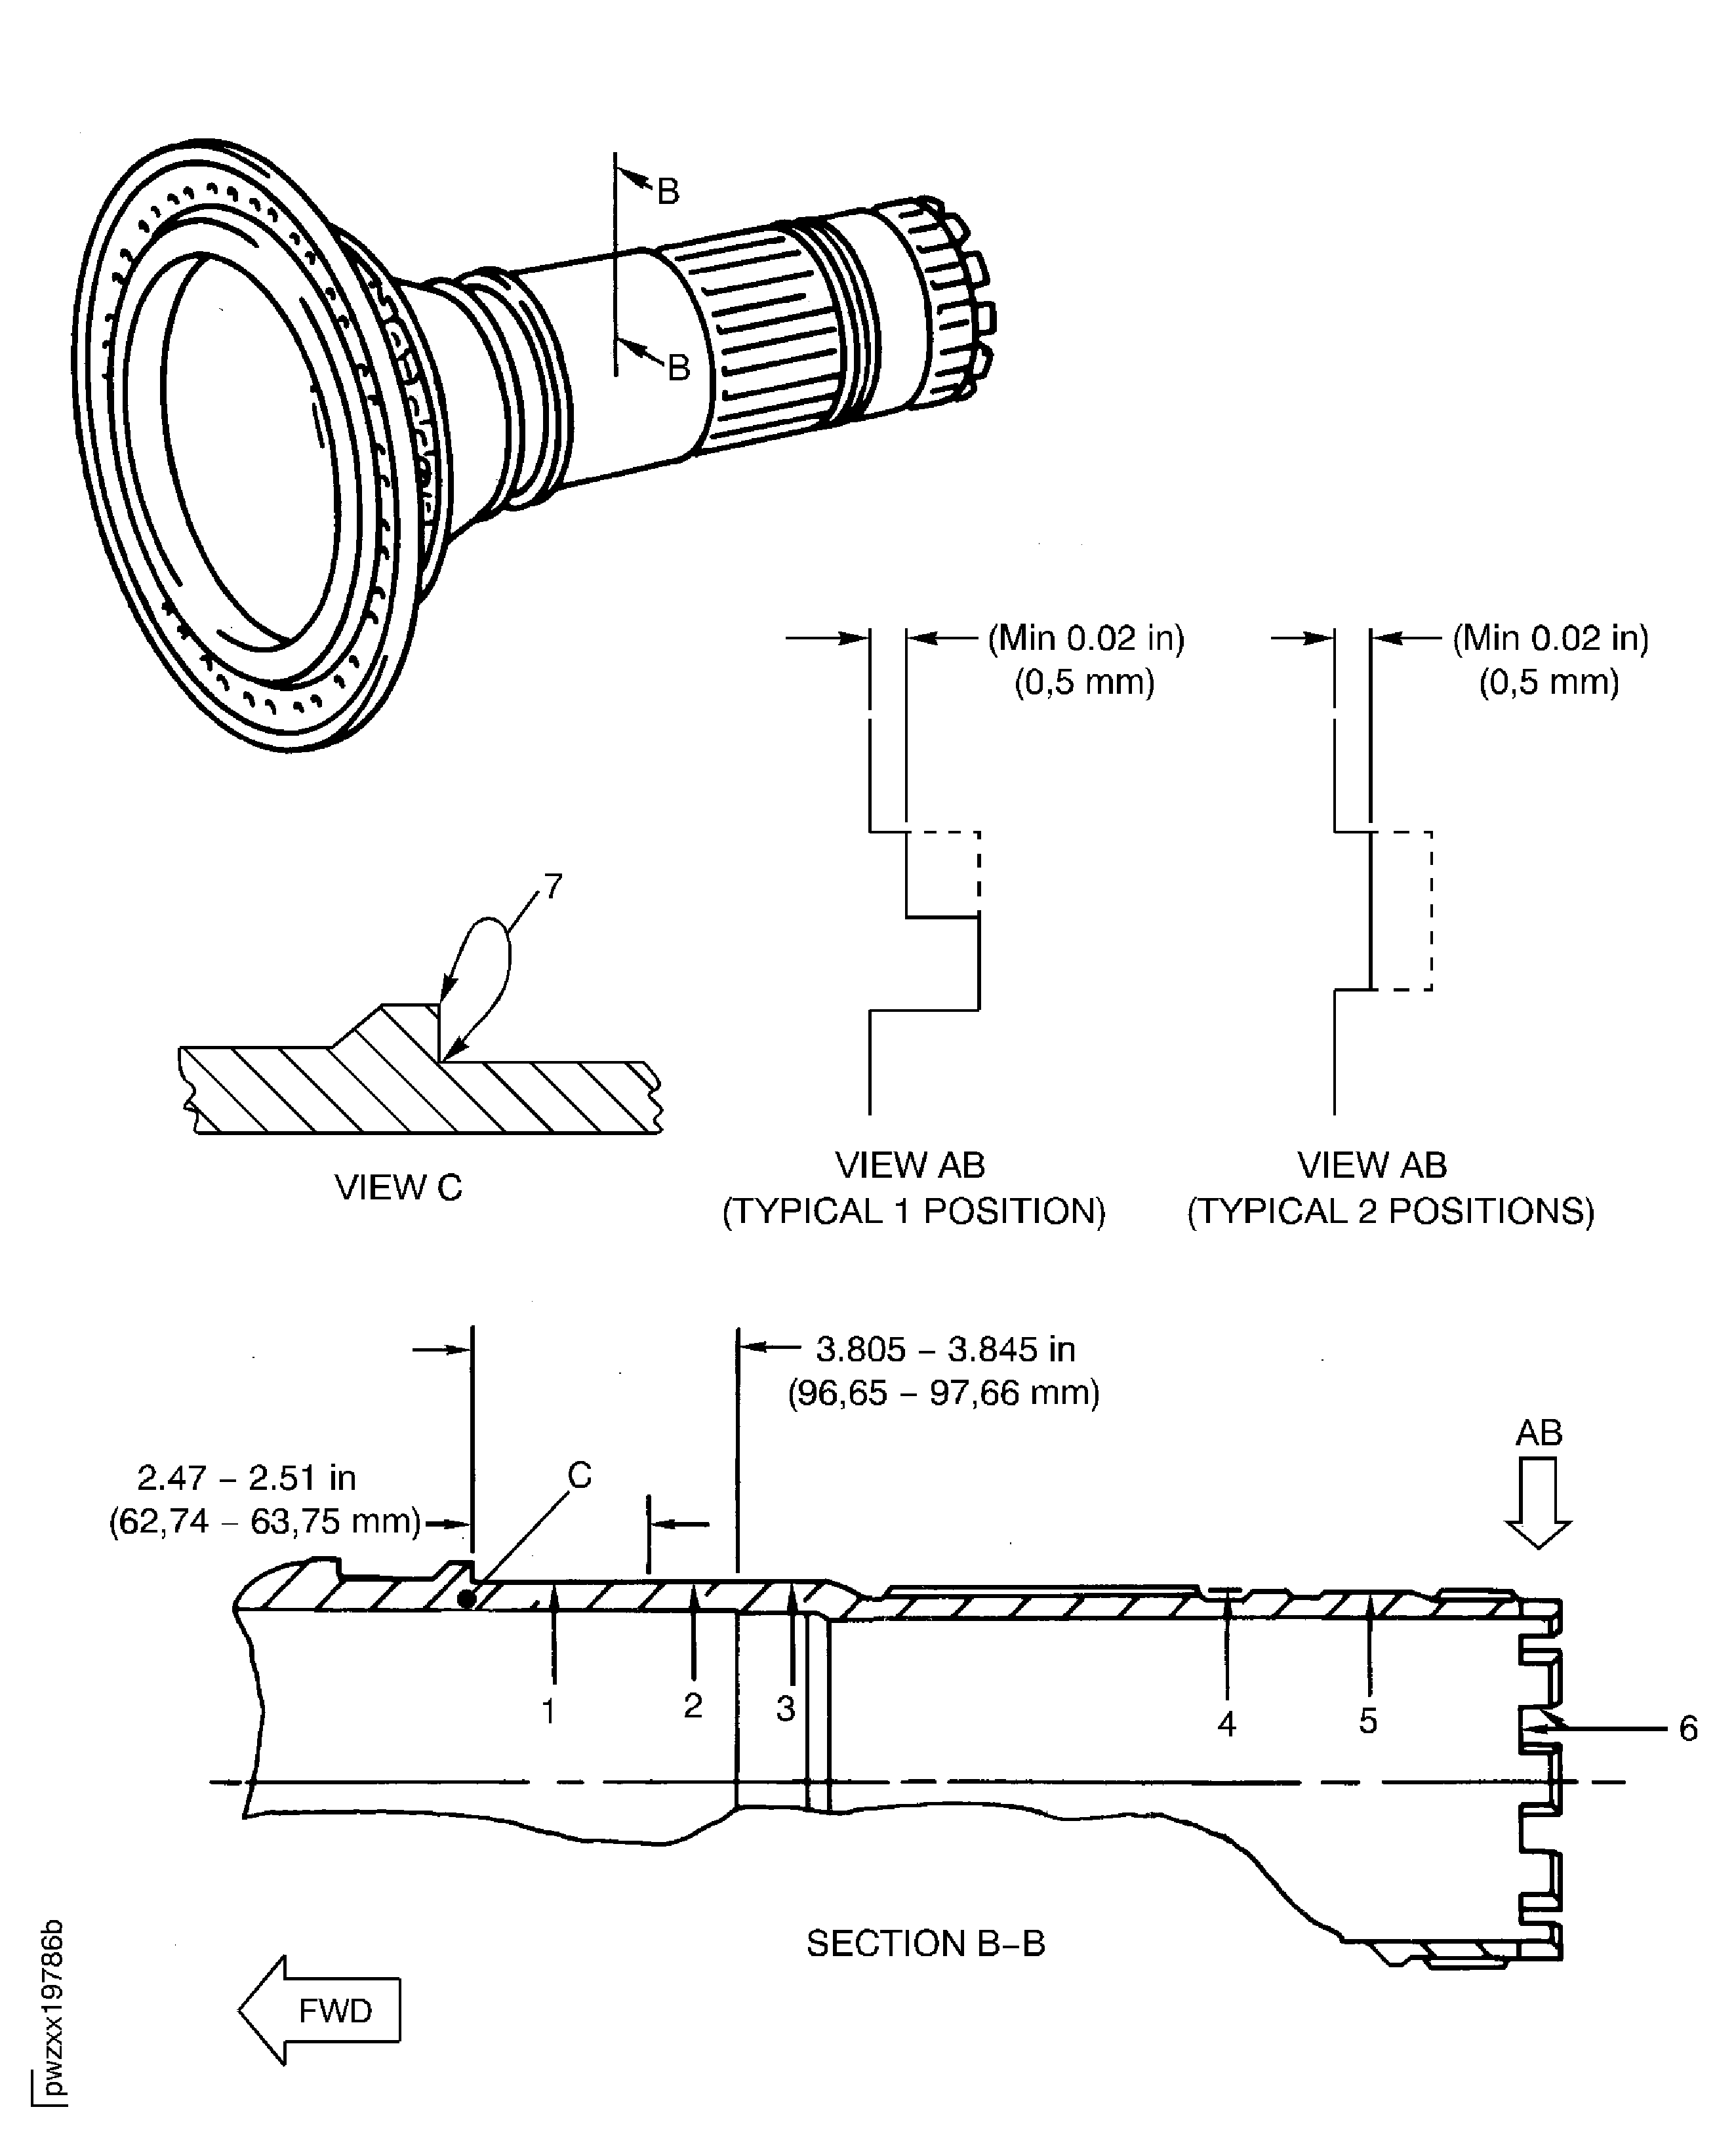
Figure: HPC Shaft Assembly Inspection Locations
HPC Shaft Assembly Inspection Locations
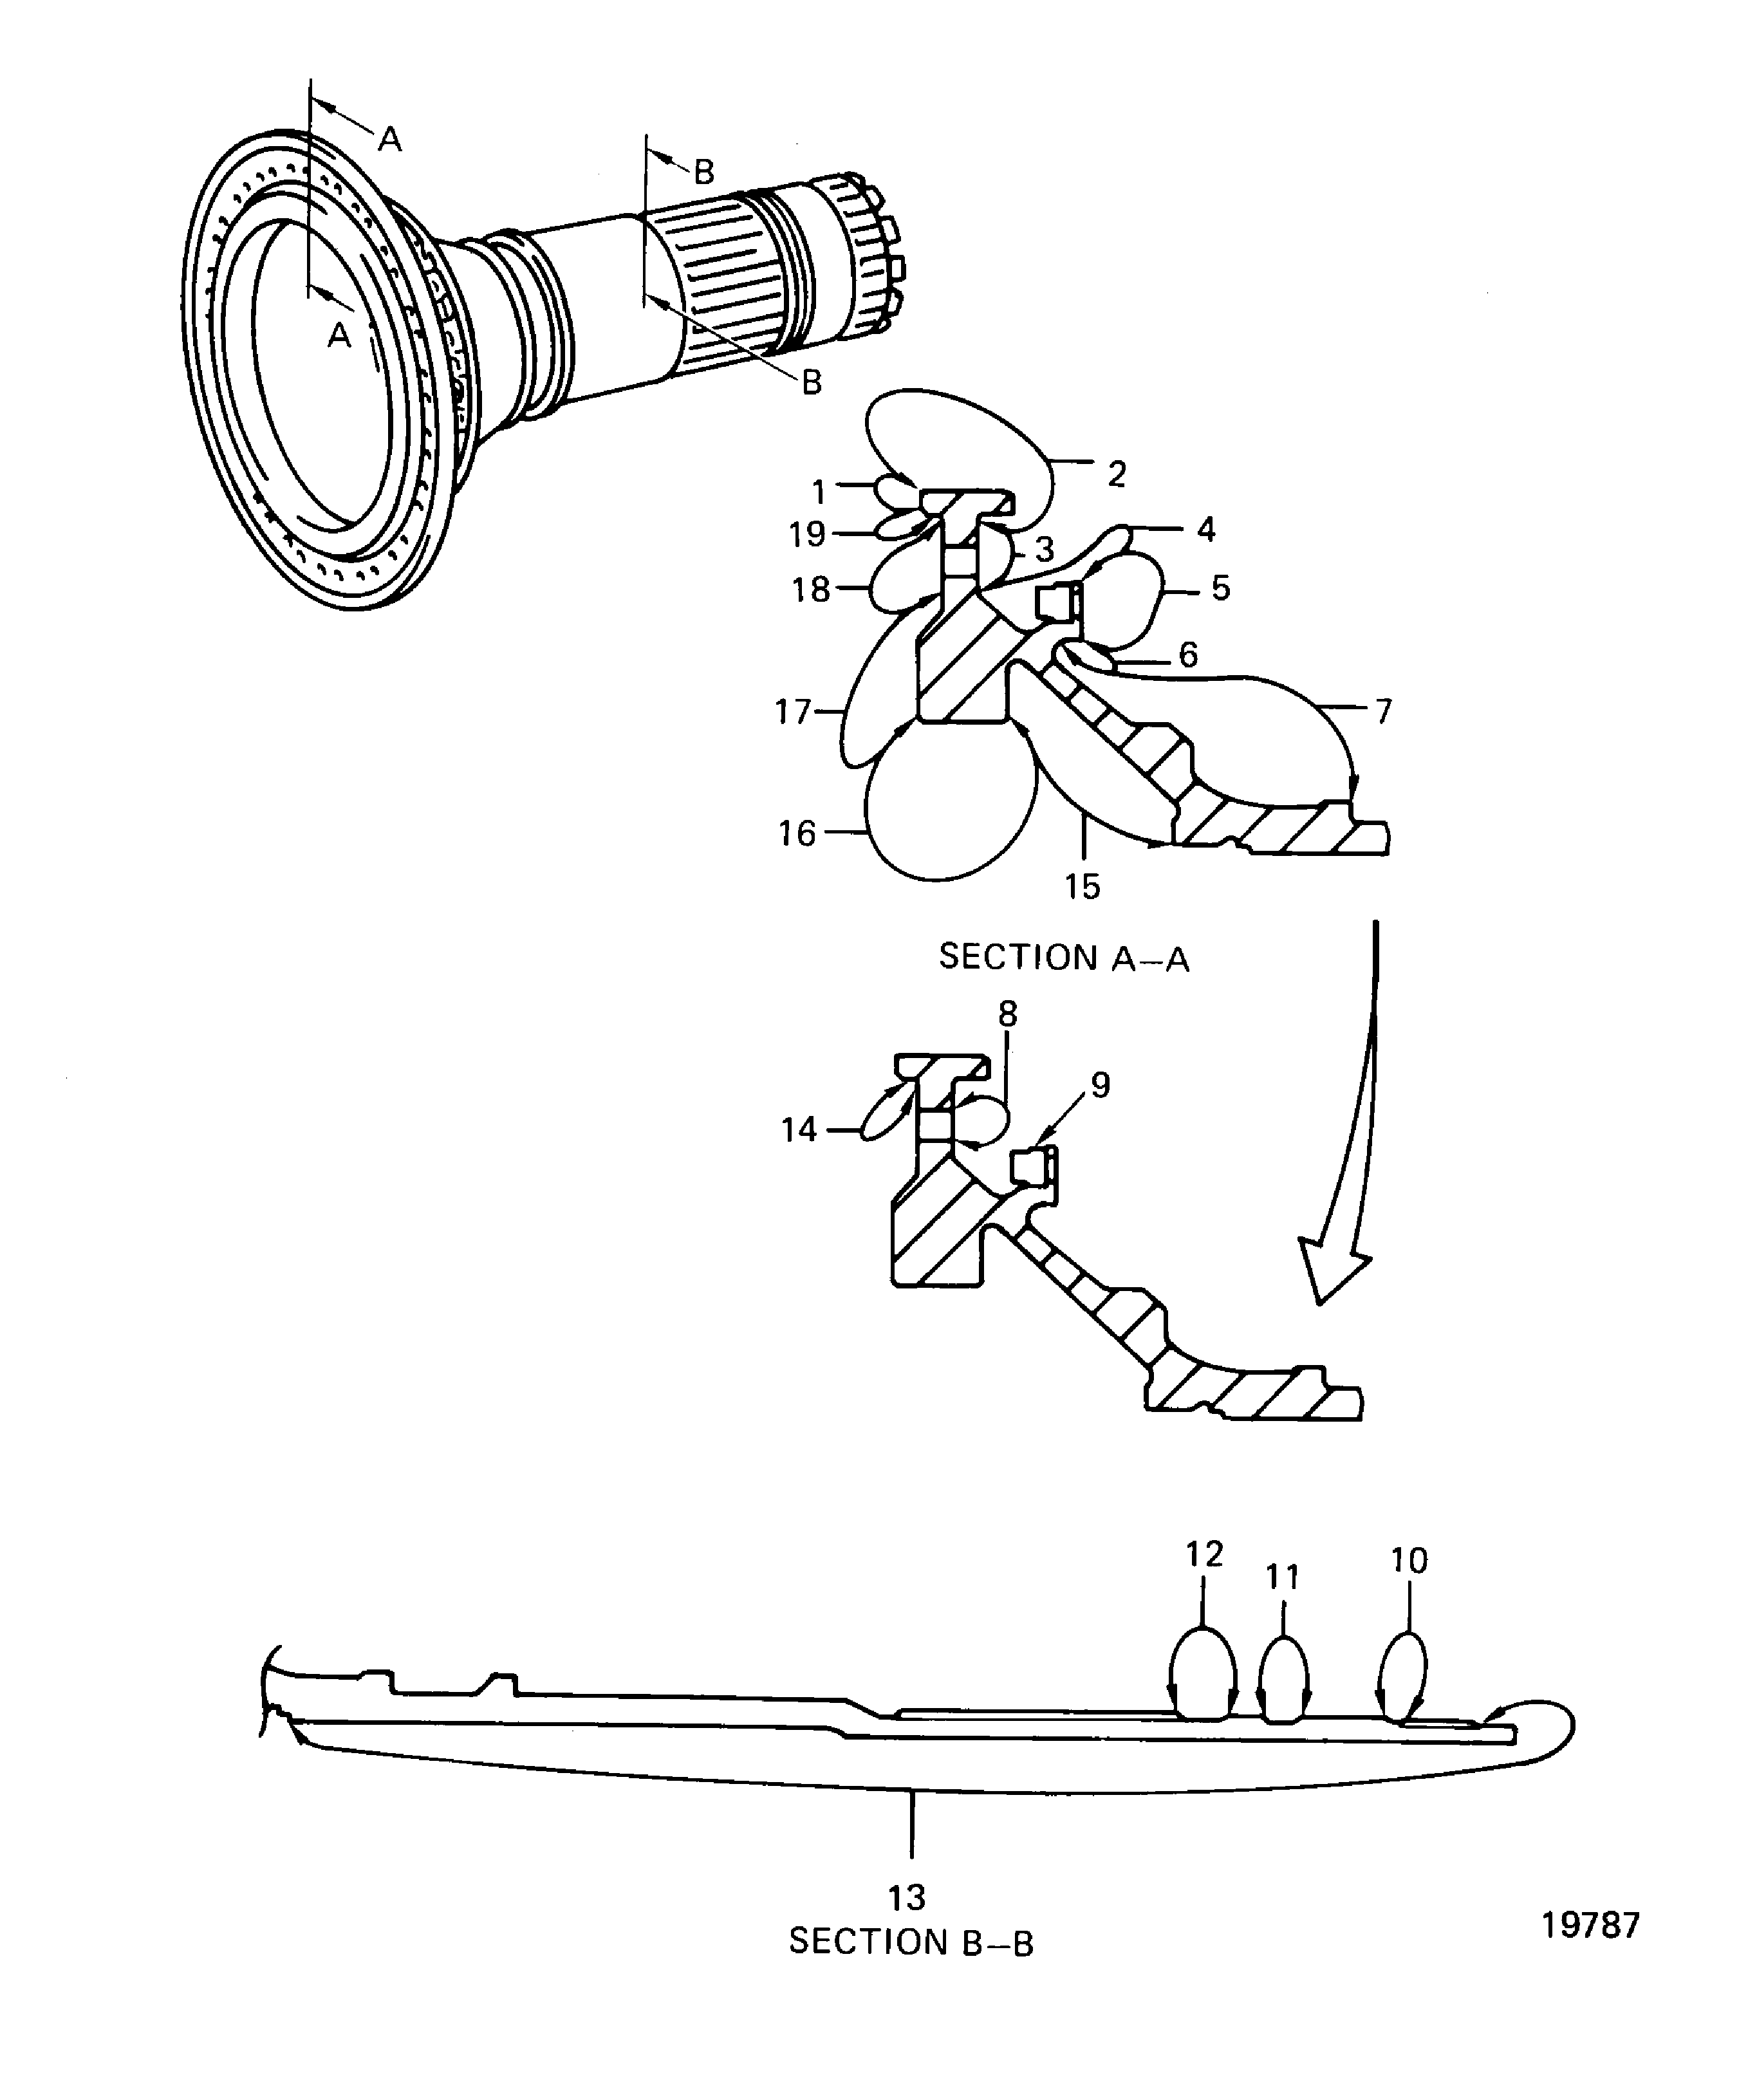
Figure: Focused Inspection - Location Splines
Focused Inspection - Location Splines
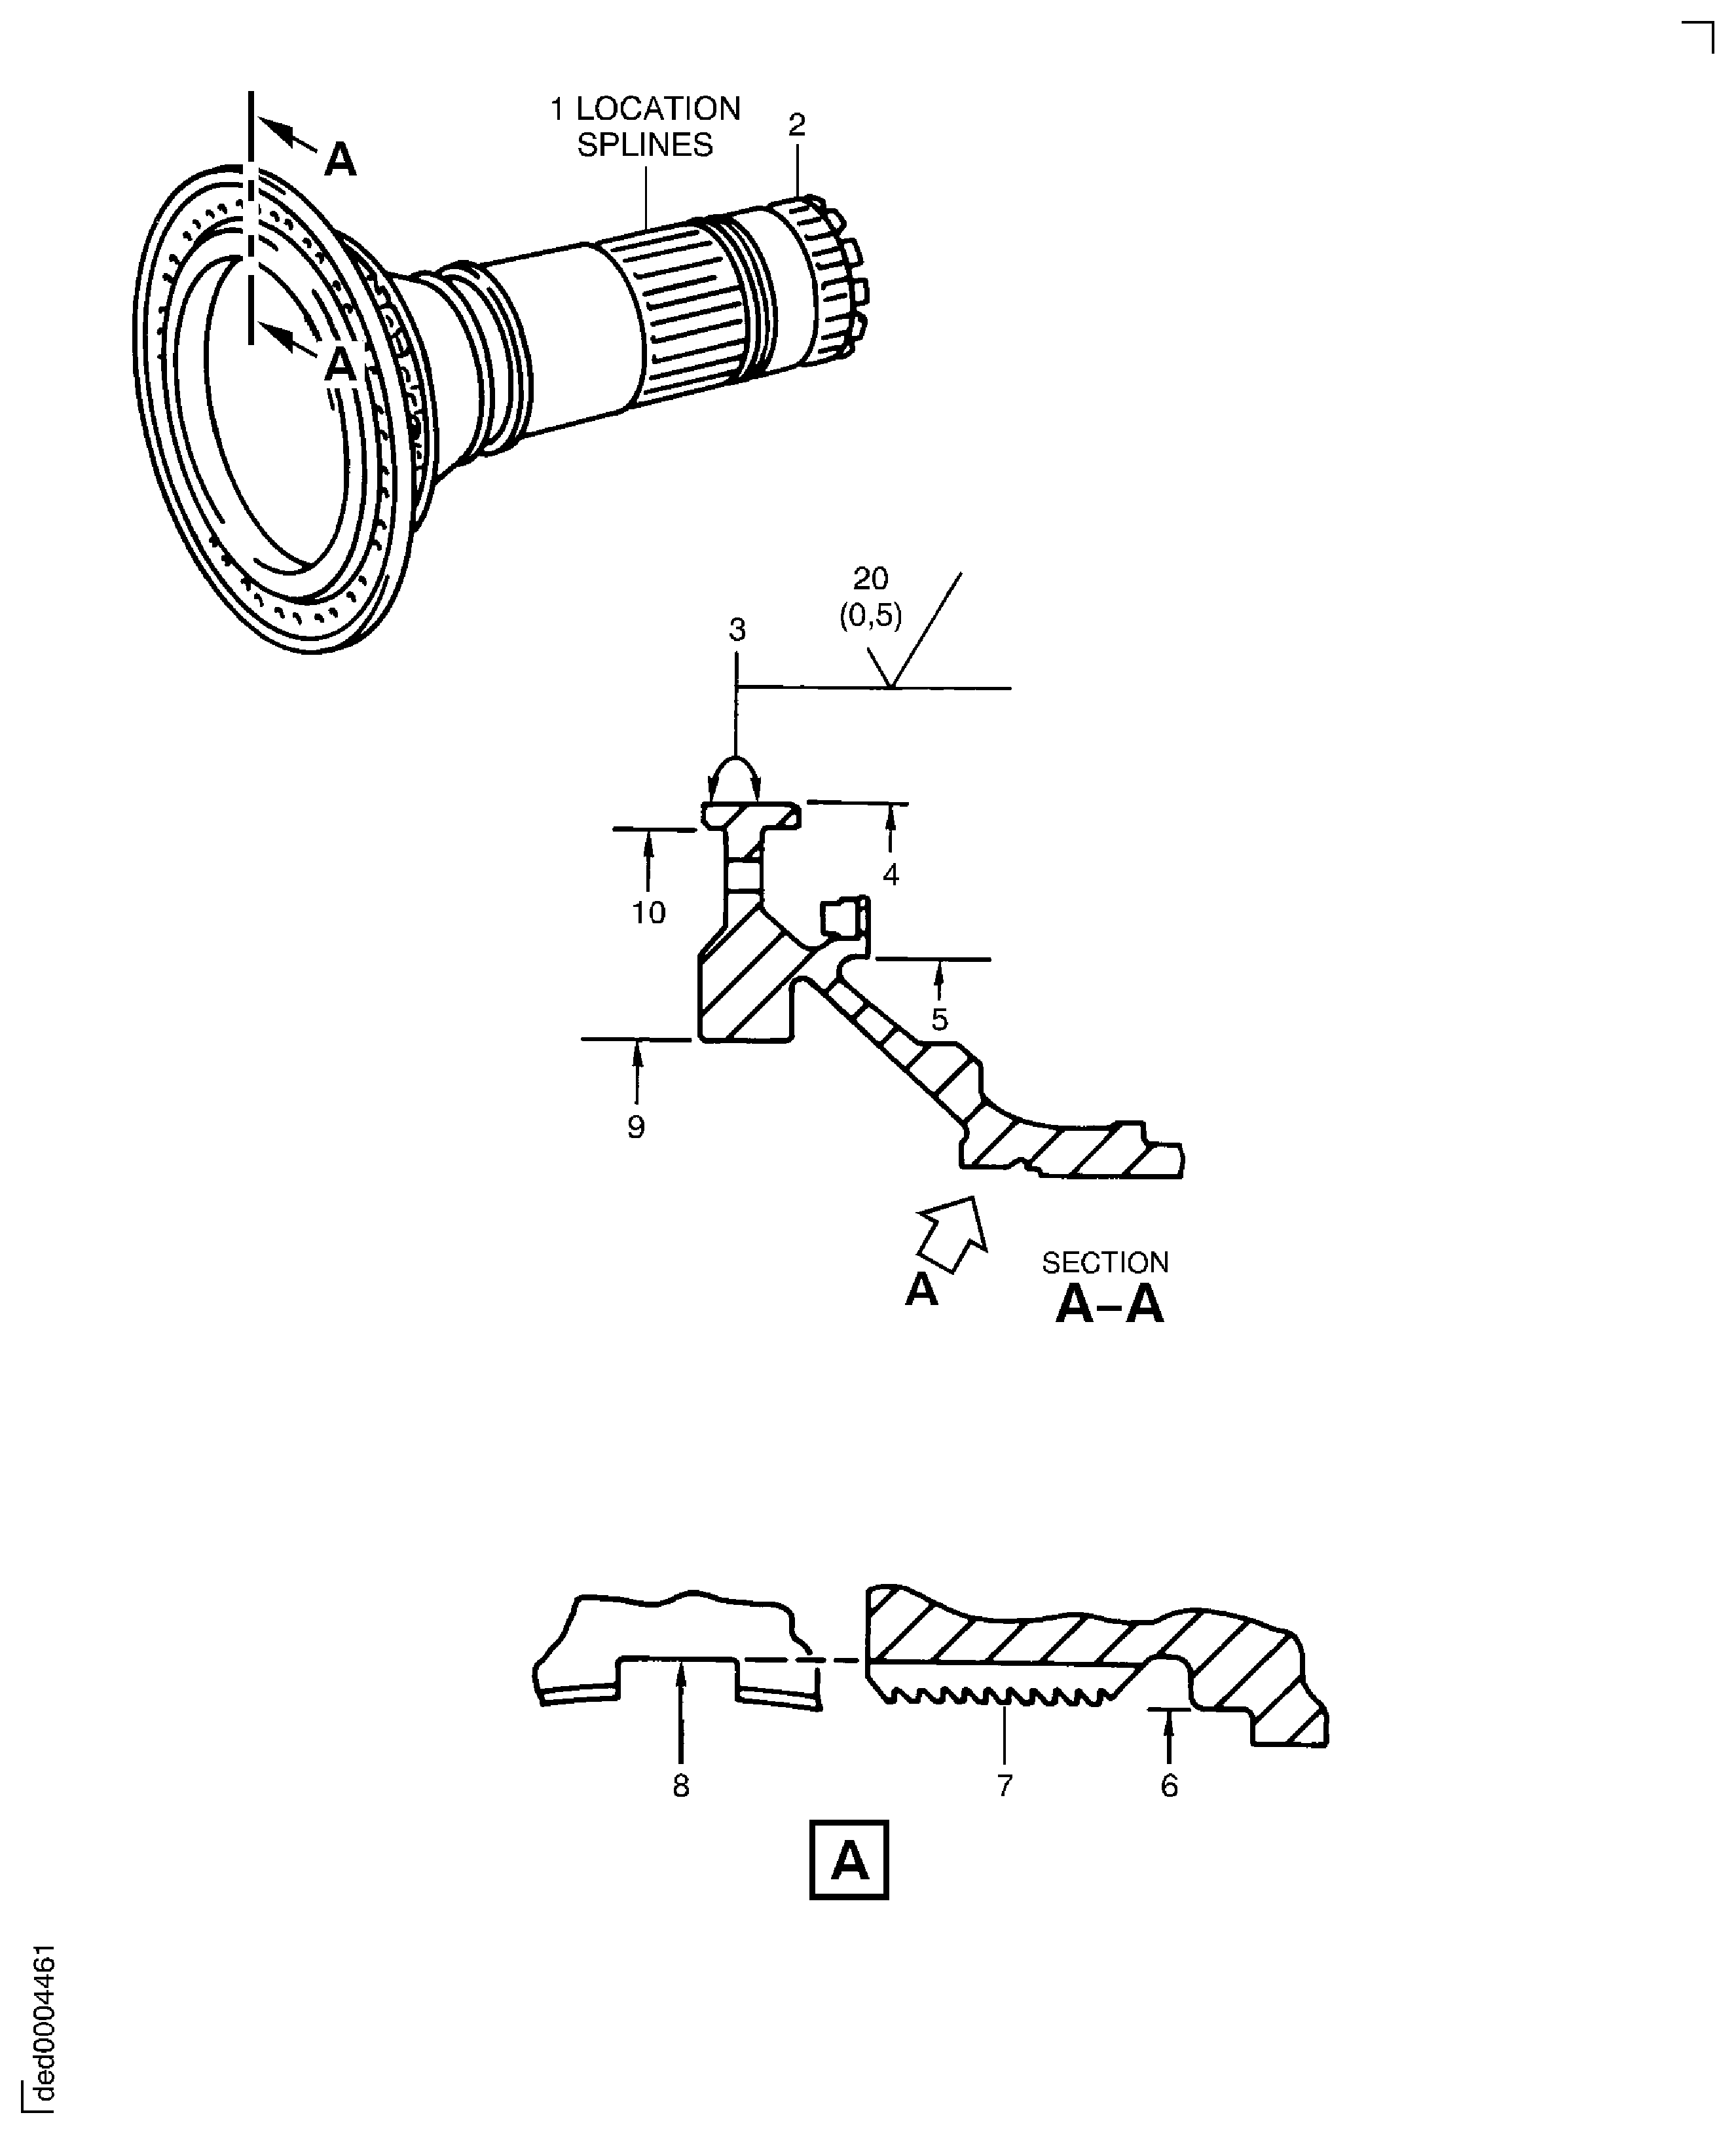
Figure: Focused Inspection - Bolt Holes, Spigot Bore Radius and Mini-Disc Bore
Focused Inspection - Bolt Holes, Spigot Bore Radius and Mini-Disc Bore
