Export Control
EAR Export Classification: Not subject to the EAR per 15 C.F.R. Chapter 1, Part 734.3(b)(3), except for the following Service Bulletins which are currently published as EAR Export Classification 9E991: SBE70-0992, SBE72-0483, SBE72-0580, SBE72-0588, SBE72-0640, SBE73-0209, SBE80-0024 and SBE80-0025.Copyright
© IAE International Aero Engines AG (2001, 2014 - 2021) The information contained in this document is the property of © IAE International Aero Engines AG and may not be copied or used for any purpose other than that for which it is supplied without the express written authority of © IAE International Aero Engines AG. (This does not preclude use by engine and aircraft operators for normal instructional, maintenance or overhaul purposes.).Applicability
All
Common Information
TASK 72-44-30-200-001-B00 Inner Combustion Chamber Assembly - Examine, Inspection-001
Effectivity
FIG/ITEM PART NO. | |
|---|---|
01-401 | 2A0549-01 |
01-401 | 2A1398 |
01-401 | 2A1617 |
01-401 | 2A2034 |
01-401 | 2A2034-001 |
01-401 | 2A2722-01 |
01-401 | 2A2838-01 |
01-401 | 2A3344-01 |
01-401 | 2A3344-001 |
01-401 | 2A3344-002 |
01-401 | 2A3344-003 |
01-401 | 2A3344-004 |
01-401 | 2A3344-005 |
01-401 | 2A3344-006 |
01-401 | 2A3344-007 |
01-401 | 2A3351-01 |
01-401 | 2A3351-003 |
01-401 | 2A3351-004 |
01-401 | 2A4283-01 |
01-401 | 2A4311-01 |
01-401 | 2A4313-01 |
01-401 | 2A4315-01 |
01-401 | 2A4315-001 |
General
This TASK gives the procedure for the inspection of the combustion chamber inner liner. For the other part of the combustion chamber inner liner, refer to TASK 72-44-30-200-000 (INSPECTION-000).
Fig/item numbers in parentheses in the procedure agree with those used in the IPC.
The policy that is necessary for inspection is given in SPM TASK 70-20-00-200-501.
All the parts must be cleaned before any part is examined. Refer to SPM TASK 70-10-00-100-501.
All parts must be visually examined for damage, corrosion and wear. Any defects that are not identified in the procedure must be referred to IAE.
Do not discard any part until you are sure there are no repairs available. Refer to the instructions in repair before a discarded part is used again or oversize parts are installed.
Parts which should be discarded can be held although no repair is available. The repair of a discarded part could be shown to be necessary at a later date.
All parts must be examined to make sure that all the repairs have been completed satisfactorily.
The practices and processes referred to in the procedure by the TASK numbers are in SPM.
Use a bright light and a 3X magnifying glass to find surface cracks.
PNs 2A3344-002, 2A3344-004, 2A3344-007, 2A4283-01, 2A4315-01 and 2A4315-001 contain Rows 3 and 4 with single crystal liners.
References
Refer to SPM for data on these items.
Definitions of Damage, SPM TASK 70-02-02-350-501.
Inspection of Parts, SPM TASK 70-20-01-200-501.
Preliminary Requirements
Pre-Conditions
NONESupport Equipment
NONEConsumables, Materials and Expendables
NONESpares
NONESafety Requirements
NONEProcedure
Refer to Figure.
Repair, VRS3173 TASK 72-44-30-300-001 (REPAIR-001)
Other than (a)
Cracks.
Repair, VRS3173 TASK 72-44-30-300-001 (REPAIR-001)
Holes
Repair, VRS3173 TASK 72-44-30-300-001 (REPAIR-001)
Other than (a)
Repair, VRS3173 TASK 72-44-30-300-001 (REPAIR-001)
Other than (a)
Burns on the corners (missing material).
Repair, VRS3173 TASK 72-44-30-300-001 (REPAIR-001)
Surface burns
Repair, VRS3173 TASK 72-44-30-300-001 (REPAIR-001)
Other than (a)
Distortion.
Examine the inner liner for cracks, holes, burns and distortion in the liner segments, rows 1 thru 5.
SUBTASK 72-44-30-220-063 Examine the Combustion Chamber Inner Liner (01-401) for Cracks, Holes, Burns and Distortion in the Liner Segments
Refer to Figure.
Repair, VRS3265 TASK 72-44-30-300-002 (REPAIR-002)
If the wear at the vane contact points is a maximum of 0.020 in. (0.51 mm) in depth
Repair, VRS3813 TASK 72-44-30-300-021 (REPAIR-021)
If the wear at the vane contact points is a maximum of 0.030 in. (0.76 mm) in depth
Wear that is not smooth.
Examine the inner liner shell at location 5 for wear that is not smooth on the rear flange-to-vane platform seal face.
SUBTASK 72-44-30-220-064 Examine the Combustion Chamber Inner Liner (01-401) for Wear that is Not Smooth on the Rear Flange-to-Vane Platform Seal Face
Refer to Figure.
Repair, VRS3264 V2500-A0-72-44-3001-00A-920A-C (REPAIR-003)
Nuts that are not there, cracks or pieces that are broken away
Examine the inner liner nut channel at location 6 for nuts that are not there, cracks and pieces that are broken away.
SUBTASK 72-44-30-220-065 Examine the Combustion Chamber Inner Liner (01-401) Nut Channel for Nuts that are Not There, Cracks and Pieces that are Broken Away
Refer to Figure.
Repair, VRS3170 TASK 72-44-30-300-004 (REPAIR-004)
Other than (a)
Wear.
Repair, VRS3170 TASK 72-44-30-300-004 (REPAIR-004)
Other than (a)
Chipped or spalled hardface.
Examine the inner liner at location 7 for wear and chipped or spalled hardface on the rear mount flange.
Repair, VRS3741 TASK 72-44-30-300-019 (REPAIR-019)
If the hole cracks go from the flange hole to the outside diameter of the flange
Cracks.
Examine the inner liner for hole cracks on the rear mount flange.
SUBTASK 72-44-30-220-066 Examine the Combustion Chamber Inner Liner (01-401) for Wear and Chipped or Spalled Hardface and for Hole Cracks on the Rear Mount Flange
Refer to Figure.
Repair, VRS3173 TASK 72-44-30-300-001 (REPAIR-001)
Nuts that are not there
Examine the inner liner at location 8 for nuts that are not there.
SUBTASK 72-44-30-220-067 Examine the Combustion Chamber Inner Liner (01-401) for Nuts that are Not There
Refer to Figure.
Replace washers by VRS3173 TASK 72-44-30-300-001 (REPAIR-001)
Loose washers
Examine the inner liner at location 9 for loose, oval-shaped washers.
SUBTASK 72-44-30-220-068 Examine the Combustion Chamber Inner Liner (01-401) for Loose, Oval-Shaped Washers
Refer to Figure.
Repair, VRS3174 TASK 72-44-30-300-005 (REPAIR-005).
Cracks.
Repair, VRS3174 TASK 72-44-30-300-005 (REPAIR-005).
Other than Step.
Dents.
Repair, VRS3174 TASK 72-44-30-300-005 (REPAIR-005).
Burn holes.
Examine the inner liner at Location 11 for cracks, dents, burn holes and blocked holes on the shell.
Repair, VRS3745 TASK 72-44-30-300-020 (REPAIR-020).
Axial cracks on the trailing edge of Row 5 that are not more than 0.125 in. (3.175 mm) long that are at least 0.100 in. (2.540 mm) apart, or look like they will go through each other and permit material to break off.
Examine the inner liner at Location 14 for cracks on the shell.
Repair, VRS3745 TASK 72-44-30-300-020 (REPAIR-020).
Cracks which extend from the boltholes.
Other than Step.
Examine the inner liner at Location 15 for cracks on the rear flange.
Repair, VRS3745 TASK 72-44-30-300-020 (REPAIR-020).
Axial cracks on the trailing edge of Row 5 that are not more than 0.125 in. (3.175 mm) long that are at least 0.100 in. (2.540 mm) apart, or look like they will go through each other and permit material to break off.
Examine the inner liner at Location 16 for cracks on the outer shell.
SUBTASK 72-44-30-220-069 Examine the Combustion Chamber Inner Liner (01-401) for Cracks, Dents, Burn Holes and Blocked Holes on the Shell
Refer to Figure.
Repair, VRS3169 TASK 72-44-30-300-007 (REPAIR-007) or Repair, VRS3055 TASK 72-44-30-300-014 (REPAIR-014)
Other than (a)
Wear.
Repair, VRS3169 TASK 72-44-30-300-007 (REPAIR-007) or Repair, VRS3055 TASK 72-44-30-300-014 (REPAIR-014)
Other than (a)
Chipped or spalled hardface.
Examine the inner liner at location 12, for wear and chipped or spalled hardface on the front outside diameter seal.
SUBTASK 72-44-30-220-070 Examine the Combustion Chamber Inner Liner (01-401) for Wear and Chipped or Spalled Hardface on the Front Outside Diameter Seal
Repair, VRS3175 TASK 72-44-30-300-011 (REPAIR-011)
NOTE
Spalled coating must not be connected to any other damage. Spalled coating has a dark area where there are no burns or cracks.
Other than (a)
Spalled coating.
Examine the inner liner (PN 2A1398) at locations 1 and 2 for spalled ceramic coating on the liner segments (rows 2 and 3).
Repair, VRS3175 TASK 72-44-30-300-011 (REPAIR-011)
NOTE
Spalled coating must not be connected to any other damage. Spalled coating has a dark area where there are no burns or cracks.
Other than (a)
Spalled coating.
Examine the inner liner (2A1617) at locations 1 and 2 for spalled ceramic coating on the liner segments (rows 1 and 4).
Repair, VRS3175 TASK 72-44-30-300-011 (REPAIR-011) or Repair VRS3664 TASK 72-44-30-300-018 (REPAIR-018)
NOTE
Spalled coating must not be connected to any other damage. Spalled coating has a dark area where there are no burns or cracks.
Other than (a)
Spalled coating.
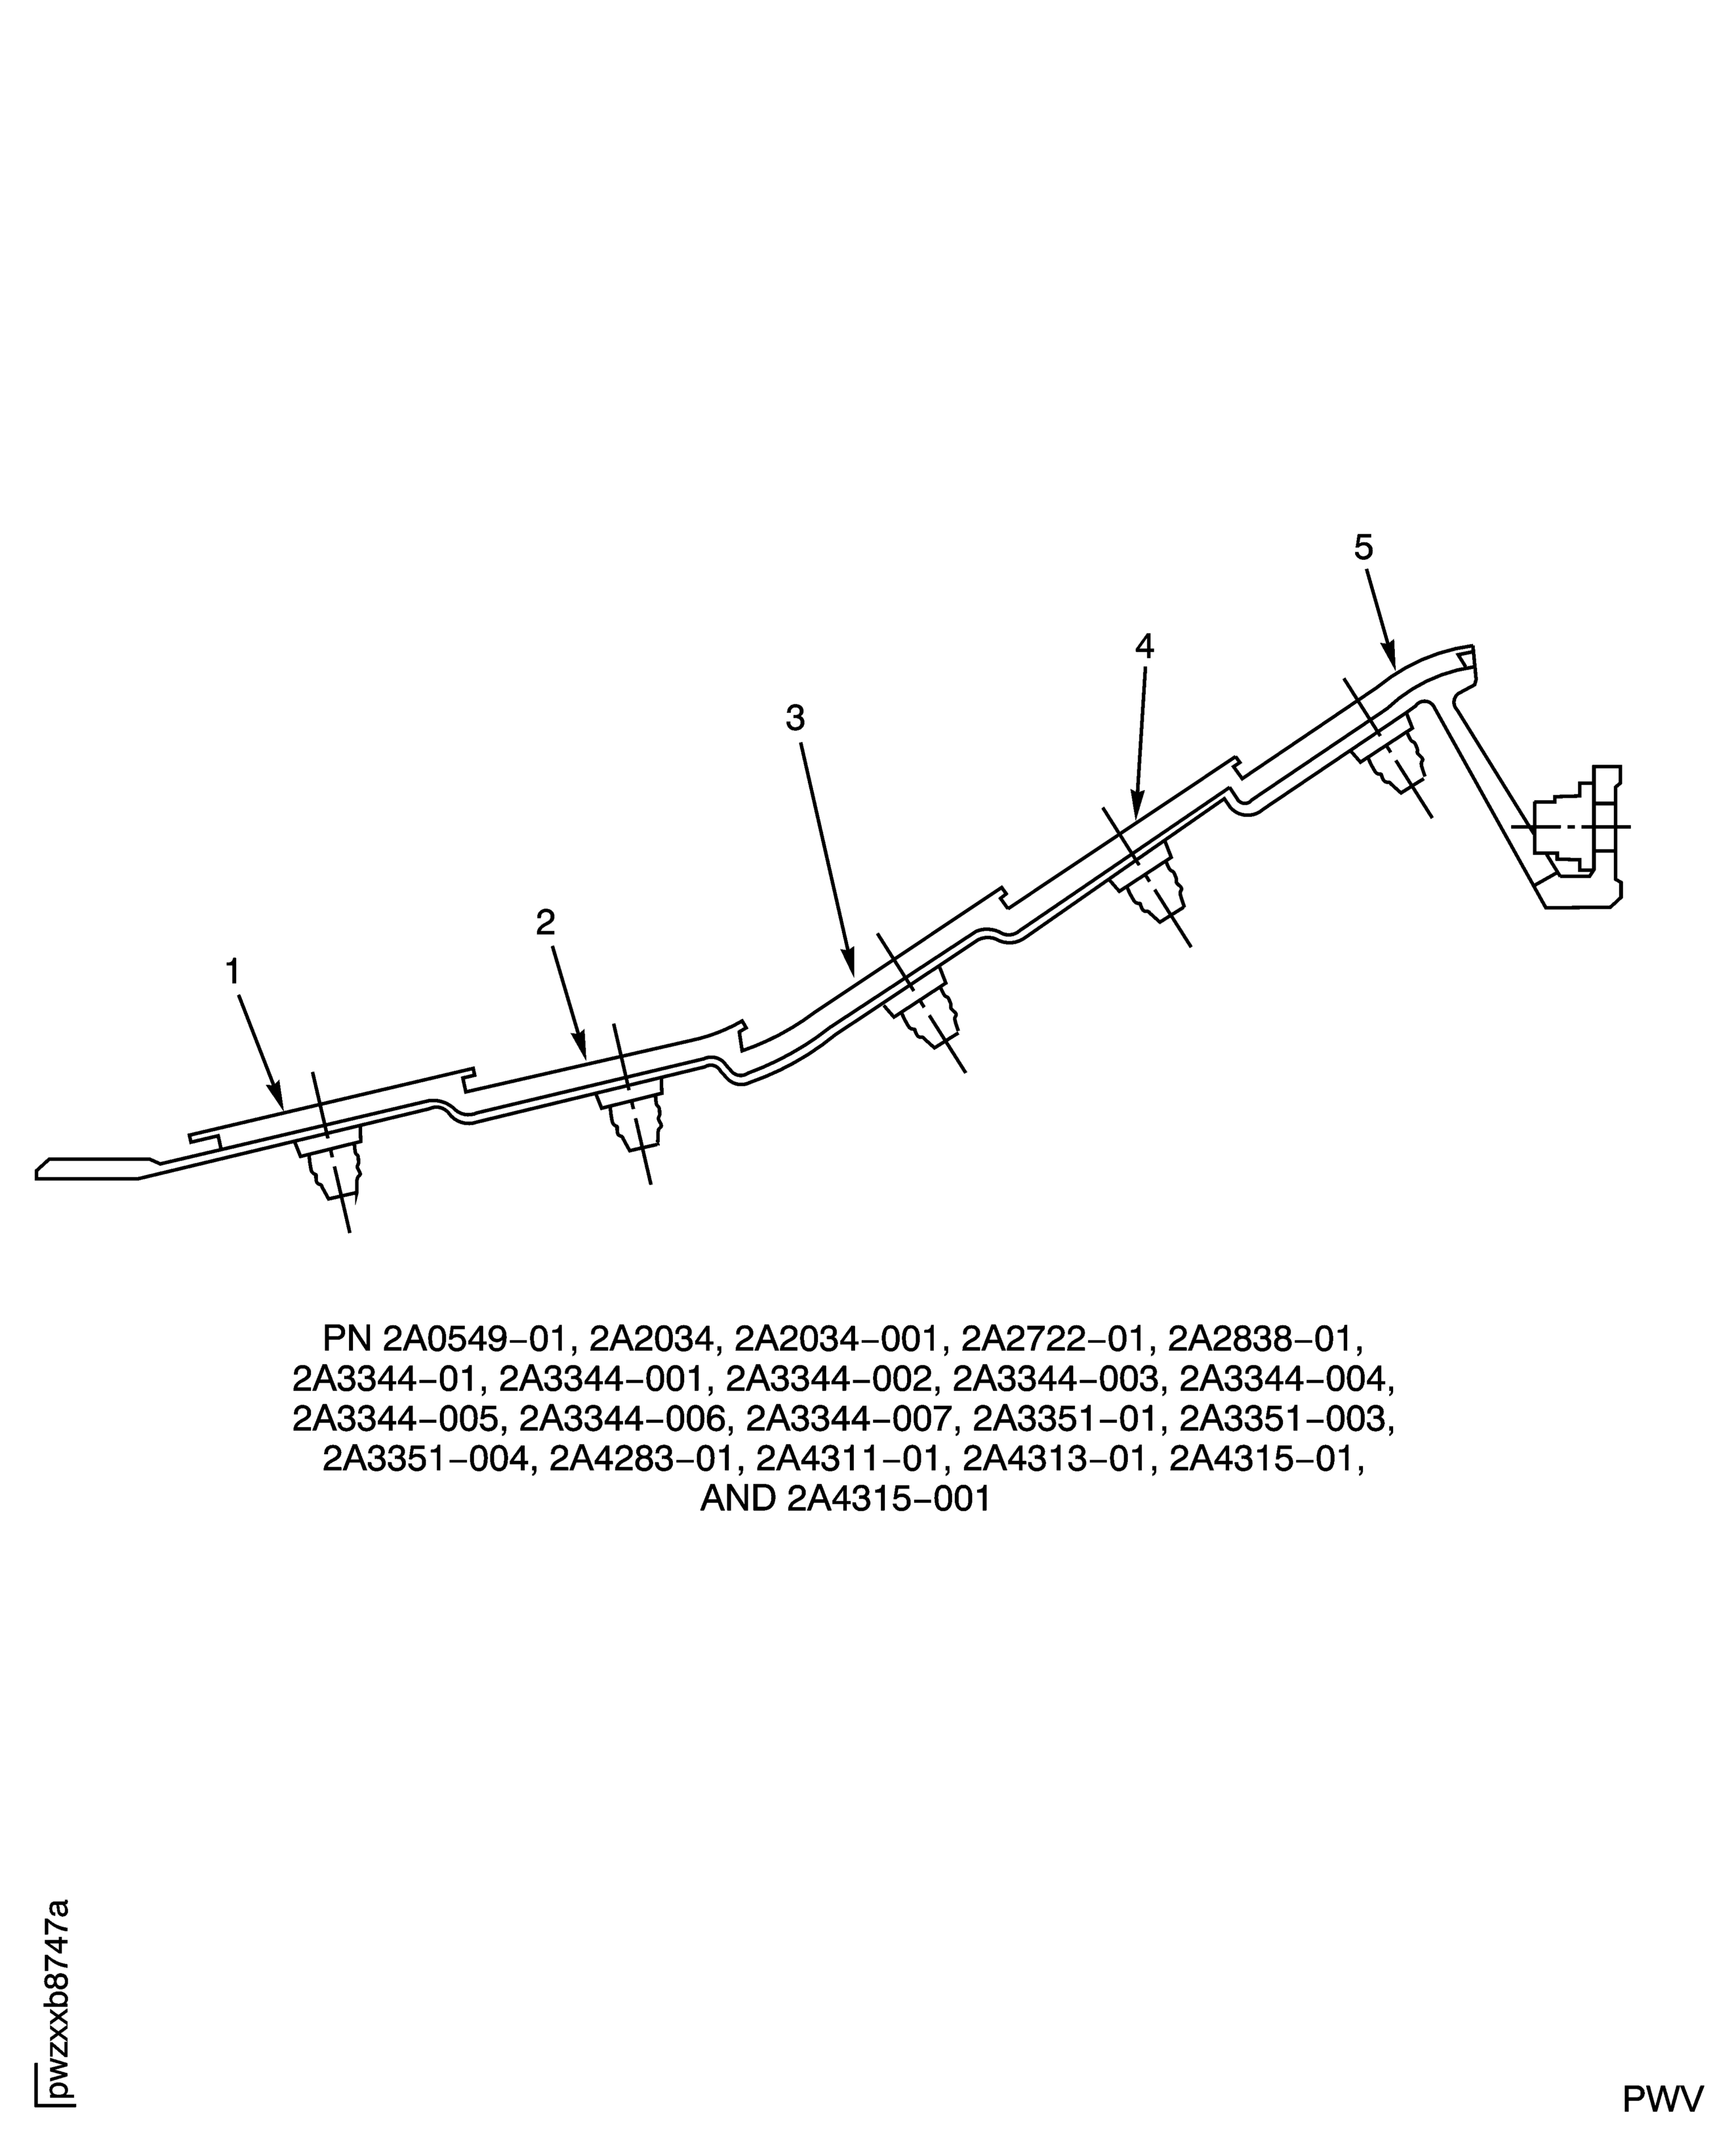
Examine the inner liner (2A0549-01, 2A2034, 2A2034-001, 2A2722-01, 2A2838-01, 2A3344-01, 2A3344-001, 2A3344-002, 2A3344-003, 2A3344-004, 2A3344-005, 2A3344-006, 2A3344-007, 2A3351-01, 2A3351-003, 2A3351-004, 2A4283-01, 2A4311-01, 2A4313-01, 2A4315-01 and 2A4315-001), at locations 1 thru 4, for spalled ceramic coating on the liner segments (rows 1 thru 4).
Repair, VRS3175 TASK 72-44-30-300-011 (REPAIR-011)
Other than (a)
Spalled coating.
Examine the inner liner (2A0549-01, 2A2034, 2A2034-001, 2A2722-01, 2A2838-01, 2A3344-01, 2A3344-001, 2A3344-002, 2A3344-003, 2A3344-004, 2A3344-005, 2A3344-006, 2A3344-007, 2A3351-01, 2A3351-003, 2A3351-004, 2A4283-01, 2A4311-01, 2A4313-01, 2A4315-01 and 2A4315-001) at location 5 and inner liner (2A1617) at location 3 for spalled ceramic coating on the liner segments (row 5).
SUBTASK 72-44-30-220-071 Examine the Combustion Chamber Inner Liner (01-401) for Spalled Ceramic Coating on the Liner Segments
Refer to Figure.
SUBTASK 72-44-30-220-072 Examine the Combustion Chamber Inner Liner (01-401) for the Length
Refer to Figure.
Repair, VRS3265 TASK 72-44-30-300-002 (REPAIR-002) or Repair, VRS3813 TASK 72-44-30-300-021 (REPAIR-021)
Other than (1)
Examine the inner liner for the axial dimension of the rear support at location 2004.
Repair, VRS3170 TASK 72-44-30-300-004 (REPAIR-004)
If the thickness is less than 0.156 in. (3.96 mm) and equal or more than 0.140 in. (3.56 mm)
Examine the inner liner for the thickness of the rear mount flange at location 2300.
SUBTASK 72-44-30-220-073 Examine the Combustion Chamber Inner Liner (01-401) for the Axial Dimension of the Rear Support and Thickness of the Rear Mount Flange
Refer to Figure.
Repair, VRS3266 TASK 72-44-30-300-008 (REPAIR-008)
More than 19.400 in. (492.760 mm)
Repair, VRS3628 TASK 72-44-30-300-017 (REPAIR-017)
Less than 19.392 in. (492.557 mm)
Examine the inner liner for the rear inside diameter at location 2000.
SUBTASK 72-44-30-220-074 Examine the Combustion Chamber Inner Liner (01-401) for the Rear Inside Diameter
Refer to Figure.
Accept part for select fit only
NOTE
This part can be used only if the mating part has a diameter that will result in fit of reference No. 2265.Refer to TASK 72-00-44-420-001-001 (INSTALLATION-001) or TASK 72-40-00-430-005 (ASSEMBLY-005).
If the diameter is between 16.616 and 16.618 in. (422.05 and 422.10 mm)
Repair, VRS3306 TASK 72-44-30-300-009 (REPAIR-009) or Repair, VRS3057 TASK 72-44-30-300-015 (REPAIR-015)
Other than (1) or (2)
Examine the inner liner for the diameter of the front outside diameter seal at location 2265.
Repair, VRS3306 TASK 72-44-30-300-009 (REPAIR-009) or Repair, VRS3057 TASK 72-44-30-300-015 (REPAIR-015)
Other than (a)
Out-of-roundness.
Examine the inner liner at location 2265 for the out-of-roundness of the front outside diameter seal.
SUBTASK 72-44-30-220-075 Examine the Combustion Chamber Inner Liner (01-401) Front Outside Diameter Seal for the Diameter and Out-of-Roundness
Figure: Combustion Chamber Inner Liner Inspection Locations
Combustion Chamber Inner Liner Inspection Locations
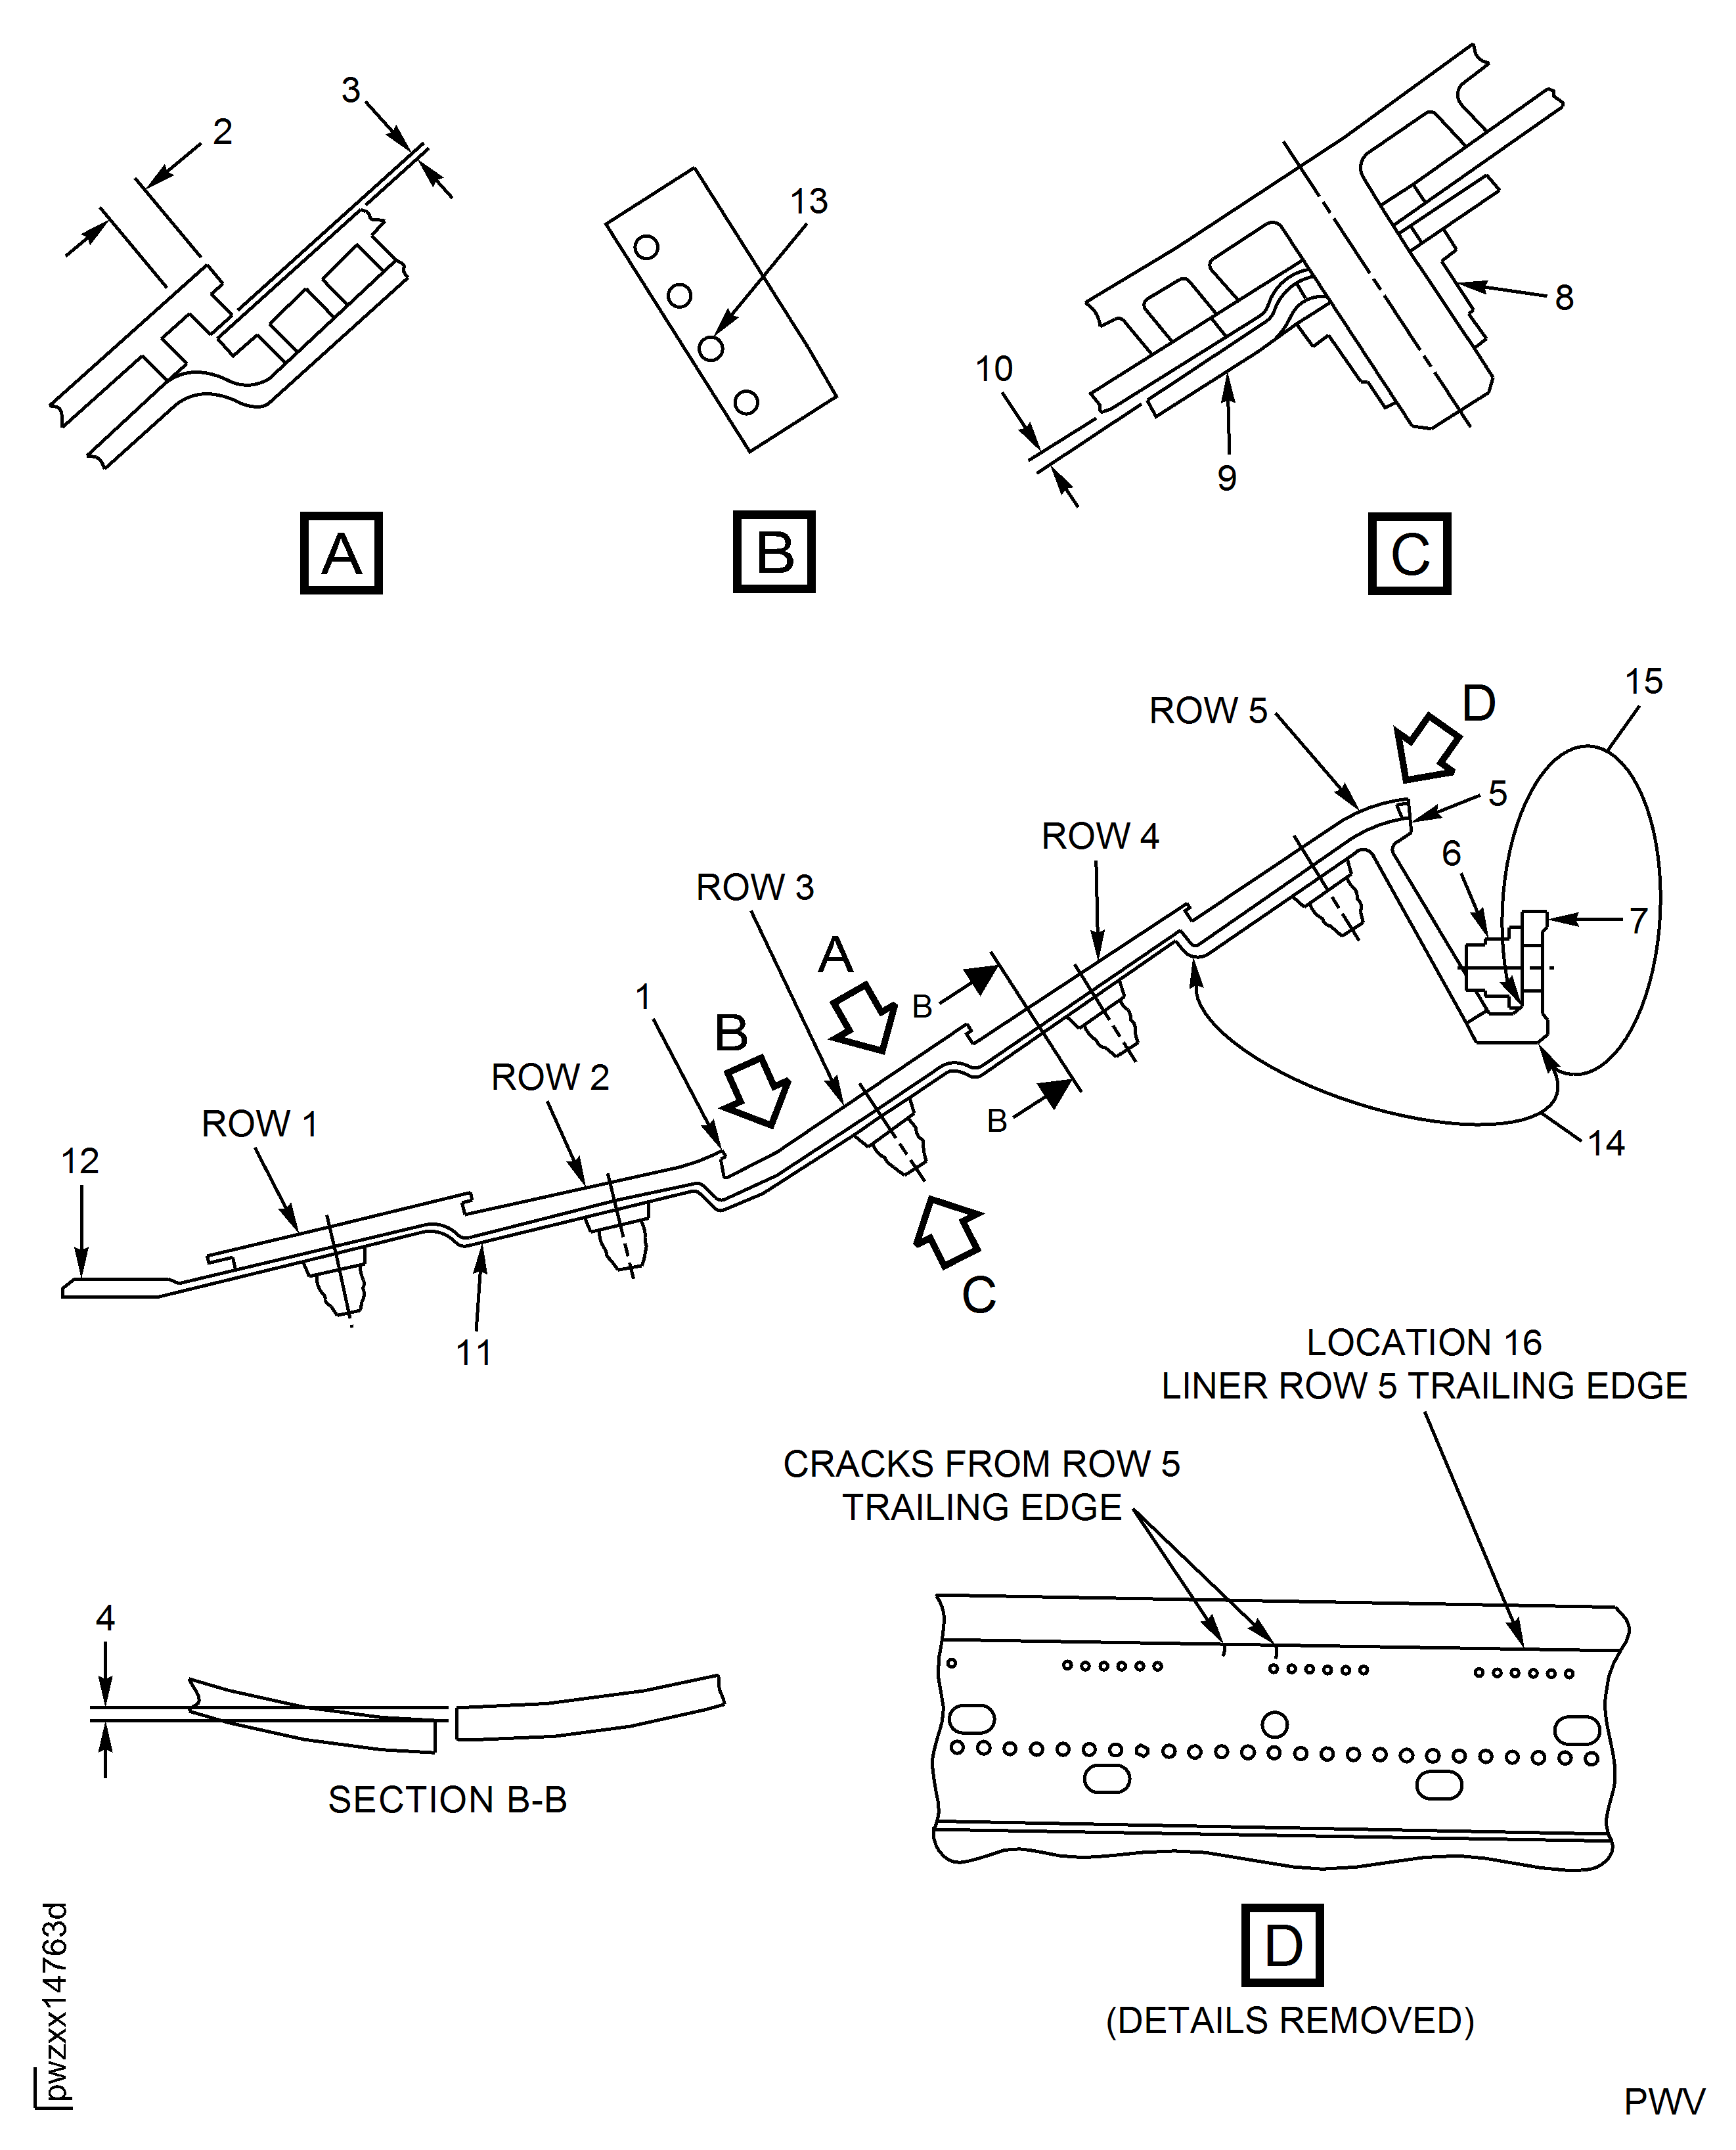
Figure: Combustion Chamber Inner Liner (PN 2A1398) Inspection Locations
Combustion Chamber Inner Liner (PN 2A1398) Inspection Locations
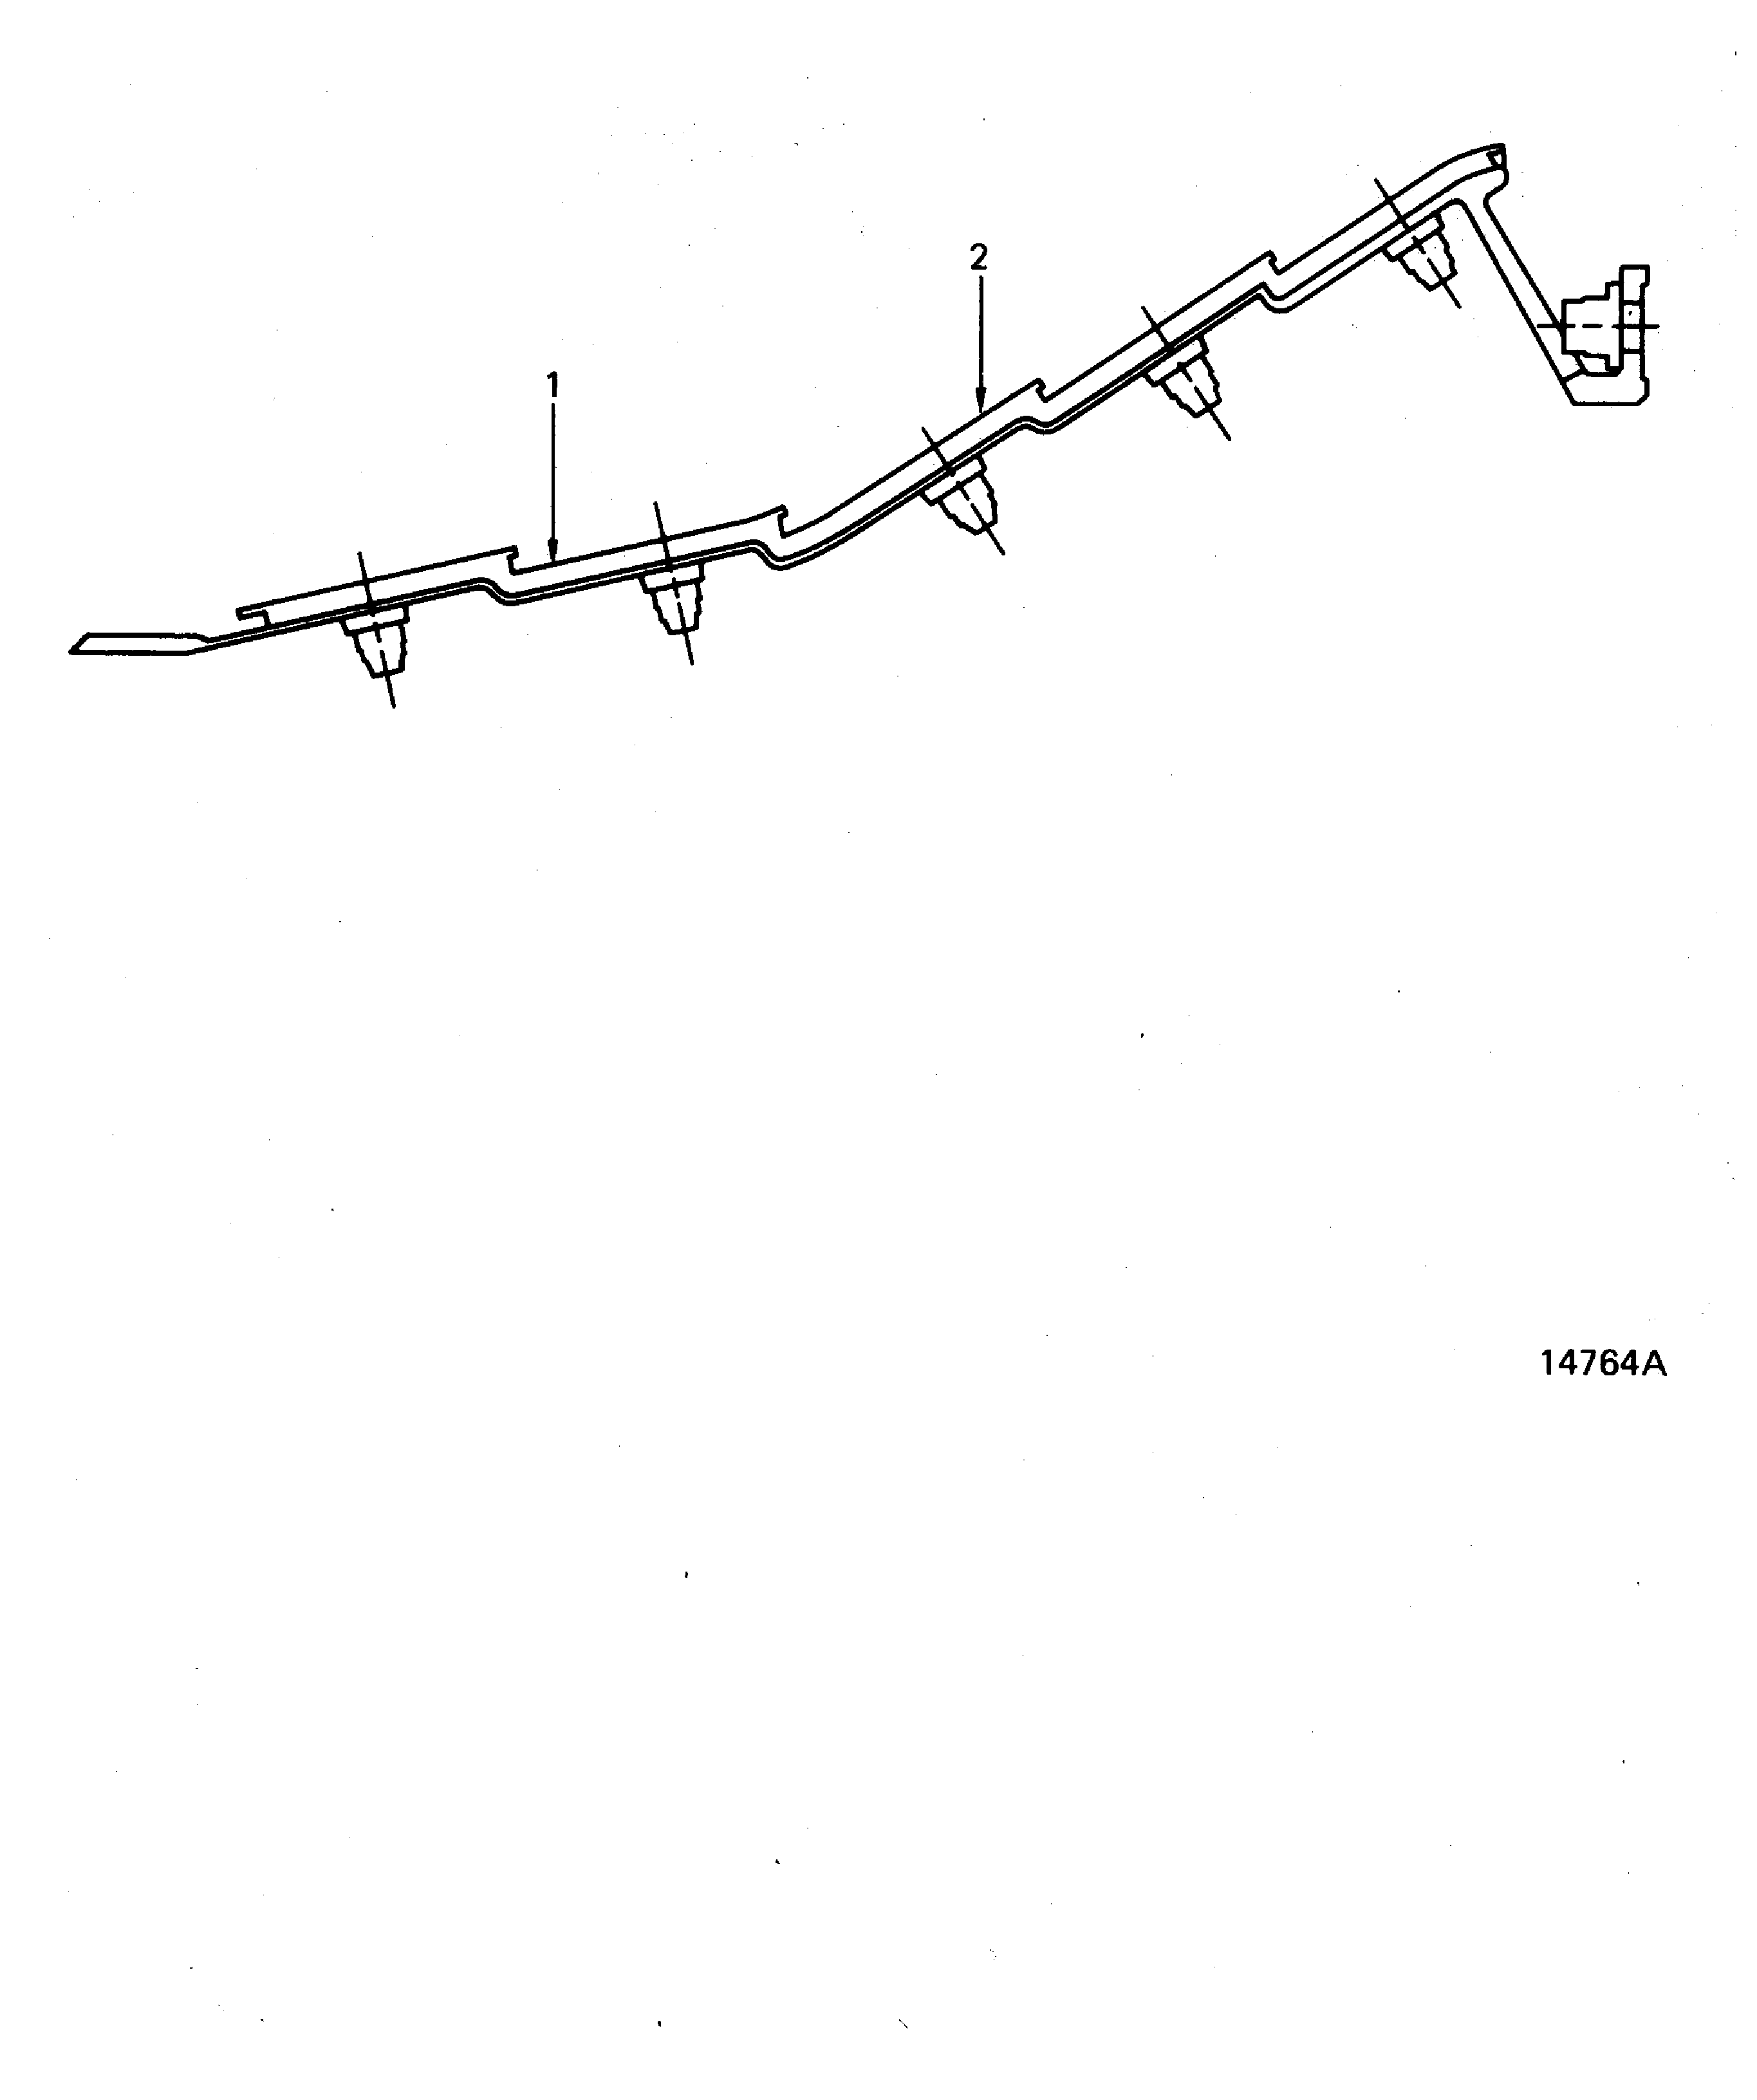
Figure: Combustion Chamber Inner Liner Inspection Locations
Combustion Chamber Inner Liner Inspection Locations
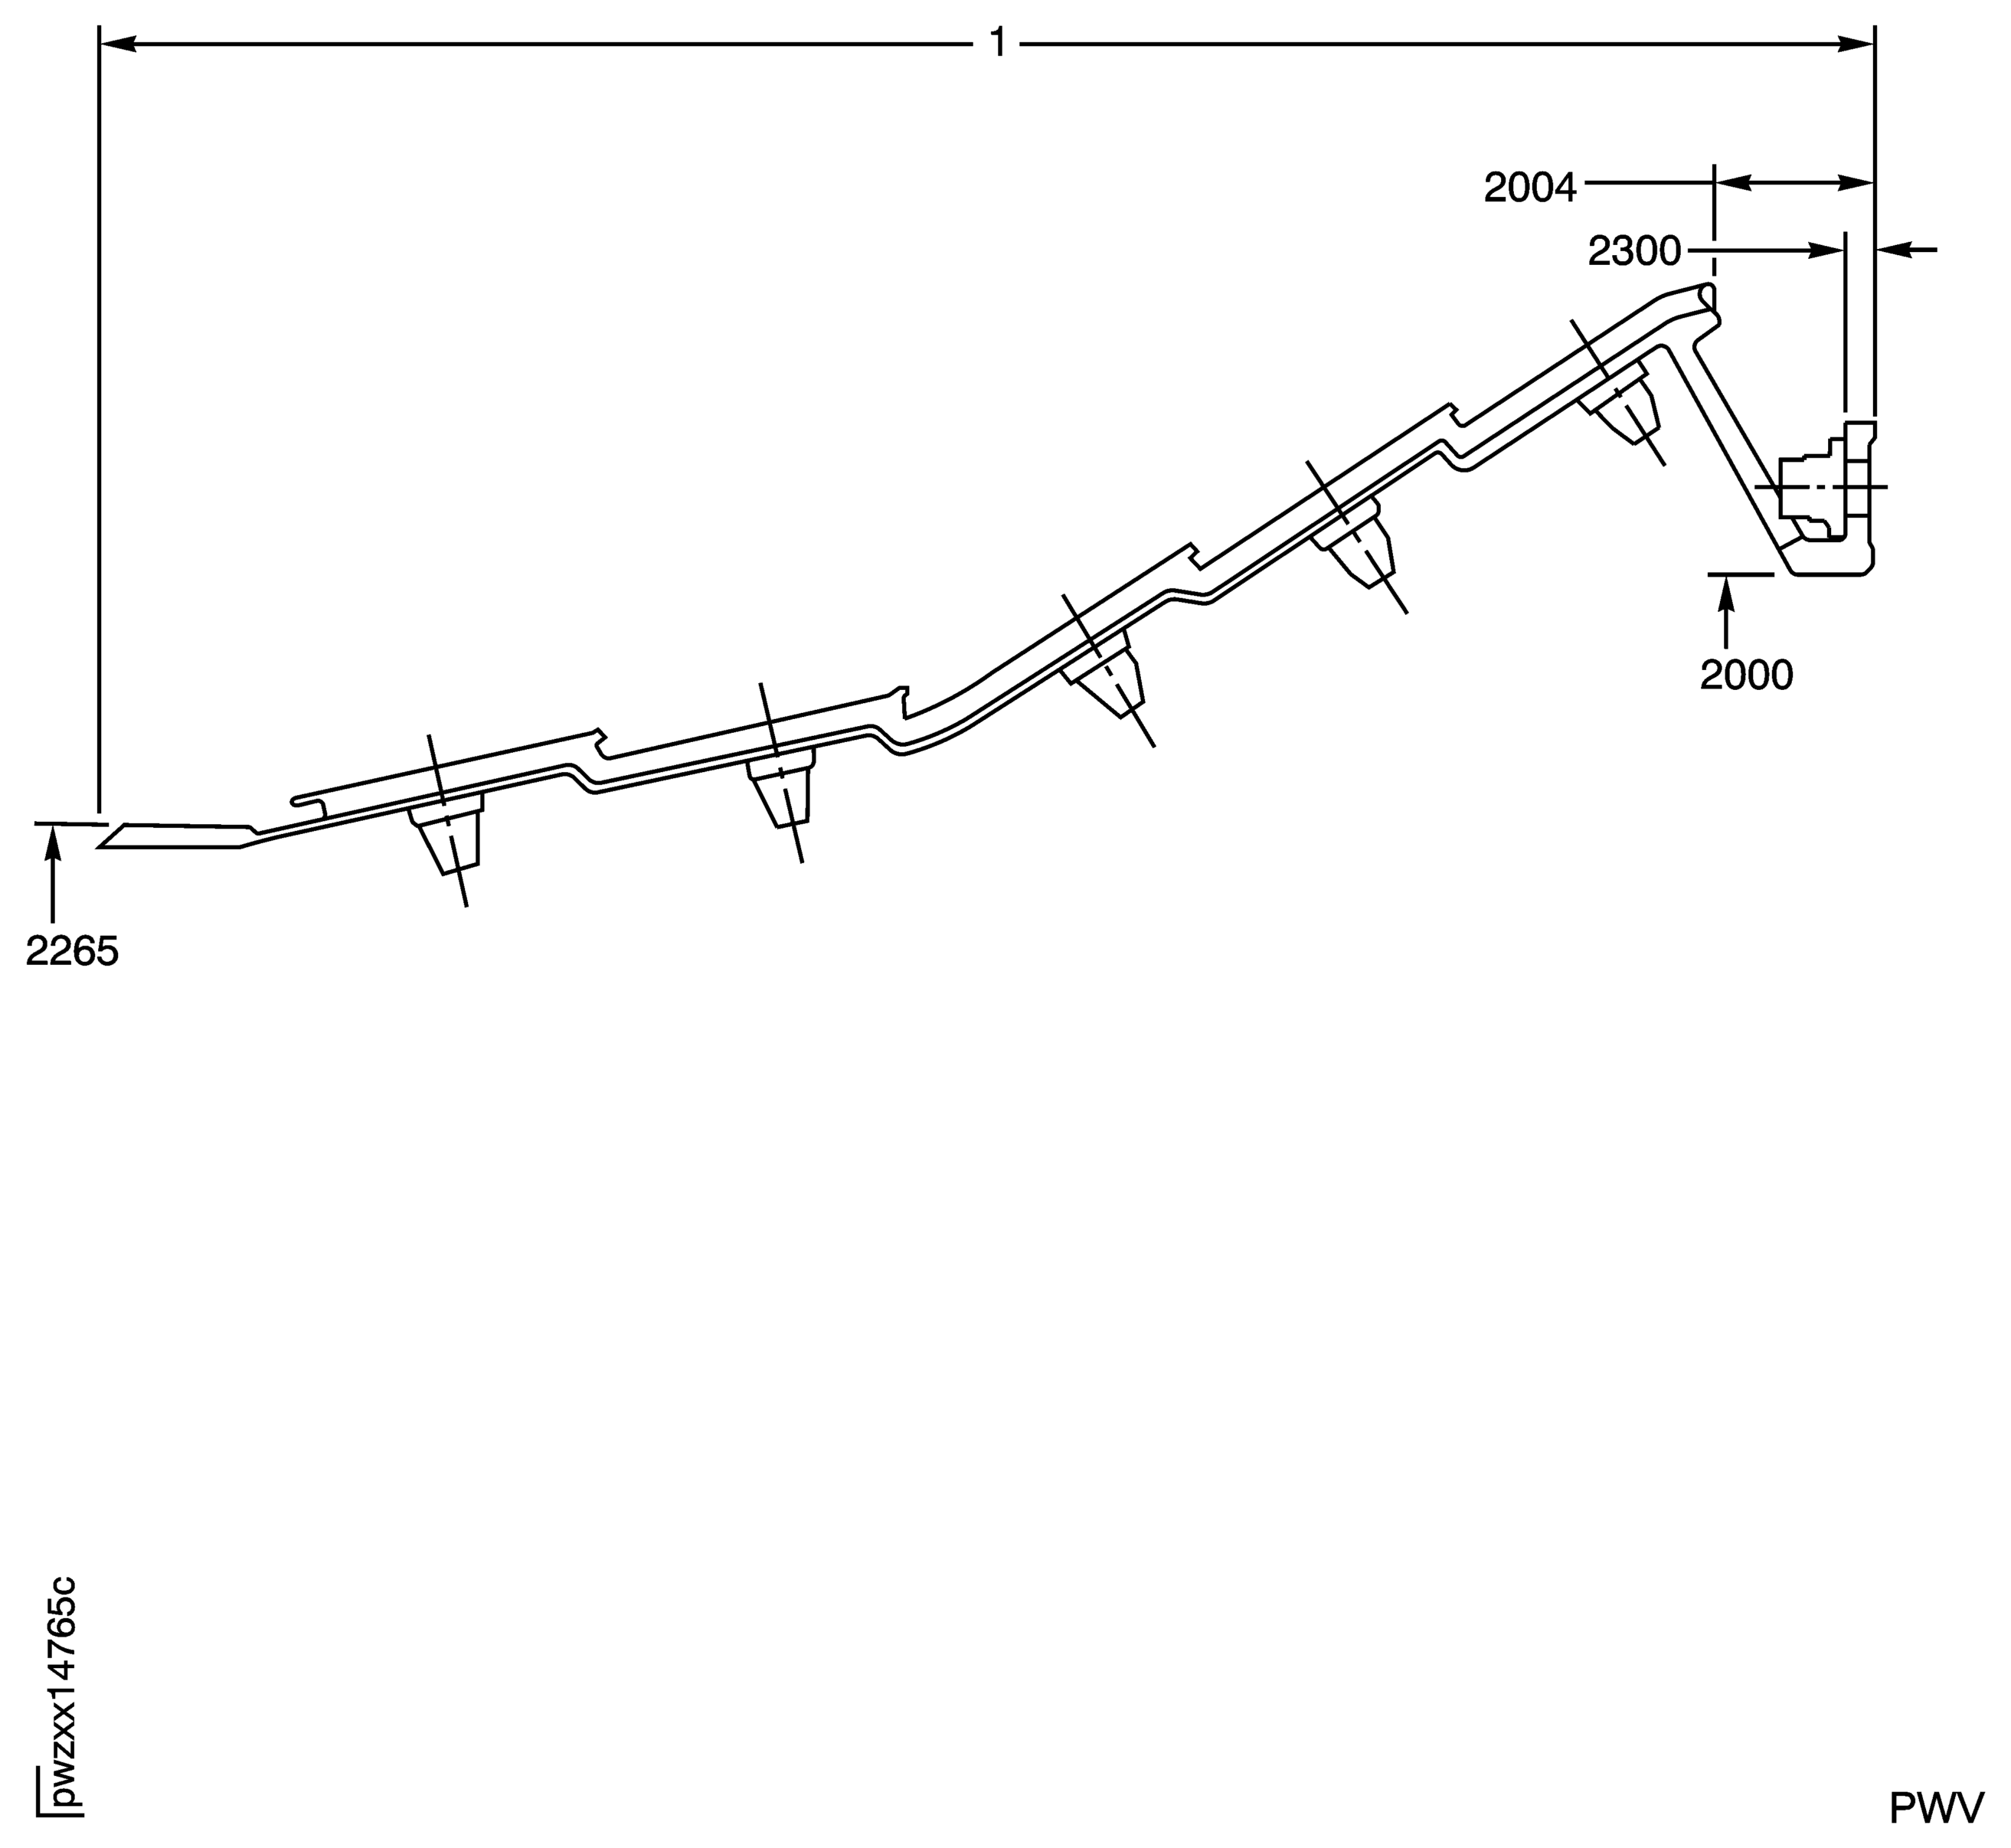
Figure: Combustion Chamber Inner Liner (PN 2A1617) Inspection Locations
Combustion Chamber Inner Liner (PN 2A1617) Inspection Locations
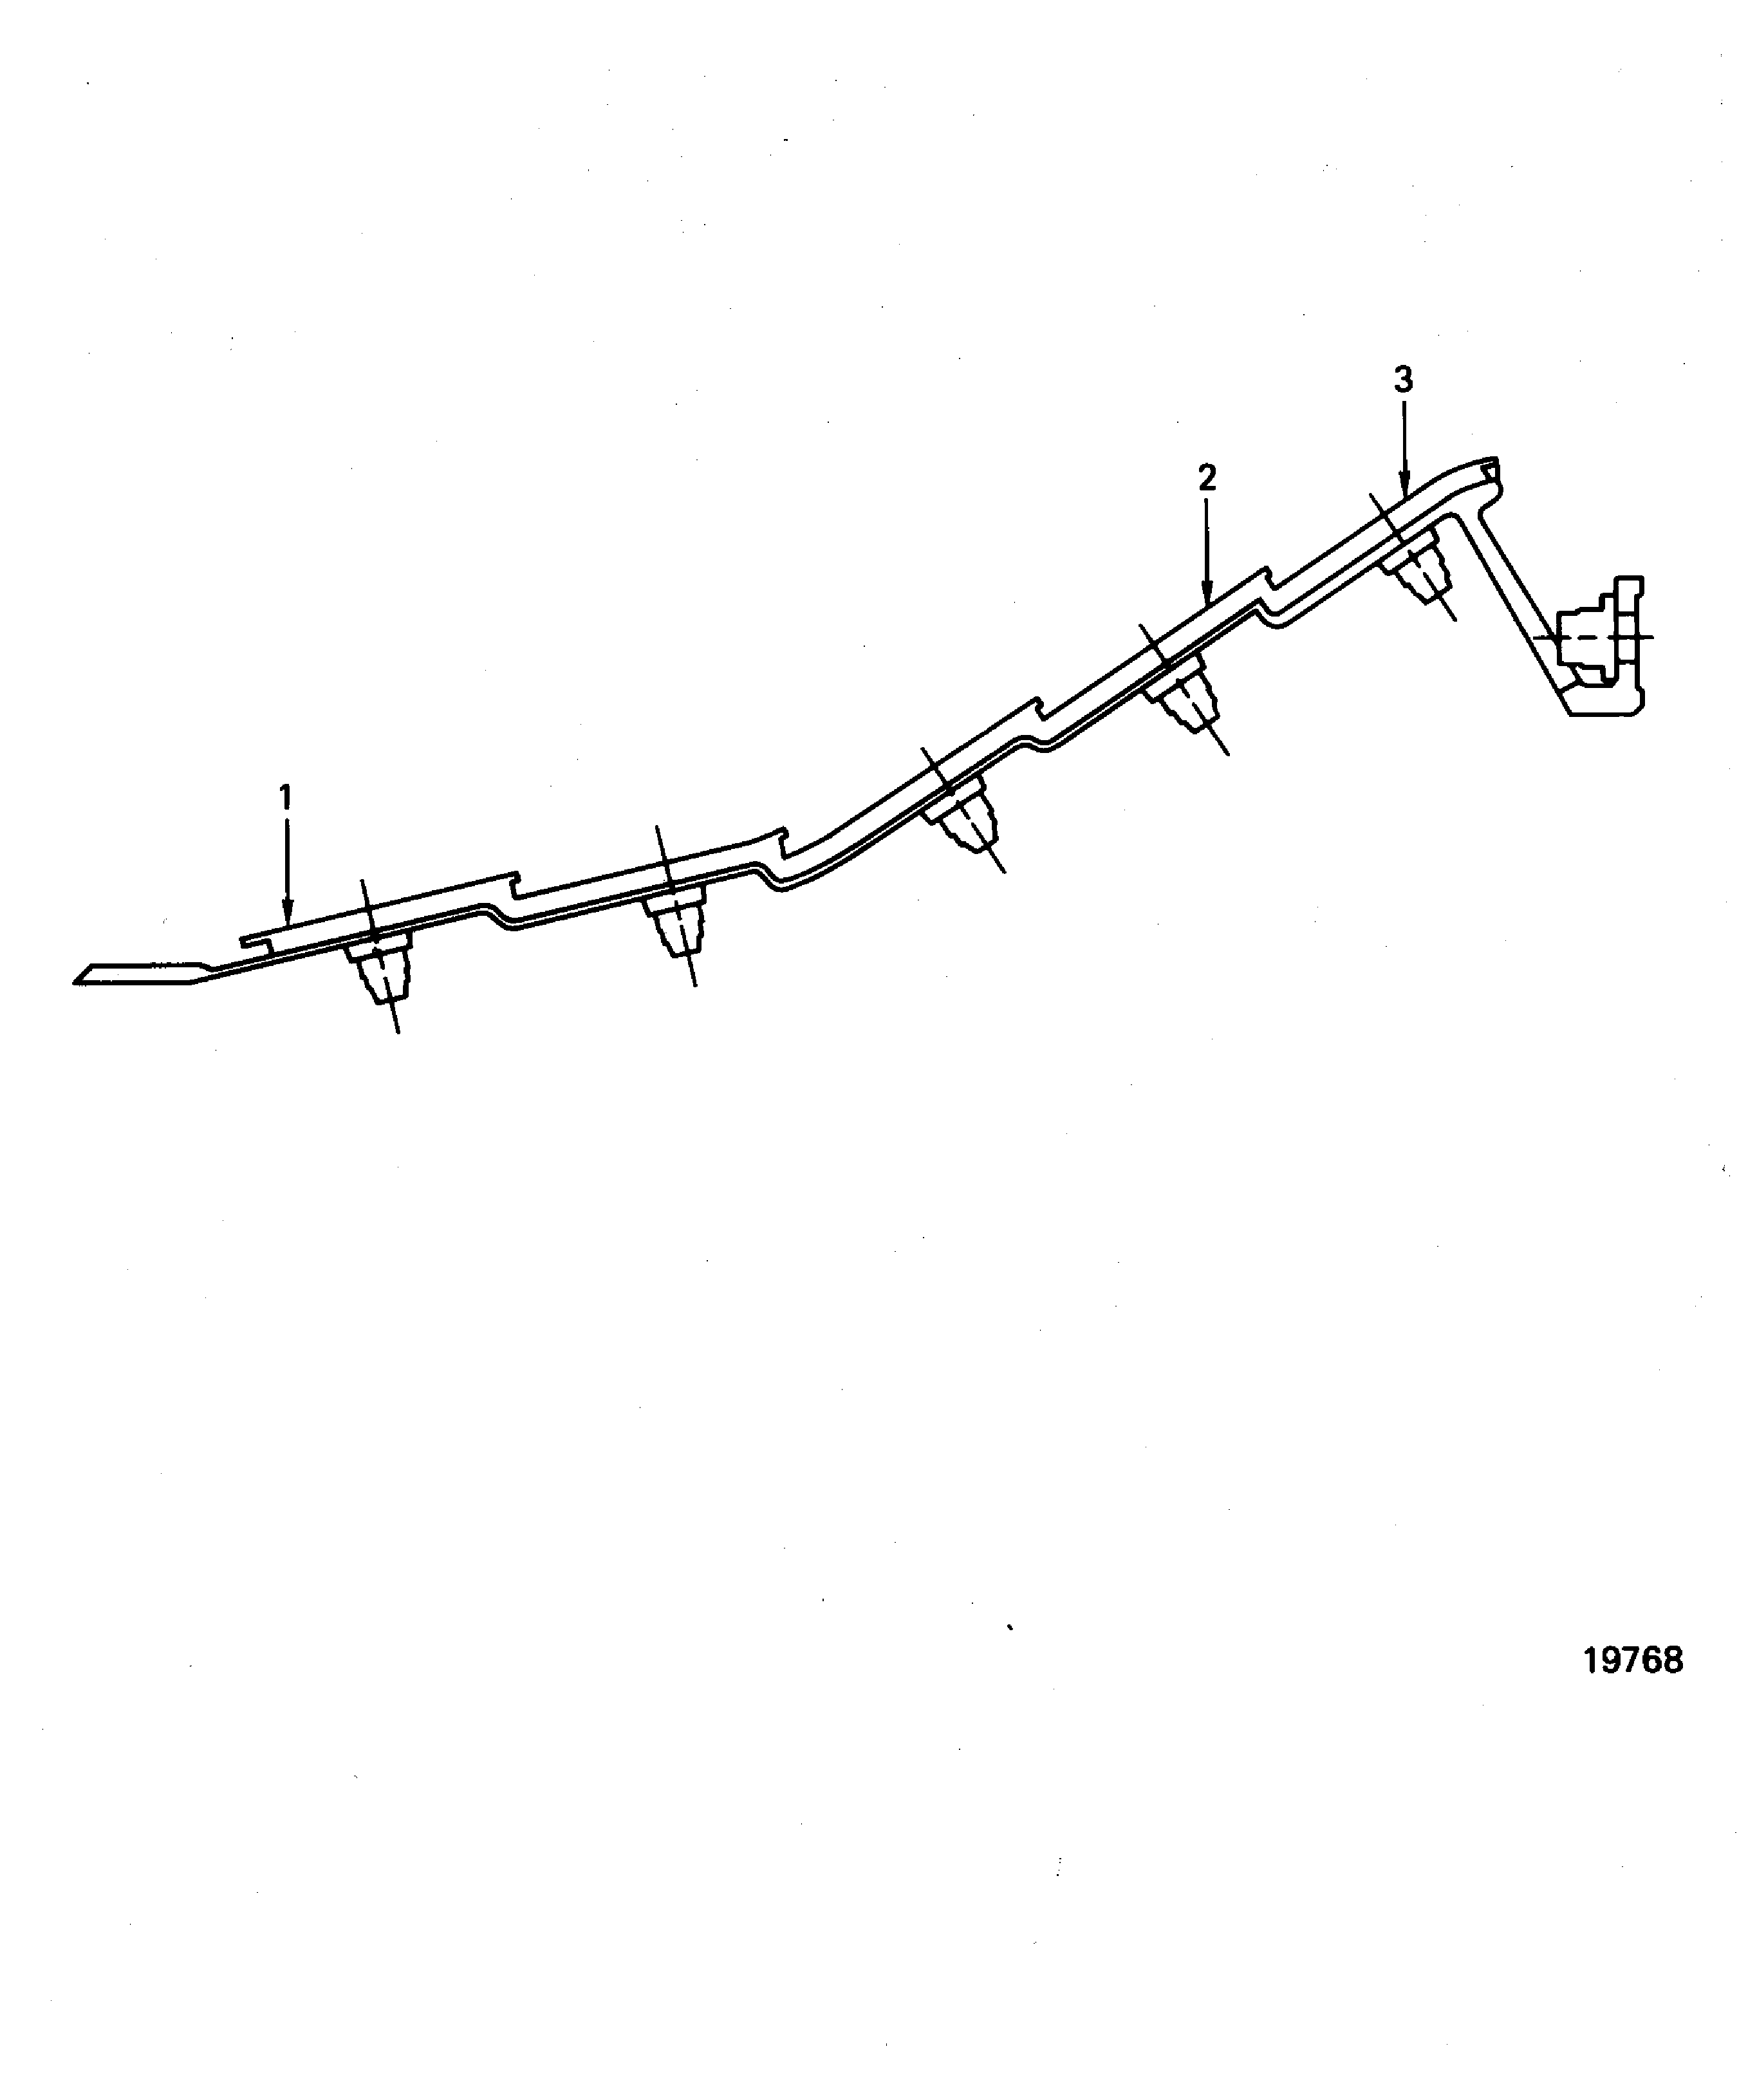
Figure: Combustion Chamber Inner Liner Inspection Locations
Combustion Chamber Inner Liner Inspection Locations
