TASK 72-00-31-200-006-B00 LPC Fan Module - Examine The Inlet Cone, The Inlet Cone Fairing, And The LPC Fan Module (Level 2 Inspection Limits), Inspection-006

DMC:V2500-A0-72-00-3100-00B-300A-B|Issue No:001.00|Issue Date:2013-11-01

Export Control

EAR Export Classification: Not subject to the EAR per 15 C.F.R. Chapter 1, Part 734.3(b)(3), except for the following Service Bulletins which are currently published as EAR Export Classification 9E991: SBE70-0992, SBE72-0483, SBE72-0580, SBE72-0588, SBE72-0640, SBE73-0209, SBE80-0024 and SBE80-0025.

Copyright

© IAE International Aero Engines AG (2001, 2014 - 2021) The information contained in this document is the property of © IAE International Aero Engines AG and may not be copied or used for any purpose other than that for which it is supplied without the express written authority of © IAE International Aero Engines AG. (This does not preclude use by engine and aircraft operators for normal instructional, maintenance or overhaul purposes.).

Applicability

All

Common Information

TASK 72-00-31-200-006-B00 LPC Fan Module - Examine The Inlet Cone, The Inlet Cone Fairing, And The LPC Fan Module (Level 2 Inspection Limits), Inspection-006

General

This TASK gives the procedure for the inspection of LP compressor (fan) module below soft time as given in the engine management program.

A ** following repair referenced in this inspection indicates that the repair is not yet published in the current revision of the manual and the part must be rejected. Contact IAE for additional information concerning FAA approved repair date.

Where applicable these inspections are to be carried out in conjunction with those given in the interface inspections. Refer to TASK 72-00-00-200-000.

The module will be sufficiently disassembled for the components to be examined as specified in accordance with this procedure. Refer to TASK 72-31-00-030-001.

The policy that is necessary for inspection is given in the SPM TASK 70-20-01-200-501.

The practices and processes referred to in the procedure by the TASK/SUBTASK number are in the SPM.

Clean the inlet cone assembly. Refer to TASK 72-38-11-100-000. Degrease the inlet cone assembly, make sure that all dirt and debris have been removed before doing the inspection. Refer to SPM TASK 70-11-03-300-503.

Clean the inlet cone fairing assembly. Refer to TASK 72-38-11-100-000. Degrease the front cone retaining ring, make sure that all dirt and debris have been removed before doing the inspection. Refer to SPM TASK 70-11-03-300-503.

Clean the front blade retaining ring. Refer to TASK 72-31-13-100-001. Degrease the front blade retaining ring, make sure that all dirt and debris have been removed before doing the inspection. Refer to SPM TASK 70-11-03-300-503.

Clean the annulus filler. Degrease the annulus filler, make sure that all dirt and debris have been removed before doing the inspection. Refer to SPM TASK 70-11-03-300-503.

Clean the fan blades. Refer to Step.

Clean the fan disc. Refer to Step.

Clean the rear blade retaining ring. Refer to TASK 72-31-12-100-001. Degrease the rear blade retaining ring, make sure that all dirt and debris have been removed before doing the inspection. Refer to SPM TASK 70-11-03-300-503.

It is not necessary to separate the rear retaining ring from the fan disc to carry out this inspection, unless it has already been done.

Reference

Refer to the SPM for data on these items:

Definition of Damage, SPM TASK 70-02-02-350-501.

Inspection of Parts, SPM TASK 70-20-01-200-501.

NOTE

The word "Reject" is used after an interface/SP50 inspection statement to show that a higher-level inspection and possible repair to the damaged part is necessary if the part is rejected, refer to the related Inspection/Check. Do the higher-level inspection procedure of the damaged part(s) as found in the applicable Chapter/Section/Subject of manual.

Preliminary Requirements

Pre-Conditions

NONE

Support Equipment

NONE

Consumables, Materials and Expendables

NameManufacturerPart Number / IdentificationQuantityRemark
CoMat 02-099 LINT-FREE CLOTHLOCALCoMat 02-099
CoMat 05-021 WATERPROOF SILICON CARBIDE44197CoMat 05-021

Spares

NONE

Safety Requirements

NONE

Procedure

    1. SUBTASK 72-00-31-220-155 Examine the Inlet Cone

    2. CAUTION

      YOU MUST DO THE INSPECTIONS THAT FOLLOW IN CONJUNCTION WITH THE INTERFACE INSPECTIONS DEFINED IN TASK 72-38-11-200-000.

      Refer to Figure.

      1. Examine the outer surface at location 1.

        1. Eroded.

          1. Erosion of polyurethane coating

          2. Accept

          1. Varnish coating colored black with white spiral

          2. Repair, VRS1458 TASK 72-38-11-300-010 (REPAIR-010)

        1. Scored, gouged or grooved.

          1. Not more than 0.015 in. (0.38 mm) in depth

          2. Accept

          1. More than in Step

          2. Reject

        1. Cracked

        2. Reject

        1. Delaminated

        2. Reject

        1. Missing coating (polyurethane and/or varnish coating).

          1. Not more than 0.315 sq in. (2.03 sqcm) per missing coating area and within five places area

          2. Repair, VRS1473 TASK 72-38-11-300-008 (REPAIR-008)

          1. More than in Step

          2. Repair, VRS1458TASK 72-38-11-300-010 (REPAIR-010)

      1. Examine the outer surface at location 5.

        1. Scored.

          1. Not more than 0.005 in. (0.12 mm) in depth

          2. Accept

          1. More than in Step

          2. Reject

        1. Cracked

        2. Reject

        1. Delaminated.

          1. Around pin holes

          2. Repair, VRS1461TASK 72-38-11-300-015 (REPAIR-015)

          1. Around bolt holes.

            1. Not more than 0.019 in. (0.50 mm) in depth within the area not more than 0.19 in. (5.0 mm) from the hole edge

            2. Accept

            1. More than in Step

            2. Reject

          1. Other areas

          2. Reject

      1. Examine the inlet cone inner surface at location 2.

        1. Cracked

        2. Reject

        1. Delaminated

        2. Reject

      1. Examine the tip at location 3.

        1. Missing

        2. Repair, VRS1462 TASK 72-38-11-300-002 (REPAIR-002)

        1. Loss of bond securing tip

        2. Repair, VRS1462 TASK 72-38-11-300-002(REPAIR-002)

        1. Tip securely bonded to inlet cone with filler missing

        2. Repair, VRS1462 TASK 72-38-11-300-002 (REPAIR-002)

      1. Examine the flange face at location 4.

        1. Cracked

        2. Repair, VRS1467 TASK 72-38-11-300-003 (REPAIR-003)

        1. Galled.

          1. Not more than 0.003 in. (0.07 mm) in depth

          2. Accept

          1. More than in Step

          2. Repair, VRS1467 TASK 72-38-11-300-003 (REPAIR-003)

      1. Examine the fairing mating surface at location 6.

        1. Depression.

          1. All quantities

          2. Repair, VRS1431 TASK 72-38-11-300-013 (REPAIR-013)

    1. SUBTASK 72-00-31-220-156 Examine the Inlet Cone Fairing

    2. Refer to Figure.

      1. Examine the outer surface at location 1.

        1. Nicked or scratched.

          1. Not more than 0.003 in. (0.08 mm) in depth

          2. Accept

          1. More than in Step

          2. Reject

        1. Dented.

          1. Not more than 0.005 in. (0.13 mm) in depth

          2. Accept

          1. More than in Step

          2. Reject

        1. Distorted

        2. Reject

        1. Cracked

        2. Reject

      1. Examine the inner surface at location 2.

        1. Cracked

        2. Reject

      1. Examine the pin holes at location 3.

        1. Edge burred

        2. Repair, VRS1460 TASK 72-38-11-300-006 (REPAIR-006)

        1. Distorted.

          1. One hole with the distortion not more than 0.078 in. (2.00 mm)

          2. Accept

          1. Two holes with the distortion not more than 0.039 in. (1.00 mm)

          2. Accept

          1. More than in Step and Step

          2. Reject

      1. Examine the balance weight at location 4.

        1. Delamination of glass fabric

        2. Repair, VRS1459 TASK 72-38-11-300-007 (REPAIR-007)

        1. Disengagement of the balance weights

        2. Repair, VRS1459 TASK 72-38-11-300-007TASK 72-38-11-300-007 (REPAIR-007)

      1. SBE 72-0318: Examine the strip seal at location 5.

        1. Unbonded

        2. Repair, VRS1057 TASK 72-38-11-300-014 (REPAIR-014)

        1. Torn

        2. Repair, VRS1057 TASK 72-38-11-300-014 (REPAIR-014)

    1. SUBTASK 72-00-31-220-157 Examine the Front Blade Retaining Ring

    2. CAUTION

      YOU MUST DO THE INSPECTIONS THAT FOLLOW IN CONJUNCTION WITH THE INTERFACE INSPECTIONS DEFINED IN TASK 72-00-31-220-002.

      Refer to Figure.

      1. Examine the blade abutment face at location 1.

        1. Galled.

          1. Not more than 0.002 in. (0.05 mm) in depth

          2. Repair, VRS1005 TASK 72-31-13-300-001 (REPAIR-001)

          1. More than in Step

          2. Reject

      1. Examine the filler abutment face at location 2.

        1. Galled.

          1. Not more than 0.003 in. (0.07 mm) in depth

          2. Repair, VRS1005 TASK 72-31-13-300-001 (REPAIR-001)

          1. More than in Step

          2. Reject

      1. Examine the disc abutment face at location 3.

        1. Galled.

          1. Not more than 0.003 in. (0.07 mm) in depth if less than 25 percent of the contact area is affected

          2. Repair, VRS1005 TASK 72-31-13-300-001 (REPAIR-001)

          1. More than in Step

          2. Reject

      1. Examine the inlet cone abutment face at location 4.

        1. Galled.

          1. Not more than 0.003 in. (0.07 mm) in depth if less than 25 percent of the contact area is affected

          2. Repair, VRS1005 TASK 72-31-13-300-001 (REPAIR-001)

          1. More than in Step

          2. Reject

      1. Examine the front face at location 5.

        1. Galled.

          1. Not more than 0.003 in. (0.07 mm) in depth

          2. Repair, VRS1005 TASK 72-31-13-300-001 (REPAIR-001)

          1. More than in Step

          2. Reject

      1. Examine the bolt holes at locations 6, 7 and 13.

        1. Edges burred

        2. Repair, VRS1005 TASK 72-31-13-300-001 (REPAIR-001)

      1. Examine the snap diameter at location 8.

        1. Scored.

          1. Not more than 0.003 in. (0.07 mm) in depth if removal does not cause loss of interface

          2. Repair, VRS1005 TASK 72-31-13-300-001 (REPAIR-001)

          1. More than in Step

          2. Reject

      1. Examine the snap diameter at location 9.

        1. Scored.

          1. Not more than 0.003 in. (0.07 mm) in depth if removal does not cause loss of interface

          2. Repair, VRS1005 TASK 72-31-13-300-001 (REPAIR-001)

          1. More than in Step

          2. Reject

      1. Examine the outside diameter at location 10.

        1. Nicks, dents or scratches.

          1. Not more than 0.003 in. (0.07 mm) in depth

          2. Repair, VRS1005 TASK 72-31-13-300-001 (REPAIR-001)

          1. More than in Step

          2. Reject

      1. Examine the pin holes at location 11.

        1. Scored.

          1. Not more than 0.002 in. (0.05 mm) in depth if removal does not cause loss of interface

          2. Repair, VRS1005 TASK 72-31-13-300-001 (REPAIR-001)

          1. More than in Step

          2. Reject

      1. Examine the pin holes at location 12.

        1. Edges burred

        2. Repair, VRS1005 TASK 72-31-13-300-001 (REPAIR-001)

      1. Examine the shank nuts at location 14.

        1. Loose

        2. Repair, VRS1161 TASK 72-31-13-300-003 (REPAIR-003)

        1. Damaged

        2. Repair, VRS1161 TASK 72-31-13-300-003 (REPAIR-003)

        1. If the locking torque between 6.500 and 60.000 lbf.in (0.74 and 6.78 Nm)

        2. Accept

        1. Other than in Step

        2. Repair, VRS1161 TASK 72-31-13-300-003 (REPAIR-003)

      1. Examine the timing mark at location 15.

        1. Missing of yellow paint

        2. Repair, VRS1173 TASK 72-31-13-300-006 (REPAIR-006)

      1. Examine the spacer at location 16.

        1. Loose, missing or cracked

        2. Repair, VRS1168 TASK 72-31-13-300-005 (REPAIR-005)

      1. Examine the aft flange front surface at location 17.

        1. Nicked.

          1. Not more than 0.0027 in. (0.069 mm) in depth

          2. Repair, VRS1005 TASK 72-31-13-300-001 (REPAIR-001)

          1. More than in Step

          2. Reject

        1. Dented or scratched.

          1. Not more than 0.0039 in. (0.100 mm) in depth

          2. Repair, VRS1005 TASK 72-31-13-300-001 (REPAIR-001)

          1. More than in Step

          2. Reject

      1. Examine the spacer wall at location 18.

        1. Nicked, dented, scratched or gouged at front face.

          1. Not more than 0.036 in. (0.92 mm) in depth

          2. Repair, VRS1005 TASK 72-31-13-300-001 (REPAIR-001)

          1. More than in Step

          2. Reject

        1. Nicked, dented, scratched or gouged at the remaining surfaces.

          1. Not more than 0.011 in. (0.30 mm) in depth

          2. Repair, VRS1005 TASK 72-31-13-300-001 (REPAIR-001)

          1. More than in Step

          2. Reject

      1. Examine the shank nut anti rotation land at location 19.

        1. Nicked, dented, scratched or gouged.

          1. Not more than 0.011 in. (0.30 mm) in depth

          2. Repair, VRS1005 TASK 72-31-13-300-001 (REPAIR-001)

          1. More than in Step

          2. Reject

      1. Examine the locating pin holes at location 20.

        1. Gouged or rubbed.

          1. Not more than 0.078 in. (0.20 mm) in depth

          2. Repair, VRS1005 TASK 72-31-13-300-001 (REPAIR-001)

          1. More than in Step

          2. Reject

      1. Examine the threaded holes at location 21.

        1. Burred

        2. Repair, VRS1005 TASK 72-31-13-300-001 (REPAIR-001)

    1. SUBTASK 72-00-31-220-158 Examine the Annulus Fillers

    2. CAUTION

      YOU MUST DO THE INSPECTIONS THAT FOLLOW IN CONJUNCTION WITH THE INTERFACE INSPECTIONS DEFINED IN TASK 72-00-31-220-002.

      Refer to Figure and Figure.

      1. Examine the platform at location 2.

        1. Nicked, dented, scratched or corrosion pitted.

          1. Not more than 0.005 in. (0.13 mm) in depth

          2. Accept

          1. Not more than 0.010 in. (0.25 mm) in depth

          2. Repair, VRS1014 TASK 72-31-11-300-028 (REPAIR-028)

          1. More than in Step

          2. Reject

        1. Missing anti-erosion coating.

          1. Not more than 1.0 sq in. (6.45 sqcm) in total

          2. Repair, VRS1016 TASK 72-31-11-300-027 (REPAIR-027)

          1. More than in step Step

          2. Repair, VRS1009 TASK 72-31-11-300-002 (REPAIR-002)

      1. Examine the seals at location 1.

      2. Pull the seals with care to make sure the seals are securely attached.

        1. Seals that are loose or are not there

        2. Repair, VRS1018 TASK 72-31-11-300-022 (REPAIR-022)

        1. Examine the seals for wear.

          1. Not more than 0.02 in. (0.5 mm) in depth, 1.25 in (31.8 mm) in length

          2. Accept

          1. More than in Step

          2. Repair, VRS1018 TASK 72-31-11-300-022 (REPAIR-022)

      1. Examine the trunnion surface at location 3.

        1. Missing dry film lubricant

        2. Repair, VRS1060 TASK 72-00-31-300-006 (REPAIR-006)

    1. SUBTASK 72-00-31-220-159 Examine the LP Compressor Blades (Fan Blades)

    2. CAUTION

      YOU MUST DO THE INSPECTIONS THAT FOLLOW IN CONJUNCTION WITH THE INTERFACE INSPECTIONS DEFINED IN TASK 72-00-31-220-002.
    3. Remove the fan blades from the fan disc. Refer to TASK 72-31-00-030-001.

      1. NOTE

        It is not necessary to remove existing dry film lubricant or the chocking pads from the blade root.

        Remove the soft dirt and dust from the fan blade.

        1. Remove the soft dirt and the dust

        2. Do not soak. Use a soft bristle brush or swab. Refer to the SPM TASK 70-11-26-300-503

        1. Dry

        2. Use clean dry air blast or CoMat 02-099 LINT-FREE CLOTH.

      1. NOTE

        An arc burn is evident by a small circular or semicircular heat-affected area on the blade surface that may contain a shallow pitting, re-melting or cracking. Visually a dark blue oxide discoloration is associated with the heat-affected area.

        Examine the fan blade for electrical arc burning.

        1. Arc burned

        2. Reject

      1. Examine the concave and convex airfoil surfaces at locations 1 and 2 in the contact area with the annulus filler. Refer to Figure.

        1. Galled or scored.

          1. Not more than 0.008 in. (0.20 mm) in depth

          2. Accept

          1. More than in Step

          2. Repair, VRS1003 TASK 72-31-11-300-008 (REPAIR-008)

      1. Examine the fan blade for bends. Refer to Figure.

        1. NOTE

          The maximum number of bent blades in fan rotor assembly must not be more than two.

          Examine the fan blade leading edge at location 3.

          1. More than one bend

          2. Reject

          1. Bend contains kinks, creases, tears, cracks or nicks

          2. Reject

          1. Untwist

          2. Reject

          1. Transition between the undamaged airfoil and bent area is not smooth

          2. Reject

          1. Circumferential deviation (x). Not more than a max. of 0.20 in. (5.1 mm) within the following limits, Step to Step

            1. The axial length of the bend (y) is not less than eight times circumferential deviation (x).

            2. Accept

            1. The radial length of bend (z) is not less than 15 times circumferential deviation (x).

            2. Accept

            1. Bends do not go into panel area by more than 2.0 in. (50.8 mm) from leading edge.

            2. Accept

          1. Circumferential deviation (x) greater than 0.20 in. (5.1 mm)

          2. Reject

          1. Bend on leading edge tips

          2. Reject

        1. NOTE

          The maximum number of bent blades in fan rotor assembly must not be more than two.

          Examine the fan blade trailing edge at location 4.

          1. More than one bend

          2. Reject

          1. Bend contains kinks, creases, tears, cracks or nicks

          2. Reject

          1. Untwist

          2. Reject

          1. Transition between the undamaged airfoil and bent area is not smooth

          2. Reject

          1. Circumferential deviation (x) not more than a max. of 0.20 in. (5.1 mm) within the following limits, Step to Step

            1. The axial length of the bend (y) is not less than eight times circumferential deviation (x).

            2. Accept

            1. The radial length of bend (z) is not less than 15 times circumferential deviation (x).

            2. Accept

            1. Bends do not go into panel area by more than 2.0 in. (50.8 mm) from leading edge.

            2. Accept

          1. Circumferential deviation (x) greater than 0.20 in. (5.1 mm)

          2. Reject

    4. Examine the fan blade airfoil. Refer to Figure, Figure, Figure and Figure.

      1. Examine the fan blade airfoil at area Ar and Br. Refer to Figure.

        1. Cracked

        2. Reject

        1. Nicks, dents or scratches not more than 0.008 in. (0.20 mm) in depth

        2. Accept

        1. More than in Step

        2. Refer to TASK 72-31-11-200-000

        1. Nicks, dents, scores and scratches on the leading edge of area Ar or on the trailing edge of area Br more than 0.008 in. (0.20 mm) in depth

        2. Repair, VRS1026 TASK 72-31-11-300-025 (REPAIR-025)

      1. Examine the area At and Bt of the fan blade for cracks, nicks, dents, scores and scratches. Refer to Figure and Figure.

        1. Cracked

        2. Reject

        1. Nicks, dents, scores and scratches not more than 0.025 in. (0.63 mm) in depth

        2. Accept

        1. More than in Step

        2. Refer to TASK 72-31-11-200-000

        1. Nicks, dents, scores and scratches on the edge of area At or on the trailing edge of area Bt more than 0.025 in. (0.63 mm) in depth

        2. Repair, VRS1026 TASK 72-31-11-300-025 (REPAIR-025)

      1. Examine the area Ar and At of the fan blades for erosion. Refer to Figure and Figure.

        1. Leading edge condition.

          1. Surface texture smoother than CoMat 05-021 WATERPROOF SILICON CARBIDE

          2. Accept

          1. More than in Step

          2. Repair, VRS1064 TASK 72-31-11-300-030 (REPAIR-030)

        1. Examine the leading edge profile. Refer to Figure.

          1. Rounded profile as shown in typical leading edge profile

          2. Accept

          1. Blunt or square as shown in typical leading edge profile

          2. Repair, VRS1064 TASK 72-31-11-300-030 (REPAIR-030)

      1. Examine the fan blade at area Cr. Refer to Figure.

        1. Cracked

        2. Reject

        1. Nicked, scored, scratched or dented

        2. Refer to TASK 72-31-11-200-000

      1. Examine the fan blade at area Ct. Refer to Figure.

        1. Cracked

        2. Reject

        1. Nicks, dents or scratches not more than 0.008 in. (0.20 mm) in depth

        2. Accept

        1. More than in Step

        2. Refer to TASK 72-31-11-200-000

      1. Examine the area F of the fan blades for cracks, nicks, dents, scores and scratches. Refer to Figure, Figure and Figure.

        1. Radial cracks extended from the tips at location 5.

          1. Not more than 0.394 in. (10.00 mm)

          2. Accept

          1. More than in Step

          2. Refer to TASK 72-31-11-200-000

          1. Other non-radial cracks

          2. Refer to TASK 72-31-11-200-000

          1. Nicks, dents, scores or scratches not more than 0.008 in. (0.20 mm) in depth

          2. Accept

          1. More than in Step

          2. Refer to TASK 72-31-11-200-000

      1. NOTE

        Make sure that SBE 72-0386 is complied with appropriate intervals.

        Examine the fan blade roots. Refer to Figure.

        1. Examine the blade root of the fan blade for dry film lubricant peeling.

          1. A amount of peeling of dry film lubricant

          2. Repair, VRS1133 TASK 72-31-11-300-XXX (REPAIR XXX)**

        1. SBE 72-0375 or SBE 72-0384: Examine the root of the fan blade for Metco 58 coating of the dovetail root flank at location 6. Refer to Figure and Figure.

          1. Localised scores of Metco 58 coating. Not more than 0.004 in. (0.1 mm) deep, not more than 0.006 in. (0.15 mm) wide and not more than 0.6 in. (15 mm) in length, if the underlying titanium is not visible and/or the location is not at the edge of bedding

          2. Accept

          1. More than in Step

          2. Reject

        1. SBE 72-0375 or SBE 72-0384: Localised gouges and chips in Metco 58 coating.

          1. Not more than 0.015 square in (9,67 square mm) in total area if the underlying titanium is not visible and/or the location is not at the edge of the bedding

          2. Accept

          1. More than in Step

          2. Reject

        1. SBE 72-0375 or SBE 72-0384: Flaking or debond of Metco 58 coating from the root flange

        2. Reject

      1. Examine the chocking pads of the fan blades for looseness or separations at location 7. Refer to Figure and Figure.

        1. Signs of looseness or separation between the chocking pad and fan blade root

        2. Refer to TASK 72-31-11-200-000

    1. SUBTASK 72-00-31-220-160 Examine the Stage 1 Fan Disc (Fan Disc)

    2. Refer to Figure.

    3. Clean the parts. Refer to TASK 72-31-12-100-000 (CLEANING-000).

      1. Do the test for cracks on the part that is given below. Use the applicable penetrant inspection procedure.

        PART IDENT

        TASK/SUBTASK

        Fan disc

        1. Special attention should be given to the following areas during the Fluorescent Penetrant Inspection.

        2. Front flange.

        3. Inner diameter.

        4. Front face.

        5. Rear face.

        6. Rear flange.

        7. Curvic Coupling area.

          1. Zone A (two positions each dovetail slot).

            1. Cracked

            2. Reject

      1. Examine the dovetail sides at location 1.

        1. Galled.

          1. Not more than 0.003 in. (0.08 mm) in depth

          2. Accept

          1. More than in Step

          2. Reject

        1. Scored

        2. Repair, VRS1152 TASK 72-31-12-300-001 (REPAIR-001)

        1. Missing dry film lubricant

        2. Repair, VRS1134 TASK 72-00-31-300-008 (REPAIR-008)

      1. Examine the curvic teeth at location 2.

        1. Galled

        2. Repair, VRS1155 TASK 72-31-12-300-005 (REPAIR-005)

        1. Dented

        2. Repair, VRS1155 TASK 72-31-12-300-005 (REPAIR-005)

        1. Corrosion pitting.

          1. General corrosion pitting of tooth crest flats, root flats, root fillets and curvic side faces excluding working flanks not more than 0.005 in. (0.12 mm) in depth

          2. Accept

          1. More than 0.005 in. (0.12 mm) in depth

          2. Reject

          1. Isolated pits not more than 0.008 in. (0.20 mm) deep on tooth crest flats

          2. Accept

          1. More than 0.008 in. (0.20 mm) in depth

          2. Reject

          1. Lightly staining only, working flanks

          2. Accept

          1. More than in Step

          2. Reject

      1. Examine the shank nuts at location 3.

        1. Loose

        2. Repair, VRS1157 TASK 72-31-12-300-007 (REPAIR-007)

        1. Damaged

        2. Repair, VRS1157 TASK 72-31-12-300-007 (REPAIR-007)

      1. Do the torque check for reuse of the shank nuts. Refer to the SPM TASK 70-42-01-400-501.

        1. If the locking torque is between 6.5 and 60 lbf.in (0.735 and 6.780 Nm)

        2. Accept

        1. Other than in Step

        2. Repair, VRS1157 TASK 72-31-12-300-007 (REPAIR-007)

      1. Examine the washer plates at location 4.

        1. Peeled

        2. Repair, VRS1159 TASK 72-31-12-300-008 (REPAIR-008)

      1. Examine the rear ramps at location 5.

        1. Peeled

        2. Repair, VRS1164 TASK 72-31-12-300-009 (REPAIR-009)

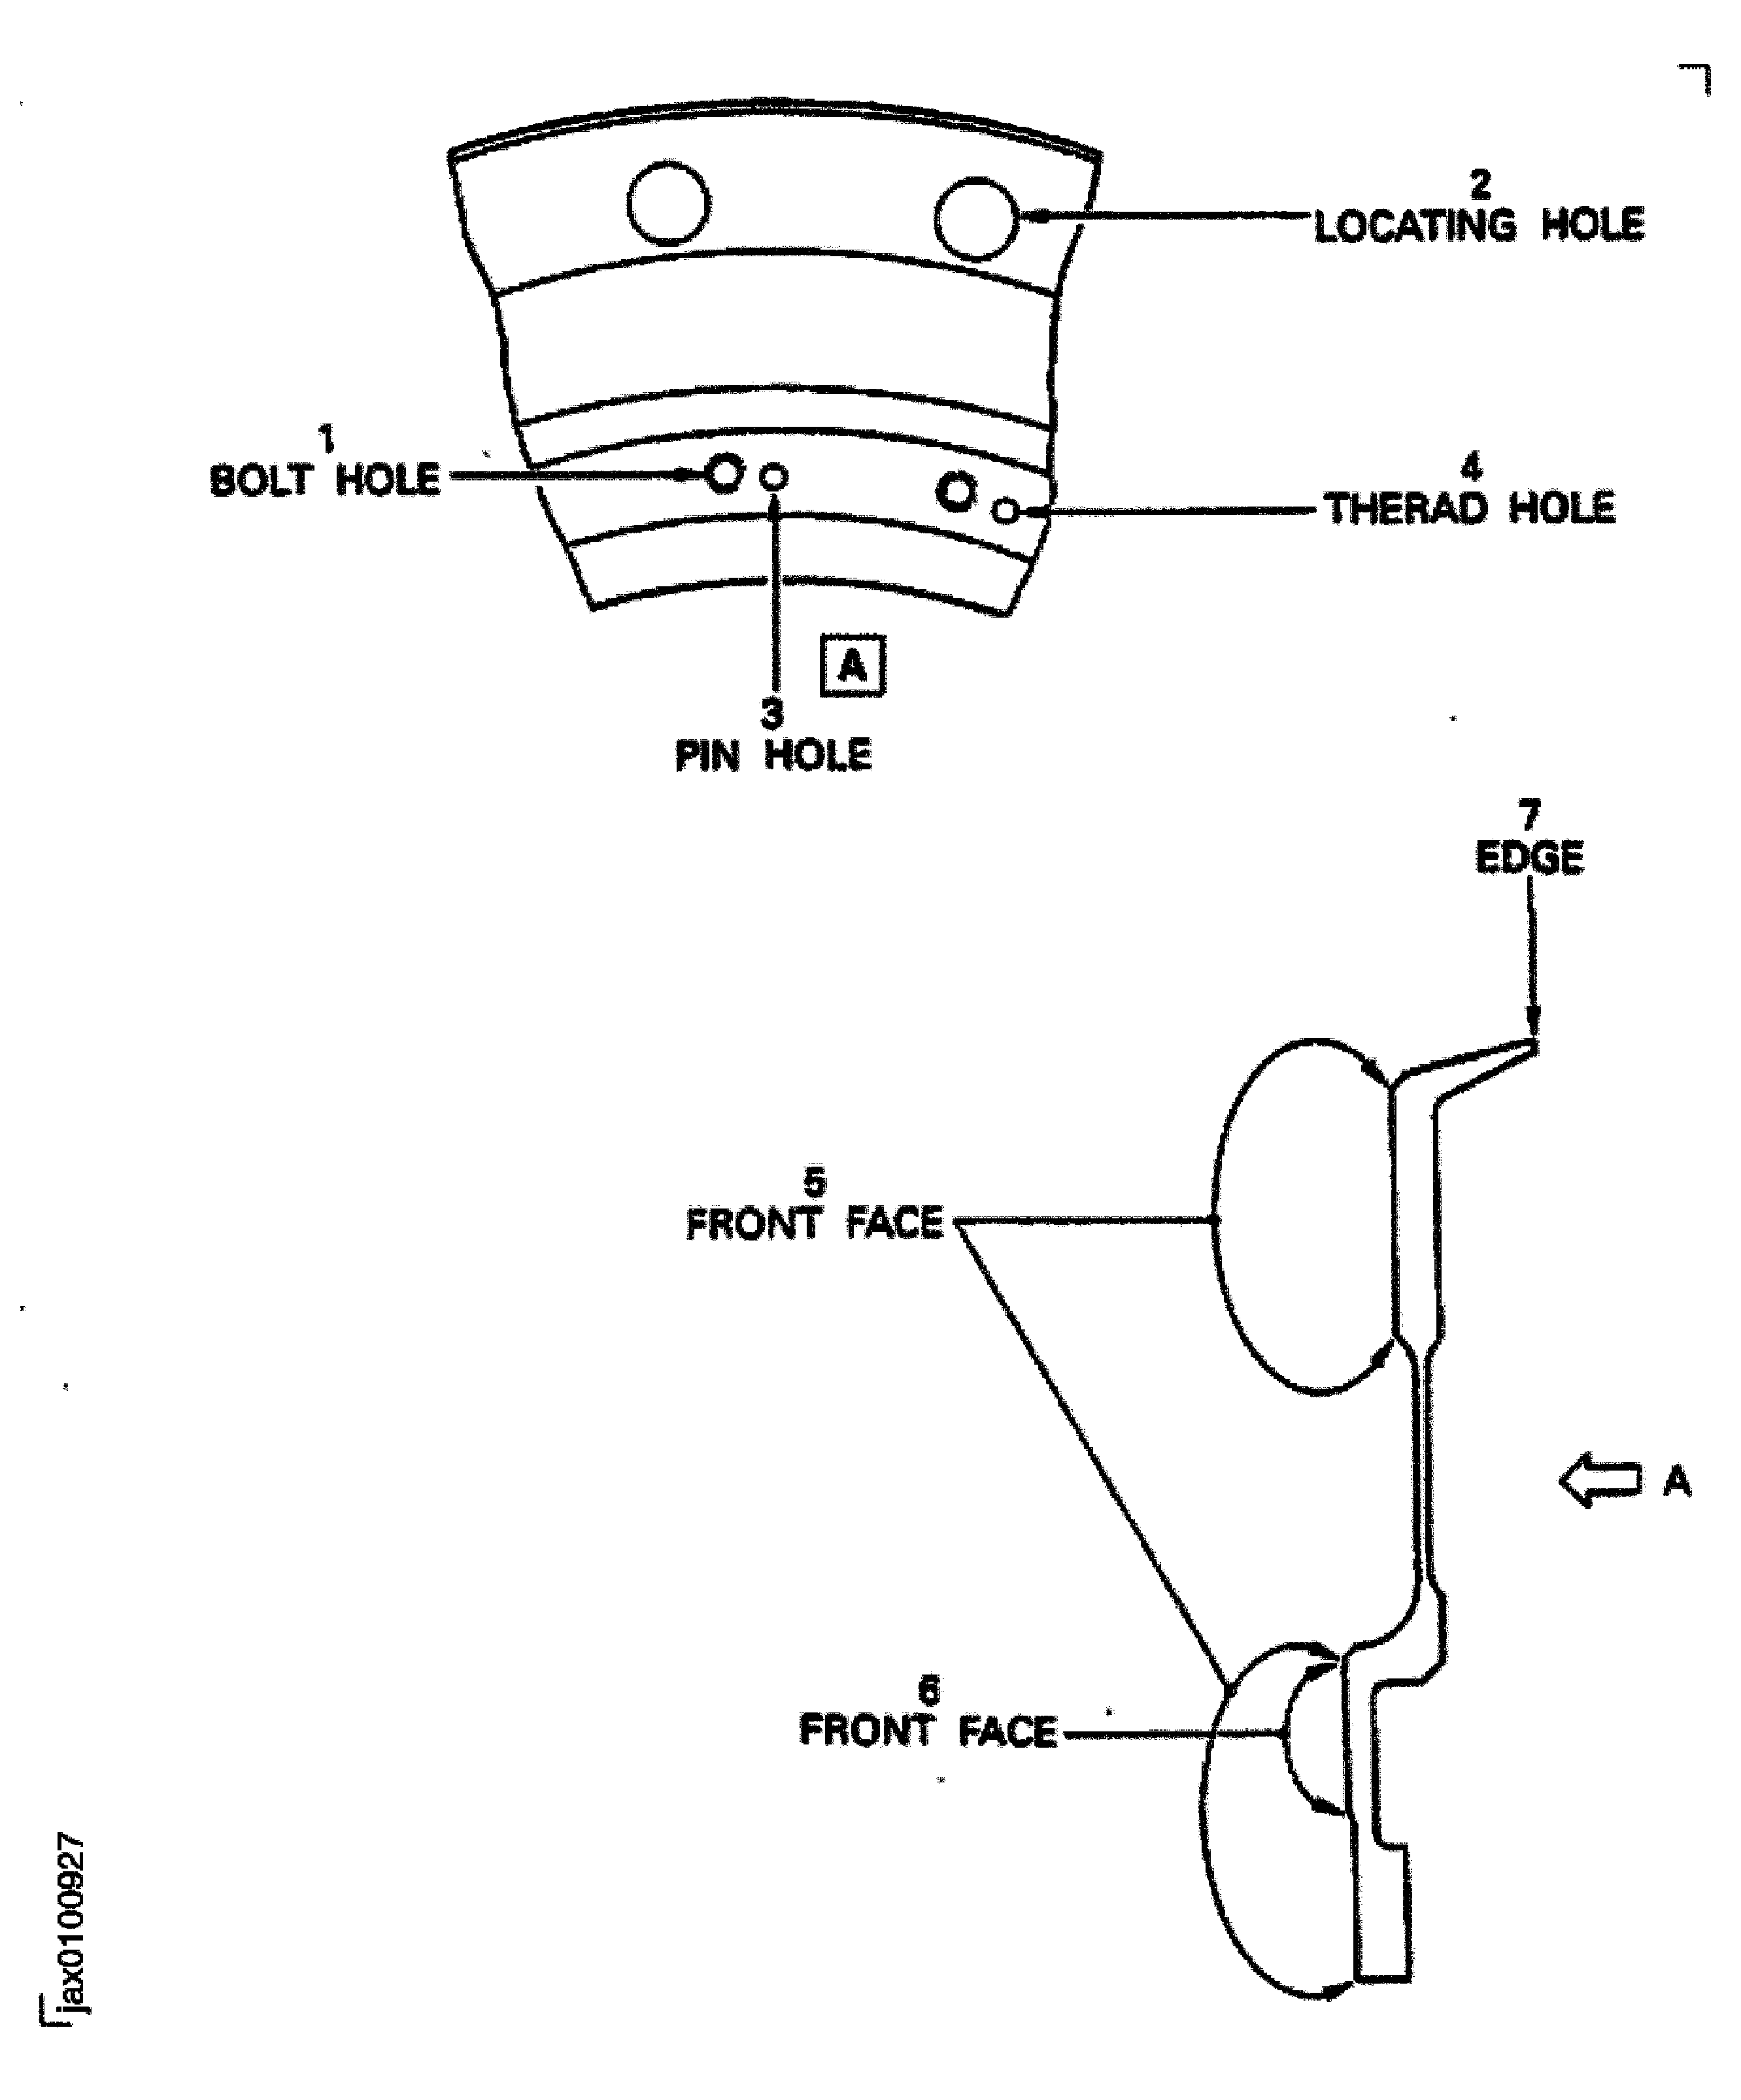
    1. SUBTASK 72-00-31-220-161 Examine the Rear Blade Retaining Ring

    2. Refer to Figure.

      1. Examine the bolt holes at location 1.

        1. Burred

        2. Repair, VRS1150 TASK 72-31-12-300-002 (REPAIR-002)

      1. Examine the locating holes at location 2.

        1. Burred

        2. Repair, VRS1150 TASK 72-31-12-300-002 (REPAIR-002)

        1. Worn.

          1. If the diameter of hole is not more than 1.0639 in. (27.025 mm)

          2. Accept

          1. More than in Step

          2. Reject

        1. Missing of dry film lubricant

        2. Repair, VRS1135 TASK 72-00-31-300-009 (REPAIR-009)**

      1. Examine the pin holes at location 3.

        1. Galled

        2. Repair, VRS1150 TASK 72-31-12-300-002 (REPAIR-002)

        1. Worn.

          1. If the diameter of hole is not more than 0.240 in. (6.10 mm)

          2. Accept

          1. More than in Step

          2. Reject

      1. Examine the thread holes at location 4.

        1. Galled

        2. Repair, VRS1150 TASK 72-31-12-300-002 (REPAIR-002)

        1. Crossed

        2. Reject

      1. Examine the front face at location 5.

        1. Galled

        2. Repair, VRS1150 TASK 72-31-12-300-002 (REPAIR-002)

      1. NOTE

        This inspection is only required if the rear retaining ring has been removed from the fan disc which exposes the inner area for the front face.

        Examine the front face at location 6.

        1. Galled

        2. Repair, VRS1150 TASK 72-31-12-300-002 (REPAIR-002)

        1. Missing dry film lubricant

        2. Repair, VRS1135 TASK 72-00-31-300-009 (REPAIR-009)**

      1. Examine the edge at location 7.

        1. Nicked

        2. Repair, VRS1150 TASK 72-31-12-300-002 (REPAIR-002)

        1. Scratched

        2. Repair, VRS1150 TASK 72-31-12-300-002 (REPAIR-002)

      1. Examine the remaining surfaces which have not yet been inspected.

        1. Nicked

        2. Repair, VRS1150 TASK 72-31-12-300-002 (REPAIR-002)

        1. Scratched

        2. Repair, VRS1150 TASK 72-31-12-300-002 (REPAIR-002)

  1. Figure: Location on the Inlet Cone Assembly

    Location on the Inlet Cone Assembly
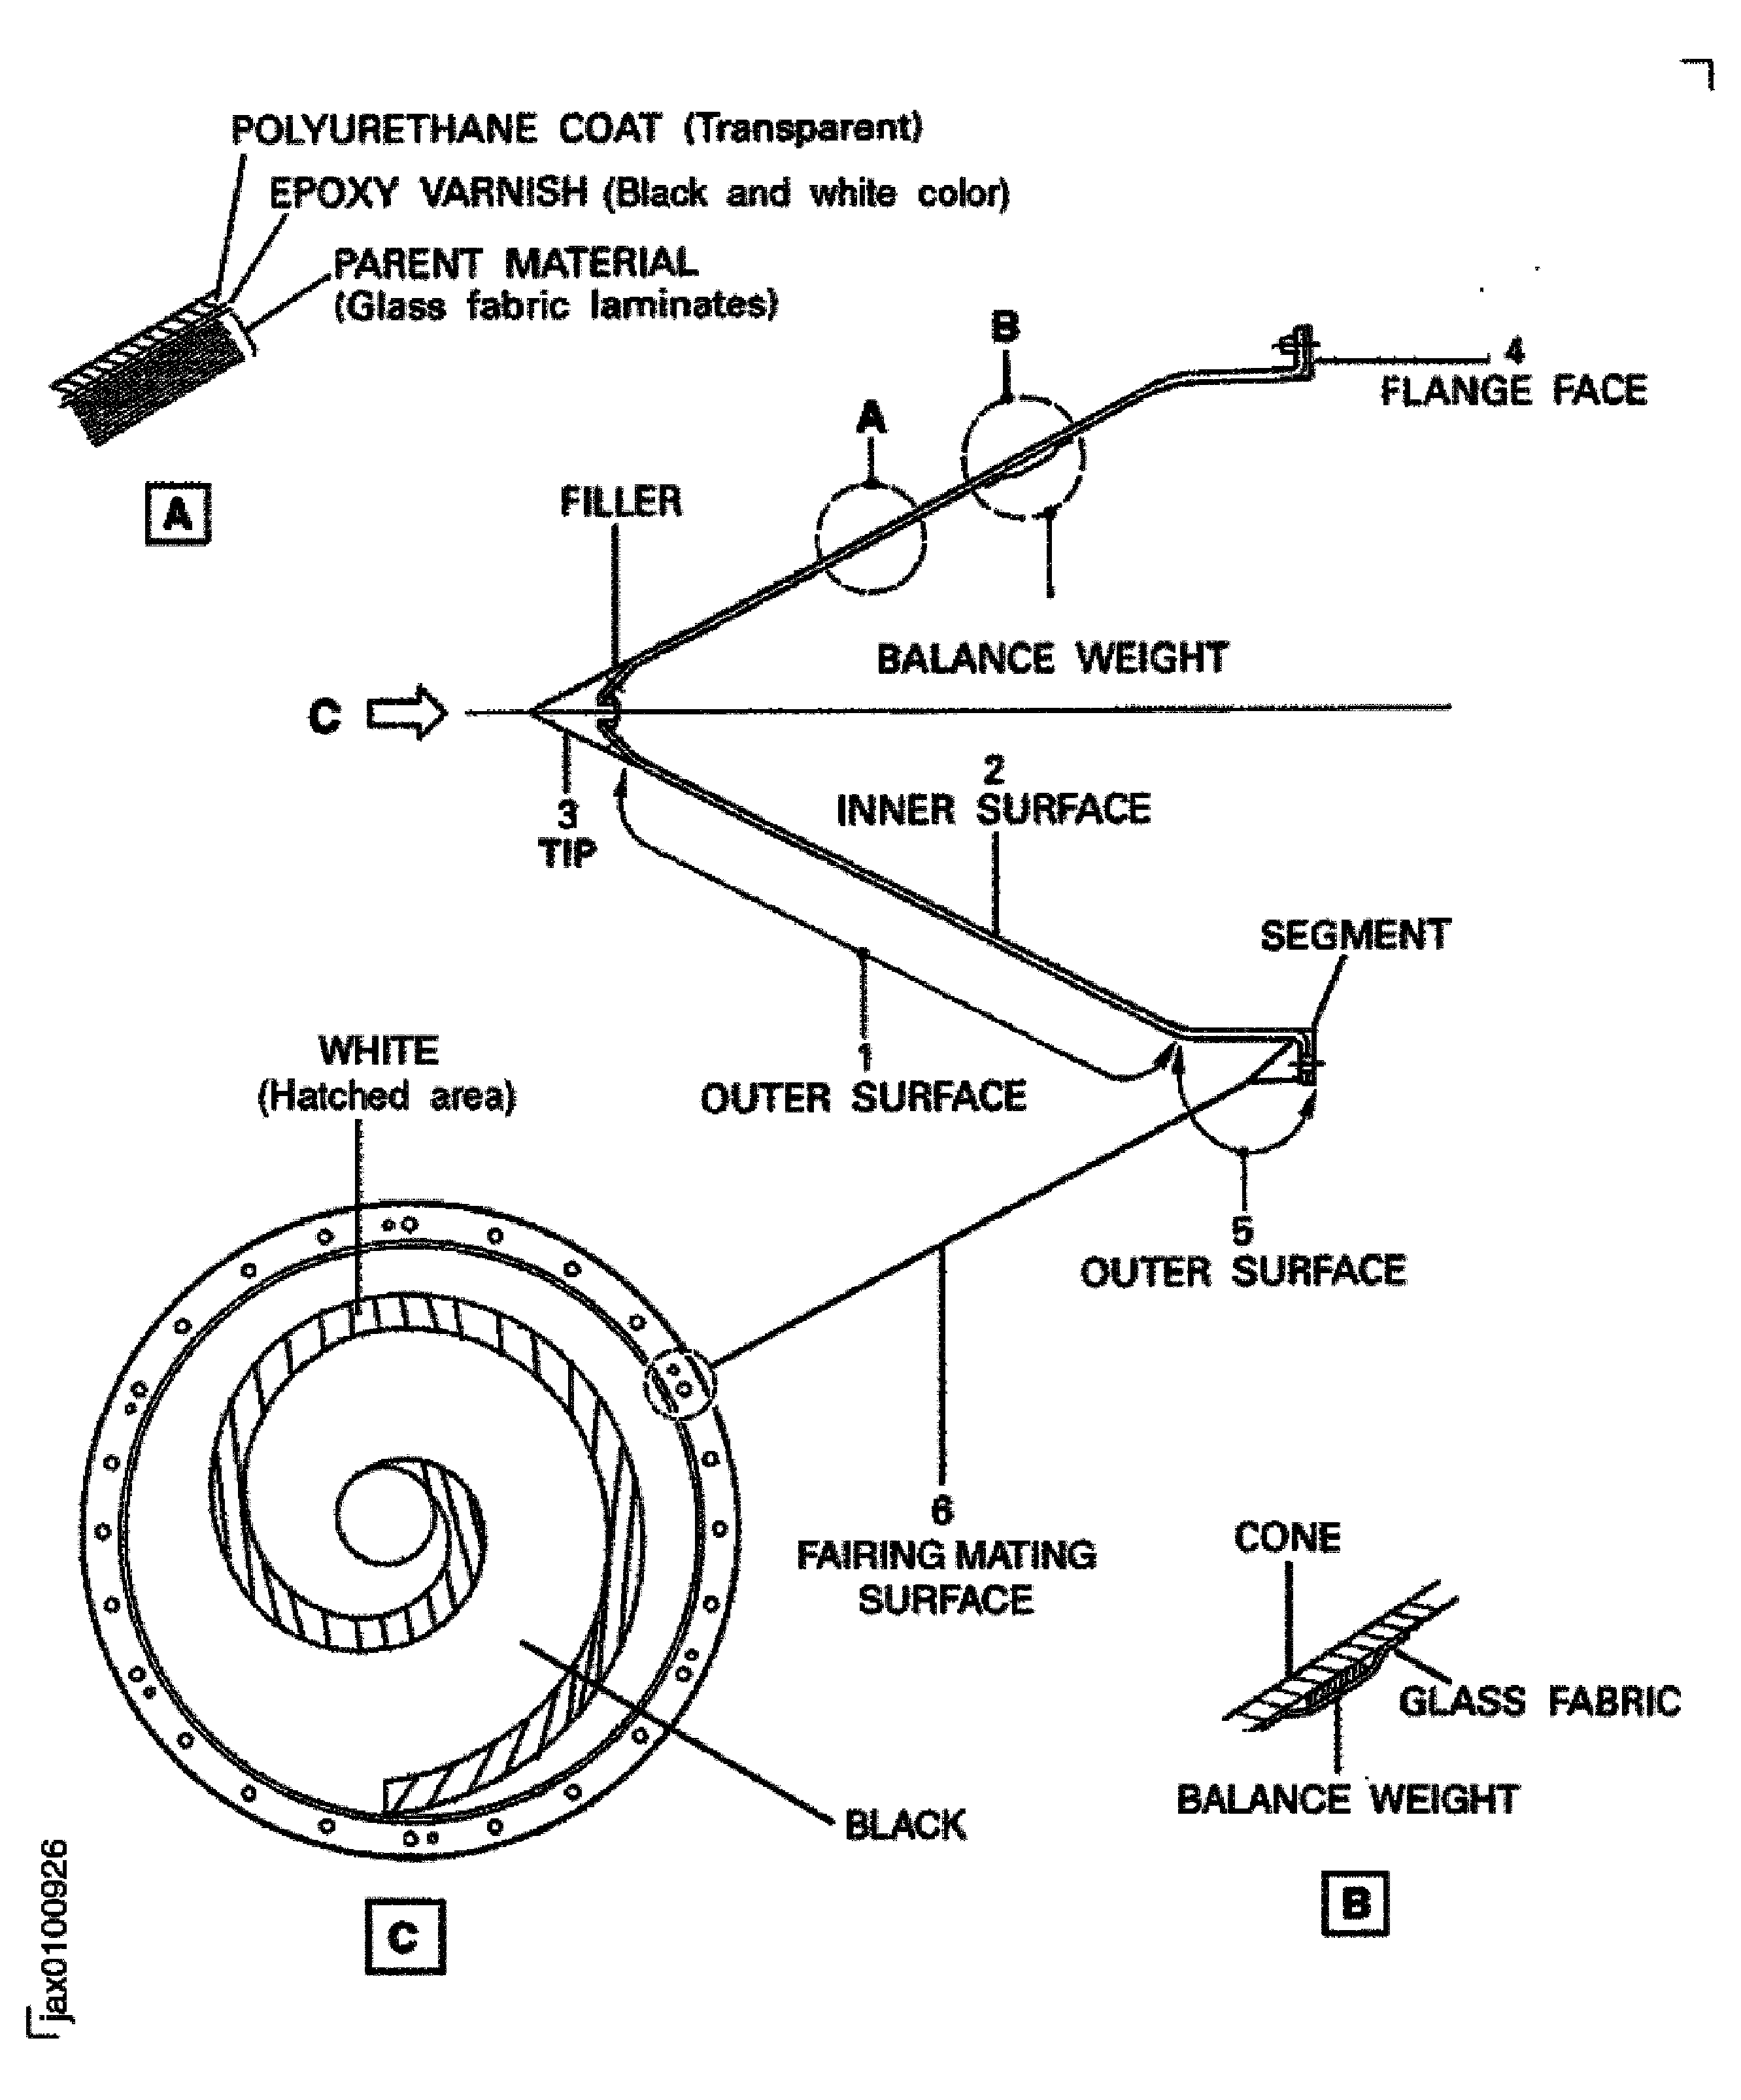
    Figure: Location on the Inlet Cone Fairing

    Location on the Inlet Cone Fairing

    Figure: Location on the Front Blade Retaining Ring

    Location on the Front Blade Retaining Ring
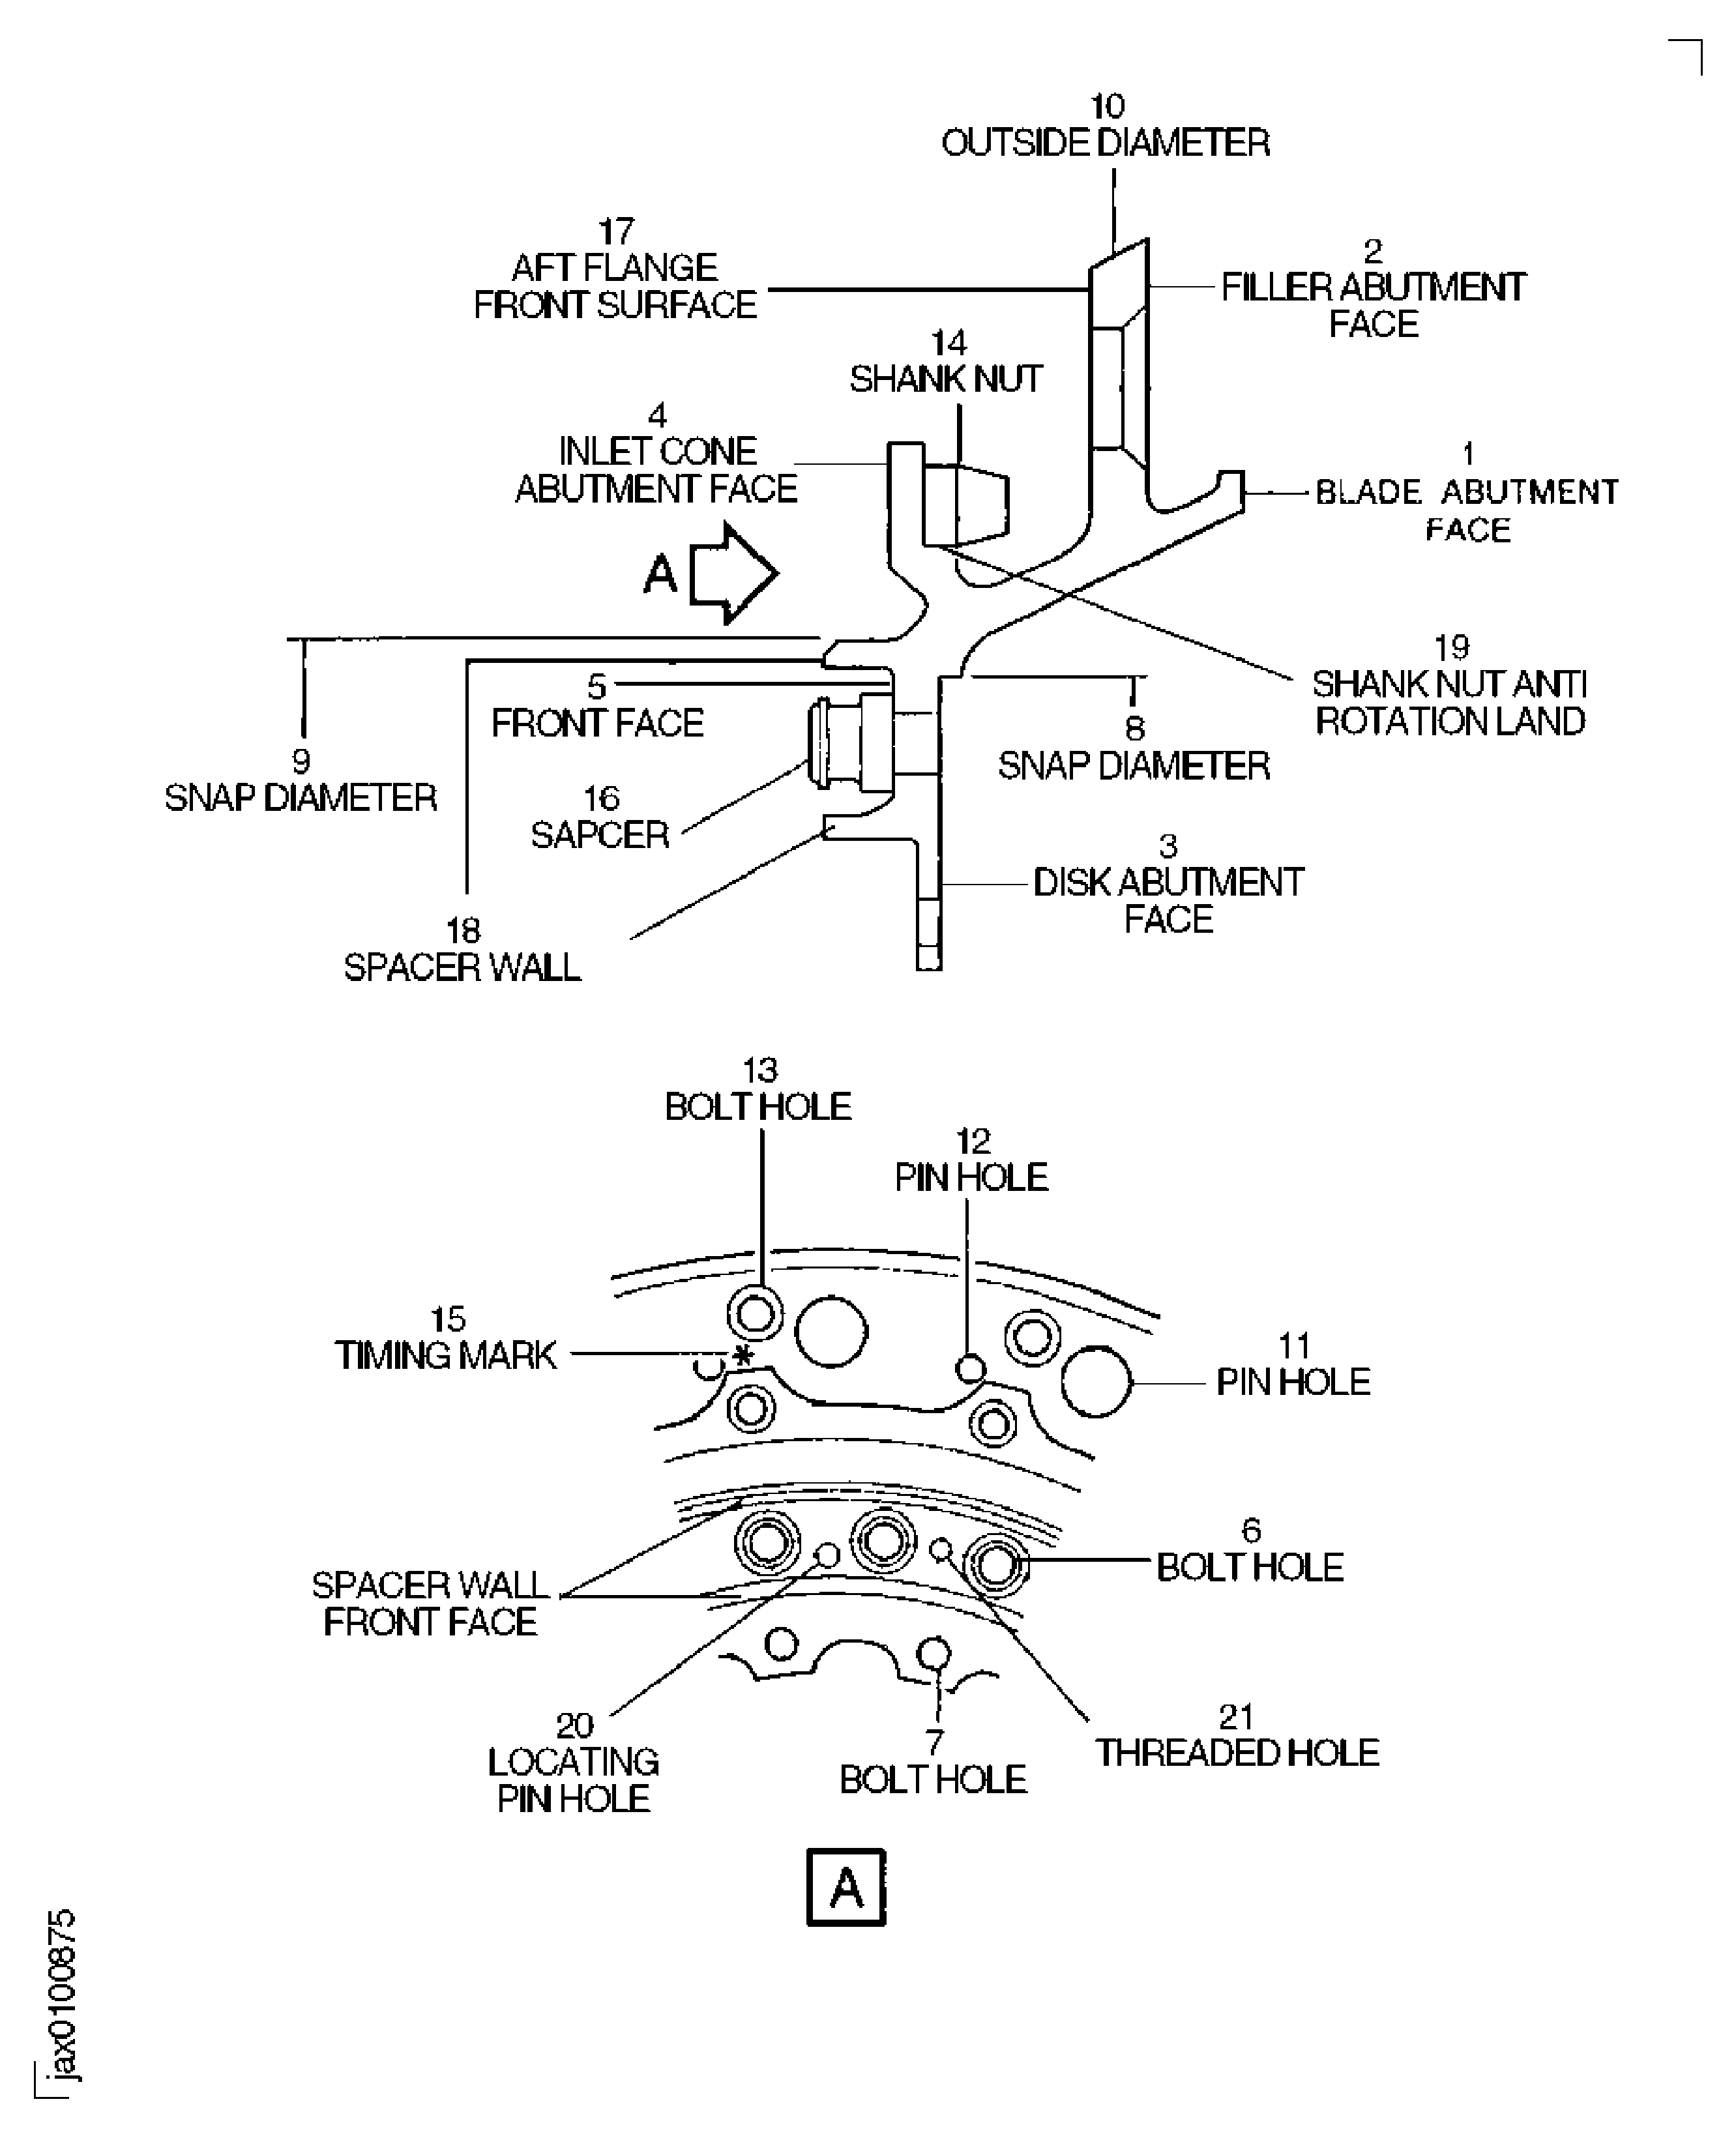
    Figure: Location of Dry Film Lubricant on the Annulus Filler

    Sheet 1

    Legend
    Location of Dry Film Lubricant on the Annulus Filler

    Sheet 1

    Close

    Figure: Location of Dry Film Lubricant on the Annulus Filler

    Sheet 2
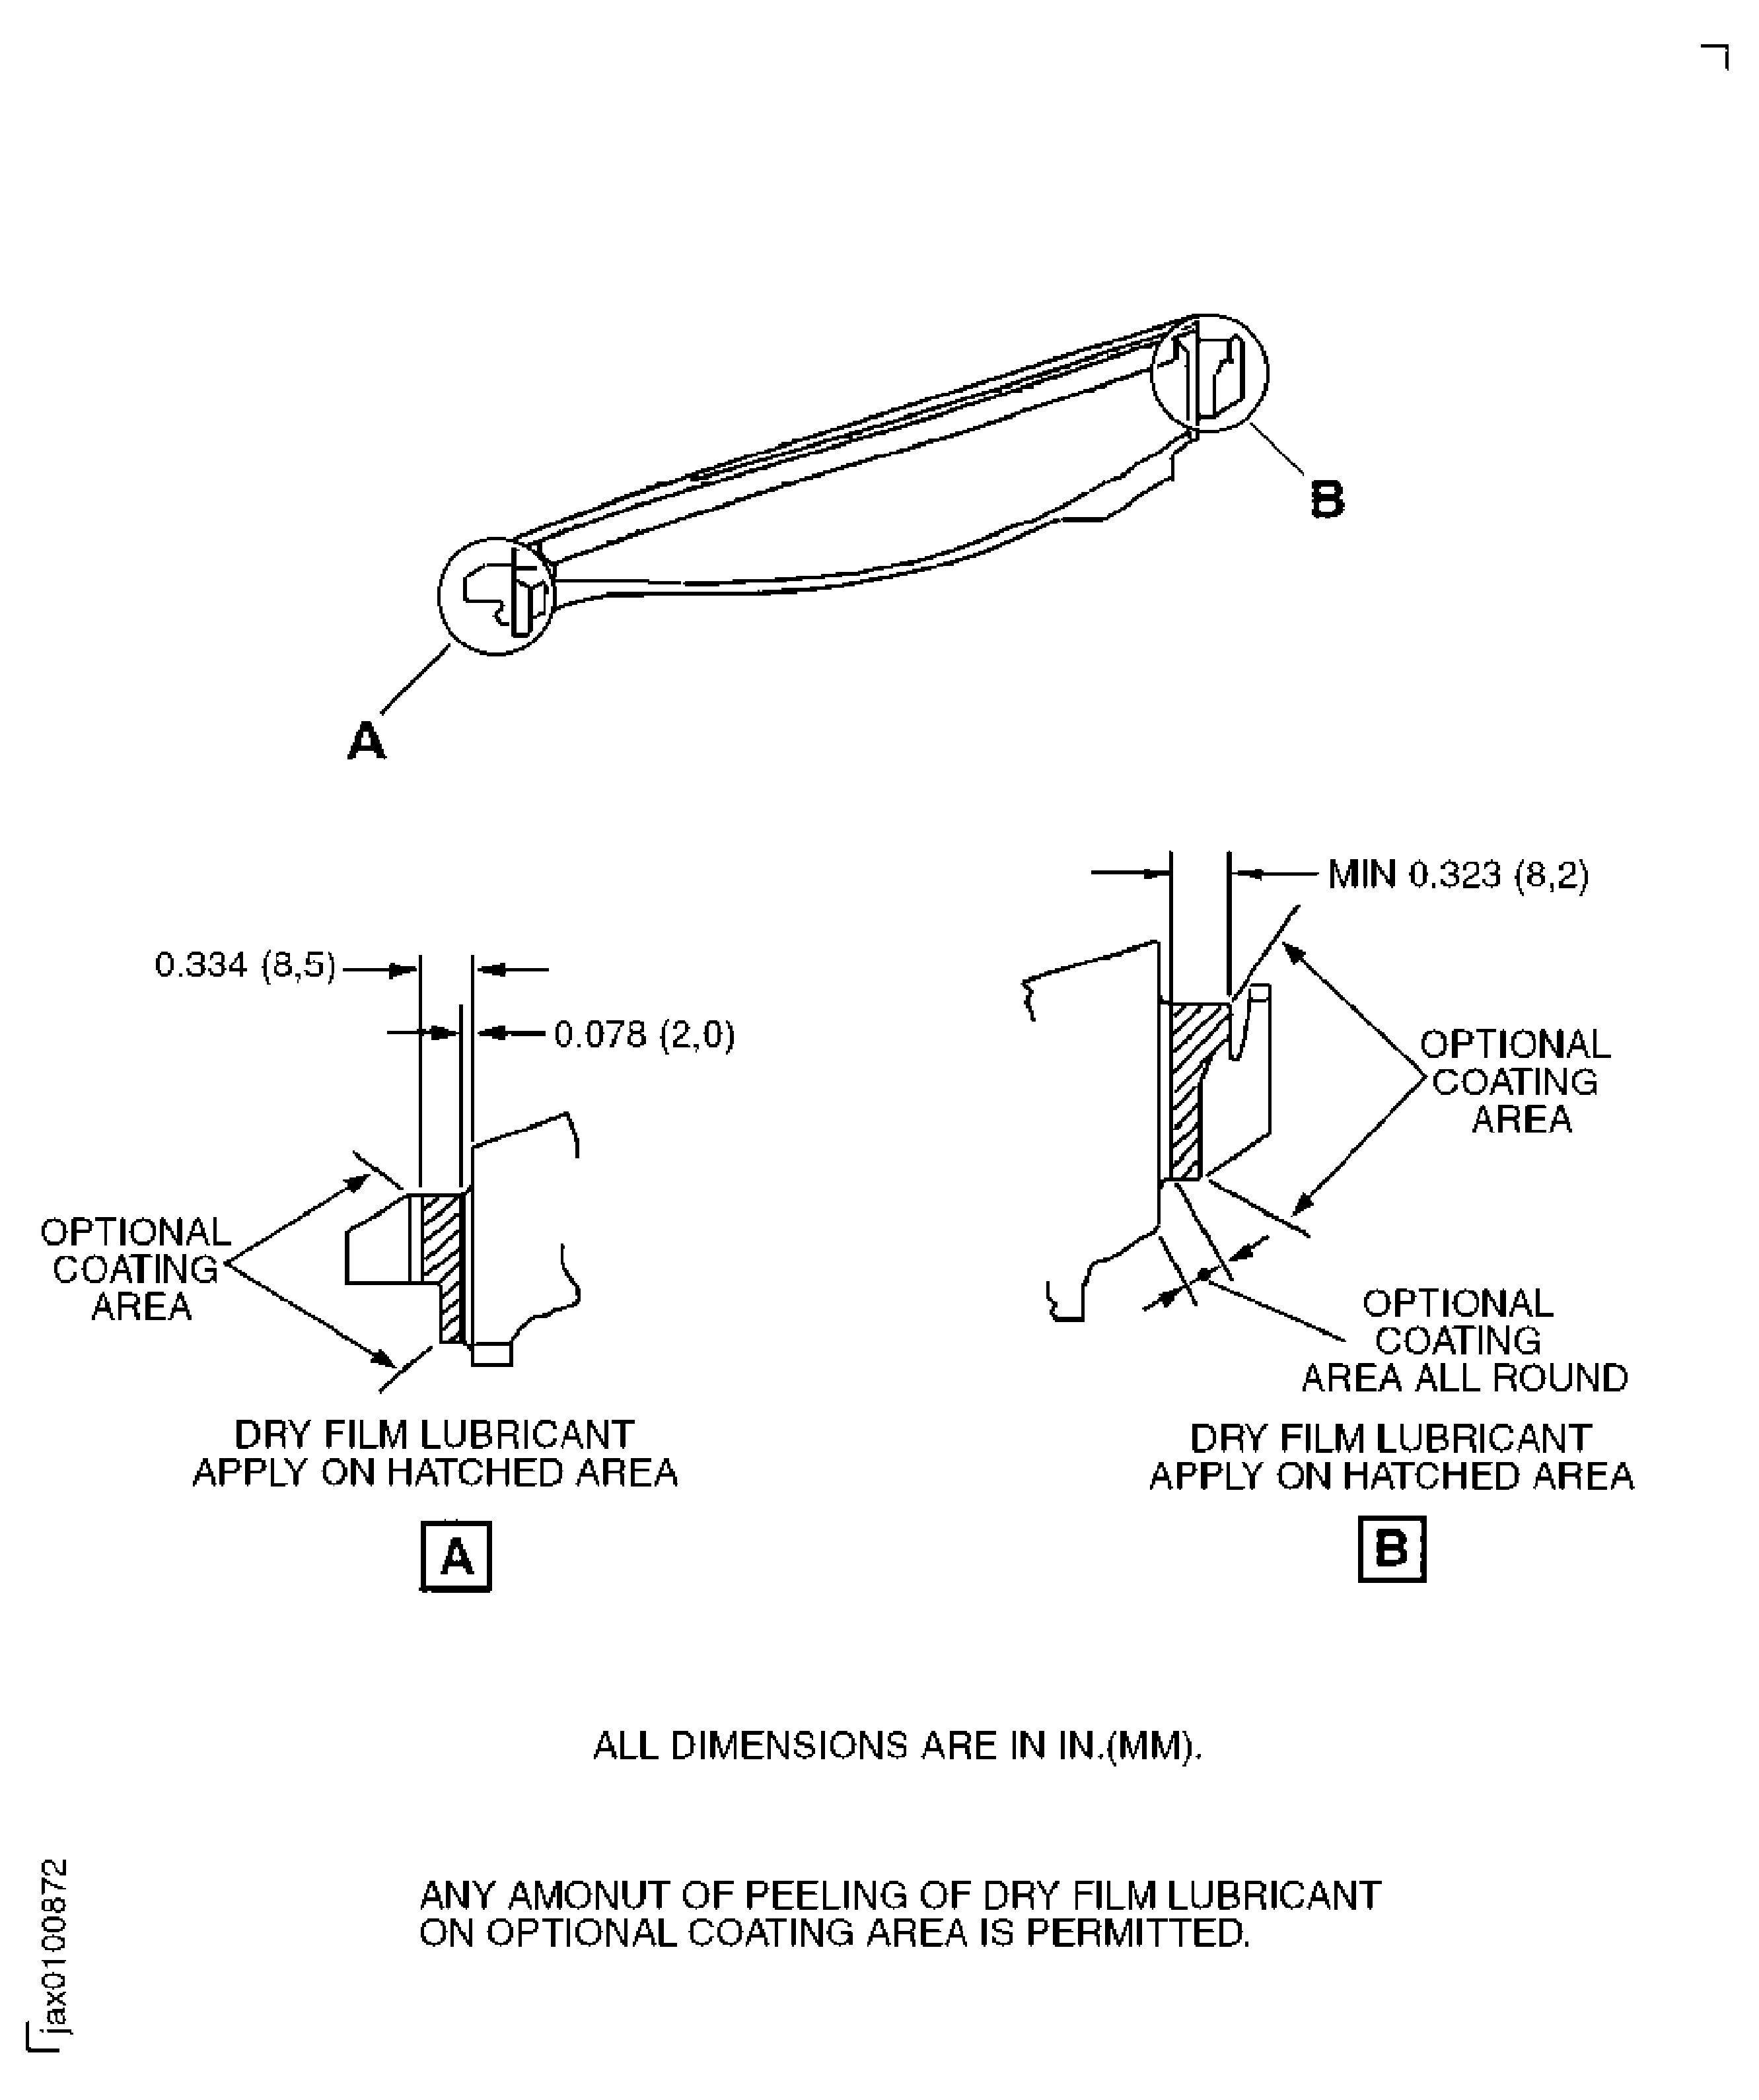
    Legend
    Location of Dry Film Lubricant on the Annulus Filler

    Sheet 2

    Close

    Figure: Locations on the Fan Blade Assembly

    Locations on the Fan Blade Assembly

    Figure: Fan Blade Damage

    Fan Blade Damage
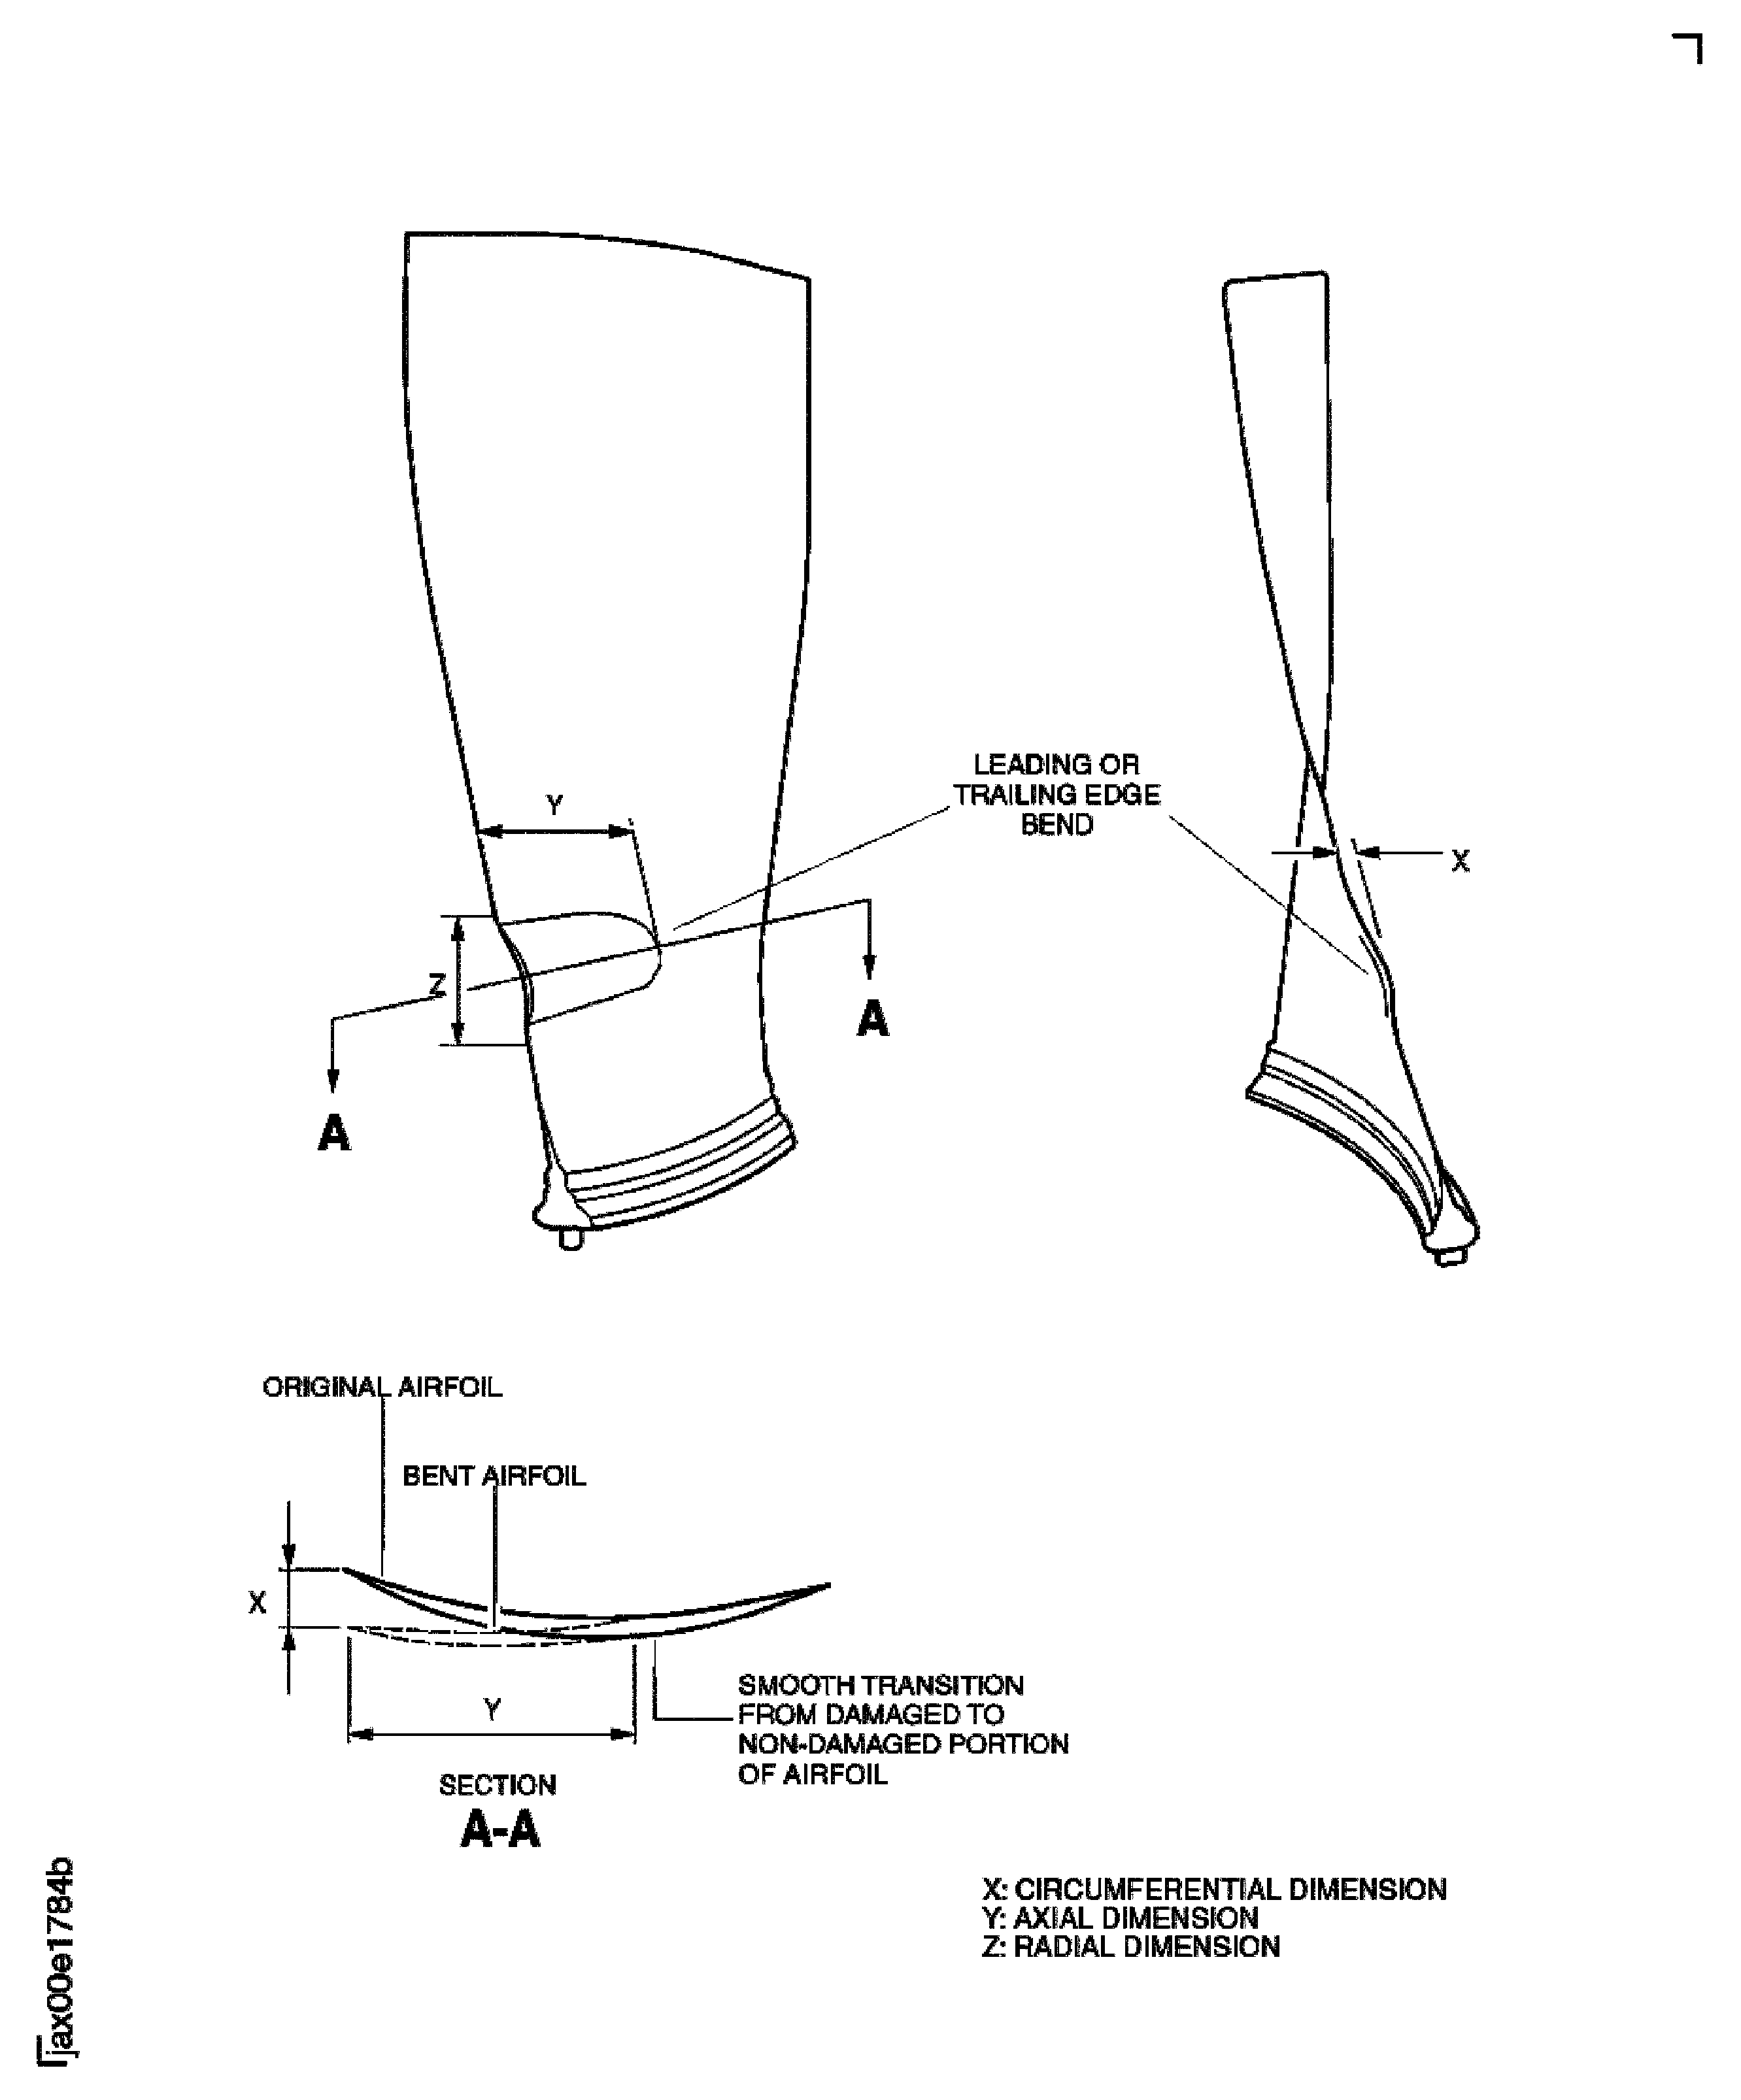
    Figure: Area F - Feather Tip Feature

    Area F - Feather Tip Feature

    Figure: Maximum Serviceable Limits

    Maximum Serviceable Limits

    Figure: Fan Blade Typical Leading Edge Profiles

    Fan Blade Typical Leading Edge Profiles
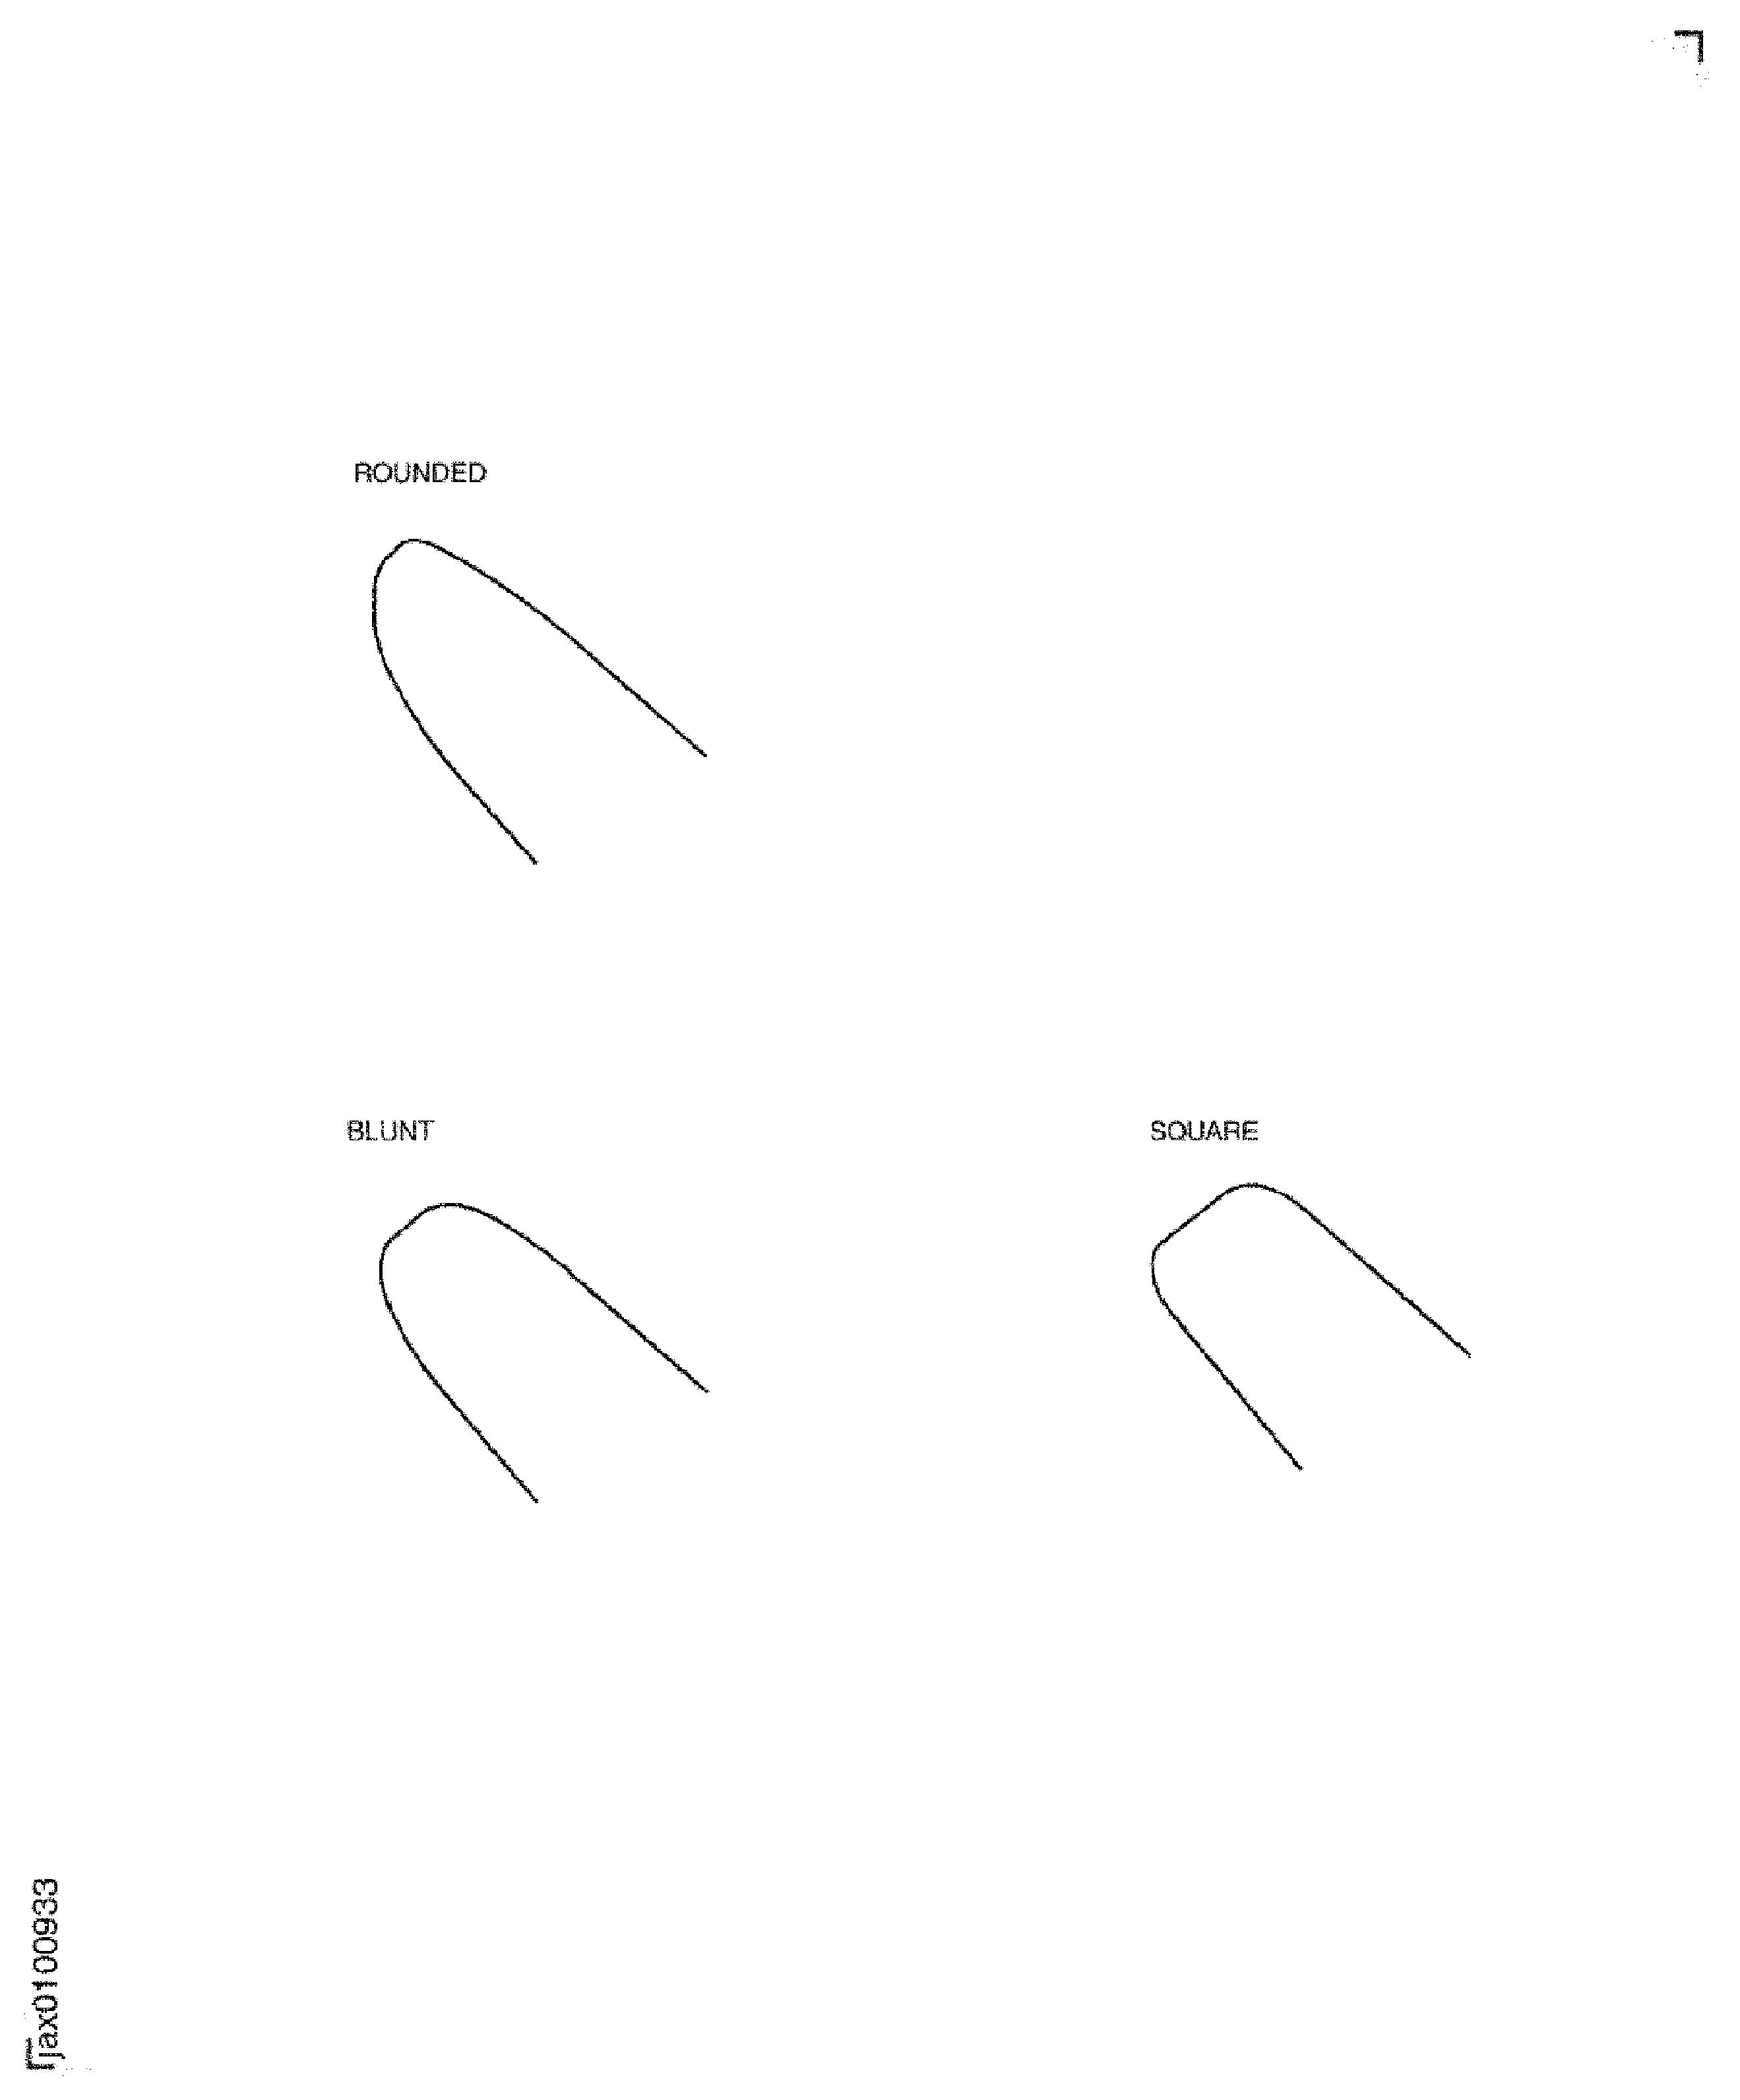
    Figure: Dry Film Lubricant Areas

    Dry Film Lubricant Areas
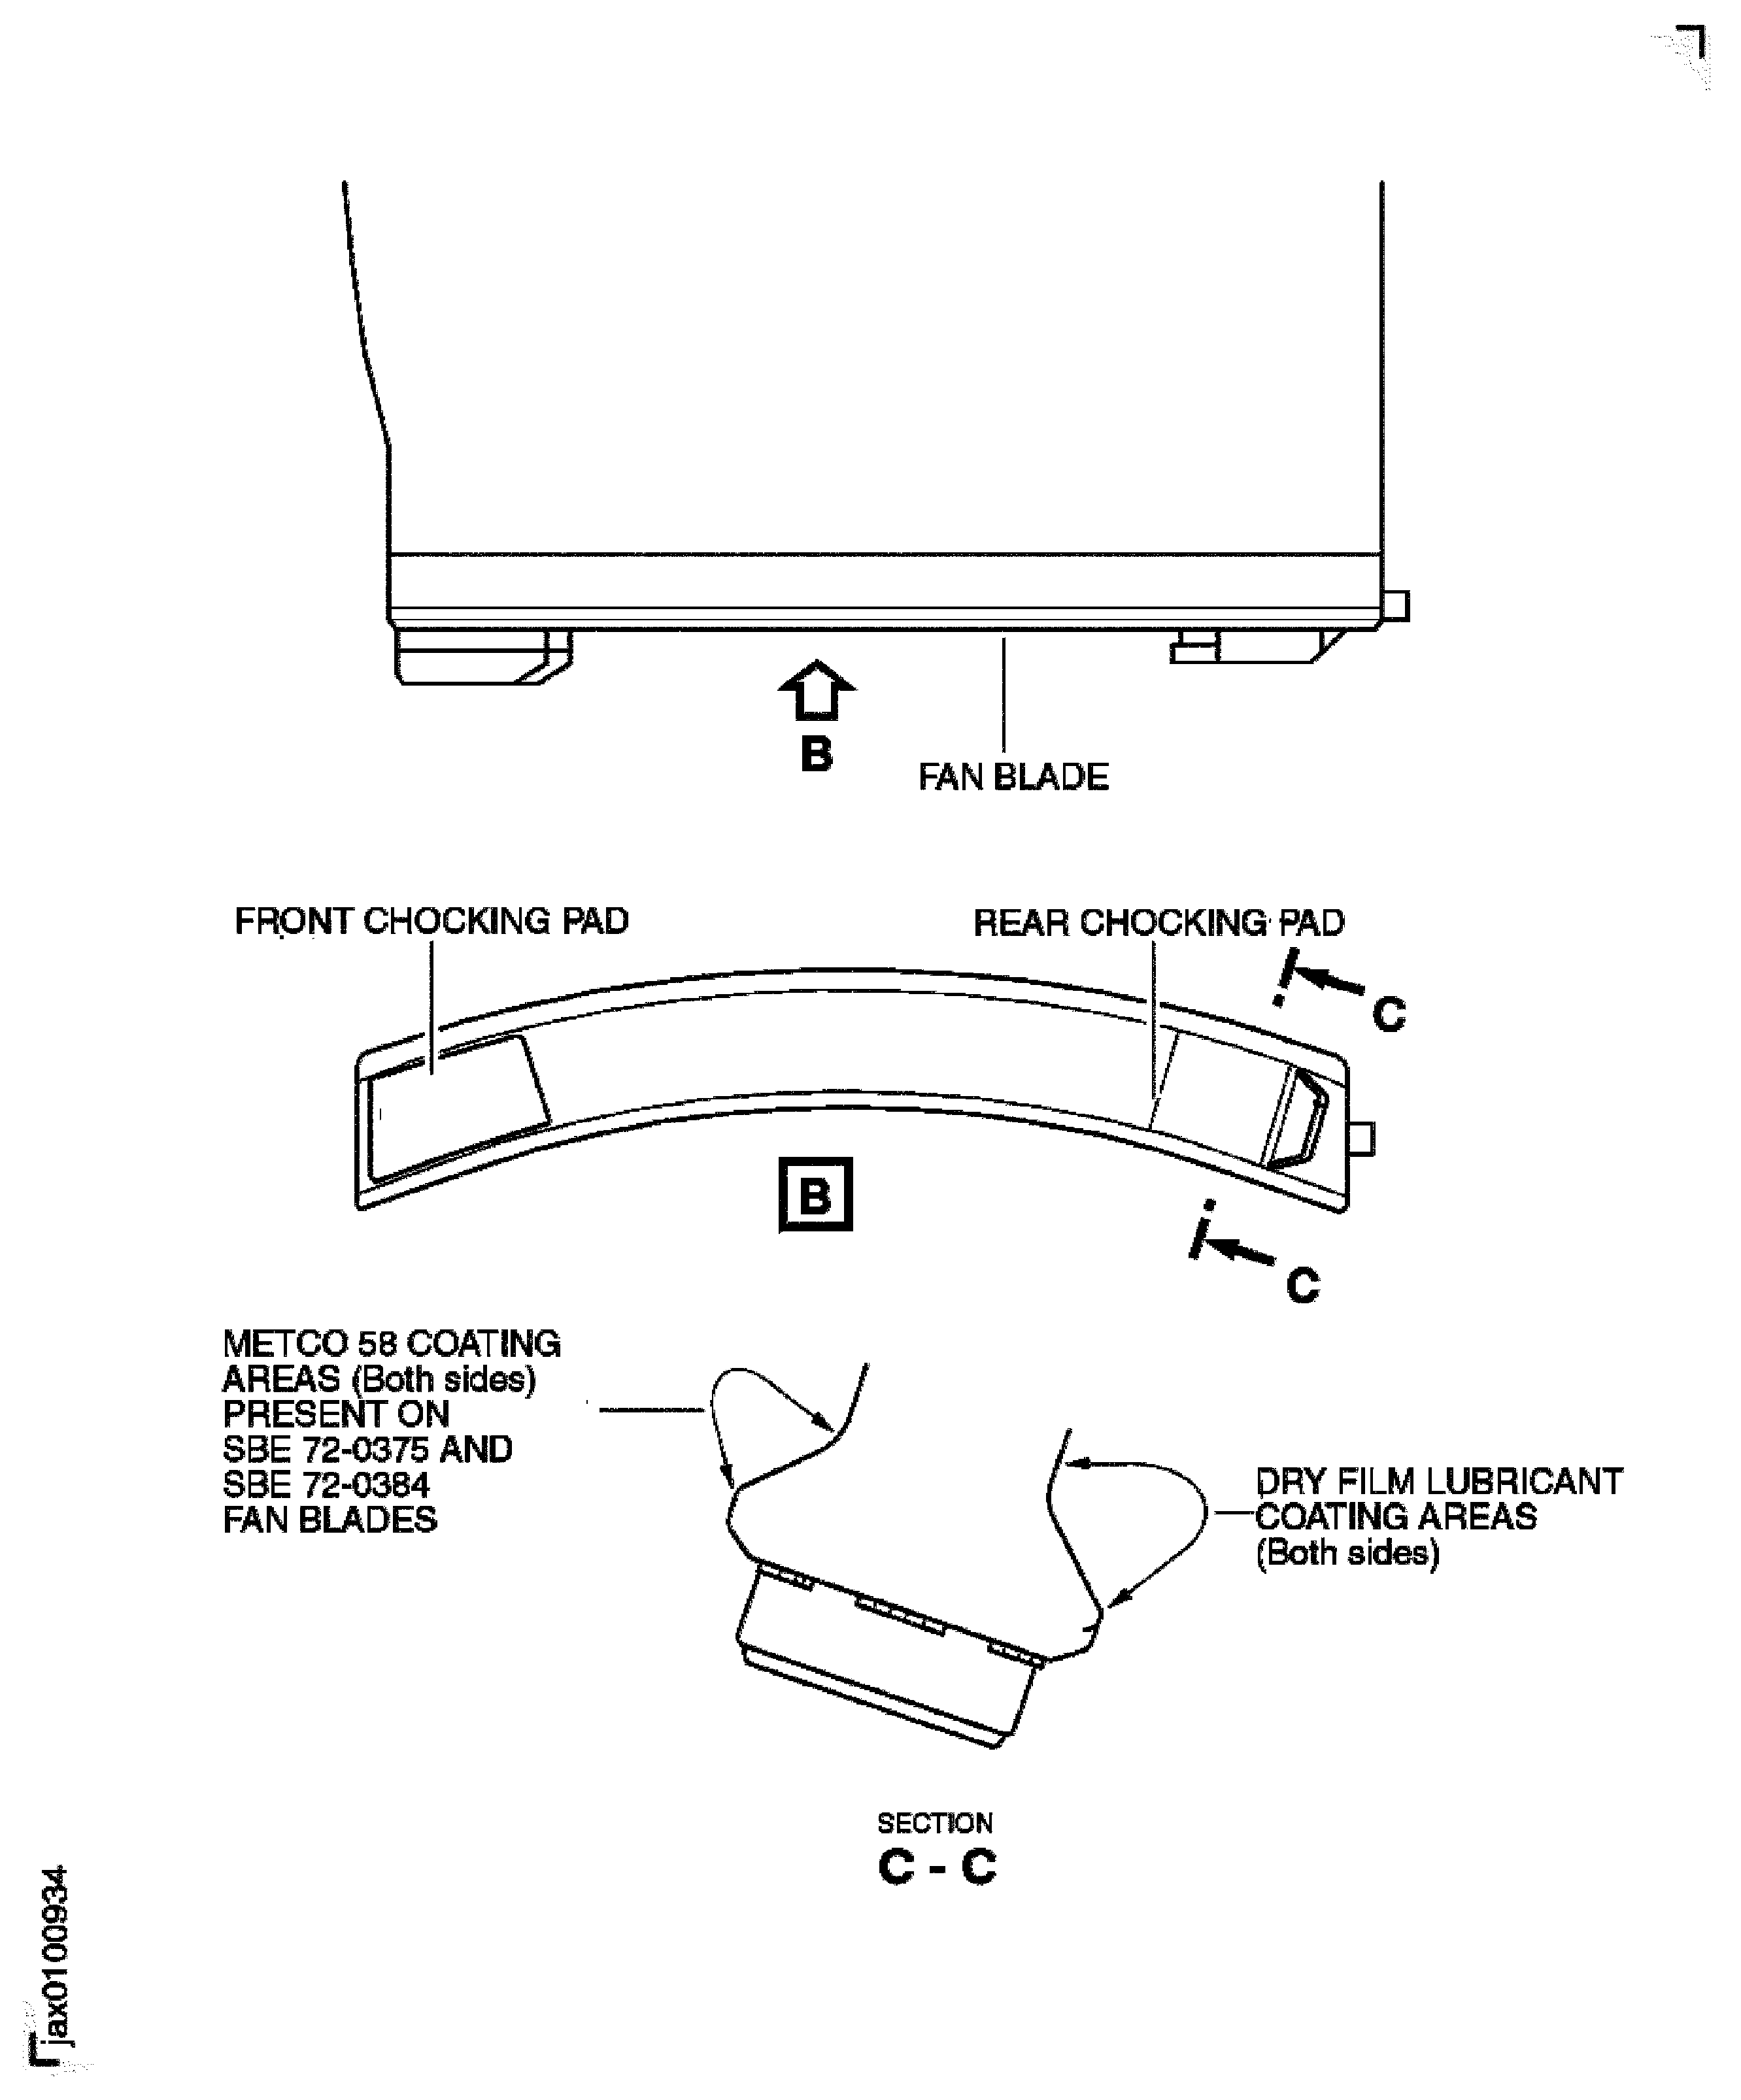
    Figure: Fan Disc Inspection Locations

    Fan Disc Inspection Locations

    Figure: Location on the Rear Blade Retaining Ring

    Location on the Rear Blade Retaining Ring
Requirements After Job Completion

Follow-On Conditions

NONE
Manufacturer Code:44197
Enterprise Name:SAINT-GOBAIN INDUSTRIAL CERAMICS INC.
BU Name:SAINT-GOBAIN ABRASIVES, INC
Street:ONE NEW BOND STREET
P.O. Box:PO BOX 15008
City:WORCESTER
State:MA
Zip Code:01615-0008
Country:USA
Phone Number:1-508-795-5000
Fax Number:1-508-795-2828
Internet:www.saint-gobain-northamerica.com
Manufacturer Code:LOCAL
Enterprise Name:LOCALLY SUPPLIED
Manufacturer Code:X222X
Supply Number:CoMat 02-099
Type:sp01
Supply Short Name:CoMat 02-099 LINT-FREE CLOTH
Supply Name:CoMat 02-099 LINT-FREE CLOTH
Specification Groups:
Doc NumberType
WHERE COMAT 02-099 IS SPECIFIED WITH NO SUFFIX, USE COMAT 02-099A OR COMAT 02-099B.
Suppliers:
ManufacturerRemarks
X222X
Manufacturer Code:1E1X8
Supply Number:CoMat 05-021
Type:sp01
Supply Short Name:CoMat 05-021 WATERPROOF SILICON CARBIDE
Supply Name:CoMat 05-021 WATERPROOF SILICON CARBIDE
Specification Groups:
Doc NumberType
OMAT: 5/35 (RR REF)WATERPROOF SILICON CARBIDE ABRASIVE PAPER, CAMI GRIT DESIGNATION 240 (ANSI B74.18 )
JCR-188 (JAEC REF)
Suppliers:
ManufacturerRemarks
1E1X8
K6835
LOCAL