Export Control
EAR Export Classification: Not subject to the EAR per 15 C.F.R. Chapter 1, Part 734.3(b)(3), except for the following Service Bulletins which are currently published as EAR Export Classification 9E991: SBE70-0992, SBE72-0483, SBE72-0580, SBE72-0588, SBE72-0640, SBE73-0209, SBE80-0024 and SBE80-0025.Copyright
© IAE International Aero Engines AG (2001, 2014 - 2021) The information contained in this document is the property of © IAE International Aero Engines AG and may not be copied or used for any purpose other than that for which it is supplied without the express written authority of © IAE International Aero Engines AG. (This does not preclude use by engine and aircraft operators for normal instructional, maintenance or overhaul purposes.).Applicability
All
Common Information
TASK 72-60-32-200-001 Angle Gearbox Support - Examine, Inspection-001
General
This TASK gives the procedure for the inspection of the angle gearbox support. For the other parts of the angle gearbox support refer to TASK 72-60-32-200-000.
Fig/item numbers in parentheses in the procedure agree with those used in the IPC.
The policy that is necessary for inspection is given in SPM TASK 70-20-01-200-501.
All the parts must be cleaned before any part is examined. Refer to SPM TASK 70-11-03-300-503.
All parts must be visually examined for damage, corrosion and wear. Any defects that are not identified in the procedure must be referred to IAE.
The procedure for those parts which must have a crack test is given in the SPM TASK 70-23-00-230-501. Do the test before the part is visually examined. Limits for cracks are given in the SUBTASK for each part.
A ** following repair referenced in this inspection indicates that the repair is not yet published in the current revision of the manual and the part must be rejected. Contact IAE for additional information concerning FAA approved repair date.
Do not discard any part until you are sure there are no repairs available. Refer to the instructions in repair before a discarded part is used again or oversize parts are installed.
Parts which should be discarded can be held although no repair is available. The repair of a discarded part could be shown to the necessary at a later date.
All parts must be examined to make sure that all the repairs have been completed satisfactorily.
The practices and processes referred to in the procedure by the TASK numbers are in the SPM.
References
Refer to the SPM for data on these items:
Definitions of Damage, SPM TASK 70-02-02-350-501,
Record and Control of the Lives of Parts, SPM TASK 70-05-00-220-501,
Inspection of Parts, SPM TASK 70-20-00-200-501.
Some data on these items are contained in this TASK. For more data on these items refer to the SPM:
Method of Testing for Crack Indications,
Chemical Processes,
Surface Protection.
Preliminary Requirements
Pre-Conditions
NONESupport Equipment
| Name | Manufacturer | Part Number / Identification | Quantity | Remark |
|---|---|---|---|---|
| Workshop inspection equipment | LOCAL | Workshop inspection equipment | ||
| Fluorescent Penetrant Inspection Equipment | LOCAL | Fluorescent penetrant inspection equipment |
Consumables, Materials and Expendables
NONESpares
NONESafety Requirements
NONEProcedure
Clean the parts. Refer to TASK 72-60-23-100-000 (CLEANING-000).
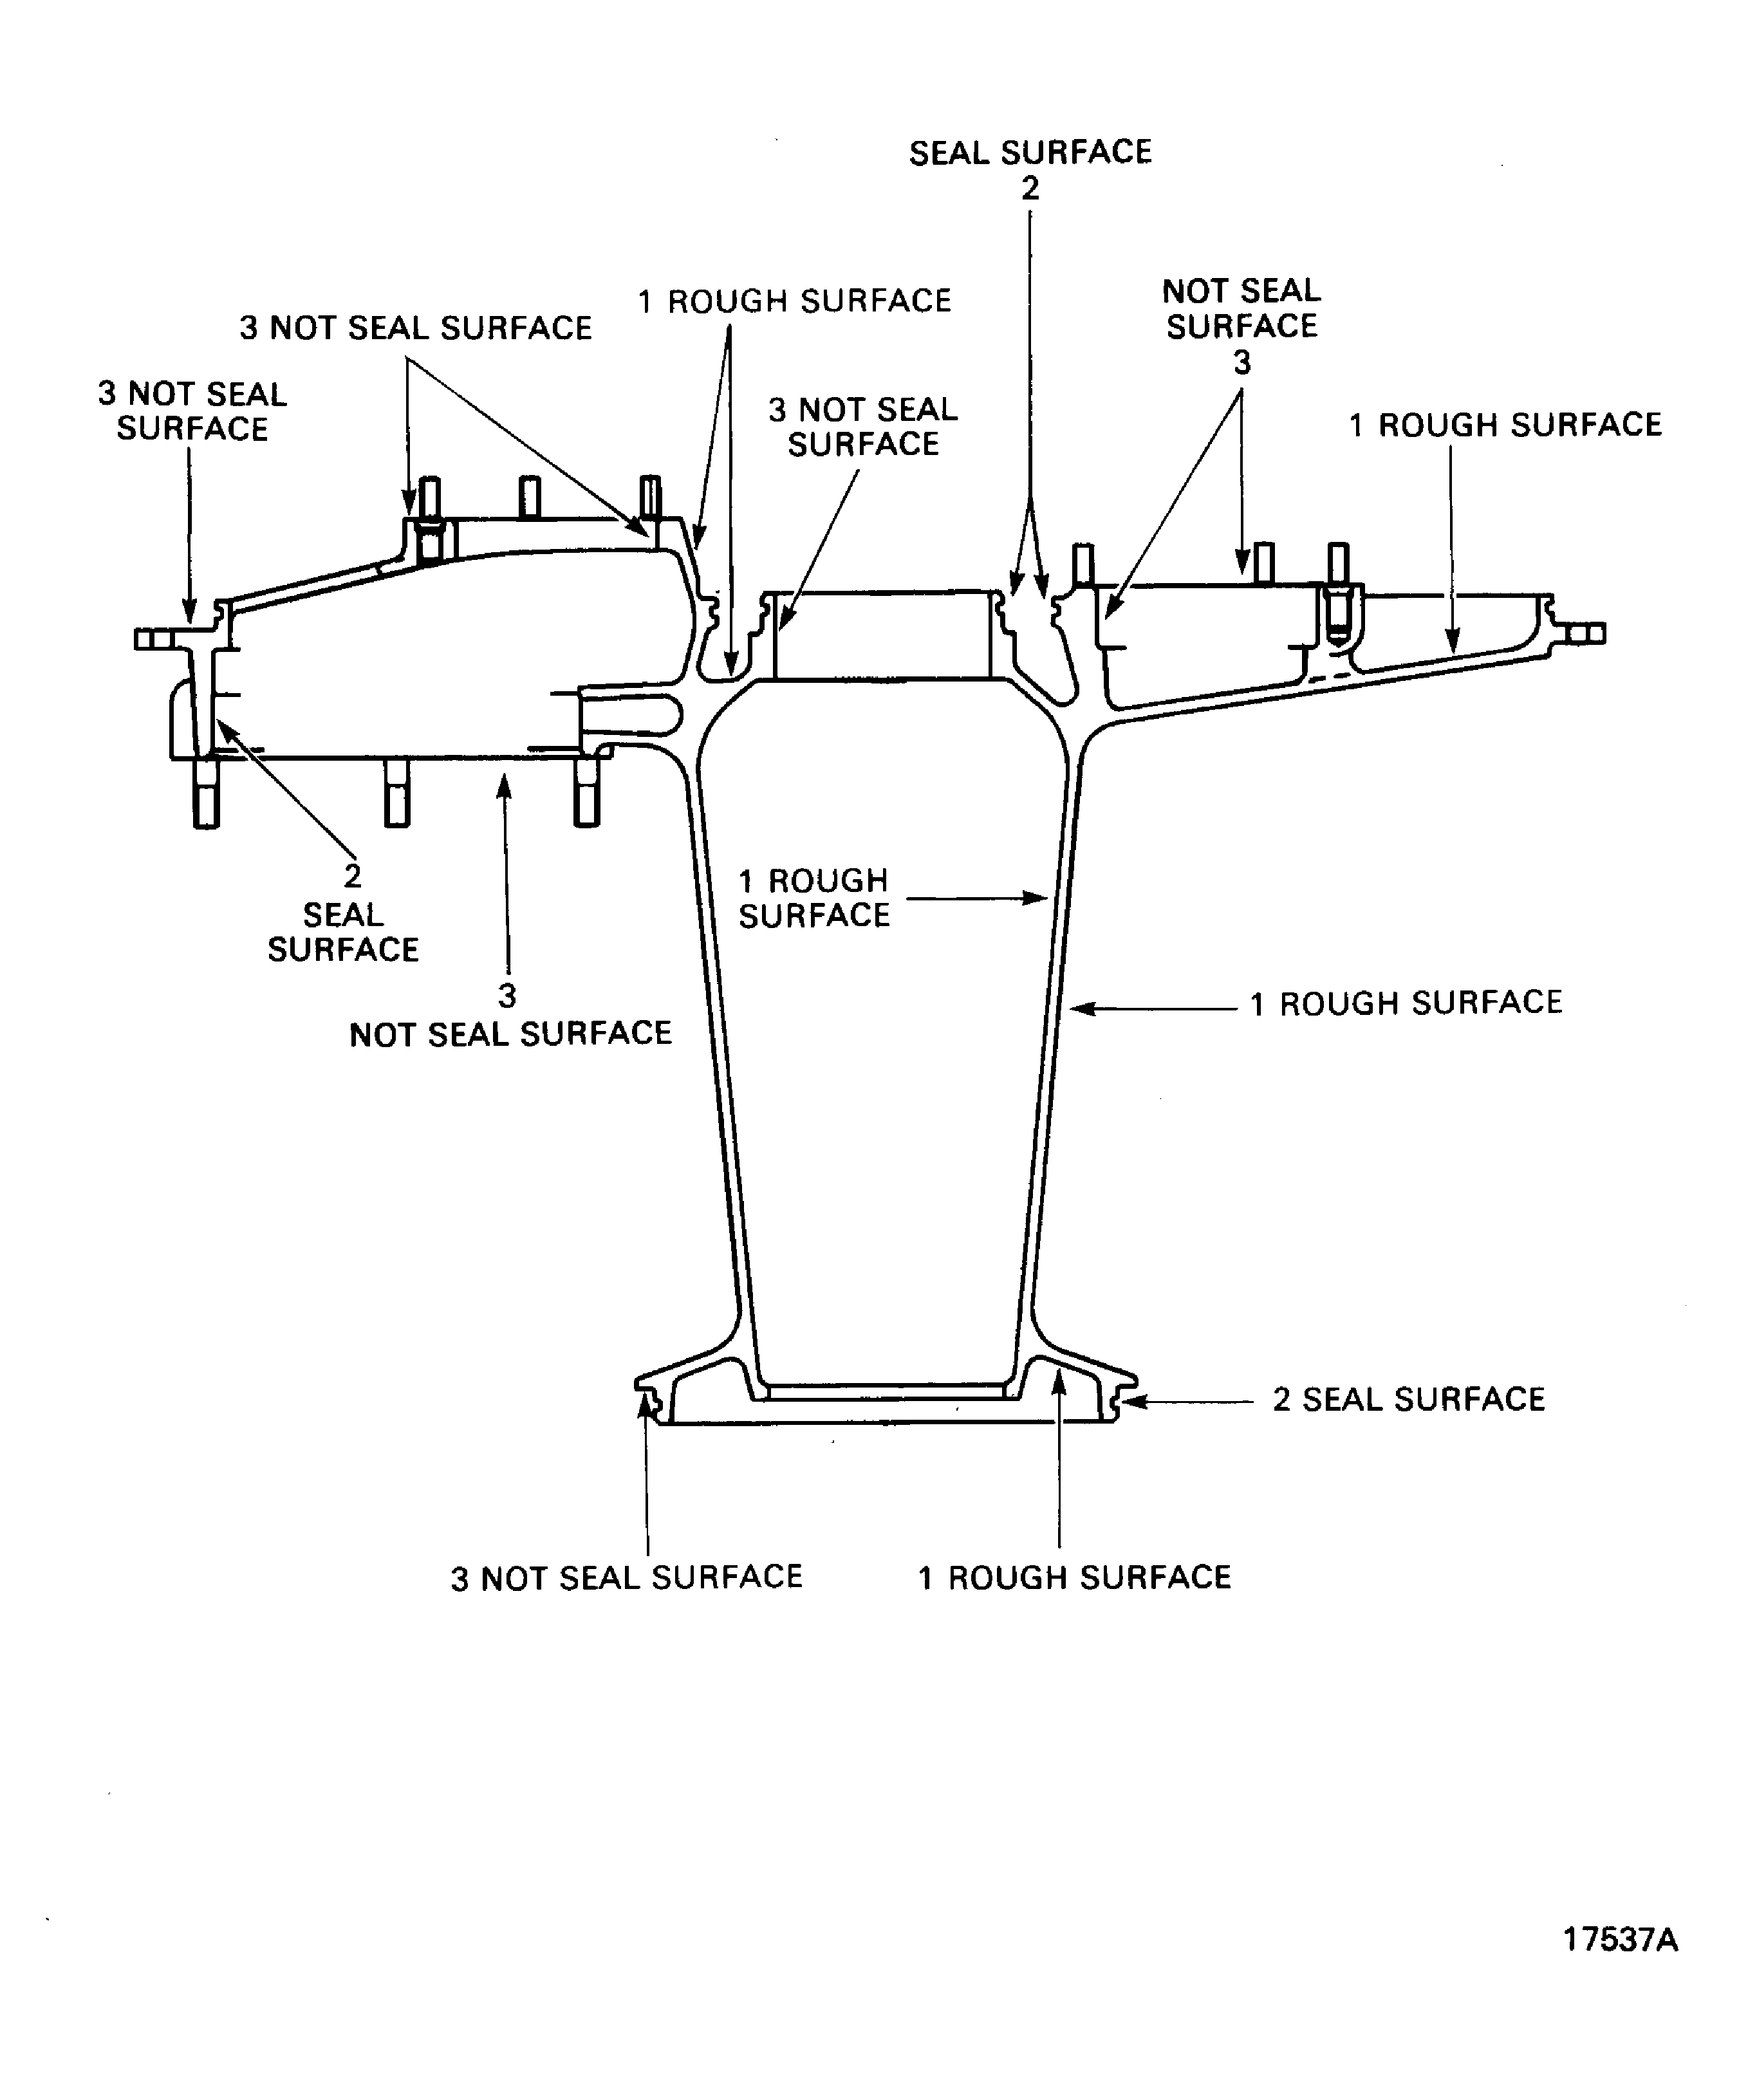
SUBTASK 72-60-32-230-051 Do a Crack Test on the Angle Gearbox Support (01-300) by Fluorescent Penetrant
Refer to Figure.
Refer to Repair, VRS5110 TASK 72-60-32-300-001 (REPAIR-001).
More than Step.
Nicks, scores, dents or scratches.
SUBTASK 72-60-32-220-052 Examine the Angle Gearbox Support (01-300) Rough Surfaces, Location 1
Refer to Figure.
Refer to Repair, VRS5110 TASK 72-60-32-300-001 (REPAIR-001).
More than Step.
Nicks, scores, dents or scratches.
SUBTASK 72-60-32-220-053 Examine the Angle Gearbox Support (01-300) Machined Seal Surfaces, Location 2
Refer to Figure.
Refer to Repair, VRS5110 TASK 72-60-32-300-001 (REPAIR-001).
More than Step.
Nicks, scores, dents or scratches.
SUBTASK 72-60-32-220-054 Examine the Angle Gearbox Support (01-300) Machined Not Seal Surfaces, Location 3
Refer to Repair, VRS5111 TASK 72-60-32-300-002 (REPAIR-002).
Light corrosion or pitting.
SUBTASK 72-60-32-220-055 Examine the Angle Gearbox Support (01-300) Protective Finish
Refer to Repair, VRS5112 TASK 72-60-32-300-003 (REPAIR-003).
More than 0.0138 in. (0.35 mm) each 3.937 in. (100.00 mm). No axial movement is permitted (moved by hand).
Perpendicularity.
Refer to Repair, VRS5112 TASK 72-60-32-300-003 (REPAIR-003).
Thread damage or not there.
SUBTASK 72-60-32-220-056 Examine the Angle Gearbox Support (01-300) Studs/Lockrings
Refer to Repair, VRS5113 TASK 72-60-32-300-004 (REPAIR-004).
Loose, not there or with the internal thread damage.
SUBTASK 72-60-32-220-057 Examine the Angle Gearbox Support (01-300) Threaded Inserts/Lockrings
Refer to Repair, VRS5114 TASK 72-60-32-300-005 (REPAIR-005).
Damaged.
SUBTASK 72-60-32-220-058 Examine the Angle Gearbox Support (01-300) Pins
Refer to Repair, VRS5115 TASK 72-60-32-300-006 (REPAIR-006).
Less than 6.8445 in. (173.850 mm).
Diameter.
Refer to Repair, VRS5115 TASK 72-60-32-300-006 (REPAIR-006).
More than Step.
True position.
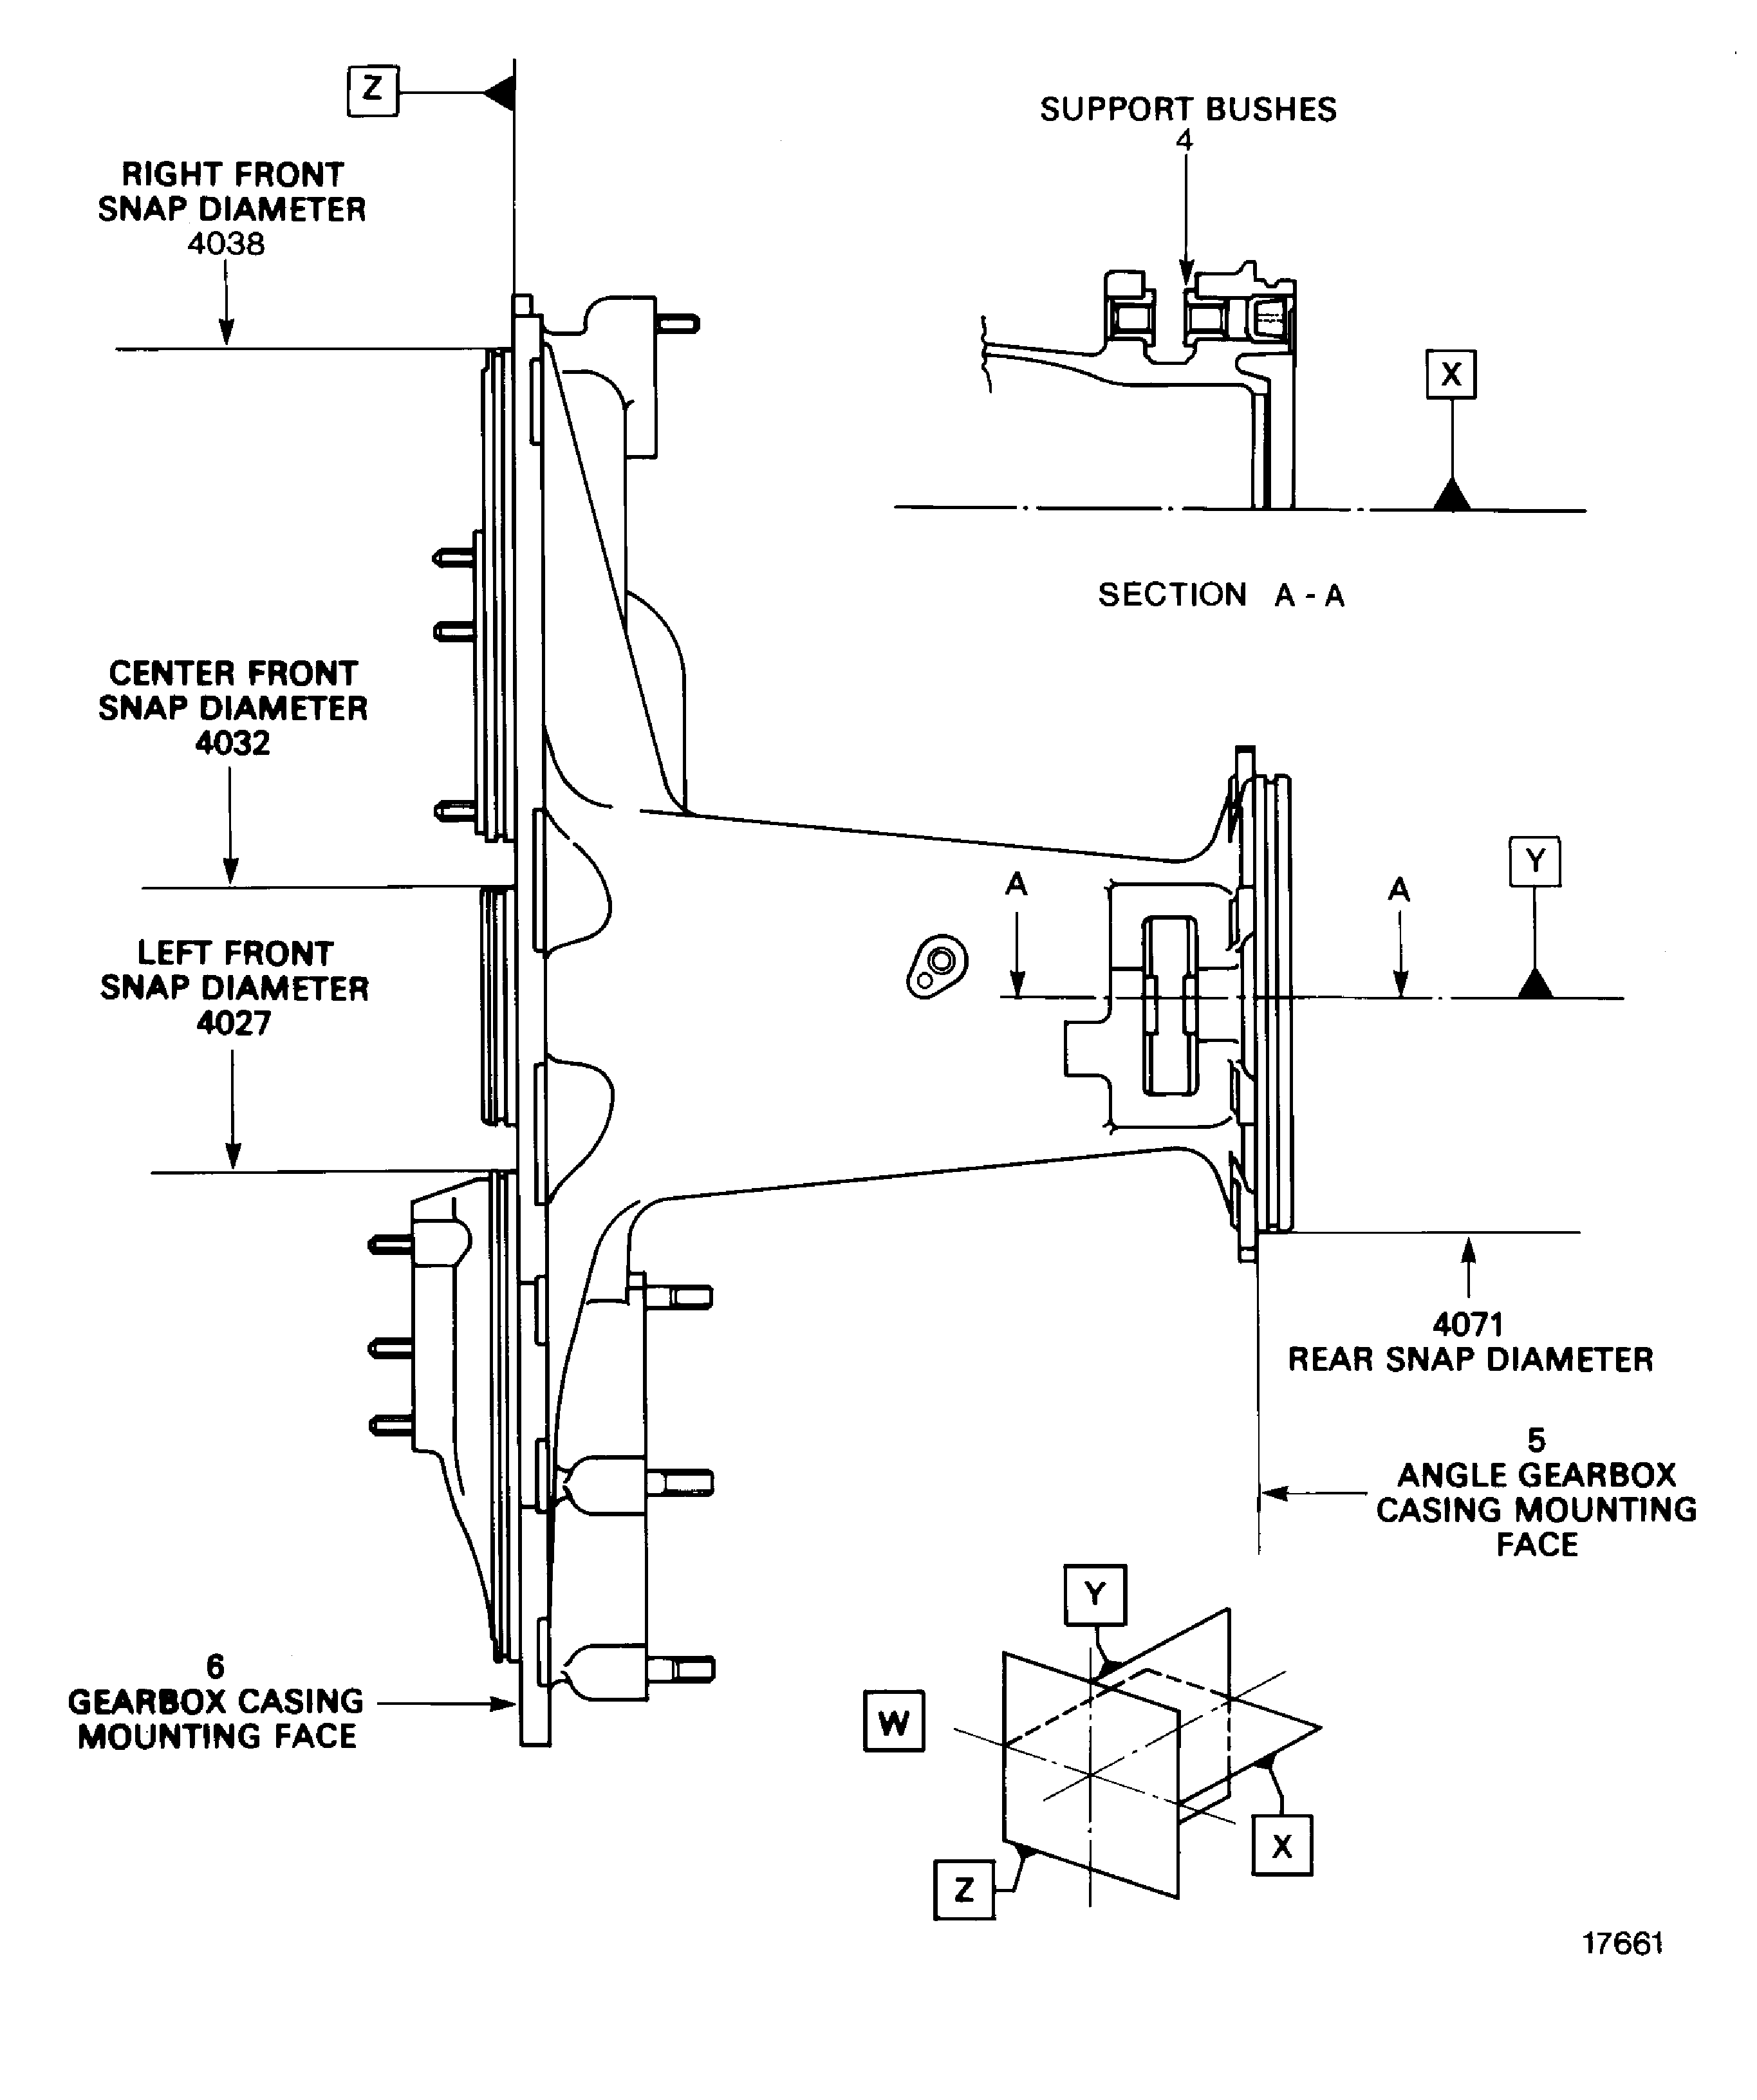
SUBTASK 72-60-32-220-059 Examine the Angle Gearbox Support (01-300) Left and Right Front Snap Diameters, Location 4027 and 4038
Refer to Figure.
Refer to Repair, VRS5116 TASK 72-60-32-300-007 (REPAIR-007).
More than 0.3746 in. (9.54 mm).
Internal diameter.
Refer to Repair, VRS5116 TASK 72-60-32-300-007 (REPAIR-007).
More than 0.4274 in. (10.85 mm).
Flange distance.
SUBTASK 72-60-32-220-060 Examine the Angle Gearbox Support (01-300) Support Bushes, Location 4
Refer to Repair, VRS5117 TASK 72-60-32-300-008 (REPAIR-008).
Less than 6.3370 in. (160.960 mm).
Diameter.
Refer to Repair, VRS5117 TASK 72-60-32-300-008 (REPAIR-008).
More than Step.
True position.
SUBTASK 72-60-32-220-061 Examine the Angle Gearbox Support (01-300) Rear Snap Diameter, Location 4071
Refer to Figure.
Refer to Repair, VRS5118 TASK 72-60-32-300-009 (REPAIR-009).
More than Step.
Parallelism.
SUBTASK 72-60-32-220-062 Examine the Angle Gearbox Support (01-300) Angle Gearbox Casing Mounting Face, Location 5
Refer to Figure.
Refer to Repair, VRS5119 TASK 72-60-32-300-010 (REPAIR-010).
More than Step.
Planarity.
SUBTASK 72-60-32-220-063 Examine the Angle Gearbox Support (01-300) Gearbox Casing Mounting Face, Location 6
Refer to Repair, VRS5120 TASK 72-60-32-300-011 (REPAIR-011).
Less than 3.3012 in. (83.85 mm).
Diameter.
Refer to Repair, VRS5120 TASK 72-60-32-300-011 (REPAIR-011).
More than Step.
True position.
SUBTASK 72-60-32-220-064 Examine the Angle Gearbox Support (01-300) Center Front Snap Diameter, Location 4032
Refer to Repair, VRS5122 TASK 72-60-32-300-013 (REPAIR-013).
More than 5.0409 in. (128.04 mm).
Diameter.
Refer to Repair, VRS5122 TASK 72-60-32-300-013 (REPAIR-013).
More than Step.
True position.
SUBTASK 72-60-32-220-066 Examine the Angle Gearbox Support (01-300) Oil Scavenge Pump Seat, Location 9
Refer to Repair, VRS5123 TASK 72-60-32-300-014 (REPAIR-014).
More than 2.7561 in. (70.004 mm).
Diameter.
Refer to Repair, VRS5123 TASK 72-60-32-300-014 (REPAIR-014).
More than Step.
True position.
SUBTASK 72-60-32-220-067 Examine the Angle Gearbox Support (01-300) Left Bearing Seat, Location 4034
Refer to Figure.
Refer to Repair, VRS5124 TASK 72-60-32-300-015 (REPAIR-015).
More than Step.
Parallelism.
SUBTASK 72-60-32-220-068 Examine the Angle Gearbox Support (01-300) Left Bearing Mating Surface, Location 10
Refer to Repair, VRS5125 TASK 72-60-32-300-016 (REPAIR-016).
More than 3.0317 in. (77.004 mm).
Diameter.
Refer to Repair, VRS5125 TASK 72-60-32-300-016 (REPAIR-016).
More than Step.
True position.
SUBTASK 72-60-32-220-069 Examine the Angle Gearbox Support (01-300) Right Bearing Seat, Location 4023
Refer to Figure.
Refer to Repair, VRS5126 TASK 72-60-32-300-017 (REPAIR-017).
More than Step.
Parallelism.
SUBTASK 72-60-32-220-070 Examine the Angle Gearbox Support (01-300) Right Bearing Mating Surface, Location 11
Refer to Repair, VRS5045 TASK 72-60-32-300-012 (REPAIR-012).
Loose, missing or with internal thread damaged.
SUBTASK 72-60-32-220-081 Examine the Angle Gearbox Support (72-60-32,01-300) Inserts (Pre SBE 72-0492)
Refer to Repair, VRS5675 TASK 72-60-32-300-020 (REPAIR-020).
Loose, missing or with internal thread damaged.
SUBTASK 72-60-32-220-110 Examine the Angle Gearbox Support (72-60-32,01-300) Helicoil Inserts (SBE 72-0492)
Refer to Repair, VRS5676 TASK 72-60-32-300-021 (REPAIR-021).
Loose, missing or with internal thread damaged.
SUBTASK 72-60-32-220-111 Examine the Angle Gearbox Support (72-60-32,01-300) Screw Head Inserts (SBE 72-0492, SBE 70-0950)
Figure: Locations - Angle Gearbox Support
Locations - Angle Gearbox Support

Figure: Locations - Angle Gearbox Support
Locations - Angle Gearbox Support

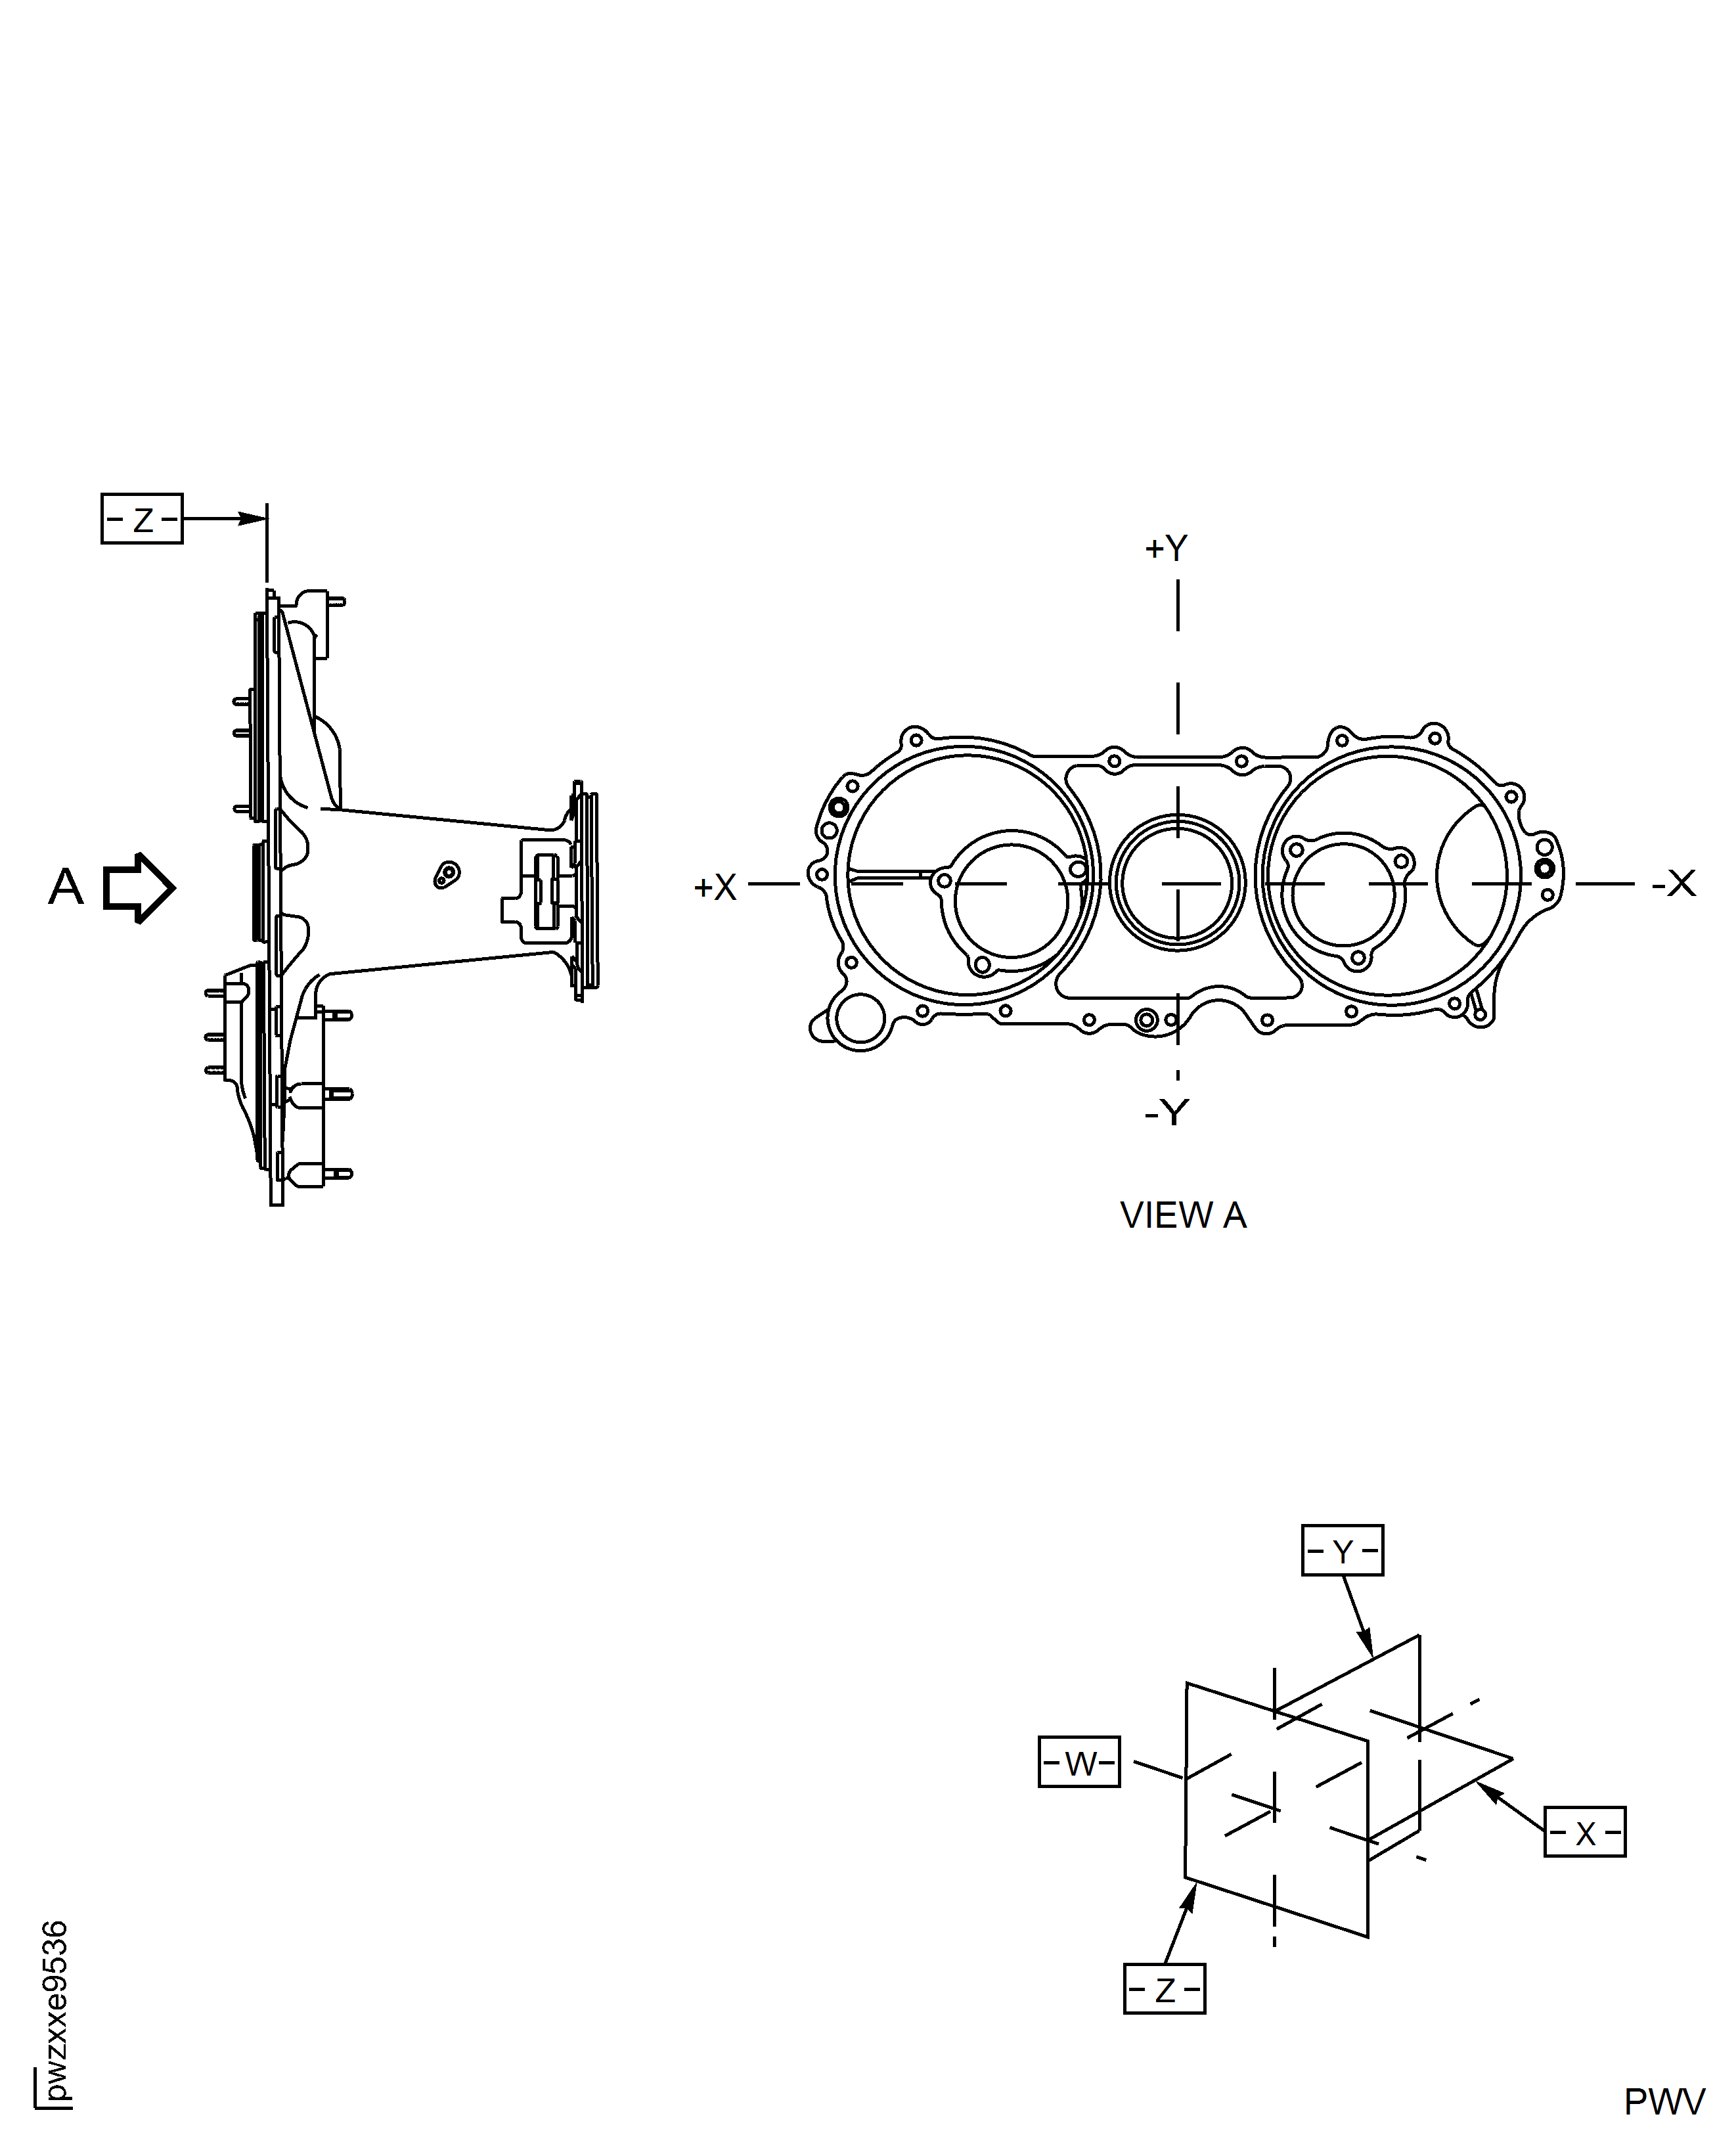
Figure: Locations - Angle Gearbox Support
Locations - Angle Gearbox Support

Figure: Angle Gearbox Support W-System
Angle Gearbox Support W-System

