Export Control
EAR Export Classification: Not subject to the EAR per 15 C.F.R. Chapter 1, Part 734.3(b)(3), except for the following Service Bulletins which are currently published as EAR Export Classification 9E991: SBE70-0992, SBE72-0483, SBE72-0580, SBE72-0588, SBE72-0640, SBE73-0209, SBE80-0024 and SBE80-0025.Copyright
© IAE International Aero Engines AG (2001, 2014 - 2021) The information contained in this document is the property of © IAE International Aero Engines AG and may not be copied or used for any purpose other than that for which it is supplied without the express written authority of © IAE International Aero Engines AG. (This does not preclude use by engine and aircraft operators for normal instructional, maintenance or overhaul purposes.).Applicability
V2500-A5
Common Information
TASK 72-41-11-200-001-B00 HPC Stage 3 - 8 Drum Disk - Examine, Inspection-001
Effectivity
FIG/ITEM | PART NO. | SERVICE BULLETIN |
01-200 | 6A4900 | PRE SBE 72-0178 |
01-200 | 6A5467 | |
01-200 | 6A6473 | |
01-200 | 6A7383 | |
01-200 | 6A7384 | |
01-200 | 6A7385 | |
01-200 | 6A7401 | |
01-200 | 6A7705 | |
01-200 | 6A8316 | |
01-200 | 6B1379 | |
01-200 | 6B1380 | |
01-200 | 6B1384 | |
01-200 | 6B1385 | |
01-200 | 6B1386 | |
01-200 | 6B1387 | |
01-200 | 6B1391 | |
01-200 | 6B1392 | |
01-200 | 6B1393 | |
01-200 | 6B1404 | |
01-200 | 6B1405 |
General
This TASK gives the procedure to examine the stages 3 to 8 HP compressor discs. For other parts of the Stages 3 to 8 HP compressor discs refer to TASK 72-41-11-200-000 (INSPECTION/CHECK-000).
Fig./item numbers in parenthesis in the procedure agree with those used in the IPC. Only the primary Fig./item numbers are used. For the service bulletin alpha variants refer to IPC.
The policy that is necessary for inspection is given in SPM TASK 70-20-01-200-501.
All the parts must be cleaned before any part is examined.
All parts must be visually examined for damage, corrosion and wear. All defects that are not identified in this procedure must be referred to IAE.
The procedure for those parts which must have a crack test is given in Step. Do the test before the part is visually examined.
Do not discard any part until you are sure that there are no repairs available. Refer to the instructions in the repair before a discarded part is used again or over size parts are installed.
Parts which should be discarded can be held although no repair is available. The repair of a discarded part could be shown to be necessary at a later date.
All parts must be examined to make sure that all the repairs have been completed satisfactorily.
The practices and processes referred to in the procedure by the TASK/SUBTASK numbers are in SPM.
All of the temporary marks made in this procedure must be removed before the component is assembled.
HP compressor stages 3 to 8 drum cleaning procedure:
For all standards of drum, an aqueous cleaning method can be used as necessary, but a nitric acid solution chemical cleaning process is mandatory to clean and remove the remaining potential silver from drums that have operated with any standard of silver coated nut in the stage 8 cavity.
Polythene or cotton gloves must be worn to prevent surface contamination from handling after cleaning process.
References
Refer to SPM for data on these items:
Definition of Damage, SPM TASK 70-02-02-350-501,
Record and Control of the Component Lives, SPM TASK 70-05-00-220-501,
Inspection of parts, SPM TASK 70-20-01-200-501.
Some data on these items is contained in this TASK. For more data on these items refer to SPM:
Method of Testing for Crack Indications,
Chemical Processes,
Surface Protection.
NOTE
NOTE
Preliminary Requirements
Pre-Conditions
NONESupport Equipment
| Name | Manufacturer | Part Number / Identification | Quantity | Remark |
|---|---|---|---|---|
| Gloves | LOCAL | Polythene or cotton | ||
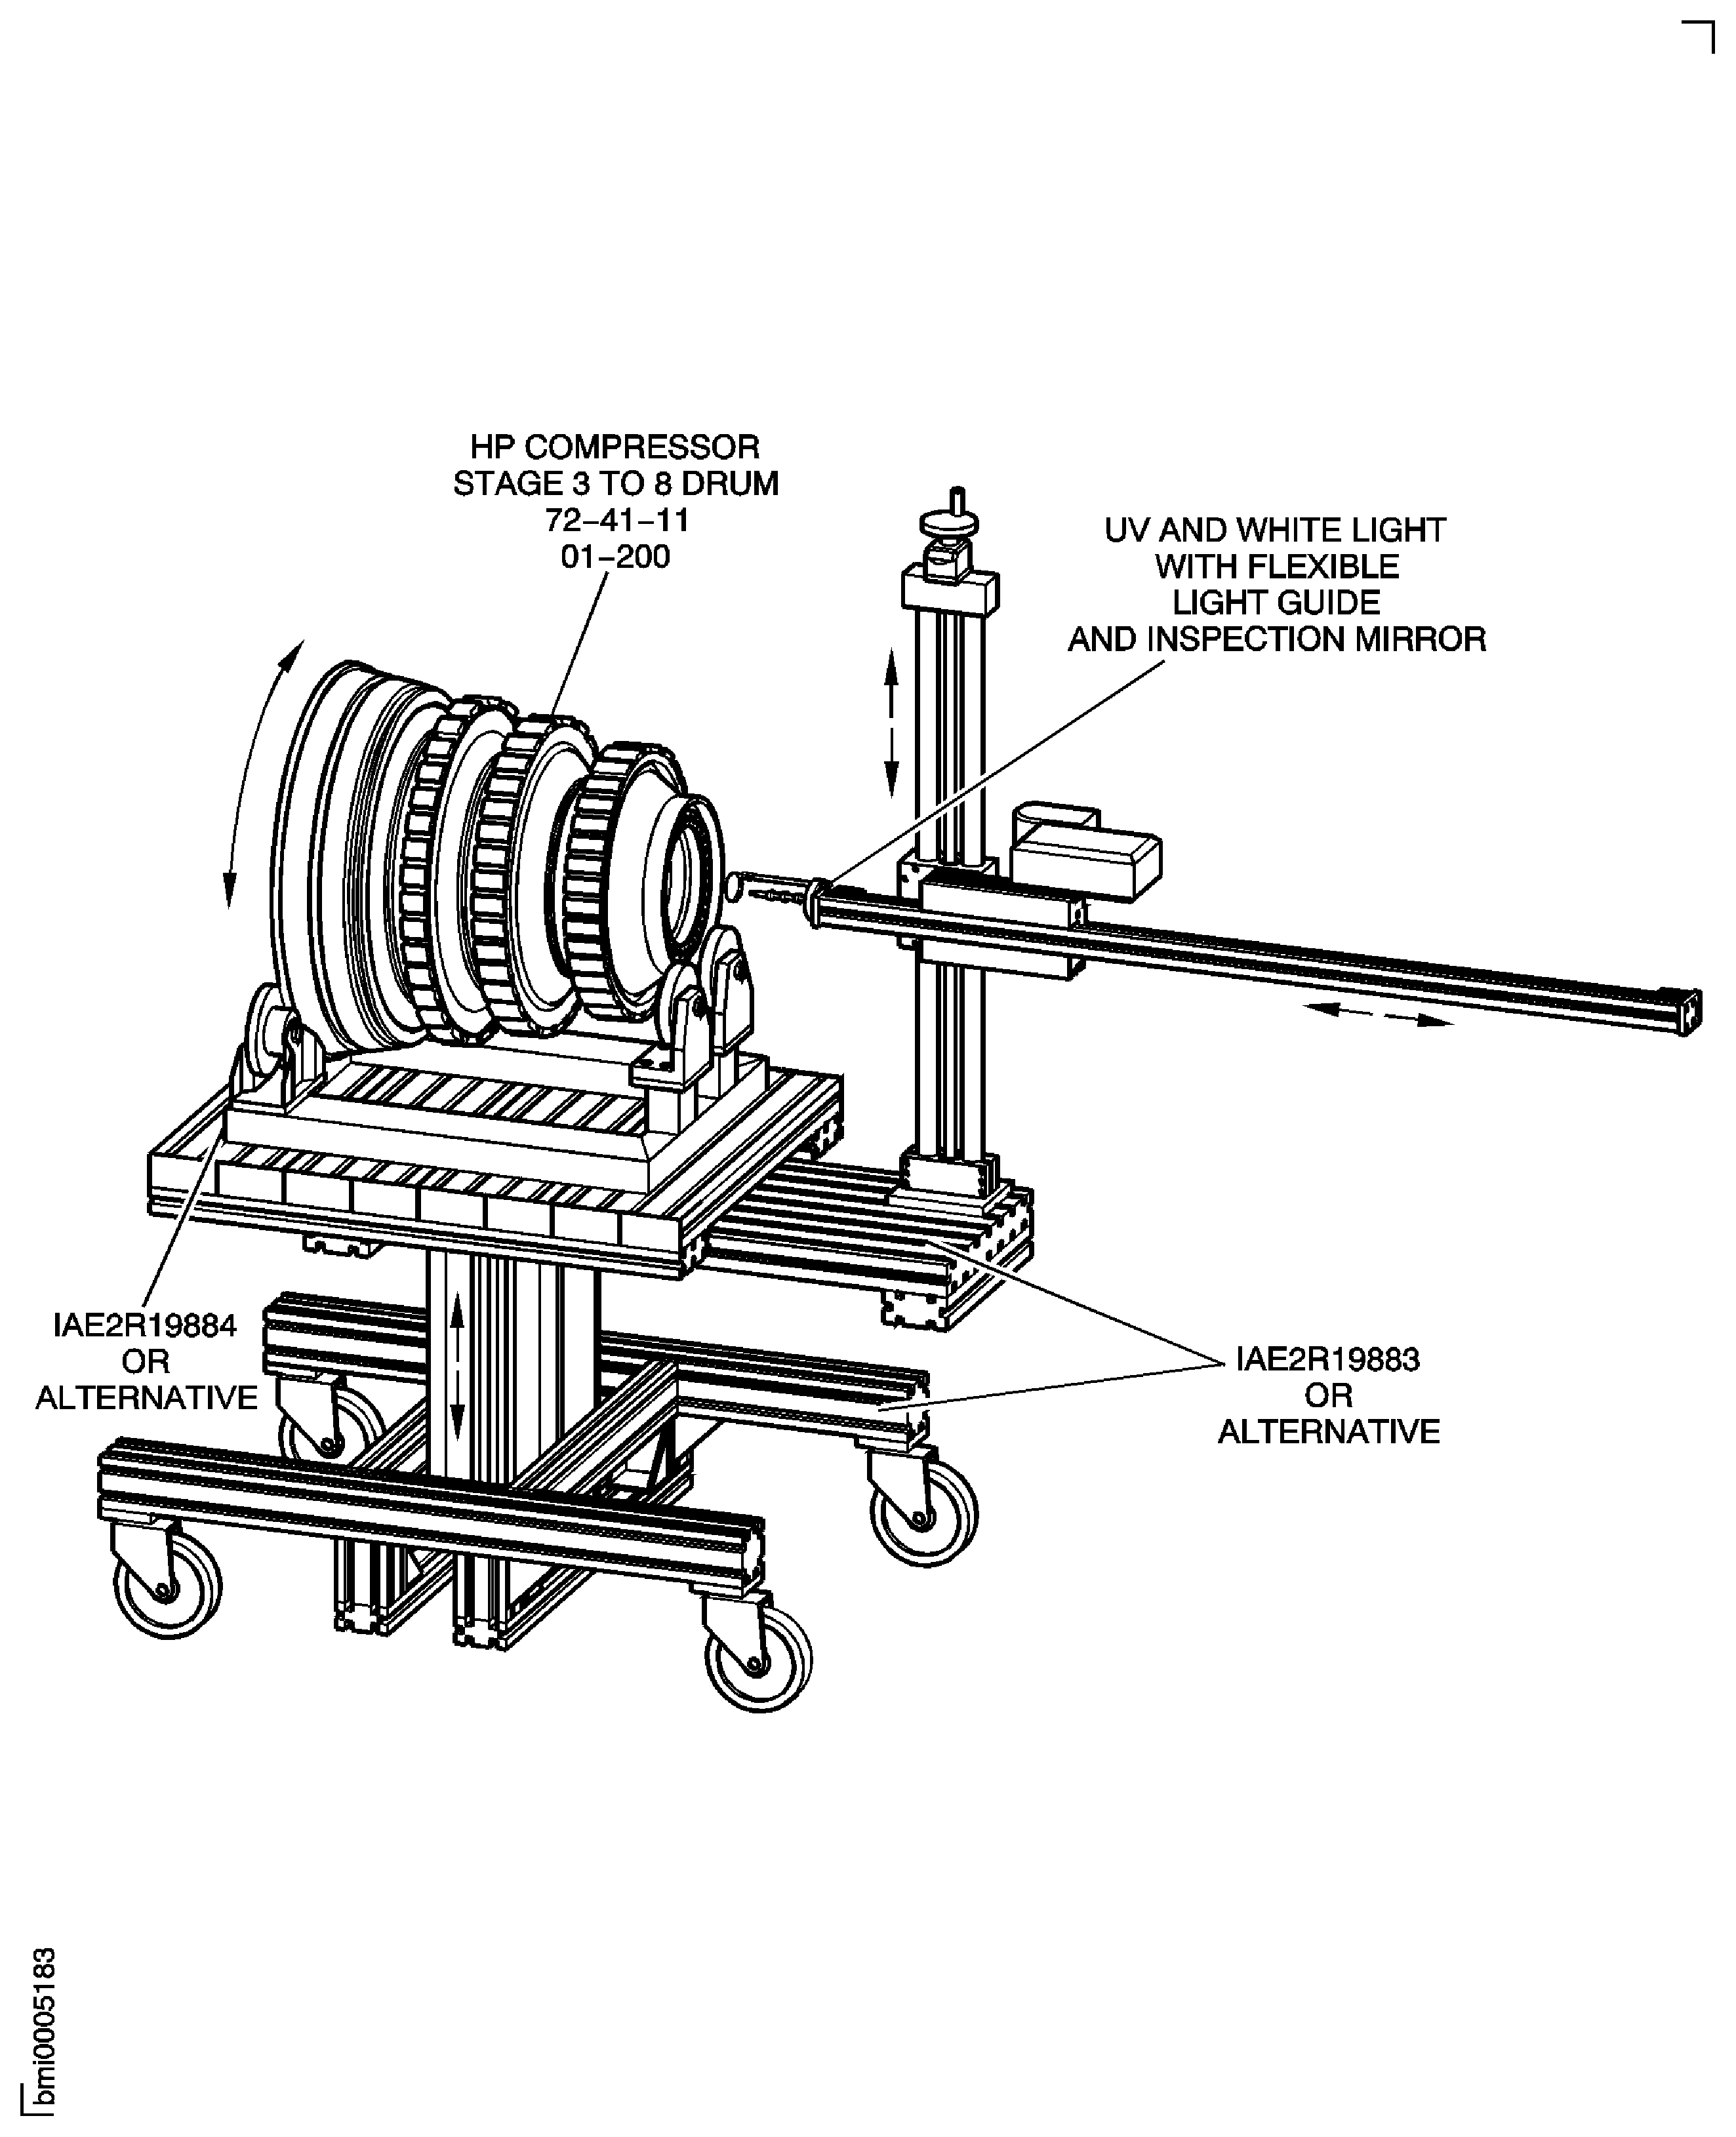
| IAE 2R19883 Rotary table inspection device | 0AM53 | IAE 2R19883 | ||
| IAE 2R19884 Adapter | 0AM53 | IAE 2R19884 |
Consumables, Materials and Expendables
| Name | Manufacturer | Part Number / Identification | Quantity | Remark |
|---|---|---|---|---|
| CoMat 02-001 ADHESIVE TAPE (MASKING) | LOCAL | CoMat 02-001 | ||
| CoMat 02-005 ADHESIVE TAPE (MASKING) | LOCAL | CoMat 02-005 | ||
| CoMat 05-001 ABRASIVE MEDIUM, ALUMINIUM OXIDE, 20/30 GRADE | LOCAL | CoMat 05-001 | ||
| CoMat 06-030 NON AQUEOUS DEVELOPER | LOCAL | CoMat 06-030 |
Spares
NONESafety Requirements
CAUTION
Procedure
Repair, VRS6220 TASK 72-41-11-300-011 (REPAIR-011), SUBTASK 72-41-11-323-051.
Drill to remove shank nuts.
Refer to SPM TASK 70-11-35-110-501.

CAUTION
IF THE PART IS PROCESSED WITHOUT MASK, THE COATING MUST BE REPLACED.NOTE
Step gives the procedure to replace the removed shank nuts.Mask all metal sprayed or other plated coatings.

CAUTION
POLYTHENE OR COTTON GLOVES MUST BE WORN TO PREVENT SURFACE CONTAMINATION OF THE COMPONENT FROM HANDLING AFTER CLEANING PROCESS.Prepare the part for cleaning.
NOTE
If the part has operated with any standard of silver coated nut (Pre SB 72-0596 and Post SB 72-0596) installed in the stage 8 cavity do TASK 72-41-11-110-001.NOTE
If the part has never operated with any standard of silver coated nut (Pre SB 72-0596 and Post SB 72-0596) installed in the stage 8 cavity do TASK 72-41-11-100-001-A00 or TASK 72-41-11-100-001-B00.Clean the part. Refer to TASK 72-41-11-100-001 (CLEANING) or TASK 72-41-11-110-001 (SPECIAL PROCEDURE).
SUBTASK 72-41-11-110-138 Clean the HP Compressor Discs

CAUTION
YOU MUST MAKE SURE ALL THE TAPE IS REMOVED AFTER THE INSPECTION.NOTE
Use fluorescent penetrant inspection SPM TASK 70-23-04-230-501 or NMSB 72-0637. Using NMSB 72-0637 will earn longer ultrasonic inspection grace periods. Refer to NMSB 72-0637 for detail of grace periods.NOTE
Use ultra high sensitivity fluorescent penetrant, for the inspection of all the components and for focus inspection of specified areas in this SUBTASK.NOTE
Optimum emulsification time is to be found by trial. It is recommended to use water filled stop bath to end the emulsification process. Refer to SPM TASK 70-23-04-230-501, SUBTASK 70-23-04-230-003. Do a water wash and use suction hose to remove pooled liquid from cavities.After wash and drying operation, apply CoMat 02-005 ADHESIVE TAPE (MASKING) to the remaining ceramic liners. The mask will prevent glare during inspection, from fluorescent penetrant which soaks into the ceramic.Use high intensity Ultra Violet (UV) light source with correct UV light guide to illuminate the inner cavities and examine with mirror or borescope. If it is difficult to apply sufficient dry powder developer in the inner cavities, then apply CoMat 06-030 NON AQUEOUS DEVELOPER to get the necessary inner surface coverage. Use IAE 2R19883 Rotary table inspection device and IAE 2R19884 Adapter to rotate the drum and to get the necessary wet surfaces in the inner cavity (NMSB 72-0637).Do a general crack test. Refer to SPM TASK 70-23-04-230-501.
NOTE
Use IAE 2R19883 Rotary table inspection device and IAE 2R19884 Adapter or equivalent inspection equipment for fluorescent penetrant inspection of internal surfaces (NMSB 72-0637). Refer to Figure.
SUBTASK 72-41-11-230-117 Do a General Inspection on Stages 3 to 8 HP Compressor Discs for Cracks
SUBTASK 72-41-11-230-120 Focus Inspection of the Stages 3 to 8 HP Compressor Discs for Cracks
Inspect according to TASK 72-41-11-230-002, Subtask 72-41-11-230-104.
More than Step.
NOTE
The damage in the general areas are not specified by the specific inspection Locations.Nicked/Dented/Scratched/Scored.
Accept.
Inner cavity weld spatter.
Weld spatter.
SUBTASK 72-41-11-220-075 Examine the Stages 3 to 8 HP Compressor Discs for Damage
Refer to Figure.
Repair, VRS6006 TASK 72-41-11-300-001 (REPAIR-001).
Within the limits of VRS6006.
More than in Step.
Galled.
SUBTASK 72-41-11-220-076 Examine the Curvic Teeth at Location 1
Repair, VRS6132 TASK 72-41-11-300-008 (REPAIR-008).
Nicked/Dented/Scratched/Scored
SUBTASK 72-41-11-220-077 Examine the Curvic Coupling Sealing Sleeve at Location 2
Refer to Figure.
Repair, VRS6047 TASK 72-41-11-300-003 (REPAIR-003).
Burred..
SUBTASK 72-41-11-220-079 Examine the Curvic Coupling Location Holes at Location 4
Examine the stage 3 diaphragm bore at Location 5A and the diaphragm surface at Location 6A. Refer to Figure.
Examine the stage 4 diaphragm bore at Location 5B and the diaphragm surface at Location 6B. Refer to Figure.
Examine the stage 5 diaphragm bore at Location 5C and the diaphragm surface at Location 6C. Refer to Figure.
Examine the stage 6 diaphragm bore at Location 5D and the diaphragm surface at Location 6D. Refer to Figure.
Examine the stage 7 diaphragm bore at Location 5E and the diaphragm surface at Location 6E. Refer to Figure.
Examine the stage 8 diaphragm bore at Location 5F and the diaphragm surface at Location 6F. Refer to Figure.
Repair, VRS6149 TASK 72-41-11-300-012 (REPAIR-012).
Nicked, dented, scratched or scored.
Examine the diaphragm bore.
Repair, VRS6047 TASK 72-41-11-300-003 (REPAIR-003).
Nicked, dented, scratched or scored.
Examine the diaphragm surface.
SUBTASK 72-41-11-220-080 Examine the Stages 3 to 8 HP Compressor Discs Diaphragms
Examine the stage 3 slots at Location 7A. Refer to Figure.
Examine the stage 4 slots at Location 7B. Refer to Figure.
Examine the stage 5 slots at Location 7C. Refer to Figure.
Refer to Repair, VRS6300 TASK 72-41-11-300-016 (REPAIR-016) or Repair, VRS9300, TASK 72-41-11-300-026 (REPAIR-026).
Not more than 0.002 in. (0.05 mm) in depth of not more than 25 percent of the surface area.
More than Step.
Galled.
Examine the slots at Zone A.
Zone A
-
NOTE
All discs that are used in service will have bedding areas that are easy to see.Refer to Repair, VRS6300, TASK 72-41-11-300-016 (REPAIR-016) or Repair, VRS9300, TASK 72-41-11-300-026 (REPAIR-026).
Not more than 0.005 in. (0.127 mm) in depth.
More than Step
Scored/Nicked.
Refer to Repair, VRS6300, TASK 72-41-11-300-016 (REPAIR-016) or Repair, VRS9300, TASK 72-41-11-300-026 (REPAIR-026).
Not more than 0.010 in. (0.254 mm) in depth.
More than Step
Fretted.
Examine the slots at Zone B.
Zone B
-
The area of the dovetail slot below zone A and the complete length of the slot and the area on the front and rear faces of the neck of the slot. The front and rear neck area is shown as the area which extends a given dimension constantly from the dovetail slots and an area below the dovetail slots which extends, constantly, circumferentially around all of the disc. Refer to Figure, Figure, Figure and Figure.
Refer to Repair, VRS6300, TASK 72-41-11-300-016 (REPAIR-016) or Repair, VRS9300, TASK 72-41-11-300-026 (REPAIR-026).
Not more than 0.020 in. (0.508 mm) in depth.
More than Step
Scored/Nicked.
Refer to Repair, VRS6300, TASK 72-41-11-300-016 (REPAIR-016) or Repair, VRS9300, TASK 72-41-11-300-026 (REPAIR-026).
Not more than 0.020 in. (0.508 mm) in depth.
More than Step
Fretted.
Examine the slots at zone C.
Zone C
-
SUBTASK 72-41-11-220-081 Examine the Stage 3, 4 and 5 HP Compressor Disc Dovetail Slots
Examine the stage 3 grooves at Location 1011. Refer to Figure.
Examine the stage 4 grooves at Location 1013. Refer to Figure.
Examine the stage 5 grooves at Location 1015. Refer to Figure.
Repair, VRS6630 TASK 72-41-11-300-023 (REPAIR-023).
In the limits of VRS6630
More than Step.
Galled/Scored/Fretted.
SUBTASK 72-41-11-220-082 Examine the Stages 3, 4 and 5 HP Compressor Disc Grooves
NOTE
If the seal fins are accepted, write down the value of the diameters of the seal fins at each Location. These values are used during assembly (72-41-00).Examine the stage 3 seal fins at Location 1001. Refer to Figure.
Examine the stage 4 seal fins at Locations 1002 and 1003. Refer to Figure.
Examine the stage 5 seal fins at Location 1004. Refer to Figure.
Repair, VRS6048 TASK 72-41-11-300-004 (REPAIR-004).
In the limits of VRS6048
Repair, VRS6122 TASK 72-41-11-300-013 (REPAIR-013).
More than Step but in the limits of VRS6122.
More than Step.
Scored/Burred.
Refer to the values written in TASK 72-41-10-040-001-B00 (DISASSEMBLY, CONFIG-002).
Location 1001.
Refer to the values written in TASK 72-41-10-040-001-B00 (DISASSEMBLY, CONFIG-002).
Location 1002.
Refer to the values written in TASK 72-41-10-040-001-B00 (DISASSEMBLY, CONFIG-002).
Location 1003.
Refer to the values written in TASK 72-41-10-040-001-B00 (DISASSEMBLY, CONFIG-002).
Repair, VRS6048 TASK 72-41-11-300-004 (REPAIR-004). Remove high spots and burrs only.
Reject.
If the value of any one of the seal fins is less than 13.821 in. (351.05 mm).
Location 1004.
Worn.
SUBTASK 72-41-11-220-083 Examine the Stages 3, 4 and 5 HP Compressor Discs Seal Fins
Examine the stage 6 linings at Location 1056. Refer to Figure.
Examine the stage 7 linings at Location 1057. Refer to Figure.
Refer to the values written in TASK 72-41-10-040-001-B00 (DISASSEMBLY, CONFIG-002) and TASK 72-41-10-040-001-C00 (DISASSEMBLY-004).
Repair, VRS6007 TASK 72-41-11-300-002 (REPAIR-002).
If the value is less than 8.600 in. (218.44 mm).
Location 1056.
Refer to the values written in TASK 72-41-10-040-001-B00 (DISASSEMBLY, CONFIG-002) and TASK 72-41-10-040-001-C00 (DISASSEMBLY-004).
Repair, VRS6007 TASK 72-41-11-300-002 (REPAIR-002).
If the value is less than 8.9340 in. (226.924 mm).
Location 1057.
Worn.
Repair, VRS6007 TASK 72-41-11-300-002 (REPAIR-002).
Missing.
Repair, VRS6007 TASK 72-41-11-300-002 (REPAIR-002).
Grooved
Repair, VRS6007 TASK 72-41-11-300-002 (REPAIR-002).
Other than Step
Rubtrack.
Repair, VRS6007 TASK 72-41-11-300-002 (REPAIR-002).
Other than Step
Chipped.
Damaged.
SUBTASK 72-41-11-220-084 Examine the Stages 6 and 7 HP Compressor Discs Linings
NOTE
SBE 72-0606 is applicable for re-worked standards from SBE 72-0300, SBE 72-0376, SBE 72-0470 and new production part.NOTE
For SBE 72-0606 standard with part numbers 6B1384, 6B1385, 6B1386 or 6B1404 is this SUBTASK applicable.Repair VRS6047, TASK 72-41-11-300-003 (REPAIR-003).
Galled/Scored/Scratched
Repair, VRS6626 TASK 72-41-11-300-022 (REPAIR-022).
In the limits of VRS6626.
Stage 6 seal grooves at Locations 1017 and 1020.
Repair VRS6626, TASK 72-41-11-300-022 (REPAIR-022).
In the limits of VRS6626
Stage 7 seal grooves at Locations 1266 and 1267.
Repair, VRS6626 TASK 72-41-11-300-022 (REPAIR-022).
In the limits of VRS6626
Stage 8 seal groove at Locations 1268 and 1269.
Worn.
SUBTASK 72-41-11-220-085-A00 Examine the Stages 6, 7 and 8 HP Compressor Discs Circumferential Grooves (SBE 72-0300, SBE 72-0376, SBE 72-0470 and SBE 72-0606)
NOTE
SBE 72-0606 is applicable for re-worked standards from SBE 72-0304.NOTE
For SBE 72-0606 standard with part numbers 6B1379, 6B1380 or 6B1387 is this SUBTASK applicable.Repair VRS6047, TASK 72-41-11-300-003 (REPAIR-003).
Galled or Scored or Scratched
Repair, VRS6626 TASK 72-41-11-300-022 (REPAIR-022).
In the limits of VRS6626.
Stage 6 seal grooves at Locations 1017 and 1020.
Repair, VRS6626 TASK 72-41-11-300-022 (REPAIR-022).
In the limits of VRS6626
Stage 7 seal grooves at Locations 1266 and 1267.
Repair, VRS6626 TASK 72-41-11-300-022 (REPAIR-022).
In the limits of VRS6626
Stage 8 seal groove at Location 1268 and 1269.
Worn
SUBTASK 72-41-11-220-085-B00 Examine the Stages 6, 7 and 8 HP Compressor Discs Circumferential Grooves (Pre SBE 72-0178, SBE 72-0178, SBE 72-0254, SBE 72-0304 and SBE 72-0606)
NOTE
SBE 72-0605 is applicable for specific re-worked standards from SBE 72-0606.NOTE
For SBE 72-0605 standard with part numbers 6B1391, 6B1392, 6B1393 or 6B1405 is this SUBTASK applicable.Repair, VRS6047 TASK 72-41-11-300-003 (REPAIR-003).
Galled or Scored or Scratched
SUBTASK 72-41-11-220-085-C00 Examine the Stages 6, 7 and 8 HP Compressor Discs Circumferential Grooves (SBE 72-0605)
Refer to Figure.
Repair, VRS6047 TASK 72-41-11-300-003 (REPAIR-003).
Repair, VRS6154 TASK 72-41-11-300-014 (REPAIR-014).
If the diameter is more than 16.1442 in. (410.063 mm)
Galled/Scored
Examine the Location diameter at Location 1005.
Repair, VRS6047 TASK 72-41-11-300-003 (REPAIR-003).
Galled/Scored
Examine the Location surface at Location 8.
Repair, VRS6047 TASK 72-41-11-300-003 (REPAIR-003).
Burred edges
Repair, VRS6047 TASK 72-41-11-300-003 (REPAIR-003).
Scored
Examine the bolt holes at Location 9.
SUBTASK 72-41-11-220-086 Examine the Rear of the Stage 8 HP Compressor Disc
Examine the stage 6 slots at Location 11A. Refer to Figure.
Examine the stage 7 slots at Location 11B. Refer to Figure.
Examine the stage 8 slots at Location 11C. Refer to Figure.
Refer to Repair, VRS6133 TASK 72-41-11-300-009 (REPAIR-009) or Repair, VRS9133 TASK 72-41-11-300-027 (REPAIR-027).
Not more than 0.002 in. (0.05 mm) in depth.
More than Step
Galled.
Examine the slots at zone A. Refer to Figure.
Zone A
-
Dovetail slot bedding area plus 0.050 in. (1.27 mm) below the bottom limit and the complete length of the slot on both sides
NOTE
All discs that are used in service will have bedding areas that are easy to see.Refer to Repair, VRS6133 TASK 72-41-11-300-009 (REPAIR-009) or Repair, VRS9133 TASK 72-41-11-300-027 (REPAIR-027).
More than Step
Galled/Fretted.
Refer to Repair, VRS6133 TASK 72-41-11-300-009 (REPAIR-009) or Repair, VRS9133 TASK 72-41-11-300-027 (REPAIR-027).
Not more than 0.002 in. (0.05 mm) in depth
More than Step
Scored/Nicked.
Examine the slots at zone B. Refer to Figure.
Zone B
-
The area in the center of the dovetail slot
Refer to Repair, VRS6133, TASK 72-41-11-300-009 (REPAIR-009) or Repair, VRS9133, TASK 72-41-11-300-027 (REPAIR-027).
Not more than 0.002 in. (0.05 mm) in depth.
More than Step.
Galled/Fretted.
Refer to Repair, VRS6133 TASK 72-41-11-300-009 (REPAIR-009) or Repair, VRS9133 TASK 72-41-11-300-027 (REPAIR-027).
Not more than 0.001 in. (0.025 mm) in depth.
More than Step
Scored/Nicked.
Examine the slots at Zone C. Refer to Figure.
Zone C
-
The blade loading and blade locking slot(s) and an area around it, on all surfaces of the dovetail, 0.040 in. (1.00 mm) away from the edges of the slot(s)
Repair, VRS6047 TASK 72-41-11-300-003 (REPAIR-003).
Not more than 0.0050 in. (0.127 mm).
More than Step
Scored/Nicked/Galled/Fretted.
Examine the slots at Zone E. Refer to Figure.
Zone E
-
The remaining areas of the disc around the dovetail slots that are not in Zones A and C.
SUBTASK 72-41-11-220-087 Examine the Stage 6, 7 and 8 HP Compressor Disc Circumferential Dovetail Slots
Refer to Figure.
Repair, VRS6220 TASK 72-41-11-300-011 (REPAIR-011).
Replace the shank nuts which were removed at Step
SUBTASK 72-41-11-350-108 Replace the Curvic Coupling Shank Nuts at Location 3
Repair, VRS6487 TASK 72-41-11-300-017 (REPAIR-017).
Apply the dry film lubricant
SUBTASK 72-41-11-380-053 Apply the Dry Film Lubricant
Figure: Stage 3 HP Compressor Disc - Inspection Locations
Stage 3 HP Compressor Disc - Inspection Locations
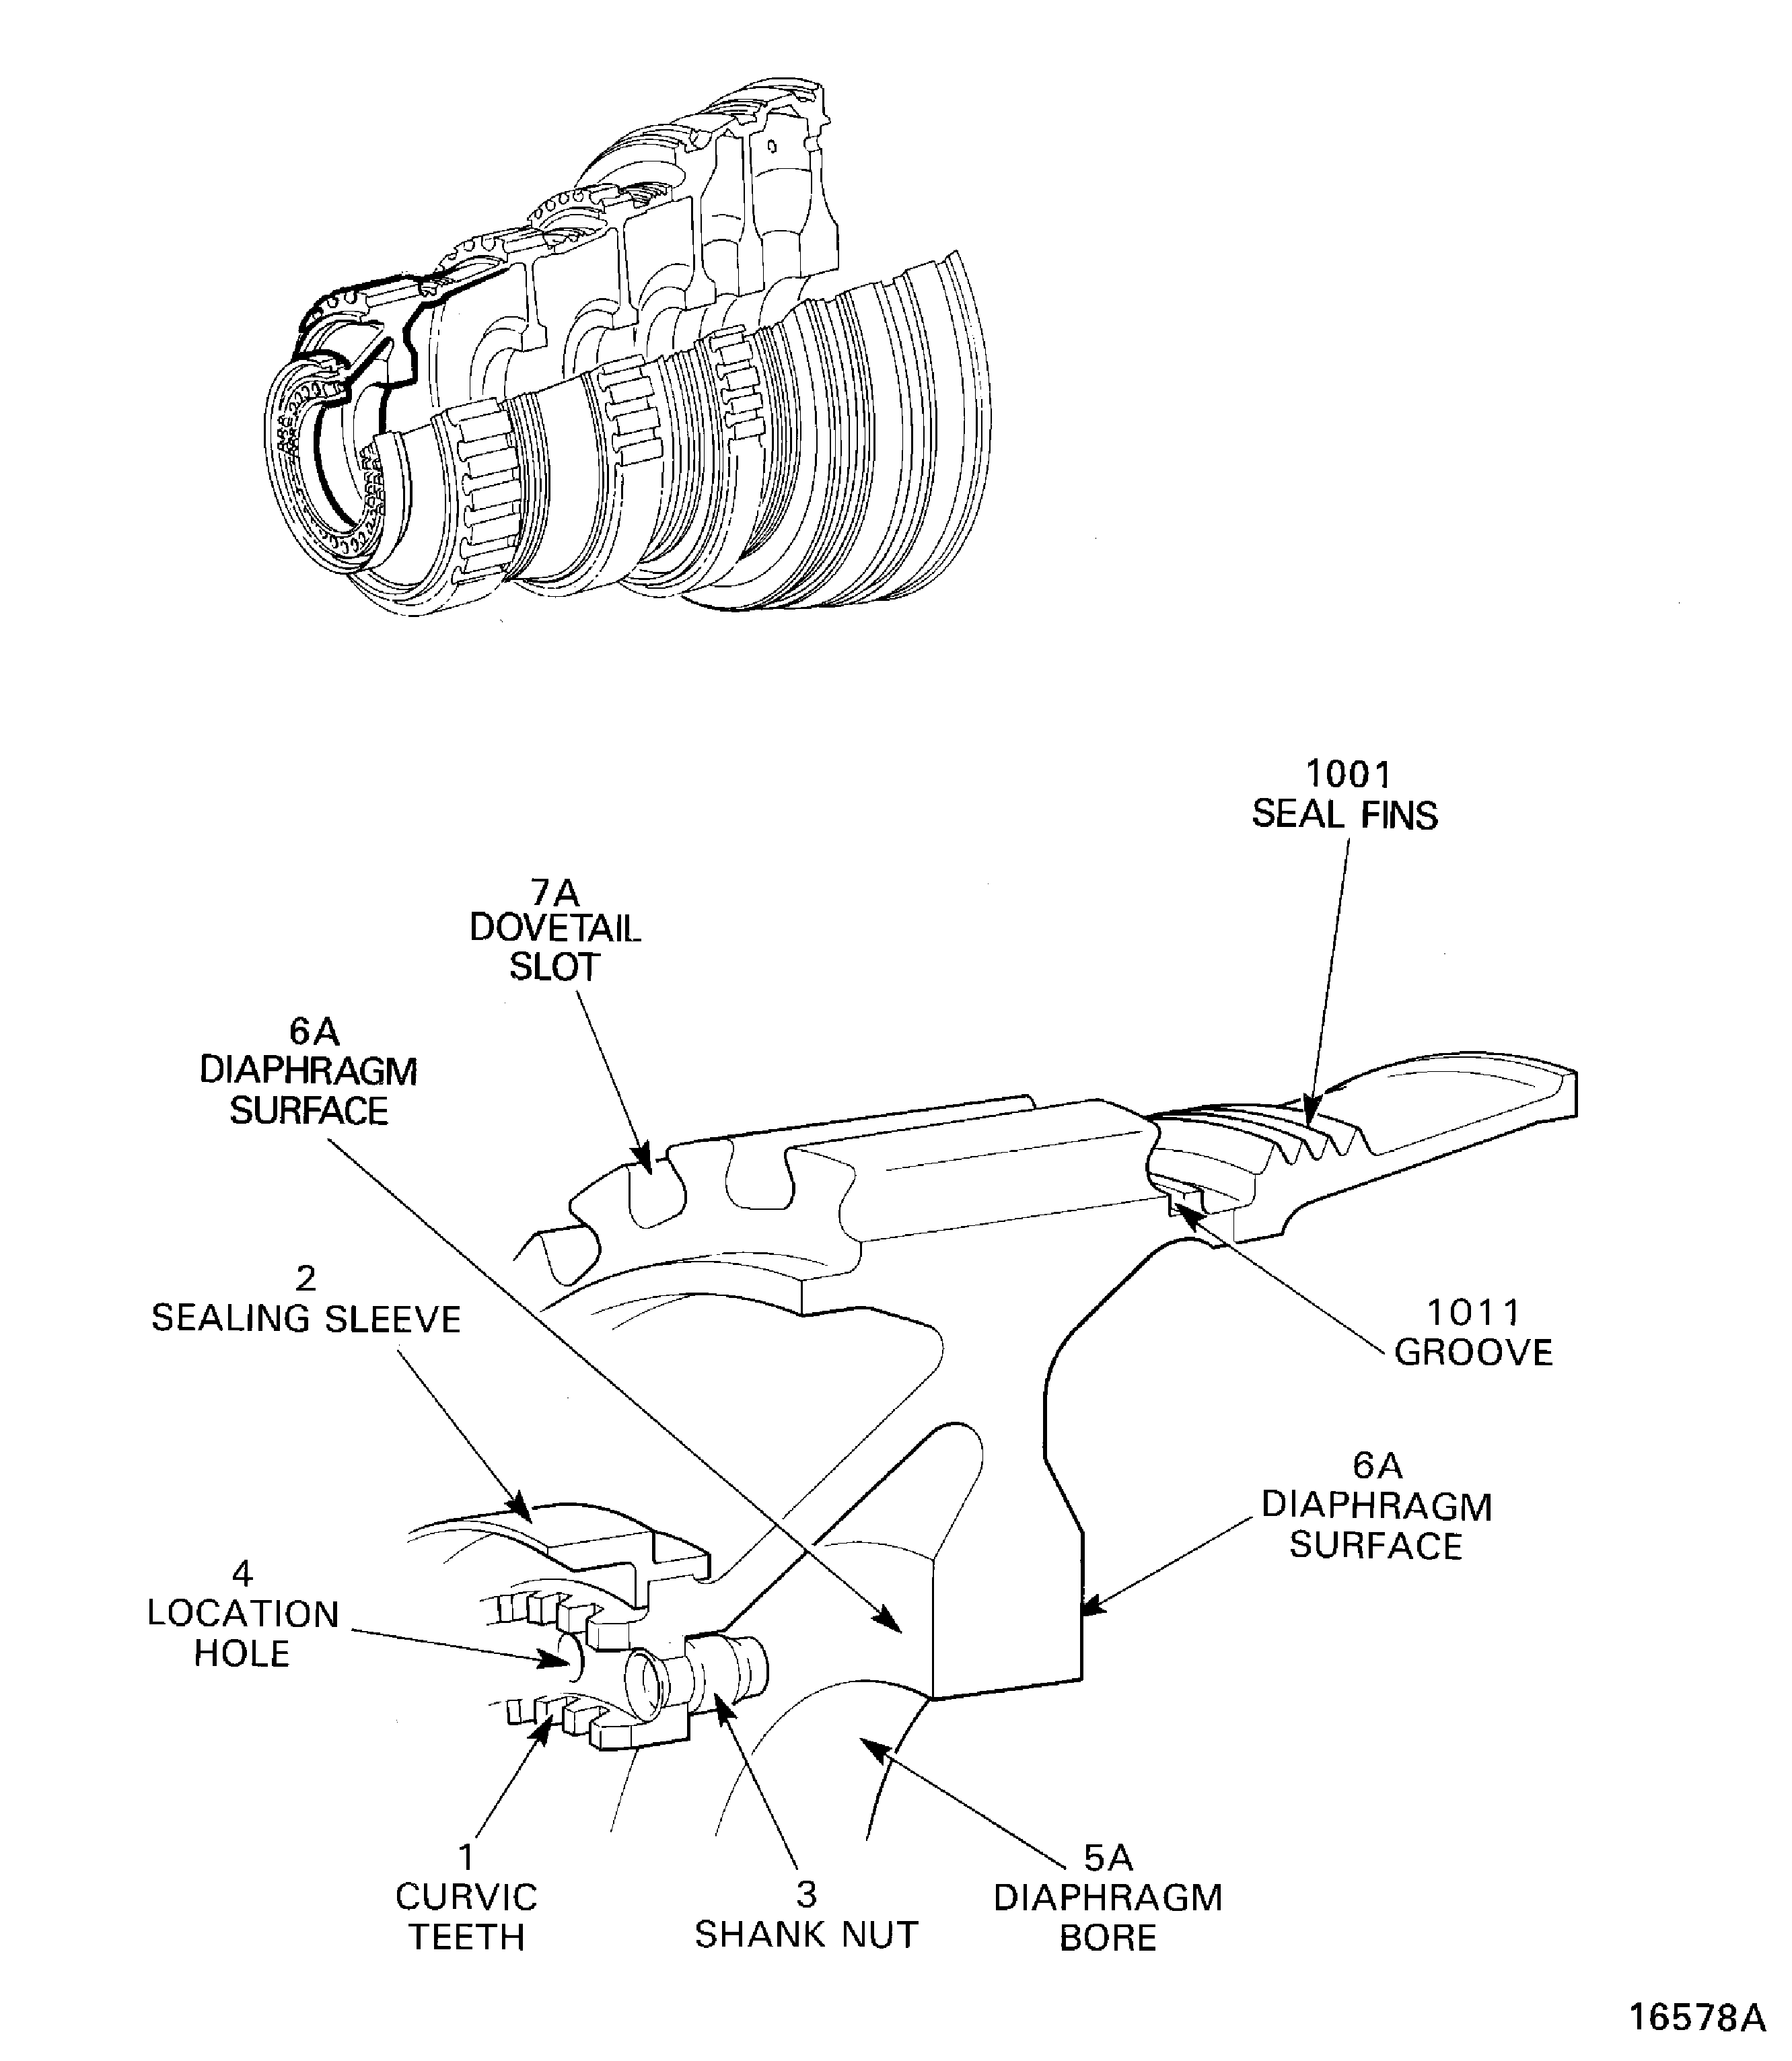
Figure: Stage 4 HP Compressor Disc - Inspection Locations
Stage 4 HP Compressor Disc - Inspection Locations
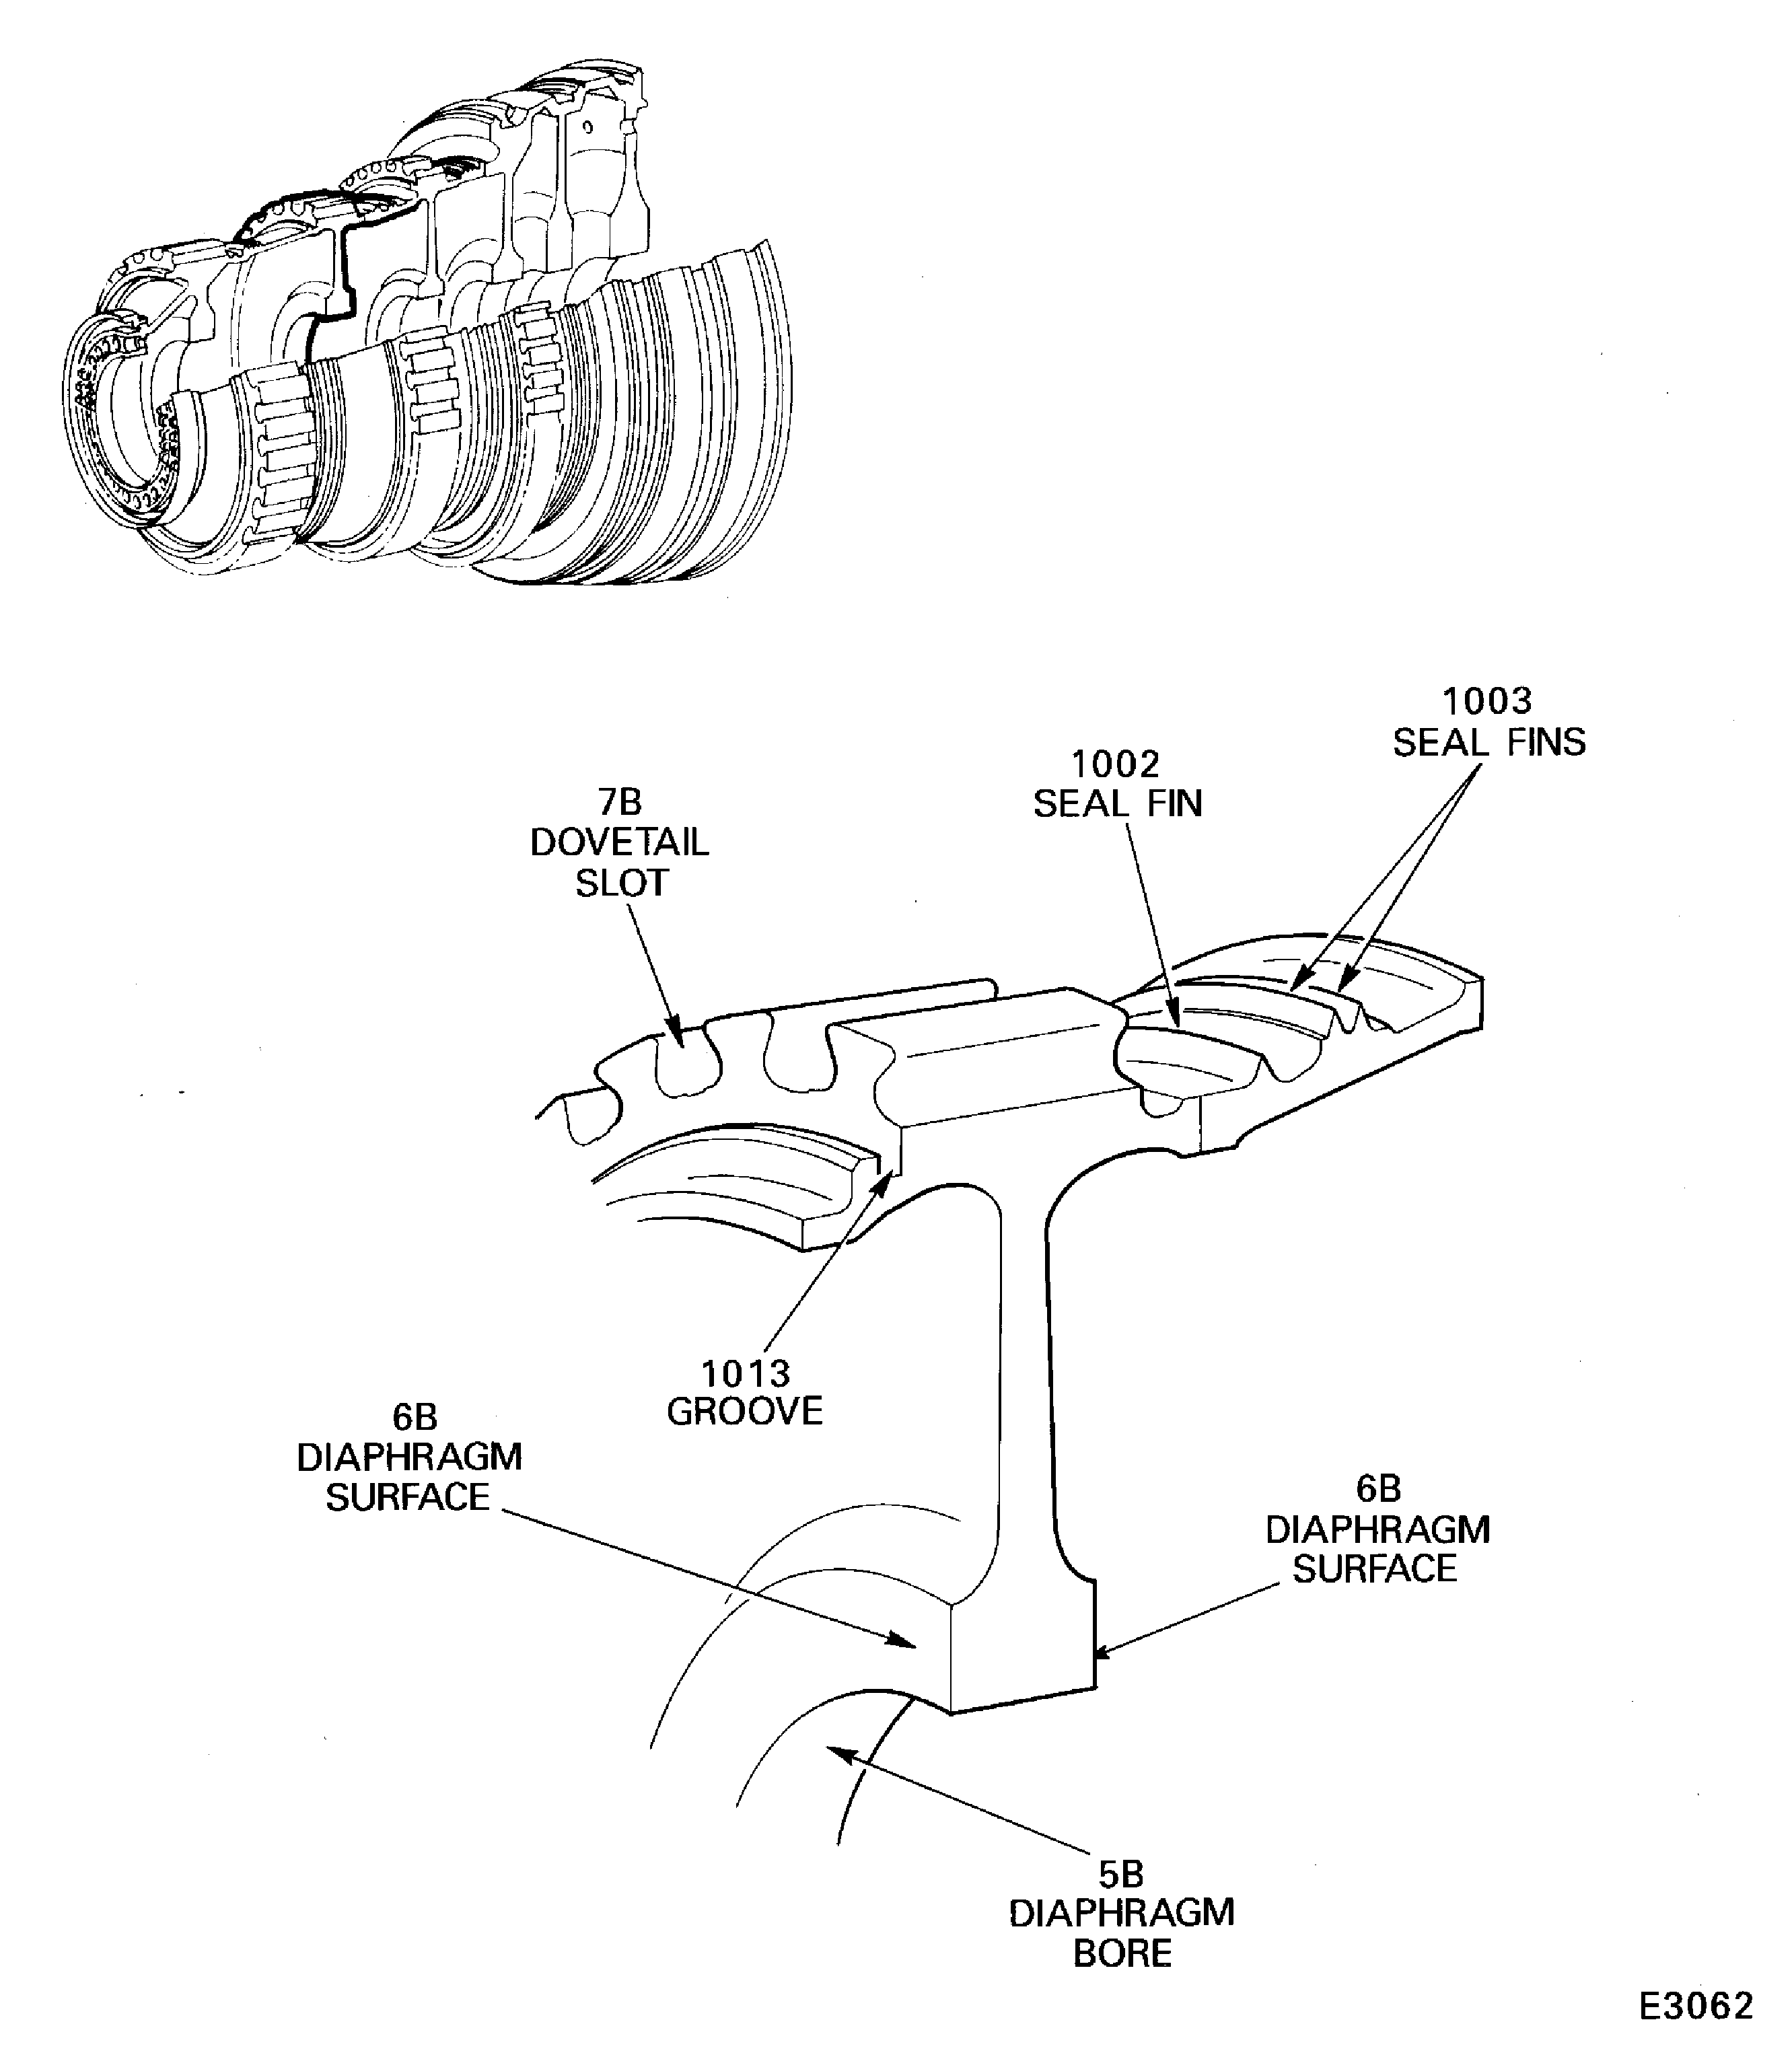
Figure: Stage 5 HP Compressor Disc - Inspection Locations
Stage 5 HP Compressor Disc - Inspection Locations

Figure: Stage 6 HP Compressor Disc - Inspection Locations
Stage 6 HP Compressor Disc - Inspection Locations
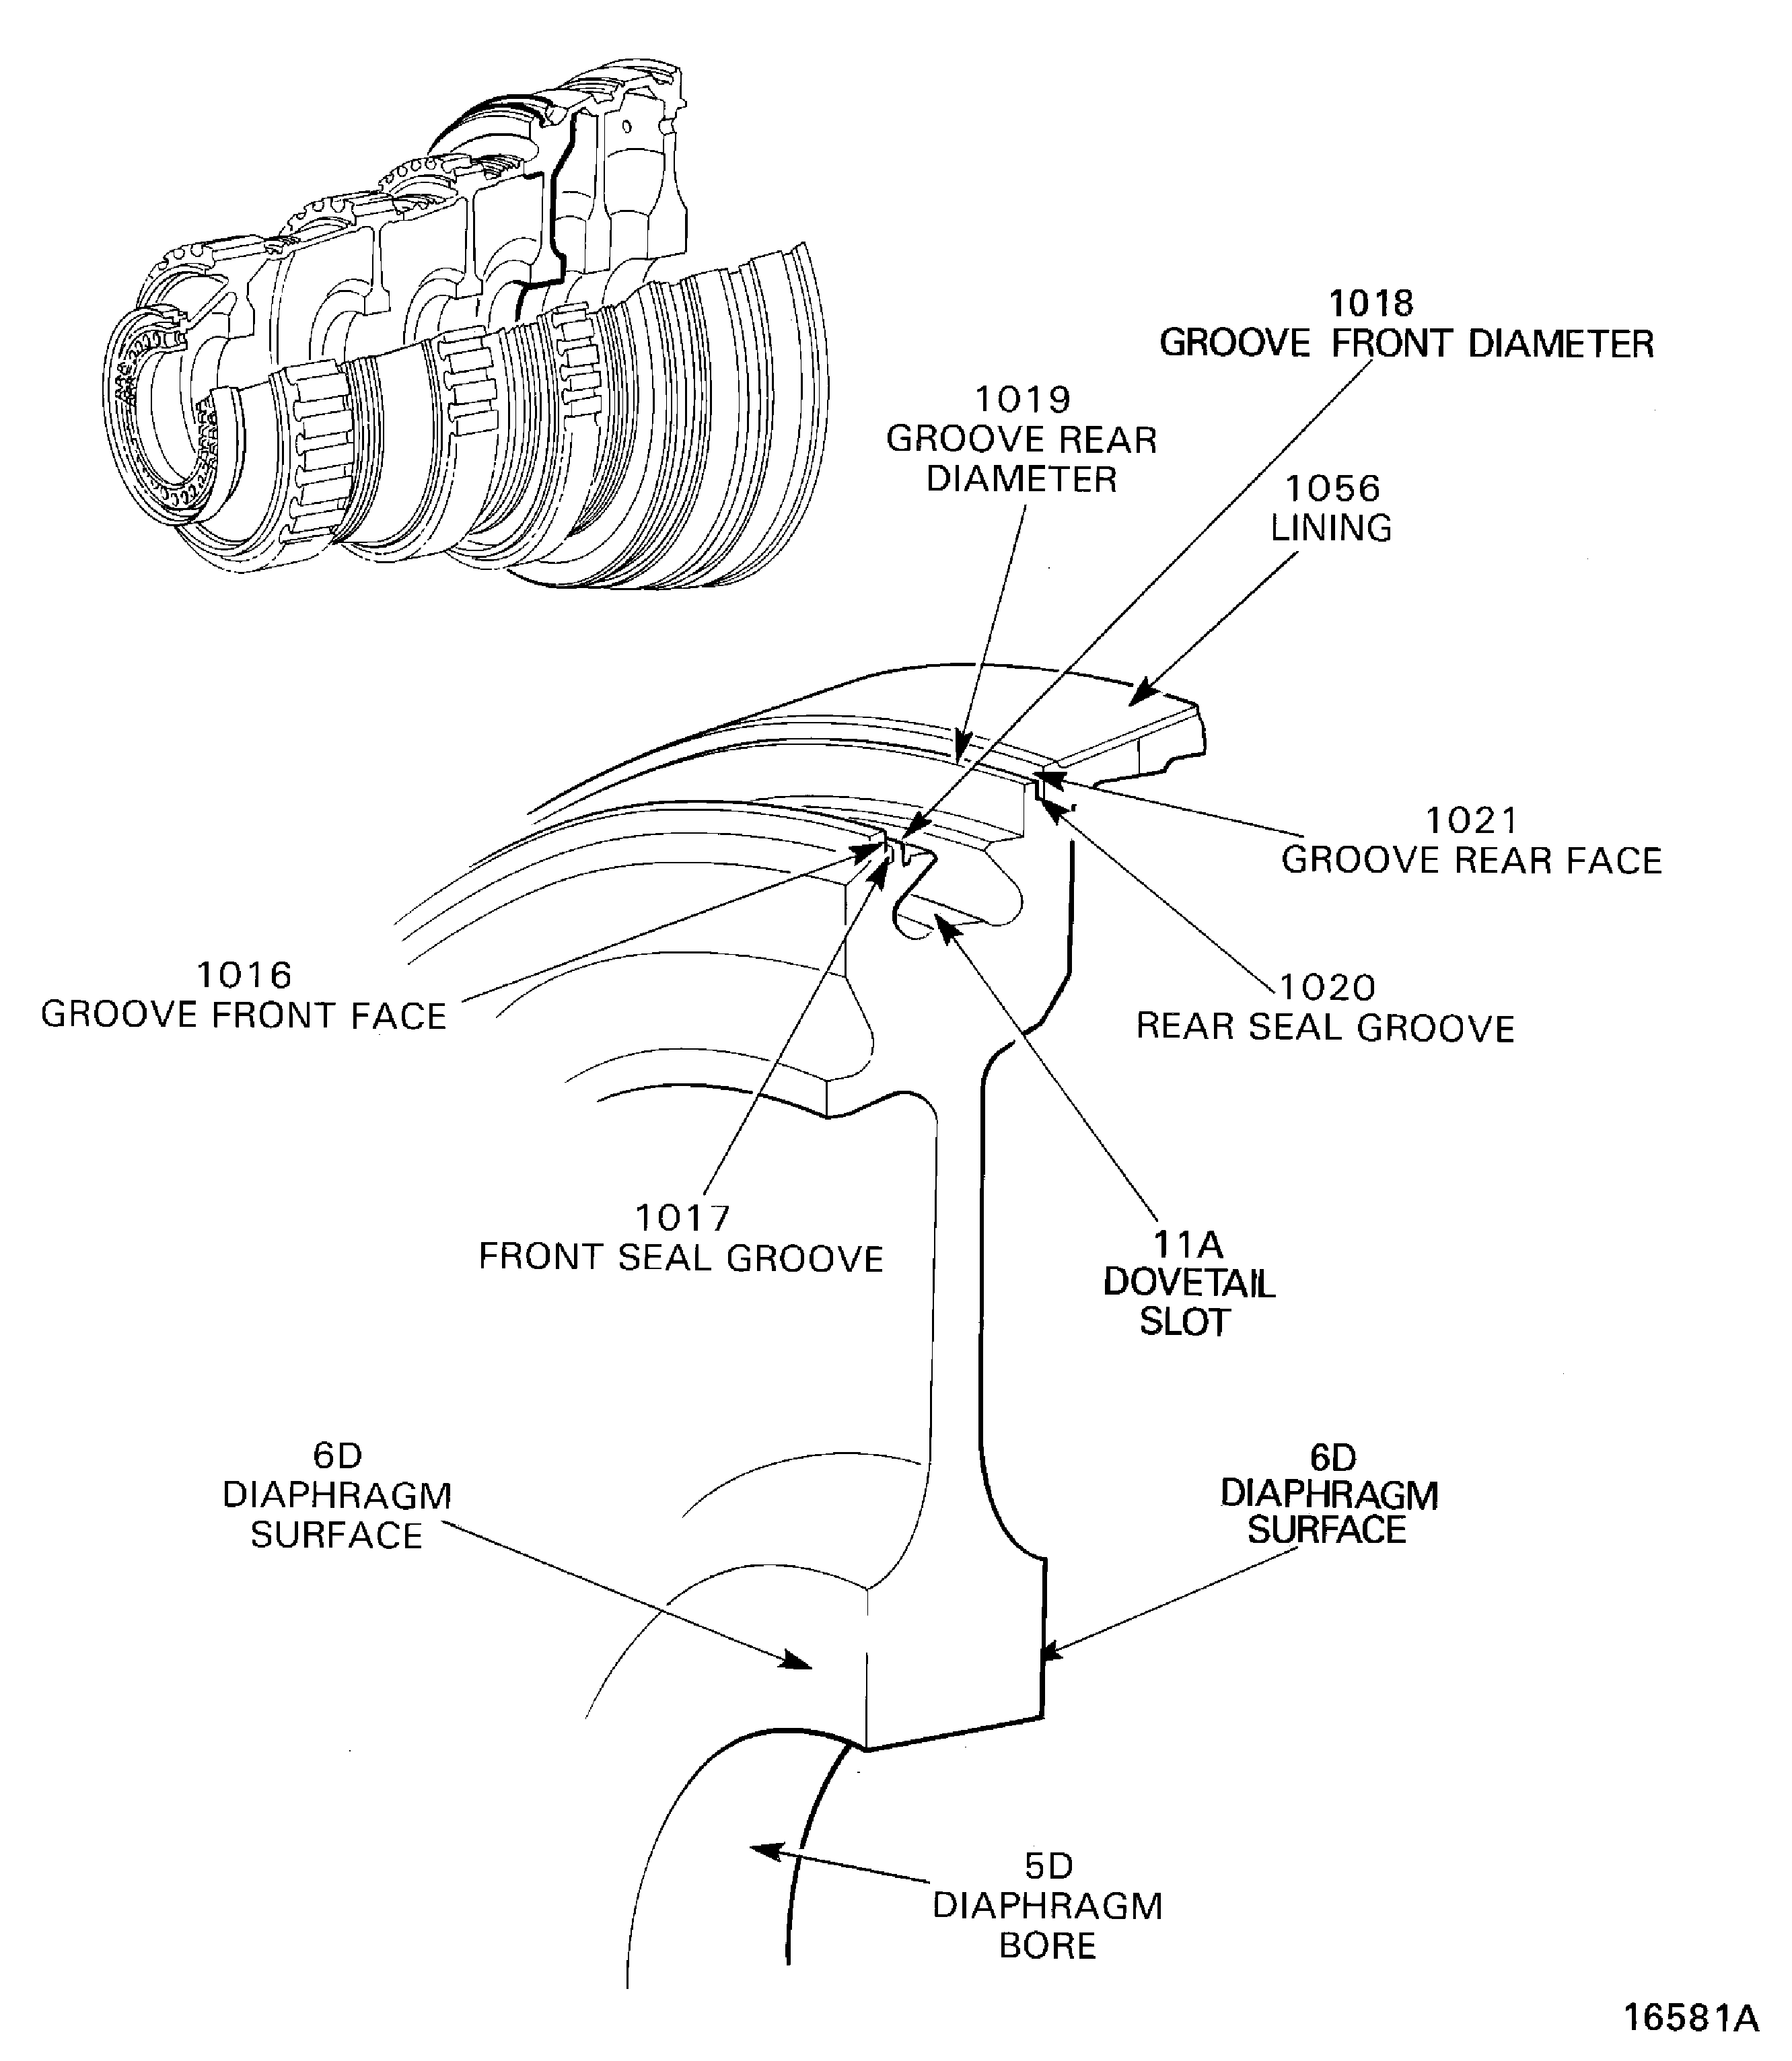
Figure: Stage 7 HP Compressor Disc - Inspection Locations
Stage 7 HP Compressor Disc - Inspection Locations
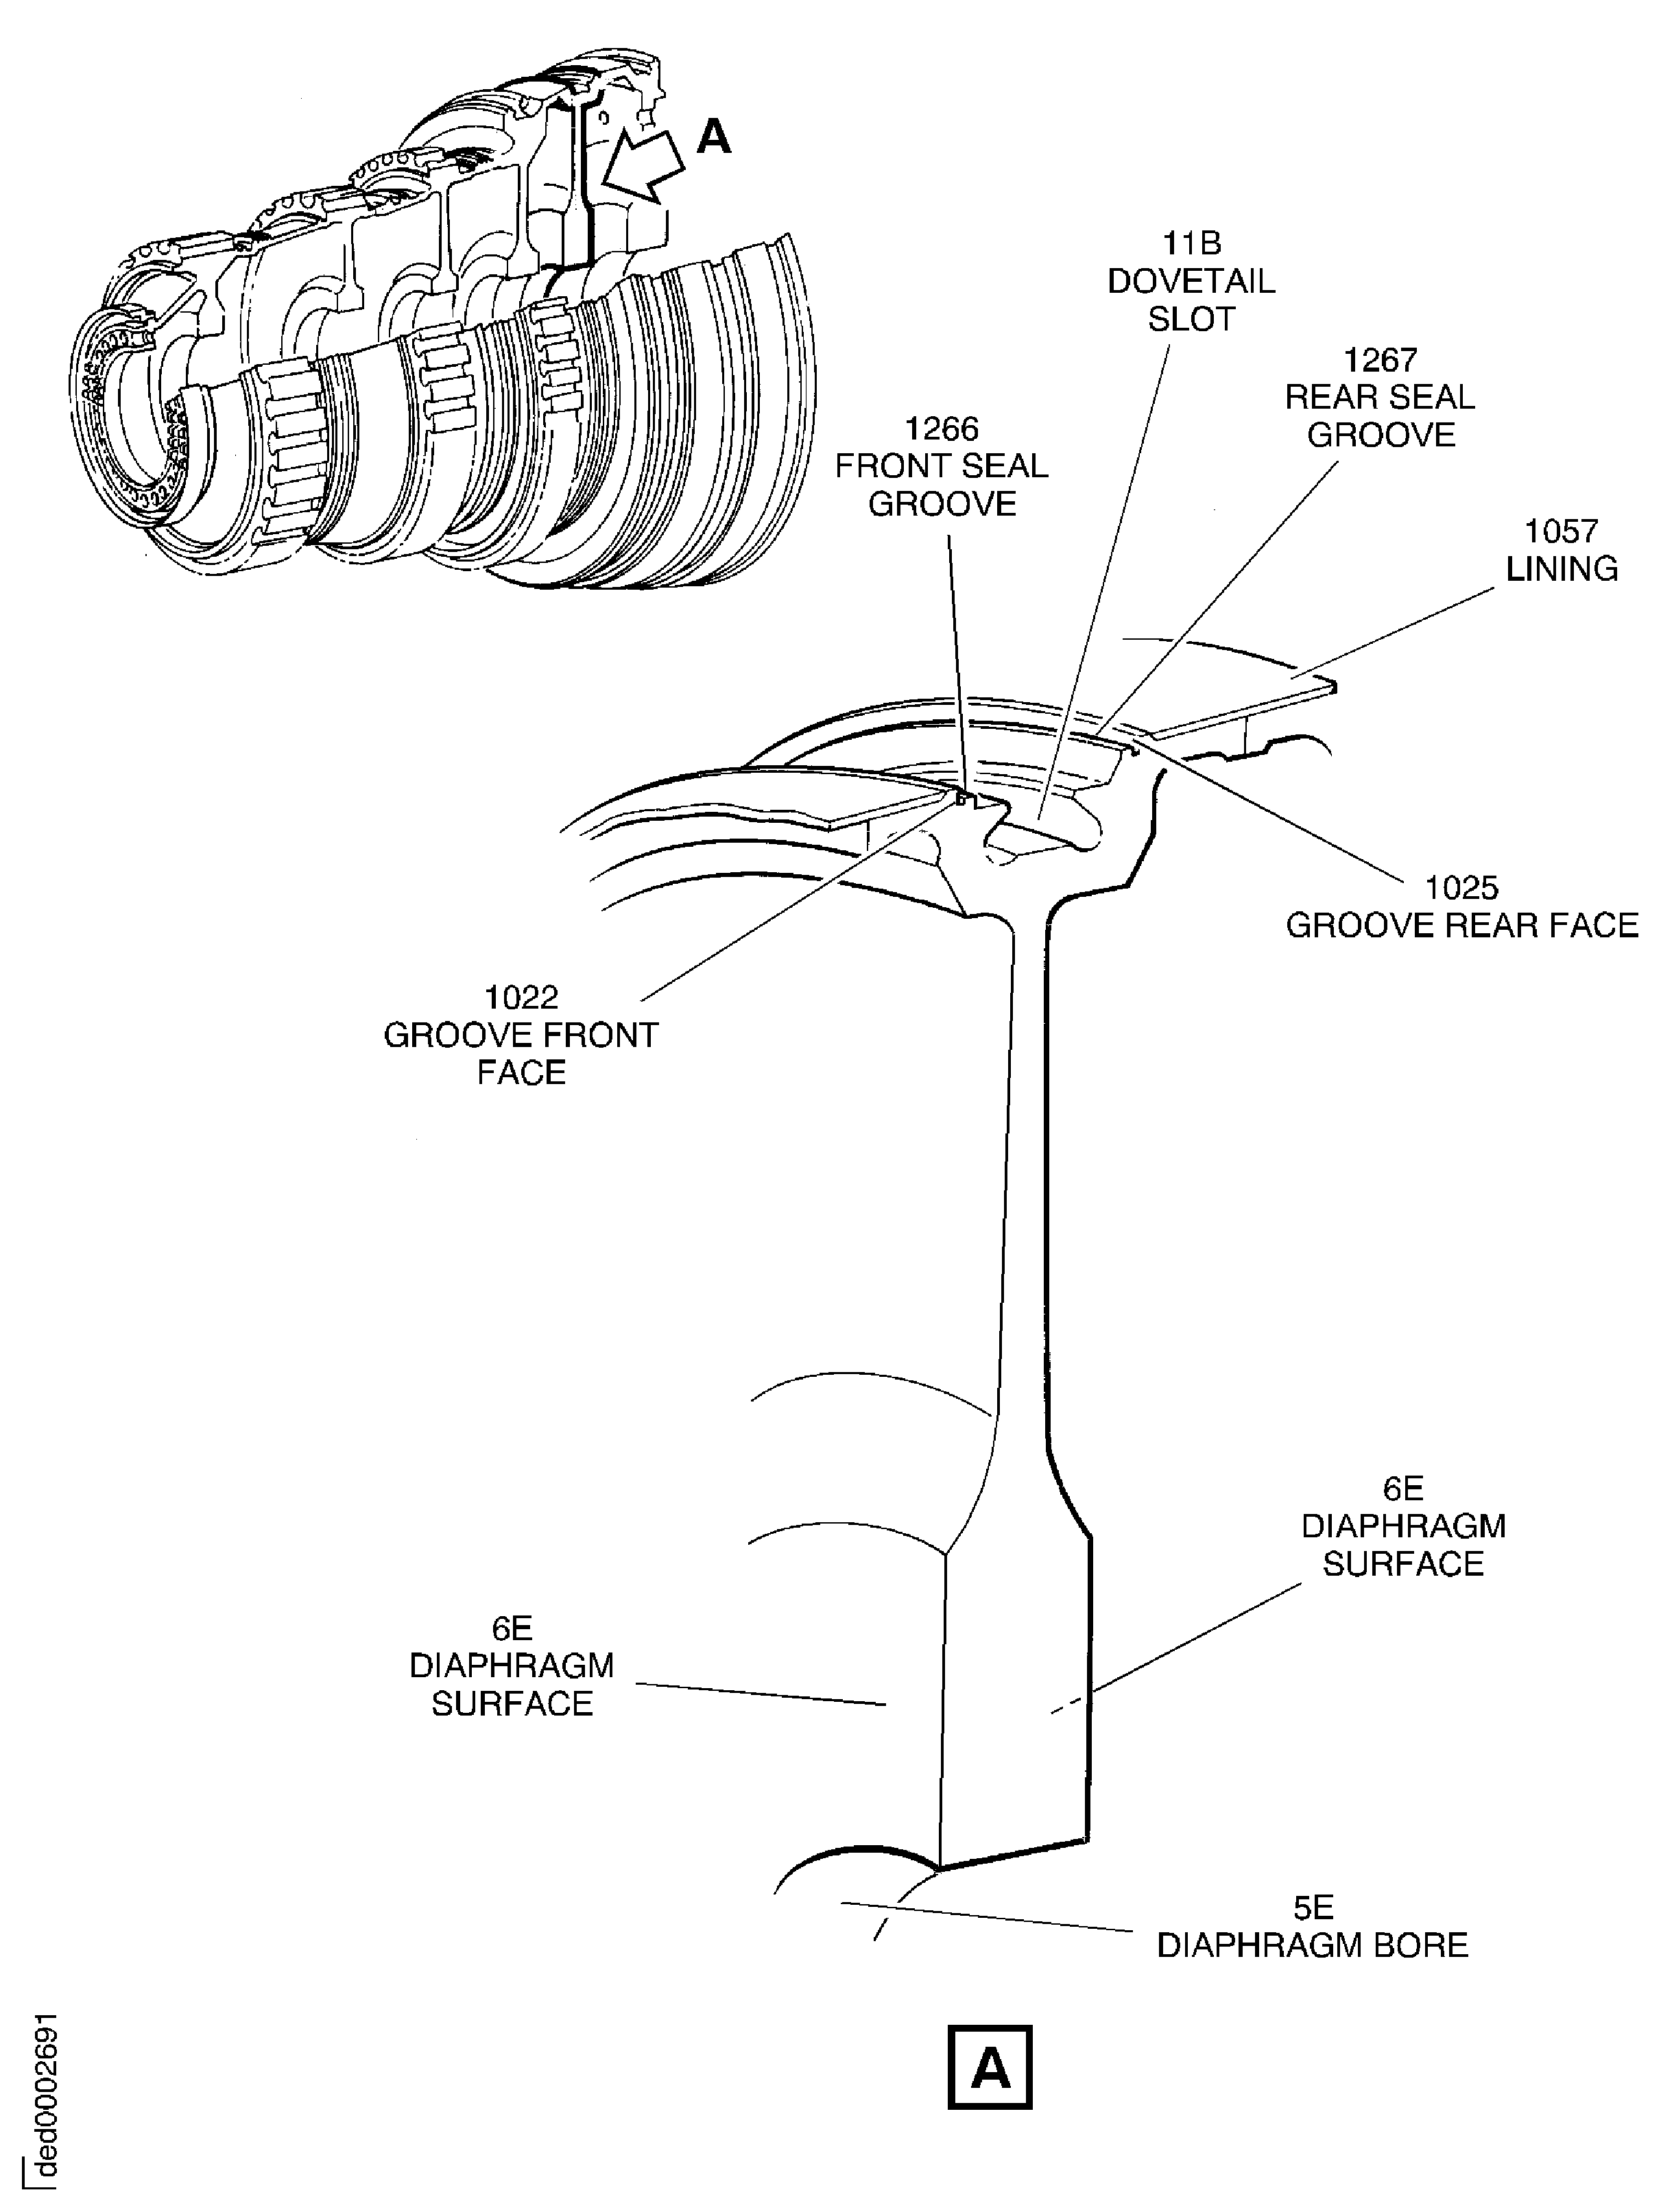
Figure: Stage 8 HP Compressor Disc - Inspection Locations
Stage 8 HP Compressor Disc - Inspection Locations
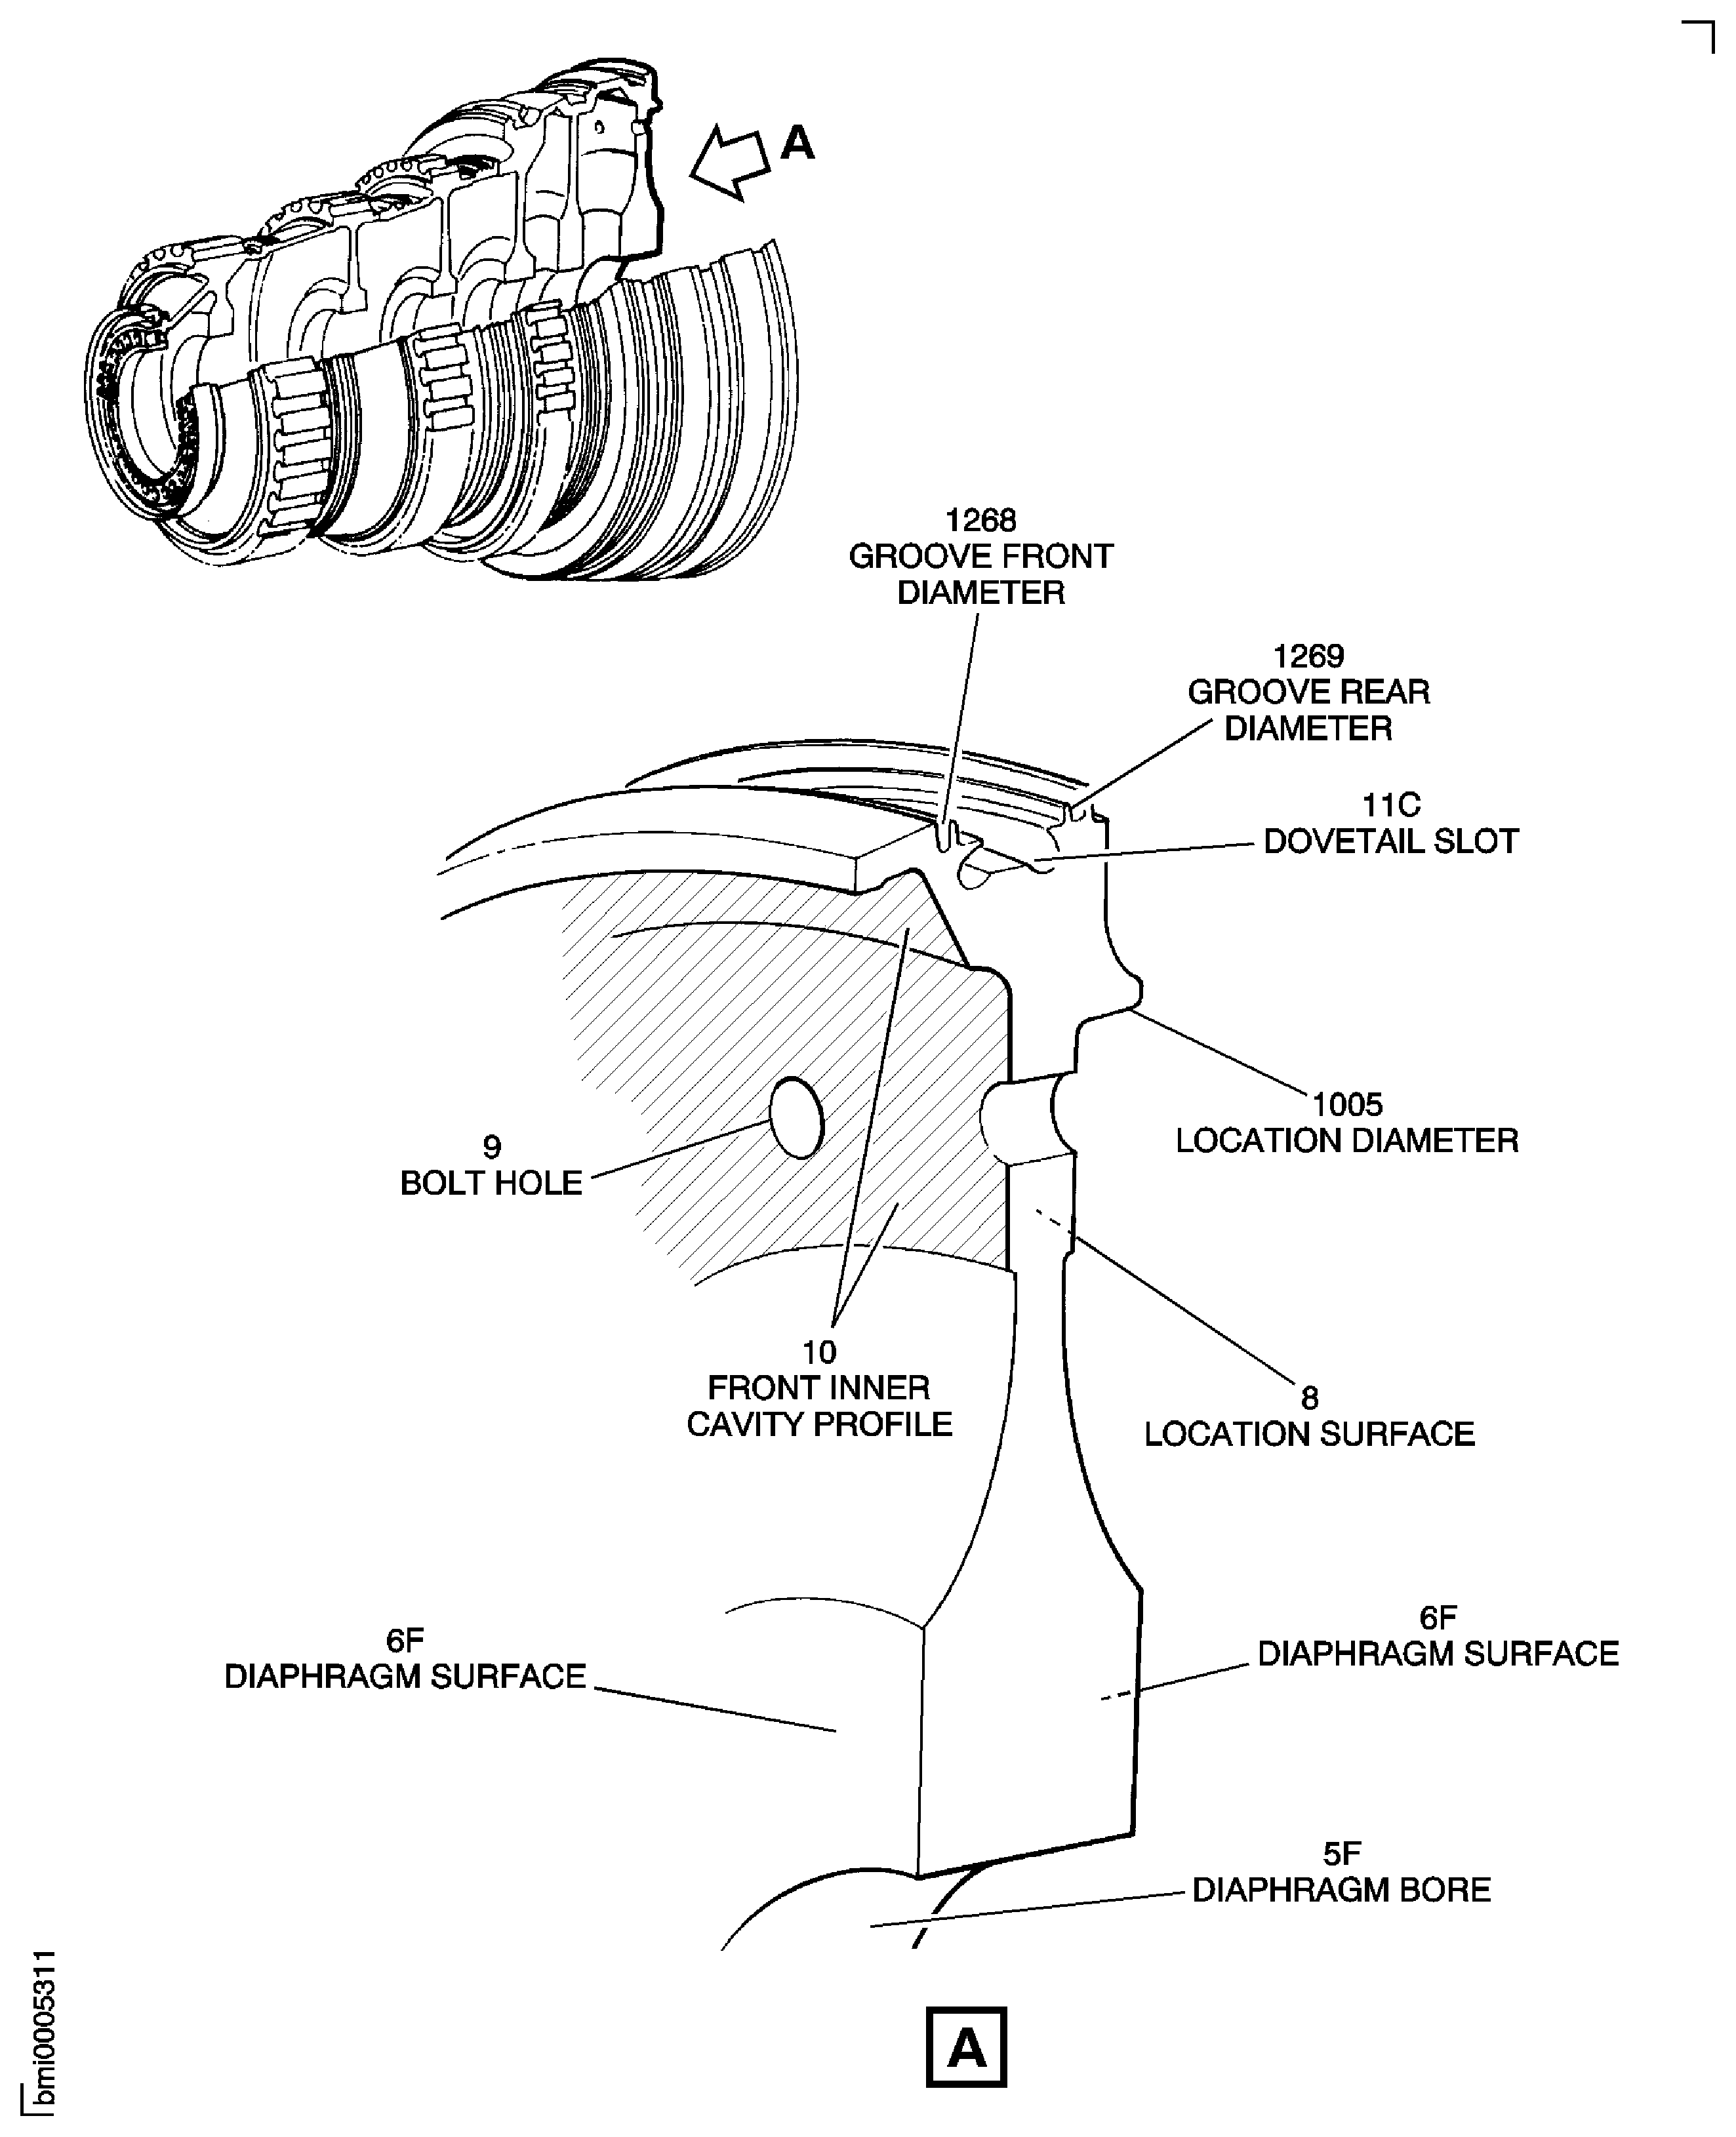
Figure: Focused Inspection - HP Compressor Stage 6 Seal Grooves
Focused Inspection - HP Compressor Stage 6 Seal Grooves

Figure: Focused Inspection - HP Compressor Stage 7 Seal Grooves
Focused Inspection - HP Compressor Stage 7 Seal Grooves

Figure: Focused Inspection - HP Compressor Stage 8 Seal Grooves and Inner Cavity
Focused Inspection - HP Compressor Stage 8 Seal Grooves and Inner Cavity
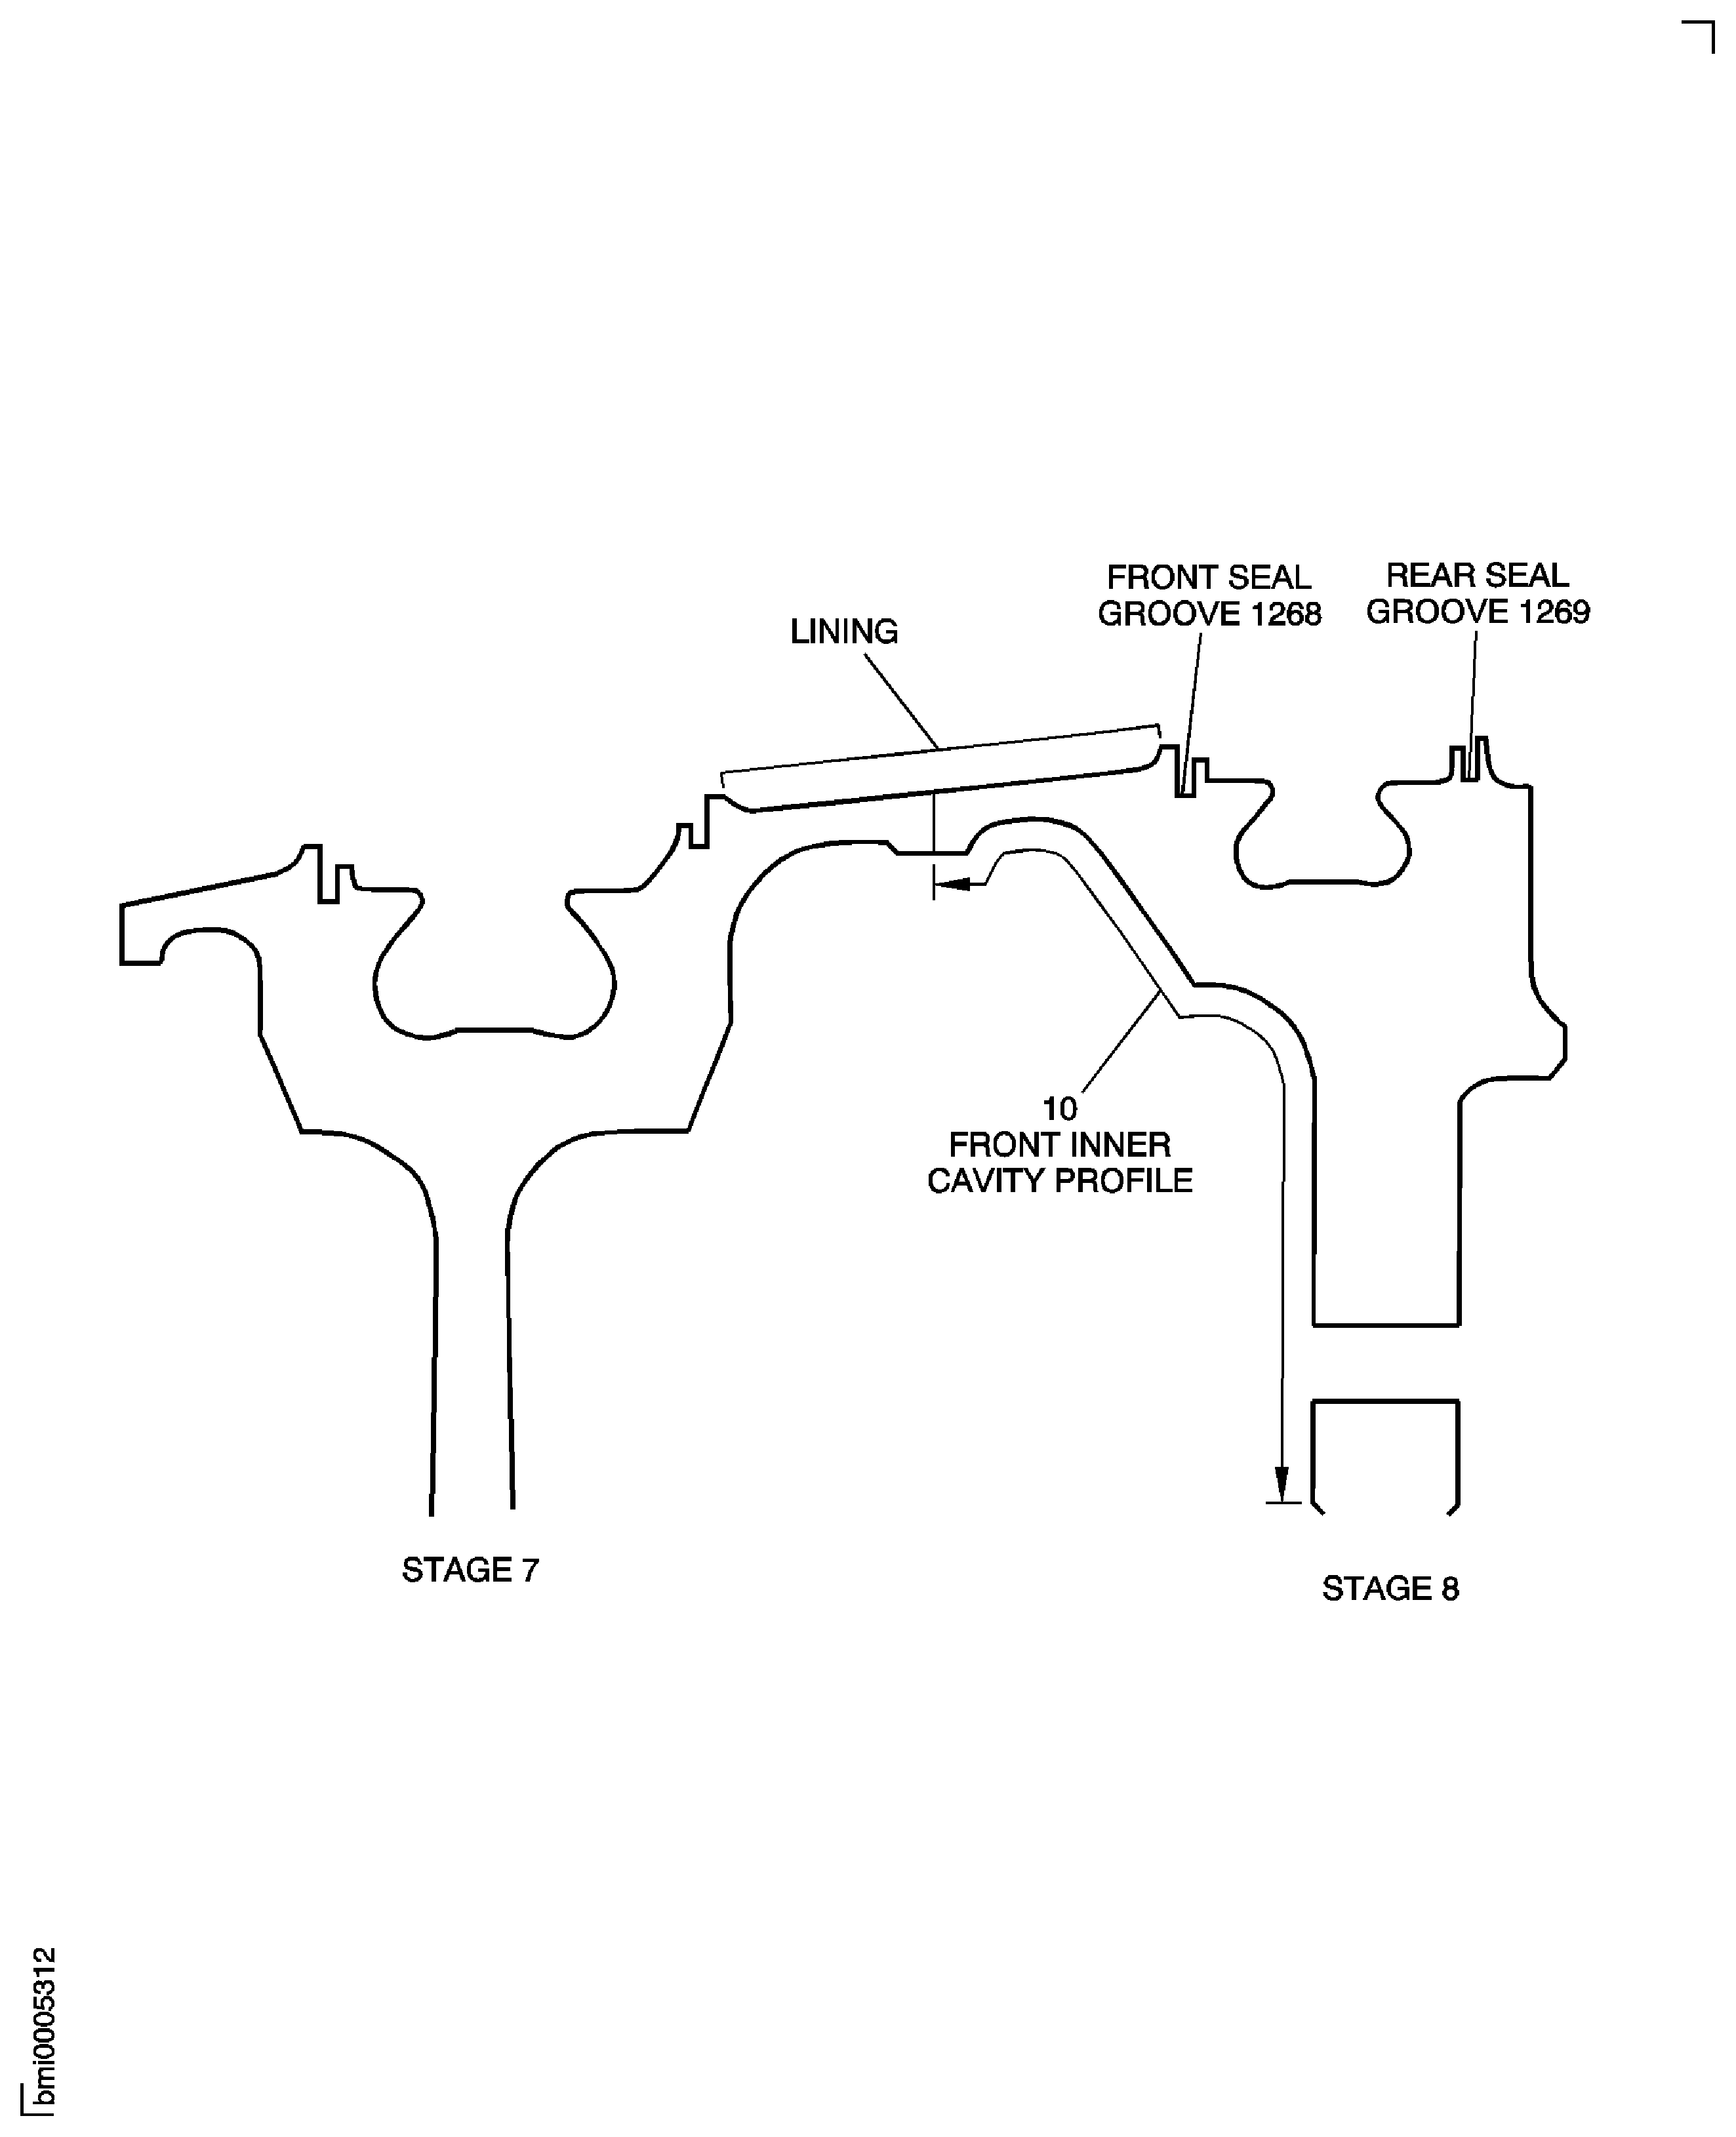
Figure: Focused Inspection - HP Compressor Stages 3 to 8 Discs
Focused Inspection - HP Compressor Stages 3 to 8 Discs
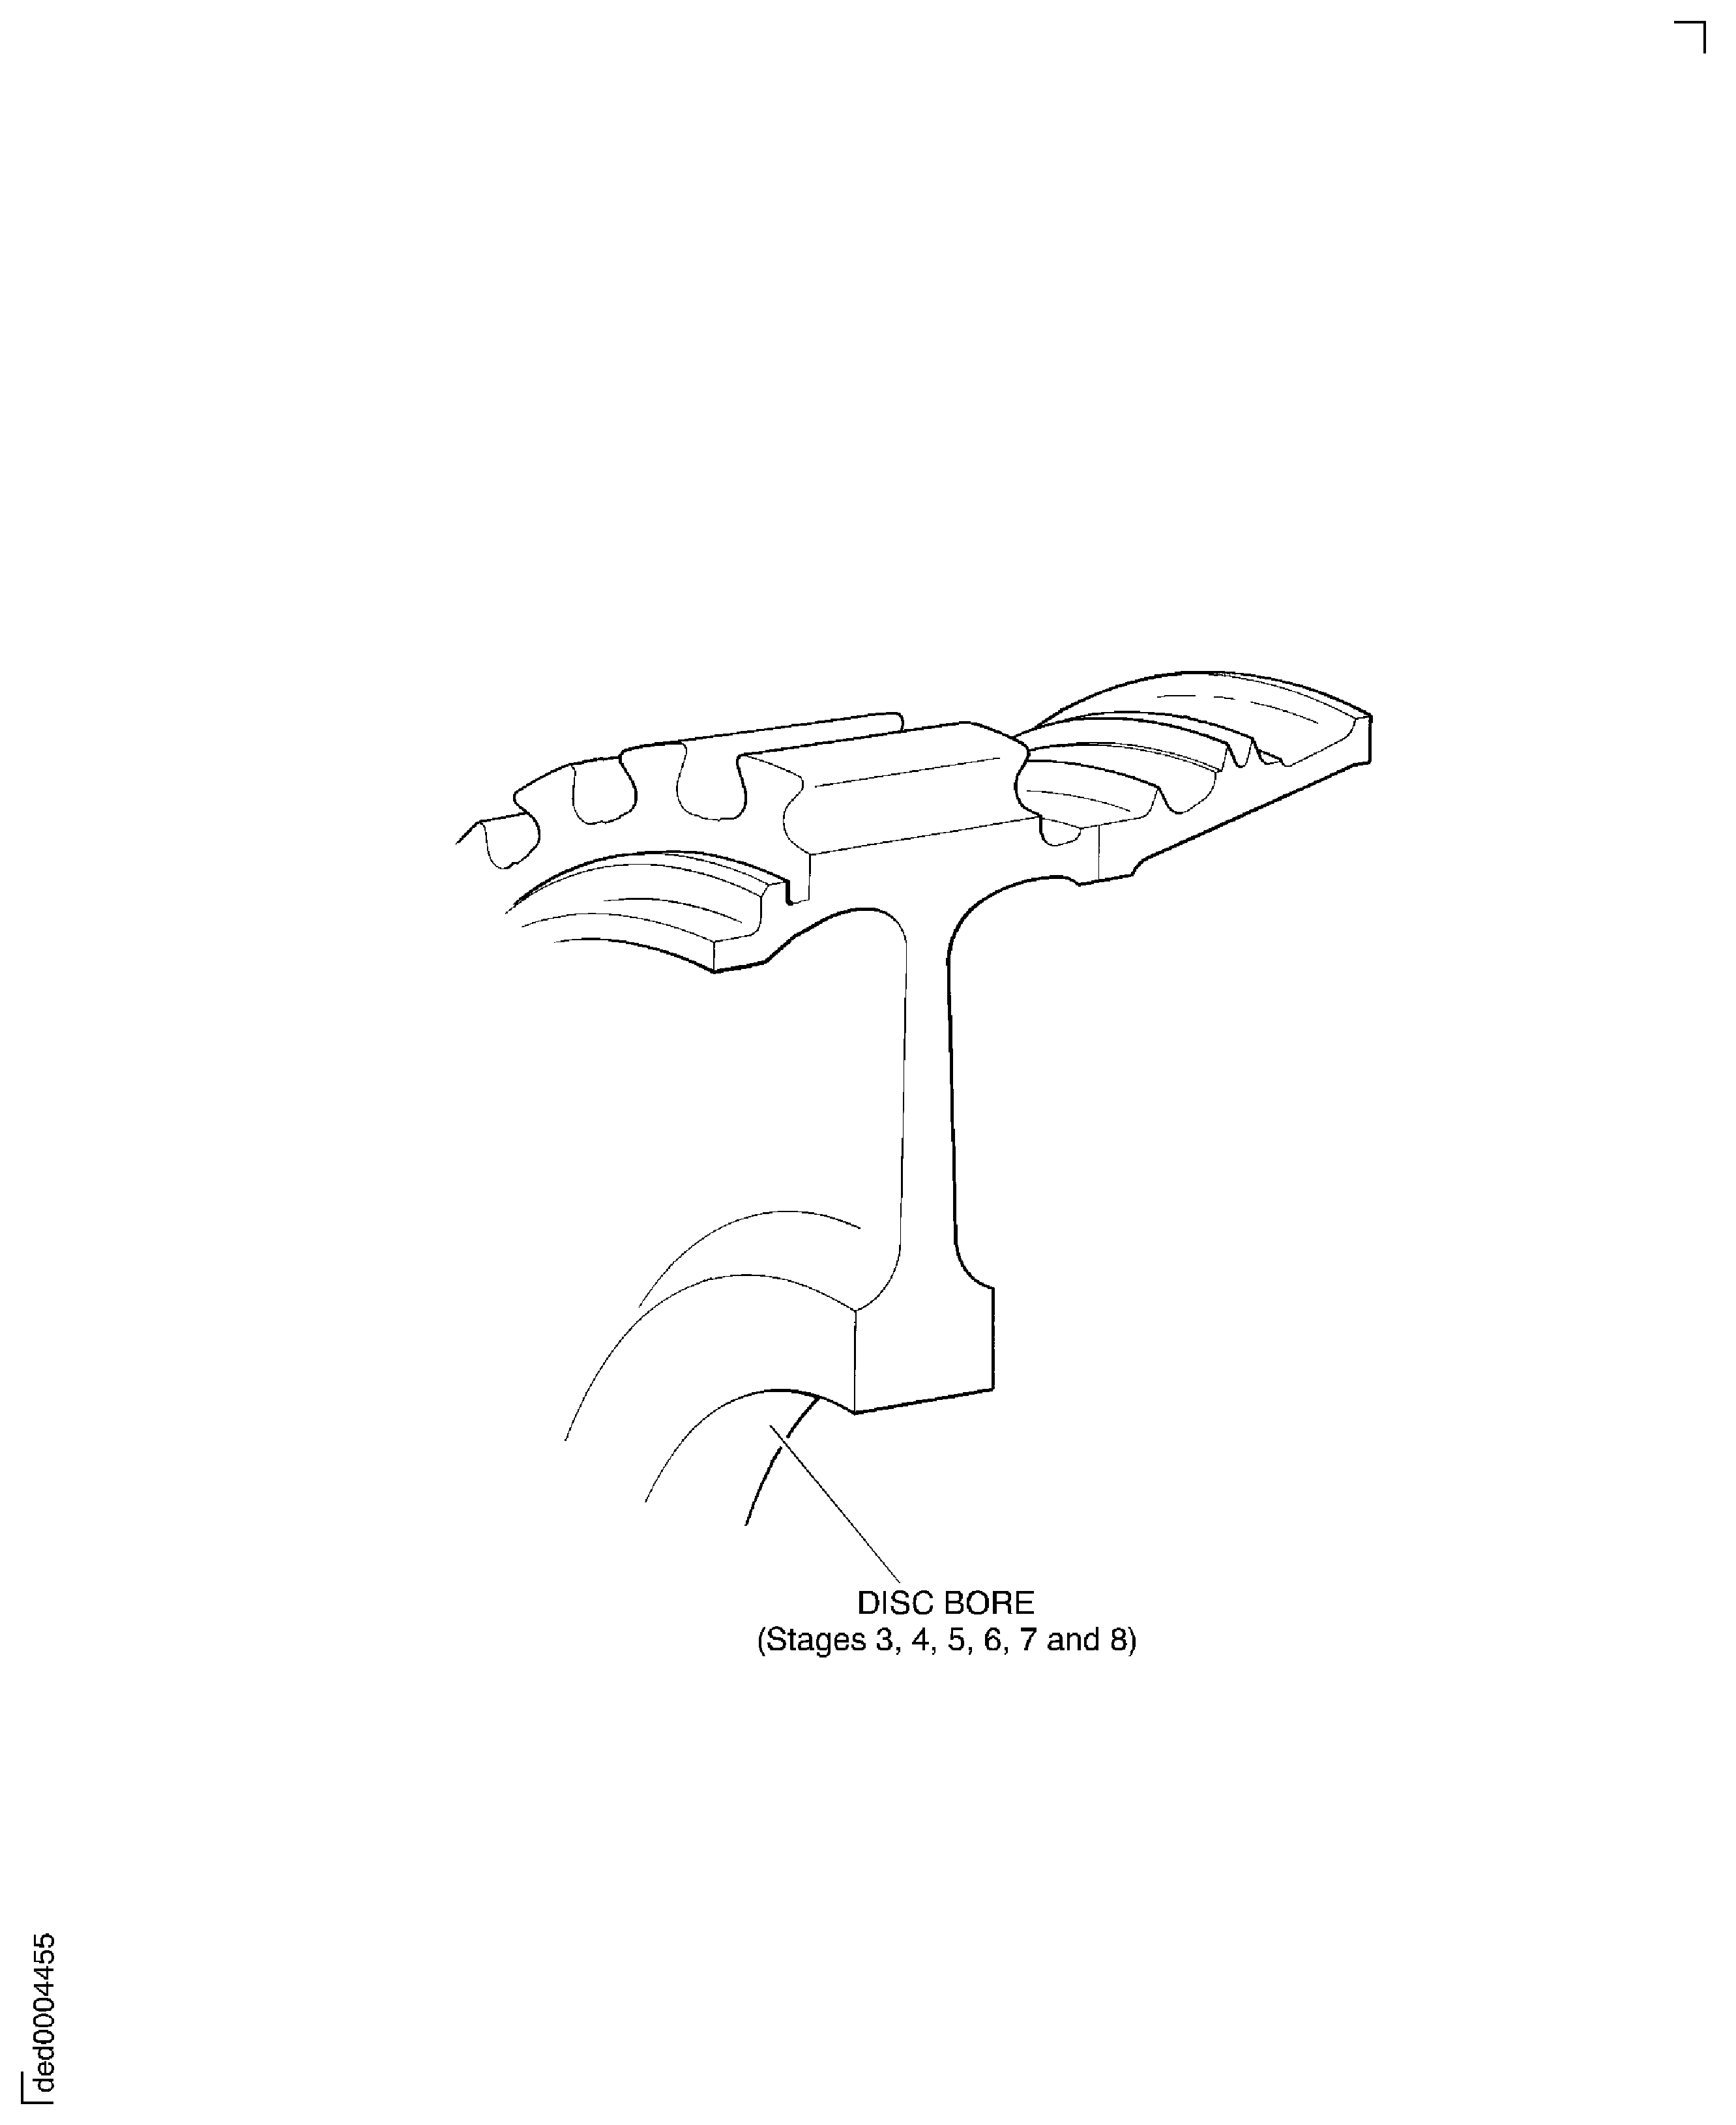
Figure: HP Compressor Stages 3, 4 and 5 Axial Dovetail Slots Inspection Zones
HP Compressor Stages 3, 4 and 5 Axial Dovetail Slots Inspection Zones

Figure: HP Compressor Stage 3 Axial Dovetails Slot Inspection Zones
HP Compressor Stage 3 Axial Dovetails Slot Inspection Zones
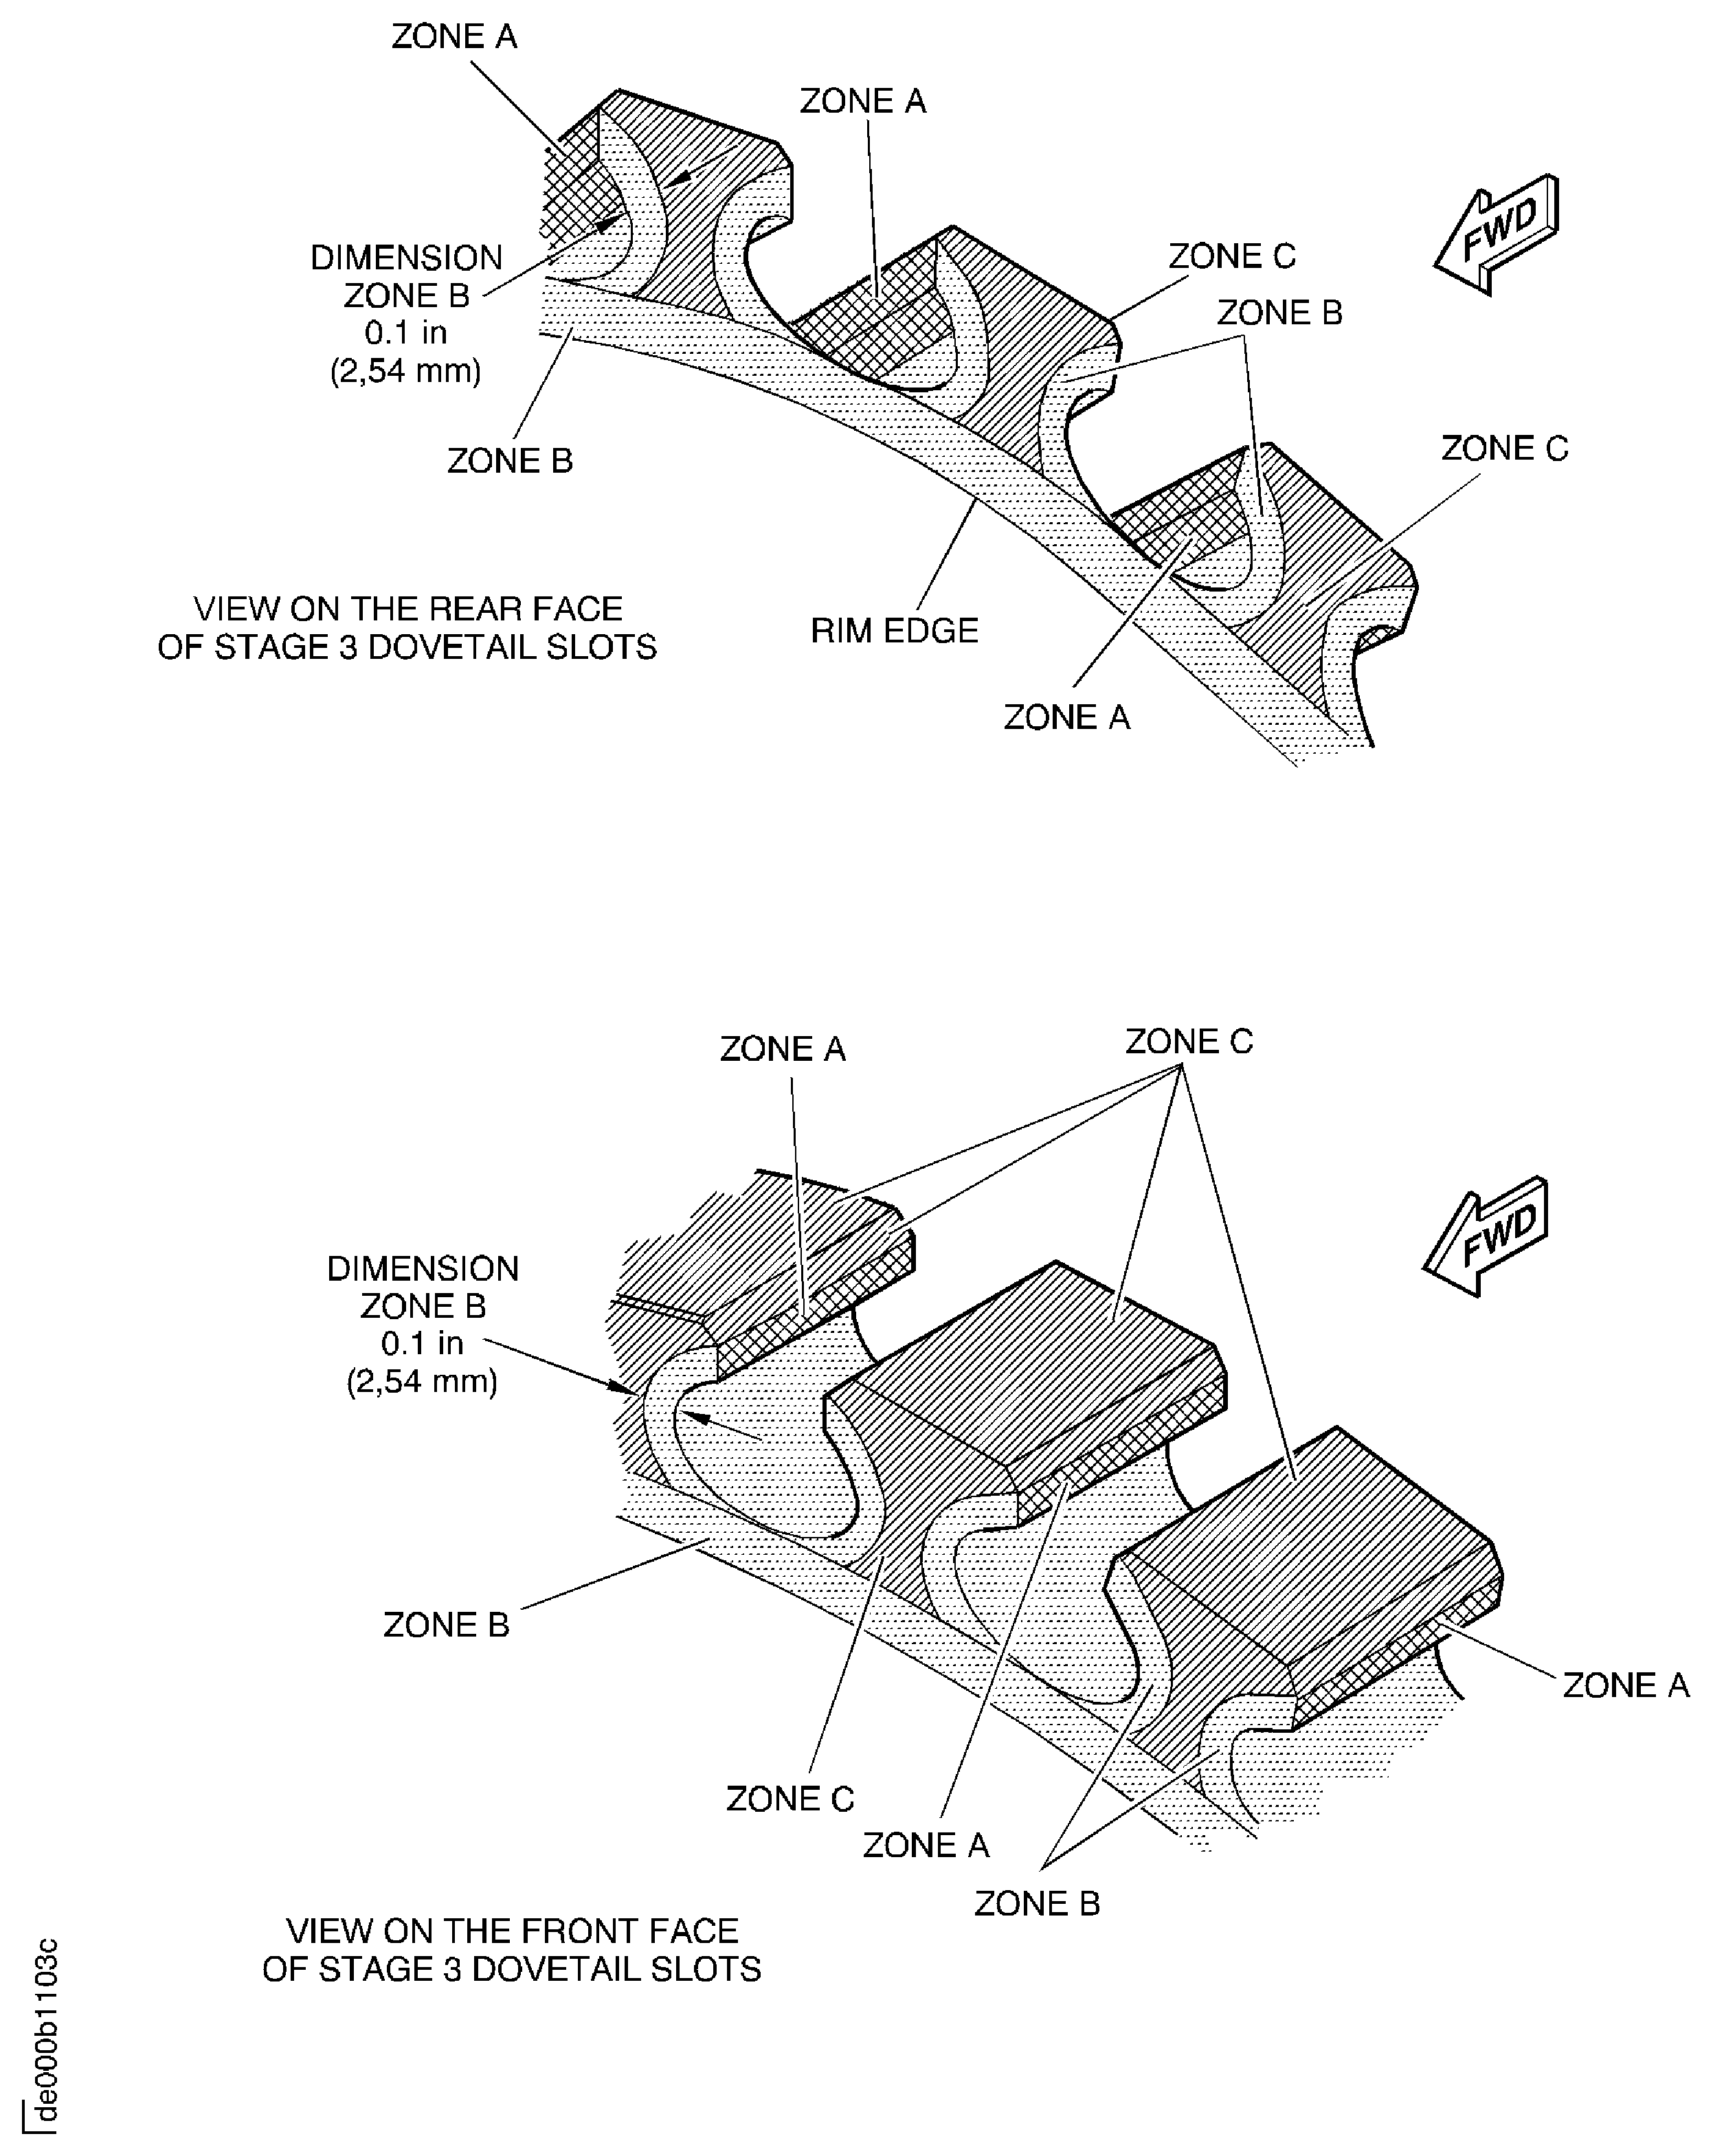
Figure: HP Compressor Stage 4 Axial Dovetail Slot Inspection Zones
HP Compressor Stage 4 Axial Dovetail Slot Inspection Zones
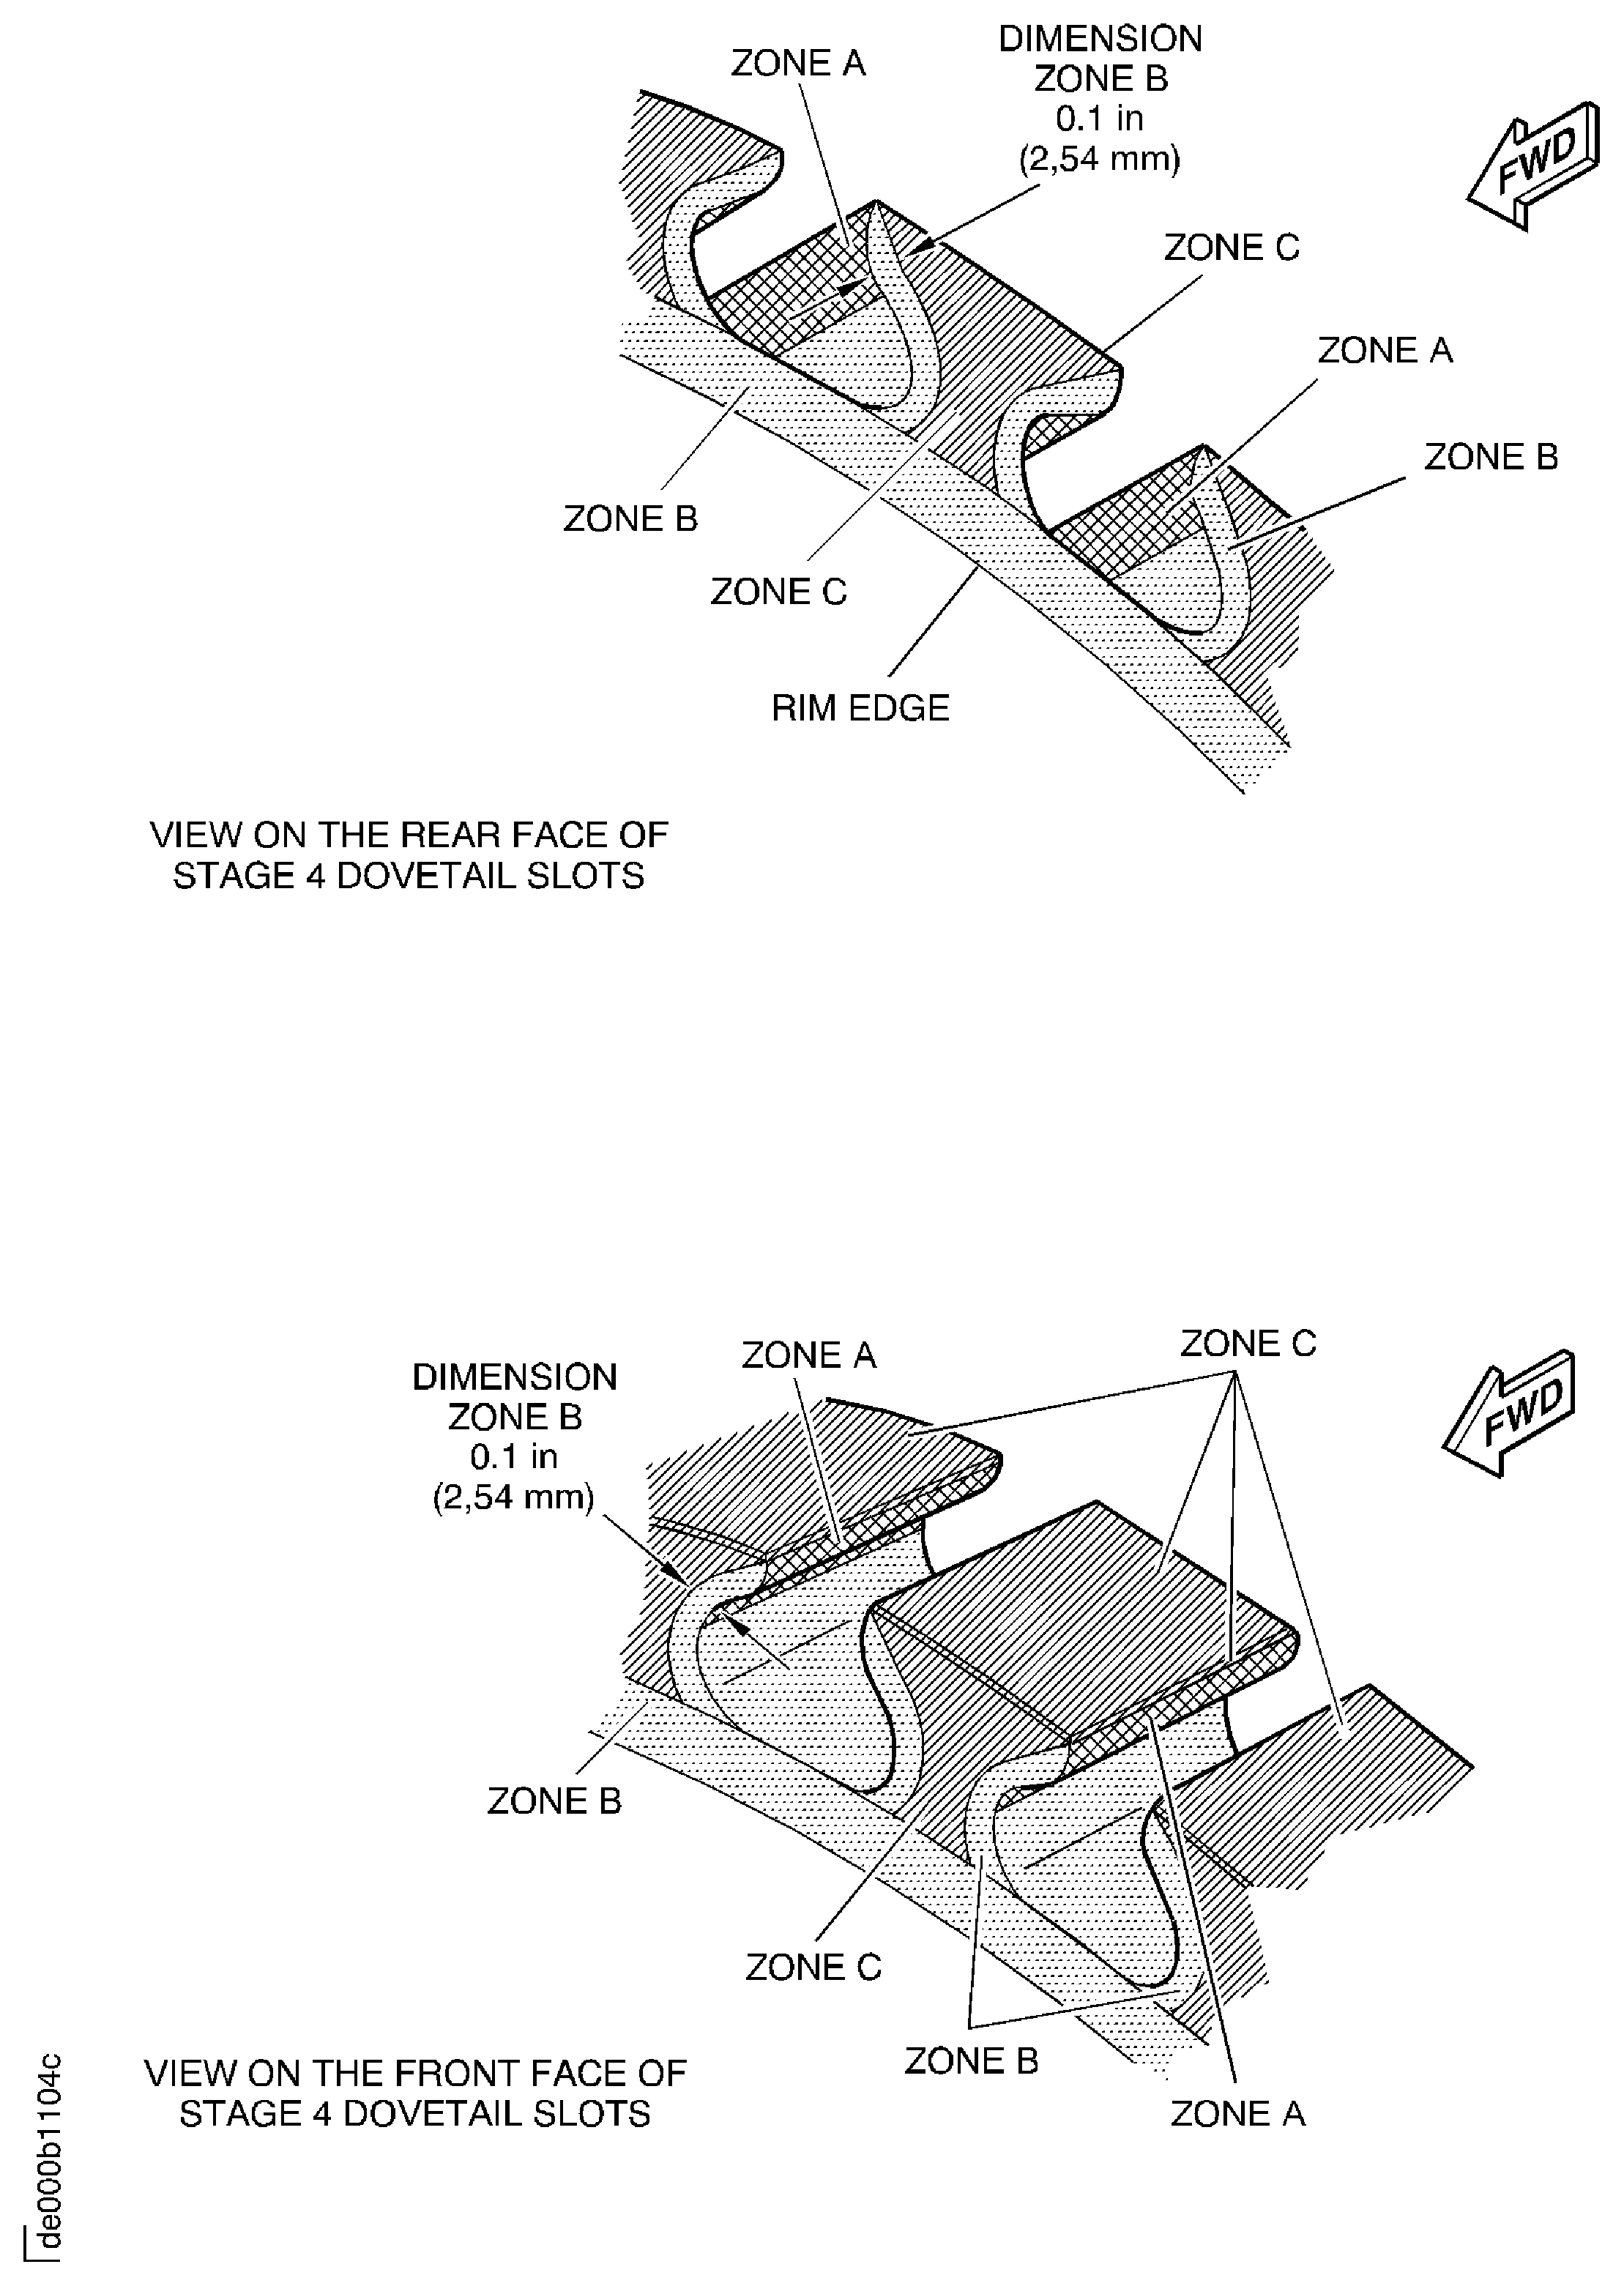
Figure: HP Compressor Stage 5 Axial Dovetail Slot Inspection Zones
HP Compressor Stage 5 Axial Dovetail Slot Inspection Zones

Figure: HP Compressor Stages 6, 7 and 8 Circumferential Dovetail Slot Inspection Zones
HP Compressor Stages 6, 7 and 8 Circumferential Dovetail Slot Inspection Zones
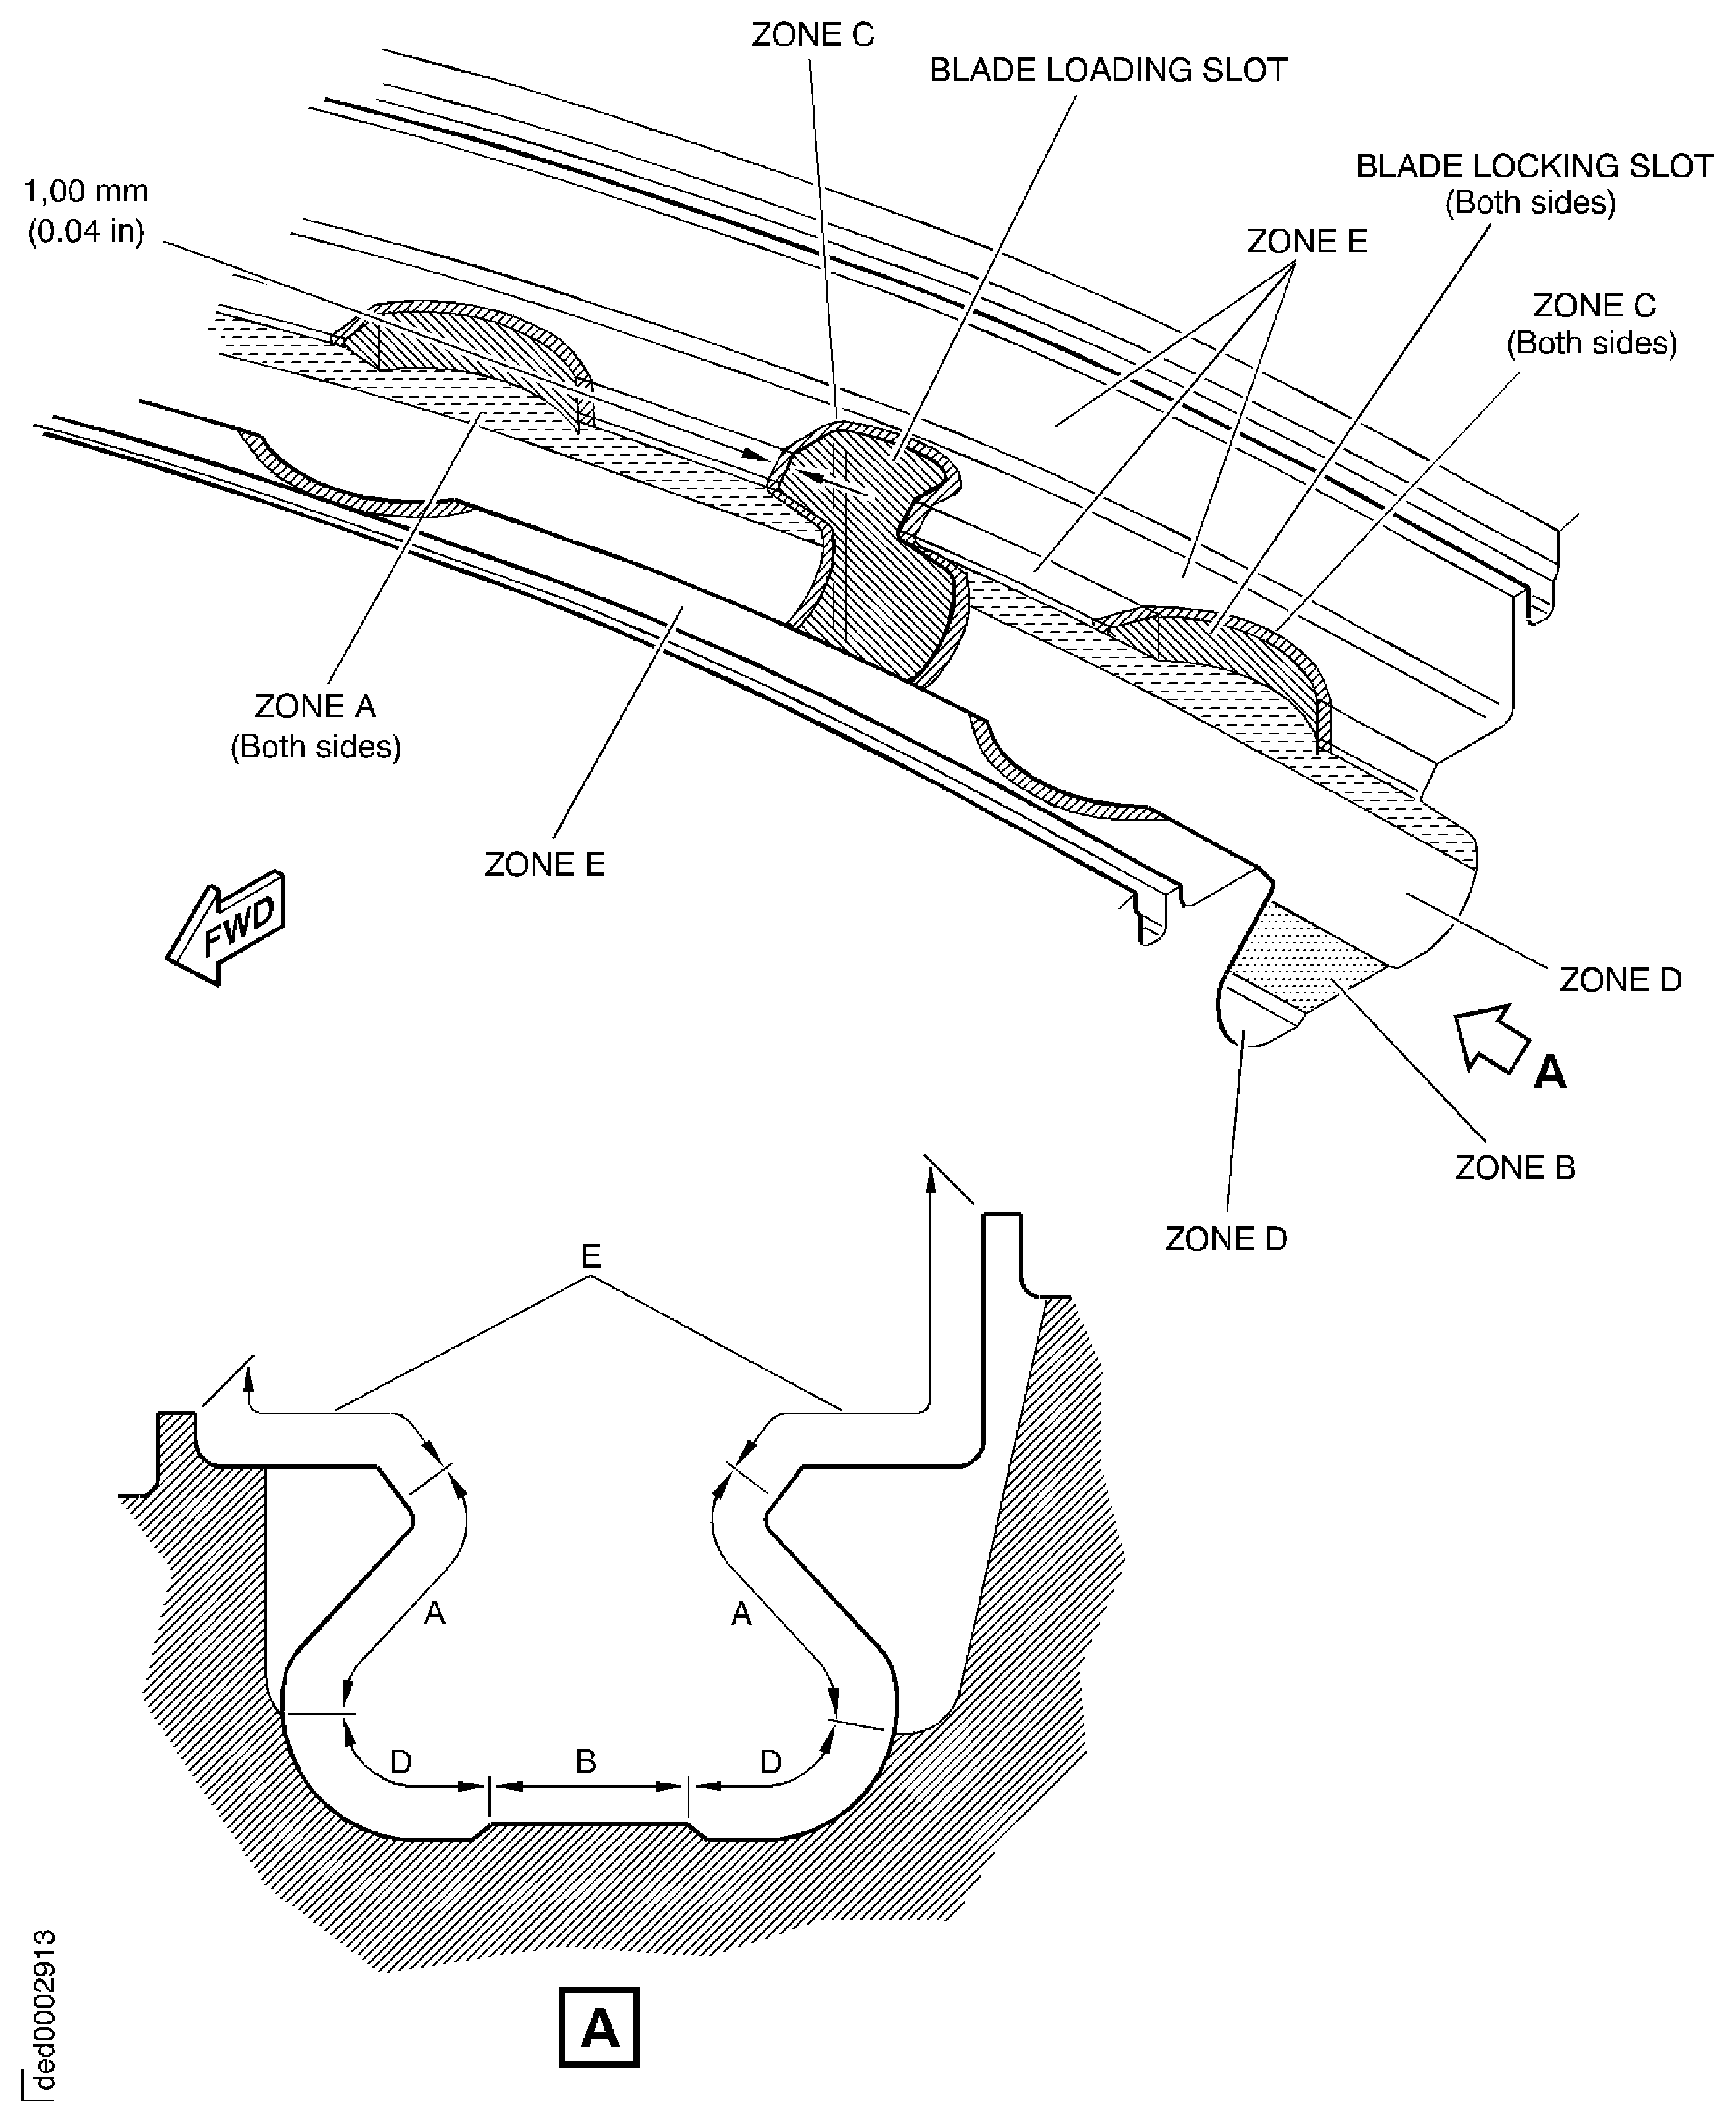
Figure: Examine the Sealing Groove
Examine the Sealing Groove

Figure: HP Compressor Stages 3 to 8 Drum Inspection Equipment for Fluorescent Penetrant Inspection of Internal Surfaces
HP Compressor Stages 3 to 8 Drum Inspection Equipment for Fluorescent Penetrant Inspection of Internal Surfaces
