Export Control
EAR Export Classification: Not subject to the EAR per 15 C.F.R. Chapter 1, Part 734.3(b)(3), except for the following Service Bulletins which are currently published as EAR Export Classification 9E991: SBE70-0992, SBE72-0483, SBE72-0580, SBE72-0588, SBE72-0640, SBE73-0209, SBE80-0024 and SBE80-0025.Copyright
© IAE International Aero Engines AG (2001, 2014 - 2021) The information contained in this document is the property of © IAE International Aero Engines AG and may not be copied or used for any purpose other than that for which it is supplied without the express written authority of © IAE International Aero Engines AG. (This does not preclude use by engine and aircraft operators for normal instructional, maintenance or overhaul purposes.).Applicability
All
Common Information
TASK 72-60-10-440-001 Main Gearbox Assembly - Assemble The Main Gearbox Assembly, Assembly-001
General
Fig/item numbers in parentheses in the procedure agree with those used in the IPC. Only the primary Fig/item numbers are used. For the service bulletin alpha variants refer to the IPC.
For all parts identified in a different Chapter/Section/Subject, the applicable Chapter/Section/Subject comes before the Fig/item number.
For standard torque data and procedures, refer to SPM TASK 70-41-00-400-501 and SPM TASK 70-41-01-400-501.
Special torque data and assembly tolerances are included in the procedure.
Lubricate all threads and abutment faces of nuts and bolts with CoMat 10-077 APPROVED ENGINE OILS, unless other lubricants are referred to in the procedure.
To identify, lubricate and install seal rings, refer to SPM TASK 70-64-02-640-501.
After assembly apply CoMat 07-038 AIR DRYING ENAMEL to any damaged surface protection, joint flanges and attach parts. Use the correct color of the air drying enamel. Refer to SPM TASK 70-63-02-380-501.
The number for each radial location must be identified in a clockwise direction. These start at the engine top position when you look from the rear of the engine, unless stated differently in the procedure.
Transportation covers/blanks must be removed immediately before installation of the components.
Make sure that the outer race has the same serial number of the related bearing.
Lubricate the cages of the roller bearings with CoMat 10-077 APPROVED ENGINE OILS before the installation.
Refer to TASK 72-60-00-030-001 to install the main gearbox on the build stand if necessary.
Operate by hand the installed gearshafts to make easier subsequent installations.
Note
NOTE
NOTE
Preliminary Requirements
Pre-Conditions
NONESupport Equipment
| Name | Manufacturer | Part Number / Identification | Quantity | Remark |
|---|---|---|---|---|
| IAE 1F10003 Pusher | 0AM53 | IAE 1F10003 | 1 | |
| IAE 1F10004 Pusher | 0AM53 | IAE 1F10004 | 1 | |
| IAE 1F10031 Pusher | 0AM53 | IAE 1F10031 | 1 | |
| IAE 1F10032 Pusher | 0AM53 | IAE 1F10032 | 1 | |
| IAE1F10070 Pusher | 0AM53 | IAE 1F10070 | 1 | |
| IAE 1F10072 Pusher | 0AM53 | IAE 1F10072 | 1 | |
| IAE 1F10082 Guide Pin | 0AM53 | IAE 1F10082 | 2 | |
| IAE 1F10155 Drift | 0AM53 | IAE 1F10155 | 1 | |
| IAE 1F10156 Drift | 0AM53 | IAE 1F10156 | 1 | |
| IAE 1F10157 IAE 1F10157 Drift | 0AM53 | IAE 1F10157 | 1 | |
| IAE 1F10221 Drift | 0AM53 | IAE 1F10221 | 1 | |
| IAE 1F10222 Pin | 0AM53 | IAE 1F10222 | 1 | |
| IAE 1F10223 Drift | 0AM53 | IAE 1F10223 | 1 | |
| IAE 1F10224 Drift | 0AM53 | IAE 1F10224 | 1 | |
| IAE 1F10225 Drift | 0AM53 | IAE 1F10225 | 1 | |
| IAE 1F10227 Drift | 0AM53 | IAE 1F10227 | 1 | |
| IAE 2F10229 Rotating handwheel | 0AM53 | IAE 2F10229 | 1 | |
| IAE 2F10257 Storage box | 0AM53 | IAE 2F10257 | 1 | |
| IAE 2F10266 Backlash kit | 0AM53 | IAE 2F10266 | 1 | |
| IAE 2F10267 Clamping fixture | 0AM53 | IAE 2F10267 | 1 | |
| IAE 2F10268 Backlash gage tip | 0AM53 | IAE 2F10268 | 1 | |
| IAE 2F10269 Comparator support | 0AM53 | IAE 2F10269 | 1 | |
| IAE 2F10270 Clamping fixture | 0AM53 | IAE 2F10270 | 1 | |
| IAE 2F10271 Clamping fixture | 0AM53 | IAE 2F10271 | 1 | |
| IAE 2F10272 Backlash gage tip | 0AM53 | IAE 2F10272 | 1 | |
| IAE 2F10273 Comparator support | 0AM53 | IAE 2F10273 | 1 | |
| IAE 2F10274 Clamping fixture | 0AM53 | IAE 2F10274 | 1 | |
| IAE 2F10275 Backlash gage tip | 0AM53 | IAE 2F10275 | 1 | |
| IAE 2F10276 Clamping fixture | 0AM53 | IAE 2F10276 | 1 |
Consumables, Materials and Expendables
| Name | Manufacturer | Part Number / Identification | Quantity | Remark |
|---|---|---|---|---|
| CoMat 07-038 AIR DRYING ENAMEL | 00BB6 | CoMat 07-038 | ||
| CoMat 10-077 APPROVED ENGINE OILS | X333X | CoMat 10-077 |
Spares
Safety Requirements
NONEProcedure
Refer to Figure.
Calculate the interference at Location 4002. Use the data made as a note in TASK 72-60-21-200-002.
Table 1. Fits and Clearances (all dimensions are in inches) NEW PART
WORN PART
DIMENSIONS
DIMENSIONS
PART IDENT
Size
Clearance
Non-select
REJECT IF
MORE THAN
LOCATION 4002
Gearbox Casing Main Gearbox Casing And Fittings (72-60-21, 02-050)
Location For The Roller Bearing Deoiler Gear, Impeller, And Housing Assembly (72-60-29, 01-490) Of The Deoiler Gear Drive
Gearbox Casing Location Bore For The Roller Bearing
2.7560
Clear
2.7553
0.0005
Roller Bearing Outer Diameter
2.7559
Intf
2.7555
0.0006
Table 2. Fits and Clearances (all dimensions are in millimeters) NEW PART
WORN PART
DIMENSIONS
DIMENSIONS
PART IDENT
Size
Clearance
Non-select
REJECT IF
MORE THAN
LOCATION 4002
Gearbox Casing Main Gearbox Casing And Fittings (72-60-21, 02-050)
Location For The Roller Bearing Deoiler Gear, Impeller, And Housing Assembly (72-60-29, 01-490) Of The Deoiler Gear Drive
Gearbox Casing Location Bore For The Roller Bearing
70, 004
Clear
69.985
0.013
Roller Bearing Outer Diameter
70.000
Intf
69.991
0.015
SUBTASK 72-60-10-220-051 Make sure the Fits and Clearances of the Gearbox Casing are in the Limits given at Location 4002
Refer to Figure.
Calculate the interference at Location 4004. Use the data made as a note in TASK 72-60-29-200-003 and TASK 72-60-29-200-001.
Table 3. Fits and Clearances (all dimensions are in inches) NEW PART
WORN PART
DIMENSIONS
DIMENSIONS
PART IDENT
Size
Clearance
Non-select
REJECT IF
MORE THAN
LOCATION 4004
Deoiler Gearshaft Deoiler Gear, Impeller, And Housing Assembly (72-60-29, 01-290)
Journal Of The Rotating Ring Deoiler Gear, Impeller, And Housing Assembly (72-60-29, 01-110)
Deoiler Gearshaft Journal Of The Rotating Ring
1.2991
1.9281
0.0010
Rotating Ring Inner Diameter
1.9311
0.0030
1.9303
Table 4. Fits and Clearances (all dimensions are in millimeters) NEW PART
WORN PART
DIMENSIONS
DIMENSIONS
PART IDENT
Size
Clearance
Non-select
REJECT IF
MORE THAN
LOCATION 4004
Deoiler Gearshaft Deoiler Gear, Impeller, And Housing Assembly (72-60-29, 01-290)
Journal Of The Rotating Ring Deoiler Gear, Impeller, And Housing Assembly (72-60-29, 01-110)
Deoiler Gearshaft Journal Of The Rotating Ring
49.000
48.975
0.030
Rotating Ring Inner Diameter
49.050
0.075
49.030
SUBTASK 72-60-10-220-052 Make Sure the Fits and Clearances of the Deoiler Gearshaft are in the Limits given at Location 4004
Refer to Figure.
Calculate the interference at Location 4006. Use the data made as a note in TASK 72-60-29-200-002.
Table 5. Fits and Clearances (all dimensions are in inches) NEW PART
WORN PART
DIMENSIONS
DIMENSIONS
PART IDENT
Size
Clearance
Non-select
REJECT IF
MORE THAN
LOCATION 4006
Deoiler Housing Deoiler Gear, Impeller, And Housing Assembly (72-60-29, 01-390)
Location For The Deoiler Casing ENGINE-DEOILER CASE AND COVER (72-60-31, 01-170)
Deoiler Housing Location For The Deoiler Casing
7.2834
7.2816
0.0008
Deoiler Casing Bore
7.2862
0.0046
7.2842
Table 6. Fits and Clearances (all dimensions are in millimeters) NEW PART
WORN PART
DIMENSIONS
DIMENSIONS
PART IDENT
Size
Clearance
Non-select
REJECT IF
MORE THAN
LOCATION 4006
Deoiler Housing Deoiler Gear, Impeller, And Housing Assembly (72-60-29, 01-390)
Location For The Deoiler Casing ENGINE-DEOILER CASE AND COVER (72-60-31, 01-170)
Deoiler Housing Location For The Deoiler Casing
185.000
184.954
0.020
Deoiler Casing Bore
185.070
0.116
185.020
SUBTASK 72-60-10-220-053 Make Sure the Fits and Clearances of the Deoiler Housing are in the Limits given at Location 4006
Refer to Figure.
Calculate the interference at Location 4007. Use the data made as a note in TASK 72-60-21-200-002.
Table 7. Fits and Clearances (all dimensions are in inches) NEW PART
WORN PART
DIMENSIONS
DIMENSIONS
PART IDENT
Size
Clearance
Non-select
REJECT IF
MORE THAN
LOCATION 4007
Gearbox casing Main Gearbox Casing And Fittings (72-60-21, 02-050)
Location For The Deoiler Housing Deoiler Gear, Impeller, And Housing Assembly (72-60-29, 01-390)
Gearbox Casing Location Bore For The Deoiler Housing
6.9307
6.9291
0.0032
Deoiler Housing Outer Diameter
6.9291
0.0000
6.9275
Table 8. Fits and Clearances (all dimensions are in millimeters) NEW PART
WORN PART
DIMENSIONS
DIMENSIONS
PART IDENT
Size
Clearance
Non-select
REJECT IF
MORE THAN
LOCATION 4007
Gearbox Casing Main Gearbox Casing And Fittings (72-60-21, 02-050)
Location For The Deoiler Housing Deoiler Gear, Impeller, And Housing Assembly (72-60-29, 01-390)
Gearbox Casing Location bore For The Deoiler Housing
176.040
176.000
0.080
Deoiler Housing Outer Diameter
176.000
0.000
175.960
SUBTASK 72-60-10-220-054 Make Sure the Fits and Clearances of the Gearbox Casing are in the Limits given at Location 4007
Refer to Figure.
Calculate the interference at Location 4010. Use the data made as a note in TASK 72-60-21-200-002.
Table 9. Fits and Clearances (all dimensions are in inches) NEW PART
WORN PART
DIMENSIONS
DIMENSIONS
PART IDENT
Size
Clearance
Non-select
REJECT IF
MORE THAN
LOCATION 4010
Gearbox Casing Main Gearbox Casing And Fittings (72-60-21, 02-050)
Location For The Roller Bearing Generator Drive Gear And Housing Assembly (72-60-28, 01-590) Of The IDG Gear Drive Gearbox Casing
Location Bore For The Roller Bearing
2.7560
Clear
2.7553
0.0005
Roller Bearing Outer Diameter
2.7559
Intf
2.7555
0.0006
Table 10. Fits and Clearances (all dimensions are in millimeters) NEW PART
WORN PART
DIMENSIONS
DIMENSIONS
PART IDENT
Size
Clearance
Non-select
REJECT IF
MORE THAN
LOCATION 4010
Gearbox Casing Main Gearbox Casing And Fittings (72-60-21, 02-050)
Location For The Roller Bearing Generator Drive Gear And Housing Assembly (72-60-28, 01-590) Of The IDG Gear Drive
Gearbox Casing Location Bore For The Roller Bearing
70.004
Clear
69.985
0.013
Roller Bearing Outer Diameter
70.000
Intf
69.991
0.015
SUBTASK 72-60-10-220-055 Make Sure the Fits and Clearances of the Gearbox Casing are in the Limits given at Location 4010
Refer to Figure.
Calculate the interference at Location 4012. Use the data made as a note in TASK 72-60-28-200-003 and TASK 72-60-28-200-001.
Table 11. Fits and Clearances (all dimensions are in inches) NEW PART
WORN PART
DIMENSIONS
DIMENSIONS
PART IDENT
Size
Clearance
Non-select
REJECT IF
MORE THAN
LOCATION 4012
IDG Gear Drive Generator Drive Gear And Housing Assembly (72-60-28, 01-410)
Journal Of The Rotating Ring Generator Drive Gear And Housing Assembly (72-60-28, 01-350)
2.0866
IDG Gear Drive Journal Of The Rotating Ring
2.0854
0.0012
Rotating Ring Inner Diameter
2.0885
0.0031
2.0878
Table 12. Fits and Clearances (all dimensions are in millimeters) NEW PART
WORN PART
DIMENSIONS
DIMENSIONS
PART IDENT
Size
Clearance
Non-select
REJECT IF
MORE THAN
LOCATION 4012
IDG Gear Drive Generator Drive Gear And Housing Assembly (72-60-28, 01-410)
Journal Of The Rotating Ring Generator Drive Gear And Housing Assembly (72-60-28, 01-350)
IDG Gear Drive Journal Of The Rotating Ring
53.000
52.970
0.030
Rotating Ring Inner Diameter
53.050
0.080
53.030
SUBTASK 72-60-10-220-056 Make Sure the Fits and Clearances of the IDG Gear Drive are in the Limits given at Location 4012
Refer to Figure.
Calculate the interference at Location 4014. Use the data made as a note in TASK 72-60-21-200-002 and TASK 72-60-28-200-002.
Table 13. Fits and Clearances (all dimensions are in inches) NEW PART
WORN PART
DIMENSIONS
DIMENSIONS
PART IDENT
Size
Clearance
Non-select
REJECT IF
MORE THAN
LOCATION 4014
Gearbox Casing Main Gearbox Casing And Fittings (72-60-21, 02-050)
Smaller Location For The IDG Housing Generator Drive Gear And Housing Assembly (72-60-28, 01-450)
Gearbox Casing Location Bore For The Housing
7.0094
7.0078
0.0035
Housing Outer Diameter
7.0074
0.0004
7.0059
Table 14. Fits and Clearances (all dimensions are in millimeters) NEW PART
WORN PART
DIMENSIONS
DIMENSIONS
PART IDENT
Size
Clearance
Non-select
REJECT IF
MORE THAN
LOCATION 4014
Gearbox Casing Main Gearbox Casing And Fittings (72-60-21, 02-050)
Smaller Location For The IDG Housing Generator Drive Gear And Housing Assembly (72-60-28, 01-450)
Gearbox Casing Location Bore For The Housing
178.040
178.000
0.090
Housing Outer Diameter
177.990
0.010
177.950
SUBTASK 72-60-10-220-057 Make Sure the Fits and Clearances of the Gearbox Casing are in the Limits given at Location 4014
Refer to Figure.
Calculate the interference at Location 4015. Use the data made as a note in TASK 72-60-21-200-002 and TASK 72-60-28-200-002.
Table 15. Fits and Clearances (all dimensions are in inches) NEW PART
WORN PART
DIMENSIONS
DIMENSIONS
PART IDENT
Size
Clearance
Non-select
REJECT IF
MORE THAN
LOCATION 4015
Gearbox Casing Main Gearbox Casing And Fittings (72-60-21, 02-050)
Larger Location For The IDG Housing Generator Drive Gear And Housing Assembly (72-60-28, 01-450)
Gearbox Casing Location Bore For The Housing
7.0925
7.0886
0.0098
Housing Outer Diameter
7.0866
0.0020
7.0827
Table 16. Fits and Clearances (all dimensions are in millimeters) NEW PART
WORN PART
DIMENSIONS
DIMENSIONS
PART IDENT
Size
Clearance
Non-select
REJECT IF
MORE THAN
LOCATION 4015
Gearbox Casing Main Gearbox Casing And Fittings (72-60-21, 02-050)
Larger Location For The IDG Housing Generator Drive Gear And Housing Assembly (72-60-28, 01-450)
Gearbox Casing Location Bore For The Housing
180.150
180.050
0.250
Housing Outer Diameter
180.000
0.050
179.900
SUBTASK 72-60-10-220-058 Make Sure the Fits and Clearances of the Gearbox Casing are in the Limits given at Location 4015
Refer to Figure.
Calculate the interference at Location 4018. Use the data made as a note in TASK 72-60-21-200-002.
Table 17. Fits and Clearances (all dimensions are in inches) NEW PART
WORN PART
DIMENSIONS
DIMENSIONS
PART IDENT
Size
Clearance
Non-select
REJECT IF
MORE THAN
LOCATION 4018
Gearbox Casing Main Gearbox Casing And Fittings (72-60-21, 02-050)
Location For The Roller Bearing Starter Drive Gear And Housing Assembly (72-60-22, 01-500) Of The Starter Gear Drive
Gearbox Casing Location Bore For The Roller Bearing
2.9529
Clear
2.9521
0.0005
Roller Bearing Outer Diameter
2.9527
Intf
2.9524
0.0006
Table 18. Fits and Clearances (all dimensions are in millimeters) NEW PART
WORN PART
DIMENSIONS
DIMENSIONS
PART IDENT
Size
Clearance
Non-select
REJECT IF
MORE THAN
LOCATION 4018
Gearbox Casing Main Gearbox Casing And Fittings (72-60-21, 02-050)
Location For The Roller Bearing Starter Drive Gear And Housing Assembly (72-60-22, 01-500) Of The Starter Gear Drive
Gearbox Casing Location Bore For The Roller Bearing
75.004
Clear
74.985
0.013
Roller Bearing Outer Diameter
75.000
Intf
74.991
0.015
SUBTASK 72-60-10-220-059 Make Sure the Fits and Clearances of the Gearbox Casing are in the Limits given at Location 4018
Refer to Figure.
Calculate the interference at Location 4020. Use the data made as a note in TASK 72-60-22-200-003 and TASK 72-60-22-200-001.
Table 19. Fits and Clearances (all dimensions are in inches) NEW PART
WORN PART
DIMENSIONS
DIMENSIONS
PART IDENT
Size
Clearance
Non-select
REJECT IF
MORE THAN
LOCATION 4020
Starter Gear Drive Starter Drive Gear And Housing Assembly (72-60-22, 01-260)
Journal Of The Rotating Ring Starter Drive Gear And Housing Assembly (72-60-22, 01-200)
Starter Gear Drive Journal Of The Rotating Ring
1.6535
1.6525
0.0012
Rotating Ring Inner Diameter
1.6555
0.0030
1.6547
Table 20. Fits and Clearances (all dimensions are in millimeters) NEW PART
WORN PART
DIMENSIONS
DIMENSIONS
PART IDENT
Size
Clearance
Non-select
REJECT IF
MORE THAN
LOCATION 4020
Starter Gear Drive Starter Drive Gear And Housing Assembly (72-60-22, 01-260)
Journal Of The Rotating Ring Starter Drive Gear And Housing Assembly (72-60-22, 01-200)
Starter Gear Drive Journal Of The Rotating Ring
42.000
41.975
0.030
Rotating Ring Inner Diameter
42.050
0.075
42.030
SUBTASK 72-60-10-220-060 Make Sure the Fits and Clearance of the Starter Gear Drive are in the Limits given at Location 4020
Refer to Figure.
Calculate the interference at Location 4022. Use the data made as a note in TASK 72-60-21-200-002 and TASK 72-60-22-200-002.
Table 21. Fits and Clearances (all dimensions are in inches) NEW PART
WORN PART
DIMENSIONS
DIMENSIONS
PART IDENT
Size
Clearance
Non-select
REJECT IF
MORE THAN
LOCATION 4022
Gearbox Casing Main Gearbox Casing And Fittings (72-60-21, 02-050)
Location For The Starter Drive Housing Starter Drive Gear And Housing Assembly (72-60-22, 01-300)
Gearbox Casing Location Bore For The Housing
7.4033
7.4015
0.0036
Housing Outer Diameter
7.4015
0.0000
7.3997
Table 22. Fits and Clearances (all dimensions are in millimeters) NEW PART
WORN PART
DIMENSIONS
DIMENSIONS
PART IDENT
Size
Clearance
Non-select
REJECT IF
MORE THAN
LOCATION 4022
Gearbox Casing Main Gearbox Casing And Fittings (72-60-21, 02-050)
Location For The Starter Drive Housing Starter Drive Gear And Housing Assembly (72-60-22, 01-300)
Gearbox Casing Location Bore For The Housing
188.046
188.000
0.092
Housing Outer Diameter
188.000
0.000
187.954
SUBTASK 72-60-10-220-061 Make Sure the Fits and Clearances of the Gearbox Casing are in the Limits given in Location 4022
Refer to Figure.
Calculate the interference at Location 4023. Use the data made as a note in TASK 72-60-32-200-001.
Table 23. Fits and Clearances (all dimensions are in inches) NEW PART
WORN PART
DIMENSIONS
DIMENSIONS
PART IDENT
Size
Clearance
Non-select
REJECT IF
MORE THAN
LOCATION 4023
Angle Gearbox Support ENGINE-ANGLE GEARBOX SUPPORT (72-60-32, 01-300)
Location For The Roller Bearing Starter Idler Gear And Bearing Assembly (72-60-27, 01-100) Of The Starter Idler Gear
Angle Gearbox Support Location Bore Of The Roller Bearing
3.0316
Clear
3.0309
0.0005
Roller Bearing Outer Diameter
3.0315
Intf
3.0311
0.0006
Table 24. Fits and Clearances (all dimensions are in millimeters) NEW PART
WORN PART
DIMENSIONS
DIMENSIONS
PART IDENT
Size
Clearance
Non-select
REJECT IF
MORE THAN
LOCATION 4023
Angle gearbox support ENGINE-ANGLE GEARBOX SUPPORT (72-60-32, 01-300)
Location For The Roller Bearing Starter Idler Gear And Bearing Assembly (72-60-27, 01-100) Of The Starter Idler Gear
Angle Gearbox Support Location Bore Of The Roller Bearing
77.004
Clear
76.985
0.013
Roller Bearing Outer Diameter
77.000
Intf
76.991
0.150
SUBTASK 72-60-10-220-062 Make Sure the Fits and Clearance of the Angle Gearbox Support are in the Limits given at Location 4023
Refer to Figure.
Calculate the interference at Location 4025. Use the data made as a note in TASK 72-60-21-200-002.
Table 25. Fits and Clearances (all dimensions are in inches) NEW PART
WORN PART
DIMENSIONS
DIMENSIONS
PART IDENT
Size
Clearance
Non-select
REJECT IF
MORE THAN
LOCATION 4025
Gearbox Casing Main Gearbox Casing And Fittings (72-60-21, 02-050)
Location For The Roller Bearing Starter Idler Gear And Bearing Assembly (72-60-27, 01-220) Of The Starter Idler Gear
Gearbox Casing Location Bore Of The Roller Bearing
3.0316
Clear
3.0309
0.0005
Roller Bearing Outer Diameter
2.0315
Intf
3.0311
0.0006
Table 26. Fits and Clearances (all dimensions are in millimeters) NEW PART
WORN PART
DIMENSIONS
DIMENSIONS
PART IDENT
Size
Clearance
Non-select
REJECT IF
MORE THAN
LOCATION 4025
Gearbox Casing Main Gearbox Casing And Fittings (72-60-21, 02-050)
Location For The Roller Bearing Starter Idler Gear And Bearing Assembly (72-60-27, 01-220) Of The Starter Idler Gear
Gearbox Casing Location Bore Of The Roller Bearing
77.004
Clear
76.985
0.013
Roller Bearing Outer Diameter
77.000
Intf
76.991
0.015
SUBTASK 72-60-10-220-063 Make Sure the Fits and Clearances of the Gearbox Casing are in the Limits given at Location 4025
Refer to Figure.
Calculate the interference at Location 4027. Use the data made as a note in TASK 72-60-21-200-002 and TASK 72-60-32-200-001.
Table 27. Fits and Clearances (all dimensions are in inches) NEW PART
WORN PART
DIMENSIONS
DIMENSIONS
PART IDENT
Size
Clearance
Non-select
REJECT IF
MORE THAN
LOCATION 4027
Gearbox Casing Main Gearbox Casing And Fittings (72-60-21, 02-050)
Pilot Starter Idler Gear Of The Angle Gearbox Support ENGINE-ANGLE GEARBOX SUPPORT (72-60-32, 01-300)
Gearbox Casing Location Bore
6,8562
6.8524
0.0117
Pilot Starter Idler Gear Outer Diameter
6.8445
6.8465
0.0059
Table 28. Fits and Clearances (all dimensions are in millimeters) NEW PART
WORN PART
DIMENSIONS
DIMENSIONS
PART IDENT
Size
Clearance
Non-select
REJECT IF
MORE THAN
LOCATION 4027
Gearbox Casing Main Gearbox Casing And Fittings (72-60-21, 02-050)
Pilot Starter Idler Gear Of The Angle Gearbox Support ENGINE-ANGLE GEARBOX SUPPORT (72-60-32, 01-300)
Gearbox Casing Location Bore
174.150
174.050
0.300
Pilot Starter Idler Gear Outer Diameter
173.850
173.900
0.150
SUBTASK 72-60-10-220-064 Make Sure the Fits and Clearances of the Gearbox Casing are in the Limits given at Location 4027
Refer to Figure.
Calculate the interference at Location 4030. Use the data made as a note in TASK 72-60-21-200-002.
Table 29. Fits and Clearances (all dimensions are in inches) NEW PART
WORN PART
DIMENSIONS
DIMENSIONS
PART IDENT
Size
Clearance
Non-select
REJECT IF
MORE THAN
LOCATION 4030
Gearbox Casing Main Gearbox Casing And Fittings (72-60-21, 02-050)
Location For The Roller Bearing Extension Layshaft Gear And Bearing Assembly (72-60-24, 01-280) Of The Layshaft Extension Gear
Gearbox Casing Location Bore Of The Roller Bearing
3.5434
Clear
3.5426
0.0004
Roller Bearing Outer Diameter
3.5433
Intf
3.5430
0.0007
Table 30. Fits and Clearances (all dimensions are in millimeters) NEW PART
WORN PART
DIMENSIONS
DIMENSIONS
PART IDENT
Size
Clearance
Non-select
REJECT IF
MORE THAN
LOCATION 4030
Gearbox casing Main Gearbox Casing And Fittings (72-60-21, 02-050)
Location For The Roller Bearing Extension Layshaft Gear And Bearing Assembly (72-60-24, 01-280) Of The Layshaft Extension Gear
Gearbox Casing Location Bore Of The Roller Bearing
90.004
Clear
89.982
0.012
Roller Bearing Outer Diameter
90.000
Intf
89.992
0.018
SUBTASK 72-60-10-220-065 Make Sure the Fits and Clearances of the Gearbox Casing are in the Limits given at Location 4030
Refer to Figure.
Calculate the interference at Location 4032. Use the data made as a note in TASK 72-60-21-200-002 and TASK 72-60-32-200-001.
Table 31. Fits and Clearances (all dimensions are in inches) NEW PART
WORN PART
DIMENSIONS
DIMENSIONS
PART IDENT
Size
Clearance
Non-select
REJECT IF
MORE THAN
LOCATION 4032
Gearbox Casing Main Gearbox Casing And Fittings (72-60-21, 02-050)
Pilot Layshaft Extension Gear Of The Angle Gearbox Support ENGINE-ANGLE GEARBOX SUPPORT (72-60-32, 01-300)
Gearbox Casing Location Bore
3.3129
3.3091
0.0117
Pilot Layshaft Extension Gear Outer Diameter
3.3012
0.0059
3.3032
Table 32. Fits and Clearances (all dimensions are in millimeters) NEW PART
WORN PART
DIMENSIONS
DIMENSIONS
PART IDENT
Size
Clearance
Non-select
REJECT IF
MORE THAN
LOCATION 4032
Gearbox Casing Main Gearbox Casing And Fittings (72-60-21, 02-050)
Pilot Layshaft Extension Gear Of The Angle Gearbox Support ENGINE-ANGLE GEARBOX SUPPORT (72-60-32, 01-300)
Gearbox Casing Location Bore
84.150
84.050
0.300
Pilot Layshaft Extension Gear Outer Diameter
83.850
0.150
83.900
SUBTASK 72-60-10-220-066 Make Sure the Fits and Clearances of the Gearbox Casing are in the Limits given at Location 4032
Refer to Figure.
Calculate the interference at Location 4033. Use the data made as a note in TASK 72-60-21-200-002 and TASK 72-60-24-200-001.
Table 33. Fits and Clearances (all dimensions are in inches) NEW PART
WORN PART
DIMENSIONS
DIMENSIONS
PART IDENT
Size
Clearance
Non-select
REJECT IF
MORE THAN
LOCATION 4033
Gearbox Casing Main Gearbox Casing And Fittings (72-60-21, 02-050)
Location For The PMA Drive Housing Extension Layshaft Gear And Bearing Assembly (72-60-24, 01-180)
Gearbox Casing Location Bore Of The PMA Drive Housing
4.3320
4.3307
0.0027
PMA Drive Housing Outer Diameter
4.3307
0.0000
4.3293
Table 34. Fits and Clearances (all dimensions are in millimeters) NEW PART
WORN PART
DIMENSIONS
DIMENSIONS
PART IDENT
Size
Clearance
Non-select
REJECT IF
MORE THAN
LOCATION 4033
Gearbox Casing Main Gearbox Casing And Fittings (72-60-21, 02-050)
Location For The PMA Drive Housing Extension Layshaft Gear And Bearing Assembly (72-60-24, 01-180)
Gearbox Casing Location Bore Of The PMA Drive Housing
110.035
110.000
0.070
PMA Drive Housing Outer Diameter
110.000
0.000
109.965
SUBTASK 72-60-10-220-067 Make Sure the Fits and Clearances of the Gearbox Casing are in the Limits given at Location 4033
Refer to Figure.
Calculate the interference at Location 4034. Use the data made as a note in TASK 72-60-32-200-001.
Table 35. Fits and Clearances (all dimensions are in inches) NEW PART
WORN PART
DIMENSIONS
DIMENSIONS
PART IDENT
Size
Clearance
Non-select
REJECT IF
MORE THAN
LOCATION 4034
Angle Gearbox Support ENGINE-ANGLE GEARBOX SUPPORT (72-60-32, 01-300)
Location For The Roller Bearing Oil Scavenge Pump Drive Gear And Bearing Assembly (72-60-26, 01-100) Of The Oil Scavenge Pump Gear Drive
Angle Gearbox Support Location Bore Of The Roller Bearing
2.7560
Clear
2.7553
0.0005
Roller Bearing Outer Diameter
2.7559
Intf
2.7555
0.0006
Table 36. Fits and Clearances (all dimensions are in millimeters) NEW PART
WORN PART
DIMENSIONS
DIMENSIONS
PART IDENT
Size
Clearance
Non-select
REJECT IF
MORE THAN
LOCATION 4034
Angle gearbox support ENGINE-ANGLE GEARBOX SUPPORT (72-60-32, 01-300)
Location For The Roller Bearing Oil Scavenge Pump Drive Gear And Bearing Assembly (72-60-26, 01-100) Of The Oil Scavenge Pump Gear Drive
Angle Gearbox Support Location Bore Of The Roller Bearing
70.004
Clear
69.985
0.013
Roller Bearing Outer Diameter
70.000
Intf
69.991
0.015
SUBTASK 72-60-10-220-068 Make Sure the Fits and Clearances of the Angle Gearbox Support are in the Limits given at Location 4034
Refer to Figure.
Calculate the interference at Location 4036. Use the data made as a note in TASK 72-60-21-200-002.
Table 37. Fits and Clearances (all dimensions are in inches) NEW PART
WORN PART
DIMENSIONS
DIMENSIONS
PART IDENT
Size
Clearance
Non-select
REJECT IF
MORE THAN
LOCATION 4036
Gearbox Casing Main Gearbox Casing And Fittings (72-60-21, 02-050)
Location For The Roller Bearing Oil Scavenge Pump Drive Gear And Bearing Assembly (72-60-26, 01-180) Of The Oil Scavenge Pump Gear Drive
Gearbox Casing Location Of The Roller Bearing
2.9529
Clear
2.9521
0.0008
Roller Bearing Outer Diameter
2.9527
Intf
2.9521
0.0006
Table 38. Fits and Clearances (all dimensions are in millimeters) DIMENSIONS
DIMENSIONS
PART IDENT
Size
Clearance
Non-select
REJECT IF
MORE THAN
LOCATION 4036
Gearbox Casing Main Gearbox Casing And Fittings (72-60-21, 02-050)
Location For The Roller Bearing Oil Scavenge Pump Drive Gear And Bearing Assembly (72-60-26, 01-180) Of The Oil Scavenge Pump Gear Drive
Gearbox Casing Location Bore Of The Roller Bearing
75.004
Clear
74.985
0.019
Roller Bearing Outer Diameter
75.000
Intf
74.985
0.015
SUBTASK 72-60-10-220-069 Make Sure the Fits and Clearances of the Gearbox Casing are in the Limits given at Location 4036
Refer to Figure.
Calculate the interference at Location 4038. Use the data made as a note in TASK 72-60-21-200-002 and TASK 72-60-32-200-001.
Table 39. Fits and Clearances (all dimensions are in inches) NEW PART
WORN PART
DIMENSIONS
DIMENSIONS
PART IDENT
Size
Clearance
Non-select
REJECT IF
MORE THAN
LOCATION 4038
Gearbox Casing Main Gearbox Casing And Fittings (72-60-21, 02-050)
Location For The Pilot Of The Angle Gearbox Support ENGINE-ANGLE GEARBOX SUPPORT (72-60-32, 01-300)
Gearbox Casing Location Bore
6.8562
6.8524
0.0117
Pilot Oil Scavenge Pump Gear Drive Outer Diameter
6.8445
6.8465
0.0059
Table 40. Fits and Clearances (all dimensions are in millimeters) NEW PART
WORN PART
DIMENSIONS
DIMENSIONS
PART IDENT
Size
Clearance
Non-select
REJECT IF
MORE THAN
LOCATION 4038
Gearbox Casing Main Gearbox Casing And Fittings (72-60-21, 02-050)
Location For The Pilot Of The Angle Gearbox Support ENGINE-ANGLE GEARBOX SUPPORT (72-60-32, 01-300)
Gearbox Casing Location Bore
174.150
174.050
0.300
Pilot Oil Scavenge Pump Gear Drive Outer Diameter
173.850
173.900
0.150
SUBTASK 72-60-10-220-070 Make Sure the Fits and Clearances of the Gearbox Casing are in the Limits given at Location 4038
Refer to Figure.
Calculate the interference at Location 4041. Use the data made as a note in TASK 72-60-21-200-002.
Table 41. Fits and Clearances (all dimensions are in inches) NEW PART
WORN PART
DIMENSIONS
DIMENSIONS
PART IDENT
Size
Clearance
Non-select
REJECT IF
MORE THAN
LOCATION 4041
Gearbox Casing Main Gearbox Casing And Fittings (72-60-21, 02-050)
Location For The Roller Bearing Hydraulic Pump Drive Gear And Housing Assembly (72-60-23, 01-640) Of The Hydraulic Pump Gear Drive
Gearbox Casing Location Bore Of The Roller Bearing
2.7560
Clear
2.7553
0.0005
Roller Bearing Outer Diameter
2.7559
Intf
2.7555
0.0006
Table 42. Fits and Clearances (all dimensions are in millimeters) NEW PART
WORN PART
DIMENSIONS
DIMENSIONS
PART IDENT
Size
Clearance
Non-select
REJECT IF
MORE THAN
LOCATION 4041
Gearbox Casing Main Gearbox Casing And Fittings (72-60-21, 02-050)
Location For The Roller Bearing Hydraulic Pump Drive Gear And Housing Assembly (72-60-23, 01-640) Of The Hydraulic Pump Gear Drive
Gearbox Casing Location Bore Of The Roller Bearing
70.004
Clear
69.985
0.013
Roller Bearing Outer Diameter
70.000
Intf
69.991
0.015
SUBTASK 72-60-10-220-071 Make Sure the Fits and Clearances of the Gearbox Casing are in the Limits given at Location 4041
Refer to Figure.
Calculate the interference at Location 4043. Use the data made as a note in TASK 72-60-23-200-002.
Table 43. Fits and Clearances (all dimensions are in inches) NEW PART
WORN PART
DIMENSIONS
DIMENSIONS
PART IDENT
Size
Clearance
Non-select
REJECT IF
MORE THAN
LOCATION 4043
Hydraulic Pump Gear Drive Hydraulic Pump Drive Gear And Housing Assembly (72-60-23, 01-440)
Journal Of The Rotating Ring Hydraulic Pump Drive Gear And Housing Assembly (72-60-23, 01-360)
Hydraulic Pump Gear Drive Journal Of The Rotating Ring
1.6535
1.6525
0.0012
Rotating Ring Inner Diameter
1.6555
0.0030
1.6547
Table 44. Fits and Clearances (all dimensions are in millimeters) NEW PART
WORN PART
DIMENSIONS
DIMENSIONS
PART IDENT
Size
Clearance
Non-select
REJECT IF
MORE THAN
LOCATION 4043
Hydraulic Pump Gear Drive Hydraulic Pump Drive Gear And Housing Assembly (72-60-23, 01-440)
Journal Of The Rotating Ring Hydraulic Pump Drive Gear And Housing Assembly (72-60-23, 01-360)
Hydraulic Pump Gear Drive Journal Of The Rotating Ring
42.000
41.975
0.030
Rotating Ring Inner Diameter
42.050
0.075
42.030
SUBTASK 72-60-10-220-072 Make Sure the Fits and Clearance of the Hydraulic Pump Gear Drive are in the Limits given at Location 4043
Refer to Figure.
Calculate the interference at Location 4045. Use the data made as a note in TASK 72-60-21-200-002 and TASK 72-60-23-200-001.
Table 45. Fits and Clearances (all dimensions are in inches) NEW PART
WORN PART
DIMENSIONS
DIMENSIONS
PART IDENT
Size
Clearance
Non-select
REJECT IF
MORE THAN
LOCATION 4045
Gearbox Casing Main Gearbox Casing And Fittings (72-60-21, 02-050)
Location For The Hydraulic Pump Housing Hydraulic Pump Drive Gear And Housing Assembly (72-60-23, 01-460)
Gearbox Casing Location Bore Of The Housing
6.9700
6.9685
0.0031
Housing Outer Diameter
6.9685
0.0000
6.9669
Table 46. Fits and Clearances (all dimensions are in millimeters) NEW PART
WORN PART
DIMENSIONS
DIMENSIONS
PART IDENT
Size
Clearance
Non-select
REJECT IF
MORE THAN
LOCATION 4045
Gearbox Casing Main Gearbox Casing And Fittings (72-60-21, 02-050)
Location For The Hydraulic Pump Housing Hydraulic Pump Drive Gear And Housing Assembly (72-60-23, 01-460)
Gearbox Casing Location Bore Of The Housing
177.040
177.000
0.080
Housing Outer Diameter
177.000
0.000
176.960
SUBTASK 72-60-10-220-073 Make Sure the Fits and Clearances of the Gearbox Casing are in the Limits given at Location 4045
Refer to Figure.
Calculate the interference at Location 4049. Use the data made as a note in TASK 72-60-10-200-002.
Table 47. Fits and Clearances (all dimensions are in inches) NEW PART
WORN PART
DIMENSIONS
DIMENSIONS
PART IDENT
Size
Clearance
Non-select
REJECT IF
MORE THAN
LOCATION 4049
Gearbox Casing Main Gearbox Casing And Fittings (72-60-21, 02-050)
Location For The Roller Bearing Fuel Pump Drive Gear And Housing Assembly (72-60-25, 01-290) Of The Fuel Pump Gear Drive
Gearbox Casing Location Bore Of The Roller Bearing
2.9529
Clear
2.9521
0.0007
Roller Bearing Outer Diameter
2.9527
Intf
2.9521
0.0006
Table 48. Fits and Clearances (all dimensions are in millimeters) NEW PART
WORN PART
DIMENSIONS
DIMENSIONS
PART IDENT
Size
Clearance
Non-select
REJECT IF
MORE THAN
LOCATION 4049
Gearbox Casing Main Gearbox Casing And Fittings (72-60-21, 02-050)
Location For The Roller Bearing Fuel Pump Drive Gear And Housing Assembly (72-60-25, 01-290) Of The Fuel Pump Gear Drive
Gearbox Casing Location Bore Of The Roller Bearing
75.004
Clear
74.985
0.019
Roller Bearing Outer Diameter
75.000
Intf
74.985
0.015
SUBTASK 72-60-10-220-074 Make Sure the Fits and Clearances of the Gearbox Casing are in the Limits given at Location 4049
Refer to Figure.
Calculate the interference at Location 4051. Use the data made as a note in TASK 72-60-25-200-002.
Table 49. Fits and Clearances (all dimensions are in inches) NEW PART
WORN PART
DIMENSIONS
DIMENSIONS
PART IDENT
Size
Clearance
Non-select
REJECT IF
MORE THAN
LOCATION 4051
Fuel Pump Gear Drive Extension Layshaft Gear And Bearing Assembly (72-60-24, 01-200)
Journal Of The Rotating Ring Fuel Pump Drive Gear And Housing Assembly (72-60-25, 01-170)
Fuel Pump Gear Drive Journal Of The Rotating Ring
1.6535
1.6525
0.0012
Rotating Ring Inner Diameter
1.6555
0.0030
1.6547
Table 50. Fits and Clearances (all dimensions are in millimeters) NEW PART
WORN PART
DIMENSIONS
DIMENSIONS
PART IDENT
Size
Clearance
Non-select
REJECT IF
MORE THAN
LOCATION 4051
Fuel Pump Gear Drive Extension Layshaft Gear And Bearing Assembly (72-60-24, 01-200)
Journal Of The Rotating Ring Fuel Pump Drive Gear And Housing Assembly (72-60-25, 01-170)
Fuel Pump Gear Drive Journal Of The Rotating Ring
42.000
41.975
0.030
Rotating Ring Inner Diameter
42.050
0.075
42.030
SUBTASK 72-60-10-220-075 Make Sure the Fits and Clearances of the Fuel Pump Gear Drive are in the Limits given at Location 4051
Refer to Figure.
Calculate the interference at Location 4053. Use the data made as a note in TASK 72-60-21-200-002 and TASK 72-60-25-200-001.
Table 51. Fits and Clearances (all dimensions are in inches) NEW PART
WORN PART
DIMENSIONS
DIMENSIONS
PART IDENT
Size
Clearance
Non-select
REJECT IF
MORE THAN
LOCATION 4053
Gearbox Casing Main Gearbox Casing And Fittings (72-60-21, 02-050)
Smaller Location For The Fuel Pump Drive Housing Fuel Pump Drive Gear And Housing Assembly (72-60-25, 01-210)
Gearbox Casing Location Bore For The Housing
5.0409
5.0393
0.0031
Housing Outer Diameter
5.0389
0.0004
5.0378
Table 52. Fits and Clearances (all dimensions are in millimeters) NEW PART
WORN PART
DIMENSIONS
DIMENSIONS
PART IDENT
Size
Clearance
Non-select
REJECT IF
MORE THAN
LOCATION 4053
Gearbox Casing Main Gearbox Casing And Fittings (72-60-21, 02-050)
Smaller Location For The Fuel Pump Drive Housing Fuel Pump Drive Gear And Housing Assembly (72-60-25, 01-210)
Gearbox Casing Location Bore For The Housing
128.040
128.000
0.080
Housing Outer Diameter
127.990
0.010
127.960
SUBTASK 72-60-10-220-076 Make Sure the Fits and Clearances of the Gearbox Casing are in the Limits given at Location 4053
Refer to Figure.
Calculate the interference at Location 4054. Use the data made as a note in TASK 72-60-21-200-002 and TASK 72-60-24-200-001.
Table 53. Fits and Clearances (all dimensions are in inches) NEW PART
WORN PART
DIMENSIONS
DIMENSIONS
PART IDENT
Size
Clearance
Non-select
REJECT IF
MORE THAN
LOCATION 4054
Gearbox Casing Main Gearbox Casing And Fittings (72-60-21, 02-050)
Larger Location For The Fuel Pump Drive Housing Extension Layshaft Gear And Bearing Assembly (72-60-24, 01-210)
Gearbox Casing Location Bore For The Housing
5.1240
5.1201
0.0098
Housing Outer Diameter
5.1181
0.0020
5.1142
Table 54. Fits and Clearances (all dimensions are in millimeters) NEW PART
WORN PART
DIMENSIONS
DIMENSIONS
PART IDENT
Size
Clearance
Non-select
REJECT IF
MORE THAN
LOCATION 4054
Gearbox Casing Main Gearbox Casing And Fittings (72-60-21, 02-050)
Larger Location For The Fuel Pump Drive Housing Extension Layshaft Gear And Bearing Assembly (72-60-24, 01-210)
Gearbox Casing Location Bore For The Housing
130.150
130.050
0.250
Housing Outer Diameter
130.000
0.050
129.900
SUBTASK 72-60-10-220-077 Make Sure the Fits and Clearances of the Gearbox Casing are in the Limits given at Location 4054
Refer to Figure.
Calculate the interference at Location 4055. Use the data made as a note in TASK 72-60-32-200-001 and TASK 72-60-21-200-002.
Table 55. Fits and Clearances (all dimensions are in inches) NEW PART
WORN PART
DIMENSIONS
DIMENSIONS
PART IDENT
Size
Clearance
Non-select
REJECT IF
MORE THAN
LOCATION 4055
Angle Gearbox Support ENGINE-ANGLE GEARBOX SUPPORT (72-60-32, 01-300)
Locations For The Pins ENGINE-MAIN GEARBOX CASE AND FITTINGS (72-60-21, 01-360) (2 Off) On The Angle Gearbox Casing
Angle Gearbox Support Location Bore For The Pin
0.3141
0.3128
0.0019
Pin Outer Diameter
0.3127
0.0001
0.3122
Table 56. Fits and Clearances (all dimensions are in millimeters) NEW PART
WORN PART
DIMENSIONS
DIMENSIONS
PART IDENT
Size
Clearance
Non-select
REJECT IF
MORE THAN
LOCATION 4055
Angle Gearbox Support ENGINE-ANGLE GEARBOX SUPPORT (72-60-32, 01-300)
Locations For The Pins ENGINE-MAIN GEARBOX CASE AND FITTINGS (72-60-21, 01-360) (2 Off) On The Angle Gearbox Casing
Angle Gearbox Support Location Bore For The Pin
7.980
7.945
0.050
Pin Outer Diameter
7.943
0.002
7.930
SUBTASK 72-60-10-220-078 Make Sure the Fits and Clearances of the Angle Gearbox Support are in the Limits given at Location 4055
Refer to Figure.
Calculate the interference at Location 4062. Use the data made as a note in TASK 72-60-24-200-001 and TASK 72-60-33-200-003.
Table 57. Fits and Clearances (all dimensions are in inches) NEW PART
WORN PART
DIMENSIONS
DIMENSIONS
PART IDENT
Size
Clearance
Non-select
REJECT IF
MORE THAN
LOCATION 4062
PMA Drive Housing Extension Layshaft Gear And Bearing Assembly (72-60-24, 01-180)
Location For The PMA Support PMA Shaft, Rotor, and Housing Assembly (72-60-33, 01-420)
PMA Drive Housing Location Bore For The PMA Support
3.1890
3.1876
0.0000
PMA Support Outer Diameter
3.1904
0.0028
3.1890
Table 58. Fits and Clearances (all dimensions are in millimeters) NEW PART
WORN PART
DIMENSIONS
DIMENSIONS
PART IDENT
Size
Clearance
Non-select
REJECT IF
MORE THAN
LOCATION 4062
PMA Drive Housing Extension Layshaft Gear And Bearing Assembly (72-60-24, 01-180)
Location For The PMA Support PMA Shaft, Rotor, and Housing Assembly (72-60-33, 01-420)
PMA Drive Housing Location Bore For The PMA Support
81.000
80.965
0.000
PMA Support Outer Diameter
81.035
0.070
81.000
SUBTASK 72-60-10-220-079 Make Sure the Fits and Clearances of the PMA Drive Housing are in the Limits given at Location 4062
Refer to Figure.
Install Main Gearbox Assembly(72-60-10, 01-211) and Main Gearbox Assembly (72-60-10, 01-214) packing 1 off each in to the grooves of the oil nozzle.
Install the oil nozzle of the fuel pump drive gear.
Install Main Gearbox Assembly (72-60-10, 01-295) and Main Gearbox Assembly (72-60-10, 01-300) packing 1 off each in to the grooves of the oil nozzle.
Install the oil nozzle of the hydraulic pump drive gear and the oil scavenge pump drive gear.
Install Main Gearbox Assembly (72-60-10, 01-251) and Main Gearbox Assembly (72-60-10, 01-254) packing 1 off each in to the grooves of the oil nozzle.
Install the oil nozzle of the extension layshaft gear.
SUBTASK 72-60-10-440-051 Install the Oil Nozzles on the Front Right-hand Side of the Main Gearbox
Refer to Figure.
Install Main Gearbox Assembly (72-60-10, 01-121) and Main Gearbox Assembly (72-60-10, 01-124) packing 1 off each in to the grooves of the oil nozzle.
Install the oil nozzle of the IDG gear drive.
Install Main Gearbox Assembly (72-60-10, 01-401) and Main Gearbox Assembly (72-60-10, 01-404) packing 1 off each in to the grooves of the oil nozzle.
Install the oil nozzle of the spline of the starter drive gear and the IDG drive gear.
Install Main Gearbox Assembly (72-60-10, 01-171) and Main Gearbox Assembly (72-60-10, 01-174) packing 1 off each in to the grooves of the oil nozzle.
Install the oil nozzle of the extension layshaft gear.
SUBTASK 72-60-10-440-052 Install the Oil Nozzles on the Front Left-hand Side of the Main Gearbox
Refer to Figure.
Install Main Gearbox Assembly (72-60-10, 01-321) and Main Gearbox Assembly (72-60-10, 01-324) packing 1 off each in to the grooves of the oil nozzle.
Install the oil nozzle of the gear drives of the fuel pump and the hydraulic pump.
Install Main Gearbox Assembly (72-60-10, 01-361) and Main Gearbox Assembly (72-60-10, 01-364) packing 1 off each in to the grooves of the oil nozzle.
Install the oil nozzle of the starter idler gear.
SUBTASK 72-60-10-440-053 Install the Oil Nozzle on the Rear Side of the Main Gearbox
Refer to Figure.
Install the outer race of the front roller bearing in to the seat in the internal of the gearbox casing. Align the holes on the outer race flange with the studs on the gearbox casing. Use IAE 1F10157 IAE 1F10157 Drift drift.
SUBTASK 72-60-10-440-054 Install the Oil Scavenge Pump Drive Gear
Refer to Figure.
Install the outer race of the front roller bearing in to the seat in the internal of the gearbox casing. Align the holes on the outer race flange with the studs on the gearbox casing. Use IAE 1F10157 IAE 1F10157 Drift drift to easy the installation.
Install Main Gearbox Assembly (72-60-10, 01-790) packings 2 off in to the grooves on the housing.
Push the housing and the drive gear in position. Use IAE 1F10223 Drift drift.
Install the fuel pump drive gear with the housing.
SUBTASK 72-60-10-440-055 Install the Fuel Pump Drive Gear
Refer to Figure.
Install Main Gearbox Assembly (72-60-10, 01-745) packing off in to the groove of the oil duct sleeve.
Install Main Gearbox Assembly (72-60-10, 01-740) packing off in to the groove of the housing.
Align the housing holes with the studs and the oil duct sleeve with the seat on the gearbox casing flange. Align the outer race with the rear roller bearing. Put the housing over the hydraulic pump gear drive and install in the pad on the gearbox casing. Use IAE 1F10225 Drift drift.
Install the hydraulic pump housing on the gearbox casing.
SUBTASK 72-60-10-440-056 Install the Hydraulic Pump Drive Gear (Pre SBE 72-0264)
Refer to Figure.
Align the holes on the shroud Hydraulic Pump Drive Gear And Housing Assembly (72-60-23, 01-620) with the studs that attach the bearing outer race to the gearbox casing.
Install the shroud Hydraulic Pump Drive Gear And Housing Assembly (72-60-23, 01-620) and the three nuts which attach the outer race to the gearbox casing. Torque to 85 lbfin to 95 lbfin (9.604 Nm to 10.734 Nm).
Put the hydraulic pump drive gear in the gearbox casing. Make sure that the inner diameter splined end points towards the front of the gearbox.
Install the rear roller bearing and the hydraulic gearshaft into the outer race installed in the gearbox casing.
Remove the three nuts that secure the bearing outer race to the hydraulic pump housing.
Align and install the shroud Hydraulic Pump Drive Gear And Housing Assembly (72-60-23, 01-410) on to the outer race. Install the nuts and torque to 85 lbfin to 95 lbfin (9.604 Nm to 10.734 Nm).
Install the hydraulic pump drive gear and the shroud.
Install Main Gearbox Assembly Main Gearbox Assembly (72-60-10, 01-745) packing into the groove of the oil duct sleeve.
Install Main Gearbox Assembly Main Gearbox Assembly (72-60-10, 01-740) packing into the groove of the housing.
Align the housing holes with the studs and the oil duct sleeve with the seat on the gearbox casing flange. Align the outer race with the rear roller bearing. Put the housing over the hydraulic pump gear drive and install in the pad on the gearbox casing. Use IAE 1F10225 Drift.
Install the two bolts which attach the housing to the gearbox casing. Torque to 85 lbfin to 95 lbfin (9.604 Nm to 10.734 Nm).
Install the hydraulic pump housing on the gearbox casing.
Measure the axial travel of the hydraulic pump drive gear which must be 0.0039 in. to 0.0315 in. (0.10 mm to 0.80 mm).
SUBTASK 72-60-10-440-081 Install the Hydraulic Pump Drive Gear (Post SBE 72-0264)
Refer to Figure.
Install IAE 1F10082 Guide Pin guide pin 2 off in to the boltholes near the seat of the outer race.
Align the holes on the outer race flange with the guide pins. Install the outer race in to the seat in the internal of the gearbox casing. Use IAE 1F10155 Drift drift to easy the installation. Remove the three guide pins.
Install the outer race of the rear roller bearing.
Install Main Gearbox Assembly (72-60-10, 01-685) packing in to the groove on the housing.
Install the PMA drive housing.
NOTE
Torque these nuts only after the installation of the PMA drive gear. Refer to Step.Release again the two nuts.
SUBTASK 72-60-10-440-057 Install the Extension Layshaft Gear
Install the outer race of the front roller bearing in to the seat in the internal of the gearbox casing. Align the holes on the outer race flange with the studs on the gearbox casing. Use IAE 1F10157 IAE 1F10157 Drift drift to easy the installation.
SUBTASK 72-60-10-440-058 Install the Starter Idler Gear
Refer to Figure.
Install Main Gearbox Assembly (72-60-10, 01-845) packings off into the grooves on the external spigots of the angle gearbox support.
Install Main Gearbox Assembly (72-60-10, 01-850) packing off into the groove on the central spigot of the angle gearbox support.
Install ENGINE-ANGLE GEARBOX SUPPORT (72-60-32, 01-169) packing off and ENGINE-ANGLE GEARBOX SUPPORT (72-60-32, 01-167) packing off into the strainer suction.
Install the bracket Main Gearbox Assembly (72-60-10, 01-831), bracket Main Gearbox Assembly (72-60-10, 01-826), and the bracket Main Gearbox Assembly (72-60-10, 01-827) on the studs.
Install the 16 washers Main Gearbox Assembly (72-60-10, 01-830) and nuts Main Gearbox Assembly (72-60-10, 01-825) on the studs.
Install the washer Main Gearbox Assembly (72-60-10, 01-840) and the bolts Main Gearbox Assembly (72-60-10, 01-835).
Install the angle gearbox support on the rear side of the gearbox casing.
Install ENGINE-ANGLE GEARBOX SUPPORT (72-60-32, 01-167) packing 1 off and ENGINE-ANGLE GEARBOX SUPPORT (72-60-32, 01-169) packing 2 off into the groove of the strainer suction.
Install Transportation Fittings (72-60-03, 01-960) packing 1 off, into the groove of the transportation plug. Install, if required, the Transportation Fittings (72-60-03, 01-970) transportation plug on the strainer suction.
Install the strainer suction on the angle gearbox.
SUBTASK 72-60-10-440-059 Install the Angle Gearbox Support
Refer to Figure.
Install the outer race of the rear roller bearing in to the seat in the internal of the gearbox casing. Align the holes on the outer race flange with the studs on the gearbox casing. Use IAE 1F10157 IAE 1F10157 Drift drift to make easier the installation.
SUBTASK 72-60-10-440-060 Install the Starter Drive Gear
Refer to Figure.
Install the outer race of the front roller bearing in to the seat in the internal of the gearbox casing. Align the holes on the outer race flange with the studs on the gearbox casing. Use IAE 1F10156 Drift drift to easy the installation.
SUBTASK 72-60-10-440-061 Install the IDG Drive Gear
Refer to Figure.
Install Main Gearbox Assembly (72-60-10, 01-585) packing off in to the groove of the housing.
Align the housing holes with the studs on the gearbox casing. Align the outer race with the rear roller bearing. Put the housing over the starter drive gear and install in the pad on the gearbox casing. Use IAE 1F10224 Drift drift.
SUBTASK 72-60-10-440-062 Install the Starter Drive Housing
Refer to Figure.
Install Main Gearbox Assembly (72-60-10, 01-540) packings 2 off in to the grooves of the housing.
Install IAE 1F10222 Pin guide pins in to the bolthole on the gearbox casing at the mating flange of the housing.
Align the housing holes with the guide pins. Align the outer race with the rear roller bearing. Put the housing over the IDG drive gear and install in the pad on the gearbox casing. Use IAE 1F10221 Drift drift.
SUBTASK 72-60-10-440-063 Install the IDG Housing
Refer to Figure.
Install the outer race of the rear roller bearing in to the seat in the internal of the gearbox casing. Align the holes on the outer race flange with the studs on the gearbox casing. Use IAE 1F10156 Drift off to make easier the installation.
Install Main Gearbox Assembly (72-60-10, 01-500) off in to the groove on the rear flange of the deoiler housing.
Install the deoiler gear and impellor and the deoiler housing.
Install Deoiler Gear, Impeller, And Housing Assembly (72-60-29, 01-090) off in to the internal groove of the mating ring.
Put the mating ring on the guide bush of IAE1F10070 Pusher off, with the large contact face against the slide pusher.
Install the mating ring on the deoiler gearshaft.
SUBTASK 72-60-10-440-064 Install the Deoiler Gear and Impellor
Refer to Figure and SBE 79-0088.
Install Main Gearbox Assembly (72-60-10, 01-470) off in to the groove of the deoiler casing.
Install Main Gearbox Assembly (72-60-10, 01-473) off in to the groove on the filter housing.
Pre SBE 79-0088: Install the bracket Main Gearbox Assembly (72-60-10, 01-456), and install the five washers and the seven nuts which attach the deoiler casing to the gearbox casing. Torque to 85 lbfin to 95 lbfin (9.604 Nm to 10.734 Nm).
SBE 79-0088: Install the bracket Main Gearbox Assembly (72-60-10, 01-457), and install the four washers and the seven nuts which attach the deoiler casing to the gearbox casing. Torque to 85 to 95 lbfin (9.604 to 10.734 Nm).
SUBTASK 72-60-10-440-065 Install the Deoiler Casing (Pre SBE 79-0088, SBE 79-0088)
Refer to Figure.
Install Main Gearbox Assembly (72-60-10, 01-645) off in to the groove on the mounting flange of the PMA support.
Install Main Gearbox Assembly (72-60-10, 01-650) off in to the groove on the end of the manifold.

CAUTION
MAKE SURE THAT THE GEARS OF THE PMA DRIVE GEAR ASSEMBLY AND THE LAYSHAFT ARE CORRECTLY ENGAGED BEFORE THE USE OF THE DRIFT. DAMAGE TO THE PMA GEARS CAN OCCUR IF THE ENGAGEMENT IS FORCED.Align the PMA support with the studs and the manifold with the seat on the gearbox casing. Install the PMA support on the PMA housing. Engage the gear of the PMA shaft with the gear of extension layshaft. Use IAE 1F10227 Drift off.
SUBTASK 72-60-10-440-066 Install the PMA Drive Gear
Install IAE 2F10229 Rotating handwheel off on the starter idler gear and manually turn the gear train. Check that the gears are free to turn.
SUBTASK 72-60-10-210-051 Check the Free Rotation of the Gear Train
Refer to Fig-72-60-10-990-032-001.
NOTE
The backlash kit IAE 2F10266 Backlash kit includesInstall IAE 2F10267 Clamping fixture clamping fixture 1 off.
Install IAE 2F10269 Comparator support comparator support 1 off.
Install IAE 2F10268 Backlash gage tip backlash gage 1 off.
SUBTASK 72-60-10-440-067 Set the Tools to Measure the Circumferential Backlash between the Fuel Pump Drive Gear and the Hydraulic Pump Drive Gear
Refer to Figure.
Remove IAE 2F10267 Clamping fixture clamping fixture 1 off.
Keep IAE 2F10269 Comparator support comparator support 1 off and IAE 2F10268 Backlash gage tip backlash gage on place for the next measure.
SUBTASK 72-60-10-220-080 Measure the Circumferential Backlash between the Fuel Pump Drive Gear and the Hydraulic Pump Drive Gear
Refer to Figure.
Install IAE 2F10276 Clamping fixture clamping fixture 1 off.
SUBTASK 72-60-10-440-068 Set the Tools to Measure the Circumferential Backlash between the Oil Scavenge Pump Drive Gear and the Hydraulic Pump Drive Gear
Refer to Figure.
Remove IAE 2F10268 Backlash gage tip backlash gage 1 off and IAE 2F10269 Comparator support support comparator.
Keep IAE 2F10276 Clamping fixture clamping fixture on place for the next measure.
SUBTASK 72-60-10-220-081 Measure the Circumferential Backlash between the Oil Scavenge Pump Drive Gear and the Hydraulic Pump Drive Gear
Refer to Figure.
Install IAE 2F10275 Backlash gage tip backlash gage 1 off.
Install IAE 2F10273 Comparator support off.
NOTE
The IAE 2F10275 Backlash gage tip 1 off has two smooth raised areas on the setting block. Use the outer raised area to measure the circumferential backlash between the oil scavenge pump drive gear and the extension layshaft drive gear.Turn clockwise the handle of the backlash gage by hand and set to zero the dial gage.
SUBTASK 72-60-10-440-069 Set the Tools to Measure the Circumferential Backlash between the Oil Scavenge Pump Drive Gear and the Extension Layshaft Drive Gear
Refer to Figure.
Remove IAE 2F10276 Clamping fixture clamping fixture 1 off.
Keep IAE 2F10275 Backlash gage tip backlash gage and IAE 2F10273 Comparator support support comparator in place for the next measurement.
SUBTASK 72-60-10-220-082 Measure the Circumferential Backlash between the Oil Scavenge Pump drive Gear and the Extension Layshaft Drive Gear
Refer to Figure.
Install IAE 2F10270 Clamping fixture off.
NOTE
The IAE 2F10275 Backlash gage tip 1 off has two smooth raised areas on the setting block. Use the inner raised area to measure the circumferential backlash between the PMA shaft and the extension layshaft drive gear.Turn clockwise the handle of the backlash gage by hand and set to zero the dial gage.
SUBTASK 72-60-10-440-070 Set the Tools to Measure the Circumferential Backlash between the PMA Shaft and the Extension Layshaft, Drive Gear
Refer to Figure and SBE 72-0048.
NOTE
Make sure all tool faces that touch are clean and not damaged.Turn counterclockwise the handle of the backlash gage by hand and read the value of backlash on the dial gage.
The value must be:
Pre SBE 72-0048: 0.0059 in. (0.15 mm) minimum 0.0102 in. (0.26 mm) maximum.
SBE 72-0048: 0.0098 in. (0.25 mm) minimum 0.0137 in. (0.35 mm) maximum.
Remove IAE 2F10270 Clamping fixture clamping fixture 1 off.
Keep IAE 2F10275 Backlash gage tip backlash gage and IAE 2F10273 Comparator support support comparator in place for the next measurement.
SUBTASK 72-60-10-220-083 Measure the Circumferential Backlash between the PMA Gear Shaft and the Extension Layshaft Drive Gear (SBE 72-0048, Pre SBE 72-0048)
Refer to Figure.
Install IAE 2F10271 Clamping fixture off.
NOTE
The IAE 2F10275 Backlash gage tip 1 off has two smooth raised areas on the setting block. Use the outer raised area to measure the circumferential backlash between the starter idler gear and the extension layshaft drive gear.Turn clockwise the handle of the backlash gage by hand and set to zero the dial gage.
SUBTASK 72-60-10-440-071 Set the Tools to Measure the Circumferential Backlash between the Starter Idler Gear and the Extension Layshaft, Gear
Refer to Figure.
Remove IAE 2F10273 Comparator support clamping fixture 1 off and IAE 2F10275 Backlash gage tip backlash gage 1 off.
Keep IAE 2F10271 Clamping fixture clamping fixture in place for the next measurement.
SUBTASK 72-60-10-220-084 Measure the Circumferential Backlash between the Starter Idler Gear and the Extension Layshaft Gear
Refer to Figure.
Install IAE 2F10268 Backlash gage tip backlash gage 1 off.
Install IAE 2F10269 Comparator support comparator support 1 off.
SUBTASK 72-60-10-440-072 Set the Tools to Measure the Circumferential Backlash between the Starter Drive Gear and the Starter Idler Gear
Refer to Figure.
Remove IAE 2F10271 Clamping fixture clamping fixture 1 off.
Keep IAE 2F10269 Comparator support comparator support and IAE 2F10268 Backlash gage tip backlash gage in place for the next measurement.
SUBTASK 72-60-10-220-085 Measure the Circumferential Backlash between the Starter Drive and the Starter Idler Gear
Refer to Figure.
Install IAE 2F10274 Clamping fixture clamping fixture 1 off.
SUBTASK 72-60-10-440-073 Set the Tools to Measure the Circumferential Backlash between the IDG Gear and the Starter Drive Gear
Refer to Figure.
Remove IAE 2F10269 Comparator support comparator support and IAE 2F10268 Backlash gage tip backlash gage.
Keep IAE 2F10274 Clamping fixture clamping fixture in place for the next measurement.
SUBTASK 72-60-10-220-086 Measure the Circumferential Backlash between the IDG Gear and the Starter Drive Gear
Refer to Figure.
Install IAE 2F10272 Backlash gage tip backlash gage 1 off.
Install IAE 2F10273 Comparator support comparator support 1 off.
SUBTASK 72-60-10-440-074 Set the Tools to Measure the Circumferential Backlash between the Deoiler Gear and the IDG Gear
Refer to Figure.
Remove IAE 2F10274 Clamping fixture clamping fixture 1 off, IAE 2F10272 Backlash gage tip backlash gage 1 off and IAE 2F10273 Comparator support comparator support 1 off.
SUBTASK 72-60-10-220-087 Measure the Circumferential Backlash between the Deoiler Gear and the IDG Gear
Refer to Figure.
Install Hydraulic Pump Drive Gear And Housing Assembly (72-60-23, 01-340) off in the internal groove of the mating ring.
Push the rotating ring against the inner race of the front roller bearing. Use IAE 1F10031 Pusher off.
Install the mating ring on the hydraulic pump drive gear.
NOTE
The carbon seal must have the free axial movement during its full travel in the seal housing.Put the seal housing with the carbon seal fully in to the CoMat 10-077 APPROVED ENGINE OILS before the installation. Make sure the free movement of the carbon seal.
Install Hydraulic Pump Drive Gear And Housing Assembly (72-60-23, 01-300) off in to the OD groove of the seal housing.
Remove the guide pin from the IAE 1F10003 Pusher off and install in to one of the bolts on the hydraulic pump housing.
Align one of the holes on the seal housing flange with the guide pin. Install the seal housing with the carbon seal over the hydraulic pump drive gear. Push the seal housing in position. Use IAE 1F10003 Pusher pusher 1 off.
Install the seal housing on the hydraulic pump drive gear.
Install Transportation Fittings (72-60-03, 01-295) off in to the groove of the retaining ring housing. Install the retaining ring housing in to the end of the drive gear until it touches the end of the ID spline. Install the retaining ring.
Install Transportation Fittings (72-60-03, 01-320) off in to the groove of the plug shaft. Install the plug shaft in the retaining ring housing.
Install the plug shaft on the hydraulic pump drive gear.
SUBTASK 72-60-10-440-075 Complete the Installation of the Hydraulic Pump
Refer to Figure.
Install Fuel Pump Drive Gear And Housing Assembly (72-60-25, 01-160) off in the internal groove of the mating ring.
Push the mating ring against the inner race of the rear roller bearing. Use IAE 1F10031 Pusher off.
Install the mating ring on the fuel pump drive gear.
NOTE
The carbon seal must have the free axial movement during its full travel in the seal housing.Put the seal housing with the carbon seal fully in to CoMat 10-077 APPROVED ENGINE OILS before the installation. Make sure the free movement of the carbon seal.
Install Fuel Pump Drive Gear And Housing Assembly (72-60-25, 01-140) off in to the groove on the seal housing.
Remove the guide pin from the IAE 1F10003 Pusher off and install in to the one of the boltholes on the fuel pump housing.
Align one of the holes on the seal housing flange with the guide pin. Install the seal housing with the carbon seal over the fuel pump drive gear. Push the seal housing in position. Use IAE 1F10003 Pusher pusher 1 off.
Install the seal housing on the fuel pump drive gear.
SUBTASK 72-60-10-440-076 Complete the Installation of the Fuel Pump Drive Gear,
Refer to Figure.
Install Starter Drive Gear And Housing Assembly (72-60-22, 01-180) packing 1 off in the internal groove of the mating ring.
Push the mating ring against the inner race of the front roller bearing. Use IAE 1F10031 Pusher pusher 1 off.
Install the mating ring on the starter drive gear.
NOTE
The carbon seal must have the free axial movement during its full travel in the seal housing.Put the seal housing with the carbon seal fully in to CoMat 10-077 APPROVED ENGINE OILS before the installation. Make sure the free movement of the carbon seal.
Install Starter Drive Gear And Housing Assembly (72-60-22, 01-140) packing 1 off in to the groove on the seal housing.
Remove the guide pin from the IAE 1F10003 Pusher pusher 1 off and install in to one of the boltholes on the starter drive housing.
Align one of the holes on the seal housing flange with the guide pin. Install the seal housing with the carbon seal over the starter drive gear. Push the seal housing in position. Use IAE 1F10003 Pusher pusher 1 off.
Install the seal housing on the starter drive gear.
SUBTASK 72-60-10-440-077 Complete the Installation of the Starter Drive Gear
Refer to Figure.
Install Generator Drive Gear And Housing Assembly (72-60-28, 01-330) off in to the internal groove of the mating ring.
Push the mating ring against the inner race of the rear roller bearing. Use IAE 1F10032 Pusher off.
Install the mating ring on the IDG drive gear.
NOTE
The carbon seal must have the free axial movement during its fully travel in the seal housing.Put the seal housing with the carbon seal fully in to CoMat 10-077 APPROVED ENGINE OILS before the installation. Make sure the free movement of the carbon seal.
Install Generator Drive Gear And Housing Assembly (72-60-28, 01-290) off in to the groove of the seal housing.
Remove the IAE 1F10004 Pusher guide pin from the pusher and install into one of the boltholes on the IDG housing.
Align one of the holes on the seal housing flange with the guide pin. Install the seal housing with the carbon seal over the IDG drive gear. Push the housing in position. Use IAE 1F10004 Pusher off.
Install the seal housing on the IDG drive gear.
Install Transportation Fittings (72-60-03, 01-440) off in to the groove of the plug shaft retainer. Install the plug shaft retainer in to the end of the drive gear until it touches the end of the ID spline. Install Transportation Fittings (72-60-03, 01-450) retaining ring 1 off.
Install Transportation Fittings (72-60-03, 01-410) off in to the groove of the plug shaft. Install the plug shaft in to the drive gear, over the plug shaft retainer.
Install the plug shaft on the IDG drive gear.
SUBTASK 72-60-10-440-078 Complete the Installation of the IDG Drive Gear
Refer to Figure.
NOTE
The carbon seal must have the free axial movement during its full travel in the air port casing.Put the air port casing with the carbon seal fully in to the CoMat 10-077 APPROVED ENGINE OILS before the installation. Make sure the free movement of the carbons seal.
Install ENGINE-DEOILER CASE AND COVER (72-60-31, 01-107) off in to the OD groove of the air port casing.
Install the air port casing on the deoiler casing. Align the holes on the air port casing with the holes on the deoiler casing. Use IAE 1F10072 Pusher pusher to make easier the installation.
Install the air port casing.
SUBTASK 72-60-10-440-079 Complete the Installation of the Deoiler Casing
Install ENGINE-MAIN GEARBOX CASE AND FITTINGS (72-60-21, 01-280) packing 1 off in to the grooves on the cover crank.
SUBTASK 72-60-10-440-080 Install the Crank Cover
Refer to Figure.
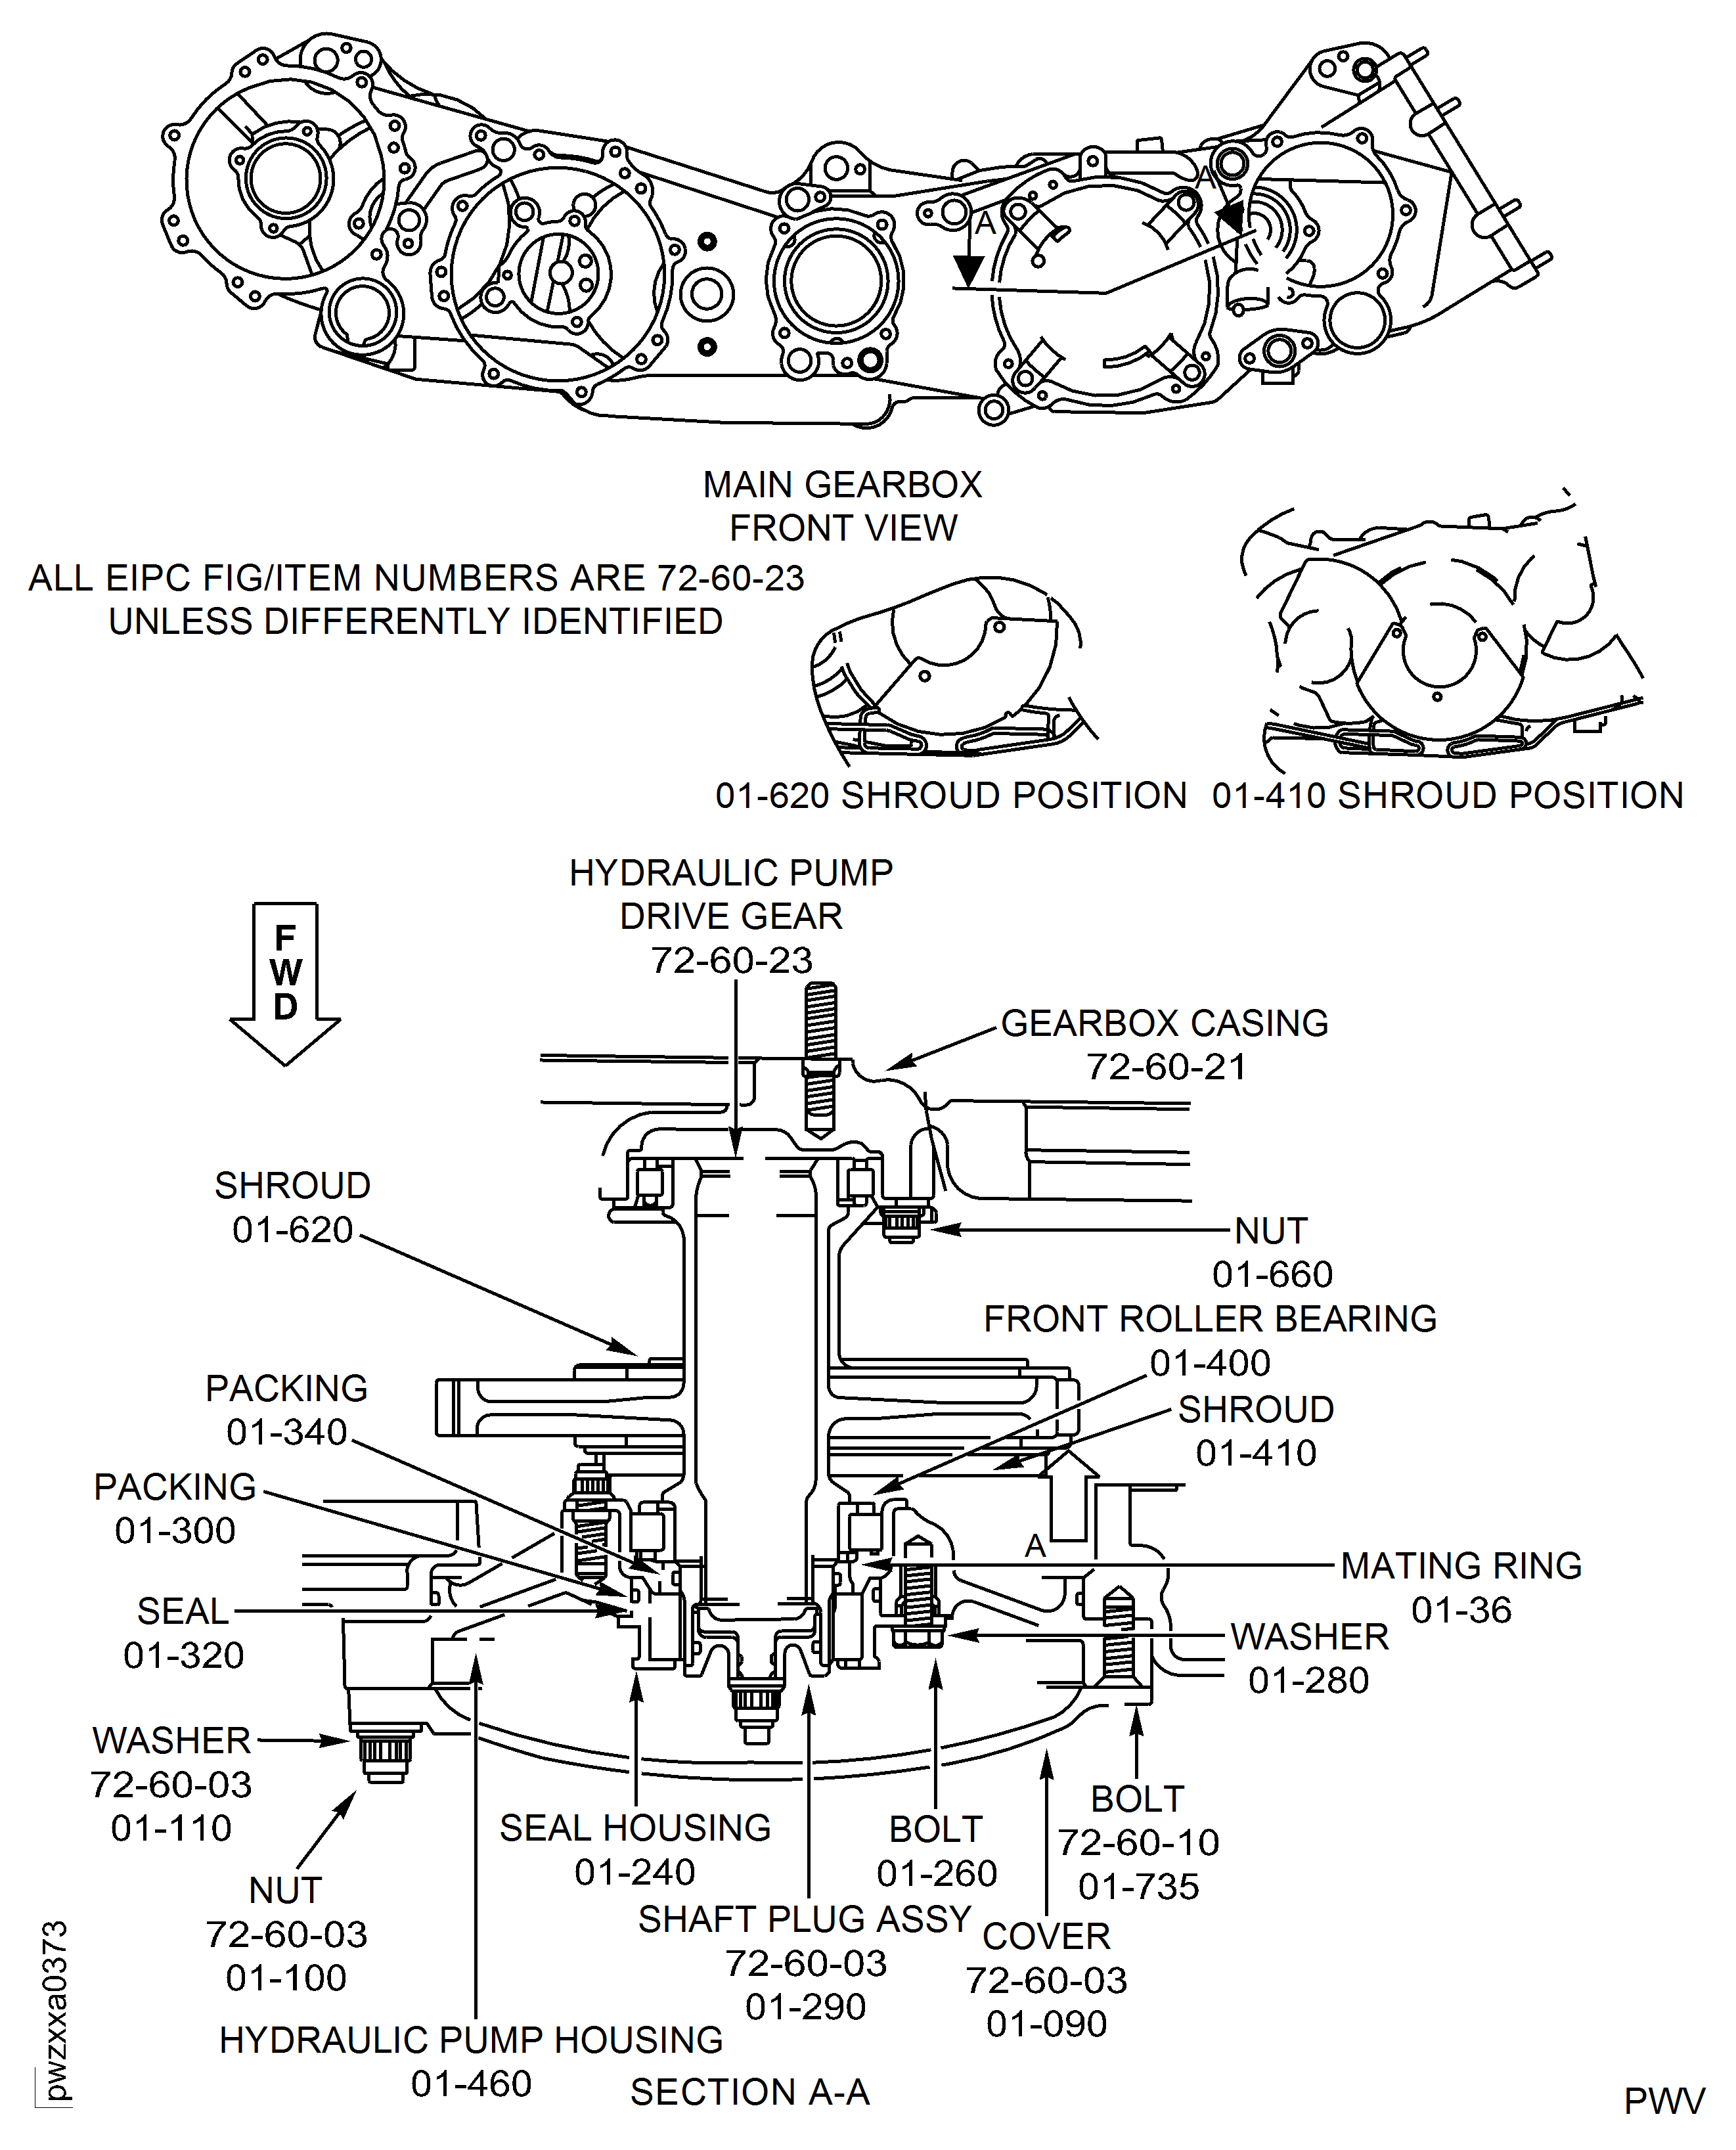
Figure: Main Gearbox Assembly - Fits and Clearances
Main Gearbox Assembly - Fits and Clearances
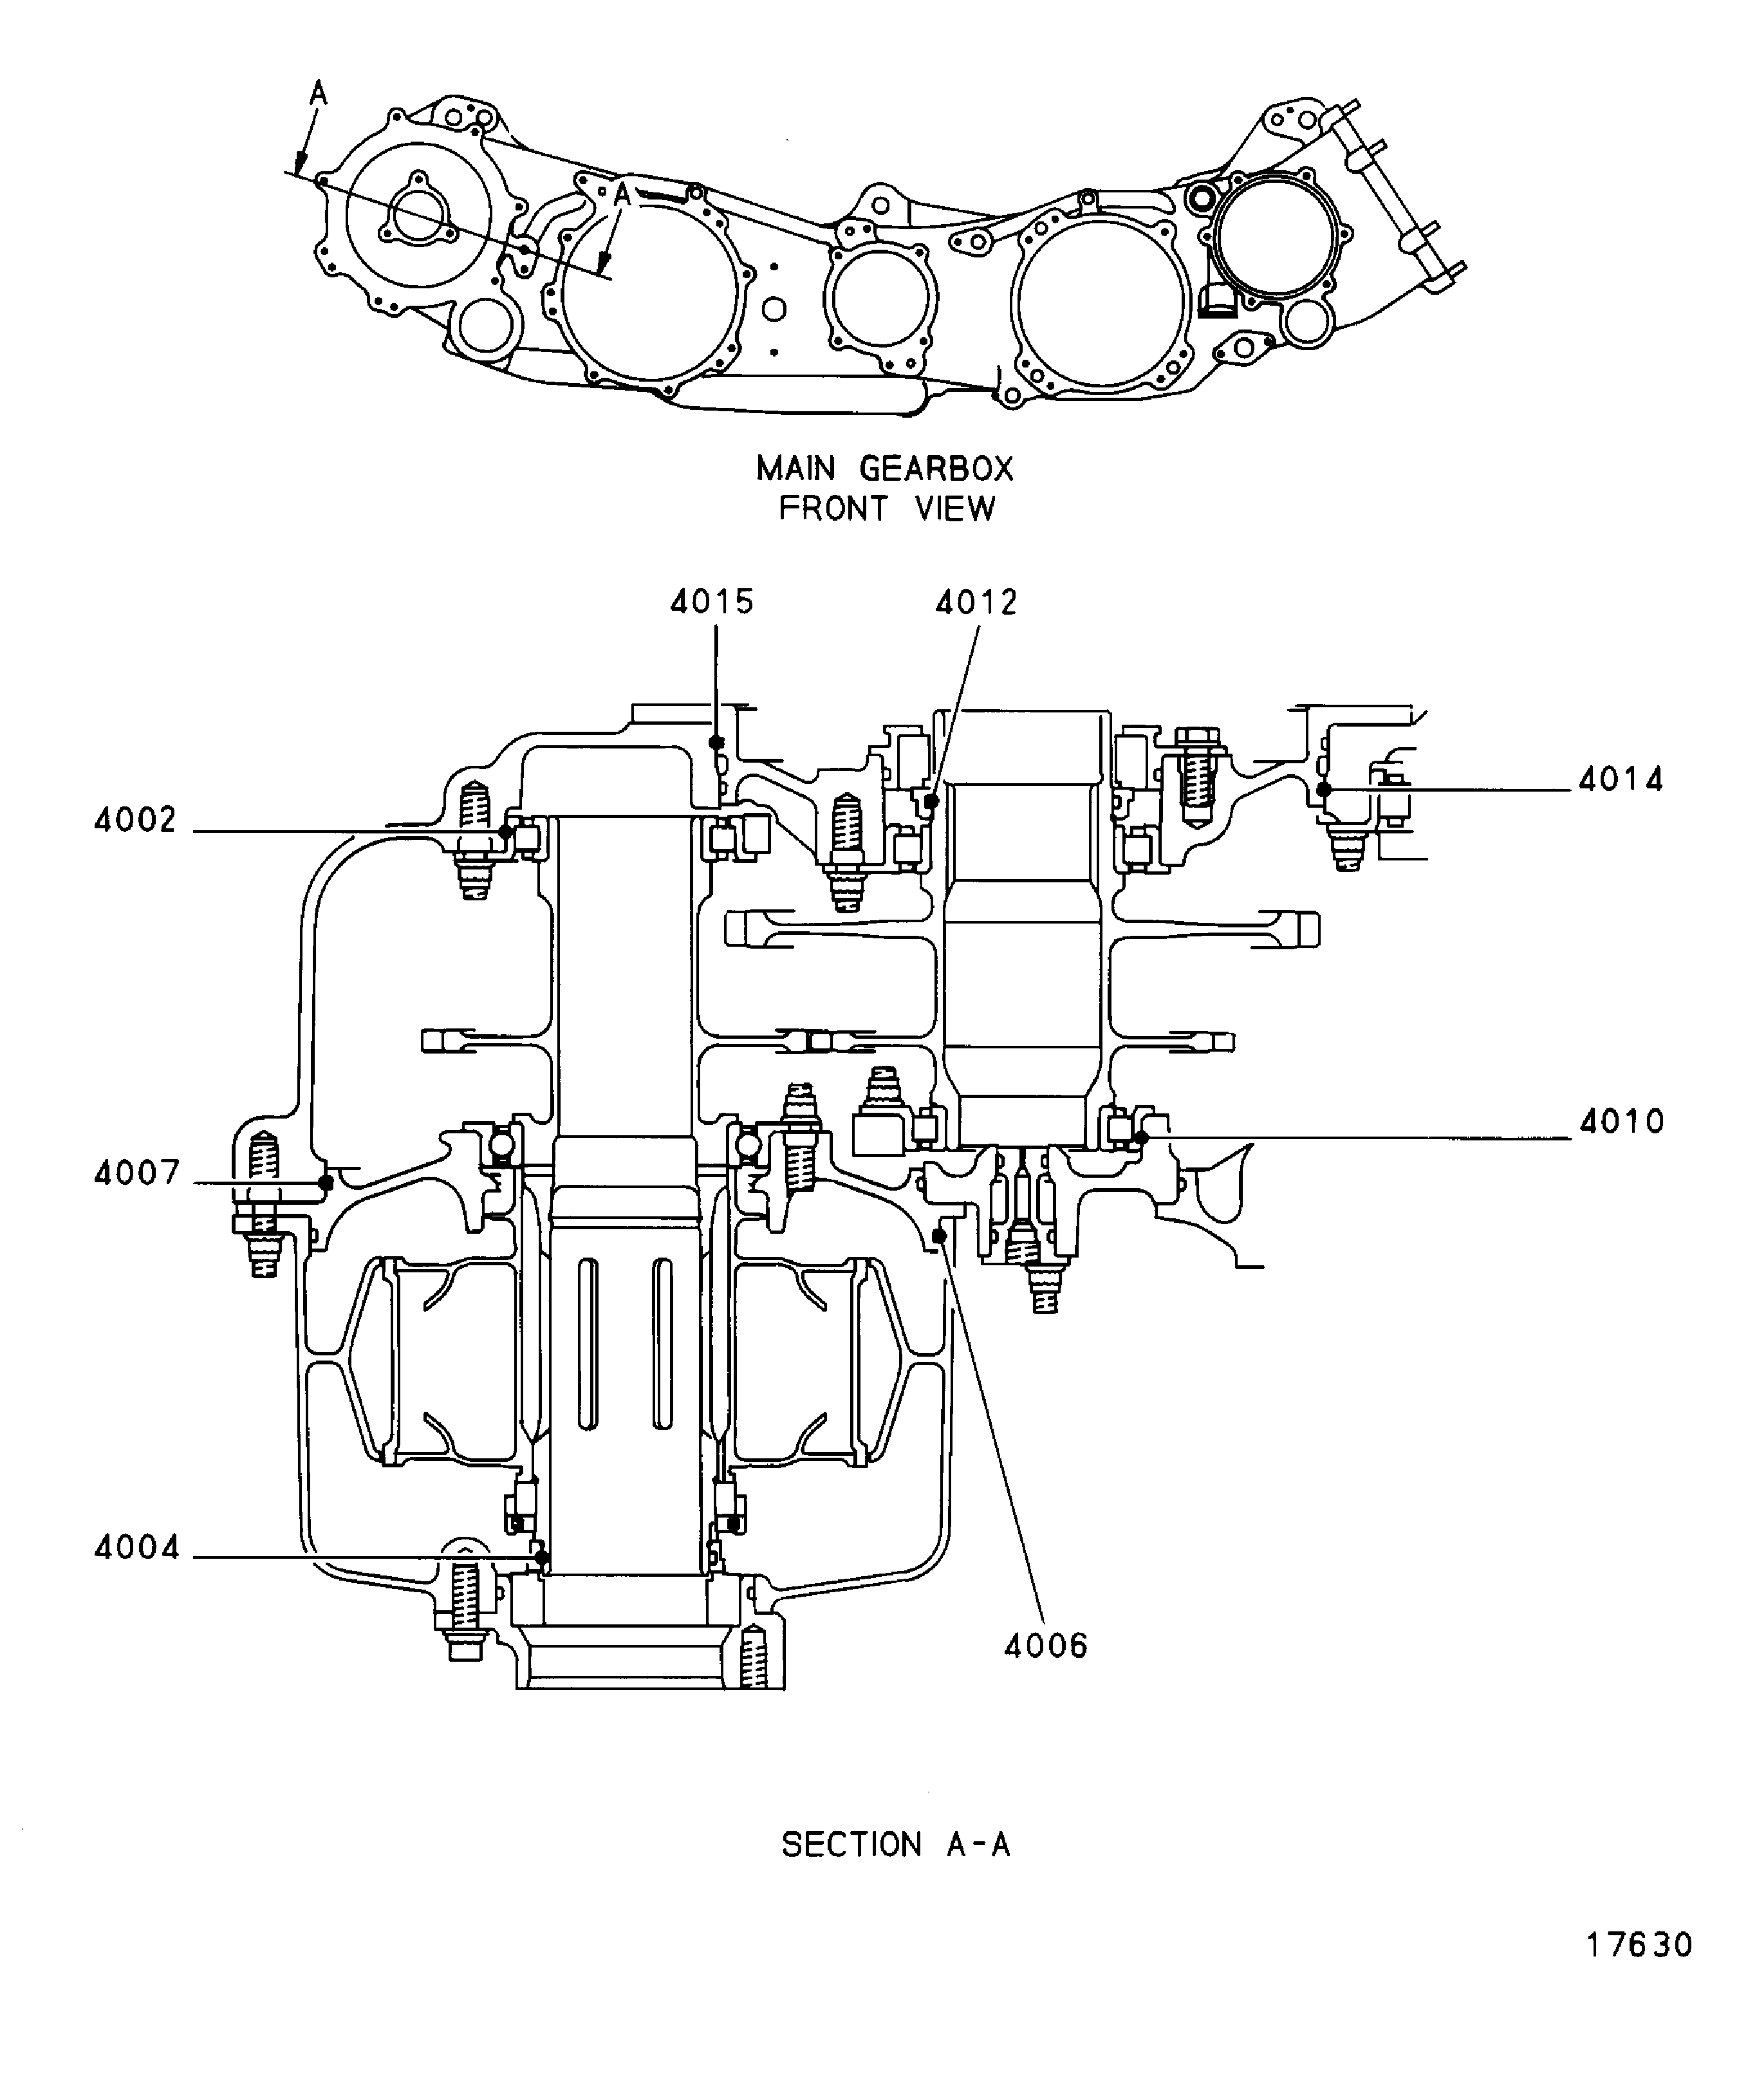
Figure: Main Gearbox Assembly - Fits and Clearances
Main Gearbox Assembly - Fits and Clearances
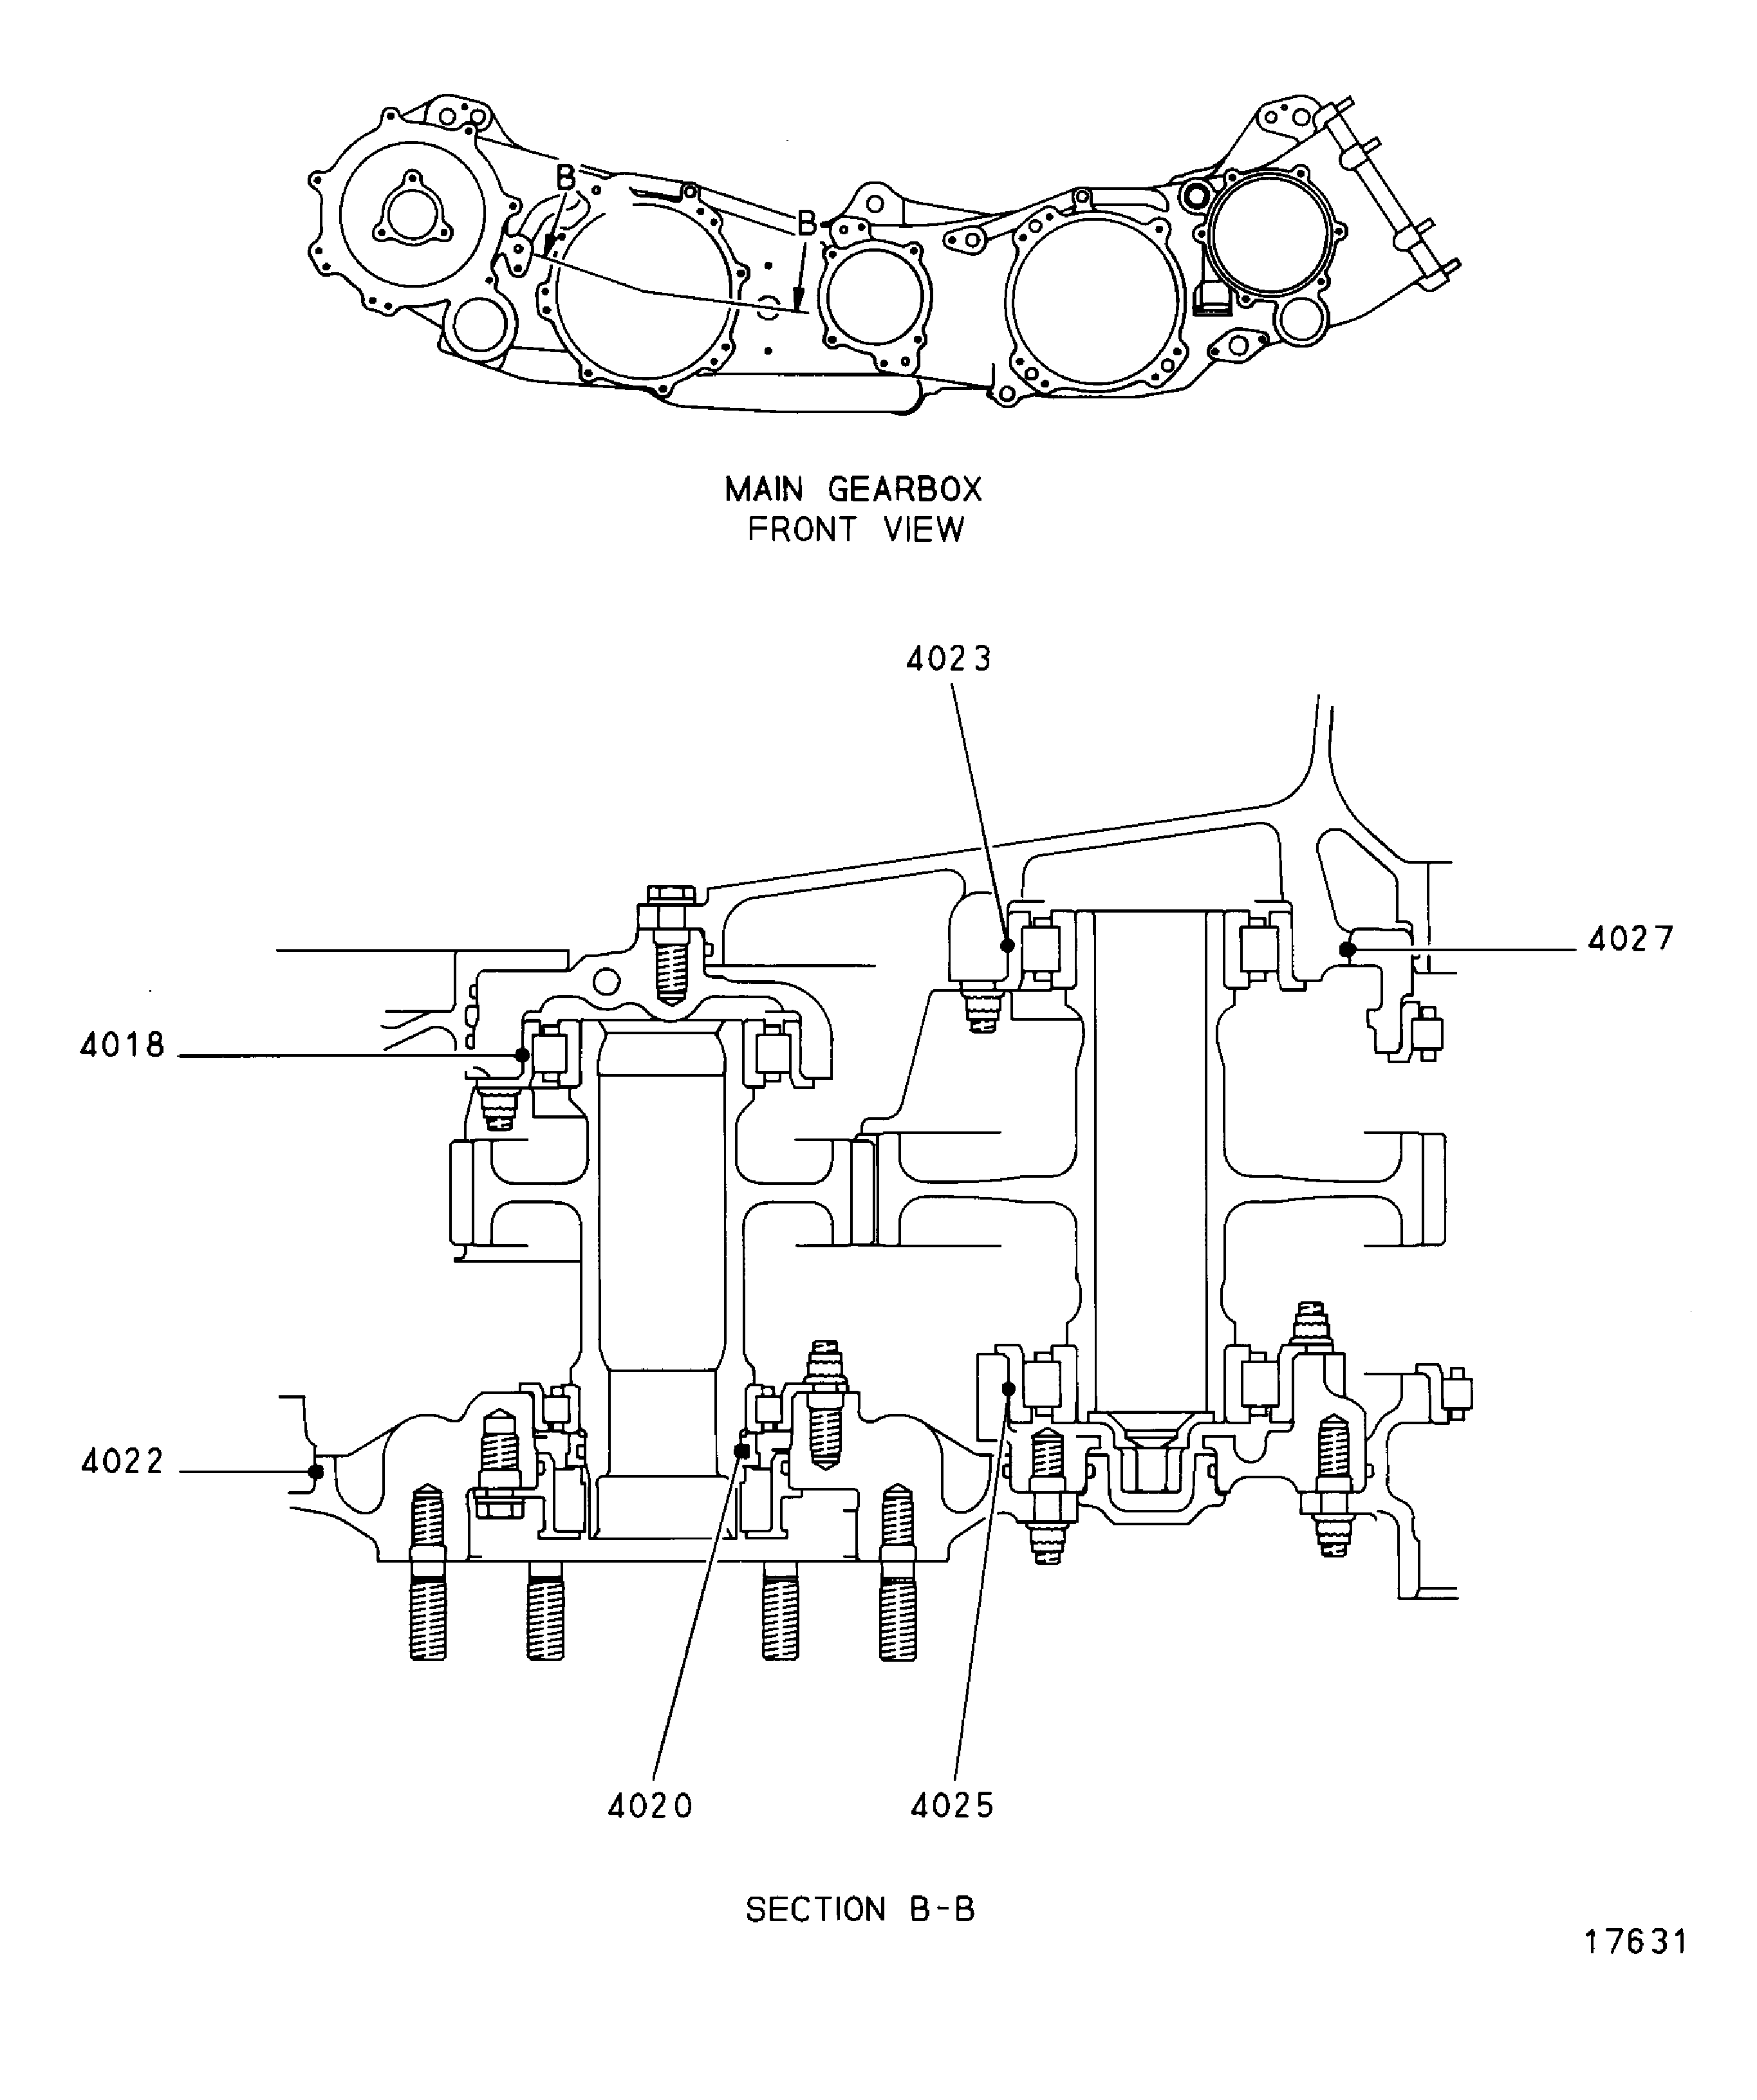
Figure: Main Gearbox Assembly - Figs and Clearances
Main Gearbox Assembly - Figs and Clearances
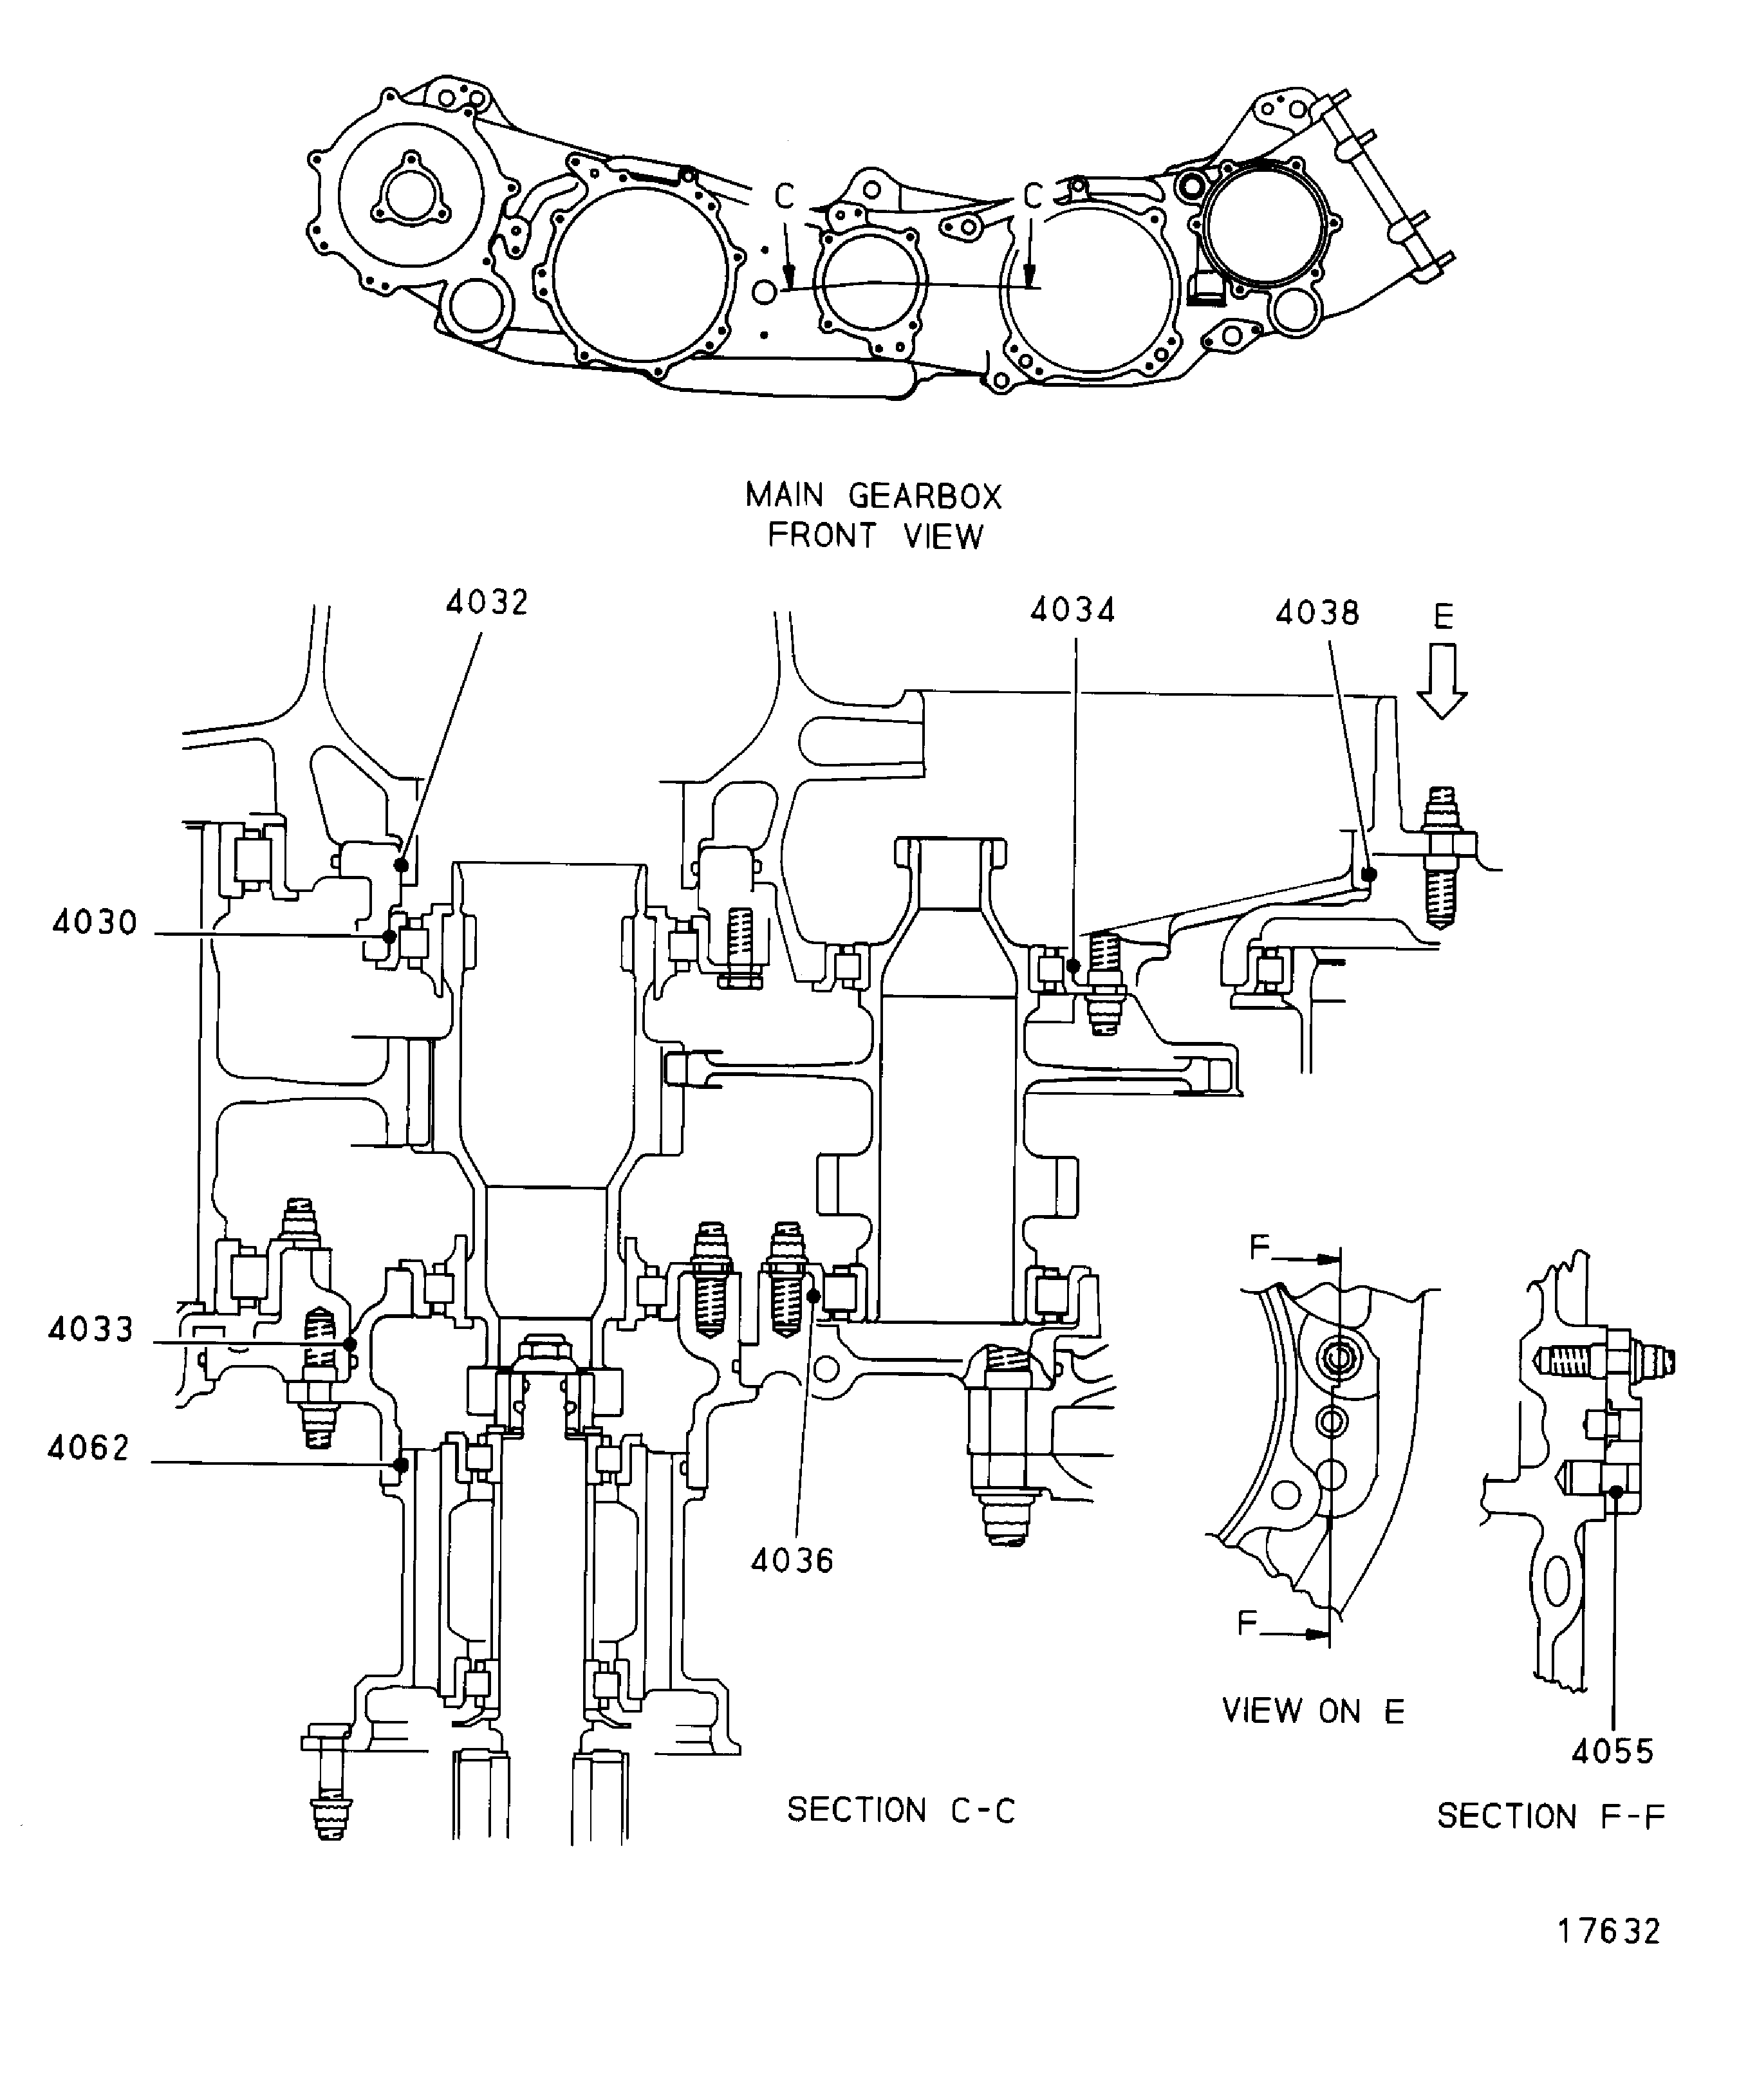
Figure: Main Gearbox Assembly - Fits and Clearances
Main Gearbox Assembly - Fits and Clearances
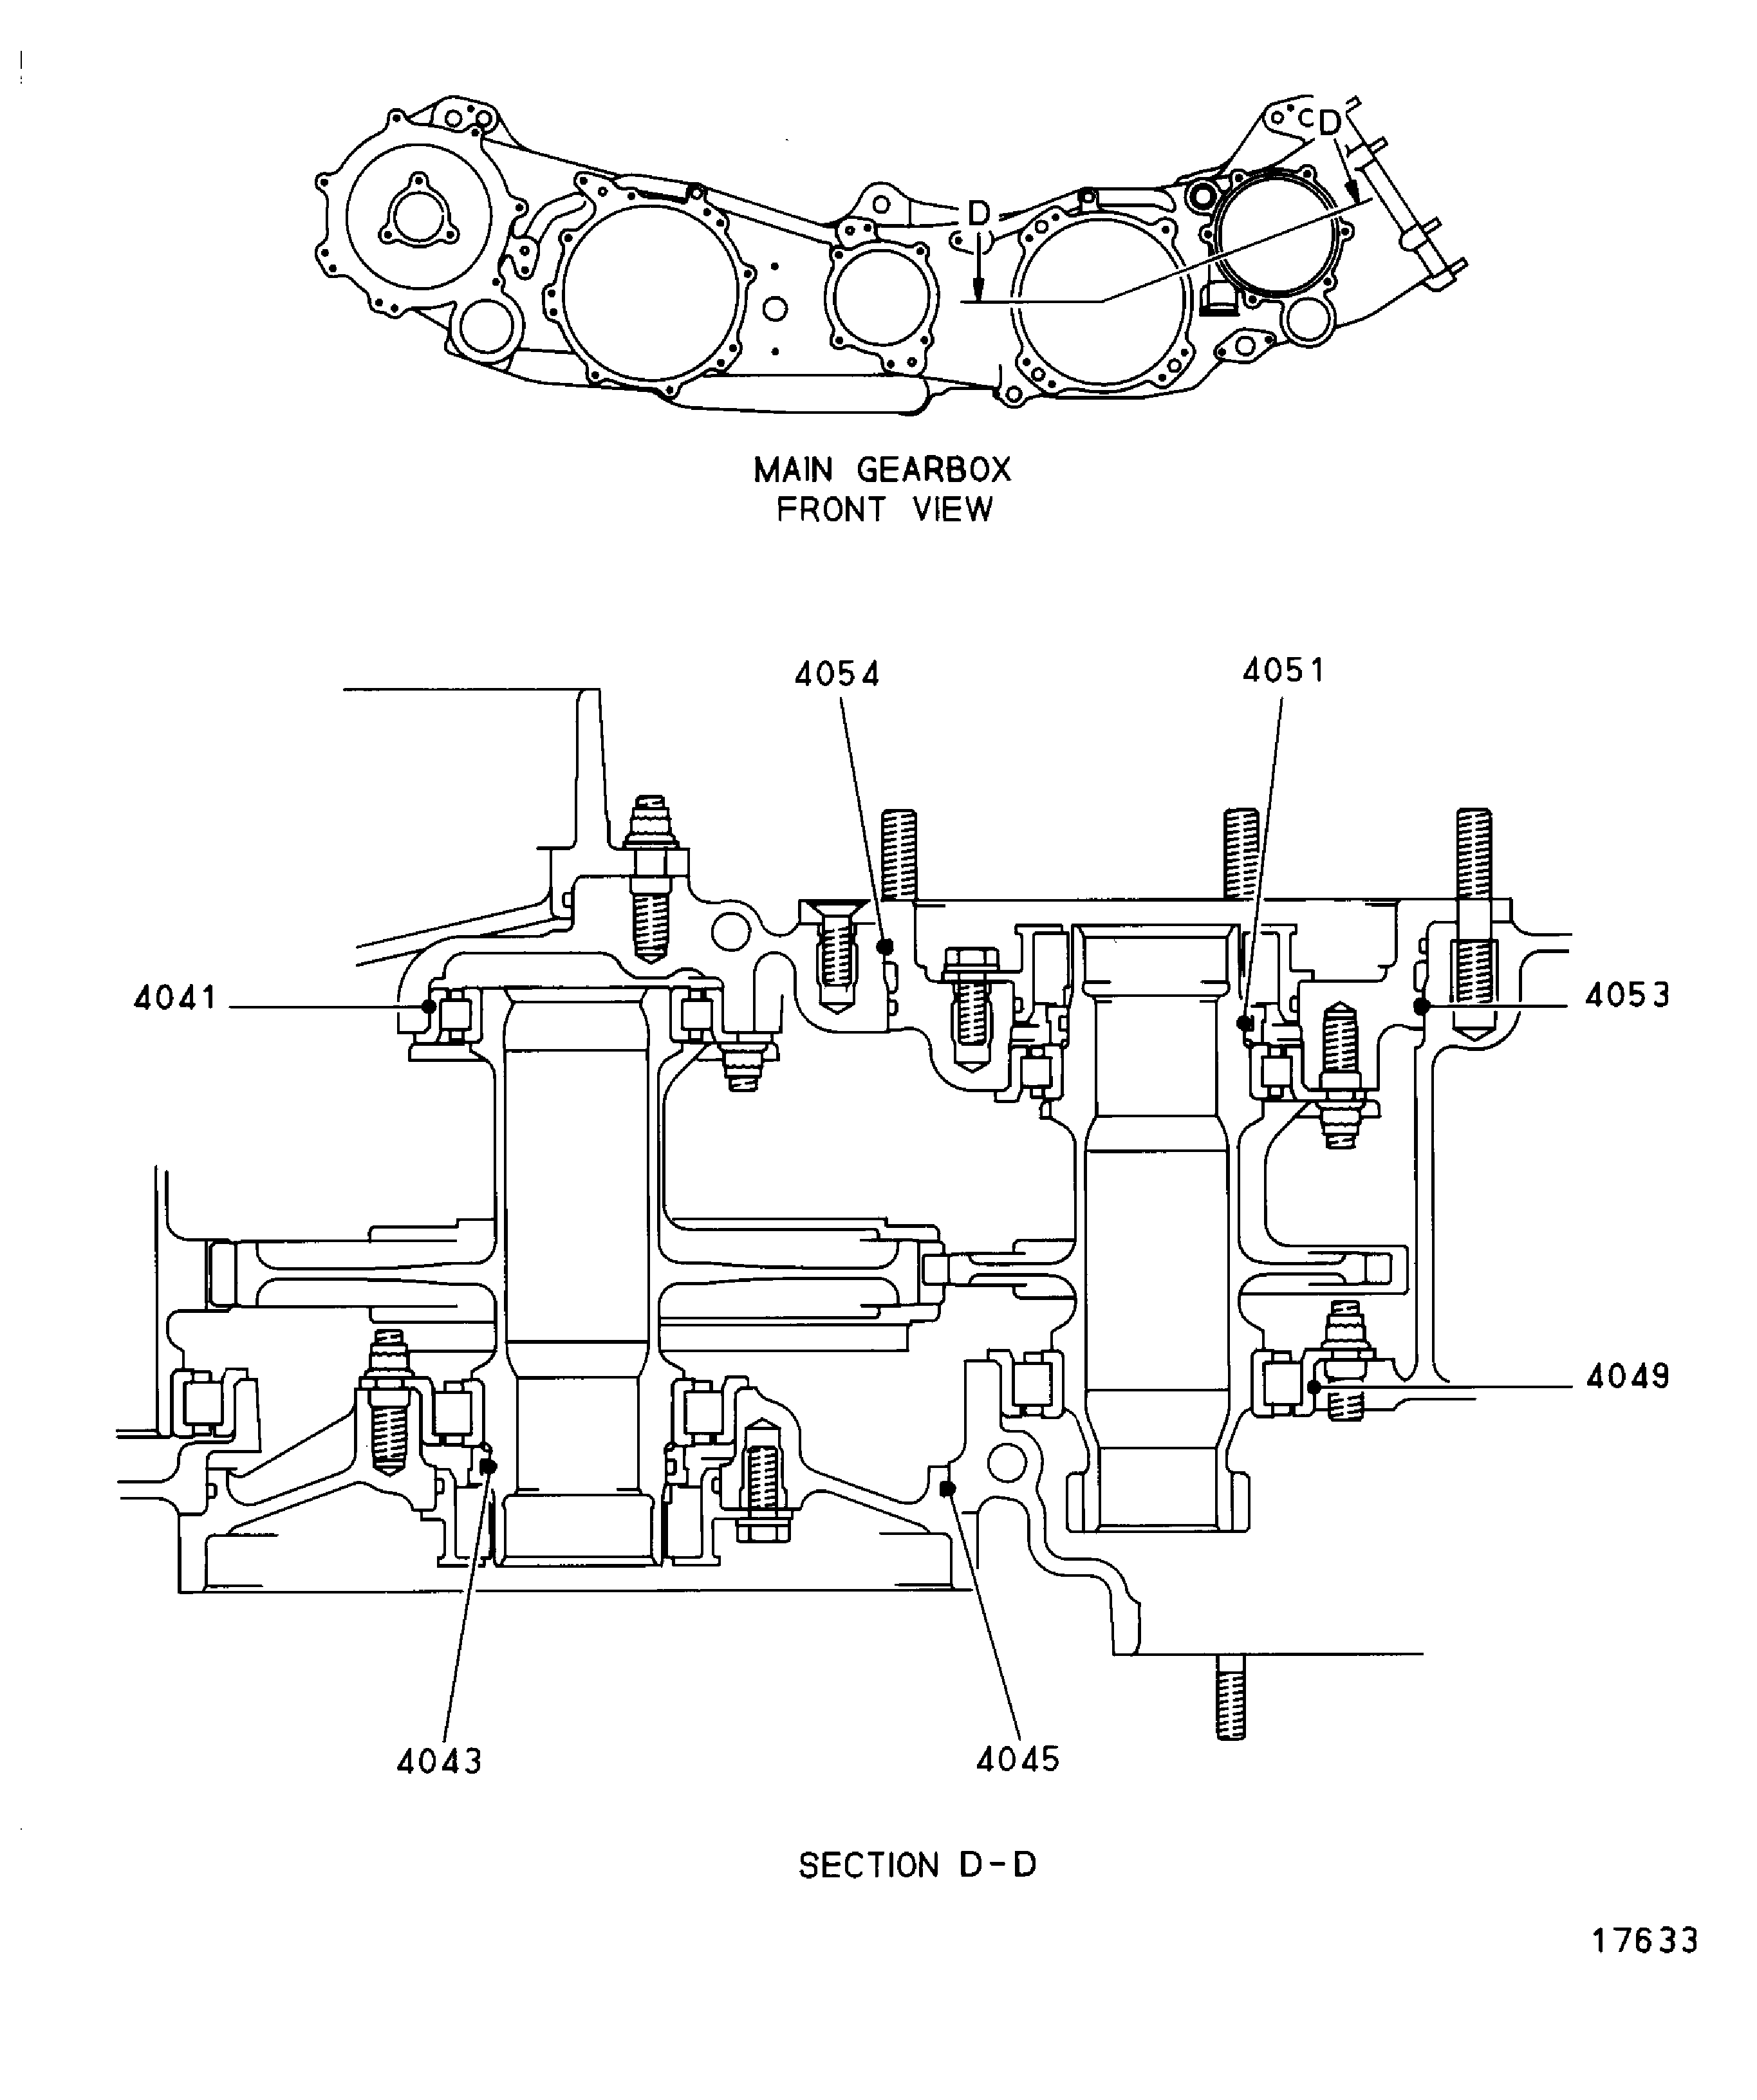
Figure: Oil Nozzles on the Front Right-Hand Side of the Main Gearbox
Oil Nozzles on the Front Right-Hand Side of the Main Gearbox
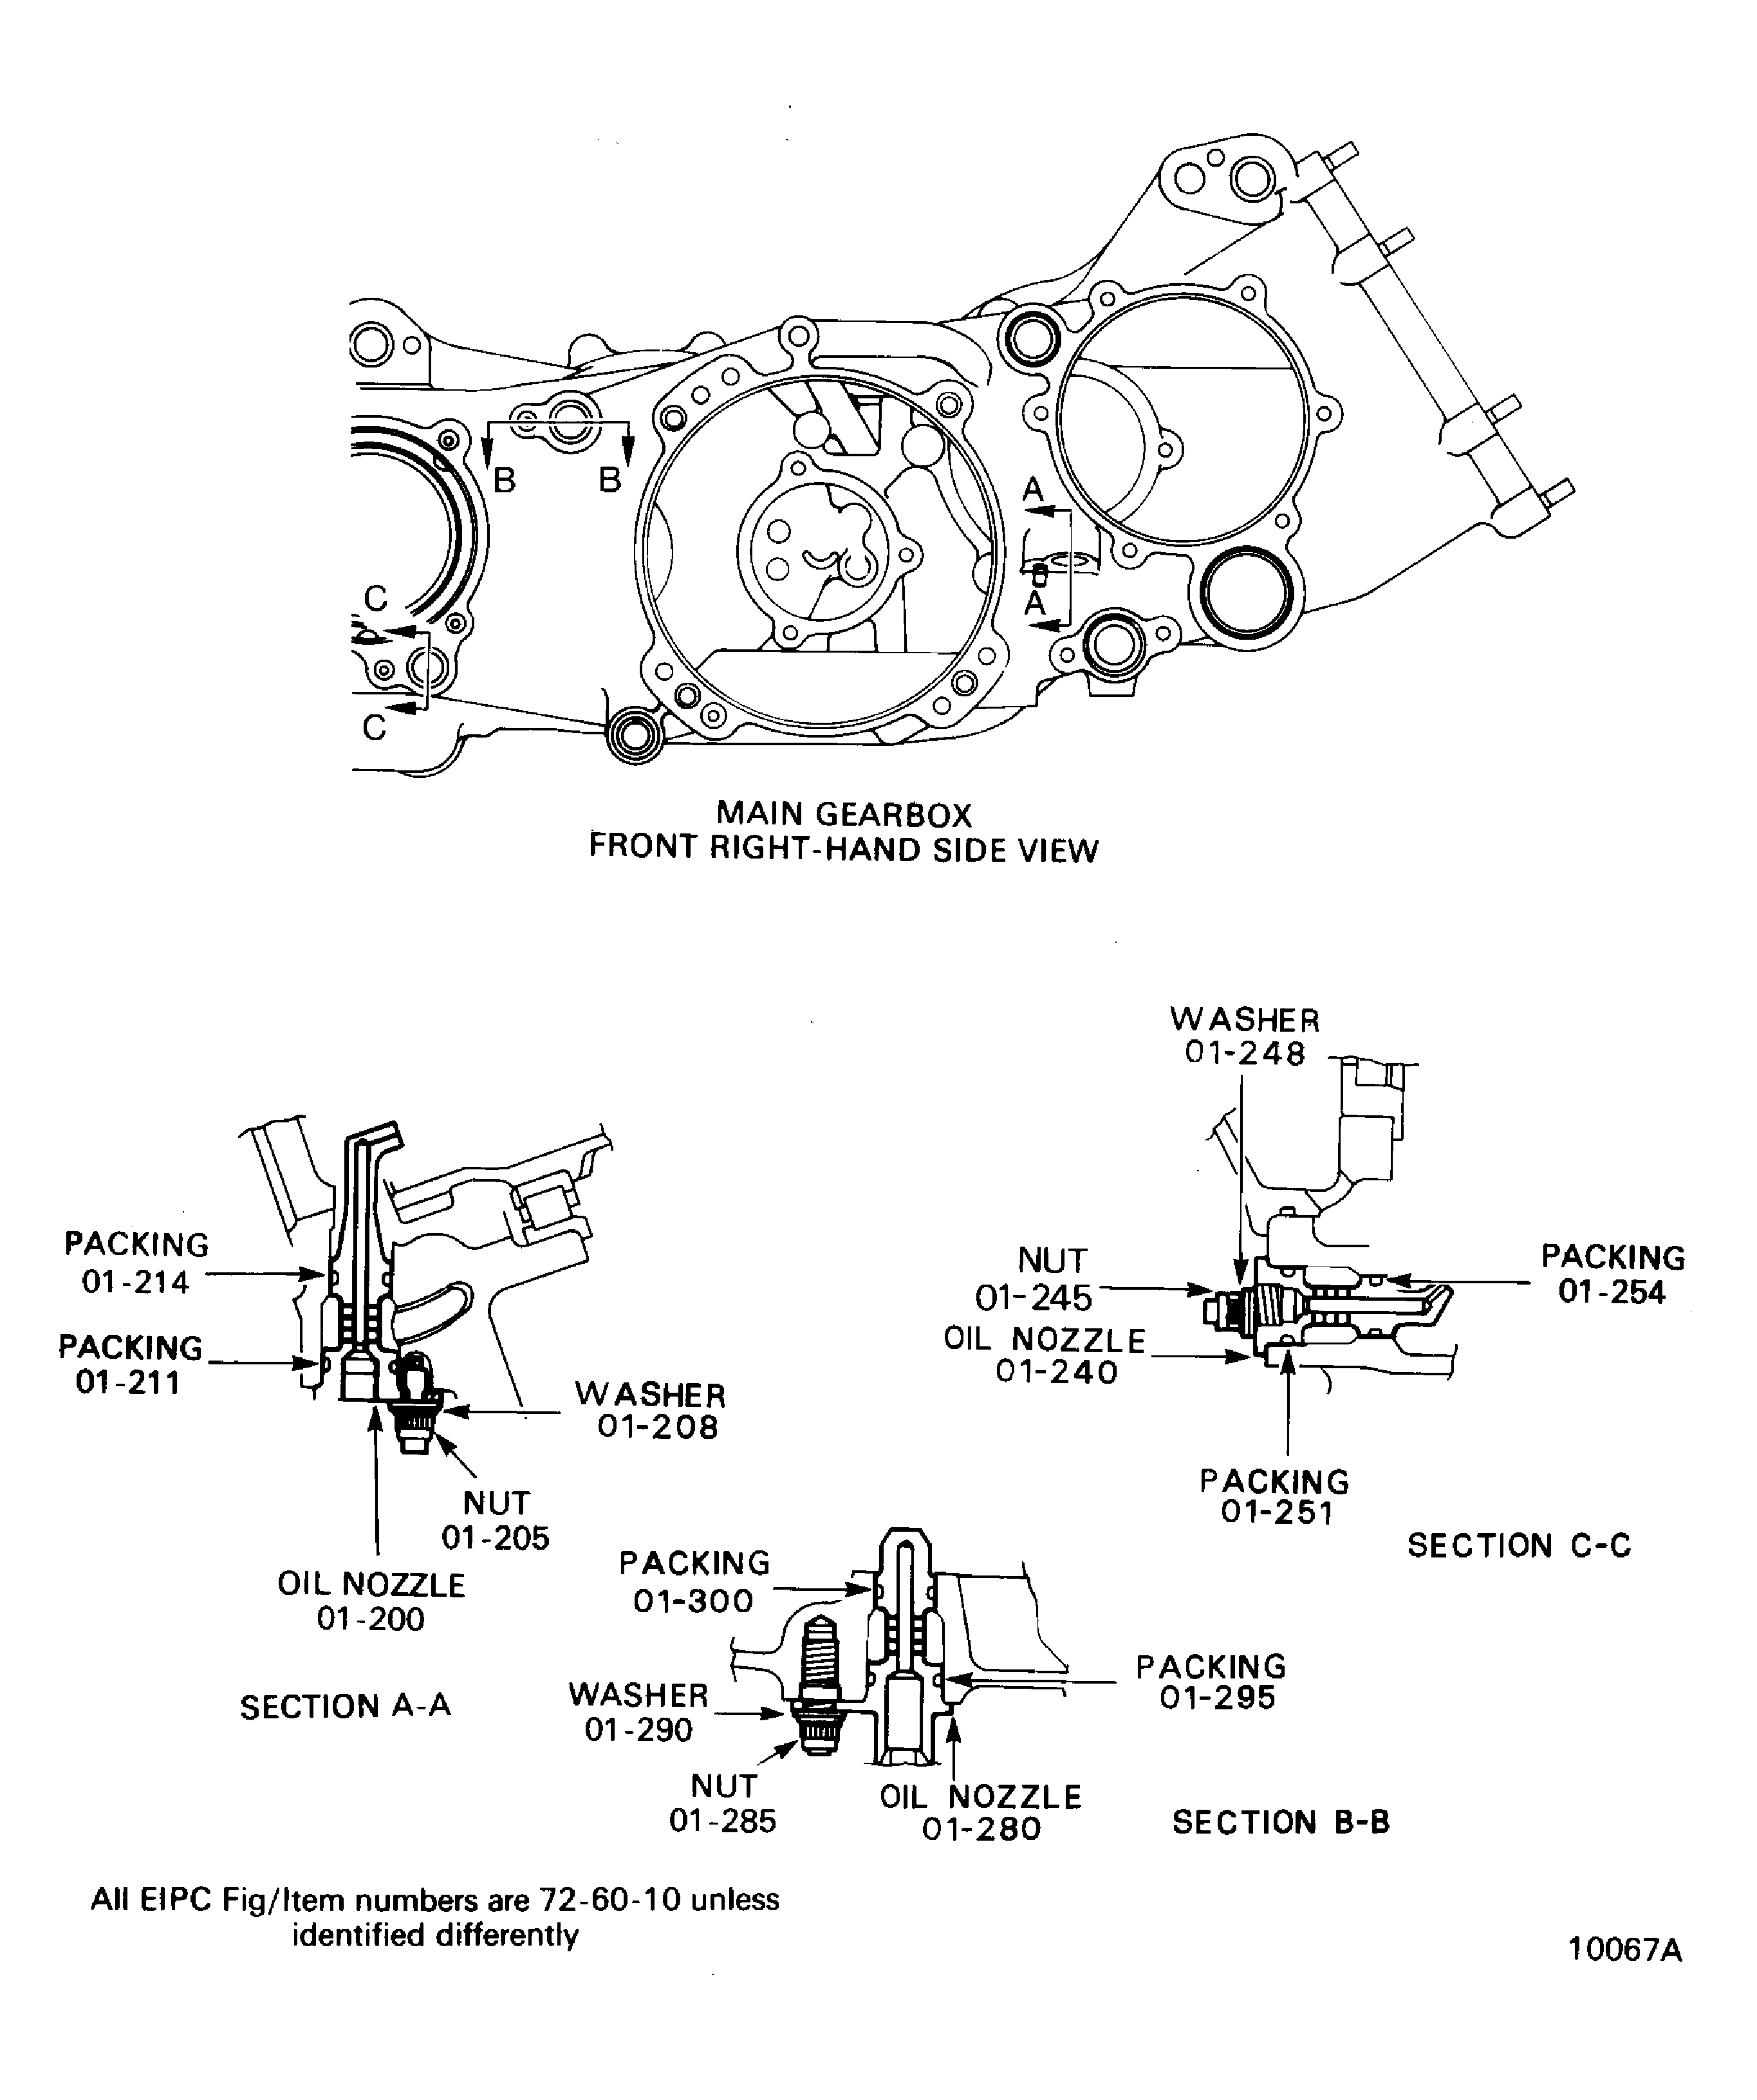
Figure: Oil Nozzles on the Front Left-Hand Side of the Main Gearbox
Oil Nozzles on the Front Left-Hand Side of the Main Gearbox
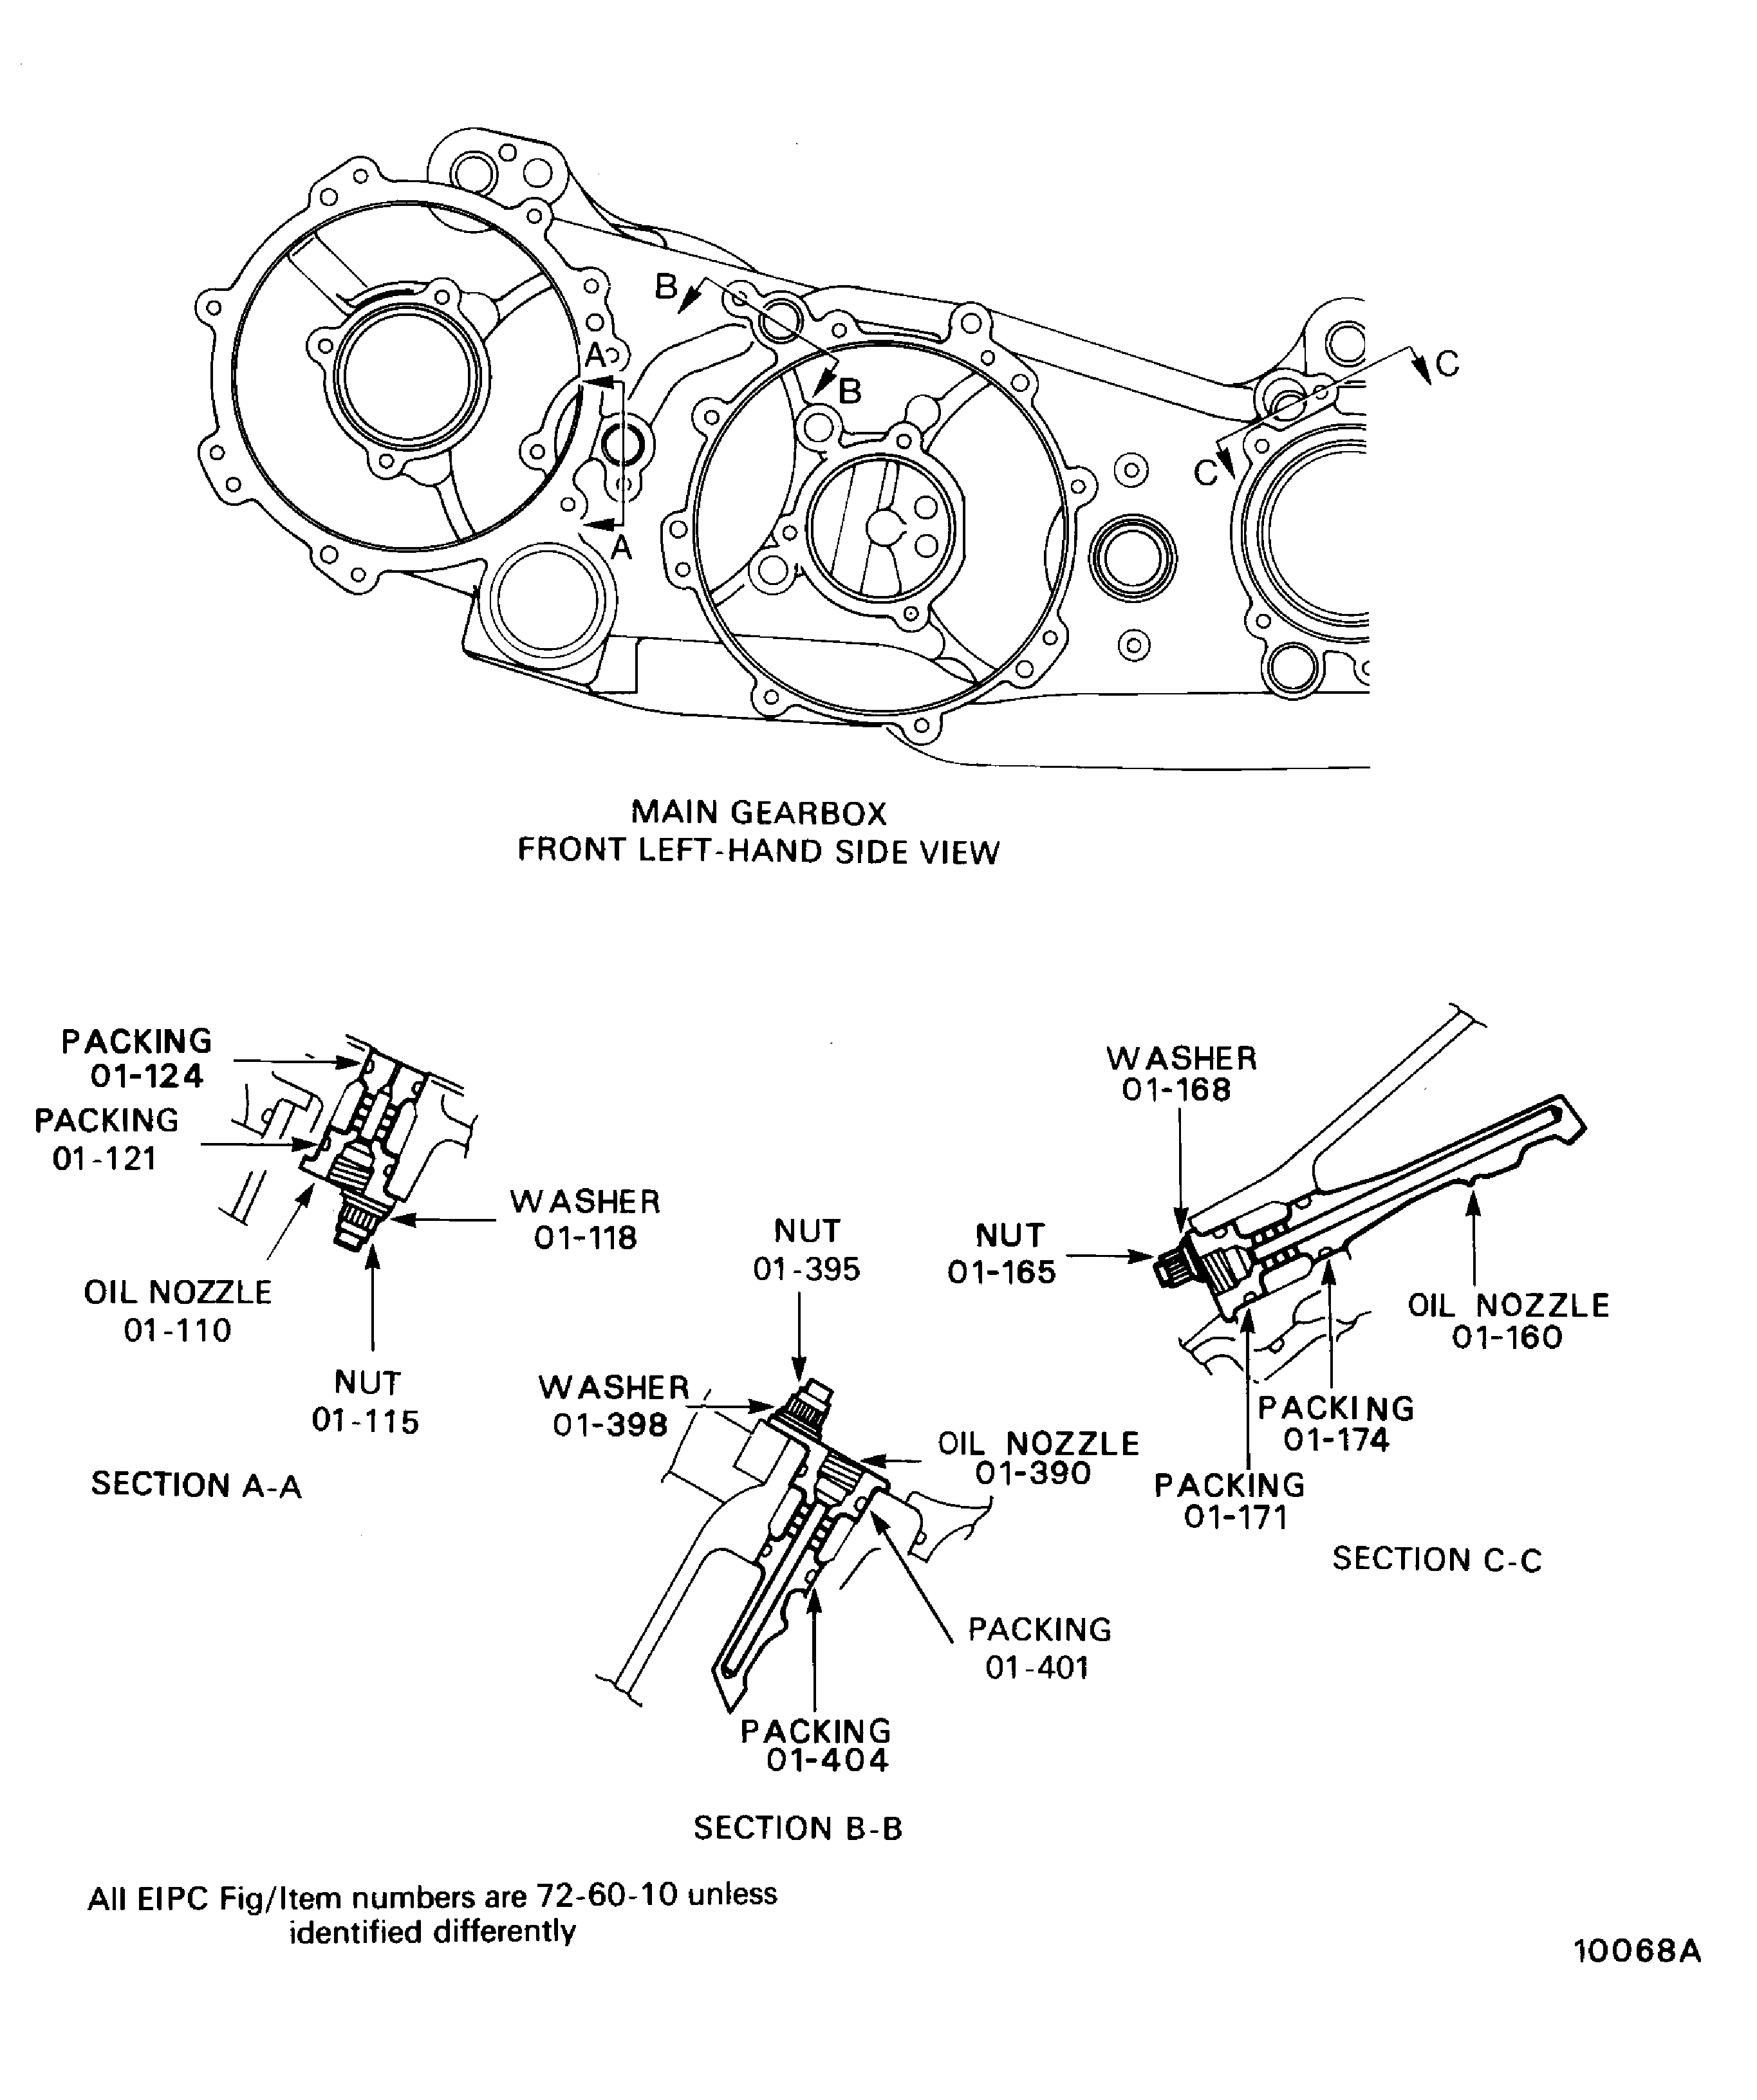
Figure: Oil Nozzle on the Rear Side of the Main Gearbox
Oil Nozzle on the Rear Side of the Main Gearbox
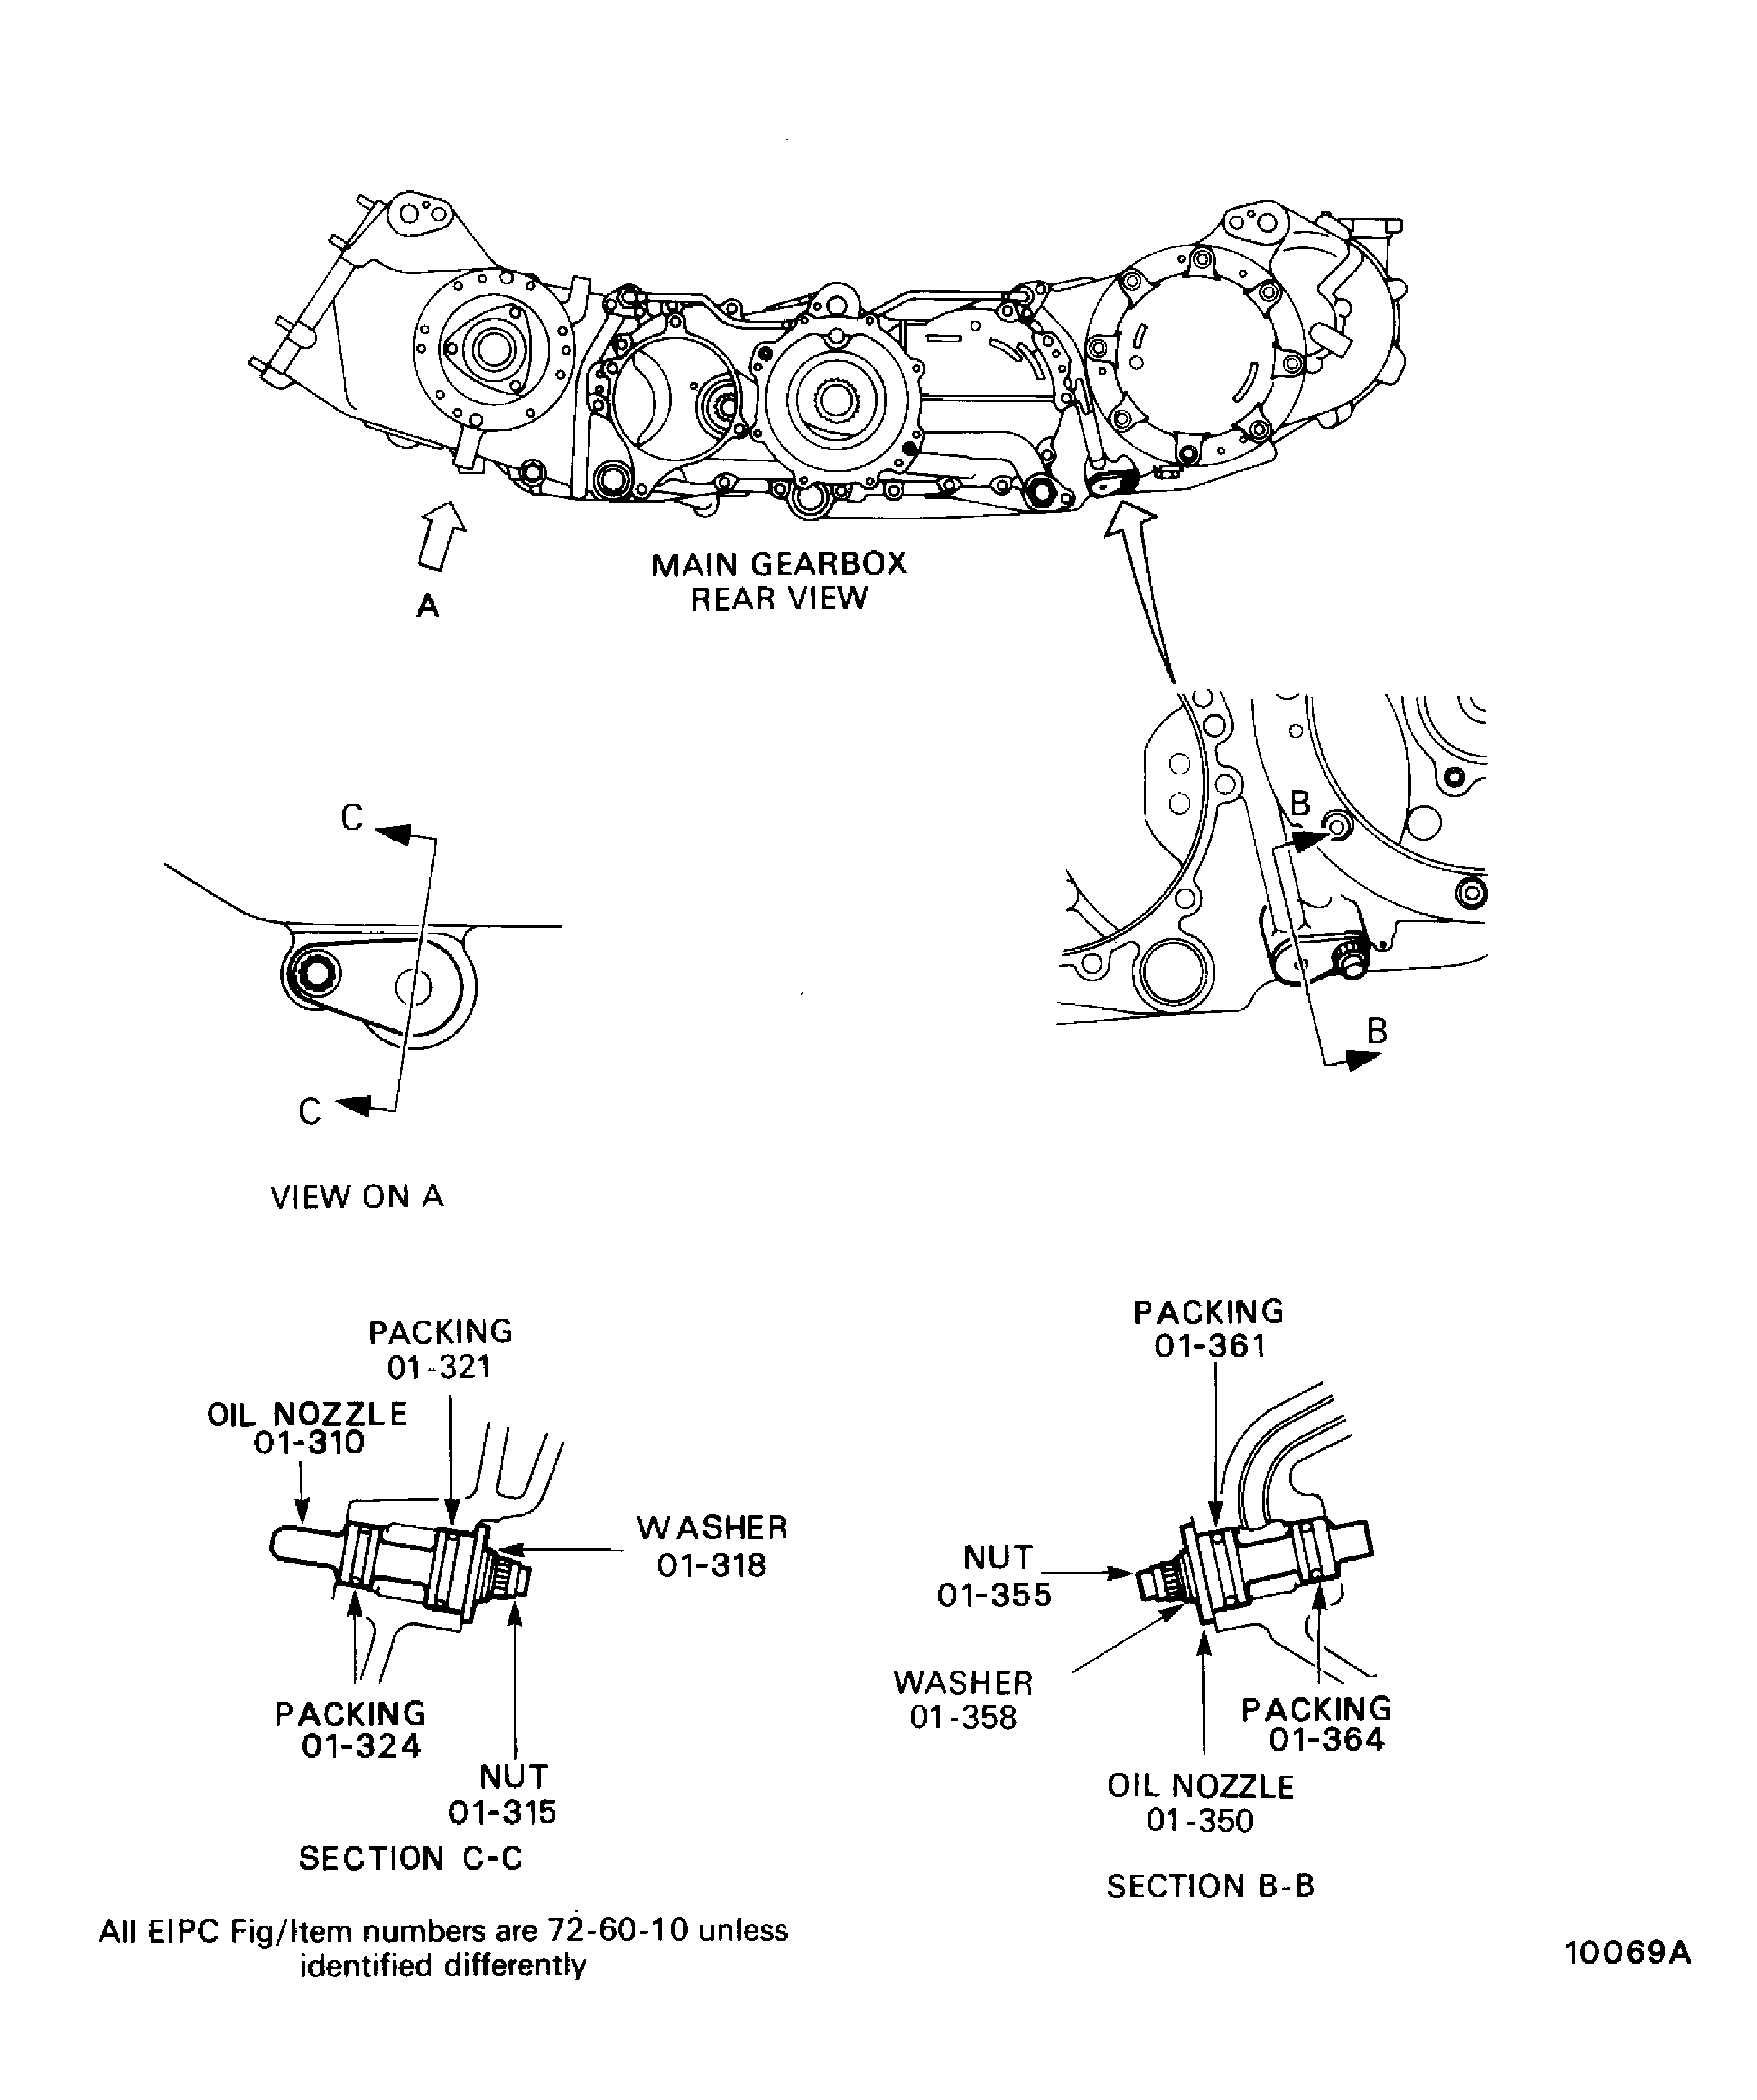
Figure: Install the Hydraulic Pump Drive Gear (Pre SB 72-0264)
Install the Hydraulic Pump Drive Gear (Pre SB 72-0264)
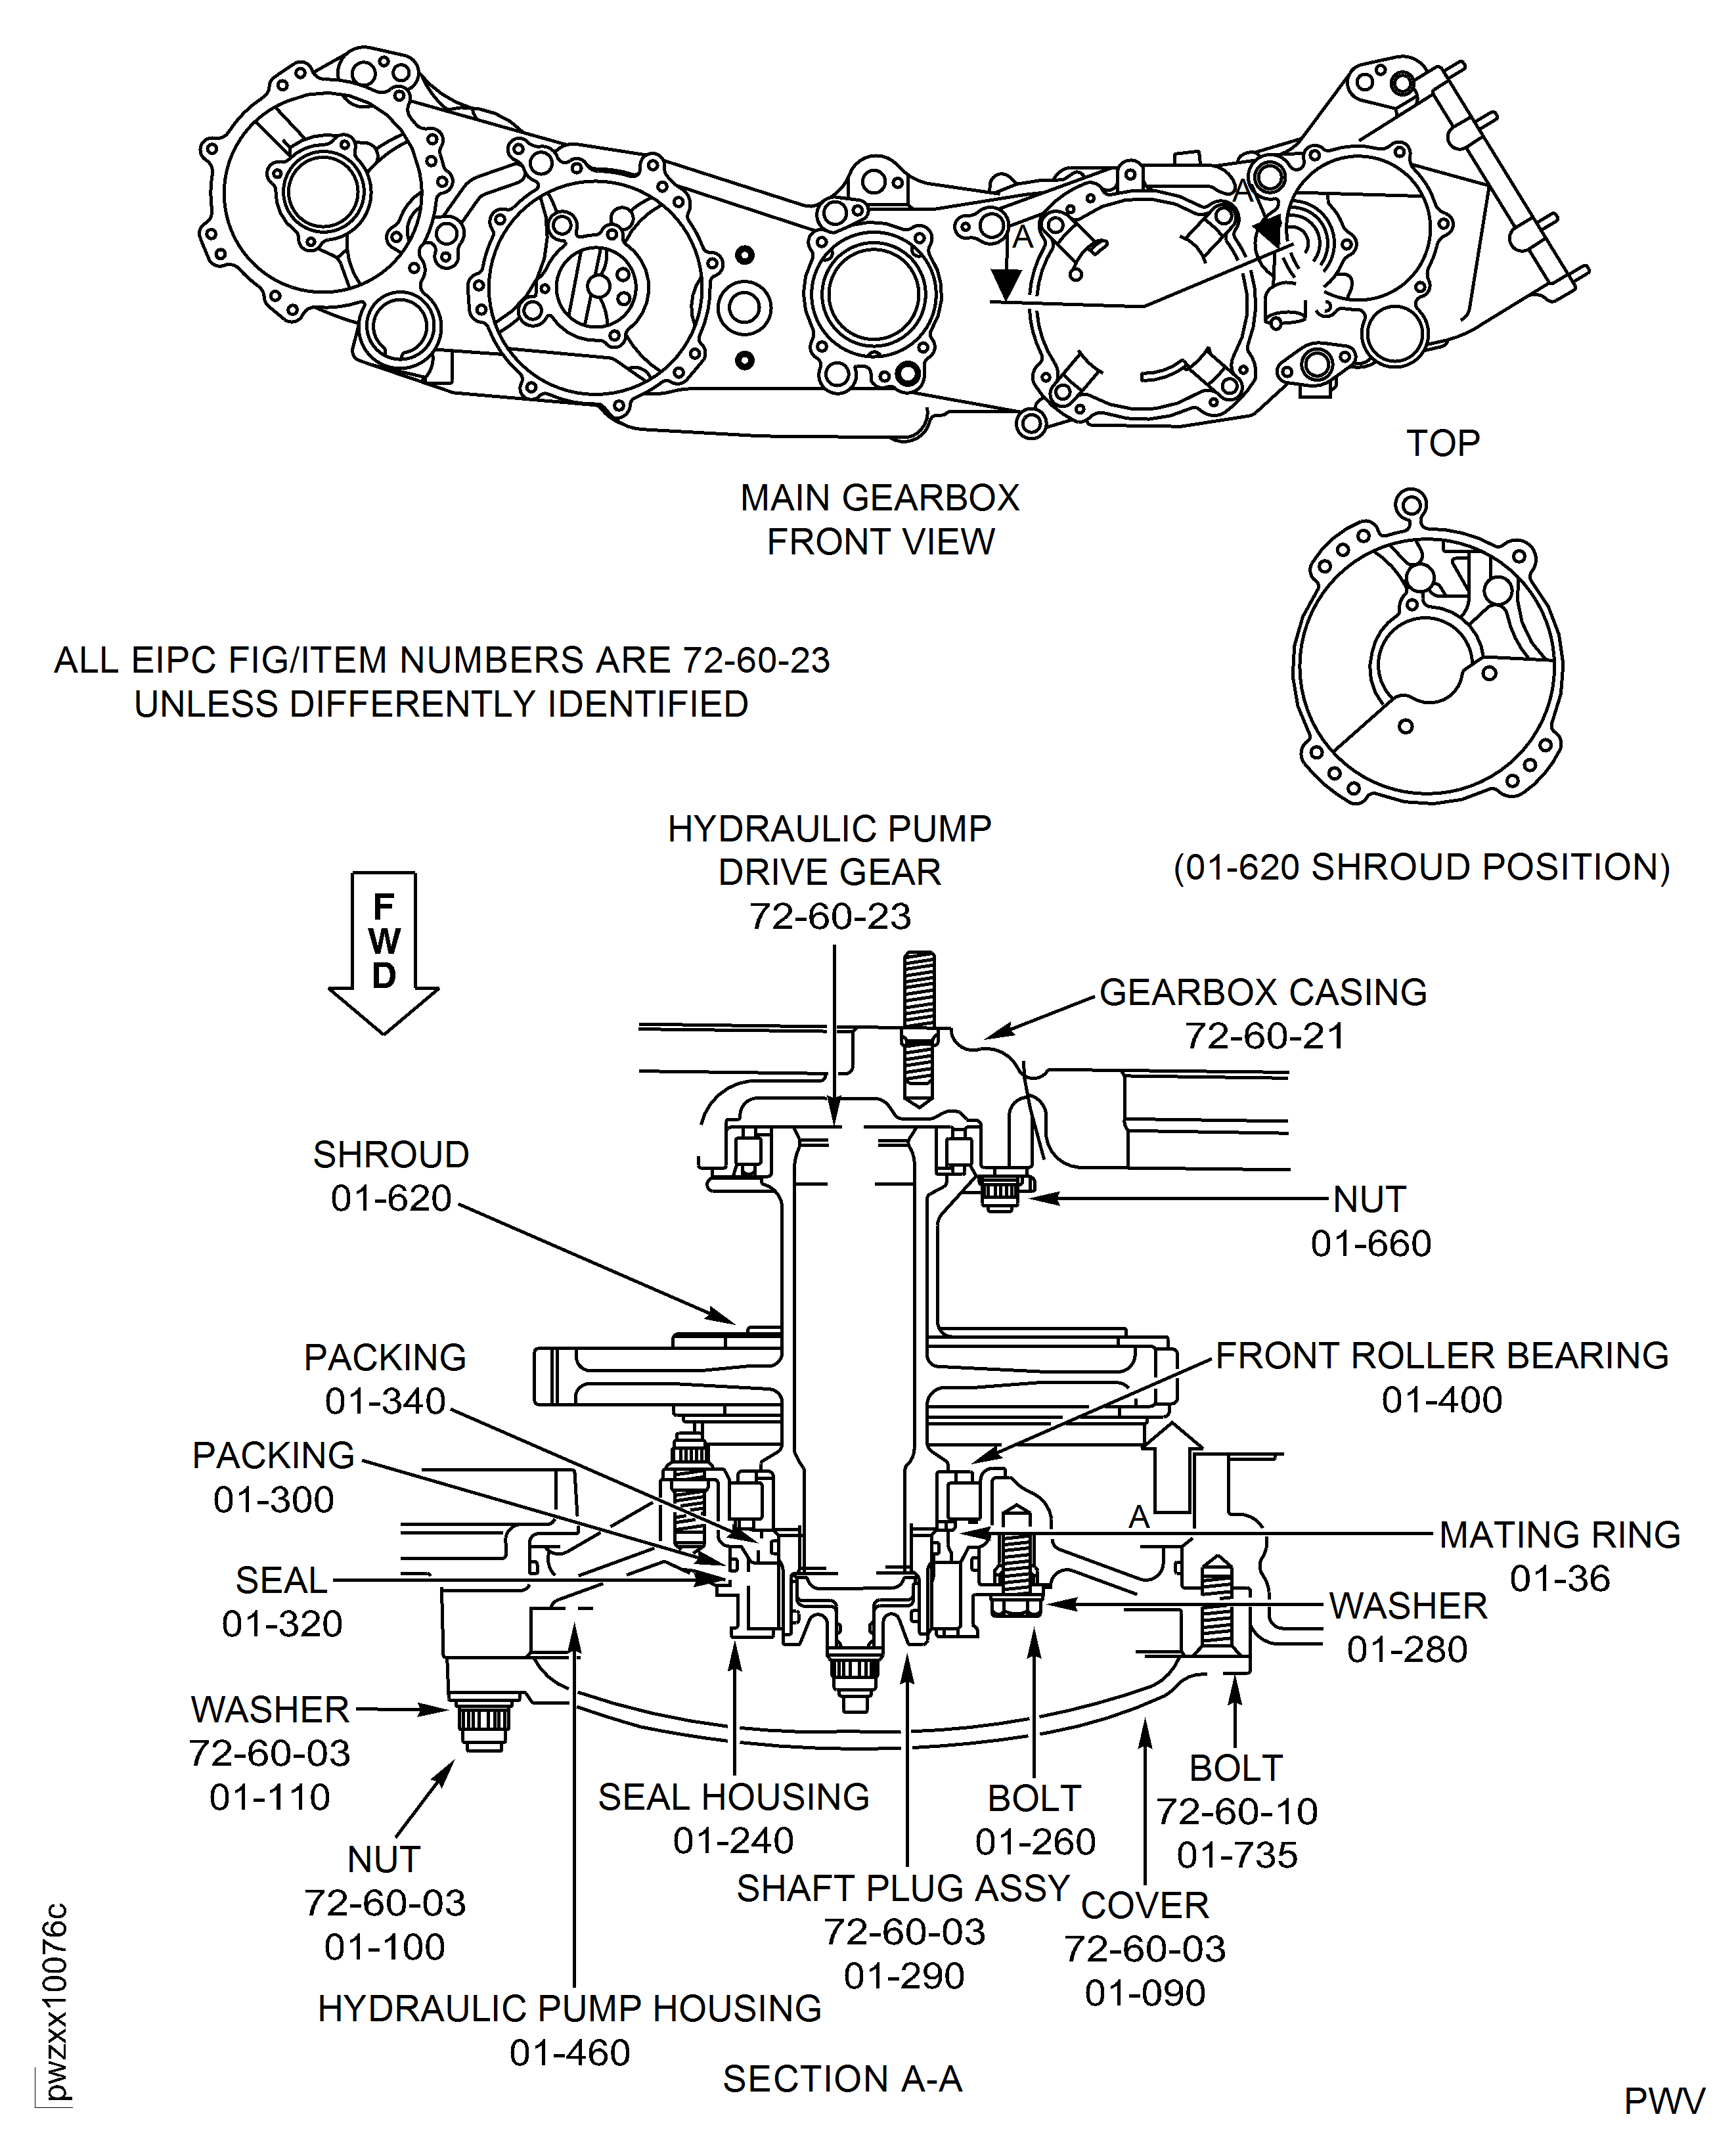
Figure: Install the Hydraulic Pump Drive Gear
Install the Hydraulic Pump Drive Gear
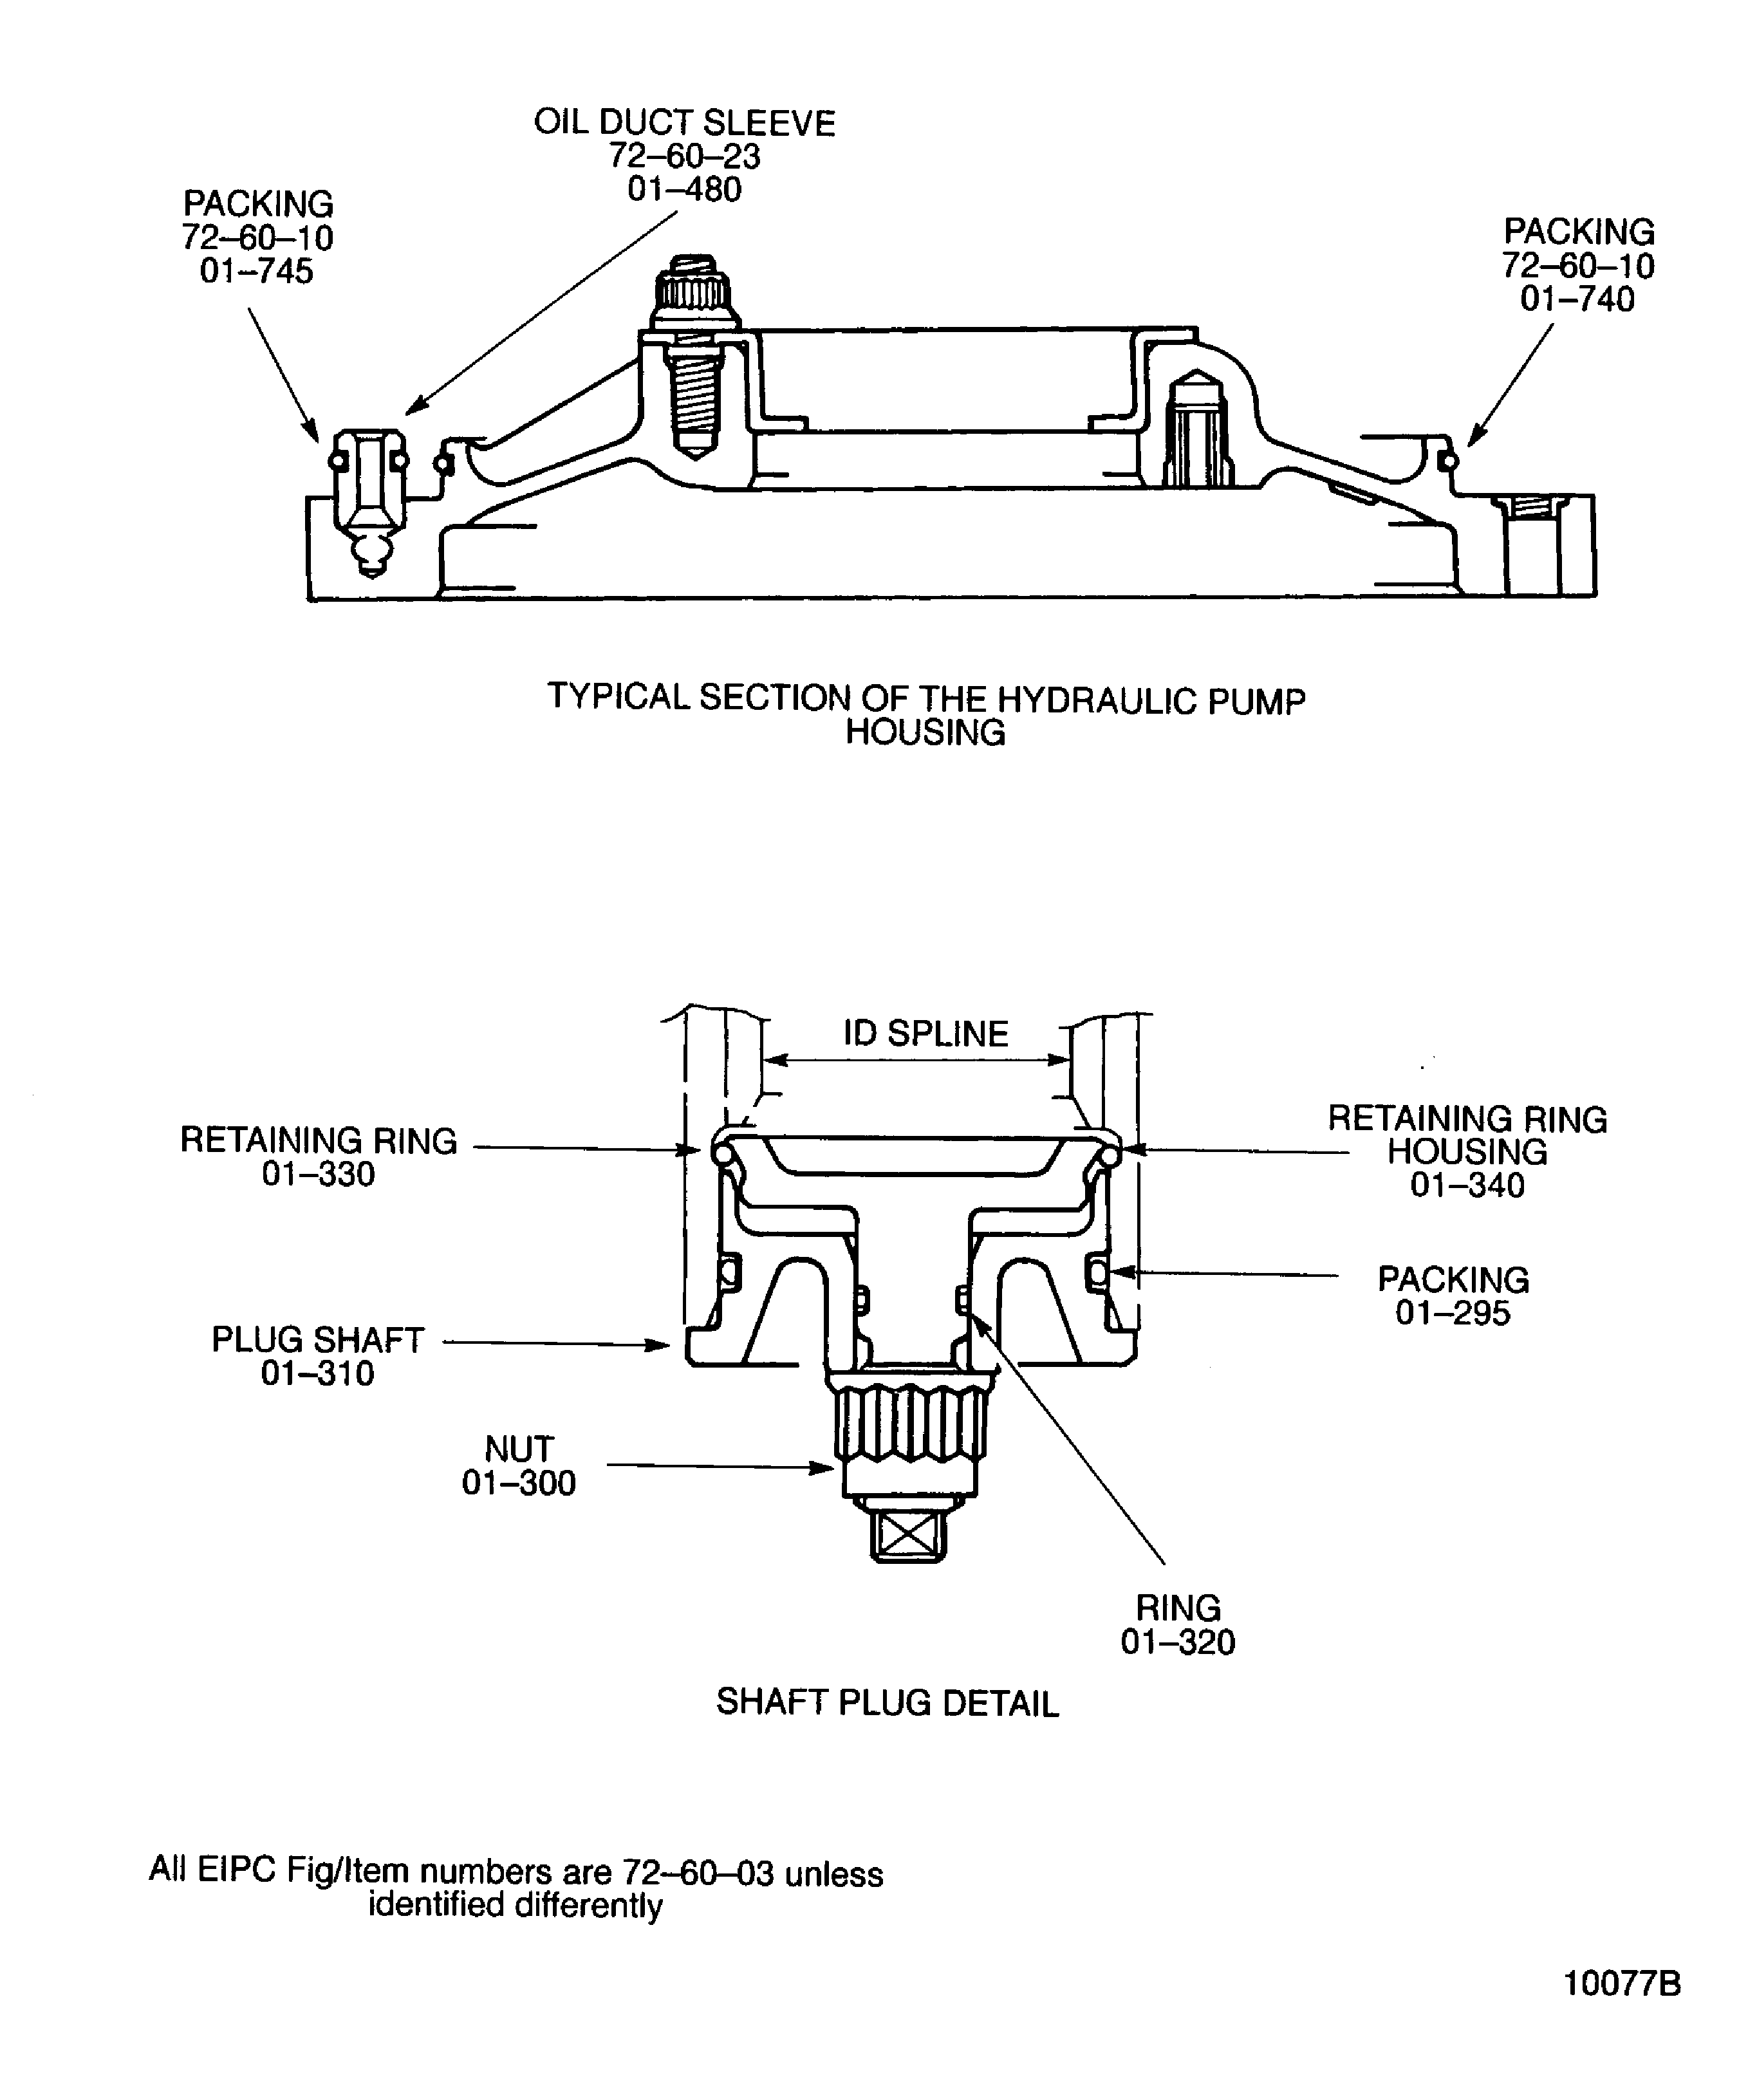
Figure: Install the Fuel Pump Drive Gear
Install the Fuel Pump Drive Gear
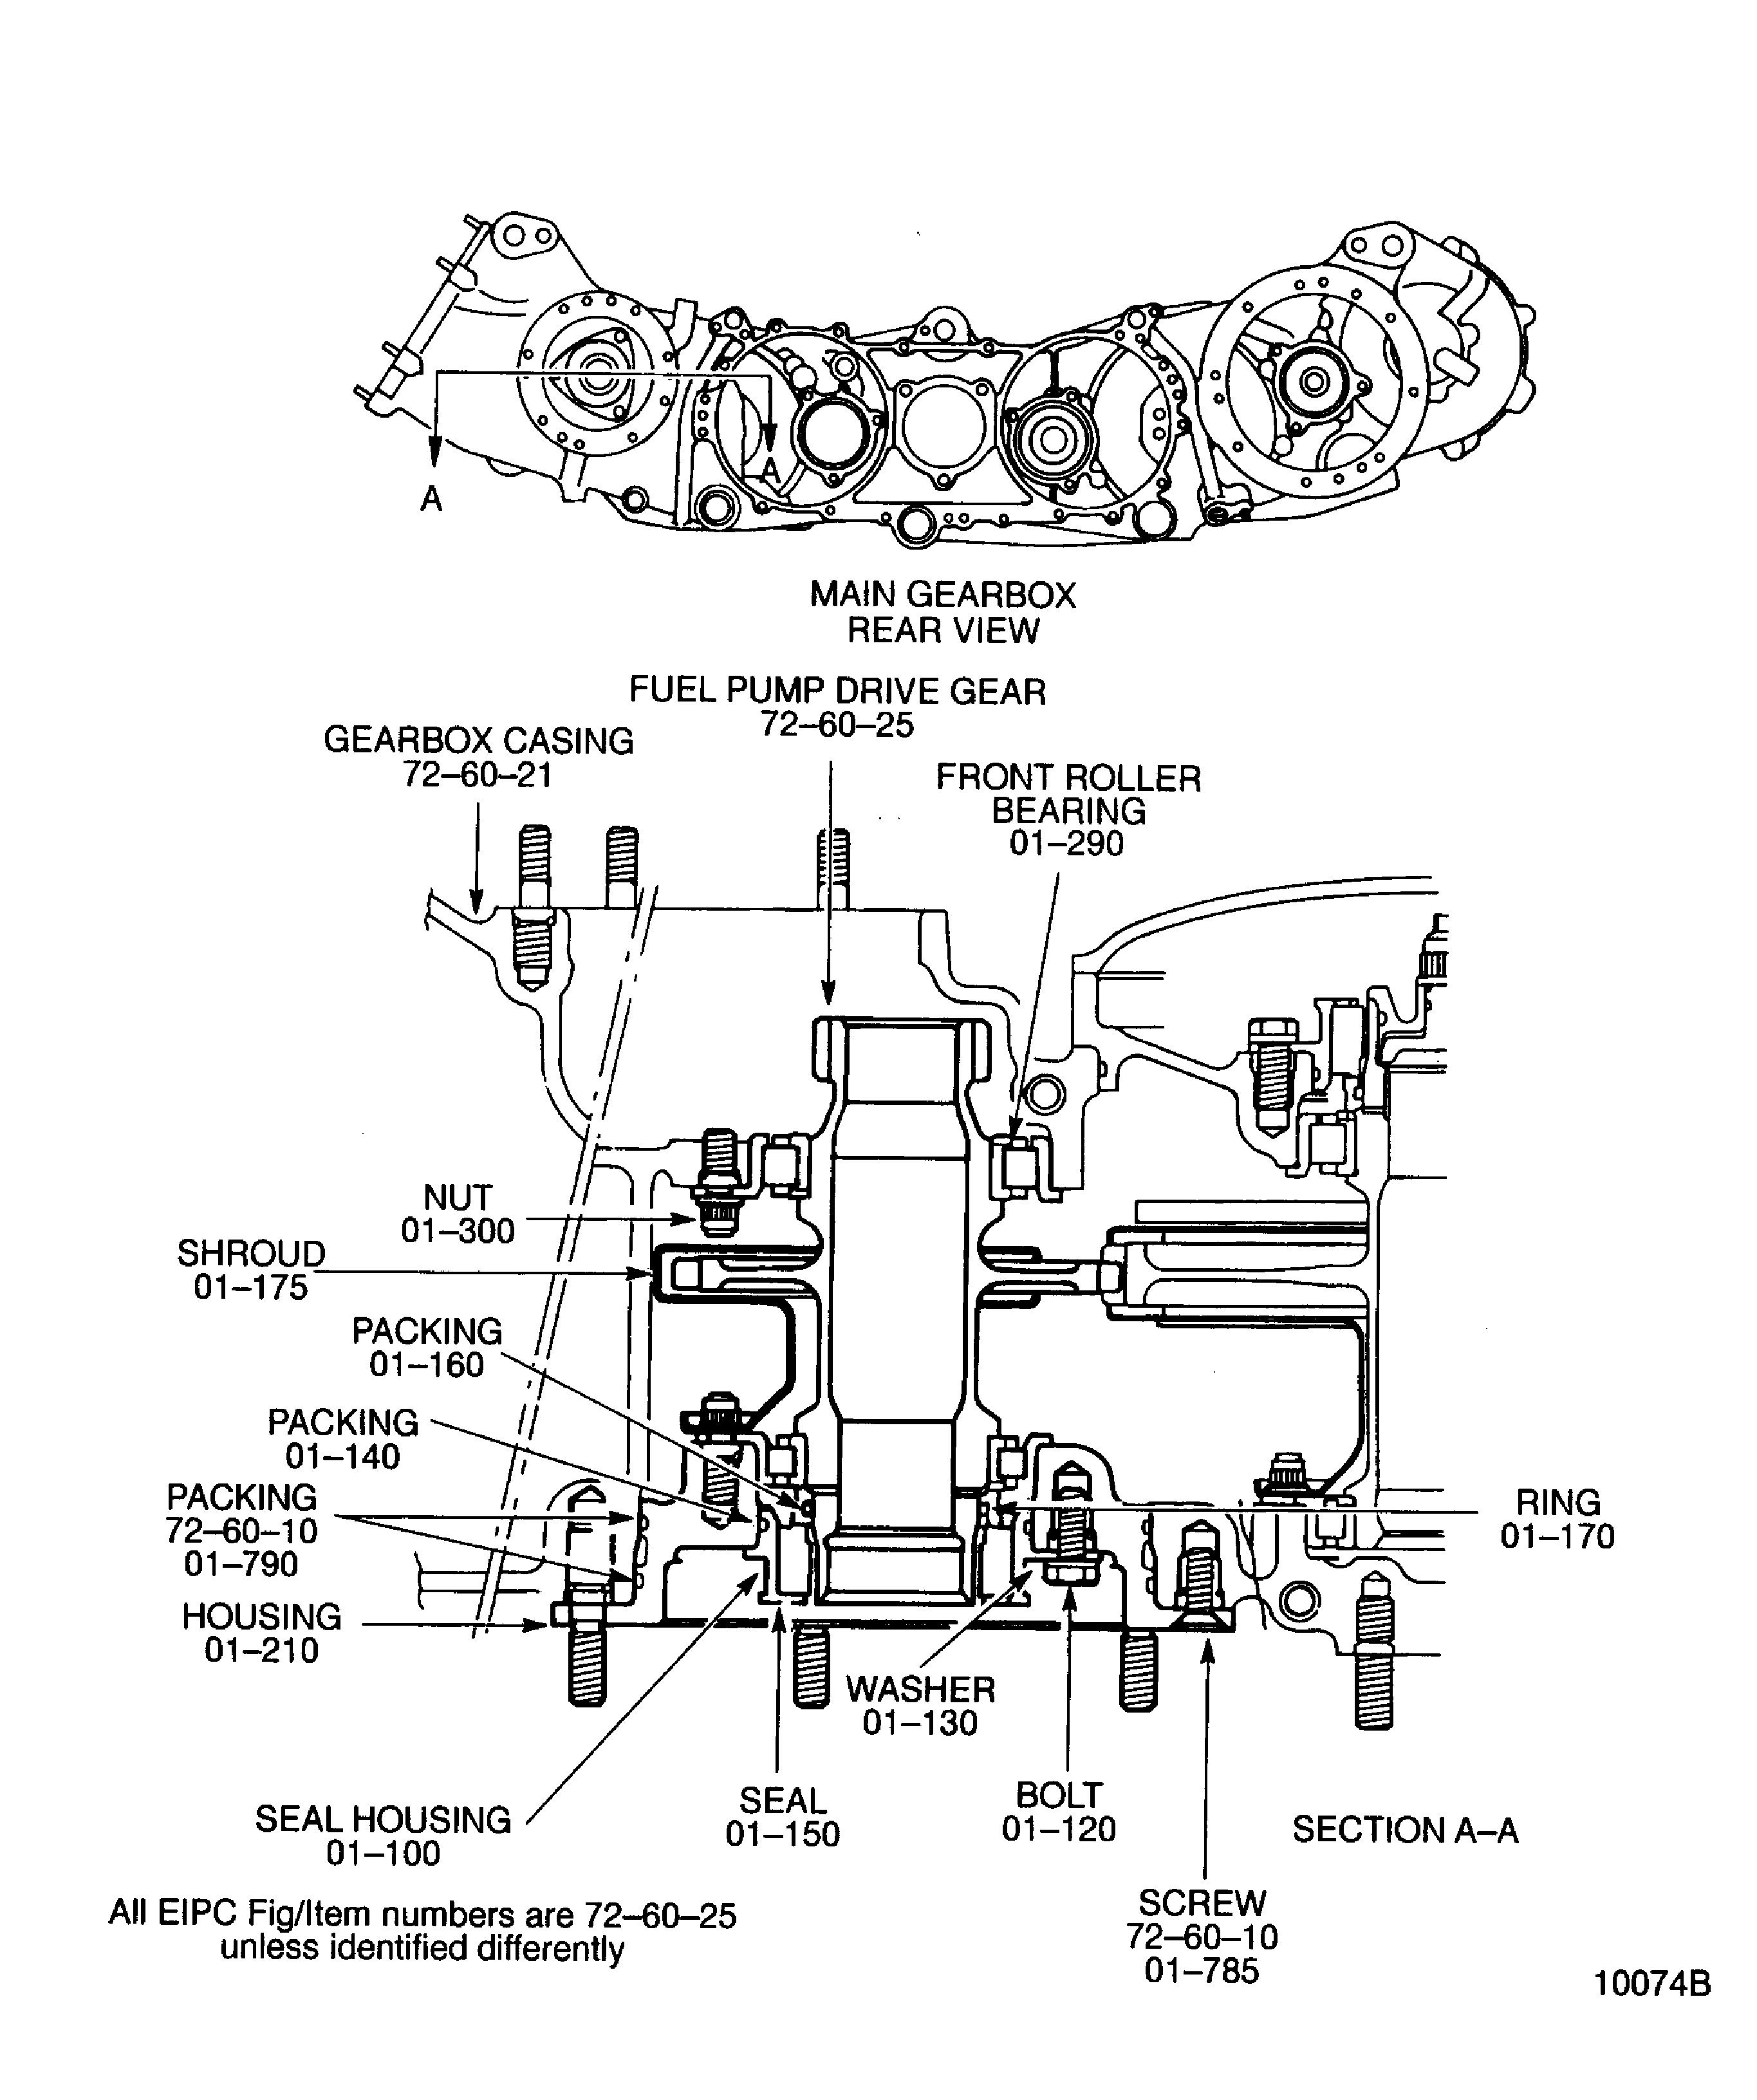
Figure: Install the Oil Scavenge Pump Drive Gear
Install the Oil Scavenge Pump Drive Gear
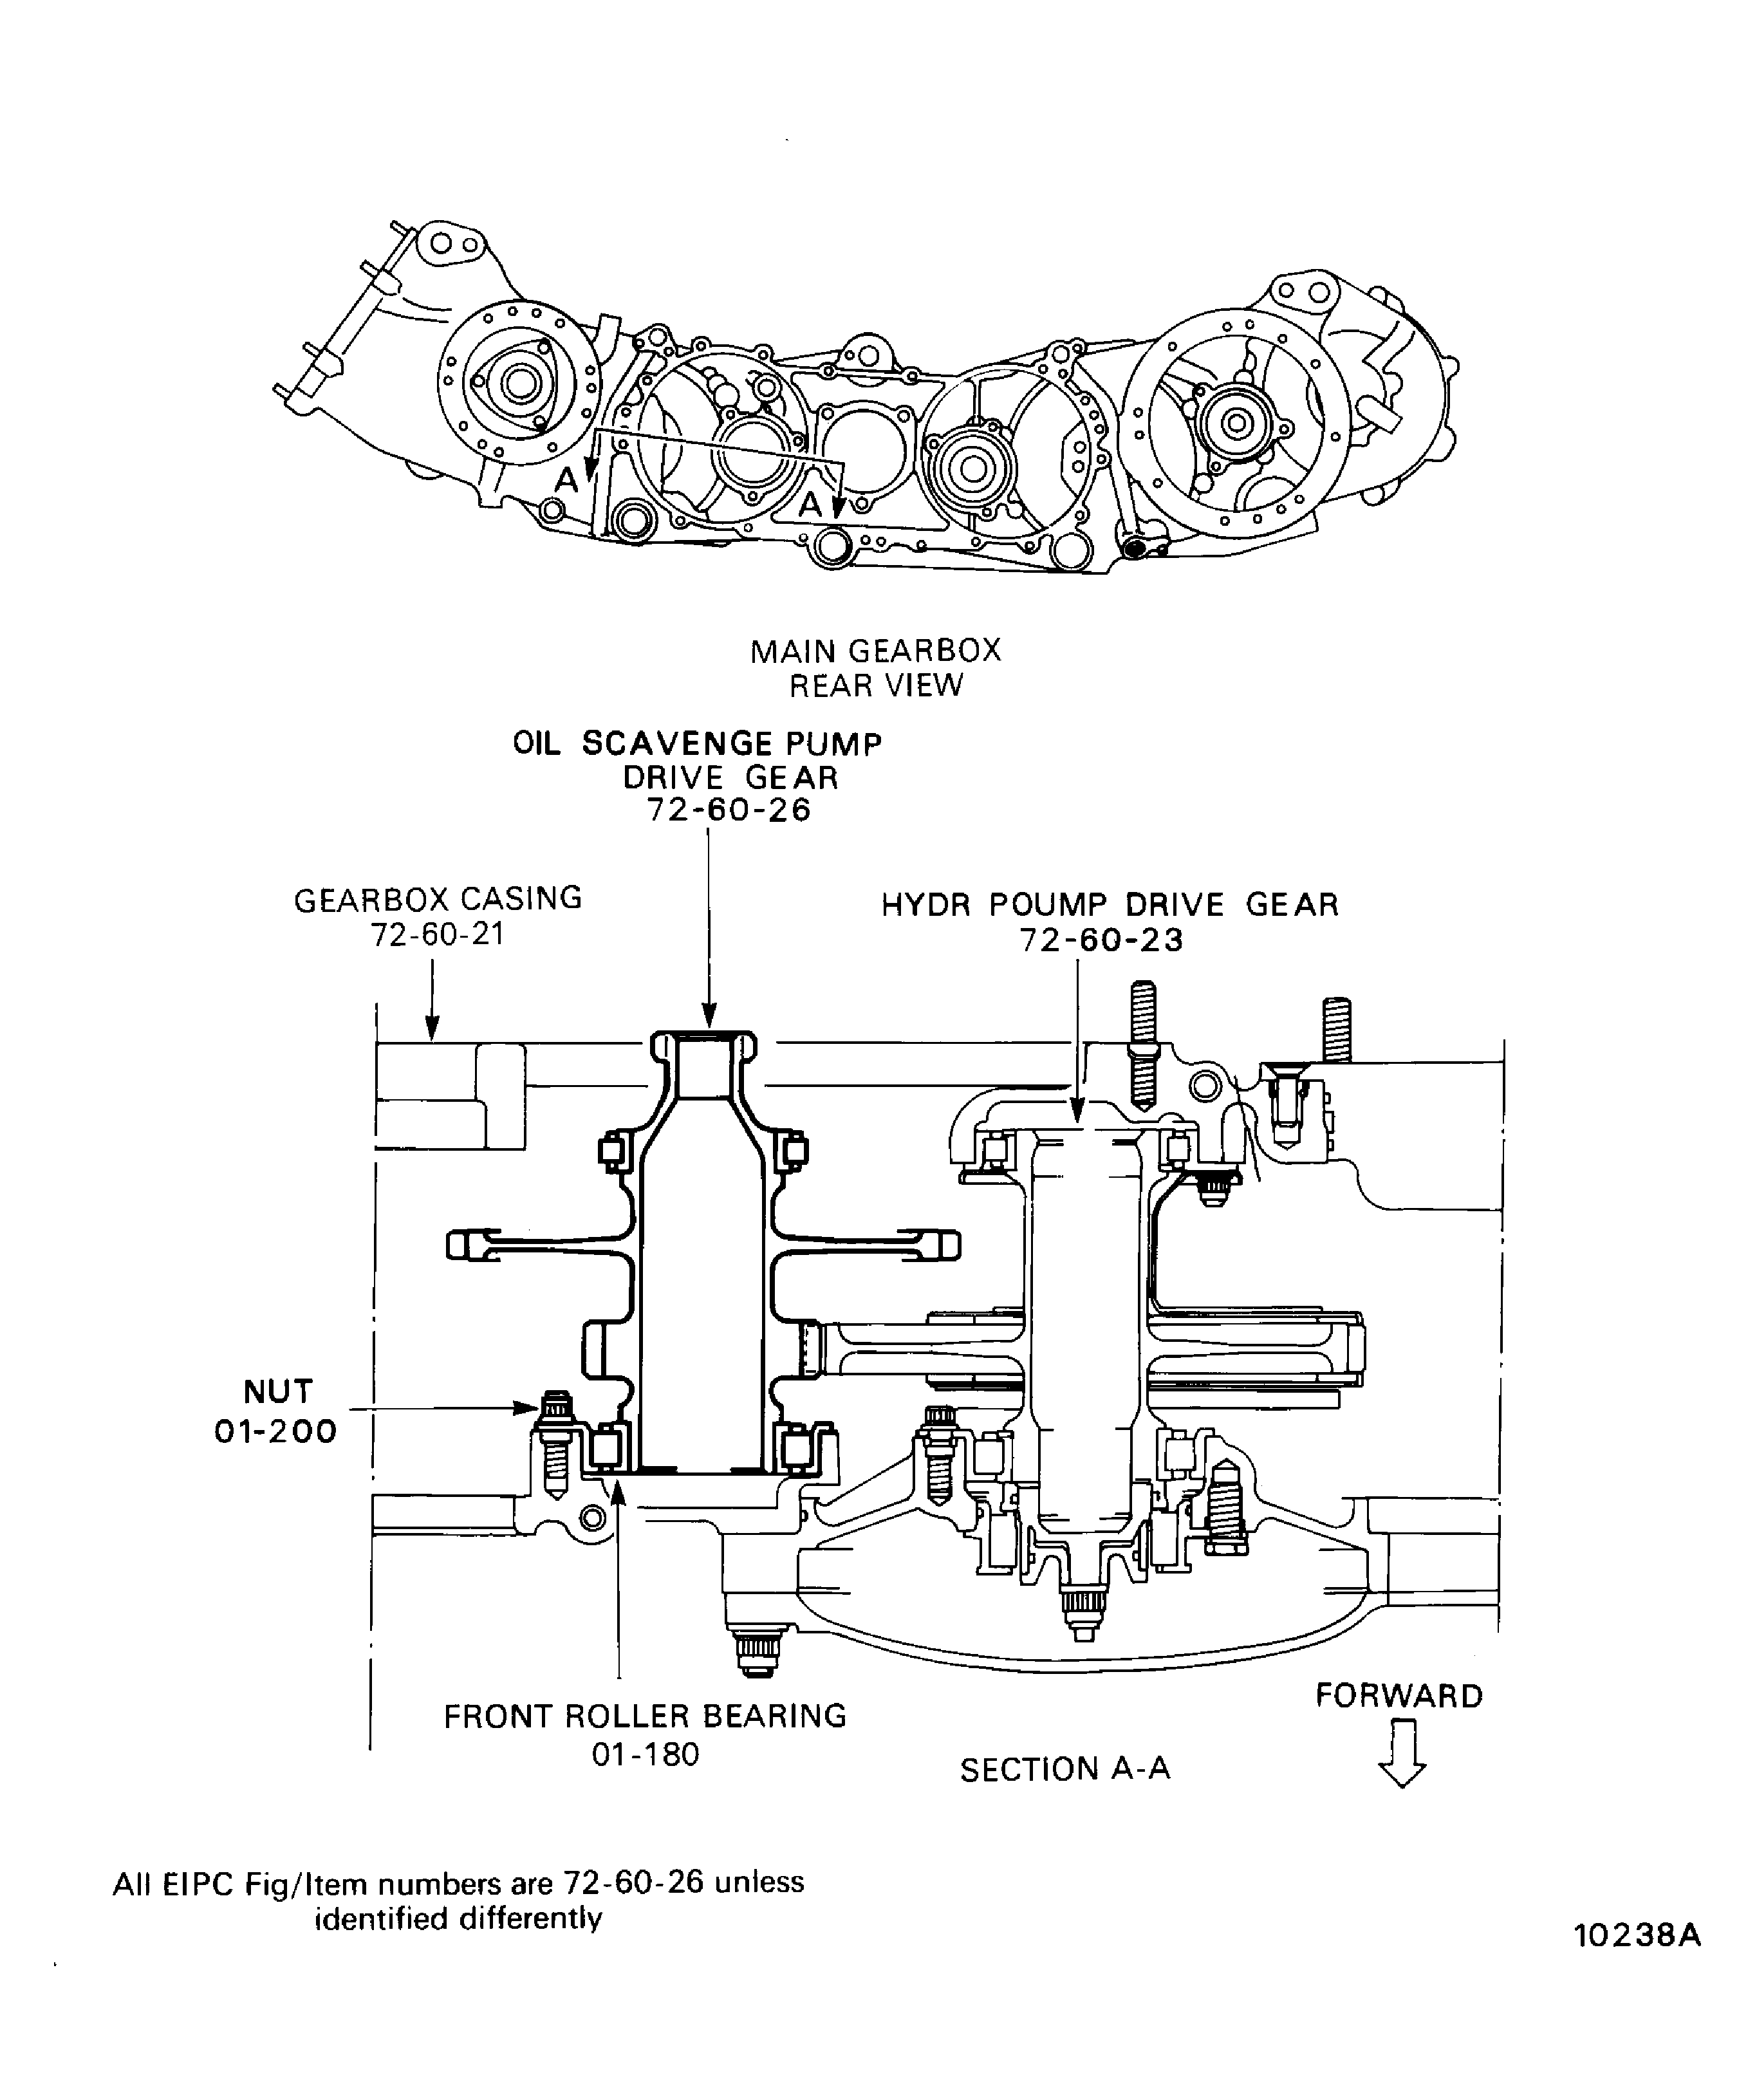
Figure: Install the Extension Layshaft Gear
Install the Extension Layshaft Gear
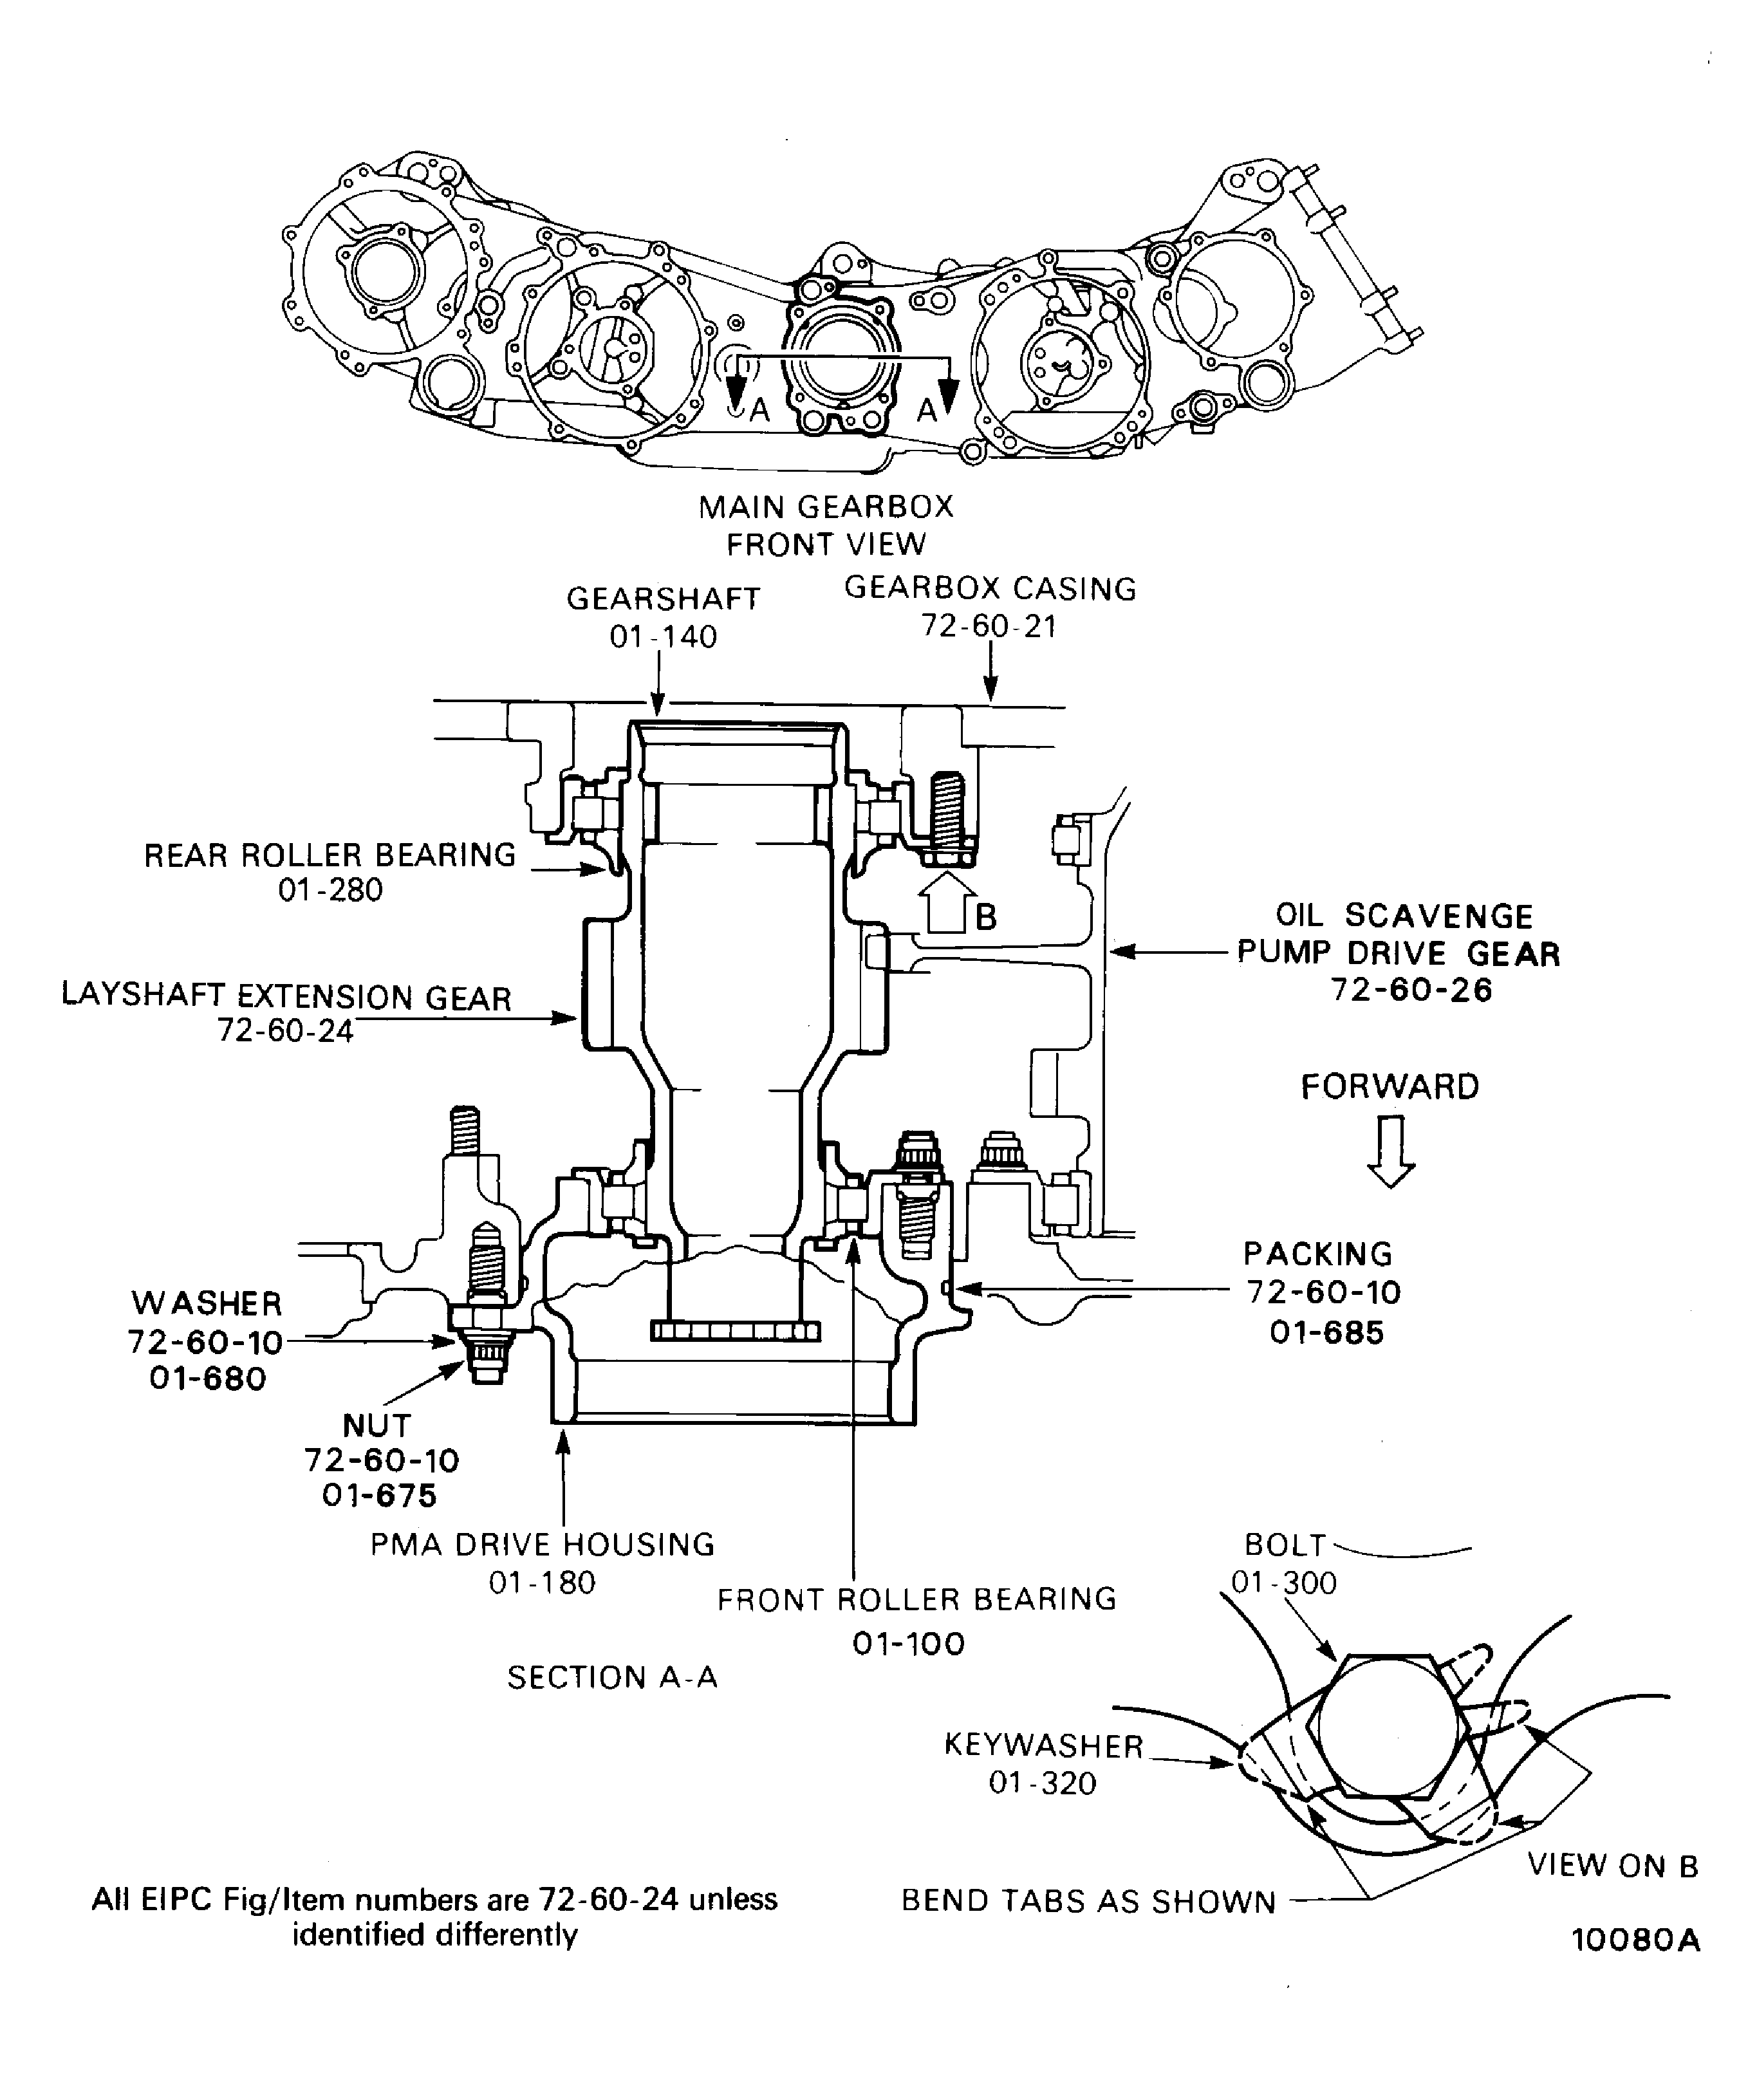
Figure: Install the Starter Idler Gear
Install the Starter Idler Gear
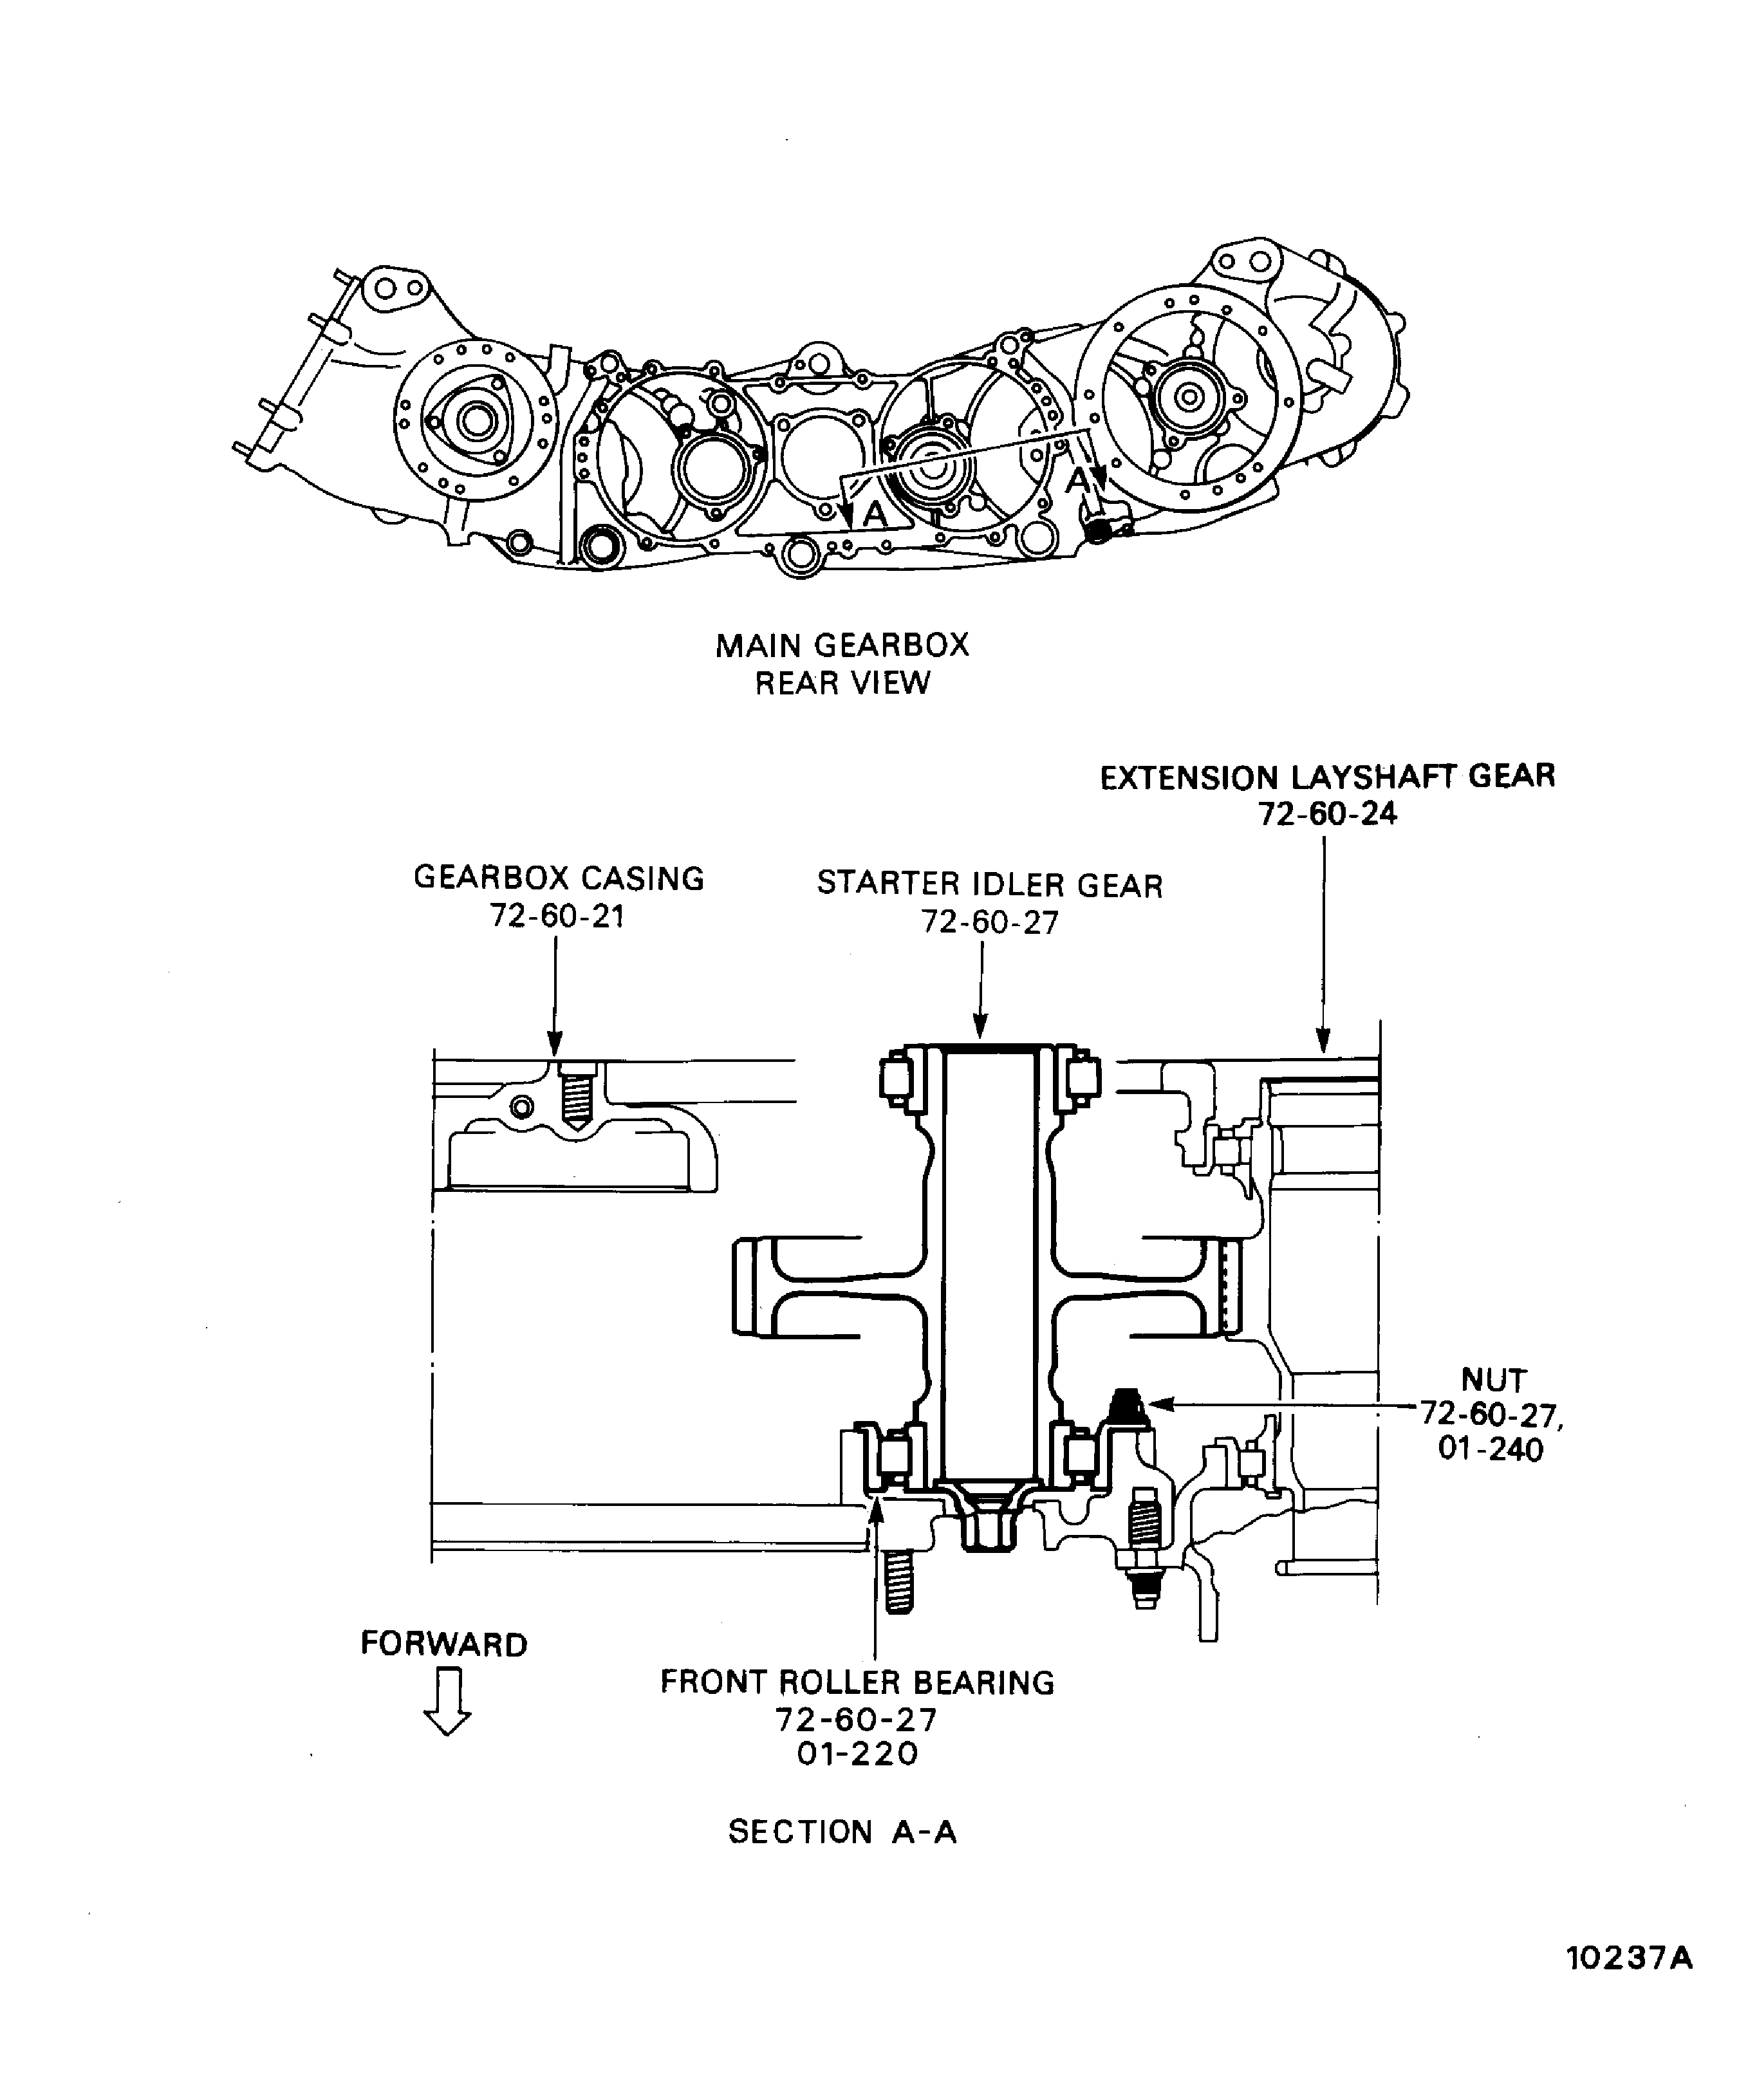
Figure: Install the Angle Gearbox Support
Install the Angle Gearbox Support
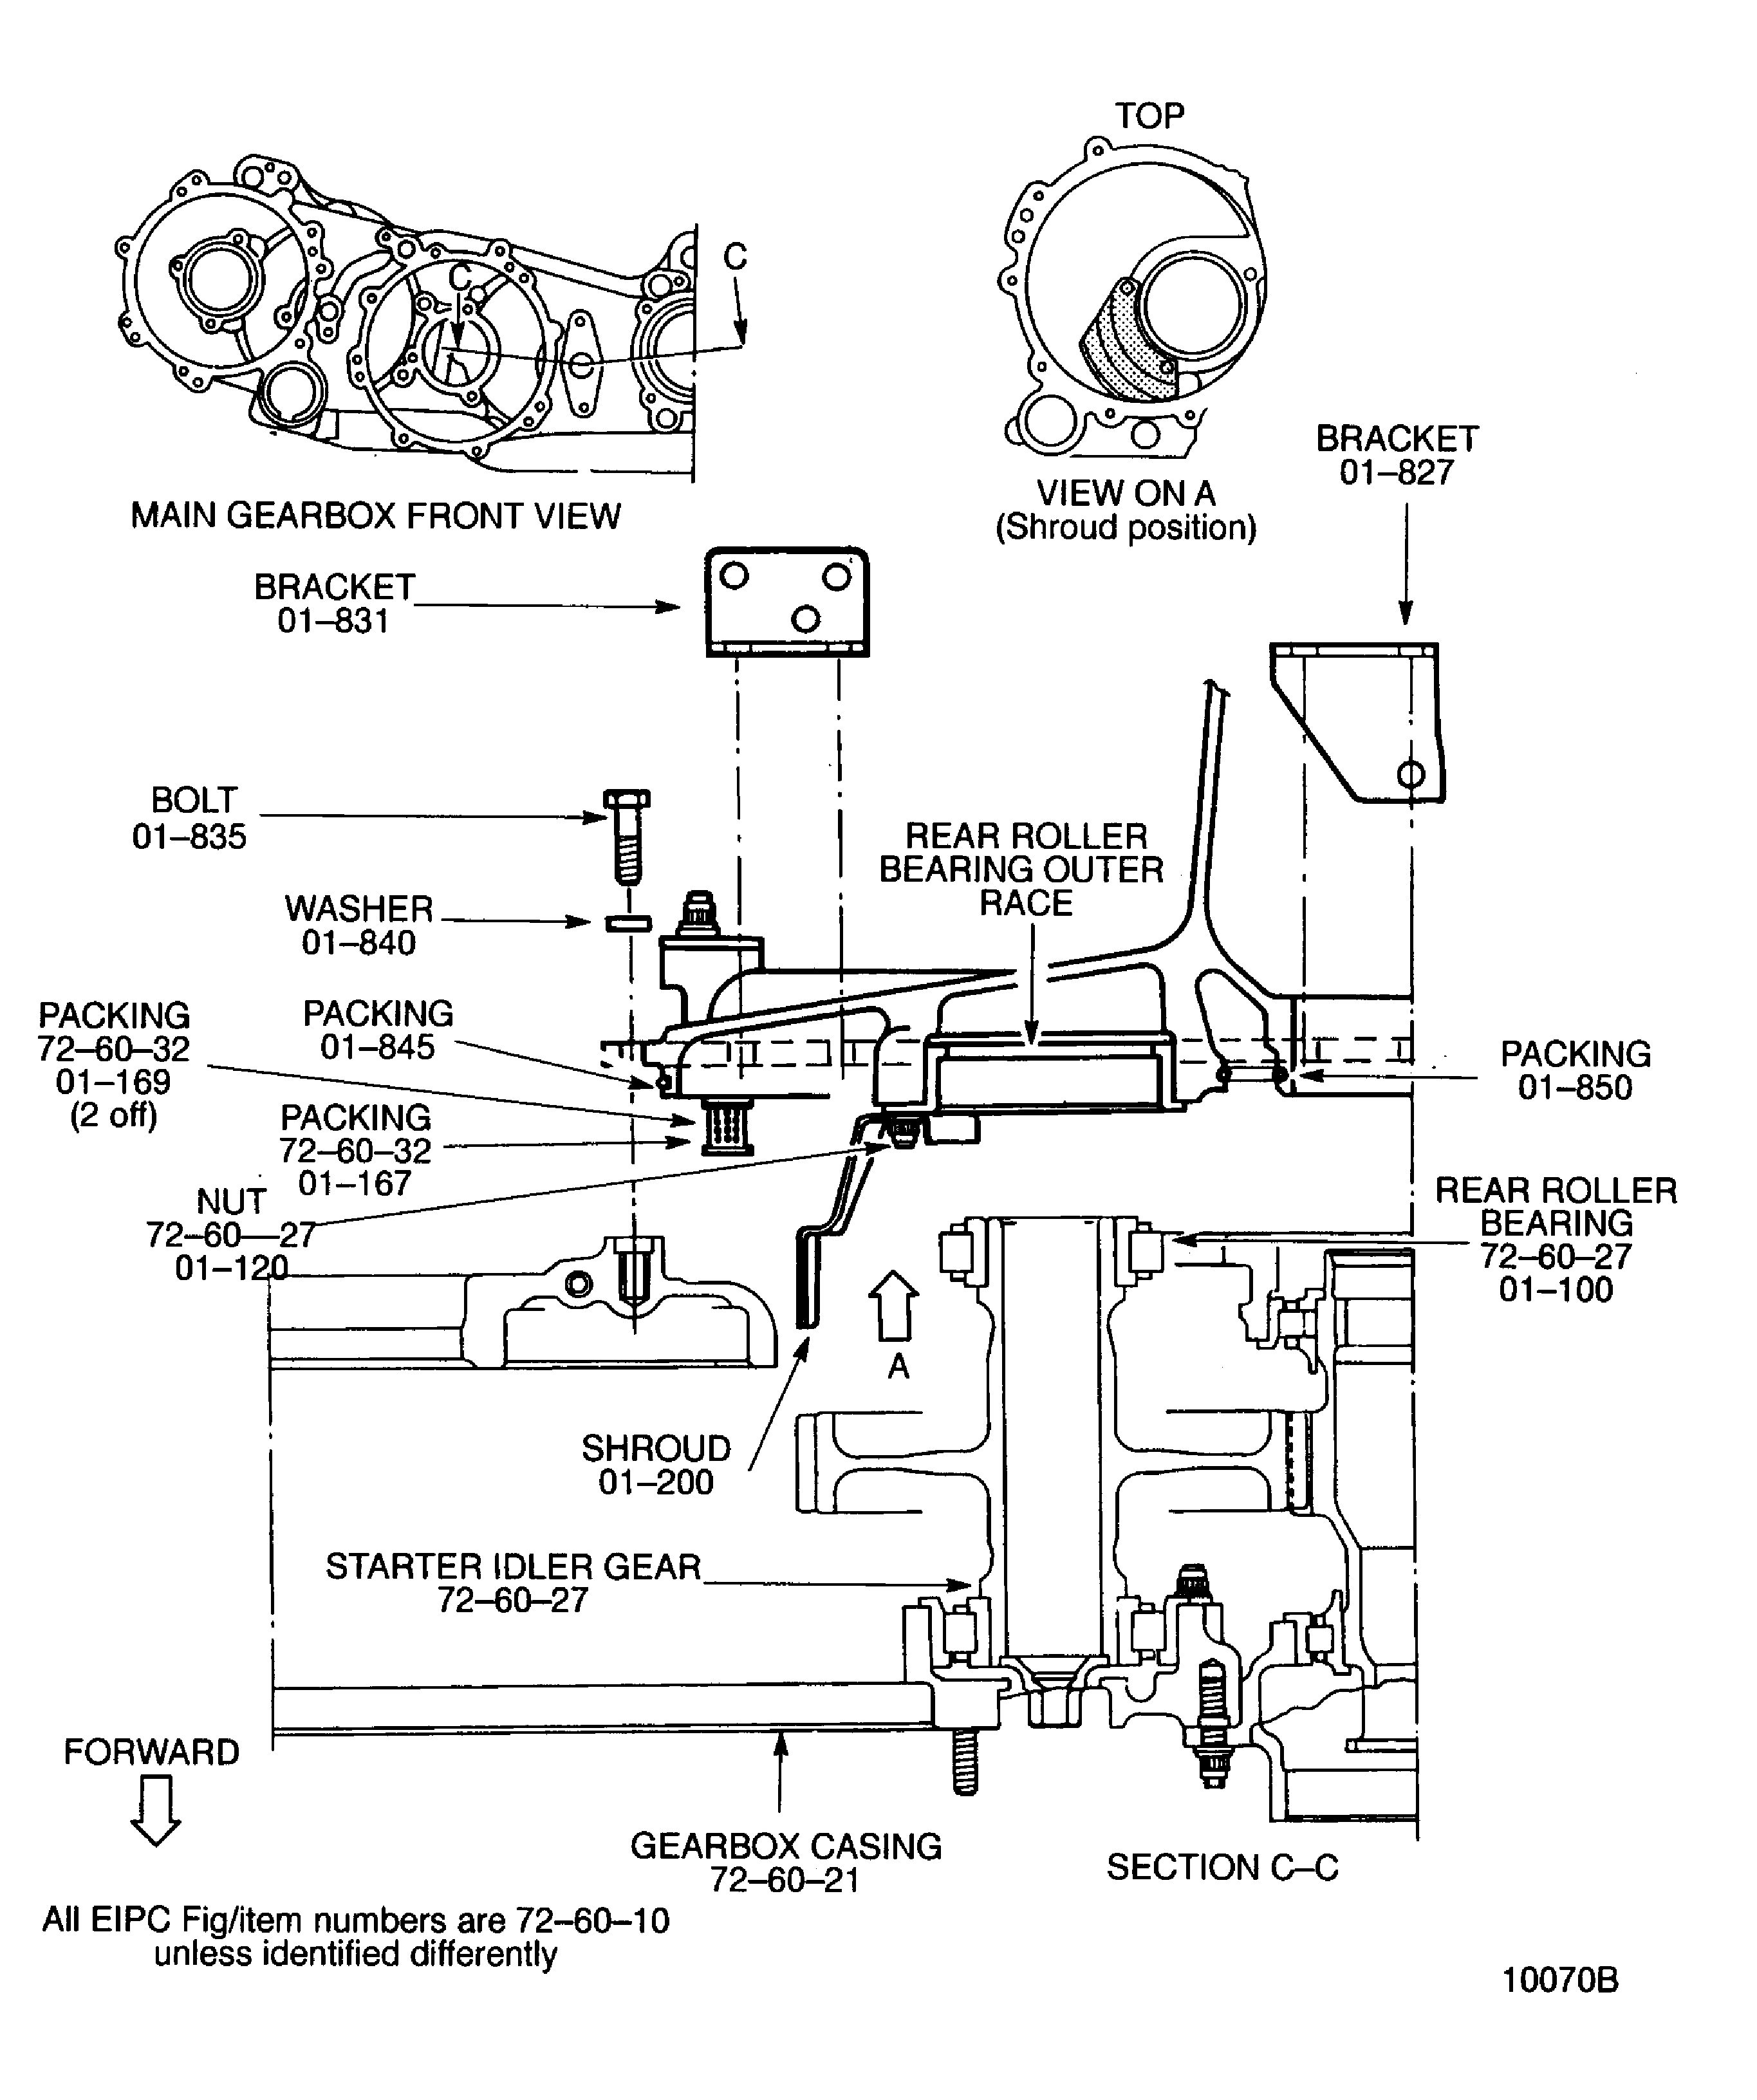
Figure: Install The Angle Gearbox Support
Install The Angle Gearbox Support
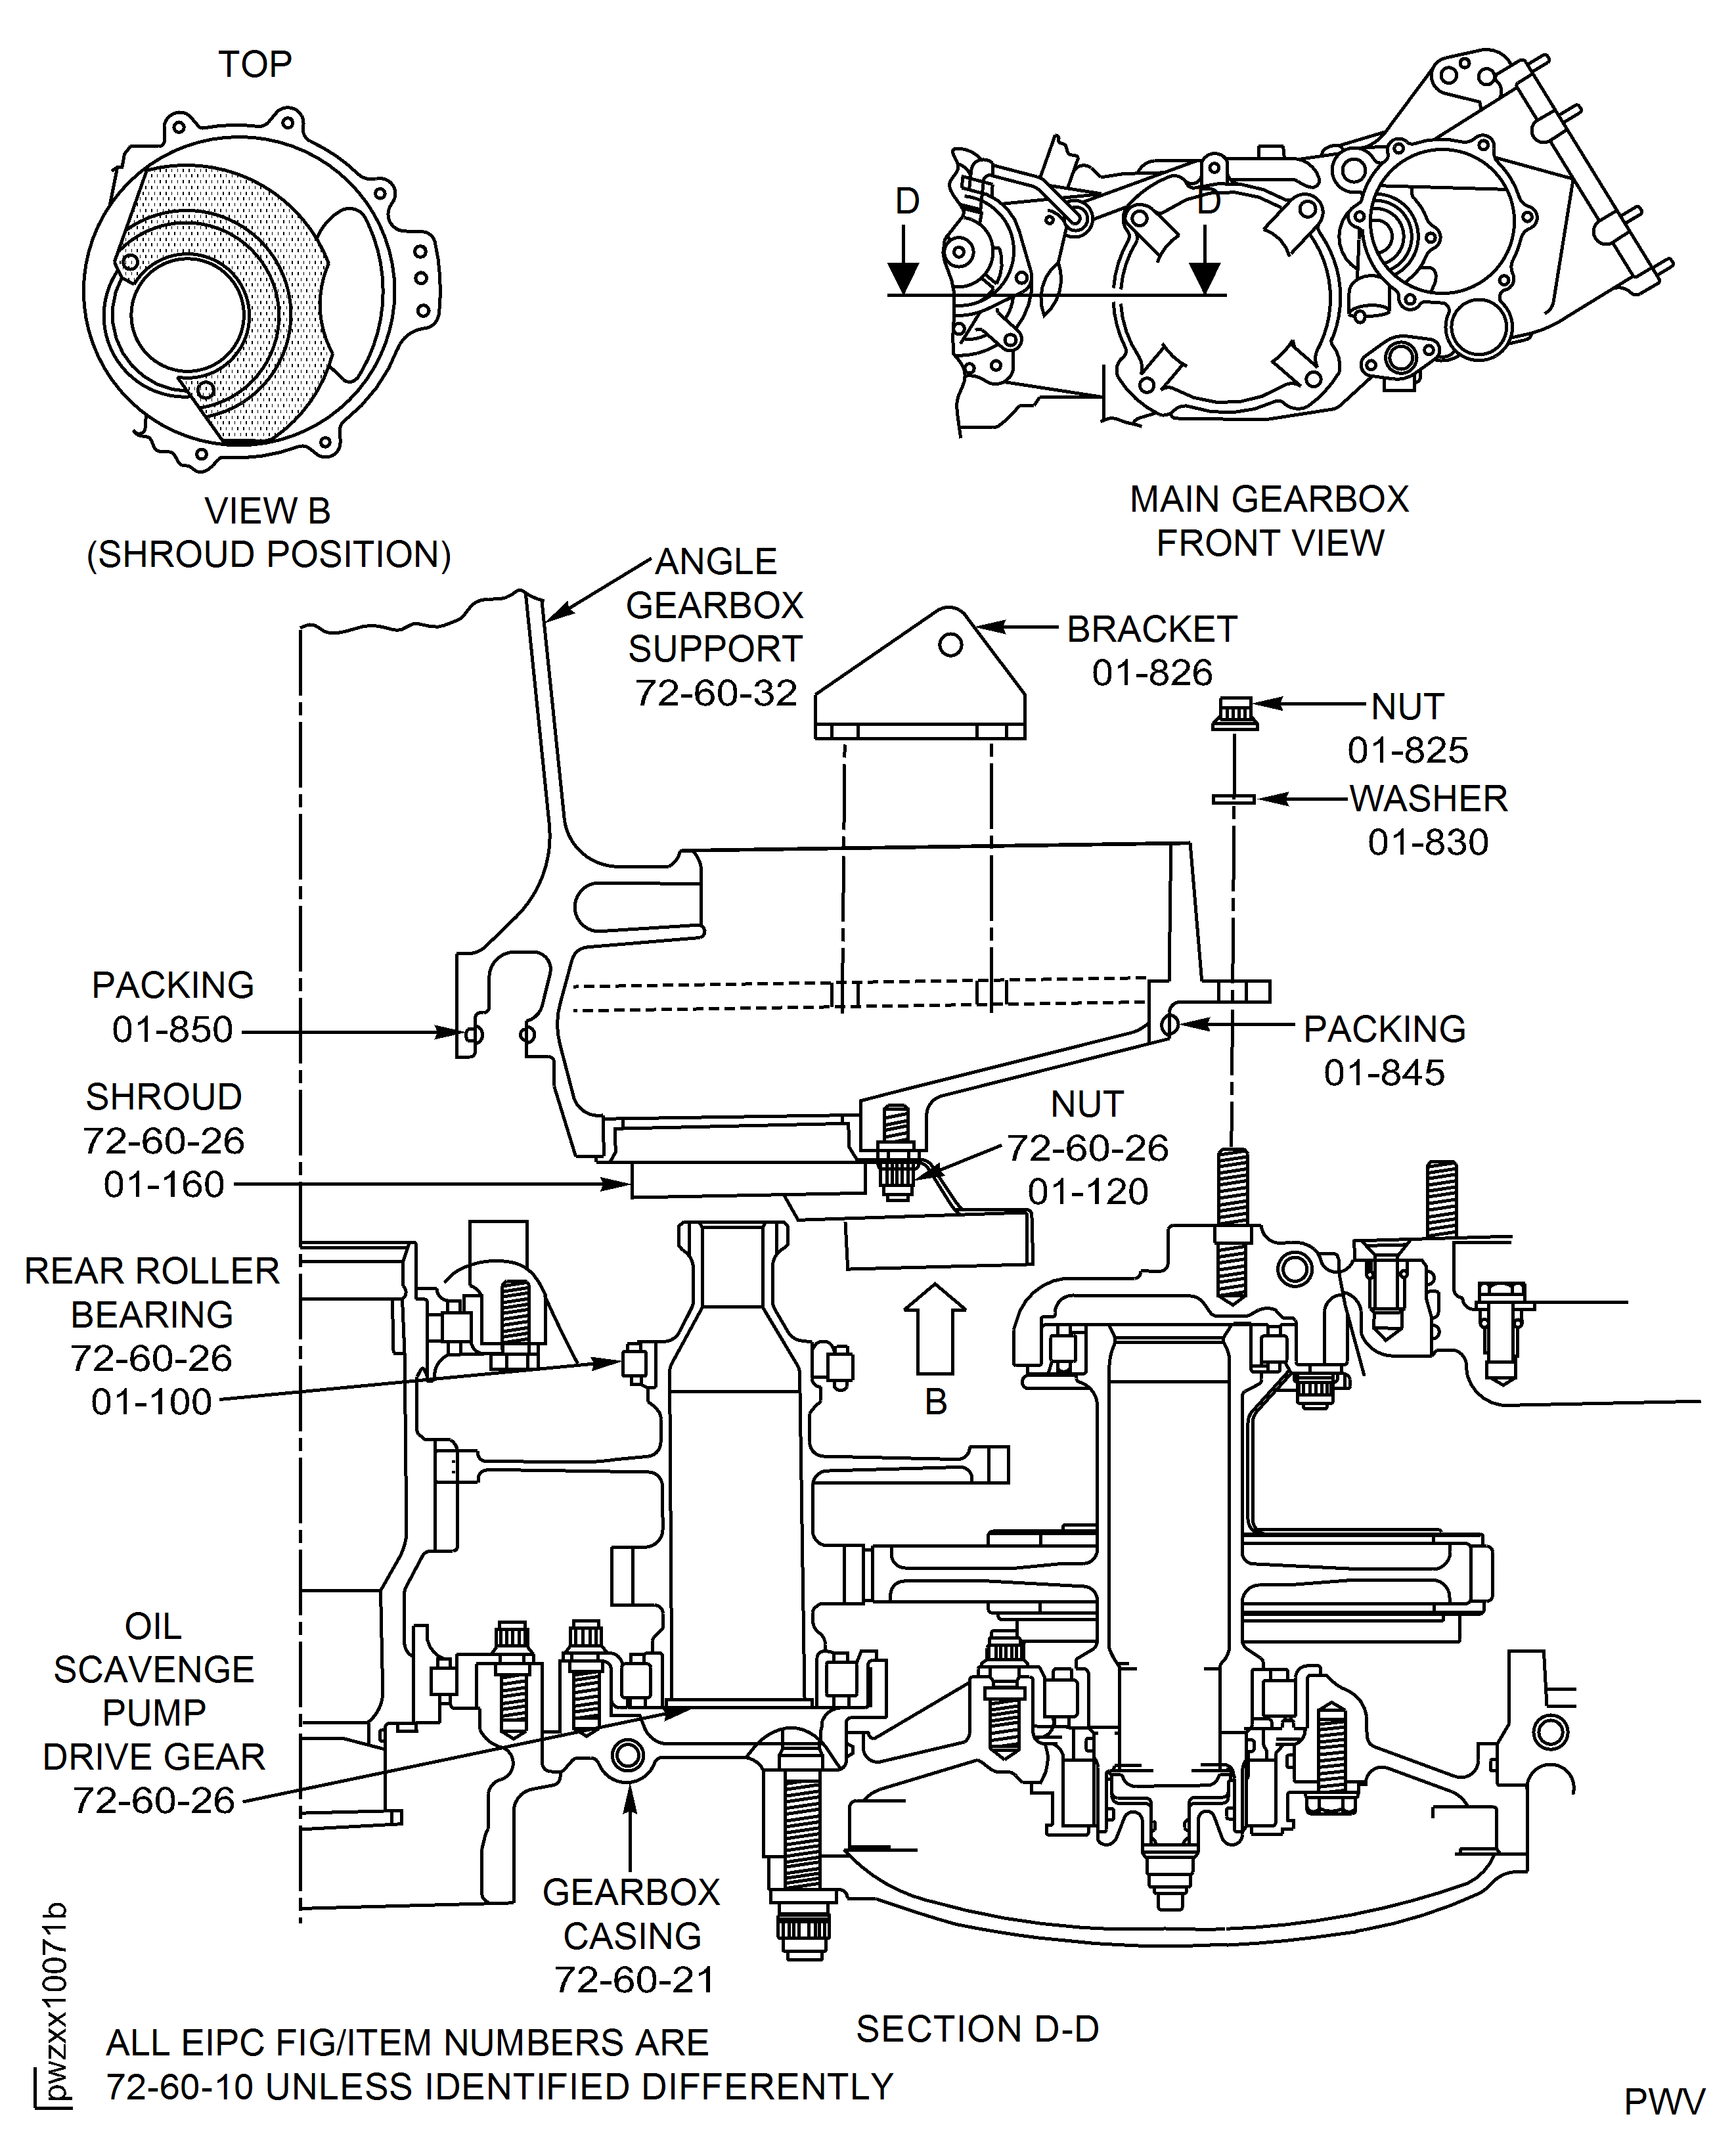
Figure: Install the Starter Drive Gear
Install the Starter Drive Gear
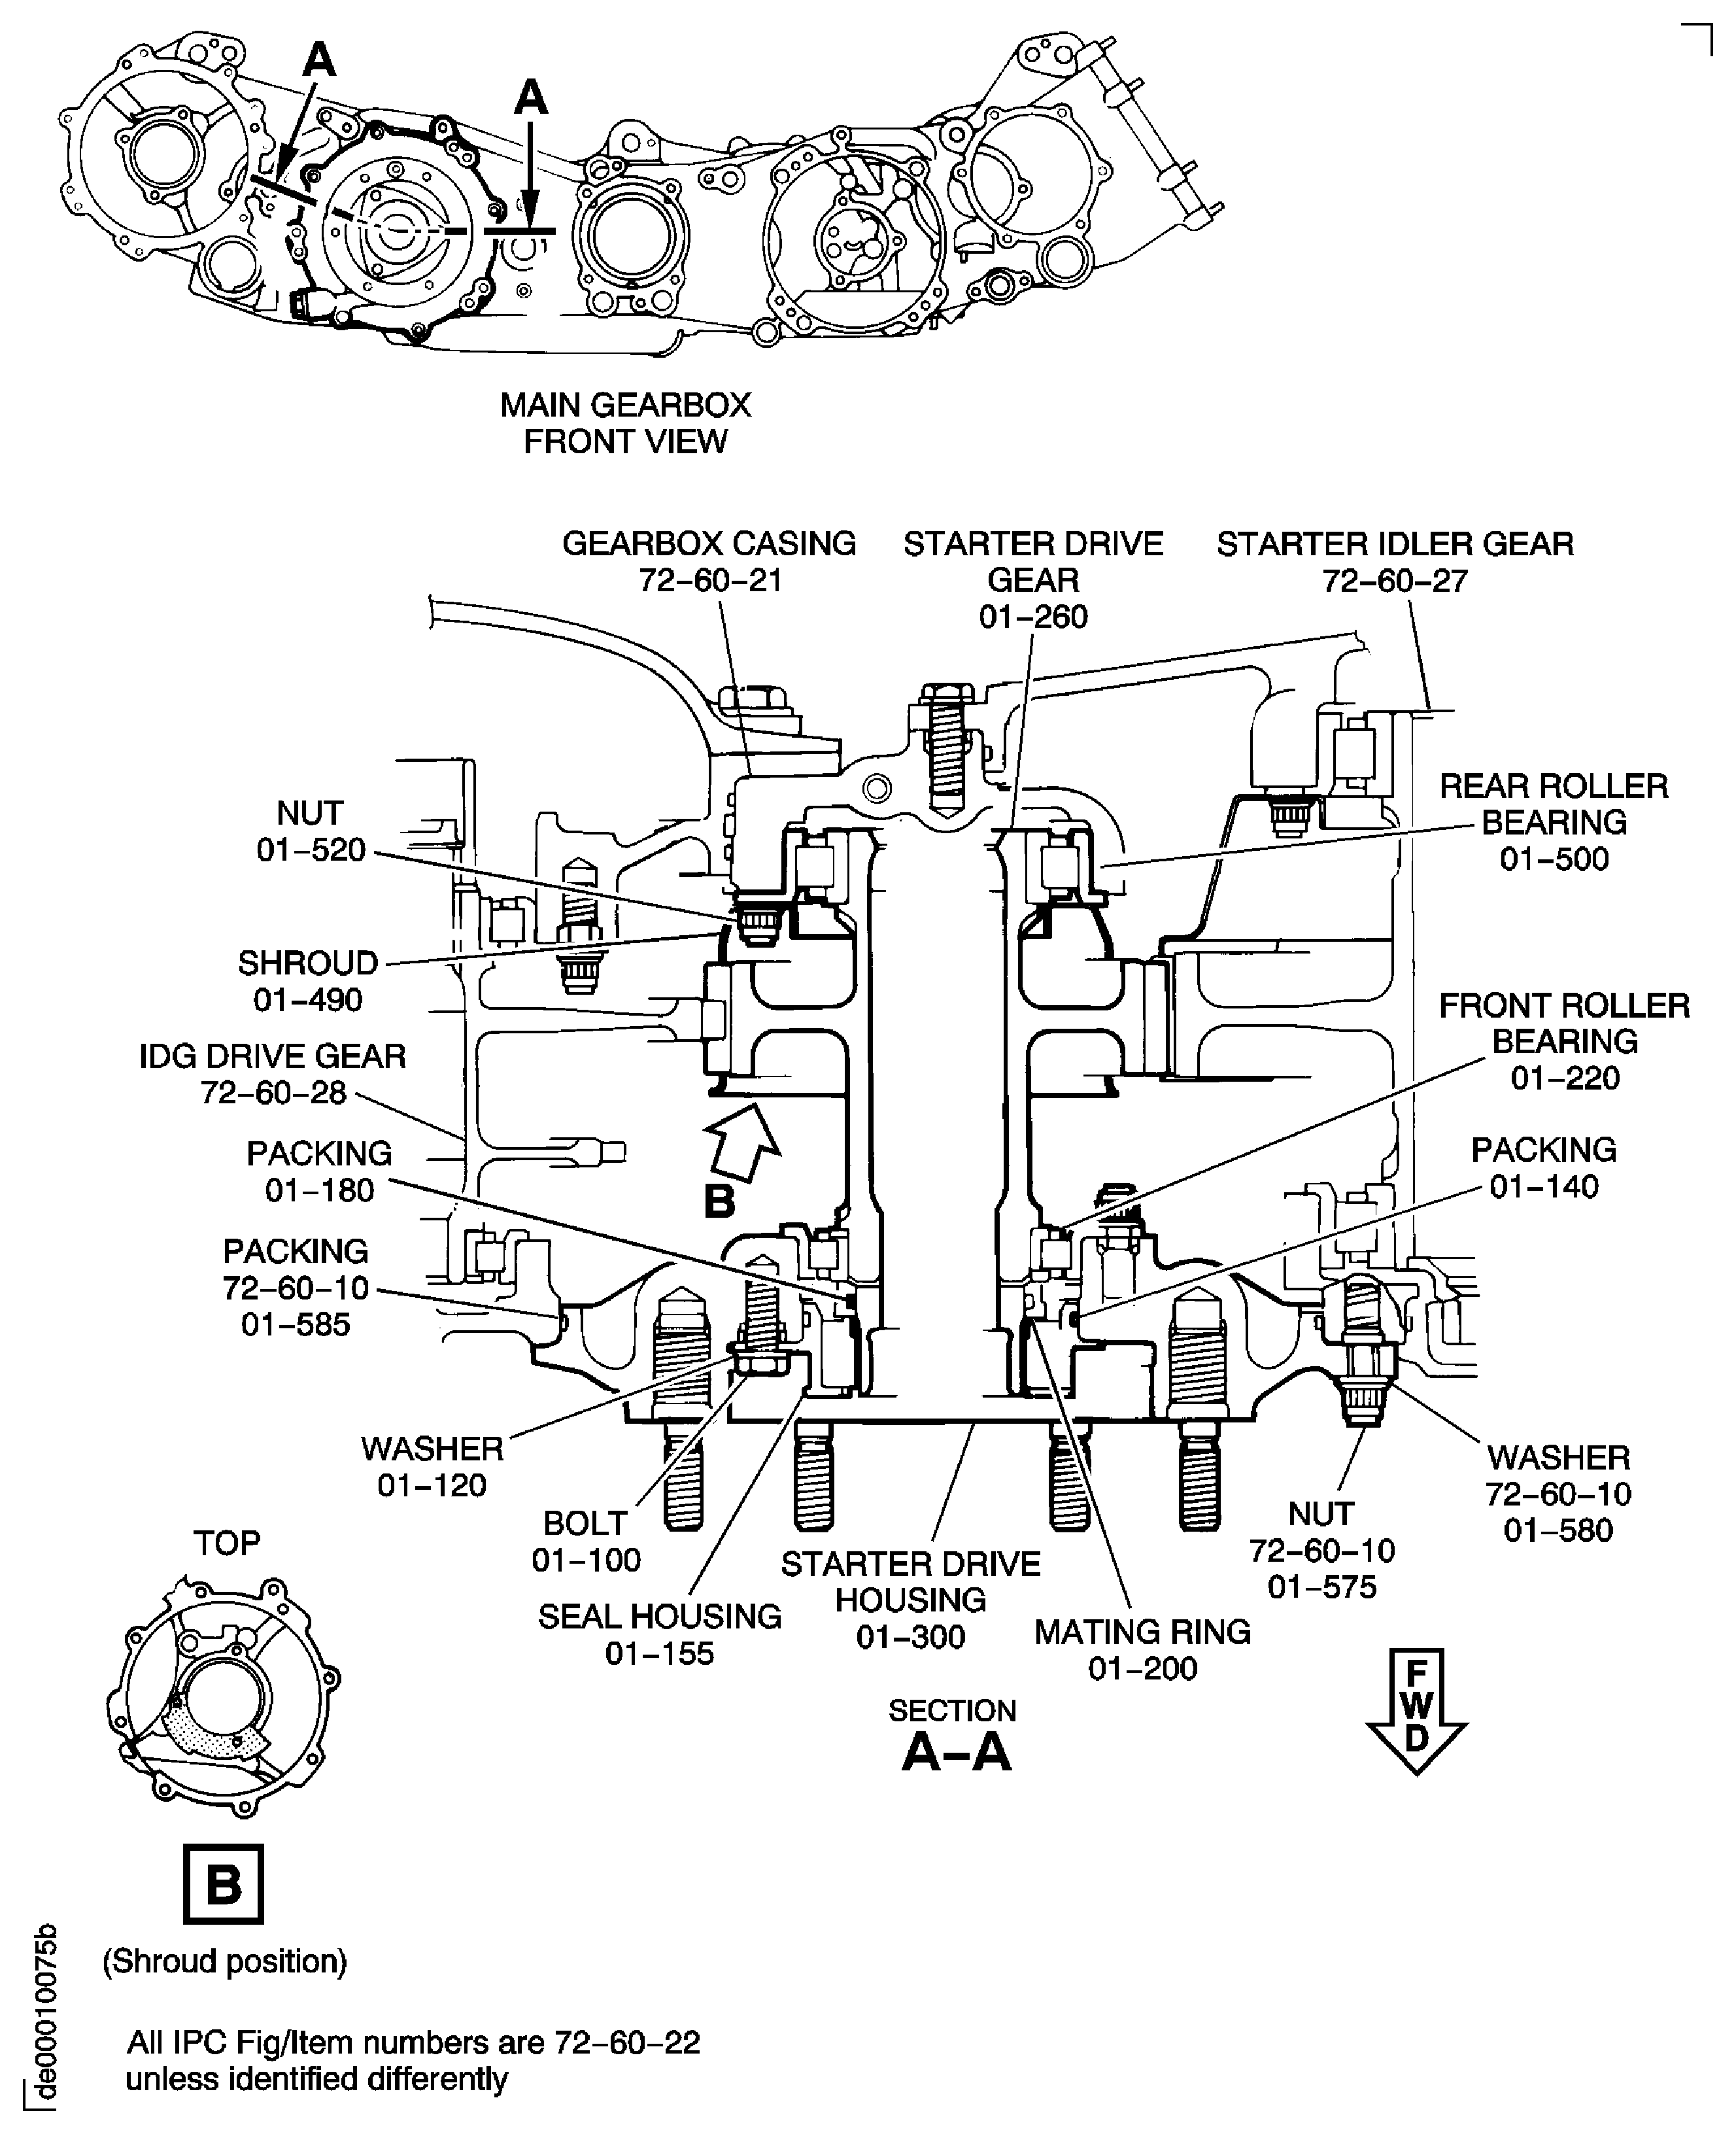
Figure: Install the IDG Drive Gear
Install the IDG Drive Gear
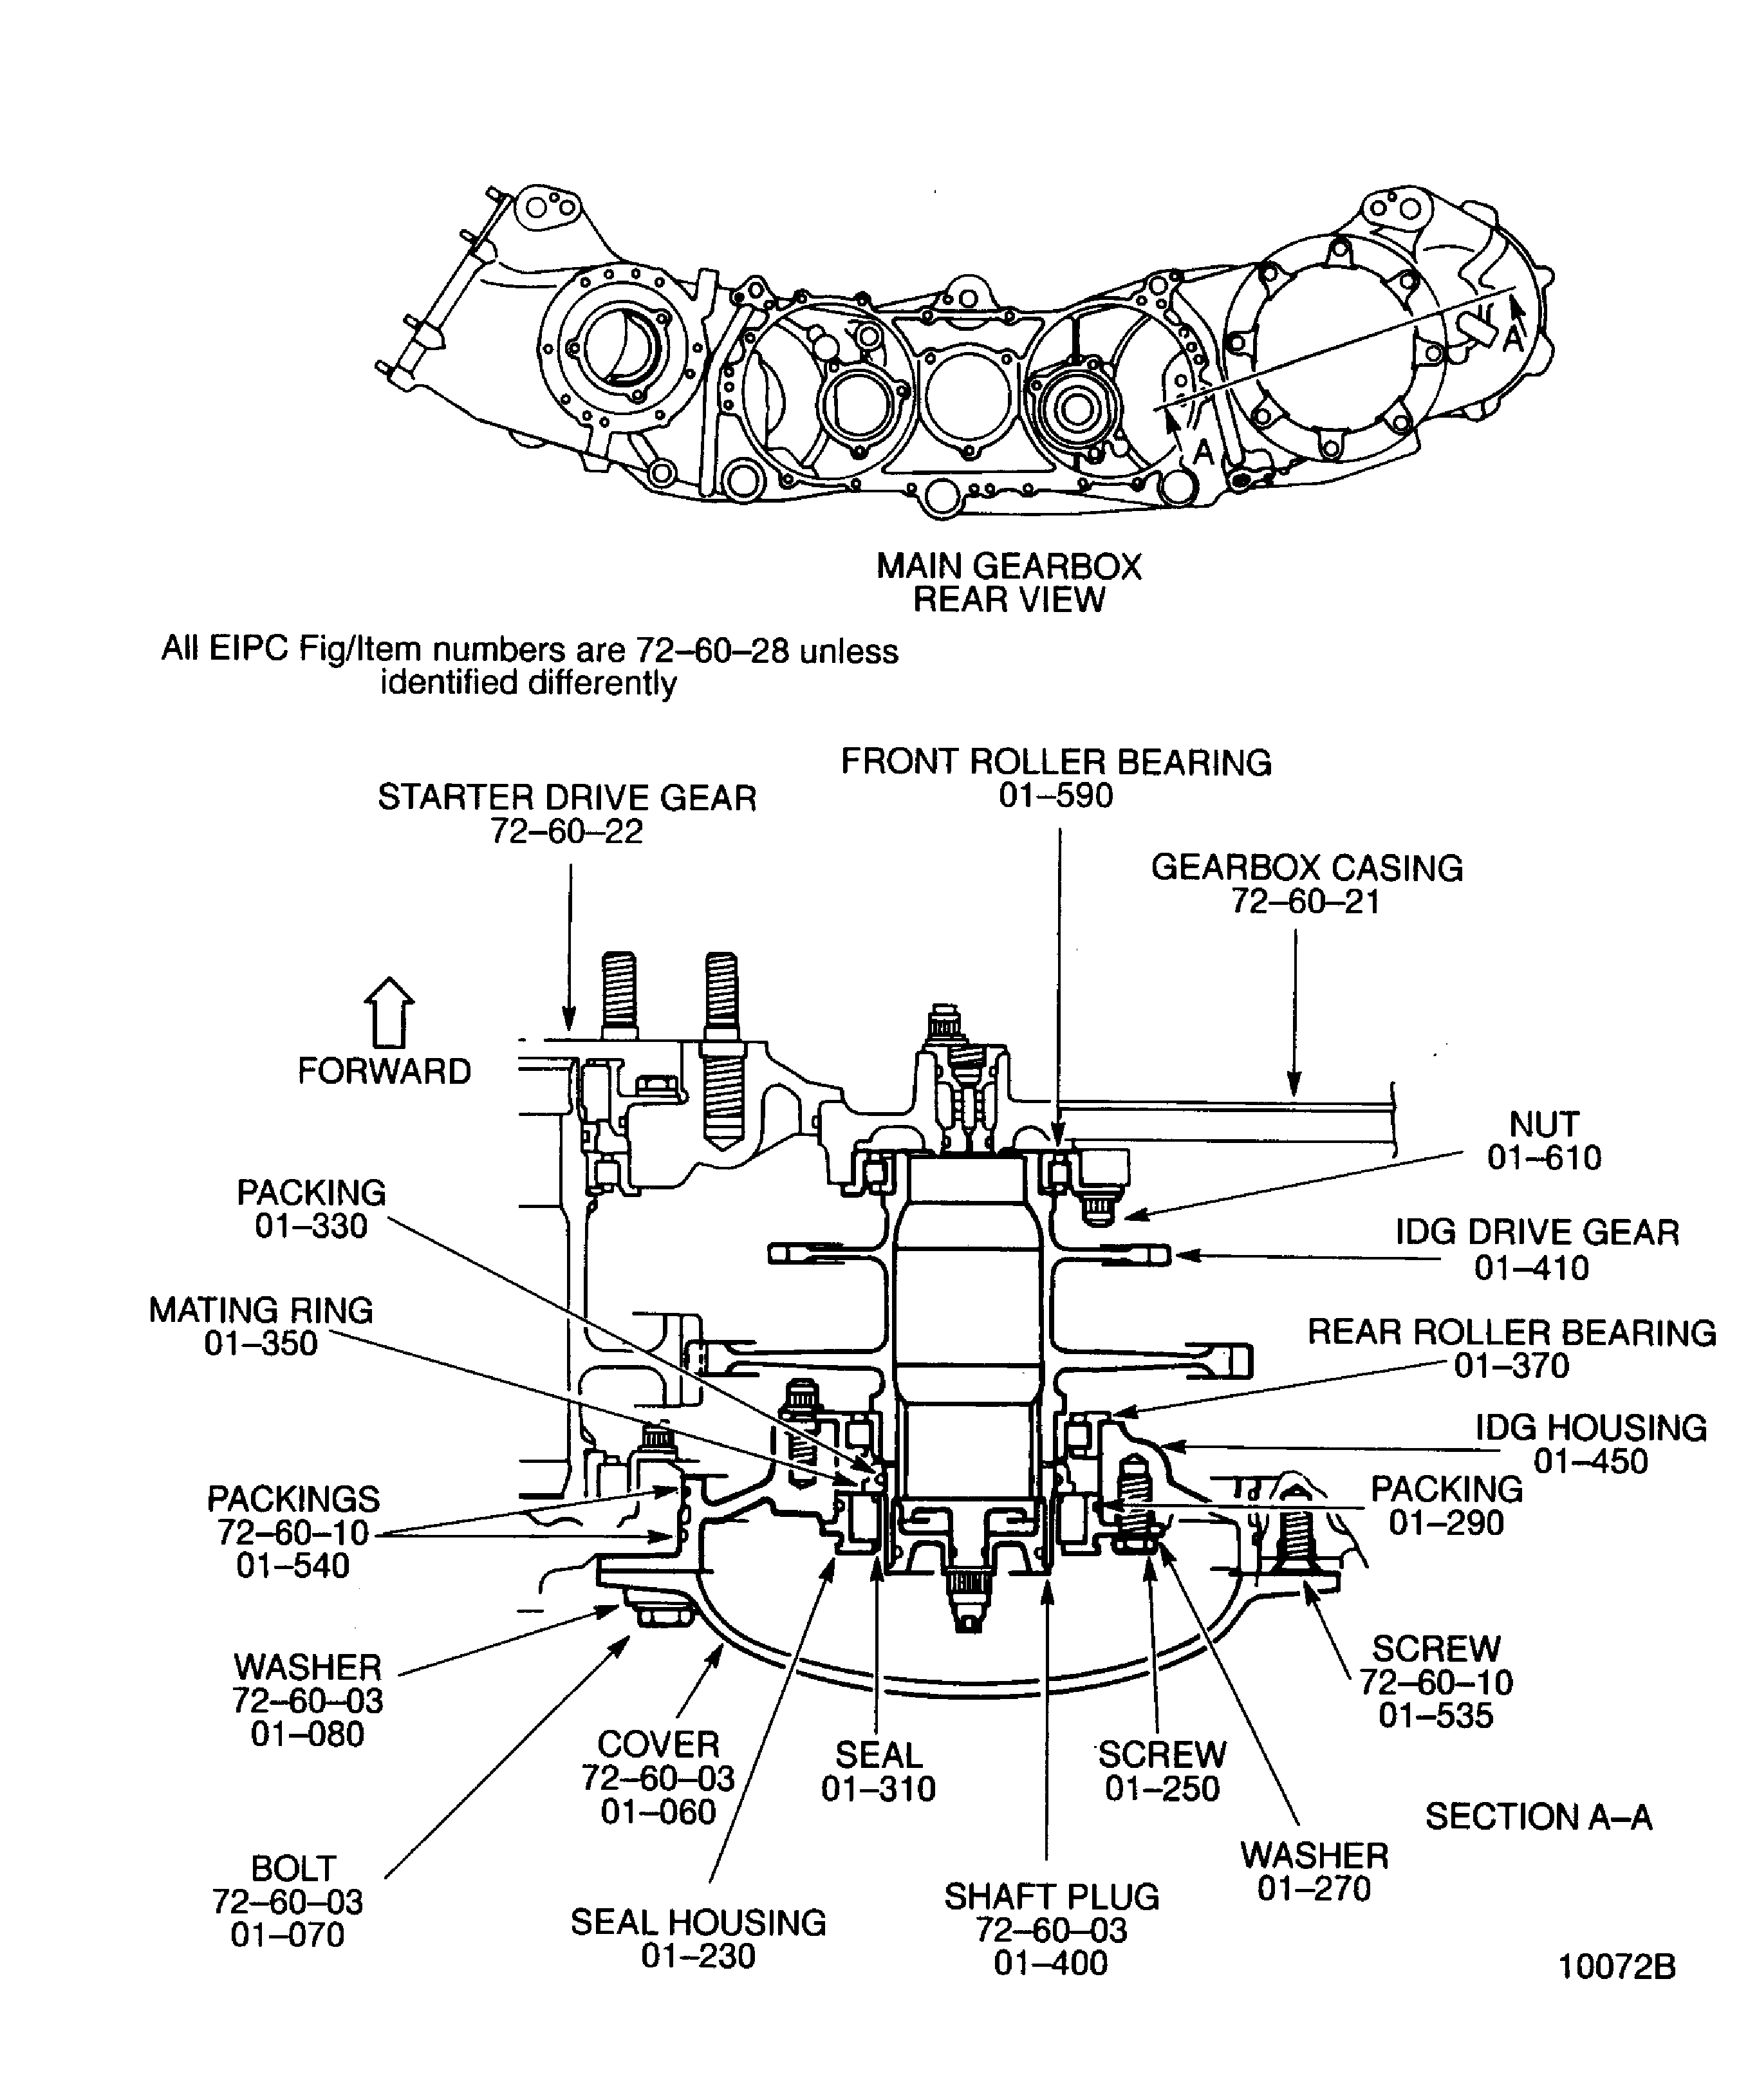
Figure: Install the IDG Drive Gear
Install the IDG Drive Gear
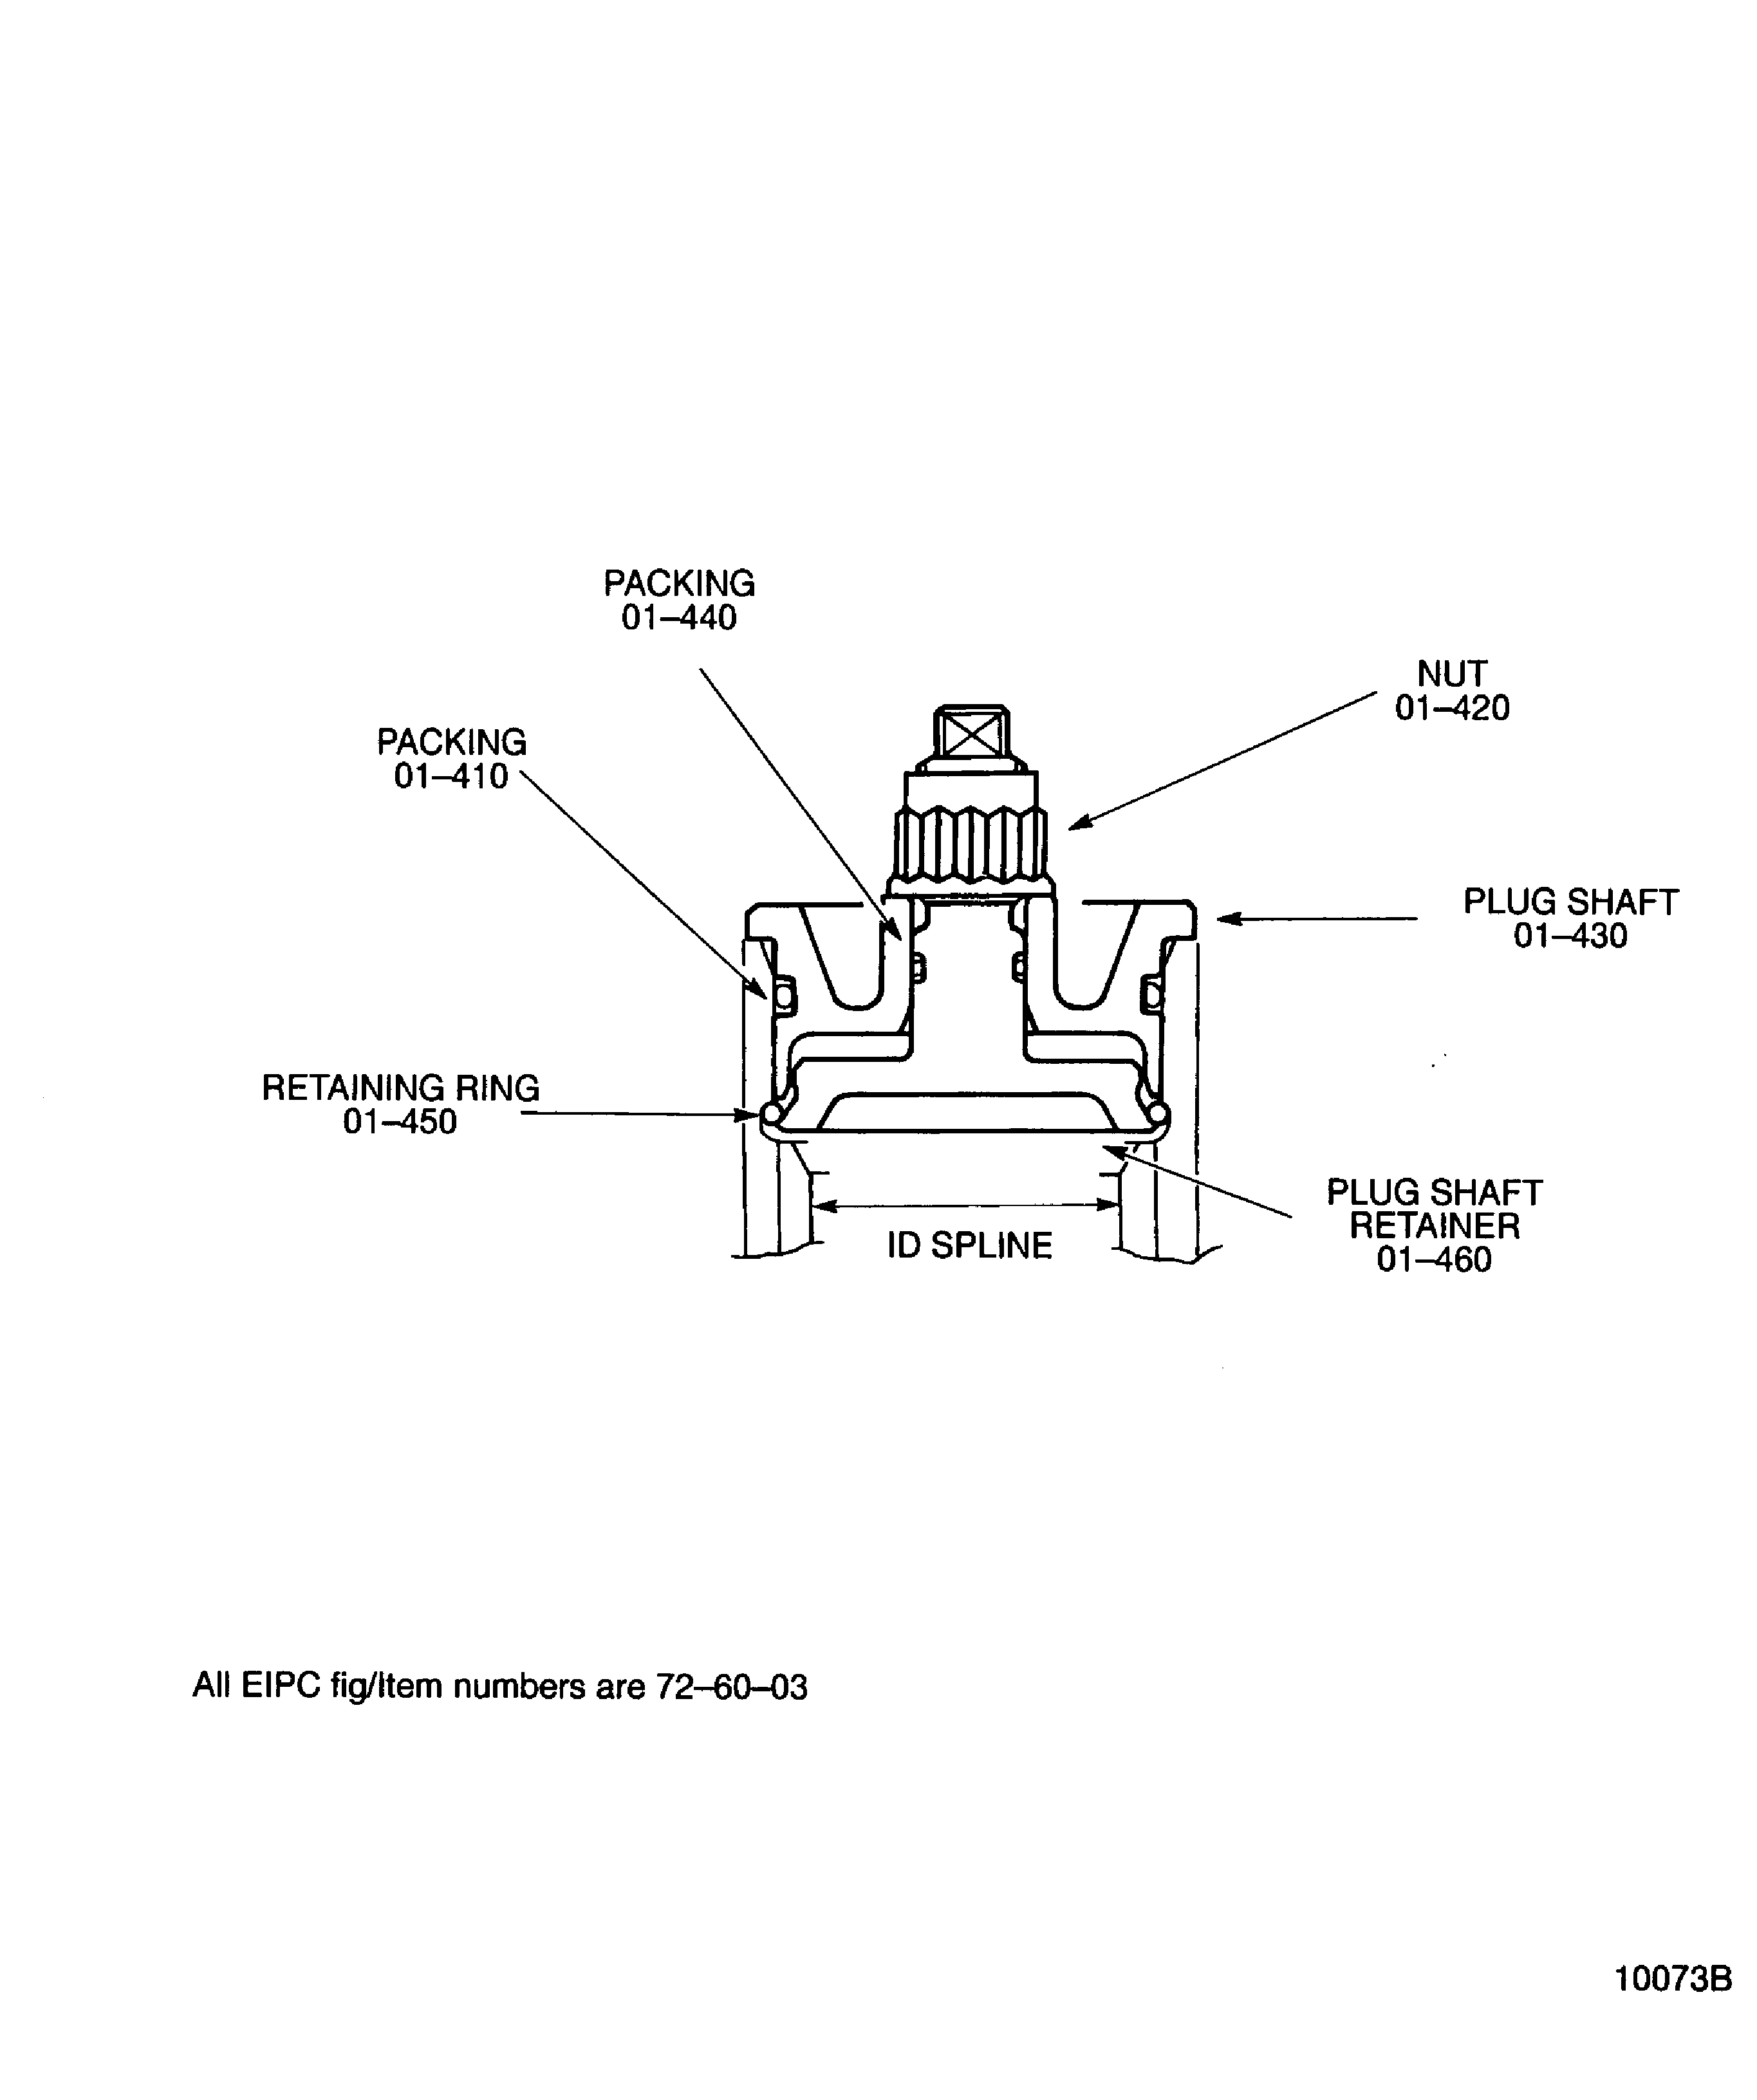
Figure: Install the Deoiler Gearshaft
Install the Deoiler Gearshaft
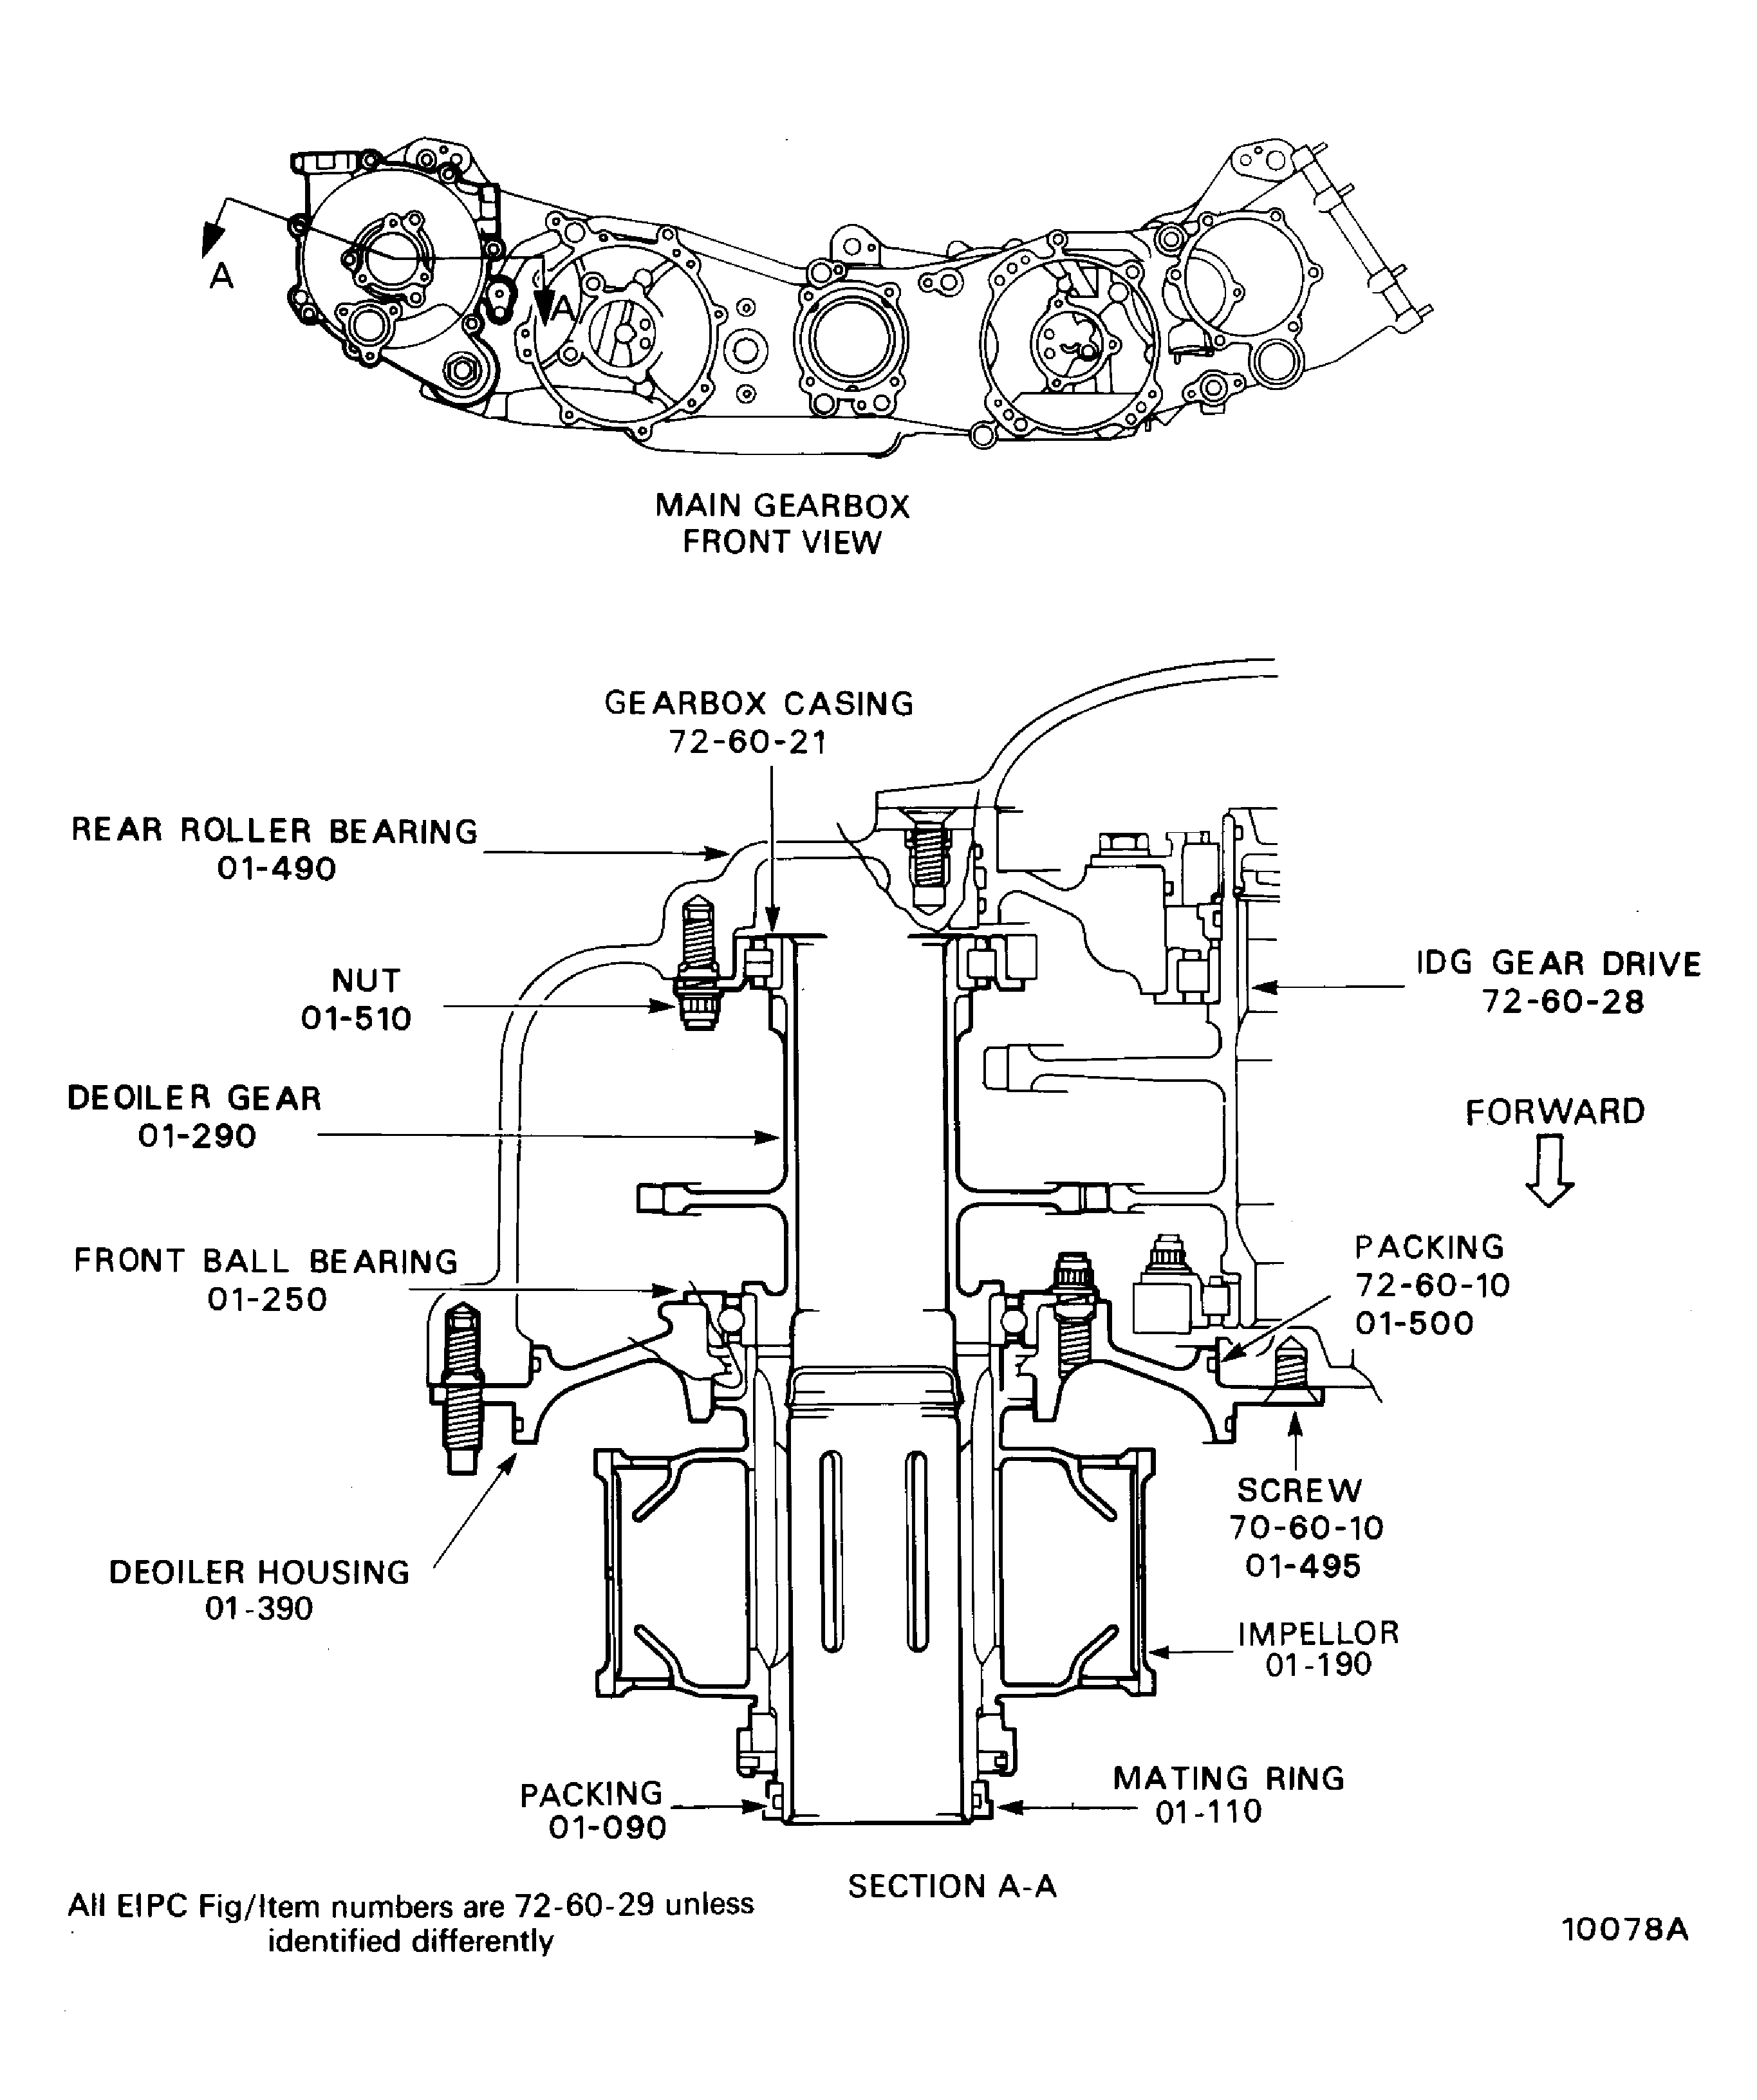
Figure: Install the Deoiler Casing
Install the Deoiler Casing
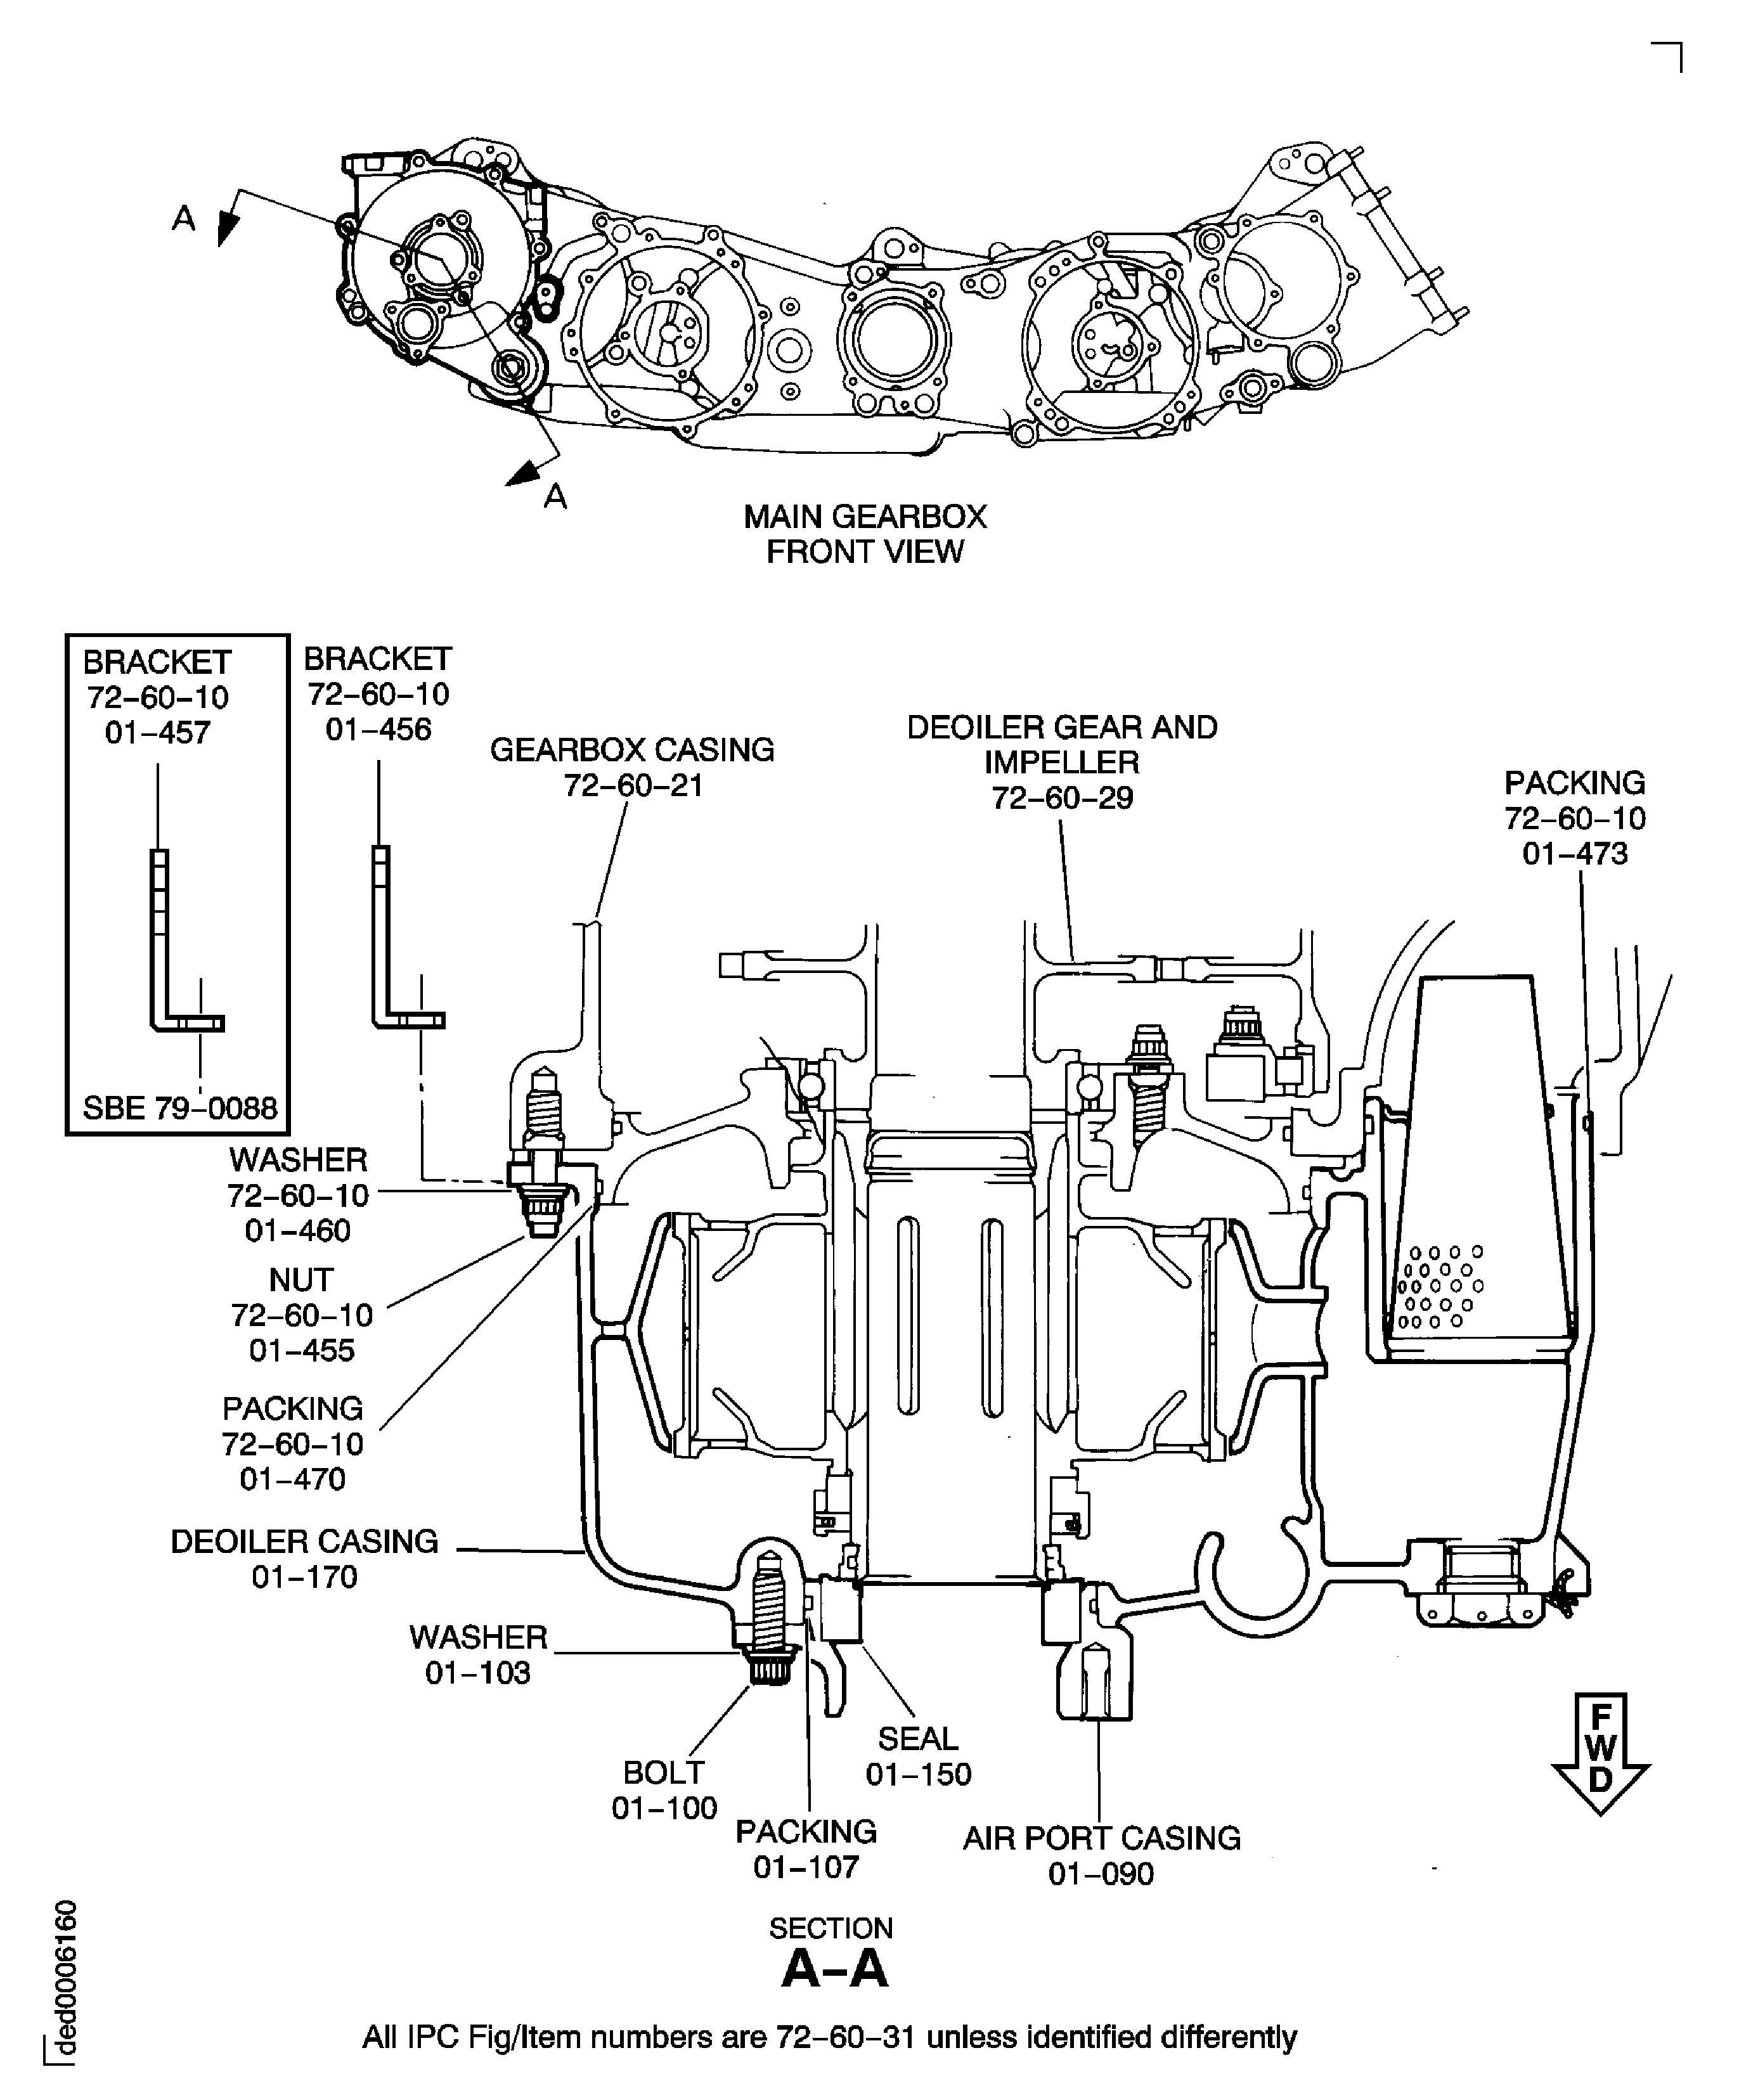
Figure: Install the PMA Drive Gear
Install the PMA Drive Gear
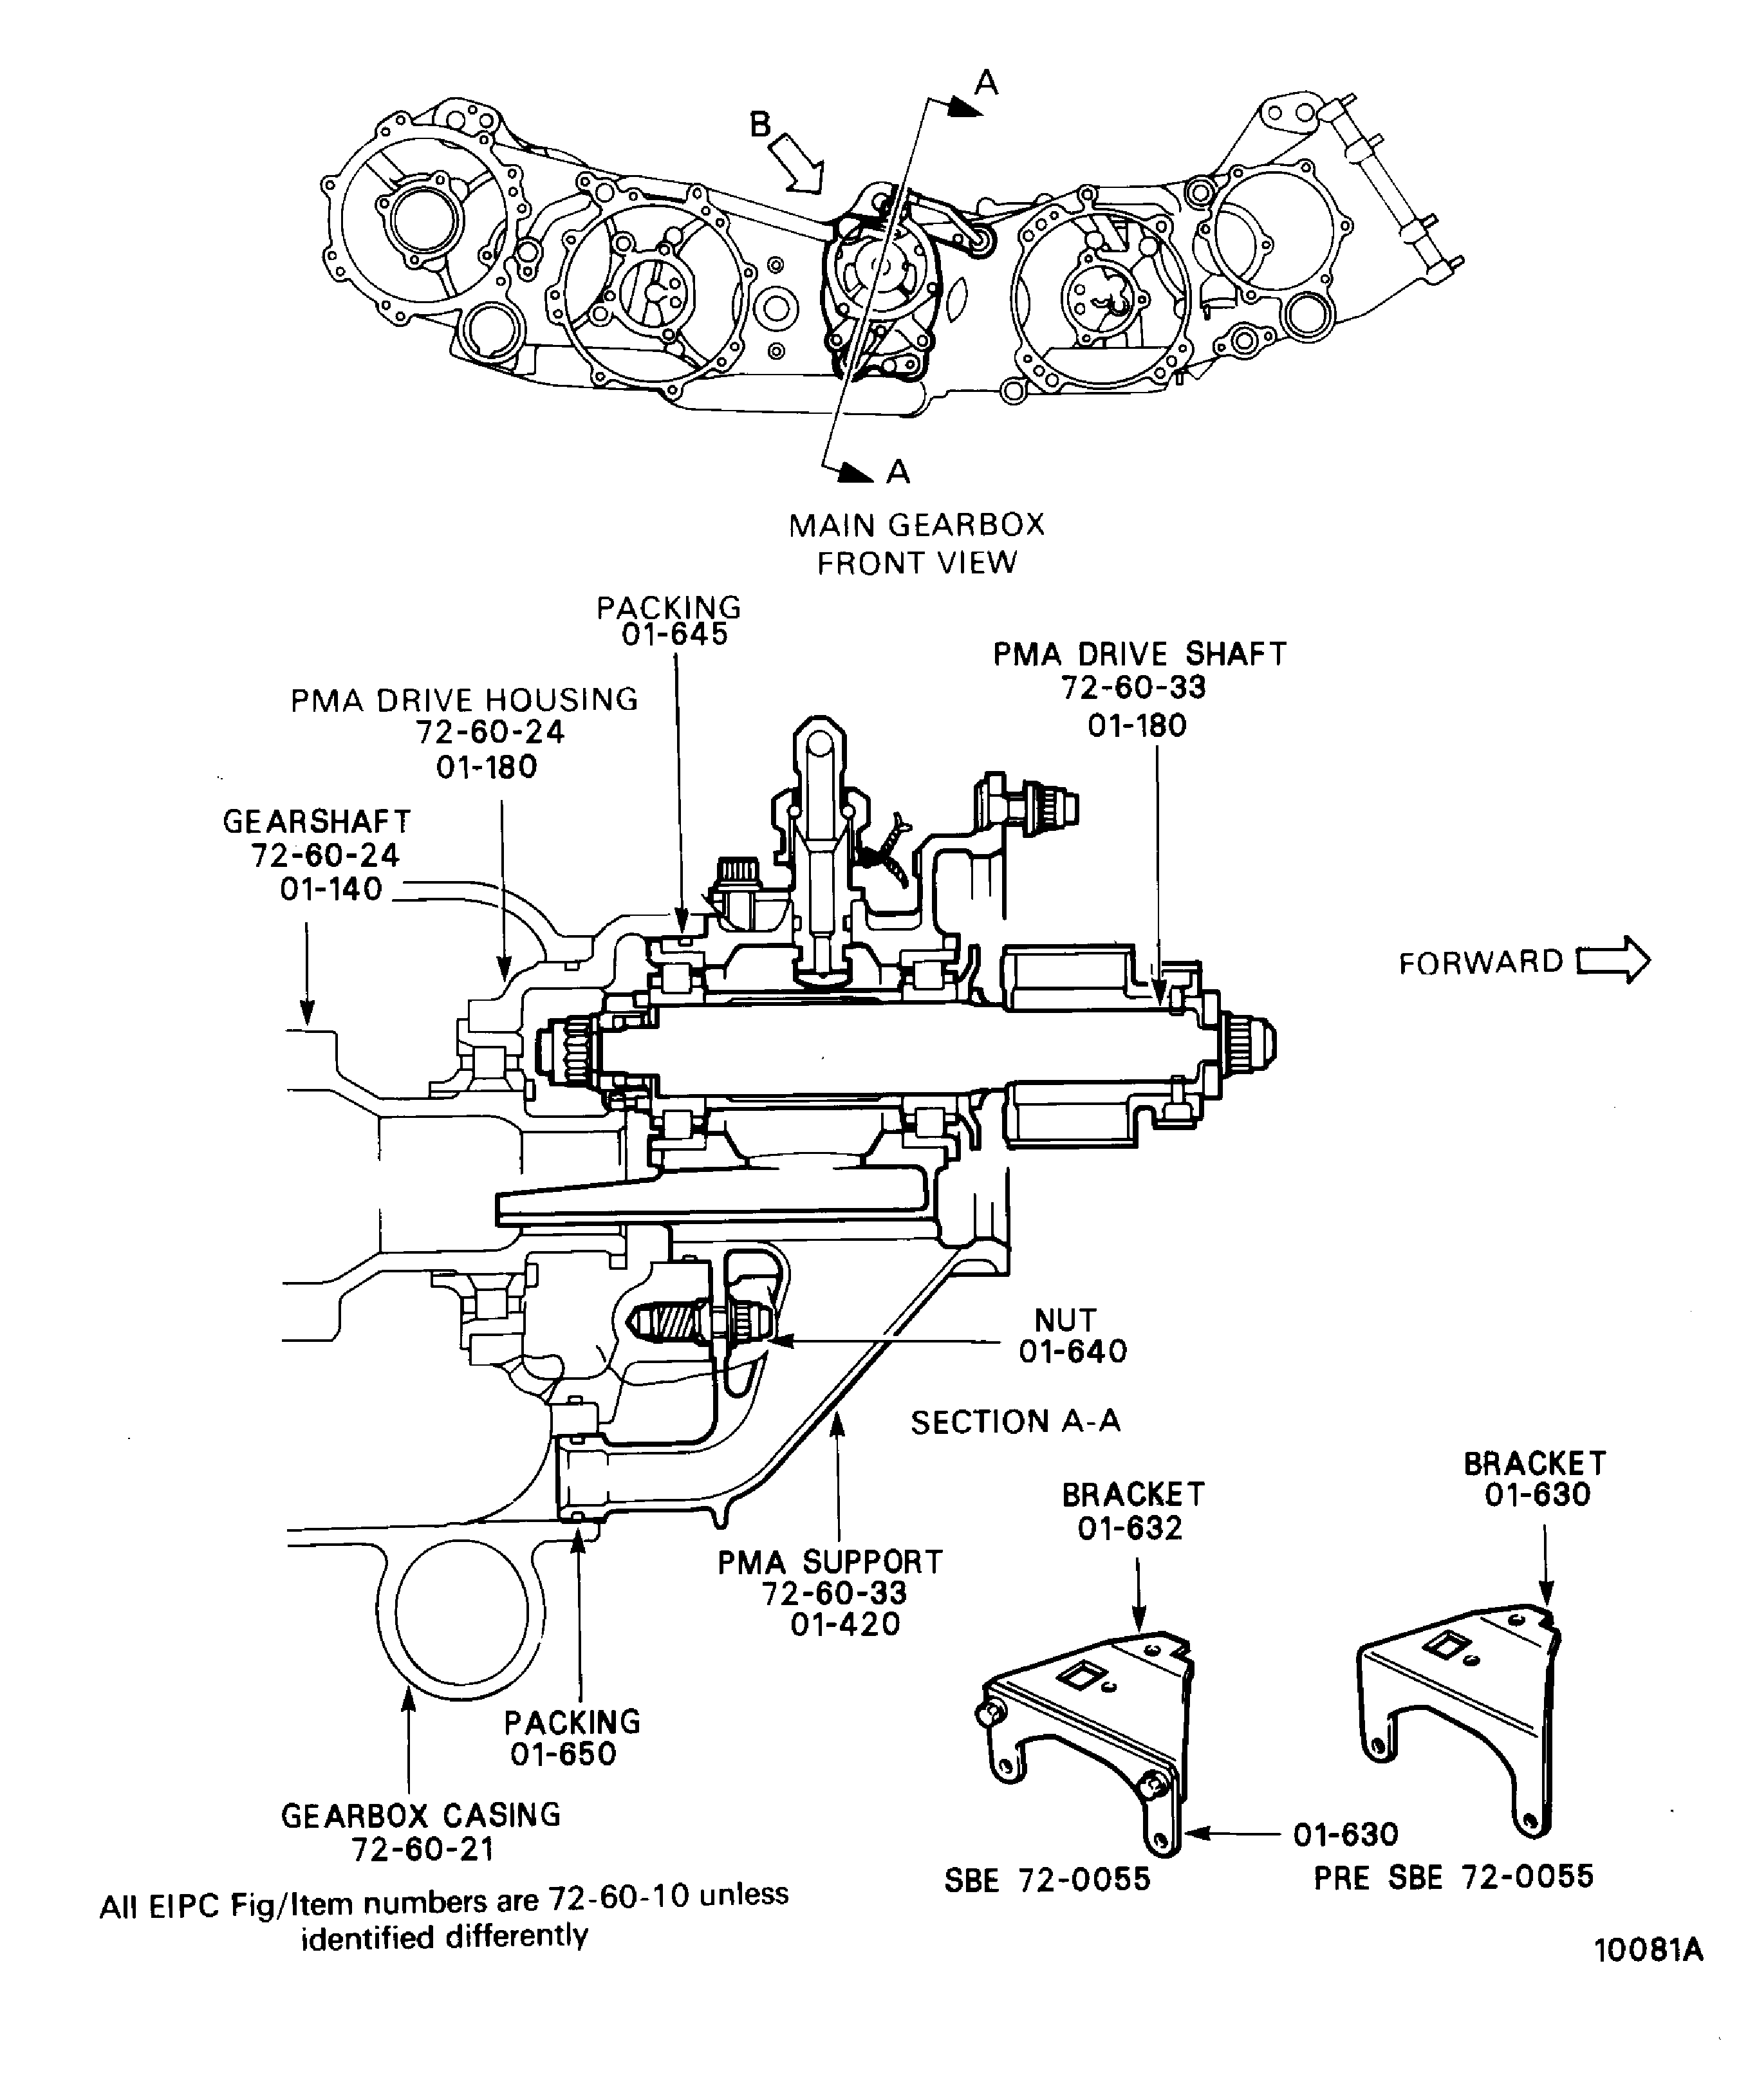
Figure: Install the Crank Cover
Install the Crank Cover
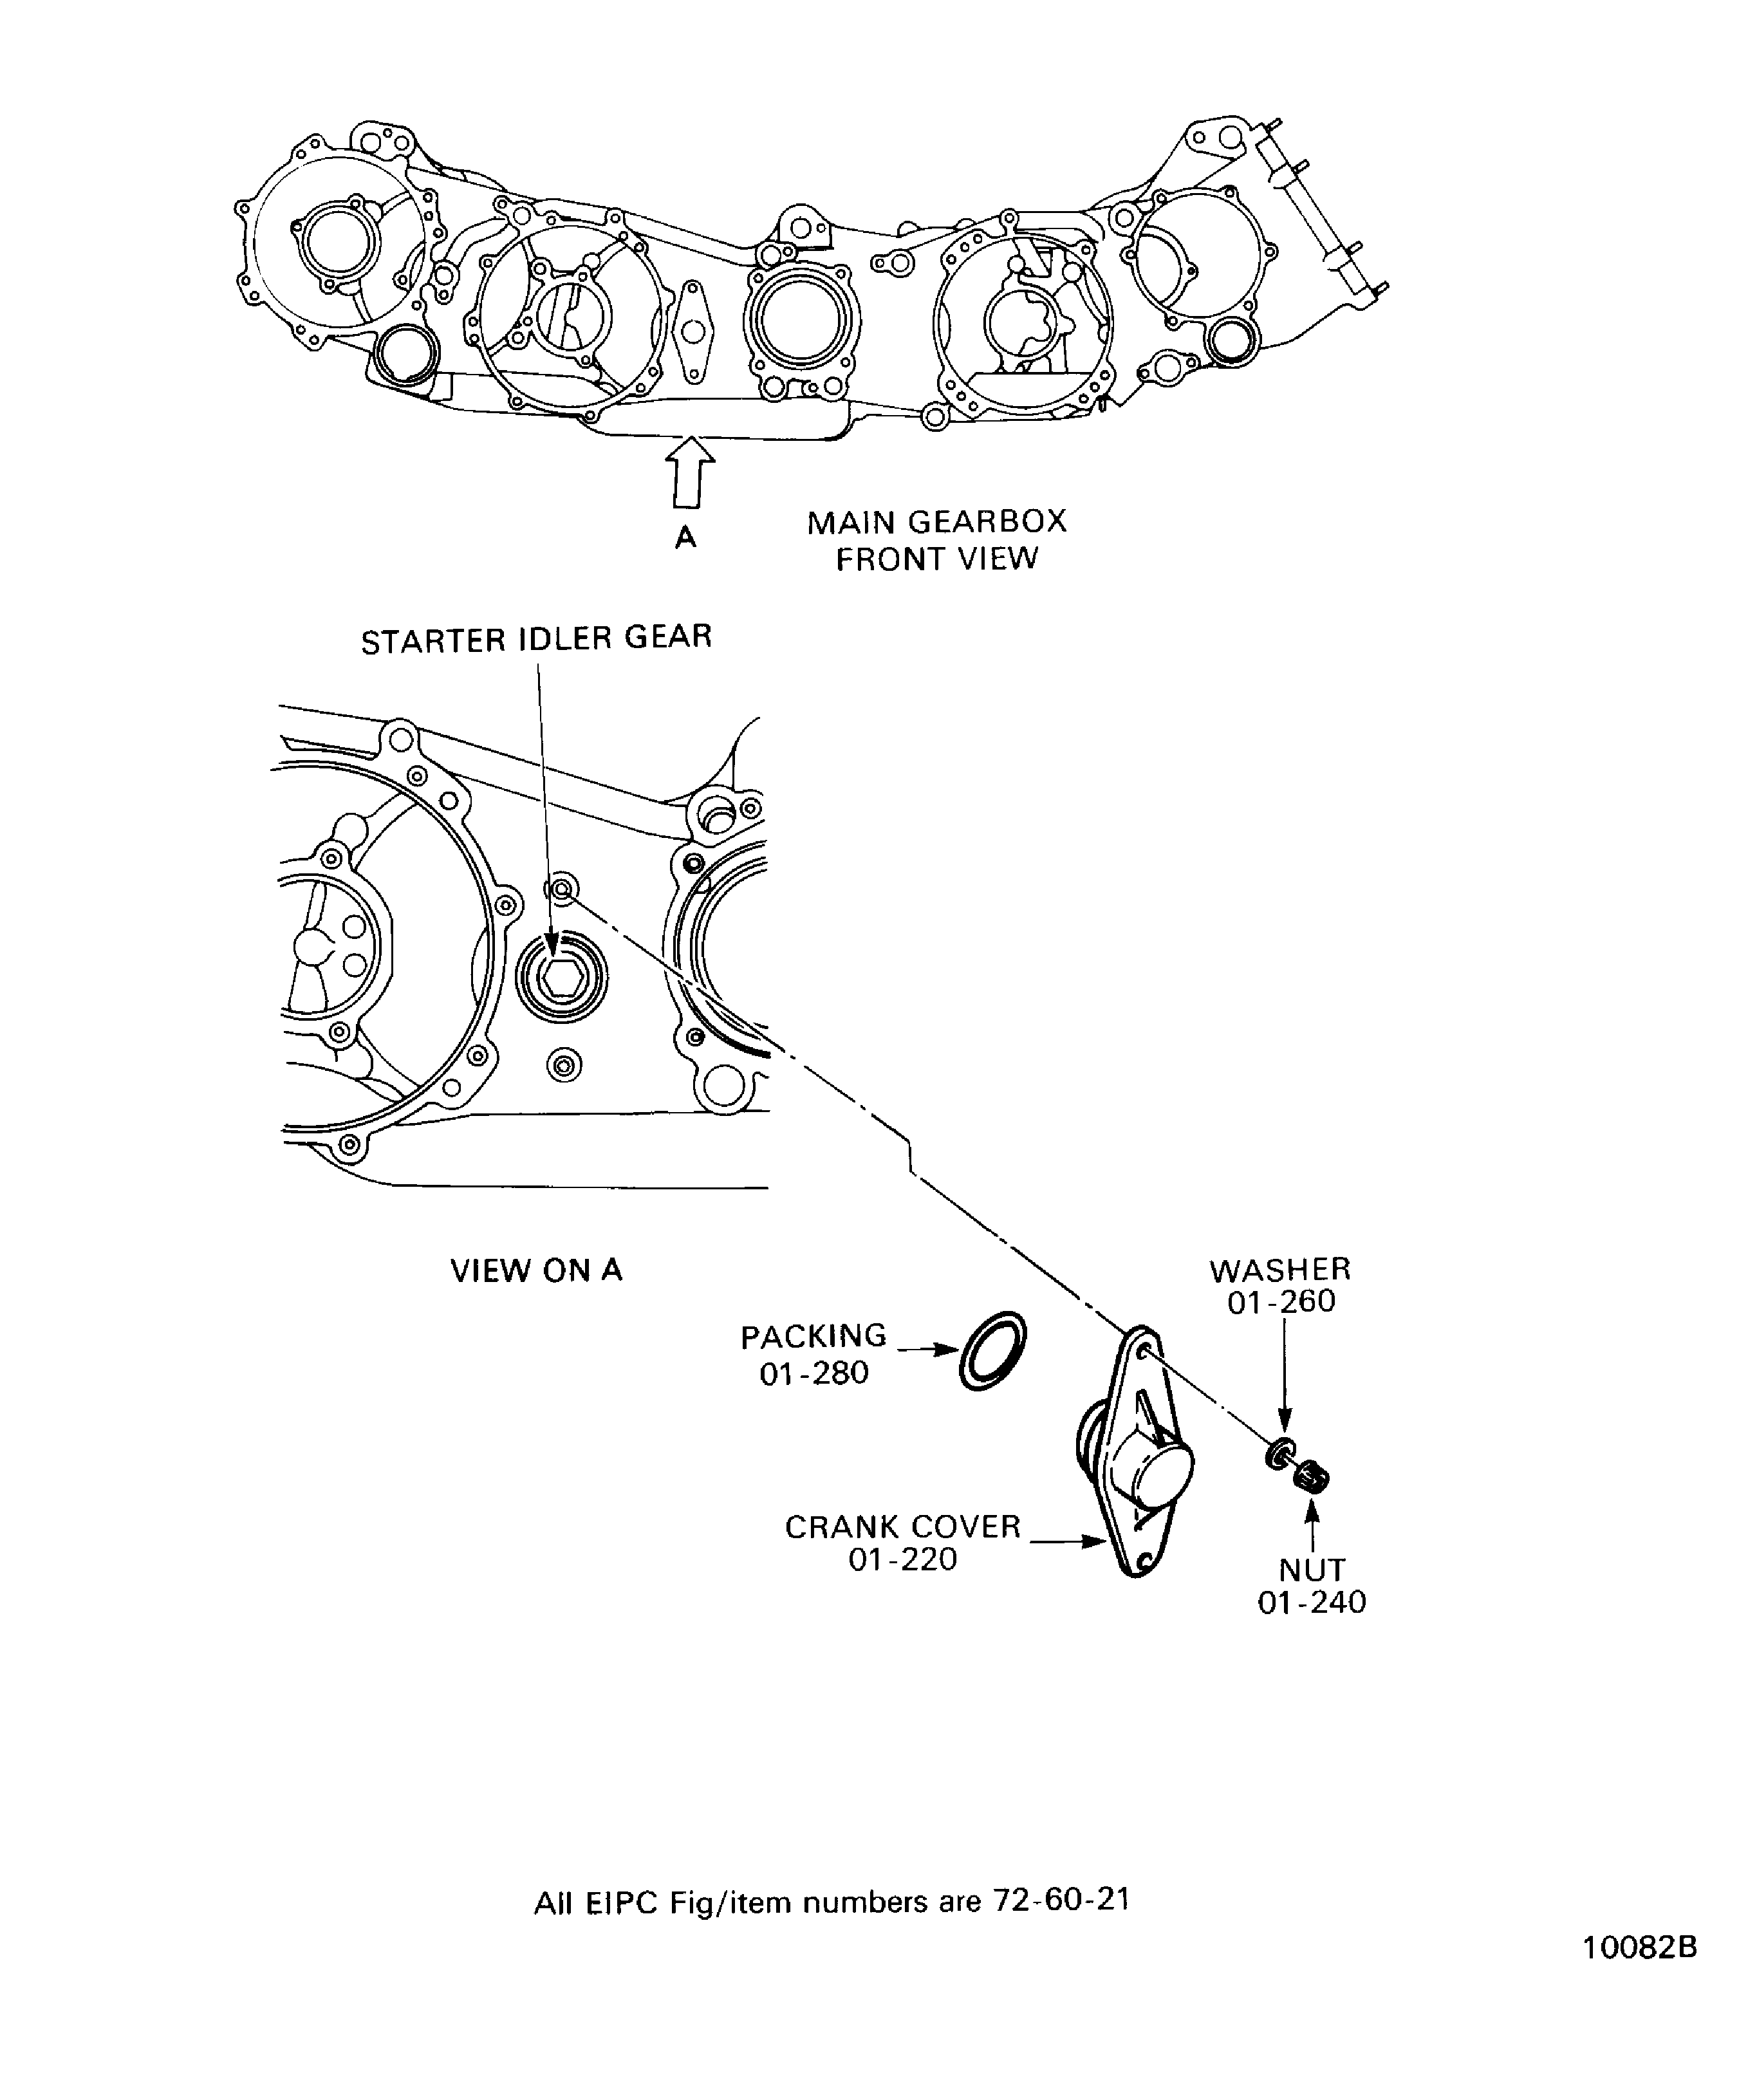
Figure: Measure the Circumferential Backlash Between the Fuel Pumpdrive Gear and the Hydraulic Pump Drive Gear
Measure the Circumferential Backlash Between the Fuel Pumpdrive Gear and the Hydraulic Pump Drive Gear
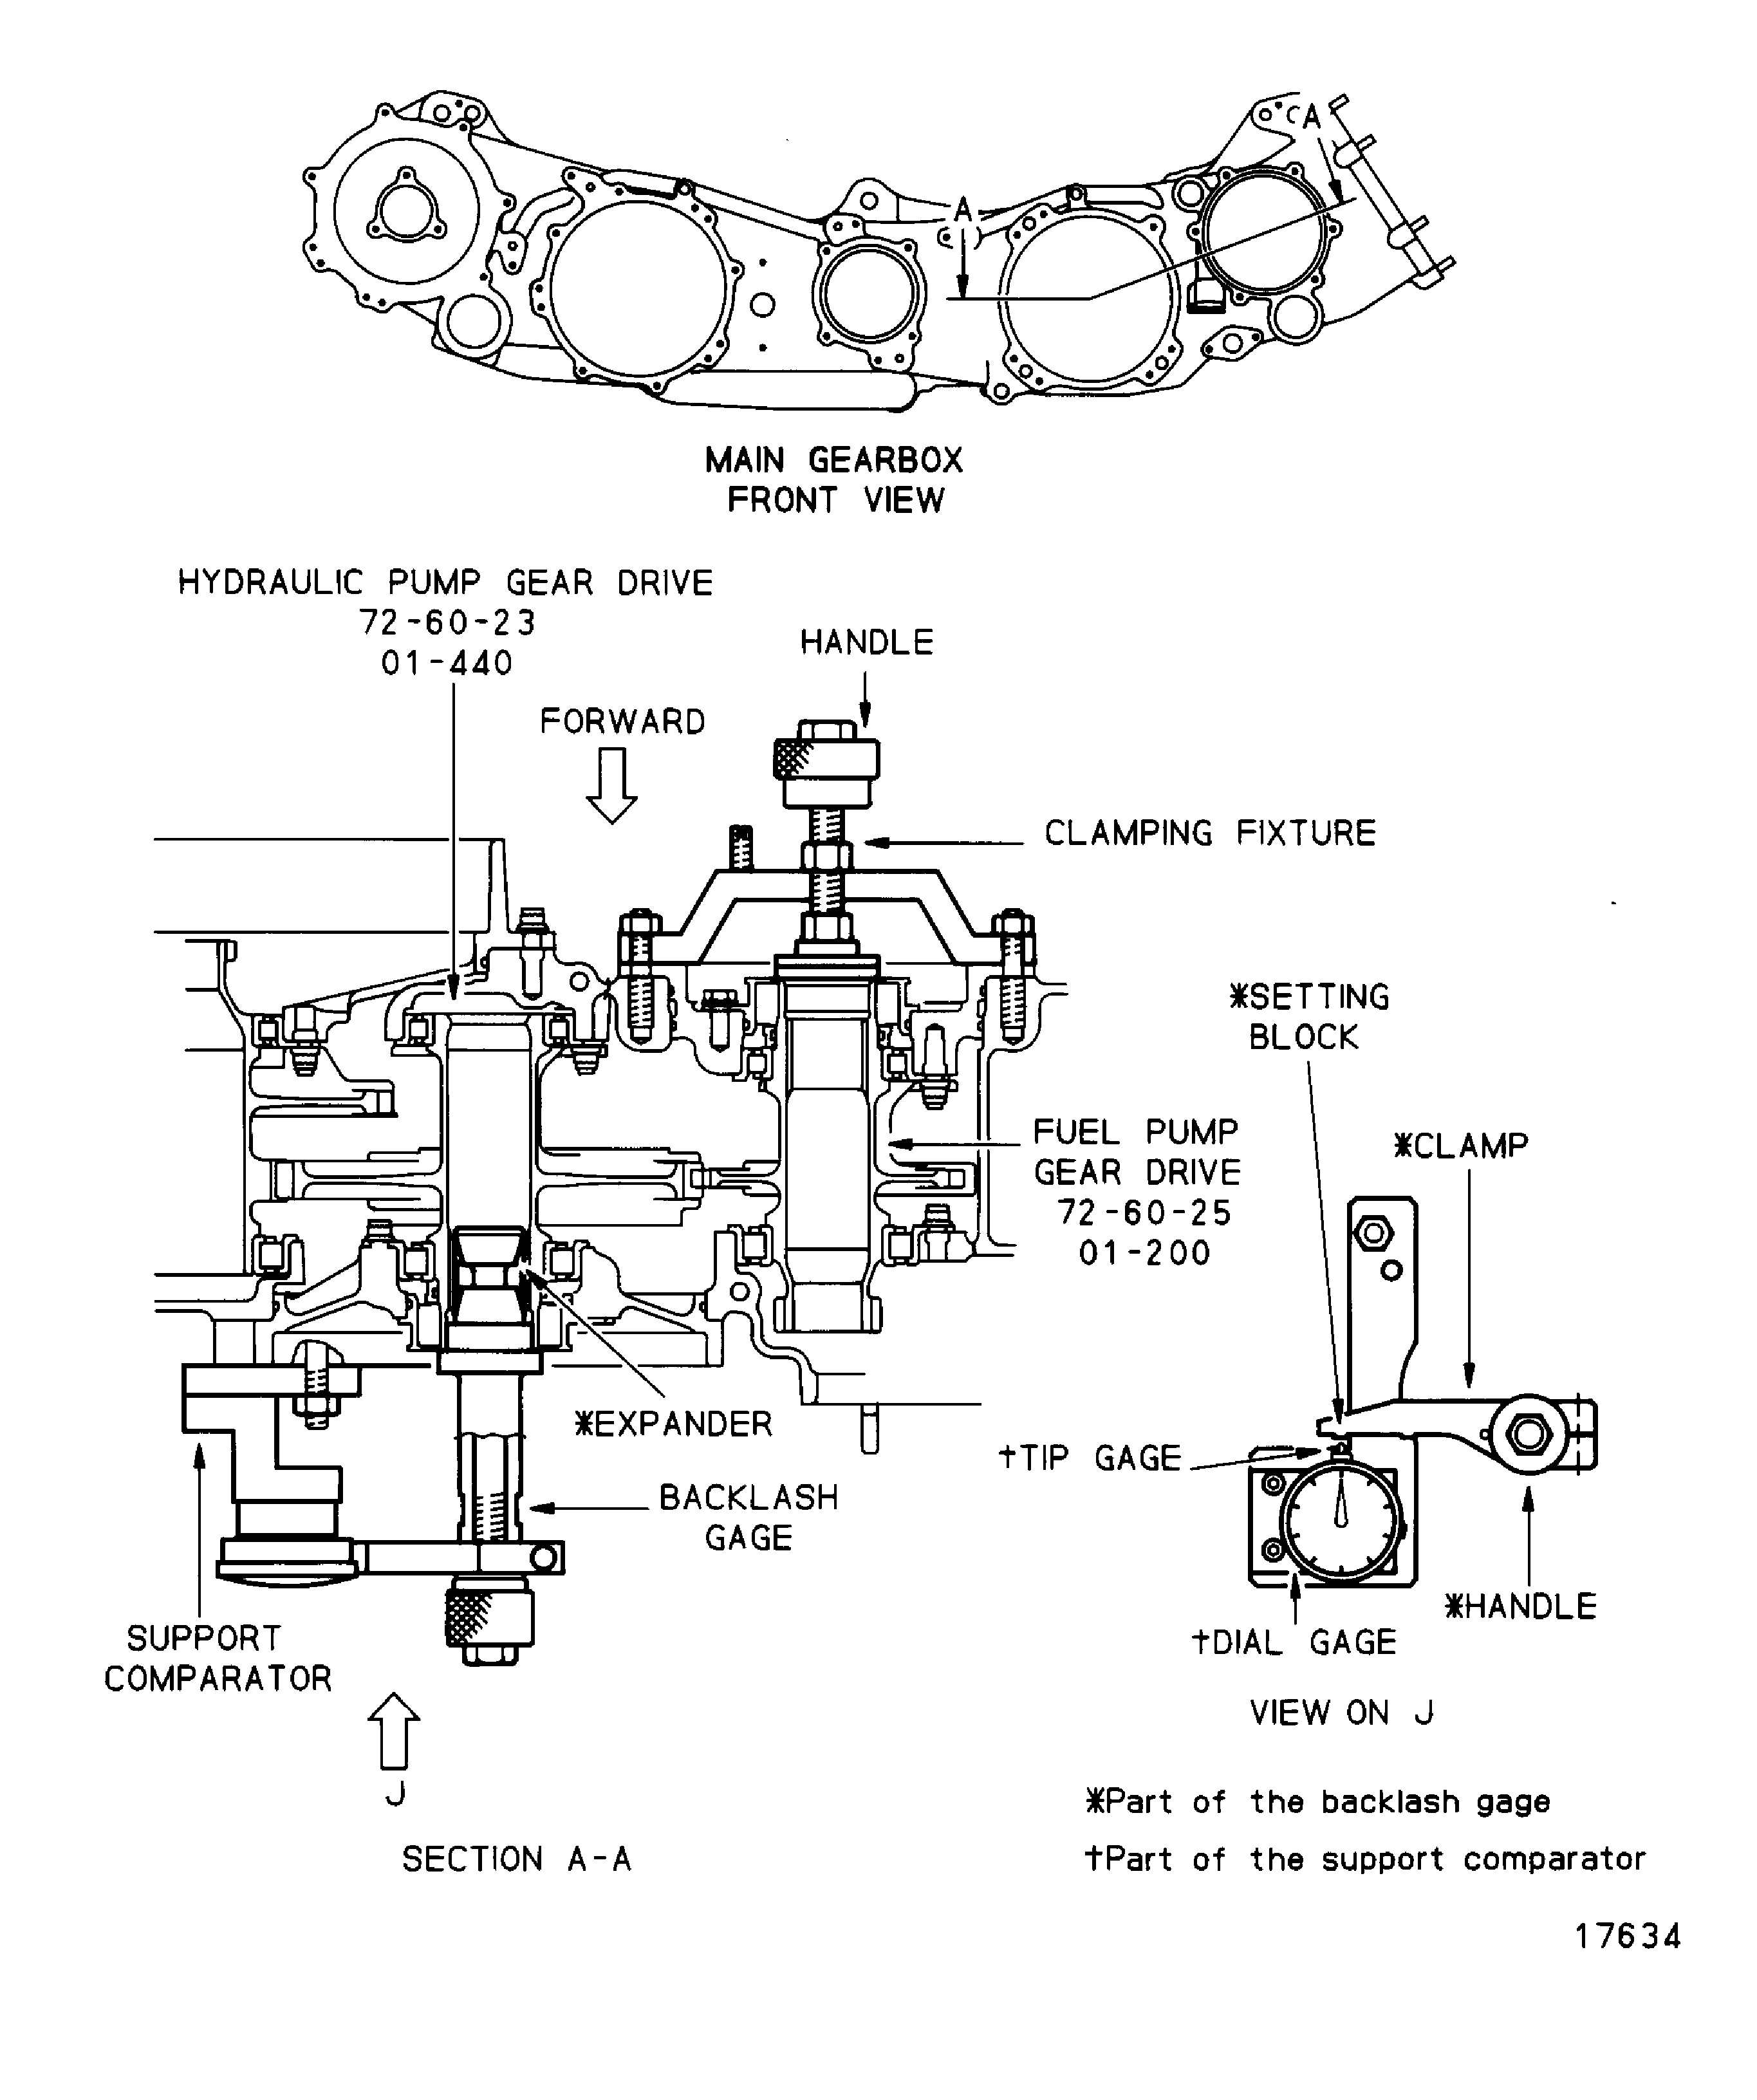
Figure: Measure the Circumferential Backlash Between the Oil Scavenge Pumpdrive Gear and the Hydraulic Pump Drive Gear
Measure the Circumferential Backlash Between the Oil Scavenge Pumpdrive Gear and the Hydraulic Pump Drive Gear
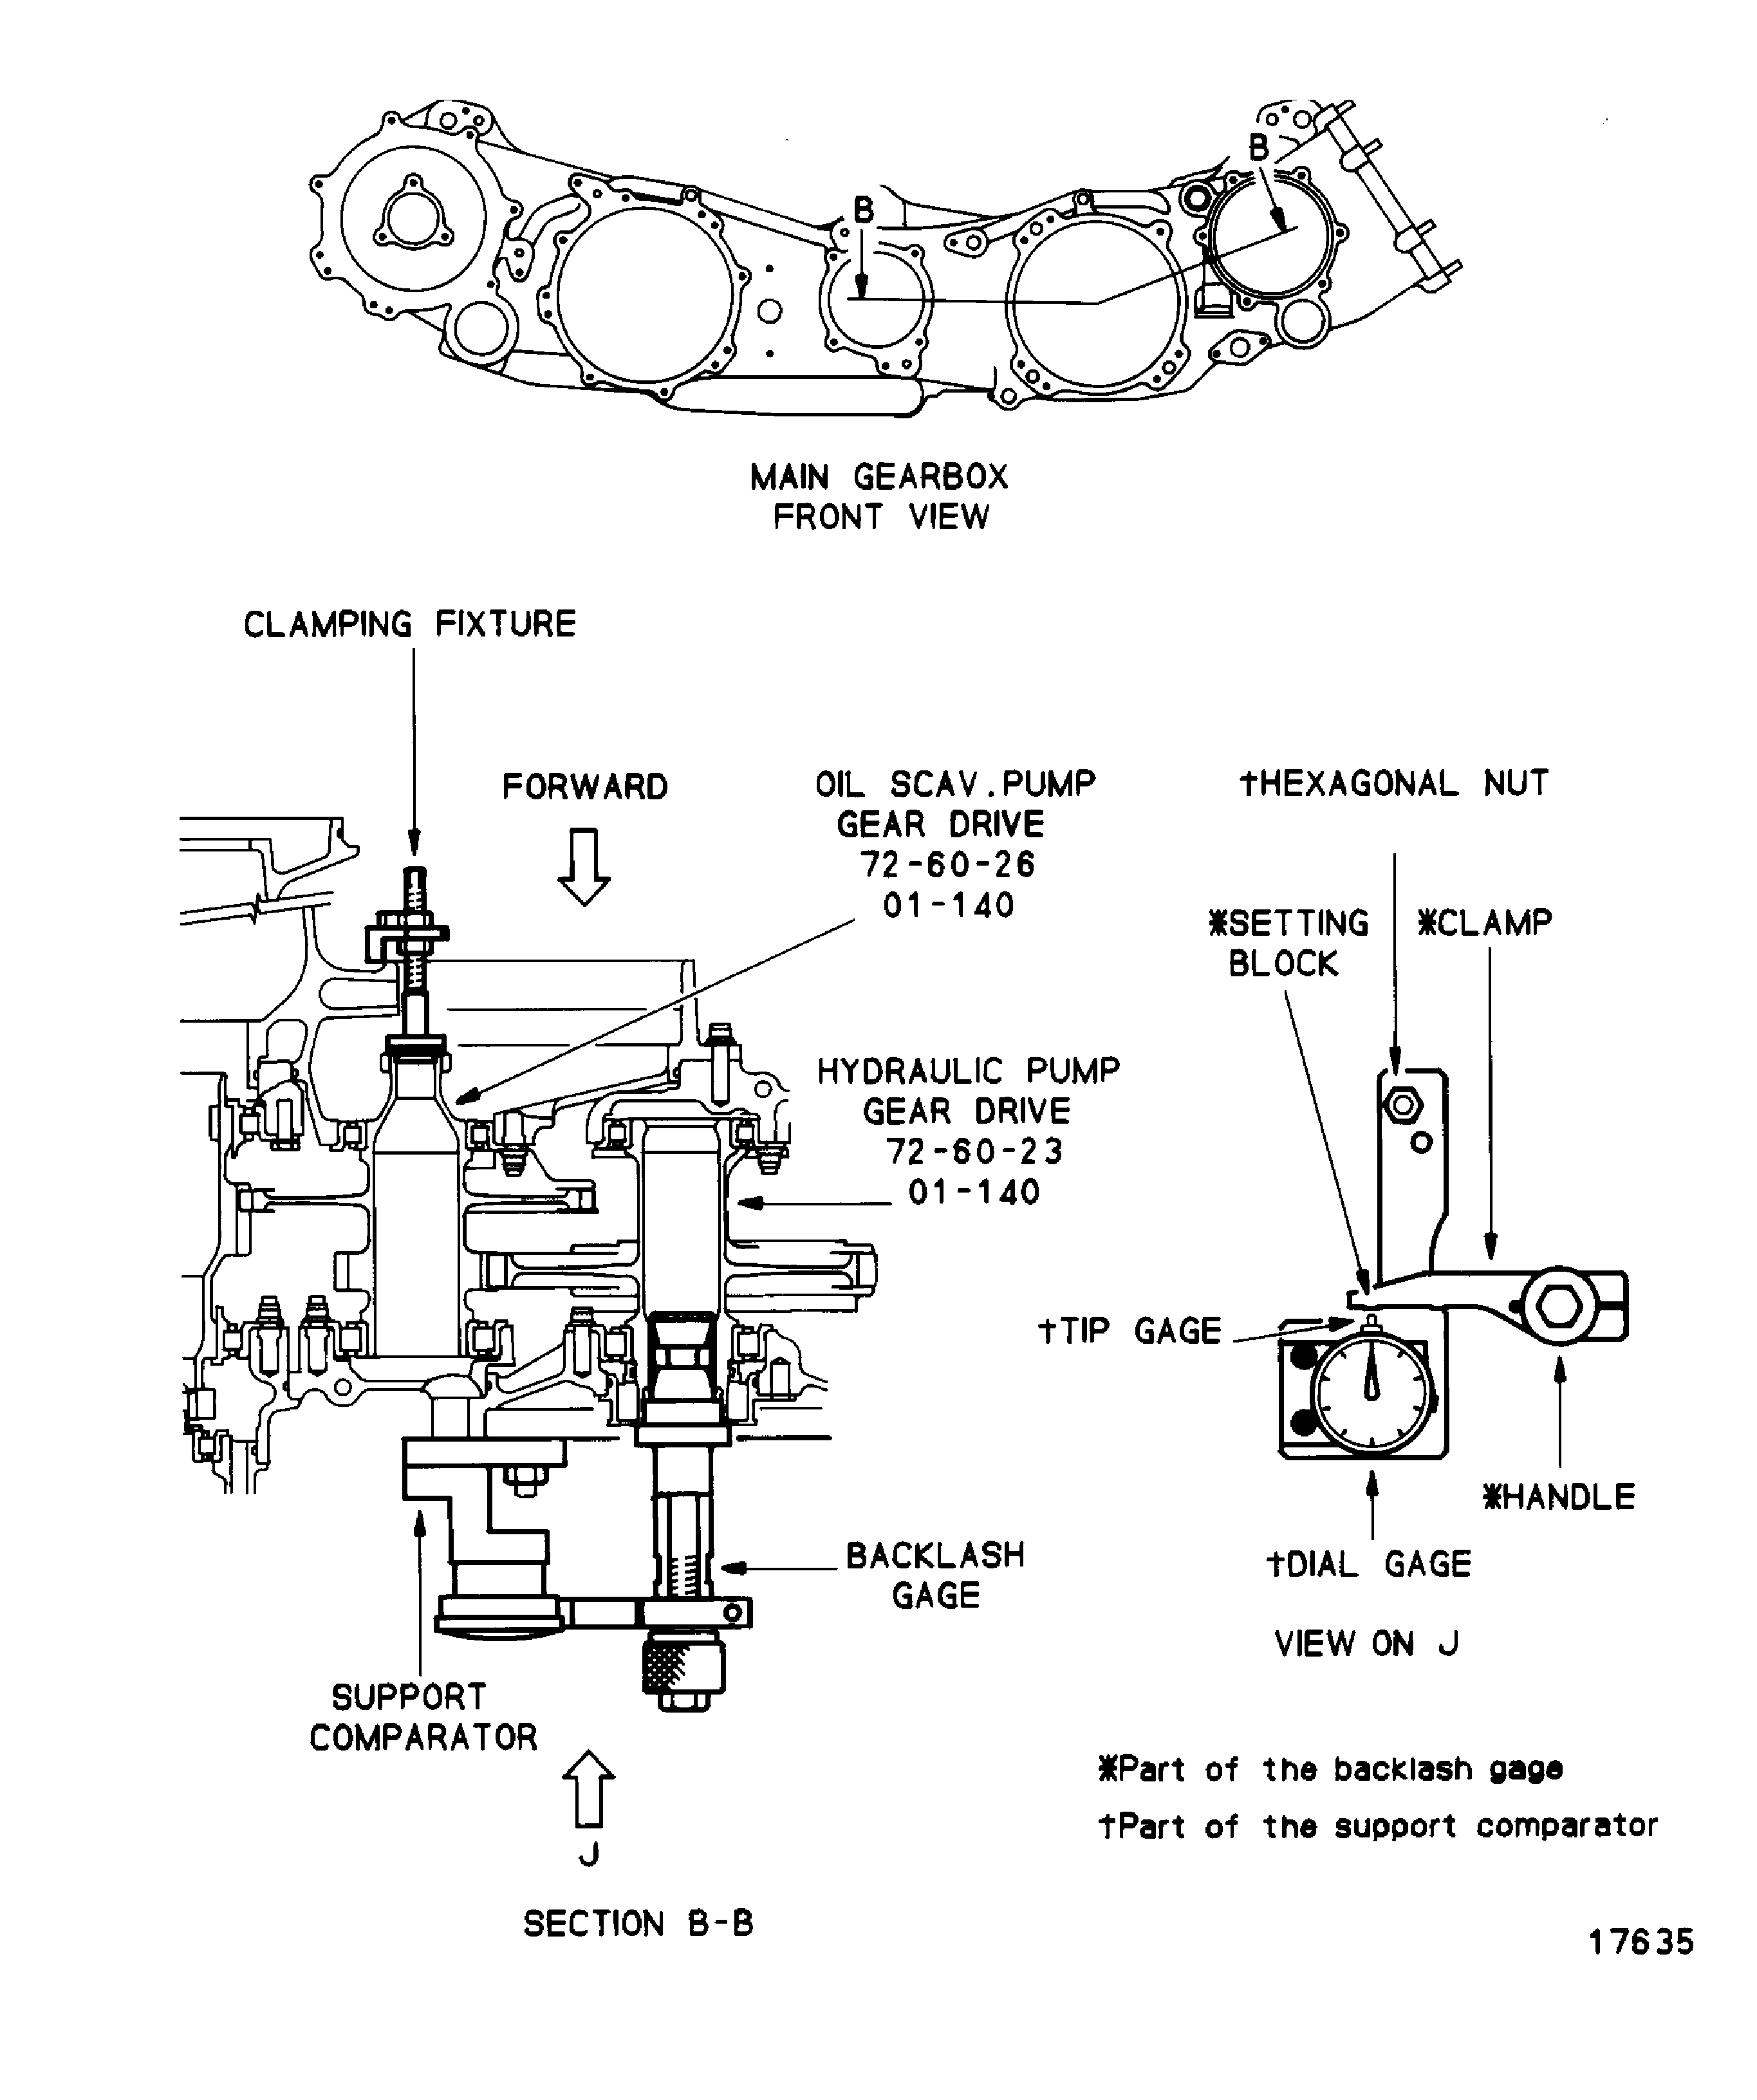
Figure: Measure the Circumferential Backlash Between the Oil Scavenge Pumpdrive Gear and the Extension Layshaft Drive Gear
Measure the Circumferential Backlash Between the Oil Scavenge Pumpdrive Gear and the Extension Layshaft Drive Gear
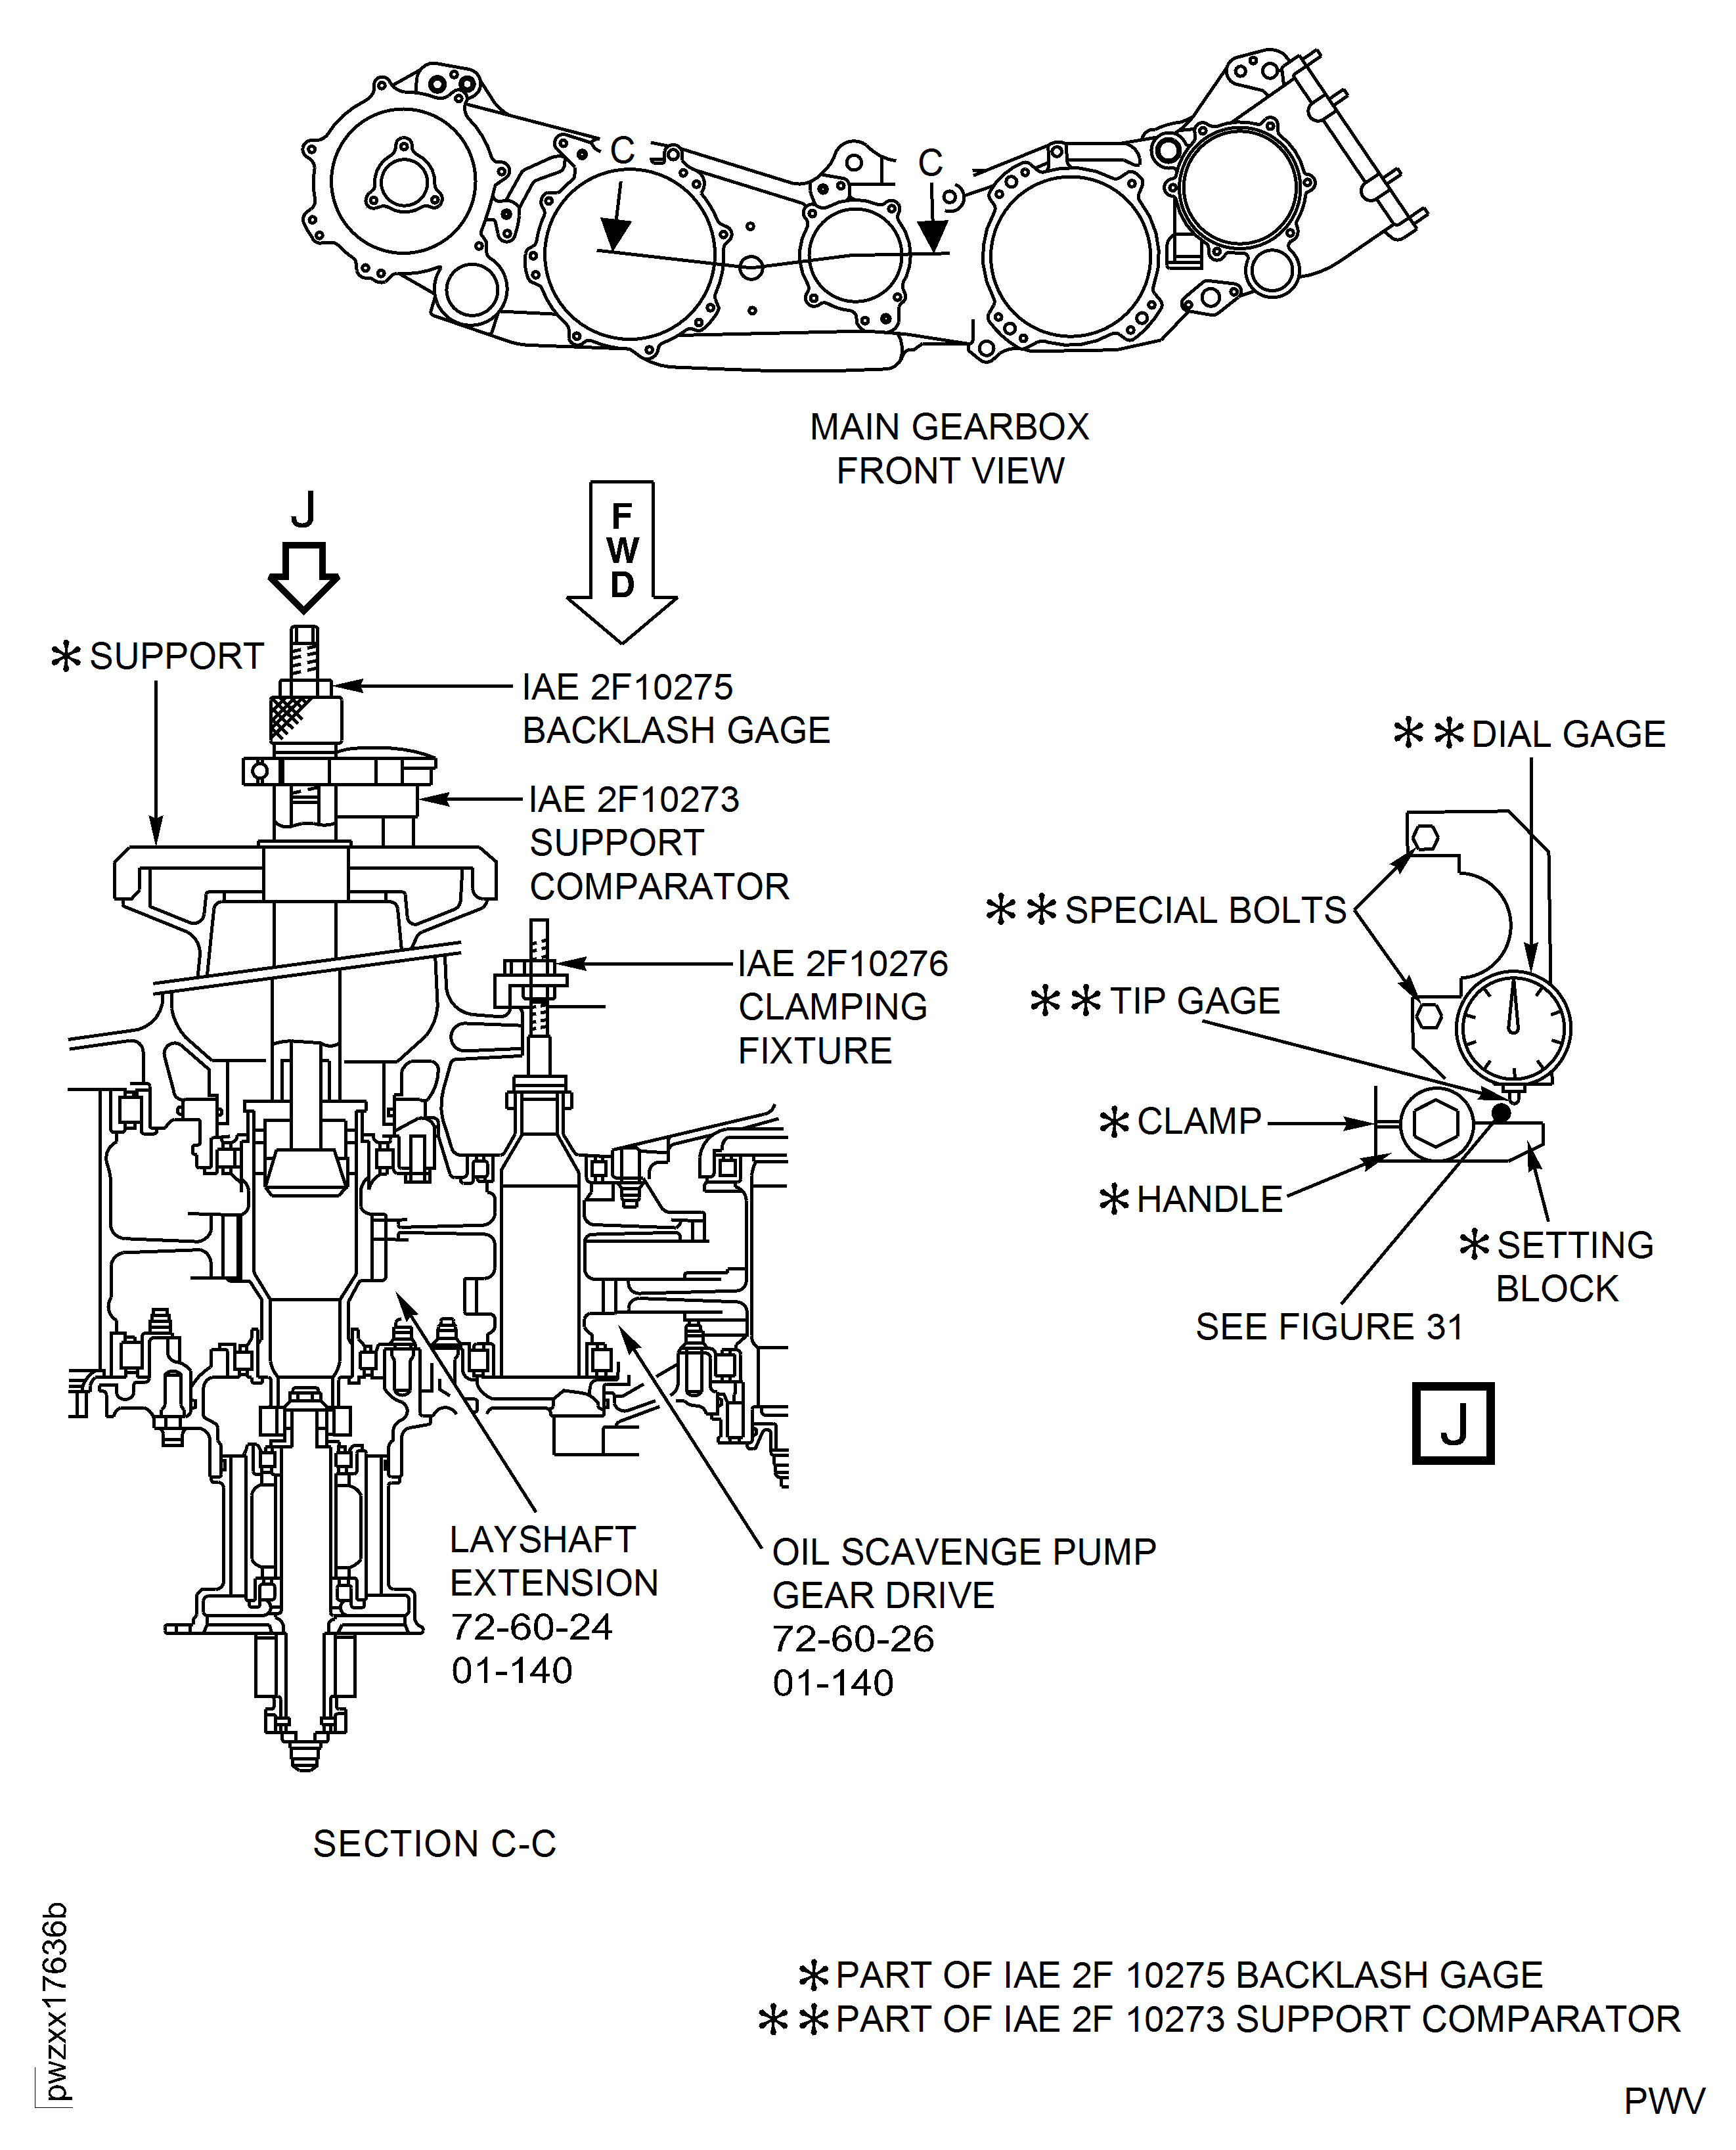
Figure: Measure the Circumferential Backlash Between the PMA Shaftand the Extension Layshaft Drive Gear
Measure the Circumferential Backlash Between the PMA Shaftand the Extension Layshaft Drive Gear
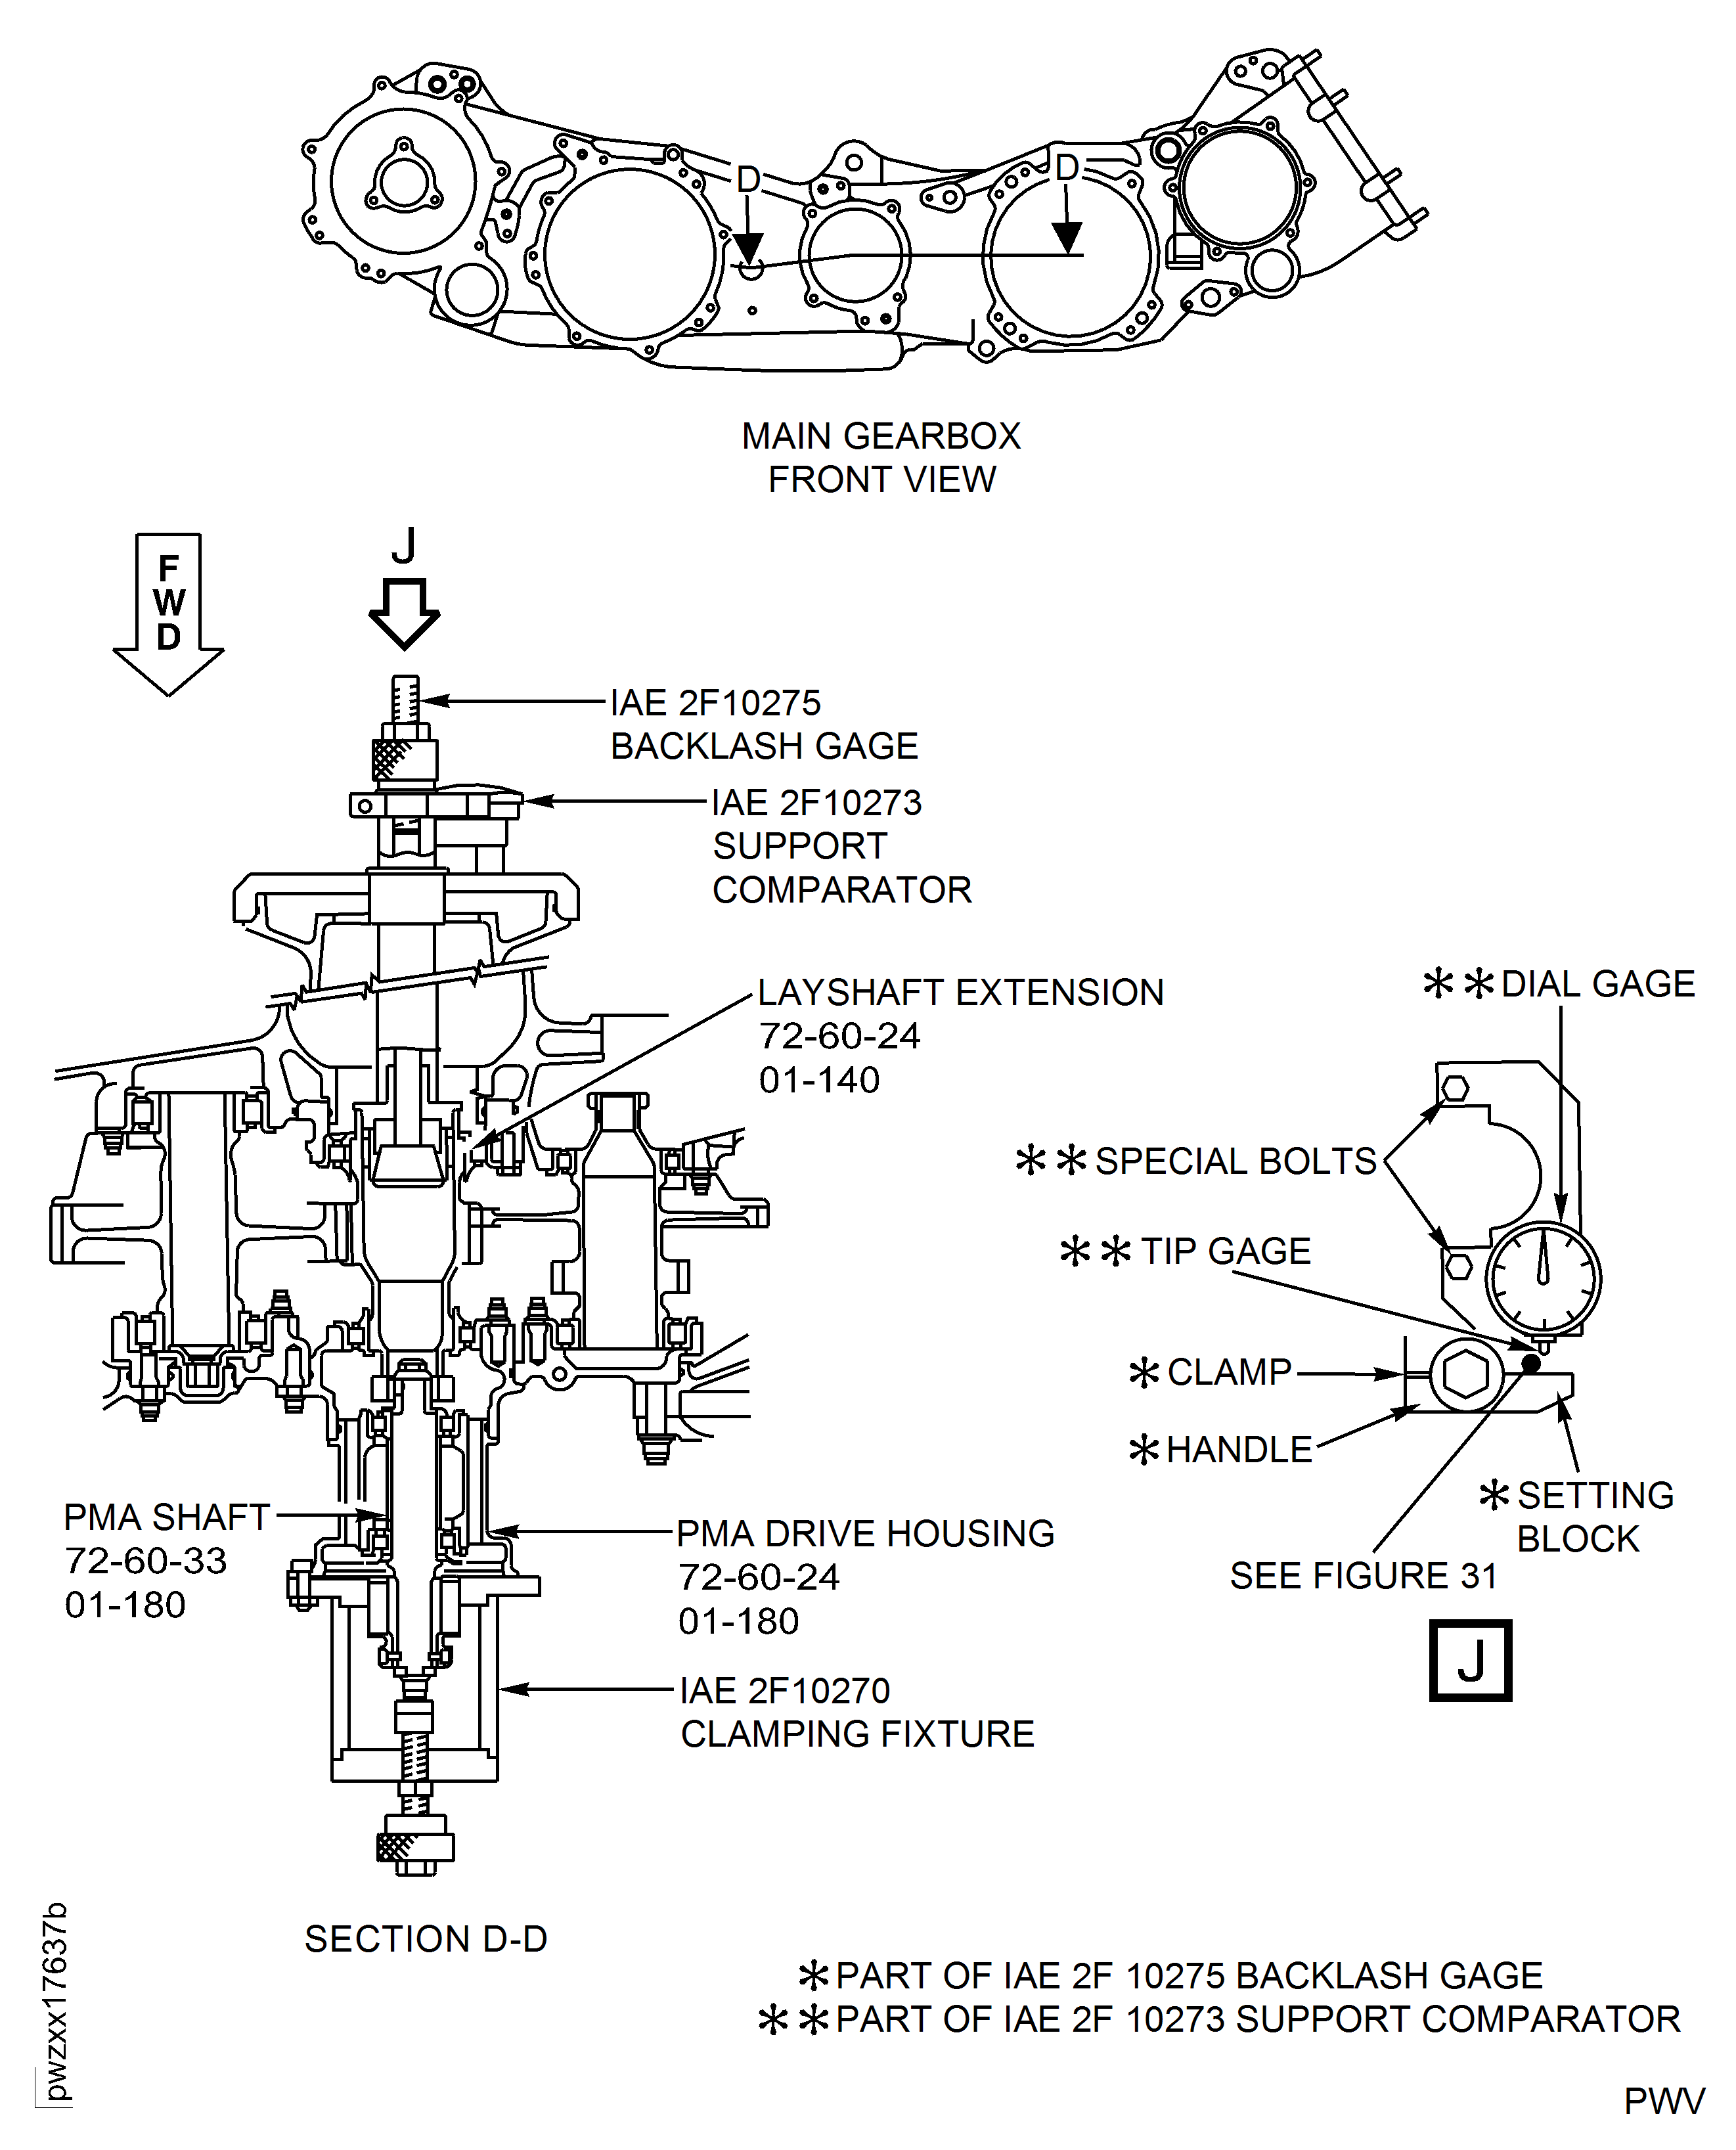
Figure: Measure the Circumferential Backlash Between the Starter Idler Gearand the Extension Layshaft Gear
Measure the Circumferential Backlash Between the Starter Idler Gearand the Extension Layshaft Gear
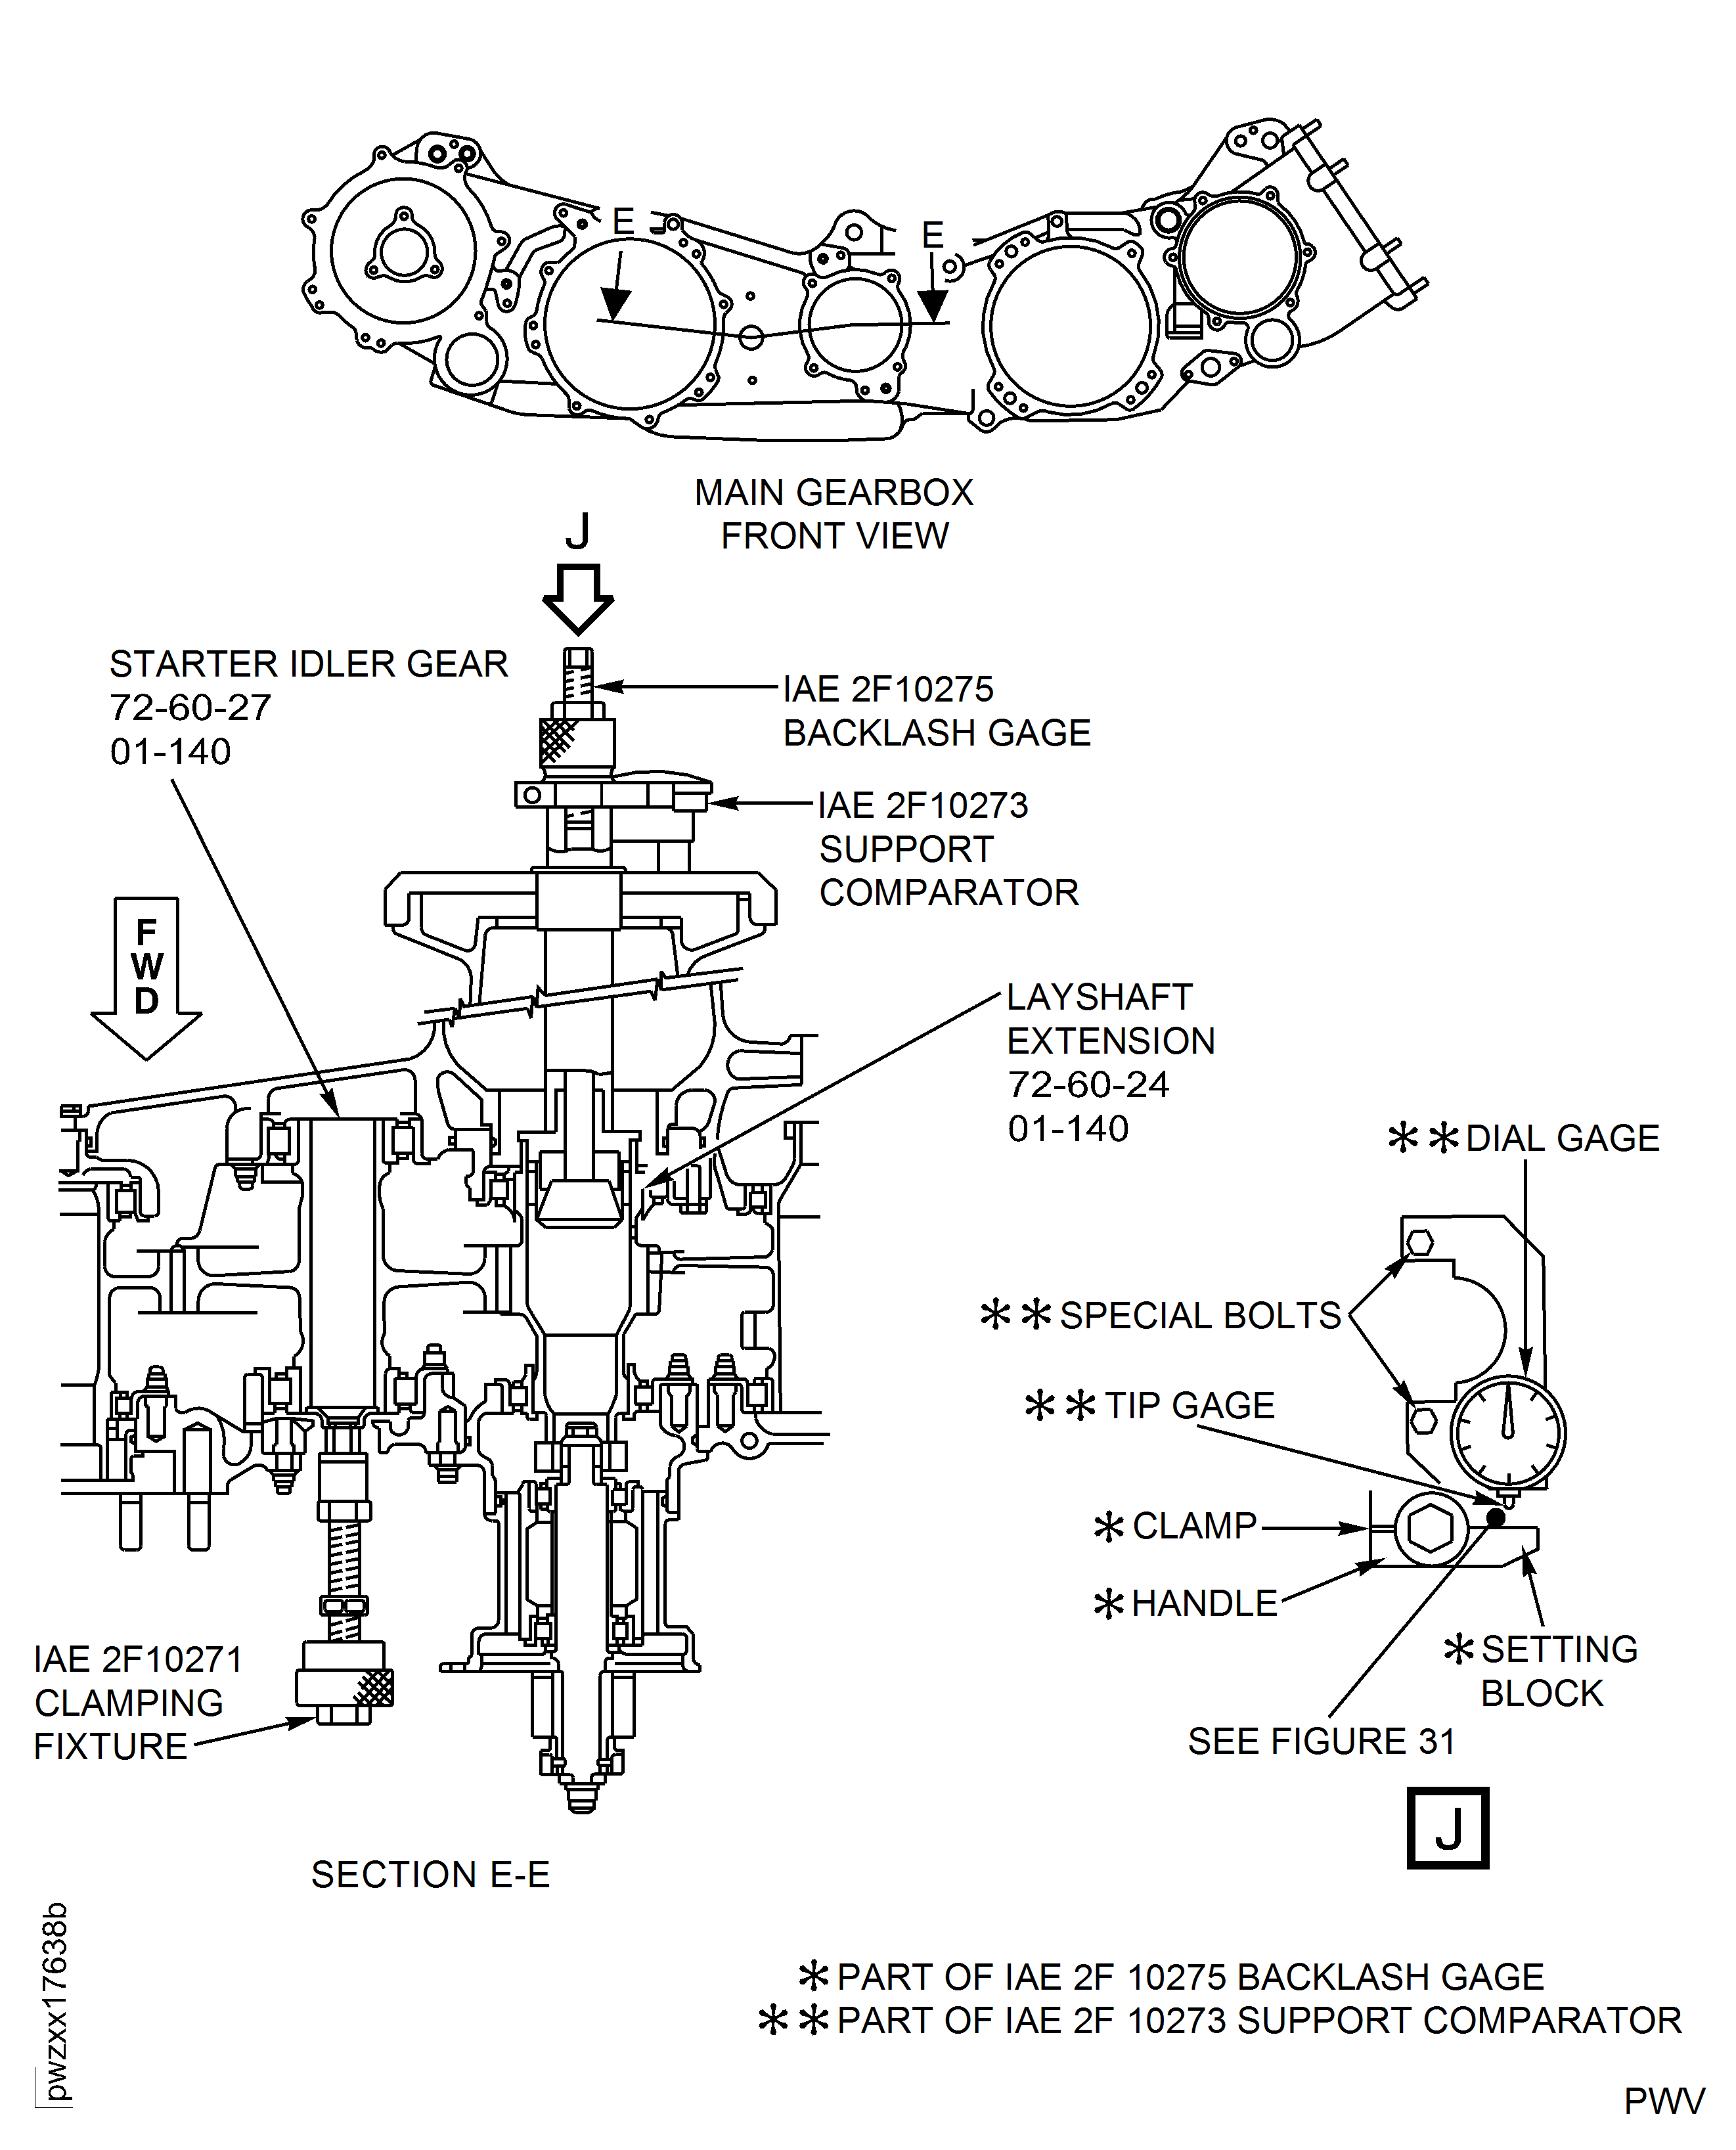
Figure: Measure the Circumferential Backlash Between the Starter Drive Gear and the Starter Idler Gear
Measure the Circumferential Backlash Between the Starter Drive Gear and the Starter Idler Gear
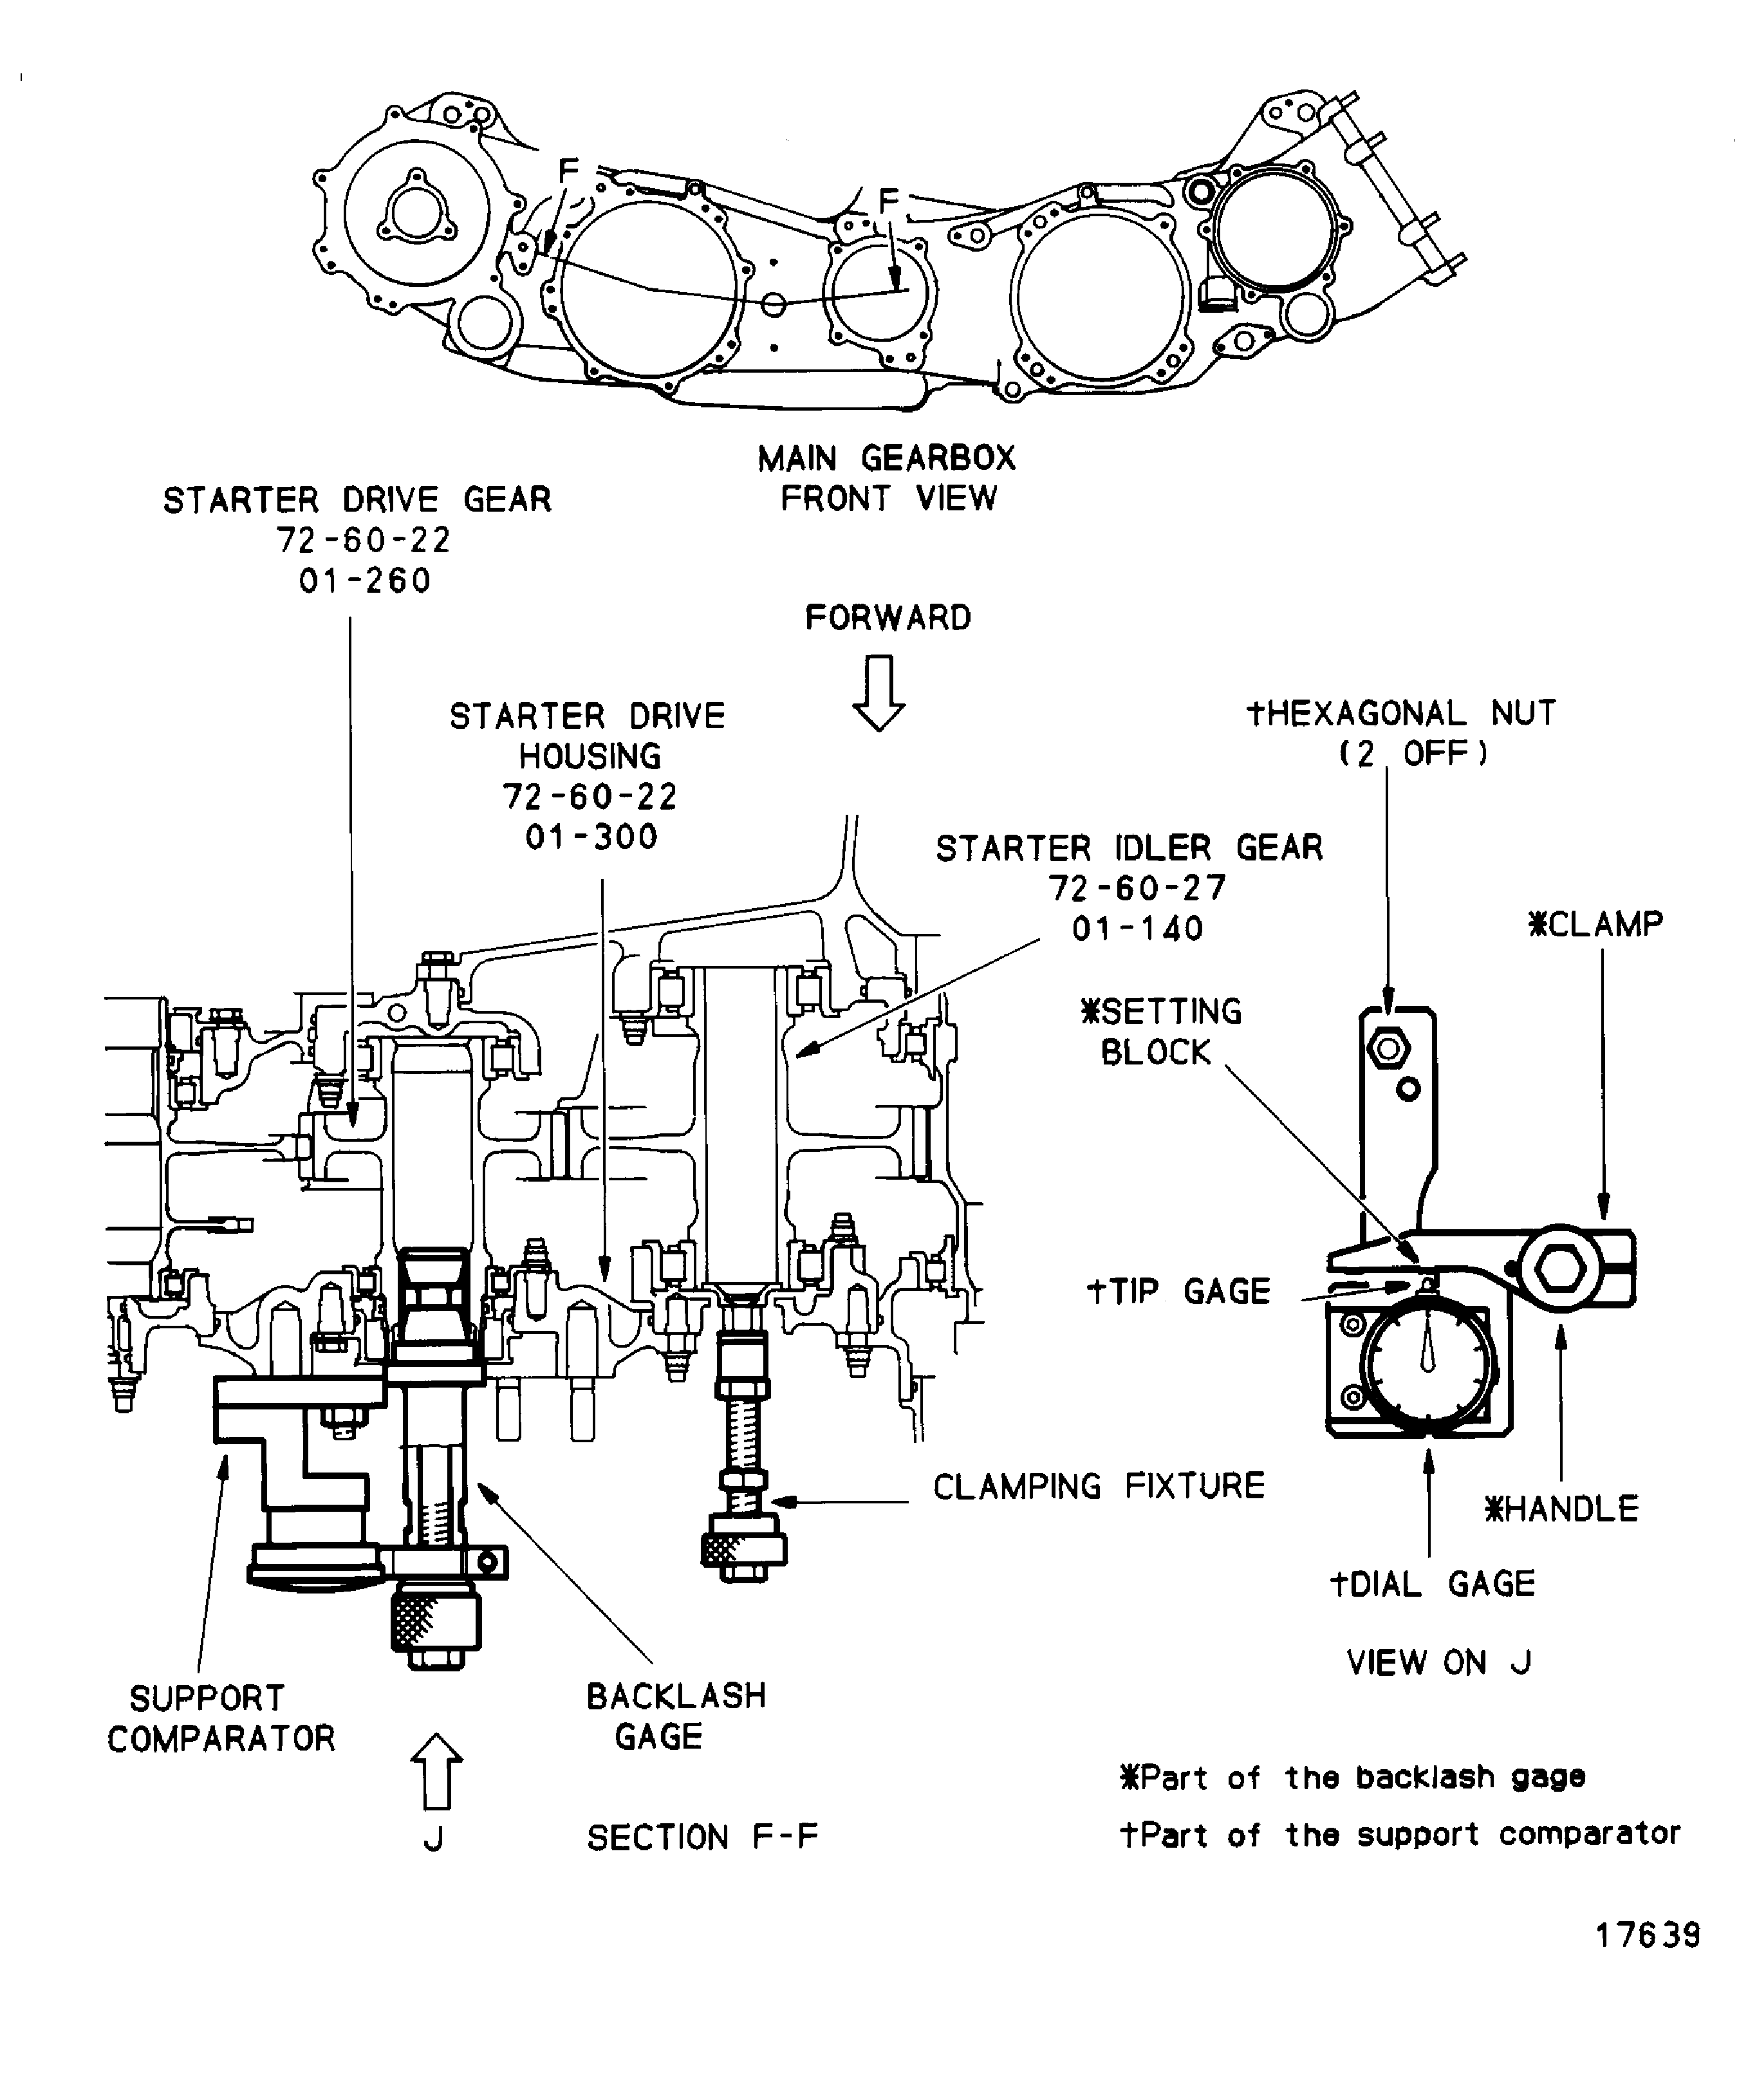
Figure: Measure the Circumferential Backlash Between the IDG Gearand the Starter Drive Gear
Measure the Circumferential Backlash Between the IDG Gearand the Starter Drive Gear
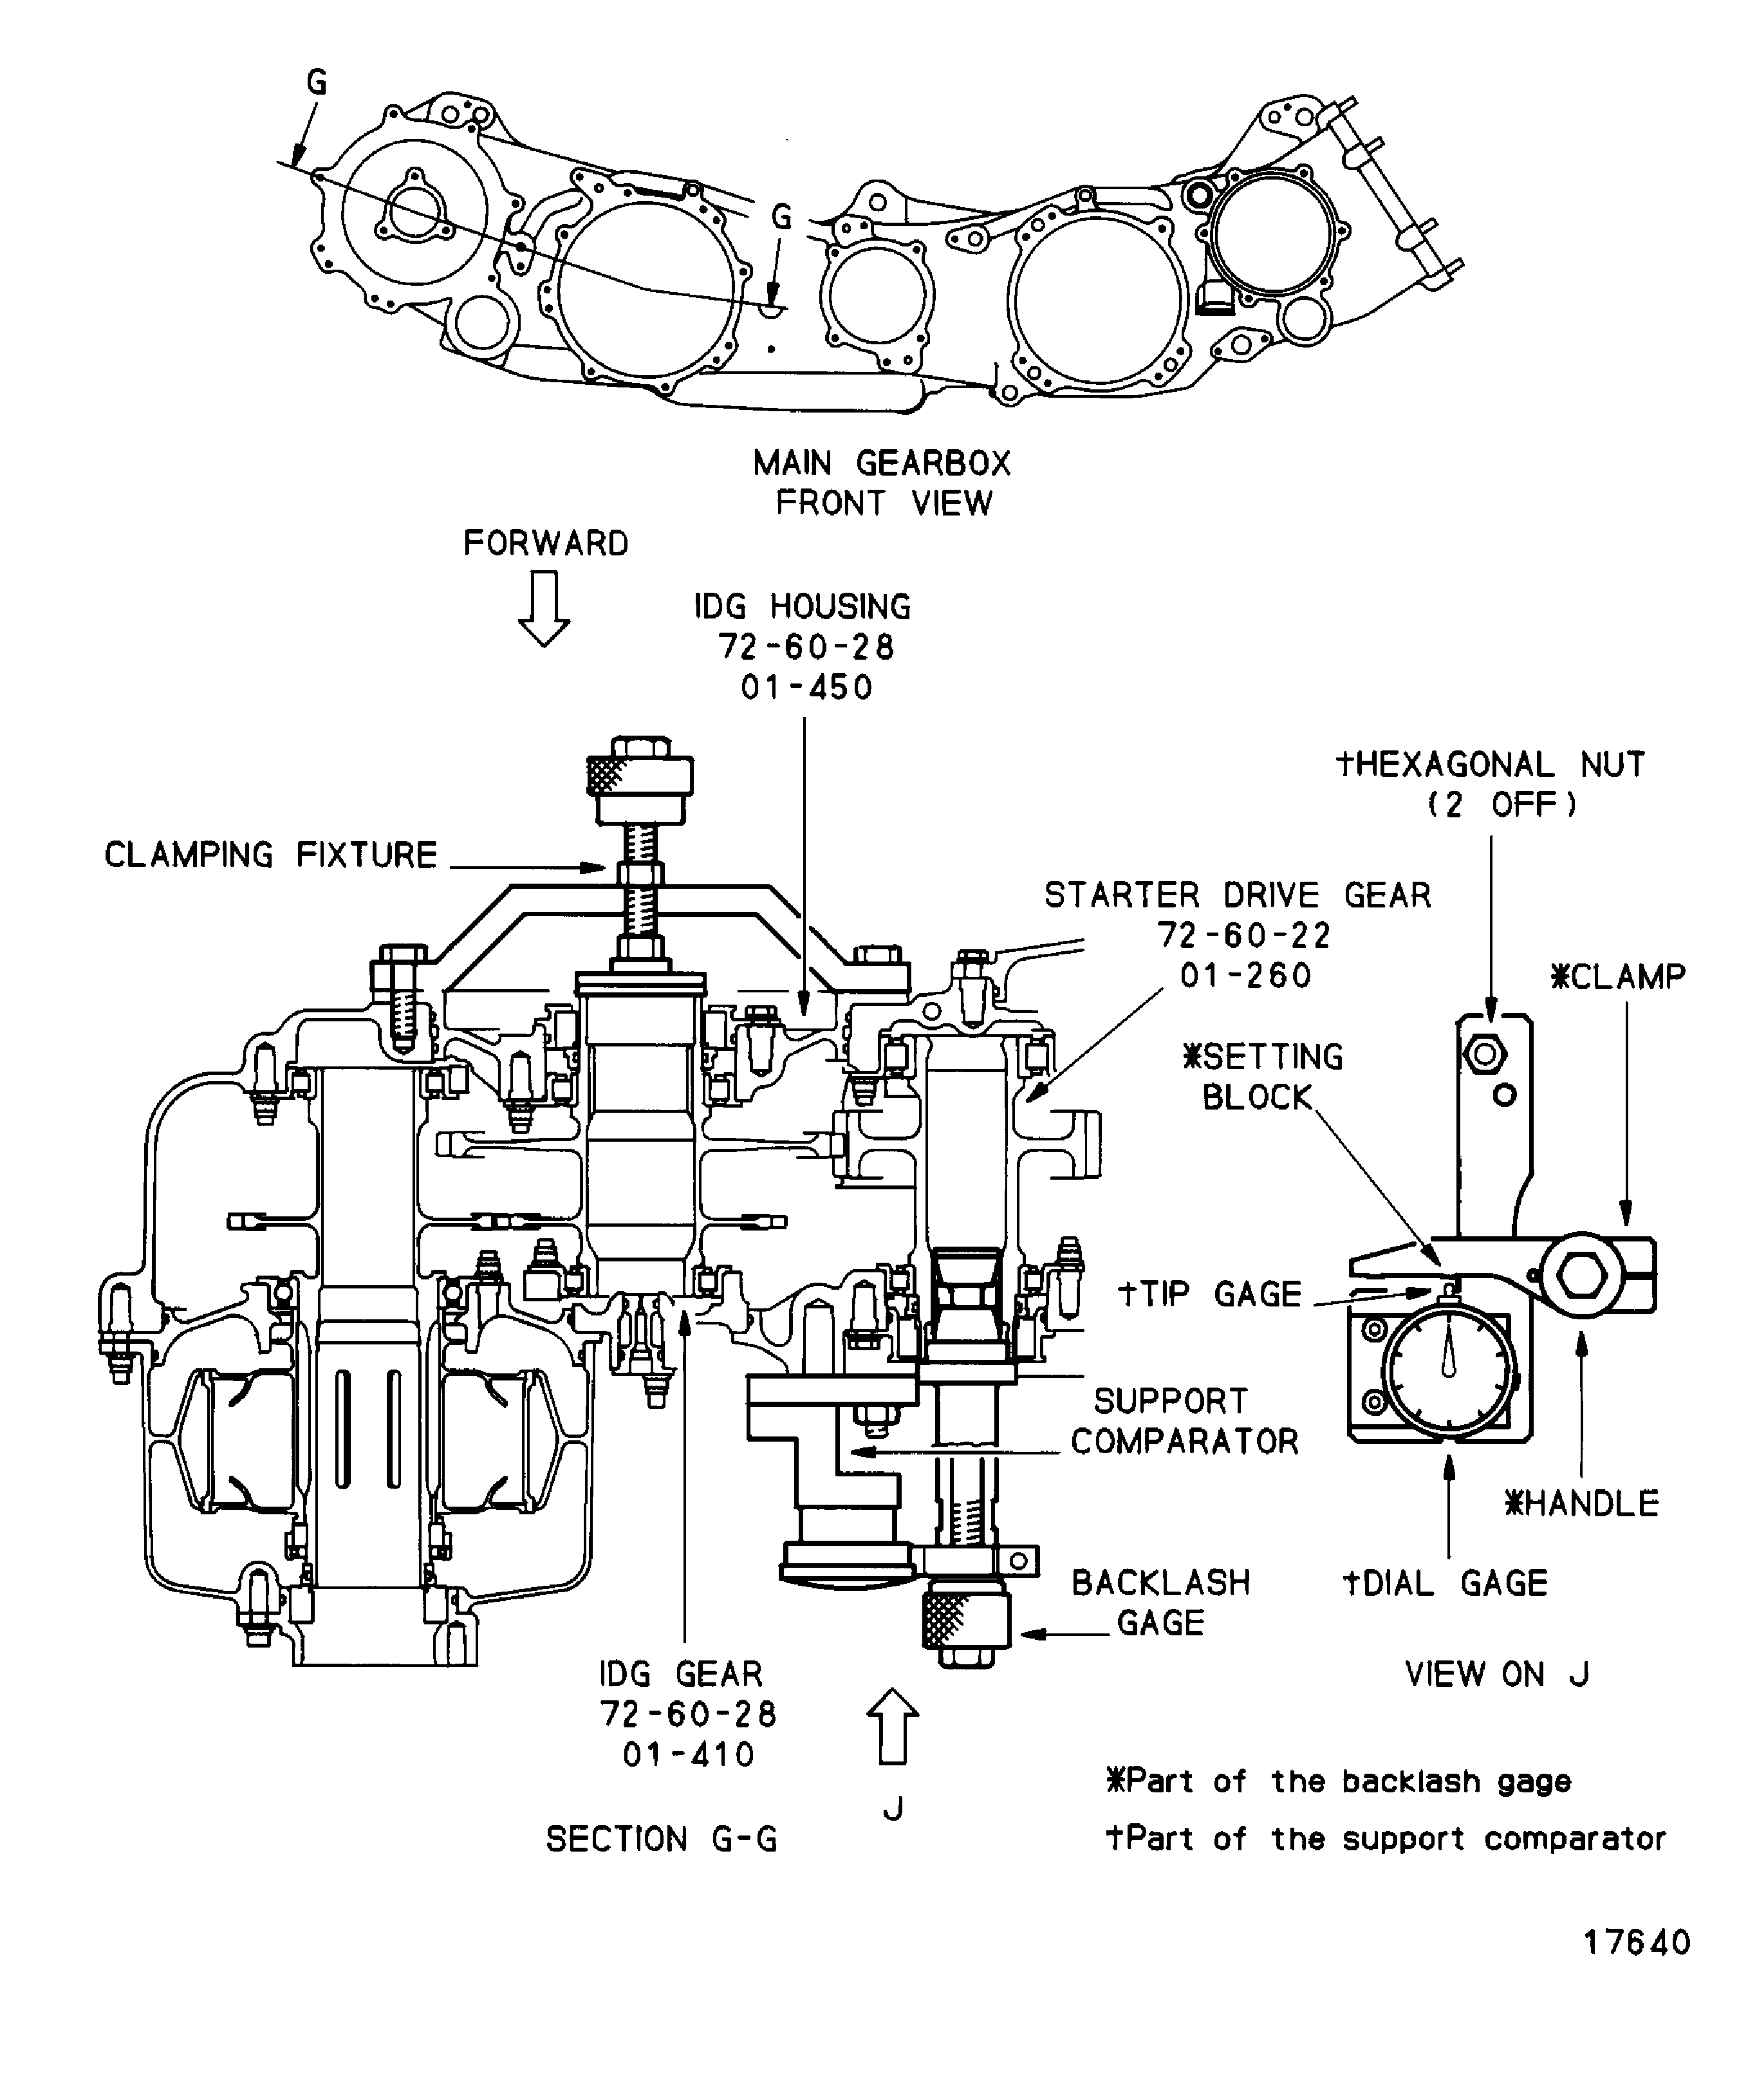
Figure: Measure the Circumferential Backlash Between the Deoiler Gear and the IDG Gear
Measure the Circumferential Backlash Between the Deoiler Gear and the IDG Gear
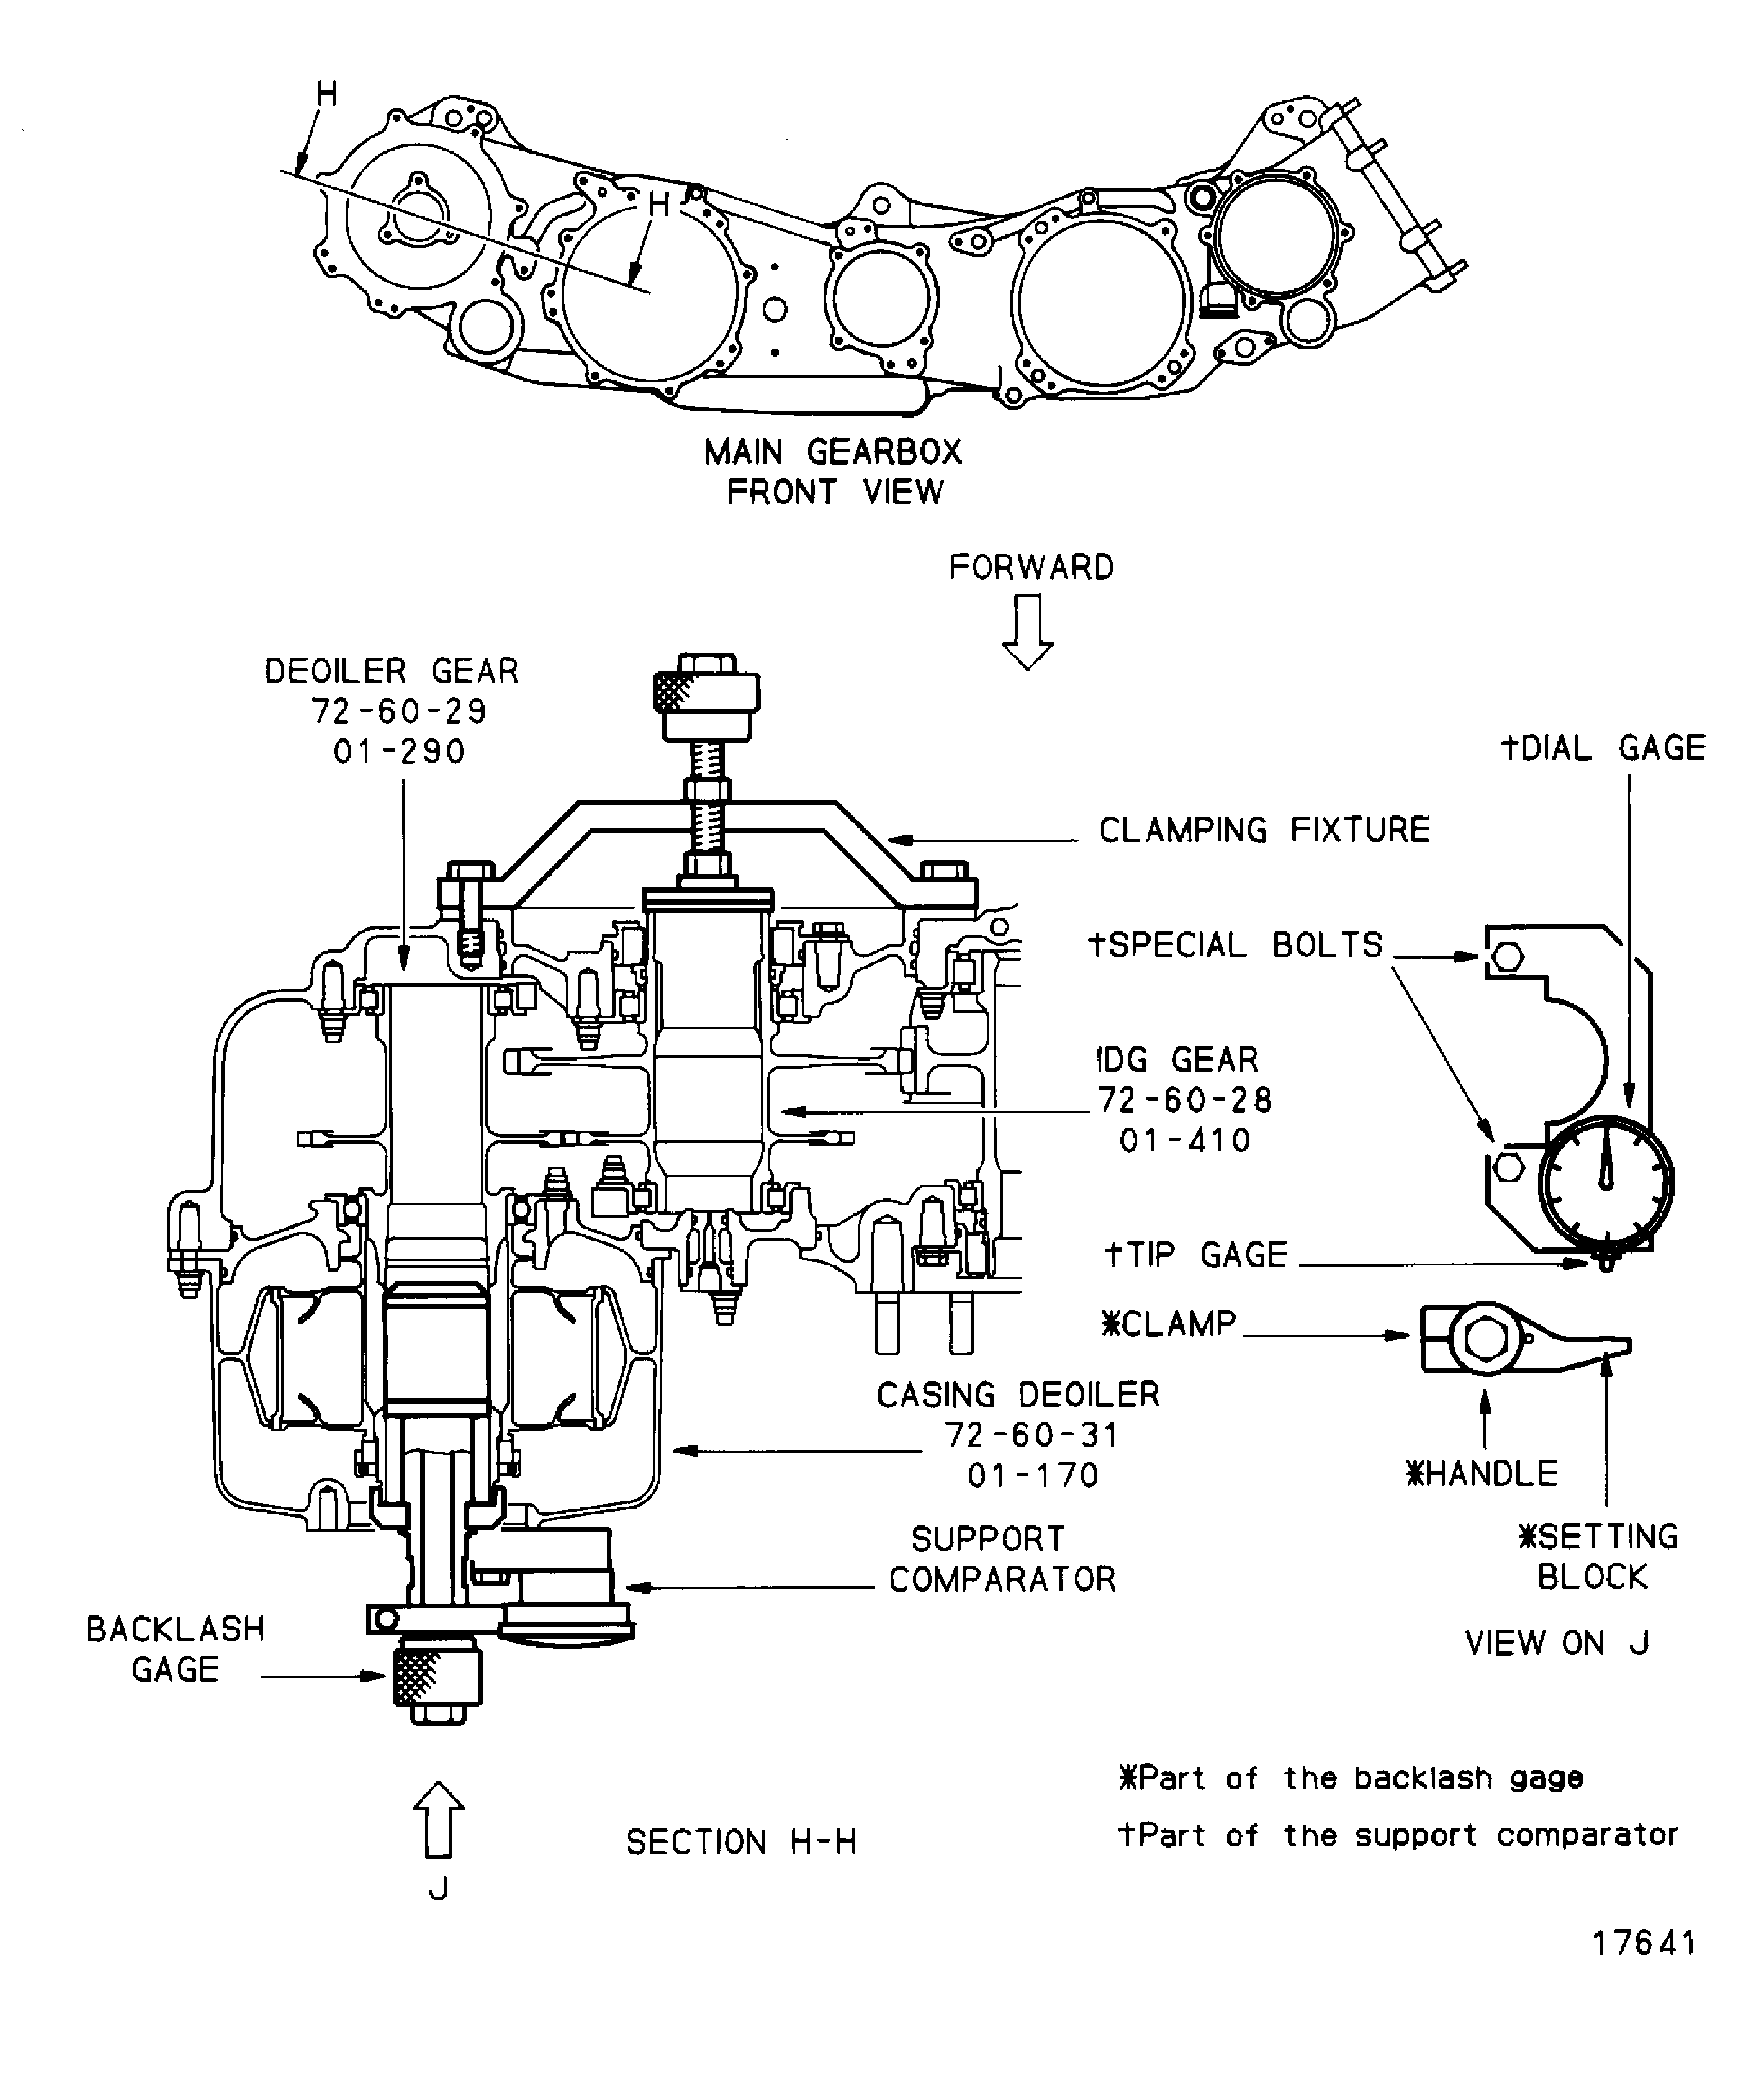
Figure: Setting Block of Backlash Gage IAE 2F10275
Setting Block of Backlash Gage IAE 2F10275
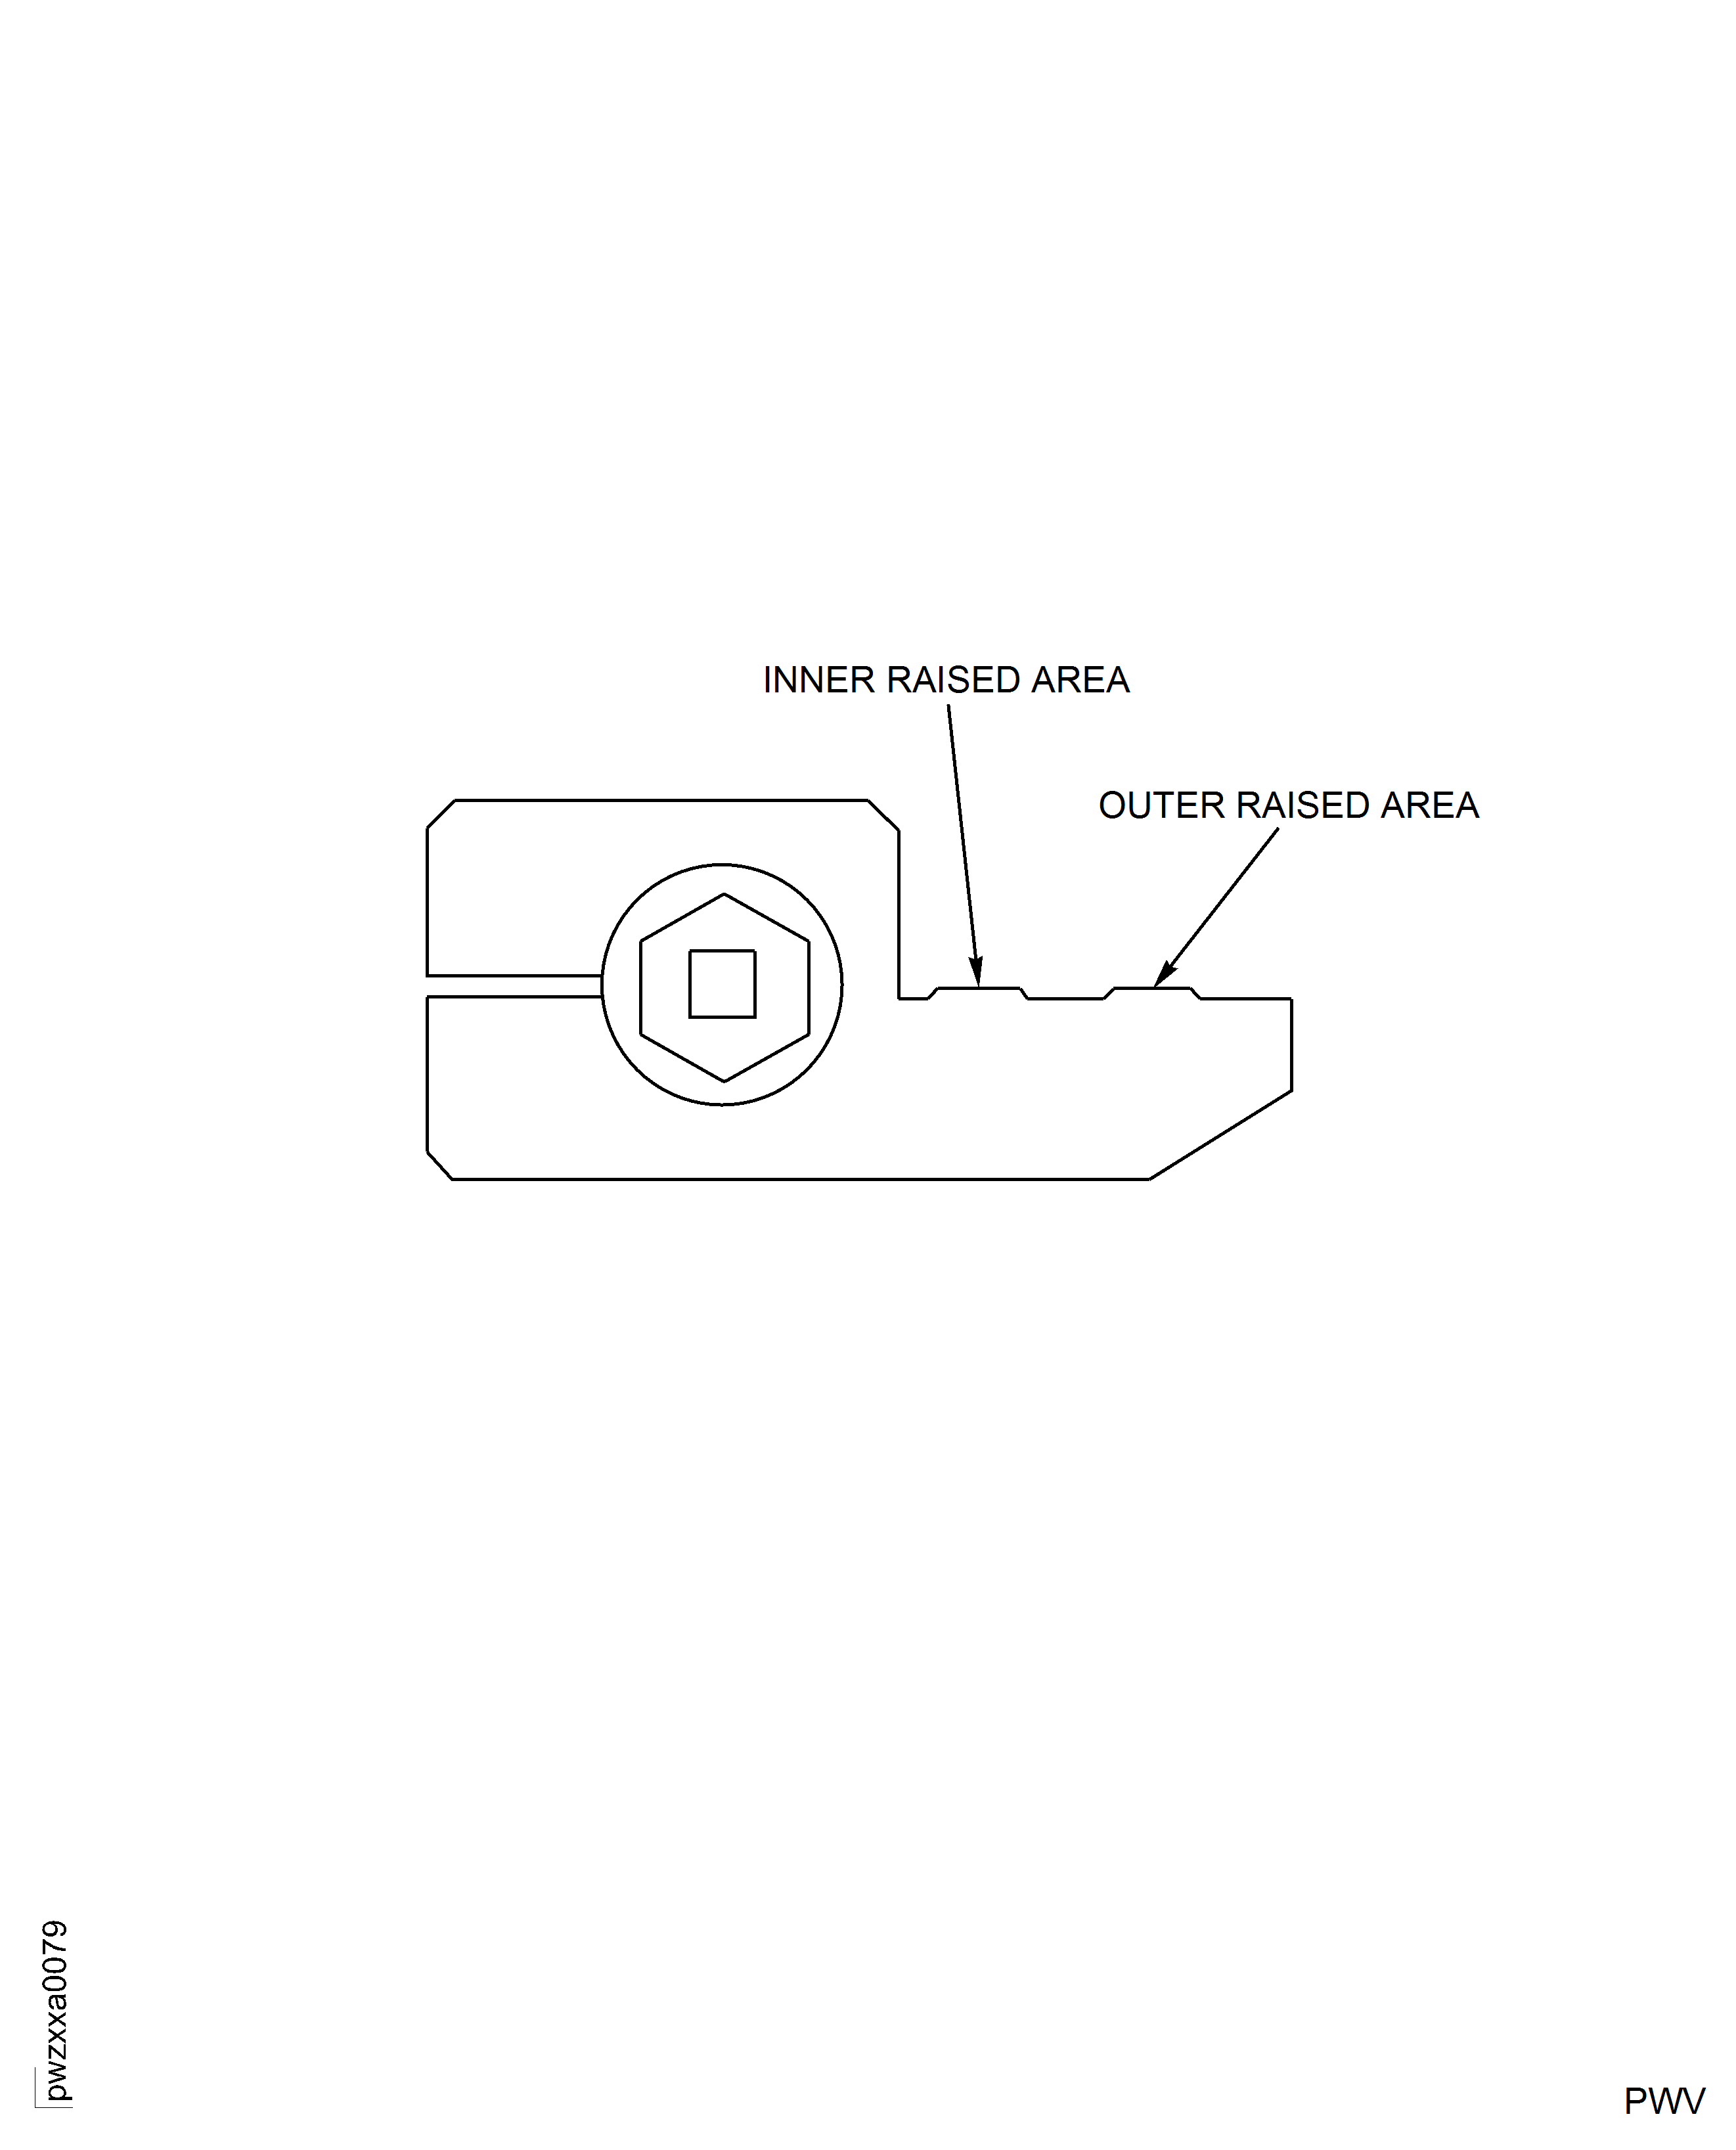
Figure: Install the Hydraulic Pump Drive Gear (Post SB 72-0264)
Install the Hydraulic Pump Drive Gear (Post SB 72-0264)
