Export Control
EAR Export Classification: Not subject to the EAR per 15 C.F.R. Chapter 1, Part 734.3(b)(3), except for the following Service Bulletins which are currently published as EAR Export Classification 9E991: SBE70-0992, SBE72-0483, SBE72-0580, SBE72-0588, SBE72-0640, SBE73-0209, SBE80-0024 and SBE80-0025.Copyright
© IAE International Aero Engines AG (2001, 2014 - 2021) The information contained in this document is the property of © IAE International Aero Engines AG and may not be copied or used for any purpose other than that for which it is supplied without the express written authority of © IAE International Aero Engines AG. (This does not preclude use by engine and aircraft operators for normal instructional, maintenance or overhaul purposes.).Applicability
All
Common Information
TASK 72-60-21-200-002 Main Gearbox Casing - Examine, Inspection-002
Effectivity
FIG/ITEM | PART NO. |
|---|---|
02-050 | 4B0053 |
02-050 | 4B0054 |
02-050 | 4B0055 |
02-050 | 4B0057 |
02-050 | 4B0400 |
02-050 | 4B0402 |
02-050 | 4B0423 |
General
This TASK gives the procedure for the inspection of the gearbox casing.
Fig/item numbers in parentheses in the procedure agree with those used in the IPC.
The policy that is necessary for inspection is given in SPM TASK 70-20-00-200-501.
All the parts must be cleaned before any part is examined. Refer to TASK 72-60-21-100-000.
All parts must be visually examined for damage, corrosion and wear. Any defects that are not identified in the procedure must be referred to IAE.
The procedure for those parts which must have a crack test is given in Step. Do the test before the part is visually examined. Limits for cracks are given in the SUBTASK for each part.
A ** following repair referenced in this inspection indicates that the repair is not yet published in the current revision of the manual and the part must be rejected. Contact IAE for additional information concerning FAA approved repair date.
Do not discard any part until you are sure there are no repairs available. Refer to the instructions in Repair before a discarded part is used again or oversize parts are installed.
Parts which should be discarded can be held although no repair is available. The repair of a discarded part could be shown to be necessary at a later date.
All parts must be examined to make sure that all the repairs have been completed satisfactorily.
The practices and processes referred to in the procedure by the TASK numbers are in SPM.
References
Refer to SPM for data on these items.
Definition of damage, SPM TASK 70-02-02-350-501 and SPM TASK 70-02-00-350-501.
Record and control of the lives of parts, SPM TASK 70-05-00-220-501.
Inspection of parts, SPM TASK 70-20-00-200-501.
Some data on these items is contained in this TASK. For more data on these items refer to SPM.
Method of testing for crack Indications,
Chemical processes,
Surface protection.
NOTE
Preliminary Requirements
Pre-Conditions
NONESupport Equipment
| Name | Manufacturer | Part Number / Identification | Quantity | Remark |
|---|---|---|---|---|
| FPI Inspection station | LOCAL | FPI Inspection station |
Consumables, Materials and Expendables
| Name | Manufacturer | Part Number / Identification | Quantity | Remark |
|---|---|---|---|---|
| CoMat 01-001 SOLVENT, DELETED | X111X | CoMat 01-001 | ||
| CoMat 06-063 FLUORESCENT PENETRANT (POST-EMULSIFIED MEDIUM SENSITIVITY) | X222X | CoMat 06-063 |
Spares
NONESafety Requirements
NONEProcedure
Clean the parts. Refer to the TASK 72-60-21-100-000.
SUBTASK 72-60-21-230-052 Do a Crack Test on the Gearbox Casing (02-050) (Fluorescent Penetrant)
Accept. Do not do SUBTASKS 72-60-21-220-061, 72-60-21-220-062, 72-60-21-220-063, 72-60-21-220-064, 72-60-21-220-065, 72-60-21-220-066, 72-60-21-220-067, 72-60-21-220-068, 72-60-21-220-069, 72-60-21-220-070, 72-60-21-220-071, 72-60-21-220-072, 72-60-21-220-073, 72-60-21-220-074, 72-60-21-220-075, 72-60-21-220-076, 72-60-21-220-077, 72-60-21-220-078, 72-60-21-220-079, 72-60-21-220-080, 72-60-21-220-081, 72-60-21-220-082, 72-60-21-220-083, 72-60-21-220-084, 72-60-21-220-085, 72-60-21-220-086, 72-60-21-220-087, 72-60-21-220-088, 72-60-21-220-089, 72-60-21-220-090, 72-60-21-220-091, 72-60-21-220-092, 72-60-21-220-093, 72-60-21-220-094, 72-60-21-220-095, 72-60-21-220-096, 72-60-21-220-097, 72-60-21-220-098, 72-60-21-220-099, 72-60-21-220-100, 72-60-21-220-101, 72-60-21-220-102, 72-60-21-220-103, 72-60-21-220-104, 72-60-21-220-175.
Damages are not found.
Do SUBTASKS 72-60-21-220-061, 72-60-21-220-062, 72-60-21-220-063, 72-60-21-220-064, 72-60-21-220-065, 72-60-21-220-066, 72-60-21-220-067, 72-60-21-220-068, 72-60-21-220-069, 72-60-21-220-070, 72-60-21-220-071, 72-60-21-220-072, 72-60-21-220-073, 72-60-21-220-074, 72-60-21-220-075, 72-60-21-220-076, 72-60-21-220-077, 72-60-21-220-078, 72-60-21-220-079, 72-60-21-220-080, 72-60-21-220-081, 72-60-21-220-082, 72-60-21-220-083, 72-60-21-220-084, 72-60-21-220-085, 72-60-21-220-086, 72-60-21-220-087, 72-60-21-220-088, 72-60-21-220-089, 72-60-21-220-090, 72-60-21-220-091, 72-60-21-220-092, 72-60-21-220-093, 72-60-21-220-094, 72-60-21-220-095, 72-60-21-220-096, 72-60-21-220-097, 72-60-21-220-098, 72-60-21-220-099, 72-60-21-220-100, 72-60-21-220-101, 72-60-21-220-102, 72-60-21-220-103, 72-60-21-220-104, 72-60-21-220-175.
Damages are found.
Damages that can be related to important deformation of the casing as oil leaks, high looseness between gears, unusual bearings wear or similar operational issues.
SUBTASK 72-60-21-220-053 Visually Examine the Gearbox Casing (02-050) Bores at Locations 3, 6, 10, 13, 15, 28, 4054, 4015, 4032, 4002 and 4007, 4010 and 4014, 4018 and 4022, 4025 and 4027, 4030 and 4033, 4036 and 4038, 4041 and 4045, 4049 and 4053
Refer to Figure.
Repair, VRS5253 TASK 72-60-21-300-002 (REPAIR-002).
More than Step.
Nicks, scores, dents or scratches.
SUBTASK 72-60-21-220-054 Examine the Gearbox Casing (02-050) Rough Surfaces at Location 1
Refer to Figure.
Repair, VRS5253 TASK 72-60-21-300-002 (REPAIR-002).
More than Step.
Nicks, scores, dents or scratches.
SUBTASK 72-60-21-220-055 Examine the Gearbox Casing (02-050) Machined Seal Surface at Location 2
Refer to Figure.
Repair, VRS5253 TASK 72-60-21-300-002 (REPAIR-002).
More than Step.
Nicks, scores, dents or scratches.
SUBTASK 72-60-21-220-056 Examine the Gearbox Casing (02-050) Machined not Seal Surface at Location 3
Repair, VRS5254 TASK 72-60-21-300-003 (REPAIR-003).
Light corrosion or pitting.
SUBTASK 72-60-21-220-057 Examine the Gearbox Casing (02-050) Protective Finish
Repair, VRS5255 TASK 72-60-21-300-004 (REPAIR-004).
More than 0.0138 in. (0.35 mm) each 3.937 in. (100.00 mm).
Perpendicularity.
Repair, VRS5255 TASK 72-60-21-300-004 (REPAIR-004).
Loose or damaged.
SUBTASK 72-60-21-220-058 Examine the Gearbox Casing (02-050) Studs/Lockrings
Refer to Figure.
Repair, VRS5713 TASK 72-60-21-300-060 (REPAIR-060). If the damage is such that it cannot be repaired with an oversize stud, do bushing repair by Repair, VRS5679 TASK 72-60-21-300-053 (REPAIR-053).
Damaged threads.
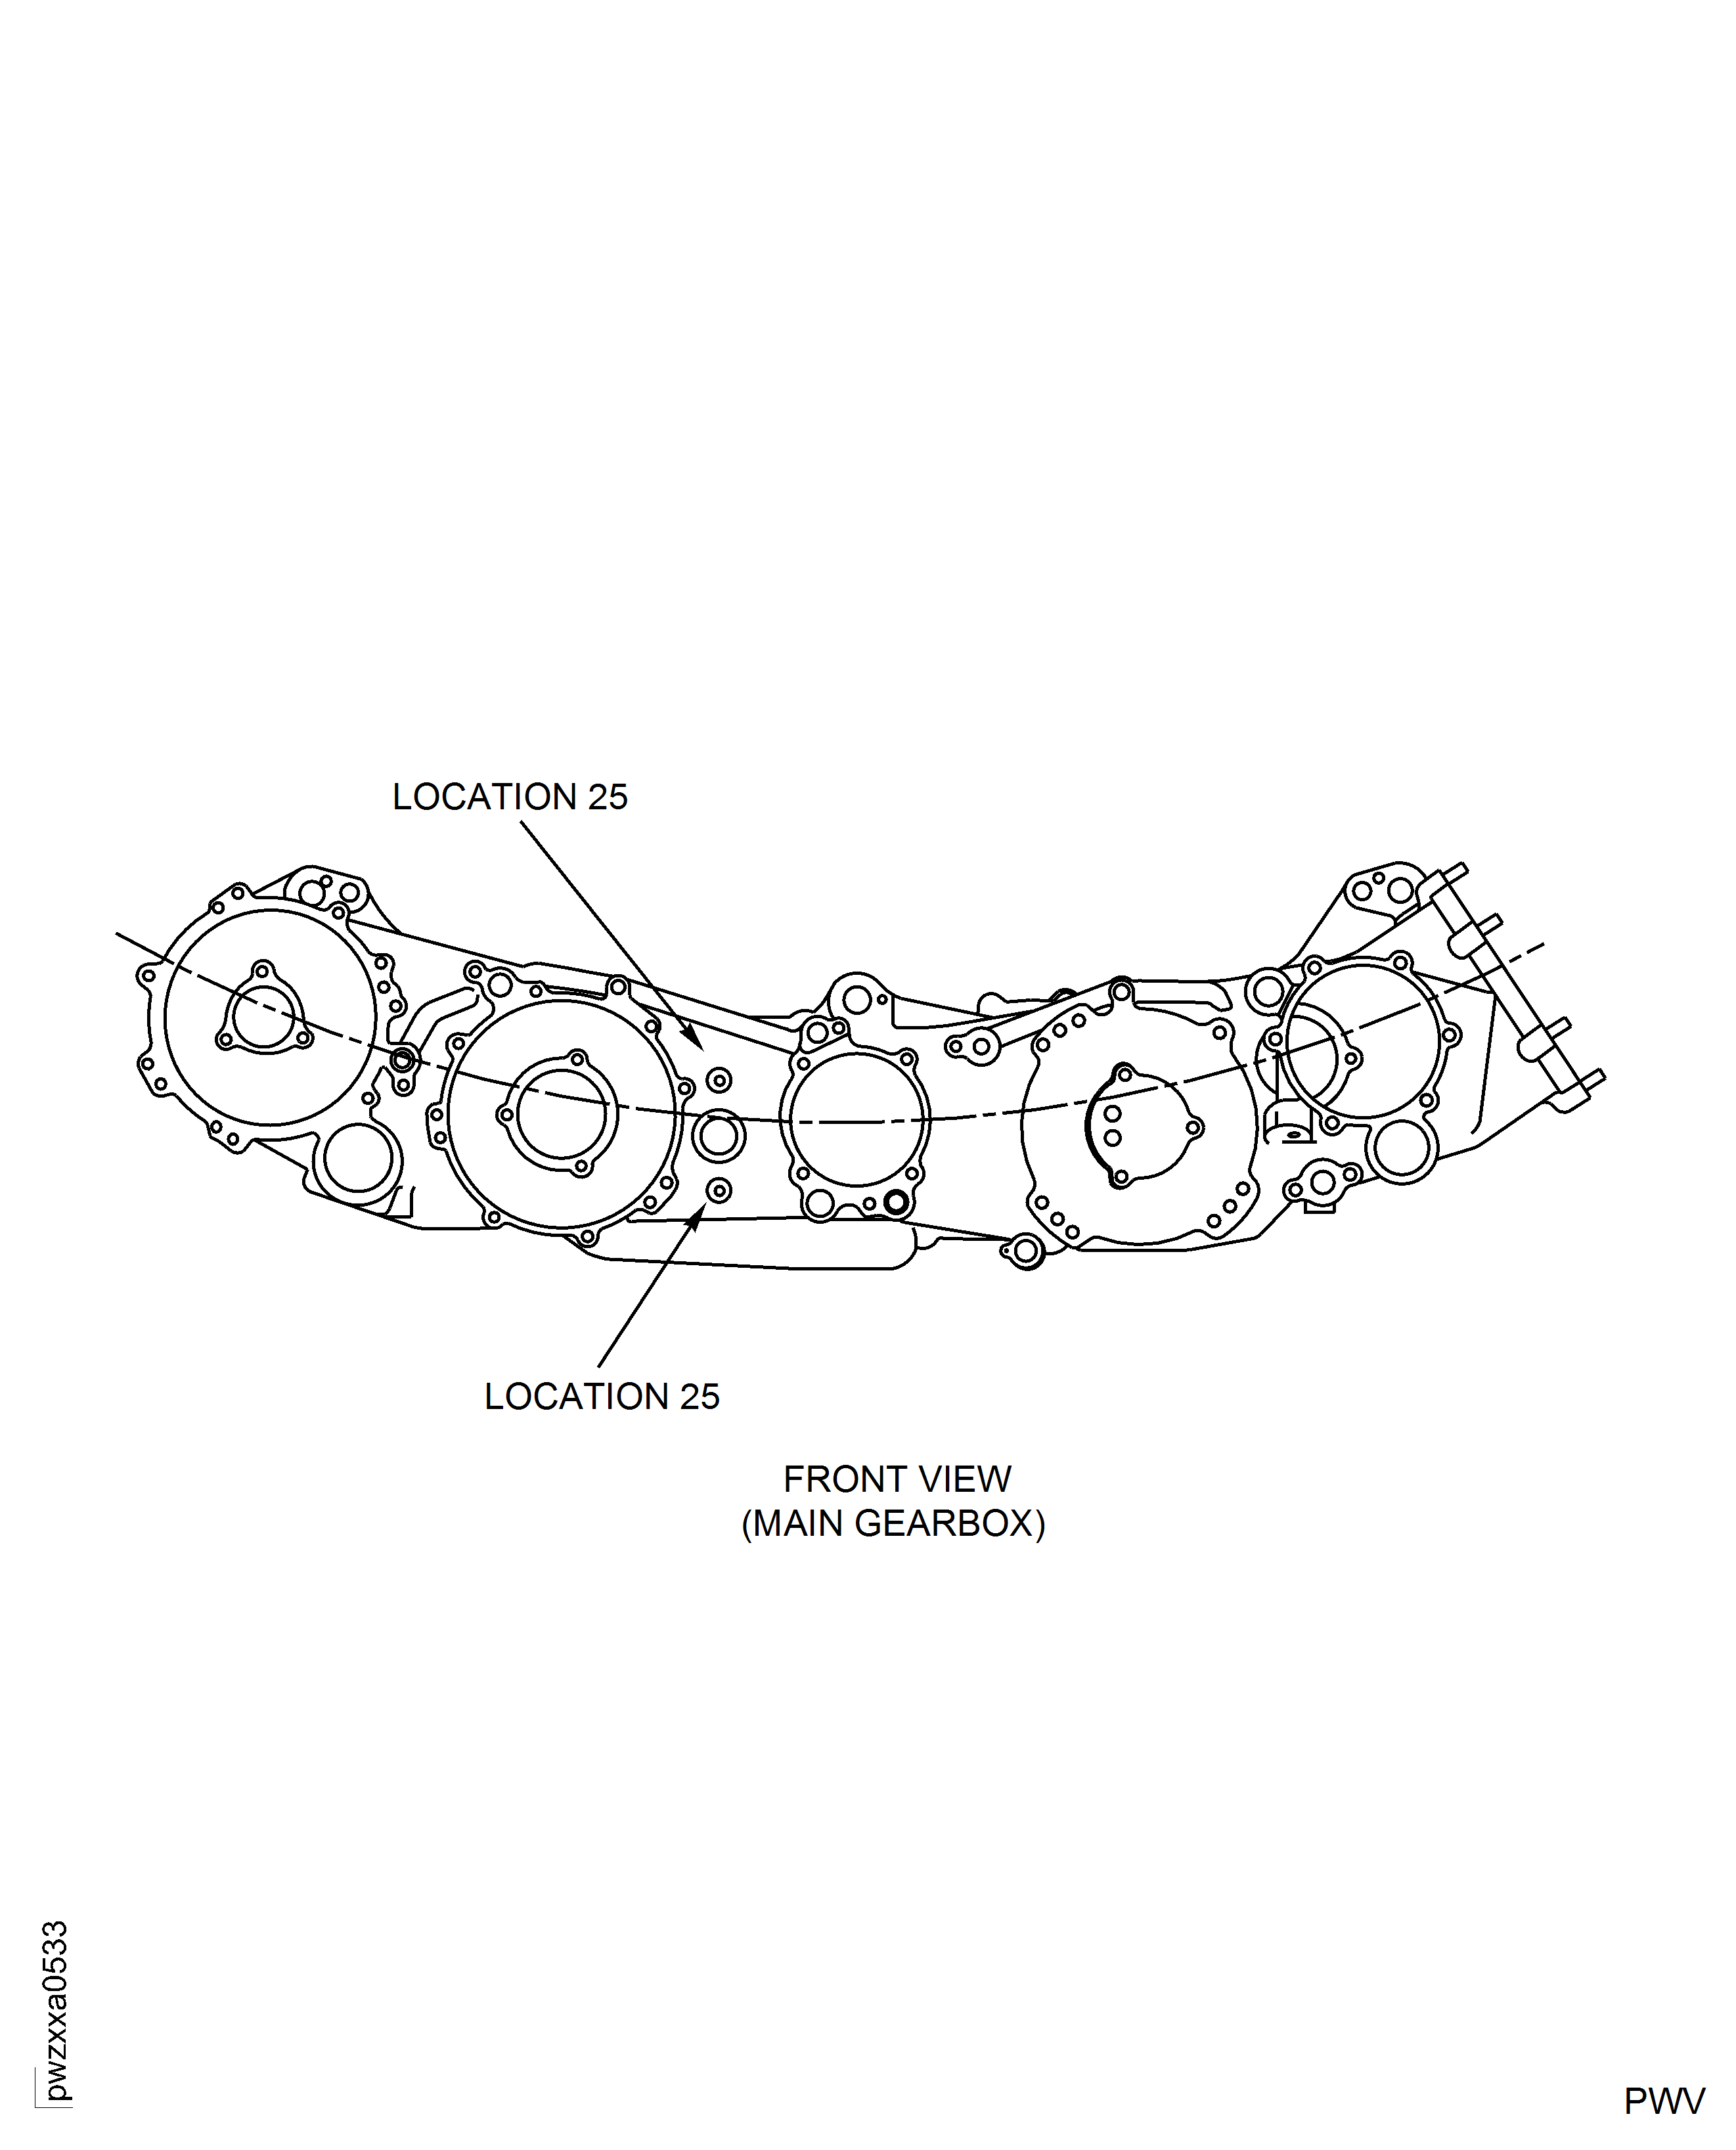
SUBTASK 72-60-21-220-215 Examine the Gearbox Casing (02-050) Crank Cover Stud Holes at Location 25, if Accessible.
Repair, VRS5256 TASK 72-60-21-300-005 (REPAIR-005).
Loose or damaged.
SUBTASK 72-60-21-220-059 Examine the Gearbox Casing (02-050) Threaded Inserts/Lockrings
Repair, VRS5345 TASK 72-60-21-300-006 (REPAIR-006).
Loose or damaged inserts.
SUBTASK 72-60-21-220-060 Examine the Gearbox Casing (02-050) Helicoil Inserts
Refer to Figure.
Repair, VRS5711 TASK 72-60-21-300-059 (REPAIR-059).
Damaged threads in parent material.
SUBTASK 72-60-21-220-199 Examine the Gearbox Casing (02-050) Helical Insert Holes at Location 27, if Exposed
Refer to Figure.
Repair, VRS5288 TASK 72-60-21-300-007 (REPAIR-007).
More than Step.
Inner diameter.
Repair, VRS5288 TASK 72-60-21-300-007 (REPAIR-007).
More than Step.
True position.
SUBTASK 72-60-21-220-061 Examine the Gearbox Casing (02-050) IDG Bearing Bore at Location 4010
Refer to Figure.
Repair, VRS5289 TASK 72-60-21-300-008 (REPAIR-008).
More than Step.
Parallelism.
SUBTASK 72-60-21-220-062 Examine the Gearbox Casing (02-050) IDG Bearing Mating Face at Location 1
Refer to Figure.
Repair, VRS5280 TASK 72-60-21-300-009 (REPAIR-009).
More than 3.0328 in. (77.035 mm).
Inner diameter.
Repair, VRS5280 TASK 72-60-21-300-009 (REPAIR-009).
More than Step.
True position.
SUBTASK 72-60-21-220-063 Examine the Gearbox Casing (02-050) Starter Idler Bearing Bore at Location 4025
Refer to Figure.
Repair, VRS5281 TASK 72-60-21-300-010 (REPAIR-010).
More than Step.
Parallelism.
SUBTASK 72-60-21-220-064 Examine the Gearbox Casing (02-050) Starter Idler Bearing Mating Face at Location 2
Refer to Figure.
Repair, VRS5278 TASK 72-60-21-300-011 (REPAIR-011).
More than 1.3839 in. (35.150 mm).
Inner diameter.
Repair, VRS5278 TASK 72-60-21-300-011 (REPAIR-011).
More than Step.
True position.
Repair, VRS5278 TASK 72-60-21-300-011 (REPAIR-011).
More than Step.
Perpendicularity.
SUBTASK 71-60-21-220-065 Examine the Gearbox Casing (02-050) Starter Idler Cover Bore at Location 3
Refer to Figure.
Repair, VRS5279 TASK 72-60-21-300-012 (REPAIR-012).
More than Step.
Parallelism.
Repair, VRS5279 TASK 72-60-21-300-012 (REPAIR-012).
More than Step.
Planarity.
SUBTASK 72-60-21-220-066 Examine the Gearbox Casing (02-050) Starter Idler Cover Mating Face at Location 4
Refer to Figure.
Repair, VRS5283 TASK 72-60-21-300-013 (REPAIR-013).
More than Step.
Parallelism.
Repair, VRS5283 TASK 72-60-21-300-013 (REPAIR-013).
More than Step.
Planarity.
SUBTASK 72-60-21-220-067 Examine the Gearbox Casing (02-050) Starter Housing Mating Face at Location 5
Refer to Figure.
Repair, VRS5282 TASK 72-60-21-300-014 (REPAIR-014).
More than 7.4059 in. (188.110 mm).
Inner diameter.
Repair, VRS5282 TASK 72-60-21-300-014 (REPAIR-014).
More than Step.
True position.
SUBTASK 72-60-21-220-068 Examine the Gearbox Casing (02-050) Starter Housing Bore at Location 4022
Refer to Figure.
Repair, VRS5296 TASK 72-60-21-300-015 (REPAIR-015).
More than 0.5965 in. (15.150 mm).
Inner diameter A.
Repair, VRS5296 TASK 72-60-21-300-015 (REPAIR-015).
More than Step.
Concentricity.
Repair, VRS5420 TASK 72-60-21-300-048 (REPAIR-048).
More than 0.7539 in. (19.150 mm).
Inner diameter B.
SUBTASK 72-60-21-220-069 Examine the Gearbox Casing (02-050) Oil Nozzle Bore at Location 6
Refer to Figure.
Repair, VRS5292 TASK 72-60-21-300-016 (REPAIR-016).
More than 6.9330 in. (176.100 mm).
Inner diameter.
Repair, VRS5292 TASK 72-60-21-300-016 (REPAIR-016).
More than Step.
True position.
SUBTASK 72-60-21-220-070 Examine the Gearbox Casing (02-050) Deoiler Housing Bore at Location 4007
Refer to Figure.
Repair, VRS5293 TASK 72-60-21-300-017 (REPAIR-017).
More than Step.
Parallelism.
Repair, VRS5293 TASK 72-60-21-300-017 (REPAIR-017).
More than Step.
Planarity.
SUBTASK 72-60-21-220-071 Examine the Gearbox Casing (02-050) Deoiler Housing Mating Face at Location 7
Refer to Figure.
Repair, VRS5275 TASK 72-60-21-300-018 (REPAIR-018).
More than Step.
Parallelism.
Repair, VRS5275 TASK 72-60-21-300-018 (REPAIR-018).
More than Step.
Planarity.
SUBTASK 72-60-21-220-072 Examine the Gearbox Casing (02-050) PMA Housing Mating Face at Location 8
Refer to Figure.
Repair, VRS5272 TASK 72-60-21-300-019 (REPAIR-019).
More than 2.9539 in. (75.030 mm).
Inner diameter.
Repair, VRS5272 TASK 72-60-21-300-019 (REPAIR-019).
More than Step.
True position.
SUBTASK 72-60-21-220-073 Examine the Gearbox Casing (02-050) Oil Scavenge Pump Bearing Bore at Location 4036
Refer to Figure.
Repair, VRS5273 TASK 72-60-21-300-020 (REPAIR-020).
More than Step.
Parallelism.
SUBTASK 72-60-21-220-074 Examine the Gearbox Casing (02-050) Oil Scavenge Pump Bearing Mating Face at Location 9
Refer to Figure.
Repair, VRS5294 TASK 72-60-21-300-021 (REPAIR-021).
More than 0.8321 in. (21.135 mm).
Inner diameter.
Repair VRS5294 TASK 72-60-21-300-021 (REPAIR-021).
More than Step.
True position.
SUBTASK 72-60-21-220-075 Examine the Gearbox Casing (02-050) PMA Oil Tube Bore at Location 10
Refer to Figure.
Repair, VRS5260 TASK 72-60-21-300-022 (REPAIR-022).
More than 2.9539 in. (75.030 mm).
Inner diameter.
Repair, VRS5260 TASK 72-60-21-300-022 (REPAIR-022).
More than Step.
True position.
SUBTASK 72-60-21-220-076 Examine the Gearbox Casing (02-050) Fuel Pump Bearing Bore at Location 4049
Refer to Figure.
Repair, VRS5261 TASK 72-60-21-300-023 (REPAIR-023).
More than Step.
Parallelism.
SUBTASK 72-60-21-220-077 Examine the Gearbox Casing (02-050) Fuel Pump Bearing Mating Face at Location 11
Refer to Figure.
SUBTASK 72-60-21-220-078 Examine the Gearbox Casing (02-050) Oil Tank Mating Face at Location 12
Refer to Figure.
Repair, VRS5258 TASK 72-60-21-300-025 (REPAIR-025).
More than 7.0891 in. (180.063 mm).
Inner diameter.
Deleted.
True position.
SUBTASK 72-60-21-220-079 Examine the Gearbox Casing (02-050) Oil Tank Bore at Location 13
Refer to Figure.
Repair, VRS5265 TASK 72-60-21-300-026 (REPAIR-026).
More than Step.
Parallelism.
Repair, VRS5265 TASK 72-60-21-300-026 (REPAIR-026).
More than Step.
Planarity.
SUBTASK 72-60-21-220-080 Examine the Gearbox Casing (02-050) Oil Pressure Pump Mating Face at Location 14
Refer to Figure.
Repair, VRS5264 TASK 72-60-21-300-027 (REPAIR-027).
More than 5.0425 in. (128.080 mm).
Inner diameter.
Repair, VRS5264 TASK 72-60-21-300-027 (REPAIR-027).
More than Step.
True position.
SUBTASK 72-60-21-220-081 Examine the Gearbox Casing (02-050) Oil Pressure Pump Bore at Location 15
Refer to Figure.
Repair, VRS5266 TASK 72-60-21-300-028 (REPAIR-028).
More than 6.9728 in. (177.110 mm).
Inner diameter.
Repair, VRS5266 TASK 72-60-21-300-028 (REPAIR-028).
More than Step.
True position.
SUBTASK 72-60-21-220-082 Examine the Gearbox Casing (02-050) Hydraulic Pump Housing Bore at Location 4045
Refer to Figure.
Repair, VRS5267 TASK 72-60-21-300-029 (REPAIR-029).
More than Step.
Parallelism.
Repair, VRS5267 TASK 72-60-21-300-029 (REPAIR-029).
More than Step.
Planarity.
SUBTASK 72-60-21-220-083 Examine the Gearbox Casing (02-050) Hydraulic Pump Housing Mating Face at Location 16
Refer to Figure.
Repair, VRS5295 TASK 72-60-21-300-030 (REPAIR-030).
More than 0.6263 in. (15.908 mm).
Inner diameter.
SUBTASK 72-60-21-220-084 Examine the Gearbox Casing (02-050) Support Gearbox Bushes at Location 17
Refer to Figure.
Repair, VRS5274 TASK 72-60-21-300-031 (REPAIR-031).
More than 4.3334 in. (110.070 mm).
Inner diameter.
Repair, VRS5274 TASK 72-60-21-300-031 (REPAIR-031).
More than Step.
True position.
SUBTASK 72-60-21-220-085 Examine the Gearbox Casing (02-050) PMA Housing Bore at Location 4033
Refer to Figure.
Repair, VRS5262 TASK 72-60-21-300-032 (REPAIR-032).
More than 5.0425 in. (128.080 mm).
Inner diameter a.
Repair, VRS5262 TASK 72-60-21-300-032 (REPAIR-032).
More than Step.
True position.
SUBTASK 72-60-21-220-086 Examine the Gearbox Casing (02-050) Fuel Pump Housing Bore at Location 4053
Refer to Figure.
Repair, VRS5268 TASK 72-60-21-300-033 (REPAIR-033).
More than 2.7568 in. (70.025 mm).
Inner diameter.
Repair, VRS5268 TASK 72-60-21-300-033 (REPAIR-033).
More than Step.
True position.
SUBTASK 72-60-21-220-087 Examine the Gearbox Casing (02-050) Hydraulic Pump Bearing Bore at Location 4041
Refer to Figure.
Repair, VRS5269 TASK 72-60-21-300-034 (REPAIR-034).
More than Step.
Parallelism.
SUBTASK 72-60-21-220-088 Examine the Gearbox Casing (02-050) Hydraulic Pump Bearing Mating Face at Location 18
Repair, VRS5257 TASK 72-60-21-300-035 (REPAIR-035).
Damaged or loose.
SUBTASK 72-60-21-220-089 Examine the Gearbox Casing (02-050) Pin (2 off) at Location 4055
Refer to Figure.
Repair, VRS5421 TASK 72-60-21-300-049 (REPAIR-049).
More than 5.1248 in. (130.170 mm).
Inner diameter b.
Repair, VRS5421 TASK 72-60-21-300-049 (REPAIR-049).
More than Step.
Concentricity.
SUBTASK 72-60-21-220-090 Examine the Gearbox Casing (02-050) Fuel Pump Housing Bore at Location 4054
Refer to Figure.
More than Step.
Parallelism.
Repair, VRS5263 TASK 72-60-21-300-036 (REPAIR-036).
More than Step.
Planarity.
SUBTASK 72-60-21-220-091 Examine the Gearbox Casing (02-050) Fuel Pump Housing Mating Face at Location 19
Refer to Figure.
Repair, VRS5276 TASK 72-60-21-300-037 (REPAIR-037).
More than Step.
Inner diameter.
Repair, VRS5276 TASK 72-60-21-300-037 (REPAIR-037).
More than Step.
True position.
SUBTASK 72-60-21-220-092 Examine the Gearbox Casing (02-050) Lay Shaft Bearing Bore at Location 4030
Refer to Figure.
Repair, VRS5277 TASK 72-60-21-300-038 (REPAIR-038).
More than Step.
Parallelism.
SUBTASK 72-60-21-220-093 Examine the Gearbox Casing (02-050) Lay Shaft Bearing Mating Face at Location 20
Refer to Figure.
Repair, VRS5284 TASK 72-60-21-300-039 (REPAIR-039).
More than 2.9539 in. (75.030 mm).
Inner diameter.
Repair, VRS5284 TASK 72-60-21-300-039 (REPAIR-039).
More than Step.
True position.
SUBTASK 72-60-21-220-094 Examine the Gearbox Casing (02-050) Starter Bearing Bore at Location 4018
Refer to Figure.
Repair, VRS5285 TASK 72-60-21-300-040 (REPAIR-040).
More than Step.
Parallelism.
SUBTASK 72-60-21-220-095 Examine the Gearbox Casing (02-050) Starter Bearing Mating Face at Location 21
Refer to Figure.
Repair, VRS5290 TASK 72-60-21-300-041 (REPAIR-041).
More than 2.7568 in. (70.025 mm).
Inner diameter.
Repair, VRS5290 TASK 72-60-21-300-041 (REPAIR-041).
More than Step.
True position.
SUBTASK 72-60-21-220-096 Examine the Gearbox Casing (02-050) Deoiler Bearing Bore at Location 4002
Refer to Figure.
Repair, VRS5291 TASK 72-60-21-300-042 (REPAIR-042).
More than Step.
Parallelism.
SUBTASK 72-60-21-220-097 Examine the Gearbox Casing (02-050) Deoiler Bearing Mating Face at Location 22
Refer to Figure.
Repair, VRS5286 TASK 72-60-21-300-043 (REPAIR-043).
More than 7.0118 in. (178.100 mm).
Inner diameter a.
Repair, VRS5286 TASK 72-60-21-300-043 (REPAIR-043).
More than Step.
True position.
SUBTASK 72-60-21-220-098 Examine the Gearbox Casing (02-050) IDG Housing Bore at Location 4014
Refer to Figure.
Repair, VRS5422 TASK 72-60-21-300-050 (REPAIR-050).
More than 7.0933 in. (180.170 mm).
Inner diameter b.
Repair, VRS5422 TASK 72-60-21-300-050 (REPAIR-050).
More than Step.
Concentricity.
SUBTASK 72-60-21-220-099 Examine the Gearbox Casing (02-050) IDG Housing Bore at Location 4015
Refer to Figure.
Repair, VRS5287 TASK 72-60-21-300-044 (REPAIR-044).
More than Step.
Parallelism.
Repair, VRS5287 TASK 72-60-21-300-044 (REPAIR-044).
More than Step.
Planarity.
SUBTASK 72-60-21-220-100 Examine the Gearbox Casing (02-050) IDG Housing Mating Face at Location 23
Refer to Figure.
Repair, VRS5271 TASK 72-60-21-300-045 (REPAIR-045).
More than Step.
Planarity.
Repair, VRS5271 TASK 72-60-21-300-045 (REPAIR-045).
Less than 0.4429 in. (11.25 mm).
Dimension P.
SUBTASK 72-60-21-220-101 Examine the Gearbox Casing (02-050) Angle Gearbox Support Mating Face at Location 24
Refer to Figure.
Repair, VRS5270 TASK 72-60-21-300-046 (REPAIR-046).
More than 6.8578 in. (174.190 mm).
Inner diameter b.
Repair, VRS5270 TASK 72-60-21-300-046 (REPAIR-046).
More than Step.
True position.
SUBTASK 72-60-21-220-102 Examine the Gearbox Casing (02-050) Angle Gearbox Support Bore at Location 4027
Refer to Figure.
Repair, VRS5423 TASK 72-60-21-300-051 (REPAIR-051).
More than 3.3129 in. (84.15 mm).
Inner Diameter c.
Repair, VRS5423 TASK 72-60-21-300-051 (REPAIR-051).
More than Step.
Concentricity.
SUBTASK 72-60-21-220-103 Examine the Gearbox Casing (02-050) Angle Gearbox Support Bore at Location 4032
Refer to Figure.
Repair, VRS5424 TASK 72-60-21-300-052 (REPAIR-052).
More than Step.
True position.
SUBTASK 72-60-21-220-104 Examine the Gearbox Casing (02-050) Angle Gearbox Support Bore at Location 4038
Repair, VRS5706 TASK 72-60-21-300-055 (REPAIR-055).
More than Step.
Repair, VRS5706 TASK 72-60-21-300-055 (REPAIR-055).
Loose missing or damaged bushing(s), if present.
Thread damage.
SUBTASK 72-60-21-220-170 Examine the Gearbox Casing (02-050) Hydraulic Pump, Fuel Pump and IDG Drain Ports at Location 25
Refer to Figure.
Accept.
Between 0.5925 in. and 0.5965 in. (15.050 mm and 15.150 mm).
Repair, VRS5296 TASK 72-60-21-300-015 (REPAIR-015).
More than 0.5965 in. (15.150 mm).
For PNs 4B0053, 4B0054, 4B0055 and 4B0057:
Accept.
Between 0.6319 in. and 0.6358 in. (16.050 mm and 16.150 mm).
Reject.
More than 0.6358 in. (16.150 mm).
For PNs 4B0400, 4B0402 and 4B0423:
Repair, VRS5296 TASK 72-60-21-300-015 (REPAIR-015).
More than Step.
For PNs 4B0053, 4B0054, 4B0055 and 4B0057:
Reject.
More than Step.
For PNs 4B0400, 4B0402 and 4B0423:
Concentricity.
Accept.
Between 0.750 in. and 0.7539 in. (19.050 mm and 19.150 mm).
Repair, VRS5420 TASK 72-60-21-300-048 (REPAIR-048).
More than 0.7539 in. (19.150 mm).
For PNs 4B0053, 4B0054, 4B0055, and 4B0057:
Accept.
Between 0.7894 in. and 0.7933 in. (20.050 mm and 20.150 mm).
Reject.
More than 0.7933 in. (20.150 mm).
For PNs 4B0400, 4B0402 and 4B0423:
Inner diameter B.
Inner diameter A.
SUBTASK 72-60-21-220-174 Examine the Gearbox Casing (02-050) Oil Nozzle Bore at Location 26
Refer to Figure.
Accept.
Between 1.4580 in. to 1.4600 in. (37.033 mm to 37.084 mm).
Repair, VRS5710 TASK 72-60-21-300-058 (REPAIR-058).
More than Step.
Diameter E.
SUBTASK 72-60-21-220-175 Examine the Gearbox Casing (02-050) Oil Scavenge Tube Bore at Location 28
Figure: Locations - Gearbox Casing Surfaces
Locations - Gearbox Casing Surfaces
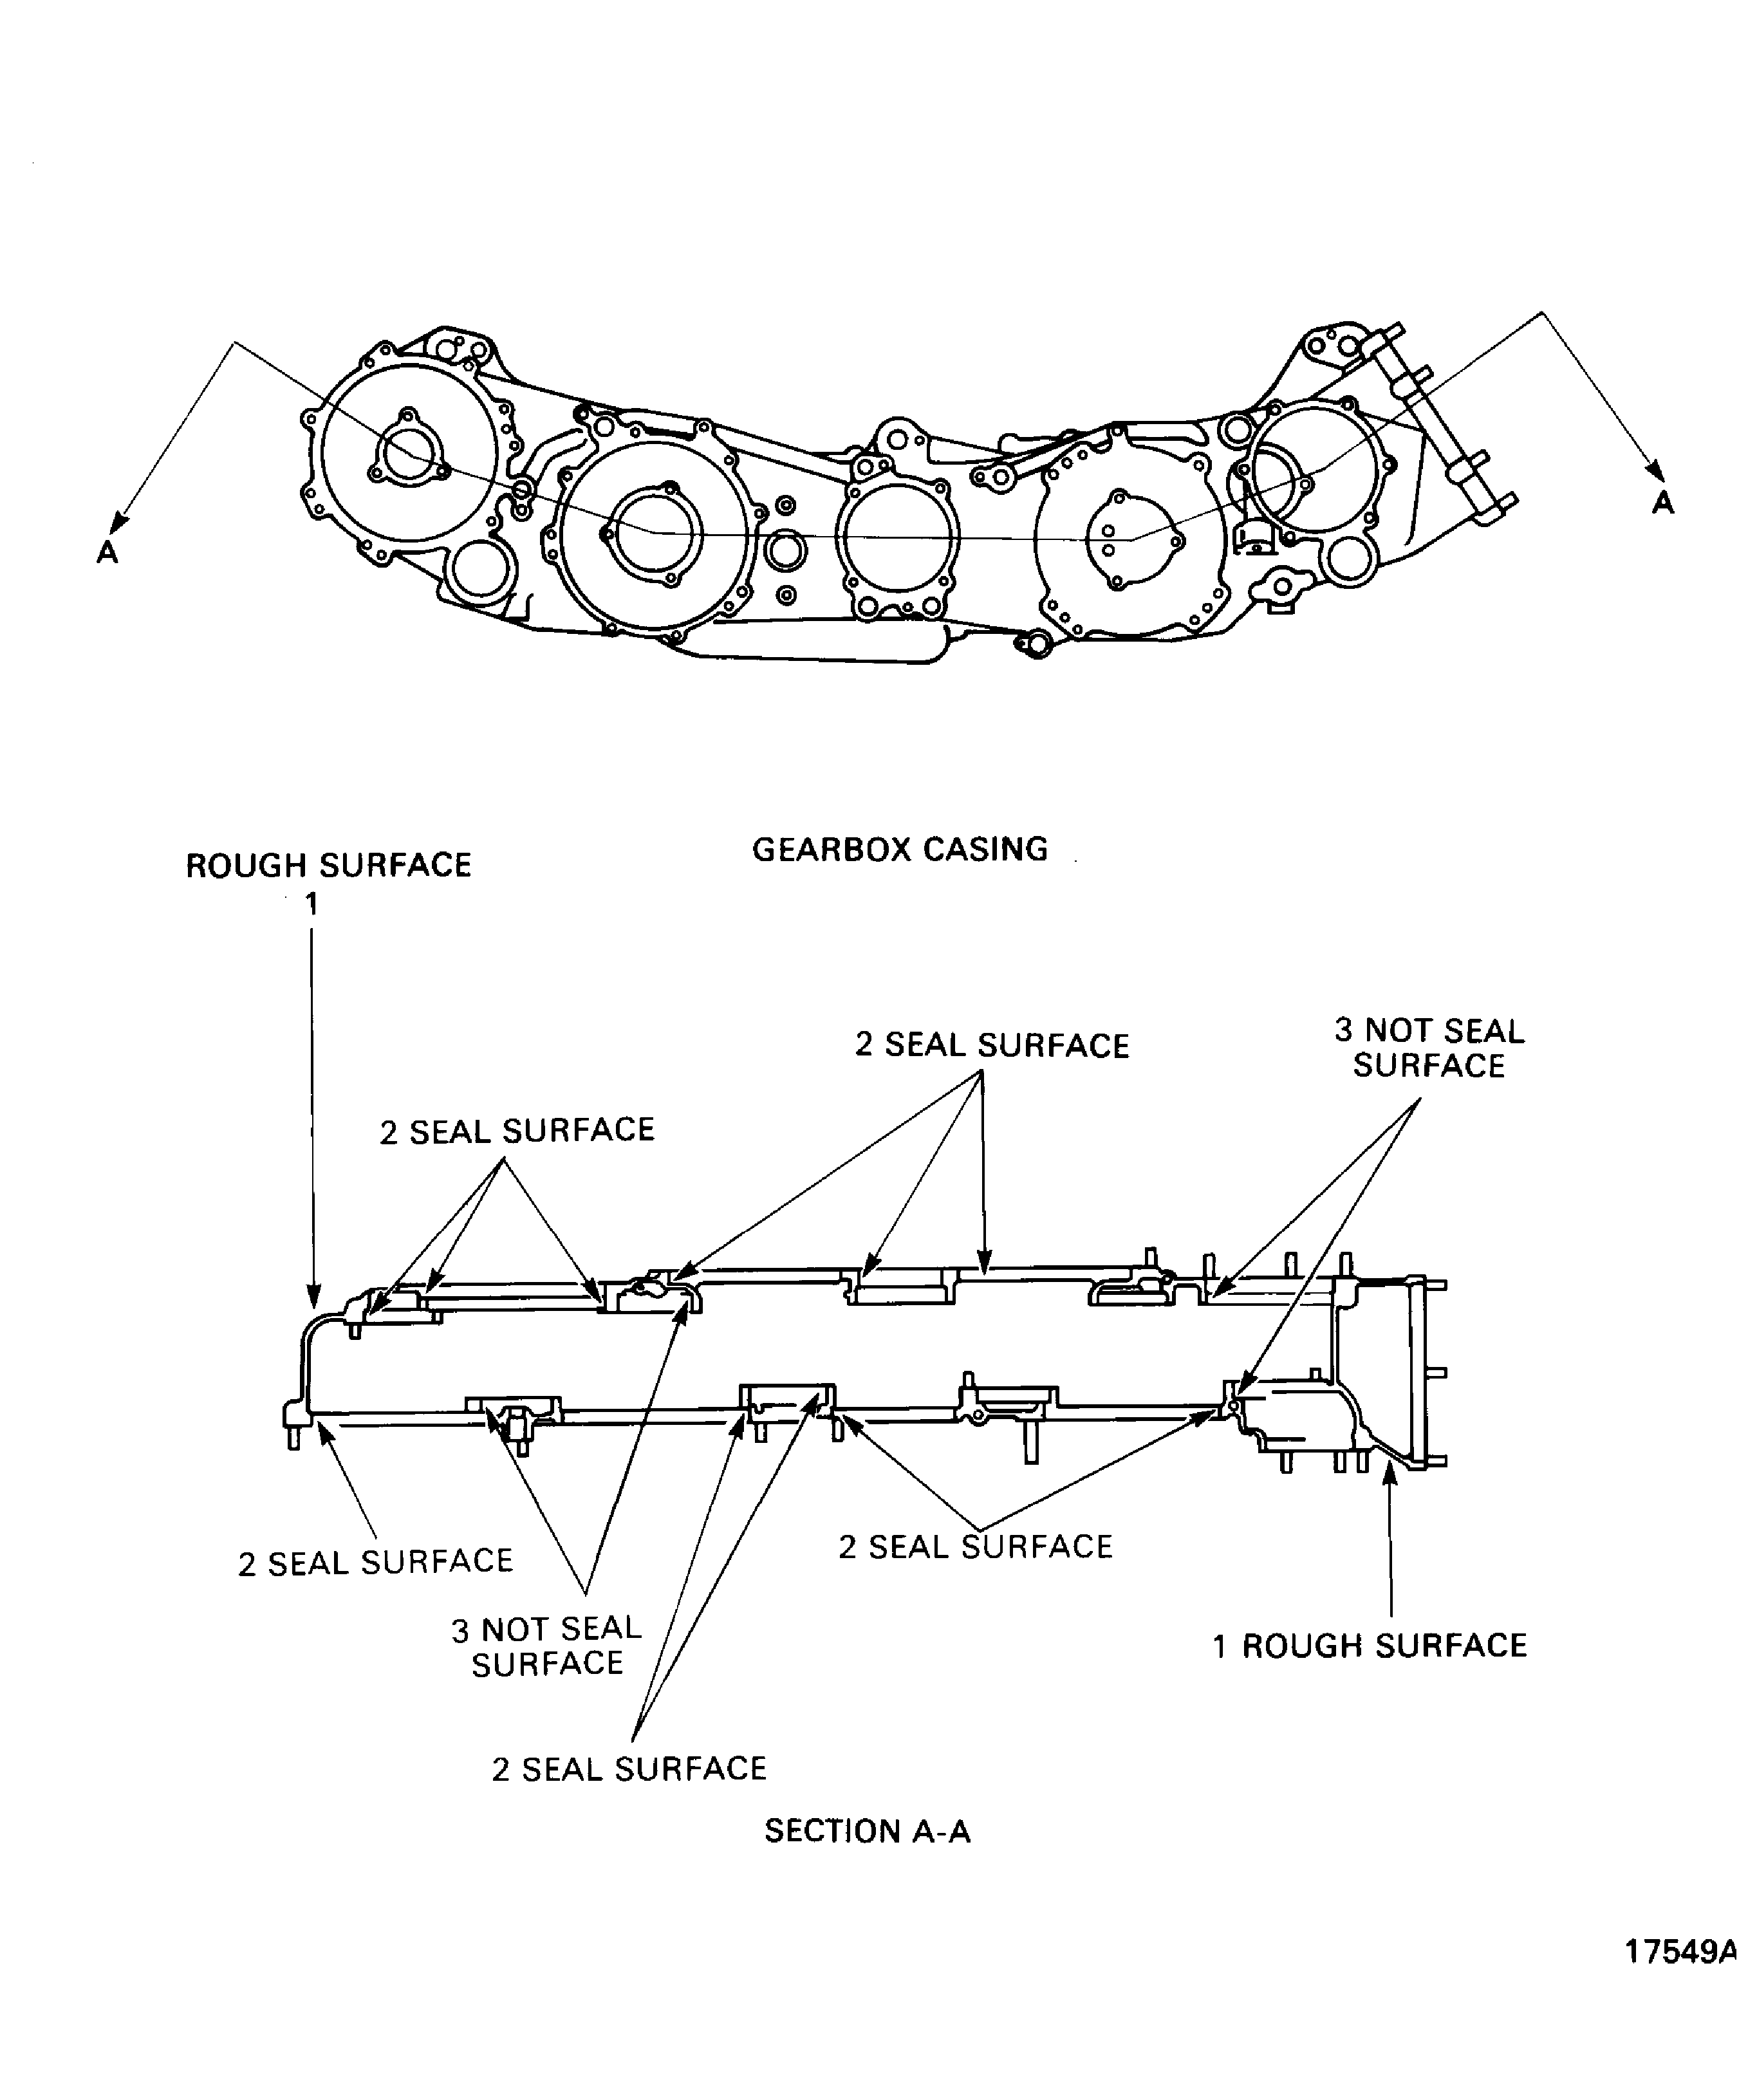
Figure: Locations - Gearbox Casing
Locations - Gearbox Casing
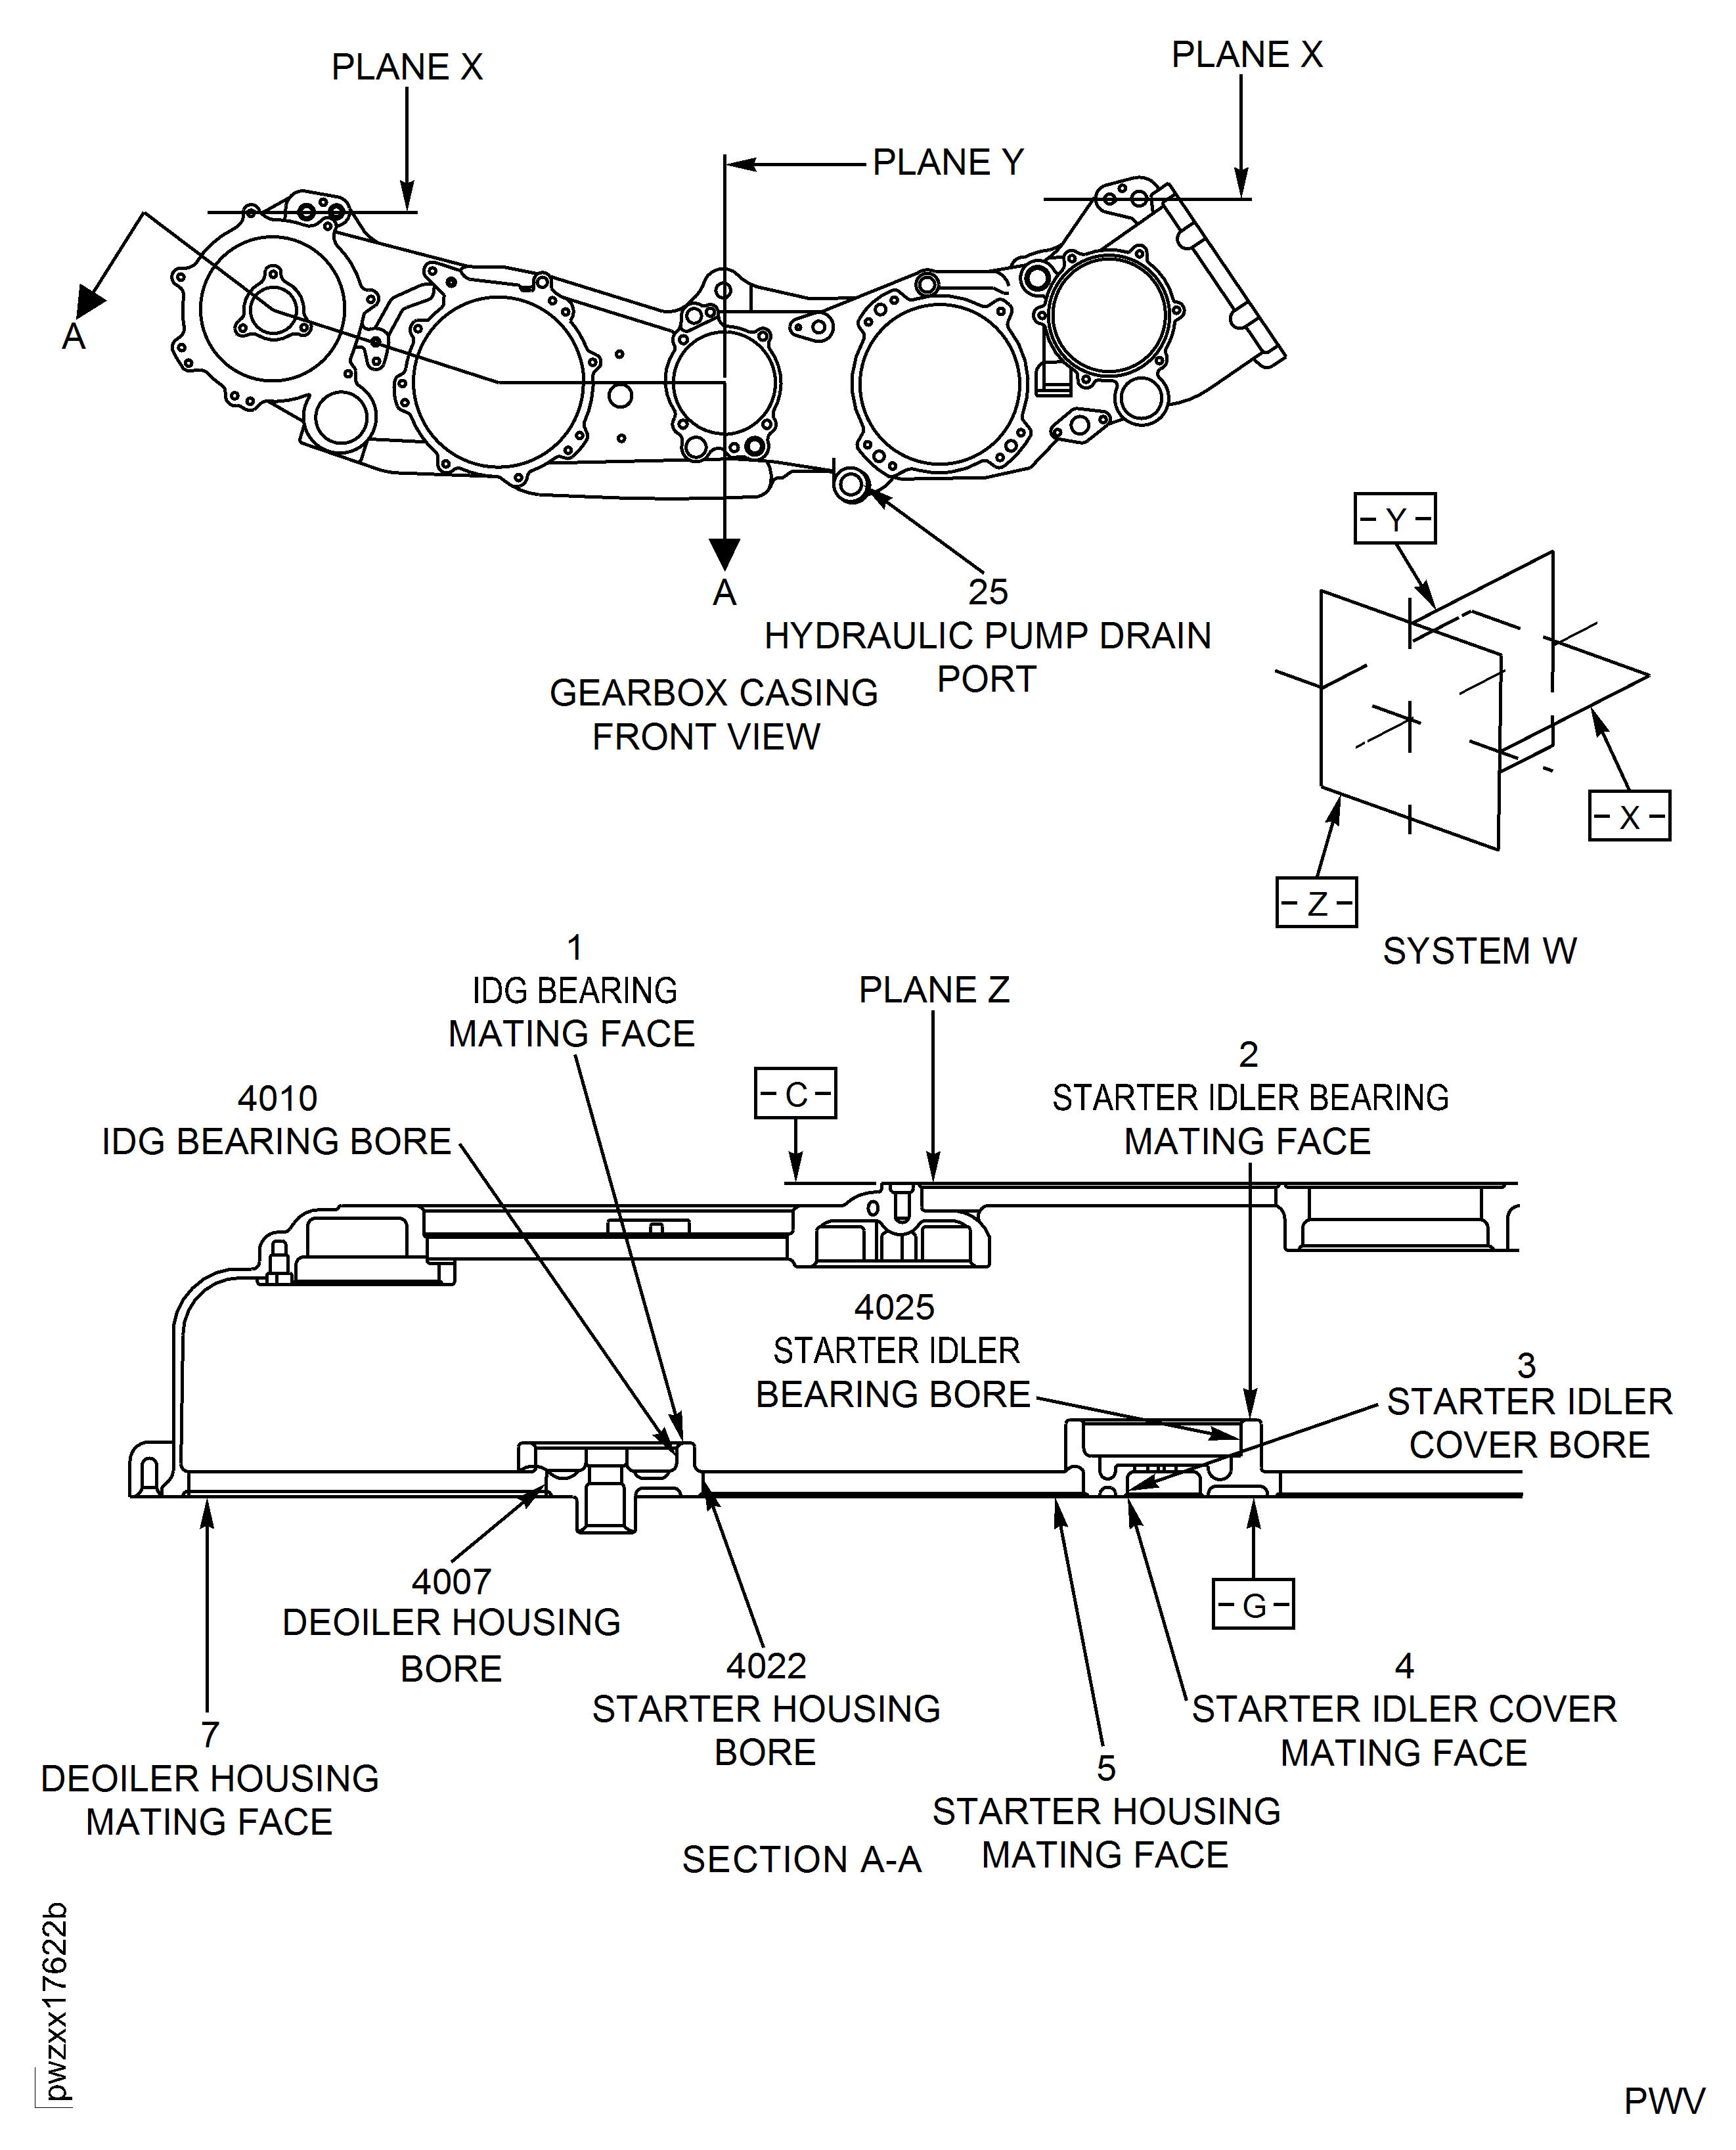
Figure: Locations - Gearbox Casing
Locations - Gearbox Casing
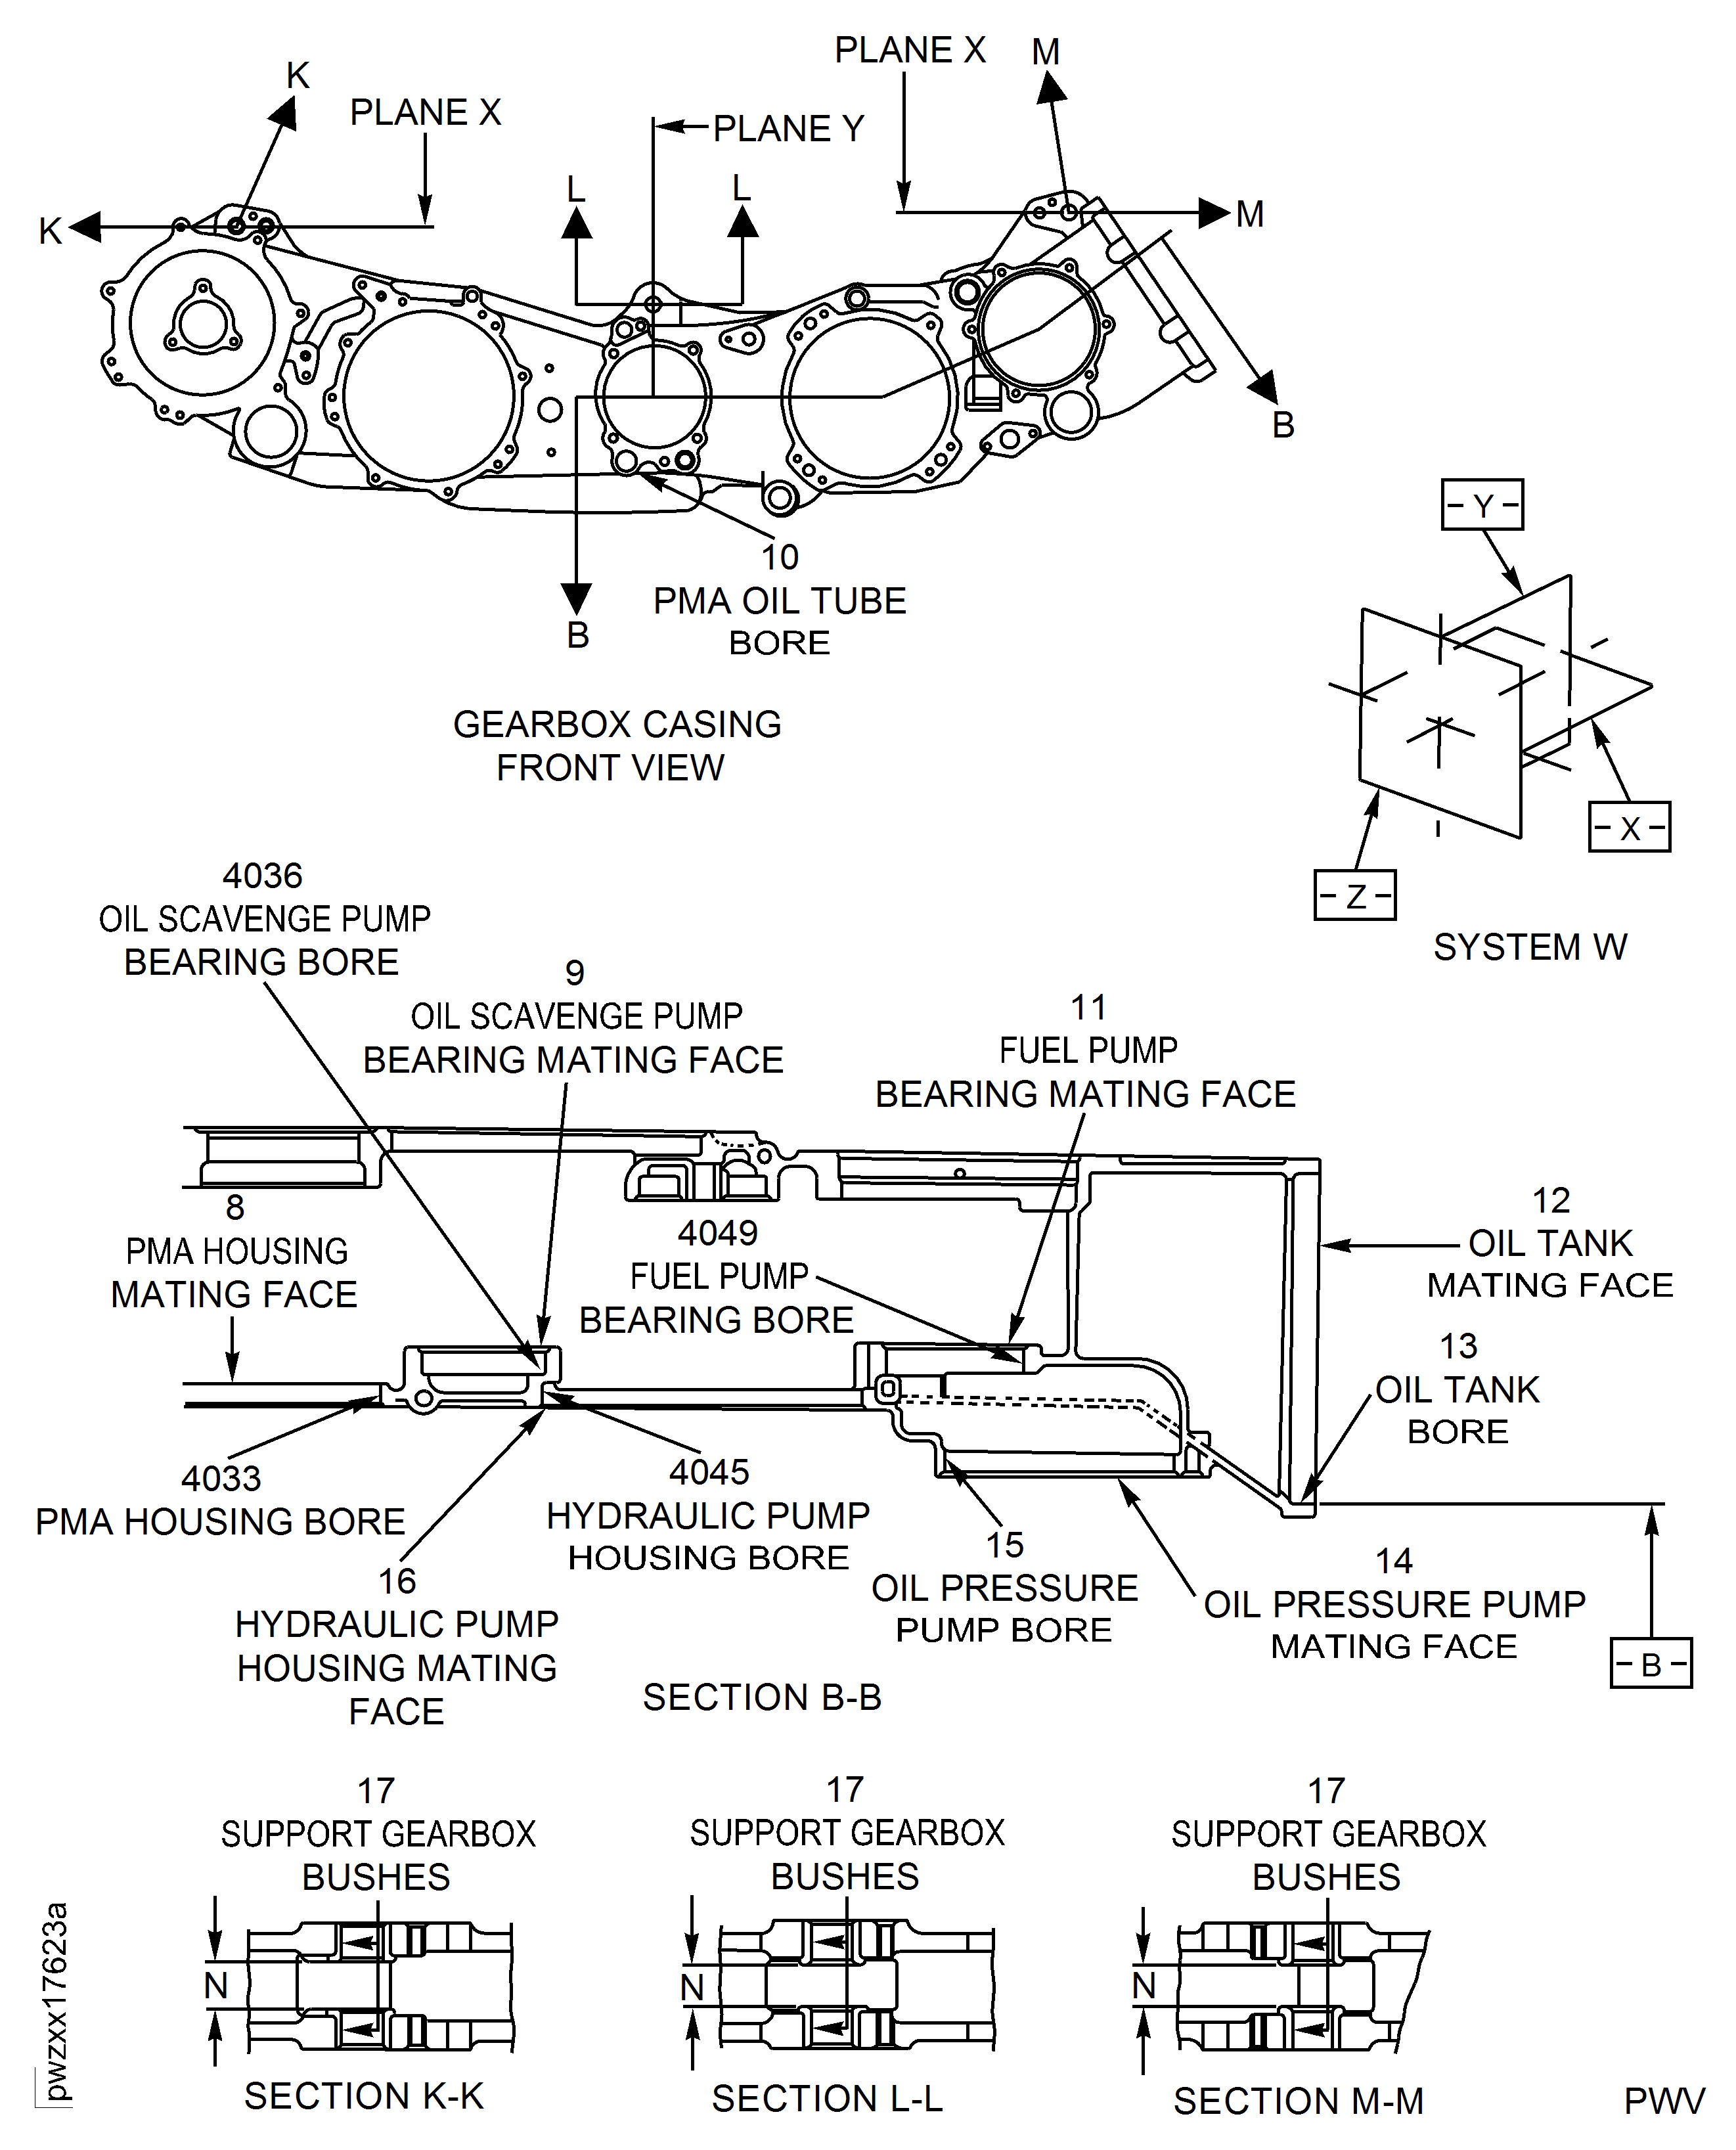
Figure: Locations - Gearbox Casing
Locations - Gearbox Casing
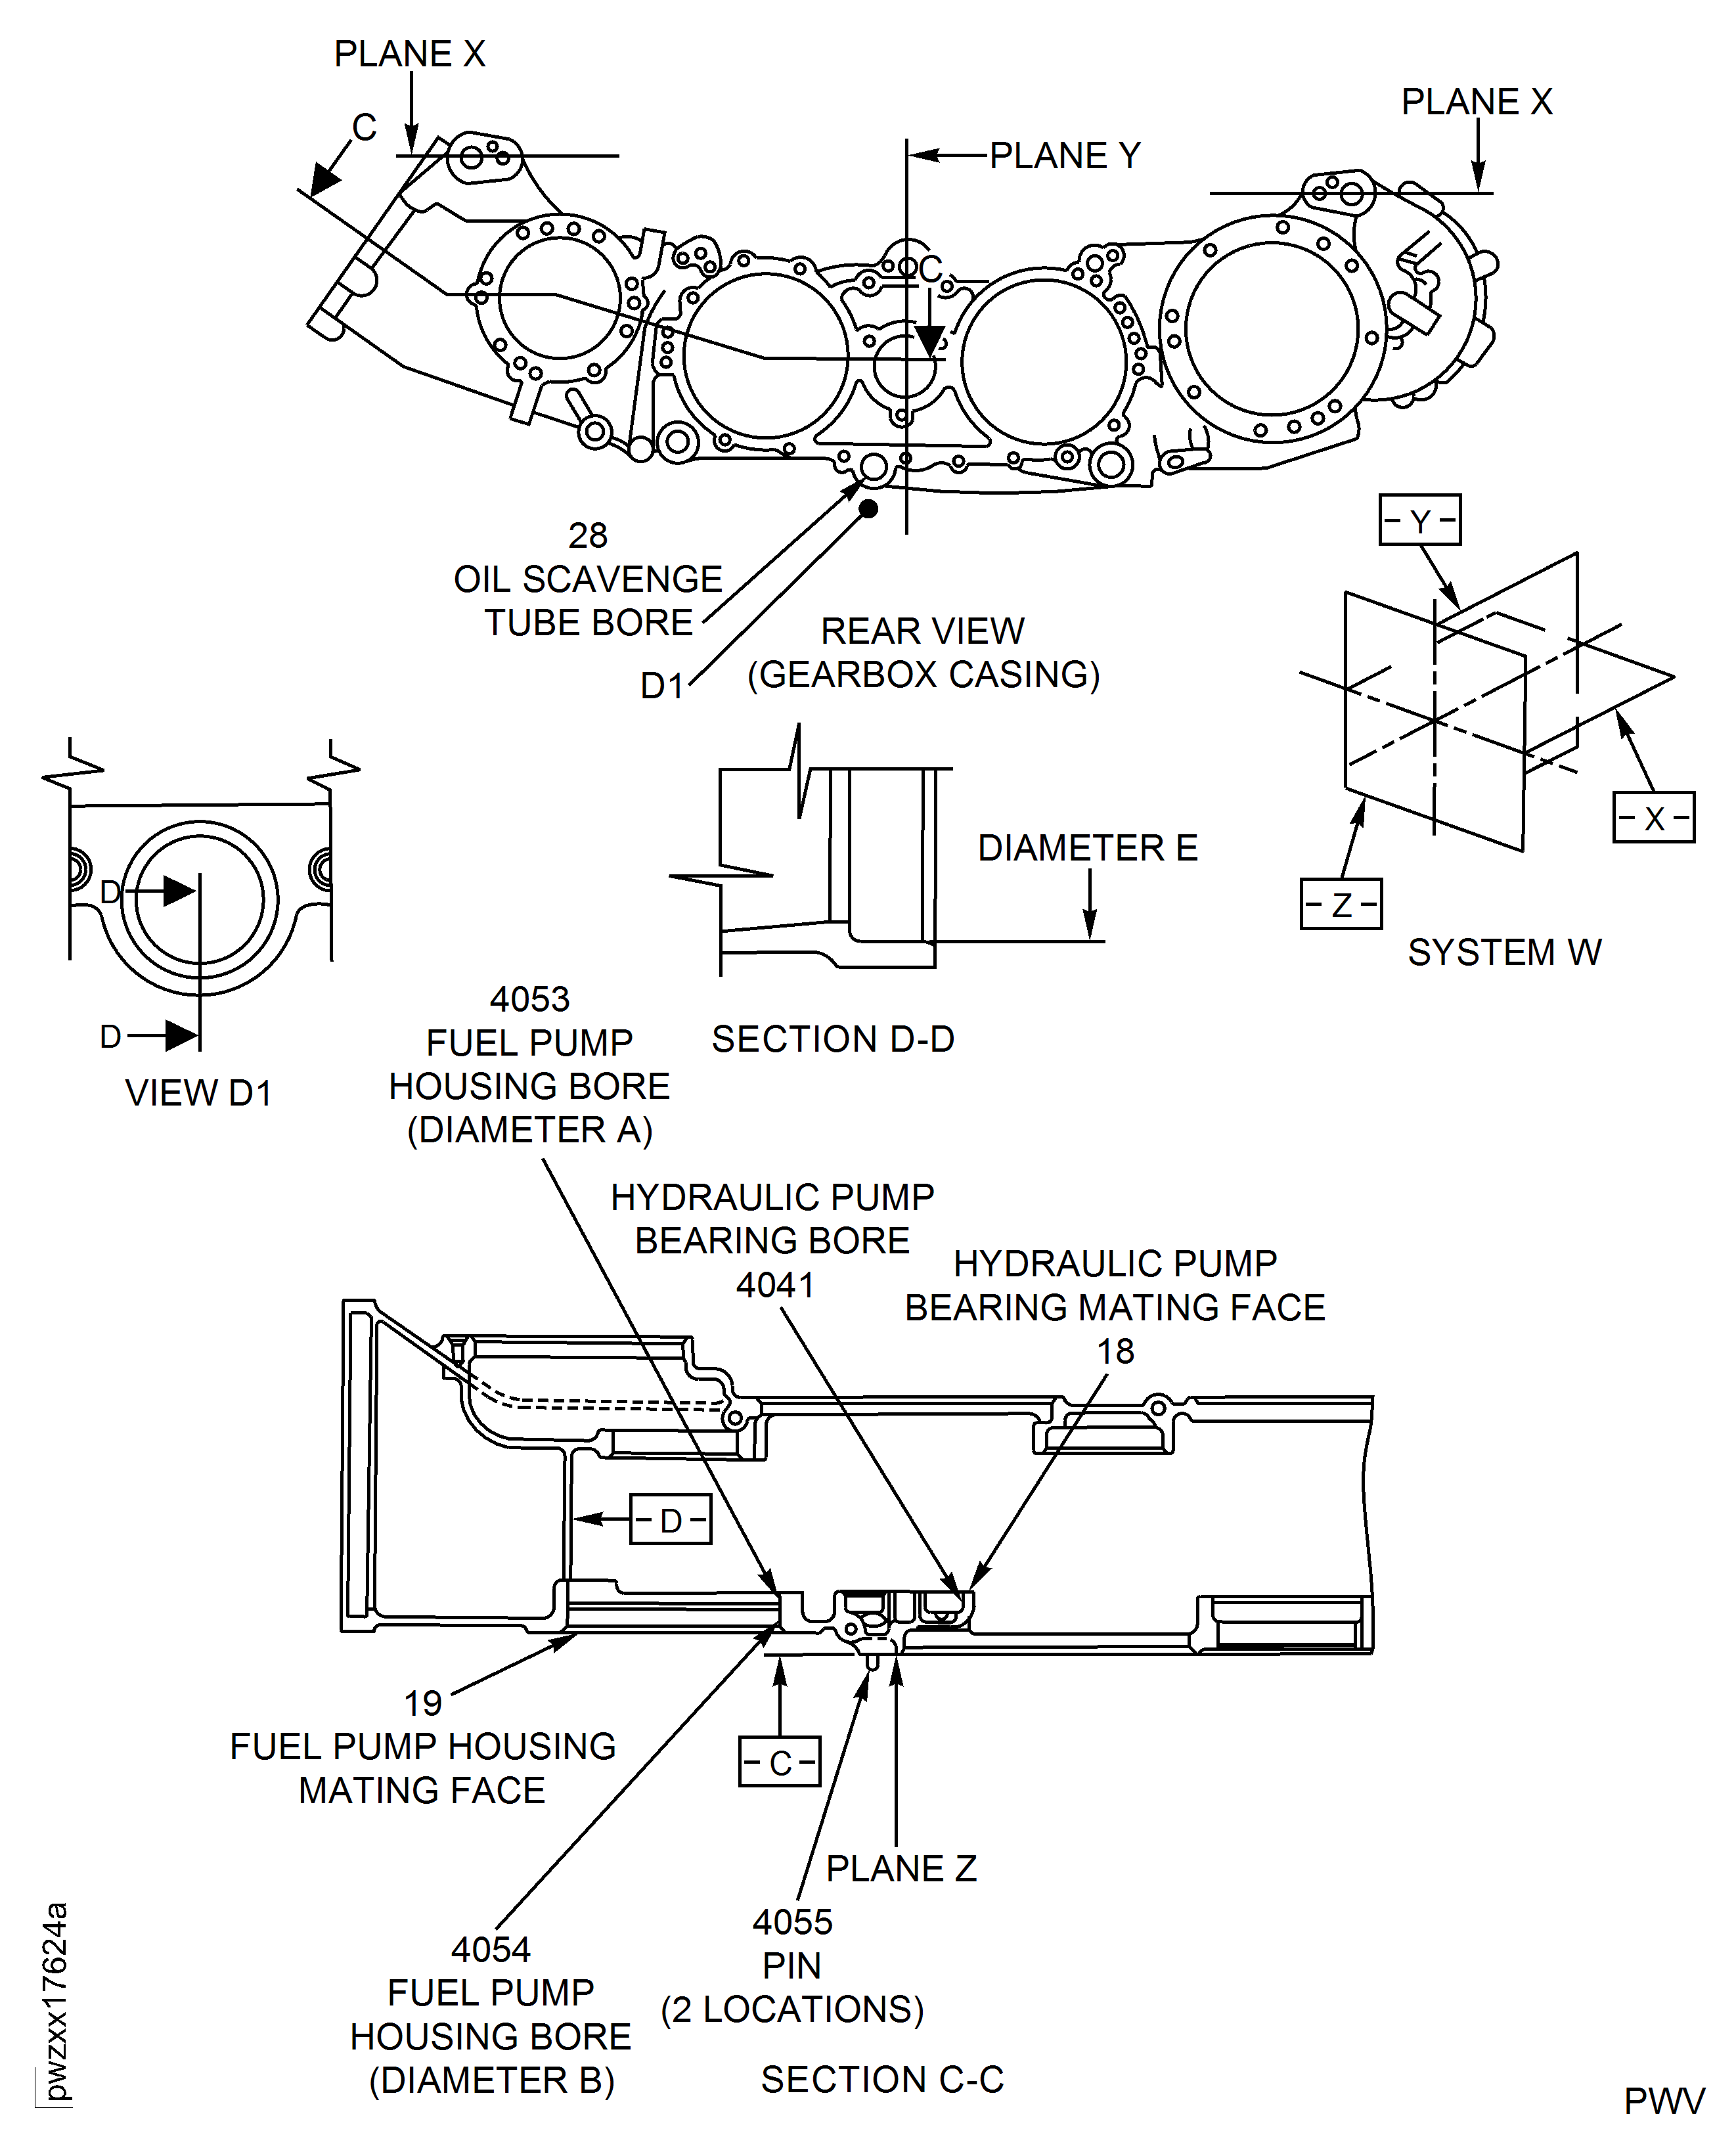
Figure: Locations - Gearbox Casing
Locations - Gearbox Casing
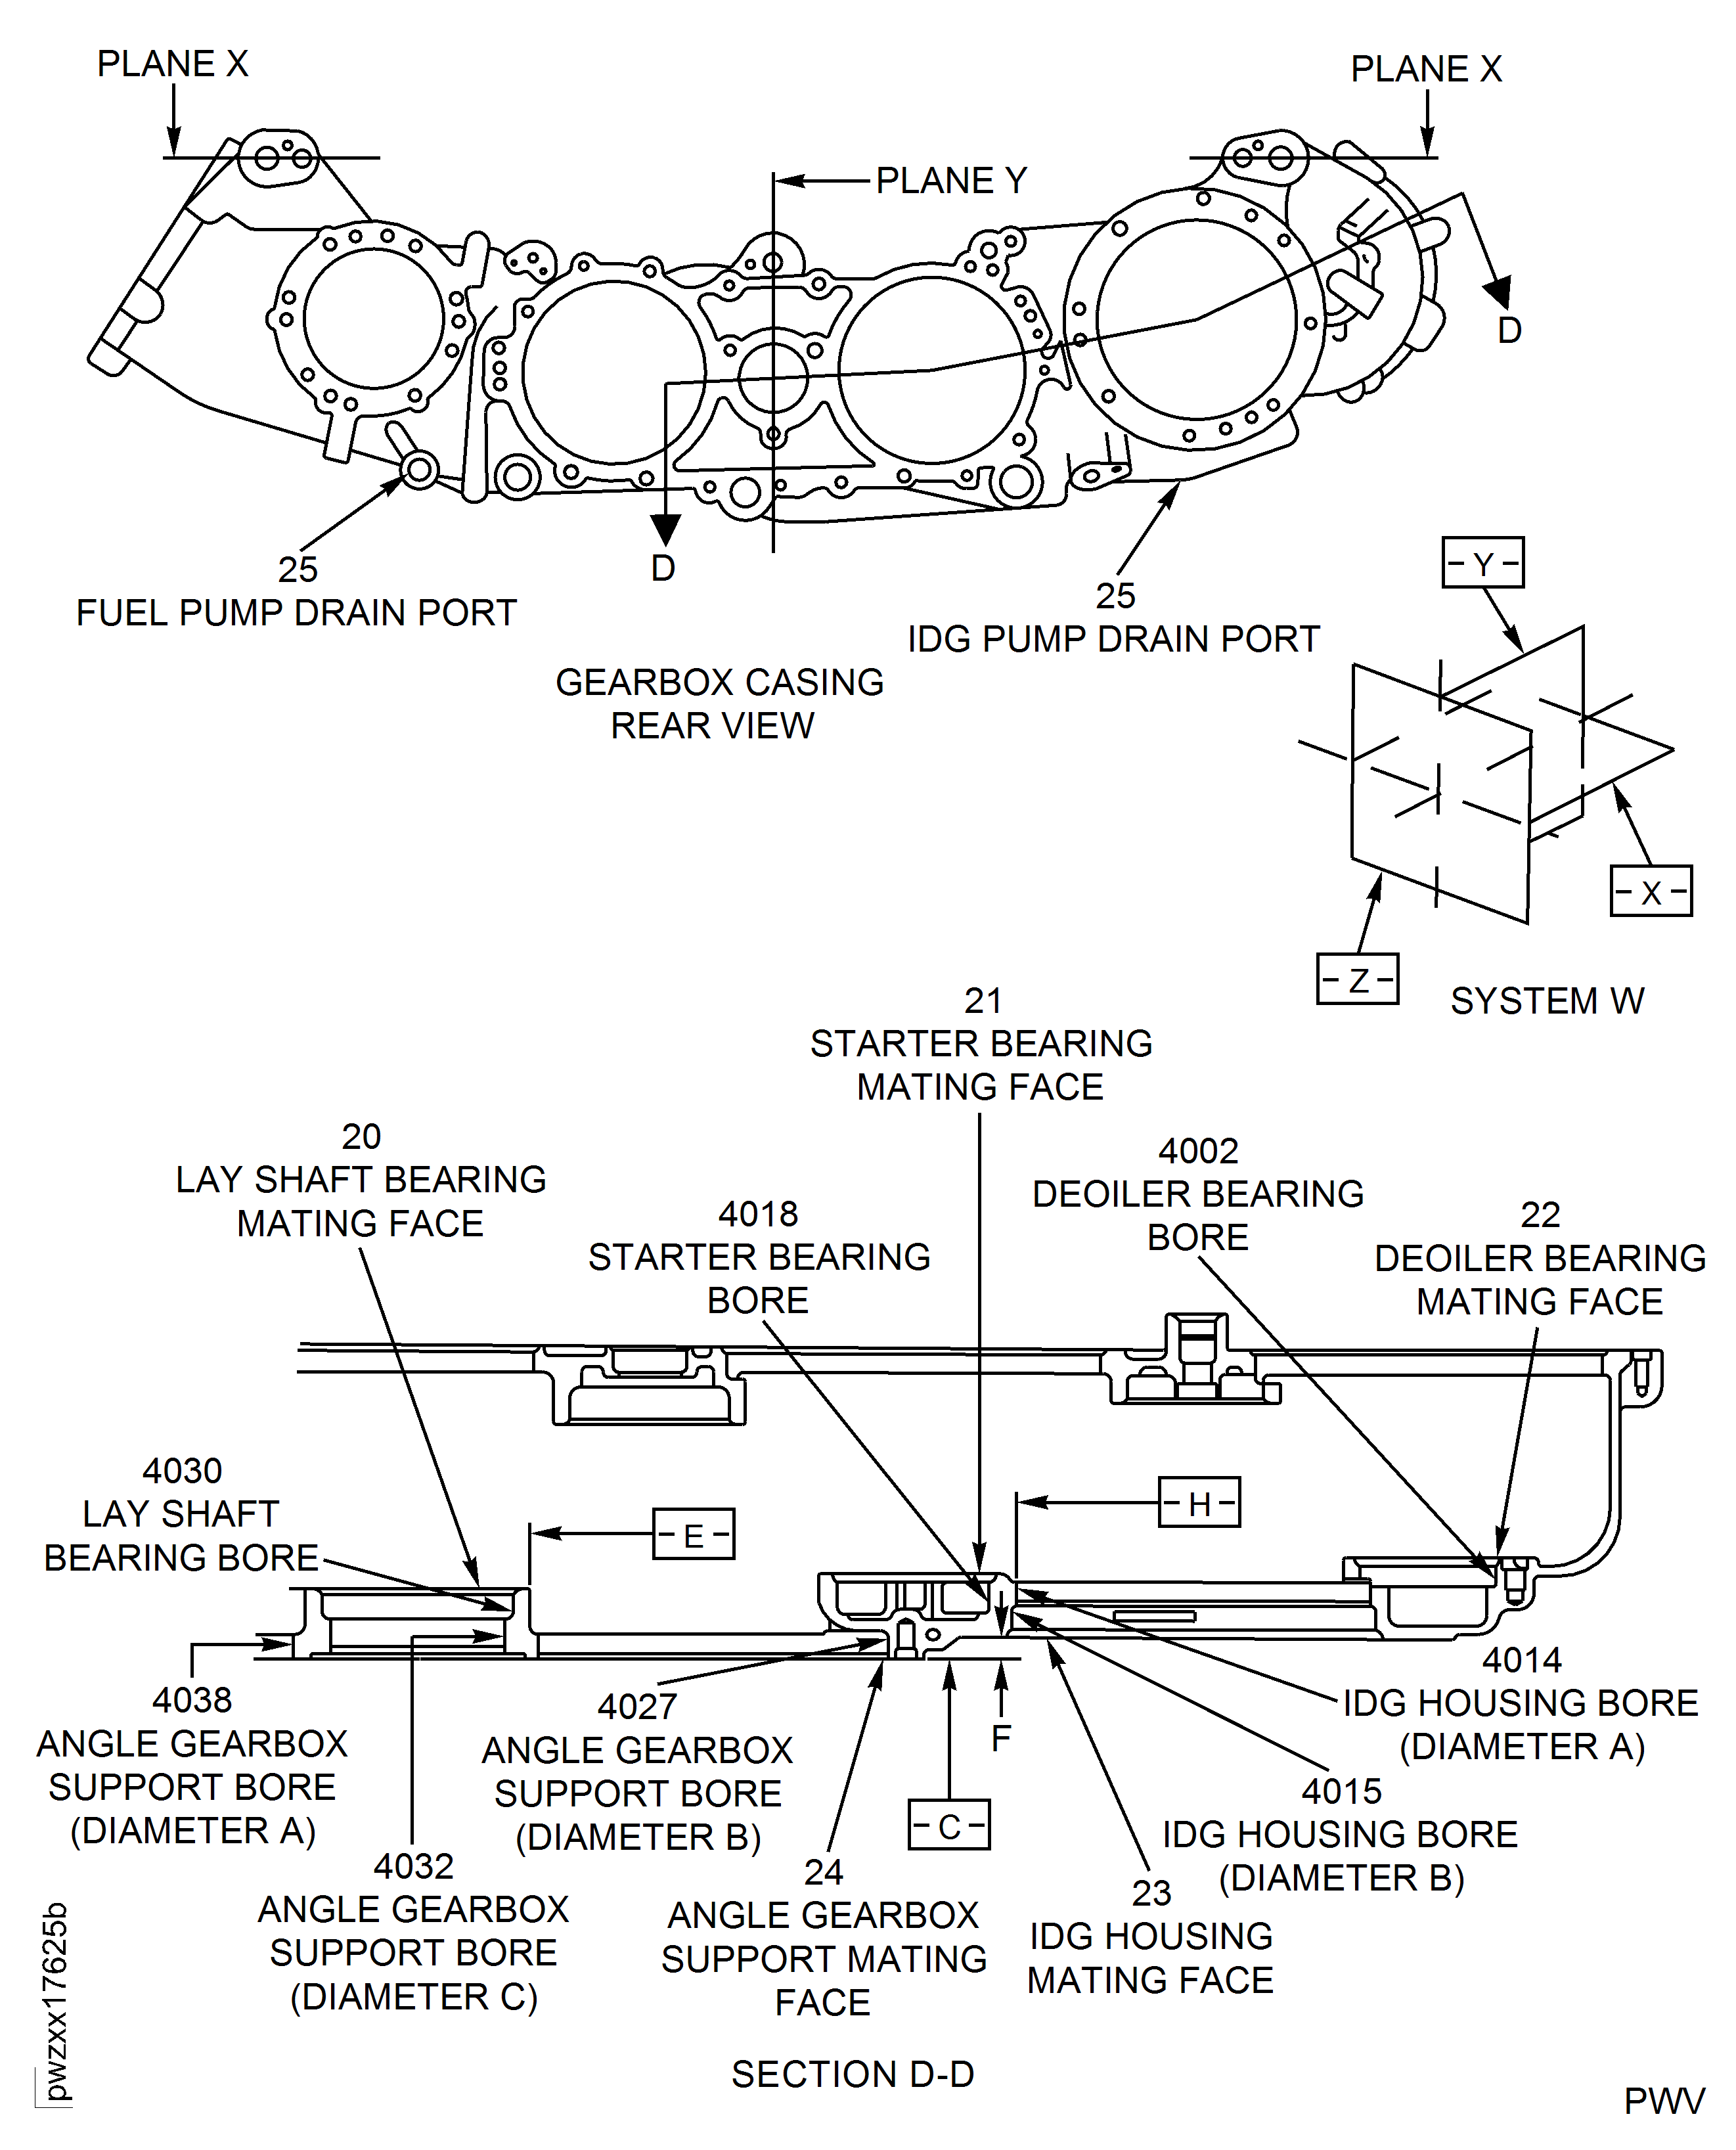
Figure: Gearbox Casing W System
Gearbox Casing W System
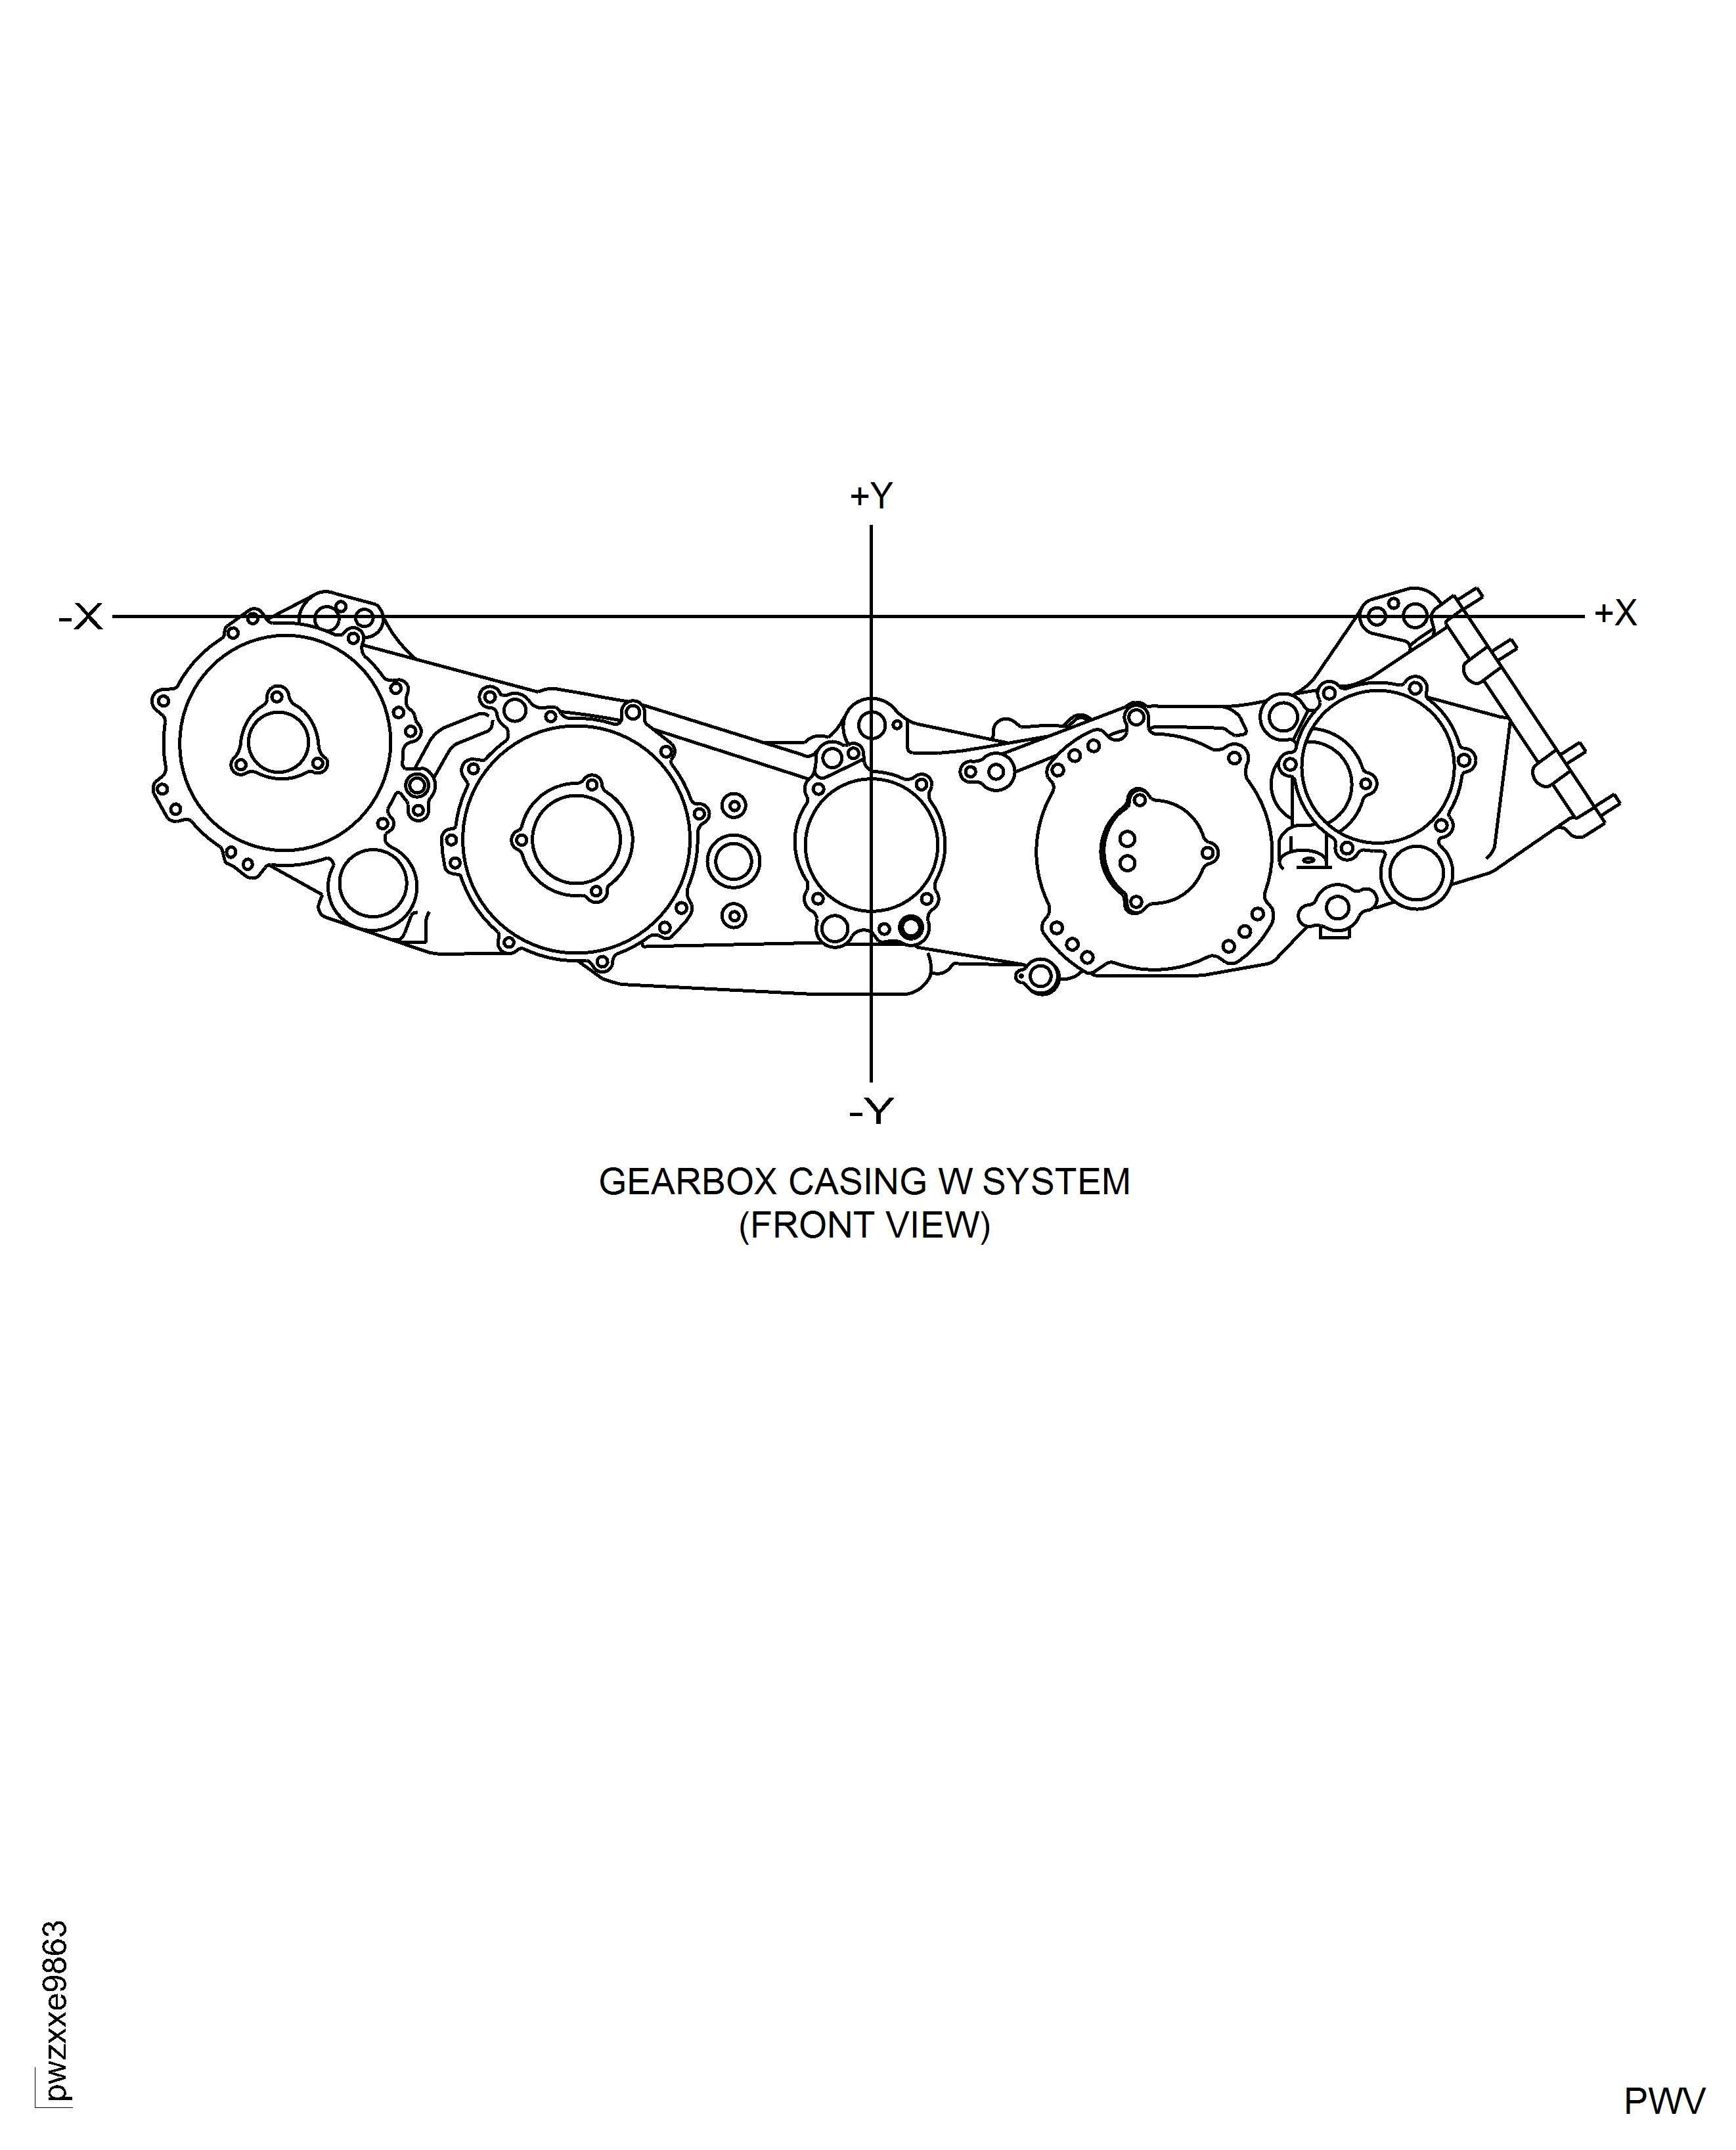
Figure: Oil Nozzle Bore Locations - Gearbox Casing
Oil Nozzle Bore Locations - Gearbox Casing
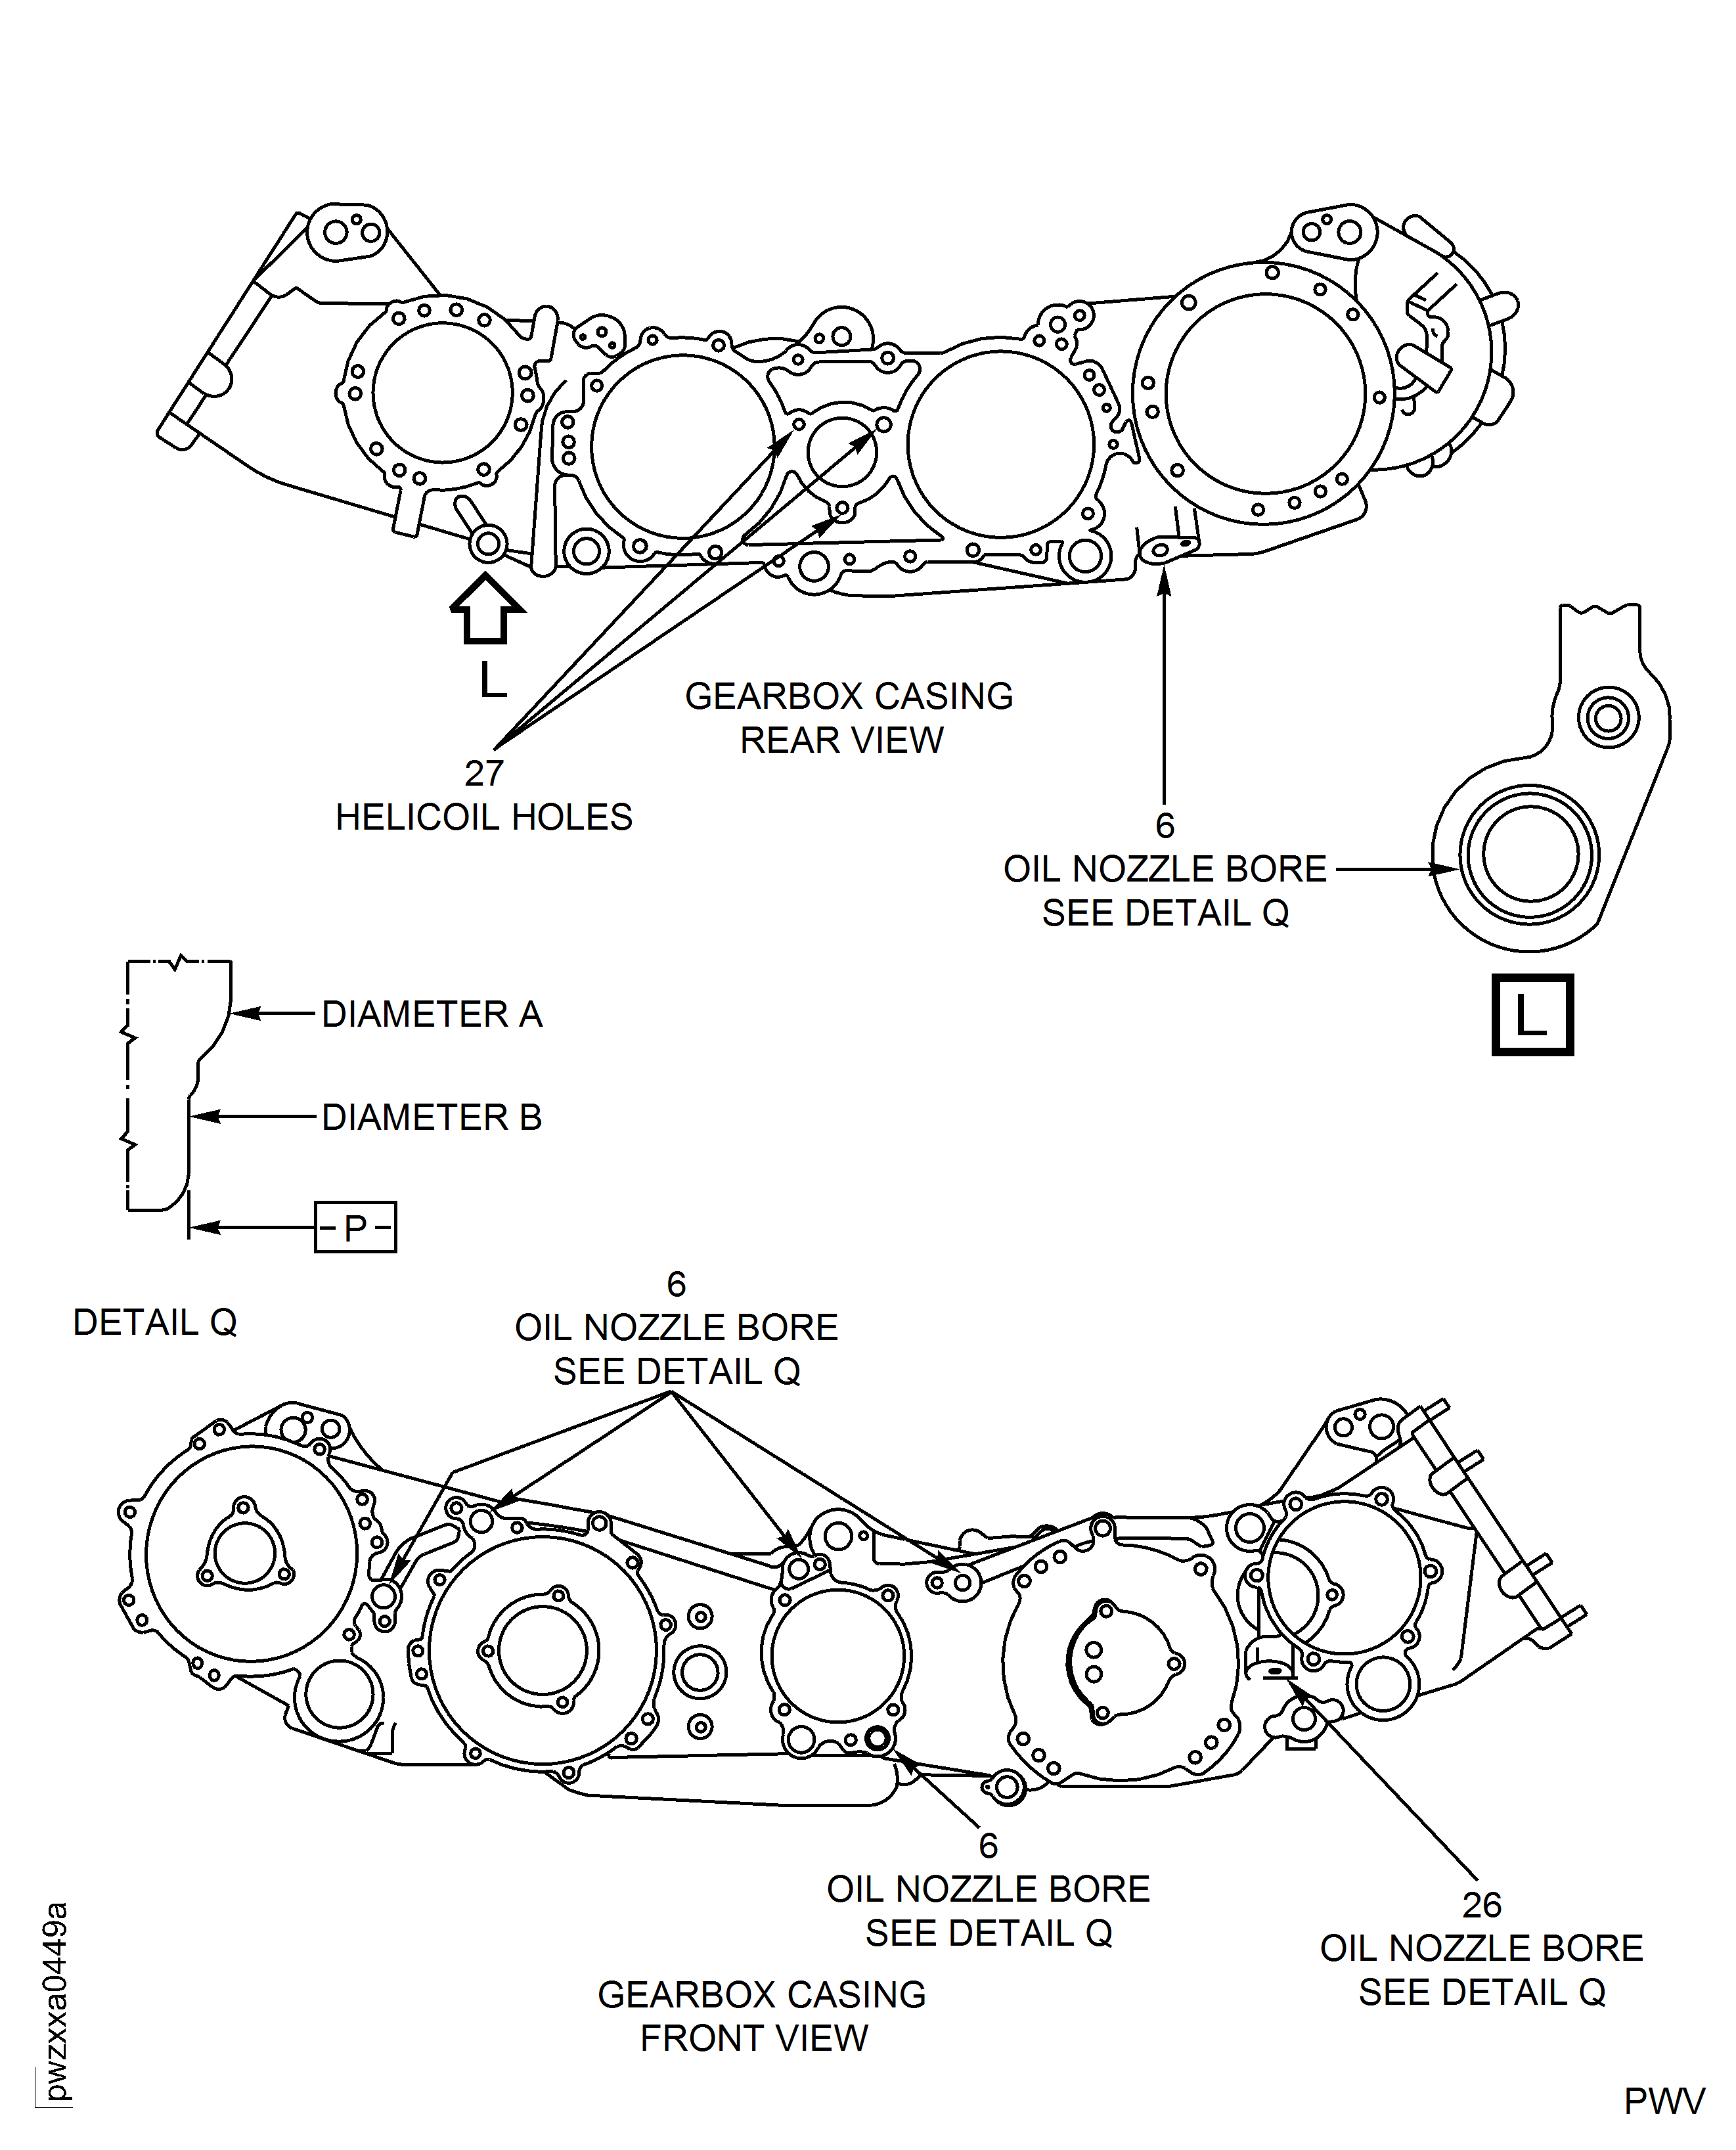
Figure: Location of Crank Cover Studs/Holes
Location of Crank Cover Studs/Holes
