Export Control
EAR Export Classification: Not subject to the EAR per 15 C.F.R. Chapter 1, Part 734.3(b)(3), except for the following Service Bulletins which are currently published as EAR Export Classification 9E991: SBE70-0992, SBE72-0483, SBE72-0580, SBE72-0588, SBE72-0640, SBE73-0209, SBE80-0024 and SBE80-0025.Copyright
© IAE International Aero Engines AG (2001, 2014 - 2021) The information contained in this document is the property of © IAE International Aero Engines AG and may not be copied or used for any purpose other than that for which it is supplied without the express written authority of © IAE International Aero Engines AG. (This does not preclude use by engine and aircraft operators for normal instructional, maintenance or overhaul purposes.).Applicability
All
Common Information
TASK 72-42-11-200-001-B00 Diffuser Case - Examine, Inspection-001
Effectivity
FIG/ITEM | PART No. |
|---|---|
01-010 | 2A2081-01 |
01-010 | 2A2081-101 |
01-010 | 2A2081-201 |
01-010 | 2A2081-301 |
01-010 | 2A2081-401 |
01-010 | 2A2581-01 |
01-010 | 2A2581-101 |
01-010 | 2A2581-201 |
01-010 | 2A2581-301 |
01-010 | 2A2581-401 |
01-010 | 2A2885-01 |
01-010 | 2A2885-101 |
01-010 | 2A2885-201 |
01-010 | 2A2885-301 |
01-010 | 2A2885-401 |
01-010 | 2A2891-01 |
01-010 | 2A2891-101 |
01-010 | 2A2891-201 |
01-010 | 2A2891-301 |
01-010 | 2A2891-401 |
01-010 | 2A2897-01 |
01-010 | 2A2897-101 |
01-010 | 2A2897-201 |
01-010 | 2A2897-301 |
01-010 | 2A2897-401 |
General
This TASK gives the procedure for the inspection of the diffuser case assembly.
Fig/item numbers in parentheses in the procedure agree with those used in the IPC.
Refer to SPM TASK 70-20-00-200-501 for General Inspection Information.
All parts must be visually examined for cracks, damage, corrosion and wear. For any defects that are not identified in the procedure, contact IAE Tech Services.
The practices and processes referred to in the procedure by the TASK numbers are in the SPM.
References
Refer to the SPM for data on these items.
Definitions of Damage, SPM TASK 70-02-02-350-501.
Surface Texture, SPM TASK 70-35-09-350-501.
Inspection of Parts, SPM TASK 70-20-00-200-501.
Some data on these items is contained in this TASK. For more data on these items refer to the SPM.
Method of Testing for Crack Indications.
Chemical Processes.
Surface Protection.
NOTE
Preliminary Requirements
Pre-Conditions
NONESupport Equipment
| Name | Manufacturer | Part Number / Identification | Quantity | Remark |
|---|---|---|---|---|
| Black light | LOCAL | Black light | ||
| Borescope probe | LOCAL | Borescope probe | ||
| Small (dental) mirror | LOCAL | Small (dental) mirror | ||
| Small (dental) pick | LOCAL | Small (dental) pick | ||
| Standard comparator | LOCAL | Standard comparator | ||
| 10X magnifier | LOCAL | 10X magnifier | ||
| Vacuum or compressed air device | LOCAL | Vacuum or compressed air device |
Consumables, Materials and Expendables
| Name | Manufacturer | Part Number / Identification | Quantity | Remark |
|---|---|---|---|---|
| CoMat 05-112 EMERY POLISHING PAPER | LOCAL | CoMat 05-112 | (400 grit) | |
| CoMat 05-113 EMERY POLISHING PAPER | LOCAL | CoMat 05-113 | (600 grit) |
Spares
NONESafety Requirements
NONEProcedure
Clean the Part. Refer to (CLEANING-000) TASK 72-42-11-100-000.
Do the test for cracks given in SPM TASK 70-23-08-230-501.
SUBTASK 72-42-11-230-054-002 Prepare the Diffuser Case Assembly (01-010) for Crack Inspection

CAUTION
THE REAR OUTER FLANGE AND REAR OUTER FLANGE BOLTHOLES OF THE DIFFUSER CASE ASSEMBLY ARE VERY IMPORTANT AREAS WHERE YOU FIND CRACKS. MAKE SURE YOU CLEAN AND EXAMINE THESE AREAS CAREFULLY BY SUBTASK 72-42-11-230-054-002 AND SUBTASK 72-42-11-230-055. IF YOU DO NOT OBEY THESE INSTRUCTIONS, YOU CAN INCREASE THE POSSIBILITY OF NOT IDENTIFYING A CRACK THAT CAN CAUSE MORE DAMAGE.NOTE
The Rear Outer Flange and Rear Outer Flange boltholes of the Diffuser Case Assembly are very important areas where you find cracks. The Diffuser Case Rear Outer Flange is cycle limited and need to do maintenance by flange replacement by TASK 05-10-00-990-000-A00 and TASK 05-10-00-990-000-B00.Refer to Figure.
Examine under a Black light. Make a mark on defects that will cause you to reject the part. Make another mark on defects that you need to examine more.
Polish the indications with CoMat 05-112 EMERY POLISHING PAPER or CoMat 05-113 EMERY POLISHING PAPER.
Do the test for cracks given in the SPM TASK 70-23-05-230-501.
If you find indications in very important areas and you are not sure whether to reject the part, do the steps that follow:
Repair, VRS3039 TASK 72-42-11-300-012 (REPAIR-012).
If the diffuser case is not in the limits given in Figure
SUBTASK 72-42-11-230-055 Examine the Diffuser Case Assembly (01-010) for Cracks
NOTE
The Rear Outer Flange and Rear Outer Flange boltholes of the Diffuser Case Assembly are very important areas where you find cracks. Examine these areas carefully.
CAUTION
THE REAR OUTER FLANGE AND REAR OUTER FLANGE BOLTHOLES OF THE DIFFUSER CASE ASSEMBLY ARE VERY IMPORTANT AREAS WHERE YOU FIND CRACKS. MAKE SURE YOU CLEAN AND EXAMINE THESE AREAS CAREFULLY BY SUBTASK 72-42-11-230-054-002 AND SUBTASK 72-42-11-230-055. IF YOU DO NOT OBEY THESE INSTRUCTIONS, YOU CAN INCREASE THE POSSIBILITY OF NOT IDENTIFYING A CRACK THAT CAN CAUSE MORE DAMAGE.Refer to Figure.
Repair, VRS3061 TASK 72-42-11-300-024 (REPAIR-024).
Other than (Step).
Warps and dents.
Repair, VRS3061 TASK 72-42-11-300-024 (REPAIR-024).
Other than (Step)
Nicks.
Repair, VRS3061 TASK 72-42-11-300-024 (REPAIR-024).
Burns.
Repair, VRS3026 TASK 72-42-11-300-002 (REPAIR-002)
Threads with high metal, burrs or damage
Repair, VRS3058 TASK 72-42-11-300-021 (REPAIR-021)
Borescope threads with high metal, burrs or damage
Repair, VRS3739 TASK 72-42-11-300-031 (REPAIR-031)
Burner pin boss thread damage
Repair, VRS3715 TASK 72-42-11-300-030 (REPAIR-030)
Ps3 boss threads with high metal, burrs or damage
Repair, VRS3039 TASK 72-42-11-300-012 (REPAIR-012).
Wear that is more than 0.020 in. (0.51 mm) and less than 0.070 in. (1.78 mm) on the front outer flange boltholes.
Repair, VRS3061 TASK 72-42-11-300-024 (REPAIR-024).
Wear that is more than 0.020 in. (0.51 mm) on the rear outer flange.
Worn flange boltholes.
Repair, VRS3061 TASK 72-42-11-300-024 (REPAIR-024) or Repair, VRS3647 TASK 72-42-11-300-026 (REPAIR-026).
Wear on oil supply inner boss bore.
Repair, VRS3777 TASK 72-42-11-300-035 (REPAIR-035).
Wear not less than 0.010 in. (0.25 mm) in depth (not more than two blends on all of the case).
Wear on the internal cavities of strut, refer to Figure.
Refer to Repair, VRS3819 TASK 72-42-11-300-036 (REPAIR-036).
Igniter boss threads with high metal, burrs or damage, or sleeves that are loose, missing or damaged.
Examine the diffuser case for damage.
SUBTASK 72-42-11-220-062 Examine the Diffuser Case Assembly (01-010) for Damage
Refer to Figure
Repair, VRS3279 TASK 72-42-11-300-025 (REPAIR-025)
Looseness
Examine the diffuser case at location 2 for looseness of the sleeves.
Repair, VRS3279 TASK 72-42-11-300-025 (REPAIR-025)
Other than (a)
Wear.
Examine the diffuser case at location 1 for wear on the spherical diameter of the sleeve (2 locations).
Repair, VRS3041 TASK 72-42-11-300-014 (REPAIR-014)
Looseness
Examine the diffuser case at location 3 for looseness of the sleeve.
Repair, VRS3041 TASK 72-42-11-300-014 (REPAIR-014).
Other than (Step).
Wear.
Examine the diffuser case at location 4 for wear on the spherical diameter of the sleeve.
SUBTASK 72-42-11-220-063 Examine the Diffuser Case Assembly (01-010) for Looseness and Wear on the Sleeves
Repair, VRS3059 TASK 72-42-11-300-022 (REPAIR-022).
Looseness or damaged threads.
Examine the diffuser case at Location 1 for looseness and damaged threads on the inserts (64 locations).
Repair, VRS3749 TASK 72-42-11-300-034 (REPAIR-034)
Looseness or damaged threads
Examine the diffuser case at Location 1 for looseness and damaged threads on the inserts (jack screw hole pattern: eight holes, four equally spaced groups of two holes).
SUBTASK 72-42-11-220-064 Examine the Diffuser Case Assembly (01-010) for Looseness and Damaged Threads on the Inserts
Refer to Figure
Repair, VRS3060 TASK 72-42-11-300-023 (REPAIR-023)
Loose or damaged pins
Examine the diffuser case at Locations 1 and 2 for loose or damaged pins.
SUBTASK 72-42-11-220-065 Examine the Diffuser Case Assembly (01-010) for Loose or Damaged Front and Rear Pins
Refer to Figure
Repair, VRS3025 TASK 72-42-11-300-001 (REPAIR-001)
Other than (a) and (b)
Damaged gang nut channel assemblies.
Examine the diffuser case at Location 1 for damaged gang nut channel assemblies.
SUBTASK 72-42-11-220-066 Examine the Diffuser Case Assembly (01-010) for Damaged Gang Nut Channel Assemblies
Refer to Figure
Repair, VRS3028 TASK 72-42-11-300-003 (REPAIR-003)
Loose or damaged threads
Examine the diffuser case at Location 1 for loose and damaged threads on the front inside diameter flange nuts.
SUBTASK 72-42-11-220-067 Examine the Diffuser Case Assembly (01-010) for Loose and Damaged Threads on the Front Inside Diameter Flange Nuts
NOTE
The dimensions that follow apply when Surface K and N are flat by 0.005 in. (0.13 mm); the diameter at Location 2242 maintains a clearance envelope of 25.210 in. (640.33 mm) and the diameter at Location 2252 maintains a clearance envelope of 28.226 in. (716.94 mm) in a free or a held condition. Hold the part only on Surfaces K, L, M and N and the diameters at Locations 2242 and 2252.Refer to Figure.
Repair, VRS3600 TASK 72-42-11-300-027 (REPAIR-027) or Repair, VRS3752 TASK 72-42-11-300-032 (REPAIR-032).
Other than Step.
Examine the diffuser case at Location A for axial length between the front and rear outer flanges.
Repair, VRS3682 TASK 72-42-11-300-029 (REPAIR-029) or Repair, VRS3752 TASK 72-42-11-300-032 (REPAIR-032).
Other than (1)
Examine the diffuser case at Location B for axial length between the front outer flange and rear inner flange.
Repair, VRS3753 TASK 72-42-11-300-033 (REPAIR-033) or Repair, VRS3752 TASK 72-42-11-300-032 REPAIR-032.
Other than Step.
Examine the diffuser case at Location C for axial length between the front outer flange front face and the front inner flange front face.
SUBTASK 72-42-11-220-086 Examine the Diffuser Case Assembly (01-010) for Axial Length
Refer to Figure.
NOTE
The dimensions that follow apply when Surfaces K and N are flat by 0.005 in. (0.13 mm), the diameter at Location 2242 maintains a clearance envelope of 25.210 in. (640.33 mm) and the diameter at Location 2252 maintains a clearance envelope of 28.226 in. (716.94 mm) in a free or a held condition. Hold the part only on Surfaces K, L, M and N and the diameters at Locations 2242 and 2252.Write down the dimension of the diameter.
NOTE
This part can be used only if the mating part has a diameter that will result in fit of reference No. 2242. Refer to TASK 72-00-42-420-001 (INSTALLATION-001).
If the select fit dimension is between 25.199 in. and 25.209 in. (640.05 mm and 640.31 mm) in a held condition and is between 25.174 in. and 25.239 in. (639.42 mm and 641.07 mm) in a free condition
Examine the diffuser case at Location 2242 for wear and concentricity of the front outside diameter.
Write down the dimension of the diameter.
NOTE
This part can be used only if the mating part has a diameter that will result in fit of reference No. 2242. Refer to TASK 72-00-44-420-001-001 (INSTALLATION-001) or 72-40-00-430-005 (ASSMBLY-005).
If the select fit dimension is between 28.222 in. and 28.233 in. (716.84 mm and 717.12 mm) and is in true position in relation to the diameter at Location 2244 by 0.008 in. (0.20 mm)
Repair, VRS3056 TASK 72-42-11-300-019 (REPAIR-019).
Other than Step.
Examine the diffuser case at Location 2252 for wear and concentricity of the rear outside diameter.
Repair, VRS3052 TASK 72-42-11-300-017 (REPAIR-017)
Other than (1)
Examine the diffuser case at Location 2056 for wear and concentricity of the rear inside diameter.
Write down the dimension of the diameter.
NOTE
This part can be used only if the mating part has a diameter that will result in fit of reference No. 2244. Refer to V2500-A0-72-42-0000-00A-710A-B (ASSEMBLY).
If the select fit dimension is between 16.894 in. and 16.901 in. (429.11 mm and 429.29 mm) and is in true position in relation to the diameter at Location 2242 by 0.004 in. (0.10 mm)
Examine the diffuser case at Location 2244 for wear and concentricity of the front inside diameter seal diameter.
Write down the dimension of the diameter.
NOTE
This part can be used only if the mating part has a diameter that will result in fit of reference No. 2243. Refer to V2500-A0-72-42-0000-00A-710A-B (ASSEMBLY).
If the select fit dimension is between 20.661 in. and 20.672 in. (524.79 mm and 525.07 mm) and is in true position in relation to the diameter at Location 2244 by 0.004 in. (0.10 mm)
Repair, VRS3046 TASK 72-42-11-300-015 (REPAIR-015).
Other than Step.
Examine the diffuser case at Location 2243 for wear and concentricity of the front inside diameter stator diameter.
SUBTASK 72-42-11-220-068 Examine the Diffuser Case Assembly (01-010) for the Diameters
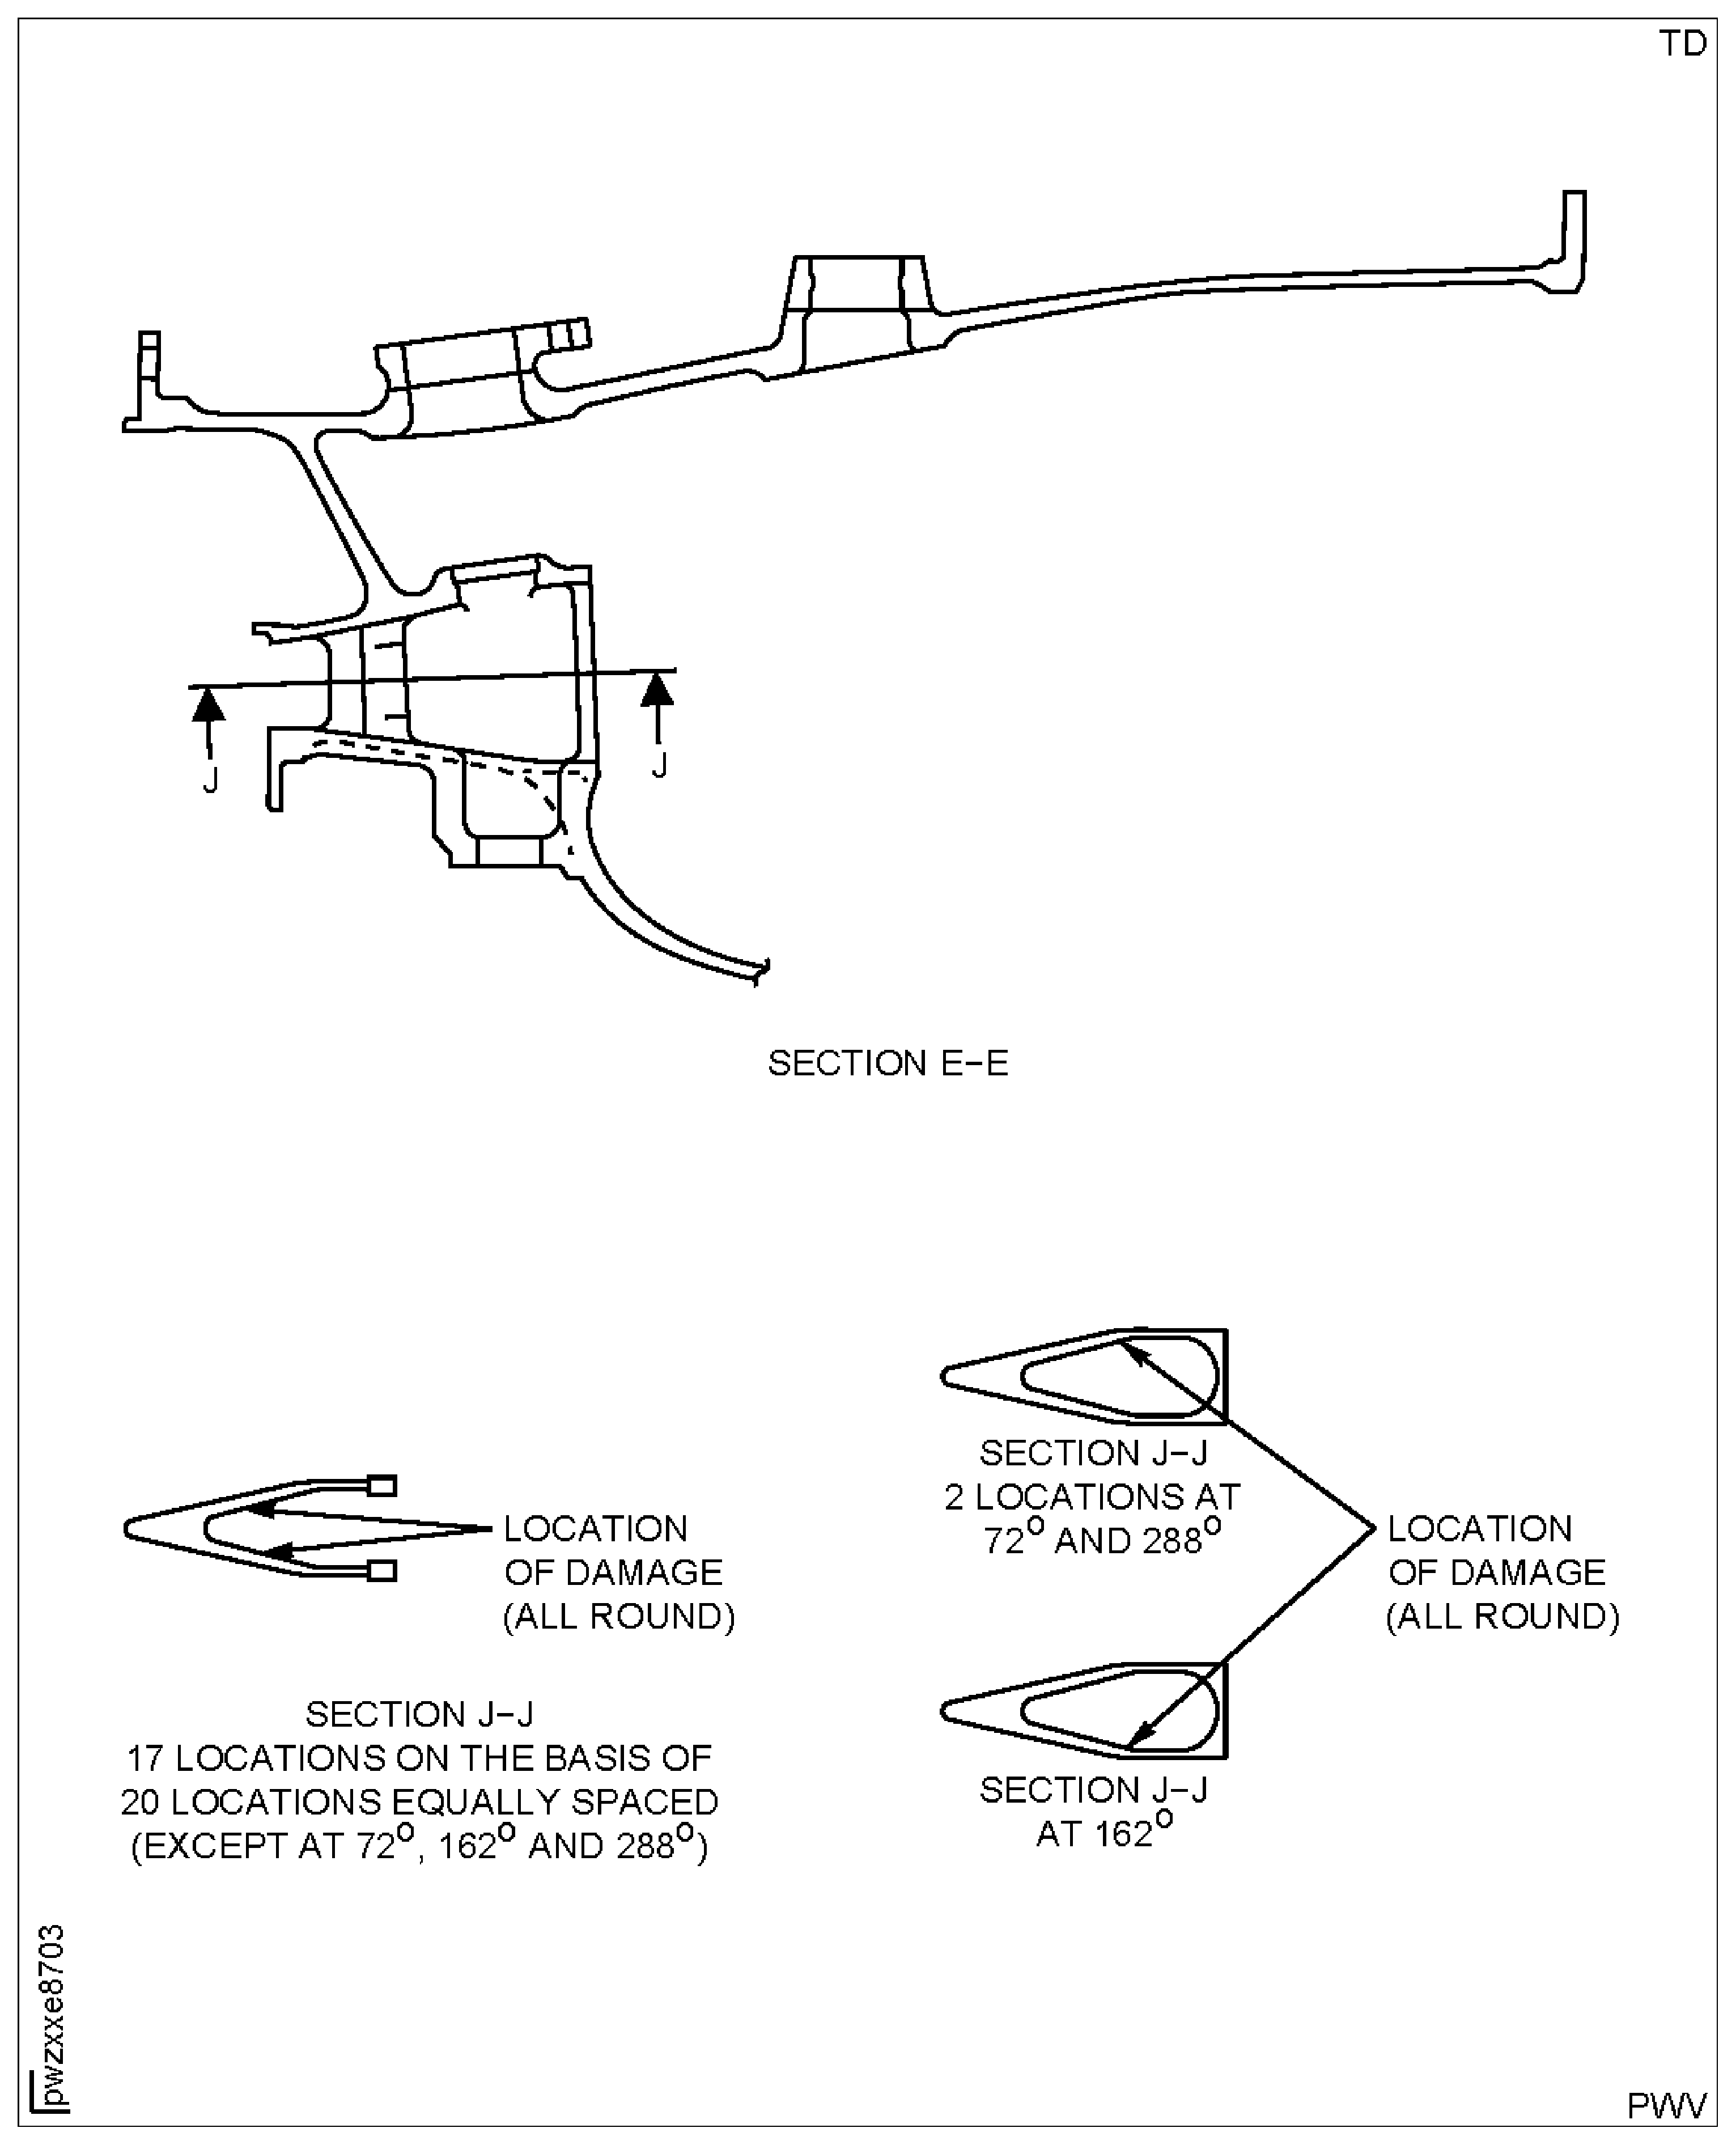
Figure: Diffuser Case Assembly Fluorescent Penetrant Inspection Locations
Sheet 1
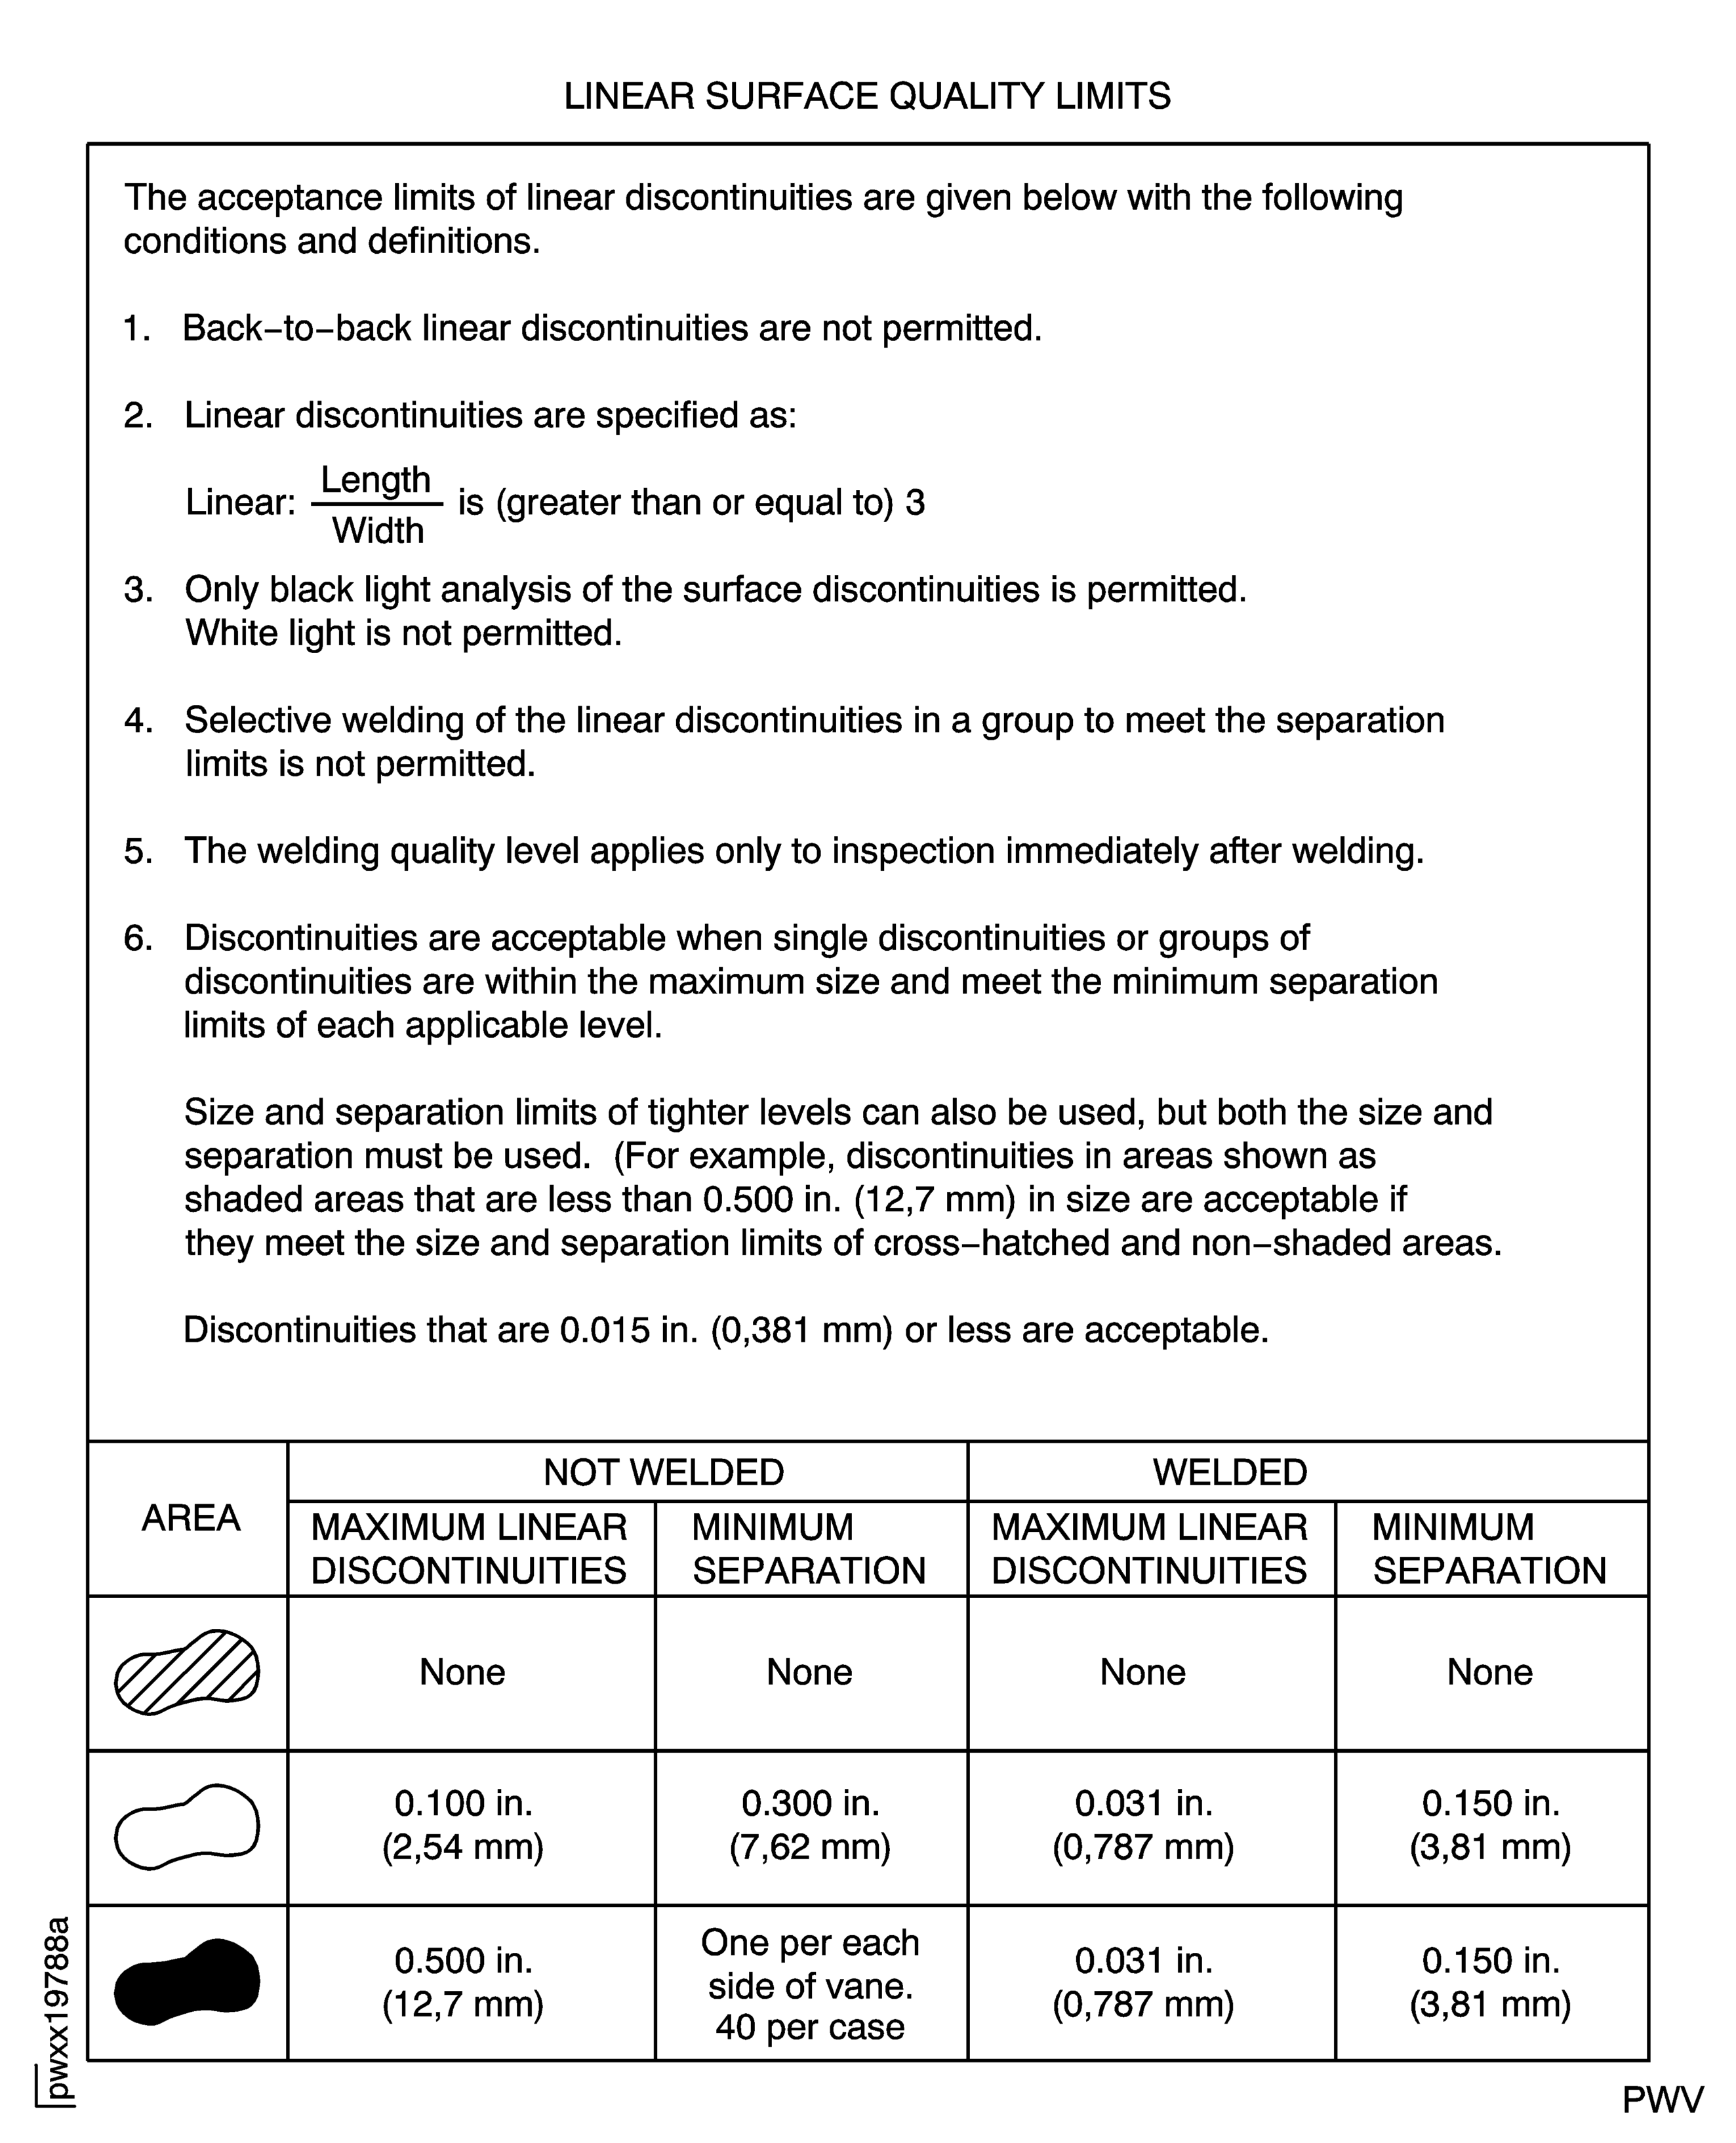
Figure: Diffuser Case Assembly Fluorescent Penetrant Inspection Locations
Sheet 2
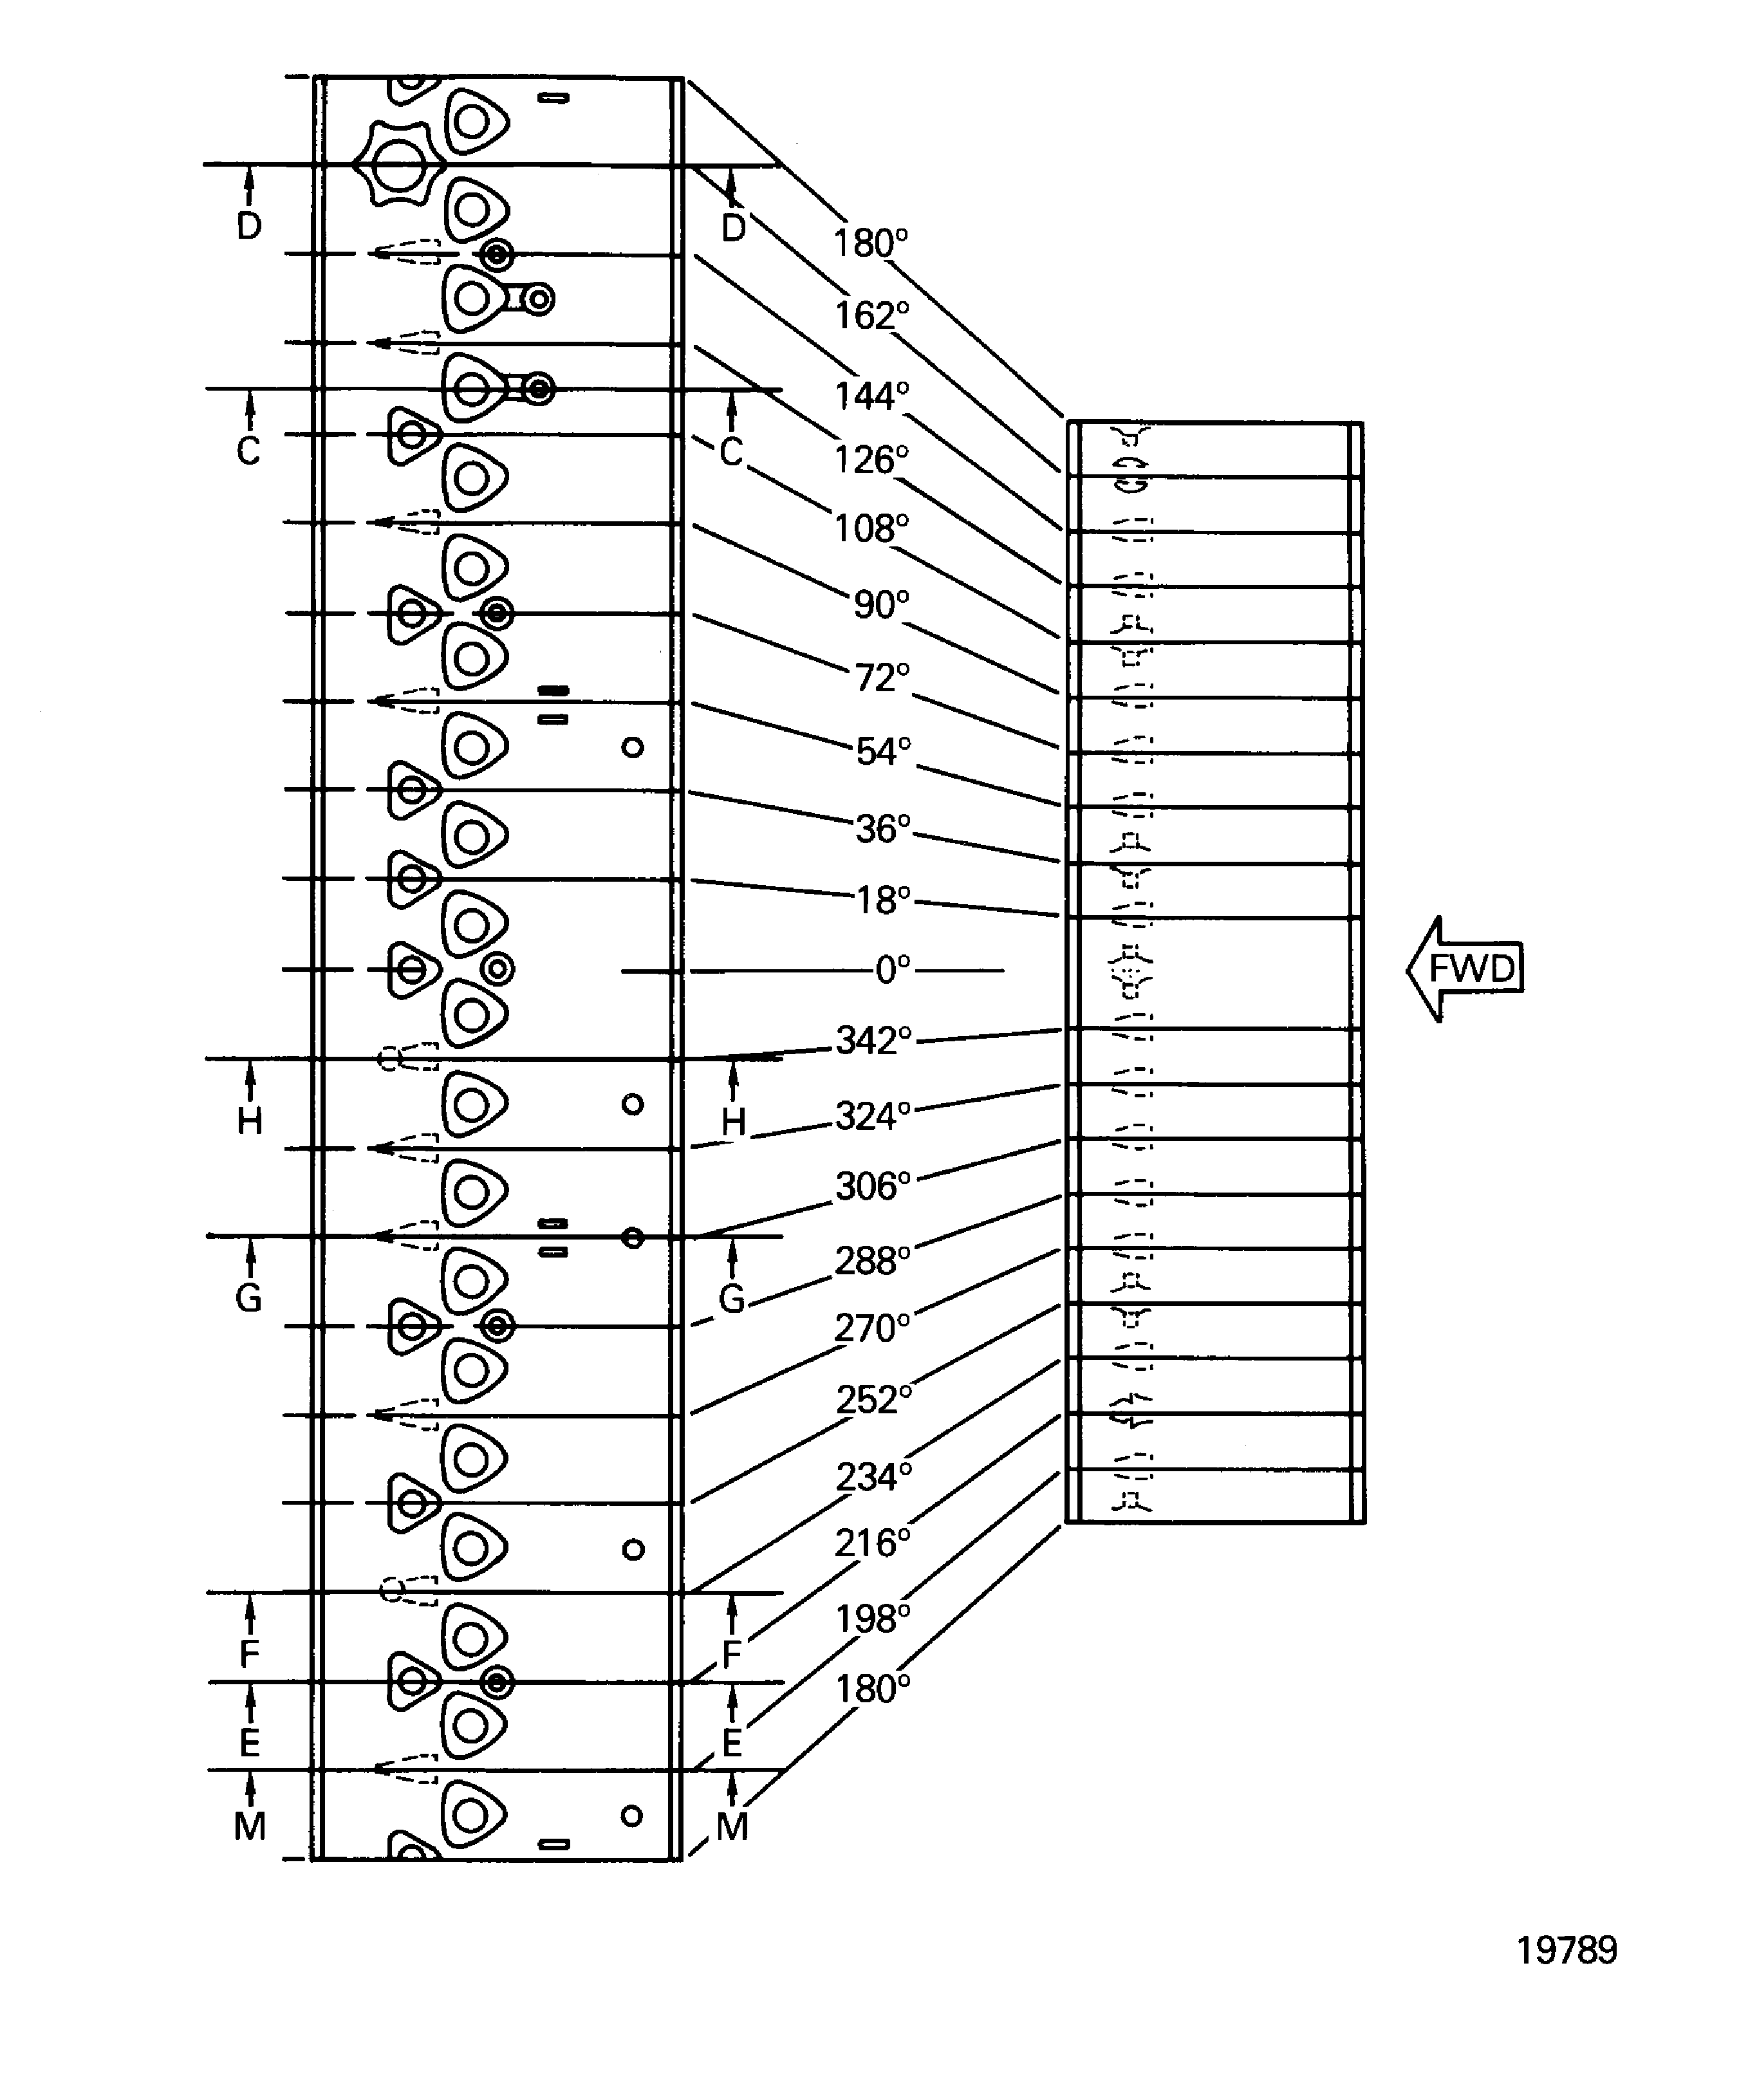
Figure: Diffuser Case Assembly Fluorescent Penetrant Inspection Locations
Sheet 3

Figure: Diffuser Case Assembly Fluorescent Penetrant Inspection Locations
Sheet 4
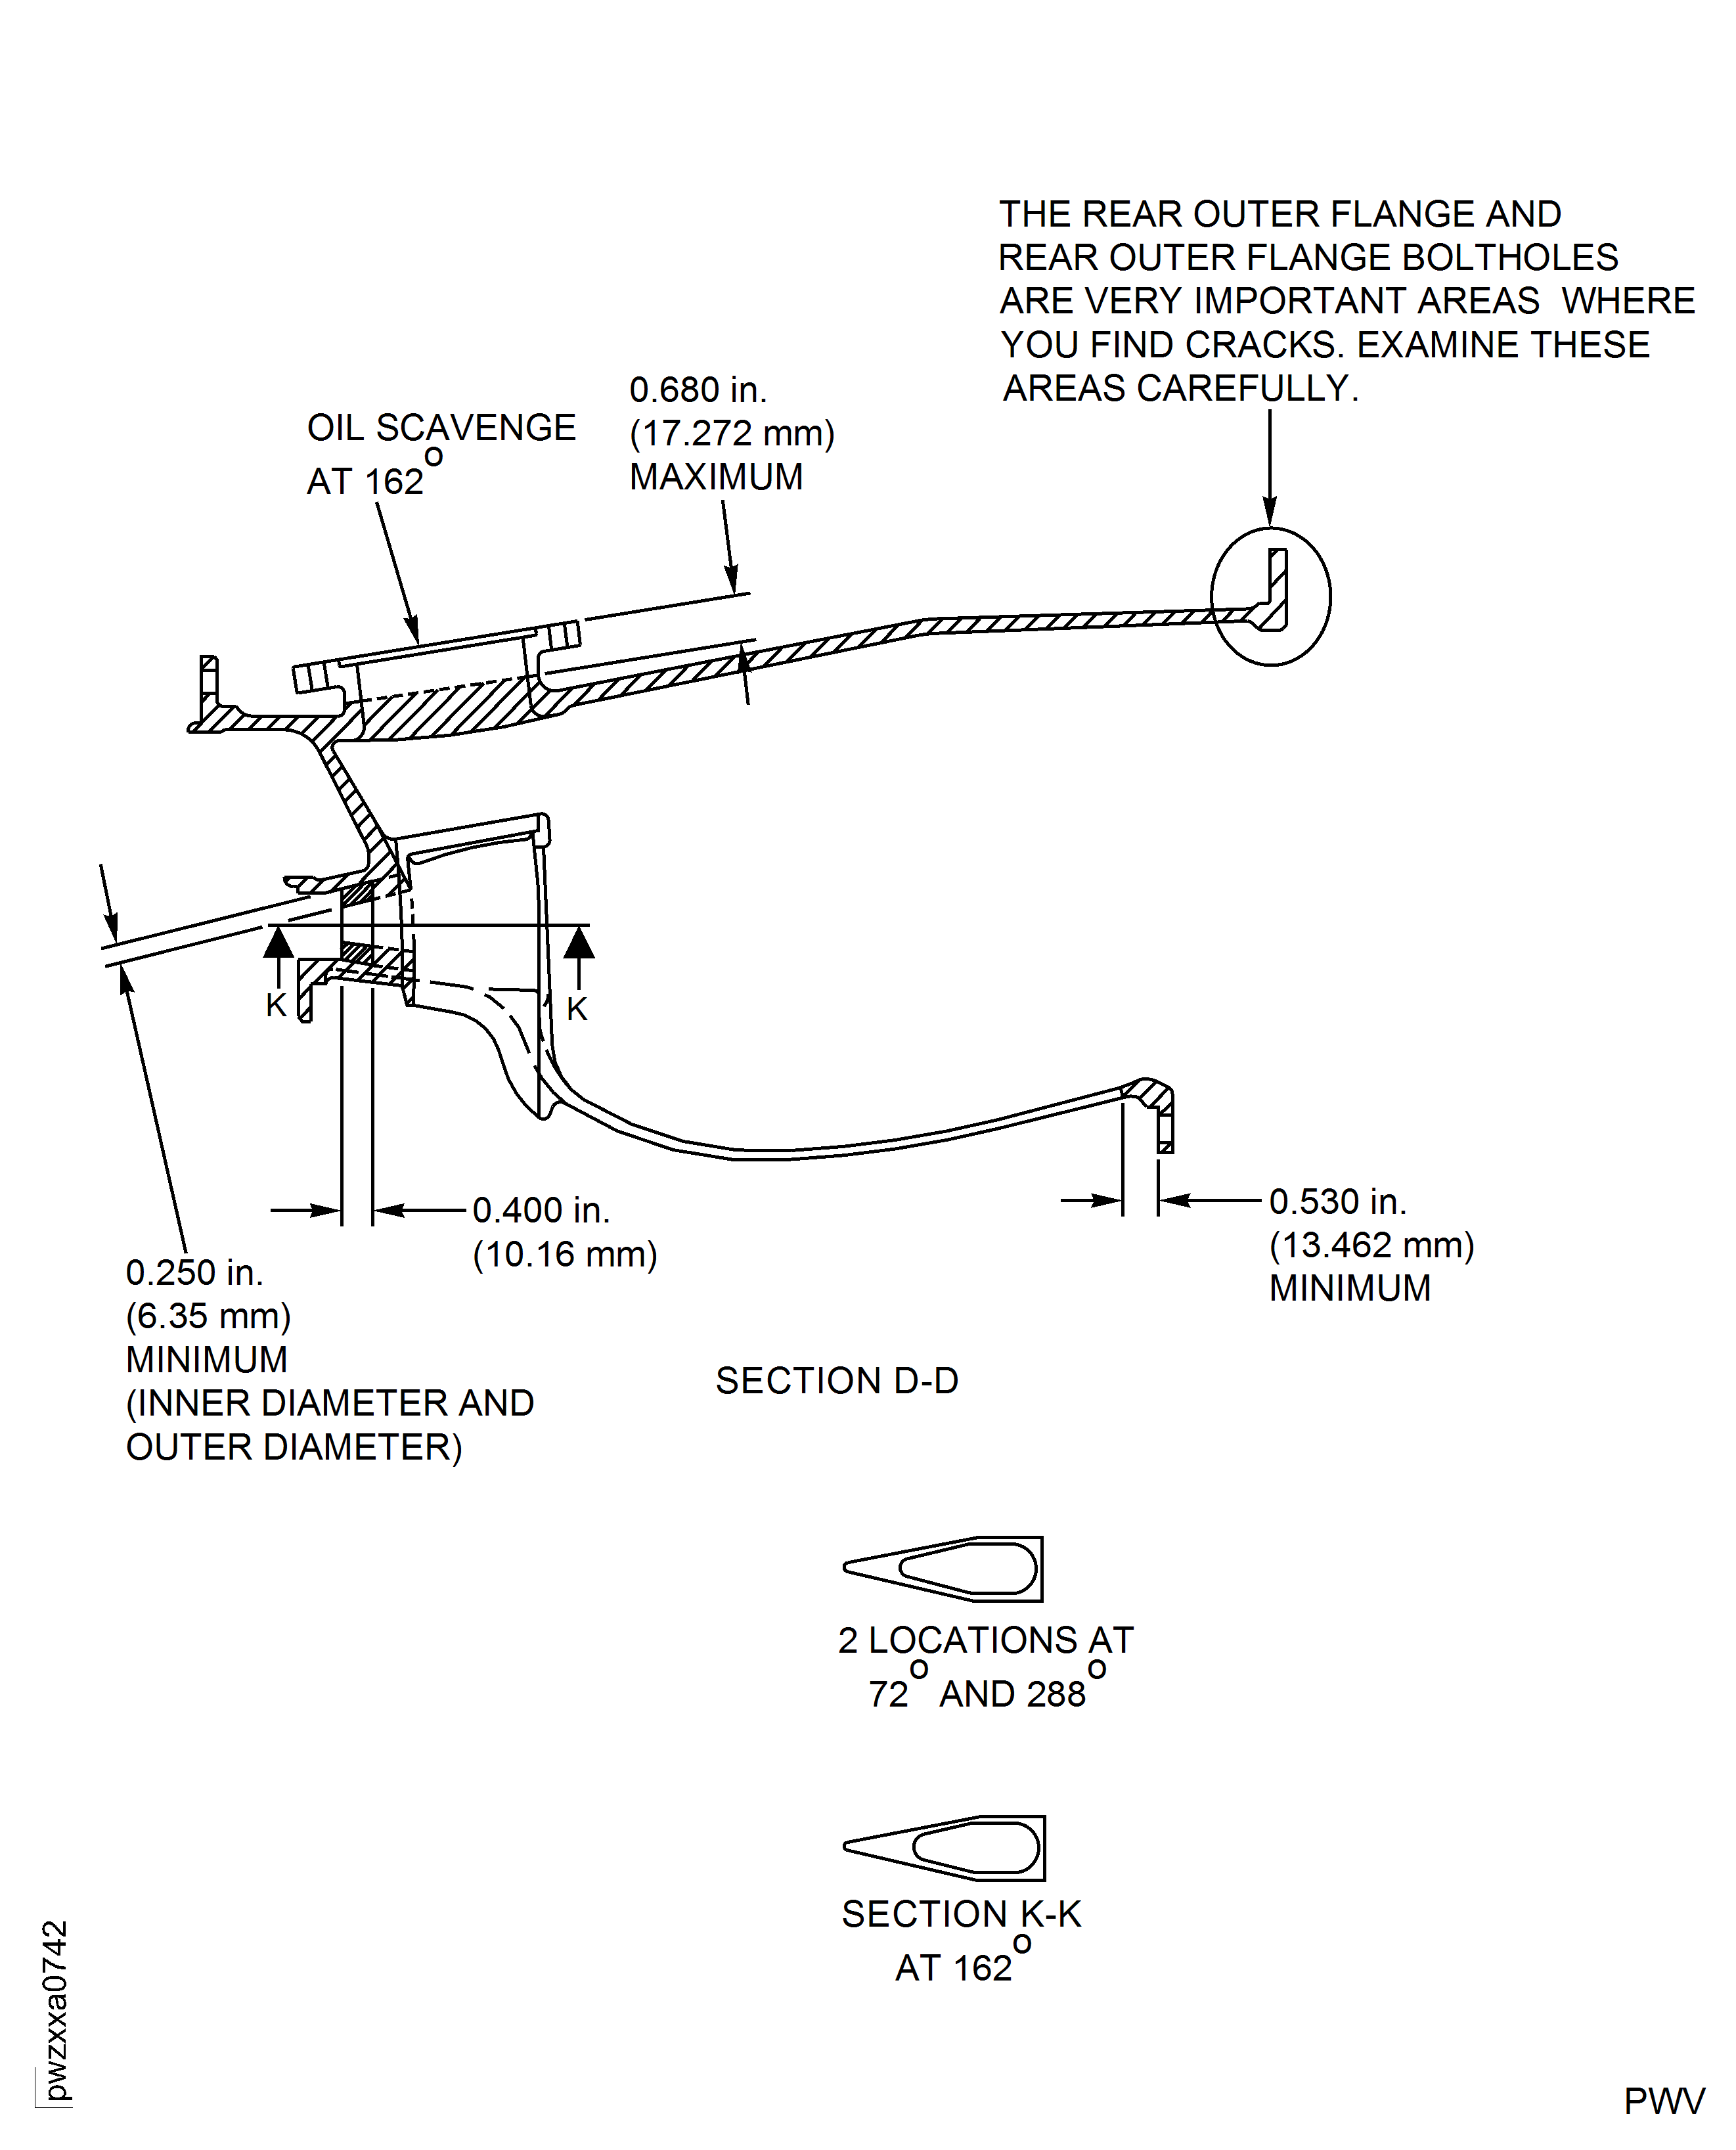
Figure: Diffuser Case Assembly Fluorescent Penetrant Inspection Locations
Sheet 5
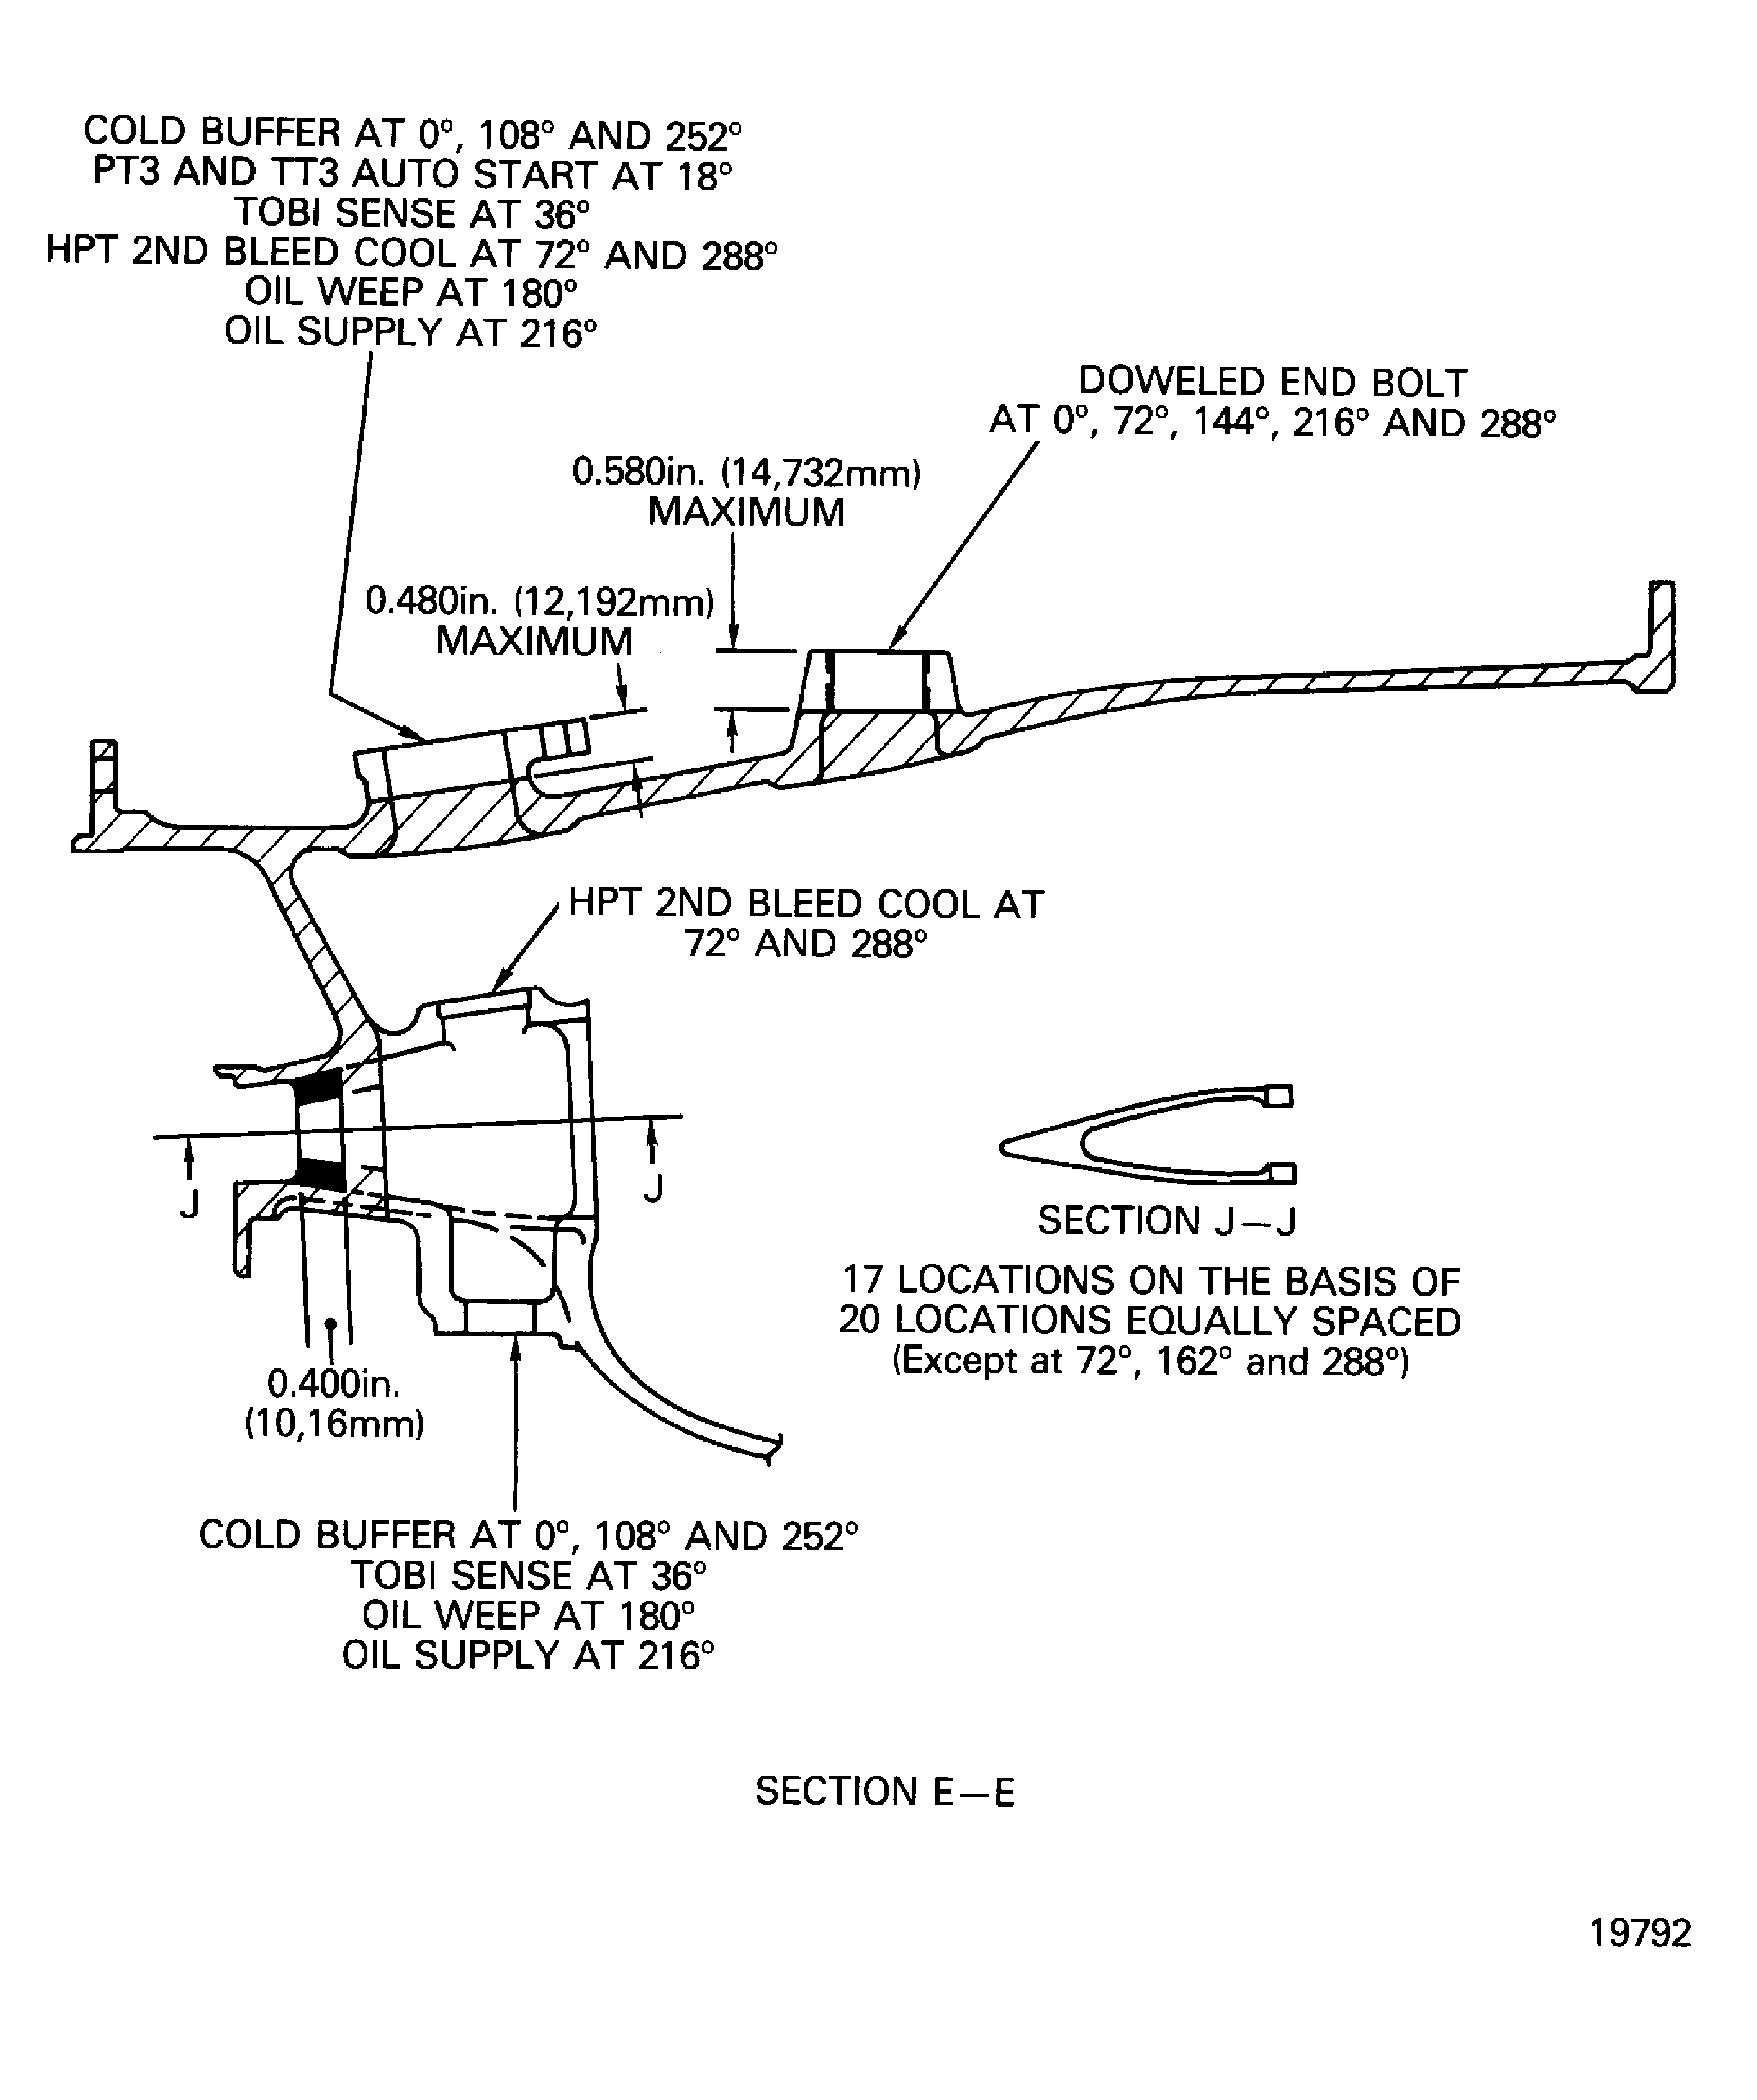
Figure: Diffuser Case Assembly Fluorescent Penetrant Inspection Locations
Sheet 6
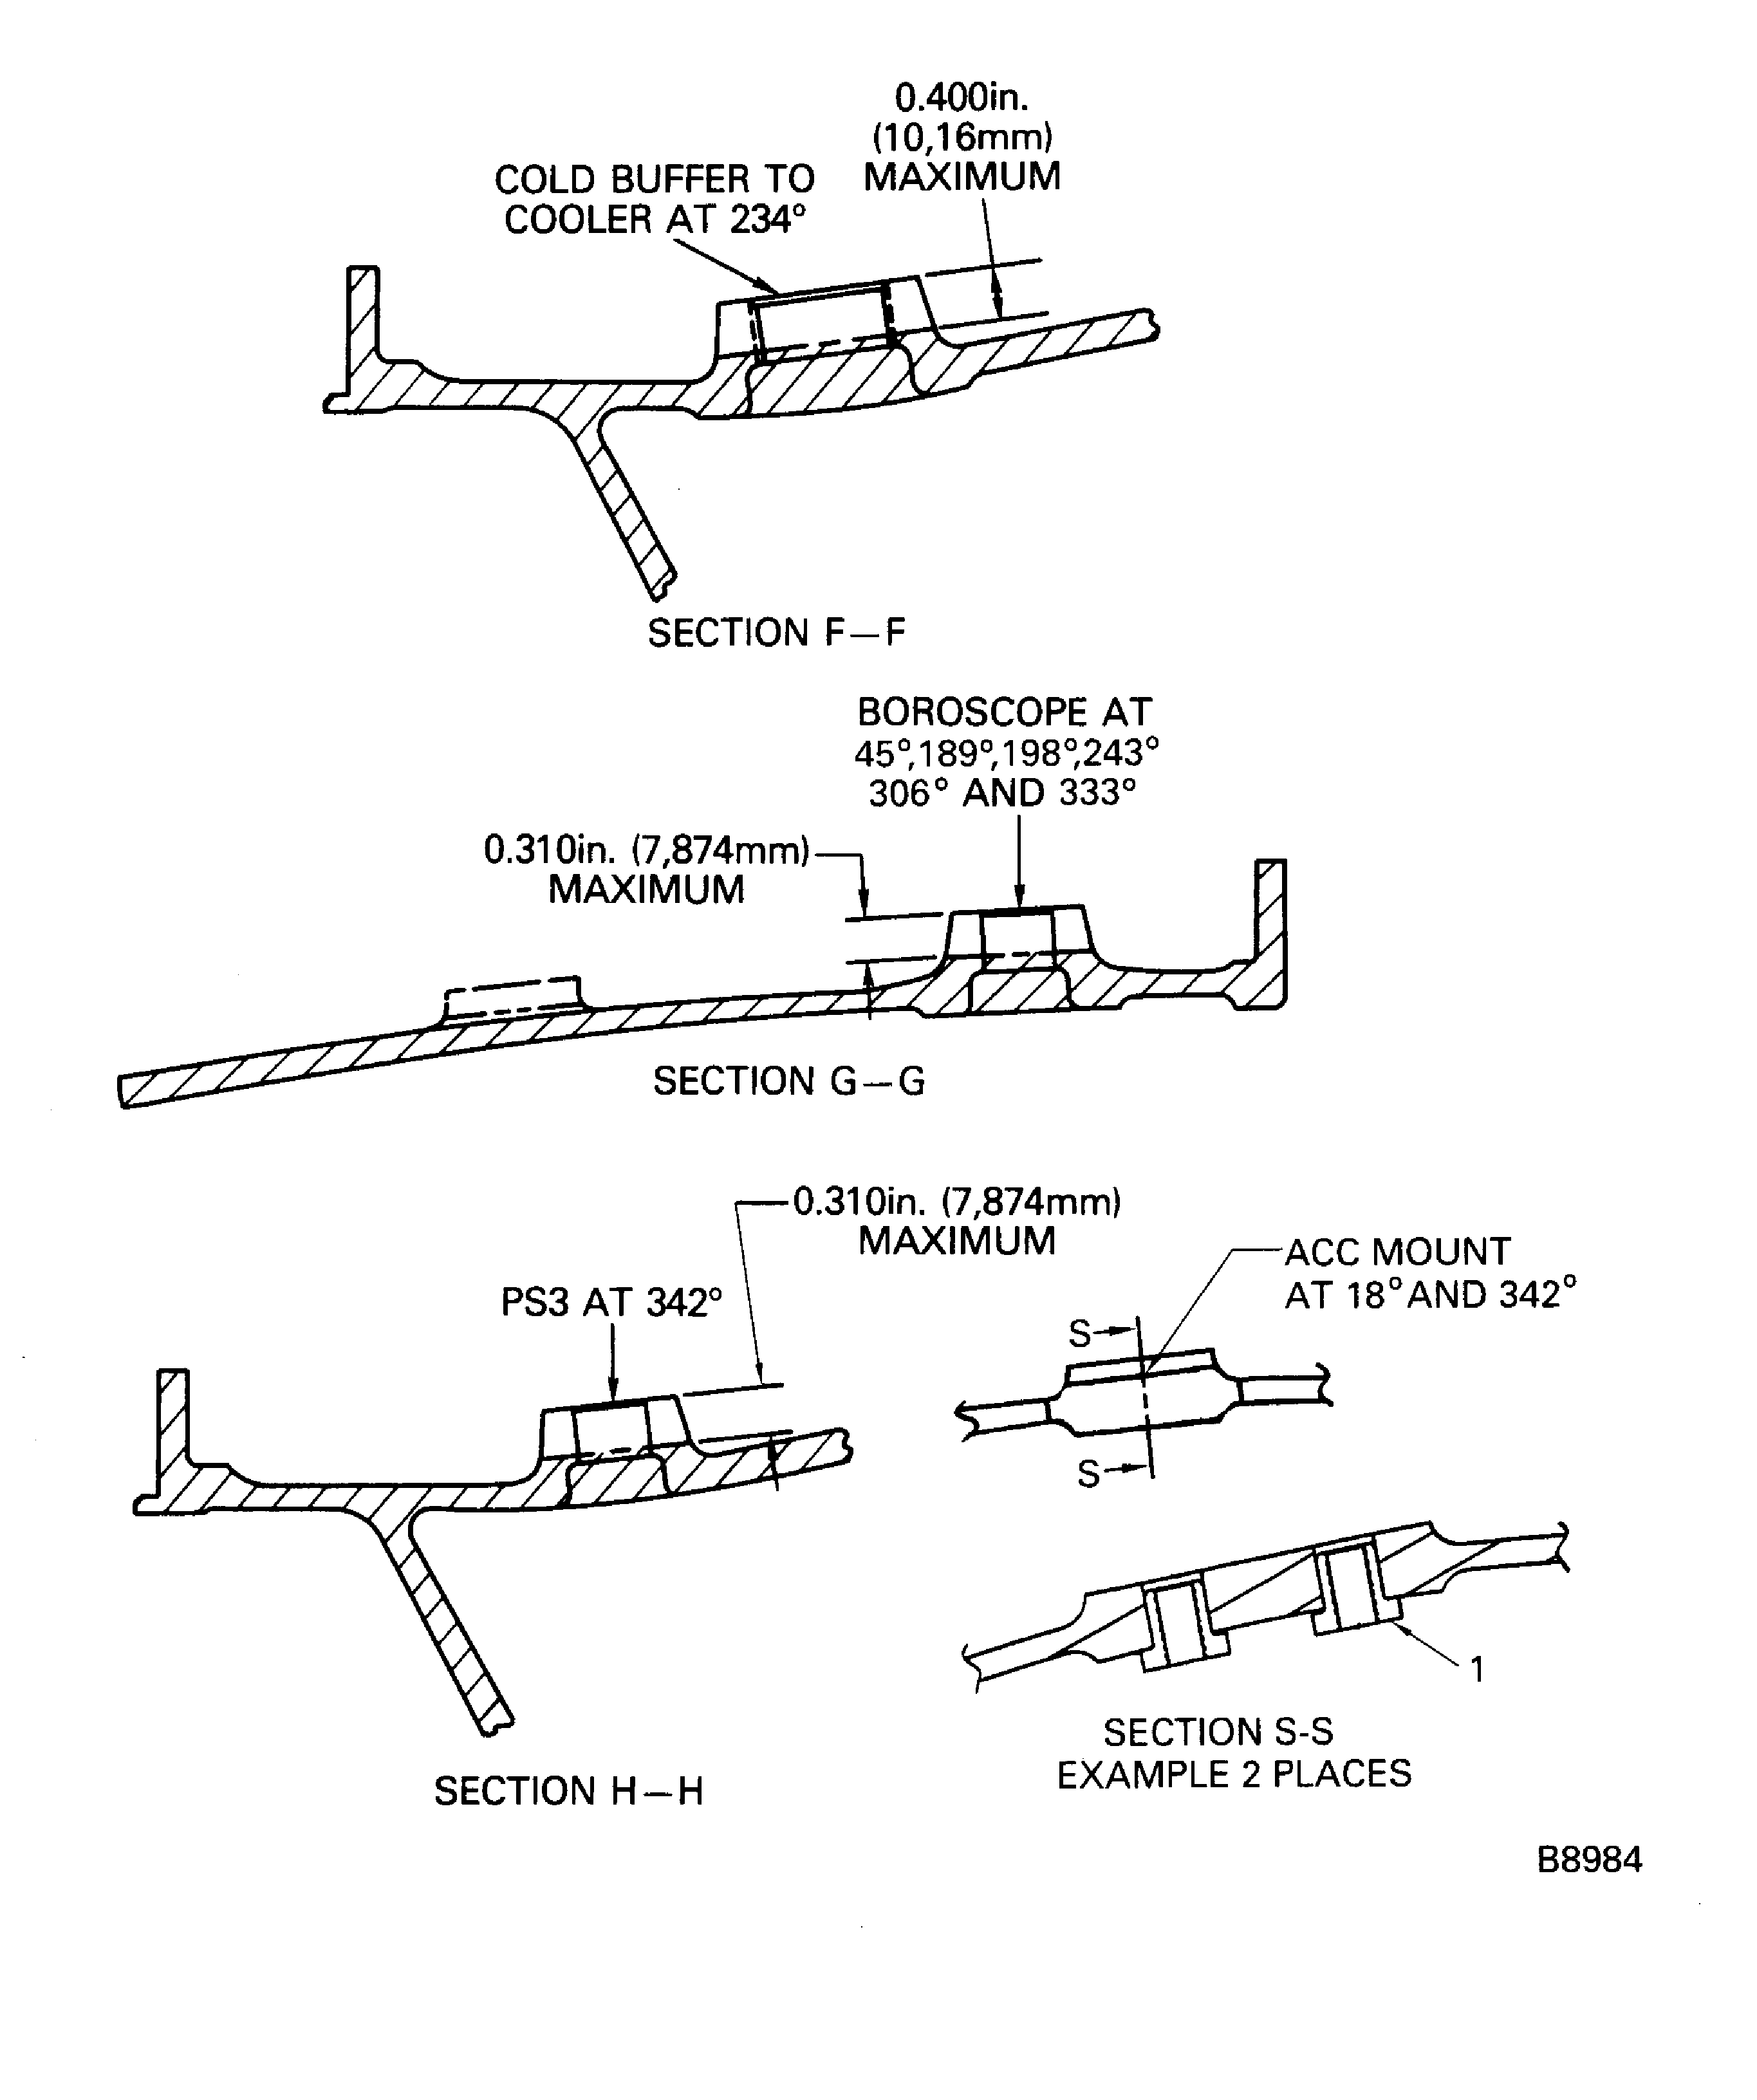
Figure: Diffuser Case Assembly Fluorescent Penetrant Inspection Locations
Sheet 7
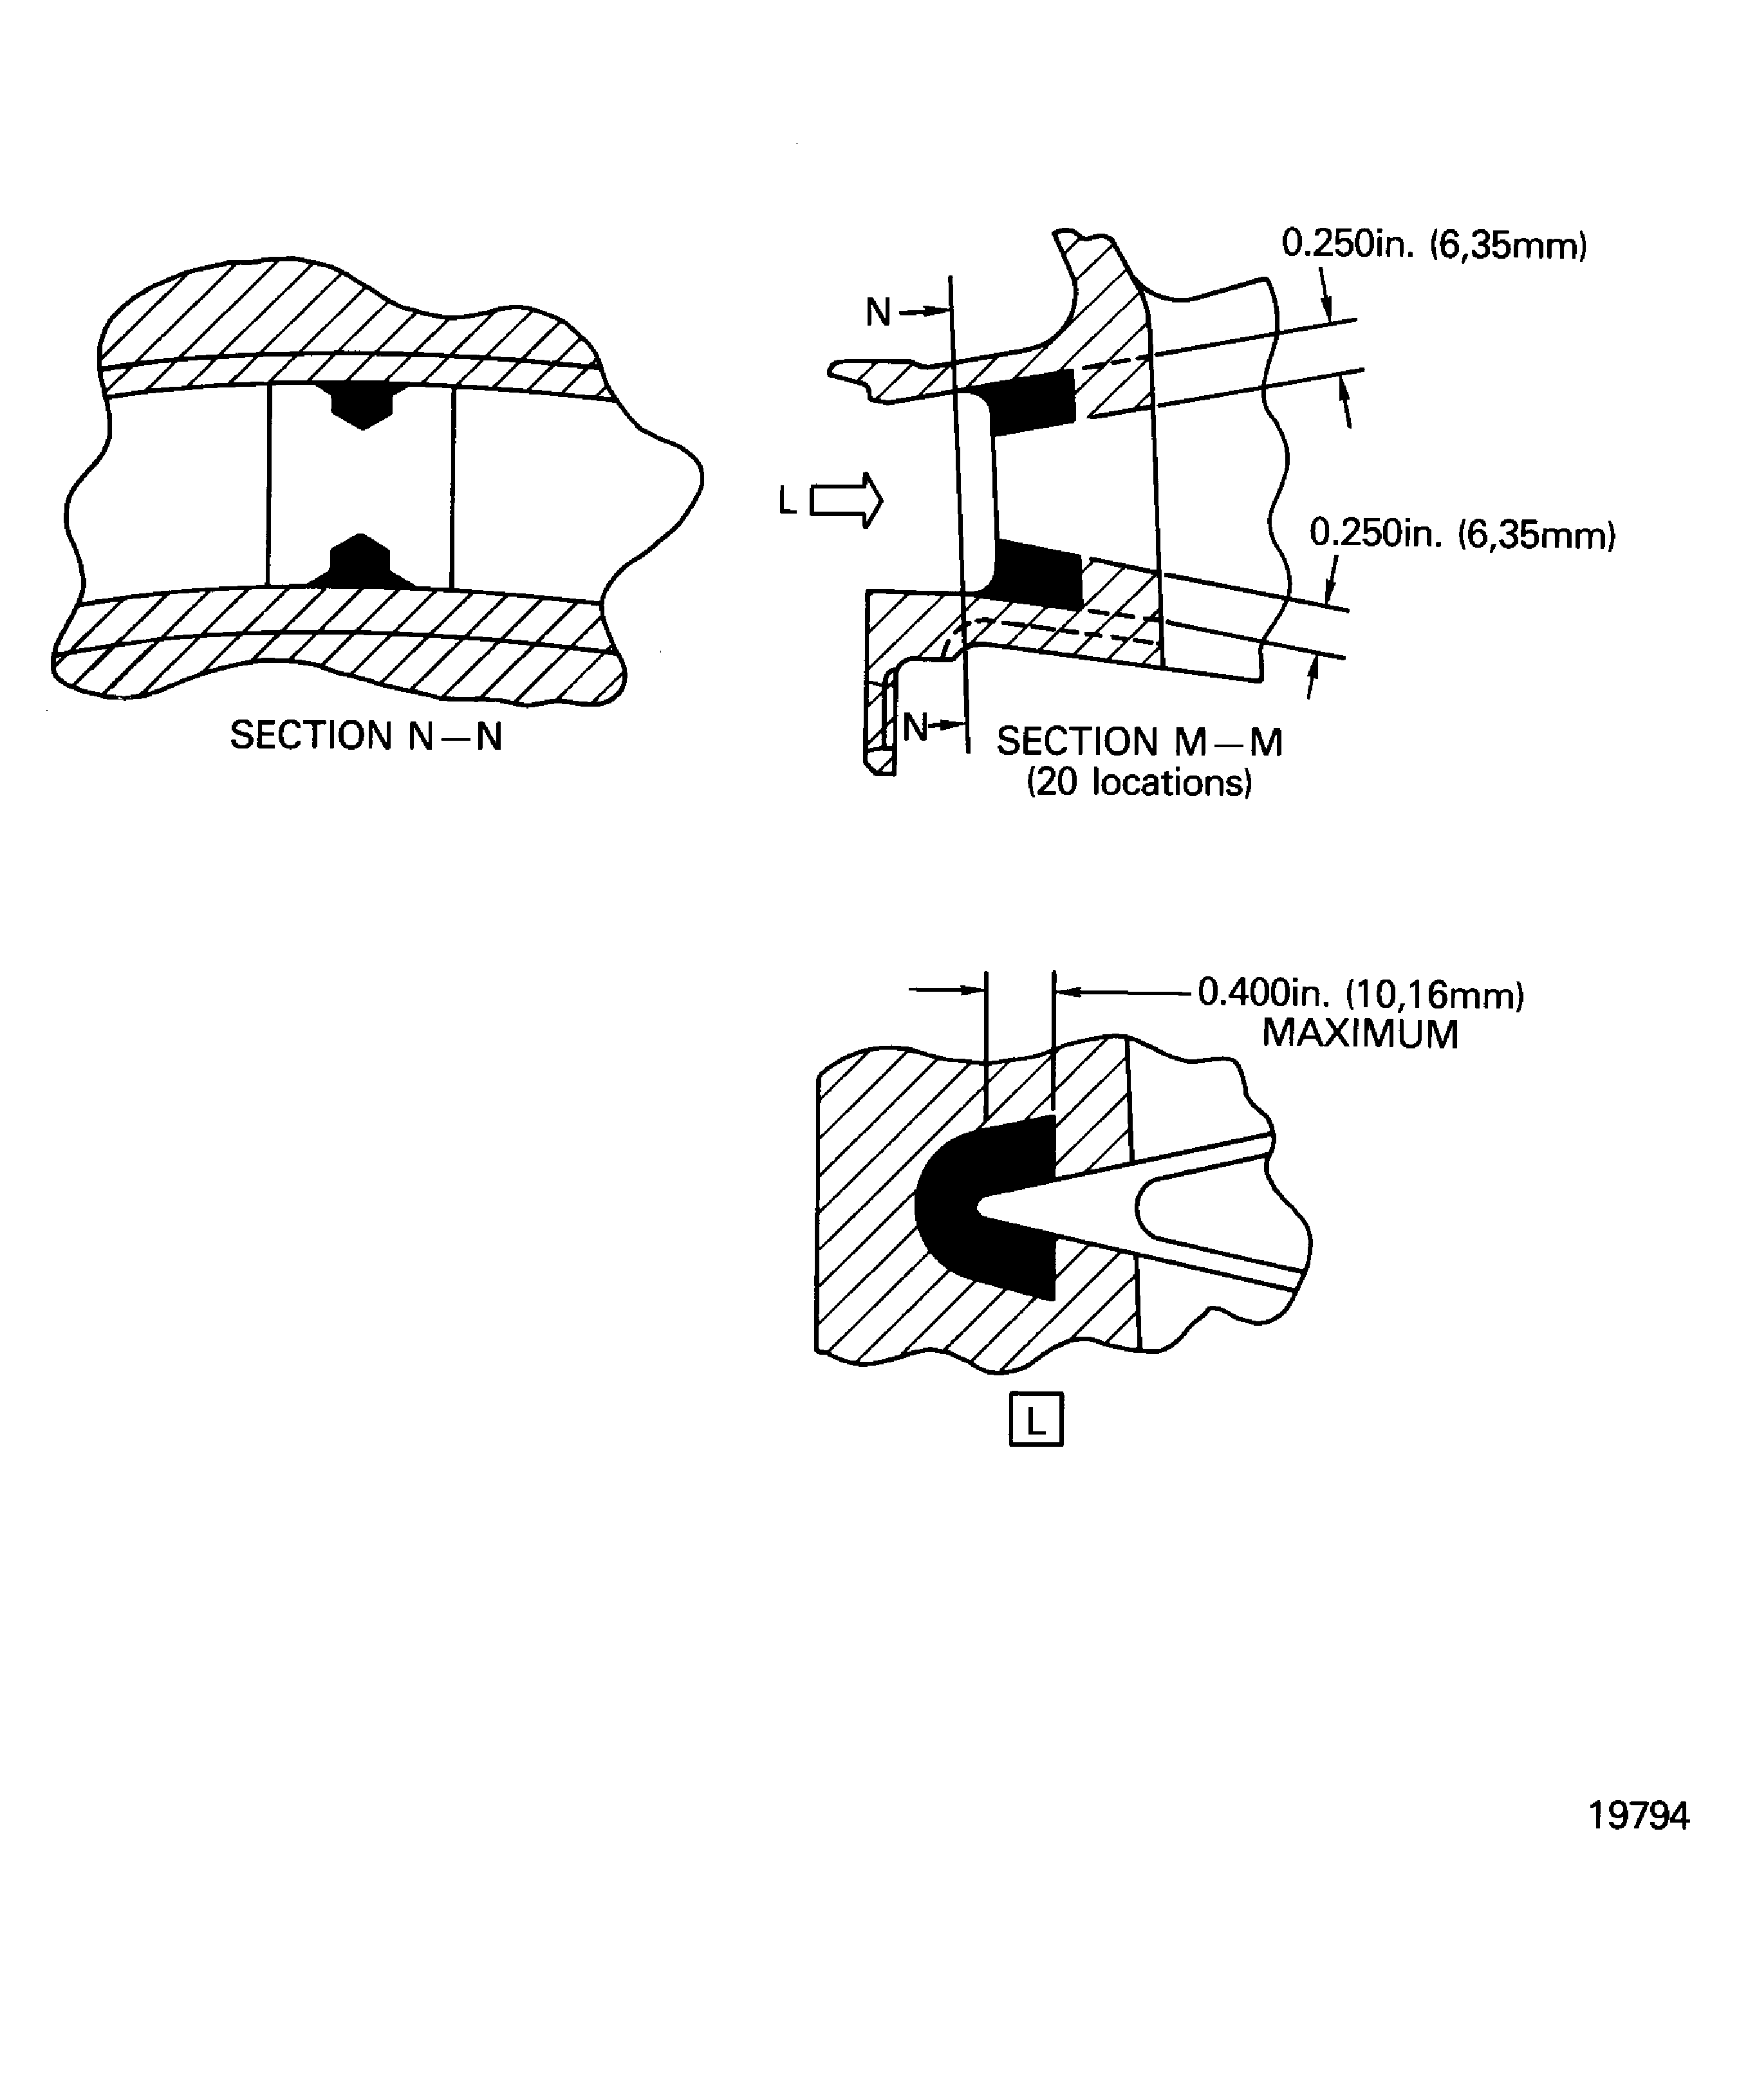
Figure: Diffuser Case Assembly Inspection Locations
Diffuser Case Assembly Inspection Locations
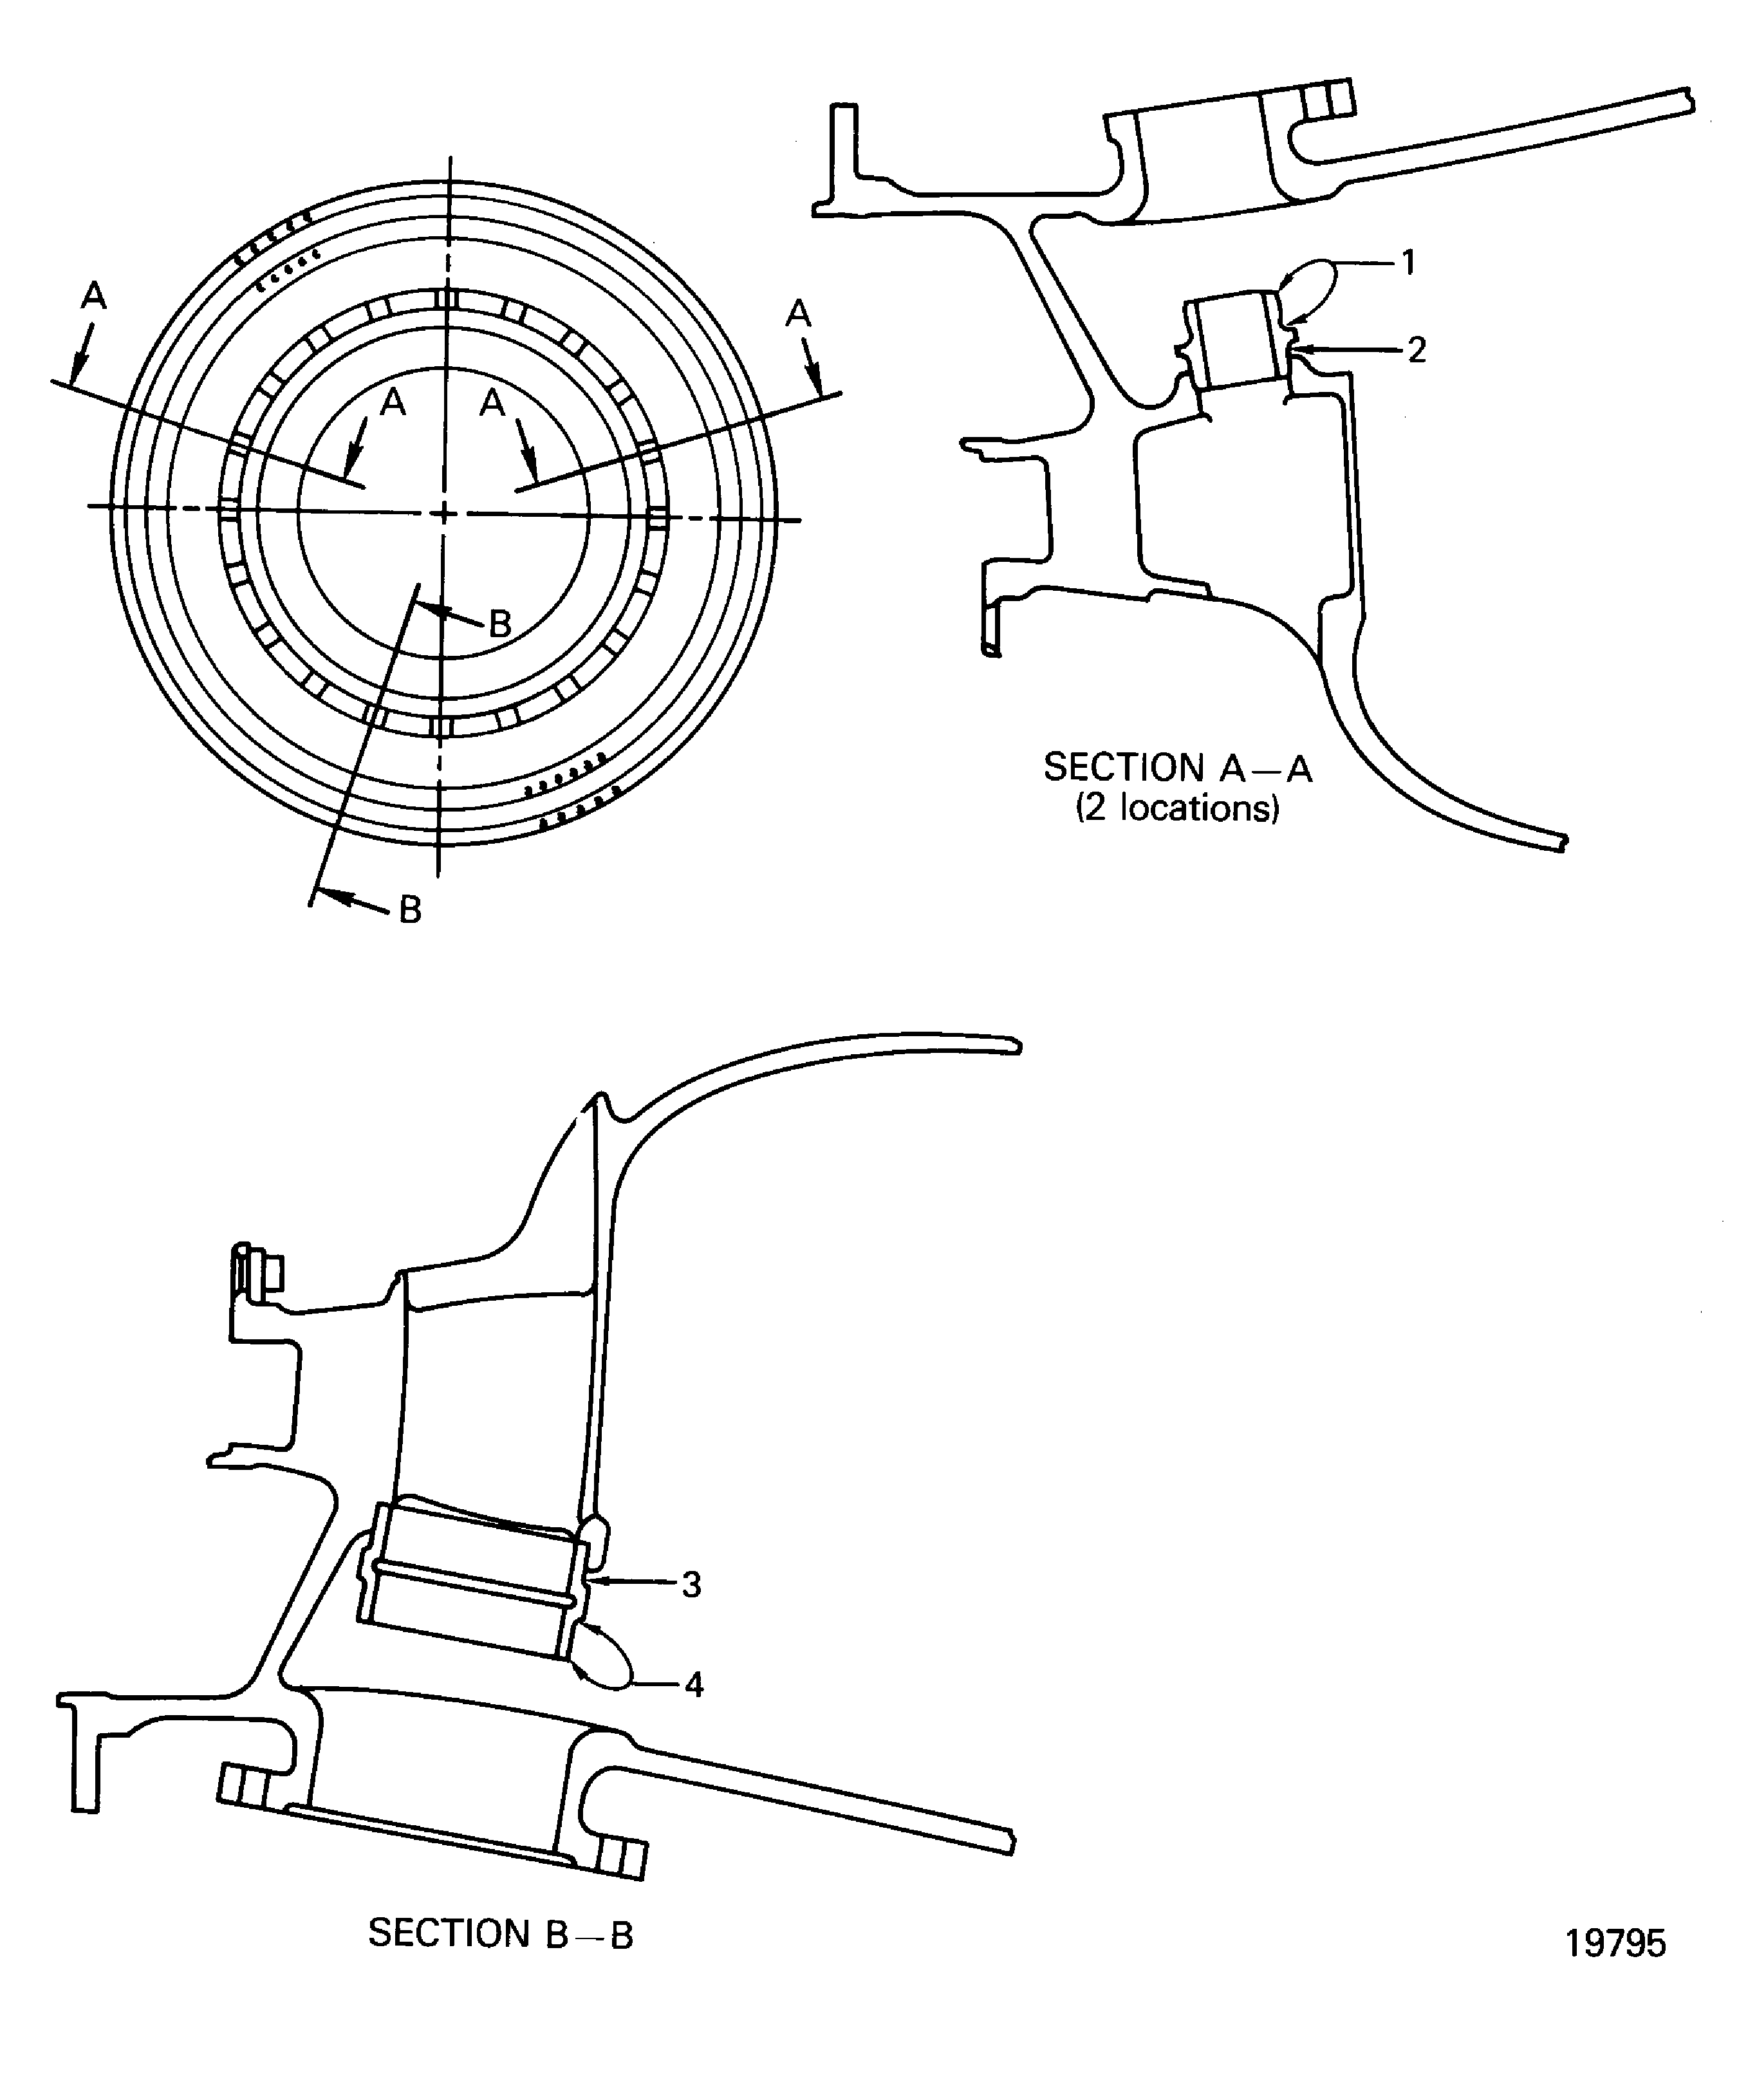
Figure: Diffuser Case Assembly Inspection Locations
Sheet 1
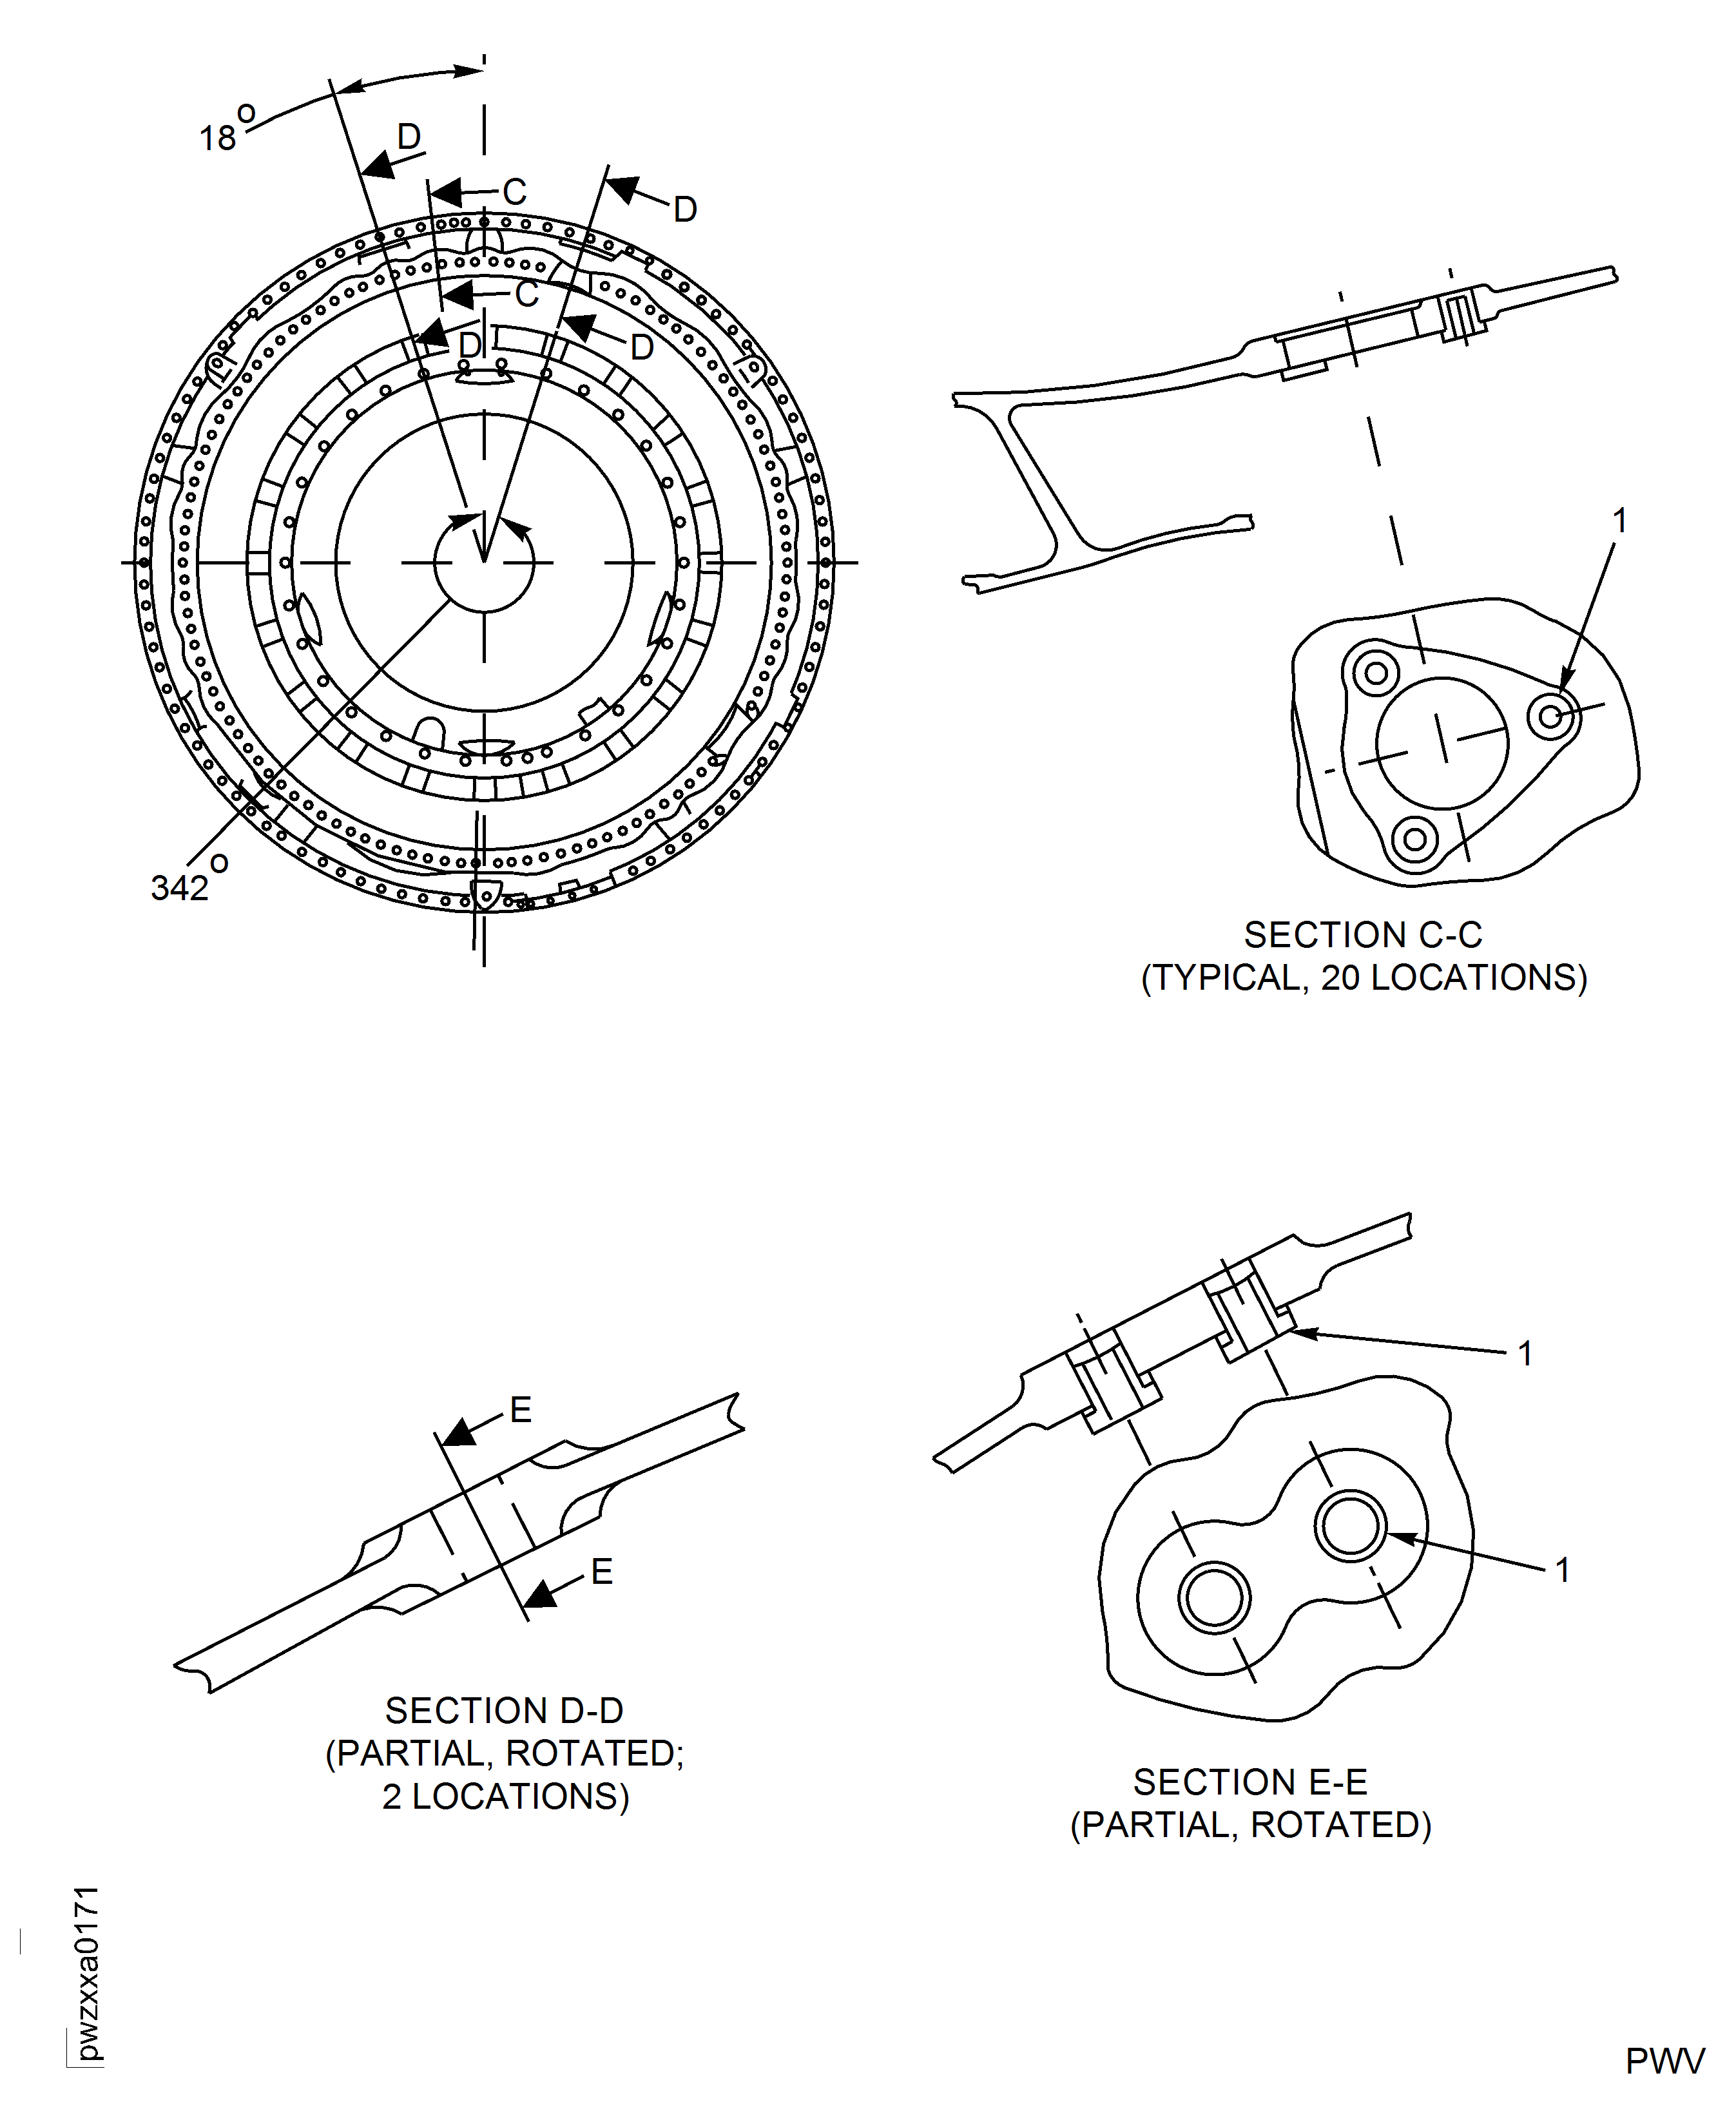
Figure: Diffuser Case Assembly Inspection Locations
Sheet 2
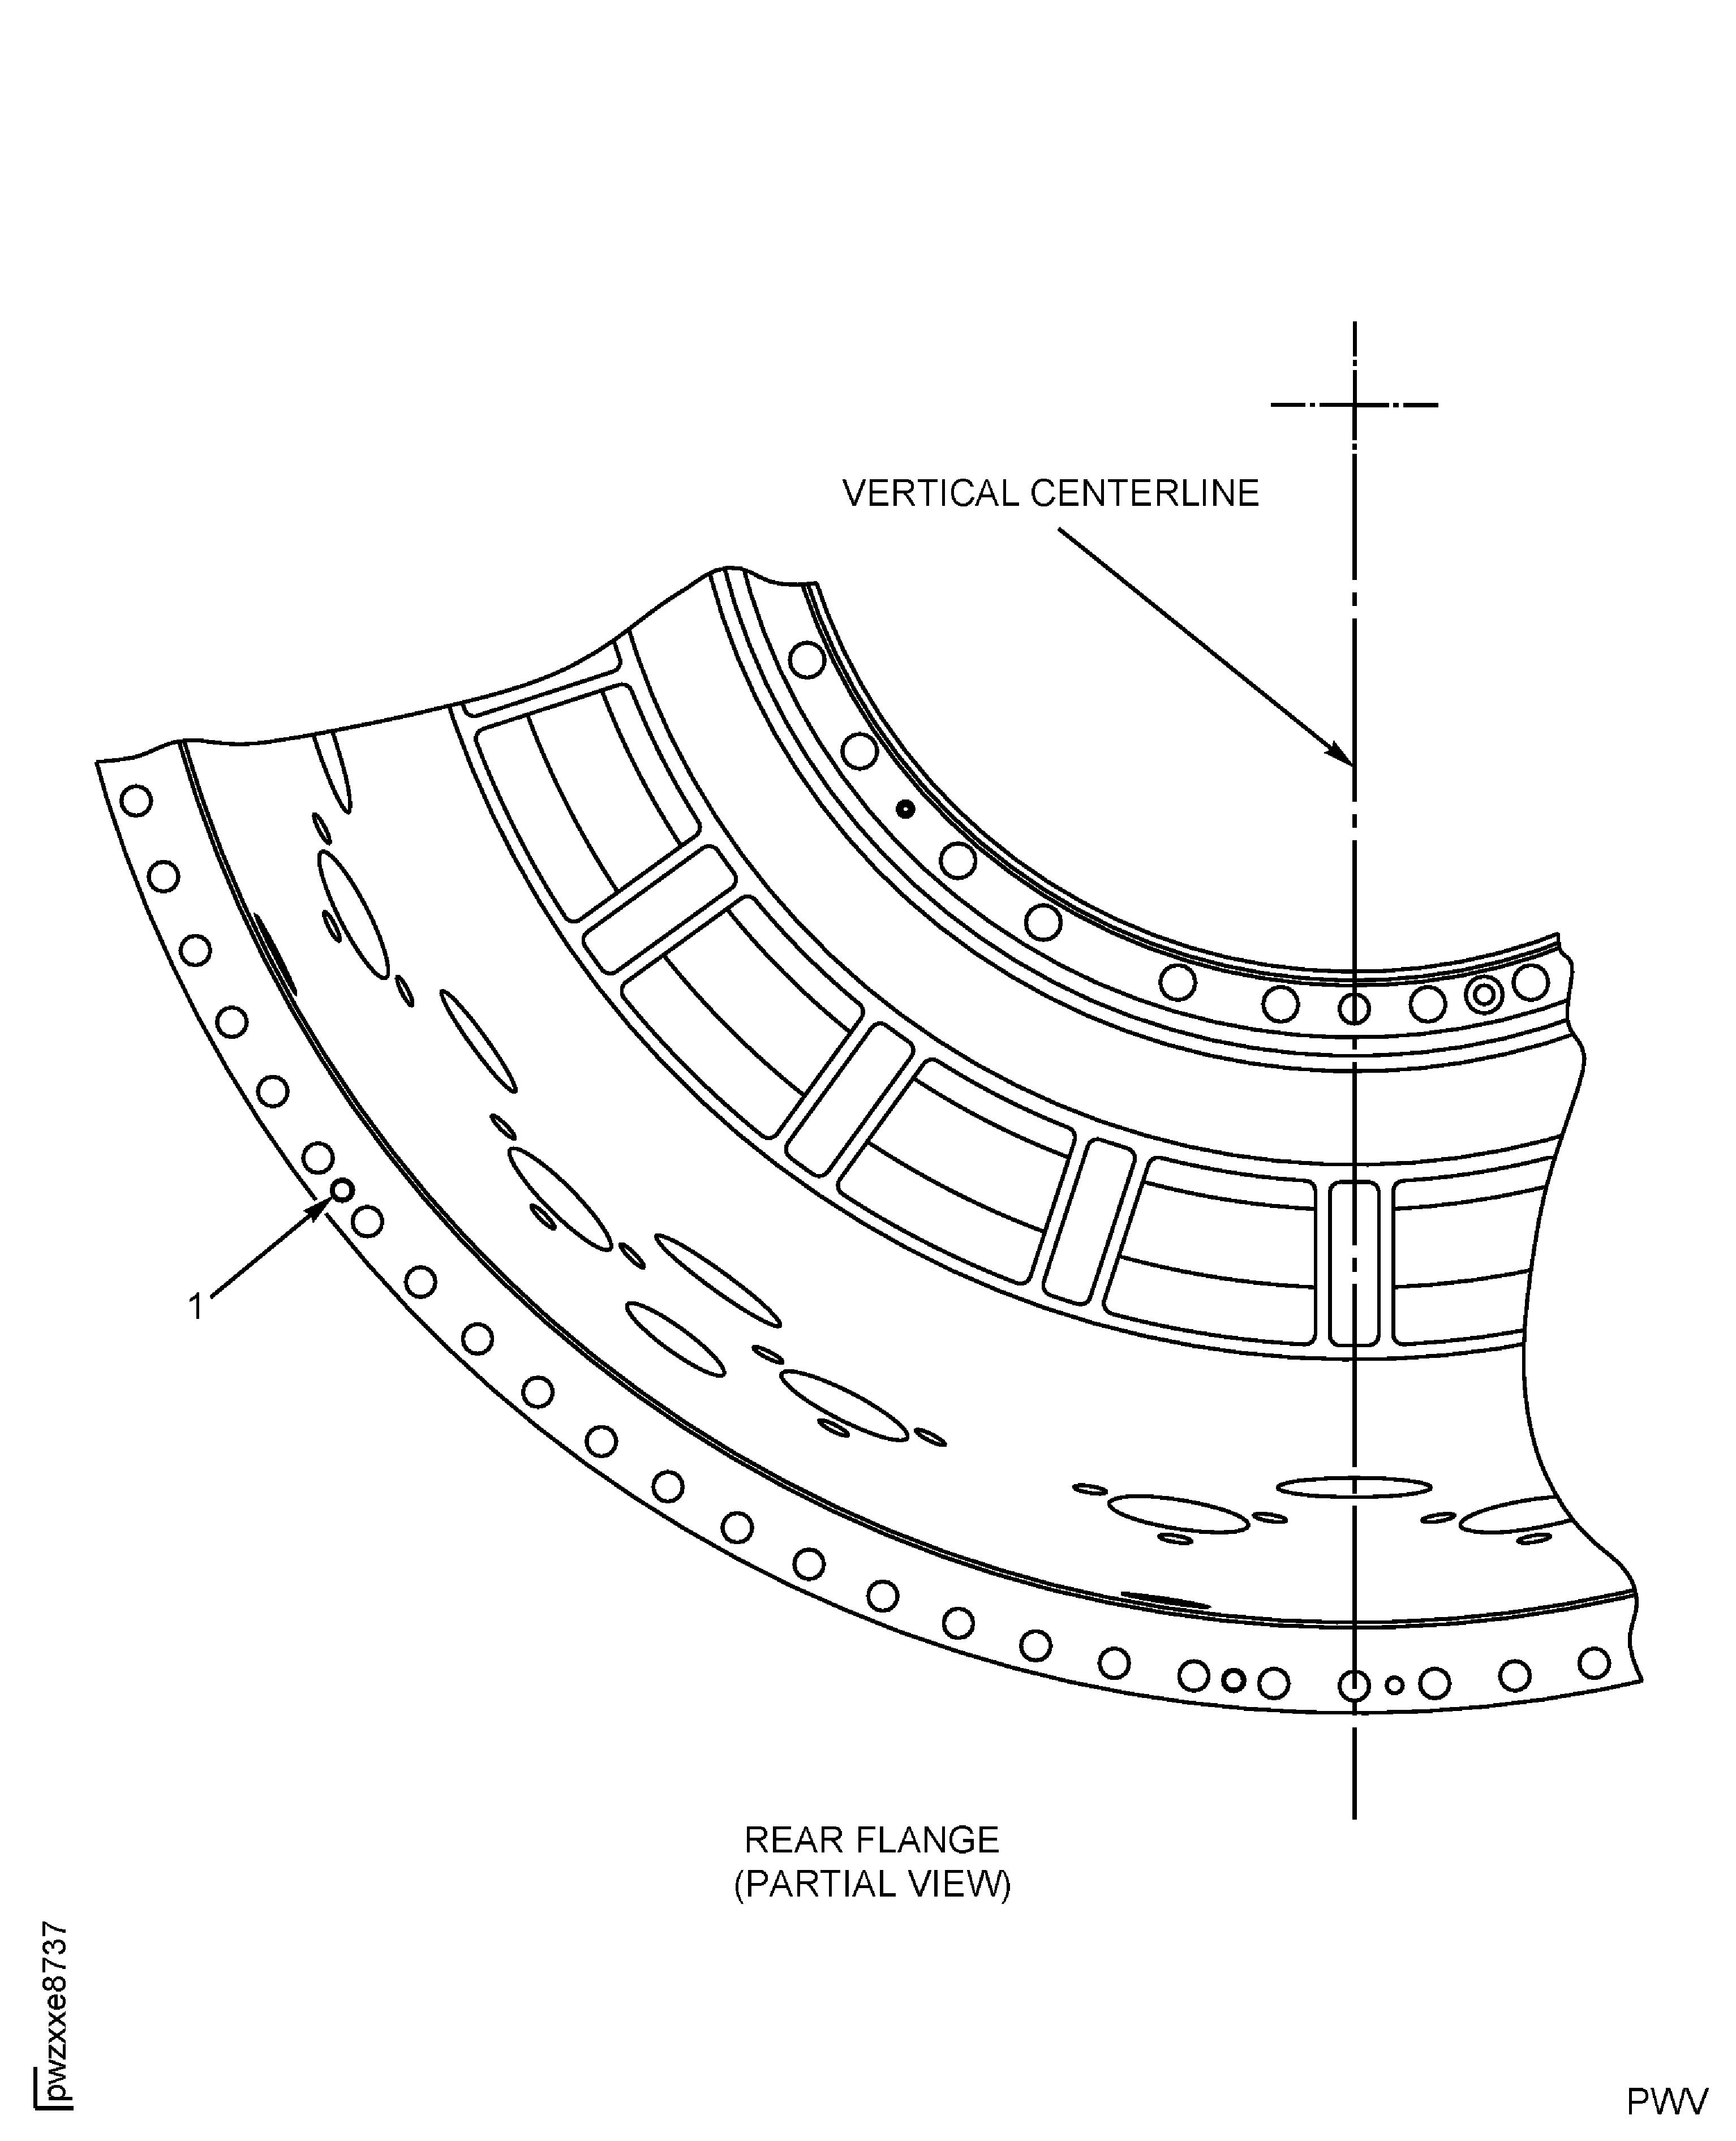
Figure: Diffuser Case Assembly Inspection Locations
Diffuser Case Assembly Inspection Locations
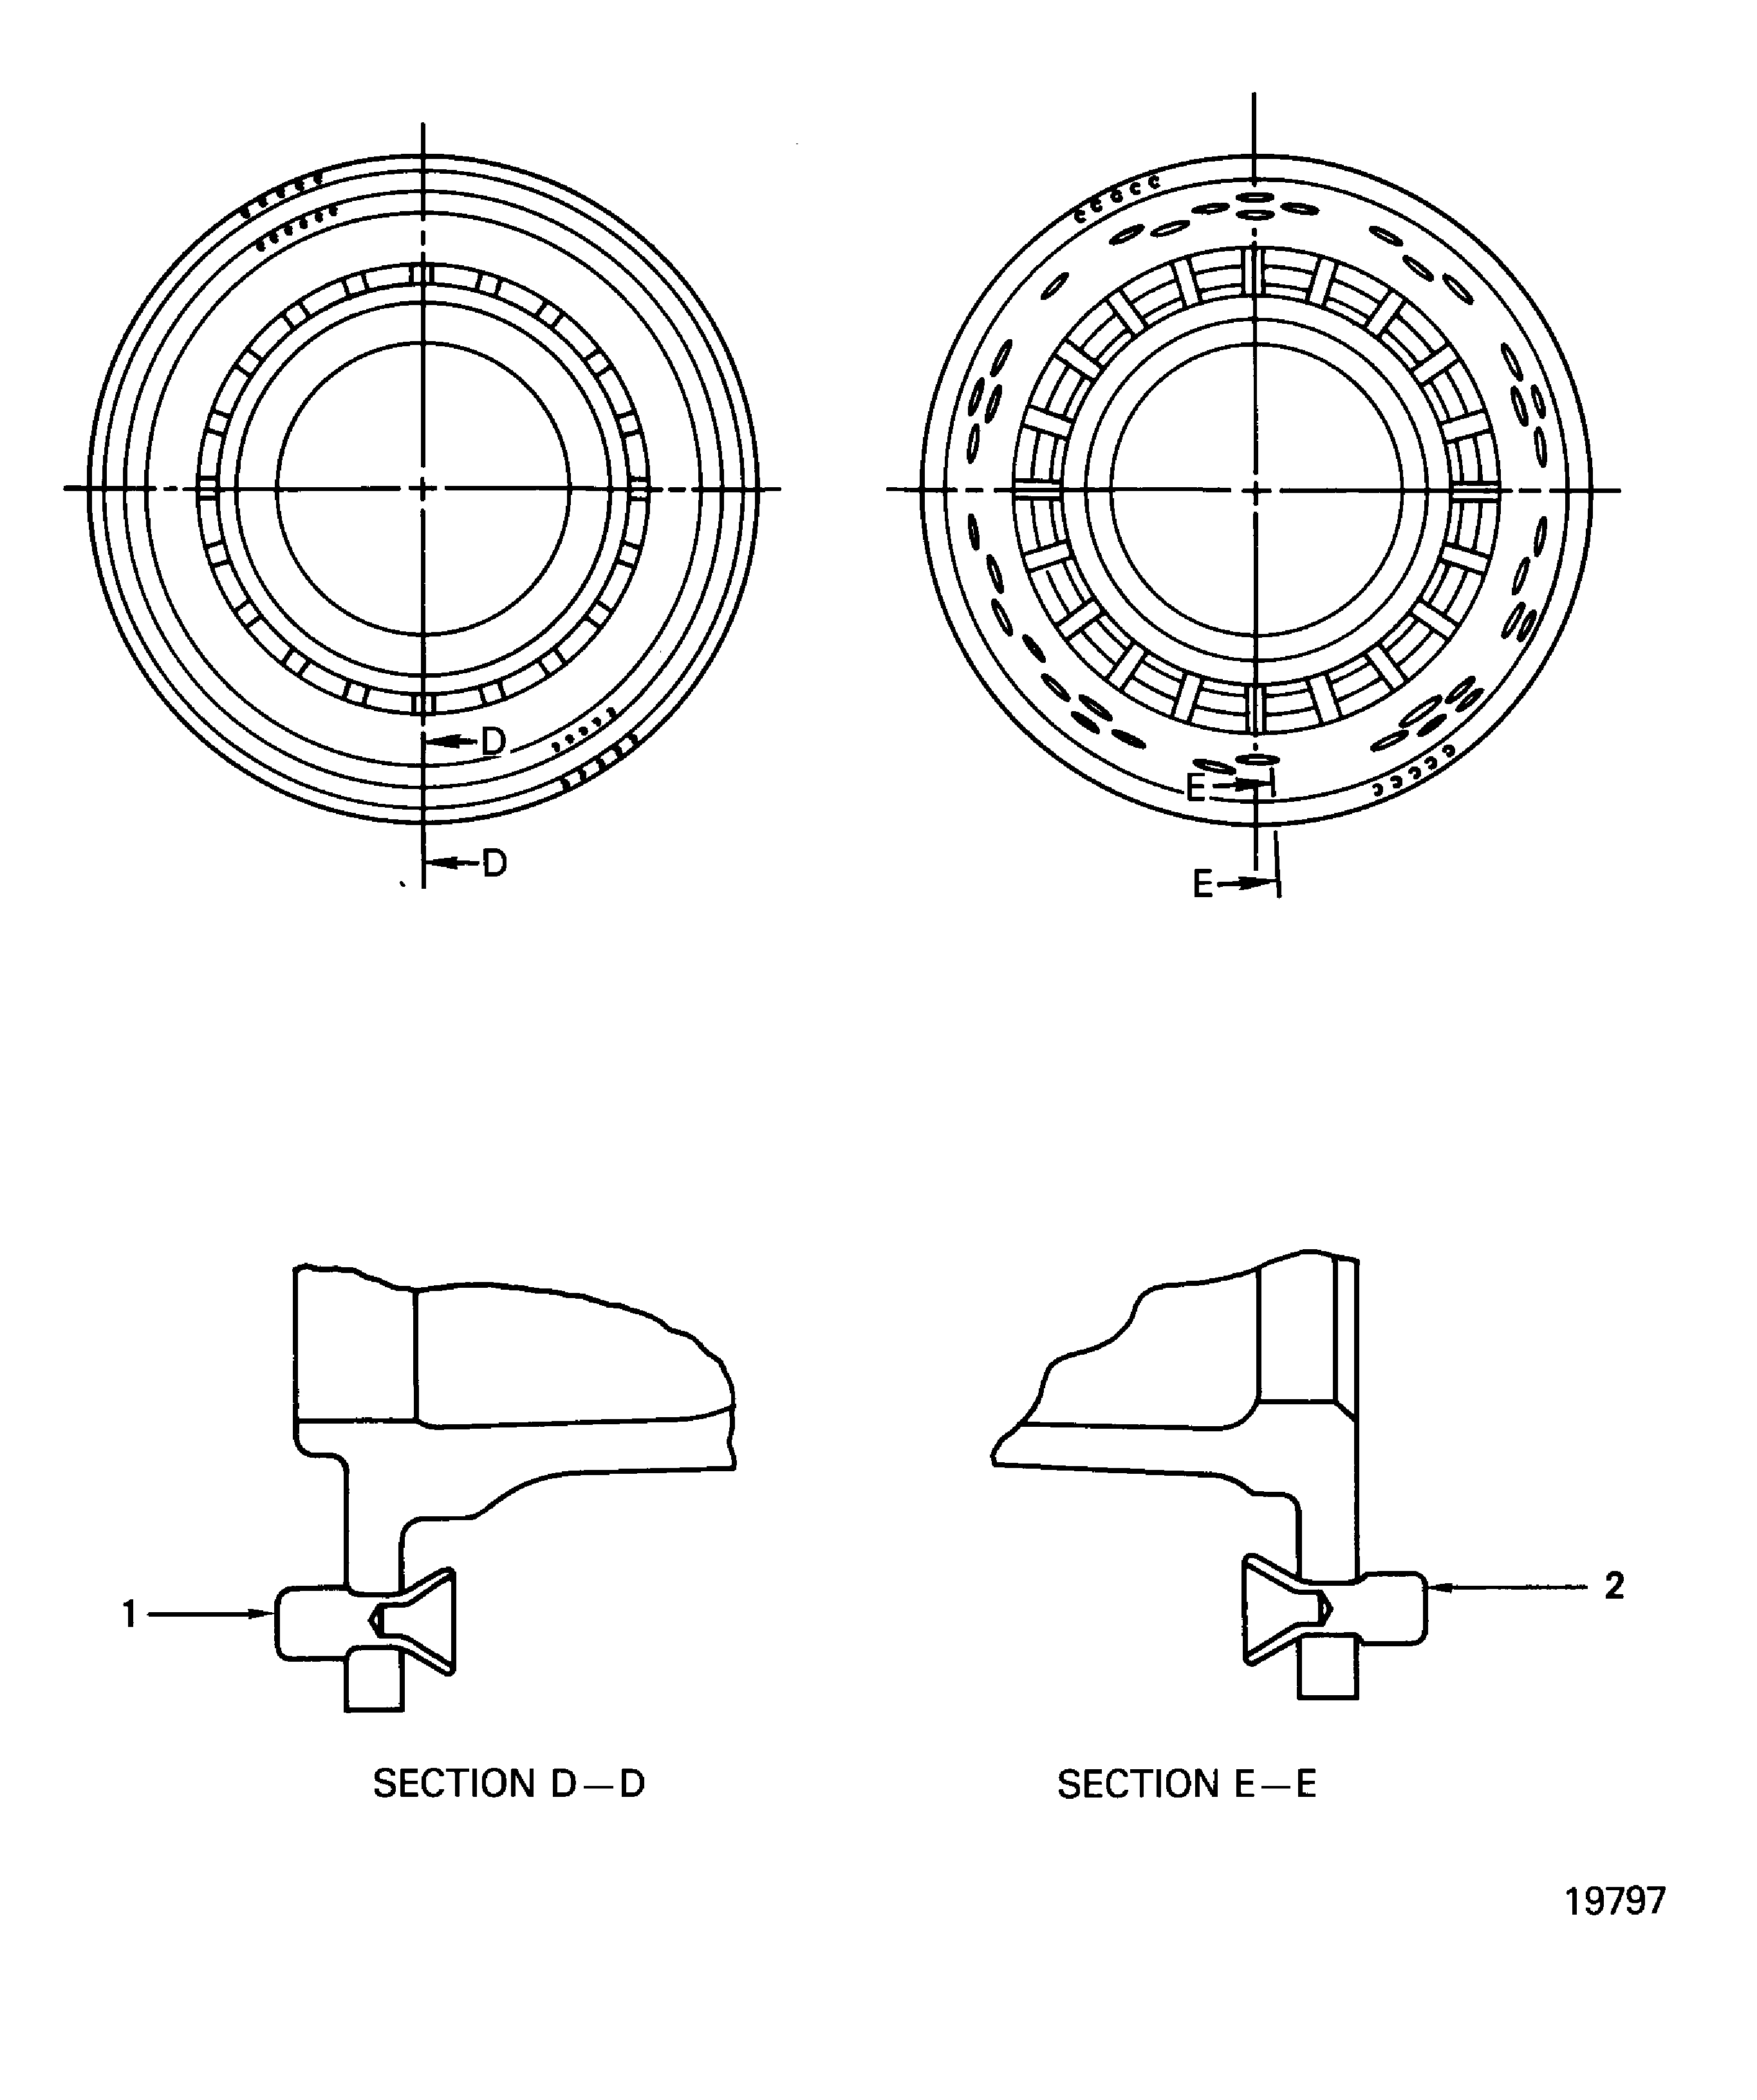
Figure: Diffuser Case Assembly Inspection Locations
Diffuser Case Assembly Inspection Locations

Figure: Diffuser Case Assembly Inspection Locations
Diffuser Case Assembly Inspection Locations
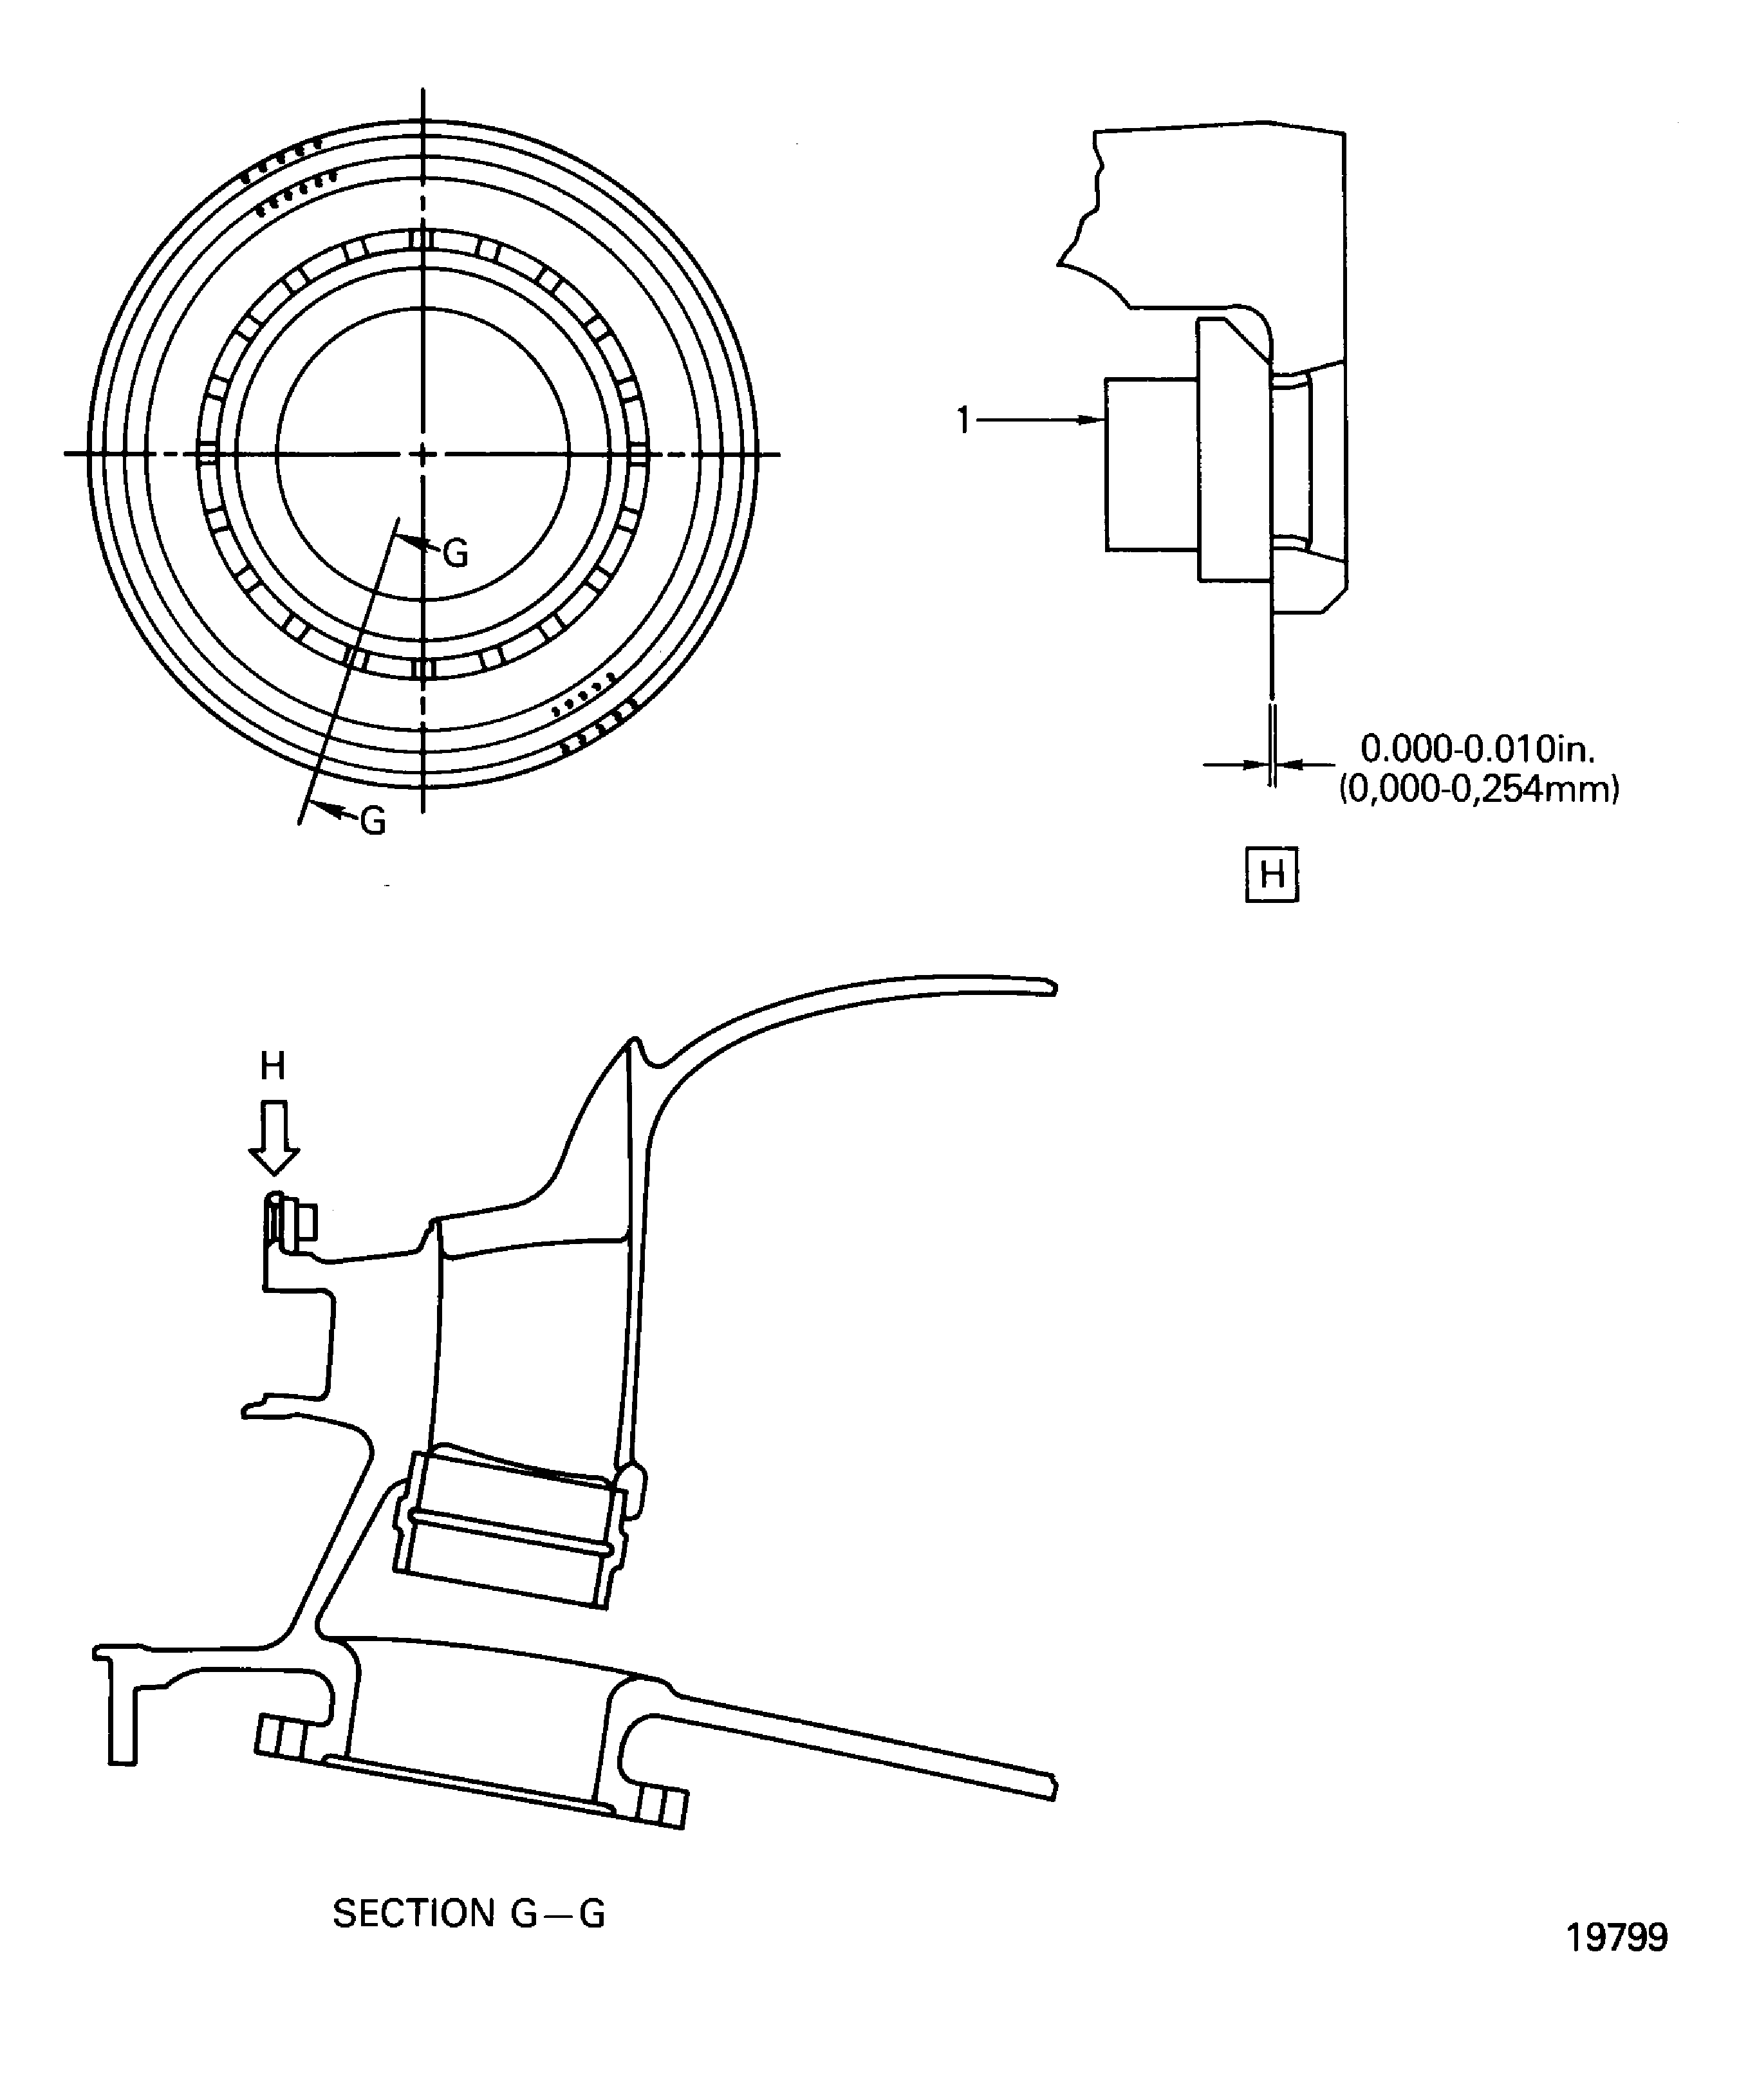
Figure: Diffuser Case Assembly Inspection Locations
Diffuser Case Assembly Inspection Locations
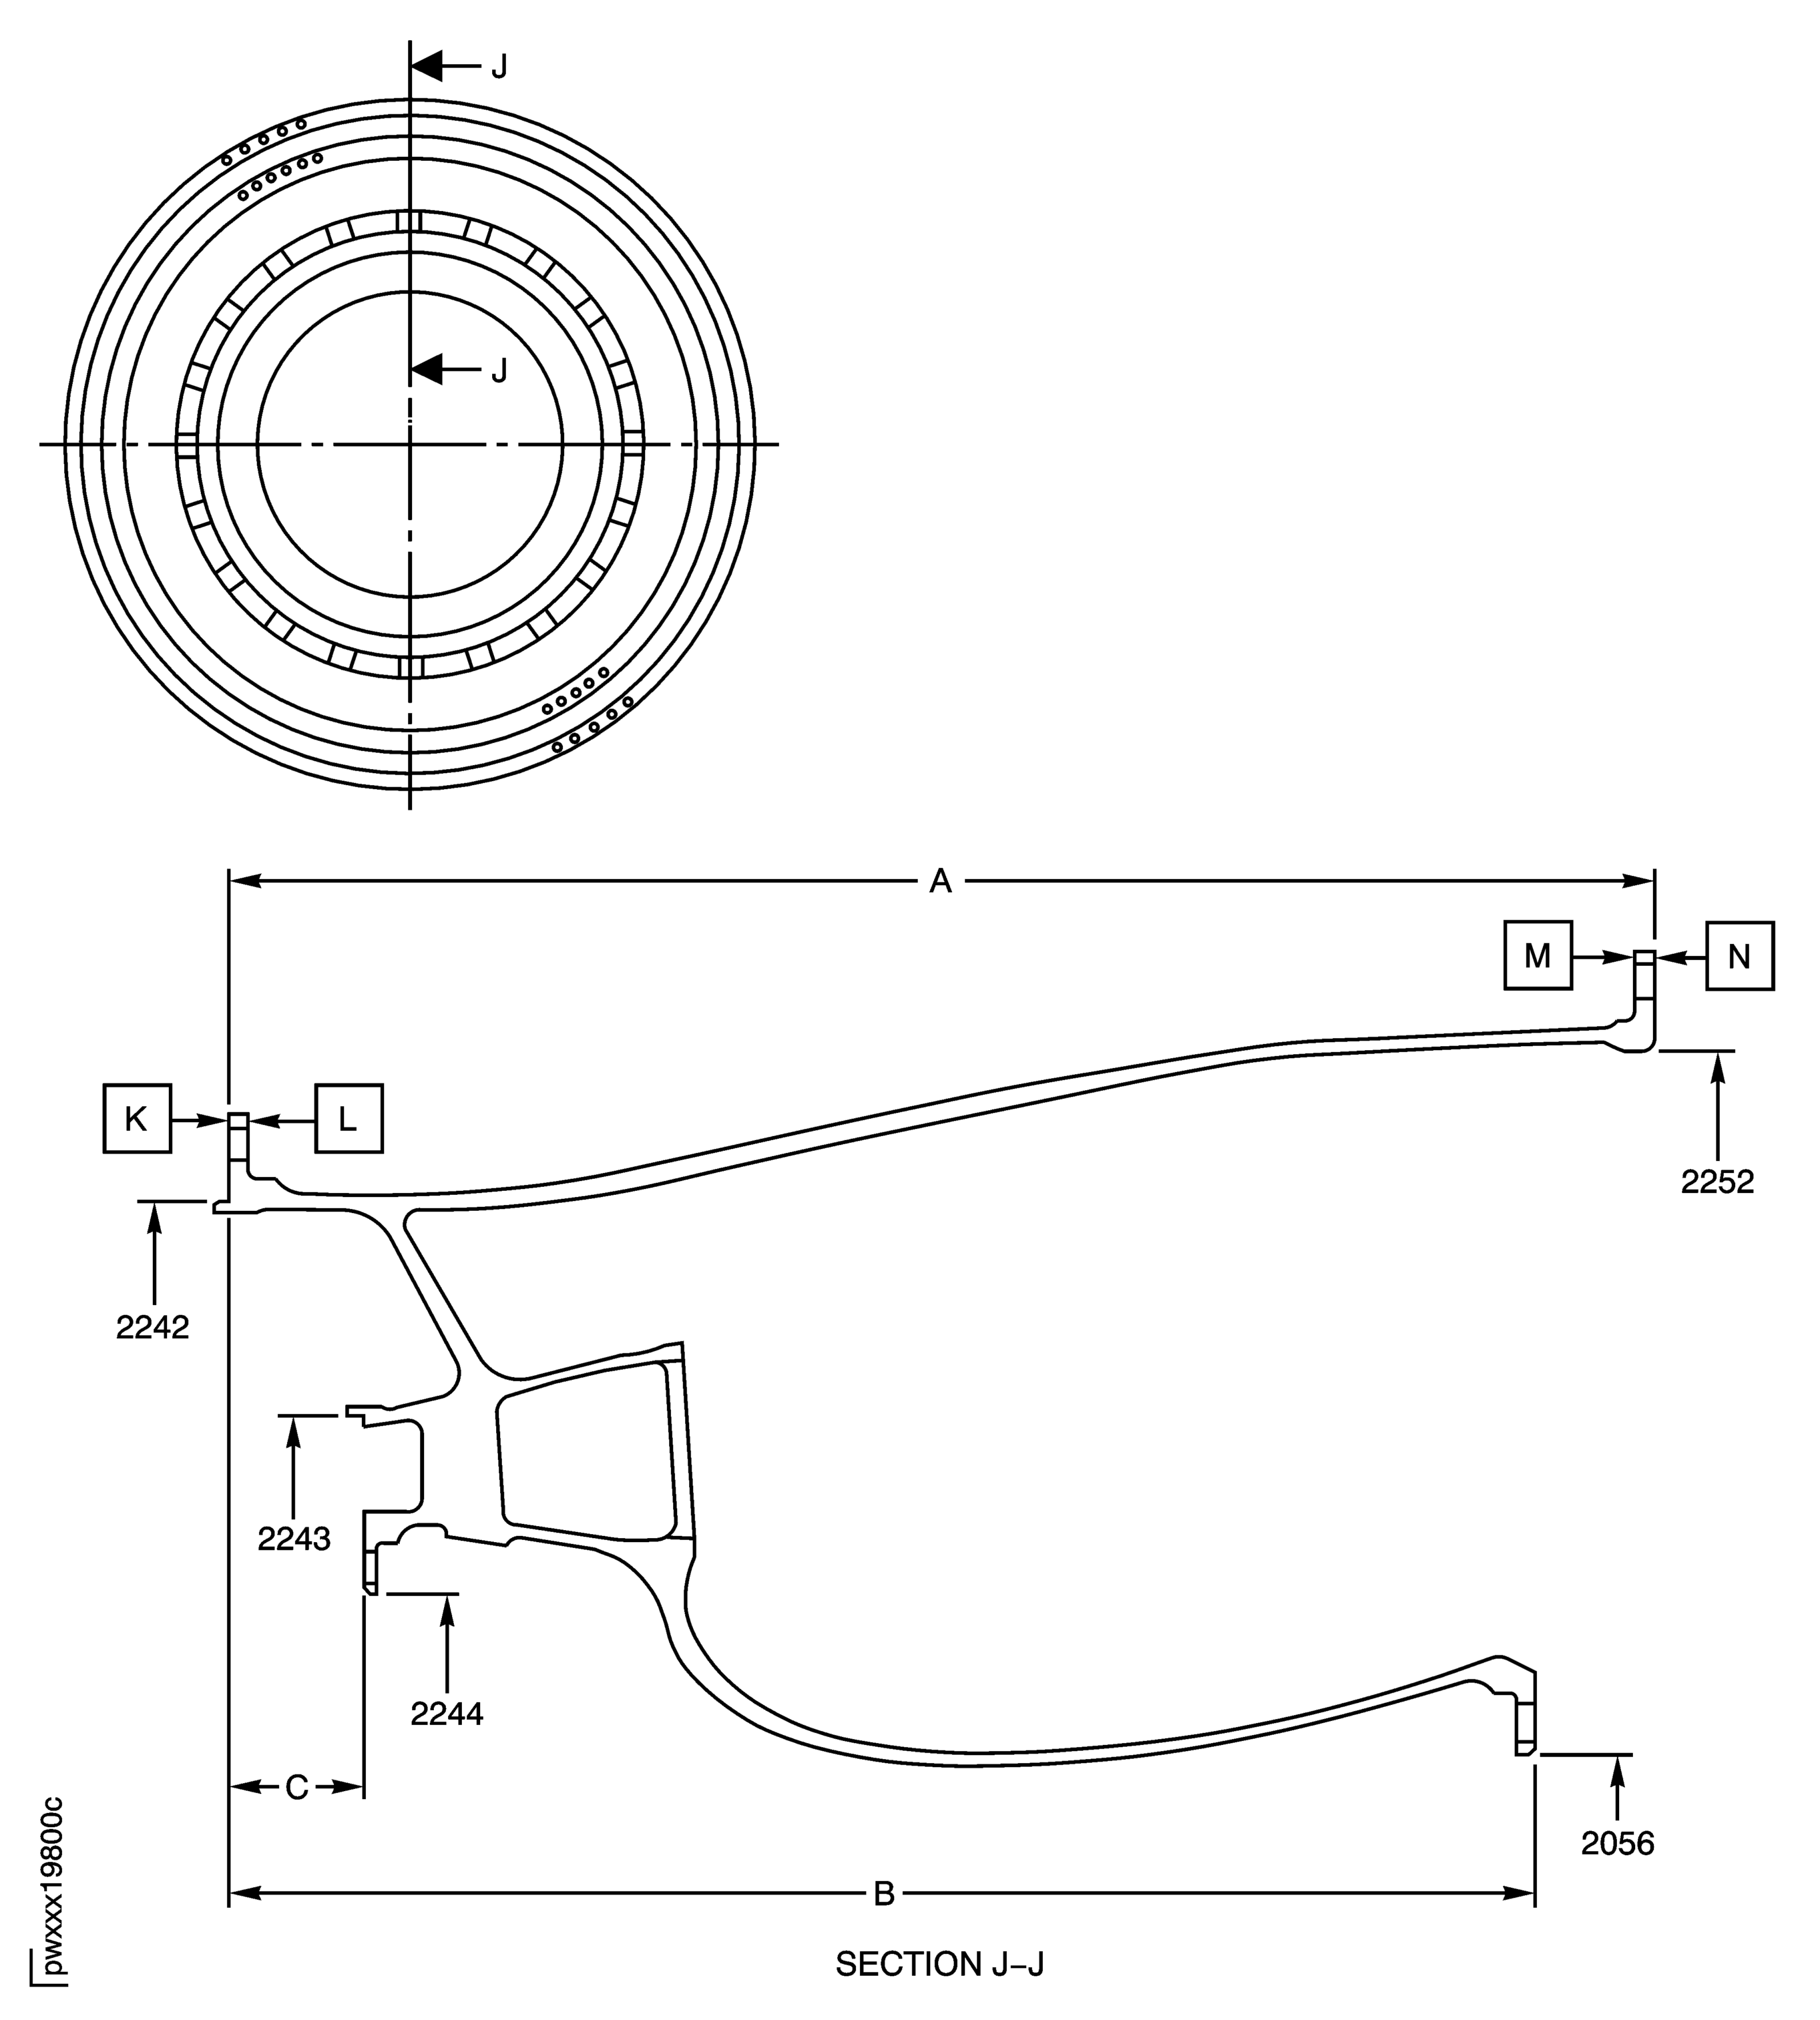
Figure: Diffuser Case Assembly Inspection Locations
Diffuser Case Assembly Inspection Locations
