Export Control
EAR Export Classification: Not subject to the EAR per 15 C.F.R. Chapter 1, Part 734.3(b)(3), except for the following Service Bulletins which are currently published as EAR Export Classification 9E991: SBE70-0992, SBE72-0483, SBE72-0580, SBE72-0588, SBE72-0640, SBE73-0209, SBE80-0024 and SBE80-0025.Copyright
© IAE International Aero Engines AG (2001, 2014 - 2021) The information contained in this document is the property of © IAE International Aero Engines AG and may not be copied or used for any purpose other than that for which it is supplied without the express written authority of © IAE International Aero Engines AG. (This does not preclude use by engine and aircraft operators for normal instructional, maintenance or overhaul purposes.).Applicability
All
Common Information
TASK 72-50-53-200-003-B00 Turbine Exhaust Case (TEC) - Examine, Inspection-003
Effectivity
FIG/ITEM | PART NO. |
|---|---|
21-300 | 2A1209-01 |
21-300 | 2A2620-01 |
21-300 | 2A3111-01 |
21-300 | 2A3183-01 |
21-300 | 2A3183-101 |
21-300 | 2A3455-01 |
21-300 | 2A4258-01 |
21-300 | 2A4263-01 |
General
This TASK gives the procedure for the inspection of the turbine exhaust case assembly. For the other parts of the exhaust case and fittings, refer to TASK 72-50-53-200-000 (INSPECTION-000).
Fig/item numbers in parentheses in the procedure agree with those used in the IPC.
The policy that is necessary for inspection is given in SPM TASK 70-20-00-200-501.
All the parts must be cleaned before any part is examined. Refer to SPM TASK 70-10-00-100-501.
If the instrumentation bushing, PN 2A2165 (21-200), is not loose, inspection of the Turbine Exhaust Case is permitted with the instrumentation bushing in position.
Alternate datum to Surfaces X and Z are available. Refer to Figure.
All parts must be visually examined for damage, corrosion and wear. Any defects that are not identified in the procedure must be referred to IAE.
The procedure for those parts which must have a crack test is given in Step. Do the test before the part is visually examined.
A ** following a repair referenced in this inspection indicates that the repair is not yet published in the current revision of the manual and the part must be rejected. Contact IAE for additional information concerning FAA approved repair date.
Do not discard any part until you are sure there are no repairs available. Refer to the instruction in repair before a discarded part is used again or oversize parts are installed.
Parts which should be discarded can be held although no repair is available. The repair of a discarded part could be shown to be necessary at a later date.
All parts must be examined to make sure that all the repair have been completed satisfactorily.
The practices and processes referred to in the procedure by the TASK numbers are in SPM.
References
Refer to SPM for data on these items.
Definitions of Damage, SPM TASK 70-02-02-350-501.
Record and Control of the Lives of Parts, SPM TASK 70-05-00-220-501.
Inspection of Parts, SPM TASK 70-20-00-200-501.
Some data on these items is contained in this TASK. For more data on these items refer to SPM.
Methods of Testing for Crack Indications.
Chemical Processes.
Preliminary Requirements
Pre-Conditions
NONESupport Equipment
NONEConsumables, Materials and Expendables
| Name | Manufacturer | Part Number / Identification | Quantity | Remark |
|---|---|---|---|---|
| DELETED | LOCAL | DELETED |
Spares
NONESafety Requirements
NONEProcedure
Refer to Figure.
Clean the part. Refer to TASK 72-50-53-100-000 (CLEANING-000).
Repair, VRS3522 TASK 72-50-53-300-073 (REPAIR-073) or Repair, VRS3064 TASK 72-50-53-300-048 (REPAIR-048).
Not more than two strut airfoil cracks that are not more than 0.500 in. (12.70 mm) each in length. Cracks must be separated by a minimum of 2.00 in. (50.8 mm). Cracks on solid leading edges of instrumented struts are not permitted.
Repair, VRS3641 TASK 72-50-53-300-074 (REPAIR-074) or Repair, VRS3064 TASK 72-50-53-300-048 (REPAIR-048).
Strut trailing edge cracks not more than 6.00 in. (152.4 mm) in length.
Repair, VRS3522 TASK 72-50-53-300-073 (REPAIR-073).
U-shaped cracks around the trailing edge strut stand-ups not more than 1.000 in. (25.40 mm) per side. Cracks must be non-linear and a minimum of 1.000 in. (25.40 mm) from the rear flange.
Repair, VRS3522 TASK 72-50-53-300-073 (REPAIR-073).
R Rail load share attachment boss cracks (R Rail only), VRS3849 TASK 72-50-53-300-090 (REPAIR-090).
Outer case cracks not more than 1.000 in. (25.40 mm) in length. Cracks must be a minimum 2.500 in. (63.50 mm) from the front flange and a minimum of 1.000 in. (25.40 mm) from the rear flange. Cracks must not be on or between the upper stiffening rails. Only outboard strap cracks on the R Rail load share attachment are repairable.
Repair, VRS3522 TASK 72-50-53-300-073 (REPAIR-073).
Inner case cracks not more than 1.000 in. (25.40 mm) in length. Cracks must not be more than 1.300 in. (33.02 mm) from forward edge of inner case wall.
Repair, VRS3522 TASK 72-50-53-300-073 (REPAIR-073).
Cracks on the inner diameter and/or outer diameter weld bead of struts not more than 5.250 in. (133.35 mm) in length.
Repair, VRS3522 TASK 72-50-53-300-073 (REPAIR-073).
Strut cracks not more than 3.50 in. (88.9 mm) along the heat affected zone of the leading edge weld bead. Refer to Figure.
Repair, VRS3522 TASK 72-50-53-300-073 (REPAIR-073).
NOTE
Bolthole cracks which go into the case wall are not permitted.
Flange bolt hole cracks which go from bolthole to the flange outer diameter.
Repair, VRS3522 TASK 72-50-53-300-073 (REPAIR-073).
Inner cone weld seam cracks not more than 1.00 in. (25.4 mm). Cracks must be in the initial weld seams.
Repair, VRS3522 TASK 72-50-53-300-073 (REPAIR-073).
Rear inner flange cracks that are not more than 1.00 in. (25.4 mm) in length.
Repair, VRS3743 TASK 72-50-53-300-083 (REPAIR-083).
Strut airfoil cracks that are more than 0.50 in. (12.7 mm) in length. Cracks on solid leading edges of instrumented struts are not permitted.
Repair, VRS3849 TASK 72-50-53-300-090 (REPAIR-090).
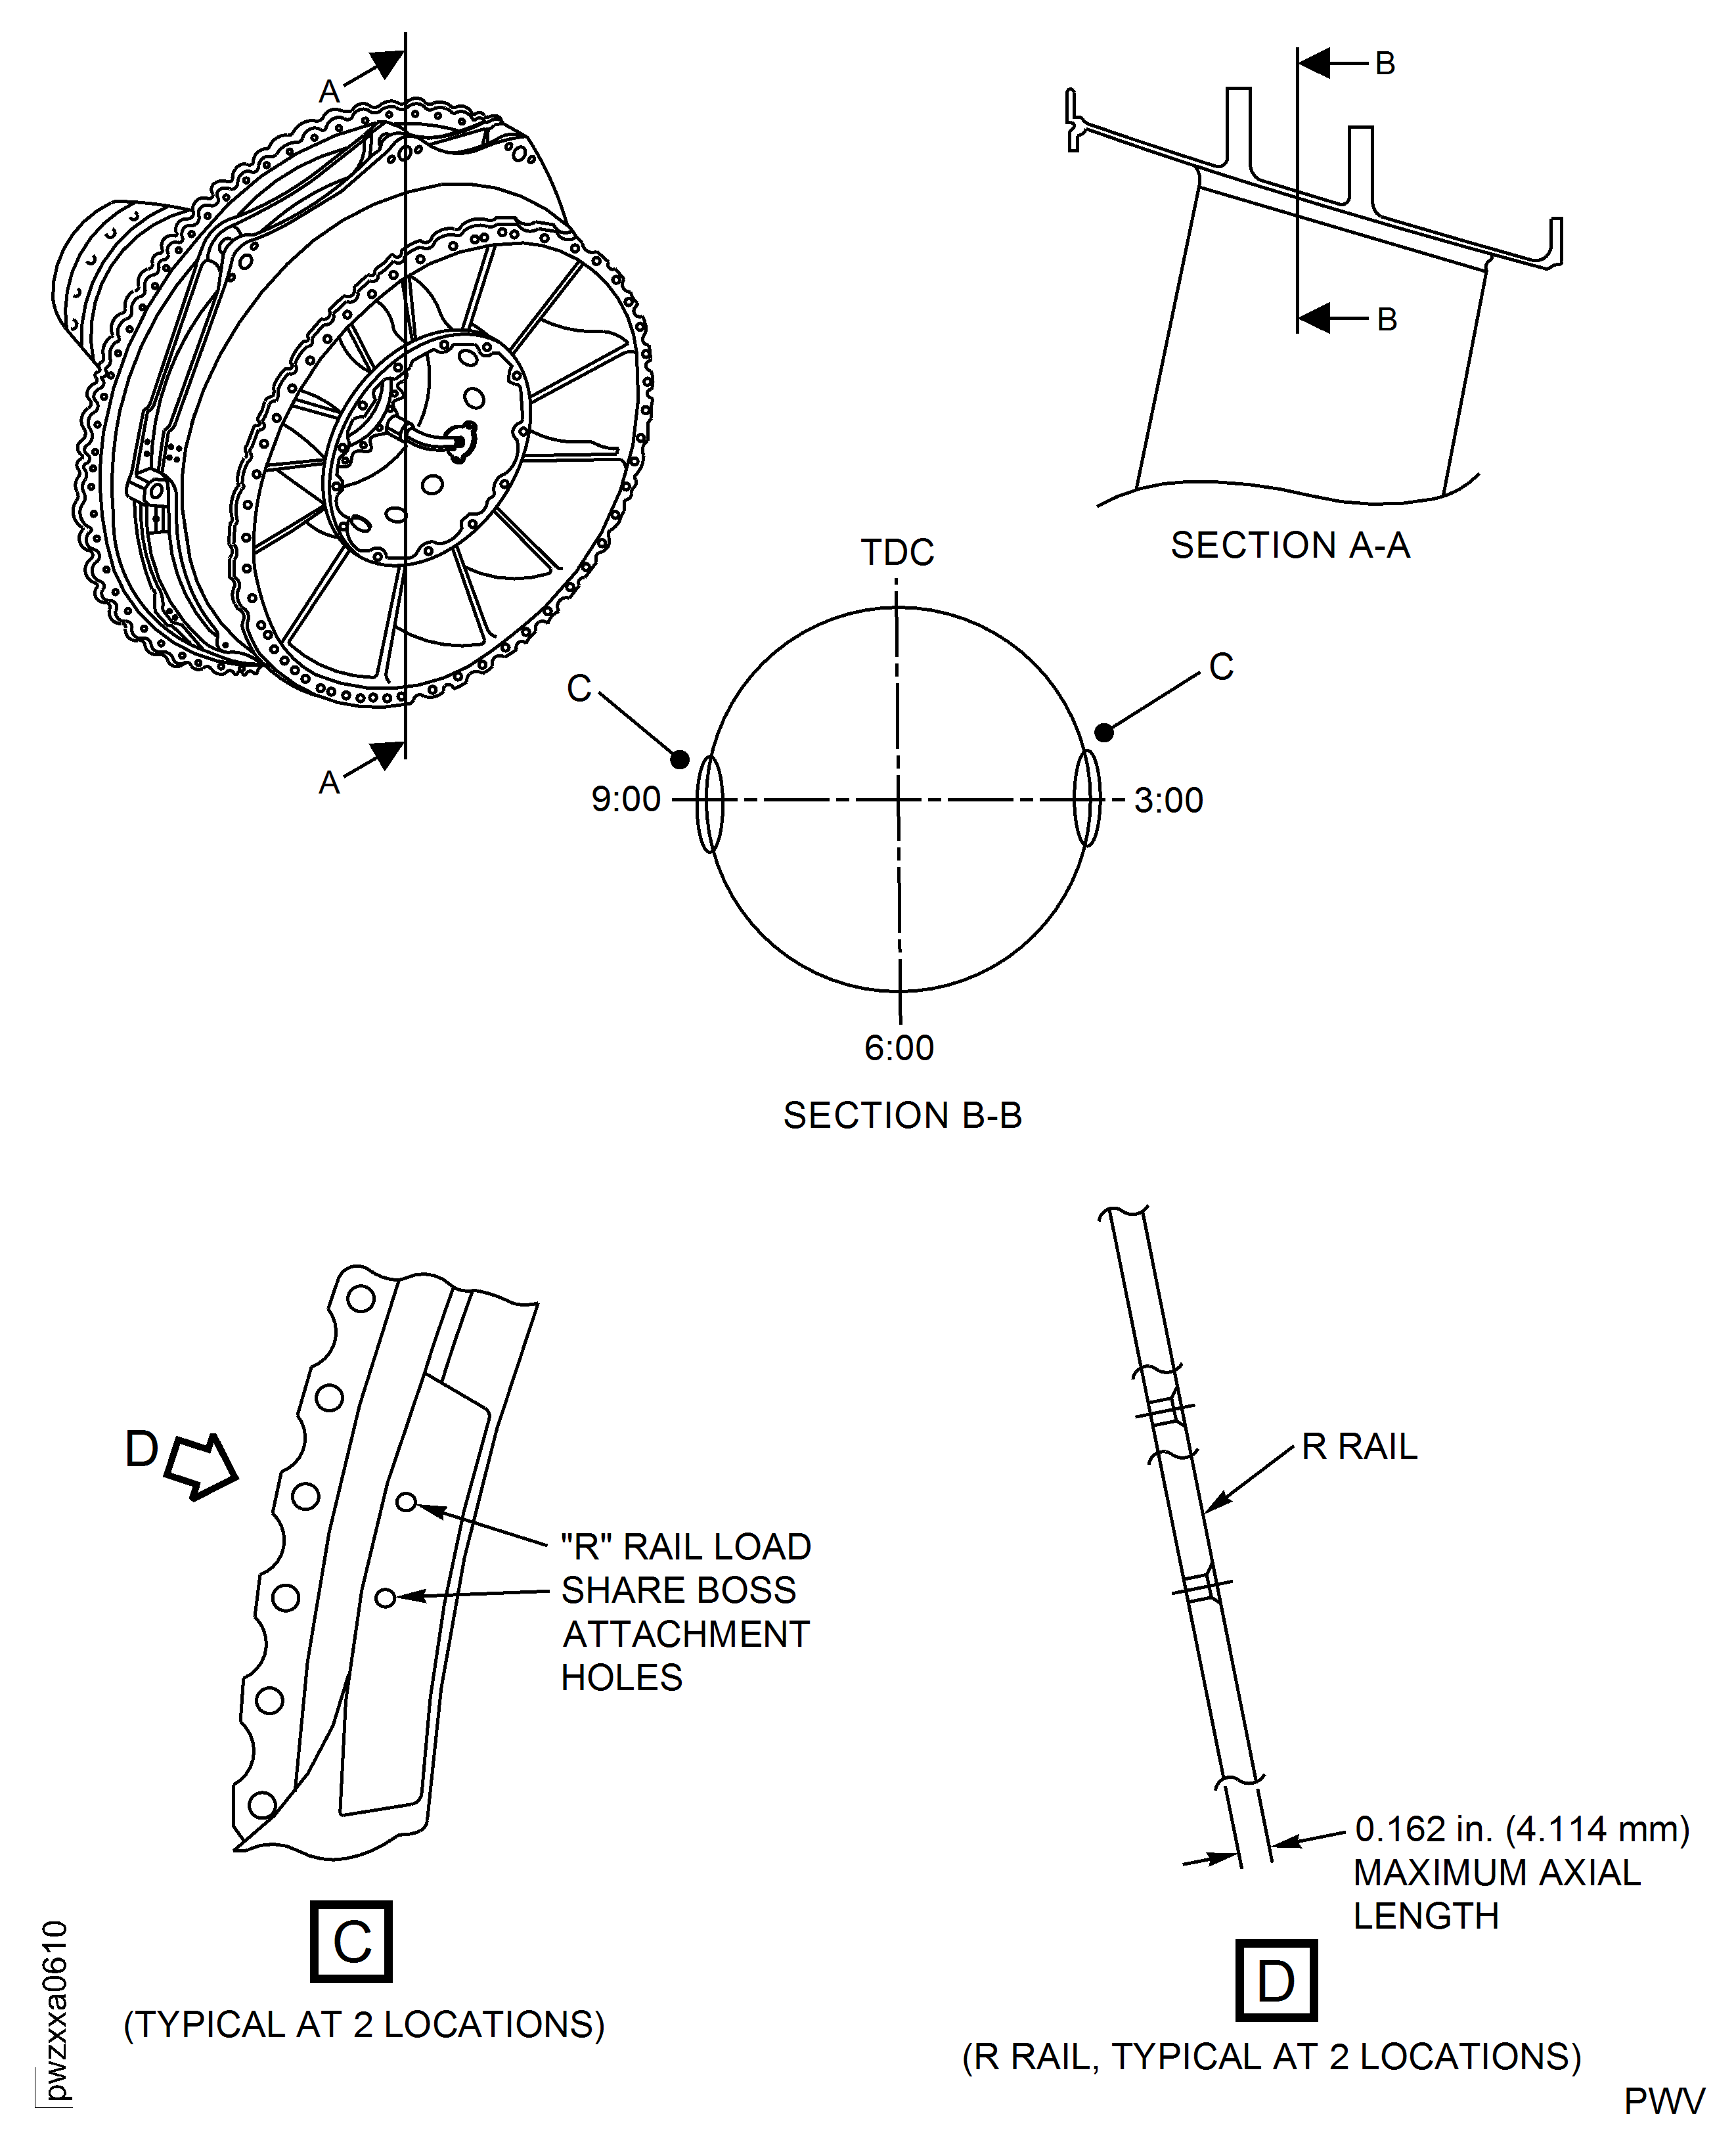
Refer to Figure.
R Rail load share boss attachment holes for cracks 0.162 in. (4.114 mm) maximum in the axial direction, and spanning the full outboard strap length (radially outward toward R Rail outer diameter). Cracks radially inboard (radially inward toward case wall) to the turbine exhaust case are not repairable.
Cracks.
Do the test for cracks on the part that is given below. Use the applicable penetrant procedure.
PART IDENT
TASK/SUBTASK
Turbine exhaust case
SUBTASK 72-50-53-230-078 Examine the Turbine Exhaust Case (21-300) for Cracks
Repair, VRS3008 TASK 72-50-53-300-045 (REPAIR-045).
More than Step.
Examine the external surfaces and the gas path surfaces including the inner/outer case walls and struts for corrosion pits, dents and nicks or surface corrosion.
SUBTASK 72-50-53-220-143 Examine the External and Internal Surfaces of the Turbine Exhaust Case (21-300)
Repair, VRS3014 TASK 72-50-53-300-046 (REPAIR-046).
Loose, not there or with internal thread damage.
Examine the helicoils. Refer to Figure.
SUBTASK 72-50-53-220-144 Examine the Turbine Exhaust Case (21-300) Helicoils
Refer to Figure.
Other Step.
Kiel heads.
Repair, VRS3008 TASK 72-50-53-300-045 (REPAIR-045) or Repair, VRS3064, TASK 72-50-53-300-048 (REPAIR-048).
More than Step
Nicks and scratches on the leading and trailing edges.
Repair, VRS3008 TASK 72-50-53-300-045 (REPAIR-045) or Repair, VRS3064, TASK 72-50-53-300-048 (REPAIR-048) or Repair, VRS3743 TASK 72-50-53-300-083 (REPAIR-083).
More than Step.
Dents on the leading or trailing edge.
Repair, VRS3008 TASK 72-50-53-300-045 (REPAIR-045) or Repair, VRS3064, TASK 72-50-53-300-048 (REPAIR-048).
More than Step.
Nicks and scratches on the airfoil.
Repair, VRS3008 TASK 72-50-53-300-045 (REPAIR-045).
More than Step.
Nicks and dents on all surfaces.
Examine the struts at location 1 for damage.
SUBTASK 72-50-53-220-145 Examine the Turbine Exhaust Case (21-300) Struts
Refer to Figure.
Repair, VRS3008 TASK 72-50-53-300-045 (REPAIR-045).

CAUTION
THIS DAMAGE DOES NOT INCLUDE CRACK INDICATION.Damage such as pits, nicks, dents, scratches and surface corrosion not more than 0.0150 in. (0.381 mm) deep must be repaired.
Examine the entire stiffening rails at location 2 for damage.
SUBTASK 72-50-53-220-146 Examine the Turbine Exhaust Case (21-300) Stiffening Rails
Refer to Figure.
Repair, VRS3008 TASK 72-50-53-300-045 (REPAIR-045).

CAUTION
THIS DAMAGE DOES NOT INCLUDE CRACK INDICATION.Damage such as pits, nicks, dents, scratches and surface corrosion.
Examine the mount lugs at locations 3 and 4 for damage.
SUBTASK 72-50-53-220-147 Examine the Turbine Exhaust Case (21-300) Mount Lugs
Refer to Figure.
Repair, VRS3015 TASK 72-50-53-300-050 (REPAIR-050).
More than 1.885in. (30.188 mm).
Inner diameter.
Repair, VRS3008 TASK 72-50-53-300-045 (REPAIR-045).
Between 0.004 in. and 0.008 in. (0.102 mm and 0.203 mm).
Repair, VRS3015 TASK 72-50-53-300-050 (REPAIR-050).
More than 0.008 in. (0.203 mm).
Scoring
Examine the mount bushings at location 5 for the inner diameter and scoring.
SUBTASK 72-50-53-220-148 Examine the Turbine Exhaust Case (21-300) Mount Bushings
Refer to Figure.
Repair, VRS3068 TASK 72-50-53-300-088 (REPAIR-088).
More than 0.4338 in. (11.018 mm) and to a maximum of 0.4400 in. (11.176 mm).
Examine the bore at location 6 for the diameter.
SUBTASK 72-50-53-220-149 If You Remove Instrumentation Bushing (21-200), Examine the Turbine Exhaust Case (21-300) Instrumentation Bushing Bore
Refer to Figure.
Repair, VRS3008 TASK 72-50-53-300-045 (REPAIR-045)
Between 0.004 in. and 0.008 in. (0.102 mm and 0.203 mm).
Repair, VRS3016 TASK 72-50-53-300-052 (REPAIR-052).
More than 0.008 in. (0.203 mm).
Examine the ground handling bushings at location 7 for scoring.
SUBTASK 72-50-53-220-150 Examine the Turbine Exhaust Case (21-300) Ground Handling Bushings
Refer to Figure.
Repair, VRS3062 TASK 72-50-53-300-053 (REPAIR-053) or Repair, VRS3328 TASK 72-50-53-300-071 (REPAIR-071).
Wear
Examine the front outer flange front face at location 8 for wear and cracks.
Repair, VRS3062 TASK 72-50-53-300-053 (REPAIR-053) or Repair, VRS3328 TASK 72-50-53-300-071 (REPAIR-071).
More than 38.6724 in. (982.28 mm).
Examine the front outer flange at location 9 for the inner diameter.
SUBTASK 72-50-53-220-151 Examine the Turbine Exhaust Case (21-300) Front Outer Flange
Refer to Figure.
Repair, VRS3019 TASK 72-50-53-300-054 (REPAIR-054).
Loose, not there, or with internal thread damage
Examine the clinch nuts at the rear inner flange at location 10 for looseness or damage.
SUBTASK 72-50-53-220-152 Examine the Turbine Exhaust Case (21-300) Rear Inner Flange for the Clinch Nuts
Refer to Figure.
Repair, VRS3087 TASK 72-50-53-300-055 (REPAIR-055) or Repair, VRS3654 TASK 72-50-53-300-077 (REPAIR-077) or Repair, VRS3799 TASK 72-50-53-300-086 (REPAIR-086).
Less than 0.035 in. (0.89 mm) in depth
Wear or damage.
Repair, VRS3087 TASK 72-50-53-300-055 (REPAIR-055) or Repair, VRS3654 TASK 72-50-53-300-077 (REPAIR-077).
More than Step.
Examine the rear inner flange rear face at location 11 for wear, damage and parallelism.
SUBTASK 72-50-53-220-153 Examine the Turbine Exhaust Case (21-300) Rear Inner Flange
Refer to Figure.
Repair, VRS3731 TASK 72-50-53-300-080 (REPAIR-080).
More than 33.0236 in. (838.799 mm).
Diameter.
Repair, VRS3731 TASK 72-50-53-300-080 (REPAIR-080).
More than (a)
Concentricity
Repair, VRS3731 TASK 72-50-53-300-080 (REPAIR-080).
More than Step
Perpendicularity
Examine the rear outer flange at location 12 for the inner diameter, concentricity and perpendicularity.
Repair, VRS3070 TASK 72-50-53-300-056 (REPAIR-056) or Repair, VRS3732 TASK 72-50-53-300-078 (REPAIR-078).
More than Step
Parallelism
Repair, VRS3070 TASK 72-50-53-300-056 (REPAIR-056) or Repair, VRS3732 TASK 72-50-53-300-078 (REPAIR-078).
Wear
Examine the rear outer flange at location 13 for parallelism and wear of the rear face.
SUBTASK 72-50-53-220-154 Examine the Turbine Exhaust Case (21-300) Rear Outer Flange
Repair, VRS3111 TASK 72-50-53-300-057 (REPAIR-057)
More than 6.947 in. (176.454 mm).
Examine the cover bore at location 14 for the diameter.
SUBTASK 72-50-53-220-155 Examine the Turbine Exhaust Case (21-300) Cover Bore for the Diameter
Repair, VRS3113 TASK 72-50-53-300-058 (REPAIR-058).
More than 5.5227 in. (140.277 mm).
Diameter
Repair, VRS3113 TASK 72-50-53-300-058 (REPAIR-058)
More than Step.
Correct position.
Examine the bearing bore at location 15 for the diameter and correct position.
SUBTASK 72-50-53-220-156 Examine the Turbine Exhaust Case (21-300) Bearing Bore
Repair, VRS3114 TASK 72-50-53-300-059 (REPAIR-059).
More than Step.
Examine the bearing shoulder at location 16 for perpendicularity.
SUBTASK 72-50-53-220-157 Examine the Turbine Exhaust Case (21-300) Bearing Shoulder for Perpendicularity
Repair, VRS3112 TASK 72-50-53-300-060 (REPAIR-060) or
Repair, VRS3755 TASK 72-50-53-300-084 (REPAIR-084) or
Repair, VRS3854 TASK 72-50-53-300-089 (REPAIR-089).
More than 5.752 in. (146.10 mm).
Examine the seal housing bore at location 17 for the diameter.
Repair, VRS3112 TASK 72-50-53-300-060 (REPAIR-060) or
Repair, VRS3755 TASK 72-50-53-300-084 (REPAIR-084) or
Repair, VRS3854 TASK 72-50-53-300-089 (REPAIR-089).
More than 0.001 in. (0.03 mm) FIR in relation to locations 15 and 16.
Circular runout.
SUBTASK 72-50-53-220-158 Examine the Turbine Exhaust Case (21-300) Seal Housing Bore for the Diameter
Repair, VRS3116 TASK 72-50-53-300-061 (REPAIR-061) or
Repair, VRS3859 TASK 72-50-53-300-091 (REPAIR-091).
More than 0.259 in. (6.58 mm) for a normal hole, more than 0.259 in. (6.58 mm) circumferentially.
Examine the locating pin hole at location 18 for the diameter.
Repair, VRS3116 TASK 72-50-53-300-061 (REPAIR-061) or
Repair, VRS3859 TASK 72-50-53-300-091 (REPAIR-091).
More than 0.004 in. (0.10 mm) diameter in relation to surfaces X and Z.
True position.
SUBTASK 72-50-53-220-159 Examine the Turbine Exhaust Case (21-300) Front Flange for the Diameter of the Locating Pin Hole
Refer to Figure.
Repair, VRS3246 TASK 72-50-53-300-063 (REPAIR-063) or Repair, VRS3744 TASK 72-50-53-300-082 (REPAIR-082)
More than 0.542 in. (13.77 mm).
Diameter
Examine the oil jet at location 20 for the mating diameter and the true position.
SUBTASK 72-50-53-220-161 Examine the Turbine Exhaust Case (21-300) for the Mating Diameter and True Position of the Oil Jet
Refer to Figure.
Repair, VRS3115 TASK 72-50-53-300-070 (REPAIR-070)
More than 0.382 in. (9.703 mm).
Diameter
Examine the pressure tube at location 21 for the diameter and true position.
SUBTASK 72-50-53-220-162 Examine the Turbine Exhaust Case (21-300) for the Diameter and True Position of the No. 5 Bearing Pressure Tube
Refer to Figure.
Repair, VRS3097 TASK 72-50-53-300-064 (REPAIR-064)
If the mating part does not turn easily and smoothly.
Examine the mating threads on the pressure and scavenge tubes at location 22 for damage.
SUBTASK 72-50-53-220-163 Examine the Turbine Exhaust Case (21-300) for Damage of the Mating Threads on the No. 5 Bearing Pressure and Scavenge Tubes
Repair, VRS3632 TASK 72-50-53-300-075 (REPAIR-075)
Cracks
Examine the No. 5 bearing oil tube bosses and cover bolt bosses at the crack repair areas shown on Figure.
SUBTASK 72-50-53-230-112 Examine the Turbine Exhaust Case (21-300) No. 5 Bearing Oil Tube Bosses and Cover Bolt Bosses
Refer to Figure.
Repair, VRS3763 TASK 72-50-53-300-085 (REPAIR-085)
Thread damage at the 3, 4, 6, 7, 8, 10 and 11 vane locations.
SUBTASK 72-50-53-220-259 Examine the Turbine Exhaust Case P4.9 Probe Boss Threads and EGT Thermocouple Boss Threads
Figure: Turbine Exhaust Case Inspection Locations
Turbine Exhaust Case Inspection Locations
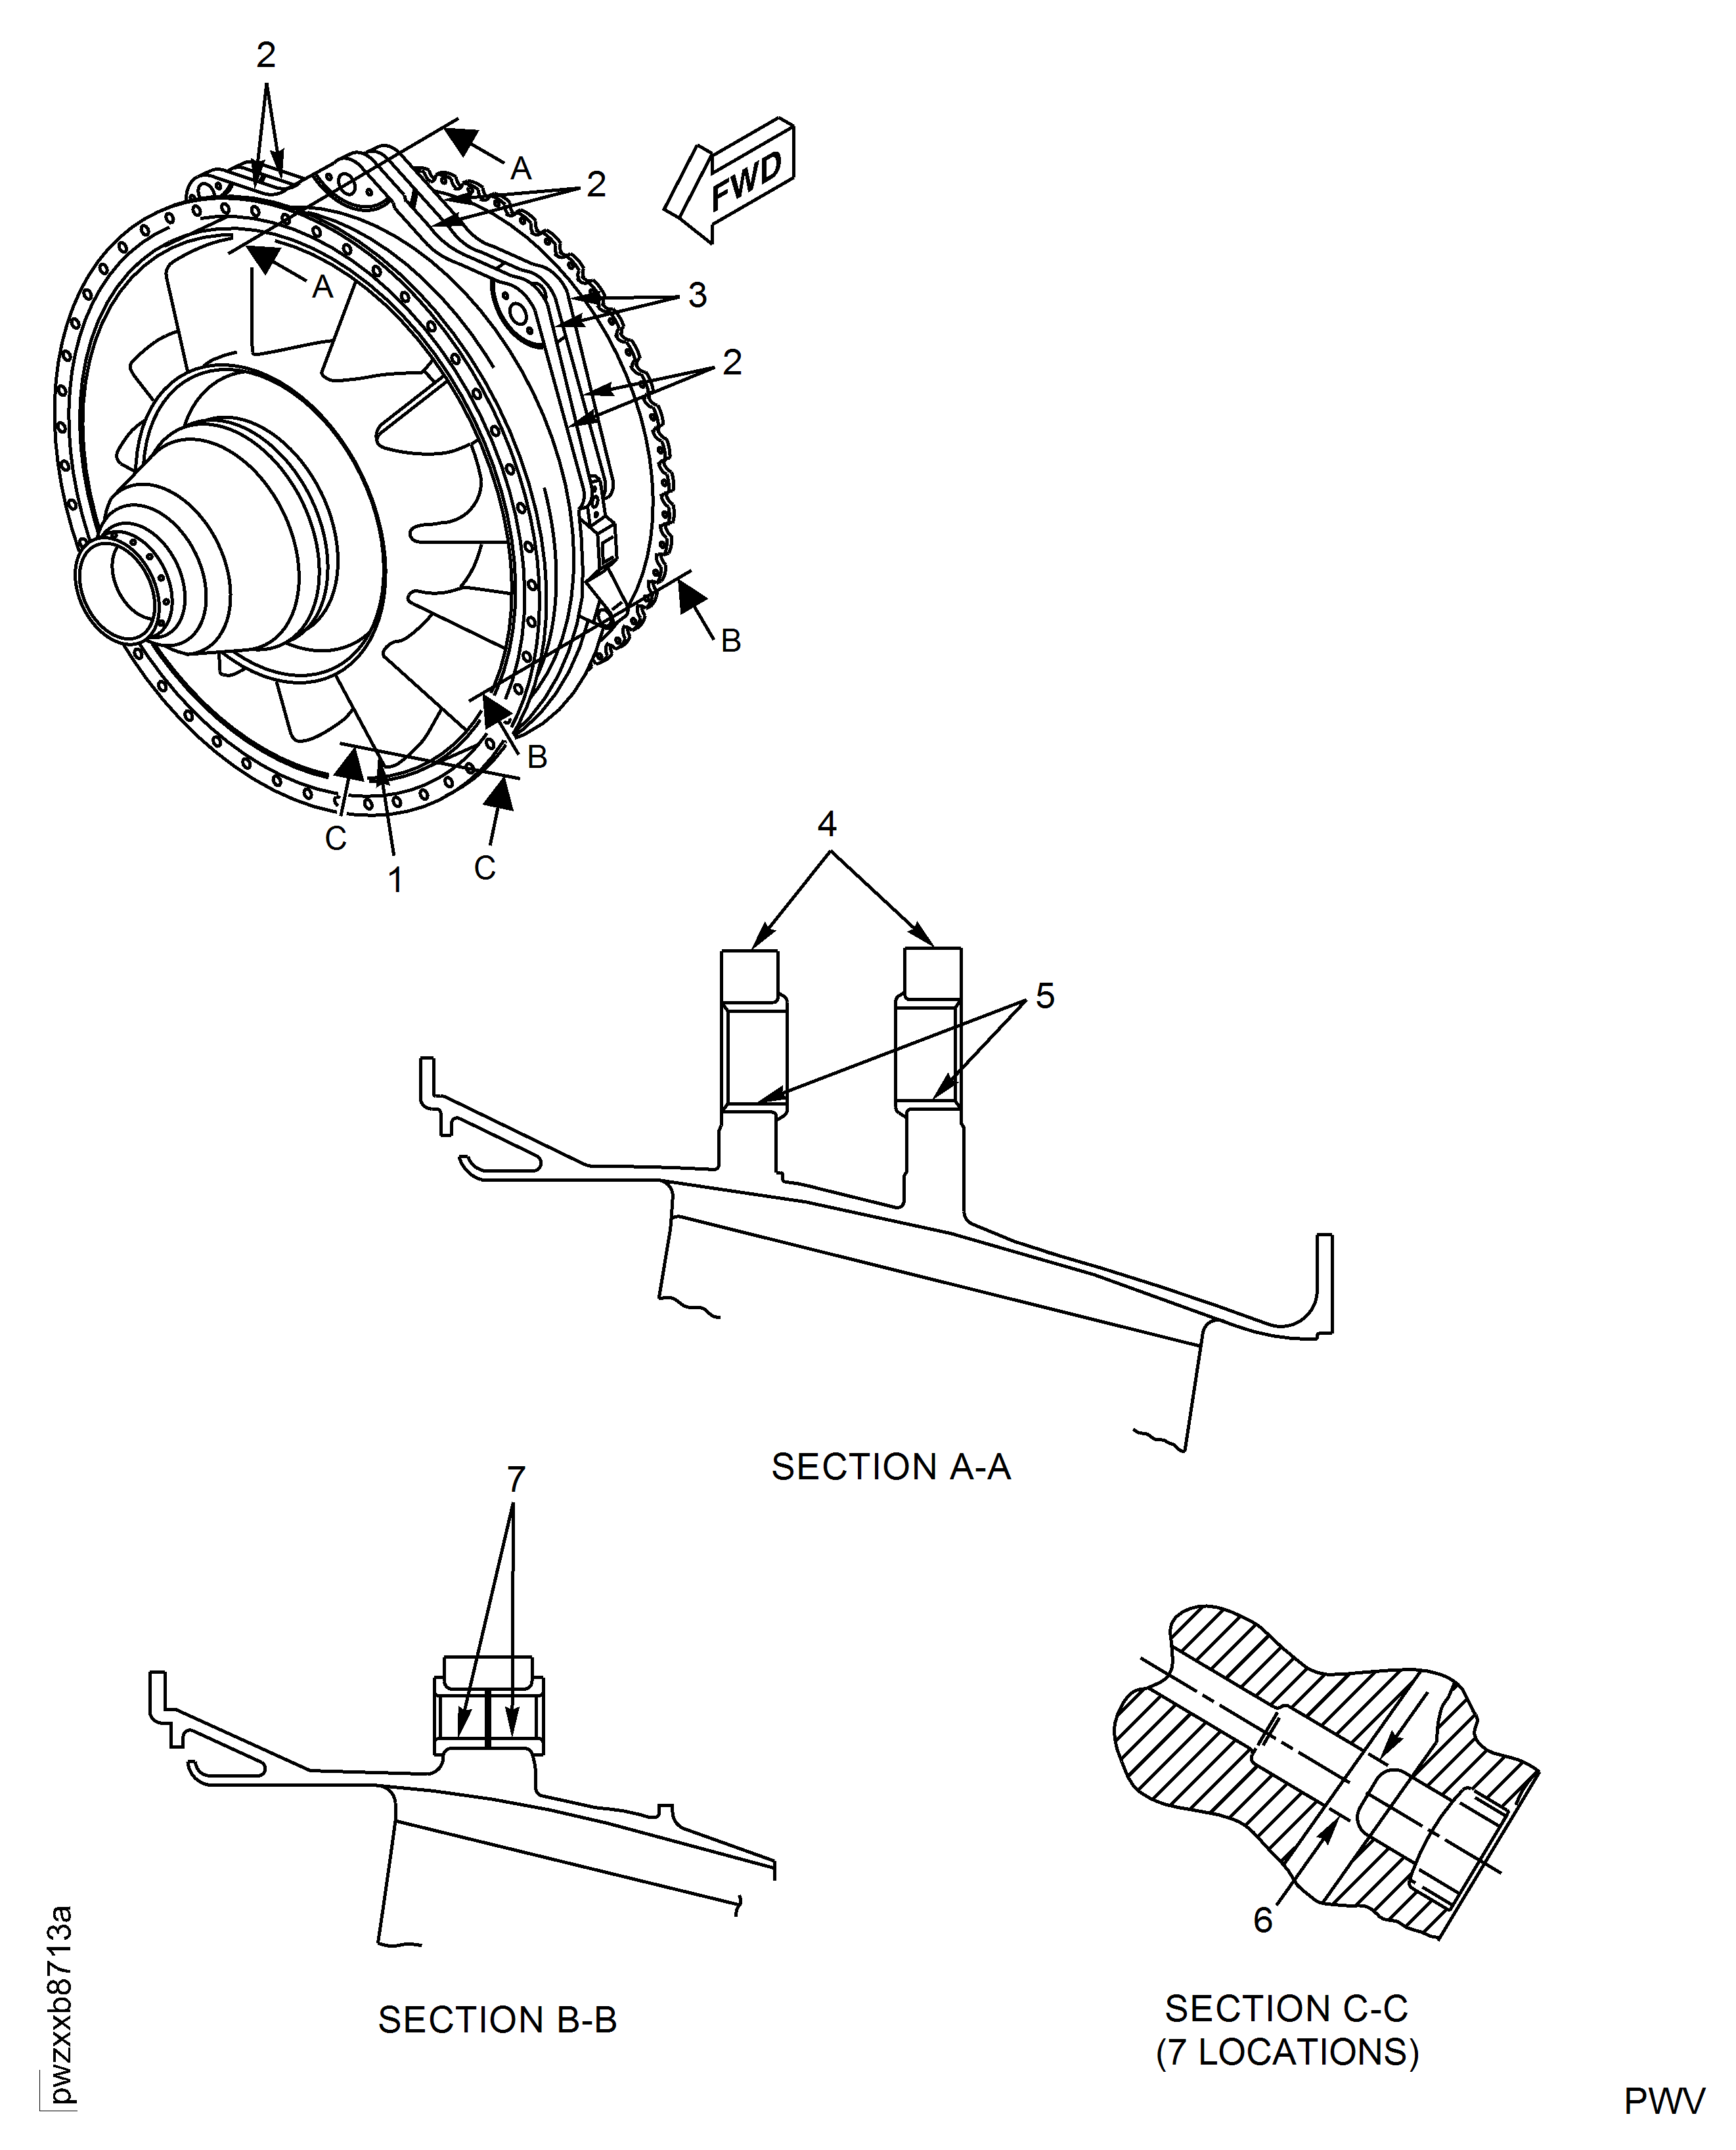
Figure: Turbine Exhaust Case Inspection Locations
Turbine Exhaust Case Inspection Locations
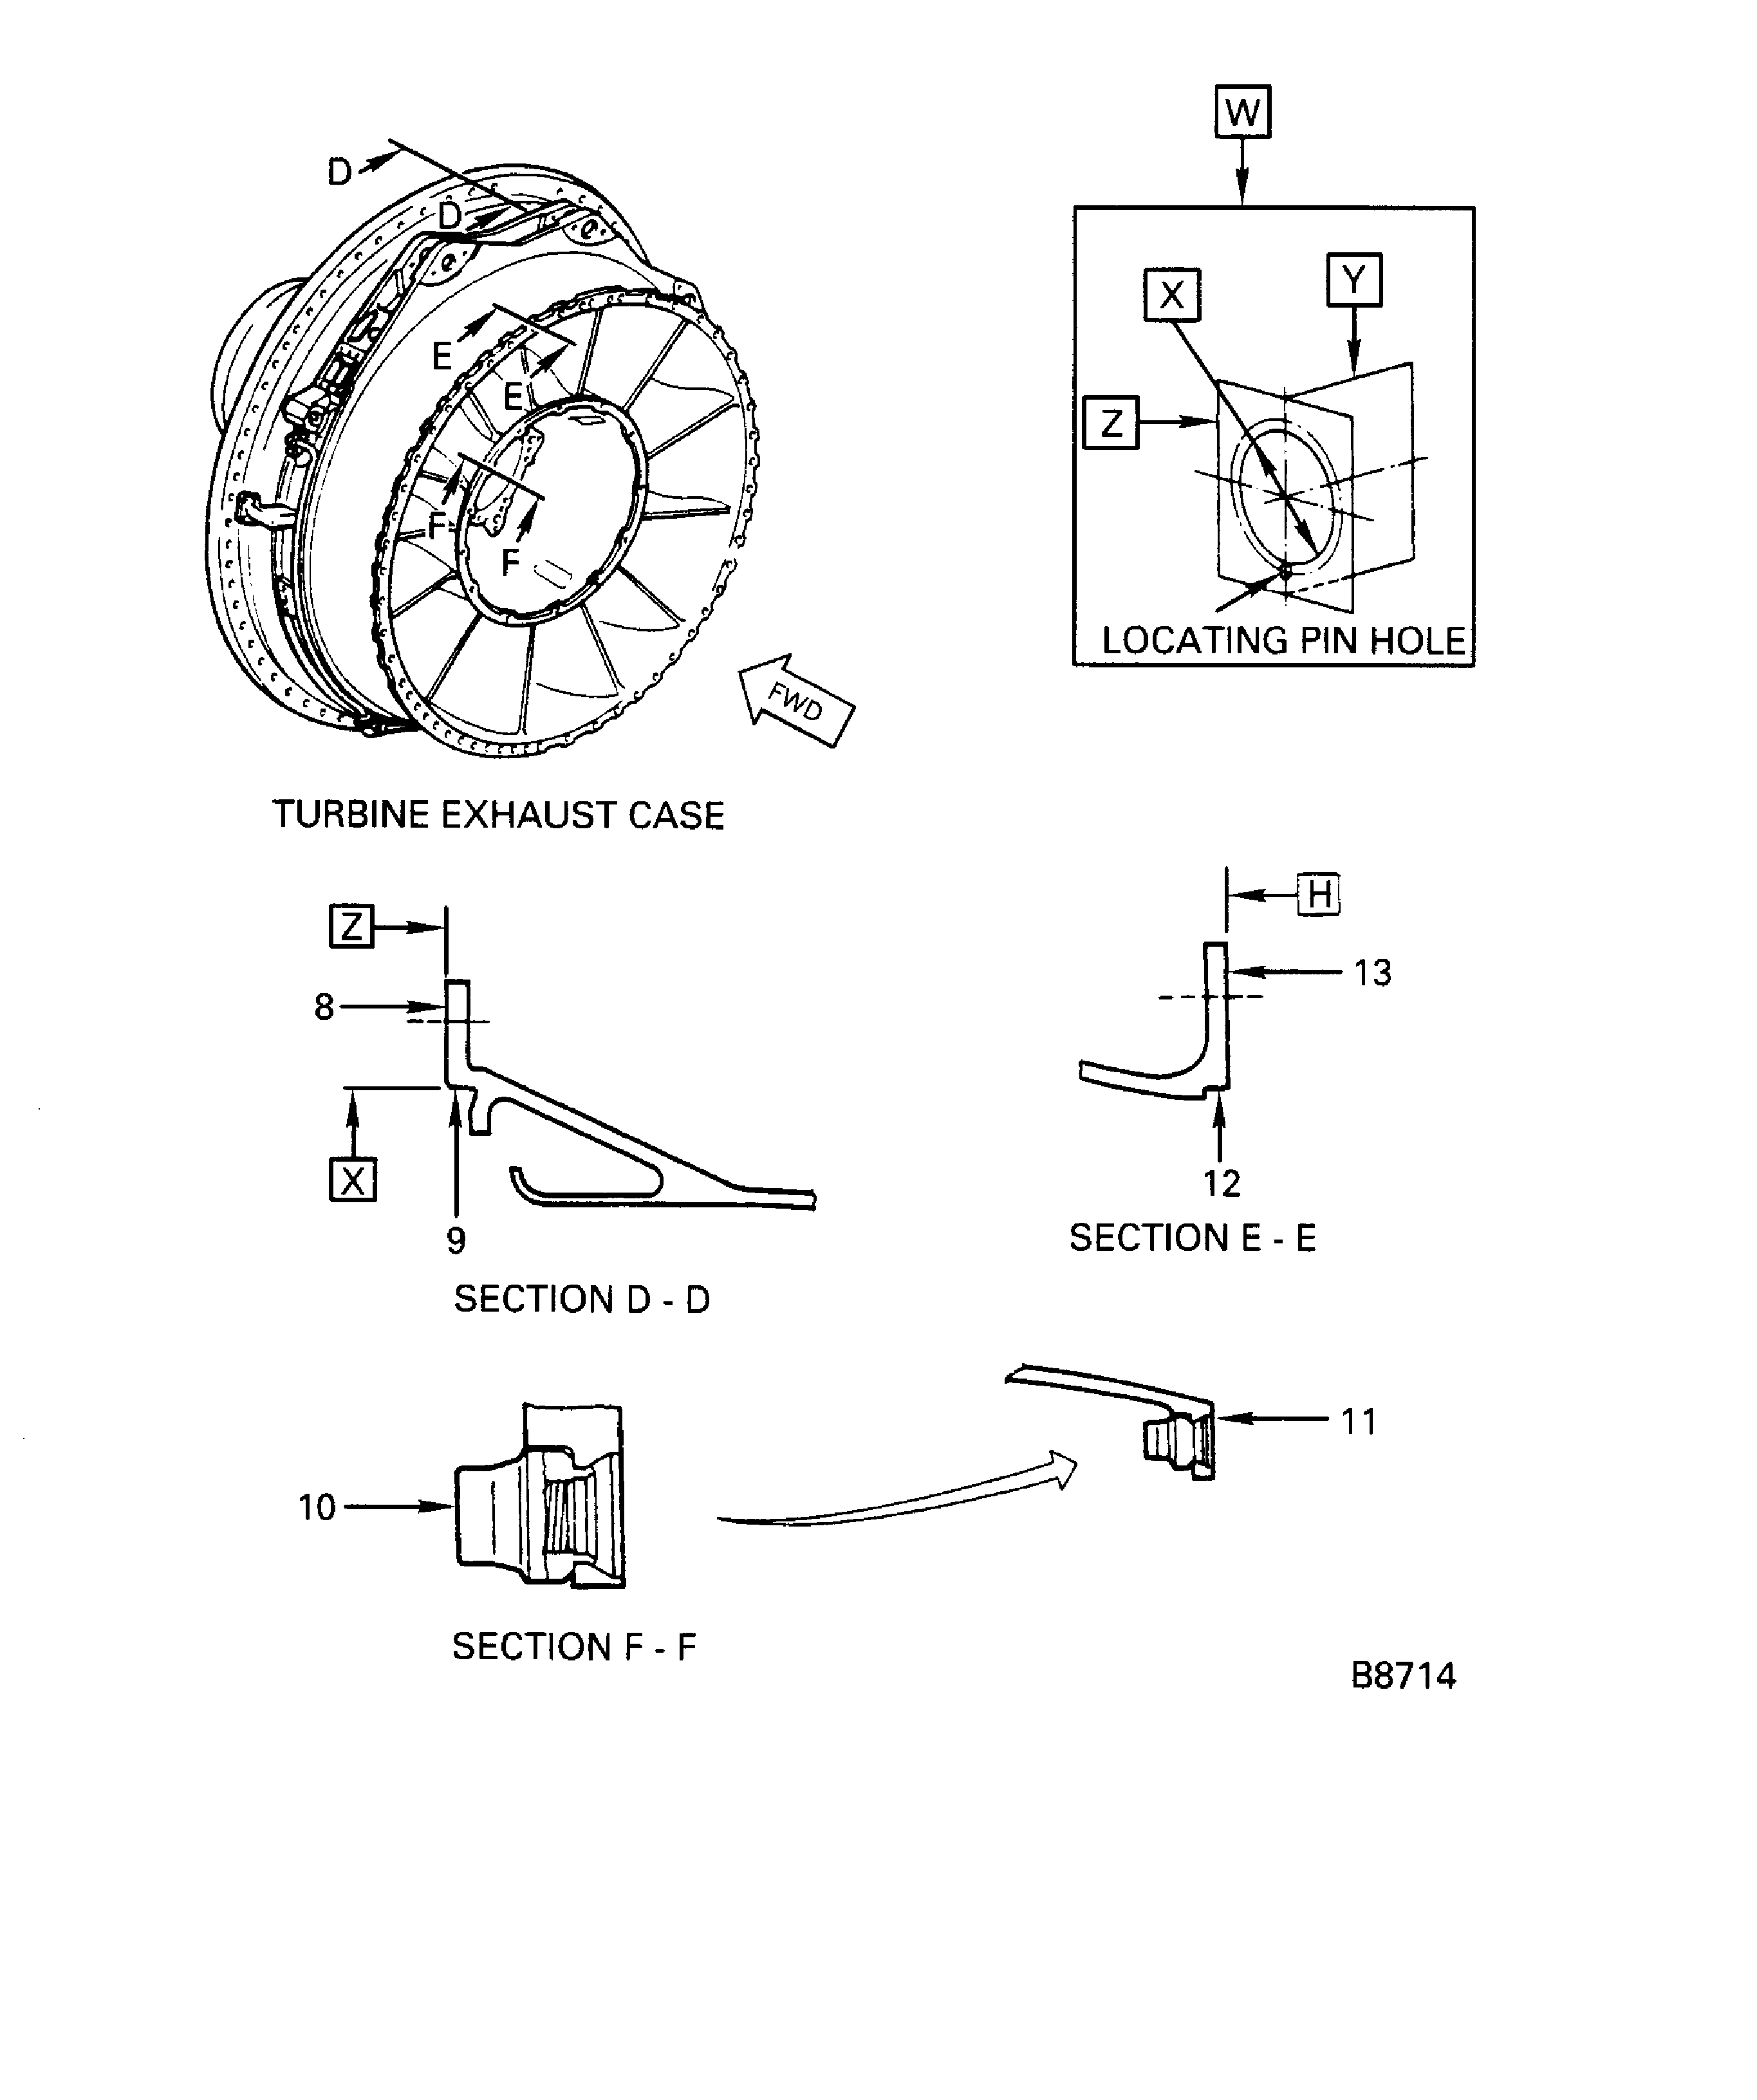
Figure: Turbine Exhaust Case Inspection Locations
Turbine Exhaust Case Inspection Locations
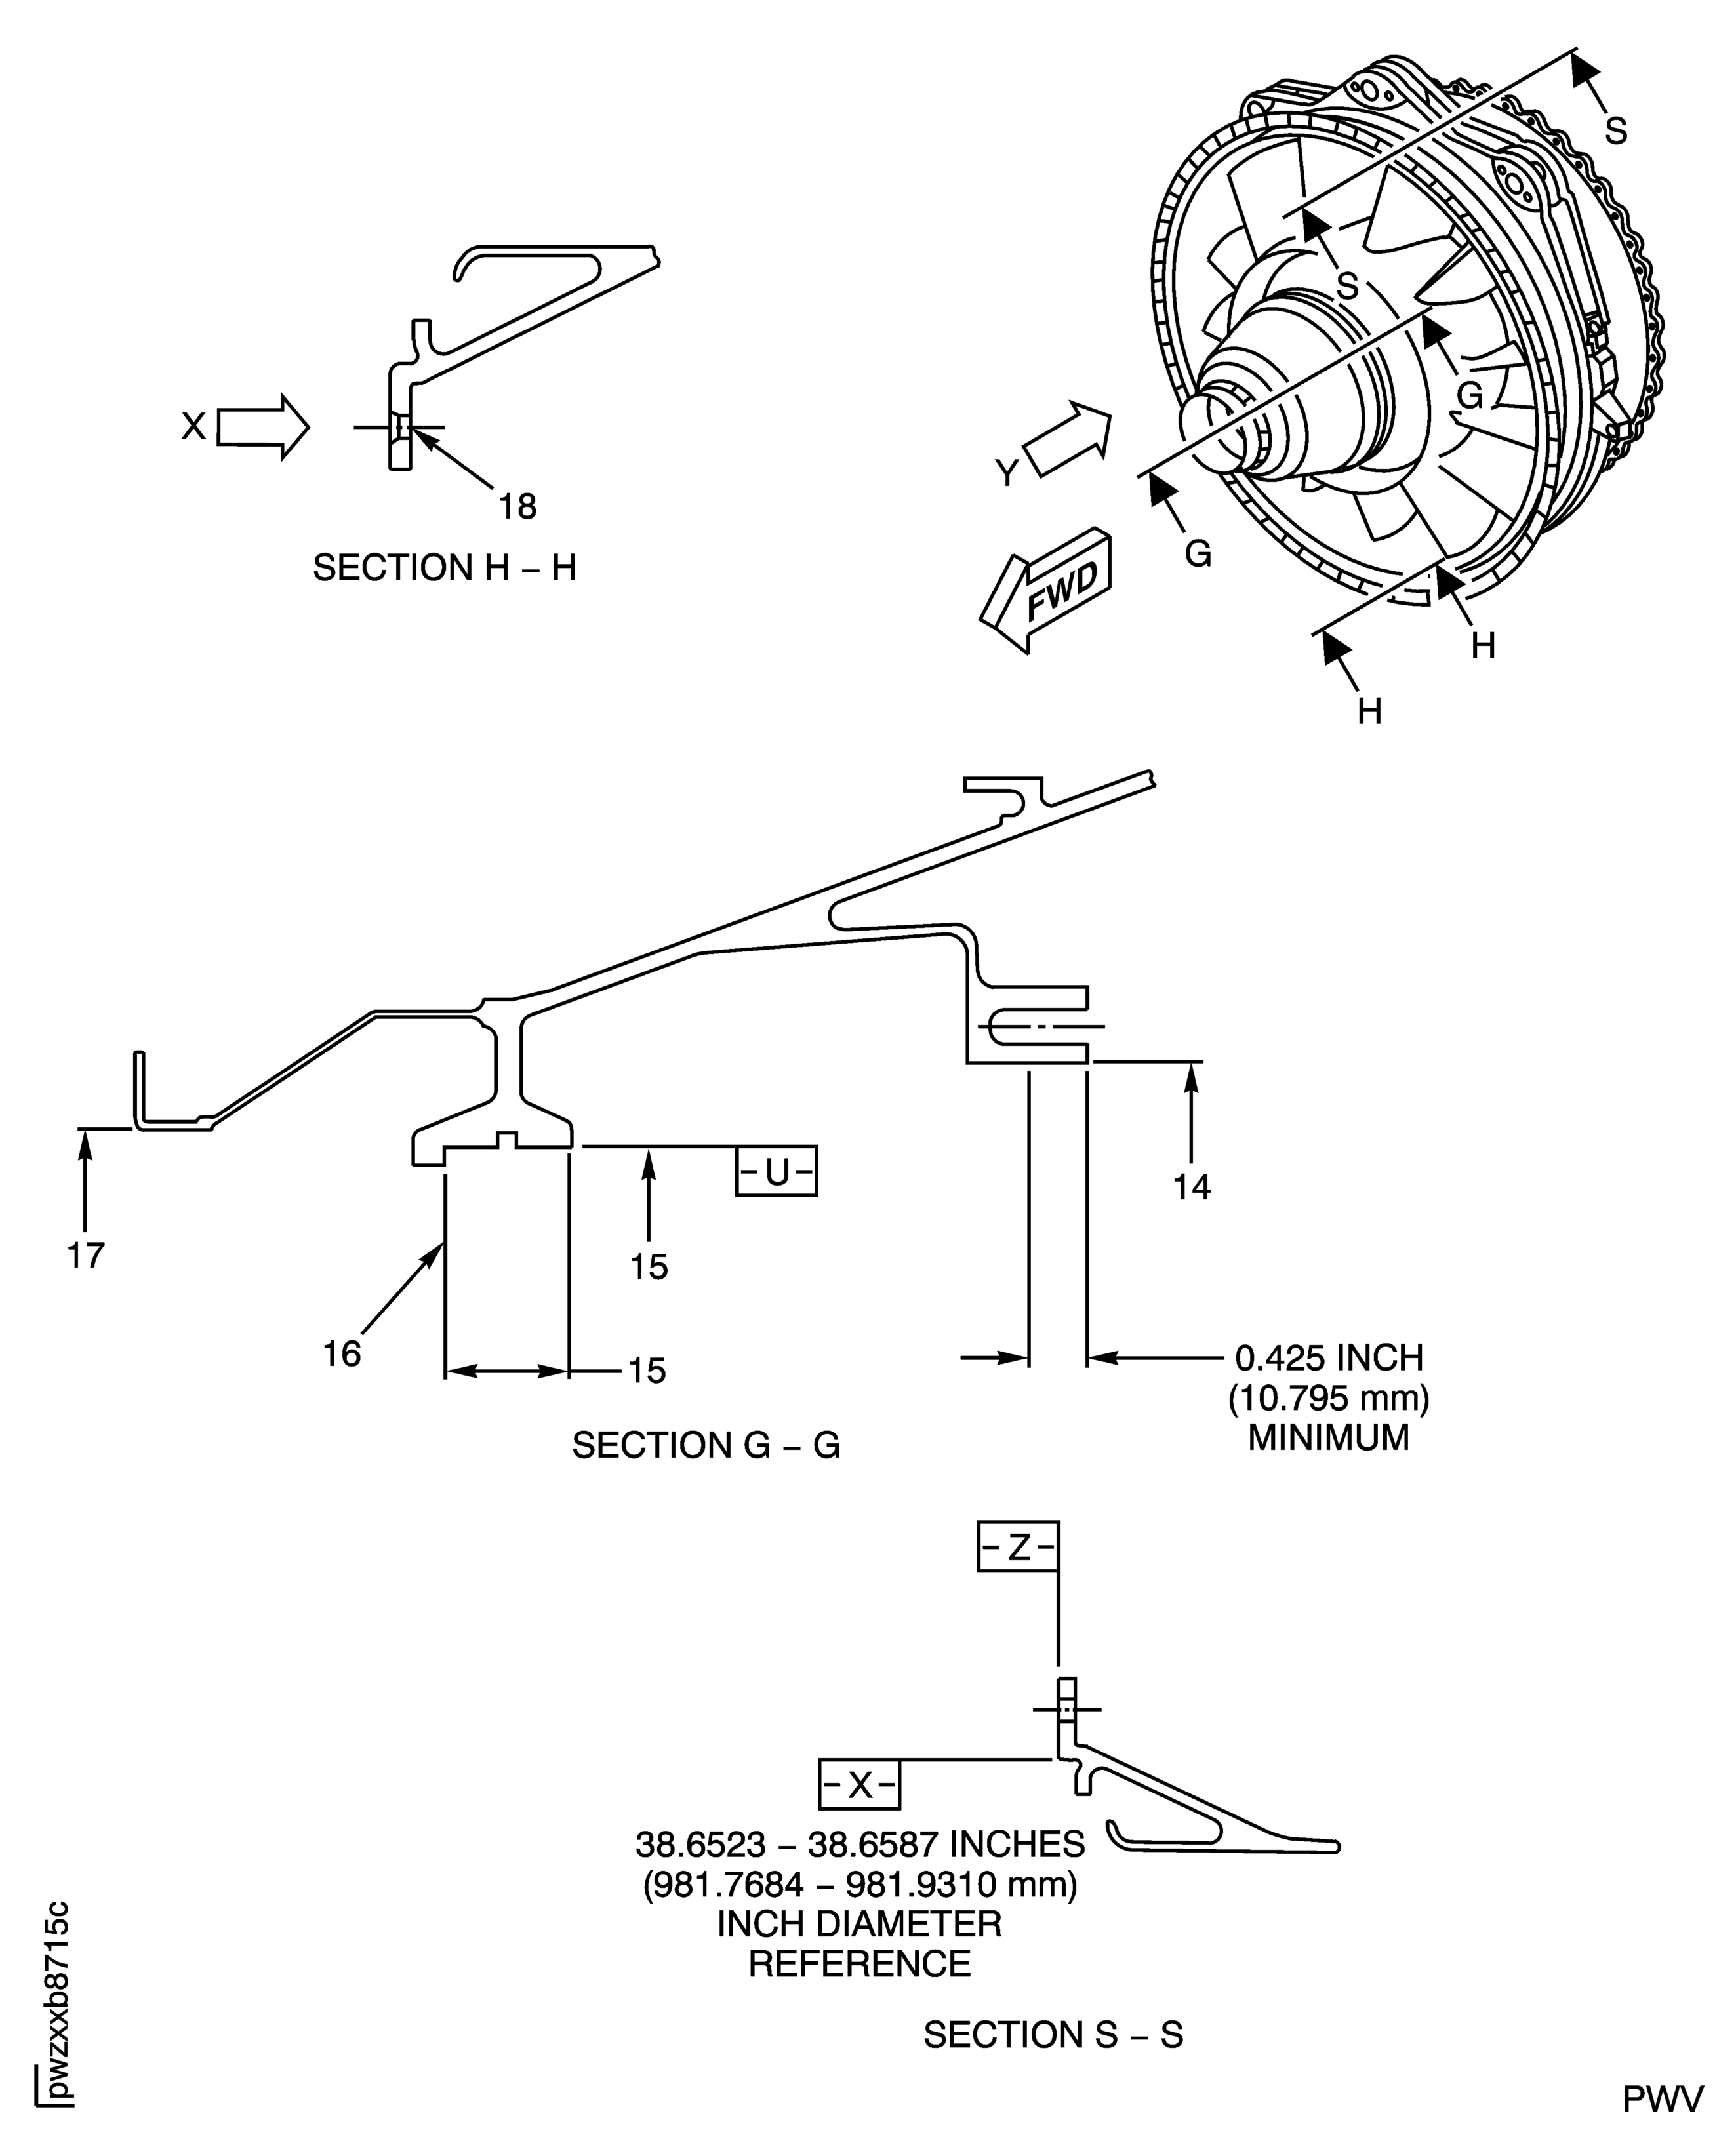
Figure: Turbine Exhaust Case Inspection Locations
Turbine Exhaust Case Inspection Locations
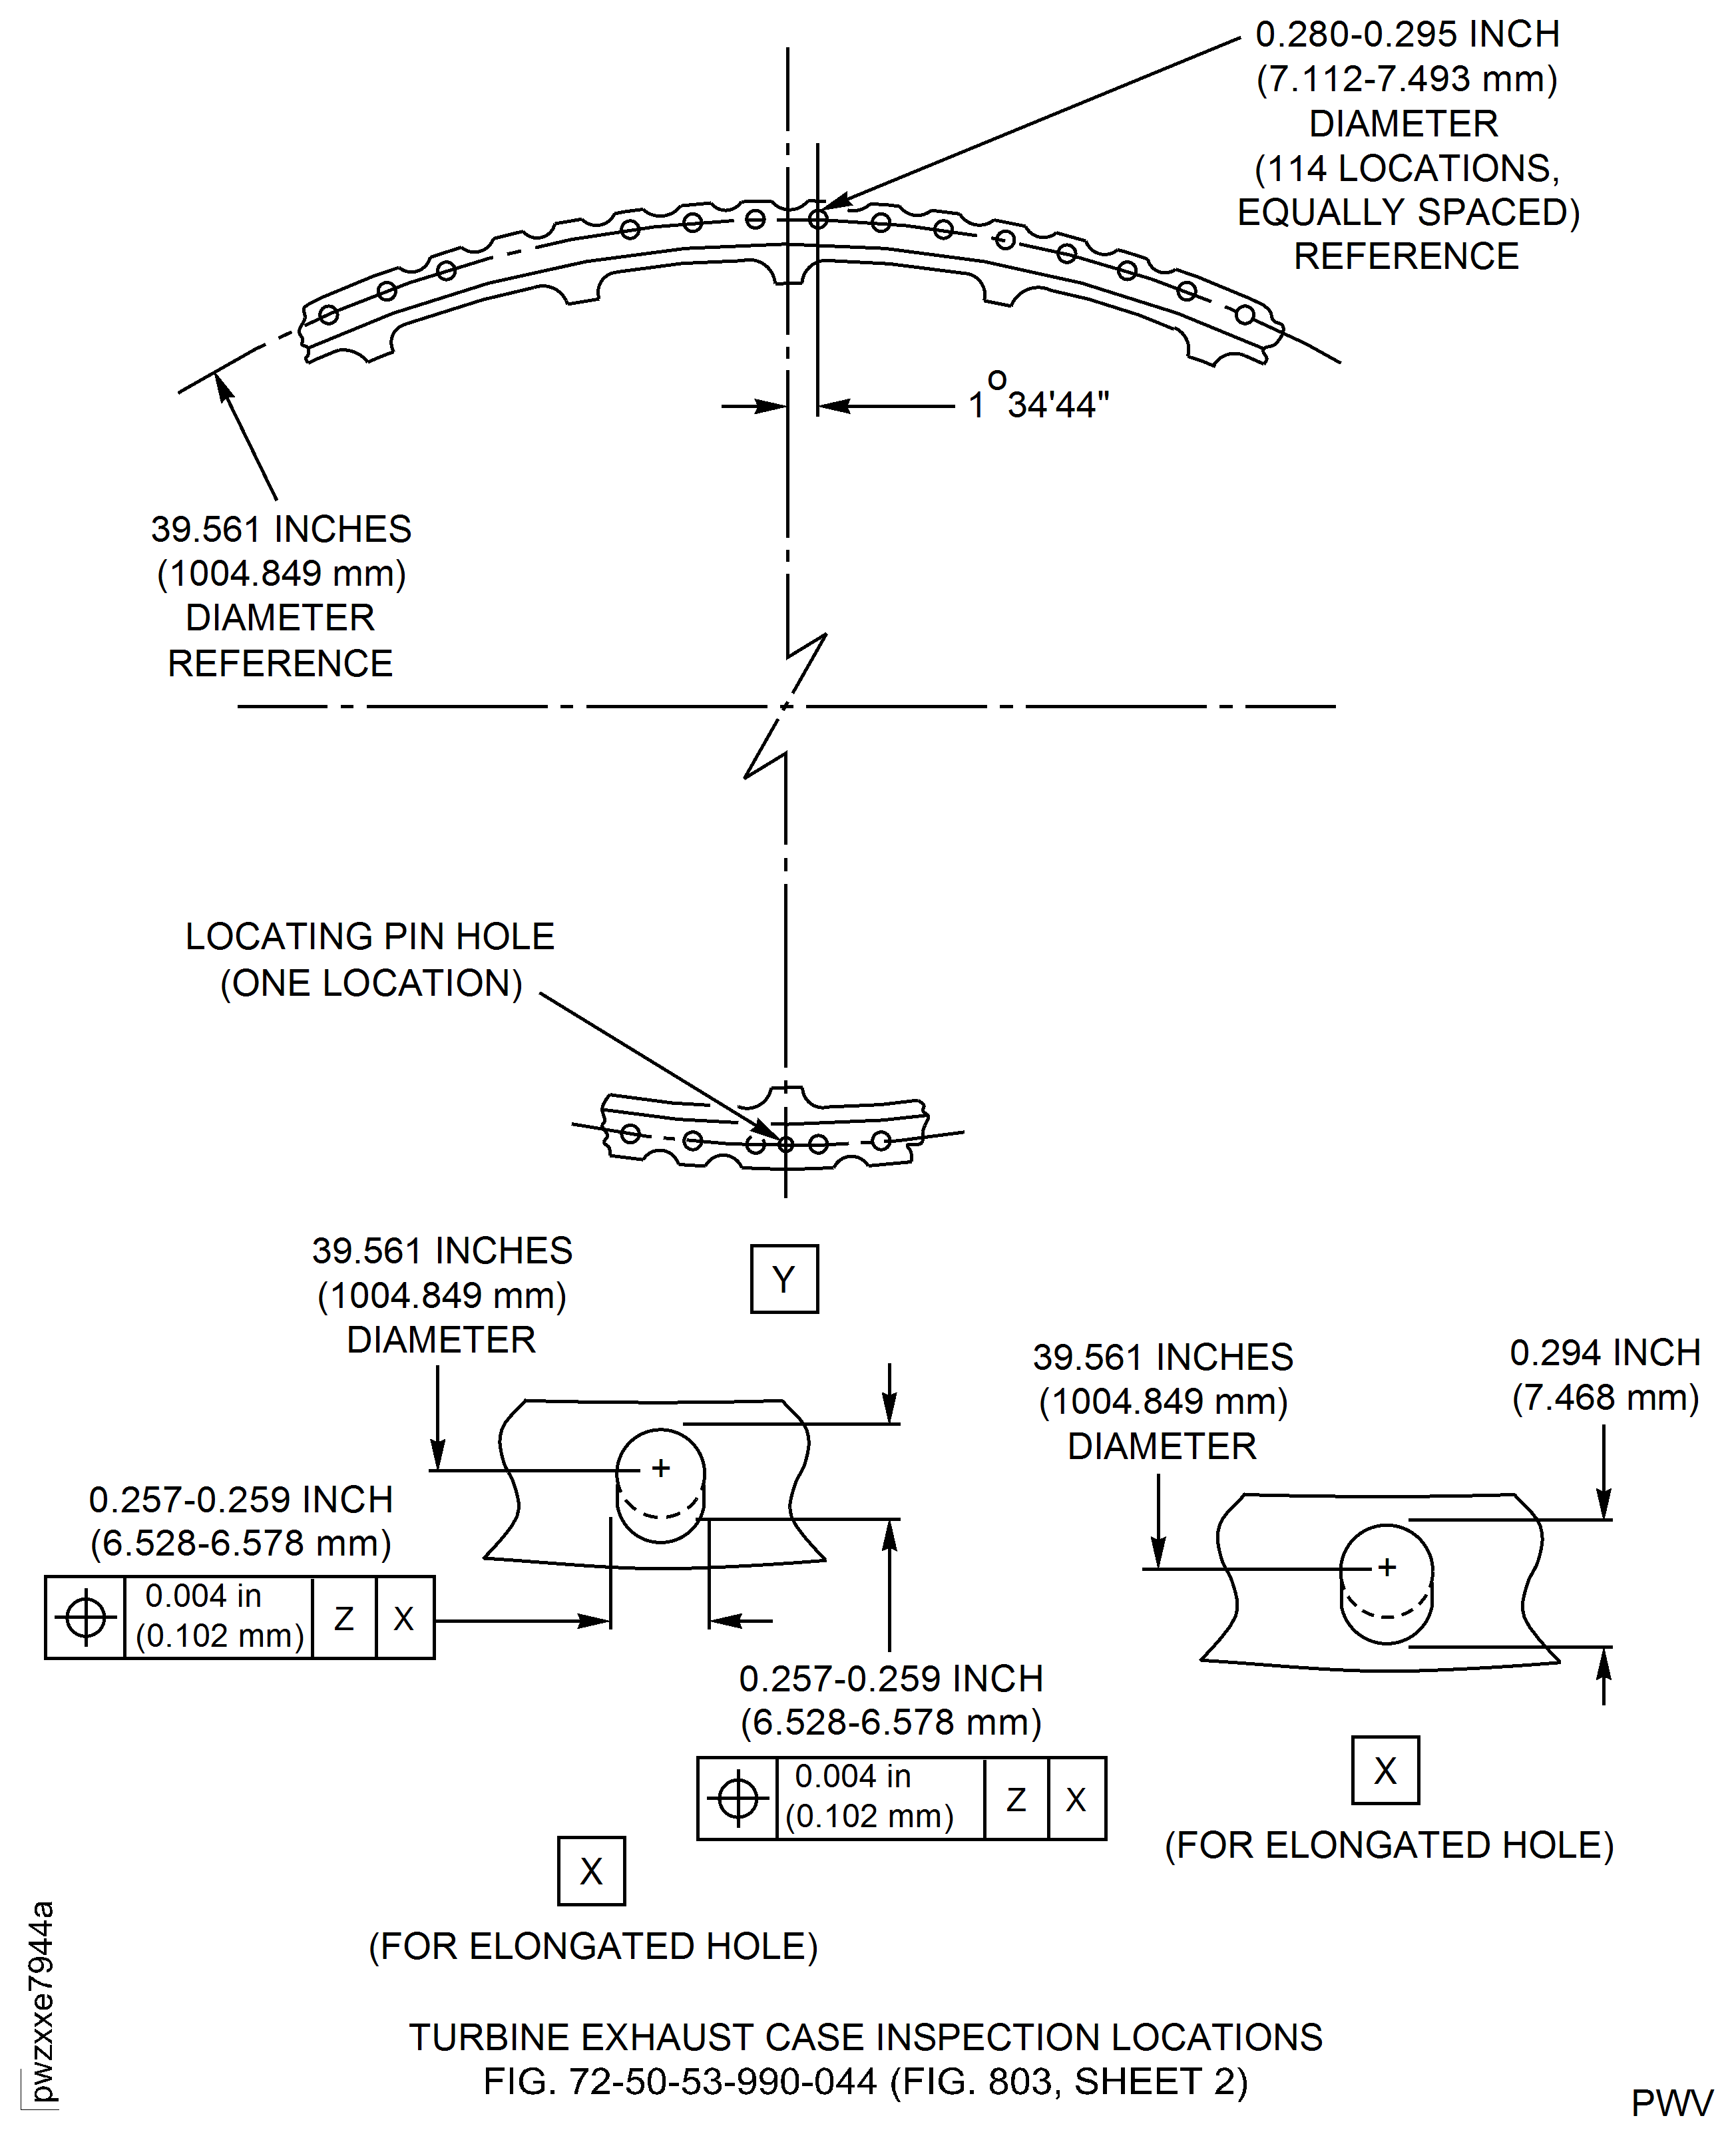
Figure: Turbine Exhaust Case Inspection Locations
Turbine Exhaust Case Inspection Locations
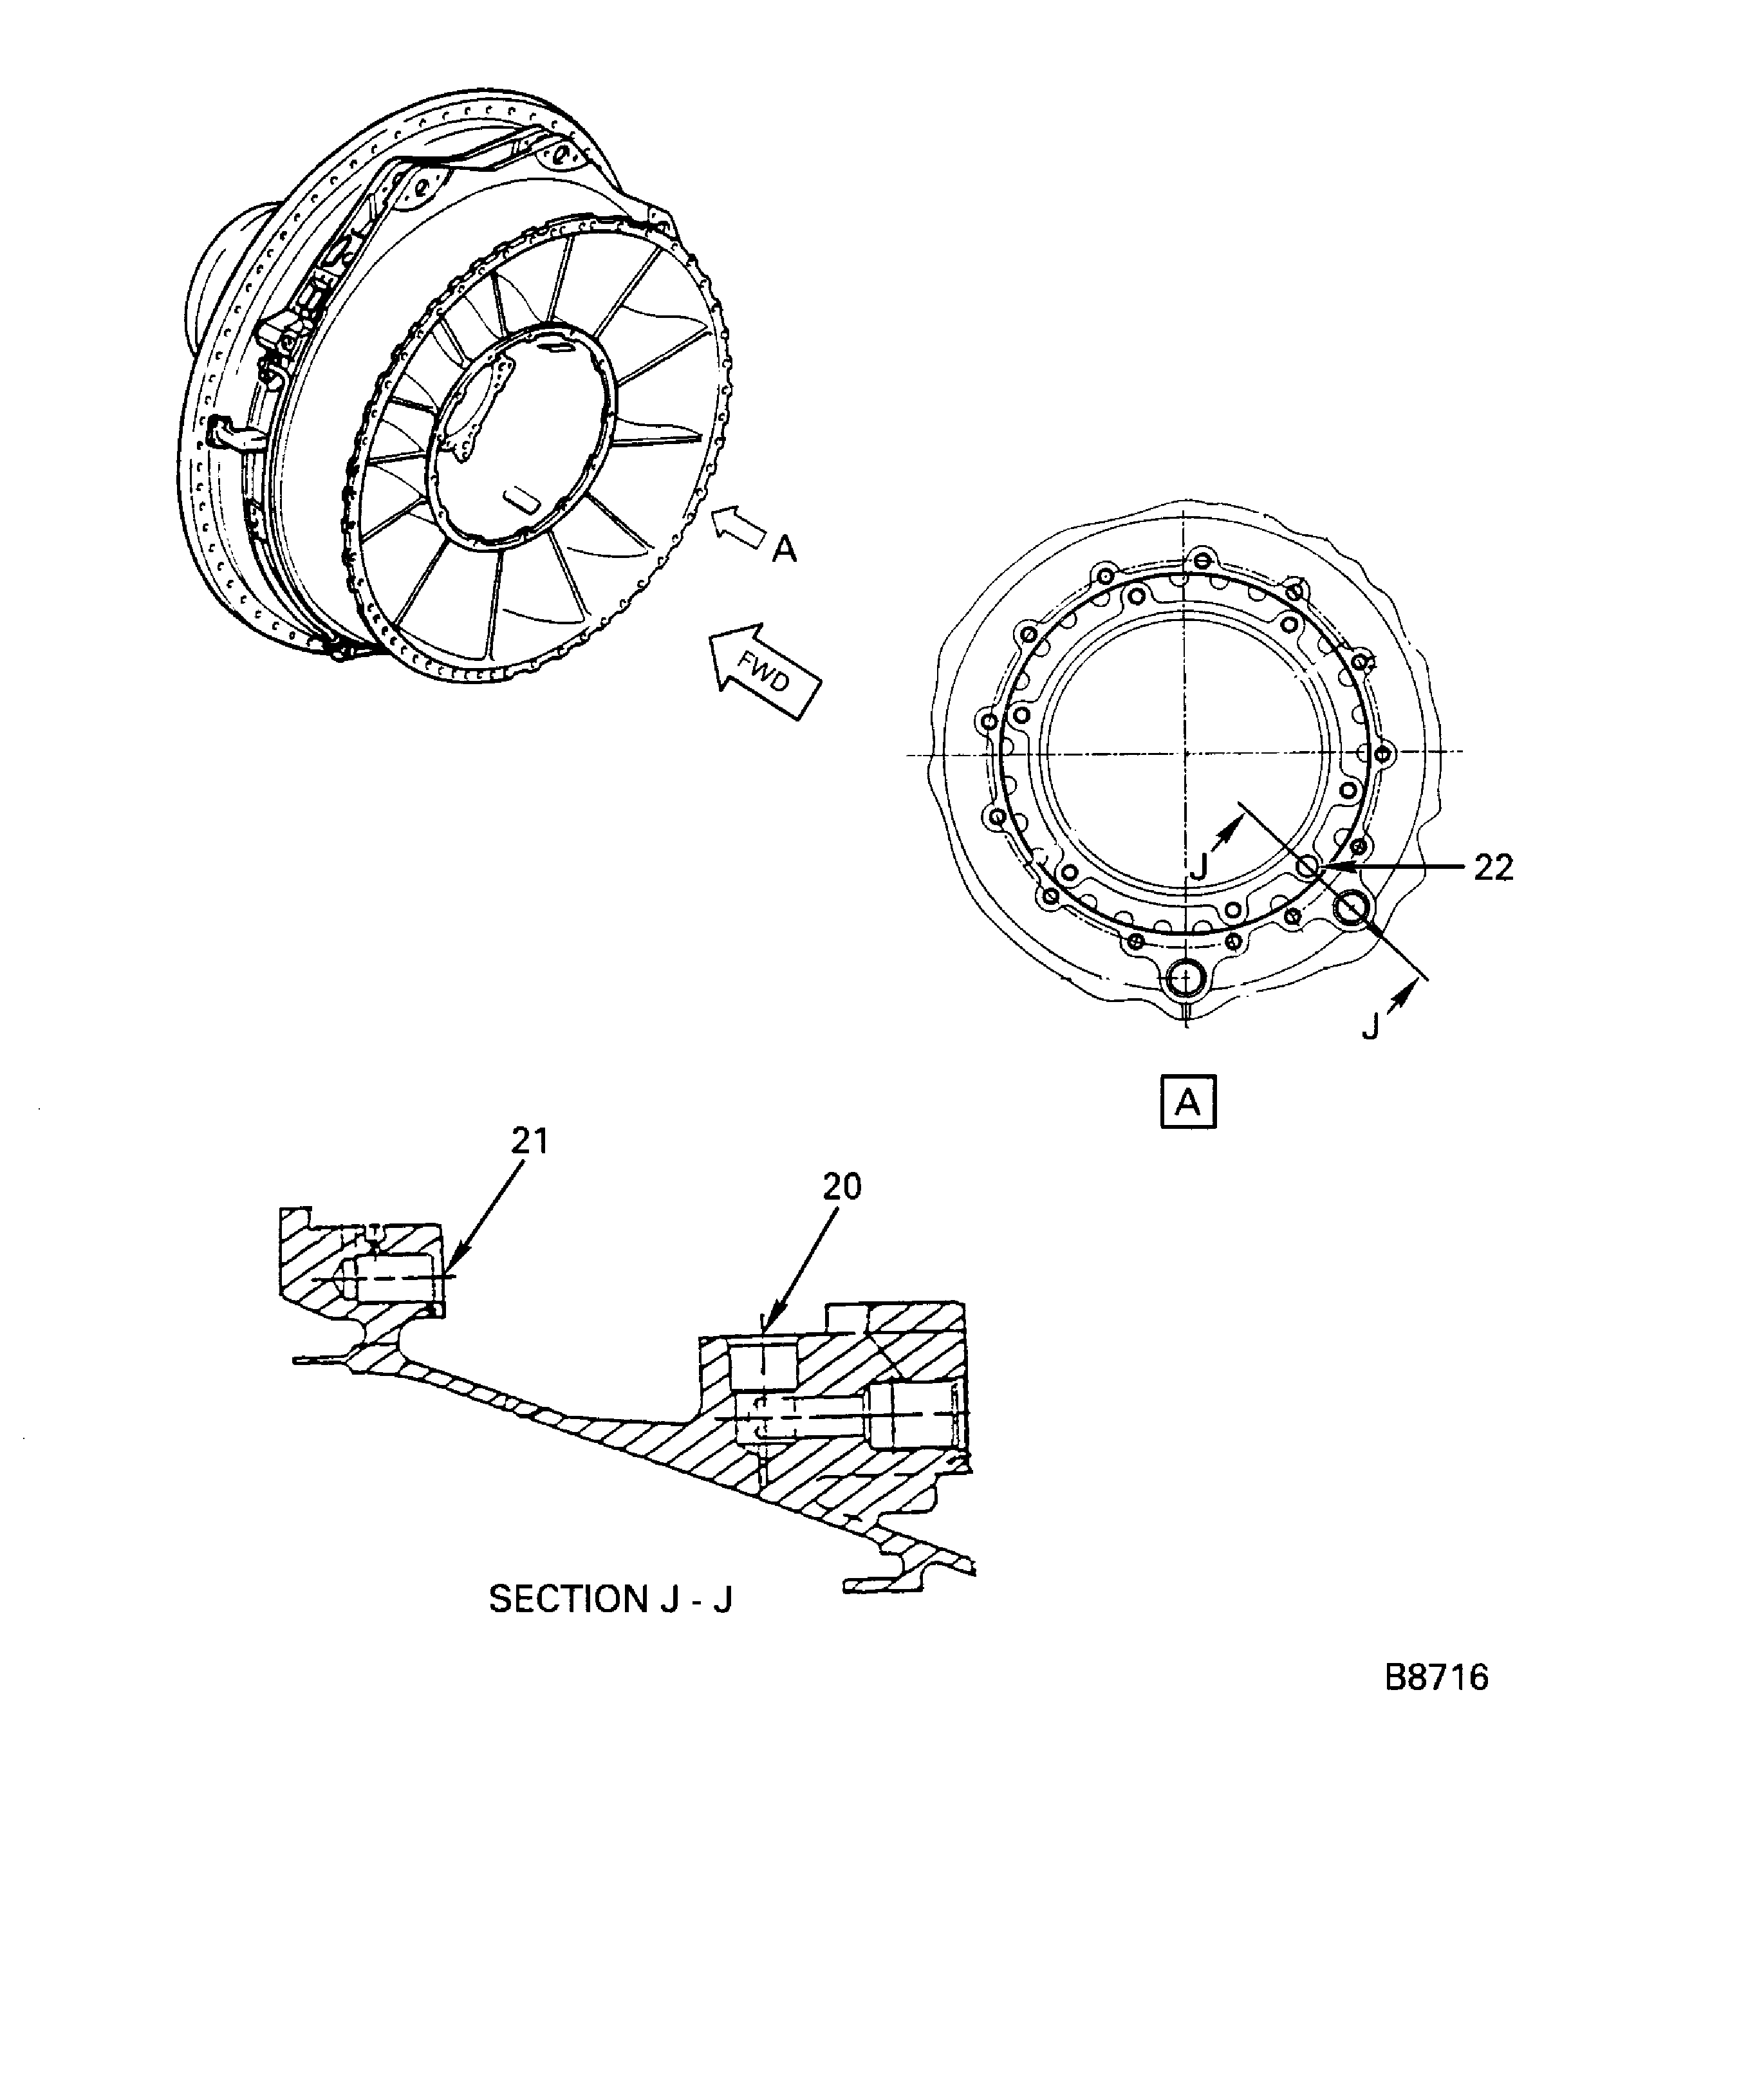
Figure: No. 5 Bearing Oil Tube Boss and Cover Bolt Boss Crack Repair
No. 5 Bearing Oil Tube Boss and Cover Bolt Boss Crack Repair (Sheet 1)
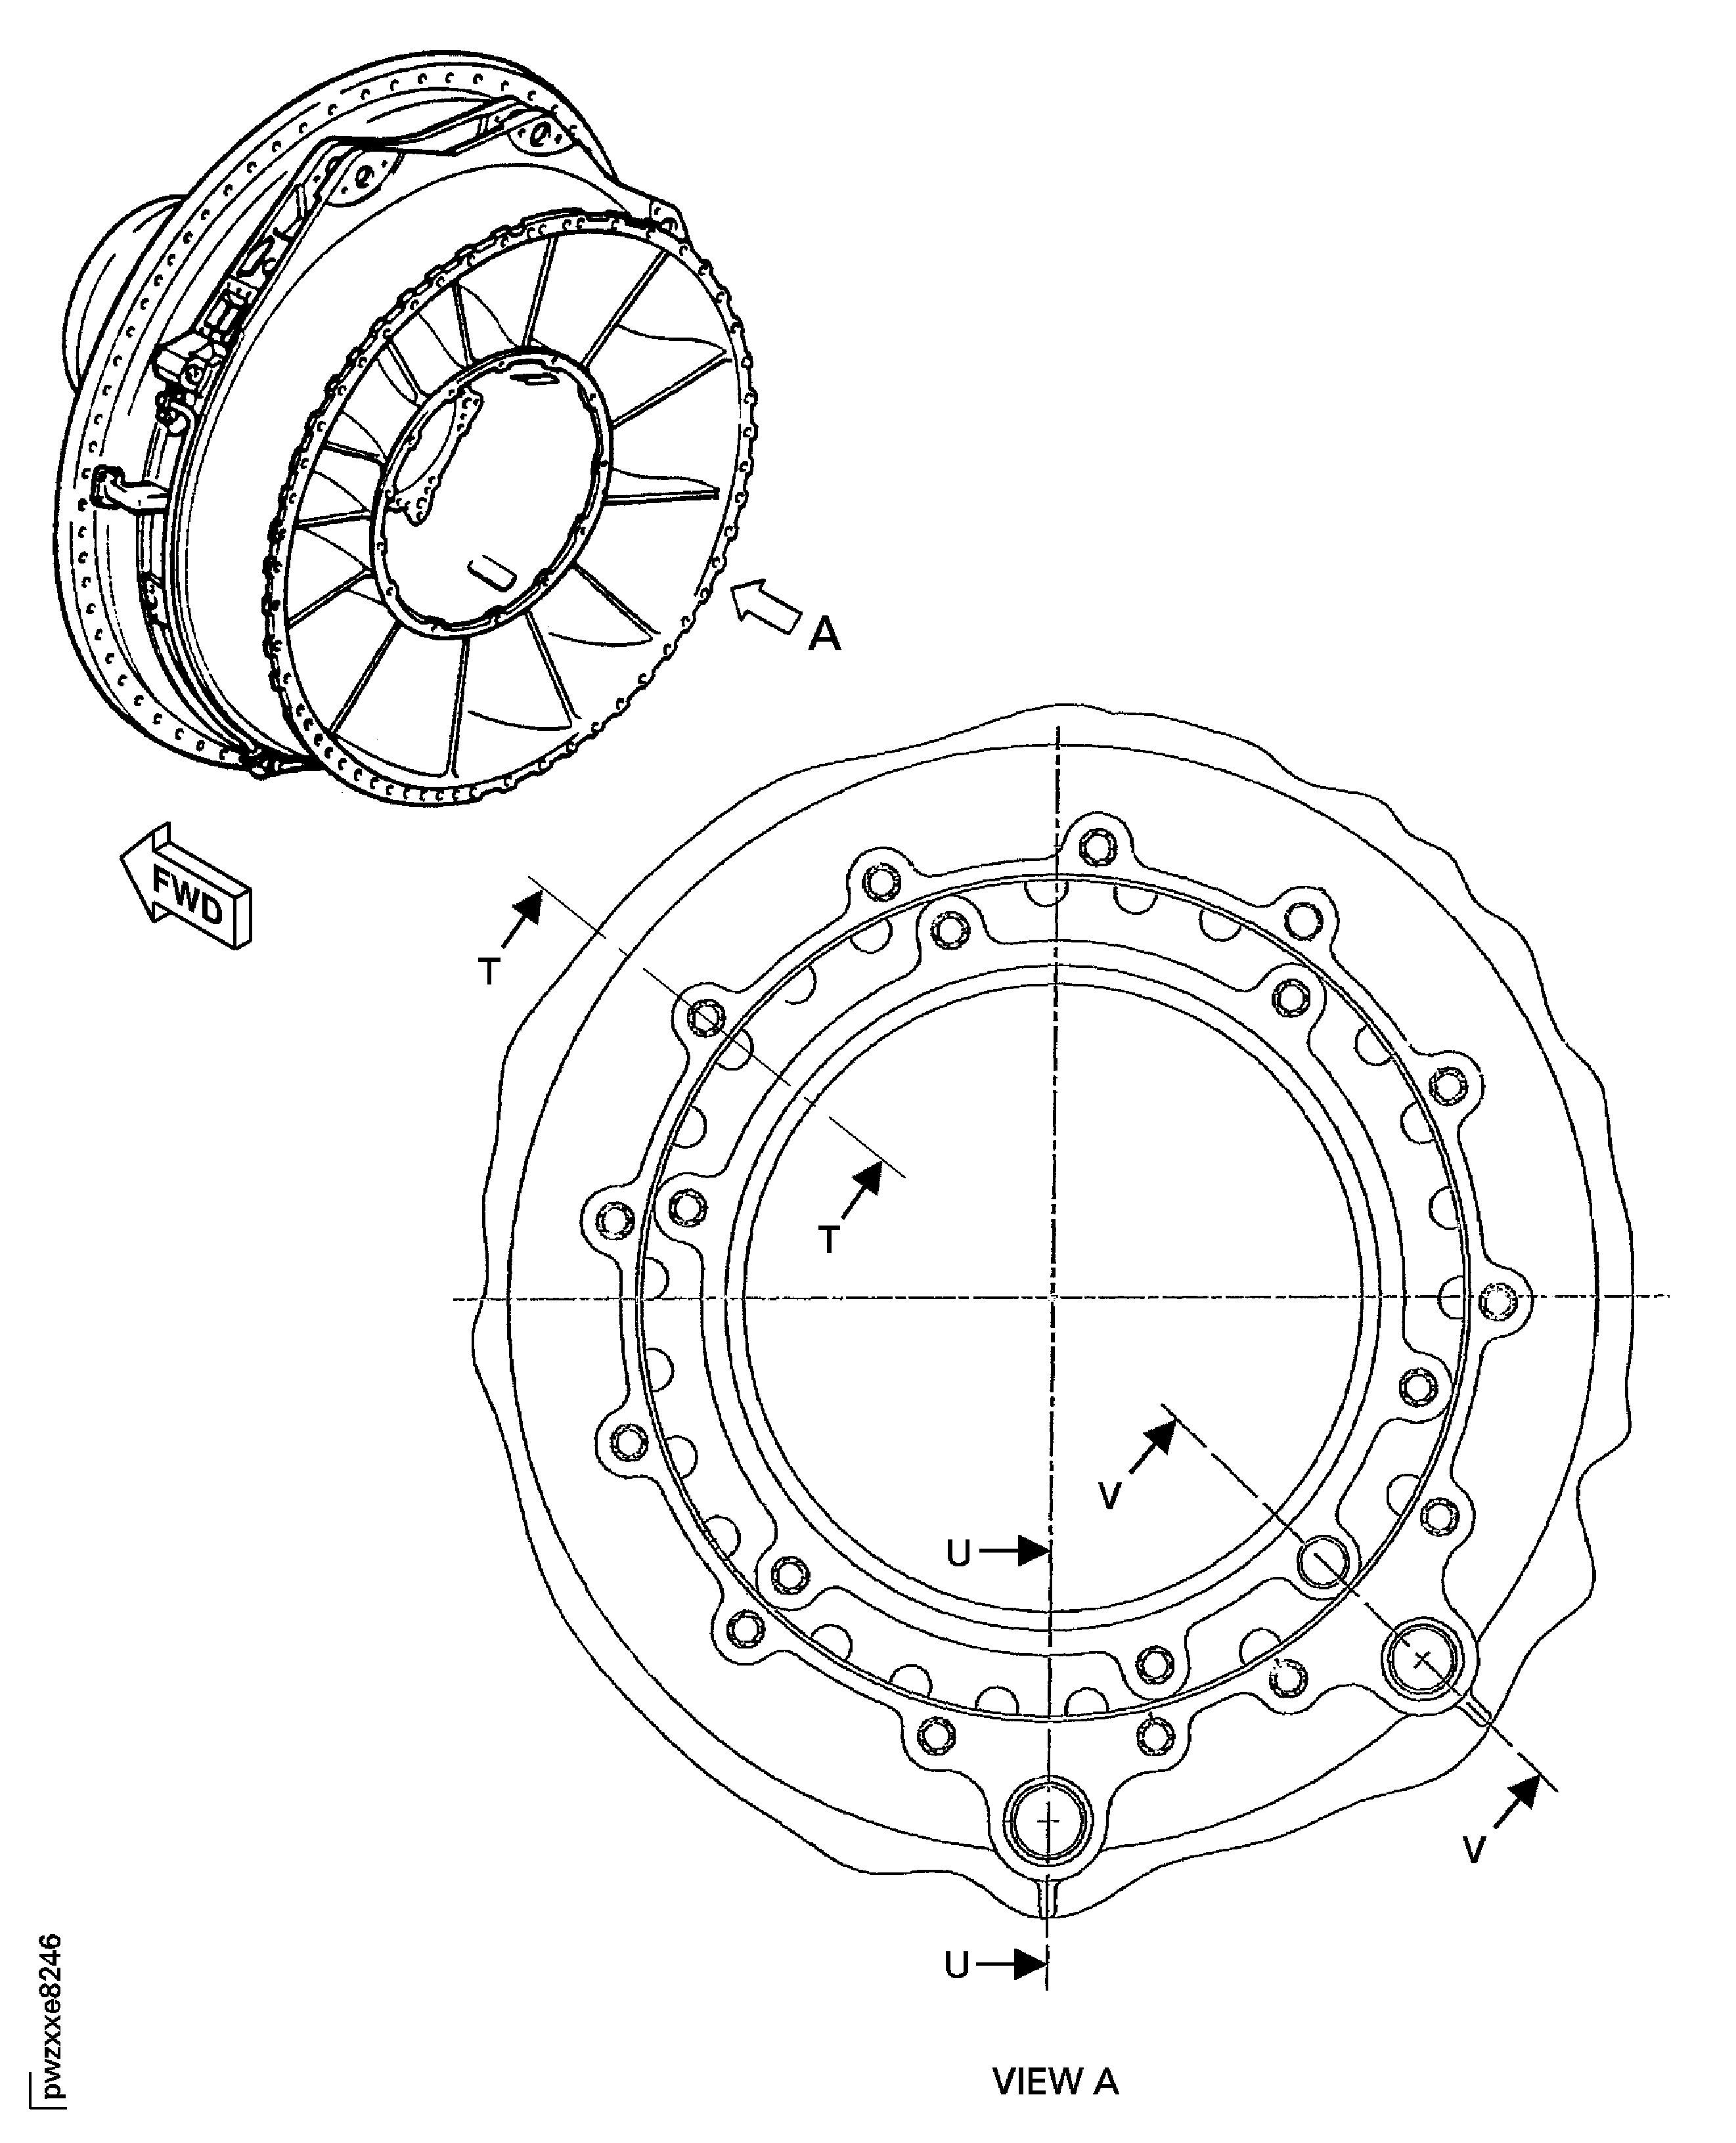
Figure: No. 5 Bearing Oil Tube Boss and Cover Bolt Boss Crack Repair
No. 5 Bearing Oil Tube Boss and Cover Bolt Boss Crack Repair (Sheet 2)
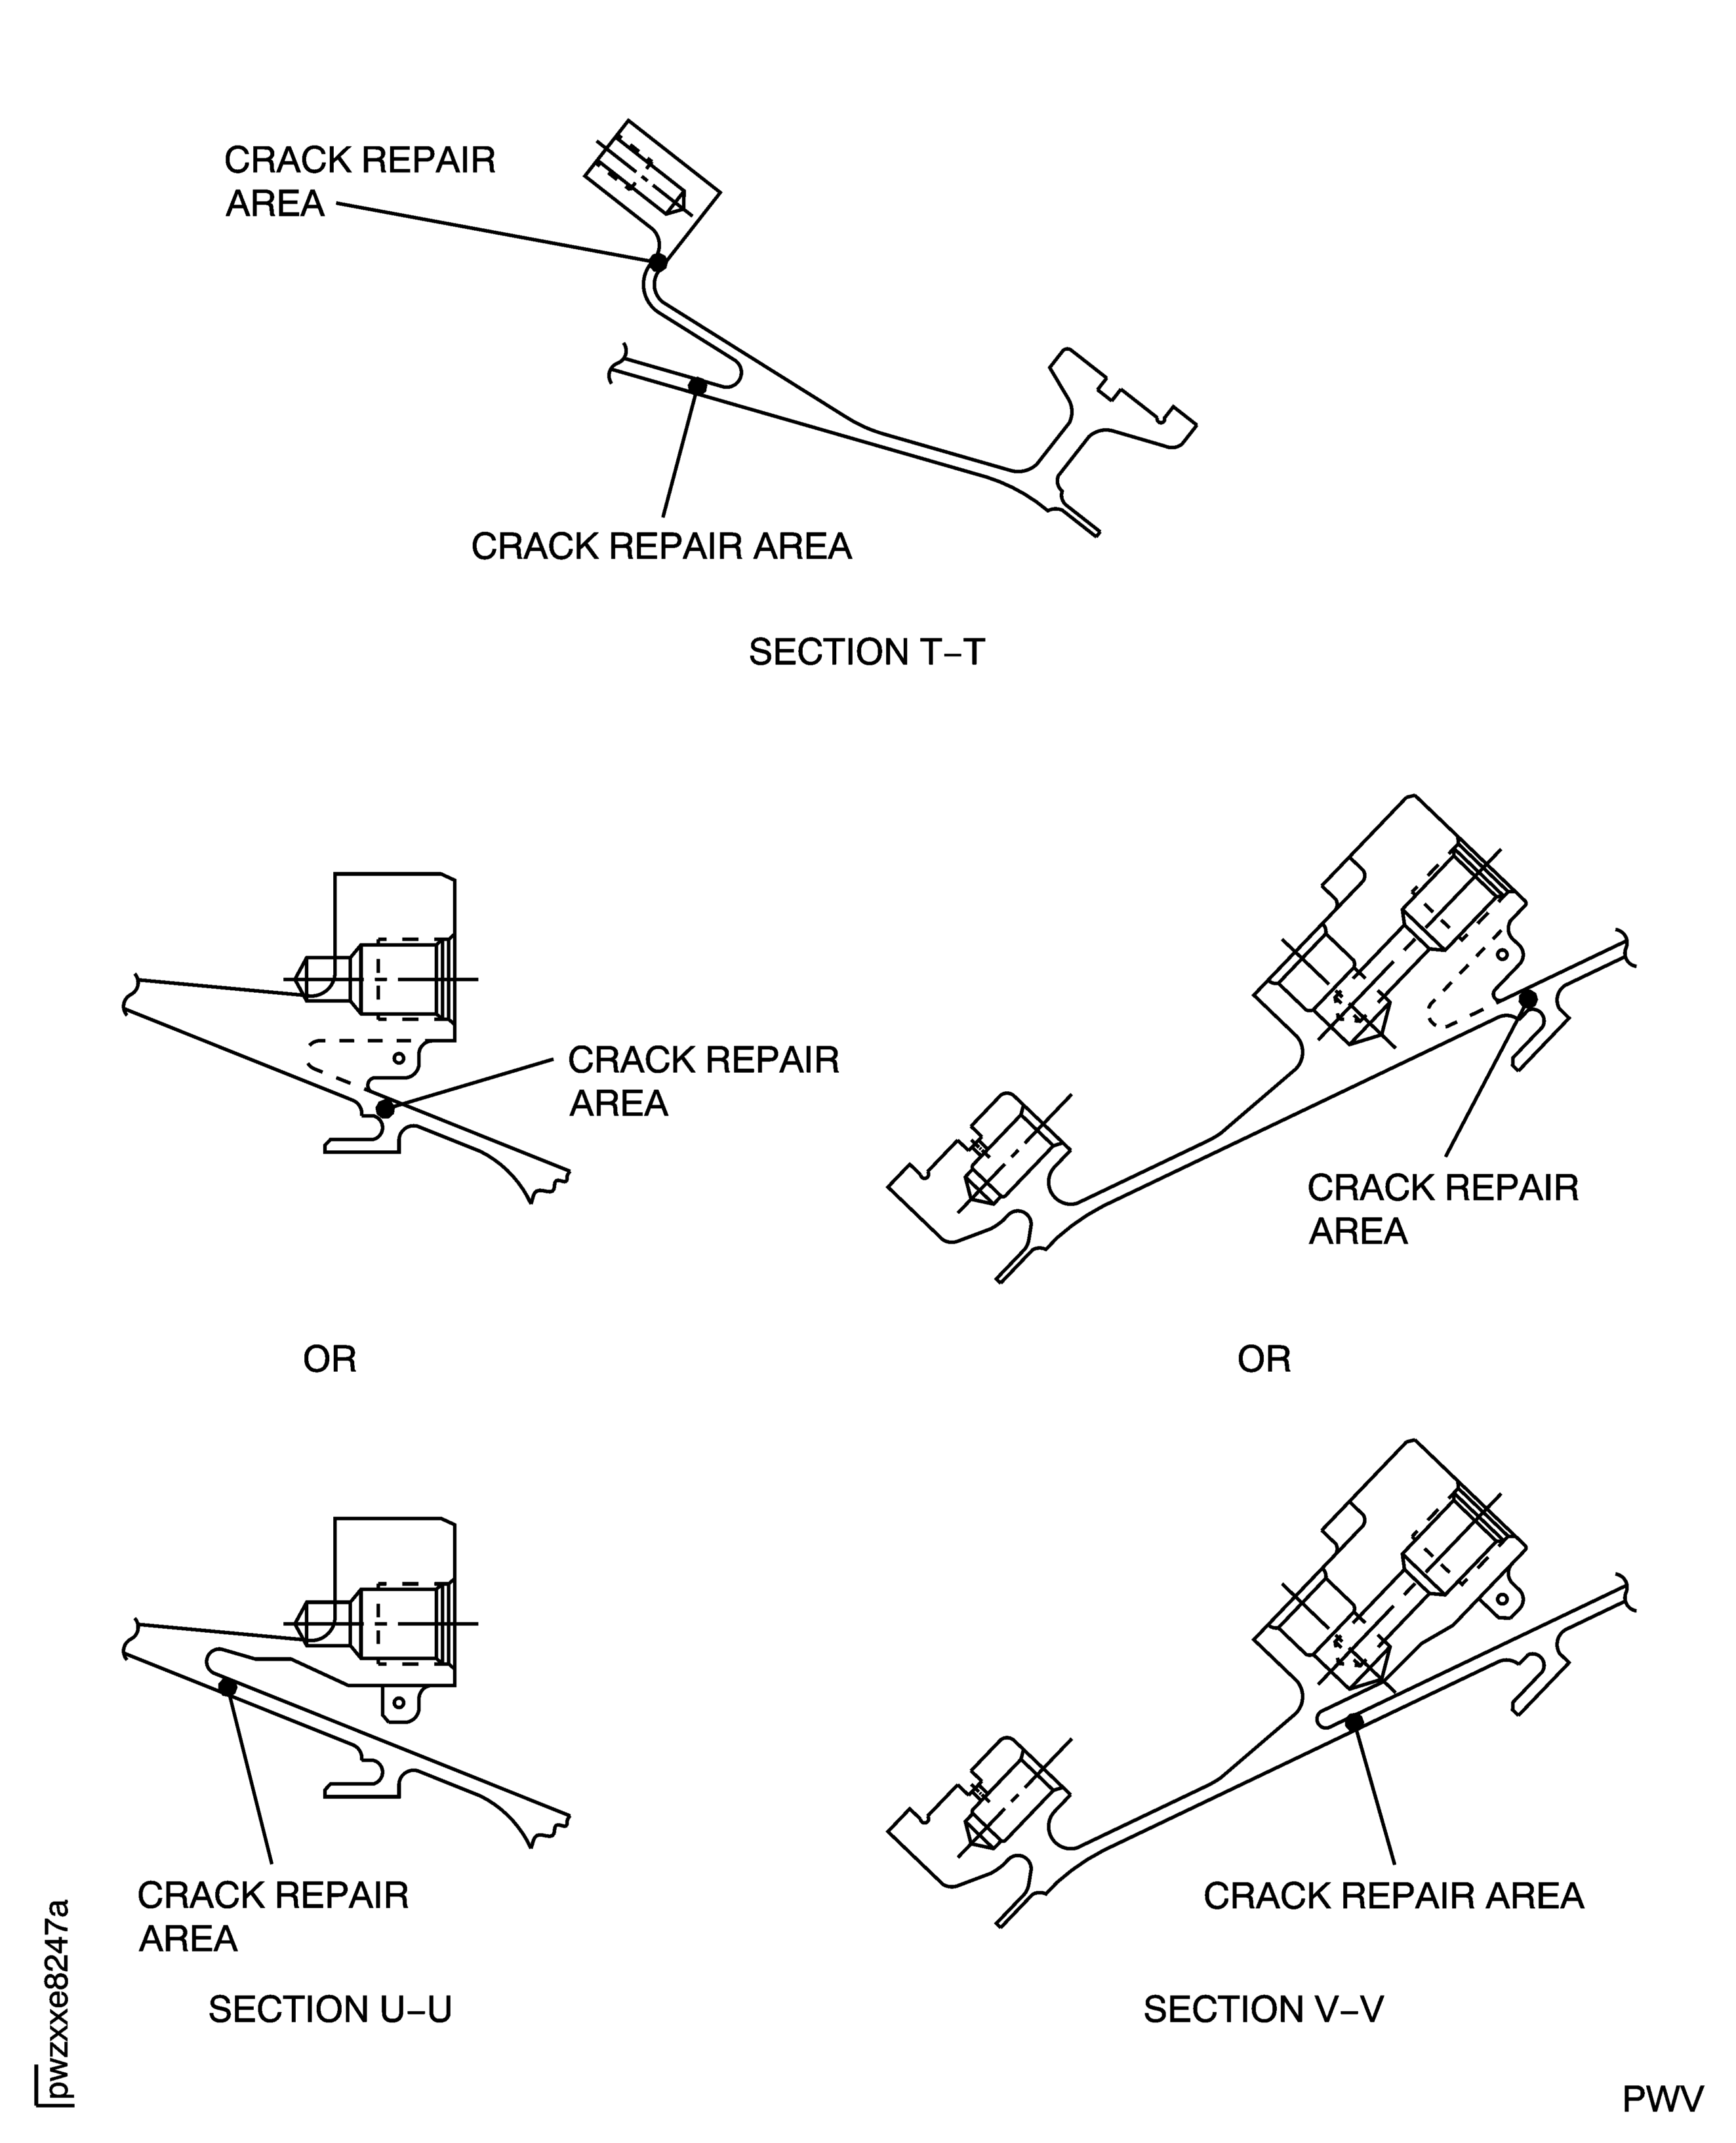
Figure: Turbine Exhaust Case - Crack Inspection
Turbine Exhaust Case - Crack Inspection
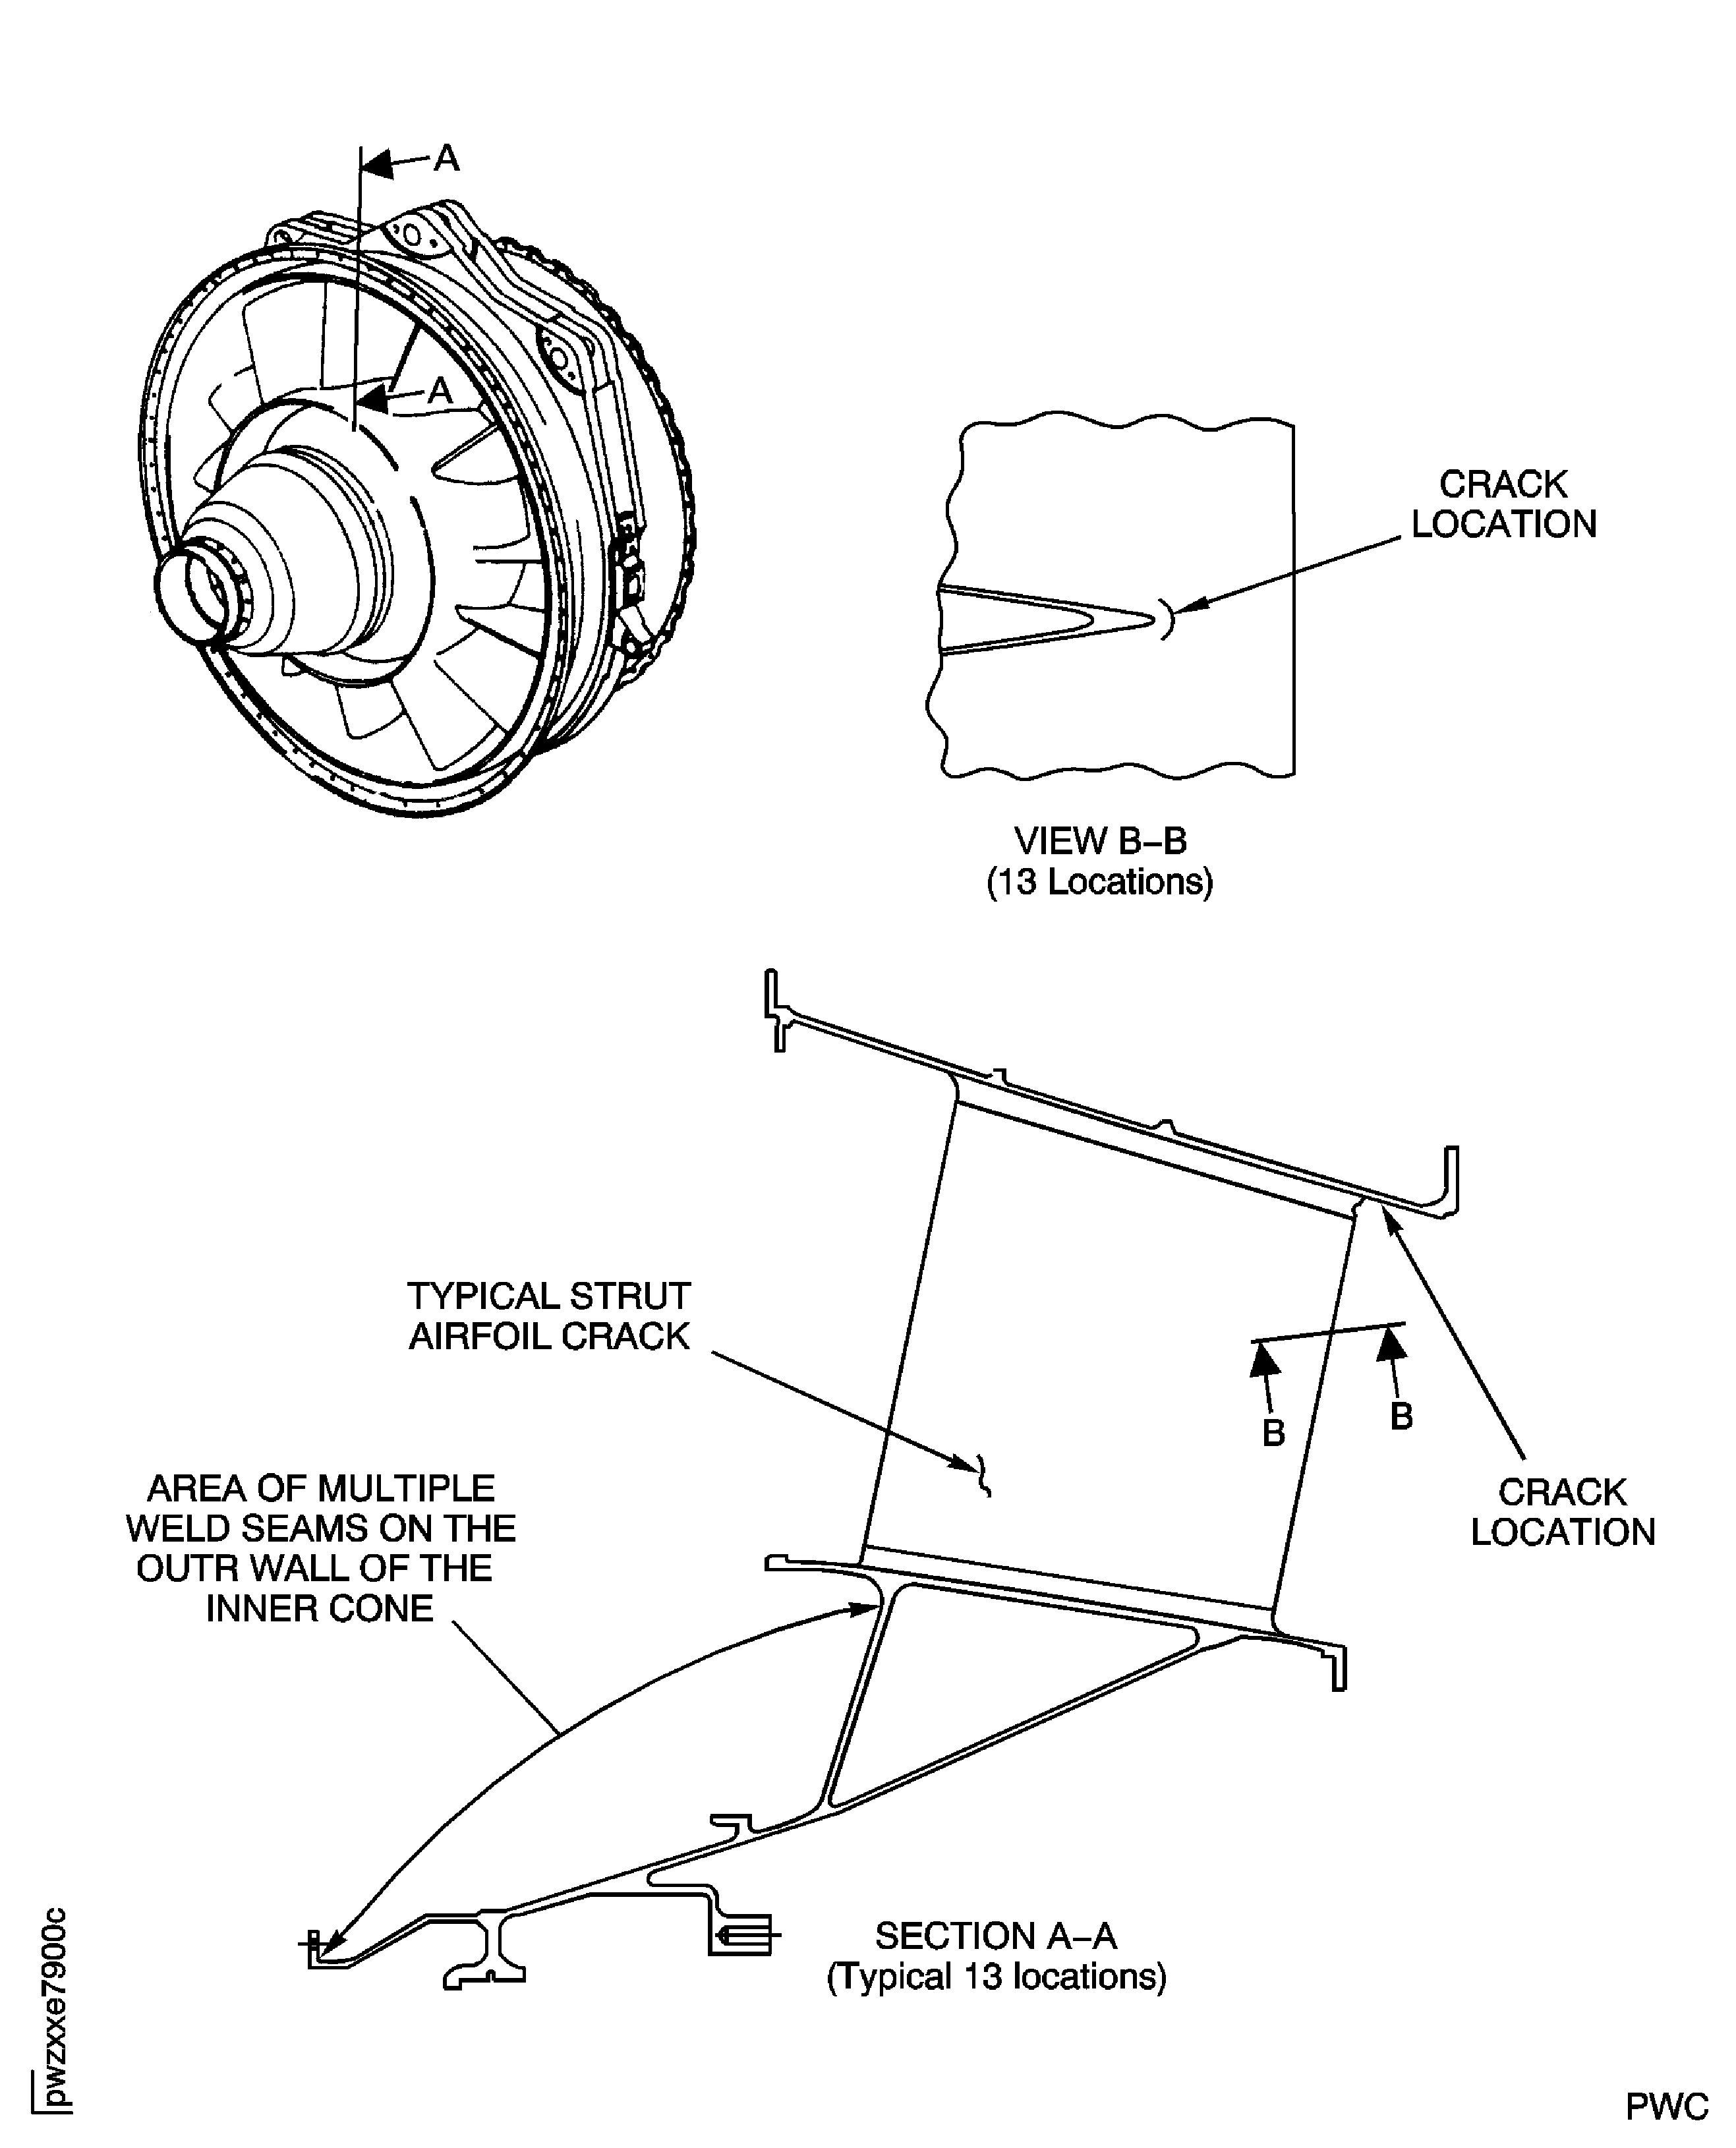
Figure: Turbine Exhaust Case Leading Edge Weld Bend Inspection Location
Turbine Exhaust Case Leading Edge Weld Bend Inspection Location
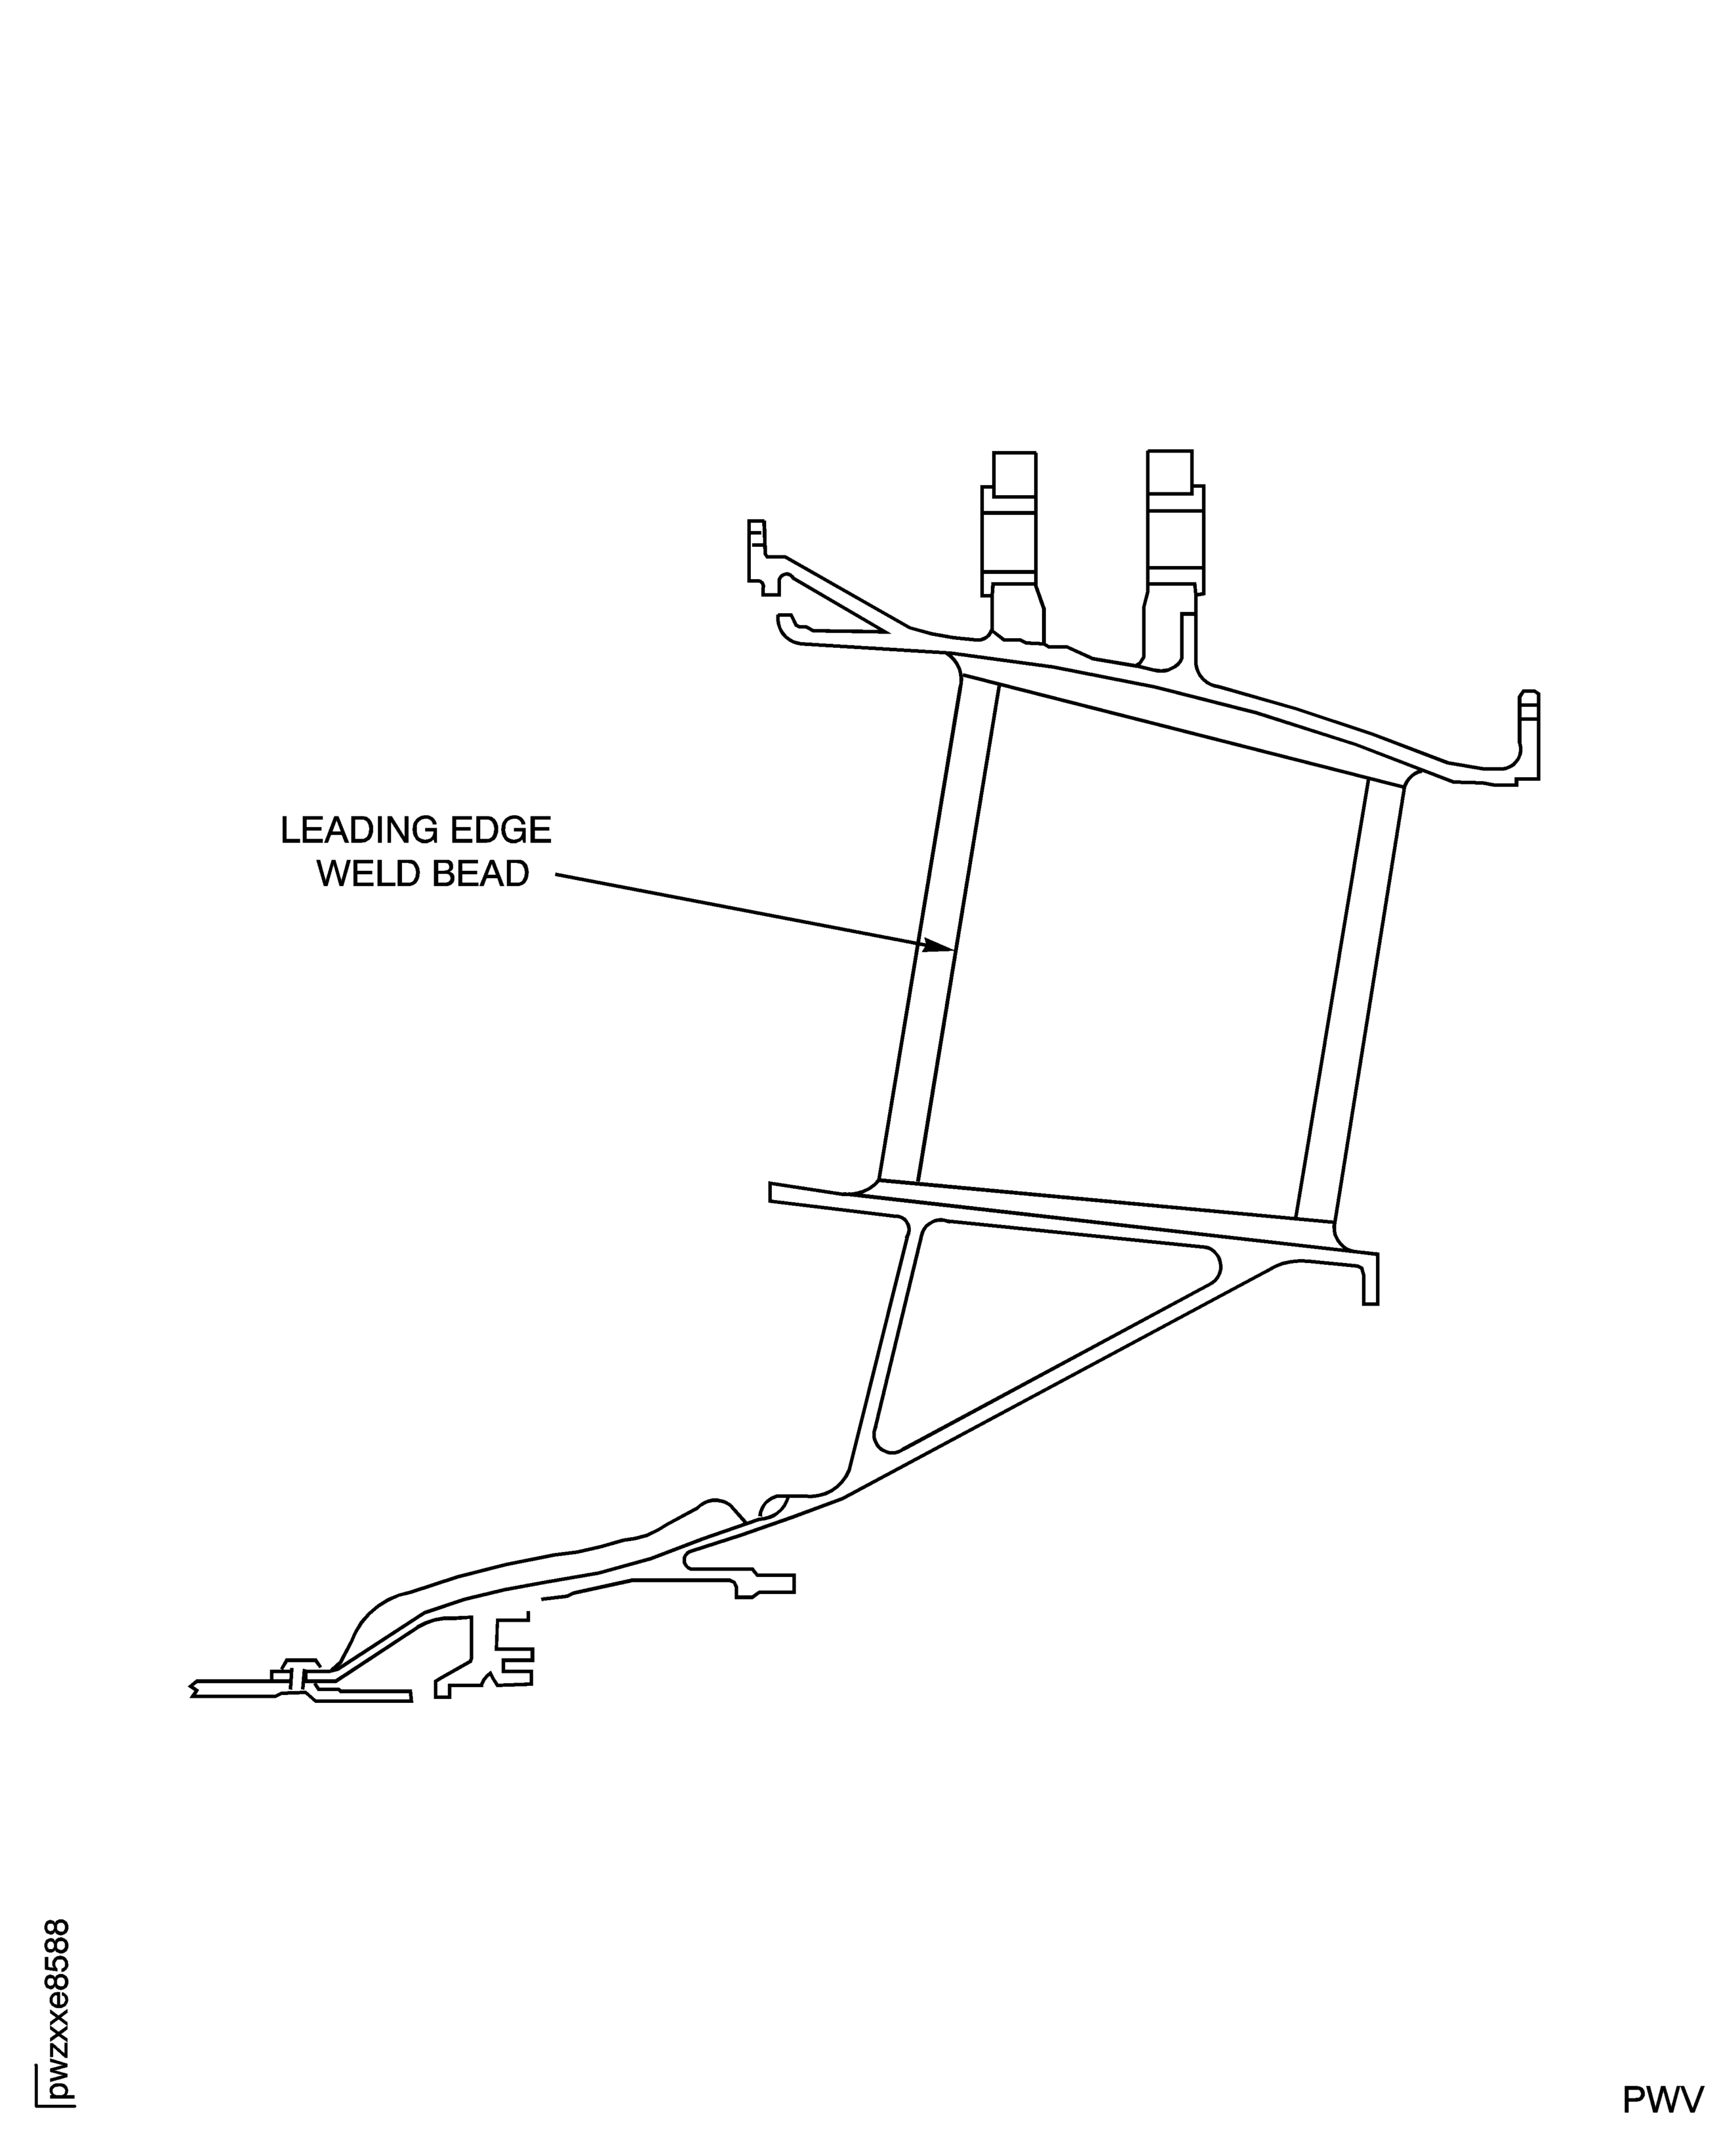
Figure: Turbine Exhaust Case - P4.9 Probe Boss Locations
Turbine Exhaust Case - P4.9 Probe Boss Locations
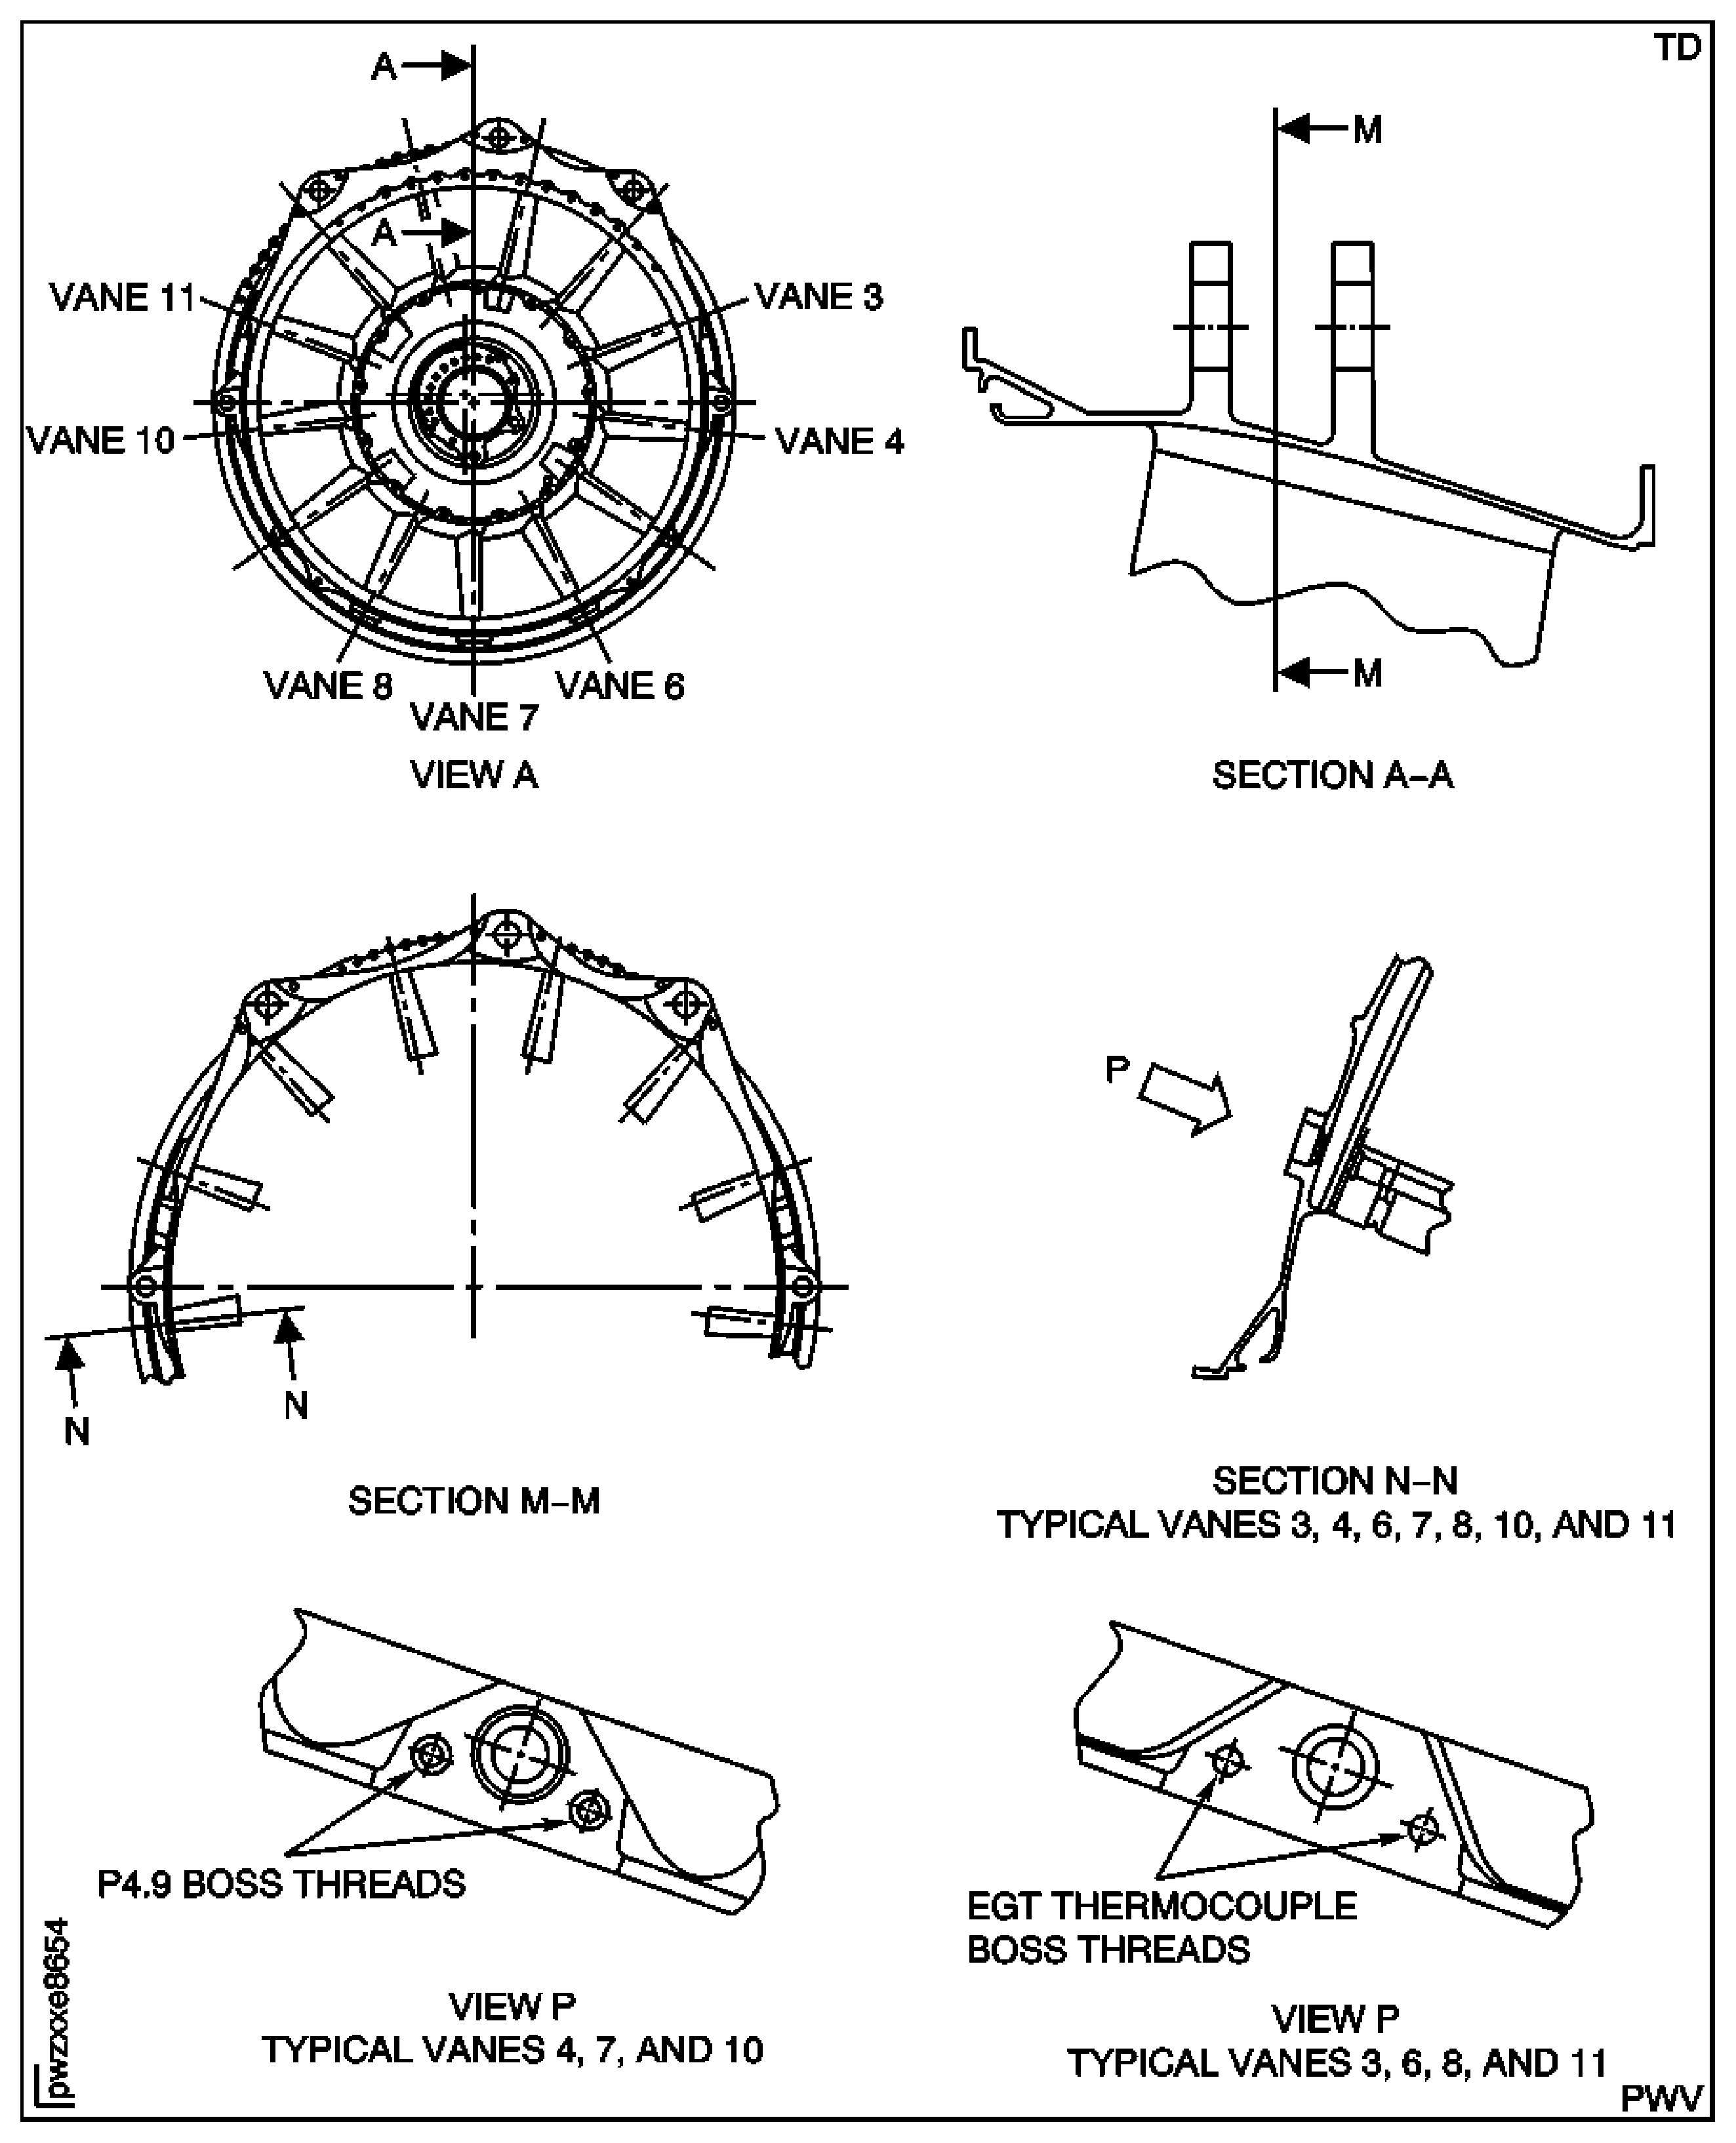
Figure: Turbine Exhaust Case - Alternate Datum
Turbine Exhaust Case - Alternate Datum
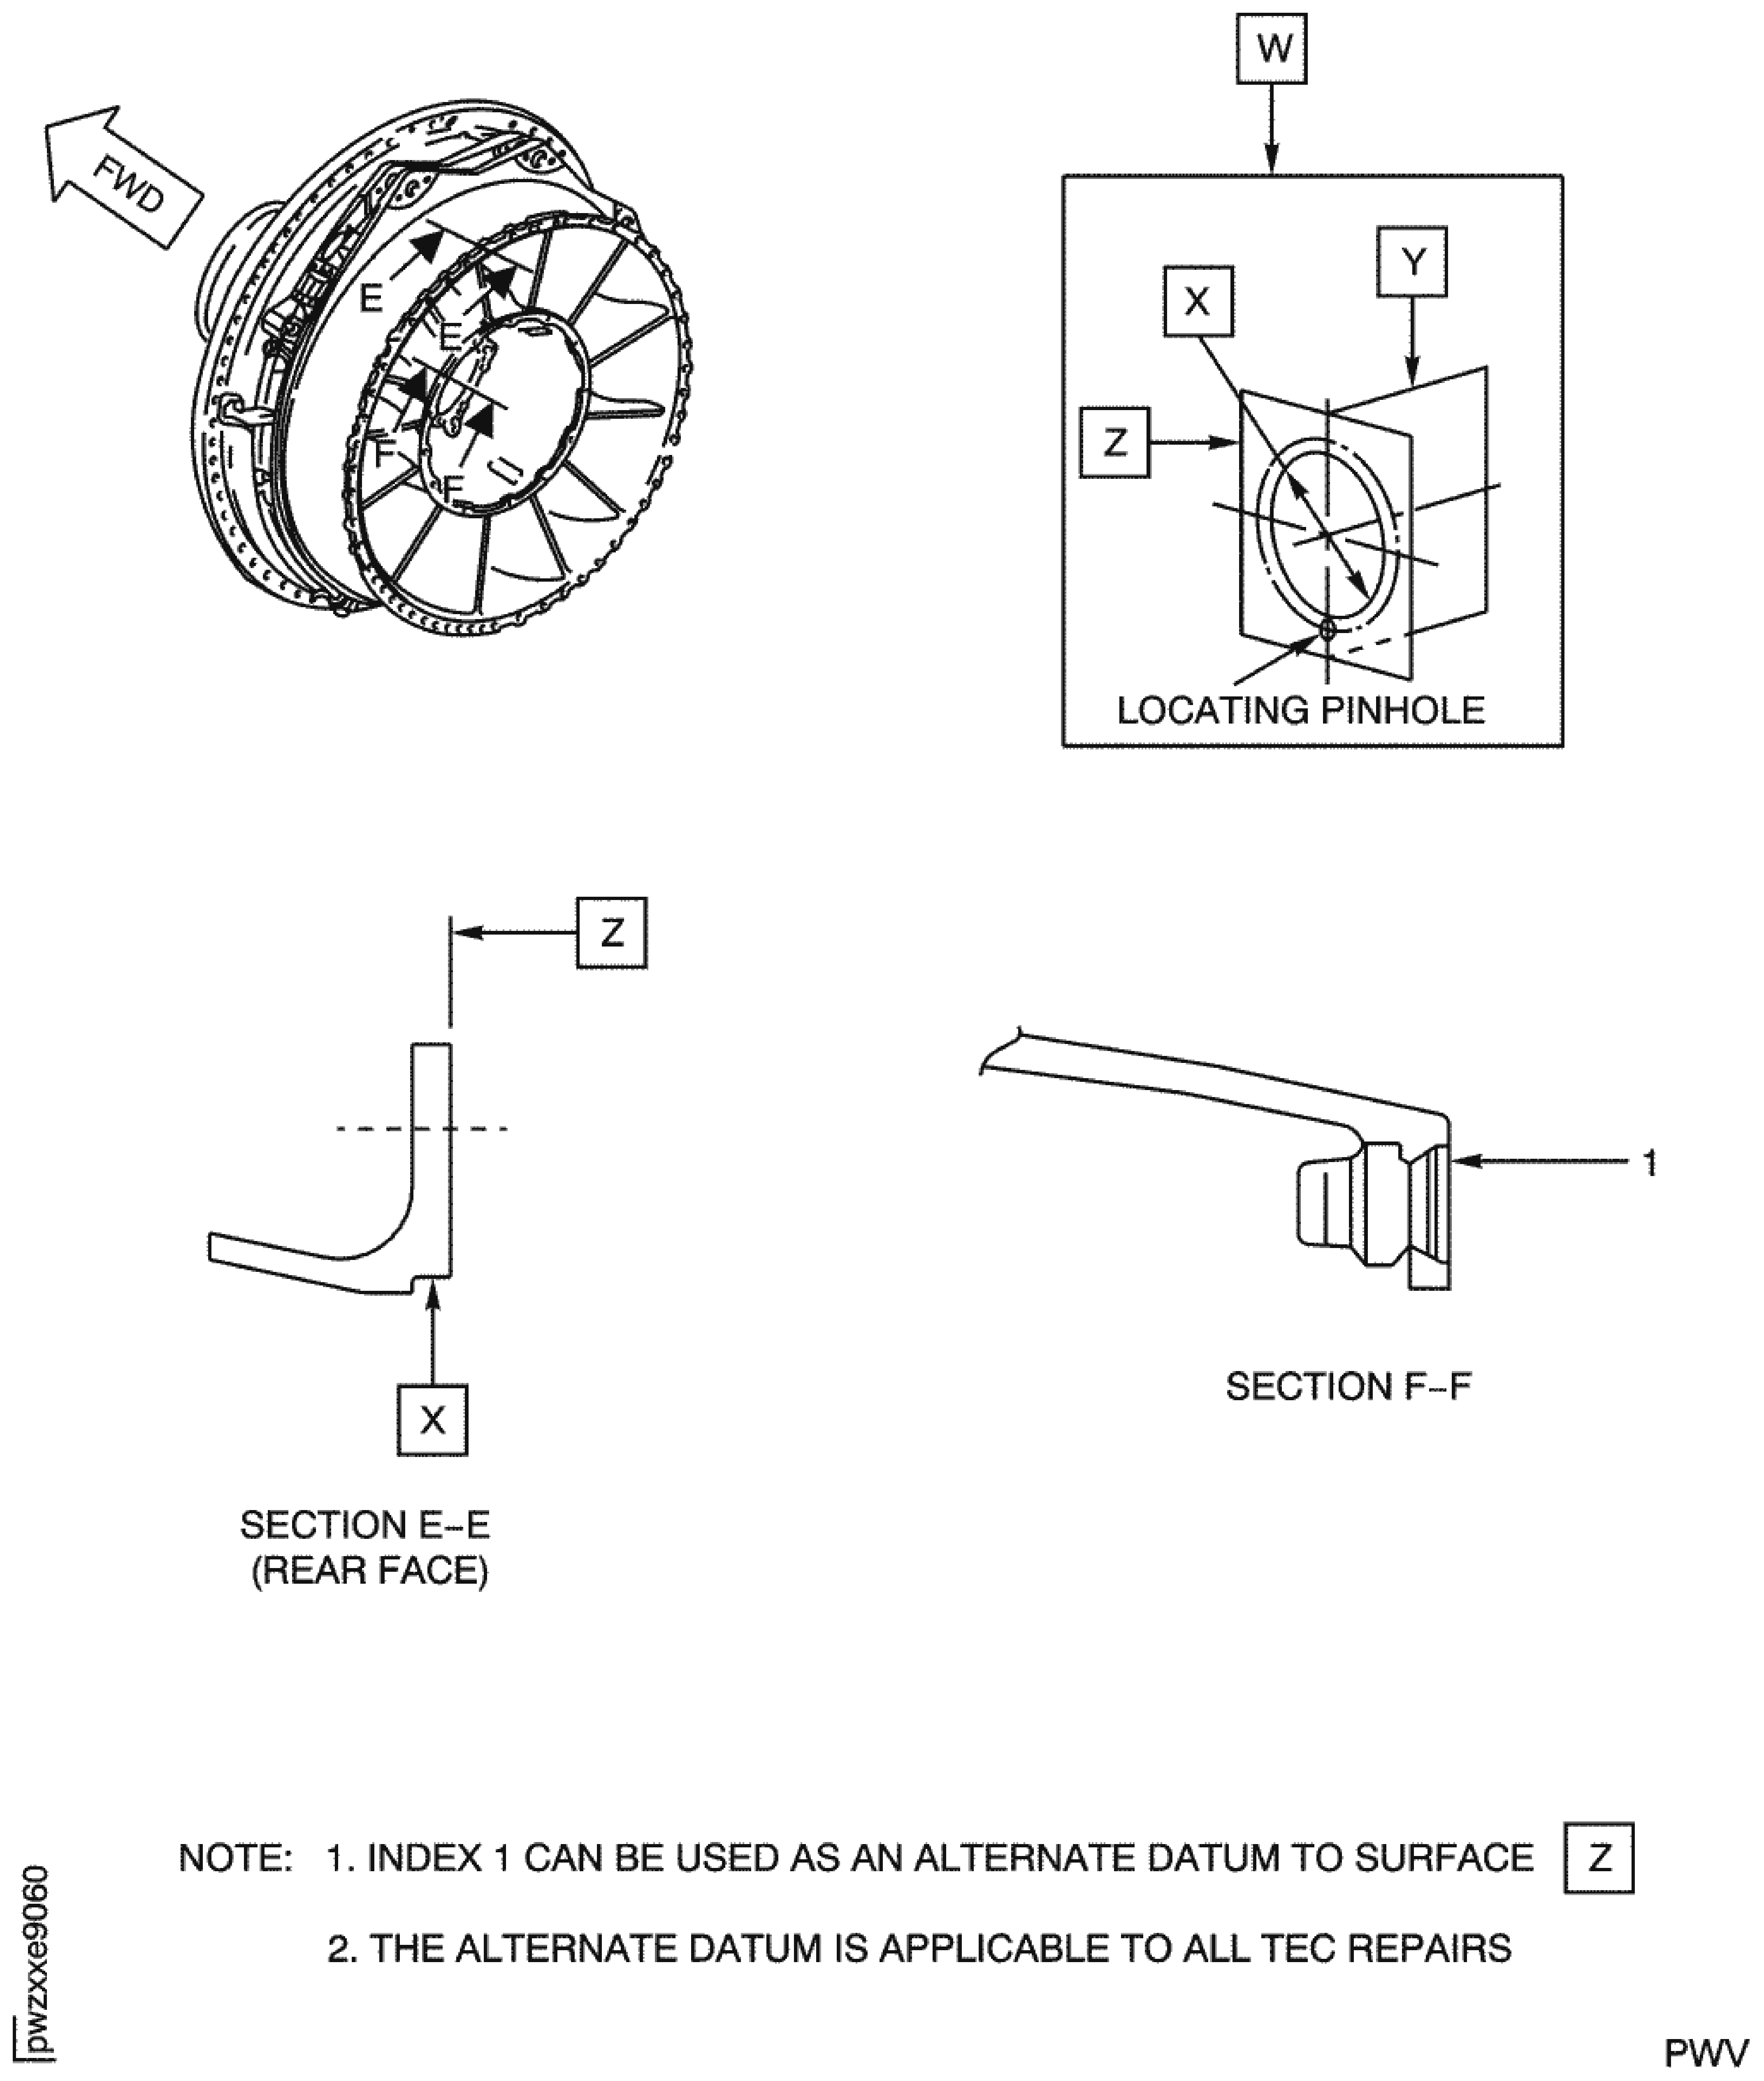
Figure: Turbine Exhaust Case - Helical Coil Insert Locations
Turbine Exhaust Case - Helical Coil Insert Locations
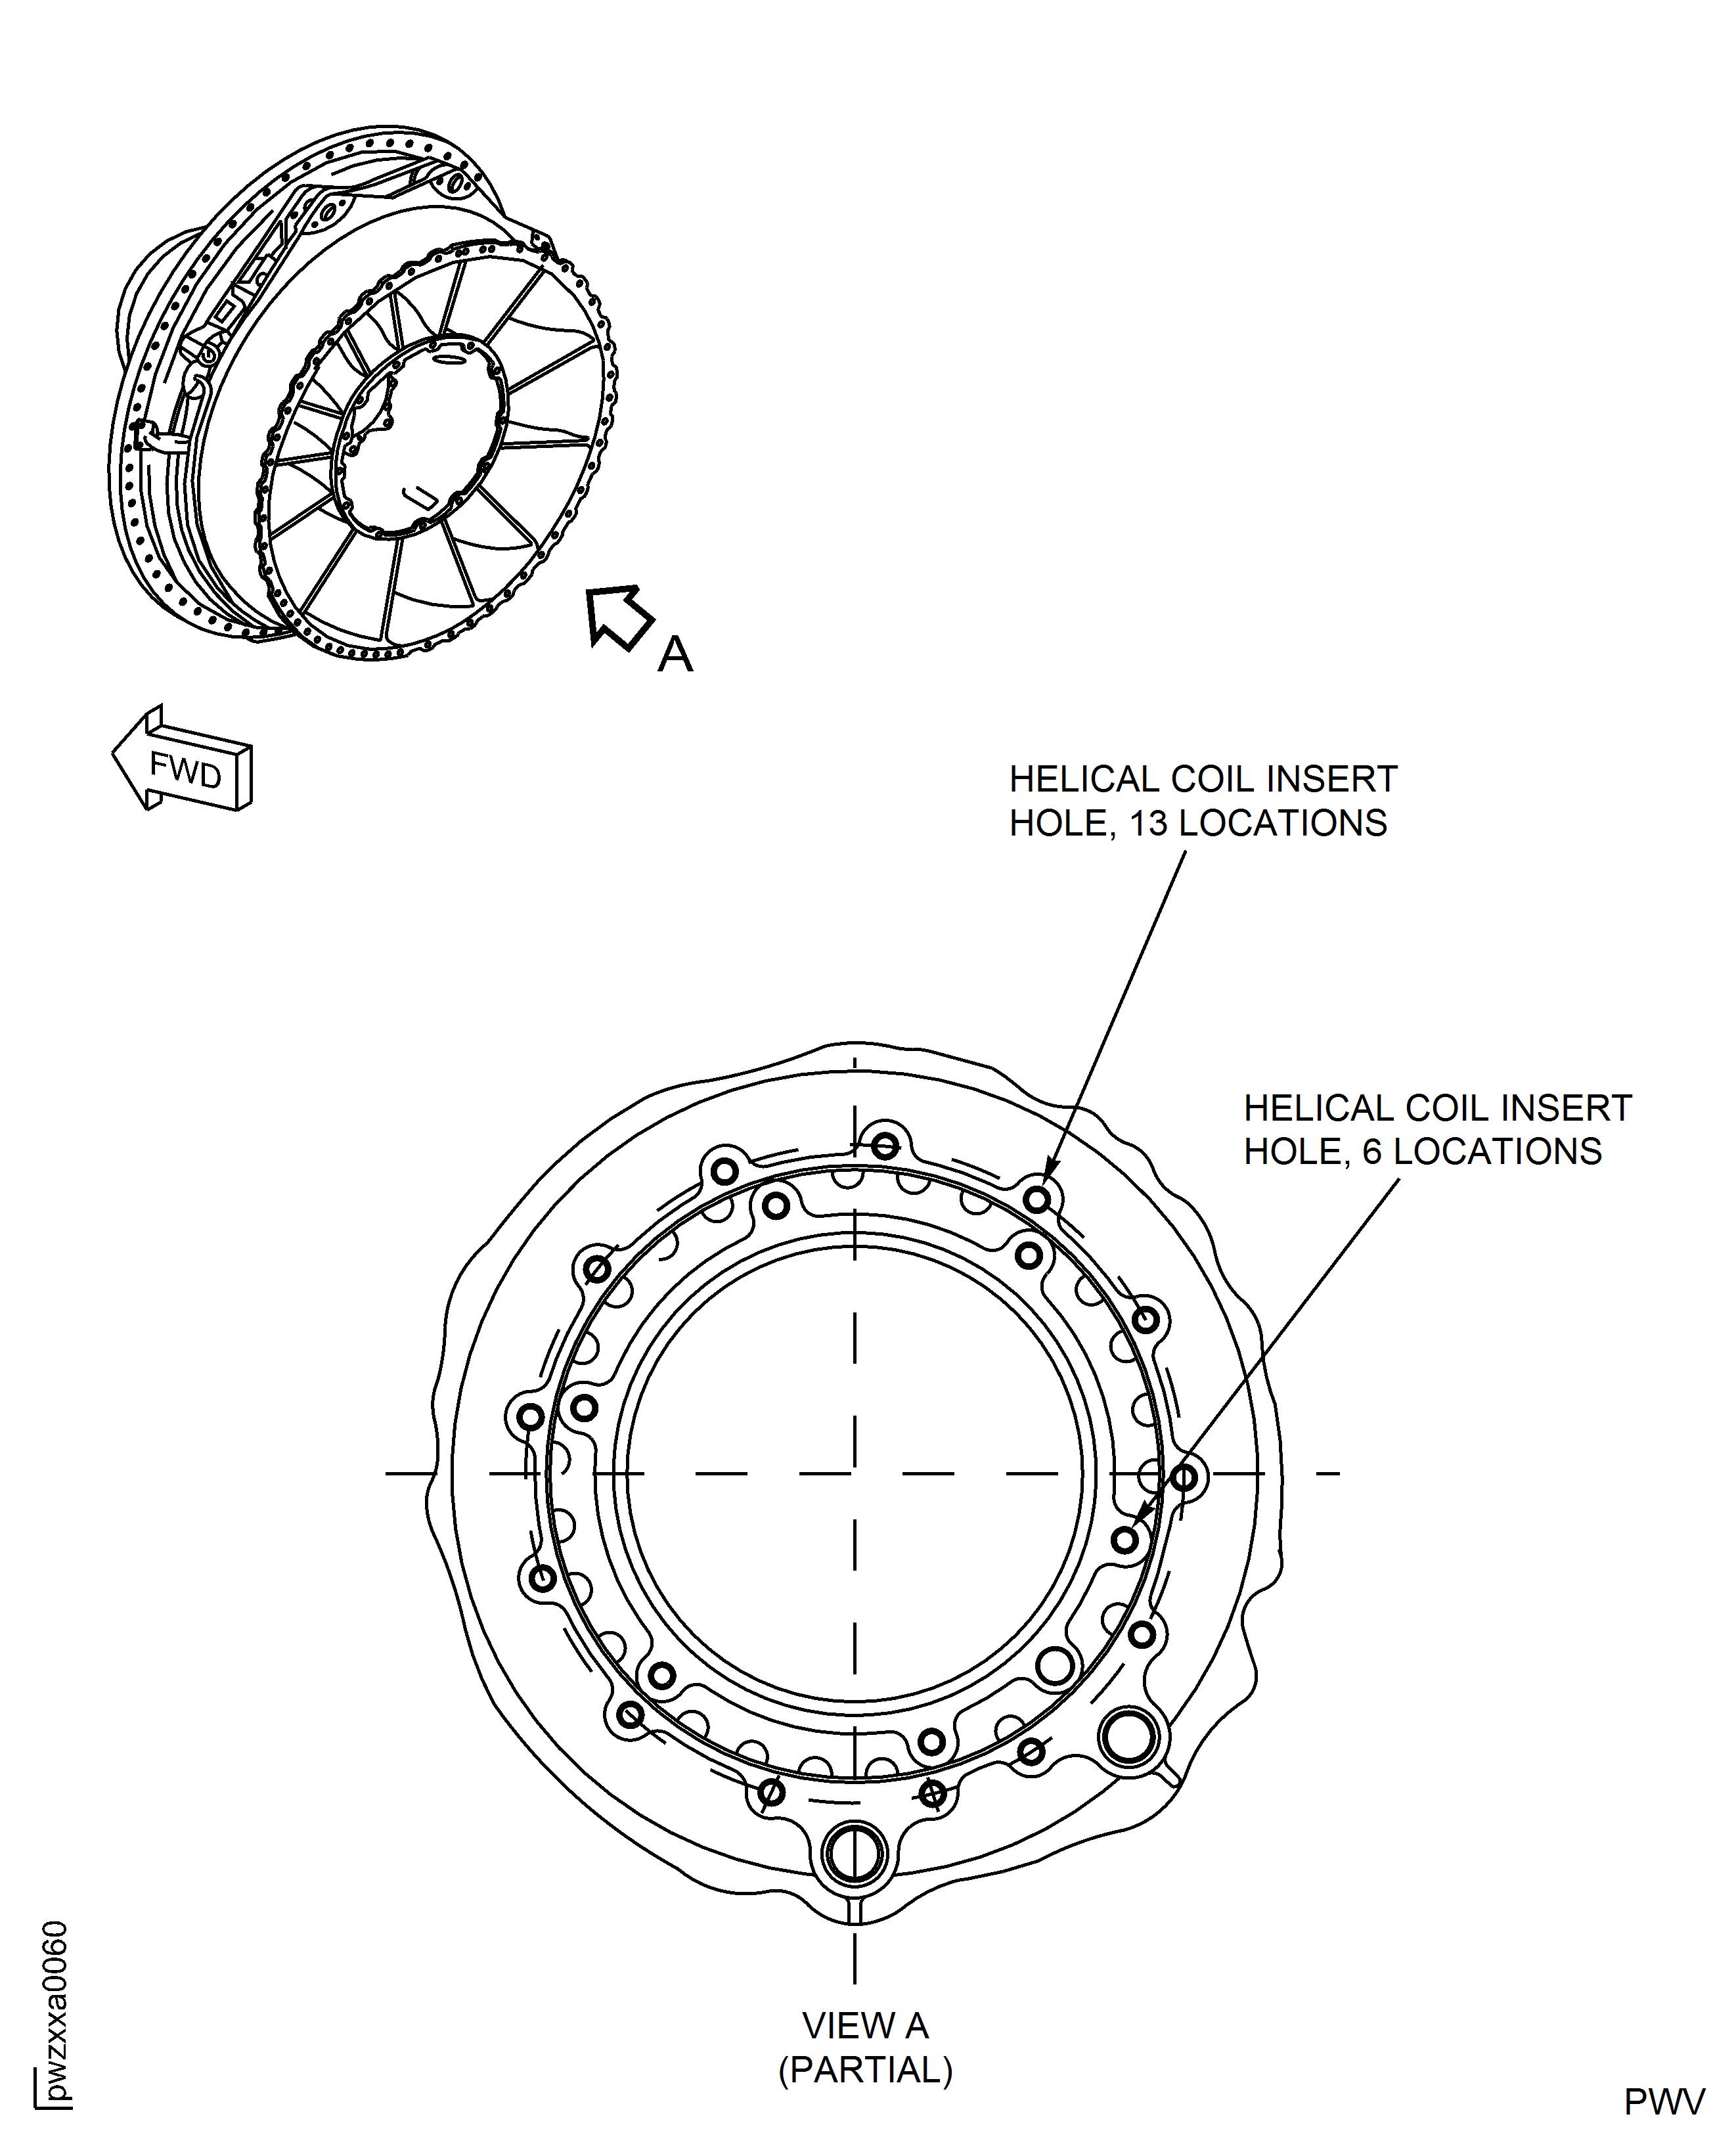
Figure: R Rail Load Share Boss Attachment Hole Location(s)
R Rail Load Share Boss Attachment Hole Location(s)
